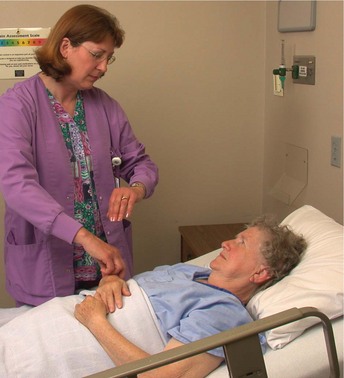
Measuring Vital Signs
Upon completing this chapter, you should be able to:
1 Review the anatomic structures involved in the regulation of the vital signs and describe their functions.
2 Identify the physiologic mechanisms that regulate temperature, heart rate, blood pressure, and respiration.
3 List the factors that affect body temperature.
4 Discuss normal and abnormal characteristics of the pulse.
5 Describe the respiratory patterns considered to be normal and abnormal.
6 Explain the relationship of Korotkoff sounds to systolic and diastolic blood pressure.
7 State why pain is considered the fifth vital sign.
1 Measure and record the body temperature of an adult and a child at the oral, rectal, axillary, and tympanic (eardrum) sites using a glass, electronic, or tympanic thermometer.
2 Measure and record an apical pulse and a radial pulse.
3 Count and record respirations.
4 Measure and record blood pressure.
5 Use an automatic vital signs machine to monitor pulse and blood pressure.
6 Recognize deviations from normal vital sign patterns.
7 Determine factors that might be adversely affecting the patient’s temperature, pulse, respiration, or blood pressure.
apnea ( , p. 358)
arrhythmia ( , p. 355)
auscultation ( , p. 359)
auscultatory gap ( , p. 364)
axillary ( , p. 342)
basal metabolic rate (BMR) ( , p. 338)
Biot’s respirations ( , p. 358)
bradycardia ( , p. 353)
bradypnea ( , p. 358)
cardiac output (p. 339)
Cheyne-Stokes respirations (p. 358)
chills (p. 343)
core temperature (p. 342)
crackles ( , p. 358)
crisis (p. 344)
cyanosis ( , p. 357)
defervescence ( , p. 343)
diastolic pressure ( , p. 341)
dyspnea ( , p. 357)
eupnea ( , p. 357)
febrile ( , p. 343)
fever (p. 338)
hypertension ( , p. 364)
hyperthermia ( , p. 343)
hyperventilation (p. 358)
hypotension ( , p. 365)
hypothermia ( , p. 344)
hypoxemia (p. 358)
hypoxia ( , p. 339)
Korotkoff sounds ( , p. 363)
Kussmaul’s respirations ( , p. 358)
lysis ( , p. 344)
metabolism ( , p. 338)
orthostatic hypotension ( , p. 365)
overhydration ( , p. 341)
oximeter ( , p. 358)
oximetry (p. 358)
palpate (p. 351)
pulse deficit (p. 354)
pulse pressure (p. 359)
pyrexia ( , p. 339)
pyrogens ( , p. 339)
respiration (p. 340)
rhonchi ( , p. 358)
shock (p. 364)
sphygmomanometer ( , p. 359)
stertor ( , p. 358)
stethoscope ( , p. 351)
stridor ( , p. 358)
stroke volume (p. 339)
systolic pressure ( , p. 341)
tachycardia ( , p. 353)
tachypnea ( , p. 358)
tympanic membrane ( , p. 342)
vital signs (p. 341)
wheeze (p. 358)
OVERVIEW OF STRUCTURE AND FUNCTION RELATED TO THE REGULATION OF VITAL SIGNS
 Heat production is a by-product of metabolism (cellular chemical reactions in the body).
When metabolism increases, more heat is produced. This is what causes fever (elevated temperature). When pathogens invade the body and the body attempts to destroy them, the increased activity (metabolism) causes fever. Pyrogens produced by some pathogens act on the body’s thermostat and raise the body temperature.
Basal metabolic rate (BMR) is the rate at which heat is produced when the body is at rest. The average BMR depends on the body surface area of the person.
What factors affect body heat production?
Basal metabolic rate is affected by thyroid hormone. Excessive amounts of thyroid hormone cause an increase in the metabolic rate and the person feels warm; insufficient thyroid hormone results in a decreased metabolic rate and the person may feel cold.
Other hormones that affect metabolic rate are epinephrine, norepinephrine, and testosterone. Because of their levels of testosterone, men have a higher BMR than women.
Voluntary muscle movement of exercise increases the BMR and heat production.
The involuntary muscle action of shivering can increase heat production up to five times normal.
How is body temperature regulated?
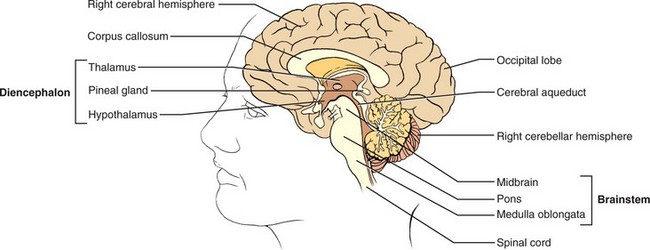
The hypothalamus, located between the cerebral hemispheres, acts as a thermostat and controls body temperature by a feedback mechanism (Figure 21-1).
The chemical reactions that occur in the body as it fights a pathogen cause the thermostat to reset to a higher level (a new set point).
When the body heat rises above normal, the hypothalamus sends out a signal through the nervous system that causes vasodilation, sweating, and inhibition of heat production.
If the body temperature drops below normal range, the hypothalamus sends messages for vasoconstriction of surface blood vessels to conserve heat and messages to induce shivering to increase heat production.
Heat loss occurs through the skin’s exposure to the environment. Heat loss occurs through (1) radiation, (2) conduction, (3) convection, and (4) evaporation.
Blood flow from the internal organs carries heat to the skin. The heat is radiated to cooler objects in the vicinity of the person.
When objects in the surroundings are warmer than the body, heat is radiated to the body and absorbed.
When warm skin touches a cool object, heat is lost to the object by conduction. Ice bags applied to the skin increase conductive heat loss.
Air movement causes heat to be transferred from the skin to the air molecules by convection. Fast-moving air from an electric fan cools by convection. Heat loss increases when the skin is moistened and evaporation occurs.
Sweat glands contribute to evaporative loss by secreting sweat in response to a message from the hypothalamus when the body temperature rises too high.
As water evaporates from the skin, heat is transferred to the air. Heat is continually lost from the body by evaporation, resulting in a daily loss of 800 mL of water from the skin and lungs.
How does fever occur and what are its physiologic effects?
Pyrexia (fever) occurs when normal mechanisms of the body cannot keep up with excessive heat production and body temperature rises. Pyrexia occurs when the body temperature rises above 100.4° F (38.0° C).
When pyrogens (substances that cause fever) such as bacteria cause an immune response in the body, the hypothalamus is stimulated to raise the temperature set point.
Altering the internal environment of the body and allowing the body to become hotter before triggering natural cooling mechanisms permit the body to become more hostile to the bacteria, and the immune system can more effectively destroy them. Fever also stimulates the immune system to produce substances to fight viruses.
If the temperature rises above the new set point, the skin becomes flushed and moist.
Diaphoresis is excessive sweat production, which attempts to cool the body by evaporation.
When the metabolic rate rises and there is a greater demand for oxygen at the cellular level, fever occurs.
Heart and respiratory rates rise in order to help the body meet the increased metabolic demand. If the oxygen demand cannot be met, cellular hypoxia (state of insufficient oxygen) occurs. Cerebral hypoxia may cause confusion in the individual.
What physiologic mechanisms control the pulse?
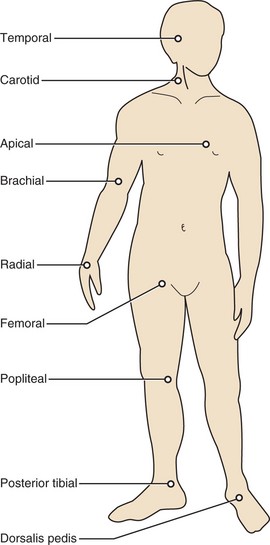
Cardiac contractions produce the pulse. The surge of blood into the aorta causes a pressure wave that can be felt over a peripheral artery. Figure 21-2 shows the points on the body where the pulse may be felt.
Cardiac contractions are normally initiated by the electrical impulse emerging from the sinoatrial (SA) node within the right atrium of the heart. If there is a problem with electrical conduction in the heart, the pulse rate is affected.
When the heart contracts, an average of 60 to 70 mL of blood is propelled into the aorta. Stroke volume is the volume of blood pushed into the aorta per heartbeat. Stroke volume affects the character of the pulse. A weak pulse may indicate a fall in stroke volume.
The amount of the blood circulating in the vascular system and the degree of vasodilation or vasoconstriction of the blood vessels can also affect stroke volume and the pulse.
The pulse rate multiplied by the stroke volume equals the cardiac output. Cardiac output is the amount of blood pumped by the left ventricle in 1 minute. Average cardiac output in the adult is about 5 L of blood per minute.
Respiration is the exchange of oxygen and carbon dioxide in the lungs and tissues and is initiated by the act of breathing.
Respiration is a combination of two processes: external respiration and internal respiration.
External respiration occurs in four ways: (1) ventilation, which is the mechanical movement of air in and out of the lungs; (2) dispersion of air throughout the bronchial tree of the lungs; (3) diffusion of O2 and CO2 molecules across the alveolar membrane; and (4) perfusion, the movement of blood through the lungs and tissues.
Internal respiration happens at the cellular level. O2 is released from hemoglobin to the cell and the cell in turn releases CO2 to the blood.
What are the organs of respiration?
The nose, pharynx, larynx, trachea, bronchi, and lungs are the respiratory organs.
There are three lobes in the right lung and two lobes in the left lung.
The bronchial tree, consisting of the bronchi and bronchioles, carries oxygen to the various parts of the lungs (Figure 21-3).
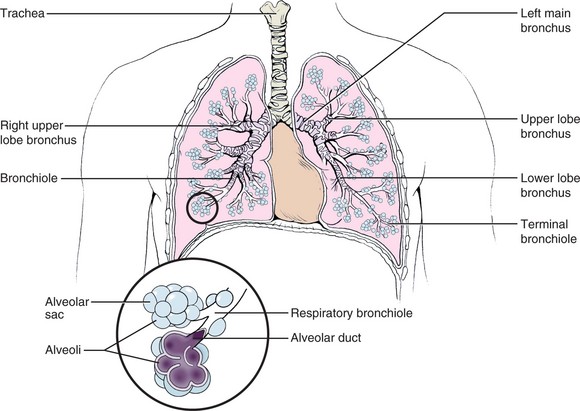
Movement of the diaphragm controls inhalation and exhalation. The slight negative pressure created in the chest during inspiration draws air into the lungs.
Gas exchange with the blood occurs in the alveoli, tiny thin-walled sacs.
Surfactant secreted by cells in the walls of the alveoli is necessary for alveoli to remain open; it reduces surface tension on the alveolar wall, allowing expansion.
How is respiration controlled?
Breathing is an involuntary, automatic function controlled by the respiratory center located in the pons and medulla of the brainstem.
The respiratory center works together with feedback mechanisms. The carotid body receptors in the common carotid arteries and the aortic body receptors lying adjacent to the aortic arch signal the respiratory centers to alter the rate or depth of respiration in response to decreased O2 levels in the blood.
Increasing levels of CO2 and increasing hydrogen ion (H+) concentration in the blood can activate these receptors also.
Messages are sent from the respiratory center to the respiratory muscles controlling the diaphragm and the intercostal muscles, thereby altering the respiratory rate or depth.
The pumping action of the heart brings blood through the lung capillaries, where diffusion of O2 and CO2 can take place across the alveolar membrane.
CO2 is mainly carried as bicarbonate ion (HCO3−) in the blood until it reaches the lung. Carbon dioxide diffused into the lungs is released with exhalation.
Blood pressure is the pressure exerted on the arterial wall. The pressure changes depending on whether the heart is pumping or resting.
Systolic pressure is the maximum pressure exerted on the artery during left ventricular contraction (systole).
Diastolic pressure is the lower pressure exerted on the artery when the heart is at rest between contractions (diastole).
What physiologic factors directly affect the blood pressure?
The amount of cardiac output (stroke volume × heart rate) affects the blood pressure. Blood pressure increases as stroke volume increases.
If cardiac output falls, blood pressure falls.
When vasoconstriction causes peripheral vascular resistance to rise, the pressure within the arterial system increases in order to push the blood along.
When vasodilation occurs, vascular resistance drops and the pressure within the arterial system decreases.
If blood volume increases, as in overhydration (excess fluid volume), blood pressure increases because there is more volume of blood in the same space (the vascular system).
If blood volume decreases, as with bleeding or dehydration, blood pressure decreases.
If the blood becomes thicker, as when excessive blood cells are manufactured, blood pressure increases because more pressure is needed to push the thicker fluid through the vascular system.
When the vascular walls lose elasticity, as happens with arteriosclerosis and aging, blood pressure increases in order to push the blood through more rigid pathways.
What changes occur in vital signs with aging?
Temperature is a less reliable indicator of health in the elderly. Fever is less likely to develop, but heat loss occurs more readily and can lead to hypothermia. The elderly person often has a lower normal temperature than the average adult. This may be due to a lower metabolic rate.
The normal range for the heart rate does not change in the healthy elderly, but the rhythm may be slightly irregular.
Respiratory rate may rise slightly as decreases in vital capacity and respiratory reserve occur.
The systolic blood pressure rises slightly because the aorta and major arteries tend to harden with age. In many elderly, the diastolic pressure rises also.
The vital signs–temperature, pulse, respiration, blood pressure, and pain level’ give some indication of the state of health of an individual. They represent interrelated physiologic systems of the body. Learning to measure vital signs is the beginning step in gathering assessment data for patients. Evaluation of vital sign data requires several readings so that a patient’s status can be determined.
It is important to understand the physiologic mechanisms that regulate the vital signs and the factors that can affect each one.
MEASURING BODY TEMPERATURE
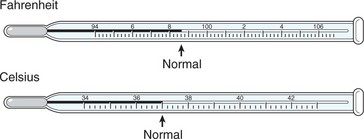
Normal body temperature ranges from 97.5° F to 99.5° F (36.4° C to 37.5° C), and varies considerably among individuals. Two scales are used to measure temperature: Fahrenheit and Celsius. Table 21-1 presents temperature correlations between the two scales. The temperature in a healthy young adult averages 98.6° F (37.0° C). It varies within the normal range as the body adjusts to changes in the amount of heat produced or the amount of heat lost. Some people run a low-normal or a high-normal temperature consistently; this represents the normal body temperature for them. It is important to know the patient’s usual temperature and then compare changes with that measurement.
Table 21-1
Comparison of Temperature Scales*

*To change Celsius to Fahrenheit, multiply by 9/5 and add 32. To change Fahrenheit to Celsius, subtract 32 and multiply by 5/9.
FACTORS INFLUENCING TEMPERATURE READINGS
The temperature reading obtained will vary according to the site used. Measurement sites are the mouth, rectum, axilla (armpit), ear, and on the skin. Most temperatures are measured orally, rectally, via the tympanic membrane (eardrum), or via the temporal artery. Rectal temperatures are usually about 1° higher and axillary temperatures are about 1° lower than those measured orally. The axillary temperature is the temperature taken in the armpit. The electronic thermometer is switched to the rectal setting and attached to a different probe before taking a rectal temperature, and the reading should be recorded as a rectal temperature. The rectal temperature is usually taken with the patient in the left Sims’ position so that the rectum is positioned to accept the thermometer probe.
Sometimes the physician indicates the site of temperature to be taken; when it is not indicated, follow agency protocol.
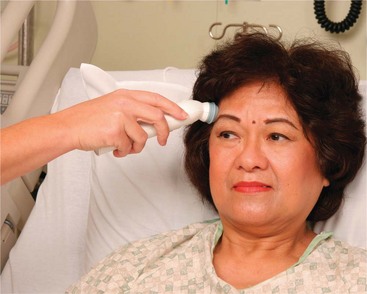
The temporal artery thermometer is the most accurate noninvasive way to measure body temperature. It is passed over the temporal artery in the forehead. It captures the naturally emitted heat from the skin over the temporal artery, taking 1000 readings per second and selects the highest reading. It provides an accurate arterial temperature. The probe is gently stroked across the forehead to the far side (Figure 21-4). The arterial temperature is close to rectal temperature, but almost 1° F (0.5° C) higher than an oral temperature. Ideally the temporal artery thermometer should be slid across the forehead above the brow ridges in a relatively straight line. Temporal artery temperature is unaffected by eating, drinking, smoking, or mouth breathing. If the person has been side-lying with part of the forehead into the pillow, allow the skin to cool to room temperature before using the thermometer.
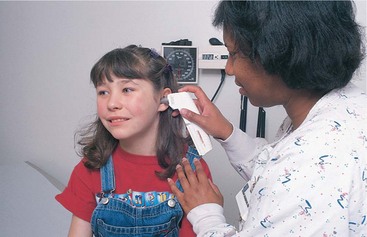
Measuring tympanic temperature involves insertion of the thermometer probe into the auditory canal. The probe must be pointed at the tympanic membrane for the reading to be accurate. This is another easy and quick method of measuring the temperature. The graduated size of the probe prevents injury to the tympanic membrane. Tympanic membrane temperature is a good indicator of core body temperature. Core temperature is the temperature of the deep tissues of the body. The thermometer measures heat radiated as infrared energy from the tympanic membrane. The same blood vessels serve the hypothalamus and the membrane, so the temperature is close to core temperature at the hypothalamus. Temperatures taken with a tympanic thermometer are not subject to variations caused by eating hot or cold foods or liquids, smoking, or chewing gum. They can be affected by an ear infection or excessive wax that blocks the canal.
Tympanic and temporal artery thermometers are more expensive than home electronic thermometers and are not universally used at home. Oral temperatures are convenient for older children and adults. The glass clinical thermometer must be left in place under the tongue for at least 3 minutes to register the temperature accurately, although newer types of electronic, chemical, and infrared thermometers register in much less time. If the patient has recently swallowed hot or cold foods or liquids or has been smoking or chewing gum, wait 15 to 30 minutes for these effects to pass for a more accurate measurement. A glass thermometer is never used orally if the patient is uncooperative or at risk for biting on the thermometer.
Rectal temperatures are taken when an accurate temperature cannot be obtained orally and a tympanic or temporal artery thermometer is not available. The rectal route may be used when there is nasal congestion or there has been nasal or oral surgery, the patient is unable to keep the mouth closed, or there is a risk for seizures. Rectal temperatures should not be used for cardiac patients or patients who have had rectal surgery.
Axillary temperatures are taken when oral or rectal temperatures are contraindicated and a tympanic or temporal artery thermometer is not available. They are a less reliable measure. Factors that may affect the body temperature are listed in Box 21-1.
PROBLEMS OF TEMPERATURE REGULATION
A condition in which the patient’s temperature is above the normal range (100.4° F or 38.0° C) is called a fever, a febrile state, or pyrexia. However, fever is often not considered significant until the temperature reaches 101.3° F or 38.5° C. A fever is usually a common symptom of infection in which the heightened temperature helps to destroy invading bacteria. Very high fevers, such as those greater than 105.8° F or 41° C, cause damage to body cells, particularly those of the central nervous system. Hyperthermia (above-normal body temperature) may also occur after brain injury.
In fever, the physiologic thermostat is reset at a higher level than normal and the heat-producing mechanisms of the body elevate the body temperature to the new setting. Because of chemical reactions in the body, chills (sensations of cold and shaking of the body) may occur. The metabolic rate increases by about 7% for each degree Fahrenheit (10% for each degree Celsius) rise in temperature.
The course of a fever can be observed on the recorded graph in the patient’s chart. There are three distinct stages in a fever: onset, febrile, and defervescence (abatement of fever). Onset may occur gradually or suddenly. The body responds to a pyrogen by trying to conserve and manufacture heat to raise the set point for core temperature. The person feels cold, and will add clothes or covers, curl up in a ball, and turn up the heat in order to feel warm. Chills, increased respiratory rate, and increased pulse rate mark this stage. During the febrile stage, the body temperature rises to the new set point established by the hypothalamus and remains there until there is resolution of the cause of the fever. If the fever is very high, or if it lasts for an extended period, dehydration, delirium, and convulsions may occur. Dehydration occurs as fluid is lost with perspiration and more rapid breathing. Delirium and convulsions may occur because neurologic function is affected when the temperature in the brain rises. The stage of defervescence brings lowering of the body temperature to normal. The person feels warm and the skin may be moist.
A crisis (abrupt decline in fever) may occur when the body controls the infection, or a lysis (gradual return to a normal temperature) may mark the decline of the fever. Fevers are classified as constant, intermittent, remittent, or relapsing (Box 21-2).
Hypothermia
Hypothermia (subnormal body temperature) refers to a lowering of the temperature of the entire body, not just a portion of it. The thermal regulating center in the hypothalamus is greatly impaired when the temperature of the body falls below 94° F (34.4° C). At this level, the activity of the cells is reduced, less heat is produced, and sleepiness and coma are apt to develop. Those at risk for hypothermia include postoperative patients who have been cooled during surgery, newborn infants whose skin is exposed to cool room temperatures, elderly or debilitated patients, and those exposed to cold temperatures for prolonged periods.
People exposed to extremely cold weather often suffer frostbite of the ears, nose, hands, and feet, where exposed tissue and feet and hands freeze. If the frozen part is thawed immediately, there is little effect on tissues. However, if frostbite is prolonged, it causes death of cells and loss of the frozen area.
Nursing activities for treating the patient with a below-normal body temperature should focus on reducing heat loss and supplying additional warmth. These activities may include (1) providing additional clothing or blankets for warmth (an electric blanket is most effective for raising temperature); (2) giving warm fluids, if permitted; (3) adjusting the temperature of the room to 72° F (22.2° C) or higher; (4) eliminating drafts; (5) increasing the patient’s muscle activity; and (6) submerging frostbitten areas in a warm bath, with water temperature no warmer than 107° F or 41.8° C.
MEASURING BODY TEMPERATURE
Clinical thermometers are used to measure the body temperature, and there are a growing number of different types on the market. The thermometer made of glass with a mercury-filled bulb is not used anymore because if the thermometer gets broken, mercury and its vapor, which are toxic, are released. Glass thermometers are now filled with nonmercury material. Health facilities often use electronic digital thermometers, tympanic thermometers, temporal artery thermometers, and disposable, single-use thermometers.
Taking an Oral Temperature
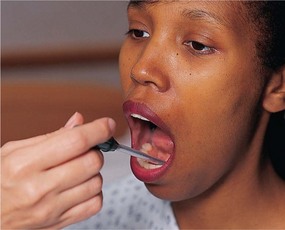
The tip of the thermometer or probe should be placed in the sublingual pocket (Figure 21-5). The patient should keep the tongue down, close the mouth, and keep the lips closed. A plastic sleeve or probe cover is used. Remove the plastic sleeve before reading a glass thermometer.
Taking a Rectal Temperature
Provide privacy and ask the patient to turn to the side facing away from you with the knees slightly flexed; drape the patient to reveal only the anal area. Don gloves and lubricate the tip of the rectal thermometer or probe, lift the upper buttock slightly so that the anus can be clearly seen. Insert the lubricated bulb into the rectum directed toward the umbilicus about 0.5 to 1.5 inches. Hold the thermometer in place for 3 to 5 minutes or until the correct temperature is indicated. Wipe the thermometer or probe from the stem toward the bulb or probe tip. Wipe the buttocks to remove lubricant or stool. Correctly dispose of tissues and gloves and perform hand hygiene.
Taking an Axillary Temperature
Place the thermometer in the center of the patient’s dry axilla (armpit). A wet axilla will produce a false reading. Ask the patient to hold the arm tightly against the chest. The arm may rest on the chest. Leave the thermometer in place for 3 to 8 minutes or until the thermometer indicates the reading is complete. Remove and wipe the thermometer clean from the stem to the tip.
GLASS THERMOMETERS
The glass thermometer has a bulb containing an alloy of elements called Galinstan and a stem in which the substance can rise (Figure 21-6). On the stem, is a graduated scale representing degrees of temperature from 94° to 106.8° F. (The range on a Celsius thermometer scale is 34° to 43° C.) The alloy in the bulb expands when the bulb is in contact with body heat and registers on the scale in the stem. The bulb may be long and slender or blunt like the short, fat bulb used for rectal thermometers. Rectal thermometers often have a red tip or color on the stem to signify that they are for rectal use only and should not be used orally. Oral thermometers may also be used to take axillary temperatures. All glass thermometers must have the alloy below the normal range before using them, which is accomplished by shaking down the alloy. This is done by holding the thermometer firmly by the distal glass end and flicking the wrist in a quick motion several times to bring the alloy down to the bulb (Safety Alert 21-1).

Rectal and oral thermometers must be kept separated so they are not confused. Glass thermometers are very slippery when soapy; be especially careful when washing the thermometer. Glass thermometers may still be used in homes as not everyone has obtained a new type of thermometer. Nurses should be able to teach parents how to read a glass thermometer (Figure 21-7).
Reading the Glass Thermometer
Hold the thermometer horizontally at eye level and rotate it toward you until you can clearly see the column of alloy. Note where the end of the alloy is on the lined scale. The stem of the Galinstan alloy–in-glass thermometer contains the scale for measuring the temperature. The scale may be calibrated in either Fahrenheit or Celsius degrees, or it may have both scales. The Celsius scale has long lines indicating the degree and short lines for each one tenth of a degree. In contrast, the Fahrenheit scale has an arrow marking the normal temperature of 98.6° F. Long lines on the scale represent each degree, but only the even-numbered degrees are written as 96°, 98°, 100°, and so on. Short lines between the degree lines represent two tenths of a degree. All temperatures are recorded as ending in an even number when using this thermometer because it does not measure odd tenths of a degree. For example, one would read and record 99.2° F or 99.8° F but never 99.3° F or 99.7° F. To convert temperature from one scale to another, use these formulas:


Lukewarm water is used to wash a glass thermometer, and it is rinsed with cold water. Oral and rectal thermometers should be stored separately to avoid confusing them (Home Care Considerations 21-1).
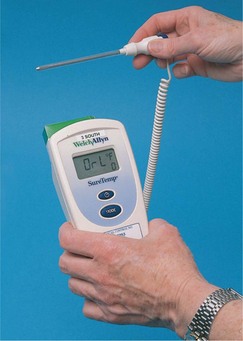
ELECTRONIC THERMOMETERS
The portable, battery-operated electronic thermometers register body temperature in 5 seconds to 1 minute. There may be an on-off button to activate the battery, and a warm-up period may be required (Figure 21-8). The oral probe is placed in a plastic cover or sheath that is used one time and then discarded. The correct disposable probe cover and the correct setting should be used for the electronic thermometer when taking an oral or rectal temperature. The temperature is displayed digitally on a small screen on the hand-held unit. The reading is in tenths of a degree, so temperatures taken with this unit may end in odd numbers, such as 99.5° F (37.5° C). Skill 21-1 describes the use of an electronic thermometer.
Skill 21-1 Measuring the Temperature with an Electronic Thermometer
An electronic thermometer may be used to measure temperature, without worry about injury, for patients who are at risk for seizure disorders. If a rectal temperature is desired, a special rectal probe is used along with a rectal probe cover.
Review and carry out the Standard Steps in Appendix 3.
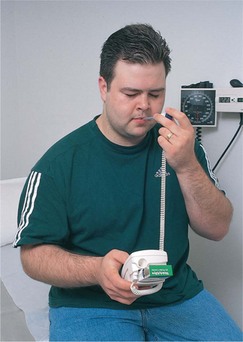
1. ACTION Perform hand hygiene, identify the patient, and explain the procedure. Ask whether the patient has had anything to eat or drink in the past 15 minutes.
RATIONALE Reduces the transfer of microorganisms, ensures that correct patient is undergoing the procedure, and puts the patient at ease. Eating, drinking, or smoking alters the temperature of the oral cavity.
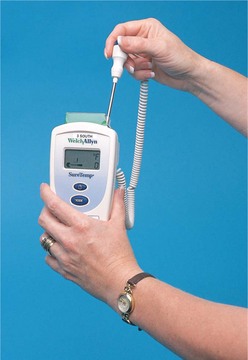
3. ACTION Remove the probe from the unit, and push it down into a probe cover until a slight click is heard.
RATIONALE The probe cover must be firmly in place for the unit to operate correctly.
4. ACTION Place the probe under the tongue in the side sublingual pocket. Ask the patient to close the lips and keep them closed.
RATIONALE The probe must be in contact with tissue rich in blood supply to obtain an accurate temperature.
5. ACTION Hold the unit steady, or allow the patient to hold it, and read the temperature on the screen when the light stops flashing or the unit beeps.
RATIONALE Many units will beep when the correct temperature is recorded. If the probe is not positioned correctly, the unit will not beep or will refuse to register a temperature.
6. ACTION Remove the probe from the mouth, and discard the probe cover into the waste container by pressing the ejector button.
RATIONALE Ejecting the probe cover directly into the waste can prevents handling its contaminated surface. Probe covers are never reused. Be careful not to accidentally leave a probe cover in the bed.
7. ACTION Note the temperature, and clear the register by returning the probe to its holder.
RATIONALE Returning the probe to its holder turns off the thermometer and saves the battery.
8. ACTION Record the patient’s temperature on your worksheet.
RATIONALE Noting the time and temperature on your worksheet makes it readily available when charting.
 If thermometer does not function, the probe cover may be loose. Remove the cover, insert the probe back into its storage location to reset, pull it out, and replace the cover, being certain it is snapped into place.
A rectal probe attachment and probe cover may be used to take a rectal temperature if this probe is available.
Tympanic Thermometers
These portable, battery-operated electronic thermometers register temperatures in 1 to 2 seconds. A switch on many units may be set for infant and toddler or for child and adult. The auditory canal probe is placed in a plastic cover that is used one time and then discarded. The temperature is displayed digitally on a small screen on the hand-held unit. The reading is in tenths of a degree and can be displayed in degrees Fahrenheit or Celsius (Figure 21-9). Using a tympanic thermometer is explained in Skill 21-2.
Skill 21-2 Measuring the Temperature with a Tympanic or Temporal Artery Thermometer
When placed into the auditory canal, a temporal thermometer produces a reading of core temperature. It is especially useful for measuring temperature in children.
2. ACTION Check the low battery light. Set unit for the desired mode: infant-toddler or child-adult.
RATIONALE If battery is low, the unit will not function. An inaccurate reading will be obtained if the wrong mode is used.
3. ACTION Check to see that there are probe covers in the container before going to the patient.
RATIONALE Prevents an unnecessary trip to obtain the covers.
4. ACTION Perform hand hygiene.
RATIONALE Reduces transfer of microorganisms.
5. ACTION Remove the probe from the unit and attach a probe cover.
RATIONALE The probe cover must be securely in place in order to obtain a reading. A disposable cover prevents transmission of microorganisms from one patient to another.
6. ACTION Gently place the probe in the ear canal until it seals the opening. Grasp the top of the pinna and gently pull up and back to straighten the ear canal of the adult if needed. Pull the lobe of the ear down or back to straighten the canal of a child under age 2 if needed. Point the probe slightly toward the face.
RATIONALE The probe must be pointed at the tympanic membrane and be sealed in the canal in order for the measurement to be taken. The auditory canal should be inspected for redness, swelling, discharge, or presence of cerumen or a foreign body before insertion of the probe.
7. ACTION Hold the unit steady. Steady the head with one hand if needed and press the button to take the reading.
RATIONALE Head movement will break the seal of the probe in the canal.
8. ACTION Read the temperature and remove the probe. Praise a child for cooperating if appropriate.
RATIONALE The temperature will be displayed on the small screen on the unit when it has been obtained.
9. ACTION Discard the probe cover in the waste receptacle.
RATIONALE Probe covers are contaminated and are not designed to be reused.
10. ACTION Return the thermometer to the base unit for recharge.
RATIONALE Returning the unit to the base prepares it for the next use.
This thermometer should not be used if the patient has an inflammatory condition of the auditory canal or if there is discharge from the ear.
Moving the probe laterally back and forth with small movements assists in positioning the probe so that it seals the canal.
Having a parent hold the child’s head against the body helps stabilize the head so that the probe can be placed in the ear.
Approaching the small child or very elderly with a slow, smooth movement after explaining what you are going to do decreases reflex “ducking.”
A rectal probe attachment and probe cover may be used to take a rectal temperature if that probe is available.

Temporal Artery Skin Thermometer
The temporal artery thermometer is placed on the skin of the forehead over the temporal artery. It is an electronic thermometer that is fast and accurate. It is less invasive than the tympanic thermometer and more reliable when used correctly (see Figure 21-4).
DISPOSABLE THERMOMETERS
Various types of single-use, disposable thermometers are available; among them are temperature-sensitive tapes that are placed on the forehead or abdomen to record the heat of the body. These are often used in newborn nurseries. Other types are the NexTemp ther- mometers (Figure 21-10). The sensor end of the shaft contains a series of dots arranged so that each one changes color at a different temperature from that of the preceding dot. Directions on the package explain how to use these thermometers. Most disposable thermometers will register the temperature within 2 minutes. They provide the least accurate readings of temperature.

APPLICATION of the NURSING PROCESS
Choose the appropriate site for temperature measurement based on the age and condition of the patient and the type of thermometer available. Determine if factors are present that might alter the temperature reading. The rectal method may be used when a tympanic or temporal artery thermometer is not available for patients who have wired jaws, who have a nasogastric tube in place and cannot breathe easily with the mouth closed, or who may have seizures.
Check the electronic thermometer battery before measuring the patient’s temperature. A low battery may make the measurement inaccurate.
Choose the right mode (infant-toddler or child-adult) on the tympanic thermometer before measuring the patient’s temperature. An inaccurate reading will result if the thermometer is not set properly.
Nursing Diagnosis
Nursing diagnoses for patients with alterations of normal temperature might be:
• Hyperthermia related to infection or excessive heat exposure
Abnormalities found on assessment of the other vital signs (pulse, respiration, blood pressure) may indicate problems in various body systems. When such findings remain abnormal, nursing diagnoses would be written that address those problems.
Planning
Expected outcomes are written for each nursing diagnosis:
• Patient’s temperature will return to normal after 3 days of antibiotic therapy.
• Normal body temperature will be regained within 6 hours.
• Temperature will be maintained below 102.5° F with use of hypothermia blanket.
Further expected outcomes would be written for nursing diagnoses established by abnormalities in other vital signs.
Implementation
Temperature is taken upon admission to the health care facility so that a baseline for comparison of future measurements is available. The physician orders the schedule for taking all the vital signs or the nurse takes them according to agency standards. Other times the temperature should be taken are as follows:
• Every 4 hours when a known infection is present
• Every 2 to 4 hours when a fever is present
• When the patient is “not feeling right”
• When the patient is receiving drugs that may affect the temperature
• Before surgery or an invasive procedure, then at regular intervals afterward as prescribed by hospital protocol
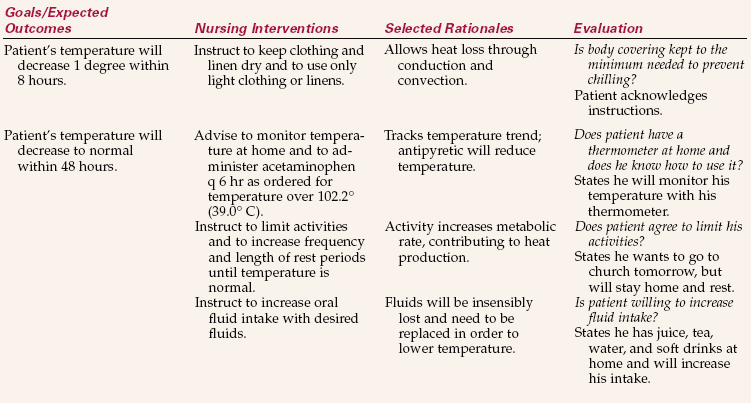
Measures to reduce fever are presented in Box 21-3. Other interventions are presented in Nursing Care Plan 21-1.
NURSING CARE PLAN 21-1 Care of the Patient with Elevated Body Temperature
Mr. Johnson, age 72, came to the clinic with malaise and temperature elevation. He has been ill for several days.
Evaluation
To evaluate success of the plan, determine whether expected outcomes have been met. Evaluation of measures to keep temperature within normal range is performed by analyzing the trend of the temperature on the graphic record. A fever that is decreasing when the patient is receiving antibiotics for an infection is one indication that the antibiotic therapy is effective. For the hypothermic patient, if the temperature returns to normal with the use of the warming blanket, the expected outcomes are met (Health Promotion Points 21-1).
Evaluation to determine whether expected outcomes have been met for nursing diagnoses related to abnormalities in the other vital signs would include measurements indicating that those vital signs are now within normal limits.
MEASURING THE PULSE
Each time the heart contracts to force blood into an already full aorta (artery leading from the heart), the arterial walls in the vascular system must expand to accept the increase in pressure. The pressure wave causing this expansion is called the pulse. By counting each pulsation of the arterial wall, you can determine the pulse rate.
COMMON PULSE POINTS
The pulse can be felt wherever a superficial artery can be held against firm tissue, such as a bone (see Figure 21-2). The pulse is felt most strongly over the following areas:
• Radial artery in the wrist at the base of the thumb
• Temporal artery just in front of the ear
• Carotid artery on the front side of the neck
• Apical pulse over the apex of the heart (the actual beat of the heart)
• Popliteal pulse behind the knee
• Pedal pulse of the posterior tibial artery on the inside of the ankle behind the malleolus, in the groove between the malleolus and Achilles tendon and dorsalis pedis on the arch of the foot
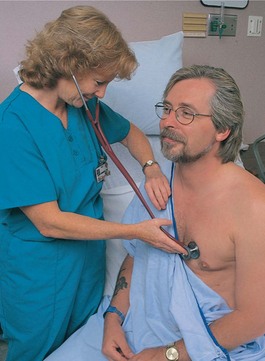
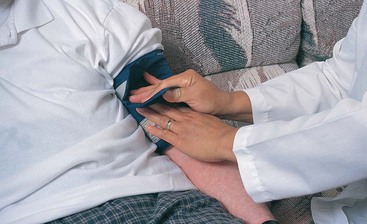
The radial artery in the wrist is most often chosen to palpate (feel) the pulse when taking vital signs. It is best found by placing the flat part of the first two fingers against the tendon, or cord, on the thumb side of the inner wrist and then rolling the fingers slightly outward into the little trough on the thumb side of the wrist. Skill 21-3 describes measurement of the radial pulse. When it is difficult to find or to count the radial pulse, the apical beat of the heart is counted for a full minute with the use of a stethoscope (device that augments sounds from within the body). The apical pulse is counted when it is important to have an accurate measure of the heart rate and may be ordered by the physician for patients with heart conditions. Nurses routinely take an apical pulse before administering digitalis and beta blocker medication. The apical, rather than the radial, pulse is also taken on children younger than 2 years. Locate the apical heart sound by placing the stethoscope on a point midway between the imaginary line running from the middle of the left clavicle through the left nipple in the fifth intercostal space (Figure 21-11, Skill 21-4).
Skill 21-3 Measuring the Radial Pulse
The radial pulse is measured whenever vital signs are taken. The pulse quality and character should be noted while the pulse is being counted. When the radial pulse is irregular, the apical pulse should also be taken.
Review and carry out the Standard Steps in Appendix 3.
3. ACTION Perform hand hygiene.
RATIONALE Reduces transfer of microorganisms.
4. ACTION Place the pads of two or three fingers lightly over the radial artery with the patient’s hand palm down.
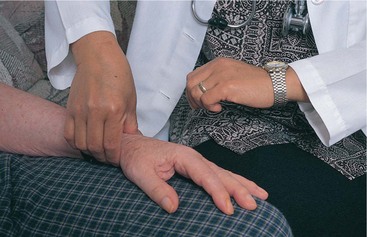
RATIONALE Fingers are used rather than the thumb because the thumb has a strong pulse that could be confused with that of the patient.
5. ACTION Begin with a beat, and count the next beat as “1.” Count the pulsations for 30 seconds and multiply by 2 to obtain the rate per minute. Note the regularity, strength, and character of the pulse.
RATIONALE If the first beat is counted “1,” the total count will be inaccurate because you should count only each full cardiac cycle. Counting for 30 seconds rather than 15 provides a more accurate measurement of the pulse. Whenever the pulse is irregular, very rapid, or very slow, count for a full minute.
RATIONALE Prevents forgetting the result.
Skill 21-4 Measuring the Apical Pulse
Review and carry out the Standard Steps in Appendix 3.
3. ACTION Expose the left chest. Warm the diaphragm of the stethoscope in the palm of your hand for a minute or two.
RATIONALE Sounds are transmitted through the stethoscope best if it is placed on bare skin. A cold stethoscope is unpleasant for the patient.
4. ACTION Locate the apex of the heart by palpating for the fifth intercostal space at the midclavicular line.
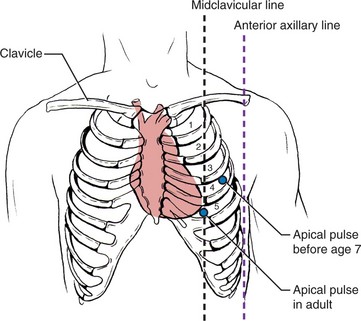
RATIONALE The apex of the healthy heart is located at the fifth intercostal space on the mid- clavicular line.
5. ACTION Listen to the heart sounds with the diaphragm of the stethoscope.
RATIONALE The high-pitched heart sounds are heard best with the diaphragm. If the sounds are not heard clearly, move the stethoscope around slightly until sound is heard.
6. ACTION Count the number of beats for 1 minute.
RATIONALE While counting, note the rhythm and the strength of the beat.
7. ACTION Cover the chest, make the patient comfortable, and restore the unit. Jot down the apical pulse.
RATIONALE Prevents chilling and protects privacy. Restoring the patient’s personal belongings to their former places, placing the call light at hand, and raising the side rails as needed protects safety.
An apical pulse is the preferred method of measuring the pulse in children under 2 years of age.
Care should be taken not to frighten a patient if the radial pulse is irregular and you then take the apical pulse. Explain to the patient that you could not obtain an accurate count radially and wish to listen to the heart directly.
Do not start counting the apical pulse until you can hear it clearly. This sometimes takes a few beats in order to tune the ear to the soft beat.
If the sound is difficult to hear, ask the patient to lean forward to bring the heart closer to the chest wall.
1. If your patient has a very thick chest and it is difficult to hear the apical pulse, how would you verify the heart rate you measured as being accurate?
2. When a patient’s vital signs are being taken by an electronic vital signs monitor, can you be sure the heart rate is accurate? How would you verify that it is?
PULSE RATE
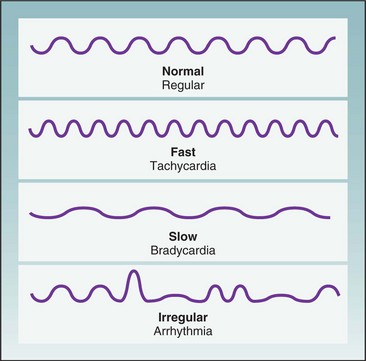
The pulse rate varies widely and is influenced by a large number of factors (Table 21-2). The term tachycardia is used to refer to a pulse greater than 100 beats per minute (bpm); bradycardia indicates a slow pulse that is less than 60 bpm. The average pulse rate in an adult is 72 bpm. Tachycardia or bradycardia should be reported to the charge nurse or the physician. Medications may be prescribed to speed up the pulse when it is too slow or to slow it down when it is too fast. Table 21-3 shows average pulse rate by age.
Skill 21-6 Measuring the Blood Pressure
Blood pressure is measured each time vital signs are taken. Trends in blood pressure are monitored to detect early signs of complications from surgery, illness, or trauma.
Review and carry out the Standard Steps in Appendix 3.
1. ACTION Identify the patient. Check to see what the patient’s blood pressure is normally.
RATIONALE Ensures that the blood pressure is recorded for the correct person. Knowing the usual pressure assists in knowing how high to inflate the cuff.
2. ACTION Assess the size of the patient’s arm to determine the size of cuff needed.
RATIONALE The bladder of the cuff should cover two thirds of the circumference of the upper arm.
3. ACTION Assess if there is a contraindication to taking the blood pressure on either arm.
RATIONALE If a patient has had a mastectomy, a serious injury, a lymph node dissection, or has a dialysis shunt on the side of the arm chosen, use the other arm. If both arms are contraindicated, use a thigh cuff on a leg.
4. ACTION Provide privacy and reduce environmental noise. Explain the procedure and perform hand hygiene.
RATIONALE Quieter environment allows you to hear the blood pressure sounds more accurately. Explaining procedure puts the patient at ease. Hand hygiene reduces transfer of microorganisms.
5. ACTION Place the patient in a comfortable position, sitting down or lying down, and allow the blood pressure to stabilize for 5 minutes before measuring it.
RATIONALE Position changes alter hemodynamics within the body; blood pressure will stabilize within 5 minutes.
6. ACTION Apply the cuff smoothly to the patient’s arm, positioning the center of the bladder over the brachial artery and placing the cuff 1 to 2 inches above the antecubital space. Wrap the cuff firmly and smoothly around the arm and fasten it. Alternatively, position the cuff over the popliteal artery on the underside of the thigh.
RATIONALE The center of the bladder of the cuff must be over the brachial or popliteal artery for an accurate measurement to be taken.
7. ACTION Position the gauge so it can be easily visualized.
RATIONALE Straining to see the lines on the gauge may cause an inaccurate reading.
8. ACTION Position and support the patient’s arm or leg at the level of the heart.
RATIONALE An arm or leg positioned above or below the level of the heart may cause an inaccurate reading.
9. ACTION Close the valve of the air pump by turning the screw valve clockwise until it is closed, but not so tightly that it cannot be easily released.
RATIONALE Closing the valve directs airflow into the cuff when the bulb is squeezed.
10. ACTION Palpate the brachial or popliteal artery for the strongest pulse area. Pump up the cuff until the artery is occluded, then release the valve and let the air out of the cuff. Radial artery may be palpated instead of brachial.
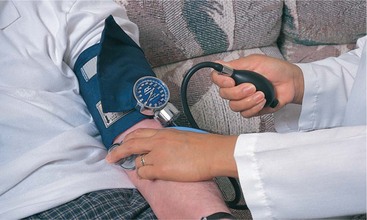
RATIONALE Locating the pulse before pumping up the cuff is essential to determine the approximate level of the systolic pressure. Locating where pulse is strongest over brachial artery allows placement of stethoscope to best hear the sounds.
11. ACTION Direct the earpieces of the stethoscope slightly forward, and place them in your ears. Place the diaphragm or bell of the stethoscope over the brachial or popliteal pulse.
RATIONALE The bell is smaller and fits more closely over the skin than the diaphragm. When the bell is used, it should be only lightly applied to the skin. The diaphragm must be held firmly in contact with the skin to hear sounds clearly.
12. ACTION When 30 seconds have passed, reinflate the cuff quickly, while watching the gauge, to at least 30 points higher than the point at which you no longer can feel the pulse.
RATIONALE Ensures that the cuff is inflated to a point above the patient’s systolic blood pressure and prevents missing an auscultatory gap (period where sound disappears). Keeping the mercury column at eye level gives a more accurate reading. The aneroid gauge should be read with the eyes directly over or in line with it.
13. ACTION Deflate the cuff at a constant rate of 2 mm Hg/sec by unscrewing the valve on the bulb pump counterclockwise.
RATIONALE Deflating too rapidly or too slowly gives false readings. Avoiding contact of the stethoscope tubing with the clothing, cuff, or tubing of the sphygmomanometer will decrease the possibility of extraneous noise.
14. ACTION Listen for the first Korotkoff sound, and note this as the systolic blood pressure. Continue to listen and steadily deflate the cuff until muffling is heard; note this point. Continue deflating until the last Korotkoff sound is heard; note this point. Replace the patient’s clothing if needed.
RATIONALE The point of muffling of Korotkoff sounds is considered the most accurate measurement of blood pressure in children; the point at which the last Korotkoff sound is heard is considered most accurate for adults. If sleeve was pushed up, replacing it shows courtesy to the patient.
15. ACTION Deflate the cuff completely. Jot down the blood pressure reading.
RATIONALE Deflating prepares the cuff for next use. Jotting the measurement on your worksheet makes it readily available when recording on the patient’s chart.
16. ACTION Perform hand hygiene.
RATIONALE Reduces the transfer of microorganisms.
17. ACTION If you turned off the TV or radio, turn it back on. Restore the unit as it was.
RATIONALE Shows courtesy and caring to the patient. Replacing personal articles and the call light within reach prevents accidents.
18. ACTION Ask yourself: Is the blood pressure within normal range? Is it elevated? Is it dangerously low? Is there a considerable unexplained difference between this reading and the former reading?
RATIONALE Answers provide data regarding further assessments that may need to be made. Excessively high or low pressure should be reported to the physician.
19. ACTION Document the time and pressure on the graphic sheet; record any new abnormality in the nurse’s notes with your assessment. Blood pressure is recorded with the systolic pressure as the top number of a fraction and the diastolic pressure as the bottom number.
RATIONALE Demonstrates trend of blood pressure and communicates any abnormality.
Use appropriate cuff size with the bladder of the cuff covering two thirds of the arm circumference. Three sizes should be available: pediatric, adult, and large adult. A poorly fitting cuff provides inaccurate measurement.
When using a thigh cuff, turn the patient onto the abdomen if possible and wrap the cuff about 2 inches above the knee. Place the stethoscope over the popliteal artery.
To palpate a blood pressure when sound cannot be heard, locate the radial pulse, inflate the cuff per usual routine, and let the pressure fall; note the pressure at which the radial pulse is first felt. This is the systolic pressure; diastolic pressure cannot be determined by this method. This measure will be 2 to 5 mm Hg lower than that obtained by auscultation.
If an ambulatory care patient has “white coat syndrome” (BP rises whenever the patient is approached by a medical person), retake the pressure before the patient leaves the office or clinic.
Teach hypertensive patients the importance of monitoring their blood pressure frequently.
Encourage the purchase of a home blood pressure unit.
If a wrist BP monitor is used, advise that the wrist must be positioned at the level of the right atrium for accuracy.
Digital blood pressure monitoring systems with large number readouts are available for the elderly with poor vision.
An elderly hypertensive patient’s blood pressure should regularly be checked with the patient standing and lying down and on both arms. This method detects hypotensive reactions to blood pressure medication more accurately.
Whenever blood pressure is measured on a patient new to the office or health facility, take the blood pressure on both arms.
If in doubt that an accurate pressure was obtained, ask another nurse to recheck the patient’s blood pressure.
Table 21-2
| FACTOR | EFFECT |
| Age | The pulse rate gradually diminishes from birth to adulthood. |
| Body build and size | Tall, slender persons may have a slower pulse rate than short, stout persons. |
| Blood pressure | When the blood pressure rises, it causes a decrease in the pulse rate. When the blood pressure is lower, there is an increase in the pulse rate because the heart is attempting to increase the output of blood. |
| Drugs | Stimulants increase the pulse rate. Depressants decrease the pulse rate. |
| Emotions | Acute anxiety stimulates the sympathetic nervous system, increasing the heart rate. |
| Blood loss | Excessive blood loss, as with hemorrhage, increases the heart rate as the body tries to meet the tissue oxygen demands. |
| Exercise | Exercise increases the pulse rate because the heart pumps faster to meet circulatory needs. |
| Increased body temperature | The pulse rate increases at the rate of 7-10 beats for each degree of temperature. |
| Pain | Pain increases the pulse rate. |

Occasionally, there may be a need to take both a radial pulse and an apical pulse when the radial pulse is very irregular, skips beats, or is difficult to count. This requires two people to count the radial and apical pulses at the same time to determine whether there is a pulse deficit (difference between the apical and radial pulse). The nurses use one watch visible to both when counting the apical-radial pulse and begin and end counting at the same time. One nurse counts the radial pulse and the other counts the apical pulse. The radial pulse subtracted from the apical pulse equals the pulse deficit.
As the blood travels farther away from the heart, the distinct wave of the pulse begins to fade, but the pulse can be palpated at the ankle or top of the foot. Pedal pulses are checked to determine whether there is any blockage in the circulation in the artery up to that point, especially in patients who have had cardiac catheterization using the femoral artery for the insertion of the catheter or those who have had surgery on the leg. Most nurses mark an “X” on the skin over the spot where the pedal pulse is felt so that all staff use the same location. When the pedal pulse is difficult to locate, a Doppler ultrasound stethoscope must be used (Figure 21-12).
PULSE CHARACTERISTICS
When the pulse is being counted, the rate, rhythm, and volume should be noted. Timing is begun with a beat that is not counted; the next beat is “1.” An arrhythmia (irregular pulse) has a period of normal rhythm broken by periods of irregularity or skipped beats. This can occur as a temporary condition from emotional stress or fright. A continuing arrhythmia may be indicative of heart disease or a medication’s side effects and should be reported to the charge nurse or physician and recorded. Figure 21-13 shows various pulse rates and rhythms.
The volume or strength of the pulse is just as important as the rate. With moderate pressure of the first two or three fingers on the vessel, a strong pulse will be felt regularly and with good force (Health Promotion Points 21-2). There are several terms to describe the strength of a pulse. The most common are
• Weak and regular (even beats with poor force), or 1+
• Strong and regular (even beats with moderate force), or 2+
• Full and bounding (even beats with strong force), or 3+
• Irregular (both strong and weak beats occur within 1 minute)
• Thready (generally indicates that it is weak and may be irregular)
APPLICATION of the NURSING PROCESS
Pulse rate and characteristics are assessment factors used to help determine cardiovascular health. Pulse abnormalities are defining characteristics for a variety of nursing diagnoses and are considered together with other assessment data. Changes in pulse rate are used for evaluation of the patient’s response to different types of interventions, such as ambulation, bathing, dressing, or exercising.
MEASURING RESPIRATIONS
Measuring the respirations is done each time a full set of vital signs is taken. A change in respiratory rate may indicate a change in a patient’s condition, but is always considered along with the other vital signs and assessment data. The respirations should be counted for 30 seconds and multiplied by 2. In someone who is known to be very ill or who has irregular respirations, count for a full minute (Skill 21-5).
Skill 21-5 Measuring Respirations
Respirations are measured each time vital signs are obtained. The depth and character of respirations, as well as the number of breaths per minute, should be noted. The most accurate measurement will be obtained when the patient is unaware that you are counting respirations.
Review and carry out the Standard Steps in Appendix 3.
3. ACTION Perform hand hygiene and tell the patient you are going to take the vital signs.
RATIONALE Reduces transfer of microorganisms and puts the patient at ease.
4. ACTION After taking the radial pulse with the wrist lying on the chest, continue holding the wrist while counting respirations or position your hand on the chest. Position the watch so that you can see both its dial and the rise and fall of the chest.
RATIONALE Looking like you are counting the pulse while watching the chest rise and fall helps distract the patient from his breathing. Alternately, having your hand on the patient’s chest allows for the feeling of the rise and fall of the chest so you can count the respirations.
5. ACTION Count the respirations, noting rate, depth, pattern, and sounds. Count for 30 seconds by the watch and multiply by 2 to get the rate for 1 minute. If respirations are irregular, count for a full minute.
RATIONALE Recall that a respiration includes both inspiration and expiration. Thirty seconds is sufficient for an accurate count if respirations are regular.
6. ACTION Jot down the measurement along with the pulse rate.
RATIONALE Prevents forgetting the count.
Many of the factors that affect the pulse rate also affect the respiratory rate because the heart and lungs are closely connected in providing oxygen to sustain life. Although the rate and depth of respirations are controlled by the respiratory center in the brain, they are easily influenced by emotions, pain, degree of activity, age, fever, drugs, and disease conditions. The respiratory center is sensitive to changes in the carbon dioxide level in the blood and, to a lesser degree, in the oxygen level. Individuals can voluntarily control the rate and depth of respirations somewhat, as may happen when patients are aware that their respirations are being counted.
The respiratory rates vary according to age. Table 21-4 shows the normal range. The ratio of respirations to heartbeats is fairly constant at approximately 1 respiration to 4 heartbeats. In addition, the rate of respirations increases during fever as the body attempts to remove excess heat. Increased levels of carbon dioxide or lower levels of oxygen in the blood cause an increase in the respiratory rate to restore the chemical balance and expel the carbon dioxide.
Table 21-4
| AGE GROUP | RESPIRATIONS PER MINUTE |
| Elderly | 16-20 |
| Healthy adult | 12-20 |
| Adolescent | 16-20 |
| Child (age 3 yr) | 20-30 |
| Infant (age 1 yr) | 20-40 |
| Newborn | 30-80 |
Head injury or any increased intracranial pressure will depress the respiratory center and result in shallow or slow breathing.
If an adult does not breathe at a minimal rate of 12 respirations per minute and in sufficient depth, some of the following symptoms of hypoxia may be noted as a result of low oxygen supply in the blood:
• Apprehension and restlessness
• Confusion, dizziness, and change in the level of consciousness
• Cyanosis (bluish discoloration) or skin color changes, particularly around the mouth and in the nail beds
RESPIRATORY PATTERNS
As respirations are being counted, observe for variations in the pattern of breathing (Figure 21-14). Eupnea (a normal, relaxed breathing pattern) is effortless, quite evenly paced, regular, and automatic. The inspiratory phase is a bit shorter than the expiratory phase. Changes from this normal pattern are described in a variety of ways.
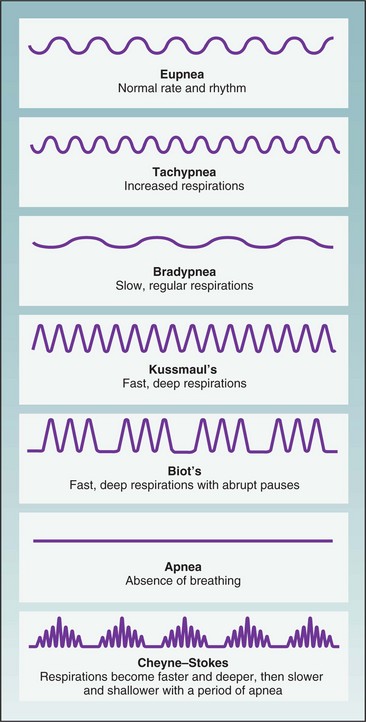
Dyspnea (difficult and labored breathing) is often accompanied by flared nostrils, anxious appearance, and statements such as “I can’t get enough air.” It is very important to know how much activity causes the dyspnea: Does it occur when walking down the hall, trying to eat a meal, or even when trying to talk?
Tachypnea (increased or rapid breathing) results from the presence of fever and a number of diseases. Breathing rate increases about four breaths for each 1° F or 0.5° C increase in temperature.
Bradypnea (slow and shallow breathing) results when a limited amount of air is exchanged and less oxygen is taken in. This type of breathing often leads to hypoxemia (decreased levels of oxygen in the blood). It is often seen in patients who are under medical sedation, who are recovering from anesthesia or abdominal surgery, or who are in a weak or debilitated condition.
Hyperventilation is a pattern of breathing in which there is an increase in the rate and the depth of breaths and carbon dioxide is expelled, causing the blood level of carbon dioxide to fall. The condition is seen after severe exertion, during high levels of anxiety or fear, and with fever and conditions such as diabetic acidosis.
Kussmaul’s respirations have an increased rate and depth with panting and long, grunting exhalation. Kussmaul’s respirations are seen in patients with diabetic acidosis and renal failure.
Biot’s respirations are shallow for two or three breaths with a period of variable apnea. These respirations occur in patients with increased intracranial pressure. Such changes from the normal respiratory pattern of breathing should be reported to the charge nurse or physician so that appropriate treatment can be carried out.
Cheyne-Stokes respirations consist of a pattern of dyspnea followed by a short period of apnea (absence of breathing). Respirations are faster and deeper, then slower, and are followed by a period of no breathing, with continuation of this cycle. It is seen in critically ill patients with brain conditions, in patients with heart or kidney failure, and in cases of drug overdose.
Some of the terms used to describe noisy respirations are
• Crackles: Abnormal, nonmusical sound heard on auscultation of the lungs during inspiration; also called rales. Sound like hair rubbed between the fingers next to the ear.
• Rhonchi: Continuous dry, rattling sounds heard on auscultation of the lungs caused by partial obstruction.
• Stertor: Snoring sound produced when patients are unable to cough up secretions from the trachea or bronchi.
• Stridor: Crowing sound on inspiration caused by obstruction of the upper air passages, as occurs in croup or laryngitis.
• Wheeze: Whistling sound of air forced past a partial obstruction, as found in asthma or emphysema.
Abnormal patterns of respiration are covered more fully in Chapter 28.
Assessment of the respiratory rate and pattern must be analyzed together with other data such as breath sounds and arterial oxygen saturation in order to determine a patient’s specific problem. Measurement of respirations may be performed to evaluate a patient’s response to activity.
MEASURING OXYGEN SATURATION OF THE BLOOD
Another method of monitoring function of the respiratory system is pulse oximetry (measurement of oxygen). With a pulse oximeter (machine that measures oxygen in the blood), changes in arterial oxygen saturation can be tracked. Oxygen saturation may be spot checked or continuously monitored (Figure 21-15). The device measures oxygen saturation by determining the percentage of hemoglobin that is bound with oxygen. A sensor or probe is attached to an area of the patient through which infrared and red light can reach the capillary bed. Oxyhemoglobin absorbs more infrared than red light. A microprocessor in the monitor receives the information from the sensor-probe, computes the saturation value, and displays it on the monitor screen. A finger or toe clip-on probe is most commonly used, but adhesive sensors can be applied to the nose or the forehead. A clip-on probe is available for use on an earlobe or an infant’s foot.
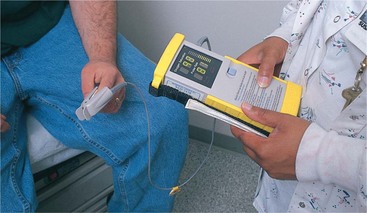
Many agencies are using a combination vital signs monitor and oximeter for scheduled vital sign measurements. The oxygen saturation is charted on the graphic sheet with the vital signs or on the electronic flow sheet in the computer. Further information about pulse oximetry can be found in Chapter 28.
MEASURING THE BLOOD PRESSURE
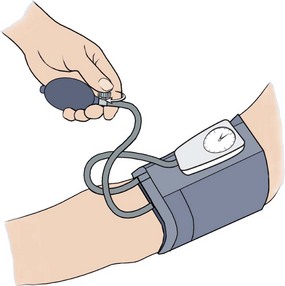
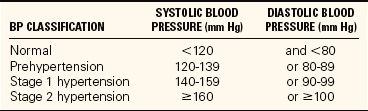
By measuring the blood pressure (BP), you obtain information about the effectiveness of the heart contractions, the adequacy of the blood volume in the system, and the presence of any obstruction or interference to flow through the blood vessels. Blood pressure is measured with the use of a sphygmomanometer and a stethoscope. The sphygmomanometer occludes the artery and then slowly allows blood flow through it. The stethoscope is used for auscultation (hearing) of the sounds made in the artery by the beats of the heart. The average blood pressure in a healthy young adult is 120/70 mm Hg: 120 is the systolic pressure, 70 is the diastolic pressure, and the difference between the two, or 40, is the pulse pressure. As a result of the many factors influencing it, the blood pressure is a dynamic force that can vary from minute to minute as the heart adjusts to demands and responses of the body and mind. Infants have very low blood pressure, and the blood pressure gradually but steadily increases with age. Normal blood pressure for any adult should be less than 120/80. The current guidelines of the National Heart, Lung, and Blood Institute, a division of the National Institutes of Health, indicate that the normal range for blood pressure should be much lower than previously thought (Table 21-5).
It is important to know the usual range of pressure of each patient and some of the factors that may be influencing it rather than to make judgments based on just one measurement (Table 21-6). Ask patients whether they have high or low pressure, or consult the chart for other readings that have been recorded. A reading of 110/60 may be normal for a 21-year-old man but low for a 70-year-old whose average pressure is 154/90. A noisy environment and crowded room conditions may cause a temporary elevation of blood pressure. Anxiety, fear, and stress elevate the blood pressure. Take a person’s blood pressure in a quiet room with a relaxed environment.
Table 21-6
Factors that Influence Blood Pressure
| FACTOR | INFLUENCE |
| Age | Newborns and infants have the lowest blood pressure. Blood pressure increases as age increases. It is highest in older adults because of a decrease in the elasticity of vessels, which causes an increase in resistance to blood flow. However, even in older adults a blood pressure above 140/90 mm Hg should not be considered normal. |
| Stress and emotions | Anxiety, pain, tension, worry, and stress raise blood pressure by stimulating the sympathetic nervous system, which causes vasoconstriction and a resulting increased heart rate. |
| Medication | Medications that lower blood pressure include narcotics, tranquilizers, hypnotics, diuretics, antihypertensives, and certain cardiac medications (particularly vasodilators). Medications that raise blood pressure include antihistamines, estrogen, and corticosteroids (glucocorticoids and mineralocorticoids). |
| Diurnal variation | Blood pressure is typically lowest in the early morning, with decreased activity, and highest in the afternoon or evening, with increased activity. |
| Sex | After puberty, males tend to have higher blood pressure than females. After menopause, women tend to have higher blood pressure than men of the same age. |
| Environment | A hot environment can lower blood pressure by causing vasodilation. A cold environment can raise it by causing vasoconstriction. |
| Exercise | Blood pressure increases with activity and exercise because the sympathetic nervous system responds to the body’s increased need for oxygen. |
| Body position | Blood pressure is lowest in the recumbent position. It is slightly higher in the standing position because of sympathetic nervous system stimulation. |
| Right vs. left arm | About one fourth of the population has a difference of 10 (±5) mm Hg between the right and left arms. |
| Arm vs. leg | There is a difference of 10–40 mm Hg in systolic blood pressure between measurements taken using the arm and measurements taken using the leg. |
| Vasodilation | Parasympathetic nervous system stimulation causes blood vessels to increase in lumen diameter, thus lowering blood pressure. This may happen in response to warm temperatures, fever, and relaxation, for example. |
| Vasoconstriction | Sympathetic nervous system stimulation causes blood vessels to decrease in lumen diameter, thus raising blood pressure. This may happen in response to cold temperatures, for example. |
| Head injury | Injuries to the head and increased intracranial pressure result in increased blood pressure. |
| Reduced blood volume | Blood pressure decreases if the circulatory system contains an inadequate volume of blood, as from low cardiac output, hemorrhage, or shock. |
| Increased blood volume | Too much fluid in the cardiovascular system increases blood pressure. |
From Harkreader, H., Hogan, M.A., & Thobaben, M. (2007). Fundamentals of Nursing: Caring and Clinical Judgment (3rd ed.). Philadelphia: Elsevier Saunders.
EQUIPMENT USED FOR MEASURING BLOOD PRESSURE
Although direct measurement of blood pressure with an arterial catheter is the best method, the sphygmomanometer (device used to indirectly measure blood pressure) with an occlusive cuff and the stethoscope are the most commonly used pieces of equipment for measuring blood pressure (Figure 21-16). Two types of manometers were traditionally used in clinical settings: the mercury gauge, when greater accuracy is needed, and the aneroid gauge, which is a smaller unit and easy to carry but less accurate. Many hospitals have manometers attached to the wall in each patient’s room. Mercury has been designated as a biohazard, and its use in medical equipment is being phased out. Although there is an effort to rid health care facilities of mercury- containing devices, many agencies and offices have not yet changed from mercury manometers because they are considered more accurate than the aneroid type. The aneroid type is prone to mechanical alterations that affect the accurate calibration of the device. Aneroid sphygmomanometers should be recalibrated every 6 to 12 months. Electronic vital signs monitors are replacing mercury manometers in hospitals.

FIGURE 21-16 Equipment for measuring blood pressure. Left, Aneroid sphygmomanometer. Right, Electronic sphygmomanometer. Front, Stethoscope.
An electronic sphygmomanometer takes the blood pressure almost automatically. The cuff is placed on the arm or wrist and pumped up. As the air is released, the systolic and diastolic pressures are displayed on a screen in the unit. This model does not require the use of a stethoscope for listening to pressure sounds, but it is much more expensive than the traditional manometer. The traditional manometer consists of a gauge for measuring the blood pressure; tubing running from the gauge to a cuff, which is wrapped around the arm or leg; and a control bulb that inflates and deflates the cuff. This sphygmomanometer is particularly useful for home monitoring.
The cuff must be the correct size to obtain an accurate blood pressure reading. A narrow cuff is used for small children and a wider cuff is needed for muscular or obese persons. Using the wrong size produces errors as great as 25 mm Hg. The proper width is 21% larger than the diameter of the arm, and the inflatable bladder should go around at least three fourths of the arm. A standard acoustic stethoscope with a “Y” tubing, soft ear tips, and diaphragm head is satisfactory for taking vital signs (Skill 21-6).
If the sounds are very faint, try using the other arm, or use a Doppler stethoscope to amplify the sounds so that accurate readings occur.
KOROTKOFF SOUNDS
While measuring blood pressure, certain sounds may be heard that relate to the effect of the blood pressure cuff on the arterial wall. These sounds, called Korotkoff sounds, were identified by a Russian surgeon and are numbered as follows:
Phase I: Tapping–systolic pressure indicated by faint, clear tapping sounds that gradually grow louder
Auscultatory gap: No sound–silence as cuff deflates for 30 to 40 mm Hg; common with hypertension
Phase II: Swishing–murmur or swishing sounds that increase as the cuff is deflated
Phase III: Knocking–louder knocking sound that occurs with each heartbeat
Phase IV: Muffling–a sudden change or muffling of the sound (indicates diastolic pressure in children and some adults)
Phase V: Silence–disappearance of sound (marks diastolic pressure in adults)
It is important to continue to listen until the cuff is deflated so that you do not mistake an auscultatory gap for the last Korotkoff sound. Follow the guidelines in Box 21-4 when measuring the blood pressure.
When the blood pressure cannot be determined by auscultation, the palpation method is used to estimate systolic pressure. Diastolic pressure cannot be measured this way. With the blood pressure cuff in place on the upper arm, palpate the radial artery. Inflate the blood pressure cuff 30 mm Hg above the point at which the radial pulse disappears. Release the valve and allow mercury to fall 2 mm Hg per second, noting the point on the manometer when the radial pulse is again felt.
HYPERTENSION
Pressure consistently elevated above the normal range is called hypertension. Hypertension is most often found in people living in urban areas, and in those under considerable emotional stress; it affects more men than women and is twice as prevalent in blacks as in whites. Obesity is another factor contributing to hypertension. Some people may have hypertension without any risk factors. Prolonged hypertension can cause permanent damage to the brain, the kidneys, the heart, and the retina of the eye. It is the cause of many cerebrovascular accidents (strokes).
A systolic pressure above 140 and a diastolic pressure above 90 are regarded as being outside the normal range (hypertension). Prehypertension is a sys
tolic pressure above 120 and a diastolic pressure above 80. Pressures consistently higher than these should be reported to the charge nurse or physician if the patient usually has normal pressure, as should low pressures that indicate possible circulatory collapse or shock (condition of circulatory failure) (Health Promotion Points 21-3).
The Healthy People 2010 goal of increasing quality and years of healthy life has an objective concerning elevated blood pressure. Objective 12.11 is directed at greater control of hypertension in the American population (Health Promotion Points 21-4).
HYPOTENSION
Low blood pressure is called hypotension. Some people have a blood pressure that is normally below 90/60 mm Hg, but they are healthy with no other symptoms. However, hypotension with symptoms of shock or circulatory collapse is a dangerous condition that can rapidly progress to death unless treated. Shock is caused by hemorrhage, vomiting, diarrhea, burns, and myocardial infarction, among other conditions.
Signs and symptoms of shock are a decrease in blood pressure, an increase in pulse rate, cold and clammy skin, dizziness, blurred vision, and apprehension. Report such signs and symptoms to the charge nurse or physician without delay, and assist in treating the shock. See Chapter 37 for information about shock and its treatment.
Some patients experience postural or orthostatic hypotension (drop in blood pressure occurring with change from supine to standing or from sitting to standing position) from drug therapy, a neurologic problem, or dehydration. Blood pressure should be taken in both the standing and sitting positions for these patients. A drop of 15 to 20 mm Hg from the patient’s normal baseline pressure combined with symptoms of faintness, blurred vision, dizziness, or syncope signifies orthostatic hypotension. It is due to a failure of vasomotor compensatory mechanisms in response to position changes or to baroreceptor reflex impairment (Box 21-5).
APPLICATION of the NURSING PROCESS
Blood pressure measurements are considered along with the pulse rate in evaluating the general health of the cardiovascular system. Abnormalities such as hypotension, hypertension, and narrow or wide pulse pressure are defining characteristics for various nursing diagnoses and are considered along with other assessment data when choosing an appropriate diagnosis. Blood pressure is often assessed to determine how the patient is responding to a procedure or to drug treatment. This measurement is used to evaluate the patient’s response to medication for hypertension. It is an important measurement in evaluating cardiovascular disease and in monitoring for shock.
PAIN, THE FIFTH VITAL SIGN
New standards of The Joint Commission state that pain is to be considered the “fifth” vital sign. The Joint Commission (2000) has recognized that “all patients have the right to pain relief.” For this reason, pain is assessed and recorded along with the other vital signs. The assessment must include pain location, intensity, character, frequency, and duration. A version of a standardized pain scale is used for the assessment. The assessment findings are often charted along with the vital signs on the graphic record. Follow-up on the assessment findings and treatment of pain is done according to agency policy. Chapter 31 presents further information on the assessment and treatment of pain.
AUTOMATED VITAL SIGN MONITORS
Lightweight, portable, automated units are available that measure blood pressure and heart rate simultaneously (Figure 21-17). Measurements can be obtained in 21 to 45 seconds. It is also possible to program most units to measure these vital signs at specified intervals. The vital signs are displayed digitally and may be retrieved using the unit’s stored data capability. BioSign machines, newly introduced in the United States, can measure heart rate, respiration, blood oxygen level, temperature, and blood pressure and compare their relative status.
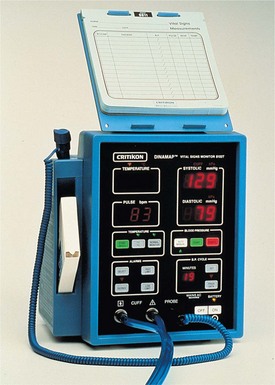
CHARTING VITAL SIGNS
The vital signs should be written down as soon as the measurements are obtained. It is easy to make errors or to forget the readings, especially when measuring vital signs for more than one patient. If computer entry is used, enter the vital signs before going to the next patient. Some nursing units record the vital signs on a jot board or worksheet used as a quick reference by nurses and physicians. Then the vital signs are recorded on the patient’s chart by the unit secretary or the nurse. In addition, any unusual or abnormal findings may be written in the nurse’s notes because of their importance to the patient’s condition. The method for charting vital signs on a graphic record is shown in Figure 21-18.

RECORDING TEMPERATURE MEASUREMENTS
The bottom half of the graphic sheet in Figure 21-18 is for recording the temperature. Note that the range of degrees for temperature is 96° F to 105° F. Guidelines for charting on the graphic record are as follows:
• Record in even numbers. The graphic sheet is scored so that each line equals two tenths of a degree. Do not use odd numbers unless an electronic thermometer was used with measurements accurate to one tenth of a degree.
• Place a dot on the center of the appropriate line; the dot should be at the intersection of the appropriate hour and temperature reading.
• Connect the dots with a straight, accurate line.
• If the temperature is rectal, write ® above the dot.
• If the temperature is axillary, write ® above the dot.
• With computerized charting, the graphing is done automatically when the numbers are entered.
RECORDING PULSE MEASUREMENTS
The pulse is charted on the same page as the temperature in a table or on a graph. On a graph, each line between the bold lines represents 10 pulse beats.
Record the pulse on a graph in even numbers, such as 80, 86, and 102. Connect the dots with a straight, accurate line when a graph is used.
RECORDING RESPIRATION MEASUREMENTS
The lower portion of a graphic sheet sometimes may be used for recording the respiratory rate on the sheet or in a table. When the respiratory rate to be recorded on a graph is one of the numbers indicated on the sheet (such as 20 or 40), place the dot in the center of the appropriate line. Otherwise, the dot is centered at the correct vertical distance between two lines.
Record on a graph in even numbers, such as 22 and 46. Connect the dots with a straight, accurate line.
RECORDING BLOOD PRESSURE MEASUREMENTS
Many graphic sheets now contain a section labeled “blood pressure” and provide space for recording the readings. Write the systolic pressure above the slanted line and the diastolic pressure below the line.
Evaluating Vital Sign Trends
When vital signs are outside the expected norms, reflect a gradual trend, or have changed significantly compared with the previous vital signs, nursing ac tions may be indicated. The nursing actions may be independent of the physician’s orders or dependent and based on a written medical order. Because a change in vital signs is an early indication of physiologic change in the patient, the physician should be notified. After notification of the physician and implementation of independent or dependent nursing actions, the effectiveness of the actions should be monitored by measuring the vital signs repeatedly until they return to acceptable limits.
When vital signs merit notification of the physician, physician’s assistant, or nurse practitioner, or implementation of nursing actions, a narrative entry should be made in the patient’s chart. The narrative entry should include the time at which the vital signs were measured, the nurse’s subjective and objective observations, the dependent and independent actions implemented, and the result of the actions. Contact with the physician or office personnel should be documented, including the name of the person to whom the message was given.
Many hospitals use a separate frequent vital sign sheet for patients whose condition requires repeated vital sign measurement. Frequent measuring of vital signs may be ordered for a patient who has had an invasive procedure, who is taking specific cardiac medications, or whose condition is unstable.
NCLEX-PN® EXAMINATION–STYLE REVIEW QUESTIONS
Choose the best answer(s) for each question.
1. The nursing assistant reports to the nurse that the temperature of a patient who is first-day postoperative is 100.4° F. Which of the following actions should the nurse take first?
1. Notify the surgeon of the temperature elevation.
2. Check the preoperative temperature reading.
3. Tell the nursing assistant to take the temperature again in 2 hours.
4. Prepare to administer an acetaminophen PRN- ordered suppository.
2. Temperature greater than 105.8° F or 41° C should be treated promptly to reduce the fever because of:
1. chemical reactions to oxygen in the bloodstream.
2. potential damage to the cells of the central nervous system.
3. heavy perspiration, reducing the amount of urine produced.
3. A newly admitted patient has a respiratory rate of 16 per minute. Which action should the nurse take?
1. Recount the respirations in 5 minutes.
2. Note the respiratory rate on the chart.
4. The person who makes harsh high sounds upon inspiration has what kind of respiratory condition?
1. count the respiratory rate.
2. determine the amount of oxygen taken into the lungs.
6. A patient who has a blood pressure decrease from supine to standing of 20 mm Hg or more systolic, or 10 mm Hg or more diastolic, has_____________. (Fill in the blank.)
7. A patient whose blood pressure is consistently 136/80 is classified as having:
8. Symptoms of shock that may be seen with hypotension are: (Select all that apply.)
9. When assigning vital sign measurement to the nursing assistant, the nurse says to take the apical pulse for the full 60 seconds. Which patient’s condition would most warrant this instruction?
1. A patient who is bradycardic
2. A patient whose usual heart rate is 76
10. Factors that may cause an inaccurate blood pressure reading are: (Select all that apply.)
CRITICAL THINKING ACTIVITIES ? Read each clinical scenario and discuss the questions with your classmates.
A mother brings her toddler into the clinic because he has been pulling at his ear and seems feverish. The child cried most of the night and is quite upset now.