Assisting with Respiration and Oxygen Delivery
Upon completing this chapter, you should be able to:
1 Explain how the respiratory system functions.
2 Name three causes of hypoxia.
3 Identify procedures to be followed in the event of respiratory or cardiac arrest.
4 Describe the various methods used for oxygen delivery.
5 List safety precautions to be observed when patients are receiving oxygen therapy.
1 Prepare to assist patients to clear the airway via coughing, postural drainage, suctioning, abdominal thrusts (Heimlich maneuver), and inhalation therapy.
2 Regulate oxygen flow and correctly apply an oxygen delivery device.
3 Prepare to provide care for the tracheostomy patient.
4 Prepare to care for the patient who has a chest tube and drainage system.
anoxia ( , p. 507)
apnea (p. 526)
atelectasis ( , p. 529)
cannula ( , p. 518)
cyanosis (p. 510)
dyspnea (p. 509)
endotracheal ( , p. 526)
expectorate ( , p. 518)
expiration (p. 508)
humidifier ( , p. 519)
hypercapnia ( , p. 509)
hypoxemia ( , p. 507)
hypoxia (p. 507)
inspiration (p. 508)
nebulizer ( , p. 518)
obturator ( , p. 532)
retractions (p. 510)
stridor (p. 510)
tachypnea (p. 510)
tenacious ( , p. 524)
tracheostomy ( , p. 526)
Maintaining an open airway and providing adequate ventilation for every patient are primary nursing responsibilities. Oxygen is needed by all cells of the body to metabolize nutrients and produce the energy needed to function. When anoxia (condition of being without oxygen) occurs, cell metabolism slows down, and some cells begin to die. Through the act of breathing, we take in air that contains about 21% oxygen. An exchange of gases takes place in the lungs as oxygen is absorbed into the bloodstream and carbon dioxide, a waste product of cell metabolism, is released in the exhaled air. The most common cause of respiratory insufficiency is obstruction of the airway. Fortunately, obstruction is often easily reversed through the use of positioning and suctioning techniques.
Nurses must identify patients with breathing problems, take appropriate nursing actions to help relieve airway obstructions, and initiate or maintain oxygen therapy competently when it is used in the patient’s treatment.
HYPOXEMIA
The foremost problem of the respiratory system is the disturbance of the levels of the gases oxygen and carbon dioxide in the bloodstream. This disturbance causes respiratory insufficiency, the inability of the body to meet its oxygen needs and remove excess amounts of carbon dioxide. The decreased amount of oxygen in the bloodstream is called hypoxemia and leads to a reduced amount of oxygen available to meet cellular needs, or the condition of hypoxia. Increased levels ofcarbon dioxide are described as hypercapnia (too much carbon dioxide in the blood).
OVERVIEW OF STRUCTURE AND FUNCTION OF THE RESPIRATORY SYSTEM
Which structures are involved in respiration?
 The nose, mouth, pharynx, larynx, and trachea comprise the upper respiratory system (Figure 28-1).
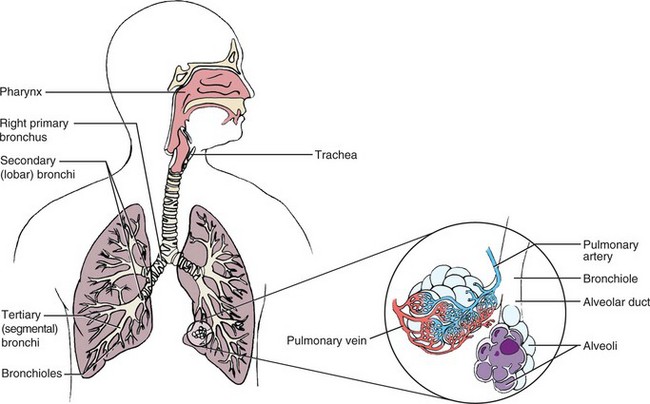
The trachea divides into the right and left main bronchi, which lead to the right and left lung.
The right lung has three lobes, and the left lung has two lobes.
Within each lung, the bronchi divide into smaller and smaller branches and then divide into bronchioles attaching to the alveoli.
The alveoli (air sacs) are the terminal respiratory units of the lung and are lined with mucous membrane. There are between 300 million and 1 billion alveoli in the lungs.
The diaphragm beneath the lungs moves, causing enlargement of the thoracic cavity. Because of negative pressure within the cavity, air flows in and inspiration (movement of air into the lungs) occurs. When the diaphragm muscle relaxes, the thoracic cavity space is decreased and air is forced out of the lungs in expiration (movement of air out of the lungs).
The chest muscles combine with diaphragm action to move air in and out of the lungs.
The respiratory muscles depend on nerve impulses from the spinal cord.
The thoracic cage allows the respiratory muscles to function correctly.
What are the functions of the respiratory structures?
The upper respiratory pathways carry air to and from the lungs.
Air is warmed and humidified as it passes through the upper airway passages.
The bronchi channel air to and from the lungs. The mucous membrane lining the bronchial tree contains tiny hairlike projections, or cilia, that trap and help remove small foreign particles that are inhaled.
The mucous membrane secretes mucus that assists cilia in cleansing foreign substances from the respiratory tract.
The alveoli contain macrophages that quickly phagocytize inhaled bacteria and other foreign particles.
The mucus and cilia propel the foreign substances toward the entrance of the respiratory tract; the cough reflex works to expel the secretions.
The central nervous system controls respiration.
Chemoreceptors located in the aorta and carotid arteries sense changes in oxygen or carbon dioxide and send signals to the brainstem.
The signals of changing levels of hydrogen ions in the blood (indicated by pH), carbon dioxide, and oxygen trigger the respiratory center in the medulla to send signals through the spinal cord to the nerves that control the respiratory muscles, causing an increased or decreased rate of respiration.
Chemoreceptors send signals in response to changes in arterial blood gases.
During normal breathing, about 500 mL of air moves in and out of the lungs with each breath.
Oxygen diffuses across the alveolar membrane into the blood; carbon dioxide diffuses across the alveolar membrane from the blood to the alveoli.
The blood transports oxygen to the cells and carries carbon dioxide from the cells to the lungs. Most of the oxygen is transported attached to the hemoglobin molecule in the red blood cells. The largest portion of carbon dioxide is transported to the lungs in the plasma portion of the blood.
What changes occur with aging that affect respiration?
Alterations in connective tissue after age 70 cause decreased elasticity of the thorax and respiratory tissues.
Total body water decreases 50% after age 70 and consequently respiratory membranes are drier, leading to thickened mucus.
There is some degree of impairment of the cilia in the airways, decreasing their efficiency in removing mucus and foreign material.
There is a loss of elastic recoil during expiration, and respiratory muscles must be used to complete expiration.
Tissue changes cause thickening of the alveolar membrane, decreasing the ease of gas diffusion across the membrane. Oxygen saturation decreases, with partial pressure of oxygen (PO2) dropping to 75 to 80 mm Hg from the usual 80 to 100 mm Hg.
The elderly patient therefore has less respiratory reserve, making it more difficult for the body to meet demands for increased oxygenation.
Hypoxemia poses a dangerous threat to patients. The onset may be rapid and obvious or it may be insidious and gradual, with no clear-cut symptoms of dyspnea (difficulty breathing) or shortness of breath. Prompt recognition of the problem and swift action are needed when airways become obstructed. Box 28-1 lists common causes of hypoxia. Persistent hypoxic states require the combined efforts of a team consisting of a physician, respiratory therapist, laboratory technologist, and nurse.
SYMPTOMS OF HYPOXIA
The symptoms of hypoxia are those resulting from decreased oxygenation of various organs. The tissues of the body differ in their ability to survive by means of anaerobic metabolism’without oxygen. Brain cells, however, cannot withstand deprivation of oxygen and very quickly show the effects of hypoxia. The areas of memory, judgment, and intellectual ability are most readily affected. The heart and the retina of the eye are also highly vulnerable to reductions in oxygen. Other organs are also affected, such as the kidney, which retains more sodium when hypoxic.
Because the brain, retina, and heart are most susceptible to slight changes in oxygenation, the earliest signs of hypoxia involve these organs. Patients just do not seem right even though the vital signs are within normal limits. There may be signs of confusion. Patients who have difficulty breathing often become very anxious, and their anxiety increases the respiratory rate, although the higher rate may not increase the oxygenation. Tachypnea or stridor may be present. Dysrhythmias develop as the amount of oxygen supplied to the heart muscle is reduced. Patients with labored breathing, such as seen in obstructive pulmonary disease, use 30% to 50% of their energy just to breathe. Cyanosis (blue tinge to skin or mucous membrane) and retractions (muscles move inward on inspiration) of accessory muscles of the neck, chest, and abdomen are late signs of respiratory insufficiency (Table 28-1 and Concept Map 28-1). Hypoxia depresses body functions and disturbs the acid–base balance of the body. Less oxygen in the bloodstream leads to respiratory acidosis (see Chapter 25). Hypoxia is treated by administering oxygen and correcting the cause. Blood gases are a valuable tool for determining the degree and possible cause of hypoxia.


Patients suffering from hypoxia are highly susceptible to respiratory infection. Inadequate inflation of the lungs results in pooling of secretions and provides a medium for growth of microorganisms. It is essential that the respiratory patient be protected from hospital-acquired infections. Personnel with a respiratory infection should be kept out of the patient’s environment.
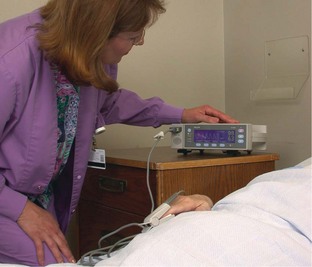
PULSE OXIMETRY
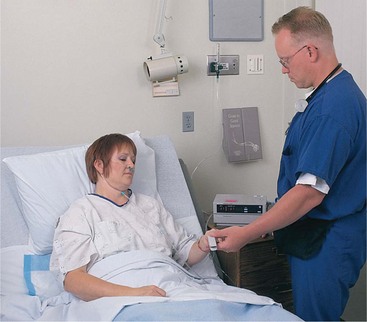
Pulse oximetry is used for any patient thought to be at risk of hypoxia. With the pulse oximeter, changes in arterial oxygen saturation can be continuously tracked. Because pulse oximetry is a form of continuous monitoring, in some ways it is more valuable than arterial blood gases for monitoring hypoxemia. The device measures oxygen saturation by determining the percentage of hemoglobin that is bound with oxygen. A sensor or probe is attached to an appendage of the patient through which infrared and red light can reach the capillary vascular bed (Skill 28-1, Figure 28-2). Oxyhemoglobin absorbs more infrared than red light. A microprocessor in the monitor receives the information from the sensor/probe, computes the saturation value, and displays it on the monitor screen.
Skill 28-1 Using a Pulse Oximeter
Pulse oximetry provides the pulse oxygen saturation level (SpO2), which is a reliable measure of oxygen saturation of the blood. It is a noninvasive measurement of the amount of oxygen carried by hemoglobin. In this manner, intermittent or continuous monitoring of oxygen saturation can be obtained. This is a painless procedure that allows the patient’s response to treatment for hypoxia to be immediately evaluated. The procedure may not be accurate if the patient has had recent tests using intravenous dye or is jaundiced. The oximeter sensor contains both red and infrared light-emitting diodes (LEDs) and a photodetector. The photodetector registers light passing through the vascular bed, and the microprocessor determines oxygen saturation from the data received. It is most accurate when there is no direct sunlight or fluorescent light on the patient. The normal SpO2 is greater than 90%. The sensor should be placed on a site that is free of moisture and has good local circulation.
Review and carry out the Standard Steps in Appendix 3.
3. ACTION Remove dark nail polish or artificial nail if using a fingertip sensor.
RATIONALE Dark nail polish or artificial nails distort readings.
4. ACTION Attach the correct sensor for the site flush to the skin and secure it.
RATIONALE Different sensor probes are used for the fingertip, toe, or earlobe. Probe must be in contact with the skin to produce accurate readings.
5. ACTION Turn on machine and set alarms to predetermined saturation levels if monitoring is to be continuous. Tell patient alarm will sound if probe falls off or is moved. Correlate oximeter pulse rate with patient’s radial pulse.
RATIONALE Alarm will sound if saturation falls below set level or if probe is loosened or dislodged. Patient will know what to expect.
6. ACTION Read oxygen saturation level on screen and record it.
RATIONALE Provides baseline data for beginning of monitoring; 10 seconds to 2 minutes are required for stabilization of unit.
7. ACTION Note and record the oximeter readings every hour.
RATIONALE Normal SpO2 saturation is 90% to 100%. When levels fall below 90%, action should be initiated immediately because the patient is on the brink of hypoxia, since as PaO2 falls, a more rapid decrease occurs in oxygen saturation of the blood due to the oxyhemoglobin dissociation curve.
8. ACTION Rotate site of clip-on probes every 4 hours and disposable probes at least every 24 hours.
RATIONALE Skin breakdown can occur with prolonged use of a probe. Apply skin cream to previously used area if skin dryness occurs.
9. ACTION Adjust oxygen flow according to readings and physician’s orders.
RATIONALE Oxygen flow rate may be increased or decreased per physician’s orders depending on the SpO2 level.
10. ACTION Check the oximeter’s calibration per manufacturer’s directions at least once a day.
RATIONALE Ensures that saturation readings are accurate.
11. ACTION When the order for pulse oximetry is discontinued, take a final reading, remove the probe, disconnect the machine, and clean the sensor site and the equipment.
RATIONALE Prepares equipment for next use.
12. ACTION Record time of discontinuation of procedure and the final oximetry reading.
Adhesive sensors can be applied to the nose or the forehead. Clip-on probes are used on the earlobe, fingertip, toe, or infant’s foot. Adhesive sensors are generally disposable, whereas clip-on probes may be reusable.
AIRWAY OBSTRUCTION AND RESPIRATORY ARREST
Sometimes the airway becomes obstructed with a foreign object or food that goes down the throat the wrong way. If a person seems to be choking and cannot breathe, there is a set pattern of responses you should make. It is hoped that the person will exhibit the universal signal for choking, signaling for help (Figure 28-3). In this event you should perform abdominal thrusts (Heimlich maneuver) (Skill 28-2). The steps are the same for adults and children older than 1 year of age, but different for infants. For an infant, the ability to cry is the best sign that the airway is unobstructed. In the unconscious person, the most common cause of airway obstruction is the tongue.
Skill 28-2 Administering Abdominal Thrusts (Heimlich Maneuver)
Abdominal thrusts below the diaphragm, also called the Heimlich maneuver, is administered to either a conscious or an unconscious victim with airway obstruction. The purpose of the maneuver is to dislodge whatever is obstructing the airway and reestablish normal respiration.
1. ACTION Ask person if she can speak.
RATIONALE Establishes if person can get air into and out of the lungs.
2. ACTION If unable to talk or coughing is proving ineffective, position herself to deliver abdominal thrusts.
RATIONALE Person needs assistance to dislodge obstruction.
3. ACTION Stand behind the person and place arms around the person’s waist.
RATIONALE Places hands at the correct height to deliver the thrusts.
4. ACTION Make a fist with one hand and place the other hand over the fist.
RATIONALE Prepares the hands to deliver a solid thrust.
5. ACTION Place the hands halfway between the xiphoid process and the umbilicus with the thumb of the fist inward.
RATIONALE Locates correct position for thrust delivery.

6. ACTION Using an upward rotating motion of the fist, forcefully thrust the hands into the abdomen at an upward angle.
RATIONALE Creates an artificial cough, making the diaphragm move and forcing air out of the lungs.
7. ACTION Repeat the thrusts until the foreign body is expelled or the person becomes unconscious.
RATIONALE The person cannot get air into the lungs until the obstruction is removed.
8. ACTION Call for help and/or activate emergency medical system (EMS) and slide the victim to the floor and place on back.
RATIONALE Positions victim for airway opening maneuver and finger sweeps.
9. ACTION Tilt the victim’s head back, grasp tongue and lower jaw between thumb and forefinger, and lift the jaw. If some foreign matter can be seen, use the index finger of the other hand to perform a finger sweep with a hook motion, being careful not to force the object farther down the throat.
RATIONALE Allows rescuer to see into the mouth and pulls tongue away from back of throat.
10. ACTION Open airway and attempt to ventilate; if unsuccessful, reposition head and try again.
RATIONALE Airway must be open for air to enter the lungs. Repositioning will often open the airway.
11. ACTION If ventilation is not successful, kneel straddling the victim’s thighs and facing the head.
RATIONALE Positions your body to deliver abdominal thrusts.
12. ACTION Locate the xiphoid process and the umbilicus, and place the heel of one hand over the back of the other slightly above the umbilicus.
RATIONALE Positions hands for effective thrusts. Ensures you are not thrusting over the xiphoid.
13. ACTION Press heel of hand toward head with five quick abdominal thrusts or until foreign object dislodges.
RATIONALE Causes artificial cough, forcing air from the lungs, which may dislodge an obstruction.
14. ACTION Use head tilt–jaw lift (or jaw-/chin thrust if patient is unconscious), to open mouth and, if a foreign body can be seen, sweep with a curved finger down inside of the cheek toward base of tongue, sweeping the debris out the other side of the mouth.
RATIONALE Removes any dislodged object.
15. ACTION Open the airway and attempt to ventilate by pinching off the nose and placing the mouth over the patient’s mouth.
RATIONALE If airway is open, breaths will go into victim’s lungs. If airway is still obstructed, attempt to ventilate will be unsuccessful.
16. ACTION If ventilation is not successful, repeat steps 12 through 14. Repeat sequence until foreign body is dislodged. If person resumes breathing, turn to side with arms in front of the body.
RATIONALE Person cannot breathe if obstruction is present. Side-lying recovery position aids continued respiration and prevents aspiration if person vomits.
17. ACTION Place the infant face down straddling your arm, keeping the head lower than the trunk. Place your hand under the chest and around the jaw for support.
RATIONALE Positions the infant for effective back blows; position assists object to move up into or out of mouth.
18. ACTION Deliver five blows between the shoulder blades.
RATIONALE Force of the blows should dislodge foreign body.
19. ACTION Sandwich the infant between your arms and turn her over. With the head down, deliver five chest thrusts using two fingers over the lower half of the sternum.
RATIONALE Helps dislodge object.
20. ACTION Repeat steps 17 through 19 until object is dislodged.
21. ACTION Turn the infant over, place on your thigh or hard surface, and open the airway. Perform tongue-jaw lift. If you can see the object, carefully perform a finger sweep to remove it.
RATIONALE Position allows visualization of object in the mouth; finger sweep removes object.
22. ACTION Open the airway and attempt to ventilate with your mouth over the infant’s mouth and nose.
RATIONALE If the airway is unobstructed, the chest will rise.
23. ACTION If the chest does not rise, reposition the head and attempt to ventilate again.
RATIONALE Airway is obstructed; repositioning may open it.
24. ACTION If unable to ventilate, reposition the infant straddling your arm and repeat the back blows and chest thrust sequences.
RATIONALE No air can reach the lungs if the airway is obstructed.
25. ACTION Perform tongue-jaw lift and, if you can see object, finger sweep it out.
RATIONALE Removes the obstructing object.
26. ACTION If unable to see anything, repeat back blows and chest thrust sequences. Activate EMS if the obstruction is not relieved within 1 minute.
RATIONALE Repeating sequences will dislodge object. EMS activation will bring help.

If the airway is obstructed for an extended period, the heart may stop due to hypoxia. Sometimes the obstruction may be cleared, but the victim has no pulse. In this instance, you must start cardiopulmonary resuscitation (Skill 28-3). Current guidelines and variations in the adult CPR procedure for infants and children for health care workers are listed in Table 28-2 on p. 517. New guidelines for public bystanders state that giving 30 chest compressions’instead of 15–for every two rescue breaths is adequate. Fast, hard chest compressions can be used rather than being combined with rescue breathing if the bystander is reluctant to give mouth-to-mouth breaths.
Skill 28-3 Cardiopulmonary Resuscitation
Cardiopulmonary resuscitation (CPR) must be started whenever someone is found in respiratory or cardiac arrest, meaning without breathing or without a heartbeat. It is vitally important to call for help while beginning to assess the victim. The following method is appropriate for adults. See Table 28-2 for differences for the child or infant.
1. ACTION Shake victim and shout name or “Are you OK?”
RATIONALE Arouses victim if she is not unconscious.
2. ACTION Call for help: activate the emergency medical system.
RATIONALE Emergency assistance and supplies for advanced life support should arrive within minutes.
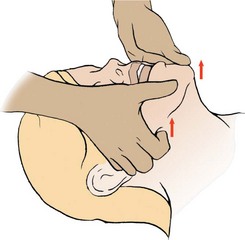
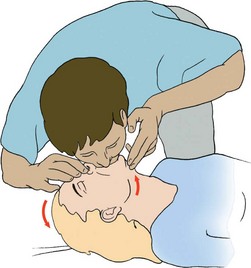
3. ACTION Place the victim supine on a firm surface, kneel beside the person, and open the airway by placing the heel of one hand on the forehead and two fingers of your other hand on the bony prominence of the chin; lift the chin to open the airway.
RATIONALE Opens airway, allowing airflow to occur if victim is breathing.
4. ACTION Look, listen, and feel for air movement by turning your face toward the victim’s chest and your ear and cheek toward the victim’s mouth.
RATIONALE Allows you to observe the chest for rise and fall of respiration, feel airflow on your cheek from the mouth, and hear the sound of airflow with your ear.
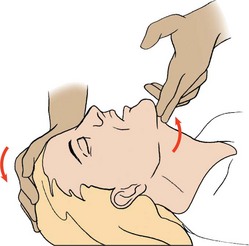
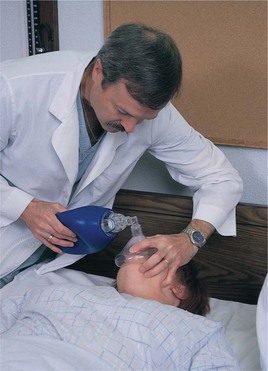
5. ACTION If mask is available, place it over the victim’s nose and mouth with the bridge of the nose as a guide. If no mask is available, maintain the head tilt and seal the nose with your fingers. Take a deep breath and, forming a seal around the victim’s mouth with your own, give two 1-second breaths that make the chest rise. If the first breath does not go in, the airway may have become obstructed; reposition with head tilt–chin lift and try to deliver the breaths again, watching to see that the chest rises and falls. If the airway is obstructed, perform the Heimlich maneuver.
RATIONALE A rescue breathing mask protects the rescuer from the victim’s secretions. Slow, long breaths help prevent air from entering the stomach. Rising and falling of the chest indicates that the airway is unobstructed. If the airway becomes obstructed, air will not enter. The Heimlich maneuver assists in dislodging an obstruction.
6. ACTION Locate the victim’s larynx with two fingers and then slide them slightly laterally with gentle pressure to locate the carotid pulse and check it for 5 seconds.
RATIONALE Positions the fingers over the carotid artery.
7. ACTION If the pulse is present but the patient is not breathing, continue rescue breathing at a rate of 12 breaths per minute (1 every 5 seconds). If there is no pulse or other signs of circulation (i.e., movement of the victim), begin chest compressions.
RATIONALE Both respiration and cardiac pumping are essential to move oxygenated blood around the body.
8. ACTION Find the xiphoid process and place two fingers on the sternum above it. Place the heel of the hand closest to the victim’s head next to the two fingers. Place the heel of the other hand on top of the first hand, keeping the fingers off of the chest.
RATIONALE Positions hands for effective chest compressions and prevents damage to the liver.
9. ACTION With your body aligned directly over the hands, depress 1½ to 2 inches, with equal time for compression and release. Give 15 compressions at a rate of 100 per minute (2 rescuers). For a lone rescuer, use a series of 30 compressions to 2 breaths.

RATIONALE Pumps blood out of the heart at a rate sufficient to provide adequate oxygenation to maintain tissue life.
10. ACTION Stop compressions, perform head tilt–chin lift, and give two slow 2-second breaths; begin another cycle of compression.
RATIONALE Rescue breathing opens airway and provides oxygen. Compressions circulate oxygenated blood.
11. ACTION Check the carotid pulse for a spontaneous heartbeat every minute (every four cycles).
RATIONALE Spontaneous pulse indicates that chest compressions may be halted.
12. ACTION If the pulse is present but victim is not breathing, stop compressions but continue the breathing for the victim.
RATIONALE Circulation of blood does little good if it does not carry oxygen.
 When a second trained rescuer is present, and the patient is intubated, perform two-rescuer CPR. The compression-to-ventilation ratio is 5:1, with the second person doing the breathing. The second person is positioned opposite the first rescuer. When CPR is stopped at the end of a cycle and the first rescuer is checking the pulse for 5 seconds, the second person switches and positions hands for the chest compressions. If the first rescuer says, “No pulse; continue CPR,” wait for a breath to be given by the first rescuer and then begin compressions. One breath is given for every five compressions. When you tire (after a minimum of 10 cycles), call out, “Switch on five,” and count with your compressions, “one-and-two-and-three-and-four-and-switch,” as you give the five compressions and then move to the patient’s head; check the carotid pulse, indicate the result, and continue CPR by giving a breath.
If a pulse is present, check breathing. If breathing is present, place the patient in side-lying recovery position and continue to monitor.
If pulse is present but breathing is absent, continue rescue breathing at 12 per minute.
If automated external defibrillator (AED) is available, use it as soon as possible if no effective heart rhythm is present.
Table 28-2
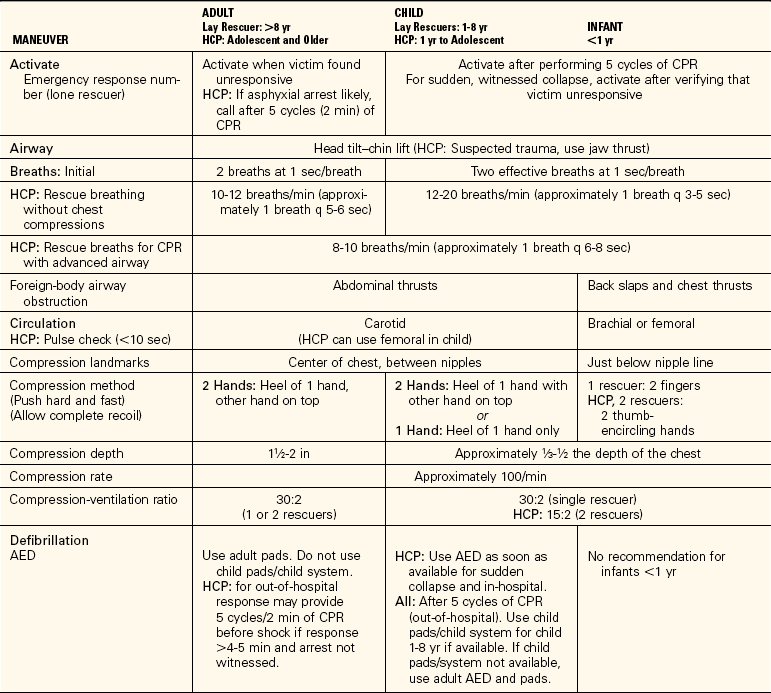
For the lay rescuer, an adult is any person older than 8 years, a child is between 1 and 8 years old, and an infant is younger than 1 year. For the health care provider, an adult is an adolescent or older, a child is between 1 year and adolescence, and an infant is younger than 1 year.
From American Heart Association. (2006). Highlights of the 2005 American Heart Association Guidelines for Cardiopulmonary Resuscitation and Emergency Cardiovascular Care. Currents in Emergency Cardiovascular Care, 16 (4), 15. Copyright © American Heart Association. Reprinted with permission. Key: AED, Automated external defibrillator; CPR, cardiopulmonary resuscitation; HCP, health care professional.
CLEARING RESPIRATORY SECRETIONS
Mucus and secretions of the respiratory tract are typical causes of obstruction of the free passage of air. The simplest method of clearing the air passages is to cough effectively. Deep breathing and coughing are two standard measures used to clear secretions and prevent hypoxia. Deep breathing increases oxygenation, opens alveoli, and may precipitate coughing. Many patients with lung disease or the inability to forcibly expel a volume of air need to be taught how to cough effectively (Patient Teaching 28-1, p. 518). They must learn to make the most of their air volume to remove the obstructing materials. Ineffective coughing spasms may produce additional hypoxia, lead to the rupture of the alveoli, or even precipitate the collapse of air passages. Although forceful exhalation can be used with patients who are lying down, it is more effective for patients in the sitting position. For forceful exhalation coughing, the patient takes two deep breaths and then inhales deeply again. That breath is rapidly and forcibly exhaled as quickly as possible with the mouth open. This moves secretions up the bronchial tree. Repeated forceful exhalation can bring the secretions up to a point where they can be more easily coughed up (Patient Teaching 28-2).
POSTURAL DRAINAGE
Although the respiratory therapist usually is responsible for this procedure in the inpatient setting, in community and home settings the nurse must teach patients the procedure. Different positions are used to drain different segments of the lungs so that secretions can be cleared (Figure 28-4). As specific segments of the lung are drained into the bronchi, the patient is able to cough more effectively and expectorate (cough up and spit out) secretions. The lungs are auscultated before and after the procedure. Generally, the patient should assume each position for 5 to 15 minutes two to four times a day as tolerated. When preparing for postural drainage, a nebulizer (a device that dispenses liquid in a fine spray) with bronchodilator or liquefying drugs may be used as inhalation therapy to thin out thick secretions and open the bronchial tree by relaxing spasm. Best results occur when the procedure is carried out in the morning and 45 to 60 minutes before a meal.
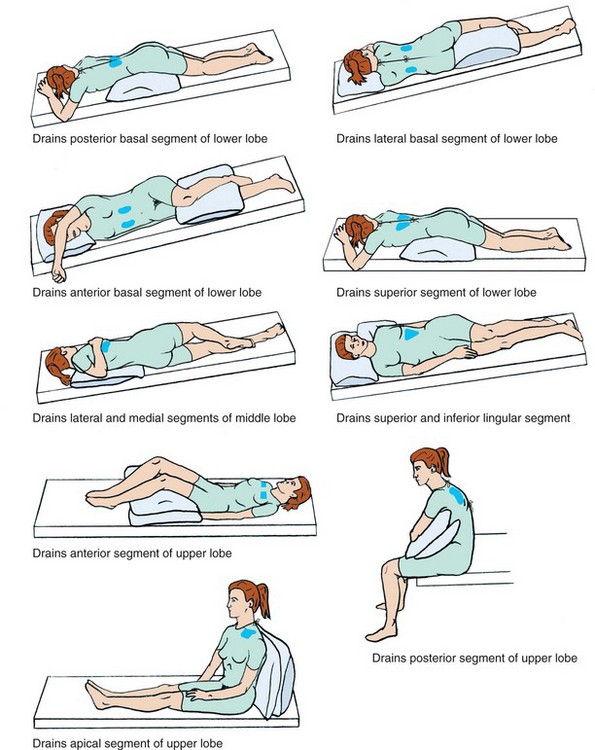
Secretions and mucus plugs may be loosened by percussion of the chest. Percussion is the rhythmic clapping with cupped hands over the thoracic area, but not over the spine or sternum. After percussion and postural drainage, the patient is assisted to cough effectively and expectorate the secretions.
OXYGEN ADMINISTRATION
When the patient cannot maintain a sufficient amount of oxygen in the body, supplemental oxygen is often ordered. Oxygen can be administered by cannula (tube for insertion into a cavity), mask, tent, Croupette, or catheter. Although respiratory therapists are usually responsible for setting up and supervising oxygen equipment, nurses often need to initiate therapy or supervise its use on a PRN (as-needed) basis (Skill 28-4).
Skill 28-4 Administering Oxygen
Oxygen therapy is ordered for patients with respiratory illnesses or those who have musculoskeletal or neurologic problems that interfere with proper oxygenation, causing hypoxia.
3. ACTION Plan amount of connecting tubing to the oxygen source needed by the patient.
RATIONALE Length of tubing needed depends on prescribed activity level and whether O2 needs to be continuous or intermittent.
4. ACTION Determine whether oxygen setup will need a humidifier.
RATIONALE Low-flow oxygen does not need a humidifier to moisten the flow. If patient suffers from sinus problems, it is best to add a humidifier. Oxygen is drying to the mucosa. A humidifier provides moisture.
5. ACTION Connect the flowmeter to the piped-in oxygen outlet on the wall by pressing it firmly into the outlet. Or attach the flowmeter to the oxygen cylinder.
RATIONALE Prepares the oxygen to be dispensed in a regulated flow.
6. ACTION Attach the humidifier and the connecting tubing to the oxygen delivery device and turn on the oxygen, adjusting the flow to the ordered rate. Check for flow through the oxygen delivery device.
RATIONALE Readies the delivery system for the patient. By turning the knob on the flowmeter, the metal ball inside the glass graduated gauge rises, indicating the rate of flow being delivered. The ordered rate is commonly between 2 and 5 L/min and is ordered by the physician. Feel for the flow with your fingers.
7. ACTION Correctly position the oxygen delivery device on the patient and secure it in place.
RATIONALE An oxygen cannula should be positioned with the nasal prongs curved downward as they go into the nares. The tubing is looped over the ears and secured in place by raising the cinch device toward the chin. Be certain the tubing is not causing pressure on the ears. A face mask should fit over the nose and mouth. A face tent fits below the chin and rises to cover the lower part of the face. A small tent-mask fits just above the upper lip and comes to a point above the nares.
8. ACTION Instruct patient and visitors regarding safety during oxygen use.
9. ACTION Ask yourself: Is the patient able to tolerate the oxygen device? Is the oxygen flow at the level ordered? Is an “Oxygen in Use” sign posted? Does patient understand instructions regarding safety during O2 administration? Is breathing less labored with oxygen administration? Is O2 saturation improving?
RATIONALE Answers determine whether patient tolerates the oxygen and whether procedure is effective.
If patient does not tolerate oxygen delivery by one method, an order to change to another device may be needed.
If oxygen is delivered PRN by cannula, instruct the patient that it is desirable to use the oxygen after meals and during activity. O2 demands are higher when digestion or activity is occurring.
Cleanse the nares regularly when oxygen is in use to prevent excessive crusting.
It is important that the patient understand the reason for and potential benefits of using the oxygen before applying the delivery device; otherwise compliance with use may be low.
The flow rate should be checked each time you enter the patient’s room; the patient or a visitor may change it from what is prescribed.
Oxygen delivery devices should be turned off when not in use; instruct the patient with PRN oxygen how to do this.
Teaching safety precautions for the home care patient is especially important because there is no medical supervision when the nurse’s visit is over.
1. If you have a patient with a history of frequent sinusitis who is receiving oxygen by nasal cannula at 3 L/min and that patient complains about nasal stuffiness and sinus discomfort, what could you do to alleviate the problem?
2. You have a postoperative patient who is receiving oxygen by nasal cannula. The patient keeps taking off the O2 cannula. What might you say that might convince the patient to leave the oxygen cannula in place?
Oxygen is a colorless, tasteless, and odorless gas that is present in the air. Although it is essential for life, the use of oxygen is not without its disadvantages (Safety Alert 28-1). One of the properties of the gas is that it supports combustion. High concentrations of oxygen can cause fires to burn very rapidly, and when oxygen is used medically in the treatment of patients, great care must be taken to prevent fires from occurring. Another disadvantage associated with the use of the gas is that it is very drying to the tissues of the respiratory tract. Unless moisture is added, the dried tissues may become cracked and provide less resistance to infection.
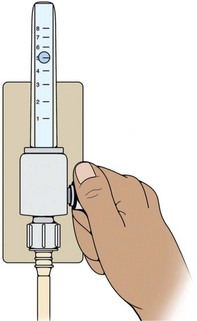
The pieces of equipment needed for oxygen therapy are the oxygen source, the flowmeter, the humidifier (device supplying moisture) (optional), the tubing, and the appropriate appliance for the method ordered. Most hospitals have a central oxygen supply with outlets mounted in the wall near the patient’s bed. The flowmeter is attached to the piped-in oxygen and regulates the amount given (Figure 28-5). The rate of flow is prescribed by the physician in terms of liters per minute and may range from 2 to 12 L/min. The flow rate is based on the patient’s condition and on the blood gas report or pulse oximetry, which measures the amount of oxygen in the blood. Rates of 4 to 6 L/min are common (Safety Alert 28-2). The flow rate is adjusted by turning the valve to the “on” position, and continuing to turn it until the desired flow level is indicated in the gauge just above the flow adjustment valve (Figure 28-6).

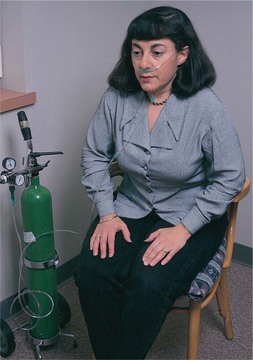
The humidifier is attached to the flowmeter and is usually situated between the flowmeter and the tubing. The oxygen bubbles through the container of water and is moisturized before entering the air passages. Check the level of fluid in the container at intervals during the day to make sure that it is working satisfactorily. When the fluid level is low, notify the respiratory care department so that the unit can be replaced or refilled with distilled water, if this is the policy in the agency. In the home setting a portable oxygen tank is used. Portable oxygen is also used when transporting oxygen-dependent patients within the hospital.
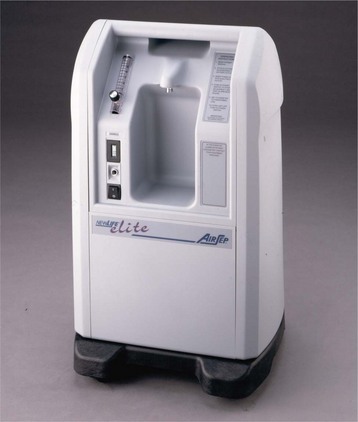
An oxygen concentrator is frequently used in the home or long-term care setting. The machine collects and concentrates oxygen from room air, storing it for use. The machine must be plugged into an electrical outlet (Figure 28-7).
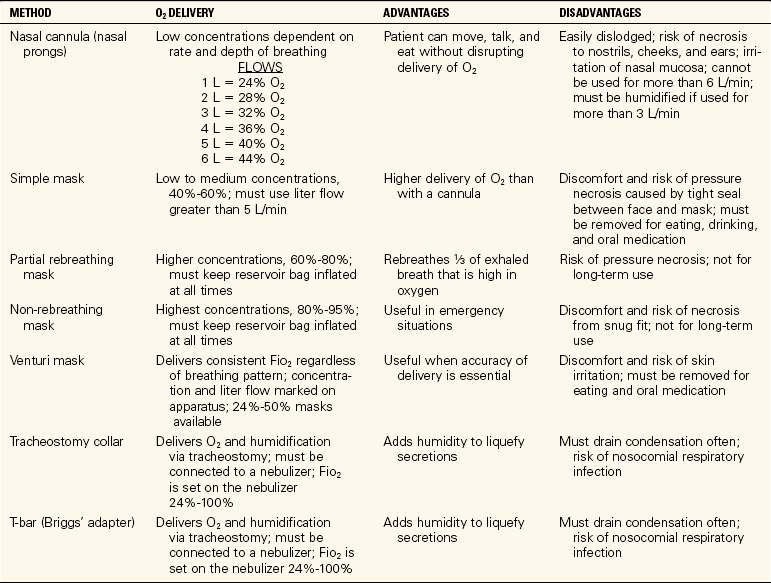
CANNULA
The nasal cannula consists of a plastic tube with short, curved prongs that extend into the nostril about ¼ to ½ inch. The cannula is held in place by looping it over the ears and cinching the tubing under the chin, and can be easily adjusted for the patient’s comfort (Figure 28-8). A Velcro holder may be placed on top of the head to keep the tubing from causing pressure sores on the ears. The nares should be checked to be certain they are unobstructed and are not becoming excoriated (Assignment Considerations 28-1). A cannula is useful for patients requiring oxygen during meals.
MASKS
Various types of masks are available for the administration of oxygen in concentrations ranging from 24% to 55% at flows of 3 to 7 L/min (Figure 28-9). Oxygen concentrations above 60% are rarely used because of the danger of oxygen toxicity. Some patients may dislike this method of oxygen administration because the mask must be placed over the face and they feel that the mask will suffocate them.
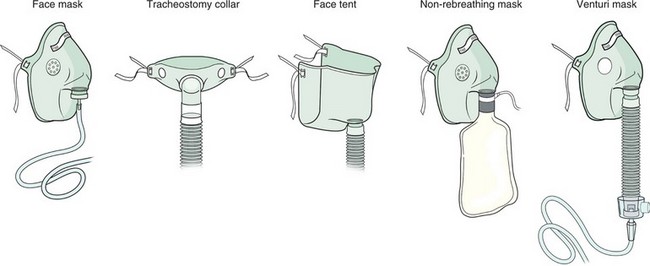
Advantages and disadvantages of various oxygen devices are listed in Table 28-3. Oxygen tents are still sometimes used, particularly for small children. Oxygen halos, Oxyhoods, or Croupettes are used for infants.
ARTIFICIAL AIRWAYS
Artificial airways are used for several purposes: to relieve an obstruction, to protect the airway, to facilitate suctioning, and to provide artificial ventilation.
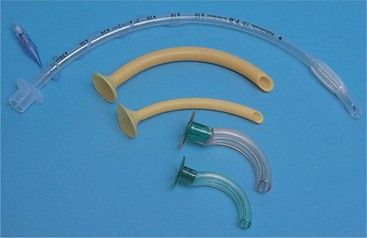
There are two types of pharyngeal airways: the nasopharyngeal airway and the oropharyngeal airway, used to keep the tongue from falling back into the throat and frequently required for postoperative patients until they have recovered from anesthesia (Figure 28-10). These airways are used for patients who can breathe on their own.
Endotracheal tubes maintain an airway in those patients who are unconscious or unable to ventilate on their own. The tube is inserted by a physician, certified nurse anesthetist, nurse practitioner, or advanced practice nurse who is certified in the procedure; intubation is often done under emergency circumstances. The tube is generally removed after 48 to 72 hours, but it may be left in place for a week or more. If it is needed for an extended period of time, the patient should have a tracheostomy performed. An endotracheal tube may cause a mucosal ulcer after 5 to 7 days of use, depending on cuff pressures or type of cuff used.
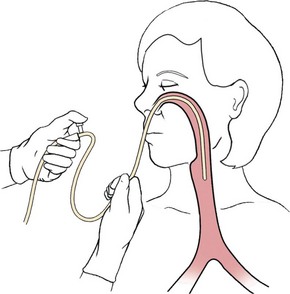
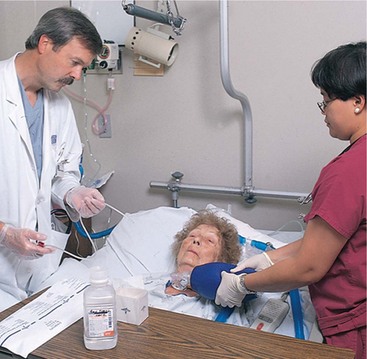
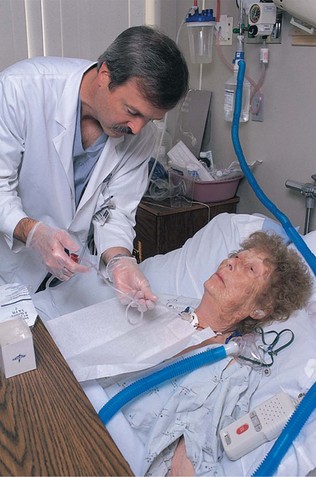
NASOPHARYNGEAL SUCTIONING
The purpose of suctioning is to maintain a patent airway by removing accumulated secretions. When air passages are obstructed by emesis or secretions, suctioning may prove to be a lifesaving procedure. Pharyngeal suctioning involves the upper air passages of the nose, mouth, and pharynx.
Among those who may require suctioning to remove obstructing fluids are infants, gravely debilitated or unconscious patients, and those who have an ineffective cough. When at all possible, the patient should be stimulated to cough because this moves secretions up into the trachea.
Oral suctioning is usually tried before nasopharyngeal suctioning because it is a more comfortable procedure for the patient. A Yankauer suction tip is attached to the suction connecting tubing and the mouth and top of the pharynx are suctioned (Figure 28-11). If this does not remove secretions adequately, nasopharyngeal suctioning is performed. Either a portable electric machine or a wall-mounted model is used for suctioning. The amount of suction pressure should be set between 80 and 120 mm Hg.
Select the suction catheter based on the size of the patient’s tube and the thickness of the secretions to be removed. Smaller 8- to 12-Fr. catheters are used for thin secretions; size 14- or 16-Fr. catheters are needed for an adult with tenacious (adhesive, sticky) or thick secretions. The amount of pressure for suctioning is controlled by placing the thumb over the suction port of the catheter or the open end of a Y connector between the tubing and the catheter.
When suctioning, every effort is made to prevent the introduction of pathogens into the airways. Countless microorganisms are found in the upper respiratory tract, and it is virtually impossible to maintain sterility when suctioning the nose or pharynx. Clean technique and thorough hand hygiene are essential for pharyngeal suctioning of the oral and nasal cavities, but aseptic technique is mandatory for suctioning the trachea. It is best to use aseptic technique for all suctioning of the airway structures.
Disposable sterile suctioning sets are widely used. A set contains a plastic catheter, a carton to hold a small amount of solution to moisten and rinse the catheter and tubing, and a sterile glove. Tap water may be used to clear secretions from the tubing in pharyngeal suctioning (Skill 28-5). A catheter that has been used in the mouth is never used again for nasoph aryngeal or tracheobronchial suctioning. Once the catheter has been in the mouth, it is contaminated.
Skill 28-5 Nasopharyngeal Suctioning
Nasopharyngeal suctioning is performed when the patient is unable to adequately clear secretions from the pharynx or when a patient cannot expectorate sputum for a diagnostic test. Suction equipment is kept at the bedside. Have patient deep breathe for several breaths before suctioning or preoxygenate.
Review and carry out the Standard Steps in Appendix 3.
2. ACTION Position the patient in the semi-Fowler’s position if possible.
RATIONALE Permits an unobstructed view of the mouth and nose for correct suctioning.
3. ACTION Set up and check equipment to see that suction is functioning correctly. Think about placement of supplies in order to maintain sterility during the procedure.
RATIONALE Suction must be functioning for procedure to be effective. Planning prevents contamination of sterile supplies.
4. ACTION Open the catheter suction kit and pour the solution into the solution container; open the water-soluble lubricant. Open the catheter package; squeeze the lubricant onto the inside of the package.
RATIONALE Prepares the equipment for sterile suctioning.
5. ACTION Put on sterile gloves, or one sterile glove on the dominant hand and a nonsterile glove on other hand.
RATIONALE Reduces transfer of microorganisms.
6. ACTION Pick up the sterile catheter with your gloved dominant hand and attach the suction port to the connecting tubing held by your other hand (glove on nondominant hand is no longer sterile).
RATIONALE Prepares catheter for suctioning procedure. Connecting tubing is not sterile; therefore, glove that touches it is no longer sterile.
7. ACTION Moisten 6 to 8 cm of the catheter with water-soluble lubricant and insert the catheter through the right naris into the nasopharynx, about 6 to 8 cm, without suction. If you meet an obstruction, remove the catheter and try the left naris. Do not force the catheter; seek assistance if you meet resistance on the left side also.
RATIONALE Moistening the catheter makes passage through the nasal passages easier.
8. ACTION Intermittently close the suction port with the thumb of your nonsterile hand. Suction no more than 10 seconds at a time. Rotate the catheter while withdrawing it.
RATIONALE Suctioning extracts oxygen from the patient’s airway. Rotating the catheter pulls up secretions from various parts of the airway.
9. ACTION Rinse the catheter by placing it in a container of solution and applying suction to draw the solution through the catheter.
RATIONALE Removes secretions from the catheter and connecting tubing.
10. ACTION Suction the other naris. Repeat the entire process if needed. Allow patient to rest between suction sessions. Observe for signs of hypoxia. Talk calmly to reassure the patient and inform of each step before doing it.
RATIONALE Secretions may be copious, and several short suction sessions may be needed to clear them completely.
11. ACTION Ask the patient to cough.
RATIONALE Brings secretions into the back of the nose and throat, where they can be easily suctioned.
12. ACTION Rinse and moisten the catheter with the solution, insert it into the oral cavity toward the pharynx, and suction the pooled secretions. Suction along the outer gums and cheeks, and at the base of the tongue as needed, using 5 to 10 seconds of suction at a time for the throat area.
RATIONALE Once the catheter has been introduced into the mouth, it is never used to enter the nasopharynx area because it is now contaminated. Suctioning in all of these areas clears pooled secretions.
13. ACTION Rinse the catheter and tubing by placing the tip in the water container and applying suction briefly; turn off the suction. Roll catheter into the palm of one hand and remove the glove, pulling it over the catheter; dispose of the glove and catheter. Remove other glove.
RATIONALE Rinsing clears suction tubing of secretions. Pulling glove over used catheter disposes of contaminated catheter and gloves by using Standard Precautions. If catheter is used only in nasopharynx and therefore can be reused, rinse with sterile water and place in a closed container according to agency protocol. The catheter should be replaced every 8 hours.
15. ACTION Document date, time, reason for suctioning, size of catheter used, type of technique, and how patient tolerated procedure.
RATIONALE Notes reason for invasive procedure and patient’s tolerance.
10/20 1015 Noisy respirations 24 per minute and stopped-up nose. States cannot get secretions out. 16 Fr. catheter used to suction nasopharynx and oral cavity. Caused considerable coughing. Moderate amount of yellow secretions extracted. Respirations quiet; lungs without crackles or wheezes. Resting quietly.
1. Why do you think that moistening the suction catheter well with the lubricant makes the nasopharyngeal suctioning procedure more comfortable for the patient?
2. Why can’t you substitute petroleum jelly for the water-soluble lubricant if none is on hand? What would you do if you had no water-soluble lubricant and the patient was becoming severely hypoxic?
TRACHEOBRONCHIAL SUCTIONING
Deep suctioning of the lower respiratory passages stimulates the cough reflex and removes secretions from the trachea and bronchi. This is most frequently performed when a patient has been intubated. Sterile technique is mandatory for deep suctioning in the tracheobronchial tree and for the intubated patient. Sterile saline or sterile water is used to wet the catheter when endotracheal (within the trachea) or bronchial suctioning is necessary. Because the patient is not receiving oxygen when you are suctioning, do not suction for longer than 10 seconds at a time.
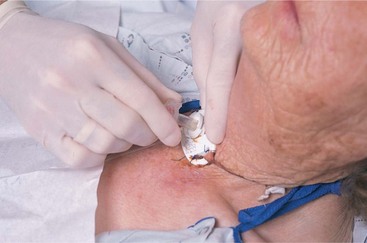
TRACHEOSTOMY
A tracheostomy (opening into the trachea) consists of a surgical incision into the throat and insertion of a tube to aerate the lungs (Figure 28-12). It is performed on patients who have apnea (absence of breathing) or some form of respiratory obstruction. The procedure is done to prevent aspiration of secretions and blood and to provide easier access to the lower airways. Intubation of the trachea with the endotracheal tube or the tracheostomy tube is performed frequently, often in order to provide mechanical ventilation. Various types of tracheostomy tubes are used depending on the purpose and the condition of the patient.
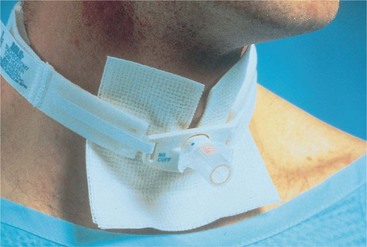
When a tracheostomy tube has a cuff, it seals the space between the tube and the tracheal wall when inflated, prevents fluid from being aspirated into the lungs, and allows only a minimal leakage of air. There may be either a foam cuff or a soft balloon cuff. Patients on a positive-pressure ventilator to treat respiratory failure must have a cuffed tracheostomy or endotracheal tube for effective use of the ventilator. When an inflated cuff is present, the pressure is checked at least every 8 hours. Pharyngeal suctioning is carried out before deflating the cuff. The patient is never left alone when the cuff is deflated because of the danger of aspirating fluid. When the cuff is reinflated, check for air leakage by holding a hand in front of the patient’s nose and mouth and asking her to blow. If air movement is felt, the cuff seal is underinflated and it is not a minimal air leak as intended.
CHEST DRAINAGE TUBES
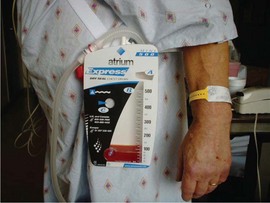
A chest tube is inserted by the physician as an emergency treatment or at the completion of intrathoracic surgery. It is connected to a disposable pleural drainage system (Figure 28-13). Drainage systems are used to drain air or fluid out of the pleural space and to keep it from being sucked back into the chest. When gravity drainage is inadequate to remove air and fluids from a patient with a large pleural leak, suction can be applied using either wall suction or a portable suction machine. The disposable chest drainage unit has a suction control chamber to prevent excessive negative pressure in the pleural space, as well as a water-seal chamber and a drainage chamber (Figure 28-14). If suction is used in the water-seal system, there should be constant bubbling in the suction chamber. There is also a waterless system that uses a one-way valve in the suction chamber. The disposable unit and the flutter valve have largely replaced the former 1-, 2-, or 3-glass bottle system for chest drainage. A number of patients are now given a mobile chest drainage unit so that they can be discharged home (Figure 28-15). The mobile devices are designed so that the drainage chamber can be emptied. A Heimlich valve may be used in place of the chest drainage unit for a small, uncomplicated pneumothorax with little or no drainage and no need for suction. The Heimlich valve, a flutter valve, allows the escape of air but prevents reentry of air into the pleural space (Figure 28-16) After surgery, a drainage set for autotransfusion may be used so that the blood drained can be processed and returned to the patient.
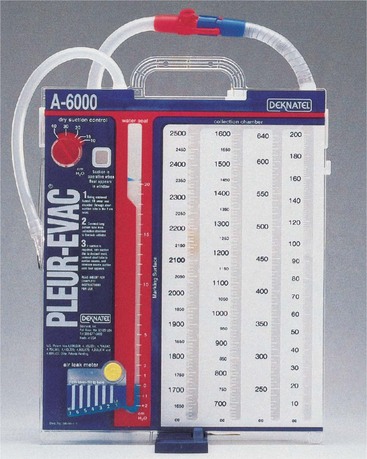
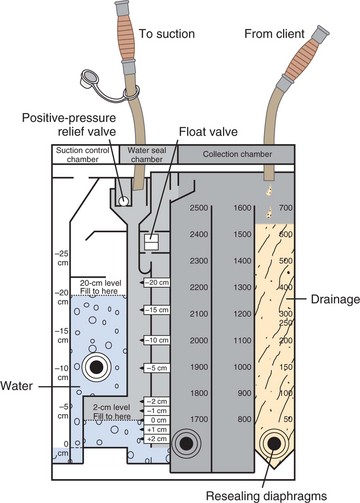
FIGURE 28-14 Suction chamber, water-seal chamber, and drainage chamber of disposable chest drainage device.
Chest tubes are removed by the physician when the lung has reinflated and the pleural space has decreased. A suture set is used to take out the suture holding the chest tube in place. After the tube is pulled out, an occlusive dressing is applied, such as a 4 × 4 petroleum jelly–coated gauze and tape. The patient should be given an analgesic before this procedure because it is painful.
APPLICATION of the NURSING PROCESS
Basic respiratory physical assessment is covered in Chapter 22. Questions that should be asked of any patient with a respiratory problem are listed in Focused Assessment 28-1; Focused Assessment 28-2 reviews points of assessment along with the rationales. The lungs should be auscultated each shift along with assessment of other respiratory status parameters. Careful documentation of findings allows other nurses to compare later data and pick up on subtle trends or deterioration. Respiratory assessment is intertwined with cardiac assessment because if the heart is not functioning properly, oxygenated blood will not be delivered to the tissues in adequate amounts. If the patient is receiving respiratory support, the equipment and settings are checked at least once a shift.
Nursing Diagnosis
Common nursing diagnoses for patients who have respiratory problems include the following:
• Ineffective airway clearance related to muscle weakness and impaired cough; decreased level of consciousness; or thick secretions
• Impaired gas exchange related to retained respiratory secretions
• Risk for infection related to alteration in airway (tracheostomy)
• Deficient knowledge related to use of oxygen equipment, tracheostomy, ventilator, or incentive spirometer
• Risk for injury related to improper safety precautions when using oxygen
Planning
Sample goals or expected outcomes are as follows:
• Patient demonstrates effective cough.
• Lungs are free of secretions.
• Patient demonstrates proper suctioning of the tracheostomy with aseptic technique.
• Area of left-lobe atelectasis (collapsed area of lung) is cleared with use of incentive spirometer.
• Patient demonstrates proper safety techniques when using oxygen.
More goals/expected outcomes can be found in Nursing Care Plan 28-1.
NURSING CARE PLAN 28-1
Care of the Patient with Impaired Gas Exchange
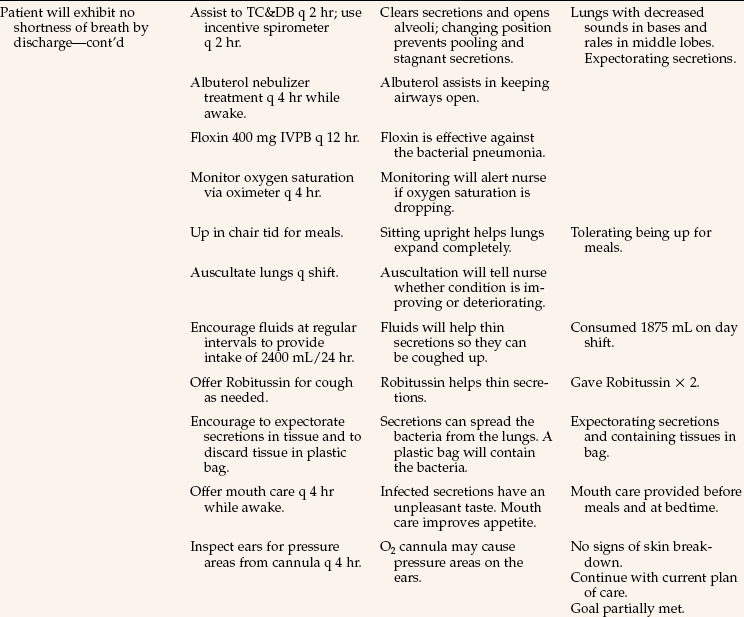
Susan Tamara, age 72, has been admitted with a bacterial pneumonia. She has been ill for a week and is quite weak because she lives alone and has not felt like preparing meals. Orders read: O2 at 5 L/min per cannula; nebulization with albuterol q 4 hr while awake; turn, cough, and deep breathe (TC&DB), incentive spirometer q 2 hr, up in chair tid; input and output (I & O); ofloxacin (Floxin) 400 mg intravenous piggyback (IVPB) q12 hr; Robitussin 30 mL q 4 hr PRN cough; increase fluids to 2400 mL/24 hr.

Other planning involves fitting in time for appropriate care of the respiratory patient into the daily work plan. Each patient with a respiratory problem or the potential for one should turn, cough, and deep breathe every 2 hours. Times for this to be done should be noted on the shift work organization sheet. Procedures such as postural drainage or tracheostomy care take time and should be planned. If a patient has copious secretions that need frequent suctioning, time must be allotted for this activity. Planning also includes seeing to it that necessary supplies for respiratory care are available at the bed-side.
Implementation
The nurse has a very active role in assisting the patient to perform needed respiratory exercises, teaching respiratory care techniques, maintaining patient safety, and offering encouragement for self-care success. Your attention to respiratory care for every patient can prevent complications and nosocomial infection and assist the patient to recovery.
First and foremost, maintain an open airway. Secretions can be removed by effective coughing, turning, and deep breathing. Splinting an incision with a small pillow and sitting on the side of the bed allow for a more effective cough (Figure 28-17; see Patient Teaching 28-1). A fluid intake of 1500 to 2000 mL/day helps thin secretions. Use suction to remove secretions and mucus when the patient is unable to cough them out. Be alert to wet, gurgling respirations in the unconscious patient and see that suctioning is done aseptically. For the unconscious or comatose patient, use an oral airway or nasal trumpet airway to keep the tongue from falling back into the throat and obstructing the passage of air. If the patient cannot breathe deeply enough to maintain adequate oxygenation, a manual resuscitator bag can be used to increase oxygenation (Figure 28-18). Use proper positioning; turn the patient frequently. Yawns and sighs are two forms of deep breaths that help expand the alveoli in the lung. A yawn is a deep, long inspiration usually due to mental or physical fatigue; a sigh is a prolonged inspiration followed by a long expiration. Encourage the use of an incentive spirometer to open alveoli and prevent or relieve atelectasis.

Patients who have undergone abdominal or chest surgery avoid using muscles in the affected areas. However, these muscles are necessary in order to take deep breaths or to cough effectively to remove accumulated secretions. Hypoxia, pneumonitis, and atelectasis are the more common conditions that pose a danger to the individual and prolong hospitalization. In atelectasis, the alveoli collapse and fail to fill with air. The condition may be acute or chronic and involve a part or all of the lung.
These common respiratory complications can be prevented by reinflating the alveoli and removing the mucous secretions. The best method to accomplish this is through a sustained maximum inspiration, or the taking of a deep breath to inflate the entire lung and holding the inspiration for at least 3 seconds so that the resulting pressure will keep the alveoli from immediately collapsing again. The same effect is produced by a sigh or a yawn.
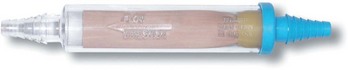
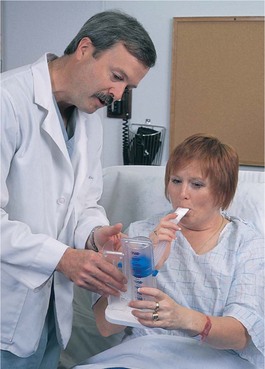
Incentive spirometers encourage patients to do respiratory exercises with sustained maximum inspiration (Figure 28-19). When the patient takes a deep breath, a ball moves upward, or the amount of air is measured so the results are visible to the user. The incentive is to reach a certain volume of air and hold it for 3 seconds. Patients at risk of developing respiratory complications should be instructed to use the device and take 10 slow, deep breaths every hour when awake.
Use positioning and relaxation to optimize respiratory exchange. Additional energy and oxygen are needed when patients are anxious and have tense, rigid muscles. Nurses can help patients with dyspnea to relax, expand the chest more fully, and use less of their limited oxygen supply by good positioning. Bed patients with dyspnea are placed in proper alignment and in high Fowler’s position unless contraindicated by their condition. Place the patient’s forearms on pillows at the sides to relax the shoulder muscles. Patients with obstructive diseases such as emphysema breathe easier when they sit at the side of the bed or in a chair, hunch the upper body over, and rest their arms on two or three pillows placed on a table or nightstand in front of them (orthopneic position, Figure 28-20). Turning to one side helps prevent the pooling of secretions in the back of the throat of unconscious, weak, or helpless patients. Postural drainage is also used to promote the removal of secretions from the lungs.
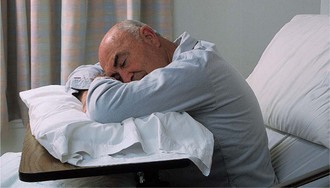
FIGURE 28-20 Position the person who is very short of breath in the orthopneic position, using pillows on the over-the-bed table.
When administering oxygen therapy, give the amount as ordered by the physician. When oxygen is in use, give oral hygiene every 3 to 4 hours because oxygen therapy is drying to the tissues, which often makes the mouth smell or taste bad. Inspect the skin around the nose and mouth for irritation from the equipment. Prevent infection by changing oxygen delivery equipment on time per agency policy. Temperature measurements should be taken tympanically, over the temporal artery, or rectally so that the patient’s breathing is not impaired by an oral thermometer.
Monitor the activity of the patient with a respiratory problem. Activity may produce shortness of breath, dizziness, or complaints of chest pain because activity uses up oxygen more quickly than the body at rest. Space activities and provide sufficient rest periods between activities of daily living and exercise. For the patient who is on PRN oxygen, do not discontinue the oxygen and then immediately ask the patient to get up and move to the chair or go to the bathroom. Allow time for the patient to adjust to room air before activity is increased. Observe safety measures to prevent explosion or fire (see Safety Alert 28-1).
Tracheostomy Care: When a patient has either a temporary or a permanent tracheostomy, daily care is needed. Care consists of suctioning and cleaning the skin around the stoma, changing the dressing, cleaning the inner cannula if there is one, and replacing the ties that hold the tube in place when they are soiled. Tracheostomy care is done every 8 hours or as frequently as needed to keep the secretions from becoming dried, blocking the airway.
A tracheostomy tube is a curved, hollow cannula made of plastic or metal. Some have an inner and an outer cannula so that the inner one can be removed to be cleaned while the outer one stays in place. All tracheostomy tubes come with a piece called an obturator, which is a curved guide that facilitates placement of the tube in the trachea when it is inserted; after insertion of the tube, the obturator is removed. An extra tube and obturator are often taped to the head of the bed so that they are handy should the tracheostomy tube somehow be dislodged and need to be replaced in an emergency.
Since the tracheostomy tube sits below the larynx, the patient cannot speak naturally. Provision for communication must be made with paper and pencil, magic slate, communication board, or other device. It is vitally important for this patient to have the call bell at hand at all times. It is frightening not to be able to call for help should it be needed (Assignment Considerations 28-2). Check on the patient frequently.
Suctioning of secretions following a tracheostomy is of prime importance in maintaining a patent airway. Patients with tracheostomies lose their ability to cough effectively. Before beginning suctioning, observe the patient’s rate and quality of respiration and auscultate lung sounds. Frequency of needed suctioning varies; in the new tracheostomy patient it may be needed as frequently as every 15 to 30 minutes. Older tracheostomies have less inflammation and therefore less secretion production and need to be suctioned only periodically. Suctioning is carried out only as needed, and need is indicated by audible respirations or dyspnea (Skill 28-6).
Skill 28-6 Endotracheal and Tracheostomy Suctioning
Since it is often difficult for a patient to cough secretions out via an endotracheal or tracheostomy tube, the tube must be periodically suctioned. The tracheostomy tube must be kept free of secretions for the patient to breathe or receive oxygen. To determine when suctioning is needed, the lungs are auscultated. A face shield or goggles and mask should be used when suctioning because the patient may spray sputum when coughing.
2. ACTION Be certain all equipment is at hand and think through the procedure before opening sterile supplies.
RATIONALE Ensures that the procedure will go smoothly.
3. ACTION Obtain a partner to preoxygenate the patient with the resuscitator bag if possible.
RATIONALE The patient should be preoxygenated before suctioning so that oxygen is not seriously depleted by suctioning. The procedure is easier to perform with an assistant.
4. ACTION Attach the connecting tubing to suction source and turn on suction; check the pressure. Place the connecting tubing close at hand.
RATIONALE Verify that the suction is functioning by occluding end of suction tubing with your thumb and watching pressure on gauge rise. Set pressure according to agency protocol. Wall suction unit pressure is generally set between 80 and 120 mm Hg maximum. Placing tubing nearby prepares tubing to be easily connected to the suction catheter.
5. ACTION Perform hand hygiene; open supplies and put on sterile gloves. Set up the water container. Place sterile drape, if available across patient’s chest. Pour about 100 mL sterile water into the container with the nondominant hand. With gloved dominant hand holding the catheter, attach the catheter to the connecting tubing. Be careful not to contaminate glove holding the catheter. Hand holding the connecting tubing is no longer sterile.
RATIONALE Provides sterile field on the chest. Prepares the water for use and maintains sterility of dominant hand. Supplies catheter with suction.
6. ACTION Have an assistant oxygenate patient by resuscitator bag with two or three large-volume inspirations while you prepare to suction, or do this yourself. If working alone and the patient is receiving oxygen, increase the concentration to 100% for a short time, keeping hand on oxygen adjustment, or give two or three sigh breaths with the ventilator. Check agency protocol for desired way to preoxygenate the patient.
RATIONALE Preoxygenation prevents hypoxia during suctioning.
7. ACTION Moisten the catheter tip in the sterile saline solution and suction up a small bit of the solution to test the system. Disconnect the ventilator tubing if ventilator is in use, and immediately introduce the catheter into the endotracheal tube or tracheostomy tube using only sterile gloved hand; do not use suction while placing the catheter. Advance catheter until resistance is met, then pull back 1 cm.
RATIONALE Moisture lubricates the catheter and makes it easier to introduce; testing with solution ensures suction is working properly. Holding the catheter at a 90-degree angle to the tube to enter it helps prevent contaminating the catheter by touching the patient’s face or neck. Suction applied on entry draws out oxygen. Resistance will occur when the catheter reaches the carina (junction of main bronchi).
8. ACTION Apply suction while rotating and withdrawing the catheter. Allow no more than 10 seconds to suction and withdraw the catheter. Counting “1-1000, 2-1000,” etc., while suctioning is one way to track the time.
RATIONALE Suction draws out secretions. Rolling the catheter between your fingers rotates the catheter openings at the tip so that they will suck up secretions around the circumference of the trachea. Suctioning for more than 10 seconds seriously depletes the patient’s oxygen.
9. ACTION Reattach the patient’s tube to the oxygen source if one has been in use, and allow a rest period before suctioning again. Keep the catheter sterile while waiting; use the nonsterile hand to reattach the oxygen source. Auscultate the lungs when finished to be certain that secretions have been adequately cleared.
RATIONALE Suction draws out oxygen as well as secretions and may cause hypoxia. Hyperoxygenation should be done again before each suctioning.
10. ACTION Suction the nasopharynx if needed.
RATIONALE Secretions may collect above the cuffed tracheostomy tube and need to be removed.
11. ACTION Rinse catheter and connecting tubing by suctioning up more solution. Discard the catheter by coiling it in your gloved hand and pulling the glove off over it.
RATIONALE Connecting tubing should be cleared of secretions. A sterile catheter must be used each time tracheobronchial suctioning is performed. Sterile catheters must be kept at the bedside for immediate use. Pulling glove over the used catheter prevents spread of microorganisms.
Suctioning with a Sleeved Catheter
12. ACTION Open catheter package without disturbing protective sleeve covering the catheter.
RATIONALE Sleeve maintains sterility of catheter so that it can be reused several times.
13. ACTION Attach catheter to endotracheal tube or tracheostomy adaptor and to suction tubing. If secretions are thick, inject sterile saline via saline port per agency protocol.
RATIONALE Sterile saline thins secretions.
14. ACTION As catheter is inserted via endotracheal tube or tracheostomy, sleeve slides back; advance the catheter as far as possible.
RATIONALE Positions catheter within trachea to carina.
15. ACTION Apply suction while rotating and withdrawing the catheter. Allow the sleeve to re-cover the catheter as it is withdrawn; pull it back out of the tube opening.
RATIONALE The sleeve will prevent the catheter from becoming contaminated from environment outside the trachea. Pulling it out of the tube prevents the catheter from occluding the airway.
16. ACTION Remove gloves and perform hand hygiene. Turn off suction.
RATIONALE Performing hand hygiene reduces transfer of microorganisms. Suction may remain off between suctioning sessions.
Some patients can cough secretions out; allow patient to try before suctioning.
Holding your breath while you apply suction helps judge the time the patient is without oxygen.
Suction container is emptied at the end of each shift or at least every 24 hours; check agency protocol.
Do not suction unnecessarily because the procedure is irritating to the tracheal tissues.
In the home care situation, suction catheters can be cleaned, sterilized, and reused.
The home care patient is taught to perform the suctioning procedure. The teaching plan should be consistently used by all home care nurses working with the patient.
1. What is one way to hold the suction catheter to introduce it into an endotracheal tube so that it doesn’t kink and hit the patient’s skin or your hand and become contaminated?
2. What would you need to do before suctioning a patient if you know that this patient frequently forcibly coughs out secretions when being suctioned?
Use strict aseptic technique and use separate catheters and solution when both the nasopharyngeal area and the trachea are suctioned. Suctioning should be no longer than 10 seconds in length. The patient should be well oxygenated before any tracheal suctioning is attempted because the hypoxemia produced by prolonged suctioning can lead to sudden death. Sleeved or in-line catheters are available that can be reused several times for tracheobronchial or endotracheal suctioning. These catheters have an outside plastic sleeve covering that slides up to allow the catheter to be introduced into the trachea for suctioning and then is allowed to slide over the catheter as it is withdrawn. The sleeve prevents contamination of the catheter between suctioning. Continuous oxygenation is provided to the patient around the catheter, and the arterial O2 partial pressure (PaO2) level does not drop as low as with other suctioning.
The inner cannula of the tracheostomy tube should be cleaned as often as needed to keep it free from tenacious secretions and crusts (Skill 28-7). Aseptic technique is employed in cleaning the wound and the inner cannula to reduce the risk of infection. Work calmly and efficiently. Remember that having a tracheostomy is a very traumatic experience. The nasopharynx is always suctioned before deflating the cuff.
Skill 28-7 Providing Tracheostomy Care
Tracheostomy care is performed every 8 hours. The tracheostomy patient is taught to do this procedure before being sent home with a new tracheostomy. The soiled dressing is removed, the area around the stoma is cleaned, and if needed, the tape or ties holding the tracheostomy tube in place are changed. If there is an inner cannula, it is removed, cleaned, and replaced.
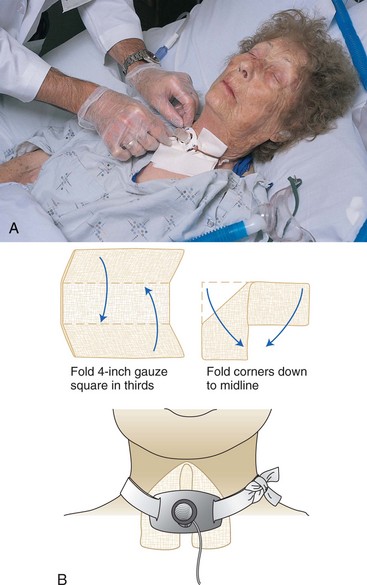
3. ACTION Place the patient in a low semi-Fowler’s position. Perform hand hygiene, open the supplies, and put on one glove. Separate basins with gloved hand; pour solutions with ungloved hand. Use one part hydrogen peroxide to one part normal saline for the wash solution; normal saline is used to rinse.
RATIONALE Positioning makes visualization of the tracheostomy site clear; opening supplies prepares them for use. Gloves prevent transfer of microorganisms. Some plastic cannulas are harmed by hydrogen peroxide; check manufacturer’s instructions.
4. ACTION Put on the second glove. Undo the lock on the outer cannula, stabilizing the tube flange with the index finger and thumb, and remove the inner cannula by gently pulling it out toward you.
RATIONALE Latch must be unlocked in order to remove the inner cannula. If tube moves, patient will cough. If difficulty is encountered, obtain assistance.
5. ACTION Place the reusable inner cannula in the basin of wash solution and clean the lumen thoroughly with pipe cleaners or a small brush. Cleanse the outer surface with the brush. Rinse in the basin of normal saline or sterile water. Place on 4 × 4 gauze pad to drain. Handle silver cannulas carefully because they tend to dent easily.
RATIONALE Pushing the pipe cleaner all the way through the cannula removes secretions. Some patients will have a second inner cannula available to place into the tracheostomy tube while the one removed is cleaned. In that case, store the removed cannula after cleaning.
6. ACTION Reinsert the cannula after excessive moisture has been removed. Hold the face plate of the outer tube securely and, using aseptic technique, insert the inner cannula into the lumen of the outer cannula. Lock in place by turning the latch on the outer cannula one-quarter turn counterclockwise. Check to see that it is properly latched. Many hospitals use disposable inner cannulas that eliminate the need for cleaning.
RATIONALE Excessive moisture may make the patient cough as the cannula is replaced. Cannula must be firmly locked into place so that it is not coughed out.
7. ACTION Remove the soiled dressing and dispose of it in the discard bag. Clean around the tube with solution required by agency protocol, using cotton swabs; rinse with saline. Move the tube as little as possible during the cleaning process.
RATIONALE Soiled tracheostomy dressings are changed as needed. The area around the tube is cleaned every 8 hours or per agency protocol. Some agencies require the use of hydrogen peroxide for cleaning; some physicians order acetic acid to be used. Moving the tube causes irritation to the trachea and is uncomfortable for the patient.
8. ACTION Replace soiled tracheostomy ties or tube holder. Ask an assistant to help if possible. Punch a hole in the end of the tie with the closed points of the forceps, pass the end through the flange on the side of the tracheostomy tube, and thread the tie through the hole, pulling it taut. Remove the old tie. Repeat for the other side, and tie the tapes at the side of the neck with a double square knot so that the patient need not lie on the knot. The knot should be rotated from one side of the neck to the other with each change. Commercial tracheostomy tube holders may be used in place of tracheostomy tape ties.
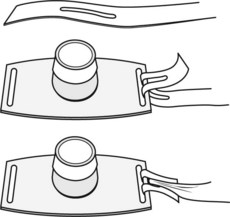
RATIONALE Ties are replaced when soiled or at least once every 24 hours. Ties are easier to replace if done before the new dressing is applied.
9. ACTION Apply the precut dressing or a “V”-folded gauze. Place it under and around the outer cannula to catch secretions. Forceps may be used to manipulate the dressing into place.
RATIONALE Cutting a 4 × 4 gauze pad to use as a tracheostomy dressing should not be done because the loose gauze may fall into the tracheostomy tube and be aspirated by the patient.
For patients with a permanent tracheostomy, teach all steps of tracheostomy care and suctioning. Proceed by explaining the rationale for a step and then demonstrate the step. Teach only a few steps at a time. Have patient demonstrate the procedure with coaching. Obtain a return demonstration of the entire procedure before the patient is discharged.
Assess for skin breakdown each time you provide tracheostomy tube care.
Chest Tube Care: When the patient has a chest tube, the lungs should be auscultated frequently to assess reexpansion of the involved lung. An accurate measure of the amount of drainage is done every 1, 2, 4, or 8 hours, depending on the situation; the drainage level is marked on the container along with the time noted. Observe the tube and level of drainage in the collection chamber each time you enter the patient’s room (Steps 28-1). Report drainage of more than 100 mL/hr.
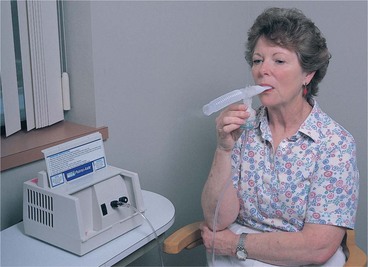
Nebulizer Treatments: If the patient is having difficulty bringing up mucous secretions trapped in the lung, a nebulizer treatment may be ordered. Nebulizer treatments are also used to deliver bronchodilators to the lung to relieve bronchospasm. Nurses often give these treatments in clinics and physicians’ offices (Figure 28-21, p. 539).
Patient Teaching: Because many respiratory patients have chronic problems, teaching for self-care is very important to independence. The patient with a permanent tracheostomy is taught to suction properly in an aseptic manner and to care for the tube, stoma, and skin. All patients are taught to deep breathe and cough effectively.
Home care patients are taught to reduce air pollutants in the home and to avoid them elsewhere as much as possible (Home Care Considerations 28-1). Safety measures are taught to the patient and family regarding the use of oxygen. Ways to conserve energy are explained to the patient and family so that the patient can maintain independence as much as possible. Patients and family are taught suctioning techniques (Home Care Considerations 28-2).
In the home, the patient and caregiver can be taught to clean suction equipment with hydrogen peroxide, gentle soap and water, or a household bleach solution depending on the type of equipment; rinse it with sterile water; and store it in a clean container until the next use.
Evaluation
It is vitally important that the patient’s respiratory status be evaluated continuously when the patient is suffering from a respiratory disorder. The lungs must be evaluated at least once a shift. The success of respiratory treatments and drugs is evaluated each day. Some sample evaluation statements are as follows:
• Effectively coughing up secretions.
• PaCO2 decreased to 38 mm Hg.
• Patient able to ambulate length of hall without shortness of breath.
• Lungs clear, no sign of respiratory infection.
Documentation: Documentation should include the following:
• Data from the respiratory assessment
• Oxygen flow rate and method of delivery
• Amount of time PRN oxygen is used
• Time and location of blood gas sampling
• Location of oximetry probe and range of oxygen saturation
• Description of sputum expectorated
Suction technique is constantly evaluated, and ways to improve in delivering respiratory care should be considered. It takes considerable practice to suction efficiently.
NCLEX-PN® EXAMINATION–STYLE REVIEW QUESTIONS
Choose the best answer(s) for each question.
Your patient has undergone a thoracotomy with resection of the right lung. She is receiving O2 by cannula at 5 L/min and has a chest tube in place attached to a disposable chest drainage system with suction. (This scenario applies to questions 1 to 4.)
1. You observe the patient for early signs of hypoxia. You know that the first signs of hypoxia include: (Select all that apply.)
1. increasing restlessness or irritability.
2. increased respiratory rate.
2. In providing nursing care for this patient, who is having difficulty breathing, it is important to reduce her anxiety because it:
1. increases the pulse and blood pressure.
2. causes tense muscles, which need more oxygen.
3. The patient is in pain but doesn’t want to take pain medication. You know that it is important to keep her comfortable because:
1. when breathing causes pain, she won’t take deep breaths to open alveoli.
2. the surgeon ordered pain medication for her.
4. Regarding the disposable water-seal chest drainage unit, you know that there should be:
1. bubbling in all the chambers of the drainage device.
2. continuous bubbling in the suction chamber.
5. When performing nasopharyngeal suctioning, you should: (Select all that apply.)
1. raise the head of the bed 30 to 45 degrees.
3. deflate the cuff before deciding to do nasopharyngeal suctioning.
6. The most common cause of respiratory insufficiency is ______________________________. (Fill in the blank.)
7. The most effective way to clear a patient’s respiratory tract of secretions after a thoracotomy and lung resection is to:
8. Older people are more prone to respiratory problems because aging causes which of the following changes? (Select all that apply.)
1. Thinning of the alveolar membrane
2. Decreased elasticity of respiratory tissues
9. In normal individuals, the drive to breathe and the control of the respiratory rate are dependent on:
10. One nursing measure that can prevent respiratory insufficiency is to: