Assessing Health Status
Upon completing this chapter, you should be able to:
1 Discuss the types of assessment used in various situations.
2 List information that should be gathered for a comprehensive database for a patient.
3 Demonstrate the techniques used during physical examination.
1 Assess the psychosocial and physical functioning of the patient by gathering information in an organized way.
2 Perform a basic physical examination on a patient.
3 Carry out focused physical assessments of the cardiovascular, respiratory, gastrointestinal, and neurologic systems.
4 Assist with a medical examination by positioning and draping the patient, and organizing the equipment.
5 Perform a visual acuity test on a patient.
6 Teach patients the assessment techniques for the early detection of cancer.
7 Educate patients about the recommendations for periodic diagnostic testing.
adventitious sounds ( , p. 379)
auscultation (p. 374)
bronchovesicular sounds ( , p. 379)
edema ( , p. 373)
kyphosis ( , p. 377)
lesions (p. 373)
lordosis ( , p. 377)
nystagmus (p. 391)
olfaction ( , p. 375)
palpation ( , p. 373)
percussion ( , p. 373)
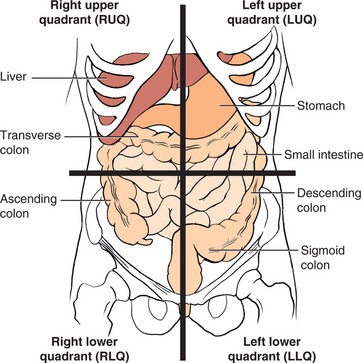
quadrant ( , p. 381)
scoliosis ( , p. 377)
tremors (p. 373)
turgor ( , p. 373)
vesicular sounds ( , p. 379)
Assessment is a vitally important nursing function. It is a continual process in which the nurse is constantly appraising the condition of patients. Nurses are expected to be able to assess lung sounds properly, identify abnormal heart sounds, determine when there might be something wrong in the abdomen, monitor circulatory status, detect neurologic changes, note skin problems, and recognize signs and symptoms of problems in any body system. When an illness occurs, it is likely to affect more than one body system. Although it is rare that a staff nurse will have the time to do a thorough physical examination of each patient assigned, the nurse must perform a quick focused assessment of each patient at the beginning of each shift and is responsible for assessing all body systems. The nurse is the person who is with the patient the most, and must monitor for subtle changes in condition. Good assessment skills can quickly identify new signs and symptoms that indicate complications of an illness or adverse side effects of medical therapy. This is especially important when working with home care or long-term care patients because the nurse is often the only health professional who sees the patient at regular intervals. The LPN/LVN charge nurse in the long-term care facility acts as the “eyes and ears” of the physician, as does the home care nurse.
The majority of people have had a physical examination at some time in their lives. Physical examinations are usually required for entry into schools, for the issuance of insurance policies, for employment, for particular types of driver’s licenses, and for induction into military service. A complete physical examination is performed on patients who seek regular medical care every 1 to 5 years, depending on age and health condition. The nurse often assists with the physician’s examination of the patient. This chapter introduces the methods used to obtain information about physiologic and psychosocial functioning and the ways to assist the examiner with the physical examination.
APPLICATION of the NURSING PROCESS
When a patient is admitted to the hospital, long-term care facility, home care service, or other agency, a nurse performs an initial assessment. This assessment usually includes gathering a history and demographic data and performing a brief physical examination. This type of assessment is covered in Chapter 5 along with interviewing (see Boxes 5-2 and 5-3).
Data Collection: Along with the physical examination, nurses are also expected to obtain some historical data concerning the patient’s past and present state of health. The type of information required for the hospital nurse’s admission history form is covered in Chapters 5 and 23. Students are often required to complete a history form to turn in with the nursing care plan. The information pertinent to daily care that you should know about the patient includes health history factors and psycho-social data. Certainly, knowledge of the current health problems is essential, and you should review the chart for these data or obtain them from the patient if the data are not yet on the chart.
Psychosocial and Cultural Assessment: To care for the whole patient rather than just tend to an area of physical need, nurses must be aware of how the illness is affecting the patient’s life. Exploration of concerns regarding not only health but also all other areas of the patient’s life is appropriate. If a mother is very worried about the care of her small children at home, energy will be focused on this area rather than on healing.
Assess for cultural preferences and health beliefs so that an individualized plan of care can be formulated. Cultural assessment is mainly a matter of asking the patient and family about preferences for food, bathing, and personal care, what they think about their illness and treatment, and who should be consulted about decisions. Phrase questions in a positive, nonthreatening way. Do not assume that just because a person is a member of a certain ethnic group, he or she has beliefs and practices common to that group. Box 22-1 provides a patient interview guide. Further information on cultural assessment is presented in Chapter 14.
Physical Assessment: When patients are first encountered, observe their behavior and appearance and make a judgment about their health status. Some of these data may lead to the conclusion that a person is ill, has an elevated temperature, or is malnourished. In addition to observations, it is essential to ask the right questions and measure various body functions. The assessment thus provides a complete picture of physiologic functioning. When combined with a health and psychosocial history, it forms a health database for the individual. The information gathered from the physical assessment can be used for a variety of purposes. These include the following:
• Determining the patient’s level of health and physiologic functioning
• Arriving at a tentative nursing diagnosis of a health problem
• Confirming a diagnosis of dysfunction, disease, or inability to carry out activities of daily living (ADLs)
• Indicating specific body areas or systems for additional testing or examination
• Evaluating the effectiveness of prescribed treatment and therapy and observing for adverse side effects
When the patient presents with a new illness or complaint, obtain a history of that illness or complaint with the questions in Box 22-2.
The physical assessment can be performed in a variety of settings, such as hospitals, health centers, clinics, schools, long-term care facilities, and physicians’ or nurse practitioners’ offices (Cultural 22-1). The examination can be performed by a physician, nurse, physician’s assistant, nurse practitioner, clinical nurse specialist, or other clinician, depending on the type of assessment, its purpose, and the policies of the particular agency. The assessment of physiologic functioning ranges from a comprehensive, in-depth examination that includes all systems of the body to a brief, scanning type of examination confined to a specific body part or system. Vocabulary specific to physical assessment is provided in Box 22-3.
Physical Examination Techniques: Because assessment is also a tool for nurses to use in planning nursing care, attention must be focused on methods of gathering information. In addition to using interviewing and communication skills, information is obtained by using the senses: sight, hearing, smell, and touch. The most helpful of these senses is sight, closely followed by touch.
Inspection and Observation.: Through the sense of sight, nurses are able to inspect the various parts of the body and observe the behavioral responses of patients. When assessing the physiologic condition of a patient, the nurse or examiner uses inspection to make observations about the patient’s general appearance, contours of the body, skin tone and color, rashes, scars and lesions (tissue damage or abnormality), deformities or extremity weakness, characteristics of movements, and respirations.
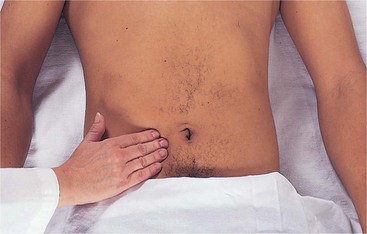
Palpation.: The sense of touch can be used to obtain a great deal of clinical information about patients. Palpation is performed with the hands and uses touch to feel various parts of the body. Palpation can be used to detect the size, shape, and position of parts of the body and the texture, temperature, and moisture of the skin. Palpation is used to ascertain the following:
• The presence of muscle spasm or rigidity
• Pain, swelling, or presence of a growth
• Any restriction in movement of a body part
• Skin temperature, turgor (elasticity), and presence of edema (fluid in the tissues)
Skillful palpation is based on knowing how to use the fingers and hands effectively. The backs of the hands and fingers are used to investigate differences in skin temperature over an inflamed joint or a foot with poor circulation. The skin is thinner on the back of the hand and more sensitive to changes in temperature. The pads of the fingers are used to palpate the size, position, and consistency of various structures, such as the lymph nodes and breast tissue. The palm of the hand is used to detect vibrations or tremors (involuntary fine movement of the body or limbs), and the thumb and index finger are used to check skin turgor, joint position, and the firmness of muscles and other tissues.
The abdomen is usually palpated lightly to identify painful or tender areas or to locate masses or abnormal collections of fluid. The pads of the fingers are used in light palpation, and pressure is exerted to indent the skin about 1 to 2 cm (½ to ¾ inch) (Figure 22-1). Deep palpation depresses the skin 4 to 5 cm (1½ to 2 inches) and can be done using one or both hands. When palpating, watch the patient’s face for signs of discomfort and discontinue if it causes pain.
Percussion.: Percussion is another method of obtaining information about structures of the body. It involves light, quick tapping on the body surface to produce sounds. Variations in the sounds reflect the characteristics of the organs or structures below the surface. Percussion is used primarily over the chest and abdomen to determine the size, location, and density of organs that lie within. The most common type of percussion consists of striking the middle finger of one hand with the index or middle finger of the other hand. When tapping, do not move the forearm; all the force is generated by a quick snap of the wrist (Figure 22-2). The tapping finger makes a quick contact with the other hand, and after two or three taps in one location, the hands are moved to another area. Different sounds are emitted as the examiner moves from one resonant area to a less or more resonant one. The sounds vary in their intensity, pitch, and duration. Sounds differ depending on the presence of underlying air, fluid, or a solid organ.
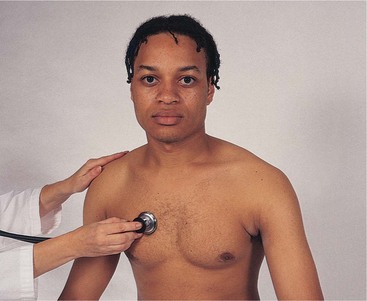
Auscultation.: Auscultation is the process of listening to sounds produced in the body with the aid of the stethoscope. It is particularly valuable in hearing sounds produced in the heart, lungs, and abdomen. Nurses use the stethoscope to take blood pressure readings, to listen to the lungs, to assess heart sounds, and to check for the presence of bowel sounds. When listening to the lungs, the diaphragm of the stethoscope is used; heart valve sounds are best assessed through the bell of the stethoscope placed lightly on the chest wall. To properly use a stethoscope, place the earpieces in your ears so that they point forward toward your nose. The diaphragm is used to detect high-pitched sounds’breath, bowel, and normal heart sounds. The diaphragm (larger, flat surface) is held firmly against the skin and may leave a ring on the skin when lifted. The bell piece (smaller, cupped piece) is used to detect low-pitched sounds such as abnormal heart sounds made by the valves. It is held lightly against the skin; pressing harder obliterates the low-pitched sounds.
Olfaction.: Olfaction refers to the sense of smell. The nose is used to identify characteristic smells associated with specific problems. A sweetish odor to the breathcan indicate diabetic acidosis; alcohol on the breath can provide a clue to the patient’s lethargy or irrationality. Mouth odor that is foul may indicate periodontal disease or poor oral hygiene. A foul or sweet odor coming from under a cast or a wound indicates infection. A foul odor in the female genital area may indicate a vaginal infection.
Basic Physical Examination: The basics of physical examination are the foundation on which the nurse begins to build expertise. As medical-surgical conditions, pediatrics, and obstetric care are studied, further assessment skills will be learned.
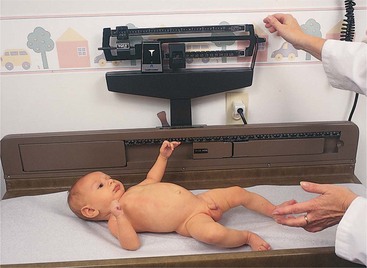
Height and Weight.: A basic nursing function is to weigh and measure the patient. Adult weight is most frequently measured on the standing scale (Figure 22-3). Weight can also be measured by using a built-in scale in a bed or a chair scale. Weight is measured consistently without or with shoes depending on the practice setting. Steps 22-1 provides the steps for weighing the adult. Infants are weighed in an infant scale (Figure 22-4). The infant is placed on a clean paper cover or the scale is cleansed after each weighing. The infant is weighed with one hand hovering closely to prevent a fall while adjusting the scale weights. Never leave an infant unattended on the scale.
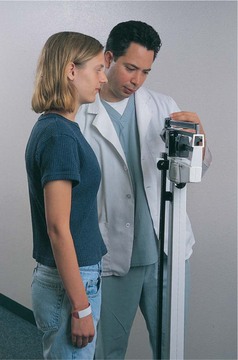
Height is measured from the sole of the foot to the crown of the head. A vertical measuring rod is generally used with the patient standing erect and looking straight ahead. Shoes should not be worn when the patient is measured. The most common device used to measure adults and older children is the height rod attached to a standing scale. The rod is raised to a height greater than the person to be measured and the extension bar is raised. The person stands with the feet together centered under the rod with the back to the rod and looks straight ahead. The extension rod is lowered while keeping it at a 90-degree angle until it rests level on the patient’s head.
Infants and children younger than 3 years of age are measured in the supine position with the legs fully extended. In the physician’s office, when an infant measurement board is not available, the length can be closely approximated by placing the infant on the paper covering an examining table, marking at the top of the head with the head in good alignment and the infant looking up, and then making another mark at the base of the heel with the leg fully extended. The distance between the marks is measured with a measuring tape. A second person is usually needed to help position the infant or toddler. Most measuring devices are marked in inches and in centimeters, with fractions of these units to ensure an exact measurement. A standard for comparison of measured heights and weights that allows determination as to whether the patient’s weight is within normal limits is the Metropolitan Height and Weight Chart (Table 22-1), or for children, standard growth charts. A body mass index chart is provided in Chapter 26 (see Table 26-8).
Table 22-1
Metropolitan Height and Weight Tables for Men and Women According to Frame, Ages 25-59
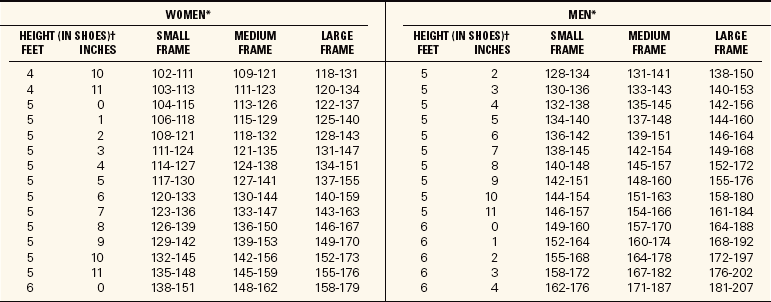
*Weight in pounds in indoor clothing weighing 5 pounds for men and 3 pounds for women.
†Shoes with 1-inch heels.
Source of basic data: Build Study, 1979. Society of Actuaries and Association of Life Insurance Medical Directors of America, 1980. Copyright © 1996, 1999 Metropolitan Life Insurance Company. Courtesy of the Metropolitan Life Insurance Company. Metropolitan Life Insurance Company
Children are weighed and measured frequently to track growth and determine if there is normal progression. Older patients should be measured yearly to track decreases in height that might indicate alterations in the spine such as those caused by osteoporosis.
Vital Signs Measurement.: Vital signs should be measured at the time of the physical examination. If previous measurements are available, the present ones are compared with them. Blood pressure should be measured on both arms after the patient has been quietly sitting or lying down for at least 5 minutes.
If it is abnormal, it should be measured on both arms and with the patient in a standing position as well. Never take the blood pressure on the arm containing a dialysis shunt or on the side where a mastectomy and lymph node dissection have occurred. If blood pressure is elevated during an office or clinic visit, the pressure should be taken again just before the patient leaves. Many patients become anxious when facing an examination or interview with a physician.
The radial pulse is assessed and, if it is irregular, the apical pulse is counted. Respirations are also assessed, as is the temperature. Techniques for measuring vital signs are presented in Chapter 21. In office practice, the temperature is taken if the patient has a complaint that might alter the body temperature. Respirations are counted if there is a problem in the respiratory system. In the hospital, the full set of vital signs is assessed.
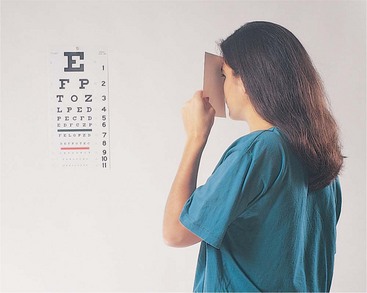
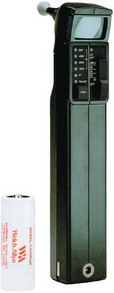
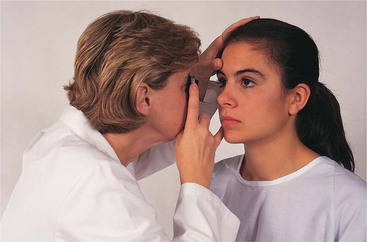
Head and Neck.: Assess the general appearance of the patient, the color and tone of the skin and its condition, appearance of the eyes, and condition of the hair. Does the nose seem stuffy? Is it drippy? Do the teeth appear clean? Does the patient seem to have difficulty hearing? Are the pupils equal in size? Do the eyes move in unison? Are there any extra movements of the eyes or lids? Are the cornea and lens clear or is there an opacity? When was the last eye examination? Is the patient alert and oriented? Does thinking seem logical? Does the neck appear normal? Are there complaints about swollen lymph nodes? Is the neck positioned midline to the head? Does neck movement seem normal and without stiffness? Perform a visual acuity exam as described in Steps 22-2 (Figure 22-5). Hearing can be quickly and easily tested using the audioscope (Figure 22-6). Directions for testing are included with the unit. Each ear is tested with four frequencies.
Chest, Heart, and Lungs.: The chest should rise and fall with respiration symmetrically on both sides of the body. By placing the thumbs over the posterior vertebrae at the level of the tenth rib and noting whether the movement of each thumb is the same upon inspiration, chest excursion can be observed. The spine should be inspected from the rear and the side. It should be in midline with gentle concave and convex curves when viewed laterally. The shoulders should appear to be at equal height. Note whether lordosis (exaggerated lumbar curve), kyphosis (increased curve in the thoracic area), or scoliosis (pronounced lateral curvature of the spine) is present.
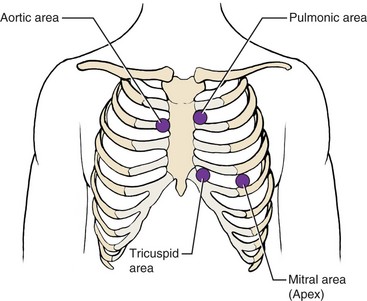
Inspect the anterior chest to see if there is a noticeable point of maximal impulse (PMI) of the heart. It will be located at or close to the fifth intercostal space at the midclavicular line. Place the diaphragm of the stethoscope over this area and listen for the heart sounds, S1 and S2. S1 is the “lub” sound and S2 is the “dub” sound. S1 is loudest at the apex of the heart in the mitral area. S2 is softer at this location and can be heard more loudly over the aortic area (Figure 22-7). The sounds are heard best if the stethoscope is placed against the skin rather than the cloth of the gown or shirt. (Check the Companion CD for audio files of heart and lung sounds.) Count the apical pulse andnote whether it is regular. Determine if there are sounds present other than the two normal heart sounds, such as the swish of a murmur (Steps 22-3). After mastering basic heart sounds, you can practice listening to the valve sounds with the bell of the stethoscope placed lightly on the skin. The locations for listening to the valves are shown in Figure 22-7.It takes considerable practice to hear all but the loudest heart murmurs and to determine the type. You will learn more about abnormal heart sound assessment and further techniques for assessing each body system in your medical-surgical nursing courses.
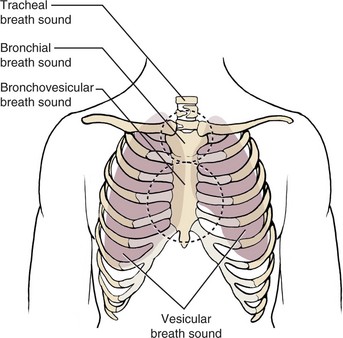
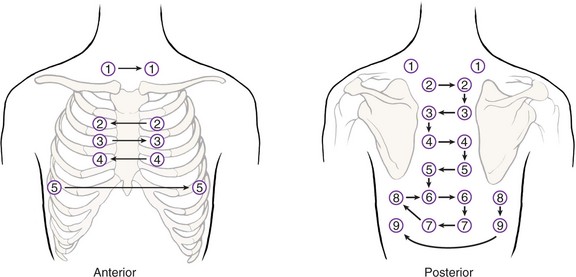
Lung sounds are auscultated using the diaphragm of the stethoscope. The sounds are created by air moving through passageways of varying diameter and length. The sounds vary in pitch and duration depending on the area of auscultation (Figure 22-8). Sounds over the trachea are loud and coarse. They are equal in length for inspiration and expiration and have a slight pause between them. When you are listening over the upper area of the chest over the bronchi, the sounds are harsh and loud and are shorter on inspiration than expiration. There is a pause between the two sounds. The bronchovesicular sounds are those heard over the central chest or back. Normally they are equal in length during inspiration and expiration and have no pause between them. They are medium in tonality and loudness. Vesicular sounds are the soft, rustling sounds heard in the periphery of the lung fields. They are longer on inspiration than expiration and there is no pause between them. Table 22-2 presents adventitious sounds (abnormal lung sounds). Auscultation is done in a systematic manner according to a set pattern (Figure 22-9). Steps 22-4 presents the steps for performing lung auscultation. Auscultation is performed on initial assessment, and once per shift for all bedrest patients and for patients who have a respiratory problem or who are at risk for a respiratory problem.
Table 22-2
| Wheeze | Whistling, musical, high-pitched sound produced by air being forced through a narrowed airway. |
| Rhonchi | Coarse, low-pitched, sonorous, rattling sounds caused by secretions in the larger air passages. |
| Crackles | Fine or coarse sounds. Fine crackles are high in pitch. Coarse crackles are louder and low in pitch. Crackles are similar to the sound produced by rubbing hairs between the fingers close to the ear. |
| Stridor | Croaking sound heard when there is partial obstruction of the upper air passages. |
| Pleural friction rub | Grating or scratchy sound similar to creaking shoe leather or opening a squeaky door. Caused when irritated pleural membranes rub over each other. |
Skin and Extremities.: The skin should be inspected for any rash or lesions (Table 22-3,p. 382). There should be no flaking or excessive dryness. Turgor is checked by gently pinching up a bit of skin on the arm or over the sternum. If the skin is slow to return to a flat position, the patient is most likely dehydrated. If the skin returns to the original position in less than 3 seconds, the turgor is “brisk.” Ask about any changes in moles or other lesions. Check the nails for discoloration or abnormal appearance. Nail fungus may cause this. Abnormally shaped fingertips may indicate a cardiopulmonary problem.
Table 22-3
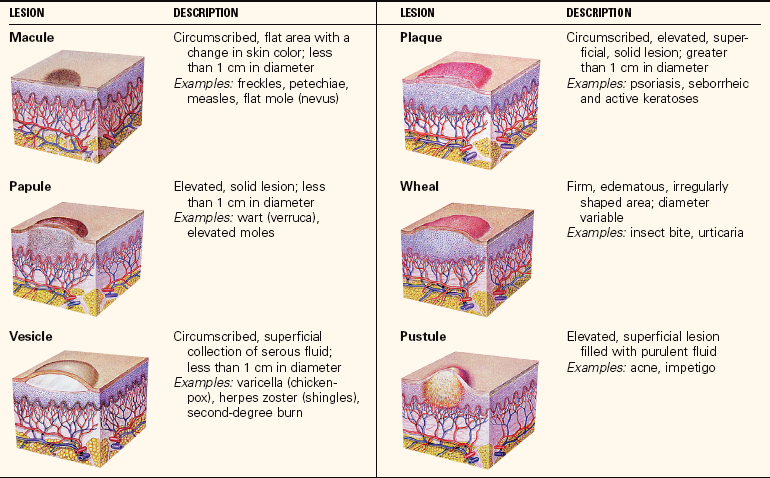
From Lewis, S.L., Heitkemper, M.M., & Dirksen, S.R. (2007). Medical-Surgical Nursing: Assessment and Management of Clinical Problems (7th ed.). St. Louis: Mosby.
Check capillary refill time by observing the color of the nail bed and then compressing the nail bed with the thumbnail or the distal end of a capped pen. Release the pressure and note how quickly the color returns to the nail bed. If the color returns slowly, check again and count the seconds (“one–one thousand, two–one thousand,” etc.) to estimate the number of seconds it takes for the color to return. Normal refill time is less than 3 seconds. This is not an accurate assessment of circulation, but it can be useful.
Peripheral pulses should be compared bilaterally. It is most important to check the dorsalis pedis pulse as this is an indication of the quality of circulation in the lower extremities.
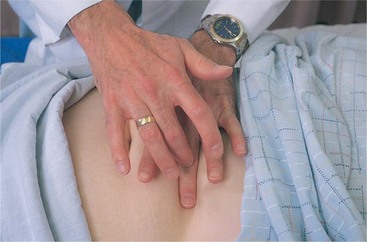
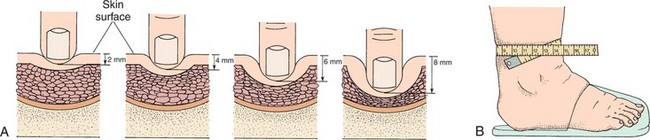
Assess for generalized edema by checking for weight gain over a short period of time. Ask about shoe and ring tightness, and sock patterns left on the ankles when socks are removed. Look for eye and hand puffiness and abdominal fullness. To check for dependent edema, press the fingers into the tissue over the tibia just above the ankle. If an indentation remains, pitting edema is present (Figure 22-10). To describe edema, you can use the terms taut, tight, puffy, indented, or pitting. If pitting is present, it is classified according to its depth.
Inquire about any abnormal sensations in the skin. Is there any tingling or twitching? Can the patient feel the difference between warmth and cold?
Inquire about any change in muscle strength. Does the patient ambulate normally? Is there weakness or paralysis of any extremity? Inquire about fatigue level. Is there any difficulty with bending and moving, as when getting in and out of a chair or a car?
The Abdomen.: Bowel sounds are assessed on admission and once a shift for all patients. Bowel sounds are produced by the contractions of the small and large intestine. They are wavelike in character and are clicks and gurgles that occur from 5 to 30 times a minute. They are quite active after eating. Between meals it is normal to hear only a few sounds. Bowel sounds are judged to be hyperactive if they are very frequent, hypoactive if there are long periods of silence, and absent if no sound is heard for 2 to 5 minutes in any of the four quadrants. Auscultate for bowel sounds with the patient in a supine position. Lightly place the stethoscope over a quadrant (quarter) of the abdomen and listen; if no sound is heard, progress through the other quadrants until sounds are heard or listen for at least 2 minutes (Figure 22-11).
Next, if the patient has a gastrointestinal problem, percuss over each quadrant of the abdomen. This is done by placing the hyperextended middle finger on the skin while the other fingers are raised off the skin and striking that finger with the curved middle finger of the other hand by flexing at the wrist in a tapping motion (see Figure 22-2). The sound will be dull over solid tissue and resonant over air-filled areas. If a lot of resonant areas are present, there is quite a bit of gas in the bowel.
After auscultating and percussing, gently palpate each quadrant of the abdomen looking for areas of tenderness, pain, and abnormal masses. When documenting the findings, a reference to the size of the abdomen establishes a baseline for future comparison.
Genitalia, Anus, and Rectum.: Unless the patient has a specific complaint in these areas, the nurse does not visually assess them. They may be assessed, however, when bathing the patient, performing perineal care, or assisting with toileting. Ask the patient if there are any problems with these areas.
Nursing Diagnosis
Nursing diagnoses are formulated or chosen depending on the problems found on assessment. The data are analyzed and the problems identified. The RN is often responsible for identifying the nursing diagnoses, but the LPN/LVN may need to choose the appropriate diagnoses from the North American Nursing Diagnosis Association–International (NANDA-I) list if no RN is present during the shift. This may be the case in long-term care facilities in the evening or on the night shift.
Planning
Appropriate goals or expected outcomes are written for each nursing diagnosis identified. The nurse sets priorities of care based on the most urgent needs of each assigned patient. A work organization plan is made incorporating all the tasks and assessments that need to be made during the shift.
Implementation
Assessment of patients involves interviewing and gathering a history, performing the physical examination, or assisting the physician while the physical examination is performed.
In many instances, a nursing assessment of the areas of basic need is more appropriate than a total physical assessment by the nurse. A systematic way to perform such an assessment is to use the acronym RNS HOPE. The acronym stands for
The data to be covered for this assessment of psychosocial and physiologic functioning are listed in Box 22-4. Information gathered from this assessment is then analyzed, and a nursing care plan is prepared using the nursing process. After the initial assessment and development of the care plan, additional information is gathered in particularly pertinent areas to update the plan and evaluate progress. Skill 22-1 describes the systematic performance of a physical examination.
Skill 22-1 Performing a Physical Examination
Nursing physical assessments are of various types and depth depending on the situation and the need. The assessment guide presented here is for a basic nursing physical examination. Further assessment would be indicated for areas where abnormalities are detected. With experience, you will add other assessment techniques to this basic examination.

Review and carry out the Standard Steps in Appendix 3.
1. ACTION Interview the patient and obtain a thorough history.
RATIONALE Provides data regarding past medical problems, current complaints, and risk factors for various disorders.
2. ACTION Ask the patient to put on a patient gown.
RATIONALE Provides easy access to various parts of the body for examination.
3. ACTION Weigh and measure the patient. Record the measurements.
RATIONALE Establishes baseline height and weight.
4. ACTION With the patient in a seated position, examine the head and neck.
RATIONALE Allows the blood pressure to stabilize while performing another part of the examination.
5. ACTION Examine the skin and joints of the extremities. Check and compare the peripheral pulses bilaterally.
RATIONALE Provides data about possible joint problems and skin lesions and possible circulatory problems. Detects presence and quality of peripheral pulses.
6. ACTION Measure the blood pressure, pulse, respirations, and temperature.
RATIONALE Supplies information about vital functions of the body.
7. ACTION Auscultate the heart and listen in valve areas and count the apical heart rate.
RATIONALE Determines abnormalities of heart rate and rhythm and presence of abnormal sounds.
8. ACTION Auscultate the lungs and check for bilateral equal chest movement with respiration.
RATIONALE Noting rate, rhythm, and depth of respiration and comparing sounds from one side with the other helps determine if lung abnormalities are present.
9. ACTION Have the patient recline to a supine position on the examining table or bed and assess the abdomen. Auscultate for bowel sounds, percuss for areas of excessive gas, and palpate gently for tenderness.
RATIONALE Determines if bowel sounds are present and normal, whether excess air is in the colon, and whether tenderness is present.
10. ACTION Obtain any needed specimens.
RATIONALE Provides specimens for ordered diagnostic tests.
11. ACTION Direct further attention to any area in which a problem was discovered or in which the patient has a complaint.
RATIONALE Gathers data to be brought to the attention of the physician, nurse practitioner, or physician’s assistant.
12. ACTION If an eye examination is indicated, check visual acuity.
RATIONALE Determines whether further eye examination is needed for visual correction.
13. ACTION If need indicates, check hearing using an audioscope.
RATIONALE Screens for hearing abnormalities requiring referral for further testing.
14. ACTION Document the findings of the physical examination.
RATIONALE Provides a written record of the findings. Provides baseline data with which future assessment can be compared.
15. ACTION Allow the patient to dress and ask if there are any questions.
 Review the physical changes of aging before deciding that a finding is “abnormal” in the elderly person.
Allow the elderly patient time to adjust to position changes and assist the person to move slowly.
If any neurologic abnormality is noted, perform a neurologic check (see Skill 22-2).
During the assessment, question the patient about the latest dental and eye exams. Inquire as to status of diagnostic tests recommended periodically for preventive health care and cancer detection.
1. If you have a patient who cannot communicate verbally with you and who seems confused, how would you go about obtaining the assessment data you need?
2. If you are doing an assessment on a patient who came in with a respiratory problem and you notice a suspicious-looking mole on the lower leg, how would you go about getting the physician to pay attention to that finding?
Each patient should also be assessed at the beginning of each shift or shortly thereafter. This is a quick head-to-toe assessment on which the nurse establishes priorities of care and organizes the work for the shift (Box 22-5,p. 386).
Patient and Family Teaching: A good time to do teaching regarding preventive health care is while you are assessing the patient. Topics can include the following:
• The need for regular physical examinations
• Recommended periodic diagnostic tests
• The necessity of regular dental examinations
• The warning signs of cancer (Patient Teaching 22-1,p. 386)
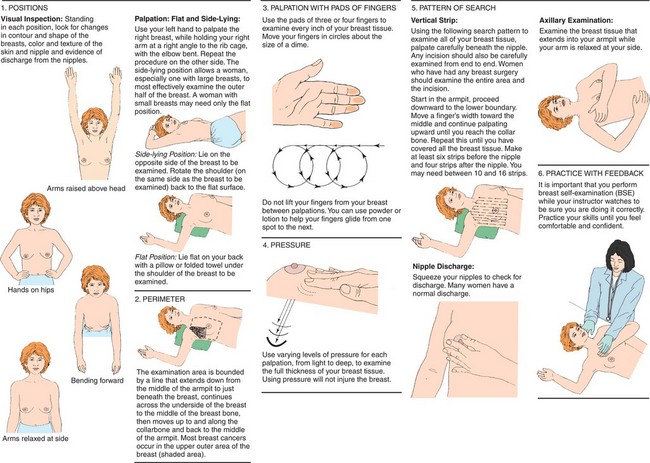
• The way to perform breast self-examination (Figure 22-12,p. 387) (Cultural Cues 22-2,p. 388)
Patients are also taught about the purpose of diagnostic tests ordered and what they will experience when undergoing them. Every patient should inquire about recommended diagnostic tests: digital rectal exam, stool for occult blood, sigmoidoscopy or colonoscopy, prostate-specific antigen (PSA) level (men), mammography and Papanicolaou (Pap) smear (women), blood glucose level, complete blood count (CBC) and metabolic panel of laboratory tests, urinalysis, full eye examination, and hearing test.
Assisting with a Physical Examination: Nurses often assist the examiner with various aspects of the physical examination. You may be asked to do the initial screening of the patient before the patient is seen by the examiner. A brief history of any complaints is obtained, vital signs are taken, and the patient is prepared for the examination. You should explain the examination procedure to the patient, answer any questions the patient has, and generally try to put the patient at ease. The examiner will explore each part of the body in considerable depth.
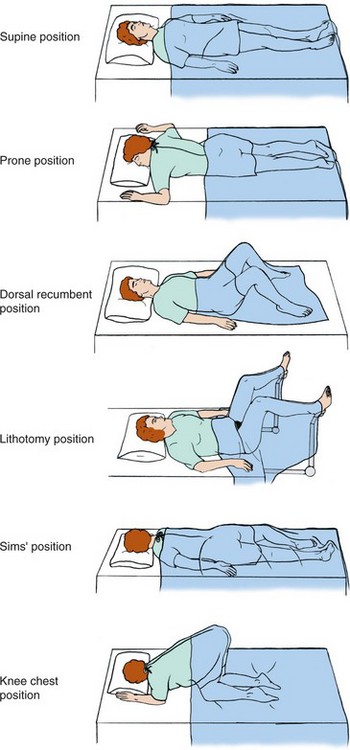
Positioning and Draping.: You will prepare the patient for the particular type of examination the examiner is going to perform. Most examinations begin with the patient seated on the end of the examination table with a drape over the lap and legs. The patient will then assume a supine position and the drape is pulled up over the upper body so that the chest and/or abdomen can be exposed. For the lithotomy position used to examine the female genitalia and for the pelvic exam, stirrups are used to hold the patient’s feet in an elevated position. The pillow can be brought down from the head of the table to cushion the patient’s head while in this position. The patient’s buttocks should be right at the end of the table.
The knee-chest position is sometimes used for a rectal examination. A lateral or Sims’ position is used for a flexible sigmoidoscopy examination of the lower colon. A prone position may be needed for examination of lesions on the back or removal of lesions on the back of the legs or on the back (Figure 22-13).
The primary purpose of draping the patient is to prevent unnecessary exposure of the patient’s body during the examination. A patient who feels exposed and embarrassed will be tense, restless, and less able to cooperate. Proper draping contributes to the patient’s feeling of being cared for and promotes relaxation. The drapes also provide some warmth and prevent chilling.
The drapes may be of cloth or paper. The examining gown is also used as part of the drape as it can be arranged to expose and cover different parts of the body as needed. To drape for the lithotomy position, provide a draping sheet or a bath blanket turned so that one corner forms a triangle that falls between the legs.
Elements of the Physical Examination.: Before a pelvic examination, the bladder should be emptied. If a urine specimen is required, it is obtained before the patient undresses for the examination. A labeled container and directions for collection of the specimen are given to the patient.
Ask the patient to disrobe and put on an examination gown. The examination table is prepared with a fresh paper cover, a drape is provided, and the necessary equipment for the physical examination is made ready (Box 22-6). Explain to the patient how to put on the gown and how to place the drape. If a pelvic exam and Pap smear are to be performed, a vaginal speculum, gloves, and lubricating jelly for the internal examination are placed conveniently. Fixative for the slide is placed within reach, or the Thin Prep jar is opened. Large cotton-tipped swabs should be within reach. The kit for the smear is opened and labeled and the patient’s name and the date are placed on the end of the slide in pencil. The label is affixed to the Thin Prep jar when that is used. The laboratory requisition slip is filled in. The examination light is positioned so that the examiner can adjust the light.
A female nurse must be present in the room any time a male health care provider performs a pelvic or breast examination of a patient. When the examiner is ready, the stirrups on the examination table are pulled out and the patient is helped to assume a lithotomy position. The drape is kept over the lower half of the patient’s body during the positioning. The examiner takes specimens for the Pap smear and then performs the pelvic examination.
For the male patient, a glove, lubricant, and a test card for occult blood in the stool are placed adjacent to the examination table. The examiner will perform a rectal examination of the prostate for men over age 40.
Other common procedures that the nurse may be asked to perform are a urine dip, a hemoglobin measurement, a random blood sugar measurement, an electrocardiogram, and possibly a spirometry reading. Blood may need to be drawn for blood chemistry tests and a complete blood count. These procedures are covered in Chapter 24.
After the nurse has prepared the patient, the examiner will systematically assess every body system. The ophthalmoscope is used to check the interior of the eye (Figure 22-14). The light in the room is dimmed for this procedure. Pupil response is tested by shining the light into first one eye and then the other and watching the pupils contract.
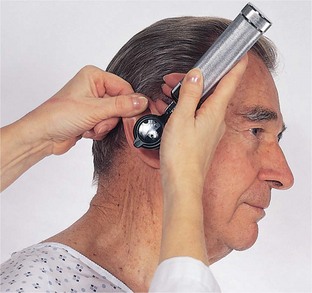
The ears are examined with an otoscope after the outer ear is palpated for tenderness or nodules. With this instrument the physician can visualize the ear canal and the tympanic membrane (Figure 22-15). It is normal for cerumen to be in the ear. If there is an excessive amount, the ear may need to be lavaged.
Hearing may be initially tested with the use of a tuning fork. The Weber test is performed by striking the tuning fork and placing it in the middle of the patient’s forehead or the skull. The patient says whether the sound is heard equally in both ears. The Rinne test compares air versus bone conduction of sound; sound is normally heard longer by air conduction. The tuningfork is struck and placed beside the ear. It is then struck and placed on the bone behind the ear. The patient says which sound lasted longer.
After the head and neck, chest, lungs, and heart have been examined, the patient will be asked to lie down supine on the examination table. The abdomen is assessed with the patient in this position. Further assessment of the extremities may be performed. When the examination is complete, the patient is often asked to dress and then the findings are discussed (Health Promotion Points 22-1).
Special Focused Examinations: At times you will need to perform a neurologic check, which is a brief form of a neurologic examination. The neurologic check is performed at regular intervals on patients who have experienced a head injury or who have had brain surgery. It is done for any patient at risk of increasing intracranial pressure. Skill 22-2 presents the steps of the neurologic check. The pupil size is measured under normal light conditions. Pupils are normally round and equal in size. A flashlight is used to make the pupils constrict. They should constrict briskly when stimulated by the light. Both pupils should get smaller when either eye is stimulated by the light. This is called the consensual reflex. Pupils will also constrict when looking at a near object and then dilate when viewing a far object. This is called accommodation. Normal findings are often documented using the acronym PERRLA, meaning Pupils Equal, Round, and Reactive to Light and Accommodation. Eye muscles are tested by checking extraocular movements (EOMs). The patient is asked to track the nurse’s finger or an object as it is moved to six different positions. The eyes normally move in a coordinated manner. Absence of movement or irregular movement may indicate cranial nerve damage or a neurologic problem. The Glasgow Coma Scale is used in most hospitals to score the neurologic exam (Table 22-4). It provides a baseline against which changes can be evaluated.
Skill 22-2 Performing a Neurologic Check
The neurologic check is done for any patient who has sustained a head injury or had cranial surgery. This assessment is also performed for those patients who have a neurologic problem such as seizures or a suspected central nervous system infection. This assessment is often performed every 2 hours to determine if there is neurologic deterioration.
Review and carry out the Standard Steps in Appendix 3.
1. ACTION Ask the patient questions to test orientation to person, place, and time. Ask if patient remembers where she is, what month it is, who is president, when she was born, or other relevant questions. Do not ask the same questions each time the neurologic check is performed.
RATIONALE Checks degree of mental orientation.
2. ACTION With the room lights subdued, examine the size of the pupils and determine if they are equal in size. Measure the size.
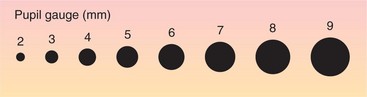
RATIONALE Increasing intracranial pressure, when extreme, causes one or both pupils to dilate.
3. ACTION Turn the flashlight on and position it lateral to the eye on the same plane. Slowly bring it over to shine directly on the pupil of the eye on that side and watch to see whether the pupil constricts. Quickly move the light back away to the side of the head.
RATIONALE The pupil of that eye should constrict briskly and return to its former size after the light is averted.
4. ACTION Perform the same maneuver for the other eye. Briefly shine the light directly onto the pupil and watch for the pupillary reaction. Briefly shine the light directly onto the pupil again and watch the other eye for pupil constriction indicating a consensual reflex.
RATIONALE If the pupil reacts sluggishly, it indicates that intracranial pressure is rising. This should be reported to the physician immediately.
5. ACTION Ask the patient to follow your finger, pen, or pencil with her eyes as you move it to the cardinal (primary) points. Test on one side and then the other.
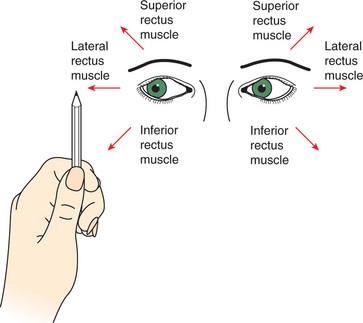
RATIONALE Watch the patient’s eyes to see whether the patient tracks your finger without nystagmus (jerky movements). Checking these eye movements provides information about cranial nerves III, IV, and VI.
6. ACTION Ask the patient to follow your commands. Ask the patient to do specific things, such as rotate the left foot at the ankle or touch the nose with the right index finger.
RATIONALE The ability to follow commands indicates intact cognition and motor pathways.
7. ACTION Test extremity muscle strength by having the patient push against your hands with the sole of one foot and then with the other. Then have the patient grasp your crossed index and middle fingers on both hands with her hands. Check for the degree of strength and equality of strength on both sides.
RATIONALE Decreases in muscle strength can indicate pressure on certain areas within the brain or a problem within the spinal cord or muscles themselves. When weakness occurs on one side only, it can indicate a problem on the opposite side of the brain. Crossing the fingers prevents excessive pain.
8. ACTION Check the patient’s response to a stimulus by pressing on the area near the base of a fingernail with a hard object or by applying pressure with two fingers in a grasp position on the trapezius muscle.
RATIONALE Note whether the patient grimaces, withdraws away from the stimulus, displays flexion posture, or displays extension posture. The Glasgow Coma Scale may be used to rank the patient’s condition (see Table 22-4).
9. ACTION Make the patient comfortable. Document the findings, precisely charting any abnormalities found.
RATIONALE Making the patient comfortable shows caring and concern. Documentation notes result of the examination and provides data for future comparison.
Table 22-4
Glasgow Coma Scale*
| EYE OPENING | |
| Spontaneous | 4 |
| To sound | 3 |
| To pain | 2 |
| Never | 1 |
| MOTOR RESPONSE | |
| Obeys commands | 6 |
| Localizes pain | 5 |
| Normal flexion (withdrawal) | 4 |
| Abnormal flexion posturing | 3 |
| Extension posturing | 2 |
| None | 1 |
| VERBAL RESPONSE | |
| Oriented | 5 |
| Confused conversation | 4 |
| Inappropriate words | 3 |
| Incomprehensible sounds | 2 |
| None | 1 |
*The highest possible score is 15. A score of 7 or less indicates coma.
Vital signs are taken at the time of the neurologic check because diseases that increase intracranial pressure can affect the vital signs, although such changes often do not occur until quite late, when circulation to the brain has been impaired. The pulse and respiratory rates slow while the temperature and blood pressure rise.
Evaluation
Evaluating the techniques of physical assessment and the thoroughness of data collection is an individual responsibility. Questions to ask are as follows:
• Were all areas assessed adequately?
• Were there any pieces of data missing from the assessment form?
• Was the patient comfortable during the assessment?
• Did the interaction remain focused on the assessment?
• Was all equipment available for the examination?
• Was the patient positioned and draped appropriately?
• Were procedures and their purpose explained to the patient?
A thorough, efficient assessment takes considerable practice. Assessment skills will improve with practice over time.
NCLEX-PN® EXAMINATION–STYLE REVIEW QUESTIONS
Choose the best answer(s) for each question.
An assessment is assigned on a 66-year-old woman who has a history of congestive heart failure. She was hospitalized 3 days ago with pneumonia and is confused.
1. Detection of air within the intestinal system is assessed by __________________. (Fill in the blank.)
2. Wet, crinkly sounds in the lungs heard on auscultation are referred to as:
3. A holistic nursing assessment of a patient is necessary to:
1. formulate an effective nursing care plan.
2. establish patient trust in the nurse.
4. When auscultating heart sounds (S1 and S2), listen at:
1. the base of the heart with the bell.
2. an area above the left nipple with the bell.
3. 2 inches below the right nipple with the diaphragm.
4. the fifth intercostal space at the midclavicular line with the diaphragm.
5. When listening to lung sounds, you should: (Select all that apply.)
1. use the bell of the stethoscope.
3. use the diaphragm of the stethoscope.
6. Neurologic assessments or neuro checks are performed for the patient who has experienced an intracranial injury to detect: (Select all that apply.)
7. If the patient requires a pelvic examination, you would position the patient on the table in which position until the examiner is ready to perform the examination?
8. When gathering data for a patient database for a patient with a respiratory complaint, which pieces of information are essential to obtain?(Select all that apply.)
9. When a blood pressure (BP) reading is abnormal on initial assessment, it is best to check the BP:
10. When performing an initial assessment on a patient, which piece of information is most important to obtain?
CRITICAL THINKING ACTIVITIES
Read each clinical scenario and discuss the questions with your classmates.
Scenario A
How could you obtain needed information for your initial assessment from a patient who is deaf?
Scenario B
If you are not certain that the blood pressure measurement you obtained is accurate, what would you do?