Administering Intradermal, Subcutaneous, and Intramuscular Injections
Upon completing this chapter, you should be able to:
1 Identify the principles for safe and effective administration of intradermal, subcutaneous, and intramuscular injections.
2 List the routes used for administering parenteral medications and the advantages and disadvantages of each route for pediatric, adult, and elderly patients.
3 Discuss the signs, symptoms, and nursing management of anaphylactic shock.
1 Choose the appropriate syringe and needle for the type of injection ordered.
2 Follow Standard Precautions when administering injections and disposing of used equipment.
3 Aseptically and accurately withdraw and measure the ordered dose of a medication from a vial or an ampule.
4 Demonstrate reconstitution of a drug from a powder.
5 Demonstrate the correct method for drawing up two types of drugs, including insulin, in one syringe.
6 Use the five rights of medication administration, also checking for patient drug allergies.
7 Locate the appropriate site on a patient to give an intradermal, subcutaneous, or intramuscular injection by identifying correct anatomic landmarks.
8 Correctly prepare, administer, and interpret the results of an intradermal injection, using the five rights and aseptic technique.
9 Correctly prepare and administer a subcutaneous injection with 100% accuracy.
10 Correctly prepare and administer an intramuscular injection with 100% accuracy.
11 Correctly document injections administered after administration.
ampules ( , p. 683)
anaphylactic shock ( , p. 708)
aspirate ( , p. 685)
bevel ( , p. 686)
bleb (bleb, p. 684)
core (p. 690)
diluent ( , p. 691)
fibrosis ( , p. 684)
gauge ( , p. 684)
gluteal ( , p. 703)
induration (p. 698)
injection ( , p. 682)
intradermal (ID) ( , p. 683)
intramuscular (IM) ( , p. 683)
lumen ( , p. 686)
parenteral ( , p. 683)
solute ( , p. 691)
subcutaneous ( , p. 683)
tuberculin syringe ( , p. 684)
urticaria ( , p. 708)
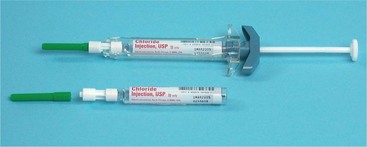
vials ( , p. 683)
viscous ( , p. 687)
Z-track technique (p. 707)
Being asked to give an injection (forcing fluid into a part) to another person makes many student nurses very apprehensive. Giving an injection means the possibility of causing pain. Focusing on the beneficial effect that the medication brings to the patient will help ease your apprehension. Developing dexterity in giving injections in the nursing skill laboratory before approaching a patient with a needle and syringe greatly decreases nervousness. Considerable practice time is required to learn how to manipulate syringes, handle vials (small bottles), accurately measure doses, and skillfully insert needles in the appropriate sites. In this chapter, you are introduced to different types of needles and syringes, the methods for withdrawing sterile solutions from vials and ampules (all-glass containers containing medication), and the sites for injections. Step-by-step procedures are outlined for the intramuscular (IM) (into the muscle), subcutaneous (beneath the skin layers), and intradermal (ID) (into the dermis) routes of administration. Intravenous administration techniques are discussed in Chapter 36.
PRINCIPLES OF PARENTERAL INJECTIONS
Parenteral (not via the gastrointestinal tract) routes require the use of a syringe and needle, or intravenous catheter, to introduce medications into the body tissues or fluids. Medications that are given parenterally must be sterile, nonallergenic to the patient, and readily absorbable. Injections are given for the following purposes:
• When the patient cannot take medication by mouth
• To hasten the action of the drug
• When digestive juices would counteract the effects of the drug if given by the oral route
Once drugs are injected into the body, they cannot be retrieved. It is therefore essential to observe these precautions:
• Ensure that the dose is accurate.
• Select the correct site to prevent damage to the tissue.
• Use sterile equipment and aseptic technique to prevent infection/sepsis.
The parenteral routes involve injecting medications into various layers of the skin or into veins. The skin is the body’s protective covering, acting as a barrier between the person and the environment. The outer layer, or epithelium, is continually sloughing off dying cells. Below the epidermis is the dermis, or true skin, which contains hair follicles, sweat glands, sebaceous glands, blood vessels, and nerve endings (Figure 35-1). Combined, these layers of the skin are 1 to 2 mm in thickness. Directly below the dermis is the subcutaneous or hypodermal layer of connective tissue (also known as superficial fascia), which contains varying amounts of fat cells. In some parts of the body, the subcutaneous layer may be more than 3 cm thick. It anchors the skin to the underlying organs. While not often considered a part of the integument, the subcutaneous layer has considerable interconnectivity with the dermis. The skin has an extensive lymphatic and capillary system; the latter plays a major role in the absorption of medications. The more vascular the tissue, the quicker the medication is absorbed.

Accuracy and care must be used in preparing and administering any parenteral medication because errors can harm the patient (Legal & Ethical Considerations 35-1). The wrong site or route may cause damage to a major nerve or blood vessel. Contamination of the equipment or the medication may cause infection or abscess formation. Box 35-1 presents the principles that must be observed for safe and effective administration of parenteral medications.
ROUTES FOR PARENTERAL MEDICATION
The intradermal, subcutaneous, intramuscular, and intravascular routes are used for parenteral medication administration (Figure 35-2). The intravenous route is covered in Chapter 36.
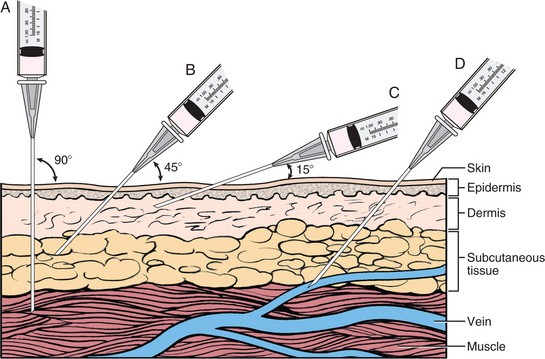
INTRADERMAL ROUTE
The intradermal (ID) route, which deposits small amounts of drug solution into the dermal layer, is used extensively for skin testing, such as tuberculin testing, generally on the inner surface of the forearm. The tuberculin syringe (syringe with graduated measurements to 1 mL) is used to measure these small dosages. A fine 25-, 27-, or 29-gauge (scale of measurement) needle is used at a 5- to 15-degree angle of insertion. This creates a pool of medication under the thin layer of skin that forms a bleb (bump; visible elevation of the epidermis).
SUBCUTANEOUS ROUTE
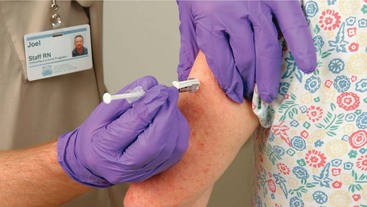
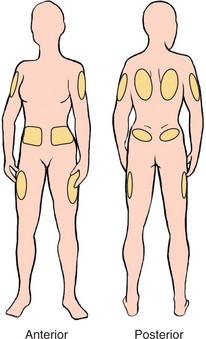
The subcutaneous route is used for injecting medication into the tissues below the dermal layer of the skin, usually in the upper portion of the upper outer arm, the anterior surface of the thigh, or the abdomen where there are no major vessels or nerves. Small amounts of solution (0.05 to 1.0 mL in volume; see agency policy) are injected subcutaneously with either a tuberculin or 3-mL syringe. A 27-gauge, ⅜- to ½-inch, or a 25-gauge, ⅝-inch needle is used. The needle is inserted at a 45- or 90-degree angle depending on needle length and the size of the individual.
Absorption time is slower than with an intramuscular injection owing to the lack of blood vessels in this area as compared with muscle. These sites are used for medications that are to be absorbed slowly for sustained action.
INTRAMUSCULAR ROUTE
Using the intramuscular (IM) route means medication is injected in the muscular layer (Cultural Cues 35-1). The most frequently used IM sites are the deltoid, ventrogluteal, vastus lateralis, and rectus femoris of the thigh. The angle of injection is 90 degrees, and depending on the size of the patient, a needle from 1 to 3 inches in length is used. For most IM injections, the nurse would aspirate for blood (pull back on the syringe plunger to create suction) before injecting the medication, to avoid injecting directly into a blood vessel. The absorption time for IM medications chiefly depends on the form of the drug; aqueous solutions are absorbed more rapidly than those in an oil suspension.
INJECTION EQUIPMENT
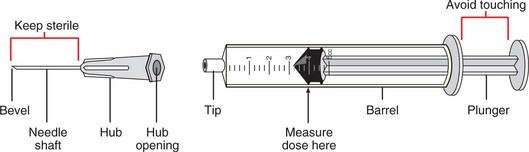
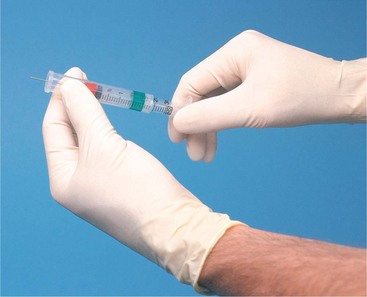
Syringes are composed of a barrel that has a tip to which the needle is attached and a plunger that fits inside the barrel (Figure 35-3). The needle, the tip, the inside of the barrel, and the sides of the plunger must be kept sterile.
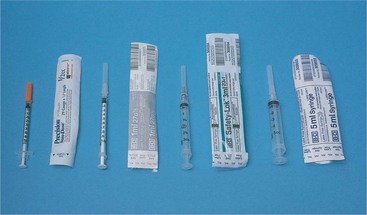
Syringes are made of plastic or glass. The plastic ones are disposable, whereas glass syringes can be re-sterilized and reused. Disposable syringes are used almost exclusively in North America because they are convenient, safe, and economical (Figure 35-4). Nursing units are supplied with various sizes of syringes.
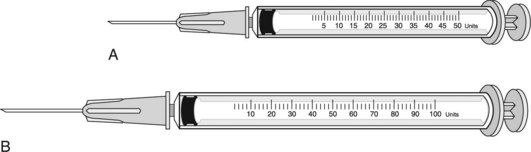
The 3-mL syringe is popular because it is large enough for subcutaneous and most IM injections given by the nurse. The U-100 syringe is used with U-100–strength insulin (Figure 35-5). The insulin needle is part of the syringe and not removable. The insulin syringe is calibrated in units, and sometimes has a milliliter scale on it as well. A minipen is available for self-administration of insulin (Patient Teaching 35-1). Tuberculin (TB) syringes are 1 mL in size and are calibrated to measure as small as 0.01-mL drug doses (Figure 35-6). They also have measurement markings for minims.

A number of injectable medications are supplied in unit-dose cartridge form. These require a special holder for the cartridge and needle in order to administer the injection. Typical unit-dose cartridges and holders include the Carpuject and Tubex systems.
MEASUREMENT SCALES
Each syringe is calibrated and the measurements are marked on the barrel so that the amount of medication can be measured accurately. The syringe chosen for the injection must have a measurement scale that is appropriate for the required dose of medication. Most 3-mL syringes have two scales: one scale measures tenths of a milliliter (0.1 mL) and the other is a minim scale (Figure 35-7). Although the 0.1-mL scale is accurate for tenths of a milliliter, it is not appropriate or accurate to measure doses in hundredths, such as 0.25 mL. A TB syringe easily measures this amount. Because there are 16 minims per milliliter, the minim scale can be used to measure 0.25- and 0.75-mL doses when the 3-mL syringe is used (0.25 mL = 4 minims and 0.75 mL = 12 minims). However, it is preferable to use a TB syringe for such small doses.

NEEDLE GAUGE AND LENGTH
A needle is a metal tube through which liquid medication flows. It consists of a hub fitting onto the end of a syringe, a hollow shaft (also called a cannula), and a bevel (slanted part of the needle tip) ending in a sharp point. The inner part of the cannula is the lumen (opening or interior diameter). Most needles are disposable and are discarded after use. Steel needles may be cleaned, sterilized, and reused.
Needles are available in standard sizes measured in gauge from 13 to 30, although each agency does not buy all sizes; Figure 35-8 shows the most commonly used sizes. The larger the number of the gauge, the smaller the needle. Because an intradermal injection goes under the epidermis (the outer layer of skin), a 25-, 27-, or 29-gauge needle works best. The 25-gauge needle is strong enough to puncture the skin and reach below the dermis for subcutaneous injections. Heavier-duty 20-, 21-, 22-, and 23-gauge needles are needed to penetrate the large muscle layers when IM injections are given in those sites.
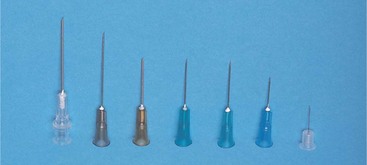
The length of the needle is measured from its beveled tip to the junction of the shaft and the hub. Most often 1-inch or 1½-inch needles are used for adult parenteral injections. Adult IM injections frequently use 22- and 23-gauge needles, although 20- and 21-gauge needles are preferred for viscous (sticky or gummy) solutions or medications in oil suspensions.
PREVENTING NEEDLE STICKS
A needle stick occurs any time a needle accidentally pricks the skin. The danger of the spread of human immunodeficiency virus (HIV), hepatitis B virus, and hepatitis C virus has created much concern about needle safety. Safety syringes are available that have a sheath that covers the needle as it is withdrawn from the skin, totally eliminating the possibility of a needle stick injury (Figure 35-9). There are a variety of safety syringes on the market. The Occupational Safety and Health Administration (OSHA) requires that they be used in most situations in all states. Sometimes a regular syringe and needle are used to draw up potentially irritating medications; the needle is then changed to a safety needle before injection to eliminate the possibility of depositing medication in surface tissue.
If a needle stick occurs, report to the charge nurse immediately, complete an incident/occurrence report, and follow agency policy for the incident (Safety Alert 35-1). The area of the puncture is washed thoroughly with soap and water, and agency protocol is instituted for treatment and follow-up. You should attempt to develop a conscious awareness of where contaminated needles might be left or carried in the immediate environment by other health care workers to prevent needle stick injuries (Assignment Considerations 35-1).
Safety Alert 35-1
Reducing Needle Stick Injuries
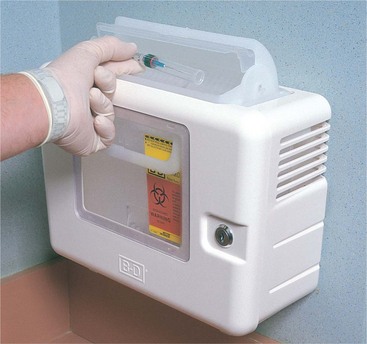
In Healthy People 2010, objective 20-10 is to “reduce occupational needle stick injuries among health care workers.” To help prevent needle sticks when nonsafety syringes and needles are used, needles are not recapped. All syringes and needles are dropped into a sharps container immediately after use (Figure 35-10).
SYRINGE AND NEEDLE SELECTION
In preparing to give an injection, the first step is to select the appropriate size and type of needle and syringe for the medication to be given and for the patient’s age and size. Today the needle and syringe are usually supplied in a preassembled safety unit, although some agencies stock them separately and the desired types can be selected.
Guidelines for types of needles and syringes have been established for the various methods of injecting parenteral medications. For giving IM injections, the 3-mL syringe and a 22-gauge, 1½-inch needle are generally used. A tuberculin or 3-mL syringe and a 27-gauge, ⅜- to ½-inch, or a 25-gauge, ⅝-inch needle are used to give a subcutaneous injection. These sizes are modified as necessary to accommodate different medications, doses, and patient needs.
PREPARING THE SYRINGE FOR USE
When preparing syringes for use (Steps 35-1), you should be sure to observe these principles:
Steps 35-1 Preparing a Syringe for Use
Disposable syringes are packaged in a paper wrapper or are encased in plastic to protect their sterility. The Tubex cartridge must be attached to the plunger, and the Carpuject cartridge is inserted and fastened into a syringe mechanism.
1. ACTION Perform hand hygiene and select the desired size and type of syringe.
RATIONALE Maintains asepsis; ensures that appropriate syringe will be used.
2. ACTION For a paper-wrapped syringe, peel open the wrapper while maintaining asepsis.
RATIONALE The inside of the syringe and the needle must be kept sterile.
3. ACTION For a rigid plastic casing, twist the plastic cap counterclockwise and remove it; slide the cover down off of the barrel of the syringe. When ready, remove the protective cover from the needle by pulling it straight off.
RATIONALE The barrel of the syringe and the protected needle slip out of the top of the plastic sheath.
 For the Tubex Holder and Cartridge
1. ACTION Obtain the unit-dose cartridge and the cartridge holder.
RATIONALE Both parts are needed to assemble the syringe.
2. ACTION Turn the ribbed collar to the “open” position until it stops.
RATIONALE Prepares the unit to receive the cartridge.
3. ACTION Hold the injector with the open end up and fully insert the cartridge–needle unit. Firmly tighten the ribbed collar in the direction of the “close” arrow.
RATIONALE Secures the cartridge in the injector.
4. ACTION Check that medication in the cartridge is the dose ordered and remove any excess air.
1. ACTION Pull out the plunger on the holder mechanism. Insert the cartridge into the holder from the side, sliding the needle through the bottom opening.
RATIONALE Positions the cartridge in the holder mechanism.
2. ACTION Twist the cartridge to lock it at the needle end.
RATIONALE Stabilizes the cartridge in the holder mechanism.
3. ACTION Place the end of the plunger against the screw end of the cartridge and turn the plunger clockwise until fastened.
RATIONALE Fastens the plunger to the cartridge so that aspiration is possible.
4. ACTION Remove unwanted excess medication or air from the unit.
RATIONALE The order may not call for a full dose of the medication; excess air may be present in the cartridge.
• Use aseptic technique in handling the syringe and needle. Protect the surfaces that must remain sterile: the needle, tip, inner barrel, and plunger.
• Discard the syringe or needle if it becomes contaminated during drug preparation for administration.
• Label the syringe with the patient’s name, name of medication, and dose (Safety Alert 35-2).
PARENTERAL SOLUTIONS
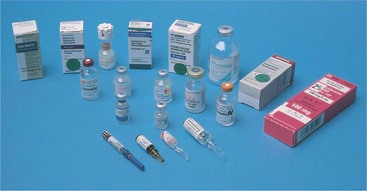
Medications for injection are dispensed in various kinds of units: glass ampules containing a single dose, single-dose vials, mix-o-vials, and multiple-dose vials (Figure 35-11). The mix-o-vial contains powder in the base and solution in the top, which are mixed together for use. The unit-dose cartridge consists of a vial with an attached needle for use with the Carpuject or Tubex holder (Figure 35-12). Parenteral medications must be kept sterile.
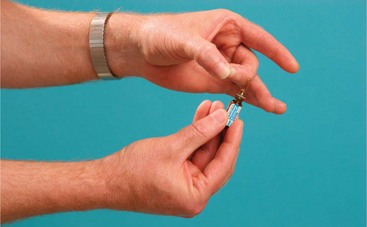
USING A MEDICATION AMPULE
Ampules are made entirely of glass or polyurethane and contain a single standard dose of the medication. Most ampules are prescored on the neck so that the glass will break more evenly with slight pressure at that portion. If the ampule is not prescored, a small file is used to etch a breaking line.
Before opening an ampule, the medication must be removed from the neck or stem of the ampule, or some will be wasted when the ampule is opened. To move the medication, tap or flick the stem several times with a finger to free the trapped solution (Figure 35-13).
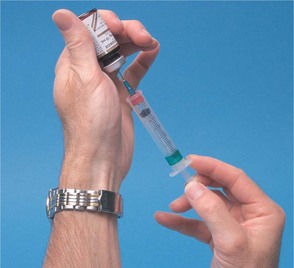
The open ampule is handled very carefully when withdrawing the medication with the filter needle (Figure 35-14). The open ampule may be stabilized on a flat surface for withdrawal of the drug when a long needle is used. If a short needle is used, the ampule may be inverted to withdraw the correct dose. The needle must be beneath the surface of the solution in order to withdraw it. Medication in an ampule is packaged in a specific amount per milliliter (Steps 35-2).

USING A MEDICATION VIAL
A vial is a small bottle with a rubber stopper attached by a metal band. A vial may contain one or more doses of medication. Single-dose vials are small, usually 1 or 2 mL in size; multiple-dose vials are 5, 10, 20, or 30 mL in size or larger. The desired amount of medication is removed by inserting the needle of the syringe through the rubber stopper into the liquid with the vial inverted and drawing up the solution (Figure 35-15).
When the needle is inserted into the vial, care must be taken to avoid coring the stopper. The sharp edges of the needle can create a small core (circular cut-out piece) that can be pushed into the bottle. A core can plug the needle or become a source of contamination (Steps 35-3).
RECONSTITUTION OF A DRUG
Drugs that are unstable in solution are prepared in a powdered or solid form. The solute (solid material) in the vial is mixed with a diluent (specified fluid to dissolve the solute) before the drug is drawn up into a syringe. Sterile water and sterile normal saline are typical diluents. The label or the drug insert packaged with the vial provides instructions about the type of diluent to use and the proper amount to mix with the drug. The solute must be thoroughly mixed with the diluent before use. The label on the vial will indicate the amount of medication per volume, such as 250 mg/mL. Follow directions with the vial for storage of the medication after reconstitution.
COMPATIBILITY OF MEDICATIONS
The number of medications that are given by injection has multiplied over the years, and not all drugs are compatible with others when mixed together. A reaction occurs when a drug combines with an incompatible drug. These reactions range from color change, precipitation, and clouding to invisible chemical changes rendering the drug inactive.
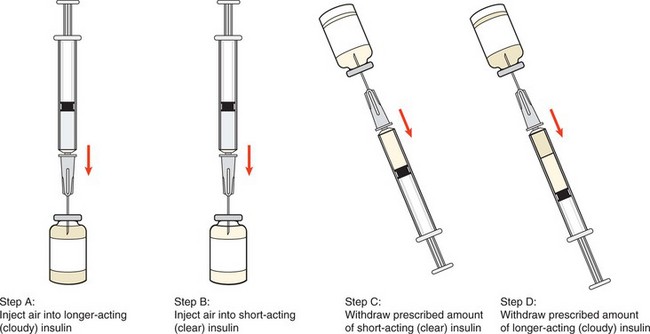
When medications are compatible, as with insulin, you inject an amount of air equal to the desired dose of each drug into their respective vials. This reduces the vacuum inside the multidose vial and makes it easier to withdraw the medication. Air is placed in the longer-acting insulin vial first (Figure 35-16). After injecting the air into the second vial, the desired dose is withdrawn. The needle is again inserted into the first vial, into which air has already been injected, and the exact desired dose of this drug is withdrawn. If too much is drawn up, the contents of the syringe must be discarded and the medications redrawn because there is no way to separate one drug from the other when already mixed in the syringe in order to discard the excess. When mixing medications in the same syringe, care must be taken not to inject any of the medication already drawn up from the first vial into the second multidose vial (Steps 35-4).
APPLICATION of the NURSING PROCESS
Although administering an injection is part of the implementation phase of the nursing process, the other steps are also followed.
Assessment (Data Collection)
Check the physician’s order for the medication. Note the patient’s name, generic/trade medication name, dosage, route, and time. Careful checking prevents medication errors. The identity of the patient who is to receive the injection is carefully assessed to prevent medication errors and harm to the patient. Check the chart for indication of drug allergies and question the patient about allergies each time a parenteral medication is given. An allergy to an injectable medication that goes into the tissue or bloodstream can have very serious consequences.
Therapeutic effects of previous doses need to be assessed. This may include review of the patient’s symptomatic response as well as checking laboratory data, such as white blood cell (WBC) count. If no improvement is seen within 2 to 3 days, the physician should be notified.
Determine the desired action of the medication, potential side effects, precautions, and recommended nursing interventions. It is imperative to know what the medication is supposed to do (therapeutic action) and what adverse/side effects may occur in order to properly assess for their presence. Assess the patient for signs of side effects to previous doses of the medication. If harmful side effects have occurred, the medication must be discontinued and the physician consulted.
Check the expiration date on the label of the medication container before drawing it up. Out-of-date medication should not be administered because it may have changed chemically.
Determine the reason the patient is receiving this medication. If the reason is not evident, the medication order may have been written on the wrong chart.
Determine previous injection sites by consulting the medication administration record (MAR) and the patient. It is best to rotate injection sites to promote the best absorption of the medication and to decrease tissue irritation. Assess the patient’s size and anatomy, and locate the appropriate landmarks at the chosen injection site. Determine if blood circulation is adequate. The needle size and length are determined by the type of injection to be given and the size of muscle tissue and the amount of fat at the injection site on the patient. Adequate circulation is essential for drug absorption.
Nursing Diagnosis
Injections are given for various reasons. The nursing diagnosis that would cover the administration of a particular medication would depend on the purpose of the drug. A few possible nursing diagnoses are as follows:
• Acute pain related to inflammation or surgery (analgesic)
• Risk for infection related to surgical procedure (antibiotic)
• Imbalanced nutrition, less than body requirements, related to inability to utilize glucose properly (insulin)
• Risk for infection related to potential for exposure to tuberculosis (purified protein derivative [PPD] test)
• Activity intolerance related to postoperative discomfort (pain medication)
Planning
Sample goals/expected outcomes for the previous nursing diagnoses might be as follows:
• Pain will be relieved for 3 hours by medication.
• No signs of infection will be present at discharge.
• Blood glucose level will be maintained within normal limits.
• Patient will return for PPD test; result will be read on time.
• Patient will demonstrate willingness to ambulate, cough, and deep breathe within 30 minutes after an injection of pain medication.
• Nausea and vomiting will be controlled by antiemetic medication.
Implementation
Giving injections involves carefully checking and preparing the medication as well as skillfully administering the injection. It is necessary to choose the correct needle size and syringe for the type of injection to be given. Maintaining asepsis while drawing up and giving injections is very important. Always follow the Five Rights when administering a medication (right drug, right route, right dose, right time, and right patient).
Once disposable needles and syringes have been used, they must be discarded in such a way that they cannot pose a danger to others (Home Care Considerations 35-1).
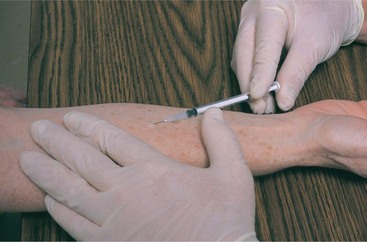
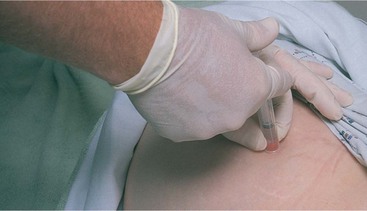
Intradermal Injections: Intradermal injections are most frequently used for tuberculosis or allergy testing. For the intradermal route, the amount of solution to be injected is very small. Extreme care must be taken to measure the dose accurately because the solutions are capable of producing severe reactions. A tuberculin syringe and a short needle, ¼ to ½ inch in length, are used. The ventral aspect of the forearm is the customary injection site, but when this site is not available for use, the dorsal and lateral sides of the upper arm can also be used because they are readily observable. The needle is inserted at an angle of about 5 to 15 degrees between the upper layers of the skin. The injected solution will raise the epidermis to form a bleb. It is then slowly absorbed from the site because the blood vessels are located in the deeper structures of the skin.
Tuberculin is a biologic product used for skin testing for exposure to tuberculosis. The test is based on the fact that a person infected with Mycobacterium tuberculosis develops sensitivity to certain products of this organism, which are contained in the culture extracts called tuberculins. Purified protein derivative (PPD) is the most commonly used tuberculin.
Tuberculin testing is the first step in a series to confirm that a patient is infected with the tubercle bacillus and may have clinical tuberculosis. The Mantoux test (PPD stabilized solution) is the preferred method (Skill 35-1). Box 35-2 provides guidelines for reading the results of a Mantoux test. A positive tuberculin test result denotes that exposure has occurred, but it does not signify the presence of active disease. Follow-up of a positive tuberculin test result involves a chest x-ray and possibly other tests.
Skill 35-1 Administering an Intradermal Injection
Intradermal injections are used for various skin tests, such as the Mantoux test for tuberculosis (TB). The object is to inject an antigen to determine if the patient has an inflammatory reaction, indicating that previous exposure to the antigen has caused antibodies to be manufactured by the body.
Review and follow the Standard Steps in Appendix 3.
2. ACTION Determine when 48 to 72 hours after the injection will occur, or the proper time for reading the result will occur, and if someone will be available to read the result.
RATIONALE Injection may need to be delayed if a weekend, or the patient’s personal schedule, will interfere with proper reading of the result.
3. ACTION Check the medication label against the MAR.
RATIONALE Verification of the name of the medication, dose to be given, route, date, and time is necessary.
4. ACTION Perform hand hygiene and draw up the medication. Perform the second check per the five rights at this time.
RATIONALE Prepares medication for injection. Helps prevent a medication error.
5. ACTION Clean the preparation area and take the injection and the MAR, or an identifying card, to the patient. Perform the third check of the medication with the MAR.
RATIONALE The area should be left clean. Third check helps prevent a medication error.
6. ACTION Properly identify the patient. Select a relatively hairless site, usually on the inside of the forearm in a relatively hairless location. (Agency policy may specify right or left.) Have patient extend the elbow and support the forearm on a flat surface. Cleanse the site well with an antiseptic swab using firm, gentle circular motions or use soap and water. Clean an area approximately 2 inches in diameter. Allow the skin to dry.
RATIONALE The inside of the forearm is used for intradermal injections. If the skin is still wet with alcohol when the injection is given, more stinging is experienced.
7. ACTION Hold the syringe vertically and verify that the exact dose is present in the syringe.
RATIONALE The exact dose must be given.
8. ACTION Don gloves; stand or sit in front of the patient and turn the patient’s forearm palm upward, facing you. With the index finger and thumb, pull the skin taut at the selected site on the forearm. Insert the needle, with the bevel up, at a 5- to 15-degree angle for approximately  inch (3 mm). You should be able to see the outline of the point of the needle. If you are in the dermis, you will feel resistance to the needle; if you can move the needle freely, you are in the subcutaneous tissue and must start over.
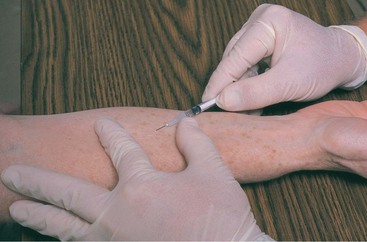
RATIONALE Positioning the needle bevel up minimizes resistance of the skin when the needle is inserted, decreasing discomfort. The needle must be placed sufficiently into the dermis at a 5- to 15-degree angle for the medication to form a bleb and not leak out immediately.
9. ACTION Lift up the needle point slightly and inject the solution slowly; a bleb or bump of 6 to 10 mm in diameter should form.
RATIONALE If a bleb is not formed, the medication has been deposited into the subcutaneous tissue and the test will not be valid.
10. ACTION Carefully withdraw the needle and wipe the skin very gently with the antiseptic swab AFTER you remove the needle: do not apply pressure. Do not recap needle.
RATIONALE Have your fingers clear of the injection site as you remove the needle to prevent accidental needle sticks. Applying pressure will force the medication back out the needle track and will nullify the injection.
11. ACTION Dispose of the syringe and needle by dropping them into the sharps container; remove and dispose of gloves; perform hand hygiene.
RATIONALE Prevents needle sticks to self or others. Prevents transfer of microorganisms.
12. ACTION Circle the injection site with a skin pencil.
RATIONALE Facilitates locating site at time of reading the reaction.
13. ACTION Verify that the bleb remains.
RATIONALE Procedure will have to be repeated if bleb is not visible or is less than 6 mm. If a repeat injection is necessary, select a site at least 2 inches from the original site and document as appropriate.
14. ACTION Read the result of the skin test at the proper interval.
RATIONALE Different antigens used for testing require different intervals before reading the result.
15. ACTION Document the dose on the MAR and record the exact site of the injection.
RATIONALE Documenting the exact site shows where to read the result in 48 to 72 hours.
16. ACTION When result is read, document the findings in the patient record.
RATIONALE Records result of test on the patient record for future reference.
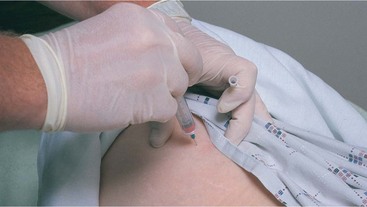
Subcutaneous Injections: Medications administered by the subcutaneous route are absorbed more slowly by the body than via the intramuscular route (Skill 35-2). This route is used to give medications to patients for a variety of reasons. Insulin and heparin are given by this route, as are some preoperative medications and narcotics to relieve pain (Safety Alert 35-3). Sites that can be used for subcutaneous injections are shown in Figure 35-17. For most patients the preferred sites are the lateral surfaces of the upper arm or the anterior and lateral aspects of the thigh. Heparin is given in the abdominal subcutaneous sites (Box 35-3; Nursing Care Plan 35-1, pp. 701–702); the best site for insulin is also the abdomen because it provides the most reliable, steady absorption. In accordance with National Patient Safety Goals, you should encourage your patients to be actively involved with medication administration. For example, teach your diabetic patients to rotate sites for insulin administration. (Home Care Considerations 35-2).
Skill 35-2 Administering a Subcutaneous Injection
Certain drugs must be injected subcutaneously rather than intramuscularly in order to be absorbed properly and at the desired speed. Heparin, insulin, allergy extract, and certain types of immunizations, as well as some other medications, are given subcutaneously.
1. ACTION Check the medication order and determine that the medication is available on the unit. Check for presence of drug allergies.
RATIONALE Ensures that time is not lost acquiring the medication. Indicates if patient might be allergic to the medication.
2. ACTION Determine that the patient is in the room and ready to receive the injection.
RATIONALE Prevents having to wait to give the injection once it is drawn up. Some drugs deteriorate in plastic syringes.
4. ACTION Perform hand hygiene and prepare the medication, checking it three times following the five rights.
RATIONALE Checking the medication three times using the five rights helps prevent medication errors.
5. ACTION Identify the patient by checking the armband with the MAR and having the patient state his name. Alternatively, use a bar code device to check the bar code on the name band and on the MAR.
RATIONALE Prevents medication errors and injury to patients.
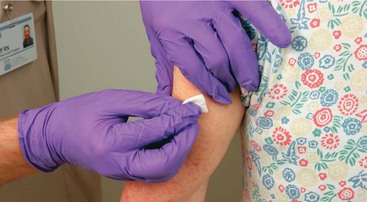
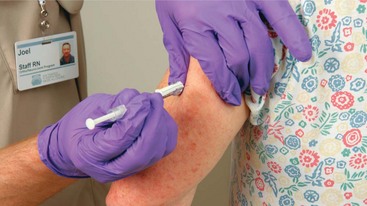
6. ACTION Don the gloves, select the site for the injection, and expose the area for good visibility. Open the alcohol swab package and cleanse the selected site gently by using a circular motion until an area approximately 2 inches in diameter is cleansed. Place the swab between the index and middle fingers of your nondominant hand. Allow the skin to dry.
RATIONALE Cleanses the area; positions the swab for use after the injection. Vigorous rubbing increases blood flow and would increase rapidity of absorption.
7. ACTION Pick up the prepared syringe in one hand and remove the needle guard by pulling it straight off the needle with the other hand to avoid contaminating the needle, dulling it, or suffering a needle stick.
RATIONALE Asepsis must be maintained.
8. ACTION Support the skin at the site by gently bunching up the tissue between your thumb and index finger.
RATIONALE Picking up the tissue helps you assess the thickness of the subcutaneous layer into which you will inject the drug and prevents medication from being injected into the muscle.
9. ACTION Hold the barrel of the syringe in your hand between the thumb and index finger, bracing with the remaining three fingers. Insert the needle into the skin at a 45- or 90-degree angle depending on the length of the needle, with a firm, quick forward thrust; release the pinched-up skin.
RATIONALE Stabilizes the tissue so that the needle will pierce cleanly. A shorter needle uses a 90-degree angle; a longer needle uses a 45-degree angle to stay in subcutaneous tissue.
10. ACTION Press the plunger with a smooth, slow motion until all of the medication is injected.
RATIONALE Places medication in the tissue. Aspiration for a subcutaneous injection is not necessary because vessels in subcutaneous tissue are so small that it is unlikely that the needle would enter a vessel.
11. ACTION Wait 5 to 30 seconds (more time for heparin) and remove the needle by pulling it out on the angle of insertion while stabilizing the skin with the other hand. Activate the safety guard on the needle.
RATIONALE Waiting a bit helps prevent solution from coming up needle track. Pulling the needle out quickly while stabilizing the skin causes the least discomfort for the patient. Enclosing the needle in a guard prevents needle sticks.
12. ACTION Rub the injection site with an alcohol swab using a gentle circular motion (except for heparin and insulin) to help disperse the medication in the subcutaneous tissue so that it will be absorbed. Do not rub an allergy extract injection site.
RATIONALE The action of a subcutaneous injection is expected within 30 minutes.
13. ACTION Dispose of the needle and syringe in the sharps container. Remove gloves; perform hand hygiene.
RATIONALE Prevents needle sticks to self or others. Reduces transfer of microorganisms.
14. ACTION Check with the patient in 30 to 60 minutes to evaluate the therapeutic effect of the medication if it was an analgesic.
RATIONALE Analgesics should be working within 30 minutes. Allergy injection sites are checked at 30 minutes for local reaction. Immunizations cannot be visually evaluated for therapeutic effect; however, patients should be observed for untoward effects.
 The needle angle used depends on the length of the needle and the amount of subcutaneous tissue at the site. If 2 inches (5 cm) of tissue can be grasped, insert the needle at a 90-degree angle; if only 1 inch of tissue can be grasped, use a 45-degree angle for the injection.
Allergy injection sites should be rotated from one side of the body to the other.
Heparin injections are given in the abdomen on both sides of and below the umbilicus outside of a 2-inch radius around the umbilicus from the lower costal margins to the iliac crests. Never aspirate before injecting the heparin.
A record should be kept of where each insulin injection is given. Insulin is absorbed more quickly and uniformly when injected into the abdominal sites.
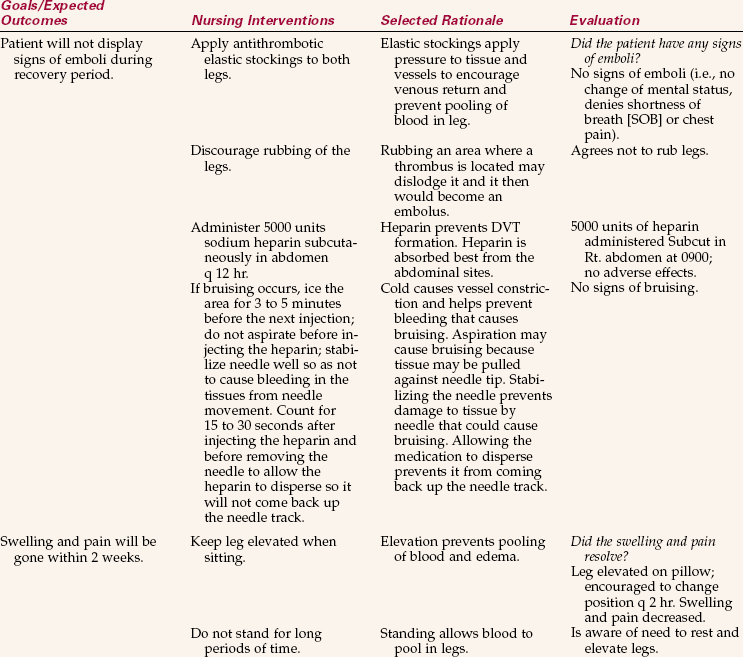
NURSING CARE PLAN 35-1
Care of the Patient Receiving Heparin Injections
Lena Thomas, age 56, was admitted with a deep vein thrombosis (DVT) of the right leg. She has been receiving intravenous heparin but is to be discharged today. She was started on warfarin sodium (Coumadin) by mouth yesterday. Because it takes 3 days for the warfarin levels to be effective for maintenance of anticoagulation, she will be receiving heparin injections twice a day for 2 days. The home health nurse will give the injections.
Intramuscular Injections: Intramuscular injections are used if the patient cannot take medicine orally, the medication is not prepared in an oral form, or a faster action is desired. Intramuscular injections can provide onset of action within 15 minutes because muscle tissue is highly vascular, and drug absorption is faster than by the subcutaneous route. Drugs introduced into a large skeletal muscle mass cause less tissue irritation than drugs administered intradermally or subcutaneously.
Selection of the injection site is a critical decision. Improper site selection can result in damaged nerves, abscesses, necrosis, and sloughing of skin, as well as pain. Therefore, the individual’s stage of development, body build, and physical condition as well as the viscosity and amount of the drug to be administered must be considered in giving an IM injection. If more than 3 mL of medication must be given at one time to an adult, such as rabies vaccine, doses should be divided in half and given in two different large muscle sites.
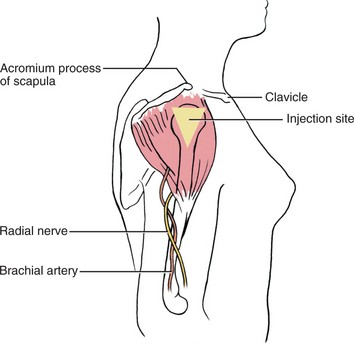
The mid-deltoid muscle is a common location for IM injection; however, the actual area involved is limited because of its proximity to major vessels, nerves, and bones. The area for the mid-deltoid injection is triangular, with the base of the triangle beginning about two finger breadths below the acromion process and extending down to just above the axilla fold (Figure 35-18). The correct site for injection can be located by placing four fingers across the deltoid muscle with the little finger on the acromion process; the site is three finger breadths below the acromion process. This site is convenient because it is usually easily accessible; it is not used in infants or children with underdeveloped muscles.
In the past the dorsogluteal (gluteal: pertaining to the buttocks) site was used; however, it is no longer recommended because of the high potential for injury to the sciatic nerve and the blood vessels.
The ventrogluteal area is an injection site involving the gluteus medius and minimus muscles (Skill 35-3). The muscle layer is thick, and this site has a very small fatty layer. The site can be used both for adults and children and is especially helpful if patients are only able to lie on their back or turn to one side or the other. To locate the injection site, the palm is placed over the greater trochanter, the index finger is put on the anterior iliac spine, and the middle finger is spread as far as possible toward the posterior iliac crest (Figure 35-19). The center of the “V” bounded by the index and middle fingers is the precise injection site to be used. Flexing of the knee and hip helps the person to relax the muscles.
Skill 35-3 Administering an Intramuscular Injection
Many drugs are given only by intramuscular (IM) injection. The site must be carefully selected to prevent injury to the patient. Intramuscular injection sites are shown in Figures 35-18 through 35-21.
Syringe and needle 1 to 3 inches in length
Medication administration record (MAR)
Review and carry out the Standard Steps in Appendix 3.
3. ACTION Verify the medication label with the MAR, checking the medication three times using the five rights. Alternatively, check the bar code on the patient’s bracelet and the code on the MAR.
RATIONALE Adhering to the five rights of medication administration and checking each medication three times for drug, dose, route, date, and time prevents medication errors.
4. ACTION Perform hand hygiene and don gloves. Select and expose the injection site so that the view is unobstructed. For the ventrogluteal site, the patient may be supine or turned to the side.
RATIONALE The ventrogluteal site is the safest site. The IM site chosen must be within defined landmarks; a good view is necessary to inject at the correct location.
5. ACTION Remove an alcohol swab from the package and cleanse a space 2 inches in diameter using a firm circular motion. Place the swab between the fingers of the nondominant hand for later use or place it just lateral to the site. Allow the area to dry.
RATIONALE Prevents transfer of microorganisms. Cleanses the site. Makes swab available after the injection. Wet alcohol on the skin may cause stinging on injection.
6. ACTION Pick up the syringe and verify that the correct dose is in it. If an air bubble is to be used as a lock, add 0.2 mL of air. Invert the syringe so that it is perpendicular to the floor and the bubble rises to a position behind the fluid in the syringe. (Consult agency policy about using an air lock.)
RATIONALE An air bubble is thought to seal the needle track, keeping the medication from leaking back out.
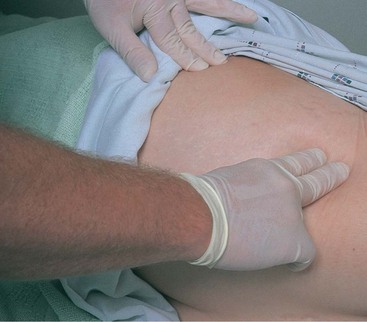
7. ACTION Spread the skin at the site with thenondominant hand, pressing firmly around the site to compress the subcutaneous and muscle tissues.
RATIONALE Taut skin reduces resistance to the needle when it enters the tissues and causes less pain.
8. ACTION Grasp the barrel of the syringe firmly between your thumb and index finger, like a dart, and plunge the needle firmly into the muscle at a 90-degree angle with a quick, firm forward thrust until the desired depth is reached.
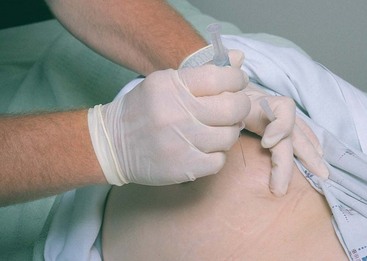
RATIONALE Holding the skin taut and the syringe steady while introducing the needle to the desired depth in one stroke causes the least discomfort to the patient.
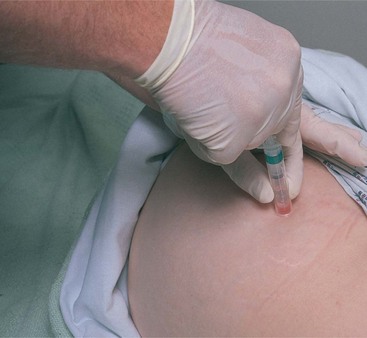
9. ACTION Steady the barrel of the syringe with the nondominant hand and pull the plunger back with the dominant hand to aspirate for blood. If blood returns in the syringe, withdraw the needle and dispose of the syringe and medication. Prepare a new injection.
RATIONALE A medication prepared for IM injection can be harmful if it is injected intravenously. Blood should not be reinjected into tissue.
10. ACTION Inject the medication by pushing the plunger into the barrel with a slow, continuous motion. Be careful not to displace the needle from its original position as you inject.
RATIONALE Injecting slowly is less painful because tissue has time to absorb the medication. A medication prepared for IM absorption may cause local tissue reaction if left in the fatty subcutaneous or intradermal tissue.
11. ACTION Quickly remove the needle, drawing it straight up with a quick motion. Activate the needle guard. Apply pressure with the alcohol swab at the needle site.
RATIONALE Removing the needle with a quick motion is less painful than removing it slowly. Enclosing the needle in a guard prevents needle sticks. Pressure also helps prevent the medication from leaking back up the needle track.
12. ACTION Massage the injection site with a gentle but firm circular motion. Apply an adhesive bandage if there is superficial bleeding.
RATIONALE Massage increases circulation and helps to disperse the medication so that it is absorbed more quickly. Blood should be contained; apply an adhesive bandage if needed.
13. ACTION Dispose of syringe, remove gloves, and perform hand hygiene.
RATIONALE Prevents needle sticks and decreases transfer of microorganisms.
14. ACTION Determine how the patient tolerated the injection. Depending on the medication injected, check for therapeutic effect of the injection at a proper interval.
RATIONALE If adverse effects of the medication occur, document them and inform the physician promptly. If the medication appears to be ineffective, discuss with the physician.
15. ACTION Document the dose and the site on the MAR. If the medication is PRN, document in the nurse’s notes.
RATIONALE The reason for the injection and the patient’s response to it are documented for all PRN medications.
The vastus lateralis site should be used for IM injections in infants less than 12 months of age.
Careful consideration of the size of muscle mass in the elderly patient is necessary to choose a safe injection site. Many elderly have muscle wasting (atrophy). A shorter needle may be necessary. The vastus lateralis and ventrogluteal sites are the preferred sites in the elderly.
Apply pressure to the injection site in the elderly for longer than for a younger person to prevent bleeding and hematoma formation. Clotting time is often decreased in the elderly.
When the patient is receiving a series of injections, check the former sites for induration at the time of choosing a site for the next injection.
If a medication causes excessive discomfort when injected, place ice over the site for 3 to 5 minutes before injecting.

The vastus lateralis muscle is also a preferred IM injection site for adults, children, and infants. The area extends from the anterior lateral aspect of the thigh to the midlateral thigh, a hand’s width below the proximal end of the greater trochanter and a hand’s width above the upper knee (Figure 35-20). The middle third of the muscle is the best site for injection. This muscle can be used when the patient is recumbent with the knee slightly flexed or in Sims’ position or is sitting upright.
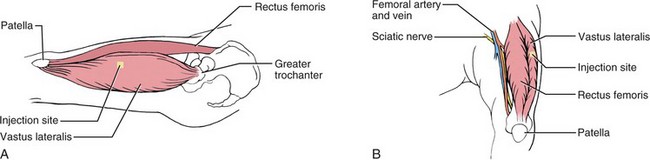
The rectus femoris muscle can also be used as an IM site in the adult and when other sites are contraindicated in children. It is located on the anterior aspect of the thigh (Figure 35-21) and is used by people who give their own IM injections because it is easy to reach. The disadvantage of this site is that the injection may cause considerable discomfort.

Air Lock Technique.: An air lock can be used when giving an IM injection to clear the needle of medication and to seal the track so that the medication does not flow back up into the subcutaneous tissues. To use an air lock, after drawing up the exact amount of medication ordered, draw up a further 0.2 mL of air. When preparing to give the injection, be certain that the needle is at a 90-degree angle and the air is behind the medication so that it will be injected last. The use of an air lock is controversial; check the agency’s policy on this part of the procedure.
Intramuscular Injections in Children.: The site used for giving IM injections to newborns and infants is the vastus lateralis. It is preferable to find another way to give medication to children because IM injections are painful and traumatic for the child. Unfortunately, some pediatric immunizations must be given IM. Ways to decrease injection discomfort are listed in Box 35-4.
The needle size and the angle of the injection depend on the size of the infant or child. For infants a ⅝-inch needle is used, whereas for older children a ⅝- or 1-inch needle may be used. The angle is varied depending on the size of the child and the anatomy; the needle point must reach the desired area in the muscle. An adult may take a 90-degree angle; a child or smaller person may need a 45-degree angle for the injection. When giving a deltoid injection to a child, the injection should be given in the thickest part of the muscle; the needle should point at a slight angle toward the shoulder. Intramuscular immunizations for children over 13 months of age can be given in the deltoid site, unless the muscle appears poorly developed.
When giving injections to children, you must assess and understand their level of biophysical and psychosocial development. Knowledge of the various stages of child growth and development enables you to give an appropriate explanation to the child and to provide emotional support before, during, and after the injection. When it is necessary to restrain a child to give the injection safely, you should have someone hold the child. Your manner can help to reassure the child. If the child is old enough to understand, be honest and say, “It will just hurt for a minute.” After the injection, talk in a soothing way and cuddle the child to reestablish trust.
School-age children want to know how and why things work. Give a clear and simple explanation of why the injection is needed and how it is done. Compliment the child for being good about the discomfort; children thrive on praise and rewards (Communication Cues 35-1).
Teenagers may avoid expressing their real feelings of anxiety and fear as they are coping with the many changes that are hurling them toward adulthood. Many adolescents are extremely modest, so take care to avoid unnecessary exposure of their bodies.
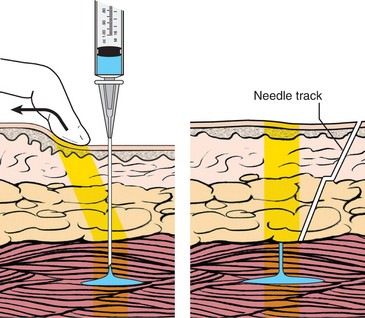
The Z-Track Technique.: The Z-track technique (causing a needle track, or pathway, in the shape of a “Z”) can be used any time an IM injection is given (Figure 35-22). It must be used whenever a deep IM injection of iron dextran (DexFerrum) and other irritating solutions such as hydroxyzine hydrochloride (Vistaril) and several antipsychotic agents are given (check the drug insert that comes with the medication). This method reduces the pain caused by irritating drugs that leak or escape along the track into subcutaneous tissue when the needle is withdrawn (Safety Alert 35-4). When this occurs, the tissues are stained and bruised, and it takes several weeks or longer for the tenderness to subside (Steps 35-5).
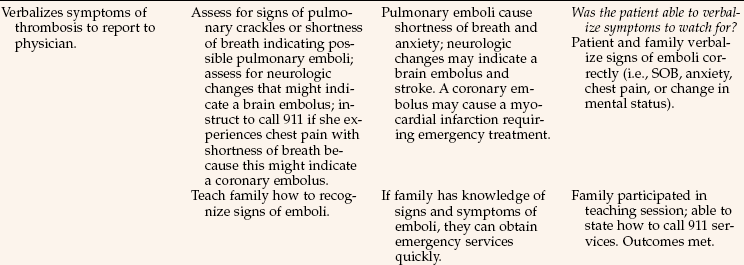
Anaphylactic Shock: When an allergen is taken in by a sensitized person, the reaction can range from mild to severe’to so severe, in fact, that death can occur within minutes. Many medications may cause this anaphylactic reaction, but parenteral medications are most likely to cause it because they are absorbed quickly. Symptoms of anaphylactic shock (circulatory failure from an allergic reaction) include urticaria (a reaction characterized by reddened, slightly elevated patches known as wheals), bronchiolar constriction that manifests as wheezing or difficulty breathing, edema, and finally, circulatory collapse. Circulatory collapse may occur as the initial symptom. Watch for signs of anaphylactic shock and, if necessary, administer immediate, lifesaving treatment. In accordance with 2009 National Patient Safety Goals (Goal 16), nurses should be vigilant for changes in patient condition and respond appropriately (Safety Alert 35-5).
Other types of allergic reactions may occur for up to 2 weeks after the medication was administered. Allergic reactions are more common the second or successive times the medication is received.
Evaluation: Administration of an injection is evaluated in terms of whether it was given properly and whether it achieved its purpose (Table 35-1). Assess for any adverse reaction to the medication and check the injection site for signs of inflammation.
Table 35-1
Evaluating the Effectiveness of Injections
| The main way to determine the effectiveness of injections is to assess for signs that the desired effect is taking place. This means checking to see if the signs and symptoms of the problem for which the medication is being given are subsiding, and looking at laboratory test results. Here are some specific examples: |
| TYPE OF DRUG | EVALUATION CRITERIA |
| Antibiotic | Temperature is returning to normal. Signs of infection are subsiding: decreased redness, swelling, pain, or tenderness. WBCs are returning to normal. |
| Antiemetic | Nausea subsides within 30–60 min; vomiting is controlled for 3 hr. |
| Narcotic medication | Pain subsides within 30–60 min and stays under control for 3-4 hr. |
| Heparin | No signs of new clots are found (negative Homans’ sign). APTT lab values are within therapeutic limits. |
| Allergy extracts | Allergy symptoms subside: decreased sneezing, stuffy head, and runny nose. |
| Iron dextran (Imferon) | Red blood cell count, hemoglobin, and hematocrit rise toward normal levels. |
| Preoperative sedatives | Patient becomes drowsy and more relaxed. |
Key: APTT, Activated partial thromboplastin time; WBCs, white blood cells.
Documentation: Injection documentation should include the medication, the dosage, the route, and the site at which the injection was given. The testing substance is noted for intradermal injections. Routine injections are recorded on the MAR only. The PRN (as needed) and stat doses may also be recorded in the nurse’s notes, along with the reason the medication was given and the result and duration of effect of the injection; check agency policy.
NCLEX-PN® EXAMINATION–STYLE REVIEW QUESTIONS
Choose the best answer(s) for each question.
1. The reasons for using the parenteral route to administer medications include:
1. parenteral medication lasts longer than an oral medication.
2. it is the least expensive method.
3. it is easier to measure an accurate dose.
4. the parenteral route allows more rapid absorption than the oral route.
2. During an intramuscular injection, the medication is absorbed quickly. This is because:
1. the muscle tissue is more vascular.
2. the needle is entering the dermis.
3. A patient needs an intradermal injection for a Mantoux test, but he currently has bilateral forearm casts in place. Which of the following would be the best alternative site?
4. Which nursing diagnosis would be the priority if a patient had a severe anaphylactic reaction to a parenteral medication?
5. The physician orders 15 units of Humulin N (long-acting) and 5 units of regular insulin (rapid acting). Put the following steps in the correct order to properly mix two insulins in one syringe.
____ 1. Inject 15 units of air into the vial containing long-acting cloudy insulin.
____ 2. Withdraw 15 units of the long-acting cloudy insulin.
____ 3. Withdraw 5 units of the rapid-acting clear insulin.
____ 4. Inject 5 units of air into the vial containing rapid-acting clear insulin.
6. When giving a Z-track injection, the nurse would retract the surface tissue with one hand before inserting the needle. The nurse would release the tissue to return to its normal position:
1. as the solution is slowly injected.
2. as the needle is removed from the tissue.
7. Which of the following is the safest place to give an IM injection for an adult patient?
8. When the nurse is preparing a parenteral injection, medical asepsis is permissible for handling the:
9. The site of choice for a DTaP injection in an 8-month-old is the:
1. upper outer quadrant of the gluteus.
2. vastus lateralis of the thigh.
10. The nurse has just given the patient an injection. Massaging the area is the appropriate nursing action for which medication?