Trauma management
Angus C Cameron, Richard P Widmer, Paul Abbott, Andrew A C Heggie and Sarah Raphael

Introduction
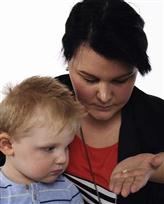
The management of dentoalveolar trauma in children is distressing for both the child and the parent (Figure 9.1), and often difficult for the dentist. However, trauma is one of the most common presentations of young children to a paediatric dentist. The patient’s emergency must be the dentist’s routine. The child should be carefully assessed regarding treatment needs before commenting to parents because many cases are not as bad as they first appear. Initial reassurance to both parent and child is of great value. Trauma not only compromises a previously healthy dentition but may also leave a deficit that affects the self-esteem and quality of life, and it commits the patient to lifelong dental maintenance.
Guidelines for management of dental injuries
The International Association of Dental Traumatology published guidelines in 2007 with recommendations for the management of dental injuries based on a review of the literature and consensus opinions. These guidelines provide views on care based on the published evidence and the opinions of professionals who practise in this field. As is stated in the guidelines, there is no guarantee of success and as further research is published, clearly the recommendations in these guidelines will be updated. The practitioner should be aware that clinical judgement is still required, depending on the presentation of each case. An internet-based set of guidelines has also been developed and sponsored by the International Association for Dental Traumatology (www.dentaltraumaguide.org). This is a free website that practitioners can use to quickly and easily access information about how to manage dental injuries, the prognosis of the teeth and many other details.
Aetiology
Most injuries are caused by falls and play accidents. Luxation injuries to upper anterior teeth predominate in toddlers because of their frequent falls during play and attempts at walking. Injuries are generally more common in boys. Blunt trauma tends to cause greater damage to the soft tissues and supporting structures, whereas high-velocity or sharp injuries cause luxations and fractures of the teeth.
Predisposing factors
• Class II division 1 malocclusion.
• Overjet 3–6 mm – double the frequency of trauma to incisor teeth compared with 0–3 mm overjet.
• Overjet >6 mm – three-fold increase in the risk.
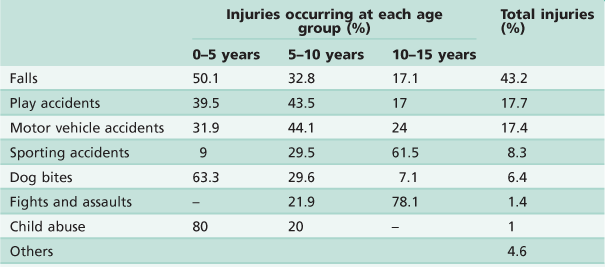
• The study summarized in Table 9.1 by Hall (1994), from the Royal Children’s Hospital in Melbourne, shows that falls and play accidents account for the majority of injuries. Lam and others (2008) also reported that dental trauma in an Australian rural population was most frequently the result of falls, accidents while playing and while participating in sports. Importantly, although accounting for only 1% of all injuries, over 80% of child abuse occurs in the very young child.
Frequency
• 11–30% of children suffer trauma to the primary dentition. This figure may represent up to 20% of all injuries in preschool children.
• 22% of children suffer trauma to the permanent dentition by the age of 14 years.
• Male : female ratio is 2 : 1.
• Peak incidence is at 2–4 years and rises again at 8–10 years.
• Upper anterior teeth are the most commonly involved teeth, especially the central incisors (in both the primary and permanent dentitions).
• Usually only a single tooth is involved, except in cases of motor vehicle accidents and sporting injuries.
Dog bites account for a significant number of injuries and every year several children are killed by dogs. It is common that the dog is known to the child and it cannot be stressed too highly that children must be supervised when around even the most timid of animals.
Child abuse
Child abuse is defined as those acts or omissions of care that deprive a child of the opportunity to fully develop his or her unique potential as a person either physically, socially or emotionally. There are four types of child abuse:
Dental neglect is the knowing failure of a parent or guardian to access treatment of orofacial conditions for a child. When left untreated, such conditions may adversely affect a child’s normal growth and development.
The true incidence of child abuse and neglect is unknown, and although there is increasing awareness and reporting, professionals are still reluctant to deal with it. The first step in preventing abuse is recognition and reporting. Dentists are in a strategic position to recognize and report mistreated children because they often see the child and parent/caretaker interacting during multiple visits and over a long period of time.
The orofacial region is commonly traumatized during episodes of child abuse (Figure 9.2). Injuries that do not match the given history, bruising of soft tissue not overlying bony prominences or injury that takes the shape of a recognizable object, and multiple injuries of different ages, may be the result of non-accidental trauma. Bite marks in children represent child abuse until proven otherwise. The characteristics and diagnostic findings of child abuse, and the protocol of reporting such cases, should be familiar to the dentist so that appropriate notification, treatment and prevention of further injury can be instituted.
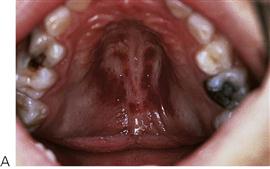
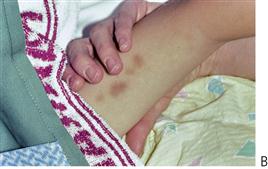
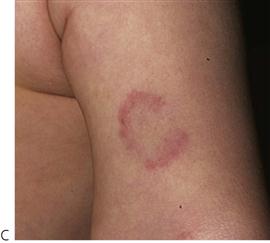
Figure 9.2 (A) Child abuse caused by sexual assault by a family member. Commonly the perpetrator is known to the child. (B) Bruising on the arm of an infant discovered during routine dental treatment under general anaesthesia. (C) An 18-month-old infant who was bitten by an older child. Good photographic records are required and the wounds should not be washed until specimens for DNA testing of saliva are taken. The child assault team will organize appropriate input from social workers, paediatricians and the police, if necessary. The dentist should also be aware of the legal requirements for recording of evidence (i.e. standardized photography with measuring scale).
Whenever injuries are inconsistent with the history, the patient must be investigated for abuse. There is a legal obligation in some countries or states to report the suspicion of child abuse or sexual assault. In Australia, child abuse teams are available at all paediatric hospitals or through the departments of family and community services.
History
As dental injuries may become the subject of litigation or insurance claims, a thorough history and examination is mandatory. Where possible, injuries should be photographed. An accurate history gives important information regarding:
Examination
Examination should be undertaken in a logical order. It is important to examine the whole body, as the patient may present first to the dentist and other injuries may also have occurred (Figure 9.3 and see Chapter 1).

Figure 9.3 One of the most convenient ways to examine young children is with the child’s head in the dentist’s lap. The child can see the parent, who gently restrains the arms. This gives an excellent view of the upper teeth and jaws, where most trauma occurs.
Trauma examination and records
• Extra-oral wounds and palpation of the facial skeleton (Figure 9.4).
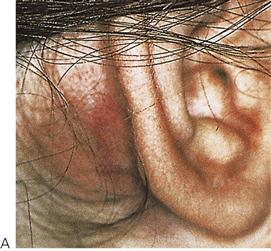
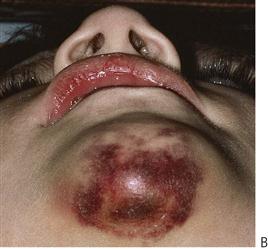
Figure 9.4 (A) The ‘battle sign’, or bruising of the mastoid region, is associated with a base-of-skull fracture. Examination must include all areas of the head and neck, which often requires parting the hair to detect lacerations and bruising. (B) Bruising is a collection of blood which will fall to the most dependent point. The chin-point ecchymosis shown here is often associated with gingival degloving, laceration and/or a mandibular fracture.
• Injuries to oral mucosa or gingivae.
Assessment of cranial nerves involved in facial trauma
| I | Olfactory | Olfaction |
| II | Optic | Vision |
| III | Oculomotor | Movements of the globe |
| IV | Trochlear | Superior rectus |
| V | Trigeminal | Muscles of mastication |
| VI | Abducent | Lateral rectus |
| VII | Facial | Muscles of facial expression |
| VIII | Vestibulocochlear | Hearing and balance |
| IX–XII | Hypoglossal | Tongue, pharyngeal and shoulder function |
Head injury
Closed head injury is the most common cause of childhood mortality in accidents. Between 25% and 50% of all accidents in children aged up to 14 years involve the head. If there is any suggestion that a head injury has been sustained, the child should be immediately medically assessed, preferably in a paediatric casualty department.
Signs of closed head injury
• Altered or loss of consciousness.
• Bleeding from the head or ears.
Dentoalveolar injuries may take second place if there is central nervous system involvement. As a head injury may be long-lasting, initial management and replantation may be possible in consultation with other medical practitioners. If there is any loss of consciousness, hourly neurological observations should be commenced. The Glasgow Coma Scale is commonly used in Accident and Emergency departments to assess the severity of head injury and prognosis (see Appendix H).
Investigations
Radiographs
The request for radiographs should only be made after a thorough history and clinical examination. There is great value in using extra-oral films in young children, e.g. panoramic radiographs. In the very upset or difficult child, it may be the only way that some clinical information can be gained in the acute phase of management.
When taking intra-oral radiographs, several periapical images from different angulations should be taken for each traumatized tooth, plus an occlusal radiograph. These are especially important to determine the presence of root fractures and tooth luxations. As a baseline, all traumatized teeth should be radiographed to assess:
Guide to prescription of radiographs
Condylar fracture (Figure 9.5)
• Panoramic radiograph, closed and open mouth.
• Cone-beam tomography (CBCT) or computed tomography (CT) scan.
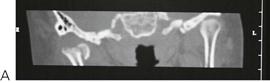
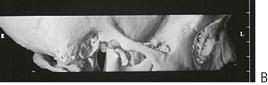
Figure 9.5 Use of computed tomographic reformatting to visualize fractures to the mandibular condyle. (A) Coronal section showing an intracapsular fracture with medial displacement of the condylar head due to the pull of medial pterygoid muscle. (B) 3-dimensional reconstruction showing the degree of displacement of the condylar head following chin-point trauma.
Maxillary fractures
New imaging technologies have superseded older-style views such as the lateral oblique, the reverse Townes’ and Waters’ (occipitomental 30°) projections. While such radiographs may be valuable in particular cases, contemporary practice indicates the use of fine-slice CT or cone-beam tomography for an accurate assessment of middle third fractures in children.
Pulp sensibility tests
Pulp sensibility tests provide an essential baseline measure of the pulp status. It is common that the initial responses at presentation may be inaccurate; however, it is important that results are recorded for later comparison. The results of pulp sensibility tests performed immediately following trauma are also very useful predictors of the prognosis of traumatized teeth. Teeth that do respond to these tests are more likely to recover than teeth that do not respond. Young children often find it difficult to discriminate between the touch of the tester and the actual stimulus itself, so the clinician must be aware of the possibility of false results. In cases that are difficult to diagnose, isolation of individual teeth under rubber dam may be required.
Pulp sensibility tests are used to help assess the status of the pulp. Previously and erroneously termed ‘vitality tests’, the contemporary terminology (i.e. sensibility tests) stresses the fact that the neural and vascular components of the pulp tissue need individual consideration. Sensibility is defined as the ‘ability to respond to a stimulus’ – which is what is tested with thermal and electric pulp tests. It is important to understand that a tooth may not respond to a thermal or electric pulp test but it may still have an intact blood supply. Such discrimination of the health of the pulp is important in planning treatment.
Thermal pulp tests
Responses to cold stimuli give the most reliable and accurate results in children (even with immature teeth). The carbon dioxide (dry ice) pencil is regarded as the most convenient. Cold sprays may also be used but they are not as accurate or as reliable. Cold tests have the advantage that assessment of the pulp is possible while temporary crowns and splints are in place.
Electric pulp tests
Electric pulp tests may give a graded response to stimuli. When using these instruments, the current should be slowly increased so that sudden painful stimulation of the tooth is avoided.
Percussion
There are two reasons to percuss teeth:
• Tenderness to percussion gives information about the extent of damage to the periapical tissues and the periodontal ligament. Tenderness to percussion can also indicate that a tooth has been concussed or subluxated. The percussion of luxated teeth will usually be painful but there is no need to percuss teeth that are obviously luxated on visual examination.
• The sound in response to percussion, especially during follow-up examinations, is also an important indicator of the presence of ankylosis.
Transillumination (Figure 9.6)
This is an extremely useful, non-invasive technique to assess the presence of cracks and/or fractures, and subtle alterations in crown colour which may indicate a change in the pulp status.

Other considerations in trauma management
Having carefully assessed the patient, the only treatment necessary may be to reassure the child and parent, and to discuss the various possible sequelae such as pulp necrosis, resorption, infection and facial swelling.
Fasting requirements
If the patient requires extensive work under general anaesthesia, it is important to check fasting details. A child over 6 years of age must be fasted for at least 6 hours without solids or liquids. Children under the age of 6 years must be fasted for 6 hours without solids and 2 hours without liquids.
Immunizations
If a child has sustained an injury that involves contamination of the wound with soil, especially from a farm area, their tetanus immunization status must be determined. If the child has completed their normal immunization schedule, under normal circumstances boosters are not required.
Maxillofacial injuries
Fractures of the facial bones are uncommon in children and account for less than 5% of all maxillofacial fractures. Consequently, few surgeons have extensive experience in this area and the management of these cases must embody an understanding of the implications of such injuries for the growing child (Figure 9.7).
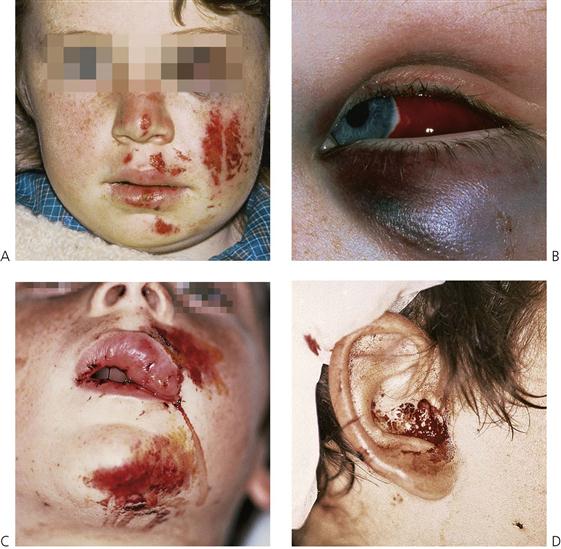
Figure 9.7 (A,B) This girl fell from a Tarzan rope on to her face. There is extensive ecchymosis and subconjunctival haemorrhage. While many of the signs of a zygomatic fracture are present, the immaturity of the frontozygomatic suture allowed for some displacement and there was no fracture evident. (C,D) Many children suffer chin-point trauma and it is important to check the mandibular condyles. This boy sustained a right subcondylar fracture. There was bleeding from the external meatus as the condyle had perforated the anterior wall of the meatus. Under no circumstances should the ear be suctioned because the ossicles may be removed if the tympanic membrane is ruptured.
Principles of management
Management of maxillofacial trauma is complicated in a child by the unerupted dentition, anxiety, growth considerations and the common association of closed head injuries that may delay definitive treatment. The use of internal fixation such as mini-plates and screws must be undertaken with care due to the potential for damaging developing tooth buds. Intermaxillary fixation, occasionally in conjunction with trans-osseous wires is well tolerated in children. While arch bars may be used as dental fixation, silver cap splints may be still used effectively. With accurate reduction, fixation and immobilization, fractures unite within 3 weeks. Prophylactic antibiotic treatment and strict oral care must be maintained. Non-union or fibrous union is rare.
Fractured mandible
Most mandibular fractures involve the parasymphysial region (due to the position of the unerupted canine) and the condylar neck either in isolation or in combination.
Clinical signs
• Stepping at the lower border.
• Sublingual/buccal ecchymosis (Figure 9.8).
Condylar fractures
Fractures of the mandibular condyle are likely to be under-diagnosed in children and comprise up to two-thirds of all mandibular injuries. This injury usually results from trauma to the lower border of the chin. If a subcondylar fracture occurs, the condylar head is usually displaced antero-medially by the action of the lateral pterygoid muscle. Depending on the displacement of the fragments and the compensatory posturing of the mandible, there may be deviation of the chin to the affected side or there may be no occlusal disharmony. Bleeding from the external meatus may occur due to perforation of the anterior wall of the auditory canal by the condylar head (see Figure 9.7C,D). Bleeding or discharge from the ear should be investigated by an otolaryngologist but suctioning of the external meatus is contraindicated due to the potential for disturbance of the ossicular chain should there be a perforation of the tympanic membrane. Displacement of the condylar head into the middle cranial fossa has been reported but is a rare event.
Management
Treatment is almost always conservative with a short period of rest followed by active movement to prevent temporomandibular joint ankylosis. Fractures involving telescoping of the condyle and distal fragment may be successfully treated with functional appliances for 2–3 weeks or longer, allowing better remodelling. Bilateral subcondylar fractures may result in significant displacement and an anterior open bite. A short period of intermaxillary fixation with posterior bite blocks to distract the fragments may be indicated where there has been gross displacement of the condylarhead, or in severe cases of bilateral condylar fracture.
As the condylar neck is relatively broader in the child with a greater volume of cancellous bone, fractures of the articular surface are more common than in the adult. In cases of intracapsular fracture (Figures 9.5, 9.9), follow-up over many years will enable detection of any growth disturbance. Should there be a limitation of opening or frank ankylosis, early intervention to mobilize and reconstruct the mandible is recommended.
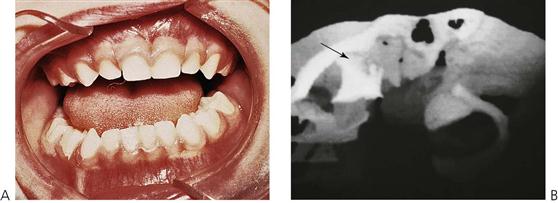
Figure 9.9 (A,B) Mandibular asymmetry caused by a dislocation of the left condyle after play equipment fell on this young girl. Imaging of these injuries can be difficult and in this case a CT scan was performed with 3-dimensional reconstruction to detail the injury. The CT demonstrates the dislocation, with the condylar head (arrow) anterior to the articular eminence and lying under the zygomatic arch. As is common with these injuries in children, an intracapsular fracture-dislocation is present, which remodelled itself without treatment. Normal function was achieved within 6 months.
Maxillary fractures
Middle-third fractures are rare in children and usually present with other severe cranio-maxillofacial and head injuries. Mid-facial fractures tend not to follow the typical ‘Le Fort lines’, as the immature skeleton results in more greenstick and incomplete fractures.
Orbital floor ‘blow-out’ and orbital roof ‘blow-in’ are seen and may require urgent reduction, particularly where orbital contents, such as fascia and muscle are trapped, thus preventing normal ocular movements.
Clinical signs
• Facial swelling and periorbital ecchymosis (Figure 9.10).
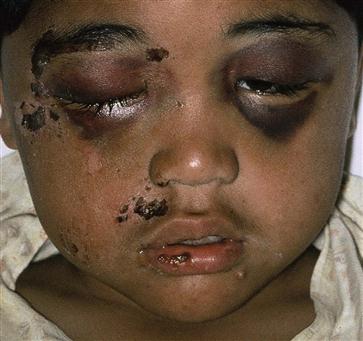
Figure 9.10 Middle-third fracture of the face in a child involved in a motor vehicle accident. Note the bilateral periorbital ecchymosis and swelling resulting in closure of the eyes. Despite the appearance, there was only minimal displacement of the maxilla, although external fixation was required to reduce the depressed nasal fracture.
• Periorbital surgical emphysema.
• Subconjunctival haemorrhage, with no posterior limit.
• Nausea, vomiting and photophobia often occurs with inferior rectus muscle entrapment.
• Orbital rim contour deformaties.
• Infraorbital paraesthesia (Figure 9.11).
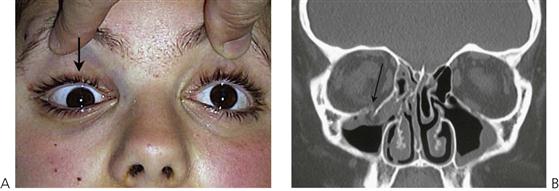
Figure 9.11 (A) Limitation of upward gaze associated with right orbital floor ‘blow-out’ fracture. (B) Coronal CT scan demonstrating ‘trapdoor’ orbital floor fracture with tissue entrapment.
Management
• Conservative management is usual unless there is significant displacement of the mid-facial complex. In this situation, open reduction with or without semi-rigid internal fixation is required.
• Simple maxillary fractures are managed with cap splints or arch bars with intermaxillary fixation.
• ‘Trap-door’ orbital floor fractures with soft tissue entrapment is a surgical emergency and must be explored as soon as possible to reduce the orbital contents.
Sequelae of fractures of the jaws in children
Closed head injury
Children who sustain middle-third facial injuries usually have concomitant head injuries. Head injuries occur in 25% of cases of facial trauma. These children spend extended periods in intensive care units, may undergo personality changes, suffer post-traumatic amnesia and may have episodes of neuropathological chewing.
Tooth loss
Approximately 10% of children who sustain fractures of the jaws will also have loss of permanent teeth.
Developmental defects of enamel
In addition to the damage caused by displacement of primary teeth into the crypts of permanent successors (see ‘Sequelae of trauma to primary teeth’ later in the chapter), unerupted teeth in the line of jaw fractures may also be damaged. Defects may include:
Intra-articular damage to the temporomandibular joint
There is always a risk of ankylosis of the temporomandibular joint after significant displacement of the condylar head, intracapsular fracture or a failure to achieve early mobilization of the joint. Treatment of the ankylosis involves condylectomy and joint reconstruction with a costochondral graft in later childhood.
Growth retardation
Maxillary (Figure 9.12) and mandibular growth retardation may occur following major trauma. Significant scarring of soft tissues and/or tissue loss may inhibit jaw growth. Mandibular asymmetry with antegonial notching may occur on the affected side after subcondylar fracture. The key to management is to correct asymmetries early to avoid secondary maxillary deformity.
Luxations in the primary dentition
General management considerations
There is general agreement that most injuries to the primary dentition can be managed conservatively and heal without sequelae. As a general rule, either leave and observe or extract the tooth.
Immunization
If the child is not fully immunized then a tetanus booster is required: tetanus toxoid 0.5 mL by intramuscular injection.
Antibiotics
Unless there are significant soft-tissue or dentoalveolar injuries, antibiotics are not usually required. Antibiotics are prescribed empirically as a prophylaxis against infection, but they are not a substitute for proper debridement of wounds. All drugs should be prescribed according to the child’s weight (see Appendix E).
Luxations
Up to 2 years of age, the most common injuries to the primary teeth are luxations involving displacement of the teeth in the alveolar bone.
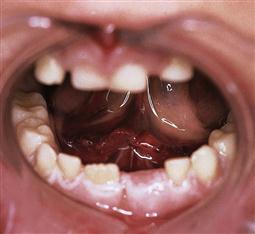
Concussion and subluxation (Figure 9.13)
Concussion is an injury to the tooth and ligament without displacement or mobility of the tooth. Subluxation occurs when the tooth is mobile but is not displaced. Both involve minor damage to the periodontal ligament. Teeth with these injuries will be tender to percussion. There will be haemorrhage and oedema within the ligament, but gingival bleeding and mobility only occurs if the teeth have been subluxated.
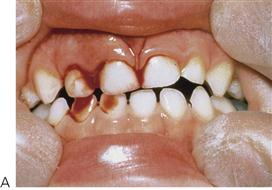

Figure 9.13 (A) Subluxation of the upper right incisors with minimal displacement. (B) Palatal luxation of the upper incisors resulting in an occlusal interference. These teeth can be repositioned by digital pressure, only to relieve the interference. Further anterior movement may damage the permanent teeth.
Intrusive luxation
Intrusive injuries (Figure 9.14) are the most common injuries to upper primary incisors. Newly erupted incisors often take the full force of any fall in a toddler. There is usually a palatal and superior displacement of the crown, which means that the apex of the tooth is forced away from the permanent follicle.
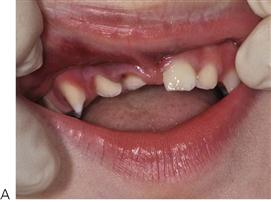
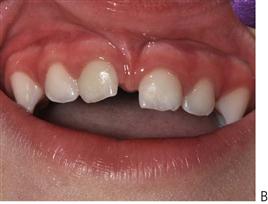
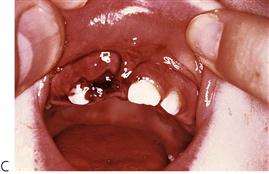
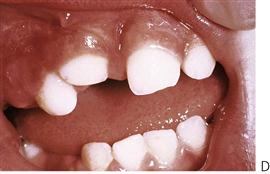
Figure 9.14 (A) Many intruded primary teeth will re-erupt (B). (C) The decision as to whether or not to extract is dependent on the degree of displacement and direction of displacement of the crown and the amount of gingival and alveolar damage. An intrusive luxation of the upper right central incisor in a 12-month-old child. Note the displacement of the gingiva, indicating that the tooth has not been avulsed. (D) The tooth partially re-erupted within a month.
Extrusive and lateral luxation (Figure 9.15)
Treatment is dependent on the mobility and extent of displacement. If there is excessive mobility the tooth should be extracted.
Avulsion (Figure 9.16)
• Avulsed primary teeth should not be replanted.
• Replanting an avulsed primary tooth may force the blood clot in the socket, or the root apex itself, into the developing permanent tooth. The other main reason is lack of patient cooperation. There are cases in which the parent or caregiver has replanted the tooth and it appears to be stable; in these cases the tooth could be left in situ but it should be splinted to prevent it being inhaled or swallowed.
• Unless significant soft-tissue damage is present, antibiotics are not required.
• Splinting of primary teeth may be difficult in young, traumatized children and if successfully placed, the splint must then also be removed later when the child may be less compliant.

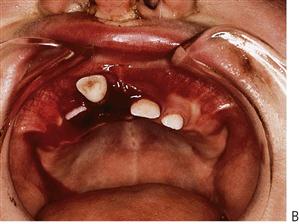
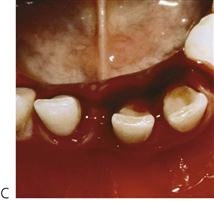
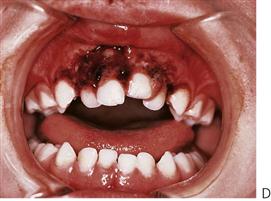
Figure 9.15 (A) Extrusive luxations result in increased mobility necessitating removal of the tooth. There is no indication for repositioning such teeth. (B) Similarly, lateral luxations of this magnitude require removal of the tooth. xation. (C) This child presented 1 week following lateral luxation of the lower primary incisors with continued gingival oozing. He was subsequently diagnosed with Christmas disease (factor IX deficiency). (D) Gross displacement of all upper anterior teeth with gingival degloving and loss of the labial plate. This child had the displaced teeth extracted, and debridement and suturing of the gingiva under general anaesthesia.
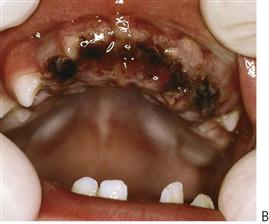
Figure 9.16 (A) There is almost no indication for the replantation of an avulsed primary tooth. There is more risk of damage to the permanent tooth than there is benefit gained by replacing the tooth. (B) A child involved in a motor vehicle accident resulting in six avulsed primary teeth, but with surprisingly very little dentoalveolar damage. A chest radiograph was required to ensure that no teeth were swallowed or aspirated.
Fractures of primary incisors
Crown fractures not involving the pulp (Figure 9.17A)
Unlike the permanent dentition, primary teeth are more commonly displaced rather than fractured. Enamel and dentine fractures may be smoothed with a disc and, if possible, cover the dentine with glass ionomer cement or composite resin. Paediatric strip crowns are often useful. A possible sequel is pulp necrosis and/or grey discolouration. If the pulp does become necrotic, then it may subsequently become infected, leading to an apical abscess.
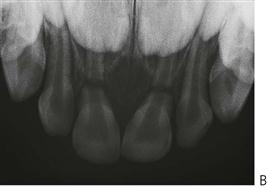

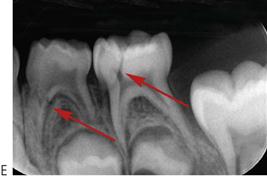
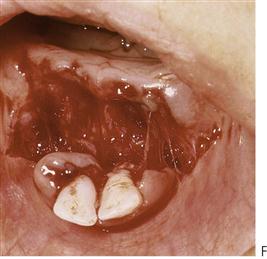
Figure 9.17 (A) Minor enamel/dentine fractures can be smoothed with a disc or left untreated. (B) Root fractures require no treatment unless the coronal fragments are excessively mobile. The pulp in the apical portions remain normal and the roots will resorb normally. (C) A complex crown/root fracture involving the upper left primary central incisor. These teeth are not suitable for restoration and need to be extracted. The extent of the subgingival fracture can be seen in (D). These teeth are often difficult to remove and care must be taken to avoid damage to the permanent teeth if using elevators or luxators to remove large fragments of root. (E) Complicated crown and root fractures of the first and second primary molars. (F) A dentoalveolar fracture in a 6-month-old infant. In these cases, it is important to reposition the bone, with or without the teeth. A thick (2–0) nylon suture passed through both labial and lingual plates can be used to provide fixation for the fragment. Teeth usually survive this trauma and there are few untoward sequelae for the permanent teeth.
Complicated crown/root fractures (Figure 9.17C–E)
More commonly, fractures of primary teeth involve the pulp and extend below the gingival margin. Commonly, there are multiple fractures in individual teeth. In these cases, it is not feasible to adequately restore the tooth and therefore it should be extracted. Often the fracture is not immediately evident, but the child may present several days after the trauma with a pulp polyp which is causing separation of the fragments. Such a proliferative response is a protective mechanism and is not painful. Management of such a case should be by extraction of the tooth.
Management
• Most of the discomfort results from the movement of fractured pieces of tooth that are still held by the gingiva or periodontal ligament. In the emergency management of such teeth, these loose tooth fragments should be removed.
• The remaining tooth can be extracted when convenient. This may necessitate the use of sedation or a short general anaesthetic.
• If a small piece of root remains in the socket after a fracture, it may be safely left in situ where it will be resorbed as the permanent tooth erupts. It is important to keep parents adequately informed in these situations.
Root fractures (Figure 9.16B)
As mentioned above, when children fracture primary incisors, there is usually a complex crown/root fracture that extends below the gingival margin and extraction is indicated. Isolated root fractures are uncommon. Normally, no treatment is necessary for primary incisors with horizontal or transverse root fractures. If, at regular review, the pulp shows signs of necrosis and infection, with excessive mobility or sinus formation, the coronal portion should be extracted. The apical root fragments are usually removed by resorption as the permanent tooth erupts.
Dentoalveolar fracture (Figure 9.17F)
This is more common in the mandible with the anterior teeth being displaced anteriorly with the labial alveolar cortical plate. It is often desirable to reposition the teeth with the bone to maintain the alveolar contour. This can be achieved with a thick nylon suture (2–0) passed through the labial and lingual plates of the bone. Teeth that are excessively mobile should be carefully dissected out of the sockets preserving the labial plate, which is then repositioned and sutured.
Sequelae of trauma to primary teeth (Figures 9.18, 9.20)
It is important to discuss with parents the sequelae of luxated or avulsed primary incisors. Although it may be difficult to accurately predict the prognosis for the unerupted permanent teeth, parents appreciate having an idea of the possible outcomes. In cases that have been followed up in studies, up to 25% of children are left with some developmental disturbance of the permanent tooth.

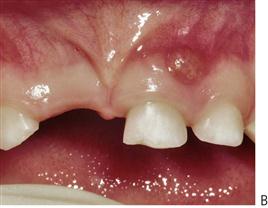
Figure 9.18 (A) Discolouration of the crown following trauma to the primary incisors. Unless an abscess is present (B), these teeth do not require treatment other than monitoring and reassurance of the parents.
Damage to the unerupted permanent dentition occurs more often with intrusive luxation and avulsion in very young children. It is important to warn parents of possible problems with permanent teeth and also to reassure them that, with modern restorative materials, minor defects are easily repaired. Sequelae in the permanent dentition depend on:
• Direction and displacement of the primary root apex (Figure 9.19).

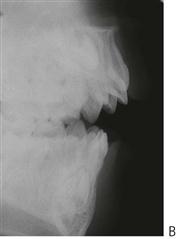
Figure 9.19 (A) Technique of taking a true occlusal maxillary radiograph. This film gives a good localization of the position of the primary root apex in relation to the central incisors. (B) The root apex is clearly visible, just underneath the anterior nasal spine, having perforated the labial plate. In this situation, damage to the unerupted permanent tooth is less likely.
Possible damage to primary and permanent teeth
• Necrosis of the pulp of the primary tooth with grey discolouration and possible infection of the root canal system followed by abscess formation (Figure 9.19).
• Internal resorption of the primary tooth.
• Ankylosis of the primary tooth. Commonly, intruded primary teeth will fail to fully erupt but will exfoliate normally. In rare cases, extraction may be required just prior to eruption of the permanent incisor.
• Hypoplasia (Figure 9.20E) or hypomineralization (Figure 9.20B) of succedaneous teeth (see also Chapter 11).

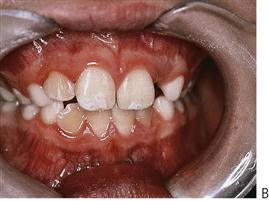
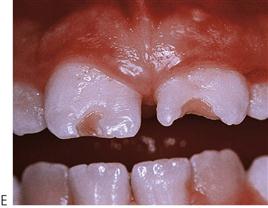
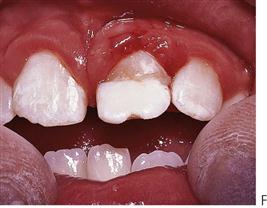
Figure 9.20 (A) It is often difficult to predict sequelae. For example, this case of severe intrusion, and alveolar disruption, has caused little damage other than mild hypocalcification of the permanent incisors (B). (C) Displacement and dilaceration of the upper-right permanent central incisor, following avulsion of the primary precursor tooth, at 18 months of age. (D) Severe dilaceration of the crown of the upper left central incisor. (E) Hypoplasia of the permanent central incisors resulting from trauma in the primary dentition. (F) Restoration of dilacerated teeth is extremely difficult, especially when the defect involves the gingival margin.
• Dilaceration of the crown, or root of the permanent tooth; varies by developmental stage of the permanent tooth at the time of trauma (Figure 9.20C,D).
Treatment options
• If the primary tooth is discoloured, but asymptomatic, no treatment is usually indicated. Masking a discoloured tooth with composite resin may be an option if aesthetics are a concern. If an abscess is present, pulpectomy (and subsequent treatment of the root canal system) or extraction is indicated.
• Hypoplasia and hypomineralization of the permanent teeth can be restored with composite resin.
• Dilaceration of the crown or root of the permanent tooth often necessitates surgical exposure and bonding of chains or brackets for orthodontic extrusion (see Chapter 11 for details of surgical procedure). Severe cases may be untreatable and such teeth may need to be removed.
Crown and root fractures of permanent incisors
Crown infractions
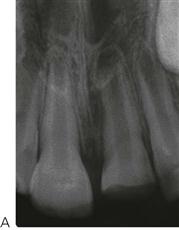
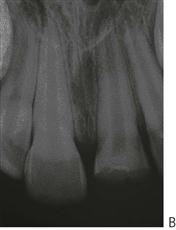
When there is an infraction (or crack) of the enamel, there is no loss of tooth structure. Infractions do not usually cross the dentino-enamel junction and usually require transillumination or indirect light to be identified (see Figure 9.6). However, it is impossible to determine the depth or extent of an infraction and whether it involves dentine or not.
Management
• Periapical radiographs taken from several angulations to exclude other injuries.
• Occlusal radiograph to exclude other injuries.
• Cover the infractions with two coats of light-cured resin bonding liquid as a temporary means of protecting the pulp by preventing bacterial penetration during the early healing phase.
Uncomplicated crown fractures
Uncomplicated crown fractures are confined to the enamel only or they may involve the enamel and dentine, but they do not involve the pulp. The most common presentation is an oblique fracture of the mesial or distal corner of an incisor.
Management
• Baseline pulp sensibility tests.
• Baseline periapical radiographs taken from several angulations to exclude other injuries.
• Occlusal radiograph to exclude other injuries.
• Enamel-only fractures – smooth over the sharp edges with a disc or restore with composite resin if required.
• Enamel and dentine fractures – cover the dentine with glass ionomer cement and then restore the crown with composite resin either immediately or at review (Figures 9.21, 9.22).
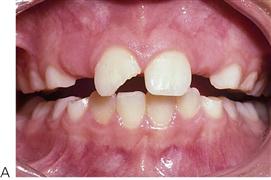
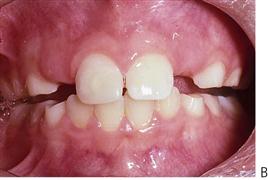
Figure 9.21 (A,B) Composite resin restoration on a proximal fracture. Retention is aided by using a long bevel over the labial surface. The dentine is protected with a glass ionomer base.
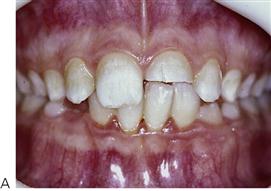
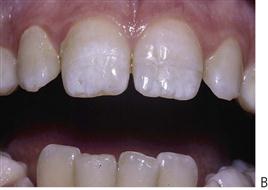
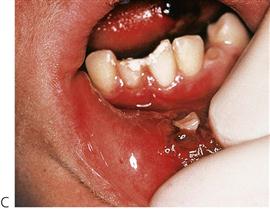
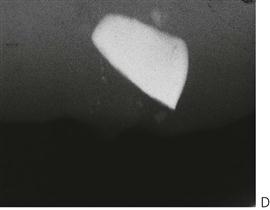
Figure 9.22 Restoration of a fractured enamel fragment by bonding the fragment back on to the tooth. (A) A chamfer or bevel is placed around the fragment and remaining crown and the dentine covered with glass ionomer cement. (B) Composite resin is then used to bond the fragment to the crown. It is often impossible to re-create the subtle hypocalcific flecks in a crown with composite resin alone; the replacement of the fractured piece is a good alternative technique if the fragment can be found. (C) Always look for fragments of tooth in the soft tissues. It is essential that they are removed at the time of the trauma, as they are extremely difficult to find once the tissues have healed. (D) Radiographs are useful in localizing tooth fragments within the lip.
Complicated crown fractures (Figure 9.23)
• Fractures involving enamel, dentine and exposure of the pulp.
• Involves laceration of the pulp and its exposure to the oral environment and bacteria within the mouth.
• Healing does not occur spontaneously and untreated exposures will result in pulp necrosis and subsequent infection of the root canal system leading to apical periodontitis and possible apical abscess.
The time elapsed since the injury and the stage of root development will influence treatment. If the tooth is treated within several hours of the exposure, conservative management is appropriate. After several days, microabscesses may occur within the pulp, and more radical pulp amputation will be required.
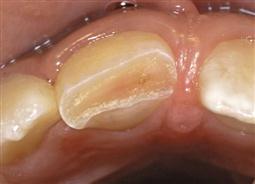
Figure 9.23 Assessment of any pulp exposure is essential, especially when the tooth is immature. The exposure of the mesial pulp horn is quite small and there is no haemorrhage, so it may be easily missed. Immediate coverage and dressing will help to prevent pulp necrosis and infection, and the subsequent need for an open apex endodontic procedure.
Management
• Baseline pulp sensibility tests – to assess adjacent teeth for possible injury.
• Baseline periapical and occlusal radiographs taken from several angulations to exclude other injuries.
• The aim of managing the exposed pulp is to preserve the non-inflamed pulp tissue and for it to be biologically walled off by a hard-tissue barrier (Cvek 1978).
In almost all situations, if the pulp tissue can be covered with a calcium hydroxide dressing, it is possible for a dentine bridge to form over the exposed pulp. It is undoubtedly preferable to preserve the pulp rather than to do root canal treatment.
Incomplete root apex with a clinically normal pulp
Cvek pulpotomy (apexogenesis) (Figure 9.24)
The Cvek pulpotomy procedure involves the removal of contaminated pulp tissue with a clean round high-speed diamond bur, using saline or water irrigation. A non-setting calcium hydroxide paste is then placed directly onto the uncontaminated pulp tissue (see Step 5. below). The steps are as follows:
1. Administer local anaesthesia.
2. Place rubber dam to isolate the operating field – this is mandatory.
3. Remove 1–2 mm of pulp using a high-speed diamond bur, as described above.
4. Wash the pulp with saline until the haemorrhage stops. Any blood clot should then be gently rinsed away.
5. Place a non-setting calcium hydroxide paste over the remaining pulp and then cover this paste with a hard-setting calcium hydroxide cement or liner. It is essential that the calcium hydroxide is placed over pulp tissue, and not over a blood clot.
6. Place a glass ionomer cement base over the calcium hydroxide and restore the tooth with composite resin.
This technique does not need to be limited to the coronal pulp. A ‘partial pulpotomy’ may be performed at any level of the pulp space, as there are great benefits in preserving the apical part of the pulp in traumatized incisors.
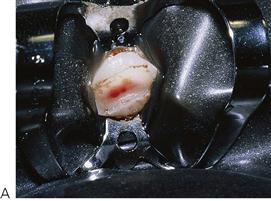
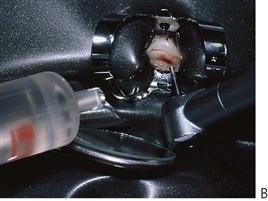
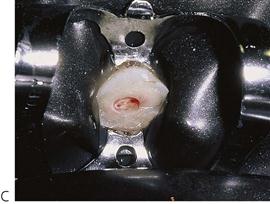
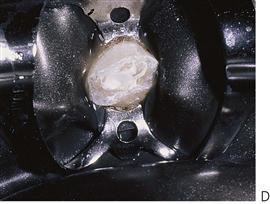
Figure 9.24 Cvek pulpotomy. (A) Traumatic pulp exposure of an upper central incisor. (B) Obtaining access to the pulp chamber with a high-speed diamond bur with copious saline irrigation. (C) Removal of 2 mm of pulp tissue to a level with no contaminated pulp tissue. (D) Placement of non-setting calcium hydroxide dressing over the pulp tissue.
Review
• 6–8 weeks and then at 6 and 12 months with pulp sensibility tests.
• Periapical radiographs at each review to check for continued root development and narrowing of the root canal space as the root develops (Figure 9.25).
Incomplete root apex with a necrotic pulp (Figure 9.26)
Pulp necrosis is unlikely to occur immediately after trauma that results in a complicated crown fracture. It is more likely to be diagnosed at follow-up examinations. If the pulp of a tooth with a complicated crown fracture becomes necrotic and infected, then removal of the pulp and subsequent root canal treatment is required. Although there is no difference in the prognosis of root canal treatment in immature teeth compared with mature teeth, the long-term survival of a tooth with an open apex may be compromised. This is caused by the thin dentine walls of the root, especially in the cervical third, and a shortened root which make the tooth susceptible to fracture during function or if there is further trauma to the tooth. Endodontic treatment of immature anterior teeth is complicated because of the inability to create an apical seat, the thin dentinal walls, and the difficulty in filling the root canal by traditional methods such as lateral compaction of gutta percha.
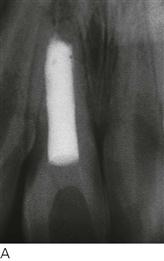
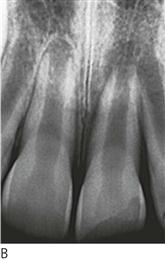
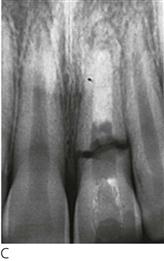
Figure 9.26 (A) Open apex root canal treatment requiring an apexification procedure. (B,C) The long-term prognosis of these teeth is not ideal with some sustaining subsequent root fractures because of inherent weakness in the cervical region.
Management
The aim of management is to create an apical hard-tissue barrier against which the root canal filling can be placed. The formation of this apical hard tissue barrier is stimulated by using long-term intra-canal calcium hydroxide dressings (apexification).
Technique (apexification)
1. Administer local anaesthesia.
2. Place rubber dam – this is mandatory for all root canal treatment.
3. Prepare an access cavity through the palatal or lingual surface of the crown.
4. Remove any necrotic pulp tissue from the canal with a barbed broach.
5. Biomechanically prepare the canal to a level 1 mm short of the radiographic apex.
6. The canal should be carefully instrumented to completely remove necrotic tissue and debris, while also preserving as much tooth structure as possible. The apical root, being very thin, is weak and may fracture if undue pressure is exerted. Very little instrumentation of the canal walls is required.
7. Irrigate thoroughly with 1% sodium hypochlorite to dissolve pulp tissue remnants and to disinfect the root canal system.
8. Ledermix® paste should be placed as the initial dressing followed by calcium hydroxide to create a 50 : 50 mixture of these two medicaments. The mixture is very effective at reducing periapical inflammation, reducing pain and controlling infection within the root canal. The pastes can be inserted into the root canal using a spiral root filler in a low-speed handpiece, run at a very low speed.
9. Place a small pledget of cotton wool in the coronal pulp chamber and then place a temporary restoration in the access cavity using a temporary filling material such as Cavit, or a double-layer temporary restoration using Cavit® and IRM®.
10. After 4–6 weeks, the patient should be reviewed. If there are no symptoms or other problems, then under rubber dam isolation, the temporary filling material should be removed and the canal should be thoroughly irrigated to remove the previous dressing. After drying the canal, it should be re-dressed with a non-setting calcium hydroxide paste.
11. Compress the calcium hydroxide with a cotton wool pellet to ensure good condensation in the canal and to allow contact with the apical tissues. Another temporary restoration should then be placed in the access cavity.
12. Review the child every 3 months and change the calcium hydroxide dressing each time in the manner described above. The formation of an apical hard tissue barrier typically takes about 12 months but it may take up to 18 months. Once the barrier has formed, the canal should be filled with gutta-percha and cement. Root canal filling with gutta-percha is performed using either a warm vertical compaction technique, or lateral compaction. An impression of the apical seat may be made with heat-softened gutta-percha which is then cemented into the canal with a root canal cement. Whichever technique is used, it should be stressed that gentle pressure must be applied to avoid splitting the root or breaking the hard tissue barrier off the root and pushing it into the periapical tissues. Thermoplasticized gutta-percha delivery systems are often invaluable in these cases.
13. Remove the gutta-percha and cement from within the crown part of the tooth. Gutta-percha can be easily removed with a hot instrument and then the remainder should be vertically compacted into the coronal third of the canal while it is still warm. The access cavity should be thoroughly cleaned by wiping it out with cotton pellets soaked in alcohol to remove the root canal cement. This should be repeated 2–3 times to ensure complete removal of the cement in order to avoid discolouration of the tooth.
14. Restore the access cavity with a base of Cavit, followed by a glass ionomer cement to replace dentine and finally composite resin. The Cavit will facilitate any further access to the root canal system should it become necessary in the future.
In immature teeth, occasionally a small root apex may develop, although the pulp otherwise appears necrotic. This is caused by surviving remnants of Hertwig’s epithelial root sheath. Such a situation requires no management or change to the treatment being provided for the tooth.
Filling an open apex tooth without apexification
An alternative approach that has been advocated in recent years is the use of a material known as mineral trioxide aggregate (MTA) to fill the apical few millimetres of an open apex tooth without first having to use long-term dressings of calcium hydroxide. Although sometimes called ‘MTA apexification’, it is not an apexification procedure, since an apical hard tissue barrier is not formed prior to root filling the tooth. It is more accurate to consider this procedure as filling an open-ended root canal. MTA is a mixture of tricalcium silicate, dicalcium silicate, tricalcium aluminate, tetracalcium aluminoferrite, calcium sulfate and bismuth oxide. It is chemically very similar to Portland cement and has similar handling and physical properties.
Initially, the root canal system must be cleaned and disinfected – this can be achieved through the use of irrigating solutions such as sodium hypochlorite and EDTAC, plus the use of an appropriate intra-canal medicament. The medicament chosen will depend on the presenting condition of the pulp or root canal. Ledermix paste may be used if there has been irreversible pulpitis, while either a 50 : 50 mixture of Ledermix paste and calcium hydroxides or just calcium hydroxide alone should be used if the root canal system had been infected.
Once the canal has been disinfected and dried, the MTA can be placed in the apical few millimetres of the canal. Special instruments and magnification are required to achieve an adequate filling, as it is very technique sensitive and difficult to do. The MTA needs to be left to set for at least several days before the remainder of the canal can then be filled with conventional materials (such as gutta-percha and cement) and techniques (such as lateral compaction).
It is claimed that this technique reduces the chances of root fractures occurring later since the dentine is not exposed to long-term calcium hydroxide. However, MTA releases calcium hydroxide and therefore the effects of this need further investigation. The other disadvantages of this procedure are the high costs of the material, the need for two appointments to do the root canal filling, the slow setting time and the technical difficulties of placing the material without any of it being pushed into the periapical tissues.
New methods to manage open apex teeth with pulp necrosis and infection
An emerging prospect for the management of teeth with incomplete root development where the pulp has necrosed and become infected is the concept of ‘pulp regeneration’ (Figure 9.27). The aim is to achieve revascularization of the root canal system and regeneration of tissue that is capable of producing what radiographically appears to be dentine. To date, several cases have been reported in the literature showing that this is feasible, especially in premolar teeth that had developmental defects such as dens evaginatus. The prospect of using this approach for traumatized teeth with an open apex is being researched and shows promise. Although there are no established guidelines published yet, the initial approach is to:
1. Disinfect the root canal system by using sodium hypochlorite irrigating solution, followed by.
2. Antibiotics as an intracanal dressing. A triple antibiotic paste (ciprofloxacin, metronidazole and minocycline) has been advocated but some authors have reported only using one or two antibiotics.
3. At the next appointment, the antibiotic paste is removed and bleeding is induced in the periapical tissues by instrumenting through the apical foramen with a root canal file. The aim of this is to get blood within the canal which then clots to form a matrix for cell regeneration (Figure 9.27A).
4. Once the clot has formed in the canal, a cement such as MTA is placed in the coronal part of the root canal followed by restoration of the crown of the tooth (Figure 9.27B).
The tooth should then be reviewed after 6 and 12 months to determine whether there is further root development and hard tissue formation along the canal walls (Figure 9.27C). Research is currently being carried out to determine whether the procedure can be more predictable if stem cells, growth factors, tissue scaffolds or other tissue engineering techniques are used.
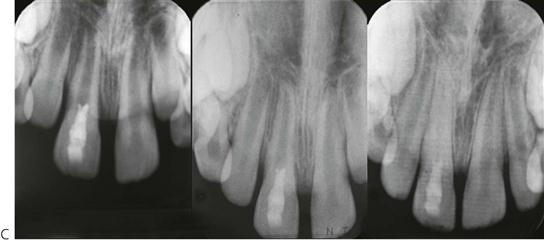
Figure 9.27 Pulp revascularization. (A) Haemorrhage is induced into the canal by passing a file through the apex of this immature tooth. (B) Mineral trioxide aggregate (MTA) is placed over the clot at the level of the cemento-enamel junction (CEJ). (C) Periapical radiographs of an open-apex tooth treated with this new technique. Over 3 and 12 months, there has been further development and closure of the root apex.
It is important to understand that the above procedures for regeneration are largely based on case reports at present, and guidelines need to be established. Current recommendations are that regenerative procedures in traumatized infected incompletely developed permanent teeth should only be performed if the tooth is not suitable for apexogenesis, or root canal treatment and apexification.
Mature root apex
If the pulp of a permanent anterior tooth is exposed by trauma, and the period of exposure is short, it need not be removed, regardless of the apical development. The Cvek (partial) pulpotomy can be used to attempt to preserve the pulp. If there are restorative considerations (i.e. the need for a post), it may be better to remove the pulp and perform root canal treatment immediately.
Root fractures (Figure 9.28)
• A fracture involving enamel, dentine and the cementum may or may not involve the pulp. Pulp necrosis occurs in 25% of teeth with root fractures and is related to the degree of displacement of the fragments. External inflammatory and replacement root resorption are rare.
• To check for horizontal root fractures, alter the vertical angulation of periapical radiographs. When looking for vertical root fractures, change the horizontal angulation. An occlusal radiograph is particularly useful and therefore indicated in all cases.
• Sometimes, a horizontal root fracture is not initially evident. This is because the fracture site opens up under the influence of the inflammatory reaction several days after the injury. Thus, for all traumatized teeth, it is important to take a subsequent radiograph within 2 weeks.
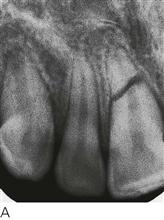
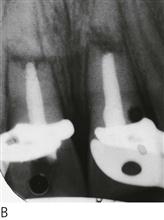
Figure 9.28 (A) Root fractures near the apex of the root often require no treatment. In most cases, the pulp in the apical fragment remains normal. (B) When the coronal fragments become necrotic and infected, root canal treatment should only be performed up to the fracture line. Long-term calcium hydroxide treatment is required because the root canal at the fracture site will be wide open. In this case, bone is interposed between the two fragments. (C) Not all pulps in the coronal fragments become necrotic. Healing of an apical third root fracture. The pulp in the apical fragment is normal and there has been pulp canal calcification in the coronal two-thirds. In this case, there is probably bone interposed between the two fragments.
Management
• Radiographs – several vertical and/or horizontal angulations of periapical radiographs plus an occlusal radiograph are usually required to adequately determine the extent of the fracture.
• Reposition the coronal fragment.
• Place a rigid splint with composite resin and wire or an orthodontic appliance for 3–4 months if the coronal fragment is mobile.
• Root fractures in the apical few millimetres often require no treatment.
Pulp necrosis and infection of the coronal fragment (Figure 9.28B)
It is uncommon for the apical fragment to develop pulp necrosis and it will usually undergo pulp canal calcification which requires no treatment. If pulp necrosis and infection of the coronal fragment occurs, there will be radiographic signs of bone loss at the level of the fracture. Symptoms, such as pain, excessive mobility, gingival swelling or a draining sinus, may also indicate that the coronal pulp has necrosed and become infected. These problems will not be evident at the time of the trauma so endodontic treatment should not be commenced then. These problems will only become evident during the review of root-fractured teeth and they may take several months or even longer to occur. If they occur, then the tooth should be managed as follows:
• Remove the pulp from the coronal fragment. Never advance an endodontic instrument through the fracture line.
• Take a periapical radiograph to determine the ‘working length’ at approximately 1.0 mm coronal to the fracture line.
• Biomechanically prepare the root canal to the working length.
• Place a 50 : 50 mixture of Ledermix paste and a calcium hydroxide paste as an initial dressing to control the infection and reduce the inflammation in the fracture line.
• Place a temporary restoration in the access cavity and arrange to review the patient in about 4 weeks.
• At the 4-week review appointment, open the access cavity and irrigate the root canal to remove the initial dressing. Then, place a non-setting calcium hydroxide paste to induce the formation of a hard-tissue barrier at the end of the coronal fragment (Figure 9.24B). The calcium hydroxide dressing should be replaced every 3 months until the hard tissue barrier has formed. This may take up to 18 months.
• Place a root canal filling using gutta-percha and cement once the barrier has formed, using a similar technique to that described above following apexification. The access cavity can then be restored, also as described above for apexification cases.
Pulp necrosis and infection of both the apical and coronal fragments
When the apical fragment shows signs of pulp necrosis and infection, the prognosis is poor. Root canal treatment of the coronal fragment should be performed followed by surgery to remove the apical fragment. There have been case reports of intra-radicular splinting and endodontic implants, but both have a very poor long-term prognosis.
Crown/root fractures
The coronal fragments should always be removed to fully assess the extent of the fracture (Figure 9.29).
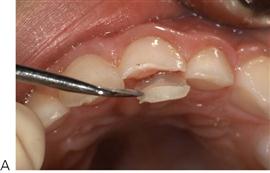
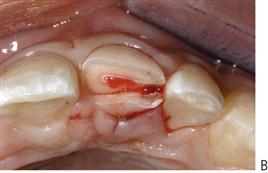
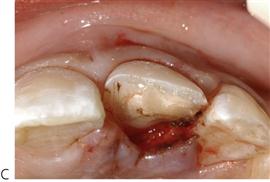
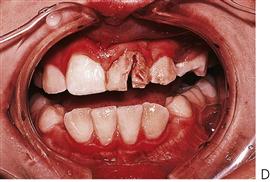
Figure 9.29 Crown/root fractures. (A) The coronal fragment of a crown/root fracture should always be removed to investigate the full extent of the fracture. (B) This case shows a complicated crown/root fracture (i.e. pulpally exposed) with the fracture extending just above the alveolar crest on the palate. (C) The fractured portion has been removed and it is clear that the fracture extends approximately 3 mm below the gingival margin. The pulp was capped, and the access cavity filled. Treatment will involve periodontal-flap surgery and placement of a crown with an extended shoulder. Alternatively, orthodontic extrusion may be required. (D) Unfortunately, vertical crown/root fractures are untreatable and such teeth should be extracted. Retention in the short term may be valuable to preserve bone while planning for possible orthodontics, or implants, when growth has finished.
Uncomplicated crown/root fracture
Where the fracture extends just below the gingival margin (Figure 7.29A), cover the dentine with a glass ionomer cement initially and then restore the tooth with composite resin or a crown. Only the crown part of the tooth should be restored to allow re-attachment and new cementum formation on the fractured root surface, i.e. do not restore the root portion.
Complicated crown/root fracture (i.e. with pulp exposure)
If the fracture extends below the crestal bone and the root development is complete, remove the coronal fragments to assess the extent of the fracture (Figure 7.29B). Root canal treatment is required. Ledermix paste or calcium hydroxide may be placed as the initial endodontic dressing.
If the crown/root fracture does not extend below the crestal bone, and the root development is complete, a Cvek pulpotomy may be performed (Figure 7.29C). This type of fracture may be restored with composite resin whereas deeper fractures may need a cast restoration or may require surgical treatment to expose the margins for restoration.
The prognosis for a tooth with a complicated crown/root fracture is poor.
Options for management
• Gingivectomy to expose the fracture margin. If the fracture is minimal, and just below the gingival margin, then restoration of the root surface may be performed with glass ionomer cement and a crown build-up in composite resin.
• Cast crown with extended shoulder with or without periodontal flap procedure.
• Orthodontic extrusion of the root to expose the fracture margin.
Orthodontic extrusion
This may be a viable option, provided there is adequate root length to support a crown. However, because of the narrower emergence profile of the root compared with the crown of a normal tooth, a satisfactory aesthetic result may be difficult to achieve. A gingivoplasty will almost always be required to reposition the gingival margin after the tooth has been extruded and then retained for an adequate period of time. Fixed appliances are placed to extrude the root so that the margin is exposed. A pericision is often advisable.
Root burial or decoronation (Figure 9.30)
In cases of sub-alveolar root fracture, root burial (decoronation) may be an alternative to extraction to preserve the alveolar bone. The root is ‘buried’ below the alveolar crest (i.e. the root is reduced in length from a coronal direction until it is entirely within bone) and a coronally repositioned flap is raised to cover the defect with periosteum. In this way, it is possible for bone to grow over the root surface (Figure 9.30.E,F). The pulp may be normal or root canal treatment may be necessary. This technique is valuable in the preservation of the labio-palatal width of the alveolus, which may be essential if an osseointegrated implant is required later, as it may negate the need for ridge augmentation.

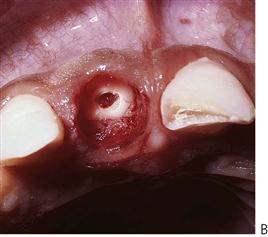
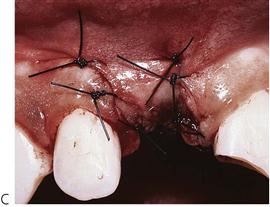
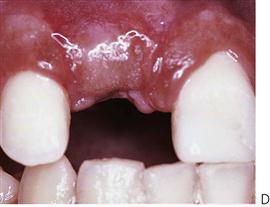
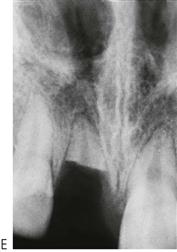
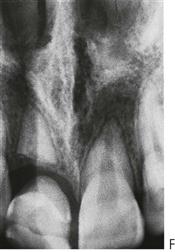
Figure 9.30 Root burial of a tooth fractured below the alveolar crest. Root burial may be an alternative to extraction in these cases. (A) This root has been traumatized with the fracture extending from the gingival margin on the labial to a level below the alveolar crest on the palatal. (B) The root was sectioned 1–2 mm below the crestal bone, and (C) covered with a coronally repositioned mucoperiosteal flap. (D) Healing after 2 weeks. (E,F) Bone growth has been stimulated over the root. This preserves the alveolar height for later prosthodontic work. The original crown has been contoured and attached to adjacent teeth with composite resin.
Crown/root fractures in immature teeth
When complex crown/root fractures occur in teeth with incomplete root formation, consideration should be given to maintaining the pulp, where possible, to allow continuation of root development. However, if the pulp has undergone necrosis and infection, then endodontic treatment including apexification will be necessary. It is worth noting, however, that complicated crown/root fractures tend to occur in mature teeth, where consideration of apical development is unnecessary. As a general comment, if the complex fracture extends below the crestal bone, then the prognosis is poor.
Luxations in the permanent dentition
Concussion and subluxation
These teeth are treated symptomatically. Concussed teeth will have a marked response to percussion, but the tooth will be firm in the socket. A subluxated tooth (Figure 9.31A) will exhibit increased mobility but will not have been displaced and there are no radiographic abnormalities. They are tender to percussion and mobility is usually increased.
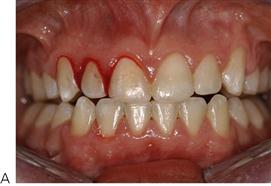
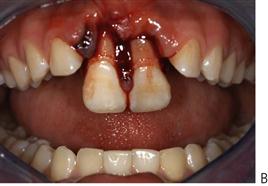
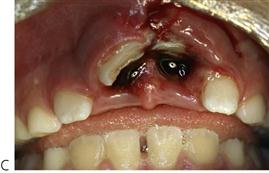
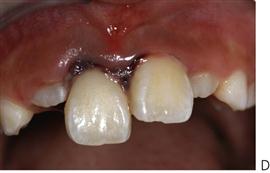
Figure 9.31 Luxations in the permanent dentition. (A) Subluxation. (B) Extrusion. (C) Intrusion. (D) Lateraluxation. Often, there is a combination of injuries, e.g. a lateral and intrusive luxation.
Review
• Pulp sensibility testing at 1, 3, 6 and 12 months.
• It is important to follow-up these teeth for at least 12 months (to check the pulp status, colour, mobility) and radiographically, to assess changes in the size of the pulp chamber and root development, as both of these indicate that the pulp has recovered and returned to a clinically normal state.
Lateral and extrusive luxation (Figure 9.31)
Teeth may be luxated in any direction and will usually need repositioning and splinting. Repositioning can be achieved with digital pressure. Ideally, forceps should not be used since they can damage the root surface and this predisposes the tooth to root resorption. Luxated teeth are easily identified by visual examination as the tooth is obviously displaced, potentially mobile and with radiographic changes to the periodontal ligament. Pulp sensibility tests may give negative results initially.
Management
1. Reposition under local anaesthesia. Early repositioning is important (Figure 9.32A,B), as it is often extremely difficult to reposition the tooth if the patient presents later (especially after 24 hours) due to the presence of blood clots in the original socket space.
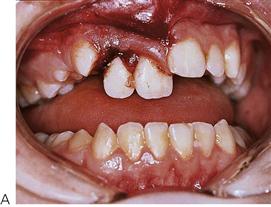

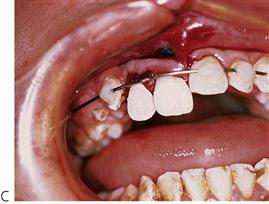
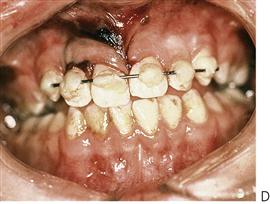
Figure 9.32 (A) Lateral luxation (palatal) with a dentoalveolar component involving the upper right central and lateral incisors. (B) The block of teeth and bone is manually replaced with finger pressure. (C,D) A rigid composite resin and wire splint is placed. When placing a splint, attach and stabilize uninvolved teeth before splinting the displaced segment.
2. Suture gingival lacerations – particularly check for ‘degloving’ of the palatal gingivae with all luxated teeth by using an instrument (e.g. flat plastic instrument) to check whether the tissue is still attached or not. They may visually appear to be attached but may not actually be attached. If in doubt, it is better to suture the tissues to ensure the ideal conditions for healing are created.
3. Place a flexible splint using composite resin and fishing line or orthodontic appliances for 10–14 days weeks for extrusive luxation. Lateral luxation cases should be splinted with a more rigid splint for 4–6 weeks (because of concomitant alveolar bone fracture) by using wire and composite resin or orthodontic appliances.
4. Prescribe antibiotics, tetanus prophylaxis and 0.2% chlorhexidine mouthrinse if required.
Lateral luxations always have a fracture of the alveolar socket wall and hence it is important to mould the bone back into the correct position. Fragments of bone attached to the periosteum should be retained.
Prognosis
• Depends on the degree of displacement and apical development, with excellent healing in immature teeth. Also depends on whether any concurrent injuries such as a crown fracture.
• Pulp necrosis and infection occurs in 15–85% of cases and is more prevalent in teeth with closed apices. Also depends on whether any concurrent injuries such as a crown fracture.
• Pulp canal calcification often occurs in teeth with immature apices.
• Transient apical breakdown (2–12%) is a repair process where the apical foramen appears to ‘open up’ via a resorptive process to allow revascularization of the pulp to occur. There is also an expansion of the apical periodontal ligament space. Essentially, there is some resorption followed by repair so the process is really a remodelling process. There is no indication for root canal treatment, unless there are other indicators of infection of the root canal system.
Intrusion
Intrusion (caused by pushing or forcing the tooth into the alveolar bone) is one of the worst injuries that can occur (Figure 9.31C, 9.33). There is extensive damage to the supporting structures (i.e. crushing of the periodontal ligament and bone) and the neurovascular bundle that supplies the pulp. There is much discussion about whether intrusively luxated teeth should be repositioned or allowed to re-erupt on their own. Treatment may well depend on the state of apical development but, as a general rule, repositioning and splinting of intruded teeth is preferred. Incompletely developed teeth may have the potential to re-erupt and therefore these teeth can be left to see if spontaneous re-eruption occurs.
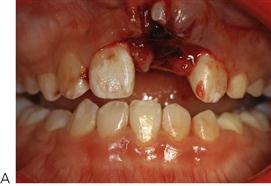
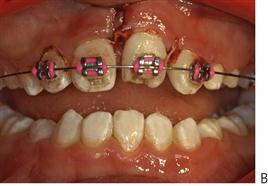
Figure 9.33 (A) Intrusion of the upper left central incisor. Early mobilization is essential to prevent ankylosis and to allow access to the palatal surface to perform root canal treatment. (B) The tooth was surgically repositioned and splinted with orthodontic appliances.
Management
Current opinion suggests that early repositioning of intruded fully developed permanent teeth is essential. The aims of repositioning are to disimpact the tooth in order to avoid ankylosis, minimize pressure necrosis of the periodontal ligament and allow access to the palatal surface of the tooth to remove the pulp immediately. It is highly unlikely that the pulp will survive and therefore, its removal is important, as this will help to reduce the possibility of external inflammatory resorption occurring.
Repositioning
Teeth with complete root formation
• Immediate repositioning is preferred for mature teeth (see above).
• Gently reposition the tooth with fingers or with forceps applied only to the crown. Avoid rotating the tooth in the socket.
Or
• Fixed orthodontic appliances can be used to apply traction to the intruded tooth over a 2-week period (Figure 9.33B).
• Extrusion should be rapid so that the palatal surface is exposed and an access cavity can be made as soon as possible.
Endodontic treatment
• Removal of the pulp is essential in almost all cases. The only exceptions are partially intruded, extremely immature teeth that are being left to re-erupt (with regular monitoring).
• Ledermix paste should be placed as the initial dressing for 3 months (change the dressing after 6 weeks to ensure adequate concentrations within the canal) to reduce the chances of external inflammatory resorption. This can then be followed by a 50 : 50 mixture of Ledermix paste and calcium hydroxide for 2–3 months before placing a root canal filling.
• If the apex is immature, then a further period of calcium-hydroxide therapy will be required for apexification before root-canal filling.
Review
• It is essential that these teeth are regularly reviewed. External inflammatory resorption can occur very rapidly if preventive measures have not been used (such as immediate root canal treatment with Ledermix paste dressings). External replacement resorption may also occur very rapidly due to the damage to (especially crushing of) the root surface and periodontal ligament during the injury, and an immature tooth may be lost within a number of weeks.
• Review every 2 weeks during the splinting phase, then at 6–8 weeks, 6 months, 12 months and yearly, for 5 years.
Prognosis
• Mature teeth undergo pulp necrosis in almost all cases (>96%), especially if there are also concurrent injuries such as a crown fracture, and there is a high prevalence of replacement resorption and ankylosis if not treated as above because of the damage to the root surface.
• Immature teeth that re-erupt show pulp necrosis in 60% of cases and ankylosis in up to 50% of cases.
Dentoalveolar fractures
With luxation of teeth, the alveolar plate can be fractured or deformed. Use firm finger pressure on the buccal and lingual plates to reposition. It should be remembered that alveolar fractures can occur without significant dental involvement. These alveolar fractures should be splinted for 4 weeks in children (or 6–8 weeks in adults). Laterally luxated, intruded and avulsed teeth always have an alveolar bone fracture and/or displacement. Firm pressure is needed to realign the bony fragments once the tooth has been repositioned. Splinting may be rigid or semi-rigid and is dependent on the degree of injury and the number of teeth involved (Figure 9.32).
Pulp status
Pulp sensibility tests only test the ability of the pulp’s nerves to respond to the stimulus that is applied; they do not provide any information about the presence or absence of blood supply or the histological status of the pulp. When determining the status of the pulp in luxated permanent teeth, beware of false test results. The pulp may not respond to a stimulus because of damage to the sensory nerves of the pulp, even though the tooth’s vascularity is maintained. It may take up to 1 year (or never) to get a response from such a pulp. Thus, one must be careful to judge the patient’s signs and symptoms before commencing root canal treatment. Regular radiographs are required to assess root development and growth, evidence of external or internal root resorption, and changes in the size and shape of the pulp chamber. Clinically, changes in colour, excess mobility, tenderness to percussion and a draining sinus are important diagnostic signs of an infected root canal system. A necrotic pulp does not cause apical periodontitis – it is only when the necrotic pulp becomes infected that a periapical response occurs. Hence, the most important thing to assess is whether the root canal system is infected or not.
Radiographs
It is important to remember that when teeth have been luxated they may also have had a crown or root fracture. Crown fractures are usually obvious but root fractures may be hidden or not yet apparent. Therefore, radiographs are always essential.
Avulsion of permanent teeth (Figure 9.34)
If a permanent tooth is avulsed, the chance of successful retention is enhanced by minimizing the extra-oral time. Even if the tooth has been out of the mouth for an extended period, it is usually still better to replant the tooth, with the knowledge that the tooth may ultimately be lost. In the mixed dentition, this is important, as replantation of even questionable teeth will allow normal establishment of the arch, occlusion and aesthetics. Furthermore, orthodontic treatment planning is simpler if the tooth remains in the socket. These teeth are usually lost by replacement resorption, which has the benefit of preserving the alveolar bone height, making prosthodontic replacement much simpler.
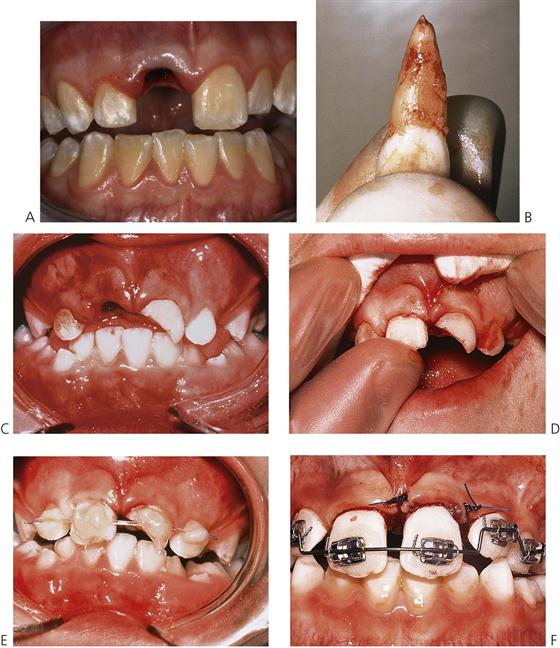
Figure 9.34 Management of avulsion. (A) With avulsions, there may be few other injuries. In other cases, there may be extensive damage to the supporting tissues. (B) Always hold the tooth by the crown and gently debride the root surface with saline. (C) The socket should be irrigated and clear of debris. (D) Replant with firm pressure. The tooth will usually click back into position. (E) Splint with a flexible splint, such as composite and nylon fishing line, to allow some physiological movement. (F) Orthodontic appliances are extremely useful when splinting traumatized teeth. The wire should be passive and allow physiological movement. Placement of a wire through orthodontic brackets allows the splint to be removed and the mobility of the tooth assessed.
First aid advice
It is important that parents, caregivers and teachers have access to appropriate advice on the management of avulsed teeth. Timing is essential and this information can be given over the telephone:
• Do not allow the child to eat or drink. If sedation or anaesthesia is required for extensive injuries, then the child may need to be fasted.
• Locate the tooth and hold by the crown only. Always check the patient’s clothing for avulsed teeth that are thought to be lost.
• Replant the tooth immediately if clean. If the tooth is dirty, it should be washed – preferably with milk if available, otherwise saline or the patient’s saliva. As a last resort, very briefly rinse under cold water (10 s only).
• Hold the tooth in place by biting gently on a handkerchief or clean cloth, or use aluminium foil or similar and seek urgent dental treatment.
• If unable to replant the tooth, store it in isotonic media to prevent dehydration and death of the periodontal ligament cells. Use:
• Milk (the preferred solution).
• Wrap in plastic cling wrap (with some saliva to keep it moist).
• Do not use water as this will result in hypotonic lysis of the periodontal ligament cells.
Time is essential! The long-term prognosis of the tooth is severely reduced after 10 min of being dry and out of the mouth. Do not waste time searching for an ideal storage medium, replant the tooth!
Management in the dental surgery
The following are guidelines for replanting avulsed permanent teeth.
Tooth replanted prior to arrival
Debride the mouth but do not extract the tooth.
Tooth maintained in storage solution with extra-oral time <60 min
1. Gently debride the root surface under copious saline, milk or tissue-culture media (Hanks balanced salt solution) irrigation. When holding teeth, always do so by only holding the crown with a wet gauze square (teeth can be very slippery, see Figure 9.34B).
2. Give local anaesthesia and gently debride the tooth socket with saline to remove any blood clot, but do not curette the bone or remaining periodontal ligament (Figure 9.29C).
3. Replant the tooth gently with finger pressure (Figure 9.34D). The tooth usually ‘clicks’ back into the correct position if there has not been too much bone damage and there is no blood clot left in the socket.
Tooth is dry or extra-oral time is >30 min
1. Remove any necrotic periodontal ligament by soaking the tooth in saline and gently debriding the root surface with saline-soaked gauze. There is conflicting evidence as to the most appropriate way in which to remove necrotic debris and remnants of the periodontal ligament – however, damage to the cementum must be avoided and mechanical instrumentation should be avoided. The tooth should also be soaked in sodium fluoride for 20 min. It is essential that the tooth be rehydrated prior to replantation.
2. Give local anaesthesia and gently debride the tooth socket with saline to remove the blood clot; do not curette the bone or remaining ligament.
Management following replantation
1. Splint for 14 days (Figure 9.34E,F).
2. Reposition and suture any degloved gingival tissues and suture all lacerations.
3. Under rubber dam isolation, cut an endodontic access cavity and remove the pulp. Irrigate the canal with sodium hypochlorite solution and then dry it. Place a Ledermix paste dressing in the canal in order to reduce the chance of external inflammatory root resorption. Continue root canal treatment as outlined above for intruded teeth.
4. Prescribe a high-dose, broad-spectrum antibiotic and check current immunization status.
5. Account for any lost teeth. A chest radiograph may be required.
6. Normal diet and strict oral hygiene including chlorhexidine gluconate 0.2% mouthwash.
Splinting of avulsed teeth
• Orthodontic brackets with a light archwire (0.014″). Orthodontic appliances are particularly useful as the time taken to apply the brackets is half that to set composite resin (Figure 9.34F).
Or
• Composite resin and nylon fibre (0.6 mm diameter) such as fishing line (20 kg breaking strain).
Splints should be flexible to allow normal physiological movement of the tooth. This helps to reduce the development of ankylosis and replacement resorption; however, if there is a bone or root fracture present, then a rigid splint must be used so that there is no movement of the teeth or bone segments.
Splints should generally stay in place for 10–14 days if there are no complicating factors such as alveolar or root fractures. When bone fractures are present, the splint should be retained for 4–6 weeks. If there is a root fracture, then the splint is usually required for 3 months. Avulsed teeth with immature apices that were kept dry prior to replantation may require splinting for up to 4 weeks. The occlusion may need to be relieved when the degree of overbite or luxation is such that the tooth will receive unwanted masticatory force. This can be achieved by minimal removal of enamel, or construction of an upper removable appliance, or placement of composite resin on the molars to open the bite. However, some physiological movement is necessary.
As a general rule, all teeth should be replanted whether wet or dry. Although the prognosis of a dry tooth may be poor, it is usually preferable to have the tooth present during growth than not at all. Always keep options open for future treatment.
Orthodontic splinting is always preferable but obviously requires suitable training and access to equipment. It does not matter which orthodontic bracket system is used. The most important point is that any arch wire placed for splinting is passive and will not move adjacent teeth. There are certain advantages over the use of a composite resin splint, in particular:
• Easier and quicker to place.
• Allows the splint to be readily removed and replaced so that the mobility of the teeth can be monitored.
• Easier to maintain oral hygiene.
• Less time to remove and less chance of damage to the teeth following removal of composite resin (often used to excess).
If composite resin splints are used, then choose a distinct shade of resin, avoid filling embrasures and try to minimize the amount of resin used. All these points assist in the later removal of the splint. It is more comfortable to delay removal of the splint until after any endodontic procedures, such as pulp extirpation, have been commenced.
Root canal treatment
Immature root apex
If a tooth has been avulsed, replanted within a short period, the apex is extremely immature (>2 mm) and the child is <8 years old, then root canal treatment is only needed if symptoms and clinical signs indicate that the pulp space has become infected. Hence, such teeth should not have root canal treatment commenced immediately after the replantation; instead they should be monitored to see whether the pulp revascularizes.
If the canal becomes infected, the root canal should be dressed with Ledermix paste, placed initially for 6 weeks followed by another Ledermix paste dressing for a further 6 weeks (i.e. total period 3 months). Calcium hydroxide treatment can then be used to induce apexification (see above). The calcium hydroxide should be a non-setting paste. This is changed 3-monthly until an apical hard tissue barrier has formed and root canal filling is possible. The rate of long-term survival of immature teeth is only 30% even if replanted early.
Mature root apex
In all other situations, in which the apex of the avulsed tooth is <2 mm open or closed, root canal treatment should be commenced immediately after replantation in order to prevent external inflammatory root resorption. The initial dressing should be Ledermix paste for two periods of 6 weeks each (i.e. total 3 months) followed by either a 50 : 50 mixture of Ledermix paste and calcium hydroxide or just calcium hydroxide alone. The root canal filling can usually be completed after 5–6 months.
Generally, it is best to always replant avulsed teeth even if they have a poor prognosis. Even with appropriate treatment, these teeth will often be lost by progressive replacement resorption, but the positive benefit being that the alveolar bone height is maintained. The only exceptions are those cases with very immature roots where ankylosis will prevent alveolar bone growth and may complicate future orthodontic and prosthodontic management.
Complications in endodontic management of avulsed teeth
External inflammatory root resorption (Figure 9.35A)
This is the progressive loss of tooth structure by an inflammatory process caused by the presence of bacteria in the root canal system and damage to the root surface. This resorption can be prevented or managed with appropriate treatment. Factors in prevention and management include:
• Prophylactic antibiotics: a broad-spectrum antibiotic (e.g. tetracycline, amoxicillin or Penicillin V) should be given as soon as possible after avulsion and continued for 1 week. Although tetracyclines are preferred, they should be avoided in children where staining of other teeth may occur.
• Pulp removal: This should be done as soon as possible after the replantation – that is, on the day of the injury once the tooth has been replanted and stabilized with a splint. It must not be done outside the mouth. Any delays in commencing root canal treatment are likely to lead to inflammatory resorption.
Avoid medicaments that may cause inflammation, such as calcium hydroxide, in the first 3 months after trauma. Ledermix paste is an ideal first-dressing medicament as it has been shown to prevent inflammatory root resorption and inhibit the action of clastic cells.
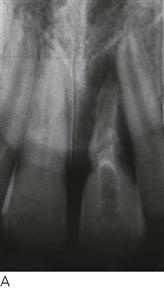


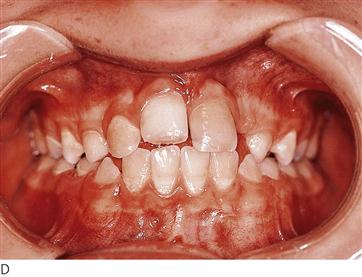
Figure 9.35 (A) Inflammatory root resorption resulting from a failure to adequately disinfect and medicate the root canal. (B) The root is being replaced by bone around the gutta-percha root filling. Note the slight infraocclusion of this tooth. (C) Replacement resorption of an avulsed central incisor. Note the ankylosis on the labial aspect of the root. (D) Ankylosis and subsequent infraocclusion is a significant problem when permanent teeth are traumatized before the cessation of growth. There is retardation of alveolar growth and the tooth is ultimately lost.
Management
If inflammatory resorption is detected, the canal must be thoroughly re-instrumented, irrigated and then dressed with Ledermix paste for 3 months, but changing the dressing every 6 weeks. Calcium hydroxide can then be placed for a further 3 months after which time, if there is no progression of the resorption, the root canal can be filled.
External replacement root resorption (Figure 9.35B–D)
This is the progressive resorption of tooth structure and replacement with bone, as part of continual bone remodelling. It results from damage to the cementum and/or periodontal ligament or from replantation of dry teeth. It cannot be treated, so the aim must be to prevent replacement resorption and subsequent ankylosis. Factors in prevention and management include:
• Extra-oral time: prognosis decreases dramatically after 15 min if the tooth is dry. Approximately 50% of the periodontal ligament cells are usually dead after 30 min and all are dead after 60 min.
• Milk is the best medium and may keep cells viable for up to 6 h. It has the advantage that it is pasteurized with few bacteria, is readily available and is cold. There appears to be no difference between low-fat and skimmed milk, but yoghurt and sour milk should be avoided due to their low pH.
• Saliva is suitable for up to 2 h.
• Saline and plastic cling wrap will maintain cells for 1 h.
• Water is hypotonic and causes cell lysis, so it should be avoided.
• Tissue culture media such as Hank’s balanced-salt solution or RPMI 1640 (Roswell Park Memorial Institute tissue culture medium) is also appropriate, if available, and may give up to 24 hours’ cell survival.
• Mechanical damage: ankylosis will result if the cementum has been removed or damaged.
• Risk increases with increased handling during transport and replantation.
• Splinting: flexible splinting allows physiological movement and results in less ankylosis and less replacement resorption.
• Extra-oral root canal treatment should be avoided since it will increase the likelihood of replacement resorption and ankylosis due to the prolonged extra-oral time, damage during treatment and the effects of toxic substances such as irrigating solutions and root canal cements.
Questions concerning the management of avulsed teeth
Despite a plethora of literature supporting the different procedures for managing avulsed teeth, the clinical reality remains that teeth that have been out of the mouth for more than 30 min have a poor prognosis (Figure 9.36).
• There is good evidence to support the use of specialized storage media, however, they are rarely available at the scene of an accident. Many dental injuries occur on weekends during sport. It would be interesting to research the average time taken to get a traumatized child to a dentist on a Saturday afternoon.
• There is a social cost following trauma, including absence from school (for the child) and work (for the parent) in attending multiple appointments, and loss of self-esteem. There are also financial considerations of complex restorative and endodontic treatment for teeth that often have a very poor outcome.
Parents and children should be given a clear indication about the probable outcomes of treatment. Heroic work is often performed with all good intentions when the prognosis is questionable (Barrett & Kenny 1997). In some cases, it may be preferable to retain hopeless teeth where replacement resorption will preserve bone. In other cases, the retardation of alveolar bone growth accompanying ankylosis in a growing child may necessitate early removal. Always keep the options open and consider the following questions:

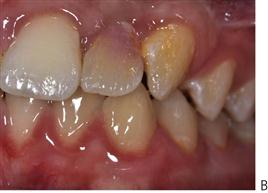
Autotransplantation (Figure 9.37)
Autotransplantation has been successfully used in the management of tooth loss following trauma. It may be used in management of complicated crown/root fractures, replacement of the missing anterior teeth, and after avulsion injuries.
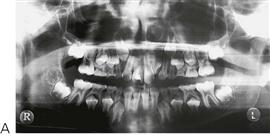
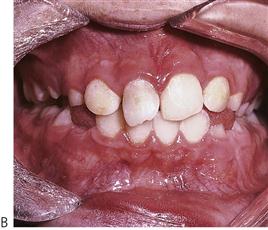
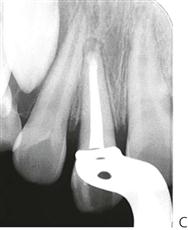
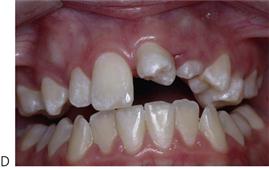
Figure 9.37 Autotransplantation. (A) The upper right central incisor in this boy was avulsed and undergoing resorption. A supernumerary lateral incisor was present lying palatal to the upper left central incisor. This tooth was autotransplanted into the socket of the traumatized central incisor. (B) Healing after 2 months. (C) Completion of root canal treatment at 6 months following transplantation showing good bone and periodontal healing. (D) Autotransplantation of a premolar. Notice the rotation of the crown by 45° to improve the emergence profile of the tooth prior to restoration with a composite resin strip crown.
Good case selection is essential.
Indications
• Traumatized anterior tooth with poor long-term prognosis.
• Donor tooth is favourable with respect to the stage of root development, size and shape of crown, etc.
• Cases with Class I or Class II malocclusion with moderate to severe crowding involving extraction of premolars.
Autotransplantation must be considered as part of an overall treatment plan for the patient and other alternatives such as orthodontic space closure, fixed and removable prosthodontics and osseointegrated implant placement must be considered.
Procedure for autotransplantation
1. Selection of donor tooth (Table 9.2) – usually a premolar – consider:
• The stage of root development.
• The optimal time for transplantation is when the root is  to
to  formed.
Table 9.2
Selection of donor tooth for autotransplantation
| Donor tooth | Recipient site |
| Third molars | First molars |
| Lower first premolar | Upper central incisor |
| Lower second premolar | Upper lateral incisor |
| Supernumerary/supplemental teeth | Upper incisors |
| Lower incisors | Upper lateral incisor |
| Upper premolars | Depends on root shape |
2. Analysis of recipient site:
• Size and shape of recipient area.
• Need for socket expansion or instrumentation.
• Need to partially rotate the donor tooth.
• Remove the traumatized incisor as carefully as possible to minimize alveolar damage.
• Prepare the socket – the socket can be enlarged if required and then irrigated with saline. Any necrotic or foreign debris such as gutta-percha, intracanal medicaments or granulation tissue must be removed.
• Make an incision into the periodontal ligament of the donor tooth through the gingival margin; a collar of attached gingiva may be included with the graft.
• Gently extract the tooth, avoiding damage to the root surface.
• Position donor tooth into recipient site. This usually involves rotation of a premolar tooth about 45–90°.
The need for root canal treatment will depend on the degree of root development (Table 9.3) and recovery of the pulp after the transplantation.
Table 9.3
Healing and prognosis after autotransplantation of premolars
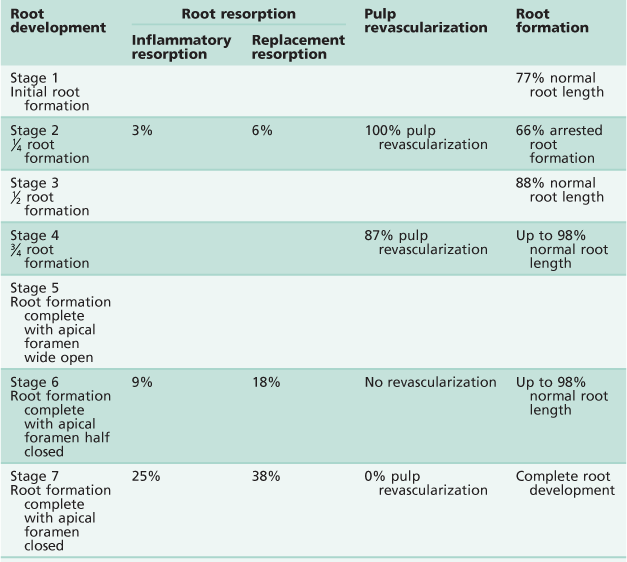
After: Andreasen et al. (1990).
Reasons for an unfavourable outcome
• Inflammatory resorption or ankylosis, replacement resorption:
• Closed apex – 20% root resorption.
• Open apex – 3% root resorption.
Details of healing and prognosis are shown in Table 9.3.
Internal bleaching of root-filled incisors
One consequence of trauma is tooth discolouration. Internal bleaching is a common procedure following root canal treatment. The integrity of the root canal filling is paramount and, above all, bleaching should not be carried out below the cemento-enamel junction because of the risk of initiating external invasive resorption.
Method
1. Bleaching must be carried out under rubber dam isolation.
2. Ensure adequate root canal filling and remove the gutta-percha to a level 3 mm below the cemento-enamel junction.
3. Place a Cavit base to just above the cemento-enamel junction.
4. Ensure that the access cavity is clean and free of all debris.
5. Acid etch the access cavity to open the dentine tubules and then rinse with water.
6. Place a thick, dry mixture of sodium perborate and hydrogen peroxide into the cavity and then place a temporary filling using Cavit. The bleaching mixture should remain in the tooth for 1 week, after which the tooth colour is evaluated. The procedure may be repeated several times if required.
7. Once good colour modification has been achieved, the access cavity can be restored. Cavit can be left as a base over the gutta percha and also on the labial wall of the access cavity. This will facilitate further access to the root canal system if endodontic re-treatment becomes necessary. Leaving Cavit on the labial wall of the cavity will allow further internal bleaching in the future if the tooth discolours again and it avoids the removal of dentine at that time. The remainder of the pulp chamber should be filled with a glass ionomer cement followed by a layer of composite resin.
Soft-tissue injuries
Alveolar mucosa and skin
Bruising (Figure 9.38)
The simplest and most common type of soft-tissue injury is bruising (contusion). This will often be present without any dental involvement. Treatment is symptomatic. However, be careful to check in the depths of the labial and buccal sulci for any other deep soft-tissue wounds (e.g. lacerations) or degloving-type injuries.
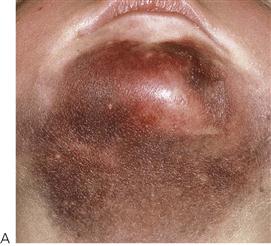
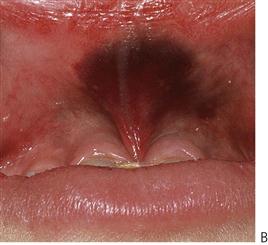
Figure 9.38 (A) Bruising of the chin is usually associated with severe degloving (see Figure 9.41B). (B) Bruising of the labial frenum may occur from a blow across the face; child abuse should always be suspected.
Lacerations (Figures 9.39, 9.40)
• Often a full-thickness laceration of the lower lip can be undetected because of the natural contours of the soft tissues or the tentative examination of an upset child. If there has been a dental injury, always look for tooth remnants in the lips.
• Careful suturing of skin wounds will be needed to avoid scarring and should be performed only by those who are competent to do so. Skin wounds must be closed within the first 24 h and preferably within 6 h.
• Any debris, such as gravel and dirt, must be removed by scrubbing with a brush and an antiseptic surgical solution such as 2.5% povidone iodine or 0.5% chlorhexidine acetate.
• Ideally, skin edges should be excised with a scalpel to remove necrotic tags and irregular margins.
• Muscle closure and deep suturing is achieved with a fine resorbable material such as polyglactin or polyglycolic acid.
• Final skin closure is with 6–0 monofilament nylon on a cutting needle.

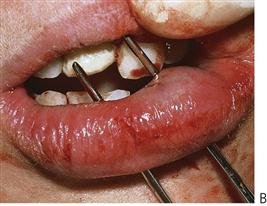
Figure 9.39 (A) When upper teeth are intruded, the lip is often bitten and it should be assessed for a through-and-through laceration. (B) These lacerations must be closed in three layers: the muscle, mucosa and skin. Always check lip lacerations for the presence of any tooth fragments if there are fractured teeth.
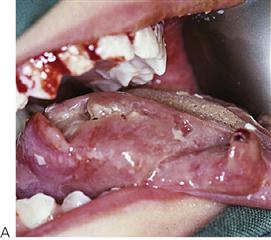
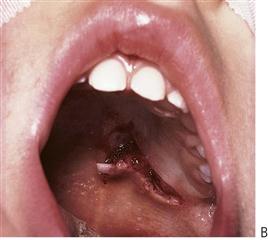
Figure 9.40 (A) Lacerations may be caused by self-mutilation. This child has a peripheral sensory neuropathy (congenital indifference to pain). Attempts to make splints that would stop her behaviour failed and, after much agonizing, a full clearance was performed. (B) A severe laceration of the palate caused by this child falling with a straw in her mouth. In many cases, small lacerations will granulate and heal without intervention. However, large lacerations require suturing.
Attached gingival tissues
Degloving (Figure 9.41)
One of the most common injuries is degloving, which is when a full-thickness mucoperiosteal flap is stripped off the bone, with the separation line usually being the mucogingival junction (Figure 9.41A). These injuries tend to occur after blunt trauma and a common presentation is a large collection of blood in the submental region (Figure 9.38A). The flap should be tightly sutured and a pressure dressing placed if the lower arch is involved. This prevents the pooling of blood and prevents swelling in the submental region, which may compromise the airway.
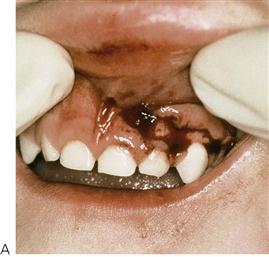
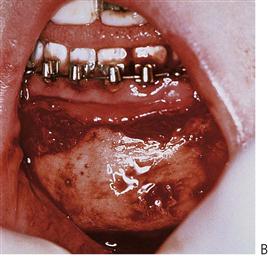
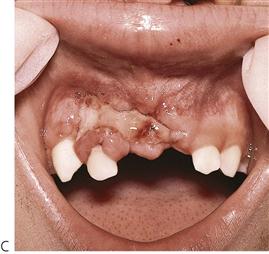
Figure 9.41 (A) Gingival degloving in a young child. Small tears such as this can be repositioned without suturing and will granulate well. (B) Severe degloving of the mandible separating at the mucogingival junction from molar to molar and to the level of the hyoid. The mental nerve on the left was severed. (C) Inadequate repositioning of a degloving injury has resulted in delayed healing and soft tissue loss. It is essential that these injuries should be treated early.
Interdental suturing of displaced gingival tissue is very important, especially where palatal tissue is involved (e.g. with lateral luxation). The close re-adaptation of tissues to the tooth surface will help preserve alveolar bone especially interdentally. Suturing will also help keep the tooth in position.
Suturing (see Chapter 8)
Prevention
Education of parents and caregivers
While seatbelts and child restraints are covered by legislation, and helmets for bike riders are mandatory in many countries, the failure of parents to observe these regulations often results in unnecessary childhood craniofacial trauma. It has been the authors’ experience that there is often little trauma seen from sports, as most children are wearing mouth guards; nevertheless, there is a disproportionate amount of trauma seen from leisure activities such as skateboarding, swimming and other ‘non-contact’ sports.
Educating parents, caregivers and teachers about primary care for dental trauma is essential. The correct protocols for dealing with avulsed teeth should be available to all schools and sporting clubs.
Further reading
Assessment
1. Gassner R, Tuli T, Hächl O, et al. Craniomaxillofacial trauma in children: a review of 3,385 cases with 6,060 injuries in 10 years. Journal of Oral and Maxillofacial Surgery. 2004;62:399–407.
2. Hall R. Pediatric orofacial medicine and pathology. London: Chapman and Hall Medical; 1994.
3. Kopel HM, Johnson R. Examination and neurological assessment of children with orofacial trauma. Endodontics and Dental Traumatology. 1985;18:252–268.
4. Lam R, Abbott PV, Lloyd C, Lloyd CA, Kruger E, Tennant M. Dental trauma in an Australian Rural Centre. Dental Traumatology. 2008;24:663–670.
5. Schatz JP, Joho JP. A retrospective study of dento-alveolar injuries. Endodontics and Dental Traumatology. 1994;10:11–14.
6. Stockwell AJ. Incidence of dental trauma in the Western Australian School Dental Service. Community Dentistry and Oral Epidemiology. 1988;16:294–298.
Facial fractures
1. Ferreira P, Marques M, Pinho C, et al. Midfacial fractures in children and adolescents: a review of 492 cases. British Journal of Oral and Maxillofacial Surgery. 2004;42:501–505.
2. Posnick JC, Wells M, Pron GE. Pediatric facial fractures: evolving patterns of treatment. Journal of Oral and Maxillofacial Surgery. 1993;51:836–844.
3. Schweinfurth JM, Koltai PJ. Pediatric mandibular fractures. Facial and Plastic Surgery. 1998;14:31–44.
4. Zachariades N, Mezitis M, Mourouzis C, et al. Fractures of the mandibular condyle: a review of 466 cases Literature review, reflections on treatment and proposals. Journal of Craniomaxillofacial Surgery. 2006;34:421–432.
5. Zimmermann CE, Troulis MJ, Kaban LB. Pediatric facial fractures: recent advances in prevention, diagnosis and management. International Journal of Oral and Maxillofacial Surgery. 2006;35:2–13.
Child abuse
1. American Academy of Pediatrics Committee on Child Abuse and Neglect; American Academy of Pediatric Dentistry; American Academy of Pediatric Dentistry Council on Clinical Affairs 2005–2006. Guideline on oral and dental aspects of child abuse and neglect. Paediatric Dentistry. 2005;7(Reference Manual):64–67.
2. Cairns AM, Mok JY, Welbury RR. Injuries to the head, face, mouth and neck in physically abused children in a community setting. International Journal of Paediatric Dentistry. 2005;5:310–318.
Trauma to primary teeth
1. Brin I, Ben-Bassar Y, Zilberman Y, et al. Effect of trauma to the primary incisors on the alignment of their permanent successors in Israelis. Community Dentistry and Oral Epidemiology. 1988;16:104–108.
2. Christophersen P, Freund M, Harild L. Avulsion of primary teeth and sequelae on the permanent successors. Dental Traumatology. 2005;21:320–323.
3. Sennhenn-Kirchner S, Jacobs HG. Traumatic injuries to the primary dentition and effects on the permanent successors – a clinical follow-up study. Dental Traumatology. 2006;2:237–241.
4. Spinas E, Melis A, Savasta A. Therapeutic approach to intrusive luxation injuries in primary dentition A clinical follow-up study. European Journal of Paediatric Dentistry. 2006;7:179–186.
Trauma to permanent teeth
1. Andreasen JO, Andreasen FM, Bakland LK, et al. Traumatic dental injuries: a manual. second ed Copenhagen: Munksgaard; 2003.
2. Andreasen FM, Andreasen JO. Diagnosis of luxation injuries: the importance of standardized clinical, radiographic and photographic techniques in clinical investigations. Endodontics and Dental Traumatology. 1985;1:160–169.
3. Andreasen JO, Borum MK, Jacobsen HL, et al. Replantation of 400 avulsed permanent incisors: 1 Diagnosis of healing complications. Endodontics and Dental Traumatology. 1995;11:51–58.
4. Andersson L, Bodin I, Sorensen S. Progression of root resorption following replantation of human teeth after extended extra-oral storage. Endodontics and Dental Traumatology. 1988;5:38–47.
5. Cvek MJ. A clinical report on partial pulpotomy and capping with calcium hydroxide in permanent incisors with complicated crown fracture. Journal of Endodontics. 1978;4:232–237.
6. Rowe NL, Williams JW. Maxillofacial injuries. Edinburgh: Churchill Livingstone; 1985.
Options for management
1. Andreasen FM, Andreasen JO, Bayer T. Prognosis of root-fractured permanent incisors – prediction of healing modalities. Endodontics and Dental Traumatology. 1989;5:11–22.
2. Andreasen JO, Paulson HU, Yu Z, et al. A long-term study of 370 autotransplanted premolars Part II: tooth survival and pulp healing subsequent to transplantation. European Journal of Orthodontics. 1990;12:14–24.
3. Barrett EJ, Kenny DJ. Survival of avulsed permanent maxillary incisors in children following delayed replantation. Endodontics and Dental Traumatology. 1997;13:269–275.
4. Barrett EJ, Kenny DJ, Tenenbaum HC, et al. Replantation of permanent incisors in children using. Emdogain Dental Traumatology. 2005;21:269–275.
5. Campbell KM, Casas MJ, Kenny DJ. Development of ankylosis in permanent incisors following delayed replantation and severe intrusion. Dental Traumatology. 2007;23:162–166.
6. Chaushu S, Becker A, Zalkind M. Prosthetic considerations in the restoration of orthodontically treated maxillary lateral incisors to replace missing central incisors: a clinical report. Journal of Prosthetic Dentistry. 2001;85:335–341.
7. Cohenca N, Stabholz A. Decoronation – a conservative method to treat ankylosed teeth for preservation of alveolar ridge prior to permanent prosthetic reconstruction: literature review and case presentation. Dental Traumatology. 2007;23:87–94.
8. Filippi A, Pohl Y, Von Arx T. Treatment of replacement resorption with Emdogain – preliminary results after 10 months. Dental Traumatology. 2001;17:134–138.
9. Flores MT, Andersson L, Andreasen JO, et al. International Association of Dental Traumatology Guidelines for the management of traumatic dental injuries I Fractures and luxations of permanent teeth. Dental Traumatology. 2007a;23:66–71.
10. Flores MT, Andersson L, Andreasen JO, et al. Guidelines for the management of traumatic dental injuries. International Association of Dental Traumatology 2007b.
11. Humphrey JM, Kenny DJ, Barrett EJ. Clinical outcomes for permanent incisor luxations in a pediatric population I Intrusions. Dental Traumatology. 2003;19:266–273.
12. Kenny DJ, Barrett EJ, Casas MJ. Avulsions and intrusions: the controversial displacement injuries. Journal of the Canadian Dental Association. 2003;69:308–313.
13. Lee R, Barrett EJ, Kenny DJ. Clinical outcomes for permanent incisor luxations in a pediatric population II Extrusions. Dental Traumatology. 2003;19:274–279.
14. Nguyen PM, Kenny DJ, Barrett EJ. Socio-economic burden of permanent incisor replantation on children and parents. Dental Traumatology. 2004;20:123–133.
15. Nikoui M, Kenny DJ, Barrett EJ. Clinical outcomes for permanent incisor luxations in a pediatric population III Lateral luxations. Dental Traumatology. 2003;19:280–285.
16. Paulsen HU. Autotransplantation of teeth in orthodontic treatment. American Journal of Orthodontics and Dentofacial Orthopedics. 2001;119:336–337.
17. Schjøtt M, Andreasen JO. Emdogain does not prevent progressive root resorption after replantation of avulsed teeth: a clinical study. Dental Traumatology. 2005;21:46–50.
Self-mutilation
1. Altom RL, Di Angelis AJ. Multiple autoextractions: oral self mutilation reviewed. Oral Surgery Oral Medicine Oral Pathology. 1989;67:271–274.