Chapter 21 Dental caries and the assessment of restorations
INTRODUCTION
The word caries is used to describe both the invisible caries process and the potentially visible caries lesion. Understanding this difference is important if the role and value of radiography is to be understood.
The caries process is the interaction of the biofilm of plaque with the dental hard tissues. The biofilm consists of a community of metabolically active micro-organisms capable of fermenting sugars (e.g. sucrose or glucose) to produce acid, which can lower the pH to 5 in 1–3 minutes and produce demineralization of the dental hard tissues. The acid can be neutralized by saliva and mineral regained resulting in remineralization. Together these processes produce the caries lesion, which may or may not be visible clinically and/or radiographically. Being able to see the lesion depends on the extent and balance between demineralization and remineralization.
The first half of this chapter concentrates on the detection of caries in posterior teeth from bitewing radiographs. The second half summarizes the important features to observe when assessing restorations and outlines a systematic approach to interpreting bitewing radiographs.
CLASSIFICATION OF CARIES
Lesions of caries are usually classified and/or described by the anatomical site of the tooth affected. Terminology used includes:
• Primary caries — caries developing on unrestored surfaces
• Secondary or recurrent caries — caries developing adjacent to restorations
• Residual caries — demineralized tissue left behind before filling the tooth.
Lesions of caries are also classified and/or described by the activity of the caries process. Terminology used includes:
Levels of Disease
Caries is also described by the extent or size of the lesion. Typically 4 levels of disease are used:
• D1 — Clinically detectable enamel lesions with intact surfaces
• D2 — Clinically detectable cavities limited to enamel
These distinctions are important with regard to management. Lesions at levels D1 and D2 are generally managed using preventative measures, whereas lesions at the D3 or D4 level are likely to require restorative treatment. Detection of lesions of caries and being able to assess the level of disease are therefore crucial in determining clinical treatment.
DIAGNOSIS AND DETECTION OF CARIES
Diagnosis has been defined as identifying a disease from its signs and symptoms. In caries diagnosis that would involve both detecting the lesion and determining the activity of the process. Dental radiography is one method used to detect the lesion but it gives no information on the activity of the process. Various detection methods are available for different sites.
Approximal caries
Radiographic detection of lesions of caries
Bitewing radiographic techniques, using both film packets and digital sensors (solid-state and phosphor plates) as the image receptor, were described in Chapter 11. For caries detection, film packets and phosphor plates are preferred as the imaging area of the equivalent sized solid-state sensors is smaller. It has been reported that on average three fewer interproximal tooth surfaces are shown per image.
Approximal lesions of caries are detectable radiographically only when there has been 30%–40% demineralization, so allowing the lesion to be differentiated from normal enamel and dentine. The importance of optimum viewing conditions for both film and digital images, as described in Chapter 20, cannot be overemphasized when looking for these early subtle changes. Magnification is of particular importance, as shown in Figure 21.1.
Radiographic assessment of caries activity
A single bitewing radiograph may illustrate one or more caries lesions but it gives no information on caries activity. As caries is a slowly progressing disease, this progression and therefore caries activity, can be assessed over time by periodic radiographic investigations.
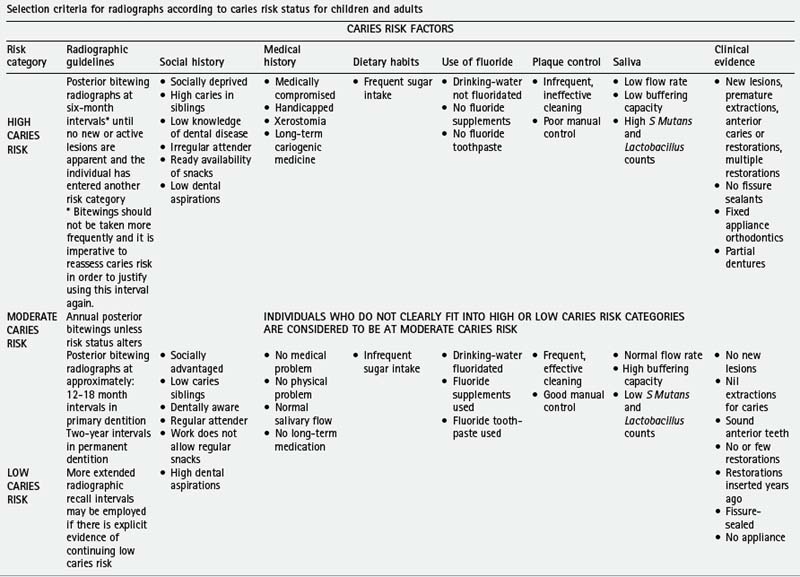
In the UK, the 2004 Faculty of General Dental Practice (UK)’s booklet Selection Criteria in Dental Radiography recommends that the frequency of these follow-up radiographs be linked to the caries risk of the patient (see Ch. 8 and Table 8.1). The booklet contains a very helpful summary table entitled Selection criteria for radiographs according to caries risk status for children and adults, which is reproduced with kind permission of the Faculty as Table 21.1. As can be seen, for high-caries-risk children and adult and patients 6-monthly intervals are recommended, for medium-caries-risk patients 12-monthly intervals and for low-caries-risk patients 2-yearly intervals for adults and 12–18 monthly intervals for children in the primary dentition.
Table 21.1 Summary of Selection criteria for radiographs according to caries risk status for children and adults
Radiographs used to monitor the progression of caries lesions need to be geometrically iden-tical — hence the need for image receptor holders and beam-aiming devices (see Ch. 11). They should also be similarly exposed to give comparable contrast and density.
Geometrically reproducible digital images can be superimposed and the information in one image subtracted from the other to create the subtraction image which shows the changes that have taken place between the two investigations (see Ch. 7).
Radiographic appearance of caries lesions
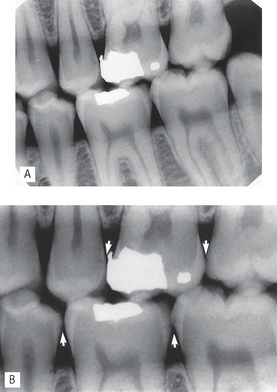
As lesions of caries progress and enlarge, they appear as differently shaped areas of radiolucency in the crowns or necks of the teeth. These shapes are fairly characteristic and vary according to the site and size of the lesion. They are illustrated diagrammatically in Figure 21.2 and examples are shown in Figure 21.3.
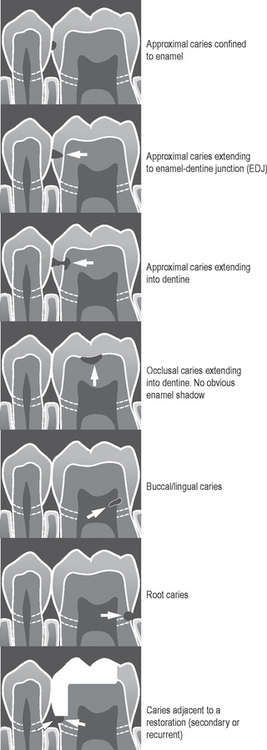
Fig. 21.2 Diagrams illustrating the radiographic appearances and shapes of various lesions of caries.
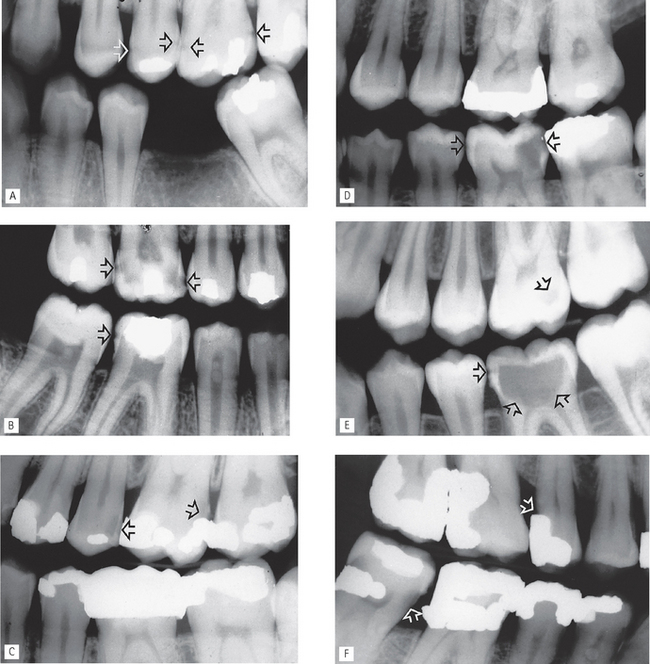
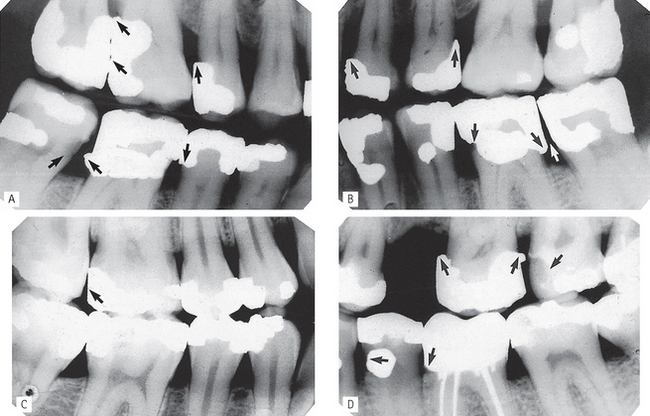
Fig. 21.3 Bitewing radiographs showing examples of typical caries lesions (arrowed). A Small approximal lesions  B Large approximal lesions with extensive dentine involvement
  and a small lesion
  . C Approximal lesion extending into dentine
  and recurrent caries
  . D Small and extensive approximal lesions
  . E Small occlusal lesion
  and extensive occlusal lesion
  , apart from the small approximal enamel lesion, the enamel cap appears intact. F Root caries
  and recurrent caries
  .
.
OTHER IMPORTANT RADIOGRAPHIC APPEARANCES
Radiographic detection of caries lesions is not always straightforward. It can be complicated by:
Residual caries
The rationale for removal of caries has changed in recent years. The primary aim nowadays when excavating dentine caries is to remove only the highly infected, irreversibly demineralized dentine in order to allow effective restoration of the cavity and surface anatomy of the tooth and to prevent disease progression. In other words, demineralized tissue (residual caries) is left behind in the base of the cavity and the tooth restored. Radiographically, this inactive caries may show a zone of radiolucency beneath the restoration. This appearance is identical to that of an active caries lesion under a restoration (see Fig. 21.4).
Radiodensity of adhesive restorations
The development of successful adhesive restorative materials in recent years, including dentine bonding agents and glass ionomer cements, has resulted in many teeth being restored with non-metallic fillings. These various adhesive materials vary considerably in their radiodensity and do not appear as white on radiographic images as traditional amalgam, as shown in Figure 21.5. Identifying subtle radiolucent lesions of caries adjacent to these materials can be very difficult, if not impossible.
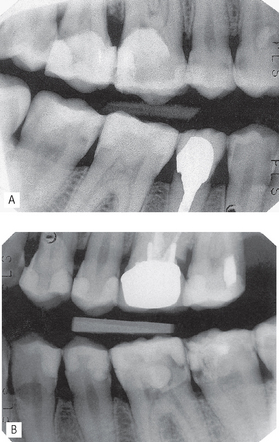
Fig. 21.5A Right and B left bitewings showing numerous posterior teeth that have been filled with adhesive restorations. Note: the fillings look less radiopaque than amalgam, and as a result the reduced contrast difference between dentine and restoration makes identification of adjacent radiolucent caries difficult
(kindly provided by Dr A. Banerjee).
Cervical burn-out or cervical translucency
This radiolucent shadow is often evident at the neck of the teeth, as illustrated in Figure 21.6. It is an artefactual phenomenon created by the anatomy of the teeth and the variable penetration of the X-ray beam.
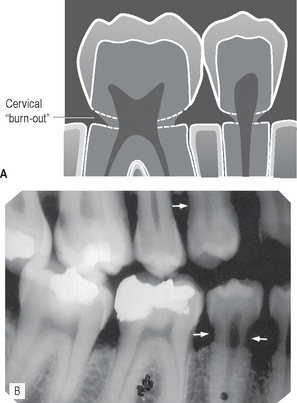
Fig. 21.6A Diagram illustrating the radiographic appearance of cervical burn-out. B Bitewing radiograph showing extensive cervical burn-out of the premolars (arrowed). Compare this with the appearance of cervical caries on distal aspect  .
.
Cervical burn-out can be explained by considering all the different parts of the tooth and supporting bone tissues that the same X-ray beam has to penetrate:
• In the crown — the dense enamel cap and dentine
• In the root — dentine and the buccal and lingual plates of alveolar bone (see Fig. 21.7).
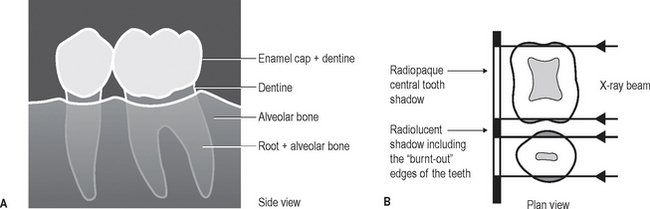
Fig. 21.7A Diagrammatic representation of  from the side showing the three-dimensional structures involved in the formation of the radiographic image. Note that in the cervical region there is less tissue present. B Plan view at the level of the necks of the teeth. Through the centre of the teeth there is a large mass of dentine to absorb the X-ray beam, while at the edges there is only a small amount. The edges of the necks of the teeth are therefore not dense enough to stop the X-ray beam, so their normally opaque shadows do not appear on the final radiograph.
Thus, at the edges of the teeth in the cervical region, there is less tissue for the X-ray beam to pass through. Less attenuation therefore takes place and virtually no opaque shadow is cast of this area on the radiograph. It therefore appears radiolucent, as if some cervical tooth tissue does not exist or that it has been apparently burnt-out.
Cervical burn-out is of diagnostic importance because of its similarity to the radiolucent shadows of cervical and recurrent caries. However, burn-out can usually be distinguished by the following characteristic features:
• It is located at the neck of the teeth, demarcated above by the enamel cap or restoration and below by the alveolar bone level
• It is triangular in shape, gradually becoming less apparent towards the centre of the tooth
• Usually all the teeth on the radiograph are affected, especially the smaller premolars.
In contrast, root and recurrent caries lesions, although they also often affect the cervical region, have no apparent upper and lower demarcating borders. These lesions are saucer-shaped and tend to be localized, as shown in Figure 21.2. If in doubt, the diagnosis should be confirmed clinically by direct vision and gentle probing having cleaned and dried the area.
Important points to note
• Burn-out is more obvious when the exposure factors are increased, as required ideally for detecting approximal caries.
• It is also more apparent, by the perceptual problem of contrast, if the tooth contains a metallic restoration, which may make the zone above the cervical shadow completely radiopaque (see Fig. 21.8 and Ch. 1, Fig. 1.16). As this area is also the main site for recurrent caries, diagnosis is further complicated.
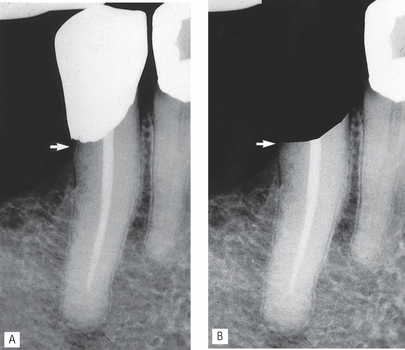
Fig. 21.8 The visual perceptual problem of contrast. A The zone at the distal cervical margin (arrowed), directly beneath the white metallic restoration shadow, appears radiolucent in the  . B The same image but with the white restoration blacked out. The zone beneath the restoration (arrowed) now appears less radiolucent.
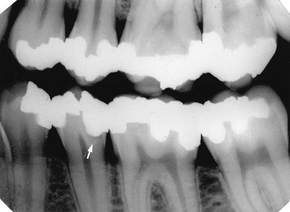
Dentinal changes beneath amalgam restorations
Following attack by caries, posterior teeth are still most commonly restored using dental amalgam. An amalgam is defined as an alloy of mercury with another metal or metals. In dental amalgam, mercury is mixed with an alloy powder. The alloy powders available principally contain silver, tin and copper with small amounts of zinc. It has been shown that, with time, tin and zinc ions are released into the underlying demineralized (but not necessarily infected) dentine producing a radiopaque zone within the dentine which follows the S-shape curve of the underlying tubules (see Fig. 21.9). The radiopacity of this zone may make the normal dentine on either side appear more radiolucent by contrast. This somewhat more radiolucent normal dentine may simulate the radiolucent shadows of caries and lead to difficulties in diagnosis.
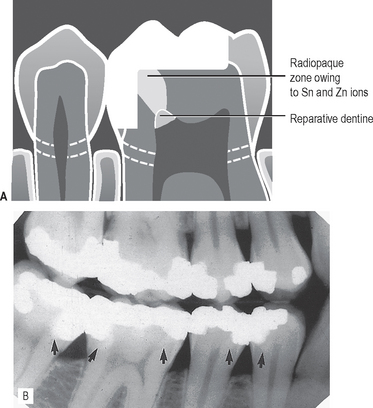
Fig. 21.9A Diagram illustrating the S-shaped radiopaque zone caused by tin and zinc ions released into the underlying demineralized dentine beneath an amalgam restoration and the appearance of reparative dentine. B Bitewing radiograph showing the S-shaped radiopaque shadows (arrowed) in the heavily restored lower teeth.
In addition, the pulp may also respond to both the carious attack and subsequent restorative treatment by laying down reparative secondary dentine which reduces the size of the pulp chamber.
LIMITATIONS OF RADIOGRAPHIC DETECTION OF CARIES
In addition to the problems of detection caused by the radiolucent and radiopaque shadows mentioned earlier, further limitations are imposed by the conventional two-dimensional radiographic image. The main problems include:
• Lesions of caries are usually larger clinically than they appear radiographically and very early lesions are not evident at all.
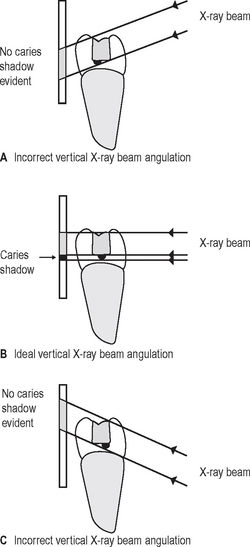
• Technique variations in image-receptor and X-ray beam positions can affect considerably the image of the caries lesion — varying the horizontal tubehead angulation can make a lesion confined to enamel appear to have progressed into dentine (see Fig. 21.10) — hence the need for accurate, reproducible techniques as described in Chapter 11.
• Exposure factors can have a marked effect on the overall radiographic contrast (see Fig. 21.11) on film-captured images and thus affect the appearance or size of caries lesions on the film.
• Superimposition and a two-dimensional image (digital or film) mean that the following features cannot always be determined:
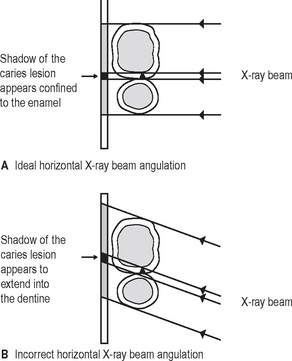
Fig. 21.10 Diagrams showing how the appearance and extent of a caries lesion confined to enamel alters with different horizontal X-ray beam angulations.
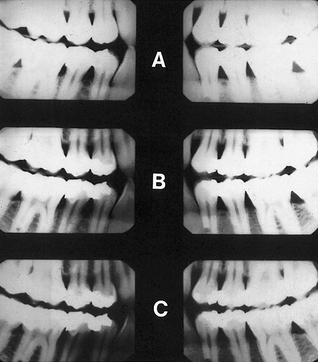
Fig. 21.11 Three pairs of film-captured bitewings taken with different exposure factors. A Considerably reduced exposure. B Slightly reduced exposure. C Slightly increased exposure. Note the varying contrast between enamel, dentine and the pulp.
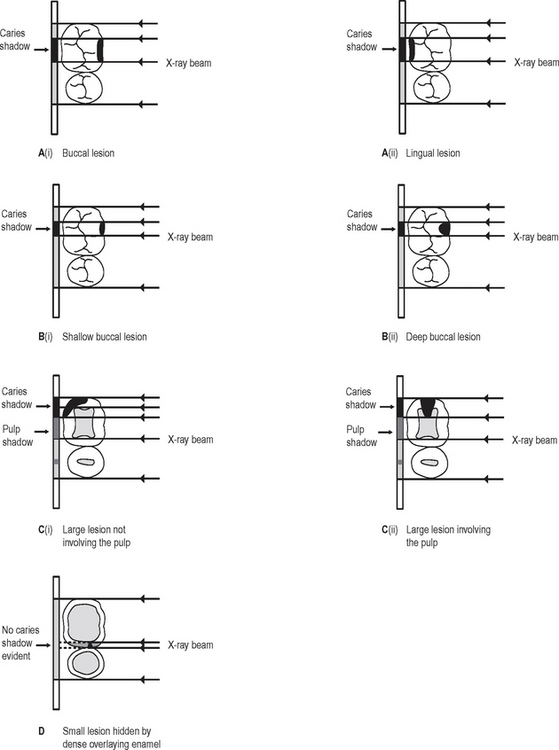
Fig. 21.12A Diagrams showing differently positioned caries lesions (i) buccal and (ii) lingual, producing similar radiographic shadows. B Diagrams showing different sized buccal lesions (i) shallow and (ii) deep, producing similar radiographic shadows. C Diagrams showing (i) a large approximal lesion superimposed over, but not involving the pulp and (ii) a large approximal lesion involving the pulp, both producing similar radiographic shadows. D Diagram showing how a small lesion may not be evident radiographically if dense radiopaque enamel shadows are superimposed.
RADIOGRAPHIC ASSESSMENT OF RESTORATIONS
Critical assessment of the restoration
Assessment of the underlying tooth
The important features to note include:
• Caries adjacent to restorations
• Residual caries (see earlier and Fig. 21.4)
• Radiopaque shadow of released tin and zinc ions (see earlier and Fig. 21.9)
Examples showing several of these features are shown in Figure 21.13.
LIMITATIONS OF THE RADIOGRAPHIC IMAGE
Once again, the radiographic image provides only limited information when assessing restorations. The main problems include:
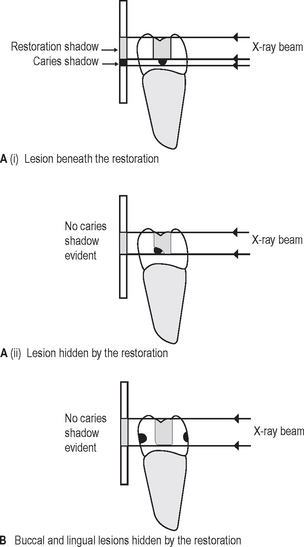
• Technique variations in X-ray tubehead position may cause recurrent caries lesions to be obscured (see Fig. 21.14)
• Cervical burn-out shadows tend to be more obvious when their upper borders are demarcated by dense white restorations because of the increased contrast differences (see Fig. 21.8)
• Superimposition and a two-dimensional image mean that:
SUGGESTED GUIDELINES FOR INTERPRETING BITEWING IMAGES
Overall critical assessment
A typical series of questions that should be asked about the quality of a bitewing image based on the ideal quality criteria described in Chapter 11, include:
Technique (film OR digitally-captured images)
• Are all the required teeth shown?
• Are the crowns of upper and lower teeth shown?
• Is the occlusal plane horizontal?
• Are the contact areas overlapped?
• Has there been any coning off or cone cutting?
Exposure factors (film-captured images)
• Is the image too dark — and so possibly overexposed?
• Is the image too light — and so possibly underexposed?
• Is the exposure sufficient to allow the enamel– dentine junction to be seen?
• What effect do the exposure factors have on the structures shown?
Processing (film-captured images)
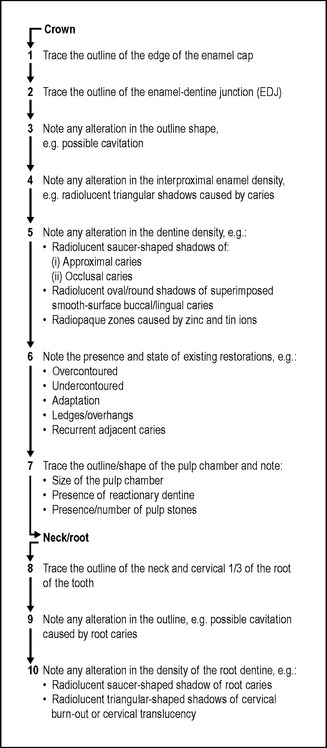
Systematic viewing
Suggested systematic approaches to viewing bitewing radiographs are shown in Figures 21.16 and 21.17