CHAPTER 18 Vital signs
At the completion of this chapter and with further reading, students should be able to
• Describe factors that affect the vital signs
• Identify the variations in acceptable ranges for body temperature, pulse, respirations and blood pressure that occur from infancy to older adulthood
• Describe advantages and disadvantages of using each body temperature site
• Verbalise the factors involved in the maintenance of the pulse and blood pressure
• Identify the sites commonly used to assess the pulse and state the reasons for their use
• State the factors necessary for an adequate supply of oxygen to the cells
• Identify the characteristics that should be included in a respiratory assessment
• Describe the various methods and sites to measure blood pressure
Assessment is an essential part of the nursing process, as it enables the nurse to obtain information about the individual that will facilitate the identification of problems relating to their health status. When the individual’s actual or potential problems or concerns are identified, steps can be taken to plan appropriate care to meet their needs.
Continued assessment enables the nurse to determine the progress being made by the individual, any change in the individual’s condition and the effectiveness of the nursing care plan in meeting the individual’s needs. Accurate assessments made, recorded and reported by nurses also assist the medical officer in making a diagnosis, planning a program of treatment or altering a plan of treatment in light of reported changes in a client’s condition. Information on the nursing process is provided in Chapter 15, which should be referred to in conjunction with this chapter.
Vital signs are a quick and efficient way of monitoring an individual’s condition or identifying problems and evaluating the individual’s response to interventions. The nurse has an essential role to play in assessing individuals and in recording and reporting the findings. To assess an individual effectively, the nurse requires knowledge of the acceptable ranges in measurements of vital signs in order to identify deviations or abnormalities. The nurse must also understand how to use the equipment necessary to complete vital signs assessment to ensure it is accurate. Vital signs, however, are only part of the clinical picture of an individual’s assessment and should be interpreted with other factors such as mentation, muscle strength, urine output, diet and bowel actions.
The last time I was admitted into hospital I had a young student nurse look after me. The student was very meticulous and looked after all my needs. The only time that I felt uncomfortable and a little scared was the first time he took my blood pressure. He pumped up the cuff, with an intense look on his face, and deflated it. He then proceeded to do this three times and then, without telling me what was wrong, left the room with a panicked look on his face, telling me that he would have to go and get his teacher. I was so worried, I thought there was something wrong with me and that I wouldn’t be able to go home. As I sat there waiting, thinking the worst, the student came back with the teacher and it turned out that he hadn’t switched on the stethoscope!
GUIDELINES FOR TAKING VITAL SIGNS
The vital signs (temperature, respirations, pulse and blood pressure) indicate the body’s ability to regulate body temperature, maintain blood flow and oxygenate body tissues. Oxygen saturation is an additional vital sign obtained through pulse oximetry that reflects the ability of the cardiac and respiratory system to maintain adequate oxygenation. Pain assessment is considered a fifth vital sign (see Ch 31) (Elkin et al 2008). When checking vital signs or ‘taking an individual’s observations’, a nurse must be able to measure the vital signs correctly, understand and interpret the values, communicate the findings appropriately and begin interventions as required. Vital signs are taken:
• When an individual is first admitted to a healthcare facility
• On a routine schedule according to a medical officer’s order or hospital policy
• When assessing a client during home health visits
• Before and after a surgical procedure
• Before and after an invasive diagnostic procedure
• Before and after administration of certain medications that affect the cardiovascular, respiratory or temperature control function
• When a client’s general physical condition changes
• Before and after nursing interventions influencing a vital sign
• When a client reports nonspecific symptoms of physical distress; for example, ‘feeling funny’
• Before, during and after a transfusion of blood products (Elkin et al 2008).
When taking vital signs the nurse should:
• Check that the equipment is functioning and appropriate
• Know the acceptable range for all vital signs
• Know the client’s usual range of vital signs
• Know the client’s medical history, therapies and medications prescribed
• Control or minimise environmental factors that may affect the vital signs
• Use an organised systematic approach
• Take the vital signs, interpret their significance and make decisions about client care
• Describe the frequency of vital sign assessment on the basis of the client’s condition
• Analyse the results of vital sign measurement
• Know other physical signs or symptoms and be aware of the client’s ongoing health status
• Verify and communicate significant changes in vital signs to the registered nurse (RN) and the medical officer.
Interpreting observations
Interpreting specific observations depends on:
• Comparison with the acceptable ranges for a given group of people
• Knowledge of the results of previous observations of a particular client
• The sum total of all observations at the time of the present observation.
For example, to interpret the significance of a client’s pulse rate, the nurse needs to know the acceptable pulse rate for people of that client’s age group, and the client’s previous pulse rate. Pulse and other observations or assessments, such as blood pressure, temperature, respirations, colour and degree of mental alertness, provide information that enables more accurate interpretation of a client’s condition. Therefore, while a single observation provides some information about a client, several observations enable a more accurate assessment of their condition.
Interpreting any observation involves a decision as to its significance. The nurse has a responsibility to report observations to the appropriate person, who makes a decision which may be to assess the client more frequently, to take immediate action or to notify the medical officer.
BODY TEMPERATURE
Measuring body temperature provides the nurse with an objective assessment of the body’s ability to maintain temperature regulation, identifies deviations from the acceptable range and monitors any changes.
The human body is warm blooded, with inbuilt mechanisms that maintain a balance between heat production and heat loss. As a result the internal or core temperature is stable. During ill health the balance may be upset and considerable stress may be placed on the body’s adaptive mechanisms if the temperature does not remain within the acceptable range. The temperature range of a normal adult depends on age, physical activity, status of hydration and state of health, including the presence of infection (Elkin et al 2008). The literature suggests three aspects that can make assessment of temperature inaccurate: the thermometer used, the skill of the healthcare provider completing the task and a valid anatomical structure for examining temperature (Lu et al 2010).
Regulation of body temperature
Body temperature is controlled by both voluntary actions and involuntary mechanisms. The surface temperature of the body varies with changes in the environmental temperature, and people adjust to these changes by adapting their immediate surroundings; for example, selecting appropriate clothing, moving away from or towards the source of heat or cold and altering the temperature of heaters or coolers can help to provide a comfortable environmental temperature.
Core temperature is maintained by inbuilt mechanisms concerned with the production of heat and its dissipation. These regulatory mechanisms, which ensure that a balance between heat production and loss is achieved, are situated in the hypothalamus, where neurons respond to changes n the temperature of the blood circulating through the brain. There are also temperature receptors in the skin and some internal organs, which transmit signals to the central nervous system to help control body temperature (Davie & Amoore 2010).
Heat production and heat loss
Heat is continually being produced by the process of cellular metabolism and is constantly being lost to the environment through the following processes.
Radiation
Body heat is transferred to cooler objects in the environment. Loss of heat by radiation means loss in the form of infrared rays. If the temperature of the body is higher than the temperature of the environment, more heat is radiated from the body.
Conduction
Only small quantities of heat are lost from the body by direct conduction from the body’s surface to other objects, for example, a bed or a chair. Loss of heat by conduction to the air represents a large proportion of the body’s heat loss, unless the temperature of the air immediately adjacent to the skin is the same as the temperature of the skin.
Convection
Convection is the dispersion of heat by air currents. The body usually has a small amount of warm air next to it. This warm air rises and is replaced by cooler air. People always lose a small amount of heat through convection.
Evaporation
Insensible evaporation of water directly through the skin results from continual diffusion of water molecules, regardless of body temperature. When the body becomes overheated, large quantities of sweat are secreted onto the surface of the skin to provide rapid evaporative cooling of the body.
Balancing heat production and heat loss
Heat balance occurs when the rates of heat production and loss are equal. When the body temperature rises, impulses from the hypothalamus to the skin arterioles are decreased, causing vasodilatation, with loss of heat occurring from radiation, conduction, convection and evaporation of sweat. When the body temperature falls, the impulses are increased, causing vasoconstriction of the skin arterioles, reducing heat loss and increasing the flow of blood to vital internal organs. Shivering is an important source of heat, which is initiated by impulses travelling to the skeletal muscles. These impulses cause increased skeletal muscle tone, resulting in increased muscle metabolism and increased rate of heat production.
Factors affecting body temperature
A range of processes and activities affect body temperature. These include age, diurnal variations, exercise, hormones, stress and environment. Factors that lower the body temperature include exposure to a cold damp environment, insufficient warm clothing and an under-secretion of the hormone thyroxin. Factors that raise the body temperature include:
• Exposure to a hot humid environment
• Intake of foods high in fat or carbohydrates
• Strong emotions such as anger
Actions to assist the physiological processes of body temperature control include:
• Maintaining immediate surroundings at a comfortable temperature
• Adapting clothing to suit the climate
• Adjusting intake of food and fluids to suit the climate
• Adjusting the level of physical exercise (Davie & Amoore 2010).
Assessing body temperature
To assess a client’s temperature the nurse uses both observational skills and a clinical thermometer. Using the senses of sight and touch the nurse can observe the client’s skin colour and temperature. Correct use of the thermometer will provide an accurate measurement of body temperature. As a result, the nurse is able to plan and implement appropriate nursing actions to assist the client in maintaining body temperature.
The frequency with which a client’s temperature is measured depends on continued assessment of their individual needs, and the nursing policies of the institution; however, it is always conducted on admission as part of baseline data (see Clinical Interest Box 18.1). Residents of long-term care facilities generally do not have their temperature measured as often as acutely ill people who require more frequent monitoring of their condition. Measuring the individual’s temperature together with assessment of the other vital signs is an important method of determining their general condition. Assessment of these vital signs enables the nurse to establish baseline measurements that can be compared with future readings and to monitor the individual’s response to treatment.
Measuring body temperature
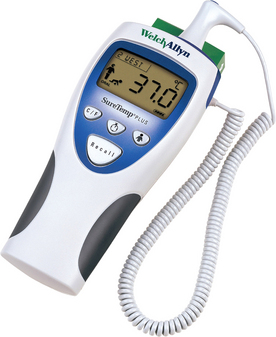
Several types of clinical thermometers are used to measure body temperature. The most commonly used types are electronic, tympanic electronic and chemical dot single use or reusable. Electronic thermometers (Fig 18.1) are most commonly used in healthcare facilities. The electronic thermometer is battery operated and a cover is placed over the probe before use and disposed of after the temperature has been measured. An electronic thermometer enables an accurate temperature reading to be obtained within a few seconds and may also be used when it is necessary to monitor a client’s temperature continuously. A signal device indicates when the temperature has registered, and the reading may be obtained from either a digital display or a printout. All types of thermometer are calibrated in the centigrade scale.
Body temperature sites
Body temperature may be measured using the oral, tympanic membrane or axillary sites, on the skin or in the groin. The taking of rectal temperature with a rectal thermometer is rarely performed because of the trauma and pain it causes individuals and because of the risk of cross-contamination. It is no longer performed on neonates.
Tympanic site
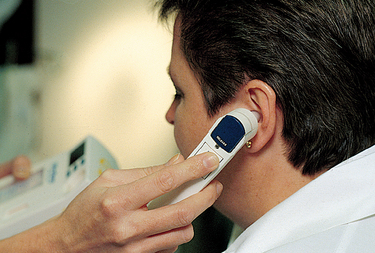
The tympanic membrane is now the most commonly used site for taking temperature. An otoscope-like speculum with an infrared sensor tip detects heat radiated from the tympanic membrane. Within 2–5 seconds of placement in the auditory canal, a reading appears on the display unit. A sound signals when the peak temperature reading has been measured (Fig 18.2). The advantages of using this site are that it is easily accessible; minimal client repositioning is required; the reading is unaffected by oral intake of food, fluids or smoking and it can be used with clients with tachypnoea without affecting breathing. Disadvantages of using this site are that it can be uncomfortable and it involves the risk of injuring the tympanic membrane if the probe is inserted too far; repeated measurements can vary and the presence of cerumen (wax) and purulent discharge can affect the reading; it requires removal of hearing aid before measurement; it requires a disposable sensor cover available only in one size; it does not obtain continuous measurement and it can be affected by ambient temperature devices, for example, heaters (Elkin et al 2008). It is imperative to check the manufacturer’s guidelines for use of this device, as some devices require the nurse to lift the pinna of the ear in an upward direction to straighten the ear canal. Research suggests that, if the manufacturer’s guidelines are not followed correctly, the temperature can be up to 2°C different from the actual temperature of the client (Davie & Amoore 2010). Other technical issues surrounding the use of the tympanic thermometer are that the nurse should use the ear closest to their hand; for example, right hand/left ear to ensure accuracy (Lu et al 2010).
The oral site
The thermometer is placed under the person’s tongue, to one side of the frenulum, to ensure that it is in contact with a heat pocket, and the person closes their lips. The advantages of this site are: it is easily accessible, comfortable for the client, reflects rapid change in core temperature and provides accurate surface temperature reading. Some disadvantages of this site are: causes delay in measurement if client has recently ingested hot/cold fluids or foods, smoked or received oxygen by mask or nasal cannula (Elkin et al 2008). Care must be taken when a client has dentures as it may be difficult for the client to keep their mouth closed for the measurement. So that an accurate measurement can be obtained safely, the person must be:
• Able to close their lips completely and retain the thermometer in the correct position
• Able to breathe comfortably through their nose for the length of time the thermometer is in their mouth
• Have not smoked cigarettes in the previous 15–30 minutes
• Rested and not have consumed cold or hot fluids in the previous 15–30 minutes.
The oral site is unsuitable for people who:
• Have an oral infection or painful mouth
• Have higher than 6 L/min of supplemental oxygen being supplied (Lu et al 2010)
• Have recently had oral surgery
• Experience any impairment of breathing or obstruction of the nasal passages
The axilla
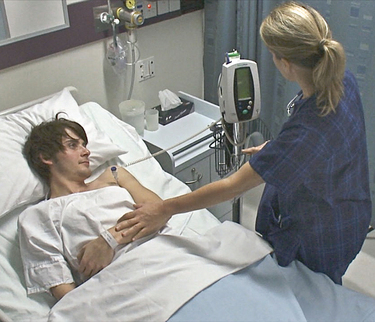
Using the axilla (Fig 18.3) provides a less accurate measurement of body temperature, but may be used when it is not possible to measure the temperature orally (see Clinical Interest Box 18.2). It is safe and non-invasive and can be used with newborns and unconscious clients. The thermometer is placed in the axilla in contact with two dry skin surfaces and is kept in place in the axilla by bringing the person’s arm over their chest. A disadvantage of using this site is that the thermometer must be left in place for a long time to obtain an accurate measurement; it can be affected by exposure to the environment and requires continuous positioning by the nurse (Elkin et al 2008).
The skin
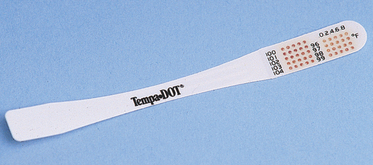
Various types of single-use disposable thermometers are available. A temperature-sensitive strip of tape is placed on the forehead or abdomen to record the heat of the body (Fig 18.4). These are often used in newborn nurseries. Directions on the package explain how to use these thermometers. Most disposable thermometers will register the temperature within 60 seconds. The advantage of this site is that it is inexpensive; provides continuous reading; and is safe and non-invasive. The disadvantages are that measurement lags behind other sites during temperature changes, it is sometimes affected by environmental temperature and diaphoresis or sweat can impair adhesion (Elkin et al 2008).
Temporal artery thermometer
The temporal artery thermometer scans across the forehead of the client in a single direction, usually from forehead to around the client’s ear. The thermometer continually samples room temperature and that of the ambient temperature. The actual reading is computed based on previous clinical trials completed on humans: each brand of temporal artery thermometer can have a different algorithm associated with the device. One advantage of this device is that there is no need for disposable covers because the device can be cleaned with alcohol swabs between clients. Another advantage is that the device doesn’t actually touch the skin of the client so can be used on a sleeping child. A disadvantage of this mode is that it requires time between temperatures to recalibrate to room air (Davie & Amoore 2010).
STEPS IN OBTAINING AN ACCURATE MEASUREMENT OF BODY TEMPERATURE
To obtain an accurate measurement of body temperature and to promote the client’s comfort and safety, the nurse should:
• Check that the thermometer is undamaged, not contaminated and is working properly
• Ensure that the person is informed of the procedure
• Ensure that the person is rested
• Position the person according to the site selected
• Wash hands to prevent cross-infection and ensure that the thermometer has been disinfected before the procedure
• Use the correct probe for the site selected when using an electronic thermometer.
Depending on the site being used, some variations occur in the time that the thermometer is left in position, the normal range of temperature and the position in which the person is placed (see Table 18.1). Because of variations between sites it is important to note on the observation or vital signs chart what method was used to take the temperature. For example, if the temperature was taken orally, the temperature would be recorded: 36.7 PO (Latin: per os (by mouth)).
Procedure for measuring body temperature
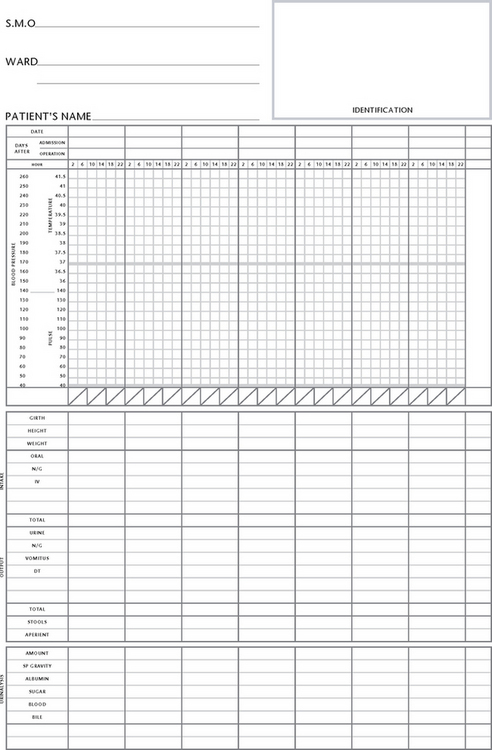
While the actual procedure for measuring temperature may vary slightly in different healthcare settings, the general principles remain the same. The nurse should assess the needs of each individual and refer to the institution’s policy manual for information about the technique and equipment. Table 18.2 lists guidelines for measuring temperature using each body site. Temperature measurements are usually recorded on graph-style charts (Fig 18.5). These enable the pattern of temperature variations to be observed readily (see Procedural Guideline 18.1).
Table 18.2 Effects of altered body temperature
| Hyperthermia | Hypothermia |
|---|---|
| Elevated temperature, pulse and ventilation rates (rigor may occur) | Subnormal temperature, decreased pulse and ventilation rates |
| Warm flushed skin and sweating may be present | Cool, pale or mottled dry skin |
| Restlessness, drowsiness or confusion | Drowsiness, shivering |
| Aching muscles and joints | Muscle weakness |
| Headache | Mental confusion |
| Photophobia | Unconsciousness (if prolonged) |
| Loss of appetite | Hypotension |
| Increased thirst | Frostbite (nose, fingers, toes) |
| Dehydration (if prolonged) | Decreased urinary output |
Adapted from Berman et al 2012
Procedural Guideline 18.1 Measuring body temperature
(Adapted from Crisp & Taylor 2009)
| Review and carry out the standard steps for all nursing procedures/interventions |
Alterations in body temperature
Body temperature reflects body function, and a deviation from the acceptable temperature range is an indication of body dysfunction. An imbalance between the production and loss of heat results in a rise or fall in normal body temperature. An elevated temperature is referred to as hyperthermia, pyrexia or fever. A temperature above 41°C is referred to as hyperpyrexia. A temperature below the acceptable range is referred to as hypothermia.
Hyperthermia occurs when cells are injured, or invaded by pathogens that release chemical substances called pyrogens, which act on the hypothalamus and cause a rise in body temperature. Hyperthermia is a manifestation of metabolic disorder, infection, neurological disease, severe trauma or neoplasm. Hypothermia is a lowering of the temperature of the entire body. The thermal regulating centre in the hypothalamus is greatly impaired when the temperature of the body falls below 34.4°C. At this level, the activity of the cells is decreased, less heat is produced and sleepiness and coma can develop. Those at risk of hypothermia include postoperative clients who have been cooled during surgery, newborn infants, elderly or debilitated clients and any person who is subjected to prolonged exposure to a cold environment (LeMone 2011). Alterations in body temperature produce certain physiological effects, as shown in Table 18.2.
Nursing care of a client with altered body temperature
Hyperthermia
The first priority of a client with a hyperthermia is to investigate why. The nurse should ask the following questions:
• Have I accurately checked this temperature? Did the client recently have a hot drink?
• Can I check this with another device to reduce user or device errors?
• What other clinical information such as tachycardia add to the clinical picture of the client?
• Who should I inform of this clinical change in the client’s assessment—the nurse in charge or the medical officer?
These questions need to be answered prior to any care aimed at reducing the temperature, as the medical officer may want to obtain blood cultures while the client is febrile to identify any microorganisms causing an infection in the client. If a client is given medications to reduce their fever prior to blood cultures this can affect the results. The most important question to ask is always ‘Why, and what other pieces of assessment data add to the clinical picture?’ Is the client febrile, tachycardic, with burning sensation on urination, or is the client febrile, tachycardic, tachypnoeic with a productive cough? When coupled with other assessment data the potential reasons the client is febrile can be identified and treated. Assessment of a febrile client should prompt you to ask more questions of your client and to begin to identify the reason for the increase in temperature (Burke 2010).
Once blood cultures are assessed or potential reasons for hyperthermia are identified the nurse should focus on the following areas:
• Reducing body temperature to an acceptable range
• Relieving any associated discomfort
These aims can be achieved by implementing certain nursing actions, which include:
• Assessing the client’s temperature after the administration of any prescribed medication such as antipyretics and antibiotics, and sponging the client with tepid water. This procedure causes the superficial blood vessels to dilate and release heat, thereby reducing body temperature. The client is undressed and covered with a bath blanket. Each part of the client’s body is sponged with water at a temperature of 27–30°C. Long slow strokes should be used, leaving beads of water on the skin to encourage loss of heat by evaporation. The skin may be gently patted dry, but rubbing should be avoided, as this increases cell metabolism and heat production. During the sponge the client must be observed for shivering, pallor, mottling or cyanosis, or a rapid, weak or irregular pulse. If any adverse reactions occur, the sponge must be discontinued immediately. During, and on completion of, the sponge the client should be advised to avoid unnecessary movement, as muscular activity increases heat production. The client’s temperature, pulse and respirations should be measured 30 minutes after the sponge to assess the effectiveness of the procedure (Burke 2010)
• Promoting the client’s general comfort by providing loose, light, clean and dry nightwear and bed linen
• Regular mouth care, including mouth rinses and the application of a lip cream, which will help reduce any oral dryness associated with hyperthermia
• Ensuring that the room is quiet and free from harsh light and ventilated adequately
• Encouraging the client to rest or sleep as much as possible, as reducing the level of physical activity will decrease the production of body heat
• Continually checking the client’s skin colour, temperature and general condition to assess the effectiveness of nursing interventions
• Maintaining optimal nutritional status to cater for the increased metabolic demand associated with hyperthermia. The client should be provided with light appetising meals that provide essential nutrients. If appetite is poor, extra kilojoules may be provided by adding glucose to oral fluids
• Providing adequate fluids, which are necessary to prevent dehydration. The client should be encouraged to drink large amounts of cool or iced fluids. If the person is unable to tolerate fluids orally, intravenous administration of fluids may be necessary. The input and output of all fluids should be closely monitored and the person observed for any signs of dehydration (Burke 2010). Information on the signs and symptoms of dehydration is provided in Chapter 30.
A rigor sometimes occurs in response to the physiological processes associated with hyperthermia. The nurse should assess the client’s condition throughout the three typical stages of a rigor, and implement the nursing actions necessary to promote client comfort:
• Stage 1: As the body temperature begins to rise the client feels cold and may shiver violently. Comfort should be promoted by keeping the client warm but avoiding overheating. The intake of fluids should be encouraged
• Stage 2: The temperature rises to approximately 40°C and the client feels very hot and uncomfortable. Minimal clothing and bed linen should be used and other actions to reduce the body temperature should be implemented; for example, encouraging the client to drink large amounts of cool fluid
• Stage 3: Profuse sweating occurs and as a result body temperature begins to fall. Actions to reduce temperature should be stopped and any damp clothing or bed linen should be changed to maintain a dry environment. The client should be encouraged to rest quietly in an attempt to reduce the production of body heat.
Hypothermia
Hypothermia can occur due to physiological factors such as an impaired hypothalamus and inadequate heat production to counteract heat loss. Hypothermia can occur from other factors such as excessive heat loss. The first priority of any changes to the client’s observation is to investigate why. See the section above on hyperthermia for questions to ask prior to treatment of any alteration in temperature.
The aims of nursing a client with hypothermia include:
• Restoring body temperature to an acceptable range
• Relieving any discomfort associated with hypothermia
• Encouraging mobilisation to increase the production of body heat if the client is able to stand
These aims can be achieved by implementing certain nursing actions which include:
• Helping to increase the client’s temperature by gradually rewarming them. Rapid rewarming and the direct application of heat to the body surface should be avoided, as these actions cause peripheral vasodilation and diversion of blood away from vital internal organs. The environmental temperature should be kept between 26°C and 29°C
• Providing lightweight warm clothing and bed linen. A hypothermia or space blanket may be used in an effort to restore normal body temperature
• Promoting general comfort by attending to the client’s position and hygiene needs
• Encouraging mobilisation as the temperature begins to rise, in an effort to increase production of body heat
• Encouraging the client to consume warm food and fluids, particularly those containing carbohydrate, to assist the production of body heat
• Continually checking the client’s temperature and general condition to assess the effectiveness of nursing interventions.
PULSE
Measuring the pulse and blood pressure provides the nurse with an objective assessment of a client’s cardiovascular and fluid status. By monitoring the pulse and blood pressure the nurse can identify deviations from acceptable ranges and detect any changes (Alexis 2010).
As described in Chapter 23, the cardiovascular system transports essential substances to the tissue cells, and waste substances from the tissue cells to various organs for excretion. An adequate supply of blood is necessary for the cells to function effectively, and any disruption to the blood supply may have serious consequences. An adequate flow of blood throughout the body is dependent on the ability of the heart to pump, the ability of the blood vessels to transport the blood and the quantity and quality of the blood.
CLINICAL INTEREST BOX 18.3 Critical thinking in a clinical setting
1. At what age range would it not be appropriate to utilise an oral thermometer?
2. What are some other physiological observations that would change if a client is febrile and why?
3. A colleague suggests that oral thermometers are the only accurate measurement of temperature. How would you respond to this statement?
4. Mr Sam Neugen, a 65-year-old retiree, has been admitted to a medical–surgical ward. Sam is febrile at 38°C with a suspected chest infection. He has nonsignificant past medical history. Sam is thirsty, tired and short of breath. Identify 2 nursing diagnoses and at least 4 interventions for each diagnosis while caring for Sam as an inpatient.
The most important factor responsible for the transport of substances to the tissues is cardiac output. Cardiac output is the volume of blood pumped by each ventricle during each minute, and is the product of the volume of blood pumped at each beat (stroke volume) and the number of beats during one minute (heart rate). A healthy heart in a healthy adult ejects 5–6 litres of blood per minute (Alexis 2010). This amount can be increased by an increase in either heart rate and/or stroke volume and can also vary with:
• Body size, as cardiac output increases in proportion to the surface area of the body
• Age, as with increasing age the cardiac output decreases
• Posture, as cardiac output is greater when a person is standing
• Exercise, as the greater the degree of physical activity the greater the cardiac output needs to be. Strenuous physical activity can result in an increased heart rate and a cardiac output of 30 L/min
• A sudden increase in total blood volume; for example, the infusion of fluid intravenously
• Certain disease states—cardiac output is increased in conditions such as pulmonary disease and anaemia, and is decreased in conditions such as shock or myocardial infarction.
The rate at which the heart beats is controlled by the conducting system of the heart and the autonomic nervous system. The sinoatrial node initiates impulses that spread throughout the conducting system and to all areas of the cardiac muscle, resulting in atrial then ventricular contraction. Stimulation of the parasympathetic nerve fibres, primarily the vagus nerves, reduces the heart rate, while stimulation of the sympathetic nerve fibres increases the heart rate. Various chemicals and ions can also affect heart activity; for example, adrenaline inhibits the parasympathetic nerves, resulting in increased heart rate. An excess of potassium ions in the blood decreases the ability of the heart to contract. Heart, and therefore pulse, rate varies according to age, gender, body build, level of physical activity and emotions.
Assessing the pulse
Cardiovascular function is assessed by observing the general appearance of the client and detecting the signs and symptoms of dysfunction, such as cyanosis, pallor, cool skin temperature, oedema and dyspnoea. Cardiovascular status is also assessed by monitoring the pulse and blood pressure. The frequency with which the pulse and blood pressure are assessed depends on the person’s condition and how closely it needs to be monitored. Residents in long-term care facilities will generally require pulse and blood pressure measurement infrequently, whereas people who are acutely ill may have the measurements performed at intervals ranging from every 30 minutes to six times a day.
Assessing the arterial pulse provides significant information about a person’s cardiac function and peripheral perfusion. As the heart beats it ejects blood from the left ventricle into the aorta. Each beat of the heart produces a wave of blood through the arteries so that there is regular recurrent expansion and contraction of the arteries. The waves of blood that cause pulsation through the arteries are palpable as a pulse, which can be felt when a superficial artery is partially compressed by the fingers, and is most easily felt over a large artery that lies close to the skin and crosses over a bone or firm tissue (see Procedural Guideline 18.2).
Procedural Guideline 18.2 Measuring pulse
(deWit 2005; Elkin et al 2008)
| Review and carry out the standard steps for all nursing procedures/interventions |
| Action | Rationale |
|---|---|
| If client is supine, place client’s forearm straight alongside or across lower chest or upper abdomen with wrist extended straight. If sitting, bend client’s elbow 90 degrees and support lower arm on chair or on nurse’s arm | Relaxed position of lower arm permits full exposure of artery to palpation |
| Place the index and middle fingers over the site and press gently until pulsation can be felt | The assessor’s thumb is not used, as it has a strong pulse and may be felt instead of the client’s pulse. Pressure that is too light will fail to detect the pulse, and frm pressure may obliterate the pulse |
| Using a watch with a second hand, count the pulse for 1 minute. While the rate is being counted, the rhythm and volume are also assessed. If pulse is regular count rate for 30 seconds and multiply total by 2. If pulse is irregular, count rate for 60 seconds. Assess frequency and pattern of irregularity and compare radial pulses bilaterally | Allows sufficient time to detect the rate and any abnormalities. It requires 30 seconds to determine if the pulse is regular in rhythm. Ineffcient contraction of heart fails to transmit pulse wave, interfering with cardiac output, resulting in irregular pulse. Longer time period ensures more accurate count. A marked difference between radial pulses may indicate arterial flow is compromised in one extremity and action should be taken immediately |
| Document the time of assessment and the rate and characteristics of the pulse. Record the pulse measurement | A record provides information about the client’s condition |
| Any abnormalities must be reported immediately, as an apical measurement may be indicated | An apical measurement provides a more accurate assessment of the pulse |
| Perform hand hygiene | Prevents risk of transmission of microorganisms |
| Special note: If pulse is irregular, assess for a pulse deficit. Count apical pulse while colleague counts radial pulse. Begin apical pulse, initiating counting by a signal to simultaneously assess pulses for a full minute. If pulse count differs by more than 2 beats per minute, a pulse deficit exists, which may indicate alteration in cardiac output | |
Pulse sites
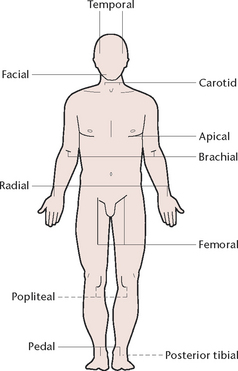
The pulse sites (Fig 18.6) where the pulse may be palpated are:
• Temporal: the temporal artery is palpated immediately in front of the ear
• Carotid: the carotid artery is palpated at the front of the neck, to the side of the thyroid cartilage
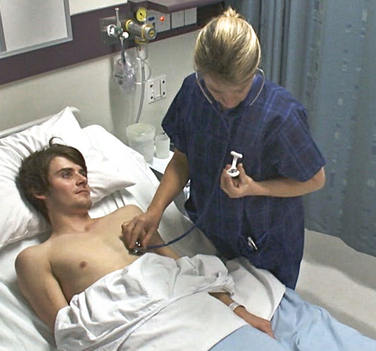
• Apical: the apical pulse is the beat heard at the apex of the heart, and is assessed using a stethoscope. The stethoscope is placed over the apex of the heart, in the left centre of the chest just below nipple level
• Brachial: the brachial artery is palpated in the antecubital fossa at the elbow joint
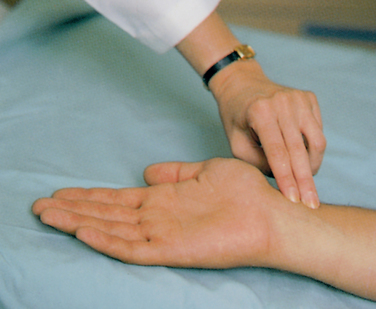
• Radial: the radial artery is palpated in the wrist just above the thumb
• Femoral: the femoral artery is palpated in the inguinal area
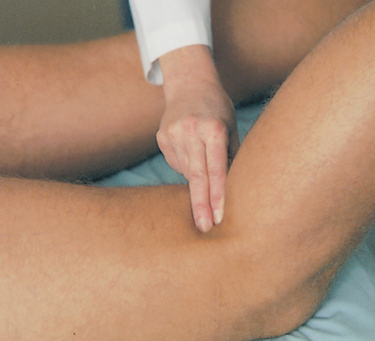
• Popliteal: the popliteal artery is palpated at the back of the knee (Fig 18.7)
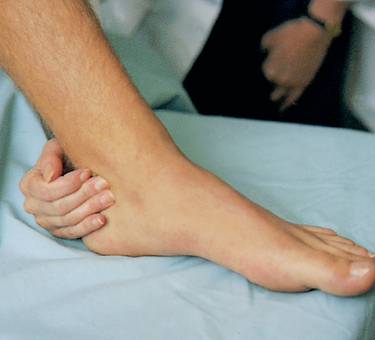
• Posterior tibial: the posterior tibial artery is palpated just behind the medial malleolus of the ankle (Fig 18.8)
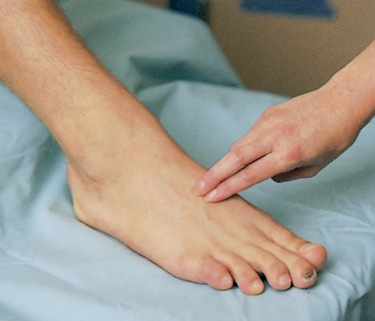
• Pedal: the dorsalis pedis artery is palpated on the anterior surface of the foot (Fig 18.9).
The radial artery is the most commonly used site, as it is conveniently located and readily accessible (Fig 18.10). The temporal or carotid sites may be used if it is difficult to palpate the radial artery easily; for example, if a client has both arms encased in plaster. The remaining sites are used when there are specific indications for assessing the flow of blood through a particular artery; for example, the popliteal and pedal pulses are assessed after certain types of surgery to the leg.
The apical pulse is assessed when a more accurate estimation of heart rate or rhythm is required, or when there is any doubt about the rate or rhythm of a peripheral pulse (Fig 18.11). It is routinely used for infants and children up to 3 years of age. Apical–radial pulse assessment may be indicated for clients with certain cardiovascular disorders. The apical and radial rates should be identical, and are usually measured by two different people. One person palpates and assesses the radial pulse while a second person assesses the apical pulse at the same time. Some heartbeats that can be detected at the apex are not strong enough to be palpated at peripheral sites. Any difference between the two measurements is called the pulse deficit, and should be reported immediately.
Character of the pulse
The pulse is assessed for rate, rhythm and volume:
• Rate: the pulse rate is the number of beats per minute, and the acceptable rate varies according to age: 120–140 beats/min for an infant, 90–120 beats/min for a child, 60–100 beats/min for an adult. It should be noted that athletes and other physically fit individuals commonly have a pulse rate below 60 beats/min. A large proportion of elderly people also have a pulse rate below 60 beats/min
• Rhythm: the rhythm of the pulse is the regularity with which the beats occur. A normal pulse has a regular rhythm, with the same intervals between each beat
• Volume: the volume refers to the strength of the beat, and an acceptable pulse is strong and easily palpated.
Factors affecting pulse rate
The pulse rate varies according to age (see Clinical Interest Box 18.4), sex, body build, level of physical activity, fever, medications, haemorrhage, position changes, pregnancy, stress and emotions. The pulse may also be affected during various disease states, which result in alterations to its character.
CLINICAL INTEREST BOX 18.4 The pulse in older adults
It is often difficult to palpate the pulse of an older adult or obese client. A stethoscope provides a more accurate reading.
Once elevated, the pulse rate of an older adult takes longer to return to a normal resting rate.
Rate
An increase in the pulse rate above 100 beats/min is called tachycardia and may result from fear, anxiety, excitement, anger or pain. Tachycardia may also occur in conditions such as haemorrhage, shock, fever, thyrotoxicosis or congestive cardiac failure. A decrease in the pulse rate below 60 beats/min is called bradycardia and may occur during absolute relaxation or sleep. Bradycardia may also occur in conditions such as cerebral haemorrhage, heart block, myxoedema or drug toxicity, such as with digitalis.
Rhythm
An irregular rhythm, when the intervals between each beat vary, is called arrhythmia, or dysrhythmia, and may occur in conditions such as electrolyte imbalance or cardiac tissue damage. Examples of irregular rhythm include:
• Ectopic beats, which are premature heartbeats and may be occasional or frequent
• Coupled beats (or bigeminal pulse), in which two beats in close succession are followed by a pause during which no pulse is felt
• Atrial fibrillation, in which fibrillation of the atria results in random, rapid contractions and, consequently, an irregular pulse.
Volume
An increased volume, when the pulse is referred to as being full and bounding, can result from strenuous physical exercise or strong emotions. An increased volume can also occur in conditions such as hypertension, thyrotoxicosis or aortic valve incompetence. A decreased volume, when the pulse is referred to as being weak and thready, can occur in conditions such as haemorrhage, shock, acute myocardial infarction or cardiac failure. When the pulse is so weak that it cannot be palpated it is referred to as being imperceptible.
When assessing the pulse, any deviations from the client’s acceptable range should be reported immediately and documented. Pulse measurements are recorded on a chart (see Fig 18.5). Each healthcare institution adopts its own printed form of graph and method for recording pulse measurements, together with the other vital signs. Commonly, the chart also provides space for recording other information, such as the client’s weight.
Alterations in pulse rate
For a client with an altered pulse rate, the priority should be determining the cause of the altered rate. The nurse should ask the following questions:
• Have I completed the assessment accurately?
• Is this normal for this client?
• What other clinical information is consistent with an altered pulse rate?
• Do I need to inform the appropriate person of alterations in the client’s condition?
An altered pulse rate should prompt the nurse to complete a full assessment of the client’s condition. A national enquiry into patient outcomes in the UK revealed that 64 of the 425 deaths in medical–surgical hospital were due to healthcare professionals not acting on a client’s deteriorating status (Preston & Flynn 2010). It is essential that the nurse identify clinical deterioration in clients and respond accordingly.
RESPIRATION
Oxygen, a colourless and odourless gas, makes up about 20% of the atmosphere, and is essential for sustaining most forms of life. Every cell in the human body requires oxygen for metabolism and must remove the metabolic waste product, carbon dioxide. The intake of oxygen and the elimination of carbon dioxide are achieved through the respiratory system. The respiratory system delivers oxygen from the atmosphere to the bloodstream, and carbon dioxide from the bloodstream to the atmosphere, through the act of breathing or ventilation (McConnell 2011). Inspiration of air occurs as the diaphragm contracts and flattens, thus enlarging the thoracic cavity. At the same time the ribs are pulled up and outwards by the action of the intercostal muscles. As the chest expands, air enters the lungs. Exhalation occurs as the ventilatory muscles relax and the chest returns to its minimum size, thus expelling air from the lungs (McConnell 2011). (Further information about the structure and function of the respiratory system is provided in Chapter 23.)
CLINICAL INTEREST BOX 18.5 Critical thinking in a clinical setting
1. Rita Ryan presents to her general practitioner for a health check. You conduct a clinical observation including heart rate blood pressure and temperature. The pulse you palpate is irregular and fast at 150 beats per minute. Identify what steps you would take next while caring for Rita.
2. Rita asks you what an irregular pulse means. How would you answer her question?
3. A medical officer asks you to palpate bilateral popliteal pulses and document the results. Where do you place your fingers?
4. What are the possible reasons for requesting bilateral pulses be palpated and documented?
The cardiovascular system is the means by which the gases are transported to and from the cells. From the lungs, oxygen, bound to haemoglobin, is transported in the blood to the cells, and carbon dioxide from the cells is transported, dissolved in the blood, to the lungs for excretion. Respiration is the exchange of oxygen and carbon dioxide. External respiration is the exchange of oxygen and carbon dioxide between the external environment and the blood by the process of diffusion in the lungs. Internal respiration is the exchange of oxygen and carbon dioxide between the blood and the body tissues by the process of diffusion between the capillaries and the cell membrane (Craft et al 2011).
The passage of oxygen from the atmosphere to the alveoli in the lungs and the passage of carbon dioxide from the alveoli to the atmosphere require an unobstructed airway. In addition, the entire process of respiration requires:
• Adequate oxygen in the atmosphere
• A functioning respiratory tract
• Functioning thoracic muscles and nerves to control the thoracic cage
• Blood to transport the gases
• Capillaries in close proximity to the cells to allow the exchange of gases (Craft et al 2011).
Regulation of breathing and respiration
The automatic control of breathing stems from the respiratory centres located in the brainstem. From these sites, impulses travel along the spinal cord to the nerves that control the diaphragm and intercostal muscles. Reflex responses and chemical signals control these nerve centres and thus the rate of breathing. During actions such as speaking and swallowing, impulses from the throat are conveyed to the respiratory centre and breathing stops temporarily. The chemical control of breathing mainly depends on the level of carbon dioxide in the blood. The presence of excess carbon dioxide causes the respiratory rate to increase until the excess carbon dioxide is eliminated. Conversely, a decreased carbon dioxide level slows the respiratory rate (Craft et al 2011).
Factors affecting respiratory function
Factors that affect the process of respiration include:
• Availability of oxygen. Oxygen makes up 20% of the air and normally this is sufficient to meet the needs of the body, but a decrease in this amount of oxygen can cause problems. Two instances where the available oxygen may be deficient are:
• Regulating mechanisms. Any factor that interferes with the control mechanisms for breathing may cause respiratory difficulties. Respirations may be depressed by factors that reduce the activity of the respiratory centre; for example, cerebral oedema or medications such as morphine. Respirations increase when the pH of the blood is lowered, as a respiratory response to rid the body of the excess acid.
• Passage of oxygen and carbon dioxide. The efficiency of respiration can be affected by any factor that obstructs the patency of the respiratory tract or the actions of the respiratory muscles, for example, an accumulation of secretions resulting from a reduced cough reflex. Respirations may be reduced by factors that affect the actions of the respiratory muscles; for example, injury or disease that restricts the movements of the diaphragm (McConnell 2011).
• Diffusion of oxygen and carbon dioxide. Any dysfunction of the lungs (e.g. pulmonary oedema, asthma or chronic obstructive airways disease) may impede the transfer of oxygen and carbon dioxide (Craft et al 2011). (Information on these and other respiratory disorders is provided in Chapter 23.)
• Transport of oxygen and carbon dioxide to and from the cells. Any condition affecting the efficiency of the heart, the blood vessels or the blood can interfere with the transportation of oxygen to the cells and carbon dioxide away from the cells. Such conditions include congestive cardiac failure, atherosclerosis and anaemia. (Information on these and other cardiovascular disorders is provided in Chapter 23.)
• Influences on the rate, depth and rhythm of breathing. Several factors influence the characteristics of breathing, for example, the degree of physical activity. Oxygen requirements are greatest during exertion and least during sleep. The respiratory rate and depth vary in response to the body’s demand for oxygen; for example, during strenuous exercise the volume of air drawn into the lungs with each breath may be increased from the usual 500 mL to as much as 4000 mL. Changes in mood or emotion may also affect the rate, depth and rhythm of ventilation; for example, the respiration rate is commonly increased during anxiety, pain or anger. Smoking also affects breathing and often causes short-term effects such as coughing and shortness of breath, or long-term effects such as severe dyspnoea, resulting from emphysema.
See Clinical Interest Box 18.6 for the effects of ageing on respirations.
Assessing respirations
A client’s respiratory status is assessed to ascertain whether they are receiving an adequate supply of oxygen to meet their body’s needs. Assessment is made by observing them for signs and symptoms of an inadequate oxygen supply, identifying any deviations from normal and by assessing their respirations. Research suggests that changes in respiratory rate are one of the most sensitive indicators of patient deterioration (Massey 2010). Assessing respiratory status and identifying any actual or potential problems are assisted by obtaining information from the client regarding:
• Allergic reactions, such as coughing, sneezing or shortness of breath that occur as a result of exposure to allergens such as dust, pet hairs or pollen
• Exposure to environmental air pollutants such as chemical wastes
It is important to observe the skin colour for signs of cyanosis. Cyanosis is a bluish discolouration of the skin and mucous membranes due to inadequate oxygenation and can be either peripheral or central. Peripheral cyanosis is caused by local vasoconstriction and is usually visible only in the nail beds and sometimes the lips. Central cyanosis is the result of prolonged hypoxia (diminished availability of oxygen to the body tissues) and affects all body organs. It is most visible in highly vascular areas such as the lips, nail beds, tip of the nose, the external ear and the underside of the tongue. In people with naturally dark brown or black skin, cyanosis can be most readily detected by inspecting the mucosa inside the lips.
The client should be observed for signs and symptoms of hypoxia. Hypoxia may result from disorders that limit the volume of air entering the lungs or from obstructive lung diseases such as asthma and emphysema. The signs and symptoms of hypoxia and respiratory distress include:
• Elevated blood pressure and pulse rate
• Shortness of breath and fatigue
• Use of accessory muscles during breathing and flaring of the nares
• Retraction of the sternum and intercostal muscles
A person who has a chronic respiratory disorder should also be observed for a barrel-shaped chest, which is a thoracic deformity commonly associated with chronic obstructive airways disease. When chronic hypoxia exists, a person experiences general fatigue and intolerance to exercise and may have clubbing of the fingers (Massey 2010).
Assessing respirations provides information about the client’s respiratory status and aids in evaluating airway patency, the status of the respiratory muscles and the client’s metabolic state. Clients have their respirations assessed, together with their other vital signs, when they are admitted to hospital. The frequency with which respirations are subsequently assessed depends on how closely the client’s condition needs to be monitored. Residents in long-term care facilities commonly have their respirations assessed less often than acutely ill clients, whose condition may need to be monitored at intervals ranging from every 30 minutes to six times a day.
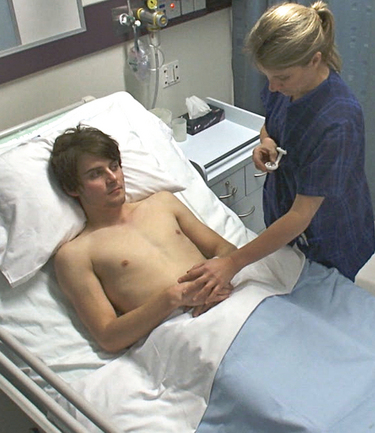
Respirations are assessed without the client’s knowledge by noting the rise and fall of the chest. If a person is aware that their respirations are being assessed they may become conscious of them and may unintentionally change their character. The nurse may assess the respirations by observing the person or by placing a hand on the client’s chest to feel the rise and fall. To avoid making the client aware that their respirations are being assessed, the nurse may place fingers on the person’s radial pulse site and continue as if counting the pulse (Massey 2010).
Respirations are assessed for rate, rhythm, depth and sound:
• Rate. The respiratory rate is the number of respirations per minute. One inhalation and one exhalation equal one respiration (Fig 18.12). The rate of respiration varies according to age, level of activity and emotions. The normal respiratory rates according to age are about 20–40 breaths per minute for a 1-year-old, 20–30 in a 3-year-old, 16–22 in a 6-year-old, 12–20 in an adult (Engel 2006).
• Rhythm. The rhythm of respiration is the pattern or regularity of breathing. Normal respirations are evenly spaced, with little variation from one breath to another
• Depth. Depth of respirations depends on the volume of air being inhaled and exhaled with each respiration. The depth should be constant with each breath and is assessed by observing the client’s chest movement for adequate expansion. Respirations are described as being normal, shallow or deep
• Sound. Normal respirations are inaudible (Massey 2010).
Alterations in respirations
Research suggests that alterations in respiratory rate can be an early sign that the client is deteriorating. However, research studies have also found that some nurses believe that this observation is not completed as accurately as pulse or blood pressure measurements. It is imperative that accurate measurement of the respirations is done to ensure early signs of clinical deterioration are identified (Preston & Flynn 2010). Many factors may cause alterations to the rate, rhythm, depth or sound of respirations and deviations from the acceptable range and pattern.
Rate
An increase in the rate above the acceptable range is called tachypnoea and may occur as a result of physical exercise; states such as fear, pain, anxiety, excitement or anger; disease states such as fever, infection, respiratory disorders, thyrotoxicosis and congestive cardiac failure. A decrease in the rate below the acceptable range is called bradypnoea and may occur as a result of absolute rest or sleep, trauma to the brain, uraemia, diabetic coma or medications that depress the respiratory centre, such as morphine.
Rhythm
The normal regular pattern of breathing may be altered by a variety of disease states. In obstructive airways disease, such as asthma, chronic bronchitis or emphysema, there is a prolonged expiratory phase. In heart failure or increased intracranial pressure, Cheyne–Stokes breathing may occur. This is an abnormal pattern characterised by periods of apnoea. The cycle of Cheyne–Stokes breathing begins with slow shallow breaths that gradually increase in depth and rate. Breathing then gradually becomes slower and more shallow, culminating in a 10–60 second period without ventilation (apnoea), before the cycle is repeated.
Depth
If a person inhales and exhales only small amounts of air, the respirations are described as shallow. Hypoventilation is the term used to describe a reduced rate and depth of ventilation, and may occur as a result of a decreased response of the respiratory centre to carbon dioxide, or in respiratory disorders such as bronchitis or atelectasis. Unresolved hypoventilation results in hypoxia and increased amounts of carbon dioxide in the blood.
When large amounts of air are inhaled and exhaled the respirations are described as deep. Kussmaul’s breathing is the term used to describe abnormally deep, very rapid, sighing respirations. This pattern of breathing may occur as a result of disorders such as renal failure or metabolic acidosis.
Dyspnoea is the term used to describe shortness of breath or difficulty in breathing and may occur after strenuous exercise (temporarily) or as a result of certain respiratory or cardiac disorders. Dyspnoea is commonly accompanied by hypoventilation or hyperventilation.
Hyperventilation is the term used to describe rapid deep breathing. Sustained hyperventilation, which is sometimes a consequence of extreme anxiety, causes loss of carbon dioxide and a decrease in carbonic acid concentration in the blood. This can cause alkalosis to occur.
Orthopnoea is the term used to describe the condition in which an individual must sit up or stand to breathe deeply or comfortably. This condition occurs in various respiratory or cardiac disorders, such as emphysema, pulmonary oedema and asthma.
Pursed-lip breathing is a technique commonly employed by people with severe dyspnoea or orthopnoea, for example, as a consequence of emphysema. This technique of breathing funnels expired air through a narrow opening, thus creating a positive back pressure on the airways to keep them open.
Procedural Guideline 18.3 Measuring respirations
(deWit 2005; Elkin et al 2008)
| Review and carry out the standard steps for all nursing procedures/interventions |
| Action | Rationale |
|---|---|
| Ensure that the individual is resting in a position of comfort | Exercise or discomfort alters the nature of respirations |
| Check client’s previous baseline respirations | It is important to know the client’s usual respiration rate to compare changes with that measurement |
| Using a watch with a second hand, without changing the position of your hand on the pulse and without the client’s knowledge, count the respirations for 1 minute | Maintaining the same position keeps client from being aware that you are counting respirations. Inconspicuous assessment prevents client from consciously or unintentionally altering rate and depth of breathing. The intervals between respirations may be inconsistent, and counting for a full minute enables an accurate measurement of rate |
| Place client’s arm (or your hand) in relaxed position across the abdomen or lower chest, directly over client’s upper abdomen | Client’s or nurse’s hand rises and falls during the respiratory cycle, which makes it easier to count the respirations |
| While measuring the rate, also observe the rhythm, depth and sound of respirations | A complete assessment of respirations is necessary |
| If rhythm is regular, count number of respirations in 30 seconds and multiply by 2. If rhythm is greater than 16 respirations per minute, count for a full minute | Respiratory rate is equivalent to number of respirations per minute. Suspected irregularities require assessment for at least 1 minute |
| Document the time of measurement and the rate and character of the respirations on the appropriate chart using numbers or dots | A record of the respirations provides information about the client’s condition to members of the health team |
| Report any deviations from usual acceptable ranges | Appropriate care may be planned and implemented |
| Special note:Occasional periods of apnoea are a symptom of underlying disease in the adult and must be reported to the medical officer or nurse in charge. Irregular respirations and short episodes of apnoea are normal in a newborn. | |
Sound
Abnormal breath sounds can occur when air passes through narrowed airways or moisture or when there is inflammation of the lungs or pleura.
Stertorous breathing is the term used to describe laboured respirations that have a snoring sound, which commonly result from an obstructed airway.
Wheezing results from narrowed airways, such as in asthma, and respirations sound high pitched and squeaking.
Bubbling refers to gurgling sounds heard as air passes through moist secretions in the respiratory tract.
Crackles refer to an abnormal non-musical sound heard on auscultation of the lungs during inspiration. It sounds like hair rubbed between the fingers next to the ear (Massey 2010).
Stridor results from an obstruction or spasm in the trachea or larynx, as in laryngotracheobronchitis (croup), in which the respirations have a high-pitched musical sound, particularly on inspiration.
When the nurse is assessing a client’s breathing, any deviations from the acceptable range and sound should be reported immediately so that appropriate actions can be planned and implemented. Respiration rates are documented using numbers or dots on a chart similar to the one illustrated in Figure 18.5.
In certain circumstances an instrument called a spirometer is used to assess pulmonary function by measuring and recording the volume of inhaled and exhaled air.
PULSE OXIMETRY—MEASURING OXYGEN SATURATION
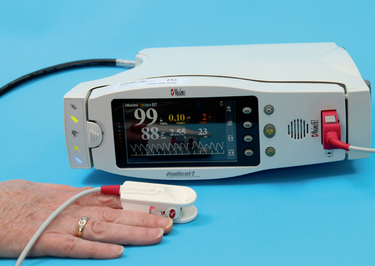
Pulse oximetry is the non-invasive measurement of arterial blood oxygen saturation; that is, the extent to which haemoglobin is loaded with oxygen and is expressed as a percentage; for example an SaO2 indicates that 96% of the haemoglobin molecules are carrying oxygen molecules. A pulse oximeter is a probe with a light-emitting diode (LED) connected by cable to an oximeter. Light waves emitted by the LED are absorbed then reflected back by oxygenated and deoxygenated haemoglobin molecules. The reflected light is processed by the oximeter, which calculates pulse oxygen saturation (SpO2).
CLINICAL INTEREST BOX 18.7 Critical thinking in a clinical setting
1. Why are unequal bilateral breath sounds clinically significant?
2. A nursing colleague states that she just writes down 12 breaths per minute of clients charts when assessing respiratory rate. What does the research suggest about the accuracy of respiratory rate and its importance when detecting clinical deterioration?
3. When auscultating breath sounds what difference would you expect before and after ventolin administration?
4. Sevin Serin is a 69-year-old male with chronic obstructive airways disease. Sevin explains that he can only sleep if sitting up in bed with pillows. What term would you document in Sevin’s notes about his sleeping sitting up in bed?
SpO2 is a reliable estimate of arterial oxygen saturation and is a simple painless measurement (Fig 18.13). The nurse usually attaches a non-invasive sensor to the client’s finger, toe or bridge of nose. In addition, sensors for infants and children can be applied to the palm or the sole of the foot. Spot check oximetry readings have little clinical value. Trends over time provide the best information about the client’s oxygenation. The measurement though can be affected by factors that affect light transmission, such as outside light sources or client motion. Conditions that decrease arterial blood flow such as peripheral vascular disease, hypothermia, medications, hypotension or peripheral oedema affect accurate determination of SpO2 (see Clinical Interest Boxes 18.8 and 18.9 and Clinical Scenario 18.1). Anaemia can also affect the accuracy of the oxygen saturation reading interpretation. Anaemic patients may have oxygen saturations above 95%; however, as a result of less haemoglobin circulating the patient may still be hypoxic. It is essential that the reading is interpreted as part of the clinical picture of the client (Booker 2008) (see Procedural Guideline 18.4).
CLINICAL INTEREST BOX 18.8 Pulse oximetry in older adults
Identifying an acceptable pulse oximeter probe site may be difficult with older adults because of the likelihood of peripheral vascular disease, decreased carbon dioxide level, cold-induced vasoconstriction and anaemia.
CLINICAL INTEREST BOX 18.9 Factors affecting determination of pulse oxygen saturation
Interference with light transmission
• Outside light sources can interfere with the oximeter’s ability to process reflected light
• Carbon monoxide (caused by smoke inhalation or poisoning) artificially elevates SpO2 by absorbing light similar to oxygen
• Client motion can interfere with the oximeter’s ability to process reflected light
• Jaundice may interfere with the oximeter’s ability to process reflected light
• Intravascular dyes (methylene blue) artificially lower saturation
Reduction of arterial pulsations
• Peripheral vascular disease (Raynaud’s disease, atherosclerosis) can reduce pulse volume
• Hypothermia at assessment site decreases peripheral blood flow
• Pharmacological vasoconstrictors (epinephrine, phenylephrine, dopamine) will decrease peripheral pulse volume
• Low cardiac output and hypotension decrease blood flow to peripheral arteries
Clinical Scenario Box 18.1
A client was admitted to a medical–surgical ward following a right lower lobe lobectomy. The client was still on oxygen 4 days after the surgery, the client’s respiratory rate was normal, the client did not appear short of breath; however, he continually had low oxygen saturation readings on room air. A senior nurse was asked to review the client. When the client was reviewed the senior nurse noted the poor peripheral circulation. She used instead an ear probe as the colour to the client’s ear appeared pink. The saturation was 95% on room air. This example highlights the importance of knowing what can make the reading of oxygen saturation inaccurate.
Procedural Guideline 18.4 Measuring oxygen saturation
(deWit 2005; Elkin et al 2008)
| Review and carry out the standard steps for all nursing procedures/interventions |
BLOOD PRESSURE
Measuring blood pressure provides significant information about the individual’s cardiovascular function. A series of blood pressure measurements may show the development of a trend and is therefore more significant than a single measurement. Blood pressure is the force exerted by the blood on the walls of the blood vessels as the heart contracts and relaxes. The pressure that the blood exerts against arterial walls during contraction of the left ventricle is called the systolic pressure. Diastolic pressure is the arterial pressure during left ventricular relaxation, and is a measurement of the minimum pressure being exerted on the arterial walls.
Blood pressure is maintained by the complex interaction of the body’s homeostatic mechanisms and is related to:
• The force of ventricular contractions
• The viscosity (thickness) of the blood
Blood pressure exerts force on the walls of arteries, veins and on the chambers of the heart. Usually arterial blood pressure is measured and involves measuring the systolic and diastolic pressures. It is generally measured by a non-invasive or indirect method, using a manometer and a stethoscope. It may also be measured directly by the insertion of a probe or catheter into a blood vessel. Blood pressure varies according to age, time of day, body posture and emotions.
Assessing blood pressure
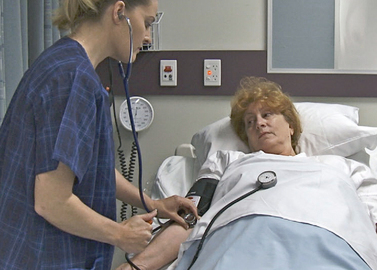
Indirect blood pressure measurement is made using one of several devices (Fig 18.14), which include:
• The sphygmomanometer, which includes a pressure manometer, an occlusive cloth or vinyl cuff that encloses an inflatable rubber bladder and a pressure bulb with a release valve that inflates the bladder
• An electronic device, where the measurement is displayed on a screen.
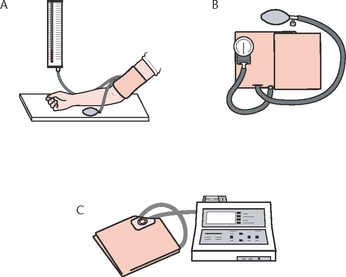
Figure 18.14 Devices for measuring blood pressure A: Mercury manometer and cuff B: Aneroid manometer and cuff C: Electronic sphygmomanometer
The sphygmomanometer consists of a cloth-covered rubber bag (the cuff) from which two rubber tubes extend. One of the tubes is connected to a hand-operated bulb that has a valve which can be tightened and released. The second tube is connected to the manometer that registers millimetre calibrations. Thus, blood pressure is measured in millimetres of mercury (mmHg). Blood pressure cuffs come in various sizes because the bladder must be the correct width and length for the client’s arm (Fig 18.15). If the bladder is too narrow, the blood pressure reading will be erroneously elevated; if it is too wide, the reading will be erroneously low. Blood pressure is not a routine part of assessment in children under age 3.
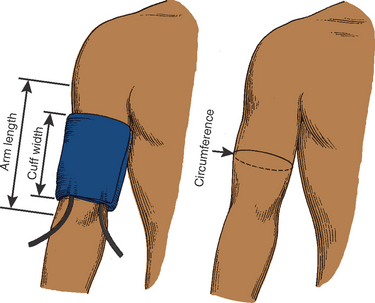
Figure 18.15 Guidelines for proper blood pressure cuff size. Cuff width = 20% more than upper arm diameter, or 40% of circumference and two-thirds of arm length
Avoid speaking to the client for at least 1 minute before initiating a blood pressure recording. Talking to a client when the blood pressure is being assessed can increase readings between 10% and 40%.
Electronic blood-pressure devices
These devices are sometimes applied when frequent blood pressure assessment is required, such as in the critically ill or potentially unstable client. The system includes either a microphone or a pressure sensor built into the inflatable cuff. The microphone or acoustic system hears Korotkoff sounds and registers diastolic and systolic readings. The pressure sensor or ultrasonic system responds to the pressure waves generated by the movement of blood through the artery.
Korotkoff sounds are sounds heard during the taking of blood pressure using a sphygmomanometer and stethoscope. In some clients, the sounds are clear and distinct, whereas in others only the beginning and ending sounds are heard. As air is released from the cuff, pressure on the brachial artery is decreased and the blood is heard pulsing through the vessel. These sounds are described in phases:
• Phase I: systolic pressure indicated by a sharp thump
• Phase II: a blowing or whooshing sound that increases as the cuff is deflated
• Phase III: crisp intense tapping that occurs with each heartbeat
• Phase IV: a softer blowing sound that fades
• Phase V: silence (Elkin et al 2008).
A baseline blood pressure should be obtained using the auscultatory method before applying automatic devices. A comparison assists in evaluating a client’s status and allows proper programming of the device. The advantages of automatic devices are the ease of use and efficiency when repeated or frequent measurements are indicated. No stethoscope is required. The microphone or pressure sensor must be positioned directly over the artery for proper function.
Palpation
The indirect palpation technique is useful for clients whose atrial pulsations are too weak to create Korotkoff sounds, such as with severe blood loss and decreased heart contractility. The diastolic pressure is difficult to determine by palpation. When the palpation technique is used, the systolic value and the manner in which it was measured are recorded, for example, RA 90/–, palpated, supine. Clinical Interest Box 18.10 outlines the method for palpating the systolic blood pressure.
CLINICAL INTEREST BOX 18.10 Palpating the systolic blood pressure
• Apply blood pressure cuff to the upper arm in the same method as the auscultation method
• Continually palpate the radial artery
• Inflate blood pressure cuff 30 mmHg above the point at which the radial pulse can no longer be palpated
• Release valve and allow mercury to fall by 2 mmHg
• As soon as the radial pulse is palpable, note the manometer reading, which is the systolic blood pressure
Assessing blood pressure in lower extremities
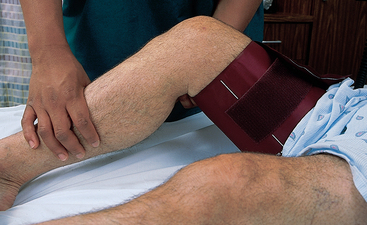
Dressings, casts, intravenous catheters, arteriovenous fistulas or shunts and axillary lymph-node dissection can make the upper extremities inaccessible. Blood pressure must then be measured in the lower extremities. The popliteal artery, palpable behind the knee in the popliteal fossa, is the site for auscultation. The cuff must be wide enough and long enough. Placing the client in a prone position is best, or with the knee flexed slightly for easier access to the artery. The cuff is positioned 2.5 cm above the popliteal artery, with the bladder over the posterior aspect of the mid-thigh (Fig 18.16). Systolic pressure in the legs is usually higher by 10–40 mmHg than in the brachial artery, but the diastolic pressure is the same.
Blood pressure sites
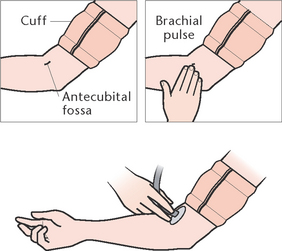
The site commonly used to measure arterial blood pressure indirectly is the brachial artery in the antecubital fossa at the elbow joint (Fig 18.17). Less commonly, it may be measured at the popliteal artery behind the knee (see Procedural Guideline 18.5).
Procedural Guideline 18.5 Measuring blood pressure
(deWit 2005; Elkin et al 2008)
| Review and carry out the standard steps for all nursing procedures/interventions |
Blood pressure measurements may be recorded using dots on a graph similar to the one illustrated in Figure 18.5, or in longhand. If the longhand method of recording is used, the systolic pressure is recorded above the diastolic pressure, for example, 120/70 mmHg. If taking a client’s blood pressure for the first time during the current admission, it should be taken in both arms. There should be a difference of no more than 5–10 mmHg between the arms. The arm found to have the higher pressure should be used for subsequent examinations. Document and record, where appropriate, which arm to use. Figure 18.18 provides the usual site for measuring blood pressure and placement of the stethoscope diaphragm.
Alterations in blood pressure
It is generally considered that an acceptable systolic blood pressure for an adult is 100–120 mmHg, and acceptable diastolic blood pressure ranges from 60–80 mmHg. Commonly, systolic pressure is regarded as being elevated when it is higher than 120 mmHg, and diastolic pressure elevated when it is above 80 mmHg (see Clinical Interest Box 18.11).
CLINICAL INTEREST BOX 18.11 Hypertension in older adults
Hypertension is common in older adults. An older adult’s blood pressure range is usually 140–160/80–90 mmHg. Systolic blood pressure is a better predictor of coronary heart disease, heart failure and stroke than is diastolic blood pressure.
Older adults are instructed to change position slowly and pause after each change to avoid postural hypotension and to prevent injuries.
The significance of a recorded blood pressure level can only be reliably assessed in the knowledge of previous levels, and in relation to the client’s current health state. For example, a person with a blood pressure of 95/60 mmHg may be perfectly healthy. Conversely, a person displaying signs of clinical shock but with a blood pressure of 135/90 mmHg may normally have a blood pressure exceeding this level.
At times it may be necessary to measure the blood pressure with the client assuming first a lying then a standing position, particularly if the client is on certain medications and/or has certain cardiovascular problems. It is important to report and document any differences observed between the two measurements.
If the blood pressure is to be measured frequently, for example, every half hour, the cuff may be left on the person’s arm but, after each measurement, the nurse must ensure that the cuff is deflated completely. Care must be taken to avoid inflating the cuff repeatedly within a short time, as this action may result in venous congestion and cause the client pain.
Hypertension is the term used to describe an elevated arterial blood pressure. Hypertension is a feature of many disease states but frequently its cause is unclear. When no cause can be detected, hypertension is described as ‘essential’. The potential for onset of hypertension increases with obesity, smoking, a family history of high blood pressure or high serum sodium or cholesterol levels. Hypertension is associated with cardiac enlargement, heart failure, coronary artery disease and cerebrovascular accidents. Sustained hypertension is associated with a high mortality rate, so the importance of preventing and controlling hypertension is considerable.
Hypotension is the term used to describe a low blood pressure in relation to the client’s usual pressure. Hypotension is associated with low cardiac output states, for example, left ventricular failure, and with hypovolaemic and cardiogenic shock. With sustained hypotension the blood pressure is not adequate for normal tissue perfusion and oxygenation and may result in renal failure. See Clinical Interest Box 18.12.
CLINICAL INTEREST BOX 18.12 Critical thinking in a clinical setting
1. You are working in a nursing home and the registered nurse asks you to complete a blood pressure on a new admission. The client is morbidly obese and the cuff only just fits around the client’s arm. How would this effect the accuracy of the reading?
2. You are working in a community health centre and you need to complete a blood pressure reading on a 75-year-old female, Rita Smith. Rita wants to keep her thick woollen jumper on while you complete the blood pressure. How would you respond to Rita’s request?
3. You are caring for Renae Polontee, a 30-year-old apprentice chef, who has accidentally cut off her right thumb. There was considerable blood loss prior to first aid administered at the scene. Would you expect Renae to be hypotensive or hypertensive? Justify your answer.
4. Which arm would you assess Renae’s blood pressure on and why?
Early warning score—clinical deteriorations
At the time of writing there were a number of warning scores being utilised in the literature. The goal of early warning scores is to encourage the nurse to identify that the client’s vital signs are no longer within normal limits and may need review by a medical officer. The Australian Commission on Safety and Quality in Health Care (ACSQHC) (2008) released a background paper identifying why recognising and responding to clinical deterioration is imperative. The paper identified that changes to conscious state, pulse, blood pressure, oxygen saturations and respirations may indicate deterioration in the client’s condition. From a client safety perspective, it is hoped that there will eventually be one standard observation and response chart for Australia, mirroring the success of the National Inpatient Medication Chart. The ACSQHC Working Party has developed colour-coded observation charts to identify when a client may be deteriorating and what further assessment the nurse should undertake (Fig 18.19, overleaf). (Note that a final draft of this chart was yet to be released at the time of writing.) Both of the Adult Deterioration Detection System (ADDS) charts and the two and four response category single parameter charts were being piloted in nine Australian hospitals at the time of writing. This phase of research was due for completion mid-2012. All four charts will be reviewed in light of the results of this research. Thus the observation and response charts provided by the Commission should be considered as templates only, to be customised for local use. Response actions included on the charts are generic placeholders only and must be altered to provide clear and specific local guidance on the process for escalating care. As a nurse, it is your responsibility to act as a client advocate and notify either the nurse in charge or the medical officer of a sudden deterioration in a client’s condition.
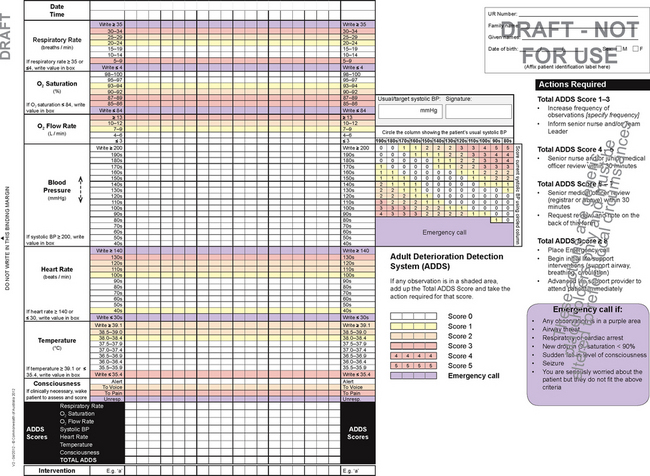
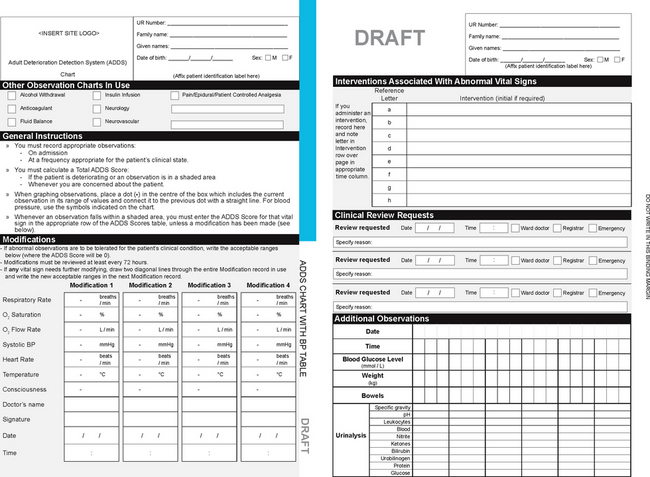
Figure 18.19 Adult Deterioration Detection System (ADDS) Chart with blood pressure table, draft version (see text, p 327)
(Australian Commission on Safety and Quality in Health Care. http://www.safetyandquality.gov.au/)
CLINICAL INTEREST BOX 18.13
‘Patient admitted with pneumonia. Became short of breath and had low oxygen levels. Staff did not call for assistance in a timely way. The patient died’ (Australian Commission on Safety and Quality in Health Care 2008). It is imperative that nursing staff identify clinical deteriorations and act accordingly for patient safety.
Clinical Scenario Box 18.2
George Callahan, a 65-year-old male, is admitted to the cardiac ward with atrial fibrillation. This is a new presentation and George has never been admitted to hospital before. George’s wife has many questions about what atrial fibrillation is and how it will affect his life. George wants to know why he finds it difficult to breathe when he is walking.
Past history: Hypertension, high cholesterol
• Pulse: 110 beats per minute and irregular
• Respiratory rate: 14 breaths per minute
• Oxygen saturation: 96% on room air
1. Which observations are abnormal?
2. Why is George’s pulse irregular?
3. What advice would you give George about his admission to the cardiac ward?
4. What advice would you give to George’s family about his admission?
Summary
Vital signs reflect changes in body function that otherwise might not be observed. Various sites and methods can be used to assess vital signs, and the nurse selects the site and method that is safest for the client and that will provide the most accurate measurement possible. It is important to note that changes in one vital sign can trigger changes in other vital signs.
Vital signs are generally assessed when a client is admitted to a healthcare agency, to establish baseline data and when there is a change or possibility of change in the client’s condition. Data obtained from measurements of vital signs are then used to plan and implement appropriate nursing interventions. Measurements of vital signs are also used to evaluate a client’s response to nursing interventions or prescribed medical therapy. It is important for the nurse to have knowledge of the normal ranges of vital signs and of the factors that regulate and influence vital signs, as this helps them interpret the measurements that deviate from normal. It is also imperative that the nurse learn to identify when a client is deteriorating and act accordingly to maintain the health of clients (ACSQHC 2008).
1. Ms Hawdon has just given birth to a healthy baby boy. After the delivery she has a postpartum haemorrhage and loses 1200 mL of blood. Would you expect Ms Hawdon’s blood pressure to increase or decrease? State the reason for your answer.
2. Identify two sites for taking blood pressure in an adult. Describe the procedure.
3. Mr Russell has just had a cigarette. The medical officer has just asked you to take Mr Russell’s vital signs. What would you do? State the reason for your answer.
4. Mr Ryan, 82 years of age, has just been admitted with shortness of breath. Describe the observation you would conduct.
5. Mr Lui was admitted to a medical ward with a respiratory infection. What would you expect Mr Lui’s respiratory rate and oxygen saturations to be, and why?
6. A 16-year-old adolescent, Benjamin, has presented to a medical ward for management of his insulin-dependent diabetes. Describe how you would assess Benjamin’s blood pressure heart rate and temperature and why.
7. Review the information in the observation chart below, then answer the questions that follow:
| Admission obs | T – 36.7, P – 100, R – 22, B/P – 140/90: 1600 hrs |
| Preoperative obs | T – 36.4, P – 80, R – 18, B/P – 130/70: 0800 hrs |
| Postoperative obs | T – 35.8, P – 60, R – 16, B/P – 120/70: 1400 hrs |
| T – 36.4, P – 80, R – 18, B/P – 130/70: 1800 hrs | |
| T – 36.4, P – 76, R – 18, B/P – 120/70: 2000 hrs | |
| Day 1 Post op | T – 36.4, P – 80, R – 20, B/P – 130/70: 1000 hrs |
| T – 36.4, P – 80, R – 20, B/P – 130/70: 1800 hrs | |
| T – 36.8, P – 88, R – 20, B/P – 130/70: 2200 hrs | |
| Day 2 Post op | T – 37.0, P – 88, R – 20, B/P – 130/70: 0100 hrs |
| T – 37.8, P – 90, R – 22, B/P – 135/80: 1400 hrs | |
| T – 38.5, P – 90, R – 22, B/P – 135/90: 2000 hrs | |
| Day 3 Post op | T – 37.4, P – 88, R – 22, B/P – 135/70: 0700 hrs |
8. Chart the above observations on the Early Warning Score chart (Fig 18.19). Identify whether any of the observations would require a clinical review and suggest why.
References and Recommended Reading
Alexis O. Providing best practice in manual pulse measurement. British Journal of Nursing. 2010;19(4):228–234.
Australian Commission on Safety and Quality in Health Care. Recognising and responding to clinical deterioration: Background paper. Online. Available: http://www.safetyandquality.gov.au/wp-content/uploads/2012/01/BackgroundPaper.pdf, 2008.
Berman A, Snyder S, Kozier B, et al. 2nd edn. Kozier and Erb’s Fundamentals of Nursing, Pearson, Frenchs Forest, NSW, 2012;Vol 2.
Booker R. Pulse oximetry. Nursing Standard. 2008;22(30):39–41.
Burke L. Postoperative fever: A normal inflammatory response or cause for concern. Journal of the American Academy of Nurse Practitioners. 2010;22(4):192–197.
Craft JG, Gordon C, Tiziani A. Understanding Pathophysiology. Sydney: Elsevier, 2011.
Crisp J, Taylor C. Potter & Perry’s Fundamentals of Nursing, 3rd edn., Sydney: Elsevier, 2009.
Davie J, Amoore J. Best practice in the measurement of body temperature. Nursing Standard. 2010;24(42):42–49.
deWit SC. Fundamental Concepts and Skills for Nursing, 2nd edn. Philadelphia: WB Saunders, 2005.
Elkin M, Perry A, Potter P. Nursing Interventions and Clinical Skills, 4th edn. Canada: Mosby Elsevier, 2008.
Engel J. Mosby’s Pocket Guide Series Pediatric Assessment, 5th edn. St Louis: Elsevier, 2006.
LeMone P, et al. Medical-surgical Nursing: Critical Thinking in Client Care. Pearson, Frenchs Forest, NSW, 2011.
Lu S-H, Leasure A-R, Dai Y-T. A systematic review of body temperature variations in older people. Journal of Clinical Nursing. 2010;19(2):4–16.
Massey DTM. Respiratory assessment 1: Why do it and how to do it? British Journal of Cardiac Nursing. 2010;5(11):537–541.
McConnell TH. Human Form, Human Function: Essentials of Anatomy and Physiology. Baltimore: Wolters Kluwer/Lippincott Williams & Wilkins, 2011.
Perry AG, Potter PA. Clinical Nursing Skills and Techniques, 5th edn. St Louis: Mosby, 2001.
Potter PA, Perry AG. Fundamentals of Nursing, 7th edn. St Louis: Elsevier Mosby, 2008.
Potter PA, Perry AG, et al. Fundamentals of Nursing, 8th edn. St Louis: Mosby, 2013.
Preston R, Flynn D. Observations in acute care: evidence-based approach to patient safety. British Journal of Nursing. 2010;19(7):442–447.
Medline Plus: Aging changes in vital signs, www.nlm.nih.gov/medlineplus/ency/article/004019.htm.
