EQUIPMENT

Accessible sink with warm running water

Antimicrobial or regular soap solution

Paper towels or air dryer

Disposable plastic nail pick (optional)

STEPS RATIONALE
1. Inspect surface of hands for breaks or cuts in skin or cuticles. Report and cover lesions before providing patient care. Open cuts or wounds can harbour high concentrations of microorganisms. Agency policy may prevent nurses from caring for high-risk patients.
2. Inspect hands for heavy soiling. Requires more-lengthy handwash.
3. Ensure nails are short and free of nail polish and/or artificial nails. Do not tear or cut skin under or around nail. Most microbes on hands come from beneath the fingernails.
4 Assess patient’s risk of or extent of infection e.g. white blood cell count, extent of open wounds, known medical diagnosis. Transmission-based precautions such as the wearing of a mask and clean gown may be required for immunocompromised patients.
5. Remove all jewellery including wristwatch, rings and bracelets. Jewellery can harbour microbes and rub against skin causing shedding of skin cells.
6. Stand in front of sink, keeping hands and uniform away from sink surface. (If hands touch sink during handwashing, repeat.) The inside of the sink is considered a contaminated area. Reaching over sink increases risk of touching edge, which is contaminated.
7. Turn on water and regulate flow and temperature so that temperature is warm. Warm water is more comfortable and it removes less of the skin’s protective oils than hot water.
8. Avoid splashing water against uniform. Microorganisms multiply in moisture.
9. Regulate temperature and intensity of flow. Warm water is most comfortable.
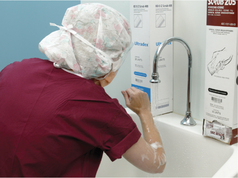
10. Wet hands and wrists thoroughly under running water. Keep hands and forearms higher than elbows during washing. Keeping hands elevated allows water to flow form least to most contaminated areas.
11. Apply a small amount of soap or antimicrobial solution, lather thoroughly. The amount applied should be as per the manufacturer’s instructions.
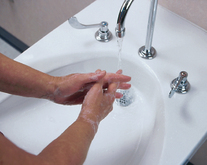
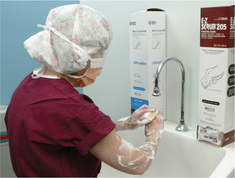
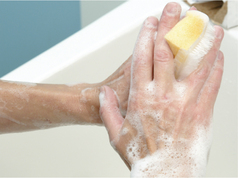
12. Wash hands using plenty of lather and friction for at least 15 seconds. Interlace fingers and rub palms, sides and back of hands with circular motion at least 5 times each (see illustration). Soap cleans by emulsifying fat and oils. Friction and rubbing mechanically will loosen and remove debris and transient bacteria. Interlacing the fingers and thumbs helps to ensure all surfaces are cleaned.
13. Areas underlying fingernails are often soiled. Clean with fingernails with a plastic, disposable nail pick. Most microbes on hands come from beneath the fingernails.
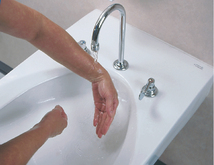
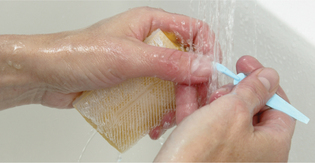
14 Rinse hands and wrists thoroughly (see illustration). Rinsing mechanically washes away debris and microorganisms.
image

Step 11 Lathering hands.

image

Step 14 Rinsing hands.

15. Gently pat hands dry from fingers to wrists and forearms with paper towel.

Drying from cleanest (fingertips) to least clean (forearms) area avoids contamination.

Gently patting hands dry helps prevents chapping and roughened skin.

16. Discard paper or towel into the proper receptacle. Prevents transfer of microorganisms.
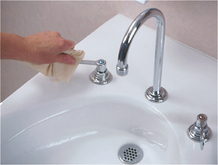
17. Turn off water with foot or knee pedals. To turn off hand tap, use clean, dry paper towel; avoid touching handles with hands (see illustration). Minimises contamination of hands.
image

Step 17 Turnirng off hand tap.

18. If hands are dry or chapped, a small amount of lotion or barrier cream can be applied. If dermatitis occurs, additional interventions may be needed.
19. Inspect hands for obvious signs of debris and contamination. If found, indicates poor technique. Handwashing should be repeated.
20. Inspect hands for dermatitis or cracked skin as this may indicate complications from excessive handwashing or an allergic reaction to the antimicrobial or soap solution. Seek advice from infection-control professional. Note: use small, single-use containers of barrier cream because large, refillable containers have been associated with nosocomial infections.
RECORDING AND REPORTING HOME CARE CONSIDERATIONS

It is not necessary to record or report this procedure.

Report any dermatitis to employee health and/or infection control per agency policy.

Evaluate the handwashing facilities in the home to determine the possibility of contamination, the proximity of the facilities to the patient and available supplies in the area.

Evaluate the availability of warm running water and soap when conducting home visits and anticipate the need for alternative handwashing products such as alcohol-based hand rubs and antimicrobial-impregnated, disposable towels.

Instruct the patient and primary caregiver in proper techniques and situations for handwashing.

Use of antimicrobial solutions is encouraged in certain high-risk situations to reduce the microbial load on nurses’ hands. These include situations where nurses are in contact with patients who are immunocompromised or have damaged skin and mucous membranes. In addition, an antimicrobial solution should be used before performing an invasive procedure such as insertion of an intravenous catheter. There are a number of effective antimicrobial solutions, including chlorohexidine gluconate, povidone–iodine and alcohol. Certain antimicrobial solutions can irritate the skin of some staff. Nurses are advised to consult an infection-control consultant in this situation.

Nurses can ensure that patients and visitors understand the appropriate technique and rationale for handwashing. Teaching handwashing is particularly important if healthcare is to continue at home. Patients should wash their hands before eating or handling food, after handling contaminated equipment, linen or organic material and after elimination. Visitors are encouraged to wash their hands before eating or handling food, after coming in contact with patients with an infection and after handling contaminated equipment or organic material.

Health promotion

An infection can be prevented from developing or spreading by minimising the organisms transmitted to potential infection sites. Eliminating reservoirs of infection, controlling portals of exit and entry and avoiding actions that transmit microorganisms prevent the colonisation of bacteria. The correct use of sterile supplies, barrier protection and appropriate hand-hygiene practices can control the spread of microorganisms. Strengthening a potential host’s defences against infection by nutritional support, rest, maintenance of physiological protective mechanisms and recommended immunisations can protect them from invasion by pathogens.

When a patient develops an infection, the nurse continues preventive care to ensure that healthcare personnel and other patients are not exposed to the infection. Patients with communicable diseases may need to be isolated or have barriers in place to prevent transmission of infection. Nurses are well placed to educate patients and their families about the proper use of antibiotics to decrease the risk of antibiotic-resistant infections (Box 29-11).

BOX 29-11 DECREASING THE RISK OF ANTIBIOTIC-RESISTANT INFECTION

Include these instructions when teaching patients and/or their carers how to decrease the risk for antibiotic-resistant infection:

1. Do not take antibiotics to prevent illness—Doing this increases your risk of developing resistant infection. Exceptions include taking antibiotics before certain surgeries and taking antibiotics before dental work if you have a heart valve disorder.

2. Wash your hands frequently—Hand-washing is the single most important thing you can do to prevent an infection.

3. Follow directions—Not taking your antibiotic as prescribed or skipping doses can allow antibiotic-resistant bacteria to develop.

4. Do not request an antibiotic for the flu or colds—If your healthcare provider says that you do not need an antibiotic, chances are that you do not. Antibiotics are effective against bacterial infections but not viruses, which cause colds and flus.

5. Finish your antibiotic—Do not stop taking your antibiotic when you feel better. If you stop taking your antibiotic early, you allow the hardiest bacteria to survive and multiply. Eventually, you could develop an infection resistant to many antibiotics. You should never have leftover antibiotics.

6. Do not take leftover antibiotics—Do not save unfinished antibiotics for later use or borrow leftover drugs from family or friends. This is dangerous because: (1) the leftover antibiotic may not be appropriate for you; (2) your illness may not be a bacterial infection; (3) old antibiotics can lose their effectiveness and in some cases can even be fatal; and (4) there will not be enough doses in a leftover bottle to allow a full therapeutic dose.

From Brown D, Edwards H 2012 Lewis’s Medical–surgical nursing: assessment and management of clinical problems. Sydney, Mosby.

Acute care measures

Treatment of an infectious process includes eliminating the infectious organisms and supporting the patient’s defences. To identify the causative organism, the nurse may collect specimens of body fluids or drainage from infected body sites for microbiological culture. When the disease process or causative organism has been identified, a medical or nurse practitioner will prescribe the most effective treatment for the situation. The nurse correctly administers antibiotics and other treatments as ordered, while observing for adverse reactions and assessing progress of the infection and the patient’s response to treatment.

Systemic infections require measures to prevent complications from the stress of fever. Maintaining intake of fluids prevents dehydration resulting from diaphoresis. The patient’s increased metabolic rate requires an adequate nutritional intake. Rest preserves energy and allows the healing process to occur.

Localised infections often require measures to facilitate removal of debris to promote healing. The nurse applies strict principles of infection control and wound care to remove infected drainage from wound sites and support the integrity of healing wounds. Various dressings (see Chapter 30) can be applied to facilitate removal of infectious drainage and promote the healing of wound margins. Drainage tubes may be inserted to remove infected discharge from body cavities. The nurse must wear personal protective attire, use an aseptic technique to manage wounds and carefully ensure the correct handling and disposal of exudate.

During the course of an infection, the nurse supports the patient’s body defence mechanisms. For example, if a patient has infectious diarrhoea, the nurse employs hygiene measures to maintain skin integrity to prevent tissue breakdown and entry of microorganisms. Other routine hygiene measures include cleansing and bathing to protect the skin and mucous membranes from invasion and overgrowth of opportunistic microorganisms.

Generally, infection control and prevention interventions are employed to minimise cross-infection by targeting components of the chain of infection.

PROTECTION OF THE SUSCEPTIBLE HOST

The nurse intervenes to maintain the body’s normal healing processes (Box 29-12). Nurses also protect themselves and others from cross-infection through vigilant use of standard and transmission-based precautions. Decisions concerning the level of precaution required in specific circumstances are not always straightforward.

BOX 29-12 INFECTION CONTROL: PROTECTING THE SUSCEPTIBLE HOST

PROTECTING NORMAL DEFENCE MECHANISMS

Regular bathing removes transient microorganisms from the skin’s surface. Lubrication helps keep the skin hydrated and intact.

Regular oral hygiene removes proteins in the saliva that attract microorganisms. Flossing removes tartar and plaque that can build up on teeth.

Maintenance of adequate fluid intake promotes normal urine formation and a resultant outflow of urine to flush the bladder and urethral lining of microorganisms.

Physically dependent or immobilised patients should be encouraged to perform regular coughing and deep breathing to expectorate and keep lower airways clear of mucus.

Correct immunisation of children or adults exposed to or potentially exposed to certain infectious microorganisms should be encouraged in accordance with the relevant health authorities. Children should be vaccinated for smallpox, measles, mumps, rubella and diphtheria.

Human papilloma virus (HPV) immunisation is recommended for adolescent and young adult females.

Adults should have tetanus–diphtheria boosters every 10 years.

Influenza vaccines are recommended for health workers and older adults.

MAINTAINING HEALING PROCESSES

The nurse promotes intake of adequate fluids and a well-balanced diet containing essential proteins, vitamins, carbohydrates and fats. The nurse also uses measures to increase the patient’s appetite.

The nurse promotes a patient’s comfort and sleep so that energy stores are replaced daily.

The nurse assists the patient to learn stress management techniques.

• CRITICAL THINKING

Mrs Niles is 83 years old and lives alone. She has multiple comorbidities and uses a wheelie-walker to mobilise. She relies on a church volunteer group to deliver lunches to her during the week. Her fixed income limits her ability to buy food. She has therefore been dividing each lunch so that it will provide her with two meals. Last week, Mrs Niles’ 79-year-old sister died. The two sisters had been very close.

Explain the factors that might increase Mrs Niles’s risk of infection.

PROTECTIVE ENVIRONMENT

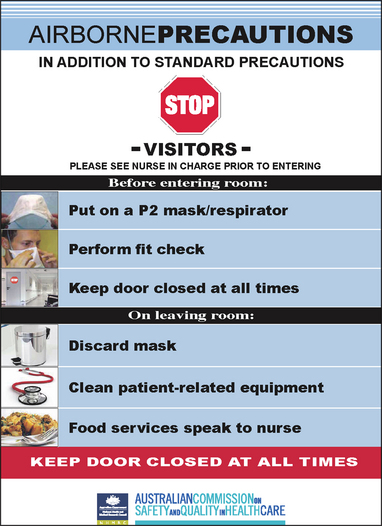
Private rooms used for isolation may have negative-pressure airflow to prevent infectious particles from flowing out of the room. Air leaving the room is filtered using high-efficiency particulate air (HEPA) filters to 99% clean it, ensuring air is free of microbes as it is released into the atmosphere (Siegel and others, 2007). Conversely, positive-pressure airflow is used in surgical operating rooms and for highly susceptible patients such as organ transplant recipients. Air in these rooms is HEPA filtered as it enters from the ceiling, and used air is extracted through vents located on the walls close to floor level. A notice listing the additional transmission-based precautions can be posted outside the room (Figure 29-6). This notice is a handy reference for healthcare personnel and visitors and alerts anyone who might enter the room that special precautions must be followed.

image

FIGURE 29-6 Example of transmission-based precautions poster for door of patient room.

From National Health and Medical Research Council (NHMRC) n.d. Canberra, NHMRC. Online. Available at http://www.nhmrc.gov.au/_files_nhmrc/publications/attachments/cd33_airborne_poster_111216.pdf

The private isolation room or an adjoining anteroom should contain soap and antiseptic solutions and toilet facilities. Personnel and visitors are required to wash their hands before approaching the patient’s bedside and again before leaving the room. If toilet facilities are unavailable, infection-control procedures for handling portable commodes, bed pans or urinals are implemented. Personal protective equipment should be stored in an anteroom between the room and hallway or in a convenient location close to the point of use.

An impervious bag for soiled or contaminated linen, as well as a rubbish container with plastic liners, should be readily available and never overfilled. Impervious receptacles prevent transmission of microorganisms by preventing seepage to and soiling of the outside surface. A disposable, rigid ‘sharps’ container should be available in the room to discard used needles, syringes and sharp objects.

Depending on the microorganism and the mode of transmission, the nurse must evaluate what articles or equipment may be taken into the patient’s room. For example, the NHMRC (2010) recommends the dedicated use of articles such as stethoscopes, sphygmomanometers and thermometers in the room of a patient infected or colonised with vancomycin-resistant enterococci (VRE). These devices should not be used on other patients unless they are first adequately cleaned and disinfected. If, after bringing any article into the room, the nurse exposes an article to infected material and then touches or removes the article, the risk of transmitting infection to other patients or personnel is increased. Box 29-13 describes the procedures commonly performed in a protective environment.

BOX 29-13 PROCEDURAL GUIDELINES FOR CARING FOR A PATIENT ON ISOLATION PRECAUTIONS

1. Assess isolation indications, e.g. current laboratory tests or patient’s history of exposure.

2. Review agency policies and precautions necessary for the specific isolation system, and consider care measures to be performed while in patient’s room.

3. Review nurses’ notes or confer with colleagues regarding patient’s emotional state and adjustment to isolation.

4. Wash hands and prepare all equipment to be taken into patient’s room.

5. Prepare for entrance into isolation room:

a. Place either surgical mask or respirator around mouth and nose. (Type will depend on type of isolation and facility policy.)
b. Wear protective eyewear.
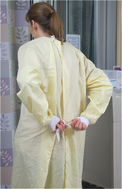
c. Wear a freshly laundered gown and cover all outer garments. Pull sleeves down to the wrist. Tie securely at neck and waist (see illustration).

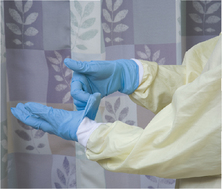
d. Put on disposable gloves. If gloves are worn with gown, bring glove cuffs over edge of gown sleeves. Note: If the patient is allergic to latex, nitrile, non-latex gloves should be worn.

image

Step 5c Tying gown at waist.

image

Step 5d Applying gloves over gown sleeves.

6. Enter patient’s room. Arrange supplies and equipment. If equipment being removed from the room requires reprocessing, place in a container with a well-fitting lid for transfer.

7. Explain the purpose of isolation and necessary precautions to the patient and family. Offer an opportunity to ask questions. Assess for evidence of emotional problems due to isolated state.

8. Assessing vital signs: wear personal protective attire including gown, gloves and eye protection.

a. If patient is infected or colonised with a resistant organism, e.g. vancomycin-resistant enterococcus (VRE) or methicillin-resistant Staphylococcus aureus (MRSA), assessment equipment must remain in the room. Assess vital signs routinely. Avoid contact of stethoscope or blood-pressure cuff with infected material.
b. Clean the diaphragm or bell of the stethoscope with an antimicrobial solution after each use to reduce contaminants. Set it aside on clean surface.
c. Individual or disposable thermometers should be used.

9. Administer medications (see Chapter 31):

a. Administer oral medications in wrapper or using a cup.
b. Dispose of the wrapper or cup in a plastic-lined receptacle.
c. Administer injections as ordered.
d. Do not remove the needle from the syringe. Discard the syringe and needle into a puncture-resistant container designated for sharp items.
e. Gloves must be worn at all times to avoid contact of hands with contaminated articles, blood, tissue or body fluids.

10. Administer hygiene, encouraging the patient to raise questions or concerns about their isolation. This time can often be effectively used for informal teaching.

a. Avoid allowing gown to become wet.
b. Remove linen from the patient’s bed; avoid contact with gown and place in an impervious linen bag.
c. Change gloves and wash hands or apply an antimicrobial, alcohol hand-rub until dry.

11. Collect specimens:

a. Place a specimen container on clean paper towel, labelled with the patient’s name, date of birth, date and time or specimen collection and the exact contents of the specimen to be collected.
b. Follow non-touch technique to collect the specimen.
c. Transfer the specimen to the container without soiling outside of container. Place the container in a plastic bag and register the specimen as per facility policy.

12. Dispose of linen and rubbish bags as they become full:

a. Use sturdy, moisture-resistant, single-use bags to contain soiled articles.
b. Tie bags securely at top in knot (see illustration).

13. Resupply the isolation room with equipment and consumables to ensure an adequate supply.

image

Step 12B Tie rubbish bag securely.

14. Leaving the isolation room:

a. Untie waist and neck strings of gown. Allow gown to fall from shoulders. Remove hands from sleeves without touching outside of gown. Hold gown inside at shoulder seams and fold inside out and dispose of.
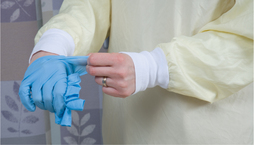
b. Remove gloves. Remove one glove by grasping cuff and pulling glove inside out over hand. Discard glove. With ungloved hand, tuck finger inside cuff of remaining glove and pull it off, inside out (see illustration).

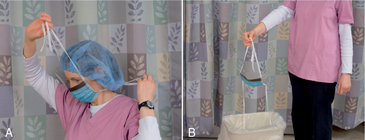
c. Untie the top mask string and then bottom strings, pull mask away from face and place in a rubbish receptacle. Do not handle outer surface of mask.

image

Step 14b Removing gloves.

image

Step 14c A, Untying top strings of mask. B, Dropping mask into rubbish bin.

d. Wash hands for minimum of 15 seconds.
e. Explain to the patient when you plan to return to room. Ask whether the patient requires any personal-care items, books or magazines.
f. Leave room and close the door.
g. All contaminated supplies and equipment should be disposed of in a manner that prevents spread of microorganisms to other persons (see agency policy).
h. Remove protective eyewear and wash hands for minimum of 15 seconds.

PERSONAL PROTECTIVE EQUIPMENT

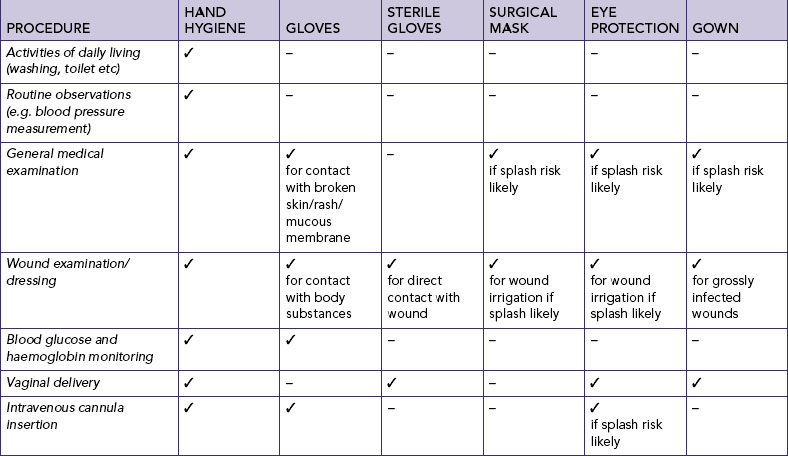
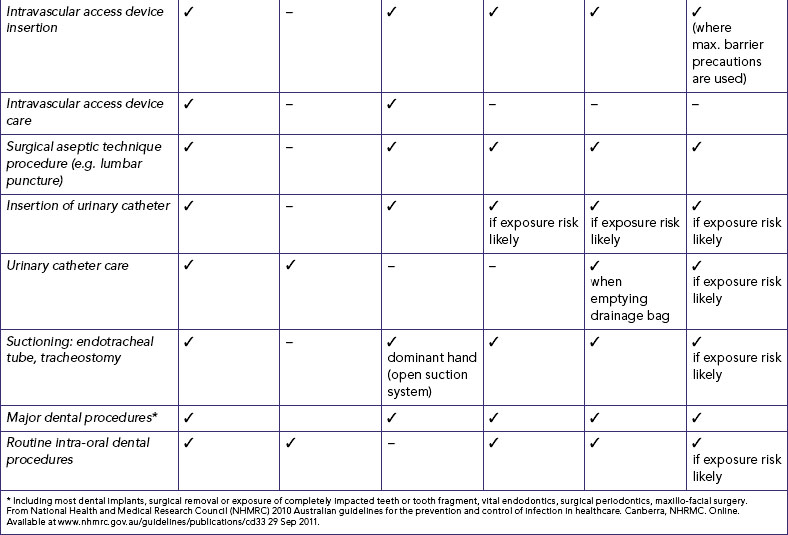
Personal protective equipment (PPE) should be readily available for staff involved in patient care. A summary of PPE requirements for different clinical procedures according to the NHMRC (2010) guidelines is presented in Table 29-6. The main reason for wearing a gown is to prevent soiling of clothes during contact with the patient. Gowns protect healthcare personnel and visitors from coming into contact with infected material and blood or body fluids. Gowns may also be required for contact precautions, depending on the expected amount of exposure to infectious material. Gowns used for barrier protection are made of a fluid-resistant material and should be changed immediately if damaged or contaminated. Depending on agency policy, gowns can be disposable or reusable.

TABLE 29-6 SUMMARY OF PERSONAL PROTECTIVE EQUIPMENT REQUIREMENTS

image image

Gowns usually open at the back and have ties or snaps at the neck and waist to keep the gown closed and secure and are long enough to cover all outer garments. Long sleeves with tight-fitting cuffs provide added protection and prevent cross-contamination from skin cells shed from the wearer to the patient. There is no special technique for donning clean gowns, provided they are fastened securely. The nurse must carefully remove and discard gowns to minimise contamination of the hands and uniform. The gown should be removed first and placed in a receptacle, followed by the gloves. The nurse’s hands must then be immediately washed.

Masks or masks with face shields should be worn when it is possible that blood or body fluids may be splashed or sprayed into the health worker’s face and when patient airborne or droplet precautions are implemented. A correctly applied mask fits snugly over the mouth and nose so that pathogens and body fluids cannot enter or escape through the sides (Box 29-14), thereby preventing contamination by droplet nuclei. A mask discourages the wearer from touching the eyes, nose or mouth. If a person wears glasses, the top edge of the mask fits below the glasses to prevent fogging of eyewear as the person exhales. A mask protects the nurse from inhaling microorganisms from a patient’s respiratory tract and prevents transmission of pathogens from the nurse’s respiratory tract to the patient. The surgical mask protects the wearer from inhaling large-particle aerosols that travel short distances (1 metre) and small-particle droplet nuclei that remain suspended in the air and travel longer distances. At times, a patient who is susceptible to infection may wear a mask to prevent inhalation of pathogens. Patients with droplet or airborne infections, transported outside their room, should wear a mask to protect other patients and personnel. Masks may prevent transmission of infection by direct contact with mucous membranes.

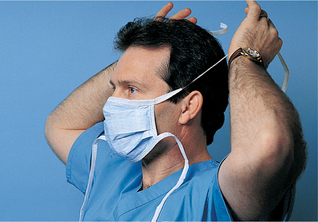
BOX 29-14 PROCEDURAL GUIDELINES FOR DONNING A SURGICAL-TYPE MASK

1. Find top edge of mask (usually has thin metal strip along edge). Pliable metal fits snugly against bridge of nose.

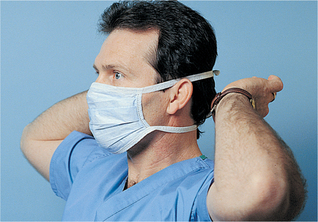
2. Hold mask by top two strings or loops. Tie two top ties at top of back of head (see illustration), with ties above ears. (Alternative: slip loops over each ear.)

3. Tie two lower ties snugly around neck with mask well under chin (see illustration).

4. Gently pinch upper metal band around bridge of nose.

Note: mask should be changed if wet, moist or contaminated.

image

image

Talking should be kept to a minimum while wearing a mask to reduce respiratory airflow. When a mask is worn, moisture increases around the mouth and nose, diminishing its effectiveness as a barrier to microorganisms. The mask should be discarded and never reused, as it is a contaminated filter. Staff must wash their hands immediately after discarding a mask. Patients and family members should be warned that a mask might cause a sensation of smothering. If family members are uncomfortable, they should leave the room, discard the mask and immediately wash their hands.

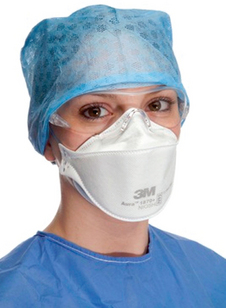
P2-rated respirators that meet the requirements of AS/NZS 1716 are required when caring for a patient with known or suspected tuberculosis (TB), avian influenza or severe acute respiratory syndrome (SARS). These masks have a suitable filtration rating and face-fit performance not achieved by a regular surgical mask and must be fit-tested to ensure an effective seal on the face of each wearer to control leakage around the edges of the mask. P2 masks are recommended for use against infections aerosols and mechanically and thermally generated particulates, so also provide protection from surgical plume generated intraoperatively by electrosurgery and lasers (Australian College of Operating Room Nurses, 2010). The nurse should be aware of agency policy regarding the type of respiratory protective devices required.

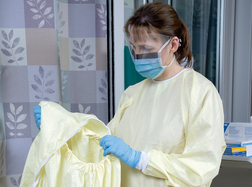
When full protective apparel is necessary, the nurse first washes and dries the hands, applies a mask and protective eyewear, applies a gown and then applies gloves. Gloves help to prevent the transmission of pathogens by direct and indirect contact. Clean, non-sterile gloves should be worn when handling body fluids and contaminated items. Clean gloves should be donned before touching mucous membranes and non-intact skin. Gloves should be changed between tasks and procedures on the same patient after contact with material that may contain a high concentration of microorganisms. Gloves should be removed promptly after use and disposed of appropriately. The wearer’s hands should be washed for 15 seconds using an antimicrobial solution or rubbed with an alcohol-based antimicrobial solution until it dries, before touching non-contaminated items and environmental surfaces and before nursing another patient. Washing hands immediately after glove removal helps prevent transfer of microorganisms.

Disposable gloves are easily applied and are designed to fit either hand. The glove can easily be torn. If a break or tear is detected in a glove while providing care, the nurse should change gloves. The nurse should explain the use of gloves to the patient’s family members and emphasise the importance of hand hygiene after the removal of gloves.

Nurses must wear protective attire, including eyewear and a mask or a face shield, when:

handling toxic chemicals, for example cytotoxic drugs, formalin

reprocessing contaminated equipment or instruments

handling or working in the presence of blood or body fluids, such as the operating room or postoperative care unit, irrigating a large abdominal wound or assisting with the insertion of an arterial catheter.

Protective eyewear, available as shields, plastic glasses or goggles, or reusable headbands with disposable shields (Figure 29-7) should fit snugly around the forehead and face to prevent fluids entering between the face and the eyewear.

image

FIGURE 29-7 Nurse wearing a P2-rated respirator and protective eyegear.

© 3M, reproduced with permission.

SPECIMEN COLLECTION

Laboratory studies are required when a patient is suspected of having an infectious disease. Body fluids and secretions suspected of containing infectious organisms are collected for culture and sensitivity tests (Box 29-15). The specimen is placed in a medium that promotes growth of organisms. A laboratory technologist then assesses the microorganisms growing in the culture. Sensitivity test results indicate antibiotics to which organisms are resistant or sensitive.

BOX 29-15 SPECIMEN COLLECTION TECHNIQUES

WOUND SPECIMEN

Clean site with sterile water or saline before wound specimen collection.

Wear gloves and use cotton-tipped swab or syringe to collect as much drainage as possible. Have clean test tube or culture tube on clean paper towel.

After swabbing centre of wound site, hold collection tube with paper towel. Carefully insert swab without touching outside of tube. After securing tube’s top, transfer tube into bag for transport and then wash hands.

BLOOD SPECIMEN

Use a syringe and culture media bottles to collect up to 10 mL of blood per culture bottle (check agency policy).

After prepping, perform venepuncture at two different sites to decrease likelihood of both specimens being contaminated with skin flora.

Place blood culture bottles on bedside table or other surface; swab off bottle tops with alcohol. Inject appropriate amount of blood into each bottle.

Remove gloves and transfer specimen into clean, labelled bag for transport. Wash hands.

STOOL SPECIMEN

Wearing gloves, use clean cup with seal top (need not be sterile) and tongue blade to collect small amount of stool, approximately the size of a walnut.

Place cup on clean paper towel in patient’s bathroom. Using tongue blade, collect needed amount of faeces from patient’s bedpan. Transfer faeces to cup without touching cup’s outside surface.

Dispose of tongue blade, and place seal on cup. Transfer specimen into clean bag for transport. Remove gloves and wash hands.

URINE SPECIMEN

Wearing gloves, use sterile cup to collect 1–5 mL of urine.

Place cup or tube on clean towel in patient’s bathroom. Have patient follow procedure to obtain a clean voided specimen (see Chapter 38).

Transfer urine into sterile container by drawing up urine using a syringe or pouring it from used collection cup. Secure top of container and transfer specimen into clean, labelled bag for transport.

Alternatively, use a Monovette to draw up the urine from the collection cup, recap, break off plunger and send the labelled Monovette to the laboratory.

If patient has a urinary catheter, use syringe to collect specimen. If there is an interlink port on urinary catheter drainage bag, use a Monovette to obtain urine specimen, recap, break off plunger, label and send to laboratory.

Remove gloves and wash hands.

The nurse wears eye protection and uses disposable gloves and sterile equipment to obtain patient specimens. When collecting fresh material from the site of an infection, such as wound drainage, it is important to ensure the specimen is uncontaminated by neighbouring microbes. Specimen containers should be sealed tightly to prevent spillage and contamination of the outside of the container and be placed in a leakproof bag (NHMRC, 2010). Specimens must be clearly labelled on the body of the container (not the lid, as this can easily be discarded in the pathology department). The date and time of collection and exact title of the specimen, along with the correct patient details, should be documented on the label. Always confirm with the attending doctor whether the specimen is required to be sent fresh, in a specific medium or in a fixative solution such as formalin.

BAGGING RUBBISH OR LINEN

Nurses use special bagging procedures for removing contaminated items from a patient’s environment. Bagging prevents accidental exposure of personnel and prevents contamination of the surrounding environment.

The NHMRC (2010) recommends a single bag for discarding items if the bag is impervious and sturdy and if the article can be placed in the bag without contaminating the outside of the bag. Soiled or wet linen should be placed in an impervious laundry bag (to prevent seepage) in the patient’s room. This should be removed from the clinical environment as soon as possible. Double-bagging is only recommended if it is impossible to prevent contamination of the bag’s outer surface. All linen and rubbish bags must be securely tied and never overfilled.

TRANSPORTING PATIENTS

Before transferring a patient to a wheelchair or trolley, the nurse should ensure the patient is dressed in a clean gown to serve as a robe. Patients infected with organisms transmitted by the airborne route should leave their rooms only for essential purposes, such as diagnostic procedures or surgery. These patients must also wear masks, as previously discussed. Personnel transporting these patients should also wear barrier protection.

An extra layer of sheets should be used to cover the trolley or seat of the wheelchair as body fluids can leak onto transport equipment. The nurse must ensure that all transport equipment, including IV poles, is thoroughly disinfected immediately after use to prevent cross-infection to other patients.

Personnel in diagnostic or procedural areas or the operating room should be notified of a patient’s precautionary care and document this in the patient’s chart. The nurse explains ways the patient can help prevent transmission of their infection during transport; for example, a patient with a respiratory infection is provided with tissues and a bag to allow appropriate disposal of secretions.

The operating suite should be notified as soon as possible if an infectious patient requires surgery, as transmission-based precautions may be required and the order of the operating list may need to be altered to ensure the most infectious patient is operated on last. The operating room is then thoroughly cleaned and ‘rested’ to enable adequate HEPA filtered air changes to remove airborne microorganisms.

PSYCHOSOCIAL IMPLICATIONS OF ISOLATION

The use of contact precautions or isolation as strategies for infection prevention and control may have negative impacts on several aspects of patient care. Contact precautions and isolation can not only affect patient safety because of decreased time spent with healthcare workers (Abad and others, 2010), but can also increase patients’ risk for unintended psychological consequences such as loneliness, anxiety and depression (Abad and others, 2010; Morgan and others, 2009). When a patient needs to be cared for in a private room, a sense of loneliness may develop because usual social relationships are disrupted. As a result of the infectious process, a patient’s body image may be altered. They may feel unclean, rejected, lonely or guilty. Infection prevention and control practices further intensify these beliefs of difference or undesirability. Being alone in a private room limits sensory contact and can lead to sensory deprivation. This situation can be psychologically harmful, especially for children. Patient education prior to initiation of contact precautions as well as staff education regarding the potential shortcomings of care received by patients in isolation may decrease the risk for unintended negative consequences (Abad and others, 2010; Morgan and others, 2009). The nurse can act to minimise feelings of psychological and physical isolation to improve patients’ emotional state and recovery (see Research highlight).

Prior to implementing isolation procedures, the patient and family should clearly understand the nature of the disease or condition, how infectious organisms are transmitted, the difference between contaminated and clean objects and the purposes of isolation and specific precautions. If they can participate in maintaining infection prevention, the chances of reducing the spread of infection are increased. The patient and family should be taught when and how to wash their hands correctly and how to wear and discard barrier protection if appropriate. Each procedure should be demonstrated and the patient and family should be given an opportunity to practise. Participation of the patient and family in the treatment of the disease can provide a positive sense of purpose and empowerment.

The nurse also takes measures to improve the patient’s sensory stimulation while confined to a private room. The room environment should be clean and pleasant. Curtains or blinds should be open, and excess supplies and equipment removed. The nurse can effectively listen to the patient’s concerns or interests. If the nurse rushes through care or shows a lack of interest, the patient will feel rejected and even more isolated. Mealtime is a particularly good opportunity for conversation. Measures such as repositioning increase comfort. Recreational and diversional activities such as board games or cards may be an option to keep the patient mentally stimulated. Depending on the patient’s condition, the nurse should encourage the patient to sit out of bed and mobilise in order to minimise the chance of deep vein thrombosis formation. The nurse must explain to the family the patient’s risk of depression or loneliness. Visiting family members should be encouraged to avoid expressions or actions that convey revulsion or disgust. The nurse can explain ways to provide meaningful stimulation and a positive approach.

RESEARCH HIGHLIGHT

Research focus

Methicillin-resistant Staphylococcus aureus (MRSA) is one of the leading multi-resistant organisms (MROs) concerning clinicians worldwide. Preventing and controlling the increase and spread of MRSA within the healthcare environment is an imperative for the infection-control team. The prevention and control of MRSA requires strict use of both standard and transmission-based precautions, which include effective hand hygiene practices, stewardship in antimicrobial prescribing and source isolation.

Research abstract

This paper presents a review of the literature on the patient experience of source isolation for MRSA or other infectious diseases. The review yielded five major interconnected themes: (1) psychological effects of isolation; (2) coping with isolation; (3) social isolation; (4) communication and information provision; and (5) physical environment and quality of care. It found that the experience of isolation by patients has both negative and positive elements. Isolation may result in detrimental psychological effects including anxiety, stress and depression, but may also result in the patient receiving less or substandard care. However, patients may also benefit from the quietness and privacy of single rooms.

Evidence-based practice

The psychological effects of isolation in the form of stress, anxiety and depression are clearly documented in the literature.

Having some control over their isolation experience appears to provide some means by which patients can cope with the situation.

Social restrictions placed on patients in source isolation may contribute to feelings of loneliness, abandonment and social isolation.

Effective communication and the adequate provision of information to patients is important in improving their experience of being in source isolation.

Patients’ perceptions, both negative and positive, of isolation are often influenced by their physical surroundings and environment.

Nurses and other healthcare workers must look for ways to improve the experience of isolation and contact precautions of patients in source isolation, particularly in improving the environment and the patient’s self-control of the situation and in providing adequate information.

Reference

Arratt RL, Shaban R, Moyle W. Patient experience of source isolation: lessons for clinical practice. Contemp Nurse. 2011;39(2):180–193.

CONTROL OR ELIMINATION OF INFECTIOUS AGENTS

If an object or instrument is labelled ‘disposable’ it is considered ‘single use’ and must be discarded after use. Reusable instruments or objects used in patient care must be appropriately reprocessed after use. Correct reprocessing, which includes cleaning and either high-level disinfection or sterilisation of contaminated objects, significantly reduces microorganisms.

CLEANING

Reusable objects must first be cleaned after use, before further reprocessing occurs. Cleaning involves the removal of all foreign materials, such as soil and organic material, from objects. In larger healthcare facilities, central supply-department personnel manually remove gross debris and then, if recommended by the manufacturer, ultrasonically remove debris from crevices and joints in instruments and equipment. Generally, cleaning requires a mild detergent and water combined with the mechanical action of rubbing or scrubbing (NHMRC, 2010).

When cleaning and handling used items and equipment soiled by organic material, for example blood, faecal matter, sputum or pus, or by chemicals, the nurse must take care to minimise exposure to contaminated surfaces, which may include wearing a face shield, plastic apron and disposable gloves. These barriers help provide protection from infectious organisms.

The following general steps help ensure the cleanliness of an object:

1. Clean the instrument or object as close to the point of use as possible to prevent contaminated debris from drying on the object.

2. Fully dismantle the equipment or instrument to ensure all surfaces are subjected to reprocessing.

3. Rinse the contaminated item with warm running water to remove organic material. Hot water causes the protein in organic material to coagulate and adhere to objects, making removal difficult.

4. After rinsing well, wash the object with soap and warm water. Soap or detergent reduces the surface tension and emulsifies debris. Rinse the object thoroughly to remove the emulsified debris.

5. Use a bristled brush to remove material in grooves or seams. Friction dislodges contaminated material for easy removal. Open any hinged items for cleaning.

6. Place the item in an ultrasonic machine (if acceptable in accordance with manufacturer’s instructions) to remove debris or bioburden from crevices and joints.

7. Turn off the ultrasonic machine, remove the item and rinse in warm water.

8. Dry the object and prepare it for sterilisation or disinfection.

9. The sink in which the equipment is cleaned is contaminated and should be cleaned and dried.

10. The apron and gloves should be discarded. The face shield is discarded if disposable; if reusable, it should be disinfected prior to reuse.

11. Cleaning brushes should be cleaned and sterilised after use to minimise microbe populations.

It is recommended that a written description of the process and procedures for cleaning contaminated items should be available in all areas where this activity is likely to occur (Standards Australia, 2003).

DISINFECTION AND STERILISATION

After thorough cleaning, reusable objects are then, ideally, sterilised. If the item cannot withstand sterilisation, high-level disinfection may be used in accordance with manufacturer’s instructions.

Disinfection describes the process of eliminating microorganisms, with the exception of bacterial spores, by thermal of chemical means. Thermal disinfection is a simple, cost-effective method that uses heat and water at temperatures that would destroy pathogens (NHMRC, 2010). Chemical disinfection is generally accomplished by a chemical disinfectant, such as glutaraldehyde, that may or may not be used in conjunction with an automated washer-steriliser (NHMRC, 2010). Disinfectants such as alcohols, chlorines, glutaraldehydes and phenols can be caustic to equipment and toxic to tissues. Care must be taken to ensure all residual disinfectant is removed prior to use. The disinfected item must be thoroughly dried prior to storage.

Sterilisation involves the complete elimination or destruction of all microorganisms, including spores. Steam under pressure, ethylene oxide (ETO) gas, hydrogen peroxide plasma and chemicals such as periacetic acid are the most common sterilising agents. Once cleaned and disinfected or sterilised, reusable items are then appropriately repackaged, accurately labelled and diligently stored for next use.

It is important for the nurse to be aware of and recognise occupational risks associated while working with chemicals used in disinfection and sterilisation and take appropriate precautions, such as the use of a respirator mask to minimise exposure to toxic fumes when working with glutaraldehydes.

Whether an item is to be simply cleaned, cleaned and disinfected or cleaned and sterilised depends on the intended use of the item. There are three categories of classification: critical, semi-critical, and non-critical (Box 29-16). The approach of Australian/New Zealand Standard 4187 (Standards Australia, 2003) recommends that all items used within a body cavity be sterile and all items used within the aseptic field be documented, so they can be tracked should a product recall be necessary in the event of sterilisation failure.

BOX 29-16 CATEGORIES OF STERILISATION, DISINFECTION AND CLEANING

CRITICAL ITEMS

Items that enter sterile tissue or the vascular system present a high risk of infection if the items are contaminated with microorganisms, especially bacterial spores. Critical items must be sterile, e.g.

surgical instruments

intravascular catheters

urinary catheters

needles.

SEMI-CRITICAL ITEMS

Items that come in contact with mucous membranes or skin that is not intact also present risks. These objects must be free of all microorganisms (except bacterial spores). Semi-critical items must be disinfected or sterilised, e.g.

respiratory suction tubing and catheters

endotracheal tubes

gastrointestinal endoscopes.

NON-CRITICAL ITEMS

Items that come in contact with intact skin but not mucous membranes must be clean. Non-critical items must be disinfected, e.g.

bed pans

blood-pressure cuffs

bedclothes

stethoscopes

food utensils.

Nurses should be familiar with the relevant standards, policies and procedures for cleaning, handling and reprocessing items and be competent in correct cleaning, disinfection and sterilisation techniques. Nurses may be required to perform these processes and must be competent to do so. The following factors influence the effectiveness of the disinfecting or sterilising method:

Concentration of sterilising or disinfecting solution and duration of contact. A weakened concentration or shortened exposure time may lessen effectiveness.

Type and number of pathogens. Certain organisms are killed more easily than others by disruption. The greater the number of pathogens on an object, the longer the disinfecting time required.

Surface areas to treat. All contaminated surfaces and areas must be fully exposed to disinfecting or sterilising agents.

Temperature of the environment. Disinfectants tend to work best at room temperature.

Presence of soap. Soap may render certain disinfectants ineffective. Thorough rinsing of an object is necessary to remove soap prior to disinfecting or sterilisation.

Presence of organic materials. Disinfectants can be rendered ineffective in the presence of organic material, for example blood, saliva, pus or other body fluids. All items should therefore be thoroughly cleaned, rinsed and dried prior to disinfection.

Selection of the appropriate method for disinfecting or sterilising an item depends on its intended use and the nature of the item; for example, delicate fibre-optic instruments such as endoscopes cannot tolerate steam and must be processed using gas, plasma or periacetic acid to achieve sterilisation (Table 29-7).

TABLE 29-7 EXAMPLES OF DISINFECTION AND STERILISATION PROCESSES

CHARACTERISTICS EXAMPLES OF USE
MOIST HEAT
Moist heat includes steam (moist heat under pressure). When exposed to high pressure, water vapour can attain temperatures above boiling point to kill pathogens and spores Autoclave is used to sterilise surgical instruments, parenteral solutions and surgical dressings
RADIATION
Ionising radiation penetrates deeply into objects for effective sterilisation and disinfection Radiation is used in sterilising drugs, foods and other heat-sensitive items
CHEMICALS
Chemicals are effective disinfectants because they attack all types of microorganisms, act rapidly, work with water, are stable in light and heat, are inexpensive, are not harmful to body tissues, do not destroy article being disinfected and are not inactivated by organic material

Chemicals are used for disinfection of instruments and equipment

Chlorine is useful for disinfecting water and for housekeeping purposes

ETHYLENE OXIDE GAS
This gas destroys spores and microorganisms by altering cells’ metabolic processes. Fumes are released within an autoclave-like chamber. Ethylene oxide gas is toxic to humans, and aeration time varies with products This gas sterilises some rubber and plastic items
BOILING WATER
Boiling is least expensive for use in the home. Bacterial spores and some viruses resist boiling. It is not used in hospitals The items (e.g. glass baby bottles) should be boiled for at least 15 minutes

CONTROL OR ELIMINATION OF RESERVOIRS

To control or eliminate reservoir sites of infection, the nurse should eliminate or contain sources of body fluids, drainage or solutions that can potentially harbour microorganisms. Articles contaminated with infectious material are carefully discarded (Box 29-17). Mandatory standards exist for minimising occupational exposure to blood-borne pathogens or other potentially infectious materials. All healthcare institutions must have policies and procedures to ensure the safe disposal of infectious waste according to local and state regulations. Health workers must adhere to standard precautions and wear protective attire to prevent cross-contamination.

BOX 29-17 INFECTION CONTROL TO REDUCE RESERVOIRS OF INFECTION

BATHING

Use soap and water to remove drainage, dried secretions or excess perspiration.

DRESSING CHANGES

Change dressings that become wet and/or soiled (see Chapter 30).

CONTAMINATED ARTICLES

Place tissues, soiled dressings or soiled sheets in moisture-resistant bags for disposal in accordance with healthcare facility infection-control guidelines.

CONTAMINATED NEEDLES

Place syringes, uncapped hypodermic needles, suture needles, skin staples and IV needles in puncture-resistant container, ideally located in patients’ rooms or treatment areas so that exposed, contaminated, sharp equipment is not carried long distances (see Chapter 34).

Do not recap needles.

BEDSIDE UNIT

Clean table surfaces regularly with antiseptic and ensure they are kept clean and dry.

SKIN PREPARATION SOLUTIONS

Use single-use skin preparation solutions.

SURGICAL WOUNDS

Keep drainage tubes and collection bags patent to prevent accumulation and backflow of drained fluids.

DRAINAGE CANISTERS AND BAGS

Dispose of full drainage suction canisters according to facility policy.

Empty drainage systems at least once per shift or as required, unless otherwise ordered by a doctor.

Never raise a drainage system, e.g. urinary drainage bag or thoracic drainage reservoir, above the level of the site being drained unless it is clamped off, as the contents of the tubing/reservoir may re-enter the wound.

CONTROL OF PORTALS OF EXIT

The nurse must follow infection-control practices to minimise or prevent infectious organisms from exiting the body. To control organisms exiting via the nurse’s respiratory tract, avoid talking, sneezing or coughing directly over surgical wounds or sterile dressings. Nurses should thoroughly wash their hands after coughing, sneezing, touching their hair, applying a face mask, removing gloves or contacting any potentially contaminated surface. The nurse is also responsible for teaching patients infection-control practices when they sneeze or cough and for providing patients with disposable wipes or tissues to help control the spread of microorganisms.

A nurse with an upper respiratory tract infection or open wound can infect immunocompromised patients and other staff. They should seek medical advice, obtain a medical certificate and if necessary notify and not attend work.

Special attention by the nurse to hand hygiene is essential when dealing with patients who are highly susceptible to infection, for example immunocompromised patients, patients with burns and neonates. Transmission-based precautions may be implemented for patients with known infections in conjunction with standard precautions.

Another way of controlling the exit of microorganisms is through the careful handling of urine, faeces, emesis and blood, as these can easily splash while being discarded. Disposable gloves, masks, gowns and protective eyewear should be worn. The nurse appropriately disposes of soiled items in contaminated waste bags. Patient laboratory specimens and all tissue, blood and body fluids must be considered potentially infectious and handled appropriately.

CONTROL OF TRANSMISSION

Effective control of infection requires a nurse to remain aware of the modes of transmission and methods of control. In the hospital, home or extended-care facility, a patient should have a personal set of care items. Sharing bed pans, urinals, bath basins and eating utensils can easily lead to transmission of infection. Single-use chemical-strip thermometers or single-use covers on tympanic or electronic thermometers present less risk of infection, provided the reusable component is thoroughly cleaned and disinfected between patients.

To prevent transmission of microorganisms through indirect contact, soiled items and equipment must be kept from touching the nurse’s clothing. A common error is to carry contaminated linen in the arms, thus touching the nurse’s uniform. Fluid-resistant linen bags should be located at the point of use, or soiled linen should be carried with hands held away from the body. Linen containers should be placed close to the area of use and replaced before they are overflowing.

CONTROL OF PORTALS OF ENTRY

Many measures that control the exit of microorganisms similarly control the entrance of pathogens. Maintaining the integrity of skin and mucous membranes reduces the opportunity for microorganisms to reach a host. Immobilised and debilitated patients are particularly susceptible to skin breakdown. Patients should not be positioned on tubes or objects that might cause breaks in the skin. Dry, wrinkle-free linen also reduces the chances of skin breakdown. Turning and repositioning of patients should be performed regularly before a patient’s skin becomes reddened. Frequent oral hygiene prevents the drying of mucous membranes. A water-soluble ointment can help keep a patient’s lips lubricated.

After elimination, a woman should clean the rectum and perineum by wiping from the urinary meatus towards the rectum. Cleansing in a direction from the least to the most contaminated area helps reduce genitourinary infections. Meticulous and frequent perineal care is especially important in older women who wear disposable incontinence pads.

Correct handling and management of urinary catheters and drainage sets includes maintaining a closed, intact system and minimising movement of the catheter in the urethra to prevent infection.

The nurse may care for patients with drainage systems collecting wound drainage, bile or other body fluids. The site from which a drainage tube exits should remain clear of excess moisture or accumulated drainage. All tubing should remain connected in a closed system throughout use. Drainage receptacles should only be opened to discard the volume of drainage. The amount, colour and consistency should be noted in the patient’s documentation.

When specimens are required from drainage tubes or needles inserted into IV ports, disinfection should be achieved by initially washing one’s hands, then carefully wiping the site outwards with an alcohol swab and allowing it to dry, before entering a tube or system.

Patients and healthcare personnel are at risk of infection from accidental needle-stick injuries. After administering an injection or inserting an IV catheter, needles should never be recapped but carefully disposed of in a puncture-resistant ‘sharps’ container. A stray needle lying in bedclothes or carelessly thrown into a wastebasket is a prime source of exposure to blood-borne pathogens, for example hepatitis B and C. A needle-stick injury should be reported immediately, appropriate treatment implemented and an injury/incident report completed (Box 29-18).

BOX 29-18 HEPATITIS B VACCINATION AND FOLLOW-UP AFTER EXPOSURE

Healthcare employers must make available hepatitis B vaccine to all employees at no cost. The serum level of those who may have had an occupational exposure should be tested for hepatitis B and HIV immediately. Evaluation and follow-up care must be available to all employees who have been exposed to blood or body fluids at no cost to employee.

A confidential written medical evaluation should be available to employees with exposure incidents.

A final method for minimising the entrance of microorganisms into a person is the technique of cleansing wounds, as described fully in Chapter 30.

Asepsis and aseptic technique

The nurse’s efforts to minimise the onset and spread of infection during clinical procedures are based on the principles of aseptic technique. Asepsis is defined as the absence of pathogenic microorganisms. An aseptic technique ‘aims to prevent pathogenic organisms, in sufficient quantity to cause infection from being introduced to susceptible sites by hands, surfaces and equipment’ (NHMRC, 2010:86). It is a method employed to help prevent contamination of wounds and other susceptible sites by organisms that could cause infection by ensuring that only aseptic parts of equipment and fluids come into contact with aseptic parts of the patient or susceptible body sites during certain clinical procedures. It is used during any procedure that bypasses the body’s natural defences (e.g. peripheral and central intravenous access, wound care or urinary catheterisation).

PRINCIPLES OF ASEPTIC NON-TOUCH TECHNIQUE

Aseptic non-touch technique (ANTT) is the framework for promoting and ensuring asepsis adopted in the current Australian infection control guidelines (NHMRC, 2010). In ANTT, asepsis is ensured by: identifying and then protecting key parts and key sites; effective hand hygiene; effective non-touch technique; appropriate glove choice; and use of aseptic fields (Rowley and others, 2010).

‘Key parts’—the aseptic key parts of procedure equipment—must be identified and protected at all times. Key parts must only come into direct contact with other aseptic key parts and/or key sites, such as wounds or insertion sites (Rowley and others, 2010). While effective hand hygiene is also an essential component of ANTT, it is known that hand hygiene is not always correctly performed; and that even when correctly performed, hand hygiene cannot always remove all pathogenic organisms. Therefore, a non-touch technique—identifying key parts and not touching them directly or indirectly—is a vital component of achieving asepsis. In other words, the optimal way of protecting key parts is never to touch them (Rowley and others, 2010). If it is necessary to touch key parts/sites directly, then sterile gloves should be used to minimise the risk of contamination. Otherwise, wear non-sterile gloves.

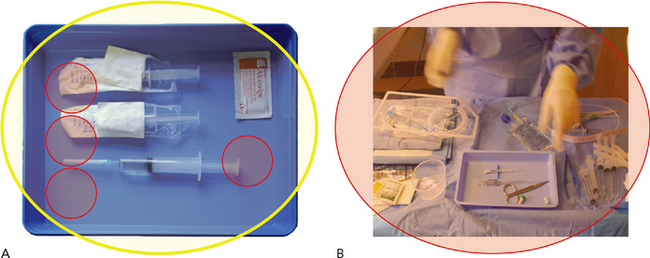
Even well-cleaned hospitals can be said to be ‘dirty’—busy and dynamic environments resident with unusual antibiotic-resistant organisms. Consequently, aseptic fields are important in providing a controlled aseptic working space to help promote or ensure the integrity of asepsis during clinical procedures. It is also important that aseptic fields are fit for purpose. In ANTT, aseptic fields are increased in size and sterilised drapes added on the basis of procedure complexity. For example, in IV therapy, ‘mobile’ aseptic fields such as plastic trays should be large enough and with sides high enough to provide an adequate working space to contain equipment, sharps and spillages. ANTT employs two types of aseptic fields—general and critical—that require different management depending on whether the primary purpose is to promote or ensure asepsis. General aseptic fields are used when key parts can be easily protected, and critical aseptic fields are used when key parts cannot be protected at all times due to their size or number (Rowley and others, 2010).

Ensuring and promoting asepsis using ANTT principles appropriately depends on the healthcare professional undertaking a risk assessment that takes into account: whether the procedure can be performed without touching key parts and key sites directly; the technical difficulty of the procedure and the competency of the healthcare professional; and risks posed by the immediate environment (Rowley and others, 2010). Although the principles of ANTT remain constant, the level of practice will change according to the risk assessment (NHMRC, 2010). The risk assessment will determine whether a ‘standard’ ANTT or a ‘surgical’ ANTT is required (Figure 29-8).

image

FIGURE 29-8 Use of standard and surgical aseptic non-touch technique. A, Standard aseptic non-touch technique (ANTT). B, Surgical ANTT.

From National Health and Medical Research Council (NHMRC) 2010 Australian guidelines for the prevention and control of infection in healthcare. Canberra, NHRMC. Online. Available at www.nhmrc.gov.au/guidelines/publications/cd33 29 Sep 2011.

PRINCIPLES OF SURGICAL ASEPSIS

The principles of surgical ANTT encompass situations where procedures are technically complex, involve large or numerous key parts, involve large open key sites and entail extended periods of time. One such example is surgery in the operating theatre (Rowley and others, 2010).

Surgical asepsis involves procedures which attempt to eliminate all microorganisms, including pathogens and spores, from an object or area by creating a critical aseptic field. In surgical asepsis an area or object is considered contaminated if touched by any object that is not sterile. For example, a torn surgical glove exposes the outside of the glove to the skin surface; it is therefore contaminated. Nurses working within a critical aseptic field or with sterile equipment must rectify the slightest break in asepsis, because contamination can place a patient at risk of infection

Surgical asepsis is commonly practised in the operating room and the perioperative nurse follows a series of steps to promote and ensure asepsis, including donning fresh scrub clothes, hair covering, mask and protective eyewear, and performing a thorough surgical hand and arm scrub. The perioperative nurse wears a sterile gown and gloves (see below).

PATIENT PREPARATION

Surgical asepsis requires precision to avoid compromising the aseptic field; the nurse must therefore gain the patient’s cooperation. The nurse must carefully prepare the patient before any procedure. Certain patients may fear moving or touching objects during an aseptic procedure, whereas others may even try to help. The nurse explains how a procedure is to be performed and what the patient can do to avoid contaminating sterile items, including the following:

Avoid sudden movements of body parts covered by sterile drapes.

Refrain from touching sterile supplies, drapes or the nurse’s gloves and gown.

Avoid coughing, sneezing or talking over a sterile area. The nurse may suggest the patient gently raise their hand if they think they may cough, sneeze or move.

Certain aseptic procedures may last an extended time. The nurse assesses the patient’s needs to anticipate factors that may disrupt a procedure. Analgesics should be administered proactively to ensure procedural pain relief. Patients must often assume relatively uncomfortable positions during aseptic procedures, so they are assisted to achieve the most comfortable position possible. To prevent wound contamination, the nurse should anticipate problems related to the patient’s condition which may result in actions or events that contaminate an aseptic field, such as offering a mask to a patient with a respiratory infection.

ENSURING ASEPSIS

When beginning a surgically aseptic procedure, the nurse should be guided by the following principles to ensure asepsis:

A sterile object remains sterile only when touched by another sterile object.

Sterile touching sterile enables the item to remain sterile; for example, sterile gloves or sterile forceps are used to handle objects within the aseptic field.
Sterile touching clean is contaminated; for example, if a sterile object touches the surface of a clean disposable glove, the object is contaminated and must be discarded.
Sterile touching contaminated occurs when the nurse touches a sterile object with an ungloved hand.

Only sterile objects may be placed on a sterile field. A package that is torn, punctured, wet or open is considered unsterile. Where there is a tear, break or puncture in the covering of a sterile item, the item cannot be used on the sterile field as it is not sterile (it is considered contaminated). The nurse should carefully check the integrity of the packaging of all items when preparing for a sterile procedure.

Sterile objects or fields should be kept in view. Clean/gloved hands should be held above waist level. Nurses never turn their backs on a sterile tray or leave it unattended. Sterile objects should be kept in front with the hands as close together as possible. Items held below waist level are considered contaminated. Contamination can occur accidentally by a dangling piece of clothing, falling hair or a patient touching a sterile object.

A sterile object or field becomes contaminated by prolonged exposure to air. The nurse avoids activities that create air currents, such as excessive movements, rearranging sterile items or rearranging linen after a sterile object or field is exposed. The number of people walking into the area and talking, laughing, sneezing or coughing when gathering and using sterile equipment should be minimised, to reduce contamination by airborne transmission. When opening sterile packages, the nurse holds the item or piece of equipment close to the sterile field, without touching the sterile surface. A sterile field must be prepared immediately prior to use. It must not be left unattended, as sterility cannot be guaranteed. Ideally, a second nurse aseptically opens items to be placed on the sterile field and the nurse performing the procedure, wearing sterile gloves and/or using a sterile instrument, receives the items, to minimise contamination.

When a sterile surface comes in contact with a wet, contaminated surface, the sterile object or field becomes contaminated by a ‘wicking’ action. If moisture seeps through a sterile package’s protective covering, microorganisms can travel onto the sterile object. When stored sterile packages become wet, the nurse discards the objects immediately or sends the equipment for resterilisation. Any spill from pouring sterile solutions can be a source of contamination unless the object or field rests on a sterile surface that cannot be penetrated by moisture. For example, urinary catheterisation trays contain sterile supplies that rest in a sterile, plastic container—if sterile solutions are spilled within the container, they will not contaminate the catheter or other objects. In contrast, if sterile gauze is left in its wrapper on a wet bedside table the gauze is considered contaminated.

The edges of a sterile field or container are considered to be contaminated. Frequently a nurse places sterile objects on a sterile towel or drape. The edge of the towels touch an unsterile surface, such as a table or bedclothes: a 2.5 cm border around the towel is therefore considered contaminated. The edges of sterile containers become exposed to air after they are open and are also considered contaminated. A sterile item removed from its protective container must not touch the container’s edge.

Fluid flows in the direction of gravity. A sterile object becomes contaminated if gravity causes unsterile liquid to flow over the object’s surface. To avoid contamination during a surgical hand scrub, hands are held above elbows, allowing water to flow downwards, without allowing water to flow back from the elbow area and over hands and fingers. Scrubbed personnel dry their hands from fingers to elbows, with their hands held upwards and using one end of the towel, then repeat the process using the other end of the towel; the towel is then discarded.

PERFORMING ASEPTIC PROCEDURES

All equipment required, plus extra supplies in case of accidental contamination, should be assembled before a procedure. The nurse then avoids leaving the area unattended. If an object is contaminated during the procedure, it should be discarded immediately. Prior to commencement of the aseptic procedure, each step should be carefully explained to the patient to help gain their cooperation.

DONNING AND REMOVING CAPS, MASKS AND EYEWEAR

Nurses generally wear a surgical mask and protective eyewear without a cap when performing aseptic procedures in a ward environment. During surgical procedures, perioperative staff wear freshly laundered attire, a cap or balaclava to cover all hair, protective eyewear and a surgical mask. Post procedure, the contaminated gloves are removed first, then the gown and finally the mask. This order aims to prevent contamination of the hair, neck and facial area. After untying the mask, the nurse holds it by the ties to discard it. Masks should not be worn hanging from the neck after removal, as they are a contaminated filter. After removing all protective wear, the nurse washes hands thoroughly.

OPENING STERILE PACKAGES

Sterile items such as syringes, gauze dressings and catheters are packaged in paper or plastic containers, impervious to microorganisms provided they remain dry and intact. Reusable supplies may be wrapped in packaging that is permeable to steam, to allow steam, gas or plasma penetration during sterilisation. Sterile items are kept in clean, enclosed storage systems and must be separated from unsterile or contaminated equipment.

Sterile supplies generally have chemical indicators or tapes that change colour during the sterilisation process. Failure of the tapes to change colour signifies that the item is unsterile and must not be used. A sterile supply should never be used if the integrity of the packaging is compromised. Healthcare facilities label each item with the date processed, a load number and the steriliser number. If an item is found to be unsterile—the chemical indicator has not changed colour to indicate sterilisation has taken place—a product recall of all items processed by that steriliser during that load must commence immediately. In accordance with AS/NZS 4187 (Standards Australia, 2003), healthcare facilities are required to demonstrate the ability to competently track all items sterilised within the facility. Double-sided stickers or barcoding systems may be used to identify when items were sterilised and in which steriliser, and on which patients the items was used.

Before opening a sterile item, the nurse should disinfect and dry the work area, then thoroughly wash their hands. Supplies are inspected for integrity and sterility and assembled in the work area, such as the bedside table or treatment room, before opening packages. A bedside table or counter top can provide a large, clean working area for opening items. The work area should be above waist level. Sterile supplies should not be opened in a wet, contaminated or confined space.

OPENING A STERILE ITEM ON A FLAT SURFACE

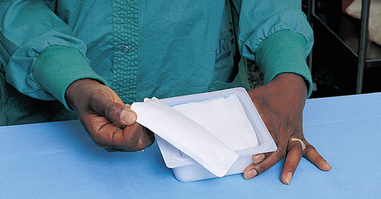
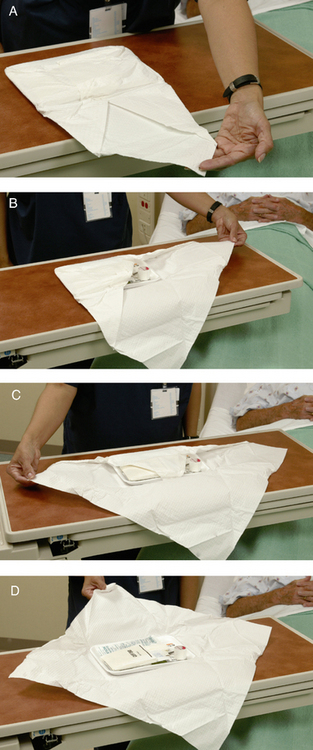
Sterile packaged items must be opened without contaminating the contents. Commercially packaged items are usually designed to allow the nurse to open or separate the paper or plastic cover, opening the wrapper away from the body (Figure 29-9). The following steps are used when opening items wrapped in polypropylene, paper or linen:

1. Ensure the surface of the trolley or table has been disinfected and dried.

2. Check the integrity of the packaging, the date, sterilisation indicator and contents.

3. Place the item flat in the centre of the work surface.

4. Remove the steriliser indicator label and affix to patient documentation. Then remove sterilisation tape or seal.

5. Grasp the outer surface of the tip of the outermost flap.

6. Open the outer flap away from the body, keeping the arm outstretched and away from the aseptic field (Figure 29-10A) and pull the packaging firmly.

7. Grasp the outside surface of the first side flap.

8. Open the side flap, allowing it to lie flat on the table surface. Keep the arm to the side and not over the sterile surface (Figure 29-10B). Do not allow the flaps to spring back over the sterile contents.

9. Grasp the outside surface of the second side flap and allow it to lie flat on the table surface (Figure 29-10C).

10. Grasp the outside surface of the last and innermost flap.

11. Stand away from the sterile package and pull the flap back, allowing it to fall flat on the surface (Figure 29-10D).

12. Use the inner surface of the package (except for the 2.5 cm border around the edges) as an aseptic field to add additional sterile items. The 2.5 cm border can be grasped to manoeuvre the field on the table surface.

image

FIGURE 29-9 When opening a commercially packaged sterile item, the nurse tears the wrapper away from the body.

From Potter PA, Perry AG 2013 Fundamentals of Nursing, ed 8. St Louis, Mosby.

image

FIGURE 29-10 Opening sterile packaged items on a flat surface. A, The nurse opens the top flap away from the body. B, The nurse’s arm is kept out away from the aseptic field while opening a side flap. C, The second side flap is opened. D, The back flap is opened.

From Potter PA, Perry AG 2013 Fundamentals of Nursing, ed 8. St Louis, Mosby.

OPENING A STERILE ITEM WHILE HOLDING IT

To open small sterile items, the package is held in the non-dominant hand while the top flap is opened and pulled away from the nurse. Using the dominant hand, carefully open the sides and top flaps away from the enclosed sterile item in the order previously mentioned. Open the item aseptically and retrieve the item for transfer to the aseptic field.

PREPARING AN ASEPTIC FIELD

When performing aseptic procedures, the nurse requires an aseptic work area that provides room for handling and placing sterile items. An aseptic field is an area free of microorganisms and prepared to receive sterile items. The field may be prepared by using the inner surface of a sterile wrapper as the work surface or by using a sterile drape. Skill 29-2 describes preparation of an aseptic field. After the surface of the field is created, the nurse adds sterile items by placing them directly on the field or by transferring them with sterile forceps. When transferring sterile items, the nurse must carefully place objects onto the aseptic field. An object that comes in contact with the 2.5 cm border around the field must be discarded.

SKILL 29-2 Preparing an aseptic field

DELEGATION CONSIDERATIONS

Preparing an aseptic field requires specialised knowledge regarding surgical asepsis.

EQUIPMENT

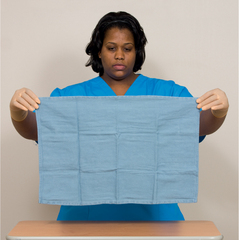
Sterile drapes

Assorted sterile supplies

STEPS RATIONALE
1. Prepare aseptic field just before planned procedure. Supplies are to be used immediately. Prevents exposure of aseptic field and supplies to air and contamination.
2. Work surfaces should be above waist level. Clean the work surface with an antiseptic solution and dry thoroughly. Sterile object held below waist is considered contaminated.
3. Check all necessary equipment is present and inspect the integrity of packaging. Preparation of equipment in advance prevents break in technique.
4. Check chemical indicators on supplies that indicate sterility of equipment. Scan barcodes of items or attach labels to patient documentation to enable effective tracking of sterilised items.  
5. Apply personal protective attire.  
6. Wash and dry hands thoroughly. Prevents transmission of infection.
7. Place pack containing sterile drape on work surface and open as shown in Figure 29-10. Ensures sterility of packaged drape.
8. With fingertips of one hand, pick up folded top edge of sterile drape. 2.5 cm border around drape is unsterile and may be touched.
9. Gently lift drape up from its outer cover and let it unfold by itself without touching any object. Discard outer cover with your other hand. If sterile object touches any other non-sterile object, it becomes contaminated.
10. With other hand, grasp adjacent corner of drape and hold it straight up and away from your body (see illustration). Drape can now be properly placed while using two hands. Drape must be held away from unsterile surfaces.
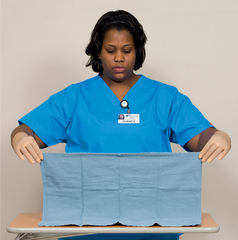
11. Holding drape, first position and lay bottom half over intended work surface (see illustration).  
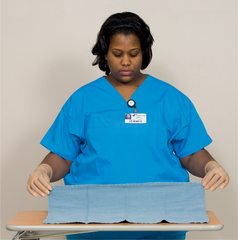
12. Allow top half of drape to be placed over work surface last (see illustration). Prevents nurse from reaching over aseptic field.
13. Grasp 2.5 cm border around edge to position as needed. Creates aseptic work surface.
image

Step 10 Hold drape straight up and away from body

image

Step 11 Lay bottom half over work surface.

image

Step 12 Place top half of drape over work surface.

ADDING STERILE ITEMS  
14. Open sterile item (following package directions) while holding outside wrapper in non-dominant hand. Frees dominant hand for unwrapping outer wrapper.
15. Carefully peel wrapper onto non-dominant hand. Item remains sterile. Inner surface of wrapper covers hand, making it sterile.
16. Being sure wrapper does not fall down on aseptic field, place item onto field at angle. Do not hold arm over aseptic field (see illustration). Prevents reaching over field and contaminating its surface.
17. Dispose of outer wrapper. Prevents accidental contamination of aseptic field.
18. Pouring sterile solutions:  
 

a. Verify contents and expiration date of solution.

Ensures correct solution and sterility of contents.
 

b. Ensure receiving container for solution is on or near edge of aseptic field. Some aseptic field kits have cups or moulded plastic sections into which fluids can be poured.

Prevents reaching over aseptic field.
 

c. Remove sterile seal and cap from bottle in an upward motion. Holding bottle away from aseptic field with label facing up and the bottle lip 3–4 cm over inside of receiving container, slowly pour contents into container (see Figure 29-11).

Prevents contamination of bottle lip and keeps inside of cap sterile. Edge and outside of bottle are considered contaminated. Slow pouring prevents splashing of liquids which causes fluid permeation of aseptic field and results in contamination.
19. Perform procedure using aseptic non-touch technique. Prevents transmission of infection to patient.
image

Step 16 Placing sterile item on aseptic field.

RECORDING AND REPORTING  
It is not necessary to record or report this procedure.  

Sterile gloves may be worn while preparing items on the field. If this is done, the nurse can touch the entire drape, but sterile items must be handed over by an assistant. The nurse’s gloves cannot touch the wrappers of sterile items.

POURING STERILE SOLUTIONS

Often sterile solutions must be poured into sterile containers. The patient’s allergy status, the type, strength and expiry date of the solution should first be checked. A bottle containing a sterile solution is sterile on the inside and contaminated on the outside; the bottle’s neck is also contaminated, but the inside of the bottle cap is considered sterile. After a cap or lid is removed, it is held in the hand or placed sterile side (inside) up on a clean surface so the inside of the lid can be seen as it rests on the table surface. A bottle cap or lid should never rest on a sterile surface as the cap’s outer edge is unsterile and would contaminate the surface. Similarly, placing a sterile cap down on an unsterile surface increases contamination. A single-use solution is preferable; any remaining solution is discarded.

The bottle should be held with its label in the palm of the hand to prevent the possibility of the solution wetting and fading the label. The nurse pours the solution slowly to avoid splashing the underlying drape or field. The bottle should never be held so high above the container that even slow pouring will cause splashing. The bottle should be held outside the edge of the aseptic field (Figure 29-11).

image

FIGURE 29-11 Pouring a sterile solution into a receiving container on the aseptic field.

From Potter PA, Perry AG 2013 Fundamentals of Nursing, ed 8. St Louis, Mosby.

SURGICAL SCRUB

Patients undergoing operative procedures are at an increased risk of infection. Nurses working in operating rooms perform surgical hand and arm scrubs to decrease and suppress the growth of skin microorganisms in case of glove tears (Australian College of Operating Room Nurses, 2010).

All jewellery should be removed from the arms, wrists and hands, including rings, as these may harbour microorganisms. Fingernails must be kept clean, short and free of nail fillers, artificial nails and nail polish (Australian College of Operating Room Nurses, 2010). Nurses with active skin infections, open lesions or respiratory infections should be excluded from the surgical team. During surgical arm and handwashing (Skill 29-3), the nurse washes from fingertips to elbows with an antiseptic solution under tepid running water. The initial wash takes 5 minutes and includes the cleaning of fingernails with a disposable nail pick. A sterile scrub brush may be used for the initial scrub of the day; however, continued use can damage the outer layer of the skin. The recommended duration of subsequent surgical scrubs is 3 minutes, as the residual antimicrobial solution on the skin surface reduces the microbe population (Australian College of Operating Room Nurses, 2010; NHMRC, 2010). The light friction created by scrubbing effectively removes microorganisms; however, vigorous scrubbing may remove outer layers of the epidermis, exposing deeper layers to bacterial flora (Rothrock, 2007).

SKILL 29-3 Surgical handwashing (‘scrubbing’): preparing for gowning and gloving

DELEGATION CONSIDERATIONS

The role of the circulating and instrument nurse can be delegated to a surgical technologist or licensed practical nurse in some countries. In Australia, registered nurses perform these roles. Individual healthcare organisations will determine the level of competency required for the role of the circulating and instrument nurse.

EQUIPMENT

Deep scrub sink with automatic, foot or knee controls for dispensing water and soap (taps should be high enough for hands and forearms to fit comfortably).

Non-irritating, broad-spectrum, fast-acting antimicrobial scrub solutions, with an accumulative, residual effect, should be used. Note: the same antimicrobial solution used for the initial scrub of the day should be used for subsequent scrubs during the day, to maximise the residual cumulative antimicrobial effects. Staff using antimicrobial solutions should have direct access to the manufacturer’s material safety data sheet (MSDS) which outlines directions for use and first aid.

Surgical scrub sponge with nail pick. Note: a scrub brush should only be used if hands are grossly contaminated, e.g. following gardening, painting, etc. Routine use damages the outer dermal layer of skin causing abrasions which breach the skin barrier enabling penetration of microbes into deeper tissue, increasing the risk of skin reactions.

Other: personnel are required to remove jewellery and don protective attire: freshly laundered scrub attire, appropriate footwear, shoe covers as required, hair covering, appropriate surgical face mask and protective eyewear prior to scrubbing.

STEPS RATIONALE
1. Scrub each side of each finger, between the fingers, and the back and front of the hand for 2 minutes. The first hand and arm wash (scrub) for the day should take 5 minutes; subsequent scrubs should take 3 minutes. (Department of Health and Ageing, 2004). Allows sufficient time to ensure the effectiveness of the surgical scrub.
2. Ensure fingernails are short, clean, healthy and free of artificial nails, nail polish and nail fillers. Long nails and chipped or old polish increase number of bacteria residing on the fingernails. Long fingernails can puncture gloves, causing contamination.
3. Inspect hands for presence of abrasions, cuts or open lesions. Consult infection-control professional as necessary. Damaged tissue may have a greater number of microbes residing on skin surfaces.
4. Don surgical face mask and protective eyewear. Protects from splashes of chemicals and patient blood and body fluids.
5. Turn on water using knee or foot controls and adjust to comfortable temperature. Taps should be high enough to allow hands and forearms to fit comfortably underneath.
6. Start timing. Wet hands and arms under running lukewarm water and lather with an antimicrobial solution to 5 cm below the elbows. Keep hands higher than elbows at all times. Water runs by gravity from fingertips to elbows. Hands become cleanest part of upper extremity. Keeping hands elevated allows water to flow from least to most contaminated areas.
7. Rinse hands and arms thoroughly under running warm water. Remember to keep hands above the elbows. Rinsing removes transient microorganisms from fingers, hands and forearms.
8. Under running water, clean under nails of both hands with either a nail pick or the bristled side of a scrub brush (see illustration). Discard after use.

This removes debris that may harbour large numbers of microorganisms.

Note: World Health Organization (WHO) guidelines recommend that a surgical handscrub with a medicated soap, such as chlorhexidine or povidone–iodine for 2 or 3 minutes, reduces bacterial counts to acceptable levels and the time required for surgical alcohol-based handrubbing depends on the compound used (WHO, 2009). WHO guidelines also state that for preoperative hand preparation, alcohol-based formulations have better antimicrobial effectiveness than all other currently available methods (WHO, 2009).

image

Step 8 Cleaning under fingernails.

9. Wash arms using a circular motion, from hands to elbows, without returning to hands (see illustration). Discard brush. This ‘pre-wash’ should take 2 minutes initially, then 1 minute for subsequent scrubs. This step allows the antimicrobial solution time to work.
10. Re-apply the antimicrobial solution and wash all surfaces of hands including between fingers (see illustration) and around wrists. Wash arms using a circular motion from hands to elbows, without returning to hands. This process should take 3 minutes initially, then 2 minutes for subsequent scrubs. Scrubbing in a circular motion loosens resident bacteria that adhere to skin and helps ensure full coverage of surfaces.
11. Ensure hands are elevated above the elbows. Carefully rinse hands and arms thoroughly under running water, without touching taps (see illustration). Correct rinsing to remove antimicrobial solution helps prevent skin irritation.
image

Step 9 Washing arms.

image

Step 10 Scrubbing sides of fingers.

image

Step 11 Rinsing arms.

12. Turn off taps without touching them with the scrubbed parts of the hands and arms. Shake off excess water, clasp hands together and hold away from the body. Keeping hands and arms elevated and away from clothing avoids contamination.
13. Walk carefully into the operating or set-up room to dry hands and arms in preparation for donning a sterile gown and gloves. Floors around scrub sink can be slippery.
14. Obtain a sterile hand towel and stand back from the aseptic field. Lean forward, outstretch hands and allow the towel to unfold. Use one half of the towel to thoroughly pat dry, from the hand to the elbow using a circular motion, on one side of the towel, then use the other half of the towel to repeat the process for the other hand and arm (Australian College of Operating Room Nurses, 2010). Leaning forward prevents accidental contact of arms with clothing. Drying hands thoroughly makes donning gloves easier.
15. Finally, drop the towel into the appropriate receptacle (Australian College of Operating Room Nurses, 2010) and proceed with gowning.  
RECORDING AND REPORTING  

Scan barcodes of sterile items or apply tracking stickers to documentation.

Report any dermatitis to employee health services or infection control as per agency policy.


DONNING STERILE GLOVES

Sterile gloves are an additional barrier to bacterial transfer. Nurses who work on general nursing wards use open gloving (Skill 29-4) for aseptic procedures such as urinary catheter insertion. The closed gloving method (Skill 29-5) is performed after nurses put on sterile gowns and is practised in operating rooms and procedure rooms.

SKILL 29-4 Open gloving

DELEGATION CONSIDERATIONS

Requires knowledge of aseptic technique.

EQUIPMENT

Sterile gloves of the correct size

A clean surface on which to open the glove packet. Wipe over the surface with an antiseptic and allow it to dry thoroughly before use

STEPS RATIONALE
OPEN GLOVING
1. Perform hand hygiene. Removes bacteria from skin surfaces and reduces transmission of infection.
2. Open the glove packet by carefully separating and peeling apart the sides, on a recently cleaned surface. Maintains the integrity of the sterile gloves.
3. Grasp the inner package, keeping the gloves on the sterile inside of the wrapper surface (see illustration). Inner surface of glove package must remain sterile.
image

Step 3 Opening glove package.

4. Identify right and left glove. Each glove has cuff approximately 5 cm wide. Glove the dominant hand first. Proper identification of gloves enables efficient, correct gloving. Gloving the dominant hand first improves dexterity
5. With thumb and first two fingers of the non-dominant hand, grasp edge of the cuff of the glove for dominant hand. Touch only glove’s inside surface Inner edge of cuff will lie next to skin and is therefore not sterile.
6. Carefully pull glove over dominant hand, leaving cuff and being sure cuff does not roll up wrist. Be sure thumb and fingers are in proper spaces (see illustration). If the outer surface of the glove touches the skin it is considered contaminated and must be replaced with a sterile glove.
image

Step 6 Pulling glove over dominant hand.

7. With gloved dominant hand, slip the fingers underneath second glove cuff (see illustration). Cuff protects gloved fingers. Ensures sterile items only touch sterile surfaces, thus avoiding contamination.
8. Carefully pull second glove over non-dominant hand. Do not allow the fingers and thumb of the gloved, dominant hand to touch any part of exposed non-dominant hand. Keep the thumb of the dominant hand abducted back (see illustration). Contact of gloved hand with exposed skin of ungloved hand causes contamination. Unsterile glove must then be removed and replaced with a sterile glove.
9. Once the second glove is applied, ensure a smooth fit over fingers and interlock the gloved hands, taking care not to touch the uniform (unless the nurse is wearing a sterile gown). The cuffs usually fall down after application. Be sure to touch only sterile sides (see illustration). Ensures a smooth fit over fingers.
image

Step 7 Slipping fingers under cuff of second glove.

image

Step 8 Pulling second glove over non-dominant hand.

image

Step 9 Interlocking gloved hands.

GLOVE DISPOSAL
10. Grasp the outside of one cuff with the other gloved hand; avoid touching wrist. Minimises contamination of underlying skin.
11. Pull the glove off, turning it inside out. Place the removed glove in the remaining gloved hand. Outside of glove does not touch skin surface.
12. Use the fingers of the bare hand to pull the remaining glove from the cuff over the hand. This will remove the glove and tuck the other glove inside. Contaminated gloves are contained.
13. Discard in an appropriate infectious waste receptacle. Used gloves are contaminated with the microbes of the wearer and handled contaminants.
14. Ensure hands are washed hands thoroughly, or liberally apply an antimicrobial alcohol hand-rub immediately after the removal of gloves. Microorganisms multiply in dark, moist, warm conditions such as on hands when gloves are worn. Gloves may contain microscopic perforations permitting the entry of microbes, which can proliferate on the wearer’s hands.
RECORDING AND REPORTING  
It is not necessary to record or report this procedure.  

SKILL 29-5 Donning a sterile gown and performing closed gloving

DELEGATION CONSIDERATIONS

The role of the circulating and instrument nurse can be delegated to a surgical technologist or licensed practical nurse in some countries. In Australia, registered nurses usually perform these roles. Individual healthcare organisations will determine the level of competency required for the role of the circulating and instrument nurse.

EQUIPMENT

Freshly laundered scrub attire

Appropriate, non-slip, clean shoes or shoes worn with shoe covers

Hair covering: hat or balaclava (to contain facial hair)

Two pairs of sterile gloves, the inner pair one size larger, the outer pair being the nurse’s correct size

Surgical mask

Appropriate eye protection: for infection control. Protective eyewear specific to various types of lasers may also be required

Sterile gown that complies with national requirements.

STEPS RATIONALE
DONNING A STERILE GOWN  
1. Personnel are required to don protective attire: freshly laundered scrub attire, appropriate footwear, shoe covers as required, hair covering, appropriate surgical face mask and protective eyewear, prior to gowning and gloving. Prevents hair and air droplet nuclei from contaminating the aseptic field. Eyewear protects staff from inadvertent splashes of chemicals, blood and body fluids.
2. Perform thorough surgical handwash (see Skill 29-3). Removes transient and resident bacteria from fingers, hands and forearms.
3. The circulating nurse aseptically opens a sterile gown pack containing a sterile gown, which is folded inside out. Outer surface of gown remains sterile.
4. The circulating nurse peels open glove package without contaminating the sterile inner contents. Inner glove package is then placed on sterile outer created by sterile outer wrapper. Inner packaging and gloves remain sterile, allowing instrument nurse to handle aseptically.
5. Reach down to sterile gown package; lift folded gown directly up and step back away from table. Provides sufficient space to don gown without contamination.
6. Hold the folded gown away from the scrub suit, locate neckband and allow the remainder of the gown to unfold without being touched. Outside of gown remains sterile.
7. Use both hands to find the arm holes of the gown and push the hands and arms through simultaneously (see illustration), without allowing the hands to protrude out from the wrist cuffs. Once the gown is pulled on, the sleeves should cover hands. Clean hands may touch the inside of the gown without contaminating the outer surface. Gown covers hands to prepare for closed gloving.
8. Circulating nurse may reach inside gown to arm seams to bring gown over shoulders. Ask the circulating nurse to securely tie up the back of the gown (see illustration). Gown must completely enclose underlying garments. The front tie or tab of the gown is handed to another sterile person to ‘turn’ the gown. This allows a sterile flap to cover the back.
image

Step 7 Placing arms in sleeves with hands kept inside cuffs.

image

Step 8 Circulating nurse tying back of gown.

CLOSED GLOVING  
1. With hands still covered by the gown sleeves, open the inner package of the larger sized gloves (see illustration). The right glove will be located on the right side of the package, and the left glove will be located on the left side of the package. Outside of gown remains sterile. Double gloving is recommended to minimise cross-infection from sharp items.
2. With the dominant hand inside gown cuff, pick up the glove for the non-dominant hand by grasping the folded cuff. Sterile gown touches sterile glove.
3. Extend non-dominant hand and forearm, with the palm facing upwards and place the palm of the glove against the palm of non-dominant hand. Glove fingers will point towards the elbow. Positions glove for application over cuffed hand, maintaining glove sterility.
4. Grasp back of glove cuff with covered dominant hand. Turn glove cuff over end of non-dominant hand and gown cuff (see illustration). Seal created by glove cuff over gown prevents exit of microorganisms over operative aseptic field.
5. Grasp the cuff of the glove and the underlying gown sleeve, with the gown cuff still covering dominant hand. Carefully extend fingers into the sterile glove.  
image

Step 1 Opening glove package with covered hands.

image

Step 4 Applying glove to non-dominant hand as dominant hand remains inside gown cuff.

6. Glove the dominant hand in same manner, reversing hands (see illustration). Use gloved non-dominant hand to pull the other glove at the cuff of the gown and extend fingers into the glove. Keep the hand inside sleeve cuff at all times to ensure ‘closed gloving’. Ensure fingers are fully extended into both gloves.

When both hands are covered by sterile gloves, fingers can more easily be manipulated into the gloves.

A seal is created by the glove cuff over the gown to prevent exit of microorganisms onto the operative aseptic field.

image

Step 6 Applying second glove.

7. The second outer pair of gloves can be applied by the instrument nurse; the sterile gloved hands touch the second sterile pair of gloves.  
8. Undo the fastener or ties in front of the gown and hand to a gowned and gloved ‘sterile’ member of the surgical team. They will stand still while the instrument nurse turns around to cover their back, with extended gown flap. The instrument nurse retrieves their gown tie from sterile surgical team member and securely ties the gown (see illustration). Contact with an unsterile team member can risk contamination of sterile gown or gloves. Gown must completely enclose underlying garments.
image

Step 8 Handing tie to ‘sterile’ team member.

9. The scrub team must ensure they either pass each other face to face or back to back, to avoid the unsterile back of the gown contaminating the aseptic field or personnel. Scrubbed personnel are considered sterile from mid-chest to waist and elbows to glove tips only. The back of the gown, the area under the arms, the collar, the area below the waist and the sleeves above the elbows are considered unsterile, as the nurse cannot keep these areas in constant view to ensure their sterility.
RECORDING AND REPORTING  

It is not necessary to record or report this procedure.


The appropriate glove size should be selected; the glove should not stretch so tightly that it constricts hand movement or tears easily. Double gloving is recommended to maximise glove integrity and reduce the microbial load of contaminated needles perforating gloves. Gloves one size larger are applied first, with the nurse’s usual size of glove worn on top (Tanner and Parkinson, 2009).

DONNING A STERILE GOWN

Nurses must wear sterile gowns when assisting at the aseptic field in the operating room and delivery room so that sterile objects can be comfortably handled with less risk of contamination. The sterile gown acts as a barrier to decrease shedding of microorganisms from skin surfaces. Nurses caring for patients with large open wounds or assisting medical staff during invasive procedures, for example inserting an epidural catheter, may also wear sterile gowns.

A hair cover, mask and eye protection are worn, a surgical handwash performed and then a sterile gown and gloves are applied (see Skill 29-5). The nurse picks up the gown from a sterile pack without touching the outside of the packaging. Once donned, only certain parts of the gown are considered sterile: the gloved fingertips to elbows and the gown front from waist to mid-chest. The back of the gown, the area under the arms, the collar, the area below the waist and the sleeves above the elbows are considered unsterile, as the nurse cannot keep these areas in constant view to ensure their sterility.

Infection prevention and control for hospital personnel

In Australia and New Zealand, legislation exists to promote the health and safety of people in the workplace through the elimination, reduction and control of hazards, including transmission of infection. Exact details can be found in the relevant national and state Acts and other legislation. Although each state has individual legislation, they share common goals and contain common elements:

Exposure control plan. Institutions must have plans designed to eliminate or minimise employee exposure to hazardous material. The plan must be accessible to all employees and describe how to avoid exposure to infectious agents, including how and when to use protective equipment.

Compliance with standard precautions. Employees must be informed of precautions to prevent contact with blood and body fluids or other potentially infectious material during the routine care of patients. Personal protective equipment must be provided for the employees by the employer.

Housekeeping. Workplaces must be maintained in a clean and sanitary condition. Cleaning and decontamination procedures and routines must be in place.

High-risk exposure. If health workers sustain a needle stick, sharps injury or mucous membrane exposure to blood or other body fluids, the incident should be reported immediately. Evaluation and appropriate preventive treatment for hepatitis B and HIV infection are critical.

Training. Employers must ensure that all employees at risk of occupational exposure participate in a training program that presents the exposure control plan for the institution and specifically explains the measures to be taken by employees for their safety. Written policies and guidelines must be provided for all personnel, outlining prevention and control activities.

Role of the infection-control professional

Many hospitals employ professionals, most of whom are registered nurses, with postgraduate qualifications in infection control and prevention. These infection-control professionals are responsible for advising hospital personnel and monitoring infections within the hospital. Roles of an infection-control professional may include the following:

provision of staff education on infection prevention and control

development and review of infection prevention and control policies and procedures

recommending implementation of appropriate standard and transmission-based precautions

screening patients for community-acquired infections that may be reportable to the public health department

consulting with health departments to implement recommendations to prevent and control the spread of infection among personnel, such as TB testing

gathering statistics regarding the epidemiology of nosocomial or hospital-acquired infections

notifying the public health department of communicable diseases diagnosed within a hospital

conferring with all hospital departments to investigate unexpected or clustered infections

educating patients and families

identifying infection-control risks with equipment and instrumentation

monitoring antibiotic-resistant organisms in the institution.

An infection-control professional can be a valuable resource for helping nurses control and prevent nosocomial infections.

Patient education

Often, patients must learn to use infection control practices at home (Box 29-19). Preventive techniques become almost second-nature to nurses who practise them daily, but patients may be less aware of factors promoting the spread of infection or ways to prevent its transmission. The home environment does not always lend itself to infection prevention, and nurses can help patients adapt to maintain hygienic techniques. Generally, patients in a home care setting have a decreased risk of infection because of decreased exposure to resistant organisms, such as those found in a hospital.

BOX 29-19 CLIENT TEACHING FOR INFECTION CONTROL

OBJECTIVE

Patient will assume self-care using proper infection-control techniques.

TEACHING STRATEGIES

Instruct the patient about decontaminating equipment using soap and water and disinfecting with an appropriate disinfectant.

Demonstrate proper handwashing, and explain rationale, e.g. before and after all treatments and following contact with infected body fluids.

Instruct the patient about signs and symptoms of wound infection.

Explain the importance of preparing adequate formula no longer than 8 hours in advance for patients who receive commercially prepared enteral tube feedings at home.

Explain to the patient how contaminated enteral feeding can cause infections.

Demonstrate how to cleanse their stoma site with mild soap and water daily and how to dry the area well.

Instruct the patient to place contaminated dressings and other disposable items containing infectious body fluids in impervious plastic bags and securely tie them off.

Instruct the patient to place used needles and other contaminated sharp items into a commercially available sharps container—these are usually supplied by local councils or community health nurses.

Clean noticeably soiled sheets separately from other laundry. Wash in water that is as hot as possible. Add 1 cup of colourfast bleach to the detergent. Ideally dry outside in the sun, as the ultraviolet rays of sunlight have an antimicrobial effect. Otherwise, set the clothes dryer temperature as high as fabric will allow.

EVALUATION

Ask patient or family member to describe and demonstrate the techniques you have explained to reduce transmission of infection.

Have patient demonstrate various techniques discussed.

Ask patient to explain the signs and symptoms of infection and their plan of action should an infection arise.

When patients are at home, nurses determine their ability to comply with infection-control practices through education about infection and techniques to prevent or control its spread.

Topics in a teaching session include:

patient susceptibility to infection

the chain of infection, with specific reference to means of transmission

hygiene practices to minimise organism growth and spread, emphasising handwashing

preventive healthcare, for example immunisation, nutrition, diet and exercise

use of antibiotics and how to decrease the risk of antibiotic-resistant infection

appropriate methods for handling and storing food

identifying family members who are at risk of acquiring infection, and prevention strategies.

It is important to involve family members who care for patients in the teaching plan.

EVALUATION

The success of infection-control techniques is measured by achievement of the goals for reducing or preventing infection. A comparison of the patient’s response (absence of fever or development of wound drainage) with expected outcomes determines the success of nursing interventions (Figure 29-12) and whether interventions should be revised or eliminated. The ability to correctly assess wound healing and conduct a physical assessment of body systems is an important evaluation skill. The nurse closely monitors a patient for signs and symptoms of infection. For example, a patient who has undergone a surgical procedure is at risk of a wound infection at the surgical site, as well as at other invasive sites, such as drainage tube sites or arterial line sites. The patient is also at risk of developing a respiratory tract infection due to decreased mobility, or a UTI if an indwelling catheter is in situ. All invasive and surgical sites should be carefully monitored for signs of infection such as redness, swelling or purulent drainage. Temperature, breath sounds and sputum character should be monitored for changes and signs of infection. Laboratory test results are reviewed; for example, leucocytes in the urine may indicate a UTI. The absence of signs or symptoms of infection is the optimal outcome of infection prevention and monitoring activities.

image

FIGURE 29-12 Clinical pathway for suspected meningococcal infection.

© The State of Queensland (Queensland Health). Reproduced with permission.

The patient at risk of infection must understand measures implemented to reduce or prevent microorganism growth and spread. Patients or family members should be provided with the opportunity to discuss infection-control measures and their ability to comply with therapy. The nurse may determine whether patients require additional information or reinforcement of information given previously.

The nurse documents the patient’s response to therapies implemented for infection control. A clear description of any signs and symptoms of systemic or localised infection is necessary to provide a baseline for comparative evaluation. The efficacy of interventions that reduce infection should be reported.

KEY CONCEPTS

Hand hygiene is the most important technique in preventing and controlling transmission of infection.

The potential for microorganisms to cause disease depends on the number of organisms, their virulence, their ability to enter and survive in a host and susceptibility of the host.

Normal flora help the body to resist infection by releasing antibacterial substances and inhibiting multiplication of pathogenic microorganisms.

Nurses need to recognise the difference between signs of local inflammation and infection.

Microorganisms are transmitted by direct and indirect contact, airborne spread, vectors and contaminated articles.

Increasing age, poor nutrition, stress, inherited conditions, chronic disease, medical conditions and medical treatments can compromise the immune response and may increase a person’s susceptibility to infection.

The major sites for healthcare-associated infections (HAIs) include the urinary and respiratory tracts, bloodstream and surgical or traumatic wounds.

Invasive procedures, medical therapies, long hospitalisation and contact with healthcare personnel increase a patient’s risk of acquiring HIAs.

Patients in an intensive care unit are at greater risk of infection compared with other patients because of the prevalent use of antibiotics and patients’ increased exposure to invasive procedures.

Isolation practices may prevent personnel and patients from acquiring infections and may prevent the transmission of microorganisms or cross-infection to others.

Patients confined to their rooms are at risk of loneliness, anxiety and depression because of the restricted and socially isolated environment.

Standard precautions are implemented for all patients, based on the assumption that all patients are potentially infectious. Hand hygiene and vigilant use of personal protective attire is essential for standard precautions.

Thorough cleansing requires mechanical removal of all foreign material from an object or area.

If a procedure involves breaching the skin integrity or an invasive procedure entering a body cavity (normally free of microorganisms), aseptic practices must be followed.

An infection-control professional monitors the incidence of infection in an institution and provides both educational and consultative services to maintain infection prevention.

ONLINE RESOURCES

Australian Commission on Safety and Quality in Healthcare; the Healthcare Associated Infection (HAI) Prevention Program, www.safetyandquality.gov.au/our-work/healthcare-associated-infection

Hand Hygiene Australia; online learning packages, www.hha.org.au/LearningPackage/olp-home.aspx

Hand Hygiene New Zealand; education centre, www.handhygiene.org.nz/index.php?option=com_content&view=category&id=9&Itemid=107

National Health and Medical Research Council (2010) Australian guidelines for the prevention and control of infection in healthcare, www.nhmrc.gov.au/guidelines/publications/cd33

New Zealand Nurses Organisation; National Division of Infection Control Nurses, www.infectioncontrol.co.nz/about

The Aseptic Non Touch Technique (ANTT) project, www.antt.org.uk

REFERENCES

Abad C, Fearday A, Safdar N. Adverse effects of isolation in hospitalised patients: a systematic review. J Hosp Infect. 2010;76:97–102.

Australian College of Operating Room Nurses (ACORN). Standards for perioperative nursing, including nursing roles, guidelines and position statements. Adelaide: ACORN, 2010.

Boyce JM, Pittet D. Guideline for hand hygiene in health-care settings. Recommendations of the Healthcare Infection Control Practices Advisory Committee and the HICPAC/SHEA/APIC/IDSA Hand Hygiene Task Force. MMWR Recommendations and Report. 2002;51:1–45.

Cruickshank M, Ferguson J, eds. Reducing harm to patients from health care associated infection: the role of surveillance. Canberra: Australian Commission on Safety and Quality in Health Care, 2008. Online Available at www.safetyandquality.gov.au/wp-content/uploads/2008/01/Reducing-Harm-to-Patient-Role-of-Surveillance1.pdf 10 Jun 2012.

Department of Health and Ageing (DoHA). Infection control guidelines for the prevention of transmission of infectious diseases in the healthcare setting. Canberra: DoHA, 2004.

Gomez C, Nomellini V, Faunce DE, et al. Innate immunity and aging. Exper Gerontol. 2008;43:718–728.

Gould DJ, Moralejo D, Drey N, et al. Interventions to improve hand hygiene compliance in patient care, Cochrane Database Syst Rev. 2010;(9). doi: 10.1002/14651858.CD005186.pub3. CD005186.

Graves N, Halton K, Robertus L. Costs of health care associated infection. Cruickshank M, Ferguson J, eds. Reducing harm to patients from health care associated infection: the role of surveillance. Canberra: Australian Commission on Safety and Quality in Health Care, 2008. Online Available at www.safetyandquality.gov.au/wp-content/uploads/2008/01/Reducing-Harm-to-Patient-Role-of-Surveillance1.pdf, 2008 10 Jun 2012.

Grayson ML, Russo KR, Bellis K, et al, eds. Hand hygiene Australian manual. Canberra: Commonwealth of Australia, 2010. Online Available at www.hha.org.au/ForHealthcareWorkers/manual.aspx 20 Nov 2011.

Hand Hygiene Australia (HHA). National Hand Hygiene Initiative. Melbourne: HHA, 2012. Online Available at www.hha.org/home.aspx 12 Mar 2012.
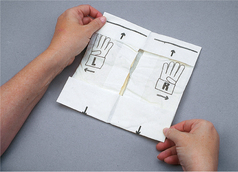
Hand Hygiene New Zealand Ringa Horoia Aotearoa (HHNZ). Guidelines on hand hygiene for New Zealand hospitals. Auckland: HHNZ, 2009. Online Available at www.infectioncontrol.org.nz/handhygiene/resources.htm 6 Jun 2012.
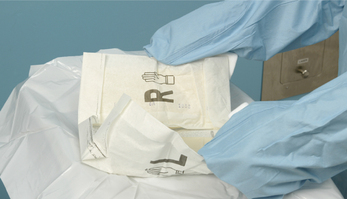
Morgan DJ, Diekema DJ, Sepkowitz K, et al. Adverse outcomes associated with contact precautions: a review of the literature. Am J Infect Control. 2009;37:85–93.

National Health and Medical Research Council (NHMRC). Australian guidelines for the prevention and control of infection in healthcare. Canberra: NHMRC, 2010. Online Available at www.nhmrc.gov.au/guidelines/publications/cd33 29 Sep 2011.

Parker D, Callan L, Harwood J, et al. Nursing interventions to reduce the risk of catheter-associated urinary tract infection. Part 1: catheter selection. J Wound Ostomy Continence Nurs. 2009;36(1):23–34.

Rothrock J. Alexander’s Care of the patient in surgery, ed 13. Toronto: Mosby, 2007.

Rowley S, Clare S, Macqueen S, et al. ANTT v2: an updated practice framework for aseptic technique. Br J Nurs. 2010;19(5):S5–S11.

Siegel JD, Rhinehart E, Jackson M, Chiarello L, the Healthcare Infection Control Practices Advisory Committee. Guideline for isolation precautions: preventing transmission of infectious agents in healthcare settings. Atlanta, GA: Centers for Disease Control and Prevention, 2007. Online Available at www.cdc.gov/hicpac/2007IP/2007isolationPrecautions.html 6 Jun 2012.
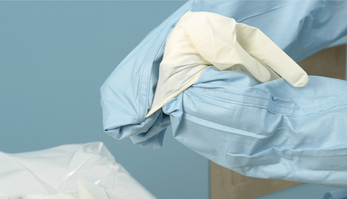
Standards Australia. Cleaning, disinfection and sterilising reusable medical and surgical instruments and equipment, and maintenance of associated environments in health care facilities (AS/NZS 4187). Sydney: Standards Australia, 2003.

Standards New Zealand. Health and disability services (infection prevention and control) standards NZS 8134.3: 2008. Wellington: Standards New Zealand, 2008.

Stewardson A, Pittet D. Ignac Semmelweis—celebrating a flawed pioneer of patient safety. Lancet. 2011;378(9785):22–23.

Stone PW, Pogorzelska M, Kunches L, et al. Hospital staffing and healthcare-associated infections: a systematic review of the literature. Clin Infect Dis. 2008;47(7):937–944.

Struelens MJ. The epidemiology of antimicrobial resistance in hospital acquired infections: problems and possible solutions. Br Med J. 1998;317:652–654.

Tanner J, Parkinson H. (updated) Double gloving to reduce surgical cross-infection, Cochrane Database Syst Rev. 2009;(3). doi: 10.1002/14651858.CD003087.pub2. CD003087.
Weaver BA. Herpes zoster overview: natural history and incidence. J Am Osteopath Assoc. 2009;109(suppl 2):S2–S6.

Weller B, ed. Encyclopedic dictionary of nursing and health care. London: Ballière Tindall, 1997:81

Weiskopf D, Weinberger B, Grubeck-Loebenstein B. The aging of the immune system. Transplant Int. 2009;22:1041–1050.

World Health Organization (WHO). WHO guidelines on hand hygiene in health care. Geneva: WHO, 2009. Online Available at www.who.int/gpsc/tools/en 12 Mar 2012.