| STEPS |
RATIONALE |
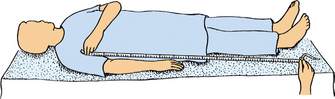
| 1. Assess patient’s body alignment and comfort level while patient is lying down. |
Provides baseline data for later comparisons. Determines ways to improve position and alignment. |
| 2. Assess for risk factors that may contribute to complications of immobility: |
Increased risk factors require patient to be repositioned more frequently. |
| |
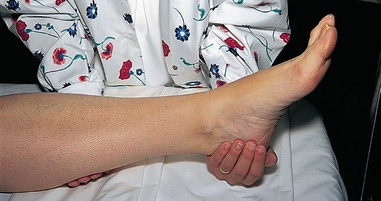
• Paralysis: hemiparesis resulting from stroke; decreased sensation
|
Paralysis impairs movement; muscle tone changes; sensation is affected. Because of difficulty in moving and poor awareness of involved body part, patient is unable to protect and position body part for self. |
| |
• Impaired mobility: traction or arthritis or other contributing disease processes
|
Traction or arthritic changes of affected extremity result in decreased range of joint motion. |
| |
|
Decreased circulation predisposes patient to pressure injury. |
| |
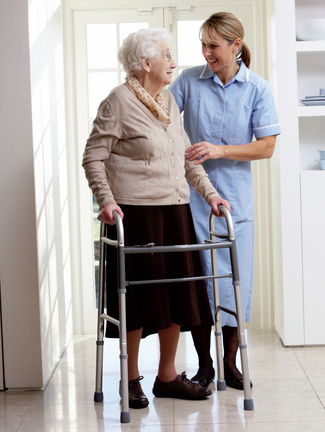
• Age: very young, older adults
|
Premature and young infants require frequent turning because their skin is fragile. Normal physiological changes associated with ageing predispose older adults to greater risks of developing complications of immobility. |
| |
• Patient’s level of consciousness
|
Determines need for special aids or devices. Patients with altered levels of consciousness may not understand instructions and may be unable to help. |
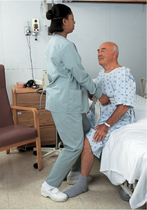
| 3. Assess patient’s physical ability to help with moving and positioning. |
Enables nurse to use patient’s mobility and strength. Determines need for additional help. Ensures patient and nurse safety. |
| 4. Explain procedure to patient. |
Helps to decrease anxiety and increase cooperation. |
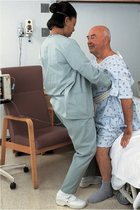
| 5. Adjust the bed height to between mid-thigh and hip height. |
Raises level of work towards nurse’s centre of gravity. |
| 6. Remove all pillows and devices used in previous position. |
Reduces interference from bedding during positioning procedure. |
| 7. Get extra help as needed. |
Provides for patient and nurse safety. |
| 8. Position patient in bed. |
|
| |
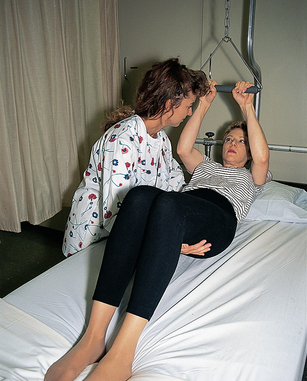
A. Patient-assisted bed slide (one nurse): |
|
| |
|
(1)Place patient supine with head of bed flat.
|
Enables nurse to assess body alignment. Reduces gravity’s pull on patient’s upper body. |
| |
|
(2)Remove pillow from under head and shoulders and place pillow at head of bed.
|
Prevents striking patient’s head against head of bed. |
| |
|
(3)Ask or assist the patient to fold his or her arms across the chest.
|
|
| |
|
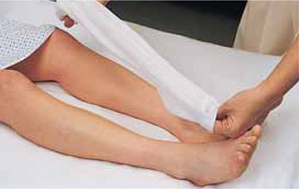
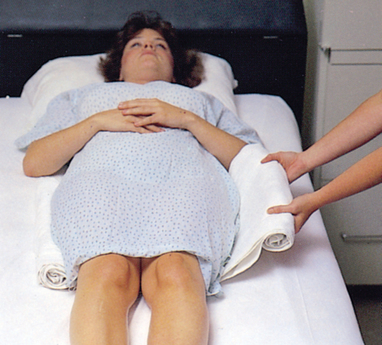
(4)Fold a slide sheet in half and tuck under the patient’s shoulders and hips with the fold facing towards the patient’s feet.
|
Slide sheets reduce friction and reduce the force required to move the patient. |
| |
|
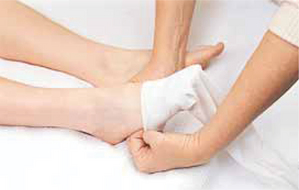
(5)Ask or assist the patient to roll to the side to pull the slide sheet into position.
|
|
| |
|
(6)Have the patient roll back to supine position and bend their knees.
|
|
| |
|
(7)Stand at the end of the bed and support the patient’s feet.
|
|
| |
|
(8)Ask the patient to extend the legs while holding the feet against the mattress. The patient will push himself or herself up the bed.
|
Where possible, patients should be encouraged to move themselves. |
| |
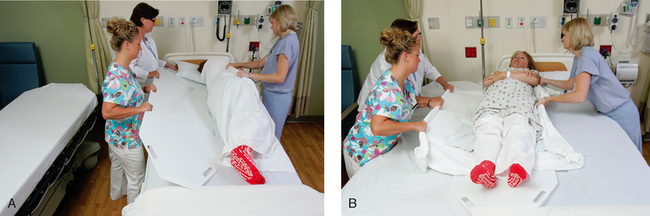
B. Bed slide (two nurses): |
|
| |
|
(1)Place patient supine with head of bed flat.
|
Enables nurse to assess body alignment. Reduces gravity’s pull on patient’s upper body. |
| |
|
(2)Remove pillow from under head and shoulders and place pillow at head of bed.
|
Prevents striking patient’s head against head of bed. |
| |
|
(3)Ask or assist the patient to fold his or her arms across the chest.
|
|
| |
|
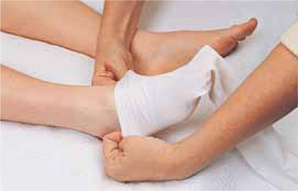
(4)Tuck two slide sheets (on top of each other) under the length of the patient’s body.
|
Slide sheets reduce friction and reduce the force required to move the patient. |
| |
|
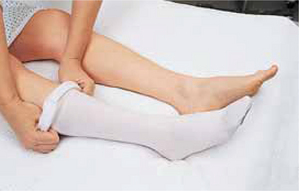
(5)Ask or assist the patient to cross their legs (i.e. if rolling to the left, cross right over left). Roll the patient to the side and pull the slide sheet into position over the mattress.
|
|
| |
|
(6)Roll the patient back to a supine position.
|
|
| |
|
(7)Stand at the top end of the bed corners and gather the ends of the top slide sheet with palms down.
|
Face in the direction of movement to prevent spinal twisting. |
| |
|
(8)In a controlled manner and with arms straight, both nurses should lunge backwards on the count of three, transferring weight from the front foot to the back foot, moving the patient towards the head of the bed.
|
Assuming a broad stance increases stability and balance. Use of large muscle groups and shifting weight reduces the force needed to move load. |
| |
|
(9)Tuck the slide sheets under the patient and pull them out from beneath the patient. Replace pillows and position the patient to a position of comfort and safety.
|
|
| |
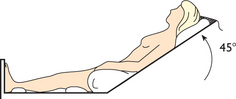
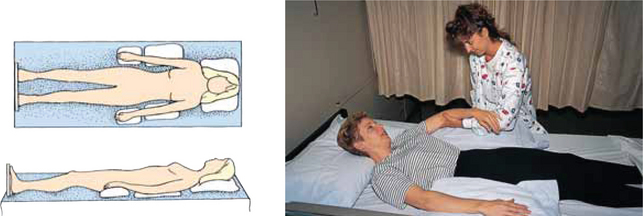
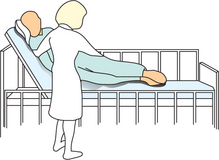
C. Position patient in supported semi-Fowler’s position (see illustration): |
|
| |
|
(1)Elevate head of bed 45–60 degrees.
|
Increases comfort, improves ventilation and increases patient’s opportunity to socialise or relax. |
| |
|
(2)Rest head against mattress or on small pillow.
|
Prevents flexion contractures of cervical vertebrae. |
| |
|
(3)Use pillows to support arms and hand if patient does not have voluntary control or use of hands and arms.
|
Prevents shoulder dislocation from effect of downward pull of unsupported arms, promotes circulation by preventing venous pooling and prevents flexion contractures of arms and wrists. |
| |
|
(4)Position pillow at lower back.
|
Supports lumbar vertebrae and decreases flexion of vertebrae. |
| |
|
(5)Place small pillow or roll under thigh.
|
Prevents hyperextension of knee and occlusion of popliteal artery from pressure from bodyweight. |
| |
|
(6)Place small pillow or roll under ankles.
|
Prevents prolonged pressure of mattress on heels. |
|
|
| Critical decision point: To keep feet in proper alignment, place footboard at bottom of patient’s feet. |
| |
D. Position hemiplegic patient in supported semi-Fowler’s position: |
|
| |
|
(1)Elevate head of bed 45–60 degrees.
|
Increases comfort, improves ventilation and increases patient’s opportunity to relax. |
| |
|
(2)Position patient in sitting position as straight as possible, with support for affected shoulder.
|
Counteracts tendency to slump towards affected side. Improves ventilation and cardiac output; decreases intracranial pressure. Improves patient’s ability to swallow and helps to prevent aspiration of food, liquids and gastric secretions. |
| |
|
(3)Position head on small pillow with chin slightly forwards. If patient is totally unable to control head movement, hyperextension of the neck must be avoided.
|
Prevents hyperextension of neck. Too many pillows under head may cause or worsen neck flexion contracture. |
| |
|
(4)Provide support for involved arm and hand on overbed table in front of patient. If transfer is to wheelchair, arms of chair can provide support. Place arm away from patient’s side and support elbow with pillow.
|
Paralysed muscles do not automatically resist pull of gravity as they do normally. As a result, shoulder subluxation, pain and oedema may occur. |
| |
|
|
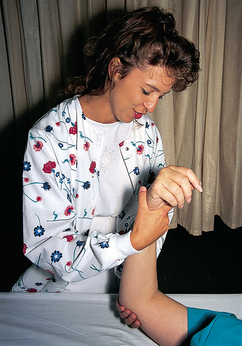
a. Position flaccid hand in normal resting position with wrist slightly extended, arches of hand maintained and fingers partially flexed; may use section of rubber ball cut in half; clasp patient’s hands together.
|
Maintains hand in functional position. Prevents contractures. |
| |
|
|
b. Position spastic hand with wrist in neutral position or slightly extended; fingers should be extended with palm down or may be left in relaxed position with palm up.
|
Maintains hand in functional position. Inhibits flexor spasticity. |
| |
|
(5)Flex knees and hips by using pillow or folded blanket under knees.
|
Ensures proper alignment. Flexion prevents prolonged hyperextension, which could impair joint mobility. |
| |
|
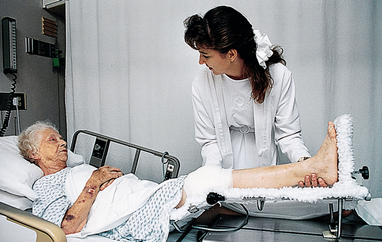
(6)Support feet in dorsiflexion with firm pillow or footboard.
|
Prevents footdrop. Stimulation of ball of foot by hard surface has tendency to increase muscle tone in patient with extensor spasticity of lower extremity. |
| |
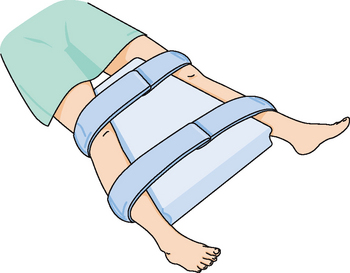
E. Position patient in supine position: |
|
| |
|
(1)Place patient on back with head of bed flat.
|
Necessary for placing patient in supine position. |
| |
|
(2)Place small rolled towel under lumbar area of back.
|
Provides support for lumbar spine. |
| |
|
(3)Place pillow under upper shoulders, neck or head.
|
Maintains correct alignment and prevents flexion contractures of cervical lumbar spine. |
| |
|
(4)Place trochanter rolls or sandbags parallel to lateral surface of patient’s thighs.
|
Reduces external rotation of hip. |
| |
|
(5)Place small pillow or roll under ankle to elevate heels.
|
Reduces pressure on heels, helping to prevent pressure sores. |
| |
|
(6)Support feet in dorsiflexion with firm pillow or footboard.
|
Prevents footdrop. |
| |
|
(7)Place pillows under pronated forearms, keeping upper arms parallel to patient’s body (see illustrations).
|
Reduces internal rotation of shoulder and prevents extension of elbows. Maintains correct body alignment. |
|
|
| |
|
(8)Place hand rolls in patient’s hands. Consider physical therapy referral for use of hand splints.
|
Reduces extension of fingers and abduction of thumb. Maintains thumb slightly adducted and in opposition to fingers. |
| |
F. Position hemiplegic patient in supine position: |
|
| |
|
(1)Place head of bed flat.
|
Necessary for positioning in supine position. |
| |
|
(2)Place folded towel or small pillow under shoulder or affected side.
|
Decreases possibility of pain, joint contracture and subluxation. Maintains mobility in muscles around shoulder to permit normal movement patterns. |
| |
|
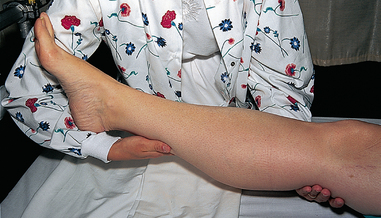
(3)Keep affected arm away from body with elbow extended and palm up. (Alternative is to place arm out to side, with elbow bent and hand towards head of bed.)
|
Maintains mobility in arm, joints and shoulder to permit normal movement patterns. (Alternative position counteracts limitation of ability of arm to rotate outwards at shoulder (external rotation). External rotation must be present to raise arm overhead without pain.) |
| |
|
(4)Place folded towel under hip of involved side.
|
Diminishes effect of spasticity in entire leg by controlling hip position. Slight flexion breaks up abnormal extension pattern of leg. Extensor spasticity is most severe when patient is supine. |
| |
|
(5)Support feet with soft pillows at right-angle to leg, and keep heels off bed or use heel protectors.
|
Maintains foot in dorsiflexion and prevents footdrop. Pillows prevent stimulation to ball of foot by hard surface, which has tendency to increase muscle tone in patient with extensor spasticity extremity. |
| |
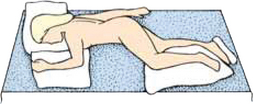
G. Position patient in prone position: |
|
| |
|
(1)Roll patient over arm positioned close to body, with elbow straight and hand under hip. Position on abdomen in centre of bed.
|
Positions patient correctly so alignment can be maintained. |
| |
|
(2)Turn patient’s head to one side and support head with small pillow (see illustration).
|
Reduces flexion or hyperextension of cervical vertebrae. |
| |
|
(3)Place small pillow under patient’s abdomen below level of diaphragm (see illustration).
|
Reduces pressure on breasts of some female patients and decreases hyperextension of lumbar vertebrae and strain on lower back. Improves breathing by reducing mattress pressure on diaphragm. |
| |
|
(4)Support arms in flexed position level at shoulders.
|
Maintains proper body alignment. Support reduces risk of joint dislocation. |
| |
|
(5)Support lower legs with pillow to elevate toes (see illustration).
|
Reduces external rotation of legs and mattress pressure on toes. |
|
|
|
| |
H. Position hemiplegic patient in prone position: |
|
| |
|
(1)Move patient towards unaffected side.
|
Ensures proper patient alignment in centre of bed when patient is rolled onto abdomen. |
| |
|
(2)Roll patient onto side.
|
|
| |
|
(3)Place pillow on patient’s abdomen.
|
Prevents sagging of abdomen when patient is rolled over; decreases hyperextension of lumbar vertebrae and strain on lower back. |
| |
|
(4)Roll patient onto abdomen by positioning involved arm close to patient’s body, with elbow straight and hand under hip. Roll patient carefully over arm.
|
Prevents injury to affected side. |
| |
|
(5)Turn head towards involved side.
|
Promotes development of neck and trunk extension, which is necessary for standing and walking. |
| |
|
(6)Position involved arm out to side, with elbow bent, hand towards head of bed and fingers extended (if possible).
|
Counteracts limitation of arm’s ability to rotate outwards at shoulder (external rotation). External rotation must be present to raise arm over head without pain. |
| |
|
(7)Flex knees slightly by placing pillow under legs from knees to ankles.
|
Flexion prevents prolonged hyperextension, which could impair joint mobility. |
| |
|
(8)Keep feet at right-angle to legs by using pillow high enough to keep toes off mattress.
|
Maintains feet in dorsiflexion. |
| |
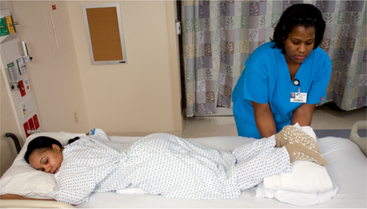
I. Position patient in lateral (side-lying) position: |
|
| |
|
(1)Lower head of bed completely or as low as patient can tolerate.
|
Provides position of comfort for patient and removes pressure from bony prominence on back. |
| |
|
(2)Position patient supine towards side of bed.
|
Provides room for patient to turn to side. |
| Critical decision point: Patients at risk of pressure ulcer development require the 30-degree lateral position. |
| |
|
(3)Roll patient onto side towards nurse by flexing patient’s knees and placing one hand on patient’s hip and one hand on patient’s shoulder.
|
Client is positioned so leverage on hip makes turning easy. Rolling patient towards nurse lessens trauma to tissues. |
| |
|
(4)Place pillow under patient’s head and neck.
|
Maintains alignment. Reduces lateral neck flexion. Decreases strain on sternocleidomastoid muscle. |
| |
|
(5)Bring shoulder blade forward.
|
Prevents patient’s weight from resting directly on shoulder joint. |
| |
|
(6)Position both arms in slightly flexed position. Upper arm is supported by pillow level with shoulder; other arm, by mattress.
|
Decreases internal rotation and adduction of shoulder. Supporting both arms in slightly flexed position protects joint. Ventilation is improved because chest is able to expand more easily. |
| |
|
(7)Place tuck-back pillow behind patient’s back. (Make by folding pillow lengthwise. Smooth area is slightly tucked under patient’s back.)
|
Provides support to maintain patient on side. |
| |
|
(8)Place pillow under semiflexed upper leg level at hip from groin to foot (see illustrations).
|
Flexion prevents hyperextension of leg. Maintains leg in correct alignment. Prevents pressure on bony prominence. |
| |
|
(9)Place sandbag parallel to plantar surface of dependent foot.
|
Maintains dorsiflexion of foot. Prevents footdrop. |
|
|
| |
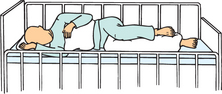
J. Position patient in Sims’ (semiprone) position: |
|
| |
|
(1)Lower head of bed completely.
|
Provides for proper body alignment while patient is lying down. |
| |
|
(2)Place patient in supine position.
|
Prepares patient for position. |
| |
|
(3)Position patient in lateral position, lying partially on abdomen.
|
Patient is rolled only partially on abdomen. |
| |
|
(4)Place small pillow under patient’s head.
|
Maintains proper alignment and prevents lateral neck flexion. |
| |
|
(5)Place pillow under flexed upper arm, supporting arm level with shoulder.
|
Prevents internal rotation of shoulder. Maintains alignment. |
| |
|
(6)Place pillow under flexed upper legs, supporting leg level with hip.
|
Prevents internal rotation of hip and adduction of leg. Flexion prevents hyperextension of leg. Reduces mattress pressure on knees and ankles. |
| |
|
(7)Place sandbags parallel to plantar surface of foot (see illustration).
|
|
| 9. Perform hand hygiene. |
Reduces transmission of infection. |
| 10. Lower bed and raise side rails. |
Provides for patient safety. |
| 11. Observe patient’s body alignment, position and level of comfort. |
Determines effectiveness of positioning. Additional supports (e.g. pillows, bath blankets) may be added or removed to promote comfort and correct body alignment. |
| 12. Assess for areas of erythema or breakdown involving skin. |
Provides ongoing observation regarding patient’s skin and musculoskeletal systems. Indicates complications of immobility or improper positioning of body part. |