EQUIPMENT

Special patient gown with press-studs at shoulder seams (makes removal with IV tubing easier)

IV infusion chart

Prescribed IV fluid (with time tape attached)

Over-the-needle catheter (ONC) for venepuncture (gauge will vary with patient’s body size and reason for IV fluid administration)

For IV fluid infusion:

Administration set (choice depends on type of solution and rate of administration; infants and children require microdrip tubing, which provides 60 drops/mL)

Extension tubing (used when a longer IV line is necessary)

Alcohol and povidone-iodine cleaning swabs or sticks (Rosenthal, 2003).

EMLA cream

Towel (to place under patient’s hand or arm)

IV pole, rolling or ceiling-mounted

Disposable gloves

Tourniquet (can be a source of contamination; use a single-use product)

Arm board, if needed (used to maintain wrist or elbow joint position

Non-allergenic tape

Needle disposal container (sharps container)
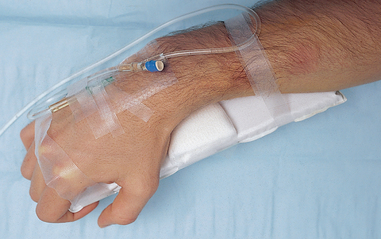
Transparent dressing (e.g. Opsite, Tegaderm)

‘Interlink injection site’ (also called IV bung/plug/cap); connects to IV cannula; allows needless connection to the IV cannula.

‘Lever lock cannula’ or ‘threaded lock cannula’; attaches to the IV-giving set and connects the giving set to the cannula. Note that the giving set is never directly attached to the IV cannula without either of these Interlink connections

1–3 mL of normal saline

5 mL syringes with Interlink needle

STEPS RATIONALE
Assessment  

1. Review doctor’s order for type and amount of IV fluid, rate of fluid administration and purpose of infusion. In addition, follow the seven rights for administration of medications (see Chapter 31).

A prescription for peripheral IV fluids must be made by a doctor before the implementation of this procedure.

Assists in selection of appropriate access device

2. Review clinical data for indications of type of fluid and electrolyte imbalance and reason for prescribed infusion; e.g. admission diagnosis, signs and symptoms (e.g. bodyweight, blood pressure, pulse, skin turgor, urine output, fluid balance chart, serum electrolytes, full blood count—haemoglobin [Hb] and haematocrit [Hct]).

Nurse is fully aware of reason for the prescribed solution and rate of infusion and ongoing monitoring required.

Provides baseline data for later evaluation of change in fluid and electrolyte status.

3. Assess patient’s history of allergies.

May reveal information that affects insertion of devices, such as allergy to iodine, adhesive or latex.

4. Assess patient’s previous or perceived experience with IV therapy and arm placement preference.

Determines level of emotional support and patient education required.

5. Consider the application of EMLA cream for children and patients with needle phobia.

Although the application of EMLA cream makes IV cannulation relatively painless, it must be applied at least 1 to 1.5 hours before the proposed procedure. It is effective for up to 4 hours post application. Not recommended for infants under 3 months of age.

6. Determine whether patient is to undergo any planned surgery or is to receive blood infusion later.

Allows placement of appropriate-size catheter (i.e. 18 or 16 gauge for surgery) which will not interfere with medical procedures.

7. Assess for the following risk factors: child or older adult, presence of heart failure or renal failure or low platelet count.

Persons at extremes in age develop fluid imbalances more rapidly because of a proportionately larger ECF volume; persons with heart failure and acute kidney disease may require fluid restriction and cannot adapt to sudden increases in vascular volume. A low platelet count predisposes patients to bleeding at IV site.
Preparation of patient  

8. Prepare patient and family by explaining the procedure, its purpose and what is expected of patient.

Decreases anxiety and promotes cooperation.

9. Help patient into comfortable sitting or supine position.


10. Change patient’s gown to the more easily removed gown with press-studs at the shoulder.

Use of a special IV gown facilitates safe removal of the gown.

11. Perform hand hygiene.

Reduces transmission of microorganisms.

12. Organise equipment on clean, clutter-free bedside stand or overbed table.

Reduces risk of contamination and accidents.

Maintains sterility of equipment and reduces spread of microorganisms.

Preparing the IV solution  

13. Check IV solution and any prescribed additives, using the seven rights of drug administration (see Chapter 31).

IV solutions are medications and should be carefully checked by two nurses to reduce risk of error.

14. Check solution for colour, clarity and expiration date. Check bag for leaks, which is best done before reaching the bedside.

Solutions that are discoloured, contain particles or are expired are not to be used. Leaky bags present an opportunity for infection and must not be used.

15. Open infusion set, maintaining sterility of both ends of tubing. Many sets allow for priming of tubing without removal of end cap.

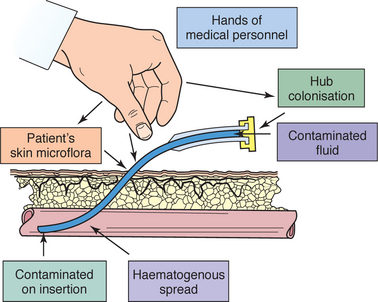
Prevents bacteria from entering infusion equipment and bloodstream.

16. Place roller clamp about 2–5 cm below drip chamber and move roller clamp to ‘off’ position (see illustrations).

Close proximity of roller clamp to drip chamber allows more-accurate regulation of flow rate. Moving clamp to ‘off’ prevents accidental spillage of fluid and decreases amount of air bubbles when priming line.
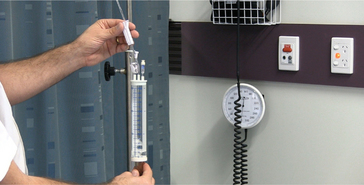
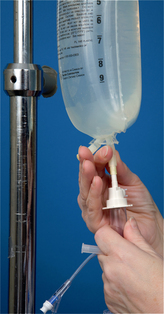
17 Remove protective sheath over IV-giving set tubing port on plastic IV solution bag (see illustration). For bottled IV solution, remove metal cap and metal and rubber disks beneath cap. Provides access for insertion of infusion tubing into solution.

18. Insert infusion set into fluid bag or bottle. Remove protector cap from tubing insertion spike (keeping spike sterile), and insert spike into opening of IV bag (see illustration).

Prevents contamination of solution from contaminated insertion spike.

19. Prime infusion tubing by filling with IV solution. Compress drip chamber and release, allowing it to fill one-third to half full.

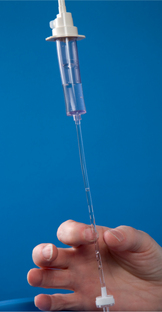
Creates suction effects; fluid enters drip chamber to prevent air from entering tubing.
image

Step 16 A, Position of roller clamp below drip chamber. B, Roller clamp in ‘off’ position.

image

Step 17 Removal of protective sheath.

image

Step 18 Inserting spike into opening of IV bag.

20. Slowly release roller clamp to allow fluid to travel from drip chamber through tubing to needle or catheter adapter. Line can be primed without removing tubing protector cap. Return roller clamp to ‘off’ position after tubing is primed (filled with IV fluid).

Slow fill of tubing decreases turbulence and chance of bubble formation.

Removes air from tubing and permits tubing to fill with solution. Closing the clamp prevents accidental loss of fluid.

21. Be certain tubing is clear of air and air bubbles. To remove small air bubbles, firmly tap IV tubing where air bubbles are located. Check entire length of tubing to ensure that all air bubbles are removed (see illustration).

Large air bubbles can act as emboli.

22. Remove tubing protector cap and replace with ‘threader link cannula’ or ‘lever lock cannula’, leaving the protector on end of these until ready to attach to the ‘Interlink injection site’, which is an Interlink connector attached to the IV cannula.

Prepares the IV-giving set for connection to the IV cannula.

Maintains system sterility.

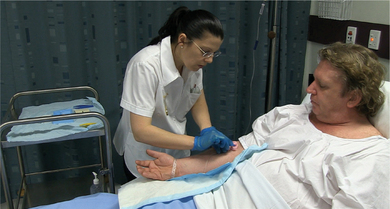
Insertion of IV catheter/cannula  

23. Put on disposable gloves.

Reduces transmission of microorganisms.
 
image

Step 21 Tapping to dislodge small air bubbles in tubing.

24. Identify accessible vein for IV placement. Apply tourniquet 10–15 cm above the proposed insertion site (see illustration). Check for presence of radial pulse. Option: Apply blood pressure cuff instead of tourniquet. Inflate to a level just below patient’s normal diastolic pressure.

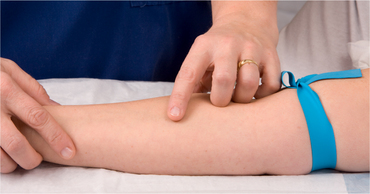
Tourniquet should be tight enough to impede venous return but not occlude arterial flow.
 
image

Step 24 Identifying accessible vein after tourniquet applied.

25. Select the vein.

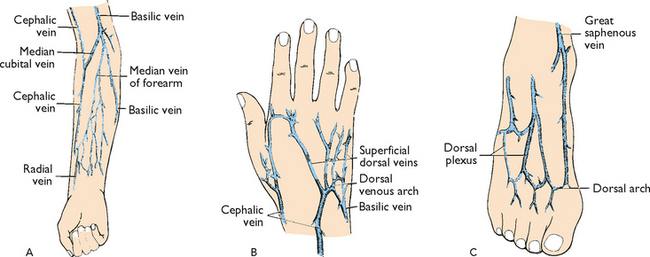
Venepuncture should be performed distal to proximal, which increases the availability of other sites for future IV therapy.
 

a. Use the most distal site in the non-dominant arm, if possible.


b. Avoid:

areas that are painful to palpation
areas that interfere with patient’s activities of daily living (ADLs) or planned procedures.
sites distal to previous venepuncture site
sclerosed or hardened cord-like veins
infiltrated site or phlebotic vessels, bruised areas and areas of venous valves or bifurcation
fragile dorsal veins in older adults and vessels in an extremity with compromised circulation (e.g. in cases of mastectomy, dialysis graft or paralysis).


c. Select a vein large enough for catheter placement.


d. Palpate the vein by pressing downwards and noting the resilient, soft bouncy feeling as the pressure is released. Always use the same finger to palpate.


e. Promote venous distension by instructing the patient to open and close the fist several times, lowering the patient’s arm in a dependent position, rubbing or stroking the patient’s arm from distal to proximal below proposed site.


26. Release tourniquet temporarily and carefully. Clip arm hair with scissors (if necessary). Do not shave area.

Prevents interruption of venous flow while preparing IV site. Hair impedes venepuncture or adherence of dressing. Shaving can cause microabrasions and predispose patient to infection.

27. Clean insertion site (see illustration):

Povidone–iodine reduces skin surface bacteria; touching the cleaned area introduces organisms from nurse’s hand. Povidone–iodine must dry to be effective in reducing microbial counts.
 

a. Using a firm, circular motion (middle to outwards) clean with alcohol and allow to dry.


b. Clean again, using same method, with povidone–iodine solution and allow to dry; refrain from touching the cleaned site.

Use of alcohol improves visualisation of the IV site and reduces the possible adverse effects of povidone–iodine.
  If the patient is allergic to iodine, use 70% alcohol and allow to dry for 60 seconds.  

28. Reapply tourniquet.

Tourniquet time should be as short as possible. Avoid the use of a tourniquet in areas of compromised circulation. The tourniquet should not interfere with arterial blood flow to the extremity.

29. Perform venepuncture. Anchor vein by placing thumb over vein and by stretching the skin against the direction of insertion 5–7.5 cm distal to the site.

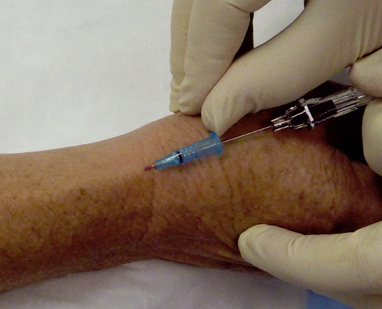
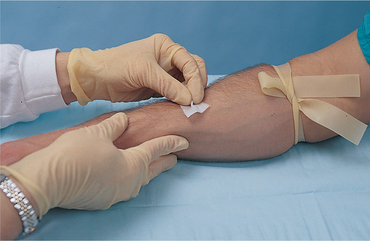
Places needle parallel to vein. When vein is punctured, risk of puncturing posterior vein wall is reduced.
image

Step 27 Cleaning the insertion site.

30. To puncture the vein, the catheter is held in the dominant hand. With the bevel up, the skin is entered in the direction of the vein at a 30- to 45-degree angle (see illustration).


31. After just entering into the vein the angle of the catheter is reduced until it is nearly parallel to the skin. If the vein appears to roll (move), the venepuncture is commenced applying counter-tension against the skin just below the entry site using the non-dominant hand.


32. The catheter is advanced into the vein until blood is seen in the flash back chamber of the catheter (see illustration).


33. After the vein is entered, the needle is left stationary and the plastic catheter (over the needle) is advanced into the vein. The plastic catheter should slide forward easily and should not be forced into the vein.


image

Step 30 Angle for entering vein

34. The tourniquet should now be released.


image

Step 32 Diagram of ONC catheter showing flash back chamber.

35. Gentle pressure is applied over the vein proximal to the entry site whilst the needle is removed from the catheter and disposed of into the sharps container. The needle should never be reinserted into the catheter as there is a risk of shearing off a part of the plastic catheter causing an embolus.

Prevents risk of exposure to blood.

36. Attach the ‘Interlink injection site’ (bung/cap) to the IV cannula and flush the IV line.

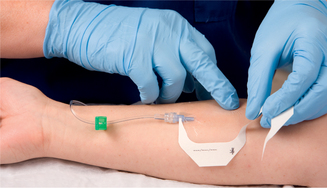
Flushing will reaffirm patency and decrease risk of intra-cannula clotting.

37. If IV fluids are ordered, remove the protective tubing from the ‘threaded link cannula’ or ‘lever lock cannula’ on the patient end of the IV-giving set and connect it to the ‘Interlink injection site’ (bung/cap) which should now be on the end of the IV cannula. Adjust the flow rate as desired.

Prompt connection of infusion set maintains patency of vein. Maintains sterility.

38. If no IV fluids are ordered, flush IV cannula with 1–3 mL of sterile normal saline (saline lock), using an Interlink needle through the ‘Interlink injection site’ (bung/cap).


39. Tape the catheter in place using a transparent (clear) dressing.

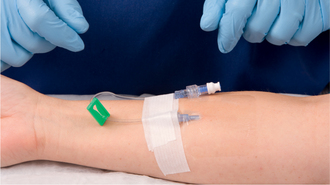
Transparent dressing allows early observation for phlebitis. Securing the catheter and tubing prevents movement and tension on the device, reducing mechanical irritation and possible phlebitis or infection. It is advisable not to use the ‘chevron’ taping technique.
 

a. Carefully remove adherent backing.


b. Apply one edge of dressing and then gently smooth remaining dressing over site, leaving end of ‘Interlink injection site’ (bung/cap) uncovered (see illustration).


40. Curl a loop of tubing alongside the arm and place a second piece of tape to secure tubing in two places (see illustration).

Tape on top of tape makes it easier to access hub/tubing junction. Securing loop of tubing reduces risk of dislodging catheter from accidental pull.

42. Label the IV site with the date, time and initials.

 
image

Step 39 Applying transparent dressing to secure catheter.

image

Step 40 Securing tubing.

Critical decision point: No more than three attempts at inserting an IV should be made by a single nurse (check agency policy).

43. Release roller clamp slowly to begin infusion at a rate to maintain patency of IV line (not necessary with a heparin/saline lock).

Permits venous flow and prevents clotting of vein and obstruction of flow of IV solution.
Critical decision point: Be sure to calculate rate so as not to infuse IV solution too rapidly or too slowly.

44. Note date and time, gauge size and size of catheter and placement of IV line and dressing.

Documents when IV was inserted and when subsequent changes in IV cannula are required (check agency policy).

45. Dispose of used needles in appropriate sharps container. Discard supplies in contaminated waste bin. Remove gloves and perform hand hygiene.

Reduces transmission of microorganisms and protects staff from injury.

46. Observe patient every hour to determine if fluid is infusing correctly.

Compression results in mechanical obstruction of vein. When IV catheter is patent, compression results in slowing or cessation of flow rate. No change in flow rate may indicate infiltration.
 

a. Check if correct amount of solution is infused as prescribed by looking at time tape.


b. Count flow rate.

Provides continuous evaluation of type and amount of fluid delivered to patient. Hourly inspection prevents accidental fluid overload or inadequate infusion rate and identifies early incidence of vein inflammation or tissue damage.
 

c. Check patency of IV catheter or needle: briefly compress cannulated vein proximal to site. Observe for slowing or cessation of IV rate.


d. Also observe patient during compression of vessel for signs of discomfort.


e. Inspect insertion site for absence of infiltration, phlebitis, or inflammation (Table 39-19).


47. Observe patient every hour to determine response to therapy (i.e. measure vital signs, conduct postprocedure assessments).

IV fluids and additives are given to maintain or restore fluid and electrolyte balance. They can also cause unexpected effects, which can be serious.
RECORDING AND REPORTING HOME CARE CONSIDERATIONS

Documentation:

sign the infusion therapy chart; complete the time and date started (see illustration)
complete and attach a change of line label to the IV tubing
enter the IV fluid type and volume onto the fluid balance chart
document the insertion site and date in the patient record/care plan/infusion chart
attach an IV time label to the IV bag.

Record patient’s response to IV fluid, amount infused in shift report; integrity and patency of system every hour or according to agency policy.

Report to oncoming nursing staff: type of fluid, flow rate, status of venepuncture site, amount of fluid remaining in present solution, expected time to hang next IV bag or bottle and any side effects.

See Box 39-6.

Teach caregiver to apply pressure with sterile gauze if catheter falls out and, if patient is on anticoagulant therapy, to tape several pieces of sterile gauze in place for at least 20 minutes or until bleeding stops.

Teach patient and caregiver to perform bed bath without getting IV tubing wet. For showering, the patient must insert hand and forearm into a plastic bag. Tape bag in place to ensure that IV site is completely covered. IV pumps are not designed to be located in moist bathroom environments during the bathing or showering process. Refer to relevant agency policy for management practices.

Teach patient and family to monitor fluid balance using household measuring devices.

image

Completed infusion therapy chart.

image

FIGURE 39-17 Common IV sites. A, Inner arm. B, Dorsal surface of hand. C, Dorsal surface of foot (used only for children).

VENEPUNCTURE

is a technique in which a vein is punctured through the skin by a sharp, rigid stylet (e.g. butterfly needle), a partially covered plastic catheter (over-the-needle catheter, ONC) or a needle attached to a syringe. The general purposes of venepuncture are to collect a blood specimen, instil a medication, start an IV infusion or inject a radio-opaque or radioactive tracer for special examinations. Most facilities require the RN to undertake specialist accreditation before being permitted to insert IV cannulae. Although central venous catheters are inserted by doctors, nurses are responsible for their maintenance.

REGULATING THE INFUSION FLOW RATE

after the IV cannula is secured and the line is patent, the nurse must regulate the rate of infusion according to the doctor’s prescription (Skill 39-3). The nurse calculates the infusion rate to prevent too-slow or too-rapid administration of the IV fluids. The minimal rate used to keep a vein patent is about 10–15 mL/h using a microdrip infusion. An infusion pump (e.g. an IVAC) is designed to deliver a measured amount of fluid over a period of time (e.g. millilitres per hour). The pump has a drop sensor and an alarm that will sound if drops are not detected at the appropriate rate. There are also alarms to alert the nurse to increased system pressure that can occur with an infiltration (IV fluid seeping into the tissue instead of the vascular space).

SKILL 39-3 Regulating intravenous flow rate

DELEGATION CONSIDERATIONS

Regulating IV therapy requires the problem-solving and knowledge-application skills of professional nurses. For this procedure, delegation is inappropriate.

EQUIPMENT

IV infusion chart with IV order

Watch with second hand

Paper and pencil

IV infusion pump (optional)

Volume-control device (optional)

STEPS RATIONALE

1. Observe for patency of IV line and needle or catheter:

For fluid to infuse at proper rate, IV line and cannula must be free of kinks, knots and clots.
 

a. Compress cannulated vein slightly proximal to the end of the catheter and observe the drip chamber.

Cessation of drops from drip chamber indicates cannula is in vein. If fluid continues to drip, infiltration may be present.

2. Check patient’s medical record for correct solution, any additives and time of infusion. Record also shows time over which each litre is to infuse.

Seven rights of drug administration ensure correct fluids are given to correct patient.

3. Check patient’s knowledge of how positioning of the IV site affects flow rate.

Fosters patient participation in maintaining most effective position of arm with IV equipment.

4. Verify with patient how venepuncture site feels (e.g. determine whether there is pain or burning).

Pain or burning may be early indication of phlebitis. Includes patient in decision making.

5. Have paper and pencil to calculate flow rate.

The beginning student is unfamiliar with IV fluid rates and should use mathematical calculations to obtain correct rate.

6. Know calibration (drop factor) in drops per millilitre of infusion set:

A. Microdrip: 60 drops/mL
B. Macrodrip: 20 drops/mL
Microdrip tubing, also called paediatric tubing, universally delivers 60 drops/mL and is used when small or very precise volumes are to be infused. Macrodrip tubing should be used when large quantities or fast rates are necessary.
Critical decision point: Know the drip rate of the infusion sets your agency uses; calculations must be checked by two nurses.

7. Determine hourly rate by dividing volume by hours; for example:

1000 mL over 8 hours = 125 mL/h
3 L over 24 hours = 3000/24 = 125 mL/h
Provides even infusion of fluid over prescribed hourly rate.

8. Select following formula to calculate flow rate (drops per minute, DPM) after determining mL/h:

Once hourly rate has been determined, the formulas for drops per minute (DPM) gives correct flow rate.
image  
  *Note:  
 

(a)If time is per hour, the hour will be multiplied by 60 to convert the time into minutes.


(b)If the time is already in minutes, no further conversion is required.

 
  E.g.: Using 20 drop factor infusion set  
 

(a)image


(b)image

 
  E.g.: Using 60 drop factor infusion set  
 

(a)image


(b)image


9. Place adhesive or fluid indicator tape on IV bag next to volume markings (see illustration).

Time-taping IV bag gives nurse visual cue as to whether fluids are being administered over correct period of time. Time tapes should be used for all IV infusions, including those on therapies infused via electronic infusion devices.
Critical decision point: Do not use felt-tip pens or permanent markers on IV bags, because ink could contaminate the solution.

10. Time flow rate by counting drops in drip chamber for 1 minute by watch, then adjust roller clamp to increase or decrease rate of infusion (see illustration).

Determines whether fluids are being administered too slowly or too fast.
image

Step 9 Time-taping the IV bag.

image

Step 10 Timing of flow rate.

11. Follow manufacturer’s directions for set-up of the infusion (see illustration) using infusion controller or pumps in your organisation:

Infusion pumps move fluid by compressing and milking IV tubing, thus propelling fluid through tubing.

Infusion controllers or pumps are not infallible and do not replace frequent, accurate nursing assessments.


a. Drip regulator must be open while infusion controller or pump is in use.


b. Monitor infusion rates and IV site for infiltration according to agency policy.

Infusion pumps may continue to infuse IV fluids after an infiltration has begun.
 

c. Assess patency and integrity of system when alarm sounds.

Alarm indicates that electronic eye has noted imprecise number of drops from drip chamber, an empty solution bag or bottle, kink in tubing, closed drip regulator, infiltrated, clotted catheter and/or air in the tubing.
image

Step 11 Setting up infusion.

Critical decision point: Special infusion tubing is required for some pumps (check agency policy).

12. Follow this procedure for volume-control device (burette):


a. Place burette between IV bag and insertion spike of infusion set (see illustration).

Prevents IV line from running dry if nurse does not return in exactly 60 minutes. In addition, if there is accidental increase in flow rate, patient receives at most only a 2-hour allotment of fluid.
 

b. Place 2 hours allotment of fluid into burette.


c. Assess system at least hourly; add fluid to burette. Regulate flow rate.

Reduces risk of sudden increase in fluid volume.
image

Step 12a Positioning of burette.

13. Observe patient for signs of overhydration or dehydration to determine response to therapy and restoration of fluid and electrolyte balance.

Signs and symptoms of dehydration or overhydration warrant changing rate of fluid infused.

14. Evaluate for signs of infiltration: inflammation at site, clot in catheter, kink or knot in infusion tubing.

Prevents decrease or cessation of flow rate.
RECORDING AND REPORTING HOME CARE CONSIDERATIONS

Record name of solution, rate of infusion, DPM and mL/h in nurses’ notes every shift or according to agency policy.

Record IV fluid administered every hour on the fluid balance chart.

Immediately record in nurses’ notes any new IV fluid rates.

Document use of any infusion-controlling device and number on that device.

At change of shift or when leaving on break, report rate of infusion and amount remaining in bag to be infused to nurse in charge or next nurse assigned to care for patient.

Ensure that patient is able and willing to operate the infusion device (if applicable) and administer IV therapy, or that there is a reliable caregiver or nursing support personnel at home to provide this IV therapy care.

Teach patient and primary caregiver to time DPM using watch with second hand.

A second type of infusion device is an IV-giving set that delivers fluids with the aid of gravity; IV-giving sets deliver fluids based on a determination of millilitres per hour. The rate is controlled by a roller clamp that is adjusted to a specified number of drops per minute. The rate of infusion depends on the height of the IV fluid container, IV tubing size and fluid viscosity. IV-giving sets are less precise than the IV pump in delivering IV fluids.

WORKING WITH DIVERSITY FOCUS ON OLDER ADULTS

In older adults, use the smallest gauge intravenous (IV) catheter or needle possible (e.g. 24 to 26 gauge), depending on prescribed IV fluid and rate. This gauge is less traumatising to the vein. This gauge can be used for hourly flow rates of crystalloids of 75–100 mL/h.

Avoid the back of the older adult’s hand or the dominant arm for venepuncture because these sites greatly interfere with the older adult’s independence.

If the older adult has fragile skin and veins, use minimal tourniquet pressure.

When the older adult has lost subcutaneous tissue, the veins lose stability and will roll away from the needle. To stabilise the vein, apply traction to the skin below the projected insertion site.

Using an angle of 5–15 degrees on insertion is helpful because the older adult’s veins are more superficial.

In the older person with fragile skin, prevent skin tears by minimising the amount of tape used.

Infusion Nurses Society, Alexander M, Corrigan A and others 2009 Infusion nursing: an evidence based approach, ed 3. Philadelphia, Saunders; Coulter K 1992 Intravenous therapy for the elder patient: implications for the intravenous nurse. J Intraven Nurs 15(suppl):S18.

No matter what device, the patient requires close monitoring to verify the correct infusion of the IV solution and to detect the occurrence of any complication. Patency of the IV catheter means that there are no clots at the tip of the needle or catheter, the cannula tip is not against the vein wall and any dressing is not impeding fluid flow. The nurse can assess patency by checking fluid flow from the drip chamber when the roller clamp is opened by applying pressure distal to the insertion site; if patent, the IV flow should stop on finger pressure and commence when finger pressure is relieved (Wotton and others, 2008). The tubing and area around the insertion site should be inspected for anything that could obstruct the flow of IV fluids. A knot or kink in the tubing can decrease the flow rate. The patient may occlude the tubing by lying or sitting on it. The position of the extremity, particularly at the wrist or elbow, can decrease flow rates. Occasionally the use of an arm board will help to keep the joint extended (Figure 39-18). The arm board also provides some protection to the IV site and tubing. The height of the IV bag can also affect flow rates. Raising the bag usually increases the rate because of increased gravitational pressure.

image

FIGURE 39-18 IV arm board.

From Potter PA, Perry AG 2004 Fundamentals of nursing, ed 6. St Louis, Mosby.

A cool, clammy, swollen and in some cases painful insertion site could signal an infiltration, which occurs when the cannula has dislodged from the vein and is in the subcutaneous space. When an infiltration occurs, the IV line must be discontinued and a new line inserted. When caring for a patient with an infusion, the nurse should assess the site and the infusion rate at least every hour.

WORKING WITH DIVERSITY FOCUS ON INFANTS AND CHILDREN

Because children are susceptible to fluid excess and deficit and are generally active (even when ill), care of an intravenous (IV) line becomes imperative. Hockenberry and others (2003) suggest:

Use a needleless system to administer the solution.

Use an infusion pump to deliver the ordered fluid at the prescribed rate.

Secure the IV catheter firmly and cover it with a transparent dressing.

Secure the IV line so the child cannot accidentally dislodge it.

Consider a commercial protective device to prevent the child from interfering with the insertion site.

Hockenberry MJ and others 2003 Wong’s Nursing care of infants and children, ed 7. St Louis, Mosby.

A sudden increase in IV infusion rate can cause a rapid increase in vascular volume, which can make the patient critically ill or even cause death. Volume-control devices, such as a burette, can prevent sudden excessive increases in the volume of IV solution infused.

MAINTAINING THE SYSTEM

After insertion of the IV line and regulation of the flow rate, the nurse must maintain the system. Agency policy provides guidelines for when peripheral and central IV cannulas must be removed and reinserted, the time for IV line changes and the response to an IV site scoring system, e.g. phlebitis score. Line maintenance is achieved by (1) keeping the system sterile, (2) changing solutions, tubing and for CVC lines site dressings and (3) assisting the patient with self-care activities so as to not disrupt the system.

Figure 39-19 demonstrates the potential sites for contamination of an IV device. Procedures during IV insertion should control the patient’s microflora and thus potential contamination during insertion. Other factors are controlled through conscientious use of infection-control principles. This begins with the use of thorough handwashing before and after the nurse handles any component of the IV system.

image

FIGURE 39-19 Potential sites for contamination of an intravascular device.

From Potter PA, Perry AG 2013 Fundamentals of nursing, ed 8. St Louis, Mosby.

The maintenance of a closed circuit will ensure the integrity of the IV system. The nurse never disconnects tubing because it becomes tangled or when positioning or moving a patient. If a patient needs more room to manoeuvre, extension tubing can be added to an IV line. A sterile bung must be attached to all available IV ports. The connection of a bung to the IV catheter decreases the risk of accidental disconnection and decreases risk of infection by ensuring the maintenance of a closed circuit.

An injection port must be cleaned thoroughly with 70% alcohol or povidone–iodine solution before accessing the system. Needleless intravascular devices and ports are now the equipment of choice for IV medication regimens, to reduce the number of needle-stick injuries. IV administration sets can remain sterile for 72 hours (Joanna Briggs Institute, 2003). The exception is tubing containing blood, blood products and lipid emulsions, which are more likely to promote bacterial growth and require more-frequent tubing changes. It is easier to change tubing when a new IV bag or bottle is being hung. To prevent entry of bacteria into the bloodstream, sterility must be maintained during tubing and solution changes (Skill 39-4).

SKILL 39-4 Changing intravenous solution and infusion tubing

DELEGATION CONSIDERATIONS

Changing IV solutions and tubing requires the problem-solving and knowledge-application skills of professional nurses. For this procedure, delegation is inappropriate.

EQUIPMENT

Bag of IV solution as ordered by doctor

Time tape

Infusion tubing

J-loop, or short extension tubing (if necessary)

‘Lever lock cannula’ or ‘threaded lock cannula’; attaches to the IV-giving set and connects the giving set to the cannula.

Normal saline flush:

Syringes

Transparent IV dressing

Tape

Disposable non-sterile gloves

STEPS RATIONALE
Changing IV solution  

1. Check doctor’s orders.

Ensures that correct solution will be used.

2. Determine the compatibility of all IV fluids and additives by consulting appropriate literature or the pharmacy.

Incompatibilities can cause physical, chemical and therapeutic patient changes.

3. Determine patient’s understanding of need for continued IV therapy.

Reveals need for patient instruction.

4. Assess patency of current IV access site.

If patency is not verified, a new IV access site may be needed. Notify doctor.

5. Have next solution prepared at least 30 minutes before needed. If prepared in pharmacy, ensure it has been delivered to the patient’s hospital unit. Check that solution is correct and properly labelled. Check solution expiry date.

Adequate planning reduces risk of clot formation in vein caused by empty IV bag. Checking prevents medication error.

6. Prepare to change solution when less than 50 mL of fluid remains in bottle or bag.

Prevents air from entering tubing and vein from clotting from lack of flow.

7. Prepare patient and family by explaining the procedure, its purpose and what is expected of patient.

Decreases anxiety and promotes cooperation.

8. Be sure drip chamber is at least half full.

Provides fluid to vein while bag is changed.

9. Perform hand hygiene.

Reduces transmission of microorganisms.

10. Prepare new solution for changing. If using plastic bag, remove protective cover from IV tubing port. If using glass bottle, remove metal cap and metal and rubber disks. Determine sterility of bag. Check seven rights of drug administration. Make sure prescribed additives and an additive label have been added. Check solution for colour, clarity, expiry date.

Permits quick, smooth and organised change from old to new solution. IV solutions are medications and as such should be carefully checked to reduce risk of error.

11. Move roller clamp to stop flow rate.

Prevents solution remaining in drip chamber from emptying while changing solutions.

12. Remove old IV fluid container from IV pole.

Brings work to nurse’s eye level.

13. Quickly remove spike from old solution bag or bottle and, without touching tip, insert spike into new bag or bottle.

Reduces risk of solution in drip chamber running dry and maintains sterility.
Critical decision point: If spike is contaminated, a new IV tubing set is required.

14. Hang new bag or bottle of solution.

Gravity assists with delivery of fluid into drip chamber.

15. Check for air in tubing.

Reduces risk of air embolus. Use of an air-eliminating filter also reduces this risk.
 

a. If bubbles form, they can be removed by closing the roller clamp, stretching the tubing downwards, and tapping the tubing with the finger (the bubbles rise in the fluid to the drip chamber).


b. For a larger amount of air, use a pair of forceps below the injection port of the IV tubing, insert a needle and syringe into a port below the air and aspirate the air into the syringe; remove forceps. Swab port with alcohol and allow to dry before inserting needle into port. Reduce air in tubing by priming slowly instead of allowing a wide-open flow.


16. Make sure drip chamber is one-third to half full. If the drip chamber is too full, pinch off tubing below the drip chamber, invert the container, squeeze the drip chamber, hang up the flask/bottle and insert giving set into the flask.

Reduces risk of air entering tubing.

17. Release roller clamp and regulate flow to prescribed rate.

Maintains measures to restore fluid balance and deliver IV fluid as ordered.

18. Observe patient for signs of overhydration or dehydration to determine response to IV fluid therapy.

Provides ongoing evaluation of patient’s fluid and electrolyte status.

19. Observe IV system for patency and development of complications (e.g. infiltration or phlebitis).

Provides ongoing evaluation of IV system.
Changing IV tubing  

20. Determine when new infusion set is needed:


a. Agency policy will indicate frequency of routine change for IV administration sets and heparin flushes.

Tubing change no more often than 72-hour intervals unless blood/blood products or TPN has been infused (Pearson, 1996).
 

b. Puncture of infusion tubing.

Punctured tubing results in fluid leakage and bacterial contamination.
 

c. Contamination of tubing.

Contamination of tubing allows entry of bacteria into patient’s bloodstream.

21. Observe for occlusions in existing tubing. Such occlusions can occur after infusion of packed red cells, whole blood, albumin or other blood components.

Whole blood or blood component product can occlude or partially occlude tubing, because viscous solutions adhere to walls of tubing and decrease the size of the lumen.

23. Prepare patient and family by explaining the procedure, its purpose and what is expected of patient.

Decreases anxiety, promotes cooperation and prevents sudden movement of extremity, which could dislodge IV needle or catheter.

24. Perform hand hygiene.

Reduces transmission of microorganisms.

25. Open new infusion set, keeping protective coverings over infusion spike, remove protection from connector at patient end of giving set and attach to ‘lever lock cannula’ or ‘threaded lock cannula’.

Provides nurse with ready access to new infusion set and maintains sterility of infusion set.

26. Put on non-sterile, disposable gloves.

Reduces risk of exposure to HIV, hepatitis and other blood-borne bacteria.

27. If needle or catheter hub is not visible, remove IV dressing. Do not remove tape securing needle or catheter to skin.

Catheter or needle hub must be accessible to provide smooth transition when removing old and inserting new tubing.

28. For IV infusion:


a. Move roller clamp on new IV tubing to ‘off’ position.

Prevents spillage of solution after bag or bottle is spiked.
 

b. Slow rate of infusion by regulating drip rate on old tubing. Be sure rate is at keep vein open (KVO) rate, usually around 20 mL/h.

Prevents complete infusion of solution that remains in tubing, which can increase risk of occlusion of IV catheter or needle.
 

c. With old tubing in place, compress drip chamber and fill chamber.

Provides surplus of fluid in drip chamber so there is enough fluid to maintain IV patency while changing tubing.
 

d. Remove old tubing from solution and hang or tape drip chamber on IV pole 90 cm above IV site.

Allows fluid to continue to flow through IV catheter while nurse is preparing new tubing.
 

e. Place insertion spike of new tubing into old solution bag opening, and hang solution bag on IV pole.

Permits flow of fluid from solution into new infusion tubing.
 

f. Compress and release drip chamber on new tubing; slowly fill drip chamber one-third to half full.

Allows drip chamber to fill and promotes rapid, smooth flow of solution through new tubing.
 

g. Slowly open roller clamp, flush tubing with solution. Usually no need to remove protective cap from ‘lever lock cannula’ or ‘threaded lock cannula’.

Removes air from tubing and replaces it with fluid.
 

h. Turn roller clamp on old tubing to ‘off’ position.

Prevents spillage of fluid as tubing is removed from needle or catheter hub.

29. For heparin lock:


a. Swab ‘lever lock cannula’ or ‘threaded lock cannula’ (bung/injection cap) with alcohol.

Removes air to prevent introduction into the vein.
 

b. Insert syringe with 1–3 mL saline and inject through the bung into the loop or short extension tubing.


30. Stabilise hub of catheter or needle and apply pressure over vein just above insertion site. Gently pull out old tubing (see illustration). Maintain stability of hub and quickly insert ‘lever lock cannula’ or ‘threaded lock cannula’ on the IV–giving set into the ‘Interlink injection site’ (bung) on the cannula (see illustrations). Re-tape IV tubing along arm.

Prevents accidental displacement of catheter or needle.

31. Open roller clamp on new tubing. Allow solution to run rapidly for 30–60 seconds.

Prevents clot formation in catheter or needle and backflow of blood.

32. Regulate IV drip according to doctor’s orders and monitor rate hourly (see illustration).

Permits IV solution to enter catheter to prevent catheter occlusion.

33. If necessary, apply new dressing.

Maintains infusion flow at prescribed rate.

34. Discard old tubing in contaminated waste bin.

Reduces risk of bacterial infection from skin.

35. Remove and dispose of gloves. Wash hands.

Reduces accidental transmission of microorganisms.

36. Evaluate flow rate and observe connection site for leakage.

Maintains prescribed rate of flow of IV fluid and determines if fit is secure.
image

Step 30 Removal of old tubing and insertion of new cannula.

image

Step 32 Monitoring IV drip rate.

RECORDING AND REPORTING HOME CARE CONSIDERATIONS

Record changing of tubing and solution on patient’s record. A special parenteral therapy flow sheet may be used.

Place a piece of tape or preprinted label with the date and time of tubing change and attach to tubing below the level of drip chamber.

Emphasise to patient and family the importance of changing solutions when IV tubing still contains fluid.

The dressings over IV sites are applied to reduce the entrance of bacteria into the insertion site. Dressings are usually transparent, but in CVC cannula (particularly where the jugular vein is used) these may be gauze. Transparent dressings reliably secure the IV device, allow continuous visual inspection of the IV site, are less easily soiled or moistened and require less-frequent changes than standard gauze (Joanna Briggs Institute, 2003). Agency policy may require IV dressings to be routinely changed within a certain timeframe (e.g. 48–72 hours) (Skill 39-5).

SKILL 39-5 Changing a peripheral intravenous dressing

DELEGATION CONSIDERATIONS

Changing a peripheral IV dressing requires the problem-solving and knowledge-application skills of professional nurses. For this procedure, delegation is inappropriate.

EQUIPMENT

Povidone–iodine swab/stick according to agency policy

Alcohol swab/stick

Adhesive remover (if needed)

Strips of non-allergenic tape

Disposable gloves

For gauze dressing:

Sterile 5 cm × 5 cm gauze pad

OR

For transparent dressing:

Sterile transparent dressing

STEPS RATIONALE

1. Determine when dressing was last changed. Many institutions require nurse to write date and time on dressing and date the device was first placed.

Provides information regarding length of time present dressing has been in place. Transparent occlusive dressing usually only changed when integrity has been breached; central venous catheter (CVC) changed weekly (Rosenthal, 2003).

2. Observe present dressing for moisture and intactness.

Moisture is a medium for bacterial growth and renders dressing contaminated.

3. Observe IV system for proper functioning or complications: kinks in infusion tubing or IV catheter. Palpate the catheter site through the intact dressing for inflammation or after subjective complaints of pain or burning.

Unexplained decrease in flow rate requires the nurse to investigate placement and patency of the IV catheter. Pain can be associated with both phlebitis and infiltration.

4. Inspect exposed catheter site for swelling or infiltration.

Indicates fluid infusing into surrounding tissues. Will require removal of IV catheter.

5. Assess patient’s understanding of need for continued IV infusion.

Determines need for patient instruction.

6. Explain procedure and purpose to patient and family. Explain that affected extremity must be held still and how long procedure will take.

Decreases anxiety, promotes cooperation and gives patient timeframe around which personal activities can be planned.

7. Perform hand hygiene. Put on disposable gloves.

Reduces transmission of microorganisms.

8. Remove tape, gauze and/or transparent dressing from old dressing one layer at a time, leaving tape that secures IV needle or catheter in place. Be cautious if catheter tubing becomes tangled between two layers of dressing. When removing transparent dressing, hold catheter hub and tubing with non-dominant hand.

Prevents accidental displacement of catheter or needle.

9. Observe insertion site for signs and/or symptoms of infection, namely redness, swelling and exudate.


10. If infiltration, phlebitis or clot occurs or if ordered by doctor, discontinue infusion.


11. If IV is infusing properly, gently remove any tape securing needle or catheter. Stabilise needle or catheter with one hand. Use adhesive remover to clean skin and remove adhesive residue, if needed.

Exposes venepuncture site. Stabilisation prevents accidental displacement of catheter or needle. Adhesive residue decreases ability of new tape to adhere tightly to skin.

12. Keep one finger over catheter at all times until tape or dressing is replaced.

Prevents decannulation from vein.

13. Using circular motion, clean peripheral IV insertion site with alcohol, then povidone–iodine solution (check that patient is not allergic to iodine) starting at insertion site and working outwards, creating concentric circles (see illustration). Allow each solution to dry for 2 minutes.

Circular motion prevents cross-contamination from skin bacteria near venepuncture site.
Critical decision point: Do not tape over connection of access tubing or port to IV catheter.
image

Step 13 Cleaning insertion site.

14. Apply new transparent or gauze dressing. (Tape the catheter in place using a transparent (clear) dressing.)

Ensures protection of IV site and reduces chance of infection.

15. Remove and discard gloves and used materials into contaminated waste bin.

Reduces transmission of microorganisms.

16. Anchor IV tubing with additional pieces of tape. When using polyurethane dressing, minimise the tape placed over dressing.

Prevents accidental displacement of IV needle or catheter or separation of IV tubing from needle adapter.

17. Place date and time of dressing change and size and gauge of catheter directly on dressing.

Documents dressing change.

18. Discard equipment and wash hands.

Reduces transmission of microorganisms.

19. Observe functioning and patency of IV system in response to changing dressing.

Validates that IV is patent and functioning correctly.

20. Monitor patient’s body temperature.

Elevated temperature indicates an infection that may be associated with bacterial contamination of the venepuncture site.
RECORDING AND REPORTING

Record appearance of IV site, type of dressing and status of IV fluid infusion.

A special parenteral fluid flow sheet may be used for recording.

To prevent the accidental disruption of an IV system, the nurse may need to help the patient with hygiene, comfort measures, meals and moving. Because a patient with an infusion in the arm finds it difficult to meet hygiene needs, the nurse should help with bathing and changing gowns. It helps to use a gown specifically made with press-studs along the top sleeve seam to facilitate changing the gown without disturbing the venepuncture site. Normal gowns are changed by following these six steps, for maximum arm mobility and speed:

1. Remove the sleeve of the gown from the non-IV arm.

2. Remove the sleeve of the gown from the IV arm.

3. Remove the IV bag from its stand and pass it and the tubing through the sleeve. (If this involves removing the tubing from an IV pump, use the roller clamp to temporary slow/stop the infusion to prevent the accidental infusion of a large volume of solution or medication.)

4. Place the IV bag and tubing through the sleeve of the clean gown and hang it on its stand. (If the IV is connected to a pump, reassemble and open the roller clamp. Turn the pump on.)

5. Place the IV arm through the gown sleeve.

6. Place the non IV arm through the gown sleeve.

Where a patient with an IV in situ is allowed to mobilise, the IV solution/pump will need to be transferred to an IV pole with wheels. The nurse helps the patient out of bed and places the pole next to the involved arm. The patient is instructed to hold on to the pole with the involved hand and to push it while walking. The nurse should assess the equipment to ensure the appropriateness of the height of the IV bag, no tension on the tubing and that correct flow rate continues. The patient should be instructed to report blood in the tubing, a stoppage in the flow or increased discomfort.

COMPLICATIONS OF INTRAVENOUS THERAPY
INFILTRATION

An infiltration (tissuing or extravasation) occurs when IV fluids enter the subcutaneous space around the venepuncture site. This manifests as swelling (from increased tissue fluid) and pallor (caused by decreased circulation) around the venepuncture site. In an infiltration, IV flow may continue or may stop; pain may also be present, usually resulting from oedema, and increases proportionately as the infiltration continues.

When infiltration occurs, the infusion must be discontinued and the extremity raised to promote venous drainage. Where the IV fluid or its additives are potentially necrotic, procedures for managing extravasations of necrotoxic solutions (e.g. IV antibiotics, chemotherapeutic agents) need to be followed. If IV therapy is still necessary, another cannula needs to be inserted into another extremity.

PHLEBITIS

is an inflammation of the vein. Selected risk factors for phlebitis include the type of catheter material, chemical irritation from IV additives and drugs (e.g. IV antibiotics) and the anatomical position of the catheter. Signs and symptoms include pain, increased skin temperature over the vein and, in some instances, redness travelling along the path of the vein (see Table 39-19). When phlebitis develops, the IV therapy must be discontinued and a new cannula inserted in another vein. Warm, moist heat on the site of phlebitis can offer some relief to the patient (see Chapter 30). Phlebitis can be dangerous because blood clots (thrombophlebitis) can occur and in some cases may result in emboli. Phlebitis is prevented by the routine removal and rotation of IV sites. Most agencies recommend replacing peripheral venous catheters and rotating sites every 48–72 hours (Joanna Briggs Institute, 2003).

TABLE 39-19 PHLEBITIS SCALE

SCORE CLINICAL SIGNS INTERPRETATION AND RESPONSE
0 No clinical symptoms No action required
1

Erythema at access site with or without pain

Oedema may or may not be present

No streak formation

No palpable venous cord

Possible signs of phlebitis

Continue to assess

2

Erythema with or without pain

Oedema may or may not be present

Streak formation

No palpable venous cord

Early signs of phlebitis

Re-site cannula

3

Erythema with or without pain

Oedema may or may not be present

Streak formation

Palpable venous cord

Signs of phlebitis

Re-site cannula

Consider treatment

Infusion Nurses Society (Alexander M, Corrigan A and others) 2009 Infusion nursing: an evidence based approach. Philadelphia, Saunders; Smith SF and others 2008 Clinical nursing skills: basic to advanced skills, ed 7. Upper Saddle River, NJ, Prentice Hall.

FLUID VOLUME EXCESS (FVE)

occurs when a patient has received a too-rapid administration of IV solutions. The assessment findings include shortness of breath, lung crepitations and tachycardia. The nurse should slow the rate of infusion, notify the doctor, raise the head of the bed and lower the foot of the bed (if not contraindicated by the patient’s underlying condition) and monitor vital signs.

BLEEDING

can occur around the venepuncture site during the infusion, or through the infusion cannula or tubing if these become inadvertently disconnected. Bleeding is common in patients who have received anticoagulant therapy or who have a bleeding disorder (e.g. leukaemia or thrombocytopenia). If bleeding occurs around the venepuncture site and the catheter is in the vein, a pressure dressing may be put over the site to control the bleeding. Bleeding from a vein is usually a slow, continuous seepage and is not serious.

DISCONTINUING INTRAVENOUS INFUSIONS

Discontinuing an infusion is necessary after the prescribed amount of fluid has been infused, when an infiltration occurs, if phlebitis is present or if the infusion cannula develops a clot at its tip. The nurse discontinuing an infusion first puts on disposable gloves, moves the roller clamp to the off/closed position and then removes the tape and dressing. The nurse places a sterile 5 cm × 5 cm gauze pad over the venepuncture site and, using the other hand, withdraws the cannula by pulling straight back away from the puncture site (Figure 39-20). If necessary, an alcohol swab can be used to remove dried blood or other drainage from around the site. The nurse elevates the extremity and applies pressure to the site for 1–2 minutes to control bleeding and prevent haematoma formation. Patients who have received heparin require longer pressure because of the action of heparin on blood-clotting mechanisms. The nurse records the amount of fluid infused and the time of the discontinuation.

image

FIGURE 39-20 IV catheter is removed slowly, keeping catheter parallel to vein.

• CRITICAL THINKING

Jane is the nurse caring for Betty, a 59-year-old who has just had a total knee replacement. She weighed 74 kg on admission. The doctor has ordered Keflin (cephalothin) 1 g in 50 mL normal saline to run over 30 minutes IV piggyback three times daily. Betty has a continuous infusion of Hartmann’s at 75 mL/h in the left forearm.

1. Calculate the drops per minute of the Keflin infusion using microtubing (60 drops/mL) and the Hartmann’s infusing using macrotubing (20 drops/mL).

2. Discuss whether the Hartmann’s is an appropriate IV solution and 75 mL/h is an appropriate amount for this postoperative patient who is also ordered nil by mouth.

TRANSFUSION (COLLOIDS)

Transfusion is the IV administration of whole blood or a component such as plasma, packed red blood cells (RBCs) or platelets. The objectives for blood transfusions are: (1) to increase circulating blood volume after surgery, trauma or haemorrhage; (2) to increase the number of RBCs and to maintain haemoglobin levels in patients with severe anaemia; and (3) to provide selected cellular components as replacement therapy (e.g. clotting factors, platelets, albumin).

BLOOD GROUPS AND TYPES

The most important grouping for transfusion purposes is the ABO system, which includes A, B, O and AB blood types. The determination of blood groups is based on the presence or absence of A and B red-cell antigens. Individuals with A antigens, B antigens, or no antigens belong to groups A, B and O, respectively. The person with A and B antigens has AB blood. People with type A blood naturally produce anti-B antibodies in their plasma. Similarly, type B people naturally produce anti-A antibodies. A type O person has neither type A nor type B antigens, and thus is considered a universal blood donor. A type AB person produces neither antibody, which is why such a person can be a universal recipient and receive any type of blood.

If blood that is mismatched with the patient’s blood is transfused, a transfusion reaction occurs. The transfusion reaction is an antigen–antibody reaction, and can range from a mild response to severe anaphylactic shock which can be life-threatening.

Another consideration when matching for blood transfusions is the Rhesus (Rh) factor, which is an antigenic substance in the erythrocytes of most people. A person with the factor is Rh positive, and a person without it is Rh negative.

AUTOLOGOUS TRANSFUSION

is the collection and administration of a patient’s own blood. The blood for an autologous transfusion can be obtained by preoperative donation up to 5 weeks before the planned surgery (e.g. heart, orthopaedic, plastic, gynaecological). The patient can donate 1–5 units of blood depending on the type of surgery and the ability of the patient to maintain an acceptable haematocrit. The blood will be tested for HIV and HBV. Another way to collect blood for an autologous transfusion is by perioperative blood salvage (e.g. during vascular and orthopaedic surgery, organ transplant surgery and traumatic injuries). The salvaged blood is then reinfused during surgery. Blood can also be salvaged postoperatively from mediastinal and chest-tube drainage and after joint and spinal surgery. Autologous transfusions are safer for the patient because they decrease the risk of complications such as mismatched blood and exposure to blood-borne infectious agents.

MANAGEMENT OF BLOOD TRANSFUSIONS

The nurse is responsible for assessment before, during and after the transfusion and for regulation of the transfusion. Assessment is critical because of the risk of allergic reactions.

The nurse should assess the venepuncture site for signs of infection, patency and infiltration. The nurse also determines whether the venepuncture was performed with an 18 gauge or 19 gauge catheter. The large catheter is needed because blood is more viscous than IV crystalloids. IV administration for blood administration has an inline filter. The tubing should be primed with 0.9% normal saline prior to commencing the transfusion.

Pre-transfusion assessment also includes information on the patient’s knowledge of the reason for the blood transfusion and any history of previous transfusion or transfusion reactions. A prior transfusion reaction does not increase the risk of a reaction with a subsequent transfusion. Before commencing the transfusion, the nurse explains the procedure and instructs the patient to report any side effects (e.g. chills, dizziness, fever) once the transfusion begins. The nurse also checks that the patient has signed an informed consent.

Because of the danger of transfusion reactions, it is important to use specific precautions in administering blood or blood products. The nurse must obtain the patient’s baseline vital signs before the transfusion begins. These data allow the nurse to determine when changes in vital signs occur, which can indicate that a transfusion reaction is developing. To ensure that the right patient receives the correct type of blood or blood product, a thorough procedure is used to check the identity of the blood products and the patient and the compatibility of the blood and the patient. The nurse, although not involved in the blood labelling process, is responsible for determining that the blood delivered to the patient corresponds to the patient’s blood type listed in the medical record. Two RNs or one RN and an enrolled nurse (depending on agency policy) must together check the label on the blood product for the type of blood product, expiry date on the bag, the patient’s identification number, blood group and complete name. This is then checked against the patient’s ID band and chart. If even a minor discrepancy exists, the blood should not be given and the blood bank should be notified immediately.

Initiation of a transfusion begins slowly, to allow for the early detection of a transfusion reaction. The nurse maintains the infusion rate, monitors for side effects, assesses vital signs and promptly records all findings. The nurse usually stays with the patient during the first 15 minutes, the time when a reaction is most likely to occur (timing of reactions depends on rate of the transfusion flow; thus the nurse may need to stay with the patient longer if the transfusion rate is slow). The nurse will continue to monitor the patient and obtain vital signs periodically during the transfusion as directed by agency policy. If a transfusion reaction is anticipated or suspected, the nurse will obtain vital signs more frequently (Table 39-20).

TABLE 39-20 ADVERSE TRANSFUSION REACTIONS/COMPLICATIONS

image image image image image image

The rate of transfusion is usually specified in the doctor’s prescription. Ideally, a unit of whole blood or packed RBCs is transfused in 2 hours. This time can be lengthened to 4 hours if the patient is at risk of FVE. Beyond 4 hours there is a risk of the blood becoming contaminated.

When patients have a severe blood loss such as with haemorrhage, they may receive rapid transfusions through a central venous catheter. In this case, a blood-warming device is often necessary, because the tip of the central venous catheter lies in the superior vena cava, above the right atrium. Rapid administration of cold blood can result in cardiac dysrhythmias (Lewis and others, 2008).

• CRITICAL THINKING

Caroline has just received a new patient on her unit with a diagnosis of anaemia related to ongoing haemorrhage. She has a haemoglobin level (Hb) of 80 g/L, temperature 36.8°C, pulse 112 beats per minute, blood pressure 88/56 mmHg, respirations 26 breaths per minute.

1. What blood product would she receive and why?

2. A transfusion was commenced, and after 15 minutes the patient stated she felt a little hot; her temperature is now 37.4°C. Make a decision on whether you would continue or stop the transfusion and provide a rationale for your decision.

3. Can Caroline delegate the administration of blood to a student, registered or enrolled nurse on her team?

TRANSFUSION REACTIONS

A transfusion reaction is a systemic response by the body to incompatible blood. Causes include RBC incompatibility and allergic sensitivity to the components of the transfused blood or to the potassium or citrate preservative in the blood. Several types of acute reactions can result from blood transfusions, as well as other complications (see Table 39-20).

A second category of reactions includes diseases transmitted by infected blood donors who are asymptomatic. Diseases transmitted through transfusions are malaria, hepatitis and HIV. Because all units of blood collected must undergo serological testing and screening for HIV and HBV, the risk of acquiring blood-borne infections from blood transfusions is reduced.

Circulatory overload is a risk when a patient receives massive whole blood or packed RBC transfusions for haemorrhagic shock or when a patient with normal blood volume receives blood. Patients particularly at risk of circulatory overload are children, older adults and those with cardiopulmonary diseases.

Blood transfusion reactions are life-threatening, but prompt nursing intervention can maintain the patient’s physiological stability.

If a blood reaction is suspected, the nurse stops the transfusion immediately.

The IV line (which contains blood product) is removed, and often another cannula is inserted in a different site. Transfusing even the small amount of mismatched blood remaining in the tubing can cause a major reaction. A 0.9% normal saline infusion is commenced using a new line and often a new IV site.

The doctor is notified immediately.

The nurse remains with the patient, observing signs and symptoms and monitoring vital signs as often as every 5 minutes.

The nurse prepares to administer emergency drugs such as antihistamines, vasopressors, fluids and steroids as per doctor’s order.

The nurse prepares to perform cardiopulmonary resuscitation.

The nurse obtains a urine specimen and sends it to the laboratory.

The blood container, tubing, attached labels and transfusion record are saved and returned to the laboratory.

INTERVENTIONS FOR ACID–BASE IMBALANCES

Nursing interventions to promote acid–base balance support prescribed medical therapies and are aimed at reversing an existing acid–base imbalance. Such imbalances can be life-threatening and require rapid correction. The nurse must maintain a functional IV line and frequently check the doctor’s orders for new medications or fluids. Prescribed drugs, such as insulin or sodium bicarbonate, and fluid and electrolyte replacement should be given promptly. Chapter 31 reviews appropriate therapies for patients with respiratory acidosis.

The nurse also monitors patients closely for changes in acid–base balance. Patients with acid–base disturbances usually require repeated ABG analysis. This procedure provides arterial blood samples for analysis of hydrogen ion concentration.

ARTERIAL BLOOD GASES

Determination of ABG levels requires the removal of a sample of blood from an artery to assess the patient’s acid–base status and the adequacy of ventilation and oxygenation. Arterial blood is drawn from a peripheral artery (usually the radial) or from an existing arterial line inserted by a doctor. After the specimen is obtained, care is taken to prevent air from entering the syringe because this will affect the blood gas analysis. To reduce metabolism of cells, the syringe is submerged in crushed ice and transported immediately to the laboratory. The nurse applies pressure to the puncture site for at least 5 minutes to reduce the risk of bleeding or haematoma formation. The nurse might also reassess the radial pulse after pressure has been removed.

Restorative care

After experiencing acute alterations in fluid, electrolyte or acid–base balance, patients often require ongoing maintenance to prevent a recurrence of health alterations.

Older adults and the chronically ill require special considerations to prevent complications from developing. The research highlight demonstrates the often unrecognised degree of chronic dehydration in older adults and the need for an interprofessional approach to discharge planning. A discharge plan for all patients who have experienced or are at risk for fluid and electrolyte disturbances (particularly older adults, infants and children) should include a written list of clinical signs and symptoms of fluid and electrolyte disturbance, frequency, type and amount of maintenance fluids required and when to seek advice.

HOME INTRAVENOUS THERAPY

IV therapy is used for patients requiring long-term hydration, parenteral nutrition (see Chapter 36) or long-term medication administration. The patient must have a family member available to assist them to manage the IV therapy. A home care nurse will work closely with the patient to ensure that a sterile IV system is maintained and that complications are avoided or recognised promptly. Box 39-6 summarises patient education guidelines for home IV therapy.

BOX 39-6 CLIENT TEACHING FOR HOME INTRAVENOUS (IV) THERAPY

Explain to patient and caregiver the importance of IV therapy in maintaining hydration and access for the delivery of medications.

Emphasise the risks involved when the IV system is not kept sterile.

Be sure the patient and/or caregiver is able to manipulate the required equipment.

Instruct patient or caregiver in how to change IV solutions, tubing and dressing when they become soiled or dislodged. (Note: the home health nurse may be able to visit often enough to perform scheduled tubing and dressing changes or to assess patient’s/family’s ability.)

Instruct patient and caregiver about signs and symptoms of overhydration, infiltration, phlebitis and infection and to notify the home health nurse immediately.

Instruct patient and caregiver to notify the home health nurse if the infusion slows or stops or if blood is seen in the tubing.

Teach patient with caregiver’s assistance how to walk or move, perform hygiene and participate in other activities of daily living without dislodging or disconnecting catheter and tubing.

NUTRITIONAL SUPPORT

Most patients who have had electrolyte disorders or metabolic acid–base disturbances require ongoing nutritional support. Depending on the type of disorder, fluid or food intake may be encouraged or restricted (see Chapter 36). The patient needs a nutritionally well-balanced diet. If patients are still responsible for preparing their own meals, they should learn to look at the lists of nutrient content of foods and to read the labels of commercially prepared foods. Nurses should possess knowledge of the fluid content of various foods if they are to be innovative in assisting patients who are reluctant to drink to maintain an appropriate level of fluid intake (see Table 39-17). Nursing staff should identify individual plans for each patient and ensure that such plans include strategies appropriate to the patient and their degree of haemodynamic stability (Table 39-21).

TABLE 39-21 STRATEGIES TO MAINTAIN ORAL INTAKE

ASPECT STRATEGY
Document

Usual fluid intake and eating habits

Usual weight, usual vital signs

Fluid preference and preferred temperature of beverage

Educate patients and relatives

Importance of hydration and encouragement of drinking even when not thirsty

Importance of fluid and foods to hydration

Early recognition of any decrease in usual patterns

Educate nursing staff

Appropriate and timely assessment of the appropriate initiation of oral rehydration solutions, nasogastric feeding, subcutaneous or intravenous rehydration

Evaluation of medications for possible dehydrating effects

Interpretation of patient data, including laboratory results

Strategies to increase fluid consumption

Identify anorexia

Replenish and refresh fluid supplies regularly

Balance caffeinated and alcoholic drinks with other fluids

Offer fluids regularly and encourage their consumption—if necessary 1- to 2-hourly. Use beverage carts to encourage fluid consumption throughout the day, not just at meal-times

Fluid intake should equate to approximately 75% of the required daily fluid requirement

Calculation of the required hourly volume depends on dietary intake. If no dietary intake, the hourly required oral intake (taking into account only waking hours) would be approximately 100 mL

Offer popsicles and fluid-rich foods

Ensure access to drinks, positioning of residents, use of drinking straws, feeder cups

Use of visual reminders to drink, e.g. posters

Check environment for obstacles

Adapted from Wotton K, Crannitch K, Munt R 2008 Prevalence, risk factors and strategies to prevent dehydration in older adults. Contemp Nurse 31(1):44–56.

RESEARCH HIGHLIGHT
Research focus

Older adults are frequently admitted with dehydration. Dehydration has serious consequences for older adults, including increased risk of illness or death.

Research abstract

This retrospective review of medical records describes the prevalence, assessment and risk factors for chronic dehydration in 185 older adults who visited an emergency department in June 2000. Results showed chronic dehydration was present in 89 (48%) of the patients. Doctors documented assessment for signs of dehydration in 23 (26%) of the dehydrated older adults, but no independent assessments for dehydration were recorded by nurses.

These findings indicate that many older adults may suffer from unrecognised dehydration, and nurses should be alert to the possibility that dehydration may be present in community-dwelling older adults as well as those who live in residential facilities.

Reference

Bennett J, Thomas V, Riegel B. Unrecognised chronic dehydration in older adults: examining prevalence rate and risk factors. J Gerontol Nurs. 2004;30(11):22–28.

• CRITICAL THINKING

Edwin Schell is an elderly resident of a long-term care facility. He is quite immobilised by severe arthritis, and needs help to get into and out of his chair.

1. How would you assess his fluid balance?

2. What measures could you take if you found him to be dehydrated?

MEDICATION SAFETY

Numerous medications contain components or create potential side effects that can alter fluid and electrolyte balance. Patients with chronic disease who receive multiple medications and those with renal or liver disorders are at significant risk for experiencing medication complications. Once patients return to a restorative-care setting, whether in the home, long-term care or a nursing home, drug safety becomes very important. Patient and family education is essential to provide information on knowing what is contained in a drug and how to monitor for and when to report side effects. The nurse should review all medications with patients and encourage them to consult with the local pharmacist, especially before taking over-the-counter medications.

EVALUATION

Patient care

The evaluation of a patient’s clinical status is especially important if an acute fluid and electrolyte or acid–base disturbance exists. The patient’s condition can change very quickly, and the nurse must be able to recognise the signs and symptoms of impending problems. To do this well, the nurse uses knowledge about the health alterations of the patient, the effects of medications and fluids, the patient’s presenting clinical status and past medical history (Figure 39-21).

image

FIGURE 39-21 Critical thinking model for fluid, electrolyte and acid–base balance evaluation phase.

The nurse performs evaluative measures and determines whether changes have occurred from the last patient assessment. For example, if the nurse assesses an increase in serum potassium for a patient diagnosed with hypokalaemia, the implementation of management strategies should see a concurrent decrease in the physical signs and symptoms of hypokalaemia. The patient’s heart rhythm becomes more regular and normal bowel function returns.

For patients with less-acute alterations, evaluation is likely to occur over a longer period of time. In this situation the nurse’s evaluation may also focus on behavioural changes (e.g. the patient’s ability to follow dietary restrictions and medication schedules). The family’s ability to anticipate alterations and prevent problems from recurring is also an important element of evaluation.

The patient’s level of progress determines whether the nurse needs to continue or revise the plan of care. If there is a failure to meet expected outcomes, the nurse may need to consult with a doctor and discuss additional methods, such as increasing the frequency of an intervention (e.g. provide more fluids to a dehydrated patient), introducing a new therapy (e.g. initiate insertion of an IV) or discontinuing a particular therapy. Once outcomes have been met, the nurse can resolve the nursing diagnosis and focus on other priorities.

Patient expectations

The nurse routinely reviews with the patient any success in meeting their expectations of care, taking into account the patient’s likes and dislikes regarding nutritional intake. ‘Tell me how you feel’ is a question that the nurse might raise if the patient’s expectations revolve around comfort and symptom management. If the patient’s concerns involve having a better understanding of a chronic problem, the nurse’s evaluation might focus on the patient’s satisfaction with educational offerings. Often the patient’s level of satisfaction with care also depends on the nurse’s success in involving family and friends. If the patient has concerns about returning home or to a different care setting, it will be important to evaluate whether the patient feels prepared for the transition from acute care.

• CRITICAL THINKING

Mr Green, 56 years of age, weighs 80 kg and has been consuming 1200 mL of fluid (estimated from food and fluid intake) each day for the last week. He attends the emergency department because he was feeling dizzy and passing small amounts of dark, concentrated urine. The hourly urine output for the last 2 hours following the insertion of an indwelling urine catheter was 20 mL and 22 mL.

Use the formulae in this chapter to calculate Mr Green’s fluid requirement and to determine the adequacy of hourly urine output to make a decision of the appropriateness of his current intake.

KEY CONCEPTS

Body fluids are distributed in extracellular fluid and intracellular fluid compartments and are composed of electrolytes, minerals, cells and water.

Body fluids are regulated through fluid intake, output and hormonal regulation.

Volume disturbances include isotonic and osmolar deficits and excesses.

Electrolytes are regulated by dietary intake and hormonal controls.

Acid–base imbalances are buffered by chemical and physiological buffering, especially the lungs and kidneys.

Patients who are very young or very old, or who are chronically or seriously ill, are at greater risk of fluid, electrolyte and acid–base imbalances.

Assessment for fluid, electrolyte and acid–base alterations includes nursing history, physical and behavioural assessment, measurements of fluid balance, daily weights and specific laboratory data.

Osmolar imbalances and fluid volume deficit can be corrected by enteral or parenteral administration of fluid.

Common complications of intravenous therapy include infiltration, phlebitis, infection, fluid volume excess and bleeding at the infusion site.

Blood transfusions are given to replace fluid volume loss from haemorrhage, to treat anaemia or to replace coagulation factors.

Blood transfusions can be donor or autologous, or obtained through perioperative salvage.

Administration of blood or blood products requires the nurse to follow a specific procedure to identify transfusion reactions quickly.

The risks of transfusion include transfusion reactions, hyperkalaemia, hypocalcaemia, fluid volume excess and infection.

Treatment for electrolyte disturbances includes dietary and pharmacological interventions.

The goals of therapy for acid–base imbalances are to treat the underlying illness and to restore the arterial pH to normal.

ACKNOWLEDGMENT

The author acknowledges the contribution of Susan Hauser Jefferies to this chapter in the previous edition of this text.

REFERENCES

Almond CSD, Shin AY, Fortescue EB, et al. Hyponatremia among runners in the Boston Marathon. New Engl J Med. 2005;352:1550–1556.

Austin C. Water: guidelines for nutritional support. Nutr Support Serv. 1996;6:27–29.

Berry BE, Pinard AE. Assessing tissue oxygenation. Crit Care Nurse. 2002;22(3):22.

Davidhizar R, Dunn LC, Hart AN. A review of the literature on how important water is to the world’s elderly population. Int Nurs Rev. 2004;51:159–166.

Dasgupta M, Binns MA, Rochon PA. Subcutaneous fluid infusion in a longterm care setting. J Am Geriatr Assoc. 2000;48:795–799.

Eaton D, Bannister P, Mulley GP, et al. Axillary sweating in clinical assessment of dehydration in ill elderly patients. Br Med J. 1999;308:1271.

Ebersole P, et al. Toward healthy aging: human needs and nursing response, ed 6. St Louis: Mosby, 2004.

Erstad BL. Osmolality and osmolarity: narrowing the terminology gap. Pharmacother. 2003;23(9):1085–1086.

Guyton AC, Hall JE. Textbook of medical physiology, ed 11. Philadelphia: Elsevier, 2006.

Haynie DT. Biological thermodynamics. Cambridge: Cambridge University Press, 2001.

Infusion Nurses Society. Intravenous nursing standards of practice. J Infusion Nurs. 2006;29(1 Suppl):S1–S93.

Joanna Briggs Institute (JBI). Aged care practice manual, ed 2. Adelaide: JBI, 2003.

Joanna Briggs Institute (JBI). Management of peripheral intravascular devices: technical report (O’Connell A, Craig A, Lockwood C), vol 4, iss 5. Adelaide: JBI, 2008.

Lancaster KJ, Smiciklas-Wright H, Heller DA, et al. Dehydration in black and white older adults using diuretics. Ann Epidemiol. 2003;13(7):525–529.

Lewis SM, et al. Medical–surgical nursing; assessment and management of clinical problems, ed 6. St Louis: Mosby, 2008.

Madias E, Adrogue H. Cross talk between two organs: how the kidney responds to disruption of acid–base balance by the lung. Nephron. 2003;93(3):61.

Mannesse C, van Puijenbroek E, Jansen P, et al. Hyponatraemia as an adverse drug reaction of antipsychotic drugs: a case-control study in VigiBase. Drug Saf. 2010;33(7):569–578.

McCance K, Huether S. Pathophysiology: the biological basis for disease in adults and children, ed 5. St Louis: Mosby, 2006.

Movig KL, Leufkens HG, Lenderink AW, et al. Association between antidepressant drug use and hyponatraemia: a case-control study. Br J Clin Pharmacol. 2002;53(4):363–369.

Noble-Adams R. Dehydration: subcutaneous fluid administration. Br J Nurs. 1995;14(9):488–494.

Pearson ML. Hospital infection control practices: advisory committee guideline for prevention of intravascular device-related infections. Infect Control Hosp Epidemiol. 1996;17(7):438.

Rosenthal K. Pinpointing intravascular device infections. Nurs Manage. 2003;34(6):35.

Roth KS, Chan JCM. Renal tubular acidosis: a new look at an old problem. Clin Pediatr (Phila). 2001;40(10):533–543.

Sasson M, Shvartzman P. Hypodermoclysis: an alternative infusion technique. Am Fam Physician. 2001;64(9):1575–1579.

Patton KT, Thibodeau GA. Anatomy and physiology, ed 7. St Louis: Mosby, 2010.

Wiese JG, Shlipak M, Browner WS. The alcohol hangover. Ann Int Med. 2000;132(11):897–902.

Wotton K. Clinical reasoning module. Adelaide: Flinders University, 2011.

Wotton K, Crannitch K, Munt R. Prevalence, risk factors and strategies to prevent dehydration in older adults. Contemp Nurse. 2008;31(1):44–56.

Xiao H, Barber J, Campbell ES. Economic burden of dehydration among the hospitalised elderly patients. Am J Health Syst Pharm. 2004;61(23):2534–2540.