Acute care
Patients with acute pulmonary illnesses require nursing interventions directed towards halting the pathological process, as with a respiratory tract infection; shortening the duration and severity of the illness, such as hospitalisation with pneumonia; and preventing complications from the illness or treatments, such as healthcare-associated (nosocomial) infection resulting from invasive procedures.
DYSPNOEA MANAGEMENT
Dyspnoea is difficult to quantify and to treat. Treatment needs to be individualised for each patient, and usually more than one therapy is implemented. The underlying process that causes or worsens dyspnoea must be treated and stabilised initially, then four additional therapies—pharmacological measures, oxygen therapy, physical techniques and psychosocial techniques—are implemented. Pharmacological agents may include bronchodilators, steroids, mucolytics and low-dose anxiolytic medications. Oxygen therapy can reduce dyspnoea associated with exercise. Physical techniques, such as cardiopulmonary reconditioning, breathing techniques and cough control, can help to reduce dyspnoea. Relaxation techniques, biofeedback and meditation are physiological measures that can lessen the sensation of dyspnoea.
AIRWAY MAINTENANCE
The airway is patent when the trachea, bronchi and large airways are free from obstructions. Airway maintenance requires adequate hydration to prevent thick, tenacious secretions; proper coughing techniques to remove secretions and keep the airway open; and a variety of interventions to help the patient with alterations in airway clearance, such as suctioning, chest physiotherapy and nebuliser therapy.
The ability of a patient to mobilise pulmonary secretions may make the difference between a short-term illness and a long recovery involving complications. Nursing interventions that promote mobilisation of pulmonary secretions help the patient achieve and maintain a clear airway and help promote lung expansion and gas exchange.
HYDRATION
Maintenance of adequate systemic hydration keeps mucociliary clearance normal. In patients with adequate hydration, pulmonary secretions are thin, clear to white, watery and easily expectorated with minimal coughing. Excessive coughing to clear thick, tenacious secretions is tiring and energy-depleting. The best way to maintain thin secretions is to provide a fluid intake of 1500–2000 mL/day (or up to 3 L/day in tropical areas), unless contraindicated by cardiac status. The colour, consistency and ease of secretion expectoration can determine adequacy of hydration.
HUMIDIFICATION
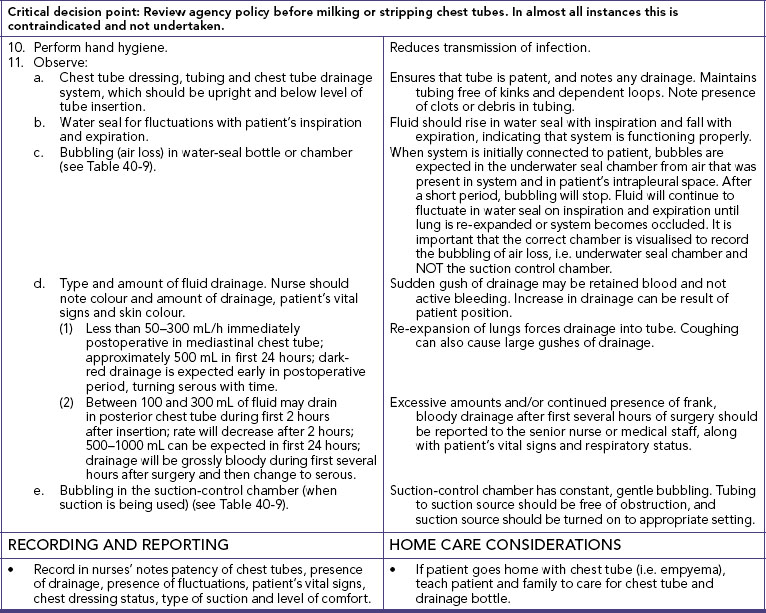
is the process of adding water to gas. Temperature is the most important factor affecting the amount of water vapour a gas can hold. The percentage of water in the gas in relation to its capacity for water at a specific temperature is the relative humidity. Air or oxygen with a high relative humidity keeps the airways moist and helps loosen and mobilise pulmonary secretions. Humidification is necessary for patients receiving oxygen therapy at greater than 4 L/min, to moisten the mucociliary system. When the thin layer of fluid that supports the mucus layer over the cilia is allowed to dry, the cilia are damaged and cannot adequately clear the airway. Bubbling oxygen through warm (37°C) water can add humidity to the oxygen delivered to the upper airways, as with a nasal catheter, nasal cannula or face mask. The oxygen (humidity) tent is used for infants and children with illnesses such as croup and tracheitis to liquefy secretions and help reduce fever (Overend and others, 2001). The nebuliser at the top of the humidity tent must remain filled with water to prevent non-humidified air or oxygen from entering the tent. Air in the humidity tent can become cool and fall below 20°C, causing the child to become hypothermic. The nurse monitors the child’s body temperature as well as respiratory status. Children in humidity tents require frequent changes of clothing and bedclothes to remain warm and dry.
NEBULISATION
is a process of adding moisture or medications to inspired air by mixing particles of varying sizes with the air. A nebuliser uses the aerosol principle to suspend a maximum number of water droplets or particles of the desired size in inspired air. The moisture added to the respiratory system through nebulisation improves clearance of pulmonary secretions. Nebulisation is often used for administration of bronchodilators and mucolytic agents. Humidification through nebulisation enhances mucociliary clearance, the body’s natural mechanism for removing mucus and cellular debris from the respiratory tract.
The major types of nebulisers are the jet-aerosol nebuliser and the ultrasonic nebuliser. A jet-aerosol nebuliser uses gas under pressure, and the ultrasonic nebuliser uses high-frequency vibrations to break up the water or medication into fine drops or particles. When inspired with air or administered oxygen, the drops of particles are then deposited throughout the tracheobronchial tree.
COUGHING TECHNIQUES
Coughing is effective for maintaining a patent airway. Coughing permits the patient to remove secretions from both the upper and the lower airways. The normal series of events in the cough mechanism are deep inhalation, closure of the glottis, active contraction of the expiratory muscles, and glottis opening. Deep inhalation increases the lung volume and airway diameter, allowing the air to bypass partially obstructing mucous plugs or other foreign matter. Contraction of the expiratory muscles against the closed glottis causes a high intrathoracic pressure to develop. When the glottis opens, a large flow of air is expelled at high speed, providing momentum for mucus to move to the upper airways where it can be expectorated or swallowed.
The effectiveness of coughing is evaluated by clearing of adventitious sounds by auscultation, sputum expectoration or the patient’s report of swallowed sputum. Patients with chronic pulmonary diseases, upper respiratory tract infections and lower respiratory tract infections should be encouraged to deep-breathe and cough at least every 2 hours while awake. Patients with a large amount of sputum should be encouraged to cough every hour while awake and every 2–3 hours during sleep time until the acute phase of mucus production has ended. Coughing techniques include deep-breathing and coughing (for the postoperative patient), cascade, huff and quad coughing.
• Deep-breathing and coughing is taught preoperatively for use postoperatively. The patient simply inhales as deeply as possible, holds the breath for 2 or 3 seconds and coughs forcefully on exhalation to clear airways. To be effective, postoperative pain must be controlled.
• With the cascade cough, the patient takes a slow, deep breath and holds it for 2 seconds while contracting expiratory muscles. Then the patient opens the mouth and performs a series of coughs throughout exhalation, thereby coughing at progressively lowered lung volumes. This technique promotes airway clearance and a patent airway in patients with large volumes of sputum.
• The huff cough stimulates a natural cough reflex and is generally effective only for clearing central airways. While exhaling, the patient opens the glottis by saying the word huff. With practice the patient inhales more air and may be able to progress to the cascade cough.
• The quad cough technique is used for patients without abdominal muscle control, such as those with spinal cord injuries. While the patient breathes out with a maximal expiratory effort, the patient or nurse pushes inwards and upwards on the abdominal muscles towards the diaphragm, causing the cough.
POSITIVE EXPIRATORY PRESSURE
(PEP), although not a cough technique, also works to mobilise secretions. The patient inhales a larger than normal volume of air and exhales through a resistor. The resistance causes the patient’s exhalation to be 3–4 times as long as the inhalation, and is thought to increase the volume of air distal to the secretions. After several breaths using this technique, the patient follows with huff coughing. There is some evidence that PEP increases sputum expectoration in patients with COPD (Tang and others, 2010).
CHEST PHYSIOTHERAPY
(CPT) is a group of therapies used in combination to mobilise pulmonary secretions (Box 40-12). These therapies include postural drainage, chest percussion and vibration. Chest physiotherapy should be followed by productive coughing and suctioning of the patient who has a decreased ability to cough. Chest physiotherapy is recommended for patients who produce greater than 25 cm3 of sputum per day or have evidence of atelectasis by chest X-ray examination. There is insufficient evidence to demonstrate that the CPT techniques detailed below improve expectoration of secretions in patients with COPD or pneumonia (Tang and other, 2010; Yang and others, 2010). This procedure can be safely used with infants and young children; however, conditions and diseases unique to children may at times contraindicate this procedure.
BOX 40-12 PROCEDURAL GUIDELINES FOR CHEST PHYSIOTHERAPY
Nursing care and selection of chest physiotherapy (CPT) skills are based on specific assessment findings. The following guidelines help the nurse in physical assessment and subsequent decision making.
• Know the patient’s normal range of vital signs. Conditions such as atelectasis and pneumonia requiring CPT can affect vital signs. The degree of change is related to the level of hypoxia, overall cardiopulmonary status and tolerance to activity.
• Know the patient’s medications. Certain medications, particularly diuretics and antihypertensives, cause fluid and haemodynamic changes. These may decrease the patient’s tolerance to the positional changes of postural drainage. Steroid medications increase the patient’s risk of pathological rib fractures and often contraindicate rib shaking.
• Know the patient’s medical history. Certain conditions such as increased intracranial pressure, spinal cord injuries and abdominal aneurysm resection contraindicate the positional changes of postural drainage. Thoracic trauma or surgery may also contraindicate percussion, vibration and rib shaking.
• Know the patient’s level of cognitive function. Participation in controlled coughing techniques requires the patient to follow instructions. Congenital or acquired cognitive limitations may alter the patient’s ability to learn and participate in these techniques.
• Be aware of the patient’s exercise tolerance. CPT manoeuvres are tiring. When the patient is not used to physical activity, initial tolerance to the manoeuvres may be decreased. However, with gradual increases in activity and planned CPT, patient tolerance for the procedure improves.
involves striking the chest wall over the area being drained. The hand is positioned so that the fingers and thumb touch and the hand is cupped (Figure 40-13). Percussion on the surface of the chest wall sends waves of varying amplitude and frequency through the chest, changing the consistency and location of the sputum. Chest percussion is performed by alternating hand motion against the chest wall (Figure 40-14). Percussion is performed over a single layer of clothing, not over buttons, press-studs or zips. The single layer of clothing prevents slapping the patient’s skin. Thicker or multiple layers of material dampen the vibrations.
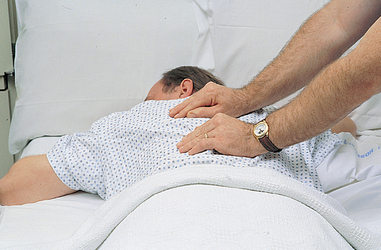
FIGURE 40-13 Hand position for chest wall percussion during physiotherapy.
From Potter PA, Perry AG 2004 Fundamentals of nursing, ed 6. St Louis, Mosby.
FIGURE 40-14 Chest wall percussion, alternating hand clapping against the patient’s chest wall.
From Potter PA, Perry AG 2013 Fundamentals of nursing, ed 8. St Louis, Mosby.
Percussion is contraindicated in patients with bleeding disorders, osteoporosis or fractured ribs. Caution should be taken to percuss the lung fields and not the scapular regions, otherwise trauma may occur to the skin and underlying musculoskeletal structures.
is a fine, shaking pressure applied to the chest wall only during exhalation. This technique is thought to increase the velocity and turbulence of exhaled air, facilitating secretion removal. Vibration increases the exhalation of trapped air and may shake mucus loose and induce a cough.
involves the use of positioning techniques that promote the movement of secretions from specific segments of the lungs and bronchi into the trachea. It improves mobilisation of secretions in patients with cystic fibrosis (McIlwaine and others, 2010) and for those who have problems expectorating large volumes of sputum. However, it has limited benefit for the majority of patients (Fink, 2002; Tang and others, 2010; Yang and others, 2010). Coughing or suctioning normally removes secretions from the trachea. The procedure for postural drainage can include most lung segments. Because patients may not require postural drainage of all lung segments, the procedure is based on clinical assessment findings. For example, patients with left lower lobe atelectasis may require postural drainage of only the affected region, whereas a child with cystic fibrosis may require postural drainage of all lung segments.
SUCTIONING TECHNIQUES
When a patient is unable to clear respiratory tract secretions with coughing, the nurse must use suctioning to clear the airways. The suctioning techniques include oropharyngeal and nasopharyngeal suctioning, orotracheal and nasotracheal suctioning and suctioning an artificial airway.
These techniques are based on common principles. Because the oropharynx and trachea are considered sterile, sterile technique is used for suctioning. The mouth is considered clean, and therefore the suctioning of oral secretions should be performed after suctioning of the oropharynx and trachea. Each type of suctioning requires the use of a round-tipped catheter with a number of side holes at the distal end of the catheter. Frequency of suctioning is determined by patient assessment and need. If secretions are identified by inspection or auscultation techniques, suctioning is required. Sputum is not produced continuously or every 1–2 hours but occurs as a response to a pathological condition; therefore, there is no rationale for routine suctioning of all patients every 1–2 hours. In addition, suctioning reduces the amount of oxygen available in the dead space in the oropharynx and trachea, often resulting in significant desaturation of the patient. The nurse must be careful to monitor the patient to ensure adequate oxygenation. Too-frequent suctioning or increased length of time suctioning can put the patient at risk of developing hypoxaemia, hypotension or arrhythmias and possible trauma to the mucosa of the trachea.
Oropharyngeal and nasopharyngeal suctioning
The oropharynx extends behind the mouth from the soft palate above the level of the hyoid bone and contains the tonsils. The nasopharynx is located behind the nose and extends to the level of the soft palate. Oropharyngeal or nasopharyngeal suctioning is used when the patient is able to cough effectively but is unable to clear secretions by expectorating or swallowing. The suction procedure is used after the patient has coughed (Skill 40-1). As the amount of pulmonary secretions is reduced and the patient is less fatigued, the patient may be able to expectorate or swallow the mucus and suctioning is no longer required.
DELEGATION CONSIDERATIONS
Suctioning requires the problem-solving and knowledge-application skills of professional nurses. Delegation is inappropriate.
EQUIPMENT
• Appropriate-size suction catheter (smallest diameter that will remove secretions effectively) or Yankauer catheter (oral suction)
• Small Y adapter (if catheter does not have a suction-control port)
• Two sterile gloves or one sterile and one non-sterile glove
• Sterile normal saline solution or water (about 50 mL)
• Connecting tube (1.5 metres)
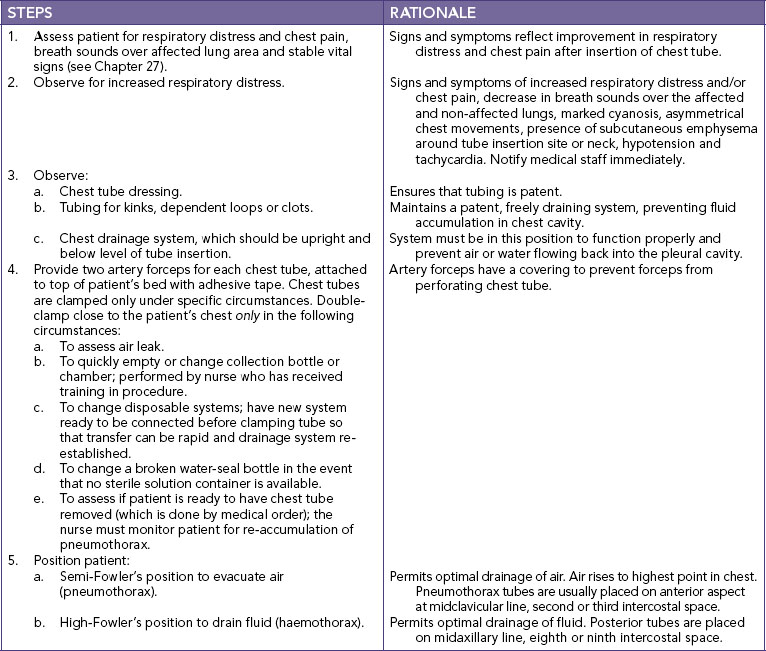
| STEPS | RATIONALE | |||
|---|---|---|---|---|
|
1. Assess signs and symptoms of upper and lower airway obstruction requiring nasotracheal or orotracheal suctioning, including respiratory rate or adventitious sounds, nasal secretions, drooling, gastric secretions or vomitus in mouth. Assess signs and symptoms associated with hypoxia and hypercapnia: increased respiratory rate and/or increased pulse rate, decreased depth of breathing, low oxygen saturations, elevated blood pressure, pallor, cyanosis and dyspnoea, apprehension, anxiety, decreased ability to concentrate, lethargy, decreased level of consciousness (especially acute), increased fatigue, dizziness, behavioural changes (especially irritability). |
Physical signs and symptoms result from decreased oxygen to tissues as well as pooling of secretions in upper and lower airways. | |||
| Fluid overload may increase amount of secretions. Dehydration promotes thicker secretions. | ||||
| The environment influences secretion formation and gas exchange, necessitating airway suctioning when patient cannot clear secretions effectively. | ||||
| Patients with respiratory infections are prone to increased secretions that are thicker and sometimes more difficult to expectorate. | ||||
| Abnormal anatomy can impair normal drainage of secretions. For example, nasal swelling, a deviated septum or facial fractures may impair nasal drainage. Tumours in or around the lower airway may impair secretion removal by occluding or externally compressing the lumen of the airway. | ||||
| Reveals need for patient instruction and encourages cooperation. | ||||
| Some institutions require a medical prescription for tracheal suctioning. | ||||
| Encourages cooperation and minimises risks, anxiety and pain. | ||||
| Reduces stimulation of gag reflex, decreases patient discomfort, assists secretion drainage and prevents aspiration and nurse strain. Hyperextension facilitates insertion of catheter into trachea. | ||||
| Reduces transmission of microorganisms by protecting gown from secretions. | ||||
| Reduces transmission of microorganisms. | ||||
|
9. Connect one end of connecting tubing to suction machine and place other end in convenient location near patient. Turn suction device on and set vacuum regulator to appropriate negative pressure (100–150 mmHg) (Pierce, 2007). |
Excessive negative pressure damages nasopharyngeal and tracheal mucosa and can induce greater hypoxia. | |||
| These measures reduce suction-induced hypoxaemia. | ||||
| Maintains asepsis and reduces transmission of microorganisms. | ||||
| Saline or water is used to clean tubing after each suction pass. | ||||
| Reduces transmission of microorganisms and allows nurse to maintain sterility of suction catheter. | ||||
| Maintains catheter sterility. Connects catheter to suction. | ||||
| Ensures equipment function. Lubricates internal catheter and tubing. | ||||
| Catheter provides continuous suction. Take care not to allow suction tip to invaginate oral mucosal surfaces. Coughing moves secretions from lower airway into mouth and upper airway. | ||||
| Critical decision point: Be careful not to dislodge any oral tubing or tubing in posterior pharynx, such as nasogastric tubes. | ||||
| Rinses catheter and reduces probability of transmission of microorganisms. Clean suction tubing enhances delivery of set suction pressure. Prevents skin breakdown. | ||||
| Critical decision point: Be sure to insert catheter during patient inspiration, especially if inserting catheter into trachea, because epiglottis is open. Do not insert during swallowing, or catheter will most likely enter oesophagus. NEVER APPLY SUCTION DURING INSERTION. | ||||
| Increases oxygen saturation and inflates lungs with oxygen- rich air to partially compensate for volume lost during suction procedure. | ||||
| Application of suction pressure while introducing catheter into trachea increases risk of damage to mucosa and increases risk of hypoxia because of removal of entrained oxygen present in airways. Epiglottis is open on inspiration and facilitates insertion into trachea. Patient should cough. If patient gags or becomes nauseated, catheter is most likely in oesophagus and must be removed. | ||||
| If resistance is felt after insertion of catheter for maximum recommended distance, catheter has probably hit carina. Pull catheter back 1 cm before applying suction. | ||||
| Critical decision point: Use nasal approach and perform tracheal suctioning before pharyngeal suctioning whenever possible. The mouth and pharynx contain more bacteria than the trachea does. If copious oral secretions are present before beginning the procedure, suction mouth with Yankauer suction device. | ||||
| Intermittent suction and rotation of catheter prevent injury to mucosa. If catheter ‘grabs’ mucosa, remove thumb to release suction. Suctioning longer than 10 seconds can cause cardiopulmonary compromise, usually from hypoxaemia or vagal overload. | ||||
| Removes secretions from catheter. Secretions that remain in suction catheter or connecting tubing decrease suctioning efficiency. | ||||
| Observe for alterations in cardiopulmonary status. Suctioning can induce hypoxaemia, arrhythmias, laryngospasm and bronchospasm. Deep-breathing reventilates and reoxygenates alveoli. Repeated passes clear the airway of excessive secretions but can also remove oxygen and may induce laryngospasm. | ||||
| Removes upper airway secretions. More microorganisms are generally present in mouth. | ||||
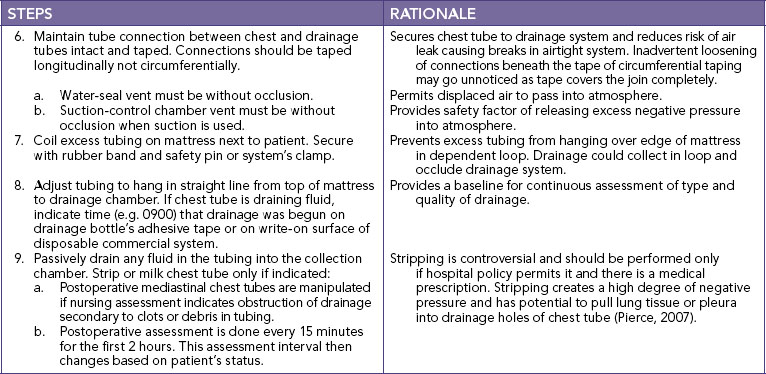
|
(1)Hyperoxygenate patient before suctioning (approx. 30 seconds) (Pierce, 2007) if patient is being administered supplemental oxygen. |
Preoxygenation converts large proportion of resident lung gas to 100% oxygen to offset amount used in metabolic consumption while oxygenation is interrupted during suctioning. | |||
| Exposes artificial airway. | ||||
| Application of suction pressure while introducing catheter into trachea increases risk of damage to tracheal mucosa, as well as increased hypoxia related to removal of entrained oxygen present in airways. Pulling back stimulates cough and removes catheter from mucosal wall. | ||||
|
(4)Apply suction either intermittently or continuously. Continuous suction may retrieve more secretions but increases volume of gas suctioned. Intermittent suction can be applied by placing and releasing non-dominant thumb over vent of catheter. Intermittent suction is recommended if catheter is in contact with tracheal walls and not in lumen of the tracheostomy tube. Slowly withdraw catheter while rotating it back and forth between dominant thumb and forefinger (Pierce, 2007). Encourage patient to cough. Watch for respiratory distress. |
Rotation of catheter exposes inlet of catheter to an increased surface area to retrieve more secretions. | |||
| Critical decision point: If patient develops respiratory distress during the suction procedure, immediately withdraw catheter and supply additional oxygen and breaths as needed. Oxygen can be administered directly through the catheter in an emergency. Disconnect suction and attach oxygen at prescribed flow rate through the catheter. | ||||
| Reoxygenates and re-expands alveoli. Suctioning can cause hypoxaemia and atelectasis. | ||||
| Removes catheter secretions. Secretions left in tubing decrease suction and provide environment for microorganism growth. Secretions left in connecting tube decrease suctioning efficiency. | ||||
|
(7)Assess patient’s cardiopulmonary status for secretion clearance and complications. Repeat Steps (1) to (6) once or twice more to clear secretions. If more than one suction pass is needed (and closed system suction is not in situ), use a new suction catheter for each pass. Allow adequate time (at least 1 full minute) between suction passes for ventilation and re-oxygenation. Replace oxygen delivery device during rest times. |
Suctioning can induce arrhythmias, hypoxia and bronchospasm and impair cerebral circulation or adversely affect haemodynamics. Repeated passes with suction catheter clear airway of excessive secretions and promote improved oxygenation. | |||
| Removes upper airway secretions. | ||||
| Sims’ position encourages drainage and reduces risk of aspiration. | ||||
| Prevents absorption atelectasis and oxygen toxicity while allowing patient time to re-oxygenate blood. | ||||
| Reduces transmission of microorganisms. | ||||
| Provides immediate access to suction catheter. | ||||
| Identifies physiological effects of suction procedure to restore airway patency. | ||||
| Provides subjective confirmation that airway obstruction is relieved with suctioning procedure. | ||||
| Provides data to document presence or absence of respiratory tract infection. | ||||


| RECORDING AND REPORTING | HOME CARE CONSIDERATIONS |
|---|---|
Orotracheal and nasotracheal suctioning
Orotracheal or nasotracheal suctioning is necessary when the patient with pulmonary secretions is unable to manage secretions by coughing and does not have an artificial airway present (see Skill 40-1). A catheter is passed through the mouth or nose into the trachea. The nose is the preferred route because stimulation of the gag reflex is minimal. The procedure is similar to nasopharyngeal suctioning, but the catheter tip is moved further into the patient’s trachea. The risk of traumatic bleeding during nasopharyngeal suctioning is increased due to the sensitive nasal mucosa which has an abundant blood supply. The entire procedure from catheter passage to its removal should be done quickly, lasting no longer than 15 seconds. Unless in respiratory distress, the patient should be allowed to rest between passes of the catheter. If the patient is using supplemental oxygen, the oxygen cannula or mask should be replaced during rest periods.
is accomplished through an artificial airway such as an endotracheal tube or tracheostomy tube. The suction catheter should be no greater than half the size of the internal diameter of the artificial airway, so as not to cause an obstruction. Secretion removal should be as atraumatic as possible. To avoid trauma to the mucosa of the lung, suction pressure should never be applied while inserting the catheter, and suction pressure should be maintained between 100 and 150 mmHg. The suction catheter is inserted until a cough is initiated or until resistance is met. The catheter should be withdrawn by approximately 1 cm before applying suction, to prevent adherence to the trachea mucosa. Suction is applied intermittently as the catheter is withdrawn, to minimise the risk of adherence to the tracheal wall. Rotating the catheter will enhance removal of secretions that have adhered to the sides of the endotracheal or tracheostomy tube (Pierce, 2007). The nurse should wear a mask and goggles and may need to wear a barrier gown to prevent splashes with body fluids.
ARTIFICIAL AIRWAYS
An artificial airway is indicated for patients with decreased level of consciousness or with airway obstruction, and to aid in removal of tracheobronchial secretions.
A Guedel airway, the simplest type of artificial airway, prevents obstruction of the trachea caused by displacement of the tongue into the oropharynx (Figure 40-15). The Guedel airway extends from the teeth to the oropharynx, maintaining the tongue in the normal position. The correct-size airway must be used. Proper Guedel airway size is determined by measuring the distance from the corner of the mouth to the angle of the jaw just below the ear. The length is equal to the distance from the flange of the airway to the tip. If the airway is too small, the tongue is not held in the anterior portion of the mouth; if the airway is too large, it may force the tongue towards the epiglottis and obstruct the airway.
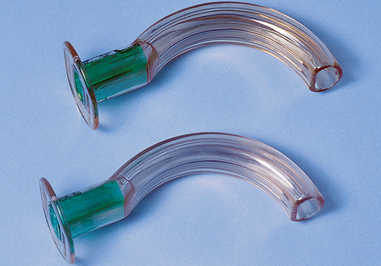
The airway is inserted by turning the curve of the airway towards the hard palate, placing it over the tongue and inserting until the soft palate is reached. The airway is then rotated so that the opening points downwards, following the curvature of the tongue. Correctly placed, the airway moves the tongue forwards away from the oropharynx; and the flange, the flat portion of the airway, rests against the patient’s teeth. Incorrect insertion merely forces the tongue back into the oropharynx (Pierce, 2007).
This airway is a flexible tube that is inserted through one nostril and into the oropharynx. It is used when there is severe trauma to the mouth, or the mouth cannot be used for an oral airway (e.g. jaws wired, severe stomatitis). As for the Guedel airway, the correct-size airway must be used. Proper size is determined by measuring from the nostril to the angle of the jaw. A too-short airway will not maintain the airway, while a too-long airway risks entry into the oesophagus and inflation of the stomach, leading to vomiting and potential aspiration of gastric contents. This airway permits suctioning and a patent airway; it is never used in the patient with a suspected or actual fractured base of skull (Pierce, 2007).
Tracheal airways include endotracheal, nasotracheal and tracheostomy tubes. These allow easy access to the patient’s trachea for deep tracheal suctioning. Because of the presence of the artificial airway, the patient no longer has normal humidification of the tracheal mucosa. The nurse should ensure that humidity is supplied to the airway through nebulisation or with the oxygen delivery system. This humidification is protective and helps reduce the risk of airway plugging.
The ‘Mini Trach’ is a narrow-bore tracheal access device to facilitate pulmonary hygiene in patients who are unable to cough and expectorate secretions from the lower airways. It remains capped between the requirements of pulmonary hygiene. It is inserted as for a tracheostomy tube but offers limited capacity for oxygen delivery.
MAINTENANCE OR PROMOTION OF LUNG EXPANSION
Nursing interventions to maintain or promote lung expansion include non-invasive techniques. This includes positioning, procedures using equipment such as incentive spirometry and invasive procedures such as management of a chest tube.
POSITIONING
In the healthy, completely mobile person, adequate ventilation and oxygenation are maintained by frequent position changes during daily activities. However, when a person’s illness or injury restricts mobility, there is an increased risk of respiratory impairment. Frequent changes of position are simple and cost-effective methods for reducing the risks of stasis of pulmonary secretions and decreased chest-wall expansion.
The most effective position for patients with cardiopulmonary diseases is the 45-degree semi-Fowler’s position, using gravity to assist in lung expansion and reduce pressure from the abdomen on the diaphragm. The nurse needs to ensure that the patient in this position does not slide down in bed, which could reduce lung expansion. A patient with unilateral lung disease, such as pneumothorax, atelectasis, pneumonia, thoracotomy and multiple trauma affecting one lung, should be positioned with the ‘good lung down’. This promotes better perfusion of the healthy lung due to gravity, and gas is preferentially distributed to the better lung due to enhanced compliance. Hence, oxygenation is improved. In the presence of pulmonary abscess or haemorrhage, the patient should be placed with the affected lung down to prevent drainage towards the healthy lung (Pierce, 2007).
INCENTIVE SPIROMETRY
is a method of encouraging voluntary deep-breathing by providing visual feedback to patients about inspiratory volume. It is used to promote deep-breathing to prevent or treat atelectasis in the postoperative patient. Studies have, however, shown no respiratory benefit to postoperative incentive spirometry when compared with deep-breathing and early ambulation (Freitas and others, 2007; Guimarães and others, 2009).
• Flow-oriented incentive spirometers consist of one or more plastic chambers that contain freely moving coloured balls. The patient inhales slowly and with an even flow to elevate the balls and to keep them floating as long as possible, to ensure a maximally sustained inhalation.
• Volume-oriented incentive spirometry devices have a bellows that is raised to a predetermined volume by an inhaled breath (Figure 40-16). An achievement light or counter is used to provide feedback. Some devices are constructed so that the light will not turn on unless the bellows is held at a minimum desired volume for a specified period to enhance lung expansion.
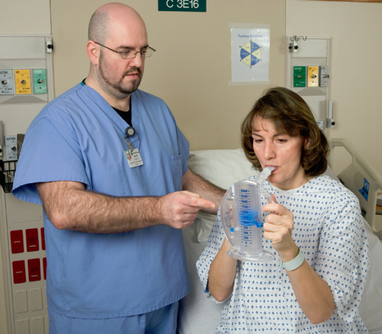
FIGURE 40-16 Volume-oriented spirometer.
From Potter PA, Perry AG 2013 Fundamentals of nursing, ed 8. St Louis, Mosby.
Incentive spirometry encourages patients to breathe to their normal inspiratory capacities. A postoperative inspiratory capacity half to three-quarters of the preoperative volume is acceptable because of postoperative pain. Administration of pain medications before incentive spirometry will help the patient achieve deep-breathing by reducing pain and splinting (see Chapter 41).
CHEST TUBES
Chest tubes, also termed intercostal catheters, are inserted to remove air and fluids from the pleural space to prevent air or fluid from re-entering the pleural space and to re-establish normal intrapleural and intrapulmonic pressures. A chest tube is a catheter inserted through the thorax to remove fluid or air. Chest tubes are used after chest surgery and chest trauma and for pneumothorax or haemothorax to promote lung re-expansion. They are sutured in place (Skill 40-2).
SKILL 40-2 Care of patients with chest tubes
DELEGATION CONSIDERATIONS
This task requires the problem-solving and knowledge-application abilities of a professional nurse and should not be delegated. Nurse assistants may help with positioning.
• Instruct care provider in the proper positioning of a patient with chest tubes to facilitate drainage.
• Explain to care provider the appropriate set-up of drainage equipment for the type of system to be used.
• Instruct care provider to inform nurse of any changes in the vital signs, chest tube drainage or excessive bubbling (air loss) in water-seal chamber.
A pneumothorax is a collection of air in the pleural space, between the visceral and parietal pleurae. The loss of negative intrapleural pressure causes the lung to collapse. There are a number of causes of pneumothorax. It may occur spontaneously or as a result of chest trauma, such as a stabbing or the chest striking the steering wheel in a car accident. A pneumothorax may result from the rupture of an emphysematous bleb on the surface of the lung (a large bulla resulting from the destruction caused by emphysema) or from an invasive procedure such as insertion of a subclavian central venous catheter (CVC) line.
A patient with a pneumothorax usually feels pain as atmospheric air irritates the parietal pleura. The pain may be sharp and pleuritic. Dyspnoea is common and worsens as the size of the pneumothorax increases.
A haemothorax is an accumulation of blood and fluid in the pleural cavity between the parietal and visceral pleurae, usually as a result of trauma. It produces a counter-pressure and prevents the lung from full expansion. A haemothorax can also be caused by rupture of small blood vessels from inflammatory processes, such as pneumonia or tuberculosis. As well as pain and dyspnoea, symptoms of shock can develop if blood loss is severe.
• The one-bottle system is the simplest closed drainage system because the single bottle serves as a collector and a water seal (Figure 40-17A). During normal respiration the fluid should ascend with inspiration and descend with expiration. The one-bottle system is used for smaller amounts of drainage, such as an empyema, which is a collection of infected fluid or pus in the pleural space.
• A two-bottle system permits the liquid to flow into the collection bottle as air flows into the water-seal bottle (Figure 40-17B). Fluctuations in the water-seal tube are still expected. The two-bottle system allows for more-accurate measurement of chest drainage and is used when larger amounts of drainage are expected.
• A three-bottle system is used to evacuate any volume of air or fluid with controlled suction (Figure 40-17C). The suction-control bottle contains a long tube, submerged under water and vented to the atmosphere. There are two short tubes: one tube connects bottles 2 and 3, and the second tube is connected to an external suction source. The suction pressure causes gentle, continuous bubbling in bottle 3. Suction pressure is measured in centimetres of water, and is equated with the length of the long tube submerged in water in bottle 3 and not to the level of pressure on the suction gauge. Usually 15–20 cm of water is used for adults. This means that the long tube is submerged in 15–20 cm of water. Children require lesser amounts of pressure.
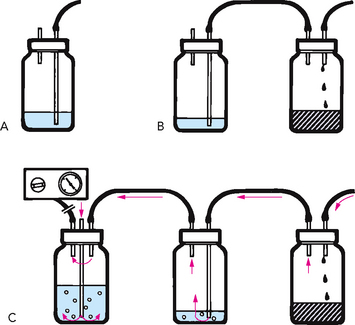
FIGURE 40-17 Chest tube drainage. A, One-bottle system. B, Two-bottle system. C, Three-bottle system with suction.
From Potter PA, Perry AG 2004 Fundamentals of nursing, ed 6. St Louis, Mosby.
Disposable systems, such as the Thora Seal™ or Pleur-Evac™ chest drainage systems, are commercially available one-piece moulded plastic units that duplicate the three-bottle system (Figure 40-18). The disposable units appear to be the system of choice because they are cost-effective and some facilitate autotransfusion, a common practice in open-heart surgeries. Knowledge of the basics of chest tube management and troubleshooting manoeuvres reduces the patient’s risk of complications (Table 40-9).
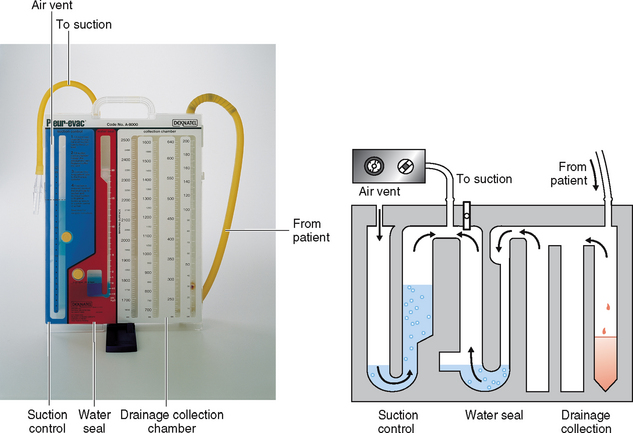
FIGURE 40-18 Left, Commercial three-bottle chest drainage device. Right, Diagram of drainage device.
From Potter PA, Perry AG 2013 Fundamentals of nursing, ed 8. St Louis, Mosby.
TABLE 40-9 PROBLEM SOLVING WITH CHEST TUBES
| PROBLEM | SOLUTION |
|---|---|
| LEAKS | |
| Air leak is present. | Locate leak. |
| Continuous bubbling is seen in water-seal bottle/chamber, indicating that leak is between patient and water seal | |
| Bubbling continues, indicating that air leak has not been corrected | Cross-clamp chest tube close to patient’s chest. If bubbling stops, air leak is inside patient’s thorax or at chest tube insertion site. Unclamp tube and notify medical staff immediately. Reinforce chest dressing. Leaving chest tube clamped causes a tension pneumothorax and mediastinal shift |
| Bubbling continues, indicating that leak is not in patient’s chest or at insertion site | Gradually move clamps down drainage tubing away from patient and towards suction-control chamber, moving one clamp at a time. When bubbling stops, leak is in section of tubing or connection distal to clamp. Replace tubing or secure connection and release clamp |
| Bubbling continues, indicating that leak is not in tubing | Leak is in drainage system. Change drainage system |
| PATIENT SYMPTOMS | |
| Determine that chest tubes are not clamped, kinked or occluded. Obstructed chest tubes trap air in intrapleural space when air leak originates within patient. Notify medical staff immediately. Prepare immediately for another chest tube insertion; obtain a flutter (Heimlich) valve or large-gauge needle for short-term emergency release of air in intrapleural space; have emergency equipment (e.g. oxygen and resuscitation trolley) near patient | |
| OTHER | |
| Dependent loops of drainage tubing have trapped fluid | Passively drain tubing contents into drainage bottle by gravity. Coil excess tubing on mattress and secure in place |
| Water seal is disconnected | Connect water seal and tape connection |
| Water-seal bottle is broken | Insert distal end of water-seal tube into sterile solution so that tip is 2 cm below surface and set up new water-seal bottle. If no sterile solution is available, double- clamp chest tube while preparing new bottle |
| Water-seal tube is no longer submerged in sterile fluid | Add sterile solution to water-seal bottle until distal tip is 2 cm under surface or set water-seal bottle upright so that tip is submerged |
Clamping chest tubes is contraindicated. The nurse should handle the chest drainage unit or bottles carefully and maintain the drainage device below the patient’s chest. If the tubing disconnects from the unit or bottles, the nurse should instruct the patient to exhale as much as possible and to cough. This manoeuvre rids the pleural space of as much air as possible. The nurse needs to clean the tips of the tubing and reconnect them to the bottles quickly. If a glass bottle is used and the bottle breaks, the end of the tubing can be quickly submerged in a container of sterile water to re-establish the seal. Clamping the chest tube may result in a tension pneumothorax, which is life-threatening.
Removal of chest tubes requires patient preparation. Patients report sensations during chest tube removal, the most common of which include burning, pain and pulling.
MAINTENANCE AND PROMOTION OF OXYGENATION
Promotion of lung expansion, mobilisation of secretions and maintenance of a patent airway help the patient meet oxygenation needs. Some patients, however, also require oxygen therapy to keep a healthy level of tissue oxygenation.
GOALS OF OXYGEN THERAPY
The goal of oxygen therapy is to prevent or relieve hypoxia. Any patient with impaired tissue oxygenation can benefit from controlled oxygen administration. Oxygen is not a substitute for other treatment, however, and should be used only when indicated. Oxygen should be treated as a drug—it has dangerous side effects. As with any drug, the dosage or concentration of oxygen should be continuously monitored. Oxygen can be initiated by the nurse in emergency situations when a patient experiences desaturation or becomes acutely dyspnoeic. Oxygen should be administered to achieve an oxygen saturation level of 88–92% for the COPD patient (Austin and others, 2010; Beasley and others, 2011) and approximately 95% for most other patients (Pierce, 2007). Follow-up with the medical or nurse practitioner should occur as soon as possible. The nurse should routinely check the prescription to verify that the patient is receiving the prescribed oxygen concentration. The seven rights of medication administration also pertain to oxygen administration (see Chapter 31).
SAFETY PRECAUTIONS WITH OXYGEN THERAPY
Oxygen supports combustion, which means that although it will not spontaneously burn or cause an explosion, it can easily cause a fire in a patient’s room if it contacts a spark from an open flame or electrical equipment. Oxygen in high concentrations has a great combustible potential and readily fuels fire. With increasing use of home oxygen therapy, patients and healthcare professionals must be aware of the dangers of combustion. The nurse should promote safety by using the following measures:
• No smoking in the environment is strictly monitored.
• The nurse determines that all electrical equipment in the room is functioning correctly and is properly grounded. An electrical spark in the presence of oxygen can result in a serious fire.
• The nurse should know the fire procedures and the location of the closest fire extinguisher.
• The nurse should always check the oxygen level of portable cylinders before transporting to ensure that there is enough oxygen remaining in the cylinder.
• Oxygen cylinders should be stored in a purpose-designed holder to avoid being knocked over and breaking the valve, which can potentially release the oxygen under pressure.
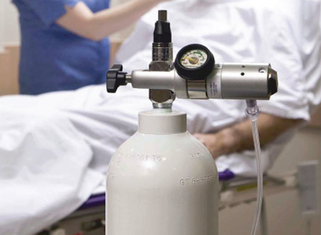
SUPPLY OF OXYGEN
Oxygen is supplied to the patient’s bedside generally through a permanent wall-piped system, but in some instances by oxygen cylinders. Oxygen cylinders are transported on carriers that allow the cylinder to be placed upright at the bedside. Regulators are used to control the amount of oxygen delivered. One common type is an upright flow meter with a flow adjustment valve at the top. A second type is a cylinder indicator with a flow adjustment handle.
In the hospital or home, oxygen cylinders are delivered with the regulator in place. Home care vendors are usually responsible for connecting the oxygen cylinder to the regulator for home use.
METHODS OF OXYGEN DELIVERY
Oxygen can be delivered to the patient by nasal cannula, nasal catheter, face mask or mechanical ventilator.
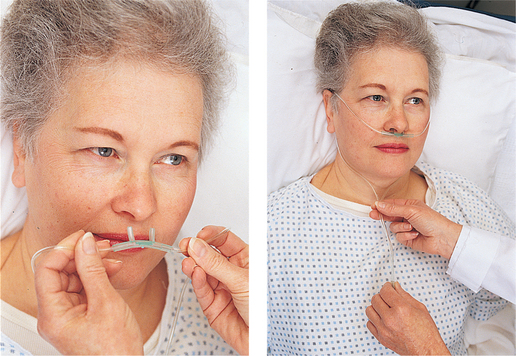
A nasal cannula is a simple, comfortable device (Figure 40-19). The two cannulas, about 1.5 cm long, protrude from the centre of a disposable tube and are inserted into the nares (Skill 40-3). Oxygen is delivered via the cannulas with a flow rate of up to 6 L/min. Flow rates greater than 4 L/min are not often used because of the drying effect on the mucosa and the relatively little increase in delivered oxygen concentration. The nurse must know what flow rate produces a given percentage of inspired oxygen concentration (FiO2). Room air has an FiO2 of 21% (Table 40-10). The nurse must also be alert for skin breakdown over the ears and in the nares from too tight an application of the nasal cannula.

SKILL 40-3 Applying a nasal cannula or oxygen mask
DELEGATION CONSIDERATIONS
This task can be delegated to appropriately trained nurse assistants. The nurse is responsible for assessing and checking the device set-up and the patient.
EQUIPMENT
• Nasal cannula (see Figure 40-19) or oxygen mask
| STEPS | RATIONALE |
|---|---|
| Left untreated, hypoxia can produce cardiac arrhythmias and death. Presence of airway secretions decreases effectiveness of oxygen delivery. | |
| Critical decision point: Patients with sudden changes in their vital signs, level of consciousness or behaviour may be experiencing profound hypoxia. Patients who demonstrate subtle changes over time may have worsening of a chronic or existing condition or a new medical condition. | |
| Decreases patient’s anxiety, which reduces oxygen consumption and increases patient cooperation. | |
| Reduces transmission of microorganisms. | |
| Prevents drying of nasal and oral mucous membranes and airway secretions. | |
| Directs flow of oxygen into patient’s upper respiratory tract. Patient is more likely to keep cannula in place if it fits comfortably. | |
| Allows patient to turn head without dislodging cannula and reduces pressure on tips of nares. | |
| Ensures patency of cannula and oxygen flow. Prevents inhalation of dehumidified oxygen. | |
| Oxygen therapy can cause drying of nasal mucosa. Pressure on ears from cannula tubing or elastic can cause skin irritation. | |
| Ensures delivery of prescribed oxygen flow rate and patency of cannula. | |
| Reduces transmission of microorganisms. | |
| Indicates that hypoxia is corrected or reduced. | |
| Critical decision point: Note whether current oxygen therapy is meeting patient’s oxygenation needs. Determine what factors have changed, resulting in new assessment findings. | |
| RECORDING AND REPORTING | HOME CARE CONSIDERATIONS |
|---|---|
|
• If patient is to have home oxygen therapy, teach patient and family how to use the oxygen equipment and properly apply the oxygen delivery device (see Skill 40-4). |
TABLE 40-10 APPROXIMATE FRACTION OF INSPIRED OXYGEN (FiO2) WITH DIFFERENT DELIVERY DEVICES
| LITRE FLOW (L/min) | APPROXIMATE FiO2 (%) | DELIVERY DEVICE |
|---|---|---|
| 1 | 24 | Nasal cannula |
| 2 | 28 | Nasal cannula |
| 3 | 32 | Nasal cannula |
| 4 | 36 | Nasal cannula |
| 5–6 | 40 | Simple face mask |
| 6–7 | 50 | Simple face mask |
| 7 | 65 | Partial rebreather mask |
| 7–8 | 60 | Simple face mask Partial rebreather mask |
| 8–15 | 70–80 | Partial rebreather mask |
| Set to prevent collapse of reservoir | 85–100 | Non-rebreather mask |
| As indicated on device | As indicated on device | Venturi mask |
Nasal catheters are used infrequently, but they are not obsolete. The procedure involves inserting an oxygen catheter into the nose to the nasopharynx. Because securing the catheter can cause pressure on the nostril, the catheter must be changed at least every 8 hours and inserted into the other nostril each time. For this reason, the nasal catheter is a less desirable method because the patient may have pain when the catheter is passed into the nasopharynx and because trauma can occur to the nasal mucosa.
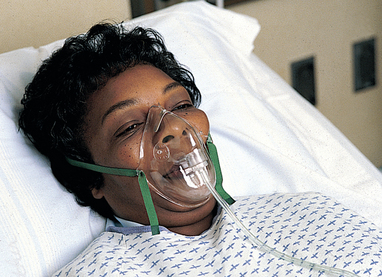
An oxygen mask is a device used to administer oxygen, humidity or heated humidity. It is shaped to fit snugly over the mouth and nose and is secured in place with a strap. There are two main types of oxygen masks: those delivering low concentrations of oxygen, and those delivering high concentrations.
• The simple face mask (Figure 40-20) is used for short-term oxygen therapy. It fits loosely and delivers oxygen concentrations from 30% to 60%. The mask is contraindicated for patients with carbon dioxide retention because retention can be worsened.
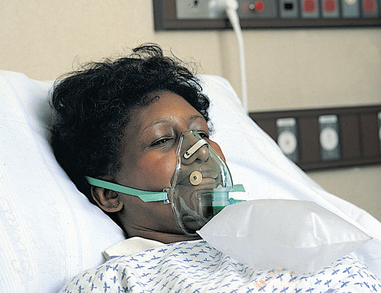
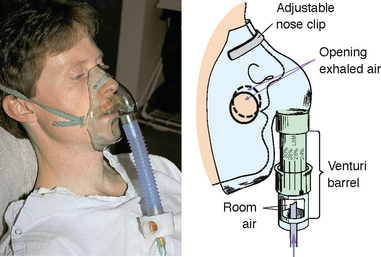
• A plastic face mask with a reservoir bag (Figure 40-21) and a Venturi mask (Figure 40-22) are capable of delivering higher concentrations of oxygen.
HOME OXYGEN THERAPY
Indications for home oxygen therapy include an arterial oxygen partial pressure (PaO2) of 55 mmHg or less or an arterial oxygen saturation (SaO2) of 88% or less on room air at rest, on exertion or with exercise. Patients with a PaO2 of 56–59 mmHg may also receive oxygen if there is also evidence of cor pulmonale, pulmonary hypertension, erythrocytosis, central nervous system dysfunction, impaired mental status or increasing hypoxaemia with exertion.
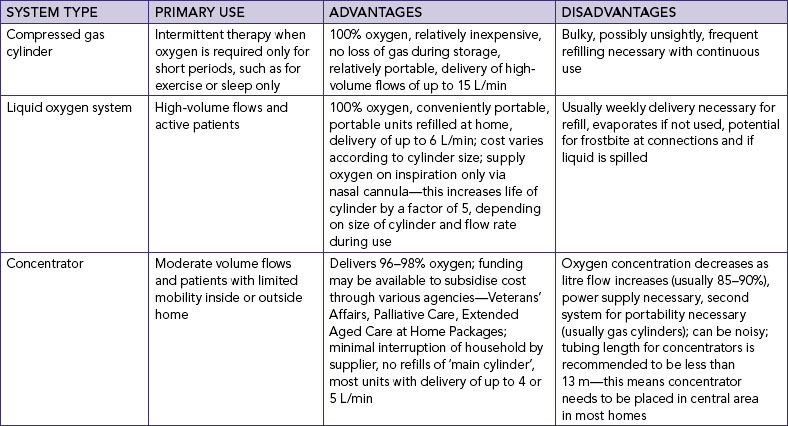
When home oxygen is required, it is usually delivered by nasal cannula. When a patient has a permanent tracheostomy, however, a T tube or tracheostomy collar is necessary. Three types of oxygen are used: compressed oxygen, liquid oxygen (Figure 40-23) and oxygen concentrators. The advantages and disadvantages (Table 40-11) of each type are assessed, along with the patient’s needs and community resources, before placing a delivery system in the home. In the home the major consideration is the oxygen delivery source.
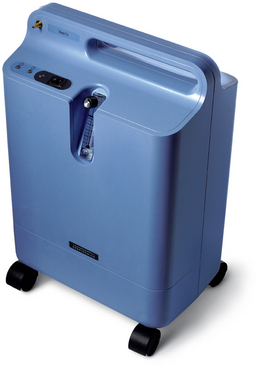
FIGURE 40-23 Primary liquid oxygen source for home use.
© BOC Gases Australia. Reproduced with permission.
Patients requiring home oxygen need extensive teaching to be able to continue oxygen therapy at home efficiently and safely (Skill 40-4). This includes oxygen safety, regulation of the amount of oxygen and how to use the prescribed home oxygen delivery system. The nurse coordinates the efforts of the patient and family, community care nurse, home physiotherapist and home oxygen equipment vendor. During discharge planning, the nurse usually helps to arrange for the community care nurse and oxygen vendor. The nurse must help the patient and family learn about home oxygen and ensure their ability to maintain the oxygen delivery system.
RESTORATION OF CARDIOPULMONARY FUNCTIONING
If a patient’s hypoxia is severe and prolonged, cardiac arrest may result. A cardiac arrest is a sudden cessation of cardiac output and circulation. When this occurs, oxygen is not delivered to tissues, carbon dioxide is not transported from tissues, tissue metabolism becomes anaerobic and metabolic and respiratory acidosis occurs. Permanent heart, brain and other tissue damage occurs within 4–6 minutes.
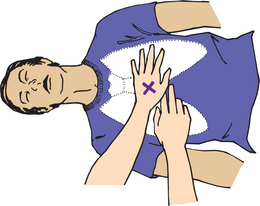
CARDIOPULMONARY RESUSCITATION
Cardiac arrest is characterised by an absence of pulse and respiration. If the nurse determines that the patient has cardiac arrest, cardiopulmonary resuscitation (CPR) must be initiated. CPR is a basic emergency procedure of expired air resuscitation (EAR) and manual external cardiac massage (Skill 40-5). Nursing students are required to have successfully completed a CPR course before their clinical experiences.
SKILL 40-5 Cardiopulmonary resuscitation—basic life support
EQUIPMENT
• CPR pocket mask or barrier device, if available
• Chest compression board, if available and required. Hospital beds have a sufficiently firm base to perform compressions.
Australian Resuscitation Council (ARC) 2010 Guideline 4, Airway; Guideline 5, Breathing; Guideline 6, Compressions; Guideline 7, External automated defibrillation in basic life support; Guideline 8, Cardiopulmonary resuscitation. Melbourne, ARC. Online. Available at www.resus.org.au 30 May 2011.
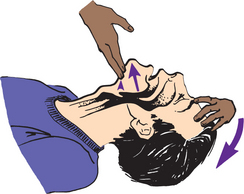
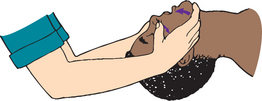
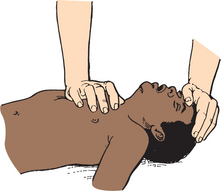
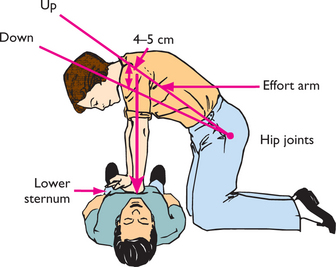

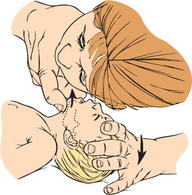
Cardiopulmonary resuscitation should follow the acronym ‘DRSABCD’—check for Danger, then for Responsiveness, Send for help, open the Airway, check for Breathing, start CPR and finally attach a Defibrillator when available. If breathing is absent when checked (look, listen, feel), then chest compressions and rescue breathing are to be initiated in a ratio of 30 : 2, commencing with compressions. CPR no longer commences with three rescue breaths followed by checking for a pulse, as this has been shown to delay initiation of effective resuscitation (Australian Resuscitation Council, 2010). It is paramount to circulate oxygenated blood to the brain to attempt to prevent permanent damage.
Restorative and extended care may emphasise cardiopulmonary reconditioning as a structured rehabilitation program. Cardiopulmonary rehabilitation is actively helping the patient to achieve and maintain the best possible level of health through controlled physical exercise; nutrition counselling; relaxation and stress management techniques; prescribed medications and oxygen; and adherence. As physical reconditioning occurs, the patient’s complaints of dyspnoea, chest pain, fatigue and activity intolerance should decrease. The patient’s anxiety, depression or somatic concerns also often decrease. The patient and the rehabilitation team together define goals of rehabilitation (Australian Lung Foundation, 2009; National Heart Foundation of Australia, 2004).
INSPIRATORY MUSCLE TRAINING
improves muscle strength and endurance, resulting in improved activity tolerance. Inspiratory muscle training may prevent respiratory failure in patients with COPD (Australian Lung Foundation, 2009).
One method of inspiratory muscle training is the incentive spirometer resistive breathing device (ISRBD). Resistive breathing is achieved by placing a resistive breathing device into a volume-dependent incentive spirometer. Muscle training is achieved when the patient uses the ISRBD on a scheduled routine (e.g. twice a day for 15 minutes).
BREATHING EXERCISES
include techniques to improve ventilation and oxygenation. The three basic techniques are deep-breathing and coughing exercises, pursed-lip breathing and diaphragmatic breathing. Deep-breathing and coughing exercises are routine interventions for postoperative patients (see Chapter 44).
involves deep inspiration and prolonged expiration through pursed lips to prevent alveolar collapse. While sitting up, the patient is instructed to take a deep breath and to exhale slowly through pursed lips, as if blowing through a straw. The nurse can also have the patient blow through a straw into a glass of water to learn the technique. Patients need to gain control of the exhalation phase so that it is longer than inhalation. The patient is usually able to perfect this technique by counting the inhalation time and gradually increasing the count during exhalation. In studies using pulse oximetry as a feedback tool, patients have been able to demonstrate an increase in their arterial oxygen saturation during pursed-lip breathing.
is more difficult and requires the patient to relax the intercostals and accessory respiratory muscles while taking deep inspirations. The patient concentrates on expanding the diaphragm during controlled inspiration, and is taught to place one hand flat below the breastbone above the waist and the other hand 2–3 cm below the first hand. The patient inhales while the lower hand moves outwards during inspiration. The patient observes for inward movement as the diaphragm ascends. These exercises are initially taught with the patient in the supine position and then practised while the patient sits and stands. The exercise is often used with the pursed-lip breathing technique.
Diaphragmatic breathing is also useful for patients with pulmonary disease, for postoperative patients and for women in labour to promote relaxation and provide pain control. The exercise improves efficiency of breathing by decreasing air trapping and reducing the work of breathing.