Laboratory and Diagnostic Tests
Because newborns experience many transitional events in the first 28 days of life, laboratory samples are often collected to determine adequate physiologic adaptation and to identify disorders that can adversely affect the child’s life beyond the neonatal period. Blood samples for most laboratory tests can be obtained from the neonate with a heel puncture. Tests commonly performed other than blood glucose and bilirubin levels include newborn screening tests and serum drug levels. Standard laboratory values for a term newborn are given in Box 24-6.
BOX 24-6 STANDARD LABORATORY VALUES IN THE NEONATAL PERIOD

Volume: 24 to 72 ml/kg excreted daily in the first few days; by week 1, 24-hour urine volume close to 200 ml.
Protein: may be present in first 2 to 4 days.
Osmolarity (mOsm/l): 100 to 600.
Pco2, Partial pressure of carbon dioxide; Po2, partial pressure of oxygen; RBCs, red blood cells; WBCs, white blood cells.
∗1 dl = 100 ml; this conforms to the standardized international (SI) system measurements.
Source: Hockenberry, M., & Wilson, D. (2007). Wong’s nursing care of infants and children (8th ed.). St. Louis: Mosby; Pagana, K. & Pagana, T. (2009). Mosby’s manual of diagnostic and laboratory tests (4th ed.). St. Louis: Mosby.
Mandated by U.S. law, newborn genetic screening is an important public health program aimed at early detection of genetic diseases that result in severe health problems if not treated early. Using tandem mass spectrometry, all states screen for PKU and hypothyroidism, but each state determines whether other tests are performed. Other genetic defects that are included in some screening programs include galactosemia, cystic fibrosis, maple syrup urine disease, and sickle cell disease. Experts recommend that the screening test be repeated at age 1 to 2 weeks if the initial specimen was obtained when the infant was younger than 24 hours (Zinn, 2006).
Families should be educated regarding the availability of metabolic tests routinely screened in their state of residence. Tandem mass spectrometry has the potential for identifying more than 30 disorders in addition to the standard inborn errors of metabolism (IEMs). With tandem mass spectrometry, earlier identification of IEMs can prevent further developmental delays and morbidities in affected children.
Information about which tests are required in a state can be obtained from state health departments (see Resources on this book’s website). Some of the major disorders for which infants are screened are described in Table 24-3.
TABLE 24-3

PKU, Phenylketonuria; T4, thyroxine, TSH, thyroid-stimulating hormone.
Source: DeBaun, M., & Vichinsky, E. (2007). Hemoglobinopathies. In R. Kliegman, R. Behrman, H. Jenson, & B. Stanton (Eds.), Nelson textbook of pediatrics (18th ed.). Philadelphia: Saunders; LaFranchini, S. (2007). Disorders of the thyroid gland. In R. Kliegman, R. Behrman, H. Jenson, & B. Stanton (Eds.), Nelson textbook of pediatrics (18th ed.). Philadelphia: Saunders; Lashley, F. (2002). Newborn screening: New opportunities and new challenges. Newborn & Infant Nursing Reviews, 2(4), 228-242; Rezvani, I. (2007). Metabolic diseases. In R. Kliegman, R. Behrman, H. Jenson, & B. Stanton (Eds.), Nelson textbook of pediatrics (18th ed.). Philadelphia: Saunders.
Newborn Hearing Screening
Significant hearing loss occurs in approximately 1 in 1000 births, often when there is no other identifiable problem. Hearing loss is difficult to detect during the first 2 to 3 years of life until the child demonstrates problems with speech and language development. When hearing loss is identified early, interventions can help prevent early developmental delays. To address this problem, the majority of states have enacted legislation mandating universal hearing screening. It is performed routinely in other states. The majority (95%) of newborns are screened for hearing loss in the United States before leaving the hospital (Joint Committee on Infant Hearing, 2007).
Two tests commonly are used to assess hearing function in the newborn. Initial screening is done with the evoked otoacoustic emissions (EOAE) test. The auditory brainstem response (ABR) test is used as follow-up if the initial screening is abnormal. Neither test is definitive in diagnosing hearing loss; they are used to determine whether further, more accurate hearing testing is needed through audiologic evaluation.
For the EOAE test, a soft rubber earpiece that makes a soft clicking noise is placed in the baby’s outer ear (Fig. 24-9, A). A healthy ear will “echo” the click sound back to a microphone inside the earpiece that is in the baby’s ear. The ABR test is performed by attaching sensors to the baby’s forehead and behind each ear. An earphone is placed in the baby’s outer ear and sends a series of quiet sounds into the sleeping baby’s ear (Fig. 24-9, B). The sensors measure the responses of the baby’s acoustic nerve. The responses are recorded and stored in a computer.
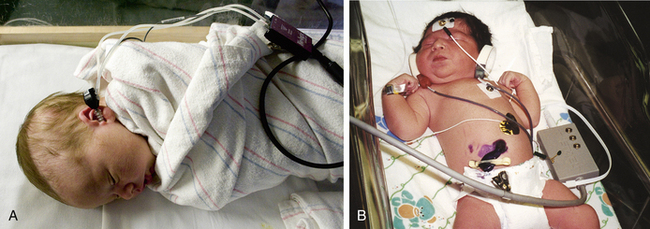
FIG. 24-9 Newborn hearing screening. A, Evoked otoacoustic emissions (EOAE) test. B, Auditory brain response (ABR)) test. (A, Courtesy Julie and Darren Nelson, Loveland, CO; B, courtesy Dee Lowdermilk, Chapel Hill, NC.)
The Joint Committee on Infant Hearing (2007) recommends routine hearing screening for all newborns before hospital discharge or no later than 1 month of age. Through early hearing detection and intervention (EHDI) programs, the outcome for infants who are deaf or hard of hearing can be maximized. Using noninvasive technology, newborn hearing screening provides information about the pathways from the external ear to the cerebral cortex. Newborns who do not pass the initial screening test should have a comprehensive audiologic evaluation by 3 months of age. Regardless of the outcome of hearing testing, all infants should have regular and ongoing surveillance of developmental, hearing, and speech-language skills through regular well-child visits beginning at the age of 2 months so that any hearing loss may be promptly identified and treated (Joint Committee on Infant Hearing).
Collection of Specimens
Ongoing evaluation and screening of a newborn often requires obtaining blood by heelstick or venipuncture or the collection of a urine specimen. The nurse is responsible for collecting the necessary specimens in a manner that minimizes pain and trauma to the infant and maximizes the accuracy of test results.
Heelstick: Most blood specimens are drawn by laboratory technicians. Nurses, however, may be required to perform heelsticks to obtain blood for glucose monitoring or newborn screening. The same technique is used to obtain a blood sample or to test for PKU, galactosemia, hypothyroidism, or other IEMs (see Table 24-3).
Warming the heel before the sample is taken is often helpful; application of heat for 5 to 10 minutes helps dilate the vessels in the area. A cloth soaked with warm water and wrapped loosely around the foot provides effective warming. Disposable heel warmers also are available from a variety of companies but should be used with care to prevent burns. Nurses should wear gloves when collecting any specimen. The nurse cleanses the area with an appropriate skin antiseptic, restrains the infant’s foot with a free hand, and then punctures the site. A spring-loaded automatic puncture device causes less pain and requires fewer punctures than a manual lance blade.
The most serious complication of an infant heelstick is necrotizing osteochondritis resulting from lancet penetration of the bone. To prevent this problem the stick should be made at the outer aspect of the heel and should penetrate no deeper than 2.4 mm. To identify the appropriate puncture site the nurse should draw an imaginary line from between the fourth and fifth toes and parallel to the lateral aspect of the foot to the heel where the stick should be made; a second line can be drawn from the great toe to the medial aspect of the heel (Fig. 24-10). Repeated trauma to the walking surface of the heel can cause fibrosis and scarring that can lead to problems with walking later in life.
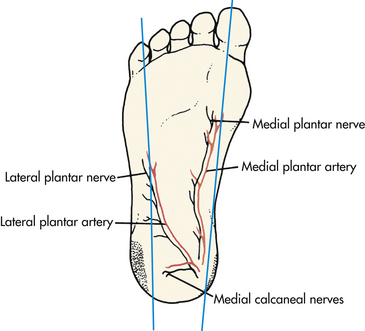
FIG. 24-10 Heelstick sites (shaded areas) on infant’s foot for obtaining samples of capillary blood.
After the specimen has been collected, pressure should be applied with a dry gauze square. No further skin cleanser should be applied because it will cause the site to continue to bleed. The site is then covered with an adhesive bandage. The nurse ensures proper disposal of equipment used, reviews the laboratory requisition for correct identification, and checks the specimen for accurate labeling and routing.
A heelstick is traumatic for the infant and causes pain. After several heelsticks, infants have been observed to withdraw their feet when they are touched. To reassure the infant and promote feelings of safety the neonate should be cuddled and comforted when the procedure is complete and appropriate pain management measures taken to minimize the pain.
Venipuncture: Venous blood samples can be drawn from antecubital, saphenous, superficial wrist, and rarely, scalp veins. If an existing intravenous site is used to obtain a blood specimen, the type of infusion fluid is an important consideration; contamination of the blood sample with the fluid can alter the results.
When venipuncture is required, positioning of the needle is extremely important. Although regular venipuncture needles can be used, butterfly needles are sometimes preferred (Fig. 24-11). A 25-gauge needle is adequate for blood sampling in neonates, with minimal hemolysis occurring when the proper procedure is followed. Patience is required during the procedure because the blood return in small veins is slow, and consequently the small needle must remain in place longer than a larger needle. A tourniquet is optional but can help increase blood flow with venipuncture. The mummy restraint is commonly used to help secure the infant (Fig. 24-12). Other methods of restraint are illustrated in Figure 24-13.
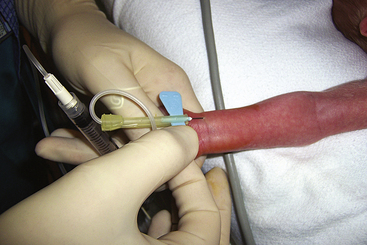
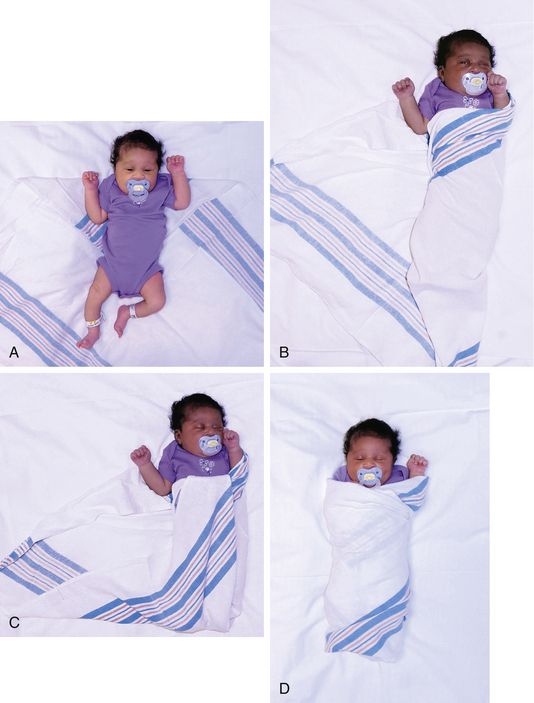
FIG. 24-12 Application of mummy restraint (swaddling). A, Infant is placed on folded corner of blanket. B, One corner of blanket is brought across body and secured beneath the body. C, Lower corner is folded and tucked and second corner is brought across body and secured. D, Modified mummy restraint with one hand uncovered. (Courtesy Cheryl Briggs, RNC, Annapolis, MD.)
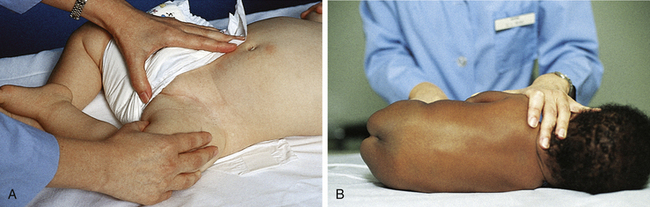
FIG. 24-13 Alternate methods of infant restraint. A, Restraining infant for femoral vein puncture. B, Modified side-lying position for lumbar puncture. (From Hockenberry, M. & Wilson, D. [2007]. Wong’s nursing care of infants and children [8th ed.]. St. Louis: Mosby.)
If venipuncture or arterial puncture is being performed for blood gas studies, crying, fear, and agitation will affect the values; therefore, every effort must be made to keep the infant quiet during the procedure. For blood gas studies, the blood sample tubes are packed in ice (to reduce blood cell metabolism) and taken immediately to the laboratory for analysis.
Pressure must be maintained over an arterial or femoral vein puncture with a dry gauze square for at least 3 to 5 minutes to prevent bleeding from the site. For an hour after any venipuncture the nurse should observe the infant frequently for evidence of bleeding or hematoma formation at the puncture site. The nurse assesses and documents the infant’s tolerance of the procedure. The infant should be cuddled and comforted (e.g., rocked, given a pacifier) when the procedure is completed and appropriate pain management measures taken.
Obtaining a Urine Specimen: Analysis of urine is a valuable laboratory tool for infant assessment; the way in which the specimen is collected can influence the results. The urine sample should be fresh and analyzed within 1 hour of collection.
A variety of urine collection bags are available (Fig. 24-14). These containers are clear plastic, single-use bags with an adhesive material around the opening at the point of attachment.
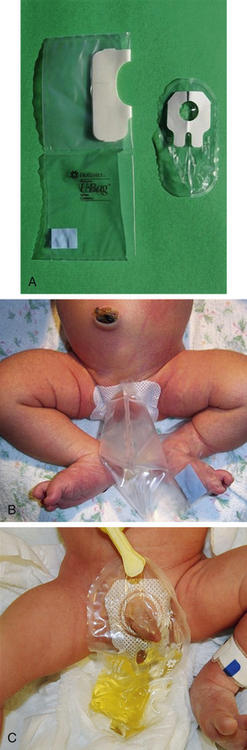
FIG. 24-14 Collection of urine specimen. A, Protective paper is removed from the adhesive surface. B, Applied to female infant. C, Applied to male infant. (Courtesy Cheryl Briggs, RNC, Annapolis, MD.)
To prepare the infant the nurse removes the diaper and places the infant in a supine position. The genitalia, perineum, and surrounding skin are washed and thoroughly dried because the adhesive on the bag will not stick to moist, powdered, or oily skin surfaces. The protective paper is removed to expose the adhesive (see Fig. 24-14, A). In female infants the perineum is stretched to flatten skinfolds; then the adhesive area on the bag is pressed firmly to the skin all around the urinary meatus and vagina. (Note: Start with the narrow portion of the butterfly-shaped adhesive patch.) Starting the application at the bridge of skin separating the rectum from the vagina and working upward is most effective (see Fig. 24-14, B). In male infants the penis (and scrotum, depending on the size of the collection device) is tucked through the opening into the collector before the protective paper is removed from the adhesive; the protective paper is then removed, and the flaps are pressed firmly onto the perineum, making sure the entire adhesive is firmly attached to skin and the edges of the opening do not pucker (see Fig. 24-14, C). This method helps ensure a leakproof seal and decreases the chance of contamination from stool. Cutting a slit in the diaper and pulling the bag through the slit can also help prevent leaking.
The diaper is carefully replaced, and the bag is checked frequently. When a sufficient amount of urine (this amount varies according to the test done) appears, the bag is removed. The infant’s skin is observed for signs of irritation while the bag is in place. The specimen can be aspirated with a syringe or drained directly from the bag. For draining the bag is held in one hand and tilted to keep urine away from the tab. The tab is then removed and the urine is drained into a clean receptacle.
Collection of a 24-hour specimen from an infant can be a challenge; the infant may need light restraint with elbow restraints for appropriate collection of the specimen. The 24-hour urine bag is applied in the manner just described, and the urine is drained into a receptacle. During the collection the infant’s skin is observed closely for signs of irritation and for lack of a proper seal.
For some types of urine tests, urine can be aspirated directly from the diaper by means of a syringe without a needle. If the diaper has absorbent gelling material that traps urine, a small gauze dressing or cotton balls can be placed inside the diaper and the urine aspirated from the cotton or gauze.
Restraining the Infant: Infants may need to be restrained to: (1) protect them from injury, (2) facilitate examinations, and (3) limit discomfort during tests, procedures, and specimen collections (see Figs. 24-12 and 24-13). The following special considerations must be kept in mind when restraining an infant:
• Apply restraints and check them to make sure they are not irritating the skin or impairing circulation.
• Maintain proper body alignment.
• Apply restraints without using knots or pins if possible. If knots are necessary, make the kind that can be released quickly. Use pins with care to eliminate the danger of their puncturing or pressing against the infant’s skin.
Restraint Without Appliance: The nurse can restrain the infant by using the hands and body. Figure 24-13 illustrates ways to restrain an infant in this manner.
Interventions
The provision of a protective environment is basic to the care of the newborn. The construction, maintenance, and operation of nurseries in accredited hospitals is monitored by national professional organizations such as the AAP, The Joint Commission, the Occupational Safety and Health Administration, and local or state governing bodies. In addition, hospital personnel develop their own policies and procedures for protecting the newborns under their care. Prescribed standards cover areas such as environmental factors, measures to control infection, and safety factors.
Environmental Factors: Environmental factors include provision of adequate lighting, elimination of potential fire hazards, safety of electrical appliances, adequate ventilation, and controlled temperature (i.e., warm and free of drafts) and humidity (i.e., 40% to 60%) (AAP & ACOG, 2007).
Infection Control Factors: Measures to control infection include adequate floor space to permit the positioning of bassinets at least 3 feet apart in all directions, handwashing facilities, and areas for cleaning and storing equipment and supplies. Only specified personnel directly involved in the care of mothers and infants are allowed in these areas, thereby reducing the opportunities for the transmission of pathogenic organisms.
 NURSING ALERT
Proper hand hygiene is essential to preventing the spread of health care associated infection. Personnel should wash hands with soap and water or use an alcohol-based handrub in accordance with hospital infection control policies. Hand hygiene should be performed before and after touching the infant, before an invasive procedure or medication administration, after contact with potentially contaminated objects (e.g., computer keyboards, telephone, countertop surfaces), and after removing sterile or nonsterile gloves (World Health Organization [WHO], 2009).
Health care workers must wear gloves when handling infants until blood and amniotic fluid have been removed from the skin, when drawing blood (e.g., heelstick), when caring for a fresh wound (e.g., circumcision), and during diaper changes.
Visitors such as siblings and grandparents are expected to perform hand hygiene before having contact with infants or equipment. Individuals with infectious conditions are excluded from contact with newborns or must take special precautions when working with infants. This group includes persons with upper respiratory tract infections, gastrointestinal tract infections, and infectious skin conditions.
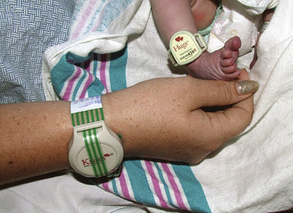
Safety Factors: Health care institutions must be proactive in protecting newborns from abductions. Examples of measures taken include placing matching identification bracelets on infants and their parents, using identification bands with radiofrequency transmitters (Fig. 24-15) that set off an alarm if the bracelet is removed or if a certain threshold is crossed (doorway to exit the unit or building), and footprinting or taking identification pictures immediately after birth, before the infant leaves the mother’s side. In addition, agencies must conduct periodic unit- and hospital-wide drills aimed at preventing newborn abductions. Personnel caring for newborns must be clearly identified by photo identification, and parents must be educated regarding measures to prevent abduction from the mother’s room (i.e., be certain they know the identity of anyone who cares for the infant and never to release the infant to anyone who is not wearing the appropriate identification). Parents are educated before discharge regarding measures to minimize the risk for abduction from the home setting.
Therapeutic and Surgical Procedures
Intramuscular Injection: Administering a single dose of 0.5 to 1 mg of vitamin K intramuscularly to an infant is routine soon after birth (see the Medication Guide box on p. 573).
Hepatitis B (HB) vaccination is recommended for all infants. Infants at highest risk for contracting HB are those born to women who have hepatitis or whose HB status is unknown. If the infant is born to an infected mother or to a mother who is a chronic carrier, HB vaccine and HB immune globulin (HBIG) should be administered within 12 hours of birth (see the Medication Guides: Hepatitis B Vaccine, and Hepatitis B Immune Globulin). The HB vaccine is given in one site and the HBIG in another. For infants born to HB-negative women the first dose of the vaccine can be given at birth or at 1 month of age. Parental consent should be obtained before administering these vaccines.
Selection of the appropriate equipment and site for injection is important. In most cases a 25-gauge, 5/8-inch needle
should be used for the vitamin K and HB vaccine injections. Injections must be given in muscles large enough to accommodate the medication, and major nerves and blood vessels must be avoided. The muscles of newborns may not tolerate more than a 0.5 ml per intramuscular injection. The preferred injection site for newborns is the vastus lateralis (Fig. 24-16). The dorsogluteal muscle is very small, poorly developed, and dangerously close to the sciatic nerve, which occupies a proportionately larger area in infants than in older children. Therefore, it is not recommended as an injection site in small children. The newborn’s deltoid muscle has an inadequate amount of muscle for intramuscular administration. A key factor in preventing and minimizing local reaction to intramuscular injections is adequate deposition of the medication deep within the muscle; therefore, muscle size, needle length, and amount of medication injected should be carefully considered.
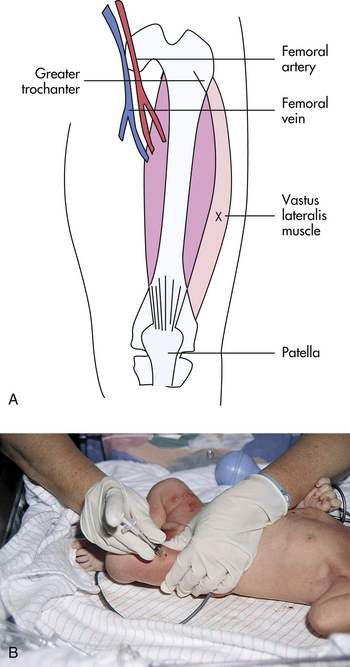
FIG. 24-16 Intramuscular injection. A, Acceptable intramuscular injection site for newborn infant. X, Injection site. B, Infant’s leg stabilized for intramuscular injection. Nurse is wearing gloves to give injection. (B, Courtesy Marjorie Pyle, RNC, Lifecircle, Costa Mesa, CA.)
The nurse wears nonsterile gloves when administering an injection. The neonate’s leg should be stabilized. The nurse cleanses the injection site with an appropriate skin antiseptic, then stabilizes the infant’s muscle between the thumb and forefinger. The needle is inserted into the vastus lateralis at a 90-degree angle. The plunger of the syringe is gently withdrawn, and if no blood is aspirated, the medication is injected. If blood is aspirated, the needle is withdrawn. A new needle is used
and the injection is given in another site after proper cleansing and checking for aspiration of blood. After the medication is injected, the nurse withdraws the needle quickly and applies gentle pressure at the site to minimize pain and bleeding.
The nurse should always remember to comfort the infant after an injection and to discard equipment properly. Needles should never be recapped but should be properly discarded in an appropriate safety container. The name of the medication, date and time, amount, route, and site of injection must be recorded in the newborn’s record.
Therapy for Hyperbilirubinemia: The best therapy for hyperbilirubinemia is prevention. Because bilirubin is excreted in meconium, prevention can be facilitated by early feeding, which stimulates the passage of meconium. However, despite early passage of meconium, the term infant can have trouble conjugating the increased amount of bilirubin derived from disintegrating fetal RBCs. As a result, the serum levels of unconjugated bilirubin can rise beyond normal limits, causing hyperbilirubinemia. The goal of treatment of hyperbilirubinemia is to help reduce the newborn’s serum levels of unconjugated bilirubin. The two principal ways of reaching this goal are phototherapy and, rarely, exchange blood transfusion. Exchange transfusion is used to treat infants whose levels of serum bilirubin are rising rapidly despite the use of intensive phototherapy (see Chapter 36).
Phototherapy: The purpose of phototherapy is to reduce the level of circulating unconjugated bilirubin or to keep it from increasing. Phototherapy uses light energy to change the shape and structure of unconjugated bilirubin and convert it to molecules that can be excreted. The dose and effectiveness of phototherapy are affected by the source of light. Phototherapy units vary in the spectrum of light they deliver and in the filters that are used. Most units use daylight, cool white, blue, or special blue fluorescent bulbs. The most effective therapy is achieved with the special blue light or a specially designed light-emitting diode (LED) light. Phototherapy lights do not emit significant ultraviolet radiation; the small amount that is emitted does not cause erythema. Most of the ultraviolet light is absorbed by the glass wall of the fluorescent tube and by the plastic cover of the light (AAP Subcommittee on Hyperbilirubinemia, 2004; Maisels & McDonagh, 2008).
Phototherapy is usually effective for treatment of hyperbilirubinemia that has not reached levels associated with acute bilirubin encephalopathy or kernicterus. Guidelines for the use of phototherapy were developed by the AAP Subcommittee on Hyperbilirubinemia (2004).
The effectiveness of phototherapy is related to the distance between the light and the neonate and on the area of skin that is exposed. During phototherapy the unclothed infant is placed under a bank of lights approximately 45 to 50 cm from the light source. Phototherapy can be used for the infant in an incubator (Fig. 24-17) or in an open crib. The distance varies according to unit protocol and type of light used. The lamp’s energy output should be monitored routinely with a photometer during treatment to ensure efficacy of therapy. Phototherapy is used until the infant’s serum bilirubin level decreases to within an acceptable range. The decision to discontinue therapy is based on the observation of a definite downward trend in the bilirubin values.
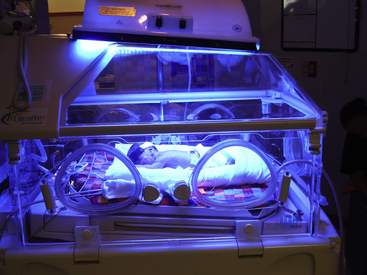
FIG. 24-17 Infant under phototherapy lights while in incubator (Courtesy Randi and Jacob Wills, Clayton, NC.)
The infant’s eyes must be protected by an opaque mask to prevent overexposure to the light. The eye shield should cover the eyes completely but not occlude the nares. Before the mask is applied the infant’s eyes should be closed gently to prevent excoriation of the corneas. The mask should be removed periodically and during infant feedings so that the eyes can be checked and cleansed with water and the parents can have visual contact with the infant (Fig. 24-18).
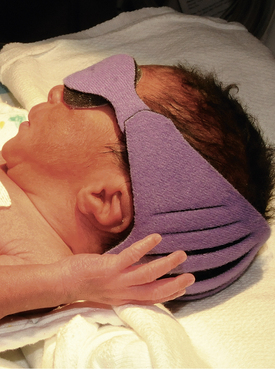
FIG. 24-18 Infant with eyes covered while receiving phototherapy. (Courtesy Cheryl Briggs, RNC, Annapolis, MD.)
It is usually unnecessary to remove the newborn’s diaper during phototherapy, although with rising bilirubin levels the diaper may need to be removed until levels show a significant decline (Maisels & McDonagh, 2008). To promote optimal skin exposure during phototherapy a “string bikini” made from a disposable face mask is often used instead of a diaper, which allows optimal skin exposure and provides protection for the genitals and the bedding. Before use the metal strip must be removed from the mask to prevent burning the infant. Lotions and ointments should not be used during phototherapy because they absorb heat and can cause burns.
Phototherapy can cause changes in the infant’s temperature, depending partially on the bed used: bassinet, incubator, or radiant warmer. The infant’s temperature should be closely monitored. Phototherapy lights can increase the rate of insensible water loss, which contributes to fluid loss and dehydration. Therefore, the infant must be adequately hydrated. Hydration maintenance in the healthy newborn is accomplished with human milk or infant formula; administering glucose water or plain water has no advantage or benefit because these liquids do not promote excretion of bilirubin in the stools and may actually perpetuate enterohepatic circulation, thus delaying bilirubin excretion.
It is important to closely monitor urinary output while the infant is receiving phototherapy. Urine output can be decreased or unaltered; the urine can have a dark gold or brown appearance.
The number and consistency of stools are monitored. Bilirubin breakdown increases gastric motility, which results in loose stools that can cause skin excoriation and breakdown. The infant’s buttocks must be cleaned after each stool to help maintain skin integrity. A fine maculopapular rash can appear during phototherapy, but this condition is transient.
In addition to phototherapy lights other systems are used for phototherapy. A bassinet system provides special blue light above and beneath the infant. A bilirubin blanket is a woven fiberoptic blanket pad connected to a light source. The blanket is flexible and can be placed around the infant’s torso or underneath the infant in the bassinet. There are also bilirubin beds with LED lights in a pad that covers the surface of the bassinet. The LEDs do not produce heat and can be used with radiant warmers. These devices are usually less effective when used alone as compared with conventional phototherapy lights. They can be very useful in combination with overhead phototherapy lights. In certain instances the infant’s bilirubin levels are increasing rapidly and intensive phototherapy is required; this situation involves the use of a combination of conventional lights and fiberoptic blankets to maximize bilirubin reduction. Although fiberoptic lights do not produce heat as do conventional lights, staff should ensure that a covering pad is placed between the infant’s skin and the fiberoptic device to prevent skin burns, especially in preterm infants. The newborn can remain in the mother’s room in an open crib or in her arms during treatment. The use of eye patches depends on whether the devices are used alone or in combination with phototherapy lights.
Parent Education: Serum levels of bilirubin in the newborn continue to rise until the fifth day of life. Many parents leave the hospital within 24 hours of birth, and some as early as 6 hours after birth. Therefore, parents must receive education regarding jaundice and its treatment. They should have written instructions for assessing the infant’s condition and the name of a contact person for reporting their findings and raising their concerns. Some institutions or third-party providers pay for a home visit to evaluate the infant’s condition and to monitor the mother’s health. If measuring serum bilirubin levels proves necessary after discharge from the hospital, a health care technician or nurse may draw the blood for the specimen, or the parents may take the baby to a laboratory to have blood drawn for a serum bilirubin. In some cases, parents may take the newborn to an outpatient clinic or physician’s office to be evaluated.
Home Phototherapy: Healthy term infants may at times be discharged home and need phototherapy for hyperbilirubinemia. Candidates for home phototherapy include infants who are healthy and active with no signs and symptoms of other complications. The parents or other caregivers must be willing and able to assume the responsibility for therapy maintenance and monitoring, and the home environment should be adequate with a telephone, heat, and electricity. Fiberoptic bilirubin blankets are often used for home phototherapy.
The company that provides the home therapy equipment is responsible for setting up the phototherapy unit and teaching the parents or caregivers how to use the equipment. The home care nurse schedules home visits to assess the infant’s response to therapy, including weight, feeding, output, and temperature stability. Additional education of parents may be necessary; their understanding of the therapy and their responsibilities is assessed. Blood may be drawn for laboratory work and results reported to the primary health care provider. When therapy is discontinued, follow-up visits for monitoring may be ordered. The equipment company is called to arrange for pick-up of the phototherapy unit.
Circumcision: Circumcision is the removal of all or part of the foreskin (prepuce) of the penis. Most often it is performed during the first few days of life, but is sometimes done at a later time for religious or cultural reasons.
Circumcision was the third most common inpatient surgical procedure in the United States in 2005. Approximately 56% of male newborns were circumcised prior to hospital discharge; this is a decline from a high of 65% in 1980 (Merrill, Nagamine, & Steiner, 2008).
The AAP Task Force on Circumcision issued a policy statement on newborn circumcision in 1999 and reaffirmed the policy in 2005 (AAP, 2005; AAP Task Force on Circumcision, 1999). The policy states that “existing scientific evidence demonstrates potential medical benefits of newborn male circumcision; however, these data are not sufficient to recommend routine neonatal circumcision” (AAP Task Force on Circumcision, p. 686). The task force further recommended that if circumcision is performed, procedural analgesia should be used. ACOG (2001) issued similar recommendations regarding newborn circumcision.
There is ongoing discussion and controversy among health care experts related to newborn circumcision as scientific evidence emerges. Proponents of circumcision cite health advantages such as decreased incidence of urinary tract infection in infants less than 1 year of age; reduced risk of penile cancer, phimosis, paraphimosis, and balanitis; and decreased risk for sexually transmitted infections including HIV and human papillomavirus. They note a low rate of complications and no substantial negative effect on sexual function. Opponents of circumcision feel that the procedure is unnatural and unnecessary. They cite risks related to acute complications such as hemorrhage, infection, and penile injury (removal of excessive skin, damage to the meatus or glans) and long-term implications such as adverse effects on sexual function and pleasure. Other negative aspects of newborn circumcision are acute pain and long-term psychologic effects (Brady, 2010).
Recent evidence from well-designed, well-controlled studies in Africa indicates that male circumcision can prevent acquisition of HIV, herpes simplex 2, and human papillomavirus (Auvert, Taljaard, Lagarde, Sobngwi-Tambekou, Sitta, & Puren, 2005; Bailey, Moses, Parker, Agot, Maclean, Krieger, et al., 2007; Gray, Kigozi, Serwadda, Makumbi, Watya, Nalugoda, et al., 2007; Siegfried, Muller, Deeks, & Volmink, 2009). Whereas it is clear that prevalence rates for HIV are lower in the United States, the studies provide evidence that newborn circumcision can reduce the risk of HIV by about 16% (Sansom, Prabhu, Hutchinson, An, Hall, Shrestha, et al., 2010). The World Health Organization (WHO) recognizes male circumcision as an important intervention in reducing the risk of heterosexually acquired HIV in men (Joint United Nations Programme on HIV/AIDS, 2007).
Circumcision is a matter of personal parental choice. Parents usually decide to have their newborn circumcised for one or more of the following reasons: hygiene, religious conviction, tradition, culture, or social norms. Cost and insurance coverage are considerations in the parents’ decision-making process. Some private insurance companies no longer cover circumcision. Medicaid does not cover the cost of circumcision in 16 states. Interestingly, in those states circumcision rates are 24% lower than in states with Medicaid coverage (Leibowitz, Desmond, & Belin, 2009). This is another point of controversy because the lack of Medicaid coverage unfairly affects disadvantaged minorities; as adults, they have the highest risk of sexually transmitted infections (STIs) and HIV. Parents need to make an informed choice regarding newborn circumcision based on the most current evidence and recommendations. Health care providers and nurses who care for childbearing families should provide factual, unbiased information regarding circumcision and give parents opportunities to discuss the benefits and risks of the procedure.
Circumcision is not performed immediately after birth because of the danger of cold stress and decreased clotting factors, but is usually done in the hospital before discharge. The circumcision of a Jewish male infant is commonly performed on the eighth day after birth at home in a ceremony called a bris. This timing is logical from a physiologic standpoint because clotting factors decrease somewhat immediately after birth and do not return to prebirth levels until the end of the first week.
Feedings are usually withheld up to 2 to 3 hours before the circumcision to prevent vomiting and aspiration. To prepare the infant for the circumcision, he is positioned on a plastic restraint form (Fig. 24-19), and the penis is cleansed with soap and water or a preparatory solution such as povidone-iodine. The infant is draped to provide warmth and a sterile field, and the sterile equipment is readied for use.
FIG. 24-19 Proper positioning of infant for circumcision. (Photo by Paul Vincent Kuntz, Texas Children’s Hospital, Houston, TX.)
The circumcision procedure itself takes only a few minutes. Although some circumcision procedures require no special equipment or appliances, the most common procedures for newborn circumcision involve the use of specific devices: the Yellen (Gomco) clamp or the PlastiBell device. The Mogen clamp is often used by Jewish mohels for ceremonial circumcision.
With the Yellen (Gomco) clamp technique, a metal bell is placed over the glans and the foreskin is pulled over the bell, which is then fit into a metal baseplate. The device crushes the foreskin between the bell and the baseplate. The foreskin is then excised with a scalpel (Fig. 24-20). Following the procedure, a small petrolatum gauze dressing is applied to the glans. Thereafter, petroleum gauze or a generous amount of petrolatum ointment is applied to the penis for the first few days to prevent the diaper from adhering to the glans. It may be necessary to gently retract the skin of the penile shaft if it starts to encroach on the glans. Some health care providers recommend doing this with each diaper change to prevent adhesions from forming.

FIG. 24-20 Circumcision with Yellen clamp. After hemostasis occurs, the prepuce (over cone) will be cut away. (Courtesy Cheryl Briggs, RNC, Annapolis, MD.)
When the PlastiBell device is used for circumcision, a plastic bell is placed between the glans and the foreskin; the foreskin is pulled forward over the bell and suture is tied around the rim of the bell, leaving a plastic rim in place. Excess foreskin is usually excised. The suture cuts off blood supply to the foreskin, causing it to wither. Within 5 to 7 days, the plastic rim falls off, along with the foreskin (Fig. 24-21). Petrolatum is not usually needed when the PlastiBell is used.
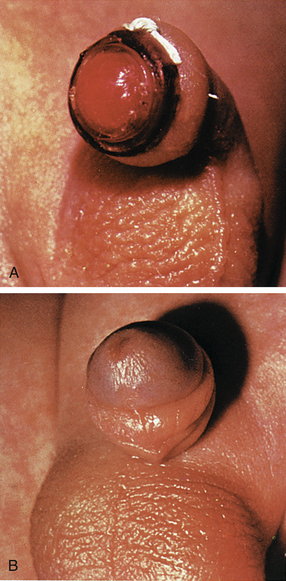
FIG. 24-21 Circumcision using Hollister PlastiBell. A, Suture around rim of PlastiBell controls bleeding. B, Plastic rim and suture drop off in 7 to 10 days. (Permission to use or reproduce this copyrighted material has been granted by the owner, Hollister, Inc., Libertyville, IL.)
Procedural Pain Management: Circumcision is painful. The pain is characterized by both physiologic and behavioral changes in the infant (see discussion that follows). Four types of anesthesia and analgesia are used in newborns who undergo circumcisions: ring block, dorsal penile nerve block (DPNB), topical anesthetic such as eutectic mixture of local anesthetic (EMLA) (prilocaine-lidocaine) or LMX4 (4% lidocaine), and concentrated oral sucrose. Nonpharmacologic methods such as nonnutritive sucking, containment, and swaddling can be used to enhance pain management. The Cochrane group exploring pain relief for neonatal circumcision (Brady-Fryer, Wiebe, & Lander, 2004) found that DPNB was the most effective intervention for decreasing the pain of circumcision. A DPNB includes subcutaneous injections of buffered lidocaine at the 2 o’clock and 10 o’clock positions at the base of the penis. A ring block is the injection of buffered lidocaine administered subcutaneously on each side of the penile shaft. The circumcision should not be performed for at least 5 minutes after these injections.
A topical cream containing prilocaine-lidocaine such as EMLA can be applied to the base of the penis at least 1 hour before the circumcision. The area where the prepuce attaches to the glans is well coated with 1 g of the cream and then covered with a transparent occlusive dressing or finger cot. Just before the procedure, the cream is removed. Blanching or redness of the skin may occur.
After the circumcision the infant is comforted until he is quieted. If the parents were not present during the procedure, the infant is returned to them. The infant can be fussy for several hours and can have disturbed sleep-wake states and disorganized feeding behaviors. Oral liquid acetaminophen may be administered after the procedure every 4 hours (as ordered by the practitioner) for a maximum of five doses in 24 hours or a maximum of 75 mg/kg/day.
Care of the Newly Circumcised Infant: Postcircumcision protocols vary. In many settings, the circumcision site is assessed for bleeding every 15 to 30 minutes for the first hour and then hourly for the next 4 to 6 hours. The nurse monitors the infant’s urinary output, noting the time and amount of the first voiding after the circumcision.
If bleeding occurs from the circumcision site, the nurse applies gentle pressure with a folded sterile gauze square. A hemostatic agent such as Gelfoam® powder or sponge can be applied to help control bleeding. If bleeding is not easily controlled, a blood vessel may need to be ligated. In this event, one nurse notifies the physician and prepares the necessary equipment (i.e., circumcision tray and suture material), while another nurse maintains intermittent pressure until the physician arrives.
Nurses provide education for parents related to care of the circumcised infant, which includes observing for complications such as bleeding or infection (see Box 24-7). Parents need support and encouragement as they perform postcircumcision care. Newborns typically cry when the diaper is changed and when petrolatum gauze is removed and reapplied. This can make new parents feel anxious because they do not want to inflict pain on the infant. Nurses can inform parents that the discomfort is usually temporary and will soon subside.
Nursing actions are planned and implemented to prevent infection. Prepackaged commercial wipes should not be used because they contain alcohol, which delays healing and causes discomfort. Instead, the nurse washes the penis gently with water to remove urine and feces and, if necessary, applies fresh petrolatum around the glans after each diaper change. The glans penis, normally dark red during healing, becomes covered with a yellow exudate in about 24 hours, which is part of normal healing, not an infective process. No attempt should be made to remove the exudate, which persists for 2 to 3 days. Parents should be taught to apply the diaper so that it does not press on the circumcised area. They should be encouraged to change the diaper at least every 4 hours to prevent it from sticking to the penis.
Neonatal Pain: Pain has physiologic and psychologic components. Its psychologic component and the diffuse total body response to pain exhibited by the neonate led many health care providers in the past to believe that infants, especially preterm infants, do not experience pain. The central nervous system is well developed, however, as early as 24 weeks of gestation. The peripheral and spinal structures that transmit pain information are present and functional between the first and second trimesters. The pituitary-adrenal axis is also well developed at this time, and a fight-or-flight reaction is observed in response to the catecholamines released in response to stress.
The physiologic response to pain in neonates can be life threatening. Pain response can decrease tidal volume, increase demands on the cardiovascular system, increase metabolism, and cause neuroendocrine imbalance. The hormonal-metabolic response to pain in a term infant has greater magnitude and shorter duration than that in adults. The newborn’s sympathetic response to pain is less mature and therefore less predictable than an adult’s.
Neonatal Responses to Pain: Pain response is influenced by a variety of factors such as characteristics of the painful stimulus, gestational age, biologic factors, and behavioral state. The source, location, and timing of the pain affect the response; newborns respond differently to acute pain than to prolonged or recurrent pain. In general, infants of younger gestational ages seem to display less vigorous pain responses. There can be genetic differences in pain responses related to the amount and type of neurotransmitters and receptors available to mediate pain. The behavioral state of the neonate also affects the pain response. Those who are more awake tend to have more robust pain responses than those in sleep states (Walden, 2007).
The most common behavioral sign of pain is a vocalization or crying, ranging from a whimper to a distinctive high-pitched, shrill cry. Facial expressions include grimacing, eye squeeze, brow contraction, deepened nasolabial furrows, a taut and quivering tongue, and an open mouth (Fig. 24-22). The infant will flex and adduct the upper body and lower limbs in an attempt to withdraw from the painful stimulus. The preterm infant has a lower than normal threshold for initiation of this flex response. An infant who receives a muscle-paralyzing agent such as vecuronium will be unable to mount a behavioral or visible pain response.
FIG. 24-22 Signs of discomfort: note eye squeeze, brow bulge, nasolabial furrow, and wide-spread mouth (Courtesy Kathryn Alden, Chapel Hill, NC.)
Pain can result in significant changes in heart rate, blood pressure (increased or decreased), intracranial pressure, vagal tone, respiratory rate, and oxygen saturation. Neonates respond to painful stimuli with release of epinephrine, norepinephrine, glucagon, corticosterone, cortisol, 11-deoxycorticosterone, lactate, pyruvate, and glucose (Walden & Gibbins, 2008).
Assessment of Neonatal Pain: In assessing pain the nurse needs to consider the health of the neonate, the type and duration of the painful stimulus, environmental factors, and the infant’s state of alertness. For example, severely compromised neonates may be unable to generate a pain response, although they are in fact experiencing pain.
Every client should have an initial pain assessment, as well as a pain management plan; this mandate includes newborns. The National Association of Neonatal Nurses (NANN) developed practice guidelines stating that all nurses who care for newborns should have education and competency validation in pain assessment. Pain should be assessed and documented on a regular basis (Walden & Gibbins, 2008).
Several pain assessment tools have been developed for use with neonates. A combination of behavioral and physiologic indicators of pain is used to diagnose and differentiate infant pain levels. Tools that have been shown to have validity and reliability include the Neonatal Infant Pain Scale (NIPS) (Lawrence, Alcock, McGrath, Kay, MacMurray, & Dulberg, 1993) and the Premature Infant Pain Profile (PIPP) (Stevens, Johnston, Petryshen, & Taddio, 1996). A pain assessment tool used by nurses in the NICU is CRIES (Krechel & Bildner, 1995) (Table 24-4). This tool was developed for use by nurses who work with preterm and term infants. CRIES is an acronym for the physiologic and behavioral indicators of pain used in the tool: crying, requiring increased oxygen, increased vital signs, expression, and sleeplessness. Each indicator is scored from 0 to 2. The total possible pain score, which represents the worst pain, is 10. A pain score greater than 4 should be considered significant. This tool can be used on infants between 32 weeks of gestation and 20 weeks after birth.
TABLE 24-4
CRIES NEONATAL POSTOPERATIVE PAIN SCALE∗
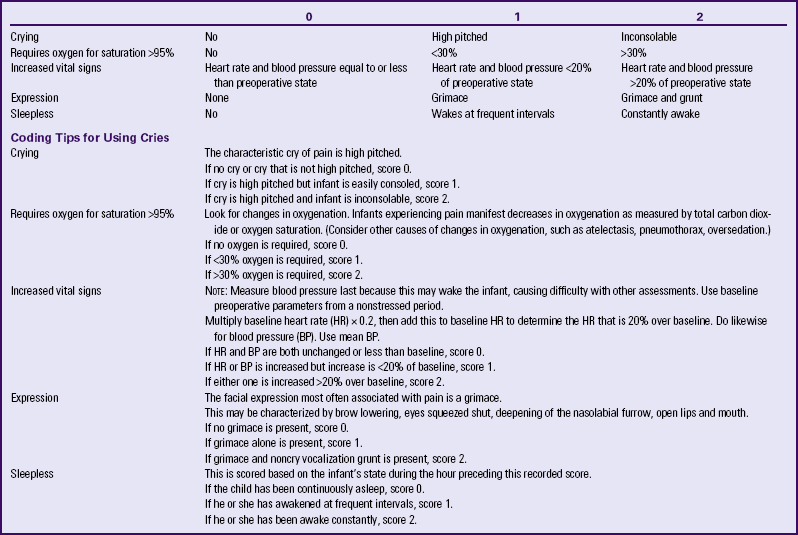
∗Neonatal pain assessment tool developed at the University of Missouri–Columbia.
Source: Krechel, S., & Bildner, J. (1995). CRIES: A new neonatal postoperative pain measurement score: Initial testing of validity and reliability. Paediatric Anaesthesia, 5(1), 53-61.
Management of Neonatal Pain: The goals of the management of neonatal pain are to: (1) minimize the intensity, duration, and physiologic cost of the pain, and (2) maximize the neonate’s ability to cope with and recover from the pain. Nonpharmacologic and pharmacologic strategies are used.
Nonpharmacologic Management: Containment, also known as swaddling, is effective in reducing excessive immature motor responses (Fig. 24-23). Containment can provide comfort through other senses, such as thermal, tactile, and proprioceptive senses. Nonnutritive sucking on a pacifier is a common comfort measure used with newborns. Oral sucrose, with or without nonnutritive sucking is safe and effective in reducing pain during single events (Stevens, Yamada, & Ohlsson, 2010). Skin-to-skin contact with the mother during a painful procedure can help to reduce pain (Chermont, Falcão, de Sousa Silva, de Cássia Xavier Balda, & Guinsburg, 2009). Breastfeeding helps reduce pain during heel lancing and blood collection (Leite, Lander, Linhares, Castral, dos Santos, & Silvan Scochi, 2009; Weissman, Aranovitch, Blazer, & Zimmer, 2009). Combining these nonpharmacologic methods results in more effective pain reduction. Distraction with visual, oral, auditory, or tactile stimulation can be helpful in term or older infants.
Pharmacologic Management: Pharmacologic agents are used to alleviate pain in neonates associated with procedures. Local anesthesia is routinely used during procedures such as chest tube insertion and circumcision. Topical anesthesia is used for circumcision, lumbar puncture, venipuncture, and heelsticks. Nonopioid analgesia (oral liquid acetaminophen) is effective for mild to moderate pain from inflammatory conditions. Morphine and fentanyl are the most widely used opioid analgesics for pharmacologic management of neonatal pain. Continuous or bolus intravenous infusion of opioids provides effective and safe pain control. Ketorolac (Toradol) has been shown to be effective in the management of postoperative neonatal pain. Other methods for managing neonatal pain are epidural infusion, local and regional nerve blocks, and intradermal or topical anesthetics.
Promoting Parent-Infant Interaction
Nurses play an important role in promoting early social interaction between parents and their newborn infant. From birth throughout the hospital stay, nurses assess attachment behaviors (see Chapter 22) and provide support and education to parents as they become acquainted with the neonate. Nurses working in outpatient settings or home care provide follow-up assessments and care related to parent-child interactions. By teaching parents to recognize infant cues and respond appropriately, the nurse facilitates development of the parents’ confidence in meeting the needs of their newborn.
The sensitivity of the parent to the social responses of the infant is basic to the development of a mutually satisfying
 CULTURAL CONSIDERATIONS
Cultural Beliefs and Practices Related to Infant Care
Nurses working with childbearing families from other cultures and ethnic groups must be aware of cultural beliefs and practices that are important to individual families. People with a strong sense of heritage may hold on to traditional health beliefs long after adopting other U.S. lifestyle practices. These health beliefs may involve practices regarding the newborn. For example, some Asians, Hispanics, eastern Europeans, and Native Americans delay breastfeeding because they believe that colostrum is “bad.” Some Hispanics and African-Americans place a belly band over the infant’s umbilicus. The birth of a male child is generally preferred by Asians and Eastern Indians, and some Asians and Haitians delay naming their infants (D’Avanzo, 2008).
parent-child relationship. Sensitivity increases over time as parents become more aware of their infant’s social capabilities. In supporting parents, nurses need to consider cultural beliefs and traditions that influence parenting behaviors and infant care practices (see the Cultural Considerations box).
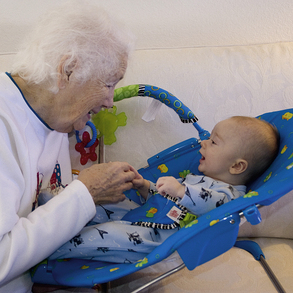
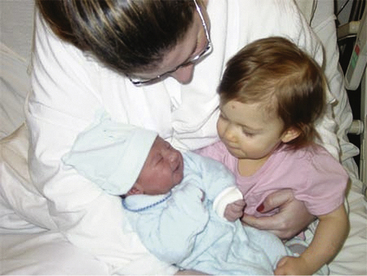
The activities of daily care during the neonatal period are the best times for infant and family interactions. While caring for their newborn the mother and father can talk to the infant, play baby games, caress and cuddle the baby, and perhaps use infant massage. Feeding is an optimal time for interaction because the infant is usually awake and alert, at least at the beginning of the feeding. In Figure 24-24 a great-grandmother and infant are shown engaging in arousal, imitation of facial expression, and smiling. Too much stimulation should be avoided after feeding and before a sleep period. Older children’s contact with a newborn is encouraged and supervised based on the developmental level of the child (Fig. 24-25). Parents often keep memento books that record the birth, the hospital stay, and their infant’s progress. Other parents create blogs (e.g., www.wordpress.com) to share their development as a family.
Discharge Planning and Teaching
Infant care activities can cause anxiety for new parents. Support from nursing staff members can be an important factor in determining whether new parents seek and accept help in the future. Whether this child is the woman’s or the couple’s first newborn or an adolescent whose mother will be the primary caregiver, and whether or not the parents attended parenthood preparation classes, parents appreciate anticipatory guidance in the care of their infant. The nurse should avoid trying to cover all the content at one time because the parents can be overwhelmed by too much information and become more anxious. However, because early discharge of new mothers is common practice, teaching all the content that is necessary can be a challenge for the nurse because of time constraints. As a result, many institutions have developed home visitation programs that take the necessary teaching to the new parents, although the hospital nurse still provides most of the essential information for newborn care.
To set priorities for teaching, the nurse follows parental cues. Knowledge deficits or gaps should be identified before beginning to teach. Normal growth and development and the changing needs of the infant (e.g., for personal interaction and stimulation, growth milestones, exercise, injury prevention, and social contacts), as well as the topics that follow, should be included during discharge planning with parents. Safety issues should be addressed (Box 24-8).
Temperature
Parents need to understand practical information related to thermoregulation. The nurse discusses the following topics in parent teaching:
• The causes of elevation in body temperature (e.g., overwrapping, cold stress with resultant vasoconstriction, or minimal response to infection) and the body’s response to extremes in environmental temperature
• Ways to promote normal body temperature, such as dressing the infant appropriately for the environmental air temperature and protecting the infant from exposure to direct sunlight
• Use of warm wraps or extra blankets in cold weather
• Technique for taking the newborn’s axillary temperature, and normal values for axillary temperature
• Signs to be reported to the primary health care provider such as high or low temperatures with accompanying fussiness, lethargy, irritability, poor feeding, and crying
Respirations
The nurse provides information to parents regarding the normal characteristics of newborn respirations, emergency procedures, and measures to protect the infant. It is helpful to discuss signs of the common cold and to offer suggestions related to care of the infant who experiences this type of illness. Review the following points:
• Normal variations in the rate and rhythm of respirations
• Reflexes such as sneezing to clear the airway
• Steps to take if the infant appears to be choking (see the Emergency box, p. 599)
• The need to protect the infant from the following:
• Exposure to people with upper respiratory tract infections and respiratory syncytial virus
• Exposure to secondhand tobacco smoke
• Suffocation from loose bedding, water beds, and beanbag chairs; drowning (in bath water); entrapment under excessive bedding or in soft bedding; anything tied around the infant’s neck; poorly constructed playpens, bassinets, or cribs
• Sleep position—on back when put to sleep
• Avoid the use of baby powder, which is a commonly aspirated substance. If parents desire to use a powder, a cornstarch preparation can be substituted. Whenever a powder is used, it should be placed in the caregiver’s hand and then applied to the skin, never sprinkled directly onto the skin.
• Notify the health care provider if the infant develops symptoms such as difficulty breathing or swallowing, nasal congestion, excess drainage of mucus, coughing, sneezing, decreased interest in feeding, or fever.
• If the infant has a respiratory illness such as the “common cold,” the following suggestions can be helpful:
• Feed smaller amounts more often to prevent overtiring the infant.
• Hold the baby in an upright position to feed.
• For sleeping, raise the infant’s head and chest by raising the mattress 30 degrees. (Do not use a pillow.)
• Avoid drafts; do not overdress the baby.
• Use only medications prescribed by a physician. (Over-the-counter “cold” remedy medications are not appropriate for infants and should be avoided [Sharfstein, North, & Serwint, 2007]).
• Use nasal saline drops in each nostril and suction well with bulb syringe to decrease and relieve secretions.
Feeding Patterns
Nurses instruct parents about infant feeding and provide assistance based on whether they have chosen breastfeeding or formula feeding. Feeding patterns and practices for newborns are discussed in Chapter 25.
Elimination
Awareness of the normal elimination patterns of newborns helps parents to recognize problems related to voiding or stooling. The following points are included in teaching about elimination:
• Color of normal urine and number of voidings to expect each day: at least two to six for the first one to three days, then a minimum of six to eight voidings per day thereafter
• Changes to be expected in the color and consistency of the stool (i.e., meconium to transitional to soft yellow or golden yellow) and the number of bowel evacuations, plus the odor of stools for breastfed or bottle-fed infants (see Chapter 25)
• Formula-fed infants may have as few as one stool every other day after the first few weeks of life; stools are pasty to semiformed
• Breastfed infants should have at least three stools every 24 hours for the first few weeks; the stools are looser and resemble mustard mixed with cottage cheese; the odor is less offensive than that of formula stools
Positioning and Holding
The AAP Task Force on Infant Sleep Position and Sudden Infant Death Syndrome (SIDS) (2005) continues to recommend placing the infant in the supine position during the first few months of life to prevent SIDS. The prone position has been associated with an increased incidence of SIDS. Since the original sleep position statement was made in 1992 recommending supine sleep position for all newborns, death rates from SIDS have decreased by more than 40% in the United States.
Infants should sleep on a firm surface, specifically on a firm crib mattress covered by a sheet. Soft materials such as comforters, quilts, pillows, or sheepskins should not be placed under the sleeping infant. These same objects should be kept out of the infant’s sleeping environment. Loose bedding such as sheets and blankets can be dangerous and if used, should be tucked securely around the crib mattress to prevent the infant’s face from being covered by the bedding. Sleep clothing such as infant sleep sacks are useful to keep the infant covered without the danger of covering the head. It is important to avoid overheating the infant during sleep. Bed sharing is not recommended during infant sleep. Infants may be brought into the parent’s bed for comforting or for breastfeeding, but should be returned to the crib or bassinet before the parent goes to sleep. Room sharing (infant sleeping in the parent’s room) is associated with a decreased risk of SIDS (AAP Task Force on Infant Sleep Position and Sudden Infant Death Syndrome, 2005).
Anatomically, the infant’s shape—a barrel chest and flat, curveless spine—facilitates the infant to roll from the side to the prone position; therefore, the side-lying position for sleep is not recommended. When the infant is awake, “tummy time” can be provided under parental supervision so the infant can begin to develop appropriate muscle tone for eventual crawling; this tummy time is also effective in the prevention of a misshaped head (positional plagiocephaly). Care must be taken to prevent the infant from rolling off flat, unguarded surfaces. When an infant is on such a surface the parent or nurse who must turn away from the infant even for a moment should always keep one hand placed securely on the infant. The infant is always held securely with the head supported because newborns are unable to maintain an erect head posture for more than a few moments. Figure 24-26 illustrates various positions for holding an infant with adequate support.
FIG. 24-26 Holding baby securely with support for head. A, Holding infant while moving infant from one place to another. Baby is undressed to show posture. B, Holding baby upright in “burping” position. C, “Football” (under the arm) hold. D, Cradling hold. (A, Courtesy Kim Molloy, Knoxville, IA. B, C, and D, Courtesy Julie Perry Nelson, Loveland, CO.)
Rashes
Diaper Rash: The majority of infants develop a diaper rash at some time. This dermatitis or skin inflammation appears as redness, scaling, blisters, or papules. Various factors contribute to diaper rash including infrequent diaper changes, diarrhea, use of plastic pants to cover the diaper, a change in the infant’s diet such as when solid foods are added, or when breastfeeding mothers eat certain foods.
Parents are instructed in measures to help prevent and treat diaper rash. Diapers should be checked often and changed as soon as the infant voids or stools. Plain water with mild soap is used to cleanse the diaper area; if baby wipes are used, they should be unscented and contain no alcohol. The infant’s skin should be allowed to dry completely before applying another diaper. Exposing the buttocks to air can help dry up diaper rash. Because bacteria thrive in moist dark areas, exposing the skin to dry air decreases bacterial proliferation. Zinc oxide ointments can be used to protect the infant’s skin from moisture and further excoriation.
Although diaper rash can be alarming to parents and annoying to babies, most cases resolve within a few days with simple home treatments. There are instances when diaper rash is more serious and can require medical treatment.
The warm, moist atmosphere in the diaper area provides an optimal environment for Candida albicans growth; dermatitis appears in the perianal area, inguinal folds, and lower abdomen. The affected area is intensely erythematous with a sharply demarcated, scalloped edge, often with numerous satellite lesions that extend beyond the larger lesion. The usual source of infection is from handling by persons who do not practice good hand hygiene. It may also appear 2 to 3 days after an oral infection (thrush).
Therapy consists of applications of an anticandidal ointment, such as clotrimazole or miconazole, with each diaper change. Sometimes the infant is given an oral antifungal preparation such as nystatin or fluconazole to eliminate any gastrointestinal source of infection.
Other Rashes: A rash on the cheeks can result from the infant’s scratching with long unclipped fingernails or from rubbing the face against the crib sheets, particularly if regurgitated stomach contents are not washed off promptly. The newborn’s skin begins a natural process of peeling and sloughing after birth. Dry skin may be treated with a neutral pH lotion, but this should be used sparingly. Newborn rash, erythema toxicum, is a common finding (see Fig. 23-5, B) and needs no treatment.
Clothing
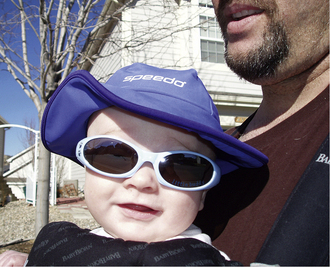
Parents commonly ask how warmly they should dress their infant. A simple suggestion is to dress the child as they dress themselves, adding or subtracting clothes and wraps for the child as necessary. A cotton shirt and diaper may be sufficient clothing for the young infant in warm weather. A cap or bonnet is needed to protect the scalp and minimize heat loss if the weather is cool or to protect against sunburn. Wrapping the infant snugly in a blanket maintains body temperature and promotes a feeling of security. Overdressing in warm temperatures can cause discomfort, as can underdressing in cold weather. Parents are encouraged to dress the infant at all times in flame-retardant clothing. The eyes should be shaded if it is sunny and hot. Infant sunglasses are available to protect the infant’s eyes when outdoors (Fig. 24-27).
Car Seat Safety
Infants should travel only in federally approved rear-facing safety seats secured in the rear seat (Fig. 24-28).
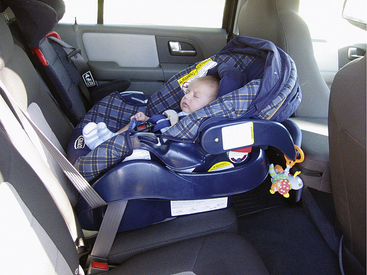
FIG. 24-28 Rear-facing car seat in rear seat of car. Infant is placed in seat when going home from the hospital. (Courtesy Brian and Mayannyn Sallee, Anchorage, AK.)
To secure the infant in the rear-facing car safety seat, shoulder harnesses are placed in the slots at or below the level of the infant’s shoulders. The harness is snug, and the retainer clip is placed at the level of the infant’s armpits as opposed to on the abdomen or neck area. The car seat is secured by using the vehicle seat belts.
 SAFETY ALERT
Infants should use a rear-facing car seat for as long as possible up to the weight and height limit for their particular car seat. At a minimum, infants should ride in a rear-facing car seat until they are one year of age and weigh at least 20 pounds. The safest area of the car is the back seat. A car safety seat that faces the rear gives the best protection for the disproportionately weak neck and heavy head of an infant. In this position the force of a frontal crash is spread over the head, neck, and back; the back of the car safety seat supports the spine (AAP, 2010; National Highway and Traffic Safety Administration [NHTSA], 2010).
In cars equipped with air bags, rear-facing infant seats should not be placed in the front seat. Serious injury can occur if the air bag inflates because these types of infant seats fit close to the dashboard. If the infant must ride in the front seat, the air bag must be turned off (AAP, 2010; NHTSA, 2010).
Infants are positioned at a 45-degree angle in a car seat to prevent slumping and subsequent airway obstruction. Many seats allow for adjustment of the seat angle. For seats that are not adjustable, a tightly rolled newspaper, a solid-core Styrofoam roll, or a firm roll of fabric can be placed under the car safety seat to place the infant at a 45 degree angle (Bull; Engle; Committee on Injury, Violence, and Poison Prevention; & Committee on Fetus and Newborn; 2009).
Prior to discharge from the birth institution, infants born at less than 37 weeks of gestation should be observed in a car seat (preferably their own) for at least 90 to 120 minutes or a period of time equal to the length of the car ride home. The infant is monitored for apnea, bradycardia, and a decrease in oxygen saturation. If the infant exhibits any of these clinical signs, travel home should be in an FMVSS 213-approved car bed (Bull et al., 2009).
If the parents do not have a car safety seat, arrangements should be made to make an appropriate seat available for purchase, loan, or donation. Parents need to be cautioned about purchasing a secondhand car safety seat without knowing the seat’s history. They should never use a car seat that was involved in a moderate to severe crash, is too old, has visible cracks, does not have a label with the model number and manufacture date, does not come with instructions, is missing parts, or was recalled (AAP, 2010).
Nonnutritive Sucking
Sucking is the infant’s chief pleasure. However, sucking needs may not be satisfied by breastfeeding or bottle-feeding alone. In fact, sucking is such a strong need that infants who are deprived of sucking, such as those with a cleft lip, will suck on their tongues. Some newborns are born with sucking pads on their fingers that developed during in utero sucking. Several benefits of nonnutritive sucking have been demonstrated, such as an increased weight gain in preterm infants, increased ability to maintain an organized state, and decreased crying.
There is compelling evidence that pacifiers help to prevent SIDS. The AAP Task Force on Infant Sleep Position and Sudden Infant Death Syndrome (2005) suggested that parents consider offering a pacifier for naps and bedtime. The pacifier should be used when the infant is placed down for sleep and it should not be reinserted once the infant falls asleep. No infant should be forced to take a pacifier. Pacifiers are to be cleaned often and replaced regularly and should not be coated with any type of sweet solution. Pacifier use should be delayed until the age of 1 month for breastfeeding infants to ensure that breastfeeding is well established (AAP Task Force on Infant Sleep Position and Sudden Infant Death Syndrome).
Problems arise when parents are concerned about the sucking of fingers, thumb, or pacifier and try to restrain this natural tendency. Before giving advice, nurses should investigate the parents’ feelings and base the guidance they give on the information solicited. For example, some parents see no problem with the use of a finger but find the use of a pacifier objectionable. In general, either practice need not be restrained unless thumb sucking or pacifier use persists past 4 years of age or past the time when the permanent teeth erupt. Parents are advised to consult with their pediatrician, pediatric dentist, or pediatric nurse practitioner about this topic.
A parent’s excessive use of the pacifier to calm the infant should also be explored, however. Placing a pacifier in the infant’s mouth as soon as the infant begins to cry can reinforce a pattern of distress and relief.
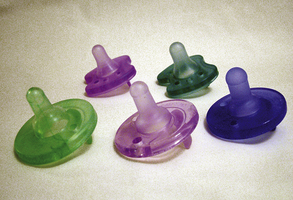
If parents choose to let their infant use a pacifier, they need to be aware of certain safety considerations before purchasing one. A homemade or poorly designed pacifier can be dangerous because the entire object can be aspirated if it is small, or a portion can become lodged in the pharynx. Improvised pacifiers, such as those made from a padded nipple, also pose dangers because the nipple can separate from the plastic collar and be aspirated. Safe pacifiers are made of one piece that includes a shield or flange large enough to prevent entry into the mouth and a handle that can be grasped (Fig. 24-29).
Bathing, Cord Care, and Skin Care
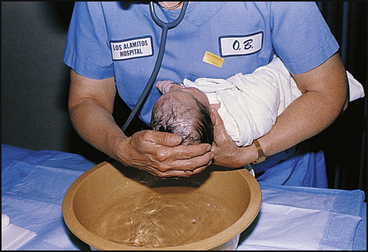
Bathing: Bathing serves several purposes. It provides opportunities for (1) completely cleansing the infant, (2) observing the infant’s condition, (3) promoting comfort, and (4) parent-child-family socializing.
An important consideration in skin cleansing is the preservation of the skin’s acid mantle, which is formed from the uppermost horny layer of the epidermis, sweat, superficial fat, metabolic products, and external substances such as amniotic fluid and microorganisms. To protect the pH of the newborn’s skin, alkaline soaps (such as Ivory®) and oils, powder, and lotions should not be used during this time because they alter the acid mantle, thus providing a medium for bacterial growth.
Sponge baths are usually used until the infant’s umbilical cord falls off and the umbilicus is healed. However, bathing the newborn by immersion has been found to allow less heat loss and provoke less crying. Immersion bathing is a safe alternative to sponge bathing, provided that the infant’s condition is stable (no temperature instability, respiratory or cardiac illness) and that the infant is dried off immediately thereafter and kept warm (AWHONN, 2007). A daily bath is not necessary for achieving cleanliness and can do harm by disrupting the integrity of the newborn’s skin; cleansing the perineum after a soiled diaper and daily cleansing of the face is usually sufficient. Until the initial bath is completed, personnel must wear gloves to handle the newborn.
The infant bath time provides a wonderful opportunity for parent-infant social interaction (Fig. 24-30). While bathing the baby, parents can talk to the infant, caress and cuddle the infant, and engage in arousal and imitation of facial expressions and smiling. Parents can pick a time for the bath that is easy for them and when the baby is awake, usually before a feeding.

Cord Care: The umbilical cord begins to dry, shrivel, and blacken by the second or third day of life, depending in part on the cleansing method used. The umbilicus should be inspected often for signs of infection (e.g., foul odor, redness, purulent discharge), granuloma (i.e., small, red, raw-appearing polyp where the umbilical cord separates), bleeding, and discharge. The cord clamp is removed when the cord is dry in approximately 24 hours (see Fig. 24-4). The cord normally falls off in 10 to 14 days after birth but can remain attached for as long as 3 weeks in some cases. Parents are instructed in appropriate home cord care (per practitioner or institution protocol) and the expected time of cord separation.
Box 24-9 contains information regarding sponge bathing, skin care, cord care, cutting nails, and dressing the infant.
BOX 24-9 BATHING, CORD CARE, SKIN CARE, AND NAIL CARE
• The temperature of the room should be 24° C (75° F), and the bathing area should be free of drafts.
• Control heat loss during the bath to conserve the infant’s energy. Bathing the infant quickly, exposing only a portion of the body at a time, and drying thoroughly are all parts of the bathing technique.
• Bring the infant to the bathing area when all supplies are ready.
• Never leave the infant alone on bath table or in the bath water, not even for a second! If you have to leave, take the infant with you, or place the infant back into the crib.
• Test the temperature of the water. It should feel pleasantly warm to the inner wrist—36.6° to 37.2° C (98°-99° F).
• Do not hold the infant under running water—the water temperature can change, and the infant can be scalded or chilled rapidly. The baby can be tub bathed after the cord drops off and the umbilicus and circumcised penis are completely healed.
• If sponge bathing is to be performed, undress the baby and wrap in a towel with the head exposed. Uncover the parts of the body you are washing, taking care to keep the rest of the baby covered as much as possible to prevent heat loss.
• Begin by washing the baby’s face with water; do not use soap on the face. Cleanse the eyes from the inner canthus outward using separate parts of a clean washcloth for each eye. For the first 2 to 3 days a discharge may result from the reaction of the conjunctiva to the substance (erythromycin) used as a prophylactic measure against infection. Any discharge should be considered abnormal and reported to the health care provider.
• Cleanse the ears and nose with twists of moistened cotton or a corner of the washcloth. Do not use cotton-tipped swabs because they can cause injury. The areas behind the ears need daily cleansing.
• Wash the body with mild soap; rinse and dry to decrease heat loss. Place your hand under the baby’s shoulders and lift gently to expose the neck, lift the chin, and wash the neck, taking care to cleanse between the skinfolds. Wash between the fingers and toes, then rinse and dry thoroughly. Wash the genital area last.
• If the hair is to be washed, begin by wrapping the infant in a towel with the head exposed. Hold the infant in a football position (under the arm) with one hand, using the other hand to wash the hair. Wash the scalp with water, mild soap, and a soft brush; rinse well and dry thoroughly. Scalp desquamation, called cradle cap, can often be prevented by removing any scales with a fine-toothed comb or brush after washing. If the condition persists, the health care provider may prescribe a medicated shampoo to massage into the scalp. A blow dryer is never used on an infant because the temperature is too hot for a baby’s skin.
• The skin of a newborn is sensitive and should be cleaned only with water between baths. Soap has drying properties, and its use is limited to bathing. Creams, lotions, ointments, or powders are not recommended. If the skin seems excessively dry during the first 2 to 3 weeks after birth, an unscented, non–alcohol-based lotion may be used; checking with the health care provider for suggestions on skin care products is best. Experts advise that baby clothes be laundered separately using a mild laundry detergent (Dreft or Ivory Snow); clothes should be rinsed twice with plain water.
• The fragile skin can be injured by too vigorous cleansing. If stool or other debris has dried and caked on the skin, soak the area to remove it. Do not attempt to rub it off because abrasion may result. Gentleness, patting dry rather than rubbing, and using a mild soap without perfumes or coloring are recommended. Chemicals in the coloring and perfume can cause rashes on sensitive skin.
• Babies are very prone to sunburn and should be kept out of direct sunlight. Use of sunscreens should be discussed with the health care provider.
• Babies often develop rashes that are normal. Neonatal acne resembles pimples and may appear at 2 to 4 weeks of age, resolving without treatment by 6 to 8 months. Heat rash is common in warm weather, which appears as a fine red rash around creases or folds where the baby sweats.
• Cleanse with soap and water around base of the cord where it joins the skin. Notify the health care provider of any odor, discharge, or skin inflammation around the cord. The clamp is removed when the cord is dry (approximately 24 hours). The diaper should not cover the cord because a wet or soiled diaper will slow or prevent drying of the cord and foster infection. When the cord drops off after 10 to 14 days, small drops of blood may be seen when the baby cries. This bleeding will heal by itself. It is not dangerous.
• Do not cut fingernails and toenails immediately after birth. The nails have to grow out far enough from the skin so that the skin is not cut by mistake. If the baby scratches him or herself, apply loosely fitted mitts over each of the baby’s hands. Do so as a last resort, however, because it interferes with the baby’s ability for self-consolation sucking on thumb or finger. When the nails have grown, the fingernails and toenails can be trimmed with manicure scissors or clippers; nails should be cut straight across. The ideal time to trim the nails is when the infant is sleeping. Soft emery boards may be used to file the nails. Nails should be kept short.
• Cleanse the genitals of infants daily and after voiding or defecating. For girls the genitals are cleansed by separating the labia and gently washing from the pubic area to the anus. For uncircumcised boys, gently pull back (retract) the foreskin. Stop when resistance is felt. In most newborns the inner layer of the foreskin adheres to the glans, and the foreskin cannot be retracted. Wash and rinse the tip (glans) with soap and warm water, and replace the foreskin. The foreskin must be returned to its original position to prevent constriction and swelling. By age 3 years in 90% of boys the foreskin can be retracted easily without causing pain or trauma. For others the foreskin is not retractable until adolescence. As soon as the foreskin is partly retractable and the child is old enough, he can be taught self-care. Once healed the circumcised penis does not require any special care other than cleansing with diaper changes.
• The infant’s skin should be allowed to dry completely before applying another diaper. Exposing the buttocks to air can help dry up diaper rash. Because bacteria thrive in moist dark areas, exposing the skin to dry air decreases bacterial proliferation. Zinc oxide ointments can be used to protect the infant’s skin from moisture and further excoriation.
Infant Follow-up Care
Follow-up care after hospital discharge usually occurs within 72 hours at the clinic or health care provider’s office. This is especially important for breastfed newborns for monitoring their weight and hydration status. When infants are discharged at less than 48 hours of age, home care follow-up is an essential component of care. Home care may be provided either by a nurse as part of the routine follow-up care of clients or through a visiting nurse or community health nurse referral service. The home care nurse provides information to parents to help them recognize signs that the newborn is progressing satisfactorily after early discharge (see Box 24-10).
Parents should plan for their infant’s follow-up health care at the following ages: within 3 days if discharged early or breastfeeding to check for status of jaundice, feeding, and elimination; 2 to 3 weeks of age for breastfeeding babies; 2 to 4 weeks of age for formula feeding babies; then every 2 months until 6 to 7 months of age; then every 3 months until 18 months; at 2 years; at 3 years; at preschool; and every 2 years thereafter.
Immunizations
The schedule for immunizations should be reviewed with parents (Table 24-5); HB vaccine is currently administered to newborns before hospital discharge (depending on maternal HB status) or within 1 month of birth.
TABLE 24-5
IMMUNIZATION SCHEDULE—2010∗
| IMMUNIZATION | AGE GIVEN |
| HBV (hepatitis B) | 3 injections: before hospital discharge, 1 or 2 months, final dose no earlier than age 24 weeks |
| HBIG (hepatitis B immune globulin—if mother is HBsAg positive) | Within 12 hours after birth |
| Rotavirus | 2, 4 months |
| DTaP (diphtheria, tetanus, acellular pertussis) | 2, 4, 6 months |
| Hib (Haemophilus influenzae b conjugate vaccine) | 2, 4 months |
| Pneumococcus | 2, 4, 6 months |
| IPV (inactivated polio vaccine—injectable) | 2, 4, 6-18 months |
| Influenza (“flu shot”) | Yearly after 6 months |
| MMR (measles, mumps, rubella) | 12 to 18 months |
| Varicella (chickenpox) | 12 to 15 months |
| Hepatitis A | 12-23 months (2 doses at least 6 months apart) |
∗This is the schedule for the first 18 months. For the full schedule, go to www.cdc.gov.
Source: U.S. Department of Health and Human Services, Centers for Disease Control and Prevention. (2010). Recommended immunization schedule for persons aged 0 through 6 years—United States 2010. Available at http://www.cdc.gov/vaccines/recs/schedules/downloads/child/2010/10_0-6yrs-schedule-pr.pdf. Accessed July 18, 2010.
Nurses should become familiar with this schedule and provide written instructions to the parents about when and where to obtain immunizations. (Immunization schedules change periodically and the nurse can update any information needed by checking with the website www.cdc.gov.) An infant’s ability to protect him- or herself against antigens by the formation of antibodies develops sequentially; therefore, the infant must be developmentally capable of responding to these antibodies, which is the reason for planning sequential immunizations for infants.
Cardiopulmonary Resuscitation
All personnel working with infants must have current infant cardiopulmonary resuscitation (CPR) certification. Parents should receive instruction in relieving airway obstruction (see the Emergency box: Relieving Airway Obstruction) and CPR (see the Emergency box: Cardiopulmonary Resuscitation (CPR) for Infants). Classes are often offered in hospitals and clinics during the prenatal period or to parents of newborns. Such instruction is especially important for parents whose infants were preterm or had cardiac or respiratory problems. Some grandparents take CPR classes. Babysitters should also learn CPR.
Practical Suggestions for the First Weeks at Home
Numerous changes occur during the first weeks of parenthood. Care management should be directed toward helping parents
cope with infant care, role changes, altered lifestyle, and change in family structure resulting from the addition of a new baby. Developing skill and confidence in caring for an infant can be especially anxiety provoking. Anticipatory guidance can help prevent a reality shock in the transition from hospital or birthing center to home that might negate the parents’ joy or cause them undue stress. For example, the nurse can teach parents several strategies that help quiet a fussy baby, prevent crying, and induce quiet attention or sleep.
Parents must be helped to anticipate events during the transition from hospital to home. This is especially important for first-time parents. Even the simplest strategies can provide enormous support. Written information reinforcing education topics is helpful, as is a list of available community resources, both local and national, and websites that provide reliable information about child care. Classes in the prenatal period or during the postpartum stay are helpful. Instructions for the first days at home should minimally include activities of daily living, dealing with visitors, and activity and rest.
Activities of Daily Living: Given the demands of a newborn, the mother’s discomfort or fatigue associated with giving birth, and a busy homecoming day, even small details of daily life can become stressful. Measures such as using disposable diapers, preparing frozen or microwave dinners during pregnancy, or getting takeout meals can decrease stress by eliminating at least one or two parental responsibilities during the first few days at home.
It is best to plan for hospital discharge to occur soon after an infant feeding. This increases the likelihood that the couple will have adequate time to get home and relatively settled before the next feeding. Offering a sample carton of premixed bottles for the formula-fed infant prevents the need for rushed preparation of formula.
Visitors: New parents are often inadequately prepared for the reality of bringing a new infant home because they romanticize the homecoming. One mother stated, “By the time we drove an hour through traffic, my stitches were hurting, and all I wanted was a warm sitz bath and some private time with Bill and the baby, in that order. Instead, a carload of visitors pulled into the driveway as we were unbuckling the baby from his car seat. I thought I would surely cry.”
The nurse can help parents explore ways, in advance, to assert their need to limit visitors. Parents can work out a signal for alerting the partner that the mother is getting tired or uncomfortable and needs the partner to invite the visitors to another room or to leave. Some mothers find that wearing a robe and not appearing ready for company leads visitors to stay a shorter time. A sign on the front door saying “Mother and baby resting—please do not disturb” may be useful.
Activity and Rest: Because mothers often report that fatigue is a major problem during the first few weeks after giving birth, they need to be encouraged to limit their activities and be realistic about their level of fatigue. Activities should not be sustained for long periods. Family, friends, and neighbors can be solicited for support and help with meals, housecleaning, picking up other children, and so on. Rest periods throughout the day are important. Mothers can nap when the baby sleeps. Adequate nutrition is also important for postpartum recovery and in dealing with fatigue.
Anticipatory guidance helps prepare new parents for what to expect as their newborn grows and develops. Parents with
 EMERGENCY
Relieving Airway Obstruction
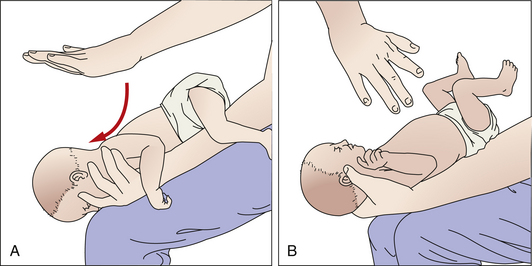
• Place the free hand on the infant’s back to sandwich the baby between both hands; one hand supports the neck, jaw, and chest, while the other supports the back.
• Turn the infant over, and place the infant’s head lower than the chest, supporting the head and neck.
• Alternative position: Place the infant face down on your lap with the head lower than the trunk; firmly support the head. Apply back blows, and then turn the infant as a unit.
realistic expectations of infant needs and behavior are better prepared to adjust to the demands of a new baby and to parenthood itself.
New parents can be overwhelmed by a large volume of information and become anxious. Anticipatory guidance should include the following: newborn sleep-wake cycles, interpretation of crying and quieting techniques, infant developmental milestones, sensory enrichment and infant stimulation, recognizing signs of illness, and well-baby follow-up and immunizations. Printed materials and audiotapes, videotapes, or DVDs for parents to take home are helpful. Parents can also be given a list of reliable websites to access for information.
Development of Day-Night Routines: Nurses can help prepare new parents for the fact that most newborns cannot tell the difference between night and day and must learn the rhythm of day-night routines. Nurses should provide basic suggestions for settling a newborn and for helping him or her develop a predictable routine. Examples of such suggestions include the following:
• In the late afternoon, bring the baby out to the center of family activity. Keep the baby there for the rest of the evening. If the baby falls asleep, let the baby do so in the infant seat or in someone’s arms. Save the crib or bassinet for nighttime sleep.
• Give the baby a bath right before bedtime. This activity soothes the baby and helps him or her expend energy.
• Feed the baby for the last evening time around 11 o’clock, and put him or her to bed in the crib or bassinet.
• For nighttime feedings and diaper changes, keep a small night-light on to avoid turning on bright lights. Talk in soft whispers (if at all), and handle the baby gently and only as absolutely necessary to feed and diaper. Nighttime feedings should be all business and no play! Babies usually go back to sleep if the room is quiet and dark.
EMERGENCY
Cardiopulmonary Resuscitation (CPR) for Infants
• Open the airway with the head tilt–chin lift method.
• Place one hand on the infant’s forehead, and tilt the head back.
• Place the fingers of the other hand under the bone of the lower jaw at the chin.

A, Opening airway with head tilt–chin lift method. B, Checking pulse of brachial artery. C, Side-by-side thumb placement for chest compression in newborn. Source: American Heart Association. (2005). 2005 American Heart Association guidelines for cardiopulmonary resuscitation and emergency cardiovascular care. Circulation, 112(24) (Suppl) IV12-IV18.
• Assess for evidence of breathing:
• Place your mouth over the infant’s nose and mouth to create a seal. Note: When available, a mask with a one-way valve should be used.
• Give two slow breaths (1 to 1.5 seconds for each breath), pausing to inhale between breaths. Note: Gently puff the volume of air in your cheeks into infant. Do not force air.
• The infant’s chest should rise slightly with each puff; keep fingers on the chest wall to sense air entry.
• Check pulse of the brachial artery while maintaining the head tilt.
• If the pulse is present, initiate rescue breathing. Continue procedure at 40 to 60 breaths/min until spontaneous breathing resumes.
• If the pulse is absent, initiate chest compressions and coordinate them with breathing.
• Chest compression: Two systems of chest compression can be used. Nurses should know both methods.
1. Place thumbs side-by-side in the middle third of the sternum with fingers around the chest and supporting the back. Compress the sternum one third the depth of the chest.
2. Place index finger of hand just under an imaginary line drawn between the nipples. Place the middle and ring fingers on the sternum adjacent to the index finger. Using the middle and ring fingers, compress the sternum approximately one third the depth of the chest.
• Avoid compressing the xiphoid process.
• Release pressure without moving the thumbs and fingers from the chest.
• Use a 30:2 compression-ventilation ratio for one-rescuer CPR and 15:2 compression-ventilation ratio for two-rescuer CPR.
• Provide 100 compressions per minute.
• Provide five cycles of three compressions and two ventilations of CPR (about 2 minutes) before leaving to call 911.
• After the cycles, check the brachial artery to determine whether a pulse can be felt.
• Discontinue compressions when the infant’s spontaneous heart rate reaches or exceeds 80 beats/min.
• Record the time and duration of the procedure and the effects of intervention.
A predictable, stable routine gradually develops for most babies; however, some babies never develop one. New parents will cope better if they are willing to be flexible and to give up some control during the early weeks.
Interpretation of Crying and Use of Quieting Techniques: Crying is an infant’s first social communication. Some babies cry more than others, but all babies cry. They cry to communicate that they are hungry, uncomfortable, wet, ill, or bored and sometimes for no apparent reason at all. The longer parents are around their infants, the easier the task becomes of interpreting what a cry means. Many infants have a fussy period during the day, often in the late afternoon or early evening when everyone is naturally tired. Environmental tension adds to the length and intensity of crying spells. Babies also have periods of vigorous crying when no comforting can help. These periods of crying can last for long stretches until the infants seem to cry themselves to sleep. Possibly the infants are trying to discharge enough energy so they can settle themselves down. The nurse needs to reinforce for new parents that time and infant maturation will take care of these types of cries. Many hospitals distribute a DVD on infant crying to new parents. The “Period of Purple Crying” is an example. It is intended to help parents understand that crying is normal and help them cope with infant crying. If parents have greater understanding of infant crying, they may be less likely to inflict harm such as occurs with “shaken-baby” syndrome.
Crying because of colic is a common concern of new parents. Babies with colic cry inconsolably for several hours, pull their legs up to their stomach, and pass large amounts of gas. No one really knows what colic is or why babies get it. Parents can be encouraged to contact the infant’s health care provider if they are concerned that their baby has colic.
Certain types of sensory stimulation can calm and quiet infants and help them get to sleep. Important characteristics of this sensory stimulation—whether tactile, vestibular, auditory, or visual—appear to be that the stimulation is mild, slow, and rhythmic, and consistently and regularly presented. Tactile stimulation can include warmth, patting, back rubbing, and covering the skin with textured cloth. Swaddling (see Fig. 24-23) to keep arms and legs close to the body (as in utero) provides widespread and constant tactile stimulation and a sense of security. Vestibular stimulation is especially effective and can be accomplished by mild rhythmic movement such as rocking or by holding the infant upright, as on the parent’s shoulder. The nurse can teach parents several strategies that help quiet a fussy baby, prevent crying, and induce quiet attention or sleep (Box 24-11).
Developmental Milestones
Knowledge of infant growth and development helps parents have realistic expectations of what an infant can do. When parents understand and appreciate the limitations and developing abilities of their infant, adjustment to parenthood can go more smoothly. Emphasizing the individuality of the infant enhances the capacity of the family to offer their infant an optimally nurturing environment.
Brazelton (1995) suggests the concept of “touch-points” for intervention, that is, points at which a change in the system (baby, parent, and family) is brought about by the baby’s spurts in development (cognitive, motor, or emotional). Immediately before each spurt in development is a predictable short period of disorganization in the baby. Parents are likely to feel disorganized and stressed as well. Because these periods of disorganization are predictable, nurses can offer parents anticipatory guidance to help them understand what happens with infant development and to prepare them for the subsequent spurts in development.
The nurse should provide parents with information on month-by-month infant growth and development. Written information that parents can consult later is especially helpful. Table 24-6 provides a summary of infant growth and development during the first 3 months.
TABLE 24-6
GROWTH AND DEVELOPMENT DURING INFANCY
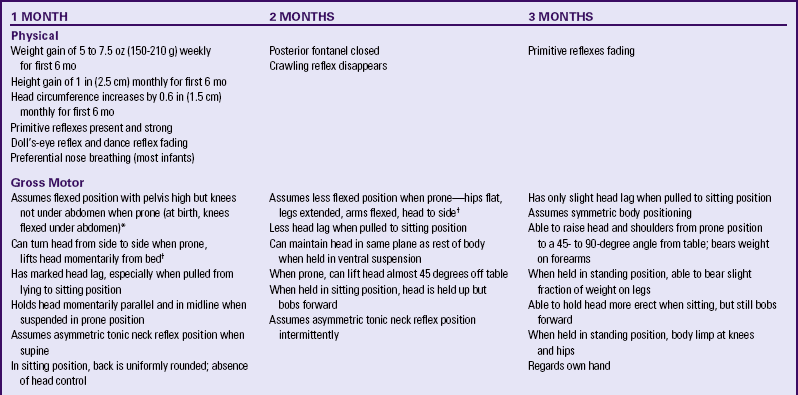
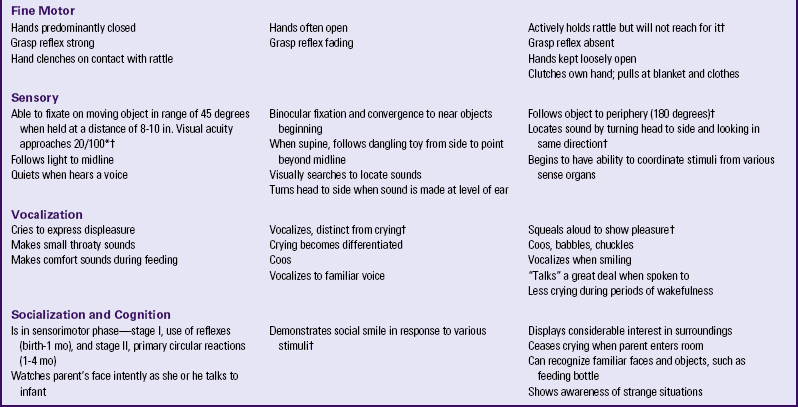
∗Degree of visual acuity varies according to vision measurement procedure used.
†Milestones represent essential integrative aspects of development that lay the foundation for the achievement of more advanced skills.
Source: Hockenberry, M. (2011). Wong’s nursing care of infants and children (9th ed.). St. Louis: Mosby.
Infant Stimulation
Interacting with their parents is an important way in which infants learn about themselves and their environment. Nurses can teach parents a variety of ways to stimulate their infant’s development and to enrich the infant’s learning environment. Home health nurses can evaluate the home environment and make suggestions to parents for promotion of their baby’s physical, cognitive, and emotional development. Suggestions for teaching infants during the first few months are presented in Boxes 24-12 and 24-13. Table 24-7 presents suggestions for visual, auditory, tactile, and kinetic stimulation.
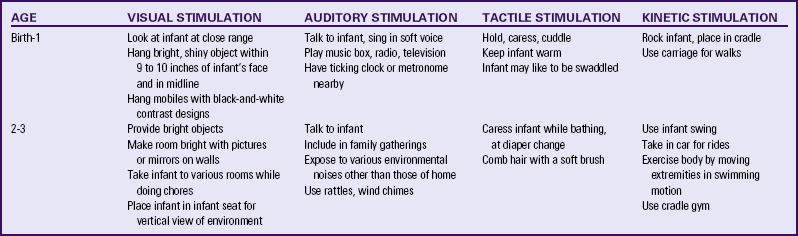
Recognizing Signs of Illness
In addition to explaining the need for well-baby follow-up visits, the nurse should discuss with parents the signs of illness in newborns (Box 24-14). Of particular importance is the parents’ assessment of jaundice in newborns discharged early. Parents should be advised to call their nurse-practitioner or pediatrician immediately if they notice increasing jaundice or signs of illness and to ask about over-the-counter medications, such as acetaminophen for infants, to keep at home.
 COMMUNITY ACTIVITY
• Visit the National Newborn Screening and Genetics Resource Center (NNSGRC) website (http://genes-r-us.uthscsa.edu). Review the information for parents and family about resources, disorders tested, and screening programs. What types of disorders are screened in your state? Is the screening for the condition required by law and fully implemented?
• At the NNSGRC website, visit the newborn screening program website for your state. Does your state require newborn hearing screening? Review the information for parents about diagnostic testing and community support services.
 Audio Chapter Summaries Access an audio summary of the Key Points on