CHAPTER 13 Extraoral and Intraoral Clinical Assessment
 Recognize normal head and neck anatomy structures, common signs of oral disease, and deviations from normal.
Careful overall client observation and a thorough assessment of the areas in and around the oral cavity are essential to planning and providing optimum client care. The orofacial structures are sensitive general health indicators. Changes in these structures may be the first indication of disease processes in other parts of the body. For example, some systemic diseases that first manifest themselves in the oral cavity include diabetes, human immunodeficiency virus (HIV) infection, nutritional deficiencies, and leukemia. A variety of skin and oral mucosal lesions observed may or may not be symptomatic.
Oral lesions are common in the adult population. It has been estimated that 10% of dental clients have some unusual or atypical finding in the oral cavity.1 Although the majority of these findings fall into the category of atypical, some may be serious and even fatal. It is the dental hygienist's responsibility to recognize oral tissue changes from their normal state and to refer clients with changes to the supervising dentist for further evaluation.
Taking appropriate action after the recognition of an abnormal extraoral or intraoral condition is imperative for promoting optimal client wellness and, in the case of cancer, possibly preventing premature death. In addition, educating clients through instruction in self-assessment techniques to identify signs outside of normal in their own mouth engages them in “co-therapy,” allowing them to assume some responsibility for the care and control of their own oral and systemic health.
To meet this challenge, the dental hygienist must be thoroughly familiar with normal and abnormal anatomy of the head and neck to recognize abnormal changes. This chapter focuses on the clinical assessment of extraoral and intraoral structures other than those related to tooth structure, oral hygiene, and the periodontium (see Chapters 14, 15, and 17, respectively).
CLINICAL ASSESSMENT
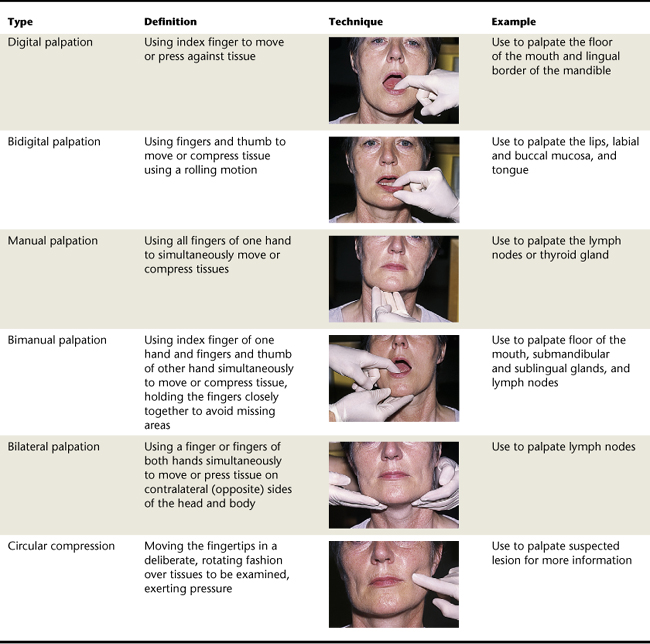
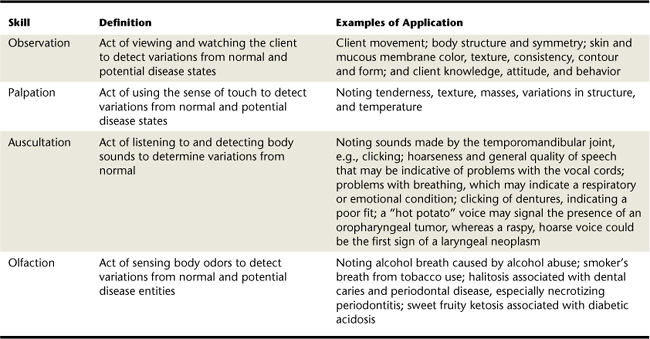
The skills of observation, palpation, auscultation, and olfaction are basic to client assessment. These skills and application examples are described in Table 13-1.2,3 Types of palpation techniques (e.g., digital palpation, bidigital palpation, manual palpation, bimanual palpation, bilateral palpation, circular compression) are described in Table 13-2. Basic anatomic orientation terms regularly used in describing head and neck anatomy are defined in Box 13-1 and are discussed later in the chapter under describing and documenting significant findings.4
TABLE 13-1 Skills Used in Conducting the Extraoral and Intraoral Assessment
| Skill | Definition | Examples of Application |
|---|---|---|
| Observation | Act of viewing and watching the client to detect variations from normal and potential disease states | Client movement; body structure and symmetry; skin and mucous membrane color, texture, consistency, contour and form; and client knowledge, attitude, and behavior |
| Palpation | Act of using the sense of touch to detect variations from normal and potential disease states | Noting tenderness, texture, masses, variations in structure, and temperature |
| Auscultation | Act of listening to and detecting body sounds to determine variations from normal | Noting sounds made by the temporomandibular joint, e.g., clicking; hoarseness and general quality of speech that may be indicative of problems with the vocal cords; problems with breathing, which may indicate a respiratory or emotional condition; clicking of dentures, indicating a poor fit; a “hot potato” voice may signal the presence of an oropharyngeal tumor, whereas a raspy, hoarse voice could be the first sign of a laryngeal neoplasm |
| Olfaction | Act of sensing body odors to detect variations from normal and potential disease entities | Noting alcohol breath caused by alcohol abuse; smoker's breath from tobacco use; halitosis associated with dental caries and periodontal disease, especially necrotizing periodontitis; sweet fruity ketosis associated with diabetic acidosis |
Before performing extraoral and intraoral assessments, the dental hygienist reviews clients' histories, examines their radiographs, and explains the assessment procedure to them. Establishing an assessment sequence and following through with it systematically during client assessment reduces the possibility of overlooking any area to be examined. A suggested sequence for a thorough extraoral and intraoral assessment is outlined and illustrated in Procedures 13-1 and 13-2 later in the chapter.
EXTRAORAL CLINICAL ASSESSMENT
An extraoral assessment includes an overall evaluation of the client's general characteristics and a thorough head, face, and neck evaluation, including the skin and associated lymph nodes.
Overall Evaluation
Initially the client is observed during reception and seating to note any physical characteristics and abnormalities that may require special dental hygiene care modification or medical and/or dental consultation.4 This overall evaluation includes the functional level of hands, arms, and legs; speech; and personal hygiene. For example, compromised hand and arm function may indicate the need to modify oral hygiene instruction. Functional impairment of arms and legs may indicate the need to modify client seating position or may affect the client's ability to easily attend subsequent appointments. Speech quality may indicate problems such as damaged vocal cords or history of stroke. Poor personal hygiene may reflect the care given to the oral cavity.
Specific Evaluation of the Head, Face, and Neck Areas
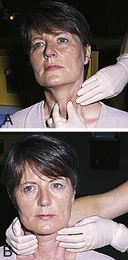
The client should be seated in an upright position for the head, face, and neck extraoral assessment. Good lighting and exposure of the area being assessed are essential (e.g., collar and tie loosened, glasses removed). Before asking clients to open the mouth, an overall evaluation is performed of the head, neck, eyes, face, lips, and surrounding skin. Normally the head, face, and neck have symmetry, and the skin should be continuous, firm, and pigmented in relation to normal variations. If lesions are initially observed, clients should be asked how long they have had the lesions, if the lesions have changed, and whether they are painful. In addition, lymph nodes, salivary glands, and the temporomandibular joints (TMJs) should be palpated (evaluated using the sense of touch). These structures are described in depth in the following sections. Suspected atypical or abnormal findings require consultation with the supervising dentist.
Lymph Nodes
Lymph nodes are bean-shaped bodies grouped in clusters along the connecting lymphatic vessels, positioned to filter toxic products from the lymph to prevent their entry into the blood (Figure 13-1). In healthy clients, nodes are usually small, soft, and mobile in the surrounding tissue and cannot be either visualized or palpated. The nodes can be superficial in position with the superficial veins or deep in the tissue with the associated blood vessels. All the head and neck nodes drain either the right or left tissues in the area, depending on their location (except for the midline submental nodes, which drain the tissues in the region bilaterally).
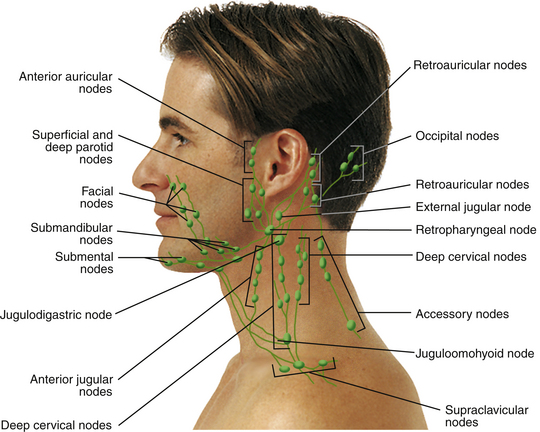
Figure 13-1 Lymphatic drainage system of the head and neck.
(Adapted from Seidel HM, Ball JW, Dains JE, Benedict GW: Mosby's guide to physical examination, ed 6, St Louis, 2006, Mosby.)
Palpable lymph nodes are those that have undergone lymphadenopathy (enlargement) resulting from an increase in size and change in consistency of the lymphoid tissue. Changed node consistency can range from firm to hard. Lymph nodes also can become attached or fixed to the surrounding tissues as the disease process progresses. Nodes also can feel tender to the client when palpated, because of the pressure on the area nerves from the node enlargement.
Palpable lymph nodes may pinpoint where a disease process (e.g., infection or cancer) is active6,7 and may help determine if it has become widespread. Approximately 63% of individuals with oral cancer have palpable enlarged nodes (see Chapter 44). Documentation of palpable nodes assists in the diagnosis, treatment, and prognosis of any disease process that may be present in the client. It is important to understand the relationship between the lymph node location and its drainage patterns. At the same time, it is important to keep in mind that head and neck lymph nodes drain not only intraoral structures such as the teeth, but also the eyes, ears, nasal cavity, and deeper areas of the pharynx.
Head and Neck Regions
Client head and neck extraoral clinical assessment begins with visually dividing the head and neck into specific regions and then palpating each region bilaterally in order from the superior to the inferior regions (Figure 13-2).8
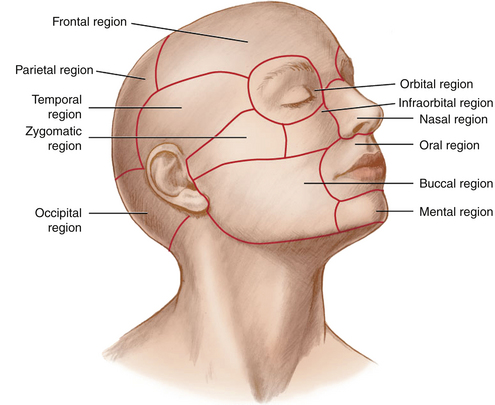
Figure 13-2 Regions of the head for extraoral examination.
(From Fehrenbach MJ, Herring SW: Illustrated anatomy of the head and neck, ed 3, St Louis, 2007, Saunders.)
Parietal and Occipital Regions
The parietal and occipital regions are both covered by the scalp overlying the cranium. The occipital nodes are located bilaterally on the posterior base of the head in the occipital region and drain this portion of the scalp (see Figure 13-1). The occipital nodes empty into the inferior deep cervical nodes in the neck.
Temporal Region
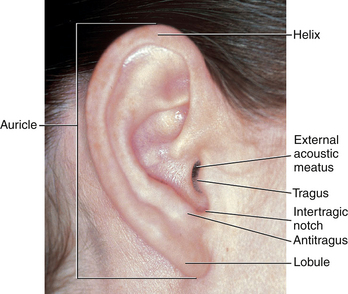
Within the temporal region is the external ear (Figure 13-3), which is composed of an auricle (the larger flap of the ear) and the external acoustic meatus (the tube through which sound waves are transmitted to the middle ear within the skull). The superior and posterior free margin of the auricle is the helix, which ends inferiorly at the lobule (ear lobe). The part of the auricle anterior to the external acoustic meatus is a smaller flap of tissue, the tragus. The other flap of tissue opposite the tragus is the antitragus. The auricular nodes are located anterior and posterior (retro) to the external acoustic meatus of the ear (see Figure 13-1). These nodes drain the external ear, the lacrimal (tear) gland above the eye, and adjacent regions of both the scalp and face and then empty into the superior deep cervical nodes.
Frontal Region
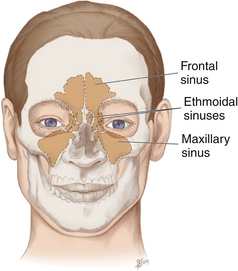
The frontal region includes the forehead and the area above the eyes. The paired frontal sinuses are located in the frontal bone just superior to the nasal cavity, and each communicates with and drains into the nasal cavity (Figure 13-4).
Orbital and Nasal Regions
In the orbital region the eyeball and all its supporting structures are contained in the bony socket called the orbit. The conjunctiva is the delicate and thin membrane lining the inside of the eyelids and the front of the eyeball. The outer corner where the upper and lower eyelids meet is called the outer canthus. The eye inner angle is called the inner canthus. The main nasal region feature is the external nose. The tip is flexible when palpated.
Infraorbital and Zygomatic Regions
The infraorbital and zygomatic regions are both located on the face. The infraorbital region is located inferior to the orbital region and lateral to the nasal region. Farther laterally is the zygomatic region, which is composed of the cheek bone, overlying the zygomatic arch (see Figure 13-2). The zygomatic arch extends from just below the eye's lateral margin toward the upper part of the ear.
Facial lymph nodes are positioned along the facial vein and are typically small and variable in number (see Figure 13-1). Each facial node group drains the skin and mucous membranes where they are located and finally drains into the submandibular nodes. The paired maxillary sinuses are each located in the body of the maxilla, just posterior to the maxillary canine and premolars (see Figure 13-4) and drain into the nasal cavity. Inferior to the zygomatic arch and just anterior to the ear is the TMJ. The TMJ is where the upper skull forms a joint with the lower jaw—which involves the two temporal bones of the maxilla and the two condyles of the mandible. Joint movements can be felt when one opens and closes the mouth or moves the lower jaw to the right, left, and forward. The TMJ should be palpated and the movement of the mandible observed as clients open and close the mouth.
Buccal Region
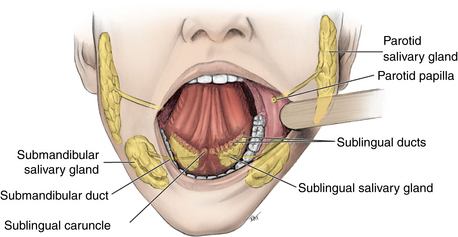
The buccal region forms the side of the face and is a broad area between the nose, mouth, and ear (see Figure 13-2). The upper cheek is fleshy, mainly formed by a fat and muscle mass including the strong masseter muscle, which is felt when clients clench the teeth together. The sharp lower jaw angle inferior to the earlobe is the angle of the mandible. (Mandibular and maxillary anatomy is illustrated in Chapter 39.) Also within this region is the parotid salivary gland, which occupies the area behind the mandibular ramus, anterior and inferior to the ear (Figure 13-5).
Oral and Mental Regions
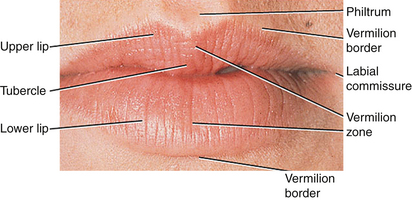
The oral region contains the lips and oral cavity. The lips are outlined from the surrounding skin by a transition zone, the vermilion border (Figure 13-6). Each lip's vermilion zone has a darker appearance than the surrounding skin. On the upper lip midline, extending downward from the nasal septum, is a vertical groove called the philtrum, which terminates in a thicker area or tubercle. The upper and lower lips meet at each mouth corner, the labial commissure. The chin is the mental region's major feature. The oral cavity is discussed further in the section on intraoral clinical assessment later in this chapter.
Anterior and Posterior Cervical Regions
The large strap muscle, the sternocleidomastoid muscle (SCM), divides each side of the neck diagonally into two cervical regions (Figure 13-7). The SCM originates from the clavicle and sternum and passes posteriorly and superiorly to insert on the temporal bone, just posterior and inferior to the ear. When the client's head is tilted to the side, the SCM is more prominent.
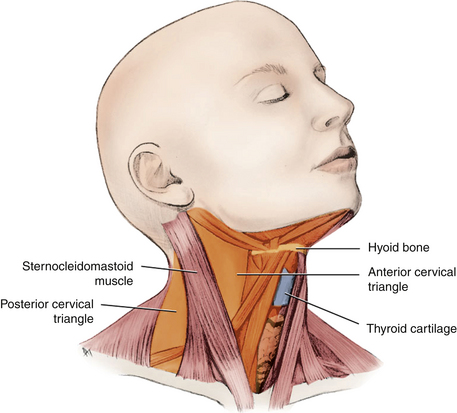
Figure 13-7 Anterior and posterior cervical triangles formed by the sternocleidomastoid muscle.
(From Fehrenbach MJ, Herring SW: Illustrated anatomy of the head and neck, ed 3, St Louis, 2007, Saunders.)
The anterior neck region corresponds to the two anterior cervical triangles, which are separated by the midline. The lateral neck region posterior to each SCM forms the posterior cervical triangles (see Figure 13-7). There are many superficial cervical nodes, such as the external jugular nodes, in this region, located on each side of the neck and superficial to the SCM (see Figure 13-1). The deep cervical nodes also are located bilaterally along the neck's length, deep to the SCM (see Figure 13-1). These nodes drain the nasal cavity, posterior portion of the hard palate, soft palate, base of the tongue, maxillary third molars, esophagus, trachea, and thyroid gland. In addition to the deep cervical nodes, there are also nodes in the neck's most inferior area, the supraclavicular nodes, which are located along the clavicle and drain the anterior cervical triangles (see Figure 13-1).
Submandibular and Submental Triangle Regions
The neck's anterior cervical triangle can be further subdivided into smaller triangular regions by portions of neck muscles and the mandible. The submandibular region is the superior portion of the anterior cervical triangle on each side of the neck. Both submandibular salivary glands are located in this region posterior to the sublingual gland (see Figure 13-5).
The submandibular nodes are located at the inferior border of the ramus of the mandible, just superficial to the submandibular gland (see Figure 13-1). They drain the cheeks, upper lip, body of the tongue, anterior portion of the hard palate, sublingual and submandibular salivary glands, and all the teeth and associated tissues, except the mandibular incisors and maxillary third molars. The submandibular nodes then empty into the superior deep cervical nodes.
Near the midline of the anterior cervical triangle is the submental region, where both the sublingual salivary glands are located (see Figure 13-5). The sublingual and submental nodes are located below the chin in this region (see Figure 13-1). These nodes drain both sides of the chin, the lower lip, the mouth floor, the apex of the tongue, and the mandibular incisors and associated tissues. They then empty into the submandibular nodes or directly into the deep cervical nodes.
Anterior Midline Cervical Region
Within the anterior midline cervical region is the hyoid bone, which has many muscles attached to it and which controls the position of the base of the tongue (Figure 13-8). The hyoid bone can be effectively palpated below and medial to the angles of the mandible as it is suspended in the neck. When palpating the neck, do not confuse the hyoid bone with the inferiorly placed thyroid cartilage, which is also found in the anterior midline. The thyroid cartilage is the prominence of the voice box, or larynx. The thyroid cartilage's anterior portion is visible as the Adam's apple, especially in adult males. The vocal cords or ligaments of the larynx are attached to the thyroid cartilage posteriorly. The thyroid gland also is located in this region, inferior to the thyroid cartilage, at the junction of the larynx and the trachea.
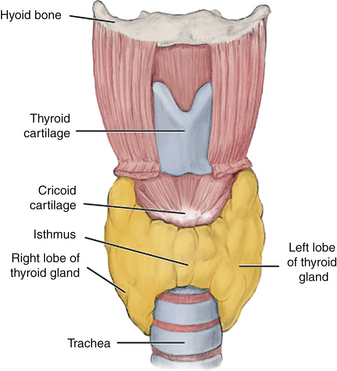
Figure 13-8 Anterior view of the thyroid cartilage, thyroid gland, and associated structures.
(From Fehrenbach MJ, Herring SW: Illustrated anatomy of the head and neck, ed 3, St Louis, 2007, Saunders.)


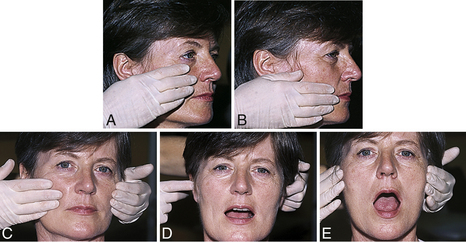
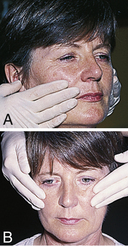
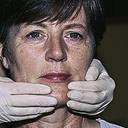

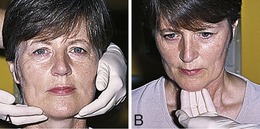
Procedure 13-1 lists the steps for examining recommended structures and examples of normal, atypical, and abnormal findings that may be observed during an extraoral assessment.∗
INTRAORAL CLINICAL ASSESSMENT
The intraoral clinical assessment includes evaluation of the oral cavity and associated structures (e.g., the palate, pharynx, tongue, floor of the mouth, teeth, and periodontium). Seat clients in a supine position. Use preprocedural antimicrobial mouth rinse, and have clients remove any pigmented lipsticks. Apply nonpetroleum lubricant to cracked and dry lip areas to make clients more comfortable, and have them remove any removable appliances.9 After an initial general inspection is made intraorally with a mouth mirror, client intraoral clinical assessment begins with the systematic assessment of specific regions using visualization and palpation. During examination of mucosal surfaces, it is important to gently dry them with a gauze or air syringe so that color or texture changes will become more obvious. Ask clients if they are experiencing any mouth discomfort.
Oral Cavity
The oral cavity is the inside of the mouth. The anatomic landmarks in the oral cavity, as shown in Figure 13-21, can be used as a general point of reference during an intraoral examination.
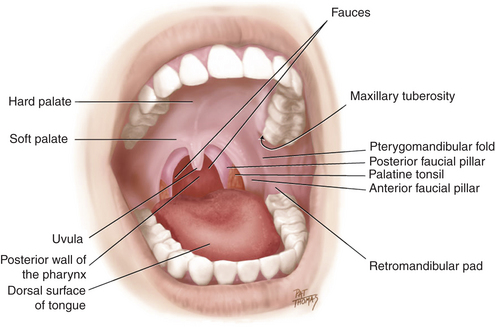
Figure 13-21 Anatomic landmarks in the oral cavity.
(From Fehrenbach MJ, Herring SW: Illustrated anatomy of the head and neck, ed 3, St Louis, 2007, Saunders.)
The oral cavity is lined by nonkeratinized oral mucosa (Figure 13-22). The lip inner area consists of thick labial mucosa that is glistening pink or pigmented with melanin. The labial mucosa is continuous with the equally pink and thick buccal mucosa that lines the inner cheek. The buccal mucosa covers a dense inner tissue pad, the buccal fat pad. On the buccal mucosa, just opposite the maxillary second molar, is a small tissue elevation called the parotid papilla, which contains the parotid gland opening (see Figures 13-5 and 13-22).
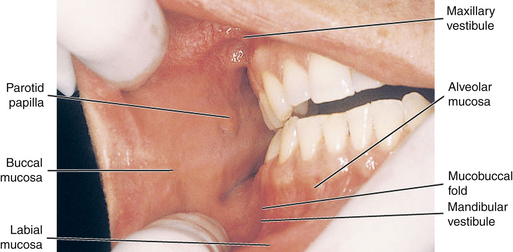
Figure 13-22 View of the buccal and labial mucosa of the oral cavity with landmarks noted.
(From Fehrenbach MJ, Herring SW: Illustrated anatomy of the head and neck, ed 3, St Louis, 2007, Saunders.)
The upper and lower spaces between the cheeks and lips and the gingival tissues are the maxillary and mandibular vestibules. Deep within each vestibule the pink and thick labial or buccal mucosa meets the redder and thinner alveolar mucosa at the mucobuccal fold (see Figure 13-22). The labial frenum is a fold of tissue located at the midline between the labial mucosa and the alveolar mucosa on each jaw. Teeth are located within the upper and lower jaws, the maxilla and mandible. Just distal to the last tooth of the maxilla is a rounded elevation, the maxillary tuberosity. Just distal to the last mandibular tooth is a dense tissue pad, the retromolar pad (see Figure 13-21).
Surrounding the teeth is the attached gingiva, composed of a firm pink keratinized mucosa that tightly adheres to the bone around the tooth roots, the alveolar ridges. The demarcation line between the firmer and pinker attached gingiva and the movable and redder alveolar mucosa is the scallop-shaped mucogingival junction. The gingiva between the teeth, the interdental papilla, is an extension of attached gingiva (see Chapter 17).
Palate and Pharynx
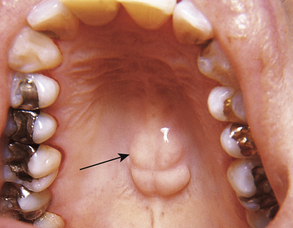
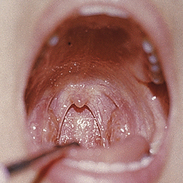
The mouth roof has two parts: the firmer anterior portion is the hard palate, and the looser posterior portion is the soft palate (see Figures 13-21 and 13-23). A midline ridge of tissue on the hard palate is the median palatine raphe. A bony projection known as palatal torus is an atypical but normal structure that may be present in this area (Figure 13-24). A small bulge of tissue at the most anterior portion, lingual to the anterior teeth, is the incisive papilla, and directly posterior to this papilla are the palatine rugae, which are firm, irregular ridges of tissue.
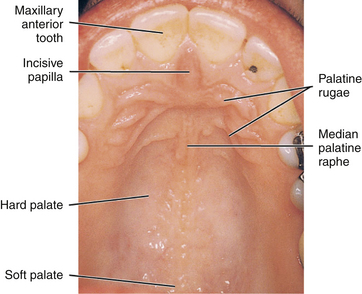
Figure 13-23 View of the palate with its landmarks noted.
(From Fehrenbach MJ, Herring SW: Illustrated anatomy of the head and neck, ed 3, St Louis, 2007, Saunders.)
A midline muscular structure, the uvula, hangs from the posterior margin of the soft palate. The pterygomandibular fold is a fold of tissue that extends from the junction of the hard and soft palates down to the mandible, just behind the retromolar pad. It stretches when clients open the mouth wider, separating the buccal mucosa from the pharynx (see Figure 13-21).
The oral cavity also provides the entrance into the pharynx, which is a muscular tube that serves both the respiratory and digestive systems. Portions of the nasopharynx and oropharynx are observable. The laryngopharynx is more inferior and is not observable. The portion of the pharynx that is superior to the level of the soft palate is the nasopharynx, which is continuous with the nasal cavity. The portion of the pharynx that is between the soft palate and the opening of the larynx is the oropharynx. The opening from the oral cavity into the oropharynx is the fauces. The fauces are formed laterally by folds of tissue, the anterior and posterior faucial pillars. The palatine tonsils are masses of lymphoid tissue located between these pillars (see Figure 13-21). Tonsils, like lymph nodes, contain lymphocytes that remove toxic products. Lymphadenopathy can also occur in the tonsils, causing tissue enlargement (see earlier discussion of lymph nodes).
Tongue
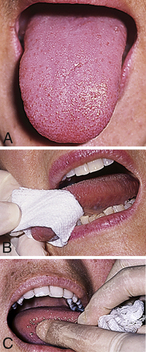
The tongue is an important potential lesion site and must be examined carefully (Figure 13-25).10 The posterior third of the tongue is its base, which attaches to the floor of the mouth. The base of the tongue does not lie within the oral cavity, but within the oral part of the pharynx. The anterior two thirds of the tongue is termed the body, and it lies within the oral cavity. The top or dorsal surface of the tongue has a midline depression, the median lingual sulcus. The dorsal surface also has small elevated structures of specialized mucosa, lingual papillae, which serve in taste sensation. The slender, threadlike, whitish filiform lingual papillae give the dorsal surface its velvety texture. The less-numerous red, mushroom-shaped dots are the fungiform lingual papillae. Because of these lingual papillae, the dorsal surface of the tongue should not be exceptionally smooth.

Figure 13-25 Dorsal surface of the tongue and relationship of lingual papillae.
(From Fehrenbach MJ, Herring SW: Illustrated anatomy of the head and neck, ed 3, St Louis, 2007, Saunders.)
Farther posteriorly on the tongue dorsal surface and more difficult to visualize clinically is a V-shaped groove, the sulcus terminalis (see Figure 13-25). The sulcus terminalis separates the base from the body of the tongue; where it points backward toward the throat is a small pitlike depression, the foramen cecum. The circumvallate lingual papillae (10 to 14 in number) line up along the anterior side of the sulcus terminalis on the body of the tongue. These large, mushroom-shaped lingual papillae also have taste buds. Farther posteriorly on the dorsal surface of the tongue base is an irregular mass of tonsillar tissue, the lingual tonsil, which is more difficult to see clinically. The side or lateral surface of the tongue is noted for its vertical ridges, the foliate lingual papillae (see Figure 13-25).
The ventral surface (undersurface) is noted for its visible large blood vessels and the deep lingual veins that run close to the surface (Figure 13-26). Lateral to each deep lingual vein is the plica fimbriata, a feathery fold of tissue.
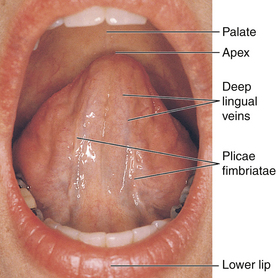
Floor of the Mouth
The floor of the mouth is inferior to the ventral surface of the tongue (see Figure 13-26). The lingual frenum is a midline fold of tissue between the tongue's ventral surface and the mouth floor. There is also a tissue ridge on each side of the mouth, the sublingual folds, that together form a V-shaped configuration from the lingual frenum to the base of the tongue. The sublingual folds contain duct openings from the sublingual salivary gland. The sublingual caruncle at the anterior end of each sublingual fold contains the submandibular and sublingual duct openings from both the submandibular and the sublingual salivary glands. A bony projection, the mandibular torus (plural, tori), is an atypical finding that may be found on the mandibular lingual surface in the premolar area, possibly bilaterally (Figure 13-27).
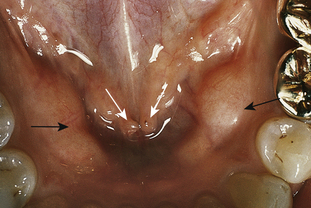
Figure 13-27 Mandibular torus (black arrows). White arrows show sublingual caruncles with orifices to submandibular (Wharton) ducts.
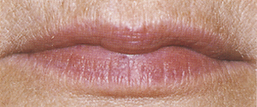
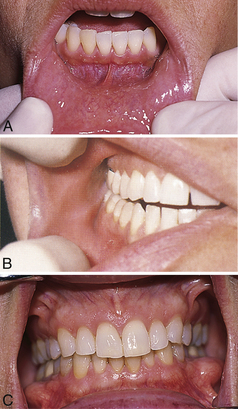
Figure 13-29 A, View of labial mucosa, labial frenum, mucogingival junction, and attached gingiva. B, View of the buccal mucosa, parotid papilla, maxillary vestibule, mandibular vestibule, and alveolar mucosa. C, Frontal view of periodontium.
Procedure 13-2 details the steps for examining recommended structures, and lists examples of normal, atypical, and abnormal findings that may be observed during an intraoral assessment. After performing this portion of the intraoral assessment, the dental hygienist initiates specific tooth, oral hygiene, and periodontal assessments (see Chapters 14, 15, and 17).
DESCRIBING AND DOCUMENTING SIGNIFICANT FINDINGS
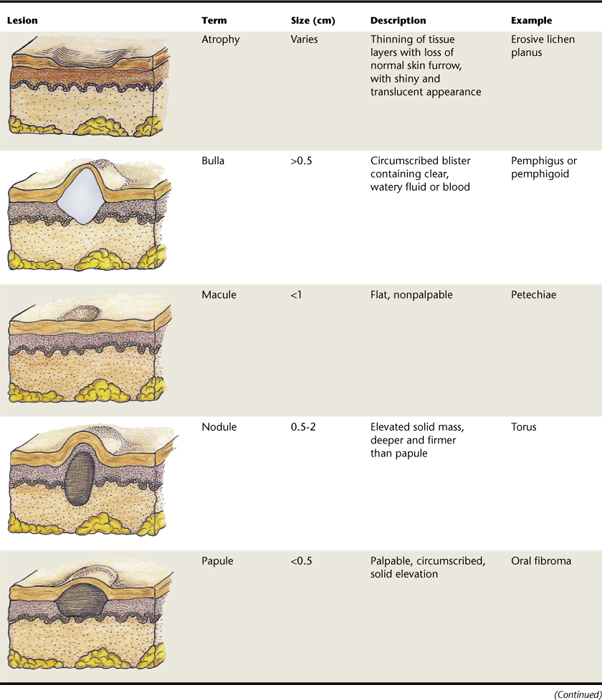
After the observation of atypical or abnormal findings, the dental hygienist describes and documents them accurately in the client record, forming a dental hygiene diagnosis.11 Precise descriptive terms enable the dental hygienist to communicate with the supervising dentist and other healthcare professionals to facilitate an accurate dental differential diagnosis. A differential diagnosis is the identification of a condition by differentiating all pathologic processes that may produce similar lesions. See Table 13-3 for the descriptive categories for oral lesions (e.g., atrophy, bulla, macule, nodule, papule, pustule, plaque, ulcer, vesicle, wheal).

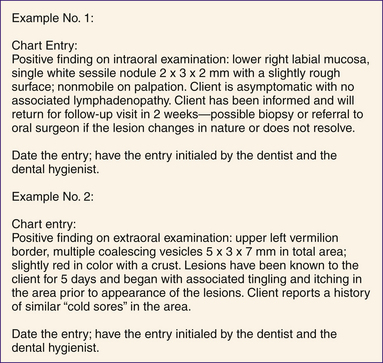
A sample form used for collecting data during an extraoral and intraoral assessment is shown in Figure 13-33. In addition, Figure 13-34 has sample lesion descriptions for entry into a client record. Specific descriptive items that need to be included in the client record when describing a lesion are discussed in the following sections and are part of the dental hygiene diagnosis of a lesion.
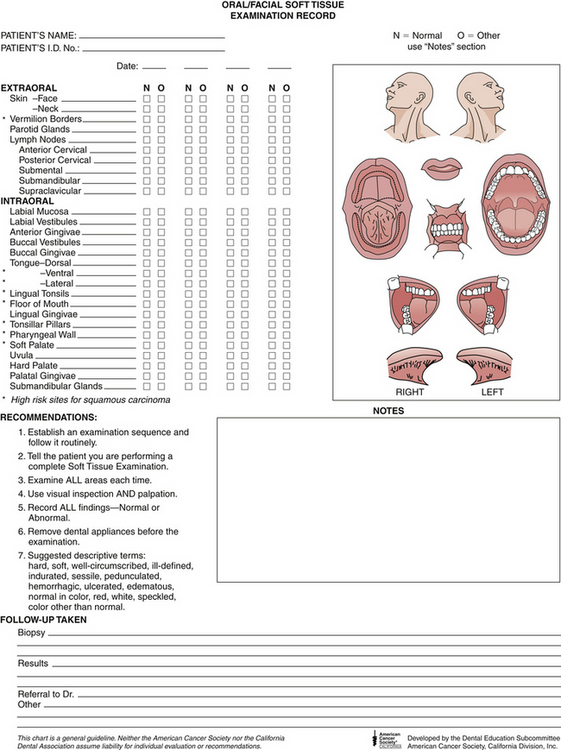
Figure 13-33 Extraoral and intraoral assessment form.
(Courtesy American Cancer Society, Atlanta, Georgia.)
Location and Distribution
When documenting the location of a lesion, it is important to be as accurate as possible so that follow-up examination may be made correctly even if the lesion has healed and no longer remains. The location also is important because some lesions characteristically occur in specific areas or tissues and this information can help the supervising dentist formulate a differential diagnosis. For example, hairy leukoplakia (thick white lesions with long fingerlike projections) occurs usually on the lateral borders of the tongue in HIV-positive clients. When describing the location of an oral lesion, the dental hygienist identifies the nearest anatomic landmark (e.g., upper lip, labial mucosa, tongue, specific teeth) and notes the lesion's anatomic relationship to the structure (e.g., anterior or posterior, medial or lateral, inferior or superior, ipsilateral or contralateral).
The description of the lesion's location must also specify whether the lesion is located on the right side or on the left side for unilateral lesions; for bilateral lesions, specify that the lesion is located on both sides of the face, neck, or oral cavity. Some lesions may be located in the midline. Generally, bilateral structures are normal anatomic structures, but a unilateral structure may indicate a pathologic lesion.
In addition to location, the lesion distribution needs to be described. The distribution is either single or multiple in number. For example, a mucocele (elevated lesion caused by accumulation of saliva from a blocked duct) is a single lesion, whereas herpes simplex virus manifesting on the gingiva often produces multiple lesions.
Multiple lesions may be described as being either separate or coalescing. Multiple lesions that are discrete and do not run together are separate, whereas lesions with margins that merge are coalescing. In addition, multiple lesions may be localized or generalized. Localized refers to lesions that are limited to a single area, whereas generalized describes lesions involving more than one area and may indicate a systemic dermatologic disease (e.g., lichen planus).
Size and Shape
Lesion size is determined by using a periodontal probe or small metric ruler to measure the legion's length, width, and height. Oral lesion size varies, but generally a lesion is not apparent to the client when it is smaller than 1 to 2 cm. In addition, lesion height, whether the lesion is a papule (raised) or macule (flat), and the contour of the lesion's borders relate to its shape. Lesion borders need to be documented as being either well defined or poorly defined. Generally, noncancerous lesions have well-defined borders and are round or ovoid in shape. In contrast, cancers have poorly defined borders and thus an irregular shape as a result of the cancer infiltration process and surrounding tissue inflammation and fibrosis.
Color
Any unusual color changes in oral tissues may signal an abnormal condition. Lesion colors observed normally are red and white, with white predominating. Other less-common colors include blue, purple, yellow, black, and gray. Lesions can even exhibit the same color as the adjacent tissue. Lesions of a red color may be the result of thinning of the superficial epithelium, increased vascularity, or dissolution of connective tissue. White lesions may be the result of excess keratin in the superficial epithelium, decreased vascularity of the connective tissue, or an increased amount of collagen tissue (fibrosis).
Brownish, bluish, or black lesions indicate that there is a deposit of melanin, blood, or heavy metal in the tissues, such as amalgam particles (amalgam tattoo). In addition, fluid-filled lesions or lesions with extra or large blood vessels can appear bluish. Yellow lesions usually contain sebaceous glands or adipose tissue. Sometimes these color modifications can occur simultaneously in the same lesion area, and this must be noted. In addition, it should be noted if the lesion is hemorrhaging (bleeding) spontaneously or easily with touch.
Texture
Lesion texture refers to the surface appearance, which is taken into account when establishing a list of possible differential diagnoses (e.g., crater, crust, induration, papillary, pseudomembrane, smooth, verrucous). Terminology used to describe lesion surface texture is listed in Table 13-4. Most of the oral cavity is smooth in texture on the surface, except in the palatal rugae and attached gingival stippling. Superficial epithelial tissue lesions frequently have a rough surface, whereas deep tissue lesions have a smooth surface.
TABLE 13-4 Terminology Used to Describe Surface Texture of a Lesion
| Term | Description |
|---|---|
| Crater | Central depression, like a bowl or saucer |
| Crust | Hard covering, composed of dried serum, pus, blood, or a combination |
| Induration | Hardness of tissue as a result of an increase in the number of surrounding epithelial cells |
| Papillary | Having a rough surface containing small nodulations or elevated projections |
| Pseudomembrane | Loose membranous layer of exudate containing organisms formed during an inflammatory reaction of the surface tissue |
| Smooth | Describes deep lesions that push up and stretch surface tissue |
| Verrucous | Having a rough, wartlike surface with multiple irregular folds |
Adapted from Wilkins EM: The clinical practice of the dental hygienist, ed 10, Philadelphia, 2009, Lippincott Williams and Wilkins.
Attachment and Depth
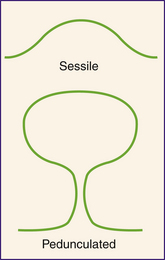
If a lesion has a broad base of attachment as wide as the lesion itself, its attachment is described as sessile. In contrast, pedunculated lesions have a narrow pedicle, or stalklike base of attachment (Figure 13-35). Whether lesions are superficial or deep is determined by checking with palpation.
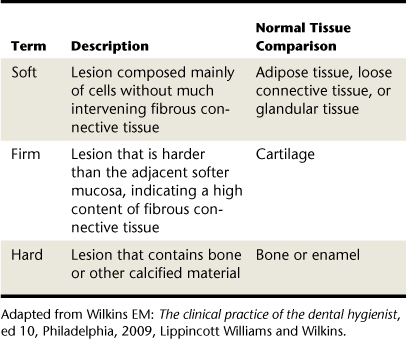
Consistency
Consistency refers to the degree of firmness or density of the tissue. This categorization can be accomplished by palpating the lesion and then comparing its felt degree of consistency (e.g., soft, firm, hard) with that of normal tissues of the body. The terminology used to indicate lesion consistency and normal tissue comparisons is described in Table 13-5.
TABLE 13-5 Terminology to Indicate Consistency of a Lesion
| Term | Description | Normal Tissue Comparison |
|---|---|---|
| Soft | Lesion composed mainly of cells without much intervening fibrous connective tissue | Adipose tissue, loose connective tissue, or glandular tissue |
| Firm | Lesion that is harder than the adjacent softer mucosa, indicating a high content of fibrous connective tissue | Cartilage |
| Hard | Lesion that contains bone or other calcified material | Bone or enamel |
Adapted from Wilkins EM: The clinical practice of the dental hygienist, ed 10, Philadelphia, 2009, Lippincott Williams and Wilkins.
Soft lesions over 1 cm in diameter should also be tested for fluctuance by placing the fingers of one hand on one side of the lesion and gently pressing on the lesion with the fingers of the other hand. If the fingers can detect a wave or force passing through the lesion, the lesion is said to be fluctuant. The lesion should also be checked for emptiability, which is the temporary loss of fluctuance caused by brief evacuation of the lesion fluid into the surrounding tissues.
Mobility
It is important to note if a lesion has mobility (it is free) or fixation in relationship to the neighboring tissues. This is done by fixing the lesion with the fingers of one hand while moving the superficial tissues over the lesion with the other hand to see if it is fixed to its overlying tissues. Then an attempt is made to move the lesion independently from its underlying structures or tissues to demonstrate if the lesion is freely movable in all directions. Note that certain areas of the oral mucosa do not normally allow movement of the oral mucosa separate from the deeper structures such as the attached gingiva, median palatine raphe, or hard palate.
Generally the following aspects of mobility can help the supervising dentist make a differential diagnosis:
Symptomatology
By directing questions to the client, the dental hygienist elicits symptoms related to the finding. A symptom is a subjective condition reported by the individual. In contrast, a sign is an objective condition that can be directly observed. Specifically, the dental hygienist needs to determine and then document in the client record the following information related to symptoms:
If the lesion is known to the client, how long it has been present, and if there have been any changes in its size and appearanceORAL CANCER
More than 75% of head and neck cancers originate in the oral cavity. One of the most serious conditions that can occur in the oral cavity is oral cancer. Oral cancer is a devastating disease when detected in its later stages. Late-stage treatment usually involves major orofacial surgery, radiation, and chemotherapy. More than 34,000 Americans will be diagnosed with oral or pharyngeal cancer this year.12 These cancers will cause more than 8000 deaths, killing approximately one person per hour, 24 hours per day. Of newly diagnosed individuals, only half will be alive in 5 years. This is a number that has not significantly improved in decades. The death rate for oral cancer is higher than that for cervical cancer; Hodgkin's disease; cancer of the brain, liver, testes, or kidney; or serious skin cancer. Worldwide the problem is much greater, with over 350,000 to 400,000 new cases being found each year. The average age of most people diagnosed is 62. However, current research indicates that human papillomavirus (HPV)–positive disease is rapidly changing these ratios and age groups; younger, nonsmoking dental clients under the age of 50 comprise the fastest growing segment of the oral cancer population.13
Oral squamous cell carcinoma (OSCC) makes up 90% to 95% of all cancers of the oral cavity.14 There is a higher risk of cancerous transformation in red and ulcerated areas than in white patches, although the latter often prove to be cancerous. This cancer is associated with certain risk factors such as tobacco use, alcohol abuse, HPV infection, and, for extraoral lesions, excessive sun exposure. Tobacco and alcohol lesions tend to favor the anterior tongue and mouth, and HPV-associated lesions tend to favor the posterior oral cavity.15,16 However, 25% of oral cancers occur in people who do not smoke and have no other risk factors.
Although cancer may arise at any site in the oral cavity, the most common sites in order are as follows:
Cancer does not show healing and resolution within a 2-week window of time, as most traumatic or infective lesions do, and does not respond to treatment. Instead, the cancer shows changes in color, shape, and size over time. See Table 13-6 for the terminology used to describe common signs of oral cancer (e.g., chronicity, erythroplakia, fixation, induration, leukoplakia, lymphadenopathy, ulceration). (For information on dental hygiene care for persons with cancer, see Chapter 44.)
TABLE 13-6 Terminology for Common Signs of Cancer
| Term | Definition |
|---|---|
| Chronicity | Lesion remains because of a failure to heal |
| Erythroplakia | Used to identify a red patch that is smooth, granular, and velvety and that cannot be diagnosed as any other disease without biopsy |
| Fixation | Immobility of a lesion occurring as a result of abnormally dividing cells invading to deeper areas and into muscle and bone |
| Induration | Hardness primarily as a result of an increase in number of surrounding epithelial cells from an inflammatory infiltrate |
| Leukoplakia | Used to identify a white, plaquelike lesion that cannot be wiped off and cannot be diagnosed as any other disease without biopsy |
| Lymphadenopathy | Disease process affecting the lymph nodes (and tonsils) resulting in firmness and enlargement |
| Ulceration | Loss of skin surface resulting from destruction of epithelial integrity from a discrepancy in cell maturation, loss of intercellular attachments, and disruption of the basement membrane |
Client Self-Examination
The client–dental hygienist interaction is an opportunity to instruct clients in simple self-examination techniques, empowering them with the skills to note any changes in their own extraoral or intraoral conditions.
Need for Early Detection
The high mortality rate for oral cancer is a result of late detection of the disease. More than 52% of oral cancers are in advanced stages when diagnosed and show evidence of invasion and metastasis. This late diagnosis of the disease is tragic because the cure rate is more than 90% when oral cancer is detected early (when the lesion is <2 cm). In addition, the chance for developing a second cancerous lesion in the orofacial region at a later time is about 10% to 40%, thus necessitating thorough follow-up examinations.
Public awareness of oral cancer as compared with other cancers is low, and this contributes to delays in diagnosis. In addition, many early oral cancers appear clinically normal, and it is not possible to determine with certainty which lesions are cancerous without performing a biopsy. Because biopsy often seems extreme for what appears to be a harmless lesion, many early oral cancers remain undiagnosed and progress to a more advanced stage.
Because many clients are seen more regularly for preventive periodontal care than for medical visits, dental hygienists have a unique opportunity during client assessment to detect oral cancer while it is still asymptomatic, harmless, and unsuspected. Several techniques have been suggested for early evaluation of lesions to determine whether they show cellular changes that may be cancerous and hence need a biopsy. These methods include oral cytology, light for identification of abnormal oral tissue, toluidine blue dye, and OralCDx brush biopsy.17 These methods are intended as adjuncts to and not a substitute for biopsy. Furthermore, studies now show combining the use of computed tomography and ultrasonography for diagnosis of oral cancer is recommended with other methods. Future methods include blood screening assays and a micronucleus test, possibly using a lab-on-a-chip: a miniaturized, integrated, automated, inexpensive diagnostic device.18,19
There is insufficient evidence from prospective clinical studies to support the use of any these methods as a general screening technique for oral cancer or precancerous lesions because they do not reduce mortality.20 In addition, many researchers believe that these tests may delay diagnosis if the results show a false negative, and if a positive result is shown, then the second procedure of biopsy must still be scheduled. Most researchers state that further studies need to be done to see if any of these methods can be used for general cancer screening.21
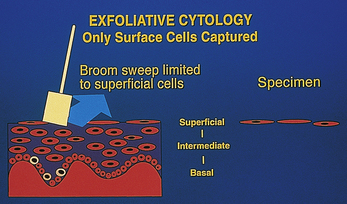
To understand and compare the relative value of these adjunctive methods, it is important to understand the structure of oral epithelial tissue.22 Oral epithelium consists of three layers: the basal cell layer, the intermediate layers, and the superficial layers. Normally, cell division occurs in the basal cell layer. Cells then move through the intermediate layers to the superficial layers, where they are exfoliated naturally. An important feature of a method for early detection of oral cancer and precancerous lesions is that it evaluates cells from all layers of the epithelium.
Oral Cytology
With oral cytology, cells are collected by scraping the surface of a lesion with a cotton swab (Figure 13-36), and then they are spread on a slide, fixed and stained, and sent to a pathologist for evaluation. The main disadvantage of this method is that it is likely to evaluate only superficial cells, which may have little diagnostic value. Therefore oral cytology in practice has a minor role in the detection of precancerous and cancerous lesions.
Light for Identification of Abnormal Oral Tissue
A simple chemiluminescent light test is now available that improves identification, evaluation, and monitoring of oral mucosal abnormalities in those at increased risk for oral cancer. The test kit includes a disposable handheld light and flavored acetic mouth rinse that work together to permit detection of abnormalities in the oral cavity that might not be visible to the unaided eye. It is a quick, painless, noninvasive procedure, with the rinse improving visualization of deeper abnormal tissue by removing superficial substances. Normal epithelium will absorb the device's illumination and appear dark, whereas abnormal epithelium will reflect it and appear bright white. As a cell becomes more abnormal, the nucleus becomes larger compared with the rest of the cell. The enlarged nucleus reflects light and appears bright white, focusing the attention on lesions that might not be seen otherwise and that may, on biopsy, reveal cancer and precancerous cells.
Also available is a handheld device that provides the direct visualization of tissue fluorescence and the changes in fluorescence that occur when abnormalities are present (VELscope Oral Cancer Screening System, LED Dental, Inc, White Rock, BC, Canada, www.velscope.com). The unit emits a cone of blue light into the oral cavity, creating different fluorescence responses depending on the health of the tissues being screened. Healthy mucosal tissue appears pale green under the light, whereas lesions considered abnormal look dark green to black.
Toluidine Blue Dye
Toluidine blue dye stains cells differentially depending on their nuclear configuration. The dye has selective dye uptake by abnormal cells, which is the premise for its use to confirm clinical impressions of abnormal cellular changes. A drawback to using the dye on the surface of a lesion to detect cellular changes is that inflammatory cells, often present with a lesion, also take up the dye stain and make interpretation of the test difficult. Toluidine blue dye often is used, however, during biopsy to define margins of the lesions and to discover secondary lesions. A kit is now available that combines chemiluminescent light and toluidine blue dye; the light improves lesion visualization and allows identification of abnormal lesions, then the dye allows the documentation of the extent of the lesion (ViziLite Plus with T Blue, Zila Pharmaceuticals, Inc, Phoenix, Arizona, www.vizilite.com).
Brush Biopsy
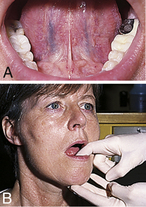
OralCDx (CDx Laboratories, Inc., Suffern, New York; 800-560-4467) has developed a lesion evaluation method, OralCDx brush biopsy, that uses a specially designed brush to remove cells from lesions that might not otherwise be subjected to biopsy because of their normal appearance.23 The supplied brush captures cells from all three layers of epithelium (unlike oral cytology) to determine if a lesion is in fact normal or if it should be submitted for further surgical biopsy (Figure 13-37).
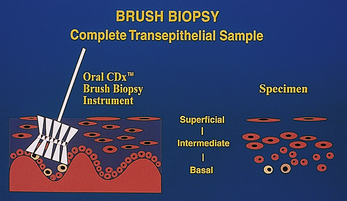
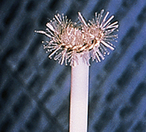

Figure 13-40 Pressing the brush firmly against the lesion.
(Courtesy CDx Laboratories, Suffern, New York.)
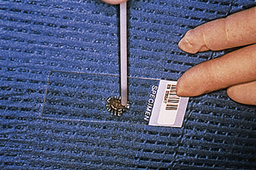
Figure 13-41 Spreading cellular sample on OralCDx slide.
(Courtesy CDx Laboratories, Suffern, New York.)
The brush biopsy has received the Seal of Acceptance by the American Dental Association. However, dental hygienists are permitted to perform the brush biopsy procedure only in certain states. The technique for performing a brush biopsy is described in Procedure 13-3. The brush containing the cells is then spread on a slide that is sent to CDx laboratories for computer-assisted analysis and confirmation by a pathologist. Specimens are classified into the following categories:
Procedure 13-3 CONDUCTING AN ORALCDx BRUSH BIOPSY
EQUIPMENT
STEPS
When the pathologist judges the biopsy to show precancerous or cancerous cells, representative cells are displayed on the computer and the images are printed onto the report form, which is provided to the dental office. A surgical biopsy is recommended for any lesions with an “atypical” or “positive” report.
Biopsy
Biopsy with a scalpel or “punch” biopsy surgical instrument is the traditional method of diagnosing a cancer. The decision to perform a biopsy by the supervising dentist after an oral lesion is identified is made by the supervising dentist or referral is made to an oral surgeon. Biopsy is the surgical removal of a section of tissue or other material from the living body for the purpose of diagnosis, to estimate prognosis, and to monitor the cause of disease when the tissue later undergoes microscopic assessment. Excisional biopsy indicates that the entire lesion is removed for assessment. Incisional biopsy indicates that only a representative section is taken.
After the specimen is obtained and properly packaged for transport to a laboratory, it is analyzed by a pathologist. A report of the findings is then issued by the pathologist, who assesses the histologic appearance of the suspected lesion in conjunction with the clinical diagnosis. This report is then sent to the supervising dentist to determine any further action. The report should be discussed with the client and placed, as well as noted, in the client record.
CLIENT EDUCATION TIPS
LEGAL, ETHICAL, AND SAFETY ISSUES
Dental hygienists have the responsibility to make a dental hygiene diagnosis and then refer all clients with head, neck, or orofacial lesions to the supervising dentist for dental diagnosis. Dental hygienists need to perform extraoral and intraoral assessment following the standard precautions of infection control. On identification of a lesion, the client must be informed of its existence. The clinician should use appropriate verbal skills, and pertinent information must be provided in writing if the client is referred to a specialist for further treatment. Biopsy using surgical instruments with microscopic assessment is the only method of definitively diagnosing a cancer.KEY CONCEPTS
Careful overall client observation and a thorough assessment of the areas in and around the oral cavity are essential to planning and providing optimum client care. The oral tissues are sensitive general health indicators. Changes in these structures may be the first indication of disease processes in other parts of the body. It is the dental hygienist's responsibility to recognize oral tissue changes from normal and to collaborate with the supervising dentist regarding these findings. The dental hygienist must establish an assessment sequence and follow it systematically during client assessment, incorporating the skills of observation, palpation, auscultation, and olfaction. During the assessment, the dental hygienist examines clients carefully for any palpable lymph nodes and documents if any are present. The lymph nodes that are palpable may pinpoint where a disease process is active, and detection will assist in the diagnosis and treatment of the disease. After the observation of atypical or abnormal findings, the dental hygienist describes and documents them accurately in the client record as a dental hygiene diagnosis. The ability to describe an oral lesion is critical to the assessment process because precise descriptive terms enable the dental hygienist to communicate with the supervising dentist and other referring healthcare professionals to identify the lesion and facilitate its accurate dental diagnosis. Because many clients are seen more regularly for preventive periodontal care than for medical visits, dental hygienists have a unique opportunity during client assessment to detect oral cancer while it is still asymptomatic, harmless, and unsuspected.CRITICAL THINKING EXERCISES
Refer to the Procedures Manual where rationales are provided for the steps outlined in the procedures presented in this chapter.
1. Hapcook C.P. Risk management considerations for oral cancer. J Am Dent Assoc. 2005;136:1566.
2. Fehrenbach M.J. Immunity. In Ibsen O.C., Phelan J.A., editors: Oral pathology for the dental hygienist, ed 5, St Louis: Saunders, 2009.
3. Fehrenbach M.J. Inflammation. In Ibsen O.C., Phelan J.A., editors: Oral pathology for the dental hygienist, ed 5, St Louis: Saunders, 2009.
4. Babbush C.A., Fehrenbach M.J., Emmons M. Mosby's dental dictionary, ed 2, St Louis: Mosby, 2008.
5. Fehrenbach M.J. Stress reduction for the oral health care patient at high risk for medical emergency. Access. July 2004.
6. Civantos F., Zitsch R., Bared A. Sentinel node biopsy in oral squamous cell carcinoma. J Surg Oncol. 2007;96:330.
7. Fehrenbach M.J. Dental infections. J Pract Hyg. 1997;6:2.
8. Fehrenbach M.J., Herring S.W. Illustrated anatomy of the head and neck, ed 3. St Louis: Saunders; 2007.
9. Fehrenbach M.J. Addressing the needs of denture patients. RDH Mag. February 2004.
10. Fehrenbach M.J. Tongue piercing and potential oral complications. J Dent Hyg. 1998;72:1.
11. Fehrenbach M.J., Weiner J. Saunders review of dental hygiene, ed 2. St Louis: Saunders; 2009.
12. Ries LAG, Melbert D, Krapcho M, et al, eds: SEER Cancer Statistics Review, 1975-2004, based on November 2006 SEER data submission, posted to the SEER web site 2007. Bethesda, National Cancer Institute. Available at: http://seer.cancer.gov/csr/1975_2004.
13. Herrero R., Castellsagué X., Pawlita M., et al. Human papillomavirus and oral cancer: the International Agency for Research on Cancer multicenter study. J Natl Cancer Inst. 2003;95:1772.
14. American Cancer Society. Cancer facts and figures 2006. Atlanta: American Cancer Society; 2006.
15. Beers M.H., Porter R.S., Jones T.V. The Merck manual of diagnosis and therapy, ed 18. Whitehouse Station, NJ: Merck, 2006.
16. Huang B., Chen H., Fan M. A postulated role for human papillomavirus (HPV) in the transformation and proliferation of oral squamous cell carcinoma (OSCC). Med Hypotheses. 2008;70:1041.
17. Gupta A., Singh M., Ibrahim R., Mehrotra R. Utility of toluidine blue staining and brush biopsy in precancerous and cancerous oral lesions. Acta Cytol. 2007;51:788.
18. Saran R., Tiwari R.K., Reddy P.P., Ahuja Y.R. Risk assessment of oral cancer in patients with pre-cancerous states of the oral cavity using micronucleus test and challenge assay. Oral Oncol. 2008;44:354.
19. Ziober B.L., Mauk M.G., Falls E.M., et al. Lab-on-a-chip for oral cancer screening and diagnosis. Head Neck. 2008;30:111.
20. Kujan O., Glenny A.M., Duxbury J., et al. Evaluation of screening strategies for improving oral cancer mortality: a Cochrane systematic review. J Dent Educ. 2005;69:255.
21. Speight P.M., Palmer S., Moles D.R., et al. The cost-effectiveness of screening for oral cancer in primary care. Health Technol Assess. 2006;10:1.
22. Bath-Balogh M., Fehrenbach M.J. Illustrated dental embryology, histology, and anatomy, ed 2. St Louis: Saunders; 2006.
23.A. Moralis, M. Kunkel, T.E. Reichert. Identification of a recurrent oral squamous cell carcinoma by brush cytology. Mund Kiefer Gesichtschir. 11, 2007. 355. Visit the  website at http://evolve.elsevier.com/Darby/Hygiene for competency forms, suggested readings, glossary, and related websites.
Source: Walker, HK etal: Clinical methods: the history, physical,and laboratory examinations, ed 3, Boston, 1990, Butterworths.
Caution for Procedure 13-1
When palpating the neck, the clinician may feel the carotid pulse on either sides of the patients's neck, but the clinician needs to avoid compression of the carotid sinus (bulb), which is located at the level of the top of thyroid cartilage as well as avoid the simultaneous or bilateral palpation of both carotid arteries. Care always should be taken to carefully palpate the lower half of the neck in order to avoid the area of the carotid sinus, to prevent a hypersensitive carotid sinus reflex from being evoked with resultant bradycardia and hypotension. Thus, it is important that the carotid pulses be palpated using light pressure, one side at at time, since bilateral carotid compression may produce cerebral ischemia and syncope; extreme caution should be exercised in patients who have a history of syncope or transient neurologic symptoms. The clinician should also never palpate the neck from an operator position that is on the opposite side of the neck as this may compromise the airway and breathing by compression on the neck from the palpating hand. The carotid pulse is normaly taken when cardiopulmonary resuscitation (CPR) is performed by qualified emergency medical service (EMS) personnel.