Basic Injection Technique
Absolutely nothing that is done for patients by their dentist is of greater importance than the administration of a drug that prevents pain during dental treatment.1 Yet the very act of administering a local anesthetic commonly induces great anxiety or is associated with pain in the recipient. Patients frequently mention that they would prefer anything to the injection or “shot” (to use patients’ term for the local anesthetic injection). Not only can the injection of local anesthetics produce fear and pain, it is also a factor in the occurrence of emergency medical situations. In a review of medical emergencies developing in Japanese dental offices, Matsuura determined that 54.9% of emergency situations arose either during administration of the local anesthetic or in the 5 minutes immediately after its administration.2 Most of these emergency situations were directly related to increased stress associated with receipt of the anesthetic (the injection) and not to the drug being used. Moreover, in a survey on the occurrence of medical emergencies in dental practices in North America, 4309 dentists responded that a total of more than 30,000 emergency situations had developed in their offices over the previous 10 years.3 Ninety-five percent of respondents stated that they had experienced a medical emergency in their office in this time period. More than half of these emergencies (15,407) were vasodepressor syncope (common faint), most of which occurred during or immediately after administration of the local anesthetic.
Local anesthetics can and should be administered in a nonpainful, or atraumatic, manner. Most dental students’ first injections were given to classmate “patients,” who then gave the same injection to the student who had just injected them. Most likely, these students went out of their way to make their injection as painless as possible. At the Herman Ostrow School of Dentistry of U.S.C., these first injections usually are absolutely atraumatic. Students are routinely surprised by this, some having experienced the more usual (e.g., painful) injection at some time in the past when they were “real” dental patients. Why should there be a difference in dental injections and in the degree of pain between injections administered by an inexperienced beginning student and those given by a more experienced practitioner? All too often, local anesthetic administration becomes increasingly traumatic for the patient the longer a dentist has been out of school. Can this discouraging situation be corrected?
Local anesthetic administration need not, and should not, be painful. Every one of the local anesthetic techniques presented in the following chapters can be done atraumatically, including the administration of local anesthetics on the palate (the most sensitive area in the oral cavity). Several skills and attitudes are required of the drug administrator, the most important of which is probably empathy. If the administrator truly believes that local anesthetic injections do not have to be painful, then through a conscious or subconscious effort, it is possible to make minor changes in technique that will cause formerly traumatic procedures to be less painful for the patient.
Additionally, the ability to buffer the pH of the local anesthetic solution to a more physiologic 7.35 to 7.5 from the pH of 3.5 in the cartridge has greatly aided in the process of atraumatic injection.4,5
An atraumatic injection has two components: a technical aspect and a communicative aspect.
 Step 1
Use a sterilized sharp needle. Stainless steel disposable needles currently used in dentistry are sharp and rarely produce any pain on insertion or withdrawal. However, because these needles are machine manufactured, occasionally (rarely) a fishhook-type barb may appear on the tip. This results in atraumatic insertion of the needle followed by painful withdrawal as the barb tears the unanesthetized tissue. This may be avoided by the use of sterile 2 × 2-inch gauze. Place the needle tip against the gauze and draw the needle backward. If the gauze is snagged, a barb is present and the needle should not be used. (This procedure is optional and may be omitted if fear of needle contamination is great.)
Disposable needles are sharp on first insertion. However, with each succeeding penetration, their sharpness diminishes. By the third or fourth penetration, the operator can feel an increase in tissue resistance to needle penetration. Clinically, this is evidenced by increased pain on penetration and increased postanesthetic tissue discomfort. Therefore it is recommended that stainless steel disposable needles be changed after every three or four tissue penetrations.
The gauge of the needle should be determined solely by the injection to be administered. Pain caused by needle penetration in the absence of adequate topical anesthesia can be eliminated in dentistry through the use of needles not larger than 25 gauge. Multiple studies have demonstrated that patients cannot differentiate among 25-, 27-, and 30-gauge needles inserted into mucous membranes, even without the benefit of topical anesthesia.6-8 Needles of 23 gauge and larger are associated with increased pain on initial insertion.
Step 2
Check the flow of local anesthetic solution. After the cartridge is properly loaded into the syringe, and with the aspirator tip (harpoon) embedded into the silicone rubber stopper (if appropriate), a few drops of local anesthetic should be expelled from the cartridge. This ensures a free flow of solution when it is deposited at the target area. The stoppers on the anesthetic cartridge are made of a silicone rubber to ensure ease of administration. Only a few drops of the solution should be expelled from the needle to determine whether a free flow of solution occurs.
Step 3
Determine whether to warm the anesthetic cartridge or syringe. If the cartridge is stored at room temperature (approximately 22° C, 72° F), there is no reason for a local anesthetic cartridge to be warmed before its injection into soft tissues. The patient will not perceive local anesthetic solution stored at room temperature as too cold or too hot when it is injected.
Most complaints concerning overly warm local anesthetic cartridges pertain to those stored in cartridge warmers heated by a (Christmas tree–type) light bulb. Temperatures within these cartridges frequently become excessive, leading to patient discomfort and adverse effects on the contents of the cartridge9 (see Chapter 7).
Cartridges stored in refrigerators or other cool areas should be brought to room temperature before use.
Some persons advocate slight warming of the metal syringe before its use. The rationale is that a cold metal object is psychologically more disturbing to the patient than is the same object at room temperature. It is recommended that both the local anesthetic cartridge and the metal syringe be as close to room temperature as possible, preferably without the use of any mechanical devices to achieve these temperatures. Holding the loaded metal syringe in the palm of one’s hand for half a minute before injection warms the metal. Plastic syringes do not pose this problem.
Step 4
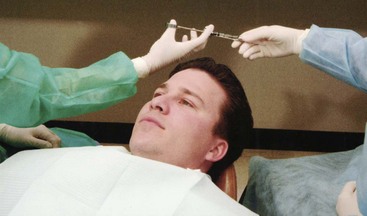
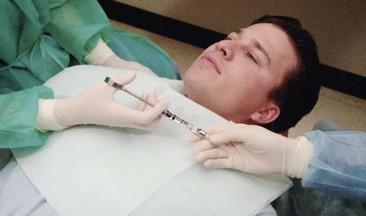
Position the patient. Any patient receiving local anesthetic injections should be in a physiologically sound position before and during the injection.
Vasodepressor syncope (common faint), the most commonly seen medical emergency in dentistry, most often occurs before, during, and, on occasion, immediately after local anesthetic administration. The primary pathophysiologic component of this situation is cerebral ischemia secondary to an inability of the heart to supply the brain with an adequate volume of oxygenated blood. When a patient is seated in an upright position, the effect of gravity is such that the blood pressure in cerebral arteries is decreased by 2 mm Hg for each inch above the level of the heart.
In the presence of anxiety, blood flow is increasingly directed toward the skeletal muscles at the expense of other organ systems such as the gastrointestinal tract (the “fight-or-flight” response). In the absence of muscular movement (“I can take it like a man!”), the increased volume of blood in skeletal muscles remains there, decreasing venous return to the heart and decreasing the volume of blood available to be pumped by the heart (uphill) to the brain. Decreased cerebral blood flow is evidenced by the appearance of signs and symptoms of vasodepressor syncope (e.g., light-headedness, dizziness, tachycardia, palpitations). If this situation continues, cerebral blood flow declines still further, and consciousness is lost.
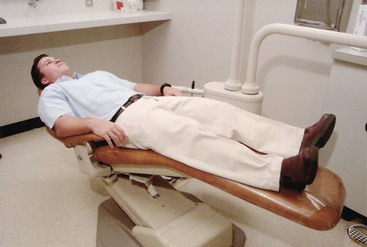
To prevent this, it is recommended that during local anesthetic administration, the patient should be placed in a supine position (head and heart parallel to the floor) with the feet elevated slightly (Fig. 11-1). Although this position may vary according to the dentist’s and the patient’s preference, the patient’s medical status, and the specific injection technique, all techniques of regional block anesthesia can be carried out successfully with the patient in this position.
Step 5
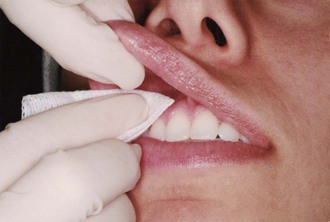
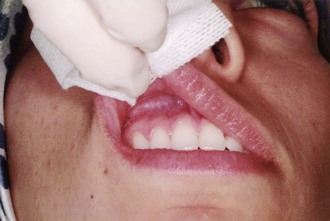
Dry the tissue. A 2 × 2-inch gauze should be used to dry the tissue in and around the site of needle penetration and to remove any gross debris (Fig. 11-2). In addition, if the lip must be retracted to attain adequate visibility during the injection, it too should be dried to ease retraction (Fig. 11-3).
Step 6
Apply topical antiseptic (optional). After the tissues are dried, a suitable topical antiseptic should be applied at the site of injection. This further decreases the risk of introducing septic materials into the soft tissues, producing inflammation or infection. Antiseptics include Betadine (povidone-iodine) and Merthiolate (thimerosal). Alcohol-containing antiseptics can cause burning of the soft tissue and should be avoided. (This step is optional; however, the preceding step [No. 5] of drying the tissue must not be eliminated.)
Step 7A
Apply topical anesthetic. A topical anesthetic is applied after the topical antiseptic. As with the topical antiseptic, it should be applied only at the site of needle penetration. All too often, excessive amounts of topical anesthetic are used on large areas of soft tissue, producing undesirably wide areas of anesthesia (e.g., the soft palate, the pharynx), an unpleasant taste, and, perhaps even more important with some topical anesthetics (such as lidocaine), rapid absorption into the cardiovascular system (CVS), leading to higher local anesthetic blood levels, which increase the risk of overdose. Only a small quantity of topical anesthetic should be placed on the cotton applicator stick and applied directly at the injection site (Fig. 11-4).
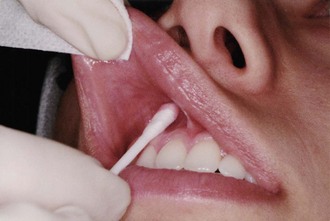
Figure 11-4 A small quantity of topical anesthetic is placed at the site of needle penetration and is kept in place for at least 1 minute.
Topical anesthetics produce anesthesia of the outermost 2 or 3 mm of mucous membrane; this tissue is quite sensitive. Ideally the topical anesthetic should remain in contact with the tissue for 2 minutes to ensure effectiveness.10,11 A minimum application time of 1 minute is recommended.
Step 7B
Communicate with the patient. During the application of topical anesthetic, it is desirable for the operator to speak to the patient about the reasons for its use. Tell the patient, “I’m applying a topical anesthetic to the tissue so that the remainder of the procedure will be much more comfortable.” This statement places a positive idea in the patient’s mind concerning the upcoming injection.
Note that the words injection, shot, pain, and hurt are not used. These words have a negative connotation; they tend to increase a patient’s fears. Their use should be avoided if at all possible. More positive (e.g., less threatening) words can be substituted in their place. “Administer the local anesthetic” is used in place of “Give an injection” or “Give a shot.” The latter is a particularly poor choice of words and must be avoided. Commonly used by Canadian dentists is the word freeze, as in “I’m going to freeze you now.” A statement such as, “This will not hurt” also should be avoided. Patients hear only the word hurt, ignoring the rest of the statement. The same is true for the word pain. An alternative to this is the word discomfort. Although their meanings are similar, discomfort is much less threatening and produces less fear.
Step 8
Establish a firm hand rest. After the topical anesthetic swab is removed from the tissue, the prepared local anesthetic syringe should be picked up (see Chapter 9). It is essential to maintain complete control over it at all times. To do so requires a steady hand so that tissue penetration may be accomplished readily, accurately, and without inadvertent nicking of tissues. A firm hand rest is necessary. The types of hand rest vary according to the practitioner’s likes, dislikes, and physical abilities. Persons with long fingers can use finger rests on the patient’s face for many injections; those with shorter fingers may need elbow rests. Figures 11-5 to 11-7 illustrate a variety of hand and finger rests that can be used to stabilize the local anesthetic syringe.
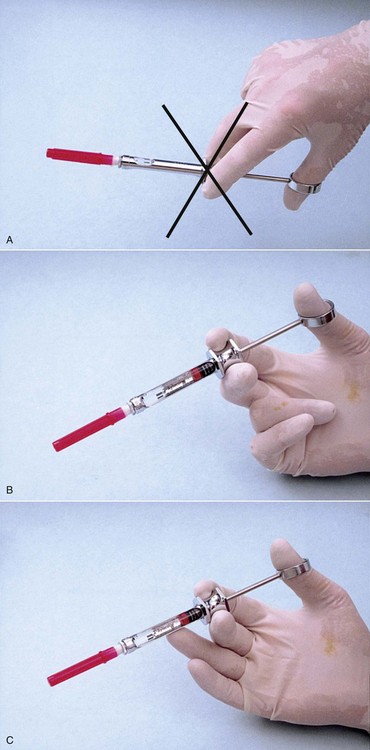
Figure 11-5 Hand positions for injections. A, Palm down: poor control over the syringe; not recommended. B, Palm up: better control over the syringe because it is supported by the wrist; recommended. C, Palm up and finger support: greatest stabilization; highly recommended.

Figure 11-6 A, Use of the patient’s chest for stabilization of syringe during right inferior alveolar nerve block (circle). Never use the patient’s arm to stabilize a syringe. B, Use of the chin (1) as a finger rest, with the syringe barrel stabilized by the patient’s lip (2). C, When necessary, stabilization may be increased by drawing the administrator’s arm in against his or her chest (3).
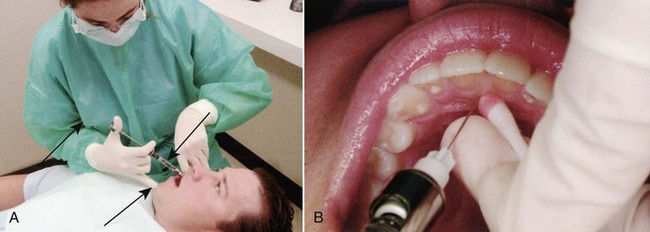
Figure 11-7 A, Syringe stabilization for a right posterior superior alveolar nerve block: syringe barrel on the patient’s lip, one finger resting on the chin and one on the syringe barrel (arrows), upper arm kept close to the administrator’s chest to maximize stability. B, Syringe stabilization for a nasopalatine nerve block: index finger used to stabilize the needle, syringe barrel resting in the corner of the patient’s mouth.
Any finger or hand rest that permits the syringe to be stabilized without increasing risk to a patient is acceptable. Two techniques to be avoided are (1) using no syringe stabilization of any kind, and (2) placing the arm holding the syringe directly onto the patient’s arm or shoulder (Fig. 11-8). In the first situation, it is highly unlikely that a needle can be adequately stabilized without the use of some form of rest. The operator has less control over the syringe, thereby increasing the possibility of inadvertent needle movement and injury. Resting on a patient’s arm or shoulder is also dangerous and can lead to patient or administrator needle-stick injury. If the patient inadvertently moves during the injection, damage can occur as the needle tip moves around within the mouth. Apprehensive patients, especially children, frequently move their arms during local anesthetic administration.
Step 9
Make the tissue taut. The tissues at the site of needle penetration should be stretched before insertion of the needle (Fig. 11-9). This can be accomplished in all areas of the mouth except the palate (where the tissues are naturally quite taut). Stretching of the tissues permits the sharp stainless steel needle to cut through the mucous membrane with minimal resistance. Loose tissues, on the other hand, are pushed and torn by the needle as it is inserted, producing greater discomfort on injection and increased postoperative soreness.
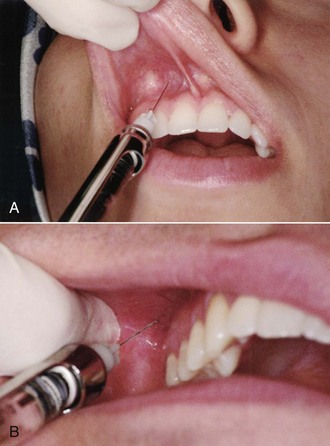
Figure 11-9 A, Tissue at needle penetration site is pulled taut, aiding both visibility and atraumatic needle insertion. B, Taut tissue provides excellent visibility of the penetration site for a posterior superior alveolar nerve block.
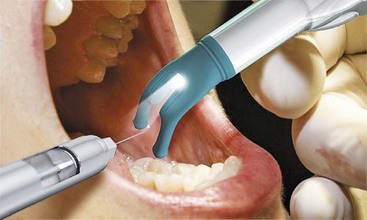
Techniques of distraction also are effective in this regard. Some dentists jiggle the lip as the needle is inserted; others recommend leaving the needle tip stationary and pulling the soft tissues over the needle tip (Fig. 11-10). Devices that are attached to the syringe that produce vibration as the injection is given are available. Two examples are DentalVibe (BING Innovations LLC, Boca Raton, Fla; Fig. 11-11) and VibraJect (Newport Coast, Calif; Fig. 11-12). Although nothing is inherently wrong with distraction techniques, there generally is no need for them. Because the operator should maintain sight of the needle tip at all times, needles should not be inserted blindly into tissues, as is necessitated by many of the distraction techniques (e.g., pulling lip over needle tip).
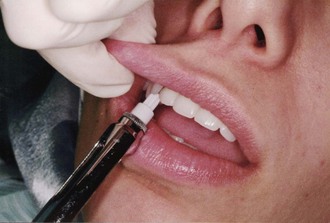
Figure 11-10 When soft tissues are pulled over the needle, visualization of the injection site is impaired.

Proper application of topical anesthetic, taut tissues, and a firm hand rest can produce an unnoticed initial penetration of tissues virtually 100% of the time.
Step 10
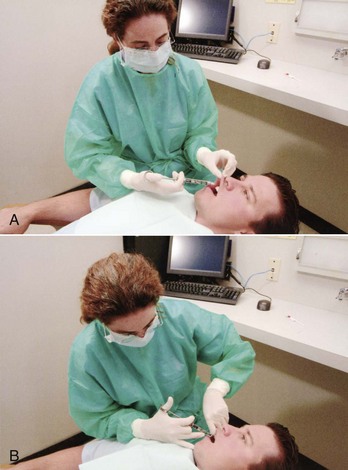
Keep the syringe out of the patient’s line of sight. With the tissue prepared and the patient positioned, the assistant should pass the syringe to the administrator out of the patient’s line of sight either behind the patient’s head or across and in front of the patient. A right-handed practitioner administrating a right-side injection can sit facing the patient (Fig. 11-13) or, if administering a left-side injection, facing in the same direction as the patient (Fig. 11-14). In all cases, it is better if the syringe is not visible to the patient. Proper positioning for left-handed operators is a mirror image of that for right-handed ones. (Specific recommendations for administrator positioning during local anesthetic injections are discussed in Chapters 13 and 14.)
Step 11A
Insert the needle into the mucosa. With the needle bevel properly oriented (see specific injection technique for bevel orientation; however, as a general rule, the bevel of the needle should be oriented toward bone), insert the needle gently into the tissue at the injection site (where the topical anesthetic was placed) to the depth of its bevel. With a firm hand rest and adequate tissue preparation, this potentially traumatic procedure is accomplished without the patient ever being aware of it.
Step 11B
Watch and communicate with the patient. During Step 11A, the patient should be watched and communicated with; the patient’s face should be observed for evidence of discomfort during needle penetration. Signs such as furrowing of the brow or forehead and blinking of the eyes may indicate discomfort (Fig. 11-15). More frequently, no change will be noticed in the patient’s facial expression at this time (indicating a painless, or atraumatic, needle insertion).
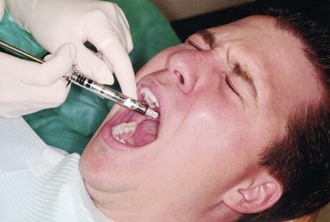
Figure 11-15 The patient’s face should be observed during administration of local anesthetic; any squinting of the eyes or furrowing of the brows, indicating discomfort, should be noted.
The practitioner should communicate with the patient as Step 11A is carried out. The patient should be told in a positive manner, “I don’t expect you to feel this,” as the needle penetrates the tissues. The words, “This will not hurt,” should be avoided; this is a negative statement, and the patient hears only the word (hurt).
Step 13
Slowly advance the needle toward the target. Steps 12 and 13 are carried out together. The soft tissue in front of the needle may be anesthetized with a few drops of local anesthetic solution. After 2 or 3 seconds are allowed for anesthesia to develop, the needle should be advanced into this area and a little more anesthesia deposited. The needle should then be advanced again. These procedures may be repeated until the needle reaches the desired target area. Use of a buffered local anesthetic will increase patient comfort during injection as a result of (1) the increased pH of the anesthetic solution (7.35 to 7.5) and (2) the presence of CO2 in the buffered solution. CO2 possesses anesthetic properties.12
In most patients, however, injection of local anesthetic during insertion of the needle toward the target area is entirely unnecessary. Pain is rarely encountered between the surface mucosa and the mucoperiosteum. If patients are asked post injection what they felt as the needle was being advanced through soft tissue (as in an inferior alveolar or posterior superior alveolar nerve block), the usual reply is that they were aware that something was there, but that it did not hurt.
On the other hand, patients who are apprehensive about injections of local anesthetics are likely to react to any sensation as though it were painful. These patients are said to have a lowered pain reaction threshold (PRT). Apprehensive patients should be told, “To make you more comfortable, I will deposit a little anesthetic as I advance (the needle) toward the target.” Minimal amounts of the local anesthetic should be injected as the process continues. In an injection such as the inferior alveolar nerve block, for which the average depth of needle insertion is 20 to 25 mm, not more than  of a cartridge of local anesthetic should be deposited as the soft tissues are penetrated. Aspiration does not need to be performed at this stage because of the small amount of anesthetic solution that is being continually deposited over a changing injection site. If a vessel were to be penetrated during this procedure, only a drop or two (<1 mg) of anesthetic would be deposited intravascularly. As the needle is advanced further, it leaves the vessel. However, aspiration should always be carried out before any significant volume of solution is deposited (Steps 15 and 16).
When treating patients who are more sensitive, or when injecting into more sensitive tissues, the use of buffered local anesthetic solutions can be of great benefit in making penetration of soft tissues more comfortable for the patient.
Step 14
Deposit several drops of local anesthetic before touching the periosteum. In techniques of regional block anesthesia in which the needle touches or comes close to the periosteum, several drops of solution should be deposited just before contact. The periosteum is richly innervated, and contact with the needle tip produces pain. Anesthetizing the periosteum permits atraumatic contact. Regional block injection techniques that require this are the inferior alveolar, Gow-Gates mandibular, and anterior superior alveolar (infraorbital) nerve blocks.
Knowledge of when to deposit the local anesthetic comes with experience. The depth of penetration of soft tissue at any injection site varies from patient to patient; therefore the periosteum may be contacted inadvertently. However, a keen tactile sense is developed with repetition, enabling the needle to be used gently as a probe. This enables the administrator to detect subtle changes in tissue density as the needle nears bone. With experience and development of this tactile sense, a small volume of local anesthetic solution may be deposited just before gentle contact with the periosteum.
Step 15
Aspirate. Aspiration must always be carried out before a volume of local anesthetic is deposited at any site. Aspiration dramatically minimizes the possibility of an intravascular injection. The goal of aspiration is to determine where the tip of the needle tip is situated (within a blood vessel or without). To aspirate, one must create negative pressure within the dental cartridge. The self-aspirating syringe does this whenever the operator stops applying positive pressure to the thumb ring (plunger). With the traditional harpoon-aspirating syringe, the administrator must make a conscious effort to create this negative pressure within the cartridge.
Adequate aspiration requires that the tip of the needle remain unmoved, neither pushed farther into nor pulled out of the tissues, during the aspiration test. Adequate stabilization is mandatory. Beginners have a tendency to pull the syringe out of the tissues while attempting to aspirate.
When the harpoon-aspirating syringe is used, the thumb ring should be pulled back gently. Movement of only 1 or 2 mm is needed. This produces negative pressure within the cartridge that then translates to the tip of the needle. Whatever is lying in the soft tissues around the needle tip (e.g., blood, tissue [or air, if tested out of the mouth]) will be drawn back into the anesthetic cartridge. By observing the needle end visible within the cartridge for signs of blood return, the administrator can determine whether positive aspiration has occurred. Any sign of blood is a positive aspiration, and local anesthetic solution should not be deposited at that site (Fig. 11-16). No return at all, or a small air bubble, indicates a negative aspiration. Aspiration should be performed at least twice before the larger volume of local anesthetic is administered (as required by the injection technique being employed), with the orientation of the bevel changed (rotate barrel of syringe about 45 degrees for second aspiration test) to ensure that the bevel of the needle is not located inside a blood vessel but is abutting against the wall of the vessel, providing a false-negative aspiration (Fig. 11-17). Several additional aspiration tests are suggested during administration of the anesthetic drug. This serves two functions: (1) to slow down the rate of anesthetic administration, and (2) to preclude the deposition of large volumes of anesthetic into the cardiovascular system.
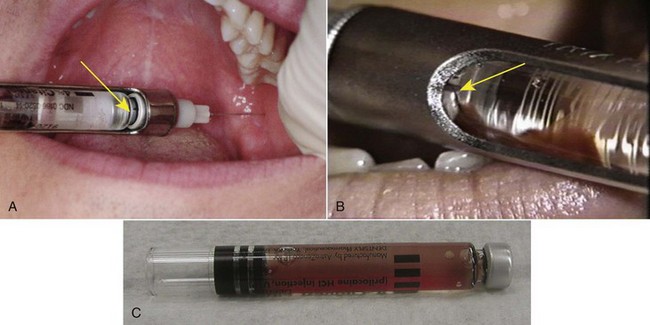
Figure 11-16 A, Negative aspiration. With the needle in position at the injection site, the administrator pulls the thumb ring of the harpoon-aspirating syringe 1 or 2 mm. The needle tip should not move. Check the cartridge at the site where the needle penetrates the diaphragm (arrow) for a bubble or blood. B, Positive aspiration. A slight reddish discoloration at the diaphragm end of the cartridge (arrow) on aspiration usually indicates venous penetration. Reposition the needle, reaspirate, and, if negative, deposit the solution. C, Positive aspiration. Bright red blood rapidly filling the cartridge usually indicates arterial penetration. Remove the syringe from the mouth, change the cartridge, and repeat the procedure.
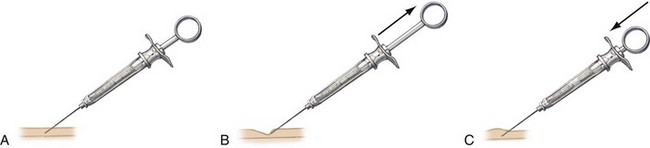
Figure 11-17 A, Needle tip within blood vessel but bevel abuts the wall of the vein. B, On aspiration vein wall is sucked into needle tip producing a false negative aspiration test. C, Rotating syringe 45 degrees and reaspirating will provide a true “positive” aspiration in this scenario.
A major factor determining whether aspiration can be performed reliably is the gauge of the needle. Larger-gauge needles (e.g., 25) are recommended more often than smaller-gauge needles (e.g., 27, 30) whenever a greater risk of positive aspiration exists.
Step 16A
Slowly deposit the local anesthetic solution. With the needle in position at the target area and aspirations completed and negative, the administrator should begin pressing gently on the plunger to start administering the predetermined (for the injection technique) volume of anesthetic. Slow injection is vital for two reasons: (1) of utmost significance is the safety factor (discussed in greater detail in Chapter 18); and (2) slow injection prevents the solution from tearing the tissue into which it is deposited. Rapid injection results in immediate discomfort (for a few seconds) followed by prolonged soreness (days) when the numbness provided by the local anesthetic dissipates later.
Slow injection is defined ideally as the deposition of 1 mL of local anesthetic solution in not less than 60 seconds. Therefore a full 1.8 mL cartridge requires approximately 2 minutes to be deposited. Through slow deposition, the solution is able to diffuse along normal tissue planes without producing discomfort during or following injection.
Most local anesthetic administrators tend to administer these drugs too rapidly. In a survey of 209 dentists, 84% stated that the average time spent to deposit 1.8 mL of local anesthetic solution was less than 20 seconds.13
In actual clinical practice, it therefore seems highly improbable to expect doctors to change their rate of injection from less than 20 seconds to a safe and comfortable 2 minutes per cartridge. A more realistic time span in a clinical situation is 60 seconds for a full 1.8 mL cartridge. This rate of deposition of solution does not produce tissue damage during or after anesthesia and, in the event of accidental intravascular injection, does not produce an extremely serious reaction. Few injection techniques require the administration of 1.8 mL for success.
For many years, the author has used one particular method to slow the rate of injection. After two negative aspirations, he deposits a volume of solution (approximately one fourth of the total to be deposited) and then aspirates again. If the aspiration is negative, he deposits another fourth of the solution, reaspirates, and continues this process until the total volume of solution for the given injection is deposited. This enables him to do two positive things during injection: (1) to reaffirm through multiple negative aspirations that the solution is in fact being deposited extravascularly, and (2) to stop the injection for aspiration; this automatically slows the rate of deposit and thereby minimizes patient discomfort. In the first situation, if positive aspiration occurs after deposition of one-fourth of a cartridge, only 9 mg of a 2% solution, or 13.5 mg of a 3% solution, or 18 mg of a 4% solution will have been deposited intravascularly—doses unlikely to provoke a drug-related adverse reaction. The needle tip should be repositioned, negative aspiration (×2) achieved, and the injection continued. The risk of an adverse reaction secondary to intravascular injection is greatly minimized in this manner.
Step 16B
Communicate with the patient. The patient should be communicated with during deposition of the local anesthetic. Most patients are accustomed to receiving their local anesthetic injections rapidly. Statements such as, “I’m depositing the solution (or “I’m doing this”) slowly so it will be more comfortable for you, but you’re not receiving any more than is usual” go far to allay a patient’s apprehension at this time. The second part of the statement is important, because some patients might not realize that there is a fixed volume of anesthetic solution in the syringe. A reminder that they are not receiving any more than is usual is a comfort to the patient.
Step 17
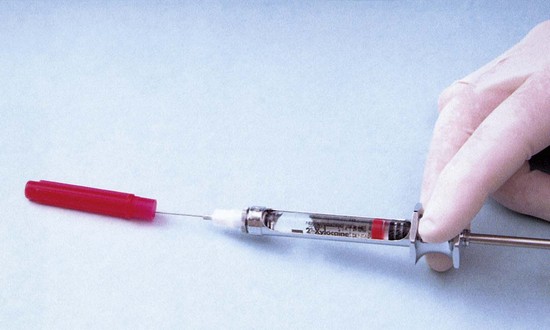
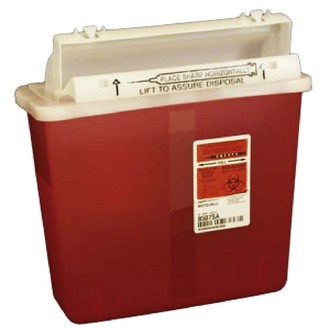
Slowly withdraw the syringe. After completion of the injection, the syringe should be slowly withdrawn from the soft tissues and the needle made safe by capping it immediately with its plastic sheath via the scoop technique.
Concerns about the possibility of needle-stick injury and the spread of infection caused by inadvertent sticking with contaminated needles have led to the formulation of guidelines for the recapping of needles for health care providers.14 It has been demonstrated that the time health professionals are most apt to be injured with needles is when recapping after administration of an injection.15,16 At this time, the needle is contaminated with blood, tissue, and (after intraoral injection) saliva. A number of devices have been marketed to aid the health professional in recapping the needle safely.17 Needle guards, placed over the needle cap before injection, prevent fingers from being stuck during recapping. Although guidelines are not yet in effect, the following are most often mentioned for preventing accidental needle-stick: Needles should not be reused. After their use, needles should immediately be discarded into a sharps container. This policy, although applicable in almost all nondental hospital situations in which only one injection is administered is, in many clinical situations, impractical in dentistry, where multiple injections are commonplace. The “scoop” technique (Fig. 11-18)—in which the needle cap has been placed on the instrument tray, and after injection the administrator simply slides the needle tip into the cap (without physically touching the cap), scooping up the needle cap—can be used for multiple injections without increased risk. The capped needle is then discarded in a sharps container (Fig. 11-19). An acrylic needle holder that holds the cap upright during injection can be purchased or fabricated. The needle then can be reinserted into the cap without difficulty after injection (Fig. 11-20).
Step 18
Observe the patient. After completion of the injection, the doctor, hygienist, or assistant should remain with the patient while the anesthetic begins to take effect (and its blood level increases). Most true adverse drug reactions, especially those related to intraorally administered local anesthetics, develop either during the injection or within 5 to 10 minutes of its completion. All too often, reports are heard of situations in which a local anesthetic was administered and the doctor left the patient alone for a few minutes only to return to find the patient seizing or unconscious. Matsuura reported that 54.9% of all medical emergencies arising in Japanese dental offices developed either during the injection of local anesthetics or in the 5 minutes immediately after their administration.2 Patients should not be left unattended after administration of a local anesthetic.
Step 19
Record the injection on the patient’s chart. An entry must be made of the local anesthetic drug used, the vasoconstrictor used (if any), the dose (in milligrams) of the solution(s) used, the needle(s) used, the injection(s) given, and the patient’s reaction. For example, in the patient’s dental progress notes, the following might be inscribed: R-IANB, 25-long, 2% lido + 1 : 100,000 epi, 36 mg. Tolerated procedure well.
The administrator of local anesthetics who adheres to these steps develops a reputation among patients as a “painless dentist.” It is not possible to guarantee that every injection will be absolutely atraumatic because the reactions of both patients and doctors are far too variable. However, even when they feel some discomfort, patients invariably state that the injection was better than any other they had previously experienced. This should be the goal sought with every local anesthetic injection.
The atraumatic injection technique was developed over many years by Dr. Nathan Friedman and the Department of Human Behavior at the University of Southern California School of Dentistry. These principles are incorporated into this section.
 Atraumatic Injection Technique
1. Use a sterilized sharp needle.
2. Check the flow of local anesthetic solution.
3. Determine whether to warm the anesthetic cartridge or syringe.
6. Apply topical antiseptic (optional).
7b. Communicate with the patient.
8. Establish a firm hand rest.
10. Keep the syringe out of the patient’s line of sight.
11a. Insert the needle into the mucosa.
11b. Watch and communicate with the patient.
12. Inject several drops of local anesthetic solution (optional).
13. Slowly advance the needle toward the target.
14. Deposit several drops of local anesthetic before touching the periosteum.
16a. Slowly deposit the local anesthetic solution.
16b. Communicate with the patient.
17. Slowly withdraw the syringe. Cap the needle and discard.
References
1. de St Georges, J. How dentists are judged by patients. Dent Today. 2004;23:96. [98–99].
2. Matsuura, H. Analysis of systemic complications and deaths during dental treatment in Japan. Anesth Prog. 1989;36:219–228.
3. Malamed, SF. Emergency medicine: preparation and basics of management. Dent Today. 2001;20:64. [66–67].
4. Hanna, MN, Elhassan, A, Veloso, PM, et al. Efficacy of bicarbonate in decreasing pain on intradermal injection of local anesthetics: a meta-analysis. Reg Anesth Pain Med. 2009;34:122–125.
5. Burns, CA, Ferris, G, Feng, C, et al. Decreasing the pain of local anesthesia: a prospective, double-blind comparison of buffered, premixed 1% lidocaine with epinephrine versus 1% lidocaine freshly mixed with epinephrine. J Am Acad Dermatol. 2006;54:128–131.
6. Mollen, AJ, Ficara, AJ, Provant, DR. Needles—25 gauge versus 27 gauge—can patients really tell? Gen Dent. 1981;29:417–418.
7. Flanagan, T, Wahl, MJ, Schmitt, MM, Wahl, JA. Size doesn’t matter: needle gauge and injection pain. Gen Dent. 2007;55:216–217.
8. Benko, K, Fiechtl, J, Gray-Eurom, K, et al. Fixing faces painlessly: facial anesthesia in emergency medicine. Emerg Med Pract. 2009;11:1–19.
9. Rogers, KB, Fielding, AF, Markiewicz, SW. The effect of warming local anesthetic solutions before injection. Gen Dent. 1989;37:496–499.
10. Gill, CJ, Orr, DL. A double blind crossover comparison of topical anesthetics. J Am Dent Assoc. 1979;98:213.
11. Jeske, AH, Blanton, PL. Misconceptions involving dental local anesthesia. Part 2. Pharmacology. Tex Dent J. 2002;119:310–314.
12. Catchlove, RF. The influence of CO2 and pH on local anesthetic action. J Pharm Exp Ther. 1972;181:298–309.
13. Malamed, SF, Results of a survey of 209 dentists. Handbook of local anesthesia, ed 4. . Mosby: St Louis, 1997.
14. Goldwater, PN, Law, R, Nixon, AD, et al. Impact of a recapping device on venipuncture-related needlestick injury. Infect Control Hosp Epidemiol. 1989;10:11–25.
15. McCormick, RD, Maki, DG. Epidemiology of needle-stick injuries in hospital personnel. Am J Med. 1981;70:928–932.
16. Berry, AJ, Greene, ES. The risk of needlestick injuries and needlestick-transmitted diseases in the practice of anesthesiology. Anesthesiology. 1992;77:1007–1021.
17. Cuny, E, Fredekind, RE, Budenz, AW. Dental safety needles’ effectiveness: results of a one-year evaluation. J Am Dent Assoc. 2000;131:1443–1448.