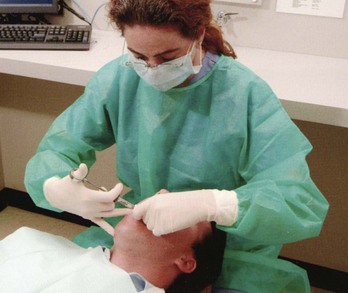
Techniques of Maxillary Anesthesia
Several general methods of obtaining pain control with local anesthetics are available. The site of deposition of the drug relative to the area of operative intervention determines the type of injection administered. Three major types of local anesthetic injection can be differentiated: local infiltration, field block, and nerve block.
 Local Infiltration
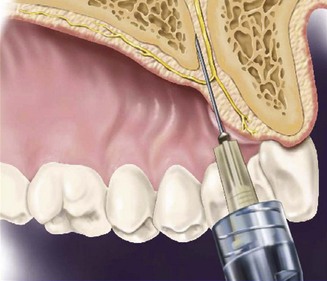
Small terminal nerve endings in the area of the dental treatment are flooded with local anesthetic solution. Incision (or treatment) is then made into the same area in which the local anesthetic has been deposited (Fig. 13-1). An example of local infiltration is the administration of a local anesthetic into an interproximal papilla before root planing. The term infiltration has been in common usage in dentistry to define an injection in which the local anesthetic solution is deposited at or above the apex of the tooth to be treated. Although technically incorrect—this technique is a field block (see following)—the common term will continue to be used for this type of injection.
Field Block
Local anesthetic is deposited near the larger terminal nerve branches so the anesthetized area will be circumscribed, preventing the passage of impulses from the tooth to the central nervous system (CNS). Incision (or treatment) is then made into an area away from the site of injection of the anesthetic (Fig. 13-2). Maxillary injections administered above the apex of the tooth to be treated are properly termed field blocks (although common usage identifies them as infiltration or supraperiosteal).
Nerve Block
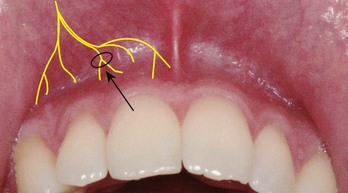
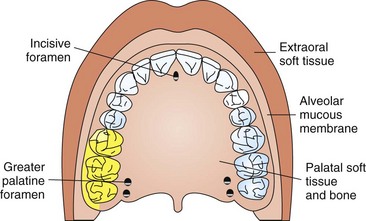
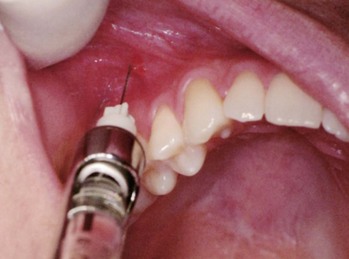
Local anesthetic is deposited close to a main nerve trunk, usually at a distance from the site of operative intervention (Fig. 13-3). Posterior superior alveolar, inferior alveolar, and nasopalatine injections are examples of maxillary nerve blocks.
Discussion
Technically, the injection commonly referred to in dentistry as a local infiltration is a field block because anesthetic solution is deposited at or above the apex of the tooth to be treated. Terminal nerve branches to pulpal and soft tissues distal to the injection site are anesthetized.
Field block and nerve block may be distinguished by the extent of anesthesia achieved. In general, field blocks are more circumscribed, involving tissues in and around one or two teeth, whereas nerve blocks affect a larger area (e.g., that observed after inferior alveolar or anterior superior alveolar nerve block).
The type of injection administered for a given treatment is determined by the extent of the operative area. For management of small, localized areas, as in providing hemostasis for soft tissue procedures, infiltration anesthesia may suffice. When two or three teeth are being restored, field block is indicated, whereas for pain control in quadrant dentistry, regional block anesthesia is recommended.
Maxillary Injection Techniques
Numerous injection techniques are available to provide clinically adequate anesthesia of the teeth and soft and hard tissues in the maxilla. Selection of the specific technique to be used is determined, in large part, by the nature of the treatment to be provided. The following techniques are available:
1. Supraperiosteal (infiltration), recommended for limited treatment protocols
2. Periodontal ligament (PDL, intraligamentary) injection, recommended as an adjunct to other techniques or for limited treatment protocols
3. Intraseptal injection, recommended primarily for periodontal surgical techniques
4. Intracrestal injection, recommended for single teeth (primarily mandibular molars) when other techniques have failed
5. Intraosseous (IO) injection, recommended for single teeth (primarily mandibular molars) when other techniques have failed
6. Posterior superior alveolar (PSA) nerve block, recommended for management of several molar teeth in one quadrant
7. Middle superior alveolar (MSA) nerve block, recommended for management of premolars in one quadrant
8. Anterior superior alveolar (ASA) nerve block, recommended for management of anterior teeth in one quadrant
9. Maxillary (V2, second division) nerve block, recommended for extensive buccal, palatal, and pulpal management in one quadrant
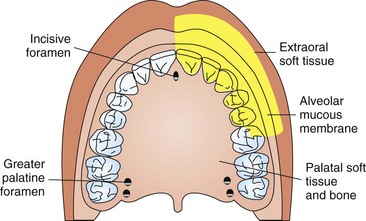
10. Greater (anterior) palatine nerve block, recommended for palatal soft and osseous tissue treatment distal to the canine in one quadrant
11. Nasopalatine nerve block, recommended for palatal soft and osseous tissue management from canine to canine bilaterally
12. Anterior middle superior alveolar (AMSA) nerve block, recommended for extensive management of anterior teeth, palatal and buccal soft and hard tissues
13. Palatal approach-anterior superior alveolar (P-ASA) nerve block, recommended for treatment of maxillary anterior teeth and their palatal and facial soft and hard tissues
Supraperiosteal, periodontal ligament, intraseptal, and intraosseous injections are appropriate for administration in the maxilla or the mandible. Because of the great success of supraperiosteal injection in the maxilla, it is discussed in this chapter. Periodontal ligament, intraseptal, intracrestal, and intraosseous injections, supplemental injections of considerably greater importance in the mandible, are described in Chapter 15.
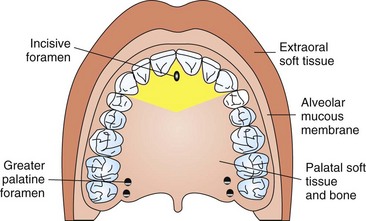
Teeth And Buccal Soft And Hard Tissues
The supraperiosteal injection, more commonly (but incorrectly) called local infiltration, is the most frequently used technique for obtaining pulpal anesthesia in maxillary teeth. Although it is a simple procedure with a high success rate, there are several valid reasons for using other techniques (e.g., regional nerve blocks) whenever more than two or three teeth are involved in treatment.
Multiple supraperiosteal injections necessitate multiple needle penetrations, each with the potential to produce pain, either during the procedure or after the anesthetic effect has resolved, or damage, either permanent or transient, to the involved tissues (blood vessels, nerves). In addition, and perhaps even more important, using supraperiosteal injections for pulpal anesthesia on multiple teeth leads to the administration of a larger volume of local anesthetic, with an attendant increase (although usually minor in adults) in the risk of systemic and local complications.
The supraperiosteal injection is indicated whenever dental procedures are confined to a relatively circumscribed area in the maxillary or mandibular incisor region.
Areas Anesthetized
The entire region innervated by the large terminal branches of this plexus: pulp and root area of the tooth, buccal periosteum, connective tissue, and mucous membrane (Fig. 13-4).

Contraindications
1. Infection or acute inflammation in the area of injection.
2. Dense bone covering the apices of teeth (can be determined only by trial and error; most likely over the permanent maxillary first molar in children, as its apex may be located beneath the zygomatic bone, which is relatively dense). The apex of an adult’s central incisor may also be located beneath denser bone (e.g., of the nose), thereby increasing the failure rate (although not significantly).
Disadvantages
Not recommended for large areas because of the need for multiple needle insertions and the necessity to administer larger total volumes of local anesthetic.
Technique
1. A 27-gauge short needle is recommended.
2. Area of insertion: height of the mucobuccal fold above the apex of the tooth being anesthetized
3. Target area: apical region of the tooth to be anesthetized
5. Orientation of the bevel*: toward bone
a. Prepare tissue at the injection site.
b. Orient needle so bevel faces bone.
c. Lift the lip, pulling the tissue taut.
d. Hold the syringe parallel with the long axis of the tooth (Fig. 13-5).
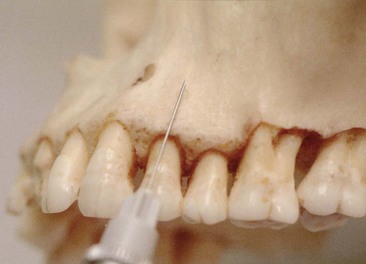
Figure 13-5 The syringe should be held parallel to the long axis of the tooth and inserted at the height of the mucobuccal fold over the tooth.
e. Insert the needle into the height of the mucobuccal fold over the target tooth.
f. Advance the needle until its bevel is at or above the apical region of the tooth (Table 13-1). In most instances, the depth of penetration is only a few millimeters. Because the needle is in soft tissue (not touching bone), there should be no resistance to its advancement, nor should there be any patient discomfort with this injection.
(1) If negative, deposit approximately 0.6 mL (one third of a cartridge) slowly over 20 seconds. (Do not allow the tissues to balloon.)
h. Slowly withdraw the syringe.
j. Wait 3 to 5 minutes before commencing the dental procedure.
Precautions
Supraperiosteal injection is not recommended for larger areas of treatment. The greater number of tissue penetrations increases the possibility of pain both during and after the injection, and the larger volume of solution administered increases the possibility of local anesthetic overdose (in lighter-weight patients) and postinjection pain. Additionally, needle puncture of tissue can lead to permanent or transient damage to structures in the area, such as blood vessels (hematoma) and nerves (paresthesia).
Failures of Anesthesia
1. Needle tip lies below the apex (along the root) of the tooth (see Table 13-1). Depositing anesthetic solution below the apex of a maxillary tooth results in excellent soft tissue anesthesia but poor or absent pulpal anesthesia.
2. Needle tip lies too far from the bone (solution deposited in buccal soft tissues). To correct: Redirect the needle closer to the periosteum.
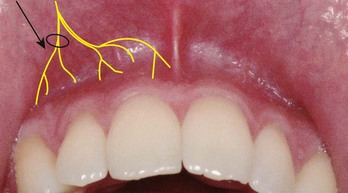
Posterior Superior Alveolar Nerve Block
The posterior superior alveolar (PSA) nerve block is a commonly used dental nerve block. Although it is a highly successful technique (>95%), several issues should be weighed when its use is considered. These include the extent of anesthesia produced and the potential for hematoma formation.
When used to achieve pulpal anesthesia, the PSA nerve block is effective for the maxillary third, second, and first molars (in 77% to 100% of patients).1 However, the mesiobuccal root of the maxillary first molar is not consistently innervated by the PSA nerve. In a dissection study by Loetscher and associates,1 the middle superior alveolar nerve provided sensory innervation to the mesiobuccal root of the maxillary first molar in 28% of specimens examined. Therefore a second injection, usually supraperiosteal, is indicated after the PSA nerve block when effective anesthesia of the first molar does not develop. Loetscher and associates1 concluded by stating that the PSA nerve usually provides sole pulpal innervation to the maxillary first molar, and that a single PSA nerve block usually provides clinically adequate pulpal anesthesia.
The risk of a potential complication must be considered whenever the PSA block is used. Insertion of the needle too far distally may lead to a temporarily (10 to 14 days) unesthetic hematoma. When the PSA is to be administered, one must always consider the patient’s skull size in determining the depth of soft tissue penetration. An “average” depth of penetration in a patient with a smaller than average-sized skull may produce a hematoma, whereas a needle inserted “just right” in a larger-skulled patient might not provide anesthesia to any teeth. As a means of decreasing the risk of hematoma formation after a PSA nerve block, use of a “short” dental needle is recommended for all but the largest of patients. Because the average depth of soft tissue penetration from the insertion site (the mucobuccal fold over the maxillary second molar) to the area of the PSA nerves is 16 mm, the short dental needle (≈20 mm) can be successfully and safely used. Overinsertion of the needle is less likely to occur, thereby minimizing the risk of hematoma. A 27-gauge short needle is recommended as long as aspiration is performed carefully and the local anesthetic is injected slowly. One must remember to aspirate several times before and during drug deposition during PSA nerve block to avoid inadvertent intravascular injection.
Areas Anesthetized
1. Pulps of the maxillary third, second, and first molars (entire tooth = 72%; mesiobuccal root of the maxillary first molar not anesthetized = 28%)
2. Buccal periodontium and bone overlying these teeth (Fig. 13-6)
Contraindication
When the risk of hemorrhage is too great (as with a hemophiliac), in which case a supraperiosteal or PDL injection is recommended.
Advantages
1. Atraumatic; when administered properly, no pain is experienced by the patient receiving the PSA because of the relatively large area of soft tissue into which the local anesthetic is deposited and the fact that bone is not contacted
3. Minimum number of necessary injections
4. Minimizes the total volume of local anesthetic solution administered
Technique
1. A 27-gauge short needle recommended
2. Area of insertion: height of the mucobuccal fold above the maxillary second molar
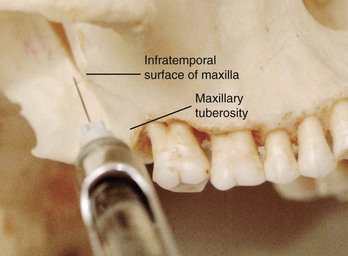
3. Target area: PSA nerve—posterior, superior, and medial to the posterior border of the maxilla (Fig. 13-7)
5. Orientation of the bevel: toward bone during the injection. If bone is accidentally touched, the sensation is less unpleasant.
a. Assume the correct position (Fig. 13-8).
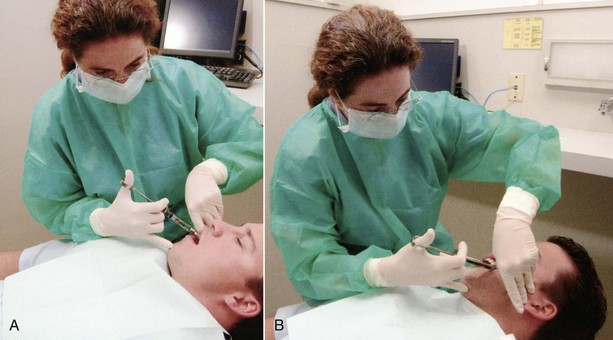
Figure 13-8 Position of the administrator for (A) right and (B) left posterior superior alveolar (PSA) nerve block.
(1) For a left PSA nerve block, a right-handed administrator should sit at the 10 o’clock position facing the patient.
(2) For a right PSA block, a right-handed administrator should sit at the 8 o’clock position facing the patient.
b. Prepare the tissues at the height of the mucobuccal fold for penetration.
c. Orient the bevel of the needle toward bone.
d. Partially open the patient’s mouth, pulling the mandible to the side of injection.
e. Retract the patient’s cheek with your finger (for visibility).
f. Pull the tissues at the injection site taut.
g. Insert the needle into the height of the mucobuccal fold over the second molar (Fig. 13-9).

Figure 13-9 Posterior superior alveolar (PSA) nerve block. Tissue retracted at the site of penetration. Note the orientation of the needle: inward, upward, backward.
h. Advance the needle slowly in an upward, inward, and backward direction (Fig. 13-10) in one movement (not three).
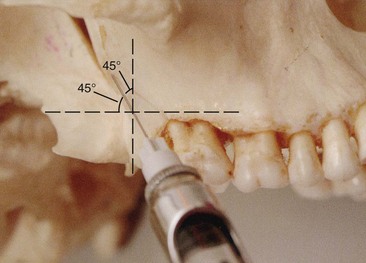
(1) Upward: superiorly at a 45-degree angle to the occlusal plane
(2) Inward: medially toward the midline at a 45-degree angle to the occlusal plane (Fig. 13-11)
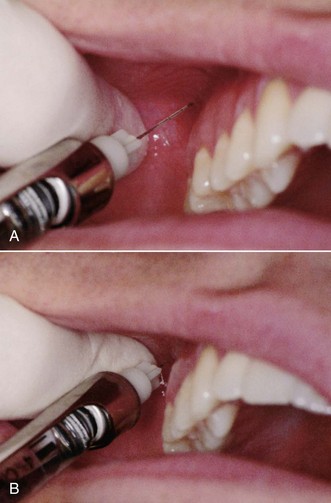
Figure 13-11 A, With a “long” dental needle (>32 mm in length) in an average-sized adult, the depth of penetration is half its length. Use of “long” needle on posterior superior alveolar (PSA) nerve block increases risks of overinsertion and hematoma. B, PSA nerve block using a “short” dental needle (≈20 mm in length). Overinsertion is less likely.
(3) Backward: posteriorly at a 45-degree angle to the long axis of the second molar
i. Slowly advance the needle through soft tissue.
(1) There should be no resistance and therefore no discomfort to the patient.
(2) If resistance (bone) is felt, the angle of the needle in toward the midline is too great.
j. Advance the needle to the desired depth (see Fig. 13-11).
(1) In an adult of normal size, penetration to a depth of 16 mm places the needle tip in the immediate vicinity of the foramina through which the PSA nerves enter the posterior surface of the maxilla. When a long needle is used (average length, 32 mm), it is inserted half its length into the tissue. With a short needle (average length, 20 mm), approximately 4 mm should remain visible.
(2) For smaller adults and children, it is prudent to halt the advance of the needle short of its usual depth of penetration to avoid a possible hematoma caused by overpenetration. Penetrating to a depth of 10 to 14 mm places the needle tip in the target area in most smaller-skulled patients.
Note: The goal is to deposit local anesthetic close to the PSA nerves, located posterosuperior and medial to the maxillary tuberosity.
l. If both aspirations are negative:
(1) Slowly, over 30 to 60 seconds, deposit 0.9 to 1.8 mL of anesthetic solution.
(2) Aspirate several additional times (in one plane) during drug administration.
(3) The PSA injection is normally atraumatic because of the large tissue space available to accommodate the anesthetic solution and the fact that bone is not touched.
m. Slowly withdraw the syringe.
o. Wait minimally 3 to 5 minutes before commencing the dental procedure.
Precaution
The depth of needle penetration should be checked: overinsertion (too deep) increases the risk of hematoma; too shallow might still provide adequate anesthesia.
Complications
a. This is commonly produced by inserting the needle too far posteriorly into the pterygoid plexus of veins. In addition, the maxillary artery may be perforated. Use of a short needle minimizes the risk of pterygoid plexus puncture.
b. A visible intraoral hematoma develops within several minutes, usually noted in the buccal tissues of the mandibular region (see Chapter 17).
a. The mandibular division of the fifth cranial nerve (V3) is located lateral to the PSA nerves. Deposition of local anesthetic lateral to the desired location may produce varying degrees of mandibular anesthesia. Most often, when this occurs, patients mention that their tongue and perhaps their lower lip are anesthetized.
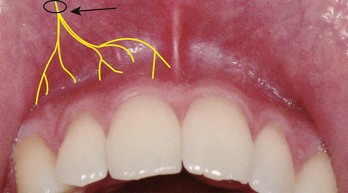
Middle Superior Alveolar Nerve Block
The middle superior alveolar (MSA) nerve is present in only about 28% of the population, thereby limiting the clinical usefulness of this block. However, when the ASA nerve block fails to provide pulpal anesthesia distal to the maxillary canine, the MSA block is indicated for procedures on premolars and on the mesiobuccal root of the maxillary first molar. The success rate of the MSA nerve block is high.
Areas Anesthetized
1. Pulps of the maxillary first and second premolars, mesiobuccal root of the first molar
2. Buccal periodontal tissues and bone over these same teeth (Fig. 13-12)
Contraindications
1. Infection or inflammation in the area of injection or needle insertion or drug deposition
2. Where the MSA nerve is absent, innervation is through the anterior superior alveolar (ASA) nerve; branches of the ASA innervating the premolars and the mesiobuccal root of the first molar can be anesthetized by means of the MSA technique.
Technique
1. A 27-gauge short or long needle is recommended.
2. Area of insertion: height of the mucobuccal fold above the maxillary second premolar
3. Target area: maxillary bone above the apex of the maxillary second premolar (Fig. 13-13)
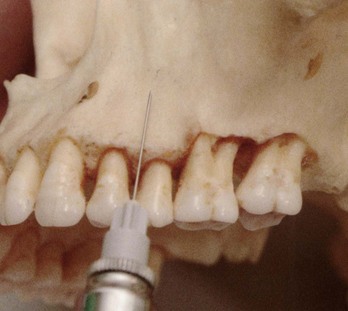
Figure 13-13 Position of needle between maxillary premolars for a middle superior alveolar (MSA) nerve block.
4. Landmark: mucobuccal fold above the maxillary second premolar
5. Orientation of the bevel: toward bone
a. Assume the correct position (Fig. 13-14).

Figure 13-14 Position of the administrator for a (A) right and (B) left middle superior alveolar (MSA) nerve block.
(1) For a right MSA nerve block, a right-handed administrator should face the patient from the 10 o’clock position.
(2) For a left MSA nerve block, a right-handed administrator should face the patient directly from the 8 or 9 o’clock position.
b. Prepare the tissues at the site of injection.
c. Stretch the patient’s upper lip to make the tissues taut and to gain visibility.
d. Insert the needle into the height of the mucobuccal fold above the second premolar with the bevel directed toward bone.
e. Penetrate the mucous membrane and slowly advance the needle until its tip is located well above the apex of the second premolar (Fig. 13-15).
g. Slowly deposit 0.9 to 1.2 mL (one half to two thirds cartridge) of solution (approximately 30 to 40 seconds).
h. Withdraw the syringe and make the needle safe.
i. Wait a minimum of 3 to 5 minutes before commencing dental therapy.
Precautions
To prevent pain, do not insert too close to the periosteum and do not inject too rapidly; the MSA should be an atraumatic injection.
Failures of Anesthesia
1. Anesthetic solution not deposited high above the apex of the second premolar
2. Deposition of solution too far from the maxillary bone with the needle placed in tissues lateral to the height of the mucobuccal fold
3. Bone of the zygomatic arch at the site of injection preventing the diffusion of anesthetic
Anterior Superior Alveolar Nerve Block (Infraorbital Nerve Block)
The ASA nerve block does not enjoy the popularity of the PSA block, primarily because there is a general lack of experience with this highly successful and extremely safe technique. It provides profound pulpal and buccal soft tissue anesthesia from the maxillary central incisor through the premolars in about 72% of patients.
Used in place of supraperiosteal injection, the ASA nerve block necessitates a smaller volume of local anesthetic solution to achieve equivalent anesthesia: 0.9 to 1.2 mL versus 3.0 mL for supraperiosteal injections of the same teeth.
Generally speaking, the major factor inhibiting dentists from using the ASA nerve block is fear of injury to the patient’s eye. Fortunately this fear is unfounded. Adherence to the following protocol produces a high success rate devoid of complications and adverse side effects.
Other Common Name
Infraorbital nerve block (technically, the infraorbital nerve provides anesthesia to the soft tissues of the anterior portion of the face, not to the teeth or intraoral soft and hard tissues; therefore it is inaccurate to call the ASA nerve block the infraorbital nerve block).
Areas Anesthetized
1. Pulps of the maxillary central incisor through the canine on the injected side
2. In about 72% of patients, pulps of the maxillary premolars and mesiobuccal root of the first molar
3. Buccal (labial) periodontium and bone of these same teeth
4. Lower eyelid, lateral aspect of the nose, upper lip (Fig. 13-16)
Indications
1. Dental procedures involving more than two maxillary teeth and their overlying buccal tissues
2. Inflammation or infection (which contraindicates supraperiosteal injection): If a cellulitis is present, the maxillary nerve block may be indicated in lieu of the ASA nerve block.
3. When supraperiosteal injections have been ineffective because of dense cortical bone
Disadvantages
Technique
1. A 25- or 27-gauge long needle is recommended, although the 27-gauge short also may be used, especially for children and smaller adults.
2. Area of insertion: height of the mucobuccal fold directly over the first premolar
Note: The needle may be inserted into the height of the mucobuccal fold over any tooth from the second premolar anteriorly to the central incisor. The ensuing path of penetration is toward the target area, the infraorbital foramen. The first premolar usually provides the shortest route to this target area.
3. Target area: infraorbital foramen (below the infraorbital notch).
5. Orientation of the bevel: toward bone
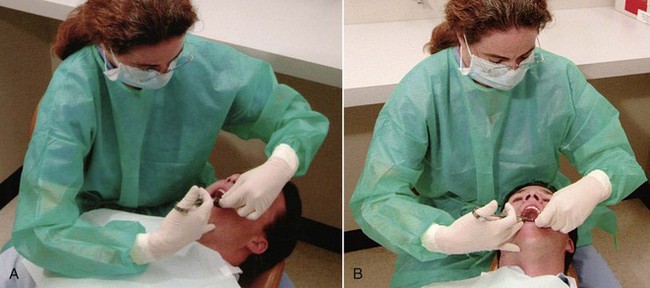
a. Assume the correct position (Fig. 13-17). For a right or left infraorbital nerve block, a right-handed administrator should sit at the 10 o’clock position, directly facing the patient or facing in the same direction as the patient.
Figure 13-17 Position of the administrator for a right or left anterior superior alveolar (ASA) nerve block. The patient’s head should be turned slightly to improve visibility.
b. Position the patient supine (much preferred) or semisupine with the neck extended slightly. If the patient’s neck is not extended, the patient’s chest may interfere with the syringe barrel.
c. Prepare the tissues at the injection site (height of the mucobuccal fold) for penetration.
d. Locate the infraorbital foramen (Fig. 13-18).
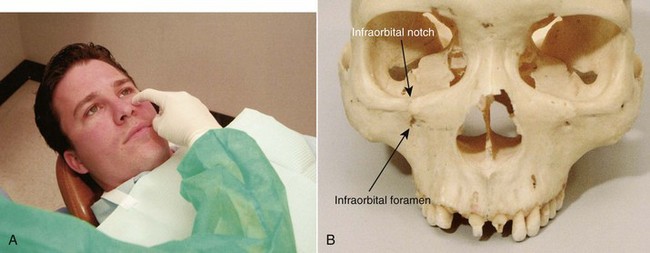
Figure 13-18 A, Palpate the infraorbital notch. B, Location of the infraorbital foramen in relation to the infraorbital notch.
(1) Feel the infraorbital notch.
(2) Move your finger downward from the notch, applying gentle pressure to the tissues.
(3) The bone immediately inferior to the notch is convex (felt as an outward bulge). This represents the lower border of the orbit and the roof of the infraorbital foramen (Fig. 13-18, B).
(4) As your finger continues inferiorly, a concavity is felt; this is the infraorbital foramen.
(5) While applying pressure, feel the outlines of the infraorbital foramen at this site. The patient senses a mild soreness when the foramen is palpated as the infraorbital nerve is pressed against bone.
e. Maintain your finger on the foramen or mark the skin at the site (Fig. 13-19).
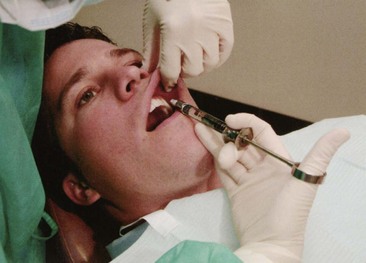
Figure 13-19 Using a finger over the foramen, lift the lip, and hold the tissues in the mucobuccal fold taut.
f. Retract the lip, pulling the tissues in the mucobuccal fold taut and increasing visibility. A 2 × 2-inch sterile gauze placed beneath your gloved finger aids in retraction of the lip during the ASA injection.
g. Insert the needle into the height of the mucobuccal fold over the first premolar with the bevel facing bone (Fig. 13-20).
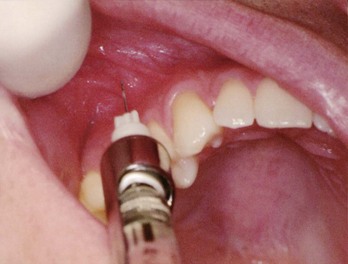
Figure 13-20 Insert the needle for anterior superior alveolar (ASA) nerve block in the mucobuccal fold over the maxillary first premolar.
h. Orient the syringe toward the infraorbital foramen.
i. The needle should be held parallel with the long axis of the tooth as it is advanced, to avoid premature contact with bone (Fig. 13-21).
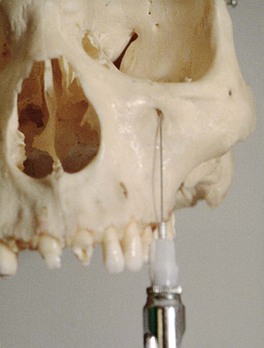
Figure 13-21 Advance the needle parallel to the long axis of the tooth to preclude prematurely contacting bone. Note how the bone of the maxilla becomes concave between the root eminence and the infraorbital foramen (note shadow).
j. Advance the needle slowly until bone is gently contacted.
(1) The point of contact should be the upper rim of the infraorbital foramen.
(2) The general depth of needle penetration is 16 mm for an adult of average height (equivalent to about half the length of a long needle).
(3) The depth of penetration varies, of course. In a patient with a high (deep) mucobuccal fold or a low infraorbital foramen, less tissue penetration is necessary than in one with a shallow mucobuccal fold or a high infraorbital foramen.
(4) A preinjection approximation of the depth of penetration can be made by placing one finger on the infraorbital foramen and another on the injection site in the mucobuccal fold and estimating the distance between them.
k. Before injecting the anesthetic solution, check for the following:
(1) Depth of needle penetration (adequate to reach the foramen)
(2) Any lateral deviation of the needle from the infraorbital foramen; correct before injecting solution
l. Position the needle tip during injection with the bevel facing into the infraorbital foramen and the needle tip touching the roof of the foramen (Fig. 13-22).
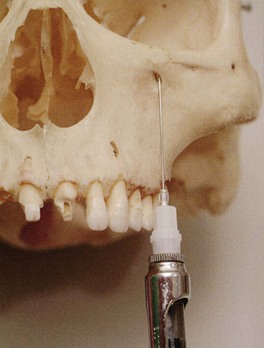
Figure 13-22 Position of the needle tip before deposition of local anesthetic at the infraorbital foramen.
n. Slowly deposit 0.9 to 1.2 mL (over 30 to 40 seconds). Little or no swelling should be visible as the solution is deposited. If the needle tip is properly inserted at the opening of the foramen, solution is directed toward the foramen.
(1) The administrator is able to “feel” the anesthetic solution as it is deposited beneath the finger on the foramen if the needle tip is in the correct position. At the conclusion of the injection, the foramen should no longer be palpable (because of the volume of anesthetic in this position).
At this point, the infraorbital nerve block (providing anesthesia to the soft tissues on the anterior portion of the face and the lateral aspect of the nose) is complete. To transform it into the anterior superior alveolar nerve block (providing anesthesia to the teeth and their supporting structures), do the following:
o. Maintain firm pressure with your finger over the injection site both during and for at least 1 minute after the injection (to increase the diffusion of local anesthetic solution into the infraorbital foramen).
p. Withdraw the syringe slowly and immediately make the needle safe.
q. Maintain direct finger pressure over the injection site for a minimum of 1 minute, preferably 2 minutes, after injection.
r. Wait a minimum of 3 to 5 minutes after completion of the injection before commencing the dental procedure.
Signs and Symptoms
1. Subjective: Tingling and numbness of the lower eyelid, side of the nose, and upper lip indicate anesthesia of the infraorbital nerve, not the ASA or MSA nerve (soft tissue anesthesia develops almost instantly as the anesthetic is being administered).
2. Subjective and objective: numbness in the teeth and soft tissues along the distribution of the ASA and MSA nerves (developing within 3 to 5 minutes if pressure is maintained over the injection site)
3. Objective: use of electrical pulp testing with no response from tooth with maximal EPT output (80/80)
Safety Features
1. Needle contact with bone at the roof of the infraorbital foramen prevents inadvertent overinsertion and possible puncture of the orbit.
2. A finger positioned over the infraorbital foramen helps direct the needle toward the foramen.
a. The needle should not be palpable. If it is felt, then its path is too superficial (away from the bone). If this occurs, withdraw the needle slightly and redirect it toward the target area.
b. In most patients, it is not possible to palpate the needle through soft tissues over the foramen unless it is too superficial. However, in some patients with less well-developed facial musculature, a properly positioned needle may be palpable.
Precautions
1. For pain on insertion of the needle and tearing of the periosteum, reinsert the needle in a more lateral (away from bone) position, or deposit solution as the needle advances through soft tissue.
2. To prevent overinsertion of the needle, estimate the depth of penetration before injection (review procedure), and exert finger pressure over the infraorbital foramen.
Failures of Anesthesia
1. Needle contacting bone below (inferior to) the infraorbital foramen: Anesthesia of the lower eyelid, lateral side of the nose, and upper lip may develop with little or no dental anesthesia; a bolus of solution may be felt beneath the skin in the area of deposition, which lies at a distance from the infraorbital foramen (which is still palpable after the local anesthetic solution has been injected). These are, by far, the most common causes of anesthetic failure within the distribution of the ASA nerve. In essence, a failed ASA is a supraperiosteal injection over the first premolar. To correct:
a. Keep the needle in line with the infraorbital foramen during penetration. Do not direct the needle toward bone.
2. Needle deviation medial or lateral to the infraorbital foramen. To correct:
Complications
Hematoma (rare) may develop across the lower eyelid and the tissues between it and the infraorbital foramen. To manage, apply pressure on the soft tissue over the foramen for 2 to 3 minutes. Hematoma is extremely rare because pressure is routinely applied to the injection site both during and after administration of the ASA nerve block.
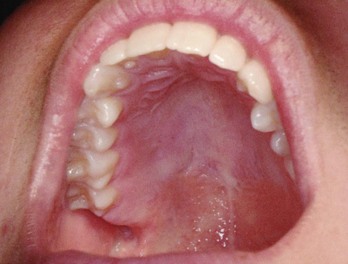
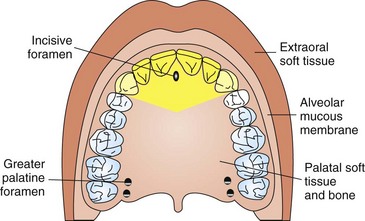
Palatal Anesthesia
Anesthesia of the hard palate is necessary for dental procedures involving manipulation of palatal soft or hard tissues. For many dental patients, palatal injections prove to be a very traumatic experience. For many dentists, administration of palatal anesthesia is one of the most traumatic procedures they perform in dentistry.2 Indeed, many dentists and dental hygienists advise their patients that they expect them to feel pain (dental professionals usually use the term discomfort rather than pain when describing painful procedures) during palatal injections! Forewarning the patient about procedural pain permits the patient to become more prepared psychologically (“psych themselves up”) and relieves the administrator of responsibility when the pain occurs. When the patient acknowledges the existence of pain, the administrator can console the patient with a shrug of the shoulders and a kind word, once again confirming to both the patient and the administrator that palatal injections always hurt.
However, palatal anesthesia can be achieved atraumatically. At best, patients are unaware of the needle penetration of soft tissues and deposition of the local anesthetic solution (they won’t even feel it). At worst, when the following techniques are adhered to, patients state that although they still were somewhat uncomfortable, this palatal injection was the least painful they had ever received.
With the introduction of computer-controlled local anesthetic delivery (C-CLAD) systems (The Wand, Comfort Control Syringe, and STA [see Chapter 5]), delivery of atraumatic palatal injections has become even more simplified.3-5
The steps in the atraumatic administration of palatal anesthesia are as follows:
1. Provide adequate topical anesthesia at the site of needle penetration.
2. Use pressure anesthesia at the site both before and during needle insertion and the deposition of solution.
3. Maintain control over the needle.
4. Deposit the anesthetic solution slowly.
5. Trust yourself…that you can complete the procedure atraumatically.
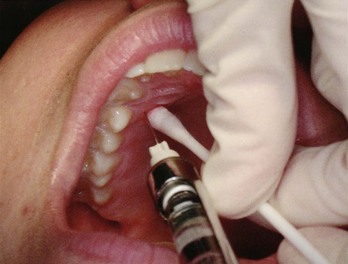
Adequate topical anesthesia at the injection site can be provided by allowing topical anesthetic to remain in contact with the soft tissues for at least 2 minutes. The palate is the one area in the mouth where the cotton swab must be held in position by the administrator the entire time.
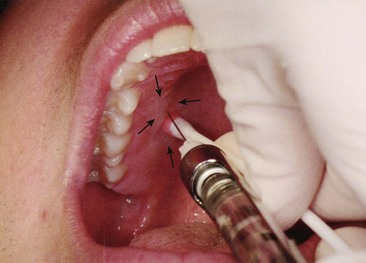
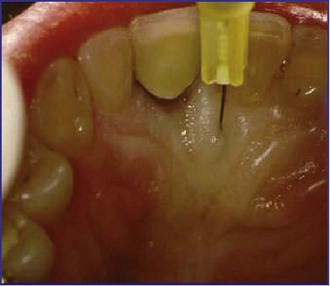
Pressure anesthesia can be produced at the site of injection by applying considerable pressure to tissues adjacent to the injection site with a firm object, such as the cotton applicator stick previously used to apply the topical anesthetic. Other objects, such as the handle of a mouth mirror, are used by some, but because these objects are metal or plastic, they are more likely to hurt the patient. The goal is to produce anesthesia of the soft tissues through use of the gate control theory of pain.6 The applicator stick should be pressed firmly enough to produce ischemia (blanching) of the normally pink tissues at the penetration site and a feeling of intense pressure (dull and tolerable, not sharp and painful) (Fig. 13-23). Pressure anesthesia should be maintained during penetration of the soft tissues with the needle and must be maintained throughout the time the needle remains in the palatal soft tissues.
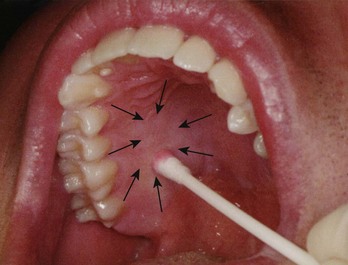
Figure 13-23 Note ischemia (arrows) of palatal tissues produced by pressure from the applicator stick.
Control over the needle is probably of greater importance in palatal anesthesia than in other intraoral injections. To achieve this control, the administrator must secure a firm hand rest. Several positions are illustrated in Chapter 11. When palatal anesthesia is administered, it is possible on occasion to stabilize the needle with both hands (Fig. 13-24). Perfection of this technique is attained only with experience.
Figure 13-24 Stabilization of the needle for (A) greater palatine and (B) nasopalatine nerve block. With both injections, the barrel of the syringe should rest against the patient’s lower lip.
The 27-gauge short needle is recommended for palatal injection techniques because patients are unable to distinguish the “feel” between a 27- and a 30-gauge needle.7
Slow deposition of the local anesthetic is important in all injection techniques, not only as a safety feature but also as a means of providing an atraumatic injection. Because of the density of the palatal soft tissues and their firm adherence to underlying bone, slow deposition is of even greater importance here. Rapid injection of the solution produces high tissue pressure, which tears the palatal soft tissues and leads to both pain on injection and localized soreness when the anesthetic actions are terminated. Slow injection of the local anesthetic is not uncomfortable for the patient.
Probably the most important factor in providing an atraumatic palatal injection is the belief by the administrator that it can be done painlessly; from this belief, special care is then taken to minimize discomfort to the patient; this generally results in a more atraumatic palatal injection.
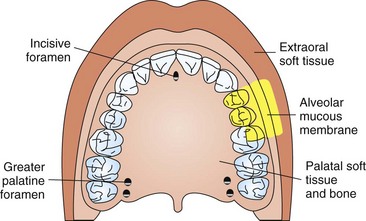
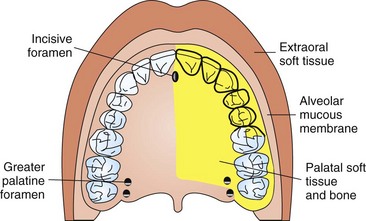
Five palatal injections are described. Three—the anterior (or greater) palatine nerve block, providing anesthesia of the posterior portions of the hard palate; the nasopalatine nerve block, producing anesthesia of the anterior hard palate; and local infiltration of the hard palate—are used primarily to achieve soft tissue anesthesia and hemostasis before surgical procedures. None provides any pulpal anesthesia to the maxillary teeth. AMSA and P-ASA are recently introduced techniques that provide extensive areas of pulpal and palatal anesthesia.5,8
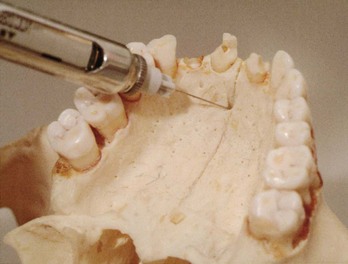
Greater Palatine Nerve Block
The greater palatine nerve block is useful for dental procedures involving the palatal soft tissues distal to the canine. Minimum volumes of solution (0.45 to 0.6 mL) provide profound hard and soft tissue anesthesia. Although potentially traumatic, the greater palatine nerve block is less so than the nasopalatine nerve block because tissues surrounding the greater palatine foramen are not as firmly adherent to bone and therefore are better able to accommodate the volume of solution deposited.
Areas Anesthetized
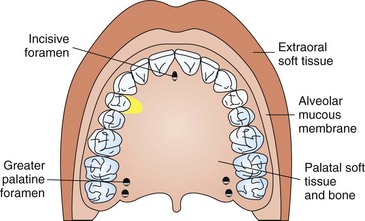
The posterior portion of the hard palate and its overlying soft tissues, anteriorly as far as the first premolar and medially to the midline (Fig. 13-25).

Technique
1. A 27-gauge short needle is recommended.
2. Area of insertion: soft tissue slightly anterior to the greater palatine foramen
3. Target area: greater (anterior) palatine nerve as it passes anteriorly between soft tissues and bone of the hard palate (Fig. 13-26)
4. Landmarks: greater palatine foramen and junction of the maxillary alveolar process and palatine bone
5. Path of insertion: advance the syringe from the opposite side of the mouth at a right angle to the target area
6. Orientation of the bevel: toward the palatal soft tissues (See steps g and h, p. 204.)
a. Assume the correct position (Fig. 13-27).
(1) For a right greater palatine nerve block, a right-handed administrator should sit facing the patient at the 7 or 8 o’clock position.
(2) For a left greater palatine nerve block, a right-handed administrator should sit facing in the same direction as the patient at the 11 o’clock position.
b. Ask the patient, who is in a supine position (Fig. 13-28, A), to do the following:

Figure 13-28 A, Patient position for a greater palatine nerve block. B, Administrator’s view of hard palate when patient is properly positioned.
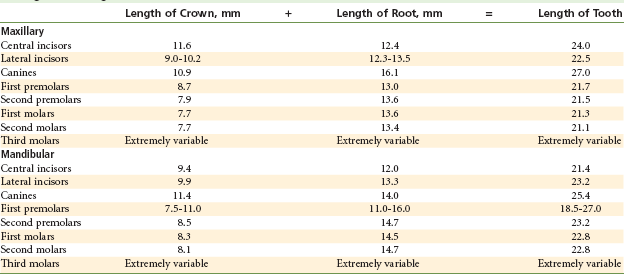
c. Locate the greater palatine foramen (Fig. 13-28, B, and Table 13-2).
TABLE 13-2
Location of the Greater Palatine Foramen*
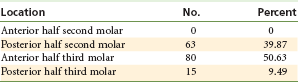
*Measurements from 158 skulls with the maxillary second and third molars present.
From Malamed SF, Trieger N: Intraoral maxillary nerve block: an anatomical and clinical study, Anesth Prog 30:44–48, 1983.
(1) Place a cotton swab at the junction of the maxillary alveolar process and the hard palate.
(2) Start in the region of the maxillary first molar and palpate posteriorly by pressing firmly into the tissues with the swab.
(3) The swab “falls” into the depression created by the greater palatine foramen (Fig. 13-29).
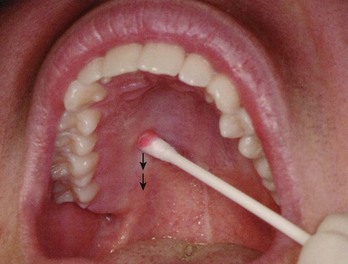
Figure 13-29 A cotton swab is pressed against the hard palate at the junction of the maxillary alveolar process and palatal bone. The swab is slowly moved distally (arrows) until a depression in the tissue is felt. This is the greater (anterior) palatine foramen.
(4) The foramen is most frequently located distal to the maxillary second molar, but it may be located anterior or posterior to its usual position. (See “Maxillary Nerve Block,” p. 220.)
d. Prepare the tissue at the injection site, just 1 to 2 mm anterior to the greater palatine foramen.
e. After 2 minutes of topical anesthetic application, move the swab posteriorly so it is directly over the greater palatine foramen.
(1) Apply considerable pressure at the area of the foramen with the swab in the left hand (if right-handed).
(2) Note the ischemia (whitening of the soft tissues) at the injection site.
(3) Apply pressure for a minimum of 30 seconds, and while doing this proceed to the following steps.
f. Direct the syringe into the mouth from the opposite side with the needle approaching the injection site at a right angle (Fig. 13-30).
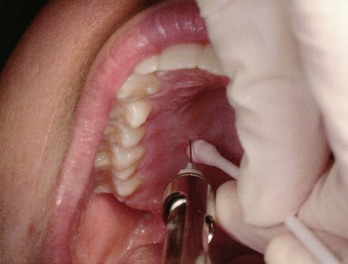
Figure 13-30 Note the angle of needle entry into the mouth. The insertion is into ischemic tissues slightly anterior to the applicator stick. The barrel of the syringe is stabilized by the corner of the mouth and the teeth.
g. Place the bevel (not the point) of the needle gently against the previously blanched (ischemic) soft tissue at the injection site. It must be well stabilized to prevent accidental penetration of the tissues.
h. With the bevel lying against the tissue:
(1) Apply enough pressure to bow the needle slightly.
(2) Deposit a small volume of anesthetic. The solution is forced against the mucous membrane, and a droplet forms (Fig. 13-31).
i. Straighten the needle and permit the bevel to penetrate mucosa.
(1) Continue to deposit small volumes of anesthetic throughout the procedure.
(2) Ischemia spreads into adjacent tissues as the anesthetic (usually with a vasoconstrictor) is deposited (Figs. 13-32 and 13-33).
j. Continue to apply pressure anesthesia throughout the deposition of the anesthetic solution (see Fig. 13-32). Ischemia spreads as the vasoconstrictor decreases tissue perfusion.
k. Slowly advance the needle until palatine bone is gently contacted.
(1) The depth of penetration is usually about 5 mm.
(2) Continue to deposit small volumes of anesthetic. As the tissue is entered, a slight increase in resistance to the deposition of solution may be noted; this is entirely normal in the greater palatine nerve block.
m. If negative, slowly deposit (30 second minimum) not more than one fourth to one third of a cartridge (0.45 to 0.6 mL).
Precautions
Do not enter the greater palatine canal. Although this is not hazardous, there is no reason to enter the canal for this technique to be successful.
Failures of Anesthesia
1. The greater palatine nerve block is not a technically difficult injection to administer. The incidence of success is well above 95%.
2. If local anesthetic is deposited too far anterior to the foramen, adequate soft tissue anesthesia may not occur in the palatal tissues posterior to the site of injection (partial success).
3. Anesthesia on the palate in the area of the maxillary first premolar may prove inadequate because of overlapping fibers from the nasopalatine nerve (partial success).
Complications
2. Ischemia and necrosis of soft tissues when highly concentrated vasoconstricting solution used for hemostasis over a prolonged period
a. Norepinephrine should never be used for hemostasis on the palatal soft tissues (norepinephrine is not available in dental local anesthetics in the United States or Canada).
3. Hematoma is possible but rare because of the density and firm adherence of palatal tissues to underlying bone.
4. Some patients may be uncomfortable if their soft palate becomes anesthetized; this is a distinct possibility when the middle palatine nerve exits near the injection site.
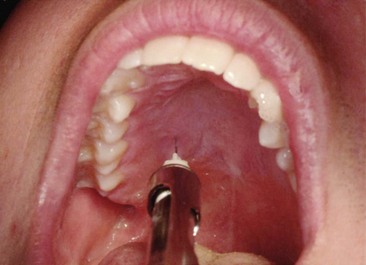
Nasopalatine Nerve Block
Nasopalatine nerve block is an invaluable technique for palatal pain control in that, with administration of a minimum volume of anesthetic solution (maximally, one quarter of a cartridge), a wide area of palatal soft tissue anesthesia is achieved, thereby minimizing the need for multiple palatal injections. Unfortunately, the nasopalatine nerve block has the distinction of being a potentially highly traumatic (e.g., painful) injection. With no other injection technique is the need for strict adherence to the protocol of atraumatic injection more important than with the nasopalatine nerve block. Two approaches to this injection are presented. Readers should become familiar with both techniques and then should use the one with which they feel more comfortable (e.g., that works best in their hands).
The first approach involves only one tissue penetration, lateral to the incisive papilla on the palatal aspect of the maxillary central incisors. The soft tissue in this area is dense, firmly adherent to underlying bone, and quite sensitive; these three factors combine to increase patient discomfort during injection. The second approach was recommended by a number of readers of earlier editions of this book. It involves three needle punctures but, when carried out properly, is significantly less traumatic than the more direct one-puncture technique. In it, the labial soft tissues between maxillary central incisors are anesthetized (injection #1), then the needle is directed from the labial aspect through the interproximal papilla between the central incisors toward the incisive papilla on the palate to anesthetize the superficial tissues in this area (injection #2). A third injection, directly into the now partially anesthetized palatal soft tissues overlying the nasopalatine nerve, is necessary. Although the single-needle puncture technique may be preferred whenever possible, the second approach can produce effective nasopalatine anesthesia with a minimum of discomfort.
Areas Anesthetized
Anterior portion of the hard palate (soft and hard tissues) bilaterally from the mesial of the right first premolar to the mesial of the left first premolar (Fig. 13-34).
Technique (Single-Needle Penetration of the Palate)
1. A 27-gauge short needle is recommended.
2. Area of insertion: palatal mucosa just lateral to the incisive papilla (located in the midline behind the central incisors); the tissue here is more sensitive than other palatal mucosa
3. Target area: incisive foramen, beneath the incisive papilla (Fig. 13-35)
4. Landmarks: central incisors and incisive papilla
5. Path of insertion: Approach the injection site at a 45-degree angle toward the incisive papilla.
6. Orientation of the bevel: toward the palatal soft tissues (review procedure for the basic palatal injection)
a. Sit at the 9 or 10 o’clock position facing in the same direction as the patient (Fig. 13-36).
b. Request the patient to do the following:
(3) Turn the head to the left or right for improved visibility (Fig. 13-37).
c. Prepare the tissue just lateral to the incisive papilla (Fig. 13-38).
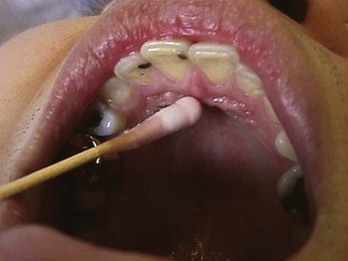
Figure 13-38 Topical anesthetic is applied lateral to the incisive papilla for 2 minutes, and then pressure is applied directly to the incisive papilla.
d. After 2 minutes of topical anesthetic application, move the swab directly onto the incisive papilla (see Figs. 13-38 and 13-39).
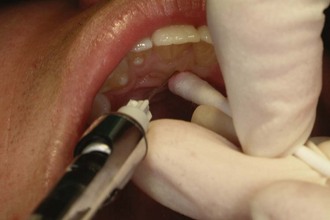
Figure 13-39 Pressure is maintained until the deposition of solution is completed. Needle penetration is just lateral to the incisive papilla.
e. Place the bevel against the ischemic soft tissues at the injection site. The needle must be well stabilized to prevent accidental penetration of tissues (see Fig. 13-39).
f. With the bevel lying against the tissue:
(1) Apply enough pressure to bow the needle slightly.
(2) Deposit a small volume of anesthetic. The solution will be forced against the mucous membrane.
g. Straighten the needle and permit the bevel to penetrate the mucosa.
(1) Continue to deposit small volumes of anesthetic throughout the procedure.
(2) Observe ischemia spreading into adjacent tissues as solution is deposited.
h. Continue to apply pressure with the cotton applicator stick while injecting the anesthetic.
i. Slowly advance the needle toward the incisive foramen until bone is gently contacted (see Fig. 13-35).
(1) The depth of penetration normally is not greater than 5 mm.
(2) Deposit small volumes of anesthetic while advancing the needle. As the tissue is entered, resistance to the deposition of solution is significantly increased; this is normal with the nasopalatine nerve block.
j. Withdraw the needle 1 mm (to prevent subperiosteal injection). The bevel now lies over the center of the incisive foramen.
l. If negative, slowly deposit (15- to 30-second minimum) not more than one fourth of a cartridge (0.45 mL).
(1) In some patients, it is difficult to deposit 0.45 mL of anesthetic solution in this injection. Injection of anesthetic can cease when the area of ischemia noted at the injection site has expanded from that produced by the application of pressure alone.
m. Slowly withdraw the syringe.
o. Wait 2 to 3 minutes before commencing the dental procedure.
Precautions
Failures of Anesthesia
1. Highly successful injection (>95% incidence of success)
a. If solution is deposited to one side of the incisive canal, unilateral anesthesia may develop.
b. To correct: Reinsert the needle into the already anesthetized tissue and reinject solution into the unanesthetized area.
3. Inadequate palatal soft tissue anesthesia in the area of the maxillary canine and first premolar:
Complications
2. Hematoma is possible but extremely rare because of the density and firm adherence of palatal soft tissues to bone.
3. Necrosis of soft tissues is possible when highly concentrated vasoconstricting solution (e.g., norepinephrine) is used for hemostasis over a prolonged period (norepinephrine is not available in dental local anesthetics in the United States or Canada).
4. Because of the density of soft tissues, anesthetic solution may “squirt” back out the needle puncture site during administration or after needle withdrawal. (This is of no clinical significance. However, do not let it surprise you into uttering a statement such as “Whoops!” that might frighten the patient.)
Technique (Multiple Needle Penetrations)
1. A 27-gauge short needle is recommended.
a. Labial frenum in the midline between the maxillary central incisors (Fig. 13-40, B)
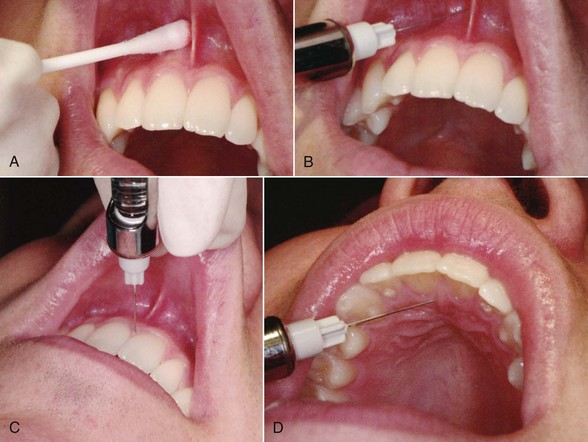
Figure 13-40 A, Topical anesthetic is applied to the mucosa of the frenum. B, First injection, into the labial frenum. C, Second injection, into the interdental papilla between the central incisors. D, Third injection, when anesthesia of the nasopalatine area is inadequate after the first two injections.
b. Interdental papilla between the maxillary central incisors (Fig. 13-40, C)
c. If needed, palatal soft tissues lateral to the incisive papilla (Fig. 13-40, D)
3. Target area: incisive foramen, beneath the incisive papilla
4. Landmarks: central incisors and incisive papilla
a. First injection: infiltration into the labial frenum
b. Second injection: needle held at a right angle to the interdental papilla
c. Third injection: needle held at a 45-degree angle to the incisive papilla
a. First injection: infiltration of 0.3 mL into the labial frenum (see Fig. 13-40, B)
(1) Prepare the tissue at the injection site.
(a) Clean and dry with sterile gauze.
(b) Apply topical antiseptic (optional).
(c) Apply topical anesthetic for 1 minute (Fig. 13-40, A).
(2) Retract the upper lip to stretch tissues and improve visibility. (Be careful not to overstretch the frenum.)
(3) Gently insert the needle into the frenum and deposit 0.3 mL of anesthetic in approximately 15 seconds. (The tissue may balloon as solution is injected.)
(4) Anesthesia of soft tissue develops immediately. The aim of this first injection is to anesthetize the interdental papilla between the two central incisors.
b. Second injection: penetration through the labial aspect of the papilla between the maxillary central incisors toward the incisive papilla (see Fig. 13-40, C)
(1) Retract the upper lip gently to increase visibility. (Do not overstretch the labial frenum.)
(2) If a right-handed administrator, sit at 11 or 12 o’clock facing in the same direction as the patient. Tilt the patient’s head toward the right to provide a proper angle for needle penetration.
(3) Holding the needle at a right angle to the interdental papilla, insert it into the papilla just above the level of crestal bone.
(a) Direct it toward the incisive papilla (on the palatal side of the interdental papilla).
(b) Soft tissues on the labial surface have been anesthetized by the first injection, so there is no discomfort. However, as the needle penetrates toward the unanesthetized palatal side, it becomes necessary to administer minute amounts of local anesthetic to prevent discomfort.
(c) With the patient’s head extended backward, you can see the ischemia produced by the local anesthetic and (on occasion) can see the needle tip as it nears the palatal aspect of the incisive papilla. Care must be taken to avoid needle puncturing through the papilla into the oral cavity on the palatal side.
(4) Aspirate in two planes when ischemia is noted in the incisive papilla or when the needle tip becomes visible just beneath the tissue surface. If negative, administer no more than 0.3 mL of anesthetic solution in approximately 15 seconds. There is considerable resistance to the deposition of solution but no patient discomfort.
(5) Stabilization of the syringe in this second injection is somewhat awkward, but critical. Use of a finger from the other hand to stabilize the needle is recommended (Fig. 13-41). However, the syringe barrel must be held such that it remains within the patient’s line of sight; this is potentially disconcerting to some patients.
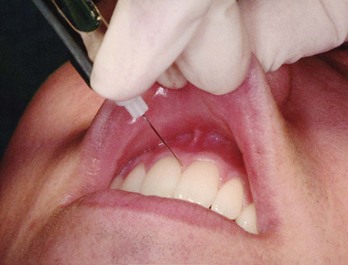
Figure 13-41 Use a finger of the opposite hand to stabilize the syringe during the second injection.
(6) Slowly withdraw the syringe.
(8) Anesthesia within the distribution of the right and left nasopalatine nerves usually develops in a minimum of 2 to 3 minutes.
(9) If the area of clinically effective anesthesia proves to be less than adequate (as frequently happens), proceed to the third injection.
(1) Dry the tissue just lateral to the incisive papilla.
(2) Ask the patient to open wide.
(3) Extend the patient’s neck.
(4) Place the needle into soft tissue adjacent to the (diamond-shaped) incisive papilla, aiming toward the most distal portion of the papilla.
(5) Advance the needle until contact is made with bone.
(6) Withdraw the needle 1 mm to avoid subperiosteal injection.
(8) If negative, slowly deposit not more than 0.3 mL of anesthetic in approximately 15 seconds. Note: Use of topical and pressure anesthesia is unnecessary in the second and third injections because the tissues being penetrated by the needle are already anesthetized (by the first and second injections, respectively).
(11) Wait a minimum of 2 to 3 minutes for the onset of anesthesia before beginning dental treatment.
Complications
2. Necrosis of soft tissues is possible when a highly concentrated vasoconstrictor solution, such as norepinephrine, is used for hemostasis over a prolonged period (norepinephrine is not available in dental local anesthetics in the United States or Canada).
3. Interdental papillae between the maxillary incisors sometimes are tender for several days after injection.
Local Infiltration of the Palate
Technique
1. A 27-gauge short needle is recommended.
2. Area of insertion: the attached gingiva 5 to 10 mm from the free gingival margin (Fig. 13-43)
3. Target area: gingival tissues 5 to 10 mm from the free gingival margin
4. Landmark: gingival tissue in the estimated center of the treatment area
5. Pathway of insertion: approaching the injection site at a 45-degree angle
6. Orientation of the bevel: toward palatal soft tissues
a. If a right-handed administrator, sit at the 10 o’clock position.
(1) Face toward the patient for palatal infiltration on the right side.
(2) Face in the same direction as the patient for palatal infiltration on the left side.
b. Ask the patient to do the following:
c. Prepare the tissue at the site of injection.
d. After 2 minutes of topical anesthetic application, place the swab on the tissue immediately adjacent to the injection site.
e. Place the bevel of the needle against the ischemic soft tissue at the injection site. The needle must be well stabilized to prevent accidental penetration of tissues.
f. With the bevel lying against tissue:
(1) Apply enough pressure to bow the needle slightly.
(2) Deposit a small volume of local anesthetic. The solution is forced against the mucous membrane, forming a droplet.
g. Straighten the needle and permit the bevel to penetrate mucosa.
(1) Continue to deposit small volumes of local anesthetic throughout this procedure.
(2) Ischemia of the tissues spreads as additional anesthetic is deposited. (When this injection is used for hemostasis, the vasoconstrictor in the local anesthetic produces intense ischemia of tissues.)
h. Continue to apply pressure with the cotton applicator stick throughout the injection.
i. Continue to advance the needle and deposit anesthetic until bone is gently contacted. Tissue thickness is only 3 to 5 mm in most patients.
j. If hemostasis is the goal in this technique, continue to administer solution until ischemia encompasses the surgical site. In usual practice, 0.2 to 0.3 mL of solution is adequate.
k. For hemostasis of larger surgical sites:
(1) Remove the needle from the first injection site.
(2) Place it in the new injection site at the periphery of the previously anesthetized tissue (Fig. 13-44).
(3) Penetrate the tissues and deposit anesthetic as in Step j. Topical anesthetic may be omitted for subsequent injections because the tissue penetrated is already anesthetized.
(4) Continue this overlapping procedure until adequate hemostasis develops over the entire surgical area.
Complications
2. Necrosis of soft tissues may be observed when a highly concentrated vasoconstricting solution is used for hemostasis over a prolonged period (e.g., norepinephrine, repeated injections of epinephrine in a 1 : 50,000 concentration). (Norepinephrine is not available in dental local anesthetics in the United States or Canada.)
Anterior Middle Superior Alveolar Nerve Block
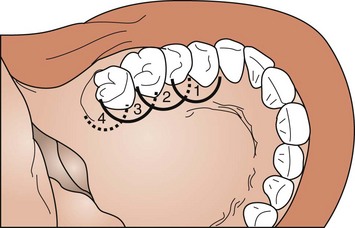
The anterior middle superior alveolar nerve block (AMSA) injection represents a recently described maxillary nerve block injection. It was first reported by Friedman and Hochman during development of a C-CLAD system.5,9 This technique provides pulpal anesthesia to multiple maxillary teeth (incisors, canine, and premolars) from a single injection site on the hard palate about halfway along an imaginary line connecting the midpalatal suture to the free gingival margin. The line is located at the contact point between the first and second premolars (Fig. 13-45).
Because the local anesthetic is deposited on the palate, the muscles of facial expression and the upper lip are not anesthetized. A minimal volume of local anesthetic is necessary to provide pulpal anesthesia from the central incisor to the second premolar on the side of the injection. The AMSA nerve block can be administered with little to no pain following the basic atraumatic palatal injection techniques previously described. Use of a C-CLAD system definitely aids in atraumatic administration of this injection.
The AMSA injection is most accurately described as a field block of the terminal branches (subneural dental plexus) of the ASA nerve that innervates the incisors to the premolar teeth. In spite of the fact that studies suggest that the MSA nerve may be absent in a high percentage of individuals, a complete subneural dental plexus must be present to provide innervation to the premolars and incisor teeth on all patients. It is this subneural dental plexus of the ASA nerve that is anesthetized in the AMSA injection. Two anatomic structures, the nasal aperture and the maxillary sinus, cause the convergence of branches of the anterior and middle superior alveolar nerves and associated subneural dental plexus in the region of the apices of the premolars (Fig. 13-46). The injection site is at this region of convergence of these neural structures. Depositing a sufficient volume of local anesthetic allows it to diffuse through nutrient canals and porous cortical bone on the palate to envelop the concentrated subneural dental plexus at this location.
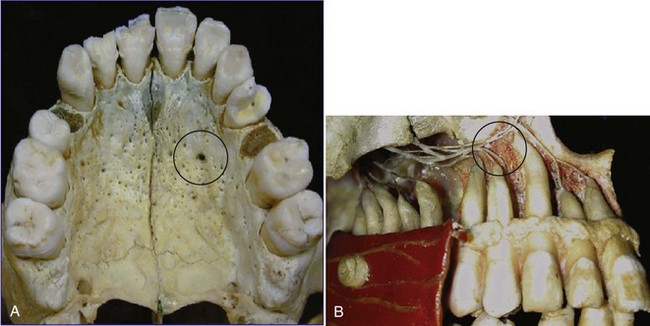
Figure 13-46 Anatomy of anterior middle superior alveolar (AMSA) nerve block. A, Palatal aspect: local anesthetic injected in area of circle. B, Buccal aspect: local anesthetic injected on palatal side in area of circle.
The AMSA injection may be particularly useful for esthetic-restorative (cosmetic) dental procedures in which the dentist wishes to evaluate the smile line during treatment.5 In addition, this injection has been found to be very useful for periodontal scaling and root planing of the maxillary region.10 It provides profound soft tissue anesthesia and anesthesia of the attached gingiva of associated teeth. Perry and Loomer demonstrated a patient preference for AMSA compared with supraperiosteal infiltration injection.10 Subjects found the AMSA to be as effective as multiple maxillary infiltrations in the maxilla.
Several important procedures should be followed in performing this injection comfortably. These techniques are most easily accomplished when performed with a C-CLAD system; however, this injection also has been successful when a standard aspirating dental syringe is used.
Indications
1. Is more easily performed with a C-CLAD system
2. When dental procedures involving multiple maxillary anterior teeth or soft tissues are to be performed
3. When anesthesia to multiple maxillary anterior teeth is desired from a single-site injection
4. When scaling and root planing of the anterior teeth are to be performed
5. When anterior cosmetic procedures are to be performed and a smile-line assessment is important for a successful outcome
6. When a facial approach supraperiosteal injection has been ineffective because of dense cortical bone
Advantages
1. Provides anesthesia of multiple maxillary teeth with a single injection
2. Comparatively simple technique
3. Comparatively safe; minimizes the volume of anesthetic and the number of punctures required compared with traditional maxillary infiltrations of these teeth
4. Allows effective soft tissue and pulpal anesthesia for periodontal scaling and root planing of associated maxillary teeth
5. Allows an accurate smile-line assessment to be performed after anesthesia has occurred, which may be helpful during cosmetic dentistry procedures
6. Eliminates the postoperative inconvenience of numbness to the upper lip and muscles of facial expression
Disadvantages
1. Requires a slow administration (0.5 mL/min) time
2. Can cause operator fatigue with a manual syringe because of extended injection time
3. May be uncomfortable for the patient if administered improperly
4. May need supplemental anesthesia for central and lateral incisor teeth
5. May cause excessive ischemia if administered too rapidly
6. Use of local anesthetic containing epinephrine with a concentration of 1 : 50,000 is contraindicated.
Technique
1. A 27-gauge short needle is recommended.
2. Area of insertion: on the hard palate about halfway along an imaginary line connecting the midpalatal suture to the free gingival margin; the location of the line is at the contact point between the first and second premolars
3. Target area: palatal bone at injection site
4. Landmarks: the intersecting point midway along a line from the midpalatine suture to the free gingival margin intersecting the contact point between the first and second premolars
5. Orientation of the bevel: The bevel of the needle is placed “face down” against the epithelium. The needle is typically held at a 45-degree angle to the palate.
a. Sit at the 9 or 10 o’clock position facing same direction as the patient.
b. Position the patient supine with slight hyperextension of the head and neck so you can visualize the nasopalatine papilla more easily.
c. Use preparatory communication to inform the patient that the injection may take several minutes to administer, and that it may produce a sensation of firm pressure in the palate.
d. Use comfortable arm and finger rests to avoid fatigue during the extended administration time.
e. Use of a C-CLAD system is suggested because it makes this injection easier to administer.
f. Initial orientation of bevel is “face down” toward the epithelium, while the needle is held at approximately a 45-degree angle with a tangent to the palate.
g. The final target is the bevel in contact with the palatal bone.
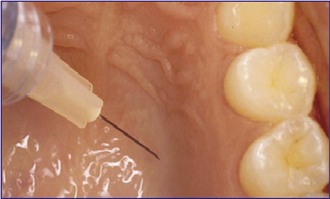
h. A prepuncture technique can be utilized. Apply the bevel of the needle toward the palatal tissue. Place a sterile cotton applicator on top of the needle tip (Fig. 13-48). Apply light pressure on the cotton applicator to create a “seal” of the needle bevel against the outer surface. Initiate delivery of the local anesthetic to the surface of the epithelium. The objective is to force the solution through the outer epithelium into the surface tissue. The cotton applicator provides stabilization of the needle and prevents any excess local anesthetic solution from dripping into the patient’s mouth. When a C-CLAD system is used, a slow rate of delivery (approximately 0.5 mL/min) is maintained during the entire injection. Maintain this position and pressure on the surface of the epithelium for 8 to 10 seconds.

i. An “anesthetic pathway technique” can be utilized. Very slowly advance the needle tip into the tissue. Rotating the needle allows the needle to penetrate the tissue more efficiently.11 Advance the needle 1 to 2 mm every 4 to 6 seconds while administering the anesthetic solution at the recommended slow rate. Attempt to not expand the tissue or advance the needle too rapidly if performing this with a manual syringe. Use of a C-CLAD system makes this process considerably easier to perform.
j. After initial blanching is observed (approximately 30 seconds), pause for several seconds to allow for onset of superficial anesthesia.
k. Continue the slow insertion technique into the palatal tissue. Orientation of the handpiece should be from the contralateral premolars (Fig. 13-49). The needle is advanced until contact with bone occurs.
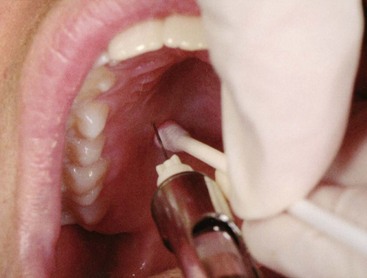
Figure 13-49 Anterior middle superior alveolar (AMSA) nerve block. Note syringe angulation from opposite side of mouth.
l. Ensure that needle contact is maintained with the bony surface of the palate. The bevel of the needle should face the surface of the bone.
n. Anesthetic is delivered at a rate of approximately 0.5 mL per minute during the injection for a total dosage of approximately 1.4 to 1.8 mL.
o. Advise the patient that he or she will experience a sensation of firm pressure.
Signs and Symptoms
1. Subjective: A sensation of firmness and numbness is experienced immediately on the palatal tissues.
2. Subjective: Numbness of the teeth and associated soft tissues extends from the central incisor to the second premolar on the side of the injection.
3. Objective: Blanching of the soft tissues (if a vasoconstrictor is used) of the palatal and facial attached gingiva is evident, extending from the central incisor to the premolar region.
4. Objective: Use of electrical pulp testing with no response from teeth with maximal EPT output (80/80)
5. Objective: Absence of pain during treatment
6. Objective: No anesthesia of the face and upper lip occurs. Note: In some patients, additional anesthetic may be necessary to supplement the incisor teeth. This can be provided from a palatal approach or as individual PDL injections.
Precautions
Complications
1. Palatal ulcer at injection site developing 1 to 2 days postoperatively
c. Prevention includes slow administration to avoid excessive ischemia.
d. Avoid excessive concentrations of vasoconstrictor (e.g., 1 : 50,000).
e. Avoid multiple infiltrations of local anesthetic with vasoconstrictor in the same area at a single appointment.
2. Unexpected contact with the nasopalatine nerve
3. Density of tissues at injection site causing squirt-back of anesthetic and bitter taste
Palatal Approach-Anterior Superior Alveolar
The palatal approach-anterior superior alveolar (P-ASA) injection, as with the AMSA injection, was defined by Friedman and Hochman in conjunction with the clinical use and development of a C-CLAD system in the mid-1990s.4,5,8 The P-ASA injection shares several common elements with the nasopalatine nerve block but differs sufficiently to be considered a distinct identity. The P-ASA uses a similar tissue point of entry (lateral aspect of the incisive papilla) as the nasopalatine but differs in its final target, that is, the needle positioned within the incisive canal. The volume of anesthetic recommended for the P-ASA is 1.4 to 1.8 mL, administered at a rate of 0.5 mL per minute.
The distribution of anesthesia differs between these injections as well. Nasopalatine nerve block provides anesthesia to the anterior palatal gingiva and mucoperiosteum and is recommended for surgical procedures on the anterior palate. It also may serve as a supplemental technique for achieving pulpal anesthesia to the incisor teeth. In contrast, the P-ASA is recommended as a primary method for achieving bilateral pulpal anesthesia of the anterior six maxillary teeth (incisors and canines). The P-ASA provides profound soft tissue anesthesia of the gingiva and mucoperiosteum in the region of the anterior palatal one third innervated by the nasopalatine nerve. In addition, soft tissue anesthesia of the facial attached gingiva of the six anterior teeth is noted. Therefore, the P-ASA is an attractive alternative for pain control before scaling and root planing, esthetic-restorative (dental) cosmetic procedures, and minor surgical procedures involving the premaxilla region. The P-ASA can be noted as the first dental injection to produce bilateral pulpal anesthesia from a single injection as its primary objective, making this a unique characteristic of this injection technique.
It is well documented in the dental literature that subjective pain associated with injections into the nasopalatine region is typically associated with a significant degree of discomfort when performed with a manual syringe.12-14 The introduction of C-CLAD systems has demonstrated that injections even into the dense, highly innervated tissues of the palate can be performed predictably with little or no pain.15 The P-ASA injection may be performed with a traditional syringe; however, a comfortable injection is more easily achieved with a C-CLAD system.10,16-18
The P-ASA is useful when anesthesia to the maxillary anterior teeth is desired, without collateral anesthesia to the lips and muscles of facial expression. It has been shown to be desirable during scaling and root planing of the anterior teeth. It is also beneficial when anterior esthetic dentistry procedures are to be performed. The smile line and the interrelationships between lips, teeth, and soft tissues cannot be accurately assessed when a traditional (mucobuccal fold) approach to anesthesia is utilized, because of paralysis of the muscles of the upper lip. The palatal approach allows anesthesia to be limited to the subneural plexus for the maxillary anterior teeth and the nasopalatine nerve. The minimum volume for this injection is 1.8 mL delivered at a slow rate of 0.5 mL per minute.
Indications
1. When dental procedures involving the maxillary anterior teeth and soft tissues are to be performed.
2. When bilateral anesthesia of the maxillary anterior teeth is desired from a single site injection
3. When scaling and root planing of the anterior teeth are to be performed.
4. When anterior cosmetic procedures are to be performed and a smile-line assessment is important to a successful outcome
5. When a facial approach supraperiosteal injection has been ineffective because of dense cortical bone
Advantages
1. Provides bilateral maxillary anesthesia from a single injection site.
2. Comparatively simple technique to perform
3. Comparatively safe; minimizes the volume of anesthetic and the number of punctures necessary compared with traditional maxillary infiltrations of these teeth
4. Allows for accurate smile-line assessment to be performed after anesthesia has occurred, which may be useful during cosmetic dentistry procedures
5. Eliminates the postoperative inconvenience of numbness to the upper lip and muscles of facial expression
Disadvantages
1. Requires slow administration (0.5 mL/min)
2. Operator fatigue with a manual syringe because of extended injection time
3. May be uncomfortable for the patient if administered improperly
4. May require supplemental anesthesia for canine teeth
5. May cause excessive ischemia if administered too rapidly
6. Use of local anesthetic containing epinephrine with a concentration of 1 : 50,000 is contraindicated.
Technique
1. A 27-gauge short needle is recommended.
2. Area of insertion: just lateral to the incisive papilla in the papillary groove (Fig. 13-51)
3. Target area: nasopalatine foramen
4. Landmarks: nasopalatine papilla
5. Orientation of the bevel: The bevel of the needle is placed “face down” against the epithelium. The needle is typically held at a 45-degree angle to the palate.
a. Sit at the 9 or 10 o’clock position facing in the same direction as the patient.
b. Position the patient supine with slight hyperextension of the head and neck so you can visualize the nasopalatine papilla more easily.
c. Use preparatory communication to inform the patient that the injection may take several minutes to administer and may produce a sensation of firm pressure in the palate.
d. Use comfortable arm and finger rests to prevent fatigue during the extended administration time.
e. Use of a C-CLAD system makes this injection easier to administer.
f. Initial orientation of bevel is “face down” against the epithelium, while the needle is held at approximately a 45-degree angle with a tangent to the palate.
g. A prepuncture technique can be utilized. Place the bevel of the needle against the palatal tissue. Place a sterile cotton applicator on top of the needle tip (see Fig. 13-48). Apply light pressure on the cotton applicator to create a “seal” of the needle bevel against the outer surface. Initiate delivery of the anesthetic solution to the surface of the epithelium. The objective is to force the solution through the outer epithelium into the tissue. Allow anesthetic solution to be delivered through the layer of the outer epithelium. The cotton applicator provides stabilization of the needle and prevents any excess dripping of anesthetic solution into the patient’s mouth. When a C-CLAD device is used, a slow rate of delivery (approximately 0.5 mL/min) is maintained throughout injection. Maintain this position and pressure on the surface of the epithelium for 8 to 10 seconds.
h. An anesthetic pathway technique can be utilized. Very slowly advance the needle into the tissue. Rotating the needle allows the needle to penetrate the tissue more efficiently. Advance the needle 1 to 2 mm every 4 to 6 seconds while administering the anesthetic solution at the recommended (slow) rate. Avoid expanding the tissue or advancing the needle too rapidly if performing the P-ASA with a traditional syringe. It is at this step where a C-CLAD system makes the process easier to achieve.
i. After initial blanching is observed (approximately 30 seconds), pause for several seconds to permit onset of superficial anesthesia.
j. Continue the slow insertion technique into the nasopalatine canal. Orientation of the needle should be parallel to the long axis of the central incisors. The needle is advanced to a depth of 6 to 10 mm (Fig. 13-52). Note: If resistance is encountered before the final depth of penetration is reached, do not force the needle forward. Withdraw it slightly and reorient it to minimize the risk of penetration of the floor of the nose.
k. Ensure that the needle is in contact with the inner bony wall of the canal. (A well-defined nasopalatine canal may not be present in some patients.)
l. Aspirate in two planes within the canal space to avoid intravascular injection.
m. Anesthetic is delivered at a rate of approximately 0.5 mL during the injection to a total volume of 1.4 to 1.8 mL. Advise the patient that he or she will experience a sensation of firm pressure. Note: It has been reported that in a small percentage of cases, needle insertion can stimulate the nasopalatine nerve (similar to contacting a nerve during an inferior alveolar block). This may be an unsettling surprise to the patient (and the operator) if it occurs. Reassure the patient with verbal support that this is not uncommon and is not a problem. If this should occur, reposition the needle and continue to administer the anesthetic before advancing farther.
Signs and Symptoms
1. Subjective: A sensation of firmness and anesthesia is immediately experienced in the anterior palate.
2. Subjective: Numbness of the teeth and associated soft tissues extends from the right to the left canine.
3. Objective: Ischemia (blanching) of the soft tissues (if a vasoconstrictor is used) of the palatal and the facial attached gingiva is evident extending from the right to the left canine region.
4. Objective: Use of electrical pulp testing with no response from teeth with maximal EPT output (80/80)
5. Objective: Absence of pain during treatment
6. Objective: No anesthesia of the face and upper lip occurs. Note: In patients with long canine roots, additional local anesthetic may be needed. This can be provided through a palatal approach at a point that approximates the canine root tips.
Precautions
Failure of Anesthesia
1. Highly successful injection for maxillary incisors
2. May need supplemental anesthesia for canines in patients with long roots
Complications
1. Palatal ulcer at injection site developing 1 to 2 days postoperatively
c. Prevention includes slow administration to avoid excessive ischemia.
d. Avoid excessive concentrations of vasoconstrictor (e.g., 1 : 50,000)
2. Unexpected contact with the nasopalatine nerve
3. Density of soft tissues at injection site causing squirt-back of anesthetic and bitter taste
Maxillary Nerve Block
The maxillary (second division or V2) nerve block is an effective method of achieving profound anesthesia of a hemimaxilla. It is useful in procedures involving quadrant dentistry and in extensive surgical procedures. Two approaches are presented here. Both are effective, and the author does not maintain a preference for either one. Major difficulties with the greater palatine canal approach involve locating the canal and negotiating it successfully. The major difficulty in the high-tuberosity approach is the higher incidence of hematoma.
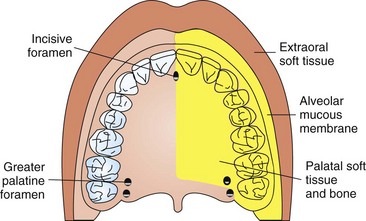
Indications
1. Pain control before extensive oral surgical, periodontal, or restorative procedures requiring anesthesia of the entire maxillary division
2. When tissue inflammation or infection precludes the use of other regional nerve blocks (e.g., PSA, ASA, AMSA, P-ASA) or supraperiosteal injection
3. Diagnostic or therapeutic procedures for neuralgias or tics of the second division of the trigeminal nerve
Contraindications
1. Inexperienced administrator
a. More difficult because of smaller anatomic dimensions
b. A cooperative patient is needed.
c. Usually unnecessary in children because of the high success rate of other regional block techniques
4. Inflammation or infection of tissues overlying the injection site
5. When hemorrhage is risky (e.g., in a hemophiliac)
6. In the greater palatine canal approach: inability to gain access to the canal; bony obstructions may be present in 5% to 15% of canals
Advantages
1. Atraumatic injection via the high-tuberosity approach
3. Positive aspiration is less than 1% (greater palatine canal approach).
4. Minimizes the number of needle penetrations necessary for successful anesthesia of the hemimaxilla (minimum of four via PSA, infraorbital, greater palatine, and nasopalatine)
5. Minimizes total volume of local anesthetic solution injected to 1.8 versus 2.7 mL
6. Neither high-tuberosity nor greater palatine canal approach is usually traumatic.
Disadvantages
1. Risk of hematoma, primarily with the high-tuberosity approach.
2. High-tuberosity approach is relatively arbitrary. Overinsertion is possible because of the absence of bony landmarks if proper technique is not followed.
3. Lack of hemostasis: If necessary, this necessitates infiltration with vasoconstrictor-containing local anesthetic at the surgical site.
4. Pain: The greater palatine canal approach is potentially (although not usually) traumatic.
Alternatives
To achieve the same distribution of anesthesia present with a maxillary nerve block, all of the following must be administered:
Technique (High-Tuberosity Approach)

1. A 25-gauge long needle is recommended. A 27-gauge long is acceptable.
2. Area of insertion: height of the mucobuccal fold above the distal aspect of the maxillary second molar
a. Maxillary nerve as it passes through the pterygopalatine fossa
b. Superior and medial to the target area of the PSA nerve block
5. Orientation of the bevel: toward bone
a. Measure the length of a long needle from the tip to the hub (average, 32 mm, but varies by manufacturer).
b. Assume the correct position.
(1) For a left high-tuberosity injection, a right-handed administrator should sit at the 10 o’clock position facing the patient (see Figure 13-8, A).
(2) For a right high-tuberosity injection, a right-handed administrator should sit at the 8 o’clock position facing the patient (see Figure 13-8, B).
c. Position the patient supine or semisupine for the right or left block.
d. Prepare the tissue in the height of the mucobuccal fold at the distal of the maxillary second molar.
e. Partially open the patient’s mouth; pull the mandible toward the side of injection.
f. Retract the cheek in the injection area with your index finger to increase visibility.
g. Pull the tissues taut with this finger.
h. Place the needle into the height of the mucobuccal fold over the maxillary second molar.
i. Advance the needle slowly in an upward, inward, and backward direction as described for the PSA nerve block (p. 191).
j. Advance the needle to a depth of 30 mm.
(1) No resistance to needle penetration should be felt. If resistance is felt, the angle of the needle in toward the midline is too great.
(2) At this depth (30 mm), the needle tip should lie in the pterygopalatine fossa in proximity to the maxillary division of the trigeminal nerve.
n. Wait a minimum of 3 to 5 minutes before commencing the dental procedure.
Technique (Greater Palatine Canal Approach)
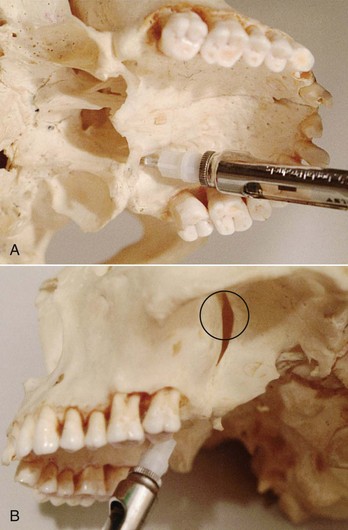
Figure 13-55 A, Maxillary nerve block, greater palatine canal approach. Note the direction of the needle and the syringe barrel into the canal. B, Second division nerve block (V2), greater palatine canal approach. Note the location of the needle tip in the pterygopalatine fossa (circle).
1. A 25-gauge long needle is recommended. A 27-gauge long needle is also acceptable.
2. Area of insertion: palatal soft tissue directly over the greater palatine foramen
3. Target area: the maxillary nerve as it passes through the pterygopalatine fossa; the needle passes through the greater palatine canal to reach the pterygopalatine fossa
4. Landmark: greater palatine foramen, junction of the maxillary alveolar process and the palatine bone
5. Orientation of the bevel: toward palatal soft tissues
a. Measure the length of a long needle from the tip to the hub (average, 32 mm, but varies by manufacturer).
b. Assume the correct position.
(1) For a right greater palatine canal V2 block, sit facing toward the patient at the 7 or 8 o’clock position.
(2) For a left greater palatine canal V2 block, sit facing in the same direction as the patient at the 10 or 11 o’clock position.
c. Ask the patient, who is supine, to do the following:
d. Locate the greater palatine foramen.
(1) Place a cotton swab at the junction of the maxillary alveolar process and the hard palate.
(2) Start in the region of the second molar and palpate by pressing posteriorly into the tissues with the swab.
(3) The swab “falls” into the depression created by the greater palatine foramen.
(4) The foramen is most frequently located at the distal aspect of the maxillary second molar (see Table 13-2).
e. Prepare the tissues directly over the greater palatine foramen.
f. After 2 minutes of topical anesthetic application, move the swab posteriorly so it lies just behind the greater palatine foramen.
g. Direct the syringe into the mouth from the opposite side with the needle approaching the injection site at a right angle (Fig. 13-56).

h. Place the bevel against the ischemic soft tissue at the injection site. The needle must be well stabilized to prevent accidental penetration of the tissues.
i. With the bevel lying against the tissue:
(1) Apply enough pressure to bow the needle slightly.
(2) Deposit a small volume of local anesthetic. The solution is forced against the mucous membrane, forming a droplet.
j. Straighten the needle and permit the bevel to penetrate the mucosa.
(1) Continue to deposit small volumes of anesthetic throughout the procedure.
(2) Ischemia spreads into adjacent tissues as the anesthetic is deposited.
k. Continue to apply pressure with the cotton applicator stick during this part of the procedure. The greater palatine nerve block is now complete.
l. Probe gently for the greater palatine foramen.
(1) The patient feels no discomfort because of the previously deposited anesthetic solution.
(2) The angle of the needle and syringe may be changed if needed.
(3) The needle usually must be held at a 45-degree angle to facilitate entry into the greater palatine foramen (Table 13-3).

m. After locating the foramen, very slowly advance the needle into the greater palatine canal to a depth of 30 mm. Approximately 5% to 15% of greater palatine canals have bony obstructions that prevent passage of the needle.
(1) Never attempt to force the needle against resistance.
(2) If resistance is felt, withdraw the needle slightly and slowly attempt to advance it at a different angle.
(3) If the needle cannot be advanced farther and the depth of penetration is almost adequate, continue with the next steps; however, if the depth is considerably deficient, withdraw the needle and discontinue the attempt.
(1) Rotate the needle one fourth turn and reaspirate.
(2) If negative, slowly deposit 1.8 mL of solution over a minimum of 1 minute.
q. Wait a minimum of 3 to 5 minutes before commencing the dental procedure.
Signs and Symptoms
1. Subjective: Pressure behind the upper jaw on the side being injected; this usually subsides rapidly, progressing to tingling and numbness of the lower eyelid, side of the nose, and upper lip
2. Subjective: Sensation of numbness in the teeth and buccal and palatal soft tissues on the side of injection
3. Objective: Use of electrical pulp testing with no response from teeth with maximal EPT output (80/80)
Precautions
1. Pain on insertion of the needle, primarily with the greater palatine canal approach; prevent by using atraumatic palatal injection protocol
2. Overinsertion of the needle; can occur with both approaches (although much less likely with the greater palatine canal approach); prevent through careful adherence to protocol
3. Resistance to needle insertion in the greater palatine canal approach; never try to advance a needle against resistance
Failures of Anesthesia
1. Partial anesthesia; may result from underpenetration by needle. To correct: Reinsert the needle to proper depth, and reinject.
2. Inability to negotiate the greater palatine canal. To correct:
a. Withdraw the needle slightly and reangulate it.
b. Reinsert carefully to the proper depth.
c. If unable to bypass the obstruction easily, withdraw the needle and terminate the injection.
d. The greater palatine canal approach usually is successful if the long dental needle has been advanced at least two thirds of its length into the canal.
Complications
1. Hematoma develops rapidly if the maxillary artery is punctured during maxillary nerve block via the high-tuberosity approach. (Refer to discussion of PSA nerve block, complications, p. 195.)
2. Penetration of the orbit may occur during a greater palatine foramen approach if the needle goes in too far; more likely to occur in the smaller-than-average skull
3. Complications produced by injection of local anesthetic into the orbit include the following*:
a. Volume displacement of the orbital structures, producing periorbital swelling and proptosis
b. Regional block of the sixth cranial nerve (abducens), producing diplopia
c. Classic retrobulbar block, producing mydriasis, corneal anesthesia, and ophthalmoplegia
d. Possible optic nerve block with transient loss of vision (Amaurosis)
e. Possible retrobulbar hemorrhage
f. To prevent intraorbital injection: Strictly adhere to protocol and modify your technique for the smaller patient.
4. Penetration of the nasal cavity
a. If the needle deviates medially during insertion through the greater palatine canal, the paper-thin medial wall of the pterygopalatine fossa is penetrated and the needle enters the nasal cavity.
(1) On aspiration, large amounts of air appear in the cartridge.
(2) On injection, the patient complains that local anesthetic solution is running down his or her throat.
(3) To prevent: Keep the patient’s mouth wide open and take care during penetration that the advancing needle stays in the correct plane.
(4) To prevent: Do not force needle if resistance is encountered.
Table 13-4 summarizes the indications for maxillary local anesthesia. Table 13-5 includes volumes of solutions recommended for maxillary injections.
TABLE 13-4
Maxillary Teeth and Available Local Anesthetic Techniques
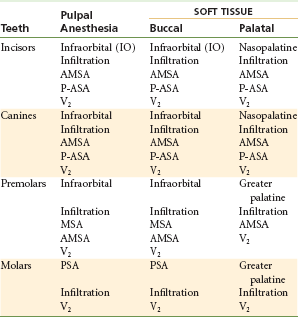
AMSA, Anterior middle superior alveolar; MSA, middle superior alveolar; P-ASA, palatal approach-anterior superior alveolar; PSA, posterior superior alveolar.
TABLE 13-5
Recommended Volumes of Local Anesthetic for Maxillary Techniques
| Technique | Volume, mL |
| Supraperiosteal (infiltration) | 0.6 |
| Posterior superior alveolar (PSA) | 0.9-1.8 |
| Middle superior alveolar (MSA) | 0.9-1.2 |
| Anterior superior alveolar (ASA, infraorbital) | 0.9-1.2 |
| Anterior middle superior alveolar (AMSA) | 1.4-1.8 |
| Palatal approach-anterior superior alveolar (P-ASA) | 1.4-1.8 |
| Greater (anterior) palatine | 0.45-0.6 |
| Nasopalatine | 0.45 (maximum) |
| Palatal infiltration | 0.2-0.3 |
| Maxillary (V2) nerve block | 1.8 |
Summary
Providing clinically adequate anesthesia in the maxilla is rarely a problem. The thin and porous bone of the maxilla permits the ready diffusion of local anesthetic to the apex of the tooth to be treated. For this reason, many dentists rely solely on supraperiosteal (or “infiltration”) anesthesia for most treatment in the maxilla.
It is only on rare occasions that difficulty arises with maxillary pain control. Most notable, of course, is the pulpally involved tooth; because of infection or inflammation, the use of supraperiosteal anesthesia is contraindicated or ineffective in treating this tooth. In nonpulpally involved teeth, the most often observed problems in attaining adequate pulpal anesthesia via supraperiosteal injection develop in the central incisor (whose apex may lie beneath the denser bone and cartilage of the nose), the canine (whose root length may be considerable, with local anesthetic deposited below the apex), and the maxillary molars (whose buccal root apices may be covered by denser bone of the zygomatic arch—a problem more often noted in patients 6 to 8 years of age whose palatal root may flare toward the palate, making the distance that local anesthetic must diffuse too great). In such situations, the use of regional nerve block anesthesia is essential for clinical success in pain control. In reality, two safe and simple nerve blocks—posterior superior alveolar (PSA) and anterior superior alveolar (ASA)—enable dental care to be provided painlessly in virtually all patients.
Palatal anesthesia, although commonly thought of as being highly traumatic, can be provided in most cases with little or no discomfort to the patient.
References
1. Loetscher, CA, Melton, DC, Walton, RE. Injection regimen for anesthesia of the maxillary first molar. J Am Dent Assoc. 1988;117:337–340.
2. Frazer, M. Contributing factors and symptoms of stress in dental practice. Br Dent J. 1992;173:211.
3. Friedman, MJ, Hochman, MN. A 21(st) century computerized injection system for local pain control. Compend Contin Educ Dent. 1997;18:995–1000. [1002–1004].
4. Friedman, MJ, Hochman, MN. The AMSA injection: a new concept for local anesthesia of maxillary teeth using a computer-controlled injection system. Quint Int. 1998;29:297–303.
5. Lee, S, Reader, A, Nusstein, J, et al. Anesthetic efficacy of the anterior middle superior alveolar (AMSA) injection. Anesth Prog. 2004;51:80–89.
6. Melzack, R. The puzzle of pain. New York: Basic Books; 1973.
7. Jeske, AH, Blanton, PL. Misconception involving dental local anesthesia. Part 2. Pharmacology. Tex Dent J. 2002;119:296–300. [302–304, 306–307].
8. Friedman, MJ, Hochman, MN. P-ASA block injection: a new palatal technique to anesthetize maxillary anterior teeth. J Esthet Dent. 1999;11:63–71.
9. Friedman, MJ, Hochman, MN. 21(st) century computerized injection for local pain control. Compend Contin Educ Dent. 1997;18:995–1003.
10. Perry, DA, Loomer, PM. Maximizing pain control: the AMSA injection can provide anesthesia with few injections and less pain. Dimens Dent Hyg. 2003;49:28–33.
11. Hochman, MN, Friedman, MJ. In vitro study of needle deflection: a linear insertion technique versus a bidirectional rotation insertion technique. Quint Int. 2000;31:33–39.
12. Malamed, SF. Handbook of local anesthesia, ed 5. St Louis: Mosby; 2004.
13. Jastak, JT, Yagiela, JA, Donaldson, D. Local anesthesia of the oral cavity. Philadelphia: WB Saunders; 1995.
14. McArdle, BF. Painless palatal anesthesia. J Am Dent Assoc. 1997;128:647.
15. Nicholson, JW, Berry, TG, Summitt, JB, et al. Pain perception and utility: a comparison of the syringe and computerized local injection techniques. Gen Dent. 2001;49:167–172.
16. Hochman, MN, Chiiarello, D, Hochman, C, et al. Computerized local anesthesia vs traditional syringe technique: subjective pain response. NYSDJ. 1997;63:24–29.
17. Nicholson, JW, Berry, TG, Summitt, JB, et al. Pain perception and utility: a comparison of the syringe and computerized local injection techniques. Gen Dent. 2001;49:167–172.
18. Fukayama, H, Yoshikawa, F, Kohase, H, et al. Efficacy of AMSA anesthesia using a new injection system, the Wand. Quint Int. 2003;34:537–541.
19. Malamed, SF, Trieger, N. Intraoral maxillary nerve block: an anatomical and clinical study. Anesth Prog. 1983;30:44–48.
20. Poore, TE, Carney, FMT. Maxillary nerve block: a useful technique. J Oral Surg. 1973;31:749–755.
*Bevel orientations are specified for all injection techniques in Chapters 13 and 14. The orientation of the needle bevel is not a significant factor in the success or failure of an injection technique, and these recommendations need not be rigidly adhered to; yet there will be a fuller expectation of successful anesthesia if they are followed, provided all other technical and anatomic principles are maintained. In general, whenever possible, the bevel of the needle is to be facing toward bone; then, in the unlikely event that the needle comes into contact with bone, the bevel will slide over the periosteum, provoking minor discomfort but not tearing the periosteum. If the bevel faces away from bone, the sharp point of the needle would contact the periosteum, tearing it and leading to a more painful (subperiosteal) injection. Postinjection discomfort is considerably greater with subperiosteal than with supraperiosteal injections.
*It has been reported that complications a, b, and c were most common after intraorbital injection; complications d and e were never encountered.19,20