Evaluation of Muscle Strength
Purposes of manual muscle testing
Results of assessment as a basis for intervention planning
Relationship between joint range of motion and muscle weakness
Limitations of the manual muscle test
General principles of manual muscle testing
Manual muscle testing of the upper extremity
Scapula elevation, neck rotation, and lateral flexion
Scapula depression, adduction, and upward rotation
Scapula abduction and upward rotation
Scapula adduction and downward rotation
Shoulder abduction to 90 degrees
Wrist extension with radial deviation
Wrist extension with ulnar deviation
Wrist flexion with radial deviation
Wrist flexion with ulnar deviation
Metacarpophalangeal flexion with interphalangeal extension
Proximal interphalangeal flexion, second through fifth fingers
Distal interphalangeal flexion, second through fifth fingers
Thumb metacarpophalangeal extension
Thumb interphalangeal extension
After studying this chapter, the student or practitioner will be able to do the following:
1 Describe screening tests for muscle strength assessment.
2 Identify what is measured by the manual muscle test (MMT).
3 List diagnoses for which the MMT is appropriate and those for which it is not appropriate, with the rationale for each.
4 List the steps of the MMT procedure in correct order.
5 Describe the limitations of the MMT.
6 Define muscle grades by name, letter, and number.
7 Administer an MMT, using the directions in this chapter, on a normal practice subject.
8 Describe how results of the muscle strength assessment are used in intervention planning.
 Case Study
Sharon
After a week of experiencing increasing numbness and weakness in her extremities and shortness of breath, Sharon, a 32-year-old woman, was admitted to an intensive care unit at a local hospital with acute respiratory distress, generalized musculoskeletal weakness, decreased sensory processing, and difficulty swallowing. Sharon complained of pain and tenderness in her muscles and was very agitated and fearful. She was diagnosed as being in the acute phase of Guillain-Barré syndrome and was placed on a ventilator.11 The OT practitioner fitted her with resting splints to support her weakened hands and minimize her muscle belly tenderness. When Sharon was moved from intensive care as the progression of the syndrome began to plateau, the therapist was able to greatly reduce her fear by adapting an environmental system that gave Sharon more control of her environmental context, allowing her to operate her call button, room lights, bed, and television.19
Sharon is a senior editor for a monthly food magazine. She has two children, ages 2 and 6. She has been married for 8 years; her husband is a sales representative for a computer company. They live in a two-story townhouse in an urban community. Sharon primarily works at home, going into the magazine’s office once or twice a week. However, once a month, during the week the magazine is being published, her life “becomes a bit crazy,” and she may go into the office 5 days. She feels fortunate that she is able to employ a housekeeper/childcare person. In addition to caring for her home and family, Sharon is an avid photographer, exercises at a gym three times per week, and enjoys hiking and camping. She is a regular volunteer at her eldest child’s school. She and her husband enjoy an active social life.
Six months after onset, Sharon is now being seen as an outpatient by an occupational therapist. Her disorder is in the recovery phase, with remyelination and axonal degeneration resulting in a generalized increase in muscle strength.11 Sharon continues to be unable to fully engage in occupations that are meaningful to her, primarily because of residual weakness in her distal extremities and moderate limitation in endurance. She is usually in a wheelchair, but she uses a walker in her home. She has an aide that comes in the morning to assist her with bathing and personal grooming and to drive her to her outpatient appointments. She states that “Although I can do things for myself, it takes so long that I end up being tired before my day even begins. I need help to safely shave my underarms and legs. Curling and blow-drying my hair can be exhausting.” Sharon has also indicated that she cannot complete home maintenance tasks such as meal preparation (chopping foodstuff, managing pots and pans) and grocery shopping without assistance. She is unable to fully provide for the care and supervision of her children, especially the 2-year-old, nor can she access the second story of her home on a regular basis. She is limited in her ability to participate in outdoor and community occupations, which formerly brought her a great deal of satisfaction. She has recently been able to resume some of her job responsibilities at home on a limited basis with a voice-activated computer and is “grateful my employer still wants me and has been willing to make accommodations.” She indicated that with all the progress she has made, she and her husband are trying to be realistic but are feeling more and more hopeful about her making a full recovery.
In reviewing the above occupational profile, the therapist must focus on those client factors that are interfering with body function, namely, decreased muscle strength and endurance. Maintaining her arms at and above shoulder level without taking several rest breaks when vigorously brushing her back teeth, for example, remains a problem. Another problem is applying enough force to open jars or perform fine motor activities, such as manipulating coins. These deficits are prohibiting the client from fully engaging in occupations for participation in the physical, social, personal, cultural, and spiritual contexts that bring meaning to her life.
1. At what stage in this client’s recovery should the occupational therapist first administer a muscle strength assessment?
2. Several methods are available for assessing muscle strength; what are they? What information regarding the client’s status could be gained from each of these methods?
3. What is the relationship between MMT and graded activity with this client?
Many physical disabilities cause muscle weakness. Slight to substantial limitations of performance in areas of occupation, such as bringing food to one’s mouth, lifting a child, removing items from a grocery store shelf, and getting into and out of bed, can result from loss of strength, depending on the degree of weakness and whether the weakness is permanent or temporary. If improvement is expected, the occupational therapist must assess the muscle weakness and plan an intervention that will enable occupational performance and increase strength.
Causes of Muscle Weakness
Loss of muscle strength is a primary symptom or a direct result of the following diseases or injuries:
1. Lower motor neuron disorders, such as peripheral neuropathies and peripheral nerve injuries, spinal cord injury (because those muscles innervated at the level[s] of the lesion generally have a lower motor neuron paralysis), Guillain-Barré syndrome, and cranial nerve dysfunction
2. Primary muscle diseases, such as muscular dystrophy and myasthenia gravis
3. Neurologic diseases in which the lower motor neuron is affected, such as amyotrophic lateral sclerosis or multiple sclerosis
Disabilities in which loss of muscle strength is caused by disuse or immobilization rather than being a direct effect of the disease process include burns, amputation, hand trauma (unless an accompanying nerve injury is present), arthritis, fracture, and a variety of other orthopedic conditions.
Muscle weakness can restrict or prevent performance in areas of occupation, including activities of daily living (ADLs), instrumental activities of daily living (IADLs), rest and sleep, education, work, play, leisure, and social participation. These limitations are assessed by observation of performance (see Chapter 20), screening tests, and manual muscle testing (MMT), when indicated.
Screening Tests
Screening tests are useful for observing areas of strength and weakness and for determining which areas require specific MMT.6,10,12,18 Screening tests can help the therapist avoid unnecessary testing or duplication of services.12 These tests are used by occupational therapists in some health care facilities in which MMT is the responsibility of the physical therapy service. Similar to the occupation-based functional motion assessment described in Chapter 20, screening tests are used to assess muscle strength. These tests are not as precise as MMT, and their purpose is to make a general evaluation of muscle strength and to determine areas of weakness, performance limitations, and the need for more precise testing. Screening may be accomplished by the following means:
1. Examination of the medical record for results of previous muscle test and range-of-motion (ROM) assessments
2. Observing the client entering the clinic and moving about
3. Observing the client perform functional activities, such as removing an article of clothing and shaking hands with the therapist6,12,13
4. Performing a gross check of bilateral muscle groups13
The last method can be performed while the client is comfortably seated in a sturdy chair or wheelchair. The client is asked to perform the motions against gravity (movements away from the floor) or in the gravity-minimized plane (parallel to the floor) if moving against gravity is not possible. Active range of motion (AROM) is observed, and resistance (application of force) can be given to the test motions to obtain a gross estimate of strength.
In the case of Sharon, who during the acute stage of her illness had very limited muscle strength, the occupational therapy (OT) practitioner would be able to observe changes by observing this client as she moved around her bed in an attempt to position herself. Initially she might require maximal assistance for bed repositioning or for food intake. The therapist will notice a gradual increase in automatic movements of the limbs as Sharon raises her arms to her forehead to brush back her hair with her forearm, cups her hands around the water glass being held by her husband as she sips through a straw, bends and straightens her legs in an attempt to get comfortable, or momentarily lifts her trunk away from the surface of the bed. Observation of these spontaneous movements as Sharon begins to engage within the context of her environment can serve as preliminary and informal screening of this client’s muscle strength.
Manual Muscle Test
Manual muscle testing (MMT) is a means of evaluating muscle strength. MMT measures the maximal contraction of a muscle or muscle group.6,7 Criteria used to measure strength include evidence of muscle contraction, amount of ROM through which the joint passes when the muscle contracts, and amount of resistance against which the muscle can contract. Gravity is considered a form of resistance.6,7,13 MMT is used to determine the amount of muscle power and to record gains and losses in strength.
Purposes of Manual Muscle Testing
The specific strength measurement of individual muscles through MMT can be essential for diagnosis of some neuromuscular conditions, such as peripheral nerve lesions and spinal cord injury. In peripheral nerve or nerve root lesions, the pattern of muscle weakness may help determine which nerve or nerve roots are involved, and whether the involvement is partial or complete. Careful evaluation can help determine the level(s) of spinal cord involvement and can provide an indication of whether the cord damage is complete or incomplete.14 Along with sensory evaluation, MMT can therefore be an important diagnostic aid in neuromuscular conditions.
The purposes of assessing muscle strength are to determine the amount of muscle power available and thus establish a baseline for intervention, to discern how muscle weakness is limiting performance in meaningful occupations such as ADLs and IADLs, to prevent deformities that can result from imbalances of strength, to determine the need for assistive devices as compensatory measures, to aid in the selection of occupations within the client’s capabilities, and to evaluate the effectiveness of intervention strategies and modalities.15
Methods of Assessment
Muscle strength can be assessed in several ways. The most precise method is a test of individual muscles. In this procedure, the muscle is carefully isolated through proper positioning, stabilization, and control of the movement pattern, and its strength is graded. This type of muscle testing is described by Kendall and McCreary14 and Cole, Furness, and Twomey.8 Another, and perhaps more common, method of MMT is to assess the strength of groups of muscles that perform specific motions at each joint. This type of testing was described by Daniels and Worthingham,10 Hislop and Montgomery,12,13 and the Rancho Muscle Testing Guide,20 and, for the most part, is the form that is presented later in this chapter.
Results of Assessment as a Basis for Intervention Planning
When planning intervention for maintenance or improvement of strength, the OT practitioner considers several factors in the clinical reasoning process before determining intervention priorities, goals, and modalities. Results of the muscle strength assessment will suggest the progression of the intervention program. What is the degree of weakness? Is it generalized or specific to one or more muscle groups? Are the muscle grades generally the same throughout, or is there significant disparity in muscle grades? If there is disparity, is there an imbalance of strength between the agonist and antagonist muscles that necessitates protection of the weaker muscles during OT intervention or when ADLs and IADLs are performed? When substantial imbalance between an agonist muscle and an antagonist muscle is noted, intervention goals may be directed toward strengthening the weaker group while maintaining the strength of the stronger group. Muscle imbalance may also suggest the need for an orthosis to protect the weaker muscles from overstretching while recovery is in progress. Examples of such orthoses are devices such as the bed footboard, used to prevent overstretching of the weakened ankle dorsiflexors, and the wrist cock-up splint, which can prevent overstretching of weakened wrist extensors.
Muscle grades will suggest the level of therapeutic activity or exercise that can help to maintain or improve strength. Is the weakness mild (G range), moderate (F to F+), or severe (P to 0)?15 Muscles graded F+, for example, could be strengthened by active assisted exercise or light activity against gravity. Likewise, muscles graded P will require activity or exercise in the gravity-minimized plane, with little or no resistance, to increase strength. (See Chapter 29 for further discussion of appropriate exercise and activity for specific muscle grades.)
Endurance of the muscles (i.e., how many repetitions of the muscle contraction are possible before fatigue sets in) is an important consideration in intervention planning. A frequent goal of the therapeutic activity program is to increase endurance as well as strength. Because MMT does not measure endurance, the therapist should assess endurance by engaging the client in periods of exercise or activity graded in length to determine the length of time that the muscle group can be used in sustained activity. A correlation between strength and endurance is usually noted. Weaker muscles will tend to have less endurance than stronger ones. When selecting intervention modalities for increasing endurance, the therapist may elect not to tax the muscle to its maximal ability, but rather to emphasize repetitive action at less than the maximal contraction to increase endurance and prevent fatigue.15
Sensory loss, which often accompanies muscle weakness, complicates the ability of the client to perform in an activity program. If little or no tactile or proprioceptive feedback is obtained from motion, the impulse to move is decreased or lost, depending on the severity of sensory loss. Thus, the movement may appear weak and ineffective even when strength is adequate for performance of a specific activity. With some diagnoses, a sensory re-education program (see Chapter 23) may be indicated to increase the client’s sensory awareness and feedback received from the part. In other instances, the therapist may elect to teach compensation techniques to address the sensory loss. These techniques include the use of mirrors, video playback, and biofeedback, which can be used as adjuncts to the strengthening program.
Other important considerations in the therapist’s clinical reasoning include the diagnosis and expected course of the disease. Is strength expected to increase, decrease, or remain about the same? If strength is expected to increase, what is the expected recovery period? What is the effect of exercise or activity on muscle function? Will too much activity delay the progress of recovery? If muscle power is expected to decrease, how rapid will the progression be? Are there factors to be avoided, such as vigorous activity or an exercise program that can accelerate the decrease in strength? If strength is declining, is special equipment practical and necessary? How much muscle power is needed to operate the equipment? How long will the client be able to operate a device before a decrease in muscle power makes it impracticable?15 In the case of Sharon, the therapist must be aware of the change in muscle strength of this client. It is expected that muscle strength will return in a proximal-to-distal pathway, and it is critical to protect the intrinsic muscles of the hand against overexertion to ensure the possibility of full recovery. Frequent muscle testing of select muscle groups will serve as a means to monitor progression of the disease and to assist in the introduction of appropriate intervention strategies.11,19
The therapist should assess the effect of muscle weakness on the ability to perform ADLs; this can be observed during assessment. Which tasks are most difficult to perform because of muscle weakness? How does the client compensate for the weakness? Which tasks are most important for the client to be able to perform? Is special equipment necessary or desirable for the performance of some ADLs, such as mobile arm support for independence in eating (see Chapter 30, Section II)?
If the client is involved in a total rehabilitation program and is receiving several other health care services, the activity and exercise programs must be synchronized and balanced to meet the client’s needs rather than the needs of the professionals, their schedules, and possibly their competition. The occupational therapist must be aware of the nature and extent of programs in which the client is engaged in physical therapy, recreation therapy, and any other services. Ideally, all members of the health care team should plan the exercise and activity programs together, to ensure that they complement one another.
 OT Practice Note
The therapist must consider the following questions: What is the client doing in each of the therapies? How long is each treatment session? Are the goals of all of the therapies similar and complementary, or are they divergent and conflicting? Is the client being overfatigued in the total program? Are the various treatment sessions provided in rapid succession, or are they well spaced to meet the client’s need for rest periods?
On the basis of these considerations and others pertinent to the specific client, the occupational therapist can select enabling and purposeful activities designed to maintain or increase strength, improve performance of ADLs, and enable the use of special equipment, while protecting weak muscles from overstretching and overfatigue.
Relationship Between Joint Range of Motion and Muscle Weakness
One of the criteria used to grade muscle strength is the ROM of the joint on which the muscle acts—that is, did the muscle move the joint through complete, partial, or no ROM? Another criterion is the amount of resistance that can be applied to the part once the muscle has moved the joint through partial or complete AROM. In this context, ROM is not necessarily the full average normal ROM for the given joint; rather, it is the ROM available to the individual client. When the therapist measures joint motion (discussed in Chapter 21), it is passive ROM (PROM) that is the measure of the range available to the client. PROM, however, is not an indication of muscle strength.
When performing muscle testing, the occupational therapist must know the client’s PROM to assign muscle grades correctly. It is possible that PROM would be limited or less than average for joint motion, but that the muscle strength would be normal. Therefore, it is necessary for the therapist to have measured joint ROM or to have moved joints passively to assess available ROM before administering the muscle test. For example, the client’s PROM for elbow flexion may be limited to 0 to 120 degrees because of an old fracture. If the client can flex the elbow joint to 120 degrees and can withstand moderate resistance during the muscle test, the muscle would be graded G (4). In such cases, the occupational therapist should record the limitation with the muscle grade, for example, 0 to 120 degrees/G.10 Conversely, if the client’s available ROM for elbow flexion is 0 to 160 degrees, and he or she can flex the elbow against gravity through only 120 degrees, the muscle would be graded F− because the part moves through only partial ROM against gravity. When the therapist determines the client’s available ROM before performing the muscle test, he or she can grade muscle strength on that basis rather than by using the average normal ROM as the standard. When assessing Sharon’s muscle strength during the recovery phase of her illness, the OT practitioner most likely will find a disparity between the client’s PROM and muscle strength, with limitation in strength preventing Sharon from moving her body parts through full available ROM, especially against gravity. The discrepancy will decrease as remyelination and axonal regeneration occur.
Limitations of the Manual Muscle Test
Limitations of MMT are that it cannot measure muscle endurance (the number of times the muscle can contract at its maximal level and resist fatigue),6 muscle coordination (the smooth, rhythmic interaction of muscle function), or motor performance capabilities of the client (the use of muscles for functional activities).8
MMT is not appropriate for and cannot be used accurately with clients who have spasticity caused by upper motor neuron disorders such as cerebrovascular accident (stroke) or cerebral palsy. In these conditions, muscles are often hypertonic. Muscle tone and ability to perform movements are influenced by primitive reflexes and the position of the head and body in space. Also, movements tend to occur in gross synergistic patterns that make it impossible for the client to isolate joint motions, which is demanded in MMT procedures.2,3,6,7,16
However, when administered during the final recovery stage, when spasticity and synergy patterns have disappeared and the client has achieved isolated control of voluntary muscle function, MMT may reveal some residual weakness. In these instances, some assessment of strength can be of value in designing a treatment program. (See Chapters 19, 31, Section II, and 32 for methods of evaluating motor function of clients with upper motor neuron disorders.)
Contraindications and Precautions
Assessment of strength using MMT is contraindicated when the client has inflammation or pain in the region to be tested; a dislocation or unhealed fracture; recent surgery, particularly of musculoskeletal structures; myositis ossificans; or bone carcinoma or any fragile bone condition.7,15
Special precautions must be taken when resisted movement could aggravate the client’s condition, as might occur with osteoporosis, subluxation or hypermobility of a joint, hemophilia or any type of cardiovascular risk or disease, abdominal surgery or an abdominal hernia, and fatigue that exacerbates the client’s condition.6,7
Unlike the PROM assessment discussed in Chapter 21, MMT requires the client’s complete involvement in the testing procedure. Therefore, the therapist must be mindful of the client’s willingness to expend true effort (especially when resistance is applied), to endure some discomfort, and to understand the requirements of the test. Results of MMT should not be compromised as a result of cognitive and language barriers, or the client’s inability to perform the motor skills required for the test.13
Knowledge and Skill of the Occupational Therapist
The validity of MMT depends on the knowledge and skill of the OT practitioner in using the correct testing procedure. Careful observation of movement, careful and accurate palpation, correct positioning, consistency of procedure, and experience of the therapist are critical factors in accurate testing.10,12–14
To be proficient in manual muscle testing, the OT practitioner must have detailed knowledge about all aspects of muscle function. Joints and joint motions, muscle innervation, origin and insertion of muscles, action of muscles, direction of muscle fibers, angle of pull on the joints, and the role of muscles in fixation and substitution are important considerations. The therapist must be able to locate and feel contraction of the muscles; recognize whether the contour of the muscle is normal, atrophied, or hypertrophied; and detect abnormal movements and positions. The OT practitioner must use consistent methods in the application of test procedures. Knowledge and experience are necessary to detect substitutions and interpret strength grades with accuracy.12–14
It is necessary for the OT practitioner to acquire skill and experience in testing and grading the muscles of normal persons of both genders and of all ages. Many factors affect muscle strength. The age, gender, and lifestyle of the client; the muscle size and type and speed of contraction; the effect of previous training for the testing situation; joint position during the muscle contraction; previous training effects; and time of day, temperature, and fatigue all can affect muscle strength.6,7 Experience can help the therapist differentiate among strength grades if these factors are taken into account.18
General Principles of Manual Muscle Testing
If several tests are to be administered, they should be organized to avoid frequent repositioning of the client.12,13,20 The OT practitioner should observe contour of the part, comparative symmetry of the muscle on both sides, and any apparent hypertrophy (increase in size) or atrophy (shrinking or wasting). During PROM, the therapist can estimate muscle tone. Is there less than or greater than normal resistance to passive movement? During AROM, the therapist can observe the quality of movement, such as movement speed, smoothness, and rhythm, and any abnormal movements such as tremors.18
Correct positioning of the client and the body part is essential for effective and correct evaluation. The client should be positioned comfortably on a firm surface. Clothing should be arranged or removed so the therapist can see the muscle or muscles being tested. For maximal comfort to the client, the assessment is administered to all muscles possible in a given position (upright, prone, supine, side-lying) before changing the position of the client. If the client cannot be placed in the correct position for the test, the OT practitioner must adapt the test and use clinical judgment in approximating strength grades.18 In addition to correct positioning, test validity depends on careful stabilization, palpation of the muscles, and observation of movement.10
Gravity Influencing Muscle Function
Gravity is a form of resistance to muscle power. It is used as a grading criterion in tests of the neck, trunk, and extremities. In other words, muscle grade is based on whether a muscle can move the part against gravity.14 Movements against gravity occur in a vertical plane (i.e., away from the floor or toward the ceiling) and are used with grades F (3), G (4), and N (5). Movements against gravity and resistance are performed in a vertical plane with added manual or mechanical resistance and are used with F+ (3+) to N (5) grades. Tests for weaker muscles (O, T [1], P [2], and P+ [2+] grades) are often performed in a horizontal plane (i.e., parallel to the floor) to reduce the resistance of gravity on muscle power. This position has been referred to as the gravity-eliminated, gravity-minimized, or gravity-lessened test position.10,14,18 Gravity-eliminated is the common term to designate this position.16 Because the effect of gravity on muscle function cannot be eliminated completely, gravity-minimized or gravity-lessened may be more accurate terms. The term gravity-minimized is used in this chapter.10,14
In many muscle tests, the effect of gravity on the ability to perform the movement must be considered in grading muscle power. It is of lesser importance, however, in tests of the forearm, fingers, and toes because the weight of the part lifted against gravity is insignificant compared with the muscle strength.10,14 Therefore, the OT practitioner may choose to do the tests for F (3) to N (5) in the gravity-minimized plane. In other tests, positioning for movements in the gravity-decreased position or the against-gravity position may not be feasible. For example, in the test for scapula depression, positioning to perform the movement against gravity would require the client to assume an inverted position. In individual cases, positioning for movement in the correct plane may not be possible because of confinement to bed, generalized weakness, trunk instability, immobilization devices, and medical precautions. In these instances, the OT practitioner must adapt the positioning to the client’s needs and must use clinical judgment in modifying the grading. If tests of the forearm, fingers, and toes are performed against gravity rather than in the gravity-minimized plane, the standard definitions of muscle grades can be modified when muscle grades are recorded. Partial ROM against gravity is graded P (2), and full ROM against gravity is graded F (3).10 Such modifications in positioning and grading should be noted by the therapist when results of the muscle test are recorded.
For consistency in procedure and grading, gravity-minimized positions and against-gravity positions are used in the manual muscle tests described later, except in cases in which the positioning is not feasible or would be awkward or uncomfortable for the client. Modifications in positioning and grading have been cited with the individual tests.
Muscle Grades
Although the definitions of muscle grades are standard, assignment of muscle grade during MMT depends on the clinical judgment, knowledge, and experience of the OT practitioner,10 especially when slight, moderate, or maximal resistance is determined. Age, gender, body type, occupation, and leisure activities all influence the amount of resistance that a particular client can take.9,10,12–14 Normal strength for an 8-year-old girl will be considerably less than that for a 25-year-old man, for example. Additionally, strength tends to decline with age, and full resistance to the same muscle group will vary considerably from an 80-year-old man to a 25-year-old man.7,14 Therefore, the amount of resistance that can be applied to grade a particular muscle group as N (5) or G (4) varies among individual clients.9,10,12–14
The amount of resistance that can be given also varies among muscle groups. Muscle strength is relative to the cross-sectional size of the muscle. Larger muscles have greater strength.7,10 For example, the flexors of the wrist are larger and therefore have more power and can take much more resistance than the abductors of the fingers. The OT practitioner must consider the size and relative power of the muscles and the leverage used when giving resistance.15 The amount of resistance applied should be modified accordingly. When only one side of the body is involved in the dysfunction causing muscle weakness, the OT practitioner can establish the standards for strength by testing the unaffected side first.
Because weak muscles fatigue easily, the results of MMT may not be accurate if the client is tired. There should be no more than three repetitions of the test movement because fatigue can result in grading errors if the muscle becomes tired as a result of low endurance.7,8 Pain, swelling, or muscle spasm in the area being tested may also interfere with the testing procedure and accurate grading. Such problems should be recorded on the evaluation form.18 Psychological factors must be considered in interpreting muscle strength grades. When interpreting strength, the therapist must assess motivation, cooperation, and the effort put forth by the client.10
In MMT, muscles are graded according to the criteria listed in Table 22-1.6,10,12,13,20
TABLE 22-1
Muscle Grades and Their Definitions
| Number | Grade | Word/Letter Grade Definition |
| 0 | Zero (0) | No muscle contraction can be seen or felt. |
| 1 | Trace (T) | Contraction can be observed or felt, but there is no motion. |
| 2− | Poor minus (P−) | Part moves through incomplete ROM with gravity minimized. |
| 2 | Poor (P) | Part moves through complete ROM with gravity minimized. |
| 2+ | Poor plus (P+) | Part moves through less than 50% of available ROM against gravity or through complete ROM with gravity minimized against slight resistance.10 |
| 3− | Fair minus (F−) | Part moves through more than 50% of available ROM against gravity.10 |
| 3 | Fair (F) | Part moves through complete ROM against gravity. |
| 3+ | Fair plus (F+) | Part moves through complete ROM against gravity and slight resistance. |
| 4 | Good (G) | Part moves through complete ROM against gravity and moderate resistance. |
| 5 | Normal (N) | Part moves through complete ROM against gravity and maximal resistance. |
The purpose of using “plus” or “minus” designations with muscle grades is to “fine grade” muscle strength. These designations are likely to be used by the experienced OT practitioner. Two OT practitioners testing the same individual may vary up to a half grade in their results, but there should not be a whole grade difference.18
Substitutions
The brain thinks in terms of movement and not in terms of contraction of individual muscles.10 Thus, a muscle or muscle group may attempt to compensate for the function of a weaker muscle to accomplish a movement. These movements are called trick movements, or substitutions.6,7,14 Substitutions can occur during MMT. To test muscle strength accurately, the therapist must give careful instructions; eliminate substitutions in the testing procedure by correct positioning, stabilization, and palpation of the muscle being tested; and ensure careful performance of the test motion without extraneous movements. To prevent substitutions, the correct position of the body should be maintained and movement of the part performed without shifting the body or turning the part.6,7,14 The therapist must palpate contractile tissue (muscle fibers or tendon) to detect tension in the muscle group under examination. It is only through correct palpation that the therapist can be certain that the motion observed is not being performed by substitution.6,10 Undetected trick movements can mask the client’s problems, resulting in inaccurate treatment planning.6
In the tests that follow, possible substitutions are described at the end of the directions. The OT practitioner should be familiar with these substitutions to detect them and correct the procedure. Detecting substitutions is a skill gained with time and experience.
Procedure for Testing
Testing should be performed according to a standard procedure to ensure accuracy and consistency. Each of the tests that follow is divided into these steps: (1) position, (2) stabilize, (3) palpate, (4) observe, (5) resist, and (6) grade.
First, the client should be positioned for the specific muscle test. The occupational therapist should position himself or herself in relation to the client. Then, the therapist stabilizes the part proximal to the part being tested to eliminate extraneous movements, isolate the muscle group, ensure the correct test motion, and eliminate substitutions. The therapist should then demonstrate or describe the test motion to the client and should ask him or her to perform the test motion and return to the starting position. The therapist makes a general observation of the form and quality of movement, looking for substitutions or difficulties that may require adjustments in positioning and stabilization. The therapist then places his or her fingers (typically the tips of the index and long fingers—avoid using the thumb because it has its own pulse) for palpation of one or more of the prime movers, or its tendinous insertion, on the muscle group being tested and asks the client to repeat the test motion. While simultaneously palpating the muscle group, the therapist again observes the movement for possible substitution and for the amount of range completed. When the client has moved the part through the available ROM, the therapist asks the client to hold the end position. The therapist removes the palpating fingers and uses the free hand to resist in the direction opposite that of the test movement. For example, when elbow flexion is tested, the therapist applies resistance in the direction of extension. The therapist usually must maintain stabilization when resistance is given. Manual muscle tests use the “break test,” that is, resistance is applied after the client has reached the end of the available ROM.12,13
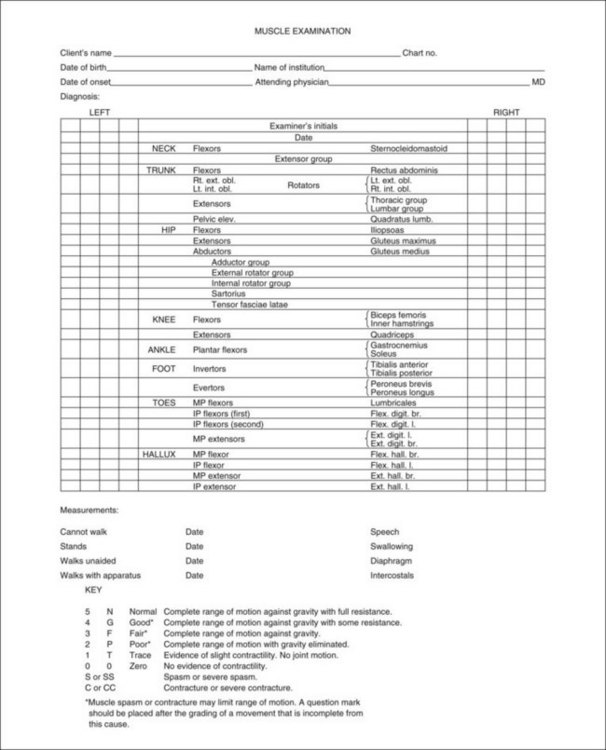
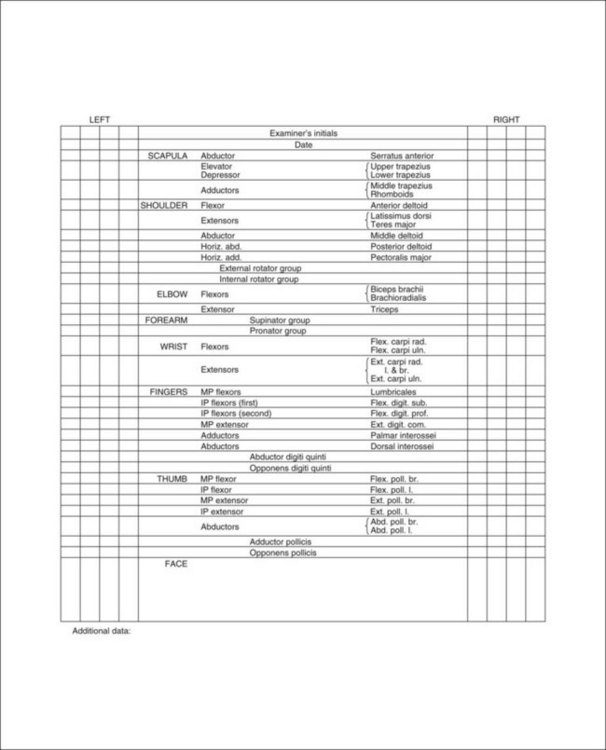
The client should be allowed to establish a maximal contraction (set the muscles) before resistance is applied.10,15 In most tests, the OT practitioner applies resistance near the distal segment to which the muscle is attached after preparing the client by giving the command to hold. Resistance should be applied gradually in a direction opposite to the line of pull of the muscle or muscle group being tested.12 The break test should not evoke pain, and resistance should be released immediately if pain or discomfort occurs.10 Finally, the therapist grades the muscle strength according to the preceding standard definitions of muscle grades. This procedure is used for tests of strength of grades F+ (3+) and above. Resistance is not applied for tests of muscles from F (3) to 0. Slight resistance is sometimes applied to a muscle that has completed the full ROM in the gravity-minimized plane to determine whether the grade is P+. Figure 22-1 shows a sample form for recording muscle grades.
The following directions do not include tests for the face, neck, and trunk. Refer to the references for these tests, as well as for comprehensive treatment of the topic of manual muscle testing.6,8,10,12–14
Manual Muscle Testing of the Upper Extremity
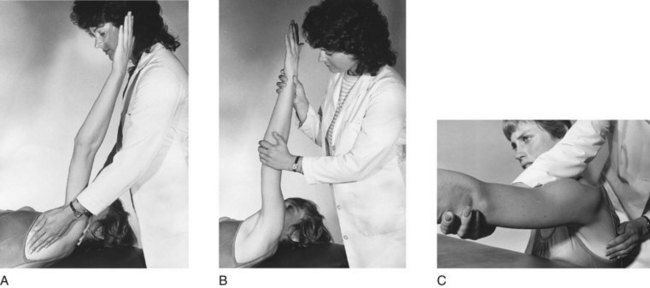
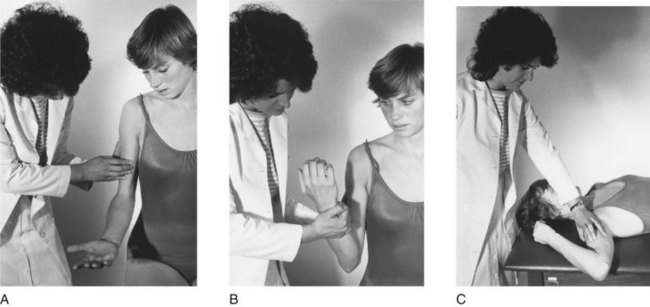
Scapula Elevation, Neck Rotation, and Lateral Flexion
| Muscles10 | Innervation: nerve, nerve roots10,14 |
| Upper trapezius | Accessory nerve (CN 12), C2-4 |
| Levator scapula | Dorsal scapular nerve, C3-5 |
Procedure for Testing Grades Normal (N or 5) to Fair (F or 3)10,12,13
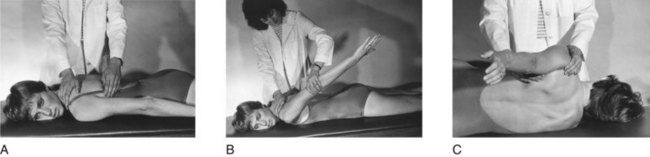
1. Position: The client is seated erect with arms resting at sides of body. The OT practitioner stands behind the client toward the side to be tested.
2. Stabilize: A chair back can offer stabilization to the trunk, if necessary.
3. Palpate: Palpate the upper trapezius parallel to the cervical vertebrae, near the shoulder-neck curve.10
4. Observe: Observe the elevation of the scapula as the client shrugs the shoulder toward the ear and rotates and laterally flexes the neck toward the side being tested at the same time (Figure 22-2, A).14
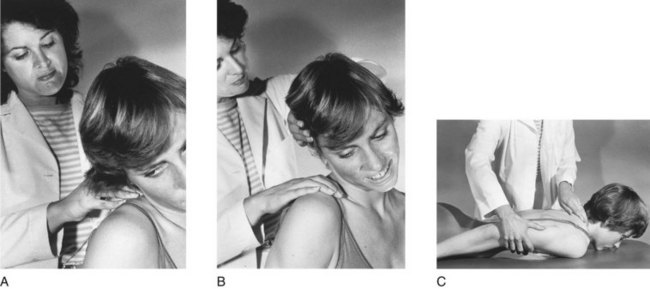
5. Resist: Provide resistance by placing one hand on top of the shoulder toward the scapula depression and the other hand on the side of the head toward derotation and lateral flexion to the opposite side (Figure 22-2, B).14
Procedure for Testing Grades Poor (P or 2), Trace (T or 1), and Zero (0)10
1. Position: The client should be prone with head in midposition. The OT practitioner stands opposite the side being tested.
2. Stabilize: The weight of the trunk on the supporting surface provides adequate stabilization.
3. Palpate: Palpate the upper trapezius, as described in the previous procedure, while observing the client elevating the shoulder being tested. Because of positioning, the neck rotation and lateral flexion components are omitted for these grades (Figure 22-2, C).
4. Grade: The standard definitions of muscle grades should be used.
Substitutions: Rhomboids and the levator scapula can elevate the scapula if the upper trapezius is weak or absent. In the event of substitution, some downward rotation of the acromion will be observed during movement.4,15,20
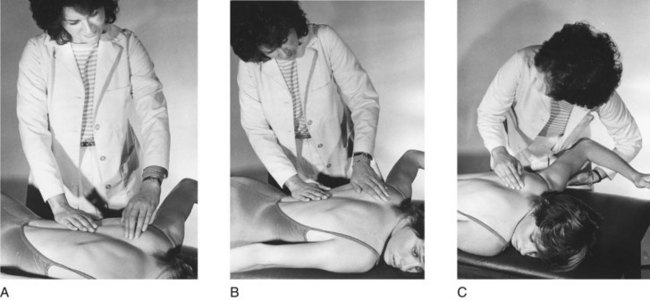
Scapula Depression, Adduction, and Upward Rotation
| Muscles1,4 | Innervation6,7 |
| Lower trapezius | Spinal accessory nerve, C3,4 |
| Middle trapezius | |
| Serratus anterior | Long thoracic nerve, C5-7 |
Procedure for Testing Grades N (5) to F (3)
1. Position: The client is prone with the arm positioned overhead in 130 to 165 degrees of abduction and resting on the supporting surface. The forearm is in midposition with the thumb toward the ceiling.12,13 The therapist stands next to the client on the opposite side7,10 or on the same side.12,13
2. Stabilize: The weight of the body provides adequate stabilization. This test is given in the gravity-minimized position, because it is not feasible to position the client for the against-gravity movement (head down). If the deltoid is weak, the arm may be supported and passively raised by the therapist while the client attempts the motion.10
3. Palpate: Palpate the lower trapezius distal to the medial end of the spine of the scapula and parallel to the thoracic vertebrae, approximately at the level of the inferior angle of the scapula.10
4. Observe: Observe the client while he or she lifts the arm off the supporting surface to ear level.12 During this movement, there is strong downward fixation of the scapula by the lower trapezius (Figure 22-3, A).10
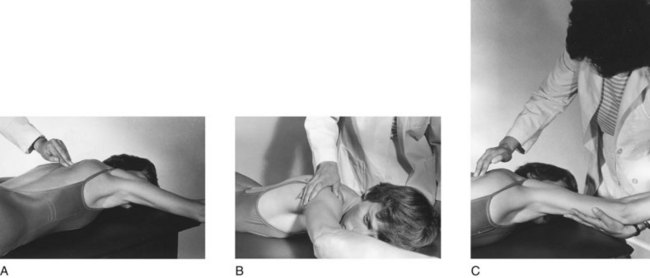
5. Resist: Provide resistance at the lateral angle of the scapula, toward elevation and abduction (Figure 22-3, B).10 Resistance may be applied on the humerus just above the elbow in a downward direction if shoulder and elbow strength are adequate.12–14
Procedure for Testing Grades P (2), T (1), and 0
1. Position and stabilize: Position and stabilize the client as described in the previous test. No stabilization is required. The therapist may support the client’s arm if the posterior deltoid muscles and triceps are weak.12
2. Palpate and observe: Palpate and observe the client in the same manner as described for the previous test (Figure 22-3, C).
3. Grade: The client receives a grade of P if he or she can complete full scapular ROM without the weight of the arm.12
Substitutions: Middle trapezius or rhomboids may substitute.6 Rotation of the inferior angle of the scapula toward the spine is evidence of substitution.20
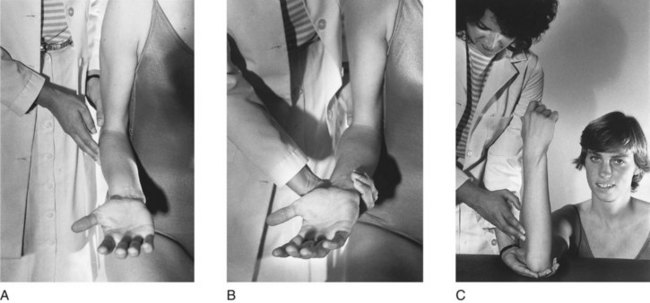
Scapula Abduction and Upward Rotation
Procedure for Testing Grades N (5) to F (3)
1. Position: The client is supine with the shoulder flexed to 90 degrees and slightly abducted, elbow extended or fully flexed. The therapist stands next to the client on the side being tested.6,7,10,13,14
2. Stabilize: Provide stabilization over the weight of the trunk or over the shoulder.6
3. Palpate: Palpate the digitations of the origin of the serratus anterior on the ribs, along the midaxillary line and just distal and anterior to the axillary border of the scapula.6,10 Note that muscle contraction may be difficult to detect in women and overweight clients.
4. Observe: Observe the client reaching upward as if pushing the arm toward the ceiling, abducting the scapula (Figure 22-4, A).6,10
5. Resist: Provide resistance at the distal end of the humerus, and push the client’s arm directly downward toward scapula adduction (Figure 22-4, B).6,7,10,13 If there is shoulder instability, the therapist should support the arm and not apply resistance. In this instance, only a grade of F (3) can be tested.7
Procedure for Testing Grades P (2), T (1), and 0
1. Position: The client is seated with the arm supported by the therapist in 90 degrees of shoulder flexion and the elbow extended.6,10,13
2. Stabilize: Provide stabilization over the shoulder to be tested.
3. Palpate: The client is palpated in the same manner as described in the previous section.
4. Observe: The therapist should note any abduction of the scapula as the arm moves forward (Figure 22-4, C).10 Weakness of this muscle produces “winging” of the scapula.8
5. Grade: The client is graded according to standard definitions of muscle grades.
Substitutions: The pectoralis major and minor may pull the scapula forward into abduction at its insertion on the humerus; the upper and lower trapezius and contralateral trunk rotation may also substitute.6 The therapist observes for humeral horizontal adduction followed by scapula abduction.7,14
Scapula Adduction
| Muscles10,14 | Innervation6,10 |
| Middle trapezius | Spinal accessory nerve, C3,4 |
| Rhomboids | Dorsal scapular nerve, C4,5 |
Procedure for Testing Grades N (5) to F (3)
1. Position: The client is prone with the shoulder abducted to 90 degrees and externally rotated and the elbow flexed to 90 degrees, shoulder resting on the supporting surface. The therapist stands on the side being tested.10,12–14
2. Stabilize: The weight of the trunk on the supporting surface usually provides adequate stabilization, or stabilization can be provided over the midthorax to prevent trunk rotation if necessary.
3. Palpate: Palpate the middle trapezius between the spine of the scapula and adjacent vertebrae in alignment with the abducted humerus.
4. Observe: Observe the client lifting the arm off the table, and note any movement of the vertebral border of the scapula toward the thoracic vertebrae (Figure 22-5, A).
5. Resist: Provide resistance at the vertebral border of the scapula toward abduction (Figure 22-5, B).6,7,10,13
Procedure for Testing Grades P (2), T (1), and 0
1. Position and stabilize: The therapist positions and stabilizes the client in the same way as described in the previous test but now supports the weight of the arm by cradling it under the humerus and forearm.14 The client may also be positioned sitting erect, with the arm resting on a high table and the shoulder midway between 90-degree flexion and abduction.10 The therapist stands behind the client in this instance.
2. Palpate and observe: Palpate and observe the middle trapezius. Ask the client to bring the shoulders together as if assuming an erect posture. Observe scapula adduction toward the vertebral column (Figure 22-5, C).
3. Grade: The client is graded according to standard definitions of muscle grades.
Substitutions: The posterior deltoid can act on the humerus and produce scapula adduction.6 Observe for use of humeral extension to initiate scapula adduction. Rhomboids may substitute, but the scapula will rotate downward.7,15,20
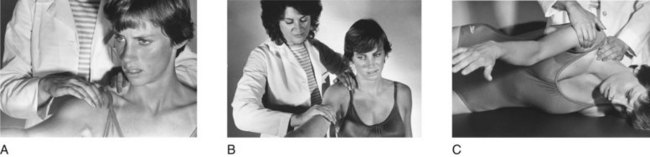
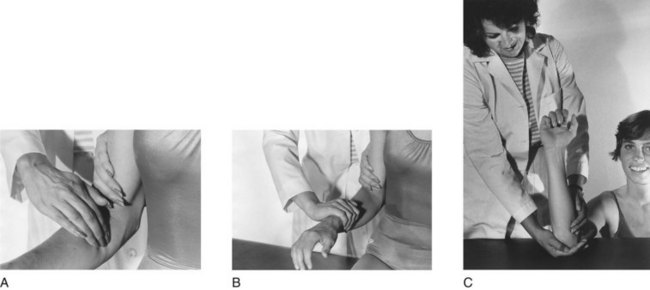
Scapula Adduction and Downward Rotation
| Muscles7,8 | Innervation6–8 |
| Rhomboids major and minor | Dorsal scapular nerve, C4,5 |
| Levator scapula | |
| Middle trapezius | Spinal accessory nerve, C3,4 |
Procedure for Testing Grades N (5) to F (3)
1. Position: The client is prone with the head rotated to the opposite side; the arm on the side being tested is placed in shoulder adduction and internal rotation, with the elbow slightly flexed and the dorsum of the hand resting over the lumbosacral area of the back.6,12 The therapist stands opposite the side being tested.7,8,10
2. Stabilize: The weight of the trunk on the supporting surface offers adequate stabilization.7,14
3. Palpate: Palpate the rhomboid muscles between the vertebral border of the scapula and the second to fifth thoracic vertebrae.10,14 (They may be more easily discerned toward the lower half of the vertebral border of the scapula, because they lie under the trapezius muscle.)
4. Observe: Observe the client raising the hand up off the back while maintaining the position of the arm.7,12 During this motion, the anterior aspect of the shoulder must lift from the table surface. Observe scapula adduction and downward rotation while the shoulder joint is in some extension (Figure 22-6, A).10
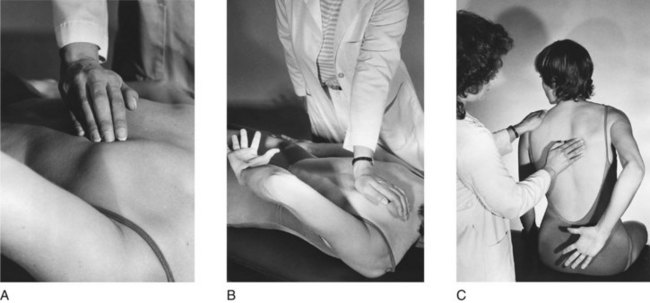
FIGURE 22-6 Scapula adduction and downward rotation. A, Palpate and observe. B, Resist. C, Gravity-minimized position.
5. Resist: Provide resistance over the scapula toward abduction and upward rotation6 (Figure 22-6, B).
Procedure for Testing Grades P (2), T (1), and 0
1. Position: The client sits erect with the arm positioned behind the back in the same manner described for the previous test. The therapist stands behind the client, slightly opposite the side being tested.10
2. Stabilize: The trunk is stabilized by placing one hand over the shoulder, opposite the one being tested, to prevent trunk flexion and rotation.
3. Palpate: The rhomboids are palpated as described previously.
4. Observe: Scapula adduction and downward rotation are observed as the client lifts the hand away from the back (Figure 22-6, C).
5. Grade: The client is graded according to standard definitions of muscle grades.
Substitutions: The middle trapezius may substitute, but the movement will not be accompanied by downward rotation.12 The posterior deltoid acting to perform horizontal abduction or glenohumeral extension can produce scapula adduction through momentum. Scapula adduction would be preceded by extension or abduction of the humerus.15,20 The pectoralis minor could tip the scapula forward.7
Shoulder Flexion
| Muscles10 | Innervation6,10 |
| Anterior deltoid | Axillary nerve, C5,6 |
| Coracobrachialis | Musculocutaneous nerve, C5-7 |
Procedure for Testing Grades N (5) to F (3)
1. Position: The client is seated with the arm relaxed at the side of the body and the hand facing backward.12 A straight-backed chair may be used to offer trunk support. The therapist stands on the side being tested and slightly behind the client.7,10,20
2. Stabilize: Provide stabilization over the shoulder being tested, but allow the normal abduction and upward rotation of the scapula that occurs with this movement.10,13
3. Palpate: Palpate the anterior deltoid just below the clavicle on the anterior aspect of the humeral head.7
4. Observe: Observe the client flexing the shoulder joint to 90-degree flexion (parallel to the floor; Figure 22-7, A).6,10,12
5. Resist: Provide resistance at the distal end of the humerus downward toward shoulder extension (Figure 22-7, B).6,7,8,12
Procedure for Testing Grades P (2), T (1), and 0
1. Position: The client is placed in a side-lying position. The side being tested is superior. If the client cannot maintain the weight of the arm against gravity, the therapist can support it.6,12 If the side-lying position is not feasible, the client may remain seated, and the test procedure described above can be performed with the grading modified.10
2. Palpate and observe: The therapist should palpate and observe the client in the same manner as described in the previous test. The arm is moved toward the face to 90-degree shoulder flexion (Figure 22-7, C).
3. Grade: The client is graded according to standard definitions of muscle grades. If the seated position was used for tests of grades poor to zero, partial ROM against gravity should be graded poor.10,13
Substitutions: Clavicular fibers of the pectoralis major can perform flexion through partial ROM while performing horizontal adduction. The biceps brachii may flex the shoulder, but the humerus will first be rotated externally for the best mechanical advantage. The upper trapezius will assist flexion by elevating the scapula. Observe for flexion accompanied by horizontal adduction, external rotation, or scapula elevation.10,15,20
Note: Arm elevation in the plane of the scapula, about halfway between shoulder flexion and abduction, is called scaption. This movement is more commonly used for function than for shoulder flexion or abduction. Scaption is performed by the deltoid and supraspinatus muscles. It is tested in a way similar to that used for shoulder flexion, described previously, except that the arm is elevated in a position 30 to 45 degrees anterior to the frontal plane.6,12
Shoulder Extension
| Muscles4,10,14 | Innervation6,10 |
| Latissimus dorsi | Thoracodorsal nerve, C6-8 |
| Teres major | Lower subscapular nerve, C5-7 |
| Posterior deltoid | Axillary nerve, C5,6 |
Procedure for Testing Grades N (5) to F (3)
1. Position: The client is prone, with the shoulder joint adducted and internally rotated so that the palm of the hand is facing up.6,7,12 The therapist stands on the opposite side or on the test side.
2. Stabilize: Provide stabilization over the scapula on the side being tested.
3. Palpate: Palpate the teres major along the axillary border of the scapula. The latissimus dorsi may be palpated slightly below this point or closer to its origins parallel to the thoracic and lumbar vertebrae.7,10 The posterior deltoid may be found over the posterior aspect of the humeral head (Figure 22-8, A).
4. Observe: Observe the client extending the shoulder joint.
5. Resist: Provide resistance at the distal end of the humerus in a downward and outward direction, toward flexion and slight abduction (Figure 22-8, B).6,7,10,12–14
Procedure for Testing Grades P (2), T (1), and 0
1. Position: The client is placed in the side-lying position; the therapist stands behind the client.6
2. Stabilize: Provide stabilization over the scapula. If the client cannot maintain the weight of the part against gravity, the therapist should support the client’s arm.6 If the side-lying position is not feasible, the client may remain in the prone position, and the test may be performed as described for the previous test with modified grading.10
3. Palpate: Palpate the teres major or latissimus dorsi as described for the previous test.
4. Observe: Observe the client extending the arm backward in a plane parallel to the floor (Figure 22-8, C).
5. Grade: Grade the client according to standard definitions of muscle grades. If the tests for grades poor to zero were done in the prone-lying position, completion of partial ROM should be graded poor.10
Substitutions: Scapula adduction can substitute. Observe for flexion of the shoulder or adduction of the scapula preceding extension of the humerus.15
Shoulder Abduction to 90 Degrees
| Muscles10,14 | Innervation10 |
| Middle deltoid | Axillary nerve, C5,6 |
| Supraspinatus | Suprascapular nerve, C5 |
Procedure for Testing Grades N (5) to F (3)
1. Position: The client is seated, with arms relaxed at the sides of the body. The elbow on the side to be tested should be slightly flexed and the palms facing toward the body. The therapist stands behind the client.6,7,12
2. Stabilize: Provide stabilization over the scapula on the side to be tested.6,10,14
3. Palpate: Palpate the middle deltoid over the middle of the shoulder joint from the acromion to the deltoid tuberosity.6,10,14,15 The supraspinatus is too deep to palpate.6
4. Observe: Observe the client abducting the shoulder to 90 degrees. During movement, the client’s palm should remain down, and the therapist should observe that there is no external rotation of the shoulder nor elevation of the scapula6,10,12–15 (Figure 22-9, A).

5. Resist: Provide resistance at the distal end of the humerus toward adduction (Figure 22-9, B).12
Procedure for Testing Grades P (2), T (1), and 0
1. Position: The client is in the supine position, lying with the arm to be tested resting at the side of the body, palm facing in and the elbow slightly flexed. The therapist stands in front of the supporting surface toward the side to be tested.10,12
2. Stabilize: Provide stabilization over the shoulder to be tested.
3. Palpate and observe: Follow the technique described for the previous test. The therapist asks the client to bring the arm out and away from the body, while abducting the shoulder to 90 degrees (Figure 22-9, C).
4. Grade: The client is graded according to standard definitions of muscle grades.
Substitutions: The long head of the biceps may attempt to substitute. Observe for elbow flexion and external rotation accompanying the movement.12 The anterior and posterior deltoids can act together to effect abduction. The upper trapezius may attempt to assist. Observe for scapula elevation preceding movement.7,15,20
Shoulder External Rotation
| Muscles4,10,14 | Innervation4,10,14 |
| Infraspinatus | Suprascapular nerve, C5,6 |
| Teres minor | Axillary nerve, C5,6 |
Procedure for Testing Grades N (5) to F (3)
1. Position: The client is prone, with the shoulder abducted to 90 degrees and the humerus in neutral (0-degree) rotation, elbow flexed to 90 degrees. The forearm is in neutral rotation, hanging over the edge of the table, perpendicular to the floor.6–8,12 The therapist stands in front of the supporting surface, toward the side to be tested.10,14
2. Stabilize: Provide stabilization at the distal end of the humerus by placing a hand under the arm on the supporting surface to prevent shoulder abduction.7,14
3. Palpate: Palpate the infraspinatus muscle just below the spine of the scapula on the body of the scapula6 or the teres minor along the axillary border of the scapula.10
4. Observe: Observe the client rotating the humerus so that the back of the hand is moving toward the ceiling (Figure 22-10, A).6,7,10,12–14
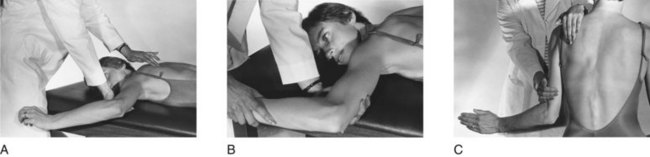
FIGURE 22-10 Shoulder external rotation. A, Palpate and observe. B, Resist. C, Gravity-minimized position.
5. Resist: Provide resistance on the distal end of the forearm toward the floor in the direction of internal rotation (Figure 22-10, B).6,10,12–14 Apply resistance gently and slowly to prevent injury to the glenohumeral joint, which is inherently unstable.12
Procedure for Testing Grades P (2), T (1), and 0
1. Position: The client is seated, with arm adducted and in neutral rotation at the shoulder. The elbow is flexed to 90 degrees, with the forearm in neutral rotation. The therapist stands in front of the client toward the side to be tested.6,7
2. Stabilize: Provide stabilization on the arm against the trunk at the distal end of the humerus to prevent abduction and extension of the shoulder, and over the shoulder to be tested.5,7,20 The hand stabilizing over the shoulder can be used to palpate the infraspinatus simultaneously.
3. Palpate: Palpate the infraspinatus and teres minor as described for the previous test.
4. Observe: Observe the client moving the forearm away from the body by rotating the humerus while maintaining neutral rotation of the forearm (Figure 22-10, C).6,20
5. Grade: The client is graded according to standard definitions of muscle grades.
Substitutions: If the elbow is extended and the client supinates the forearm, the momentum could aid external rotation of the humerus. Scapular adduction can pull the humerus backward and into some external rotation. The therapist should observe for scapula adduction and initiation of movement with forearm supination.15,20
Shoulder Internal Rotation
| Muscles10,14,15 | Innervation4,5,10 |
| Subscapularis | Subscapular nerve, C5,6 |
| Pectoralis major | Medial and lateral pectoral nerves, C5-T1 |
| Latissimus dorsi | Thoracodorsal nerve, C6-8 |
| Teres major | Subscapular nerve, C5-7 |
Procedure for Testing Grades N (5) to F (3)
1. Position: The client is prone, with the shoulder abducted to 90 degrees, the humerus in neutral rotation, and the elbow flexed to 90 degrees. A rolled towel may be placed under the humerus. The forearm is perpendicular to the floor. The therapist stands on the side to be tested, just in front of the client’s arm.6–8,12
2. Stabilize: Provide stabilization at the distal end of the humerus by placing a hand under the arm and on the supporting surface, as for external rotation.6,7,10,14
3. Palpate: Palpate the teres major and latissimus dorsi along the axillary border of the scapula toward the inferior angle.
4. Observe: Observe the client internally rotating the humerus, moving the palm of the hand upward toward the ceiling (Figure 22-11, A).6,10
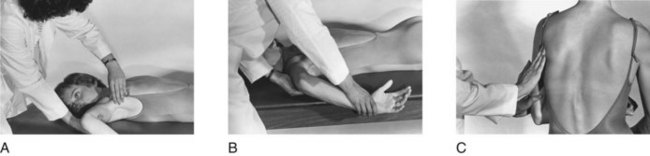
FIGURE 22-11 Shoulder internal rotation. A, Palpate and observe. B, Resist. C, Gravity-minimized position.
5. Resist: Provide resistance at the distal end of the volar surface of the forearm anteriorly toward external rotation (Figure 22-11, B).7,10,12–14
Procedure for Testing Grades P (2), T (1), and 0
1. Position: The client is seated, with the shoulder adducted and in neutral rotation, elbow flexed to 90 degrees with the forearm in neutral rotation. The therapist stands on the side to be tested.6,20
2. Stabilize: Provide stabilization on the arm at the distal end of the humerus against the trunk to prevent abduction and extension of the shoulder.
3. Palpate: Palpate the teres major and latissimus dorsi, as described for the previous test.
4. Observe: Observe the client moving the palm of the hand toward the chest, while internally rotating the humerus (Figure 22-11, C).
Substitutions: If the trunk is rotated, gravity will act on the humerus, rotating it internally.6 The therapist should observe for trunk rotation. When the elbow is in extension, pronation of the forearm can substitute.10,15,20
Shoulder Horizontal Abduction
| Muscles4,10,15 | Innervation10,13 |
| Posterior deltoid | Axillary nerve, C5,6 |
| Infraspinatus | Suprascapular nerve, C5,6 |
Procedure for Testing Grades N (5) to F (3)
1. Position: The client is prone, with the shoulder abducted to 90 degrees and in slight external rotation, elbow flexed to 90 degrees, and forearm perpendicular to the floor. The therapist stands on the side being tested.14,15
2. Stabilize: Provide stabilization over the scapula.6,10
3. Palpate: Palpate the posterior deltoid below the spine of the scapula and distally toward the deltoid tuberosity on the posterior aspect of the shoulder.10
4. Observe: Observe the client horizontally abducting the humerus, lifting the arm toward the ceiling (Figure 22-12, A).12
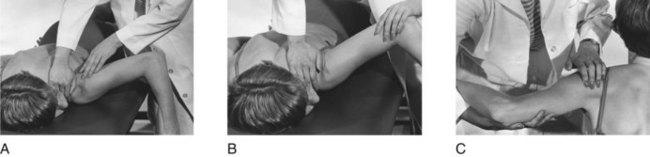
FIGURE 22-12 Shoulder horizontal abduction. A, Palpate and observe. B, Resist. C, Gravity-minimized position.
5. Resist: Provide resistance just proximal to the elbow obliquely downward toward horizontal adduction (Figure 22-12, B).6,12–14
Procedure for Testing Grades P (2), T (1), and 0
1. Position: The client is seated, with the arm in 90-degree abduction, the elbow flexed to 90 degrees, and the palm down, supported on a high table or by the therapist.6,12 If a table is used, powder may be sprinkled on the surface to reduce friction.
2. Stabilize: Provide stabilization over the scapula.
3. Palpate: Palpate the posterior deltoid, as described for the previous test.
4. Observe: Observe the client pulling the arm backward into horizontal abduction (Figure 22-12, C).
5. Grade: Client is graded according to standard definitions of muscle grades.
Substitutions: Latissimus dorsi and teres major may assist movement if the posterior deltoid is very weak. Movement will occur with more shoulder extension rather than at the horizontal level. Scapula adduction may produce slight horizontal abduction of the humerus, but trunk rotation and shoulder retraction would occur.6,15,20 The long head of the triceps may substitute. Maintain some flexion at the elbow to prevent this.12
Shoulder Horizontal Adduction
| Muscles4,12–14 | Innervation4,10,12,13 |
| Pectoralis major | Medial and lateral pectoral nerves, C5-T1 |
| Anterior deltoid | Axillary nerve, C5,6 |
| Coracobrachialis | Musculocutaneous nerve, C6,7 |
Procedure for Testing Grades N (5) to F (3)
1. Position: The client is supine, with the shoulder abducted to 90 degrees, elbow flexed or extended. The therapist stands next to the client on the side being tested or behind the head of C.4,6,7,10,12
2. Stabilize: Stabilize the trunk by placing one hand over the shoulder on the side being tested to prevent trunk rotation and scapula elevation.
3. Palpate: Palpate over the insertion of the pectoralis major at the anterior aspect of the axilla.6
4. Observe: Observe the client horizontally adducting the humerus, moving the arm toward the opposite shoulder to a position of 90 degrees of shoulder flexion.14 If the client cannot maintain elbow extension, the therapist may guide the forearm to prevent the hand from hitting the client’s face (Figure 22-13, A).

FIGURE 22-13 Shoulder horizontal adduction. A, Palpate and observe. B, Resist. C, Gravity-minimized position.
5. Resist: Provide resistance at the distal end of the humerus, in an outward direction toward horizontal abduction (Figure 22-13, B).6,7,10
Procedure for Testing Grades P (2), T (1), and 0
1. Position: The client is seated next to a high table, with the arm supported in 90 degrees of shoulder abduction and slight flexion at the elbow.4,12,20 Powder may be sprinkled on the supporting surface to reduce the effect of resistance from friction during movement, or the therapist may support the arm.6
2. Stabilize: Provide stabilization over the shoulder on the side being tested, simultaneously using the stabilizing hand to palpate the pectoralis major muscle.6
3. Palpate: Palpate the pectoralis major, as described for the previous test.
4. Observe: Observe the client horizontally adducting the arm toward the opposite shoulder, in a plane parallel to the floor (Figure 22-13, C).
Substitutions: Muscles may substitute for one another. If the pectoralis major is not functioning, the other muscles will perform the motion, which will be considerably weakened.15 Contralateral trunk rotation, the coracobrachialis, or the short head of the biceps may substitute.6
Elbow Flexion
| Muscles10,12–14 | Innervation12–14 |
| Biceps brachii | Musculocutaneous nerve C5,6 |
| Brachialis | |
| Brachioradialis | Radial nerve C5,6 |
Procedure for Testing Grades N (5) to F (3)
1. Position: The client is seated, with the arm adducted at the shoulder and extended at the elbow and held against the side of the trunk. The forearm is supinated to test for the biceps primarily (forearm should be positioned in pronation to test for the brachialis primarily, and in midposition to test for the brachioradialis).10,12,13 The therapist stands next to the client on the side being tested or directly in front of the client.
2. Stabilize: Provide stabilization at the humerus (in adduction).
3. Palpate: Palpate the biceps brachii over the muscle belly, on the middle of the anterior aspect of the humerus. Its tendon may be palpated in the middle of the antecubital space.6,7,10 (Brachioradialis is palpated over the upper third of the radius on the lateral aspect of the forearm, just below the elbow. The brachialis may be palpated lateral to the lower portion of the biceps brachii if the elbow is flexed and in the pronated position.15)
4. Observe: Observe the client flexing the elbow, with hand toward the face. The therapist should observe for maintenance of forearm in supination (when testing for biceps) and for relaxed or extended wrist and fingers (Figure 22-14, A).6,15
5. Resist: Provide resistance at the distal end of the volar aspect of the forearm, pulling downward toward elbow extension (Figure 22-14, B).7,10,14
Procedure for Testing Grades P (2), T (1), and 0
1. Position: The client is supine, with the shoulder abducted to 90 degrees and externally rotated, elbow extended, and forearm supinated. The therapist stands at the head of the table on the side being tested. (The client may also be seated, with the side being tested resting on the treatment table, which is at axillary height, the humerus in 90-degree abduction, the elbow extended, and the forearm in neutral position.7)
2. Stabilize: Provide stabilization at the humerus. The stabilizing hand can be used simultaneously for palpation here.
3. Palpate: Palpate the biceps as described for the previous test.
4. Observe: Observe the client flexing the elbow, with the hand toward the shoulder.10 Watch for maintenance of forearm supination and relaxation of the fingers and wrist (Figure 22-14, C).15
5. Grade: The client is graded according to standard definitions of muscle grades.
Substitutions: The brachioradialis will substitute for the biceps, but the forearm will move to midposition during flexion of the elbow. Wrist and finger flexors may assist elbow flexion, which will be preceded by finger and wrist flexion.10,12,13,15 The pronator teres may assist. Forearm pronation during movement may be evidence of this substitution.15
Elbow Extension
Procedure for Testing Grades N (5) to F (3)
1. Position: The client is prone, with the humerus abducted to 90 degrees, the elbow flexed to 90 degrees, and the forearm in neutral rotation and perpendicular to the floor. The therapist stands next to the client, just behind the arm to be tested.7,14,20
2. Stabilize: Provide stabilization at the humerus by placing one hand for support under it, between the client’s arm and the table.12,14
3. Palpate: Palpate the triceps over the middle of the posterior aspect of the humerus or the triceps tendon just proximal to the olecranon process on the dorsal surface of the arm.6,7,10,15
4. Observe: Observe the client extending the elbow to just less than maximal range. The wrist and fingers remain relaxed (Figure 22-15, A).

5. Resist: Provide resistance at the distal end of the forearm into elbow flexion. Before resistance is given, be sure that the elbow is not locked. Resistance to a locked elbow can cause joint injury (Figure 22-15, B).6,10
Procedure for Testing Grades P (2), T (1), and 0
1. Position: The client is supine, with the humerus abducted to 90 degrees and in external rotation, the elbow fully flexed, and the forearm supinated. The therapist is standing next to the client, just behind the arm to be tested.10 An alternate position is with the client seated, shoulder abducted to 90 degrees in neutral rotation, elbow flexed, and forearm in neutral position, supported by the therapist.7,10,12
2. Stabilize: Provide stabilization at the humerus by holding one hand over the middle or distal end to prevent shoulder motion.
3. Palpate: Palpate the triceps as described for the previous test.
4. Observe: Observe the client extending the elbow, moving the hand away from the head (Figure 22-15, C).
5. Grade: The client is graded according to standard definitions of muscle grades.
Substitutions: Finger and wrist extensors may substitute for weak elbow extensors. Observe for the presence of finger and wrist extension preceding elbow extension. When the client is upright, gravity and eccentric contraction of the biceps will effect elbow extension from the flexed position.15 Scapula depression with shoulder external rotation aided by gravity is another effective substitution pattern for elbow extension.6
Forearm Supination
| Muscles4,10,13 | Innervation6,10,13 |
| Biceps brachii | Musculocutaneous nerve, C5,6 |
| Supinator | Radial nerve, C5-7 |
Procedure for Testing Grades N (5) to F (3)
1. Position: The client is seated, with the humerus adducted, the elbow flexed to 90 degrees, and the forearm pronated. The therapist stands in front of the client or next to the client on the side to be tested.6,7,10,12,13
2. Stabilize: Provide stabilization at the humerus just proximal to the elbow.6,10
3. Palpate: Palpate the client over the supinator muscle on the dorsal-lateral aspect of the forearm, below the head of the radius. The muscle can be best felt when the radial muscle group (extensor carpi radialis and brachioradialis) is pushed up out of the way.4 The therapist may also palpate the biceps at the middle of the anterior surface of the humerus.6,7
4. Observe: Observe the client supinating the forearm, turning the hand palm up. Because gravity assists movement, after the 0-degree neutral position is passed, the therapist may apply slight resistance equal to the weight of the forearm (Figure 22-16, A).6,7
5. Resist: Provide resistance by grasping around the dorsal aspect of the distal forearm with the fingers and heel of the hand, while turning the arm toward pronation (Figure 22-16, B).6
Procedure for Testing Grades P (2), T (1), and 0
1. Position: The client is seated, shoulder flexed to 90 degrees and the upper arm resting on the supporting surface, elbow flexed to 90 degrees; the forearm is in full pronation in a position perpendicular to the floor.6,7,20 The therapist stands next to the client on the side to be tested.
2. Stabilize: Provide stabilization at the humerus just proximal to the elbow.6
3. Palpate: Palpate the supinator or biceps as described for the previous test.
4. Observe: Observe the client supinating the forearm, turning the palm of the hand toward the face (Figure 22-16, C).
5. Grade: The client is graded according to standard definitions of muscle grades.
Substitutions: With the elbow flexed, external rotation and horizontal adduction of the humerus will effect forearm supination. With the elbow extended, shoulder external rotation will place the forearm in supination. The brachioradialis can bring the forearm from full pronation to midposition. Wrist and thumb extensors, assisted by gravity, can initiate supination. The therapist should note any external rotation of the humerus, supination to midline only, and initiation of motion by wrist and thumb extension.10,13,15,20
Forearm Pronation
| Muscles4,12,13,15 | Innervation12,14 |
| Pronator teres | Median nerve, C6,7 |
| Pronator quadratus | Median nerve, C6-8 |
Procedure for Testing Grades N (5) to F (3)
1. Position: The client is seated with the humerus adducted, the elbow flexed to 90 degrees, and the forearm in full supination. The therapist stands beside the client on the side to be tested.6,7,10,13
2. Stabilize: Provide stabilization at the humerus just proximal to the elbow to prevent shoulder abduction.6,7,10,14
3. Palpate: Palpate the pronator teres on the upper part of the volar surface of the forearm, medial to the biceps tendon and diagonally from the medial condyle of the humerus to the lateral border of the radius.7,10,14,15
4. Observe: Observe the client pronating the forearm, turning the hand palm down (Figure 22-17, A).10 Slight resistance may be applied after the arm has passed midposition to compensate for the assistance of gravity after that point.6
5. Resist: Provide resistance by grasping over the dorsal aspect of the distal forearm, using the fingers and heel of the hand and turning toward supination (Figure 22-17, B).
Procedure for Testing Grades P (2), T (1), and 0
1. Position: The client is seated, shoulder flexed to 90 degrees, elbow flexed to 90 degrees, and the forearm in full supination. The upper arm is resting on the supporting surface, and the forearm is perpendicular to the floor.20 The therapist stands next to the client on the side to be tested.
2. Palpate: Palpate the pronator teres as described for the previous test.
3. Observe: Observe the client pronating the forearm, turning the palm of the hand away from the face (Figure 22-17, C).
4. Grade: The client is graded according to standard definitions of muscle grades.
Substitutions: With the elbow flexed, internal rotation and abduction of the humerus will produce apparent forearm pronation. With the elbow extended, internal rotation can place the forearm in a pronated position. Brachioradialis can bring the fully supinated forearm to midposition. Wrist flexion, aided by gravity, can effect pronation.6,7,10,12,13,15,20
Wrist Extension With Radial Deviation
| Muscles10,12,14 | Innervation6,12 |
| Extensor carpi radialis longus (ECRL) | Radial nerve, C5-7 |
| Extensor carpi radialis brevis (ECRB) | Radial nerve, C6-8 |
| Extensor carpi ulnaris (ECU) |
Procedure for Testing Grades N (5) to F (3)
1. Position: The client is seated or supine with the forearm resting on the supporting surface in pronation, the wrist at neutral, and the fingers and thumb relaxed. The therapist sits opposite to or next to the client on the side to be tested.10,14
2. Stabilize: Provide stabilization over the volar or dorsal aspect of the distal forearm.6,10,14
3. Palpate: Palpate the ECRL and ECRB tendons on the dorsal aspect of the wrist at the bases of the second and third metacarpals, respectively.6,7,10 The tendon of the ECU may be palpated at the base of the fifth metacarpal, just distal to the head of the ulna (Figure 22-18, A).4,6,10,15
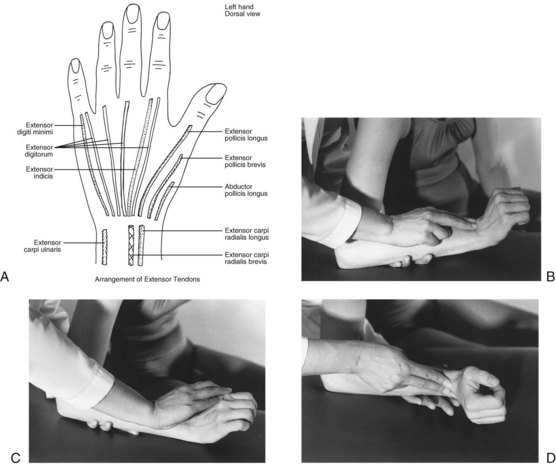
FIGURE 22-18 A, Arrangement of extensor tendons at wrist. B, Wrist extension with radial deviation. Palpate and observe. C, Resist. D, Gravity-minimized position.
4. Observe: Observe the client extending and radially deviating the wrist, while lifting the hand from the supporting surface and simultaneously moving it medially (to the radial side). The movement should be performed without finger extension, which could substitute for the wrist motion (Figure 22-18, B).6,10,15
5. Resist: Provide resistance over the dorsum of the second and third metacarpals, toward flexion and ulnar deviation (Figure 22-18, C).6,10,12–14
Procedure for Testing Grades P (2), T (1), and 0
1. Position: The client is placed in the same manner as described for the previous test, except that the forearm is resting in midposition on its ulnar border.10,20
2. Stabilize: Provide stabilization at the ulnar border of the forearm, supported slightly above the table surface.10
3. Palpate: Palpate radial wrist extensors as described for the previous test.
4. Observe: Observe client extending the wrist, moving the hand away from the body (Figure 22-18, D).
5. Grade: The client is graded according to standard definitions of muscle grades.
Substitutions: Wrist extensors can substitute for one another. In the absence of the extensor carpi radialis muscles, the extensor carpi ulnaris will extend the wrist, but in an ulnar direction. Combined extension and radial deviation will not be possible. The extensor digitorum communis muscle and the extensor pollicis longus can initiate wrist extension, but finger or thumb extension will precede wrist extension.6,7,12,13,15,20
Wrist Extension With Ulnar Deviation
| Muscles10,12–14 | Innervation10,14 |
| Extensor carpi ulnaris (ECU) | Radial nerve, C6-8 |
| Extensor carpi radialis brevis (ECRB) | |
| Extensor carpi radialis longus (ECRL) | Radial nerve, C5-7 |
Procedure for Testing Grades N (5) to F (3)
1. Position: The client is seated, forearm pronated, wrist neutral, fingers and thumb relaxed, supported on a table. The therapist sits opposite or next to the client on the side to be tested.
2. Stabilize: Provide stabilization under the distal forearm.10,12–14
3. Palpate: Palpate the ECU tendon at the base of the fifth metacarpal, just distal to the ulnar styloid,6 and the ECRL and ECRB tendons at the bases of the second and third metacarpals.
4. Observe: Observe the client extending the wrist and simultaneously moving it laterally (to the ulnar side). The therapist should observe that movement is not preceded by thumb or finger extension (Figure 22-19, A).6,10,12,13,15
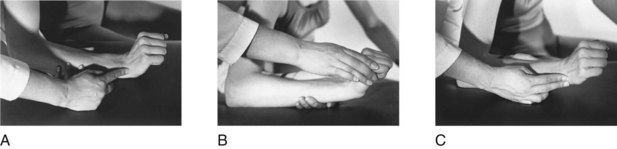
FIGURE 22-19 Wrist extension with ulnar deviation. A, Palpate and observe. B, Resist. C, Gravity-minimized position.
5. Resist: Provide resistance over the dorsal-lateral aspect of the fourth and fifth metacarpals toward flexion and radial deviation (Figure 22-19, B).6,10,14
Procedure for Testing Grades P (2), T (1), and 0
1. Position: The client is placed in the same manner as that described for the previous test, except that the forearm is in 45 degrees of pronation and is supported on a table. The wrist is flexed and radially deviated, and the thumb and fingers are flexed.6
2. Stabilize: Provide stabilization under the distal forearm, supporting it slightly above the supporting surface.10,14
3. Palpate: Palpate the extensor tendons as described previously.
4. Observe: Observe client extending the wrist and moving it ulnarly at the same time (Figure 22-19, C).
5. Grade: The client is graded according to standard definitions of muscle grades.
Substitutions: In the absence of the ECU muscle, the ECRL and ECRB muscles can extend the wrist but will do so in a radial direction. The ulnar deviation component of the test motion will not be possible. Long finger and thumb extensors can initiate wrist extension, but the movement will be preceded by finger or thumb extension.6,7,12,13,15,20
Wrist Flexion With Radial Deviation
| Muscles12,14 | Innervation5,6,10 |
| Flexor carpi radialis (FCR) | Median nerve, C6-8 |
| Flexor carpi ulnaris (FCU) | Ulnar nerve, C7-T1 |
| Palmaris longus | Median nerve, C7-T1 |
Procedure for Testing Grades N (5) to F (3)
1. Position: The client is seated or supine, with the forearm resting in nearly full supination on the supporting surface, fingers and thumb relaxed.7,12,15 The therapist is seated next to the client on the side to be tested.
2. Stabilize: Provide stabilization over the volar aspect of the midforearm.6,10,14
3. Palpate: The FCR tendon can be palpated over the wrist at the base of the second metacarpal bone. The palmaris longus tendon is at the center of the wrist at the base of the third metacarpal, and the FCU tendon can be palpated at the ulnar side of the volar aspect of the wrist, at the base of the fifth metacarpal (Figure 22-20, A).4
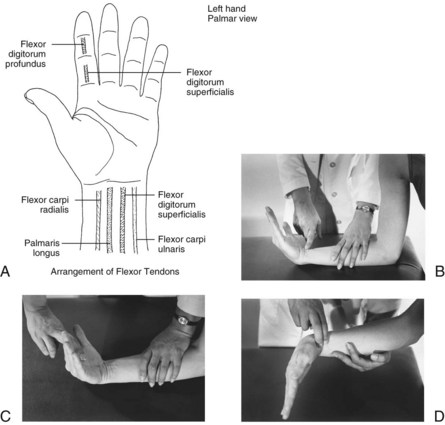
FIGURE 22-20 A, Arrangement of flexor tendons at wrist. B, Wrist flexion with radial deviation. Palpate and observe. C, Resist. D, Gravity-minimized position.
4. Observe: Observe the client simultaneously flexing and radially deviating the hand. The therapist should observe that the fingers remain relaxed during the movement6 (Figure 22-20, B).
5. Resist: Provide resistance in the palm at the radial side of the hand, over the second and third metacarpals toward extension and ulnar deviation (Figure 22-20, C).6
Procedure for Testing Grades P (2), T (1), and 0
1. Position: The client is seated with the forearm in midposition and the ulnar border of the hand resting on the supporting surface.10,20 The therapist sits next to the client on the side to be tested.
2. Stabilize: Provide stabilization under the ulnar border of the forearm, supporting the wrist slightly above the supporting surface.
3. Palpate: Palpate the wrist flexor tendons as described for the previous test.
4. Observe: Observe the client flexing and radially deviating the wrist. Movement should not be initiated with finger flexion (Figure 22-20, D).
5. Grade: The client is graded according to standard definitions of muscle grades.
Substitutions: Wrist flexors can substitute for one another. If the flexor carpi radialis is weak or nonfunctioning in this test, the flexor carpi ulnaris will produce wrist flexion, but in an ulnar direction, and radial deviation will not be possible. The finger flexors can assist wrist flexion, but finger flexion will occur before the wrist is flexed. The abductor pollicis longus, with the assistance of gravity, can initiate wrist flexion.6,7,15
Wrist Flexion With Ulnar Deviation
| Muscles10,13 | Innervation5,10,13 |
| Flexor carpi ulnaris (FCU) | Ulnar nerve, C7-T1 |
| Palmaris longus | Median nerve, C7-T1 |
| Flexor carpi radialis (FCR) | Median nerve, C6-8 |
Procedure for Testing Grades N (5) to F (3)
1. Position: The client is seated or supine, with the forearm resting in nearly full supination on the supporting surface, fingers and thumb relaxed. The therapist is seated opposite or next to the client on the side to be tested.10,14
2. Stabilize: Provide stabilization over the volar aspect of the middle of the forearm.10,14
3. Palpate: Palpate the flexor tendons on the volar aspect of the wrist, the FCU at the base of the fifth metacarpal, the FCR at the base of the second metacarpal, and the palmaris longus at the base of the third metacarpal.4
4. Observe: Observe the client simultaneously flexing the wrist and deviating it ulnarly (Figure 22-21, A).
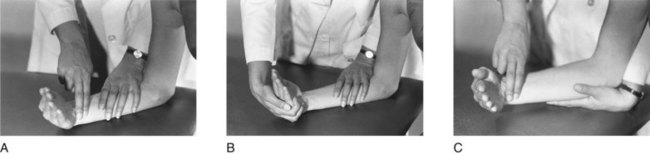
FIGURE 22-21 Wrist flexion with ulnar deviation. A, Palpate and observe. B, Resist. C, Gravity-minimized position.
5. Resist: Provide resistance in the palm of the hand over the hypothenar eminence toward extension and radial deviation (Figure 22-21, B).6,7,14
Procedure for Testing Grades P (2), T (1), and 0
1. Position: The client is seated, with the forearm in neutral rotation and resting in 45 degrees of supination on the ulnar border of the arm and hand.10 The therapist sits opposite or next to the client on the side being tested.
2. Stabilize: The client’s arm can be supported slightly above the supporting surface and stabilized at the dorsal-medial aspect of the forearm to prevent elbow and forearm motion.
3. Palpate: Palpate the wrist flexor tendons as described for the previous test.
4. Observe: Observe the client simultaneously flexing and deviating the wrist toward ulnar side (Figure 22-21, C).
5. Grade: The client is graded according to standard definitions of muscle grades.
Substitutions: Wrist flexors can substitute for one another. If the FCU is weak or absent, the FCR can produce wrist flexion in a radial direction, and the ulnar deviation will not be possible. The finger flexors can also assist wrist flexion, but the motion will be preceded by flexion of the fingers.6,15,20
Metacarpophalangeal Flexion With Interphalangeal Extension
| Muscles1,4 | Innervation10,12 |
| Lumbricals 1 and 2 | Median nerve, C8,T1 |
| Lumbricals 3 and 4 | Ulnar nerve, C8,T1 |
| Dorsal interossei | |
| Palmar interossei |
Procedure for Testing Grades N (5) to F (3)
1. Position: The client is seated, with forearm in supination, wrist at neutral, resting on the supporting surface.8 The metacarpophalangeal (MP) joints are extended, and the interphalangeal (IP) joints are flexed.12,20 The therapist sits next to the client on the side being tested.
2. Stabilize: Provide stabilization over the metacarpals, proximal to the MP joints in the palm of the hand to prevent wrist motion.
3. Palpate: Palpate the first dorsal interosseous muscle just medial to the distal aspect of the second metacarpal on the dorsum of the hand. The remainder of these muscles are not easily palpable because of their size and deep location in the hand.15,20
4. Observe: Observe the client flexing the MP joints and extending the IP joints simultaneously (Figure 22-22, A).12,14
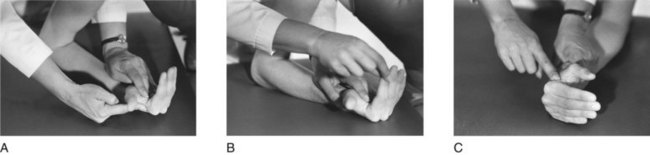
FIGURE 22-22 Metacarpophalangeal flexion with interphalangeal extension. A, Palpate and observe. B, Resist. C, Gravity-minimized position.
5. Resist: Provide resistance to each finger separately by grasping the distal phalanx and pushing downward on the finger into the supporting surface toward MP extension and IP flexion, or apply pressure first against the dorsal surface of the middle and distal phalanges toward flexion, followed by application of pressure to the volar surface of the proximal phalanges toward extension (Figure 22-22, B).14
Procedure for Testing Grades P (2), T (1), and 0
1. Position: The client is seated or supine, with the forearm and wrist in midposition and resting on the ulnar border on the supporting surface. MP joints are extended, and IP joints are flexed.10,13 The therapist sits next to the client on the side being tested.
2. Stabilize: Provide stabilization at the wrist and palm of the hand.
3. Palpate: Palpate the client as described for the previous test.
4. Observe: Observe the client flexing the MP joints and extending the IP joints simultaneously (Figure 22-22, C).
5. Grade: The client is graded according to standard definitions of muscle grades.
Substitutions: Flexor digitorum profundus and superficialis may substitute for weak or absent lumbricals.12 In this case, MP flexion will be preceded by flexion of the distal and proximal IP joints.15,20
Metacarpophalangeal Extension
| Muscles10,13 | Innervation10,13 |
| Extensor digitorum communis (EDC) | Radial nerve, C7,8 |
| Extensor indicis | |
| Extensor digiti minimi (EDM) |
Procedure for Testing Grades N (5) to F (3)
1. Position: The client is seated, with the forearm pronated and the wrist in the neutral position, MP and IP joints relaxed in partial flexion.7,10,12 The therapist sits opposite or next to the client on the side to be tested.
2. Stabilize: Provide stabilization at the wrist and metacarpals slightly above the supporting surface.10,12–14
3. Palpate: Palpate the EDC tendons where they course over the dorsum of the hand.6,7,10 In some individuals, the EDM tendon can be palpated or visualized just lateral to the EDC tendon to the fifth finger. The extensor indicis tendon can be palpated or visualized just medial to the EDC tendon to the first finger.6
4. Observe: Observe the client extending the MP joints but maintaining the IP joints in some flexion (Figure 22-23, A).6,12
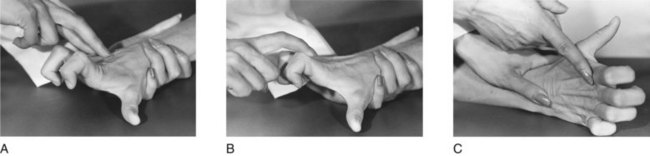
FIGURE 22-23 Metacarpophalangeal extension. A, Palpate and observe. B, Resist. C, Gravity-minimized position.
5. Resist: Provide resistance to each finger individually on the dorsum of the proximal phalanx toward MP flexion (Figure 22-23, B).6,10,14
Procedure for Testing Grades P (2), T (1), and 0
1. Position: The patient should be placed in a position similar to that described for the previous test, except that the client’s forearm is in midposition and the hand and forearm are supported on the ulnar border.10,12
2. Stabilize: Provide stabilization in the same manner as described for the previous test.
3. Palpate: Palpate the patient in the same manner as described for the previous test.
4. Observe: Observe the client extending the MP joints while keeping the IP joints somewhat flexed (Figure 22-23, C).
5. Grade: The patient is graded according to standard definitions of muscle grades.
Substitutions: With the wrist stabilized, no substitutions are possible. When the wrist is not stabilized, wrist flexion with tendon action can produce MP extension.6,7,10,13,15,20
Proximal Interphalangeal Flexion, Second Through Fifth Fingers
Procedure for Testing Grades N (5) to F (3)
1. Position: The client is seated, with the forearm supinated, wrist at neutral, fingers extended, and hand and forearm resting on the dorsal surface.6,10,12 The therapist sits opposite or next to the client on the side being tested.
2. Stabilize: Provide stabilization at the MP joint and the proximal phalanx of the finger being tested (Figure 22-24, A).6,7,14 If it is difficult for the client to isolate PIP flexion, hold all of the fingers not being tested in MP hyperextension and PIP extension. This maneuver inactivates the flexor digitorum profundus so that the client cannot flex the distal joint (Figure 22-24, B).4,6,12,20 Most individuals cannot perform isolated action of the PIP joint of the fifth finger, even with this assistance.15
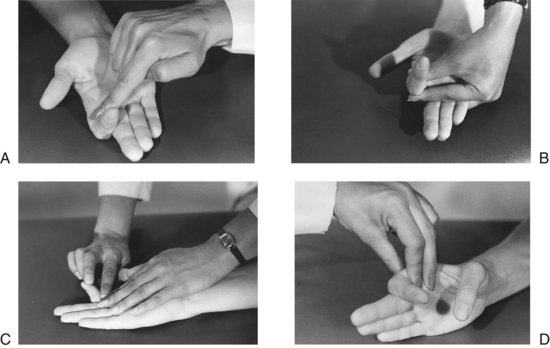
FIGURE 22-24 Proximal interphalangeal flexion. A, Palpate and observe. B, Position to assist with isolation of proximal interphalangeal joint flexion. C, Resist. Therapist checks for substitution by flexor digitorum profundus. D, Gravity-minimized position.
3. Palpate: Palpate the FDS tendon on the volar surface of the proximal phalanx.6 A stabilizing finger may be used to palpate in this instance.15 The tendon supplying the fourth finger may be palpated over the volar aspect of the wrist between the flexor carpi ulnaris and the palmaris longus tendons, if desired.4,6
4. Observe: Observe the client flexing the PIP joint while maintaining DIP extension (Figure 22-24, A).
5. Resist: Provide resistance with one finger at the volar aspect of the middle phalanx toward extension.6,10,14 If the therapist uses the index finger to apply resistance, the middle finger may be used to move the DIP joint to and fro to verify that the flexor digitorum profundus (FDP) is not substituting (Figure 22-24, C).
Procedure for Testing Grades P (2), T (1), and 0
1. Position: The client is seated, with the forearm in midposition and the wrist at neutral, resting on the ulnar border.12,20 The therapist sits opposite or next to the client on the side to be tested.
2. Stabilize: Provide stabilization at the MP joint and proximal phalanx of the finger.10,14 If stabilization during the motion is difficult in this position, the forearm may be returned to full supination because the effect of gravity on the fingers is not significant.
3. Palpate and observe: The therapist palpates and observes the client in the same manner as described for the previous test, except that movement is performed in the gravity-minimized position (Figure 22-24, D).
4. Grade: The client is graded according to standard definitions of muscle grades. If the test for grades poor and below is done with the forearm in full supination, partial ROM against gravity may be graded poor.10
Substitutions: The FDP may substitute for the FDS. DIP flexion will precede PIP flexion.7,12,13,15,17,20 Tendon action of the long finger flexors accompanies wrist extension and can produce apparent flexion of the fingers through partial ROM.10,13,20
Distal Interphalangeal Flexion, Second Through Fifth Fingers
Procedure for Testing Grades N (5) to F (3)
1. Position: The client is seated, with the forearm supinated, the wrist at neutral, and the fingers extended.10 The therapist sits opposite or next to the client on the side being tested.12
2. Stabilize: Provide stabilization at the wrist in neutral and the PIP joint and middle phalanx of the finger being tested.6,20
3. Palpate: Use the finger stabilizing the middle phalanx to simultaneously palpate the FDP tendon over the volar surface of the middle phalanx.6,10,15
4. Observe: Observe the client flexing the DIP joint (Figure 22-25, A).
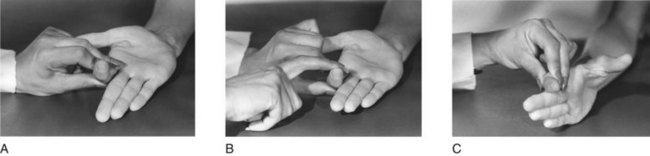
FIGURE 22-25 Distal interphalangeal flexion. A, Palpate and observe. B, Resist. C, Gravity-minimized position.
5. Resist: Provide resistance with one finger at the volar aspect of the distal phalanx toward extension (Figure 22-25, B).6,7,10,14
Procedure for Testing Grades P (2), T (1), and 0
1. Position: The client is seated, with the forearm in midposition and with the wrist at neutral, resting on the ulnar border.12,20 The client may be positioned with the forearm supinated, if necessary.
2. Stabilize: The client is stabilized in the same manner as described for the previous test.
3. Palpate: The client is palpated in the same manner as described for the previous test.
4. Observe: Observe the client flexing the DIP joint (Figure 22-25, C).
5. Grade: The client is graded according to standard definitions of muscle grades, except that if the test for grades poor and below was done with the forearm in full supination, movement through partial ROM may be graded poor.10
Substitutions: None possible during the testing procedure if the wrist is well stabilized because the FDP is the only muscle that can act to flex the DIP joint when it is isolated. During normal hand function, however, wrist extension with tendon action of the finger flexors can produce partial flexion of the DIP joints.10,15,20
Finger Abduction
Procedure for Testing Grades N (5) to F (3)
1. Position: The client is seated or supine, with the forearm pronated, wrist at neutral, and fingers extended and adducted. The therapist is seated opposite or next to the client on the side to be tested.10,13
2. Stabilize: Provide stabilization at the wrist and metacarpals slightly above the supporting surface.
3. Palpate: Palpate the first dorsal interosseous muscle on the radial side of the second metacarpal or of the abductor digiti minimi on the ulnar border of the fifth metacarpal. The remaining interossei are not palpable.6,7,10
4. Observe: Observe the client spreading the fingers, with abduction of the little finger, the ring finger toward the little finger, the middle finger toward the ring finger, and the index finger toward the thumb (Figure 22-26, A).12
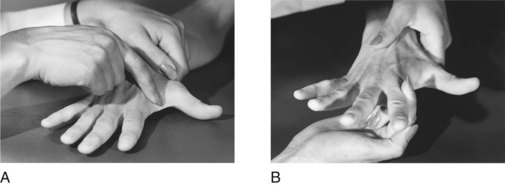
5. Resist: Provide the first dorsal interosseous by applying pressure on the radial side of the proximal phalanx of the second finger in an ulnar direction (Figure 22-26, B); the second dorsal interosseous on the radial side of the proximal phalanx of the middle finger in an ulnar direction; the third dorsal interosseous on the ulnar side of the proximal phalanx of the middle finger in a radial direction; the fourth dorsal interosseous on the ulnar side of the proximal phalanx of the ring finger in a radial direction; and the abductor digiti minimi on the ulnar side of the proximal phalanx of the little finger in a radial direction.6,14 An alternative mode of resistance is to flick each finger toward adduction. If the finger rebounds, the grade is N (5).12
Procedure for Testing Grades P (2), T (1), and 0
Tests for these muscle grades are the same as described for the previous test.
1. Grade: Because the test motions were not performed against gravity, the therapist must exercise professional judgment when grading. For example, partial ROM in the gravity-minimized position may be graded poor and full ROM graded fair.10,13
Substitutions: EDC can assist weak or absent dorsal interossei, but abduction will be accompanied by MP extension.6,15,20
Finger Adduction
Procedure for Testing Grades N (5) to F (3)
1. Position: The client is seated, with forearm pronated, wrist in neutral, and fingers extended and abducted.10,13
2. Stabilize: Provide stabilization at the wrist and metacarpals slightly above the supporting surface.6
3. Palpate: The condition is not palpable.6 The muscle cannot be palpated.
4. Observe: Observe the client adducting the first, fourth, and fifth fingers toward the middle finger (Figure 22-27, A).

FIGURE 22-27 Finger adduction. A, Therapist observes movement of fingers into adduction. Palpation of these muscles is not possible. B, Resist.
5. Resist: Provide resistance at the index finger at the proximal phalanx by pulling it in a radial direction, with the ring finger at the proximal phalanx in an ulnar direction, and the little finger likewise (Figure 22-27, B).6,14 These muscles are very small, and resistance must be modified to accommodate their comparatively limited power. Fingers can be grasped at the distal phalanx and flicked in the direction of abduction. If the finger snaps back to the adducted position, the grade is N (5).12
Procedure for Testing Grades P (2), T (1), and 0
The test for these muscle grades is the same as described for the previous test. The therapist’s judgment must be used in determining the degree of weakness. Achievement of full ROM may be graded fair and partial ROM graded poor.10,12
Substitutions: FDP and FDS can substitute for weak palmar interossei, but IP flexion will occur with finger adduction.13,15,20
Thumb Metacarpophalangeal Extension
Procedure for Testing Grades N (5) to F (3)
1. Position: The client is seated or supine, forearm in midposition, wrist at neutral, and hand and forearm resting on the ulnar border.6,10,13 The thumb is flexed into the palm at the MP joint, and the IP joint is extended but relaxed. The therapist sits opposite or next to the client on the side to be tested.
2. Stabilize: Provide stabilization at the wrist and the thumb metacarpal.6
3. Palpate: Palpate the EPB tendon on the dorsoradial aspect of the base of the first metacarpal. It lies just medial to the abductor pollicis longus tendon on the radial side of the anatomical snuffbox, which is the hollow space created between the EPL and EPB tendons when the thumb is fully extended and radially abducted.4,6,7
4. Observe: Observe the client extending the MP joint. The IP joint remains relaxed (Figure 22-28, A). It is difficult for many individuals to isolate this motion.
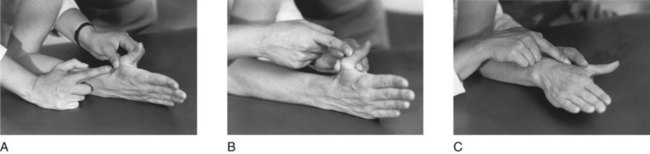
FIGURE 22-28 Thumb metacarpophalangeal extension. A, Palpate and observe. B, Resist. C, Gravity-minimized position.
5. Resist: Provide resistance on the dorsal surface of the proximal phalanx toward MP flexion (Figure 22-28, B).6,10,12–14
Procedure for Testing Grades (P), (T), and (0)
1. Position and stabilize: Positioning and stabilizing are the same as described for the previous test, except that the forearm is fully pronated and resting on the volar surface.20 The therapist may stabilize the first metacarpal, holding the hand slightly above the supporting surface. The test may also be performed in the same manner as for grades normal to fair, with modified grading.10
2. Palpate and observe: The client is palpated and observed in the same way as described for the previous test. MP extension is performed in a plane parallel to the supporting surface (Figure 22-28, C).
3. Grade: The client is graded according to standard definitions of muscle grades. If midposition of the forearm was used, partial ROM is graded poor and full ROM is graded fair.10,12
Substitutions: Extensor pollicis longus may substitute for extensor pollicis brevis. IP extension will precede MP extension.6,7,13,15,20
Thumb Interphalangeal Extension
Procedure for Testing Grades N (5) to F (3)
1. Position: The client is seated or supine, forearm in midposition, wrist at neutral, and hand and forearm resting on the ulnar border.6,10,13 The thumb is adducted, the MP joint is extended or slightly flexed, and the IP is flexed.6 The therapist sits opposite or next to the client on the side being tested.
2. Stabilize: Provide stabilization at the wrist in neutral position, the first metacarpal, and the proximal phalanx of the thumb.6
3. Palpate: Palpate the EPL tendon on the dorsal surface of the hand medial to the EPB tendon, between the head of the first metacarpal and the base of the second on the ulnar side of the anatomical snuffbox.4,6,10
4. Observe: C extends the IP joint (Figure 22-29, A).
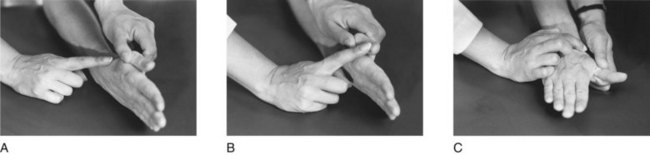
FIGURE 22-29 Thumb interphalangeal extension. A, Palpate and observe. B, Resist. C, Gravity-minimized position.
5. Resist: Provide resistance on the dorsal surface of the distal phalanx, down toward IP flexion (Figure 22-29, B).6,10,14
Procedure for Testing Grades P (2), T (1), and 0
1. Position and stabilize: Positioning and stabilizing are the same as described for the previous test, except that the forearm is fully pronated.20 The therapist may stabilize so that the client’s hand is held slightly above the supporting surface. The test may also be performed in the same position as for grades normal to fair with modification in grading.
2. Palpate and observe: The patient is palpated and observed in the same manner as described for the previous test. IP extension is performed in the plane of the palm, parallel to the supporting surface (Figure 22-29, C).
3. Grade: The client is graded according to standard definitions of muscle grades. If the test was performed with the forearm in midposition, partial ROM is graded P (2).10
Substitutions: A quick contraction of the flexor pollicis longus followed by rapid release will cause the IP joint to rebound into extension.6 IP flexion will precede IP extension.7,15 The abductor pollicis brevis, the flexor pollicis brevis, the oblique fibers of the adductor pollicis, and the first palmar interosseous can extend the IP joint because of their insertions into the extensor expansion of the thumb.14,20
Thumb Metacarpophalangeal Flexion
Procedure for Testing Grades N (5) to F (3)
1. Position: The client is seated or supine, the forearm supinated, the wrist in neutral position, and the thumb in extension and adduction.6,12 The therapist is seated next to or opposite the client.7,10,14
2. Stabilize: Provide stabilization at the first metacarpal and the wrist.12
3. Palpate: Palpate the client over the middle of the palmar surface of the thenar eminence just medial to the abductor pollicis brevis muscle.6,10 The hand that is used to stabilize may also be used for palpation.
4. Observe: Observe the client flexing the MP joint while maintaining extension of the IP joint (Figure 22-30, A).6 It may not be possible for some individuals to isolate flexion to the MP joint. In this instance, both MP and IP flexion may be tested together as a gross test for thumb flexion strength and graded according to the therapist’s judgment.
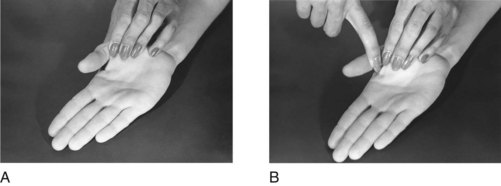
5. Resist: Provide resistance on the palmar surface of the first phalanx toward MP extension (Figure 22-30, B).6,7,10,14
Procedure for Testing Grades P (2), T (1), and (0)
Positioning, stabilizing, and palpating are the same as described for the previous test.
1. Observe: Observe the client flexing the MP joint so that the thumb moves over the palm of the hand.
2. Grade: Full ROM is graded fair; partial ROM is graded poor.10,13
Substitutions: FPL can substitute for FPB. In this case, isolated MP flexion will not be possible and MP flexion will be preceded by IP flexion.7,12,13,15,20
Thumb Interphalangeal Flexion
Procedure for Testing Grades N (5) to F (3)
1. Position: The client is seated, with the forearm fully supinated, wrist in neutral position, and thumb extended and adducted.10,13 The therapist is seated next to or opposite the client.
2. Stabilize: Provide stabilization at the wrist, thumb metacarpal, and proximal phalanx of the thumb in extension.6,7,10,14
3. Palpate: Palpate the FPL tendon on the palmar surface of the proximal phalanx.6 In this instance, the palpating finger may be the same one used for stabilizing the proximal phalanx.
4. Observe: Observe the client flexing the IP joint in the plane of the palm (Figure 22-31, A).10,12
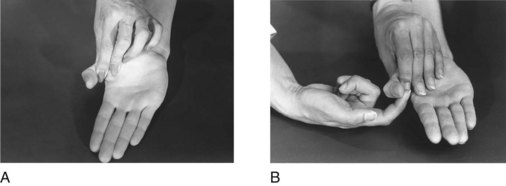
5. Resist: Provide resistance on the palmar surface of the distal phalanx, toward IP extension (Figure 22-31, B).6,10,12–14
Procedure for Testing Grades P (2), T (1), and 0
The test for these muscle grades is the same as that described for the previous test. The judgment of the occupational therapist must be used in determining the degree of weakness. Achievement of full ROM may be graded fair and partial ROM graded poor.10,13
Substitutions: Quick contraction and release of the EPL may cause an apparent flexion of the IP joint. The therapist should observe for IP extension preceding IP flexion.6,7,12,13,15,20
Thumb Palmar Abduction
Procedure for Testing Grades Fair (F) to Normal (N)
1. Position: The client is seated or supine, forearm in supination, wrist at neutral, thumb relaxed in adduction against the volar aspect of the index finger. The OT sits opposite or next to the client on the side to be tested.6,7,10,12–14
2. Stabilize: Provide stabilization at the metacarpals and wrist.
3. Palpate: Palpate the APB muscle on the lateral aspect of the thenar eminence, lateral to the flexor pollicis brevis muscle.10
4. Observe: Observe the client raising the thumb away from the palm in a plane perpendicular to the palm (Figure 22-32, A).6,14
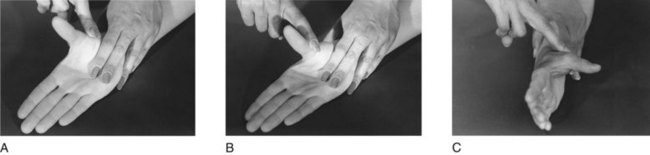
FIGURE 22-32 Thumb palmar abduction. A, Palpate and observe. B, Resist. C, Gravity-minimized position.
5. Resist: Provide resistance at the lateral aspect of the proximal phalanx, downward toward adduction (Figure 22-32, B).6,14
Procedure for Testing Grades P (2), T (1), and 0
1. Position: The client is positioned in the same manner as described for the previous test, except that the forearm and hand are supported on the ulnar border.12,20
2. Stabilize: Provide stabilization at the wrist and metacarpals.
3. Palpate: Palpate the APB muscle on the lateral aspect of the thenar eminence.
4. Observe: Observe the client moving the thumb away from the palm in a plane at right angles to the palm of the hand and parallel to the supporting surface (Figure 22-32, C).
5. Grade: The client is graded according to standard definitions of muscle grades.
Substitutions: APL can substitute for APB. Abduction will take place more in the plane of the palm, however, rather than perpendicular to it.13,15,20
Thumb Radial Abduction
Procedure for Testing Grades N (5) to F (3)
1. Position: The client is seated or supine, forearm in neutral rotation, wrist at neutral, thumb adducted and slightly flexed across the palm. Hand and forearm are resting on the ulnar border.14 The therapist sits opposite or next to the client on the side being tested.
2. Stabilize: Provide stabilization at the wrist and metacarpals of the fingers.10,14
3. Palpate: Palpate the APL tendon on the lateral aspect of the base of the first metacarpal. It is the tendon immediately lateral (radial) to the EPB tendon.4,6,10
4. Observe: Observe the client moving the thumb out of the palm of the hand, abducting away from the index finger at an angle of about 45 degrees (Figure 22-33, A).6
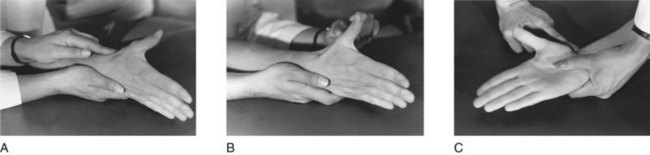
5. Resist: Provide resistance at the lateral aspect of the thumb metacarpal toward adduction (Figure 22-33, B).6,10,14
Procedure for Testing Grades P (2), T (1), and 0
1. Position: The client is positioned in the same manner as described for the previous test, except that the forearm is in supination.10
2. Stabilize: Provide stabilization at the wrist and palm of the hand.
3. Palpate: The client is palpated in the same manner as described for the previous test.
4. Observe: Observe the client moving the thumb out away from the palm of the hand in the plane of the palm (Figure 22-33, C).
5. Grade: The client is graded according to standard definitions of muscle grades.
Substitutions: APB can substitute for APL. Abduction will not take place in the plane of the palm but rather in a more ulnar direction.15,20 EPB can substitute for APL. The movement will be more toward the dorsal surface of the forearm.12
Thumb Adduction
Procedure for Testing Grades N (5) to F (3)
1. Position: The client is seated or supine, forearm pronated, wrist at neutral, thumb relaxed and in palmar abduction.10,13,20 The therapist is sitting opposite or next to the client on the side to be tested.
2. Stabilize: Provide stabilization at the wrist and metacarpals by grasping the hand around the ulnar side and supporting it slightly above the resting surface.10,13
3. Palpate: Palpate the AP on the palmar side of the thumb web space.6,15
4. Observe: Observe the client adducting the thumb to touch the palm (Figure 22-34, A).10,12 (The palm is turned upward in the illustration to show the palpation point.)

5. Resist: Provide resistance by grasping the proximal phalanx of the thumb near the metacarpal head and pulling downward, toward abduction (Figure 22-34, B).10
Procedure for Testing Grades P (2), T (1), and 0
1. Position: The client is positioned in the same manner as described for the previous test, except that the forearm is in midposition and the forearm and hand are resting on the ulnar border.20
2. Stabilize: Provide stabilization over the wrist and palm of the hand.
3. Palpate: Palpate the client in the same manner as described for the previous test.
4. Observe: Observe the client adducting the thumb to touch the radial side of the palm of the hand or the second metacarpal (Figure 22-34, C).
5. Grade: The client is graded according to standard definitions of muscle grades.
Substitutions: FPL or EPL may assist weak or absent AP. If one substitutes, adduction will be accompanied by thumb flexion or extension preceding adduction.13,15,20
Opposition of the Thumb to the Fifth Finger
| Muscles10,13 | Innervation10,13 |
| Opponens pollicis | Median nerve, C8,T1 |
| Opponens digiti minimi | Ulnar nerve, C8,T1 |
Procedure for Testing Grades N (5) to F (3)
1. Position: The client is seated or supine, with forearm supinated, wrist at neutral, thumb in palmar abduction, and fifth finger extended.6,7,10,14 The therapist sits opposite or next to the client on the side to be tested.
2. Stabilize: Provide stabilization at the forearm and wrist.
3. Palpate: Palpate the opponens pollicis along the radial side of the shaft of the first metacarpal, lateral to the APB; the opponens digiti minimi on the shaft of the fifth metacarpal.6,10,15
4. Observe: Observe the client opposing the thumb to touch the thumb pad to the pad of the fifth finger, which flexes and rotates toward the thumb (Figure 22-35, A).6,7
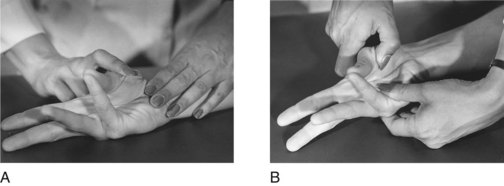
5. Resist: Provide resistance at the distal ends of the first and fifth metacarpals toward derotation of these bones and flattening of the palm of the hand (Figure 22-35, B).10,12
Procedure for Testing Grades P (2), T (1), and 0
The procedure described for the previous test may be used for these grades, if grading is modified to compensate for movement of the parts against gravity. For example, movement through full ROM would be graded fair and through partial ROM would be graded poor.10,12
Substitutions: APB will assist with opposition by flexing and medially rotating the CMC joint, but the IP joint will extend. The FPB will flex and medially rotate the CMC joint, but the thumb will not move away from the palm of the hand. The FPL will flex and slightly rotate the CMC joint, but the thumb will not move away from the palm, and the IP joint will flex strongly.15,20 The DIP joints of the thumb and little finger may flex to meet, giving the appearance of full opposition.7,12
Manual Muscle Testing of the Lower Extremity
| Muscles4,7,10 | Innervation4,6,10 |
| Psoas major | Lumbar plexus, L1-3 |
| Iliacus | Femoral nerve, L2,3 |
| Rectus femoris | Femoral nerve, L2-4 |
| Tensor fasciae latae | Superior gluteal nerve, L4,5,S1 |
| Sartorius | Femoral nerve, L2-S1 |
| Pectineus | Femoral nerve, L2,3 |
Procedure for Testing Grades N (5) to F (3)
1. Position: The client is seated, with knees flexed over the edge of the table and feet above the floor.12 The therapist stands next to the client on the side being tested.7
2. Stabilize: Provide stabilization at the pelvis at the iliac crest on the side being tested. The client may grasp the edge of the table or fold arms across chest.6,7,10,12–14
3. Palpate: The psoas and iliacus are difficult to palpate.6 The rectus femoris may be palpated on the middle anterior aspect of the thigh, just lateral to the sartorius muscle.4,15
4. Observe: Observe the client flexing the hip so that the femur rises above the table surface (Figure 22-36, A).
5. Resist: Provide resistance just proximal to the knee on the anterior surface of the thigh, down toward the table into hip extension (Figure 22-36, B).6,7,10,12–14
Procedure for Testing Grades P (2), T (1), and 0
1. Position: The client assumes a side-lying position. The therapist stands behind the client, supporting the upper leg in neutral rotation and slight abduction, with the knee extended.10,12,13 The lower leg (to be tested) is extended at the hip and knee.
2. Stabilize: The weight of the trunk may provide adequate stabilization, or the therapist may stabilize the pelvis.10
3. Palpate: The client is palpated in the same manner as described for the previous test.
4. Observe: Observe the client bringing the lower leg up toward the trunk, flexing the hip and knee (Figure 22-36, C).10
5. Grade: The client is graded according to standard definitions of muscle grades.
Substitutions: Observe for internal rotation, external rotation, and abduction accompanying flexion as signs of substitution or muscle imbalance in this muscle group.6,7,13,14 The hip flexors can substitute for one another. If the iliacus and psoas major muscles are weak or absent, hip flexion will be accompanied by other movements: abduction and external rotation (sartorius), abduction and internal rotation (tensor fasciae latae), and adduction (pectineus).10,12,13 If the anterior abdominal muscles do not stabilize the pelvis, it will flex on the thighs; the hip flexors may hold against resistance but not at maximal ROM.14
Hip Extension
| Muscles6,12,14 | Innervation10,13 |
| Gluteus maximus | Inferior gluteal nerve, L5-S2 |
| Semitendinosus | Sciatic nerve, L5-S2 |
| Semimembranosus | |
| Biceps femoris (long head) | Sciatic nerve, L5-S3 |
Procedure for Testing Grades N (5) to F (3)
1. Position: The client is prone, with the hip at neutral and the knee flexed to about 90 degrees. This position is used to isolate the gluteus maximus.6,12 The client may also be prone with the knee extended.12 The therapist stands next to the client on the opposite side.14 Two pillows may be placed under the pelvis to flex the hips.6,7
2. Stabilize: Provide stabilization over the iliac crest on the side being tested.10,12
3. Palpate: Palpate the gluteus maximus on the middle posterior surface of the buttock.15
4. Observe: Observe the client extending the hip while keeping the knee flexed to minimize action of the hamstring muscles on the hip joint (Figure 22-37, A).
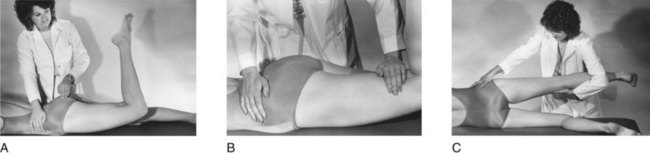
5. Resist: Provide resistance at the distal end of the posterior aspect of the thigh, downward, toward flexion (Figure 22-37, B).10,12–14
Procedure for Testing Grades P (2), T (1), and 0
1. Position: The client assumes a side-lying position. The therapist stands in front of the client, supporting the upper leg in extension and slight abduction.10 The lower leg (to be tested) is flexed at the hip and knee.
2. Stabilize: Provide stabilization at the pelvis over the iliac crest.10
3. Palpate: The client is palpated in the same manner as described for the previous test.
4. Observe: Observe the client extending the hip, bringing the lower leg backward, while maintaining flexion of the knee (Figure 22-37, C).
5. Grade: The client is graded according to standard definitions of muscle grades.
Substitutions: Elevation of the pelvis and extension of the lumbar spine can produce some hip extension. In the supine position, gravity and eccentric contraction of the hip flexors can return the flexed hip to extension.15 Hip external rotation, abduction, or adduction may be used to substitute.7
Hip Abduction
Procedure for Testing Grades N (5) to F (3)
1. Position: The client assumes a side-lying position, with the upper leg (to be tested) with the knee extended and hip extended slightly beyond the neutral position and slight forward rotation of the pelvis12; the lower leg is flexed at the hip and knee to provide a wide base of support.7 The therapist stands behind or in front of the client.6,7,10,12–14
2. Stabilize: Provide stabilization at the pelvis over the iliac crest.10,14
3. Palpate: Palpate the gluteus medius on the lateral aspect of the ilium above the greater trochanter of the femur.6,10
4. Observe: Observe the client abducting the hip, lifting the leg upward (Figure 22-38, A).
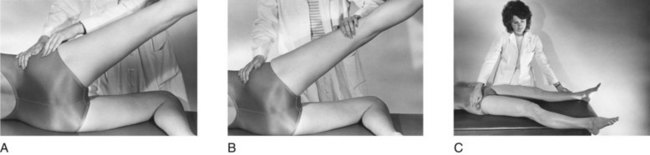
5. Resist: Provide resistance at the point just proximal to the knee in a downward direction, toward adduction (Figure 22-38, B).6,10,12
Procedure for Testing Grades P (2), T (1), and 0
1. Position: The client is supine, with both legs extended and in neutral rotation. The therapist stands next to the client on the opposite side.10 The therapist may use one hand to support at the ankle and slightly lift the test leg off the surface, being careful to offer no resistance or assistance to the movement.12
2. Stabilize: Provide stabilization at the pelvis at the iliac crest on the side to be tested and at the opposite limb at the lateral aspect of the calf.10
3. Palpate: Use the hand stabilizing over the pelvis to palpate the gluteus medius muscle simultaneously by adjusting the position of the hand so that the fingers are touching the lateral aspect of the ilium, above the greater trochanter, as described for the previous test.
4. Observe: Observe the client abducting the hip, moving the free leg sideward, while maintaining neutral rotation during this movement (Figure 22-38, C).10
5. Grade: The client is graded according to standard definitions of muscle grades.
Substitutions: Lateral muscles of the trunk may contract to bring the pelvis toward the thorax, effecting partial abduction at the hip.10 If the hip is externally rotated, the hip flexors may assist in abduction.6,7,10,15
Hip Adduction
| Muscles4,10,12 | Innervation4,10,12 |
| Adductor magnus | Obturator L2-4 |
| Adductor brevis | |
| Adductor longus | |
| Gracilis | |
| Pectineus | Femoral L2-4 |
Procedure for Testing Grades N (5) to F (3)
1. Position: The client assumes a side-lying position, with the test limb lowermost; the therapist supports the uppermost limb in 25 degrees of abduction and stands behind the client.12 This test may also be done with the client in the supine position.6,8,10
2. Stabilize: Support the client’s upper leg in partial abduction while the client grasps the supporting surface for stability.5,6,10,14
3. Palpate: Palpate any of the adductor muscles as follows: adductor magnus at the middle of the medial surface of the thigh; adductor longus at the medial aspect of the groin; gracilis on the medial aspect of the posterior surface of the knee, just anterior to the semitendinosus tendon.15
4. Observe: Observe the client adducting the hip by raising the lower leg from the table until it meets the upper leg. Observe that there is no rotation, flexion, or extension of the hip nor pelvic tilting (Figure 22-39, A).12,14

5. Resist: Provide resistance over the medial aspect of the leg, just proximal to the knee, downward toward abduction or outward if tested in supine position (Figure 22-39, B).6,7,10,12–14
Procedure for Testing Grades P (2), T (1), and 0
1. Position: The client is supine; the limb to be tested is abducted to 45 degrees. The therapist stands next to the client on the opposite side.
2. Stabilize: Provide stabilization over the iliac crest on the side to be tested.10
3. Palpate: The client is palpated in the same manner as described for the previous test.
4. Observe: Observe the client adducting the leg toward midline (Figure 22-39, C).
5. Grade: The client is graded according to standard definitions of muscle grades.
Substitutions: Hip flexors may substitute for adductors. The client will internally rotate the hip and tilt the pelvis backward. Hamstrings may be used to substitute for adduction. The client will externally rotate the hip and tip the pelvis forward.12–15
Hip External Rotation
| Muscles10,12 | Innervation10,12 |
| Quadratus femoris | Sacral plexus, L5,S1 |
| Piriformis | Sacral plexus, S1,2 |
| Obturator internus | Sacral plexus, L5-S2 |
| Obturator externus | Obturator nerve, L3,4 |
| Gemellus superior | Sacral plexus, L5-S2 |
| Gemellus inferior | Sacral plexus, L4-S1 |
Procedure for Testing Grades N (5) to F (3)
1. Position: The client is seated, with knees flexed over the edge of the table. A small pad or folded towel is placed under the knee on the side to be tested. The therapist stands in front of the client toward the side to be tested.6,10,12–14
2. Stabilize: Provide stabilization at the lateral aspect of the knee on the side to be tested. The client may grasp the edge of the table to stabilize the trunk and pelvis.6,10,14
3. Palpate: These deep muscles are difficult or impossible to palpate.6 Action of the external rotators may be detected by palpating deeply posterior to the greater trochanter of the femur.10
4. Observe: Observe the client rotating the thigh outwardly, moving the foot medially (Figure 22-40, A).
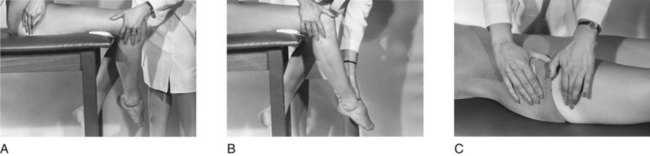
FIGURE 22-40 Hip external rotation. A, Palpate and observe. B, Resist. C, Gravity-minimized position.
5. Resist: Provide resistance at the medial aspect of the lower leg, just proximal to the ankle in a lateral direction, toward internal rotation.6,7,10,12–14 Resistance should be given carefully and gradually, because use of the long lever arm can cause joint injury if sudden forceful resistance is given. Clients with knee instability should be tested in the supine position (Figure 22-40, B).7,10
Procedure for Testing Grades P (2), T (1), and 0
1. Position: The client is supine, with hips and knees extended; the hip to be tested is internally rotated. The therapist is standing next to the client on the opposite side.10,12
2. Stabilize: Provide stabilization at the pelvis on the side to be tested.
3. Palpate: Action of the external rotators may be detected by palpating deeply posterior to the greater trochanter of the femur.10
4. Observe: Observe the client externally rotating the thigh (roll laterally). Gravity may assist this motion once the client has passed the neutral position. The therapist may use one hand to palpate and the other to offer slight resistance during the second half of the movement to compensate for the assistance of gravity. If the range can be completed with slight resistance, a grade of poor can be given (Figure 22-40, C).10
5. Grade: The client is graded according to standard definitions of muscle grades for fair to normal muscles. Muscles are graded poor if ROM in the gravity-minimized position can be achieved against slight resistance during the second half of the ROM. A grade of trace can be assigned if contraction of external rotators can be detected by deep palpation, as described for the previous test, when movement is attempted in the gravity-minimized position.10
Substitutions: The gluteus maximus may substitute for the deep external rotators when the hip is in extension. The sartorius may substitute, but external rotation will be accompanied by hip flexion, abduction, and knee flexion.7,15
Hip Internal Rotation
| Muscles4,10,14 | Innervation10,14 |
| Gluteus minimus | Superior gluteal nerve, L4-S1 |
| Gluteus medius | |
| Tensor fasciae latae |
Procedure for Testing Grades N (5) to F (3)
1. Position: The client is seated on a table, with the knees flexed over the edge and with a small pad placed under the knee. The therapist stands in front of or next to the client on the side to be tested.6,10 (The therapist is shown on the opposite side in the illustration so that palpation and stabilization will be apparent.)
2. Stabilize: Provide stabilization at the medial aspect of the knee. The client may grasp the edge of the table to stabilize the pelvis and trunk.6,10,14
3. Palpate: Palpate the gluteus medius between the iliac crest and the greater trochanter.4
4. Observe: Observe the client internally rotating the thigh, moving the foot laterally. The therapist should observe that the client does not lift the pelvis on the side being tested (Figure 22-41, A).6,10
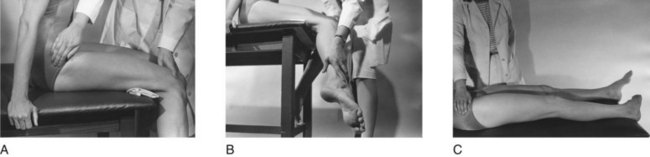
FIGURE 22-41 Hip internal rotation. A, Palpate and observe. B, Resist. C, Gravity-minimized position.
5. Resist: Provide resistance at the lateral aspect of the lower leg, pushing the leg medially and, therefore, the thigh toward external rotation. Resistance is stressful to the knee joint. Clients with knee instability should be tested in the supine position as described for the next test (Figure 22-41, B).7,10,14
Procedure for Testing Grades P (2), T (1), and 0
1. Position: The client is supine, with hips and knees extended; the hip to be tested is in external rotation. The therapist stands on the opposite side.10,12
2. Stabilize: Provide stabilization over the iliac crest on the side to be tested.10
3. Palpate: The client is palpated in the same manner as described for the previous test.
4. Observe: Observe the client rotating the thigh inwardly or medially. As in external rotation, gravity may assist the motion once the neutral position is passed but to a lesser degree than in the test for external rotation (Figure 22-41, C).
5. Grade: The client is graded according to standard definitions of muscle grades.
Substitutions: Hip adduction and knee flexion may substitute; trunk medial rotation may cause some internal rotation of the hip.7,15
Knee Flexion
| Muscles4,10,14 | Innervation4,10,12,13 |
| Biceps femoris | Sciatic nerve, L5-S2 |
| Semitendinosus | |
| Semimembranosus (hamstrings) |
Procedure for Testing Grades N (5) to F (3)
1. Position: The client is prone, with knees and hips in extension and neutral rotation with the foot in midline and toes hanging over the end of the table.5,7,10,12–14 The therapist stands next to the client on the opposite side, or the same side, toward the lower end of the supporting surface.10
2. Stabilize: Provide stabilization firmly over the posterior aspect of the thigh, above the tendinous insertion of the knee flexors.6,10
3. Palpate: For the biceps femoris tendon proximal to the knee joint, palpate on the lateral aspect of the popliteal fossa; for the semitendinosus tendon proximal to the knee joint, palpate medial to the popliteal fossa.4,6,15
4. Observe: Observe the client flexing the knee to slightly less than 90 degrees (Figure 22-42, A).13,15
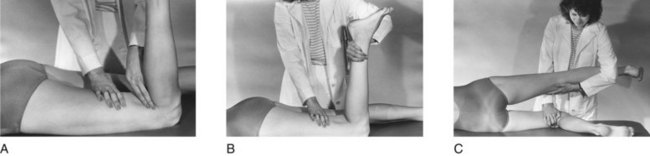
5. Resist: Provide resistance over the posterior aspect of the ankle downward toward knee extension.6,10,13 Note that not as much resistance can be applied to knee flexion in this position as when tested in sitting position with the hip flexed (Figure 22-42, B).14
Procedure for Testing Grades P (2), T (1), and 0
1. Position: The client assumes a side-lying position, with knees and hips extended and in neutral rotation. The therapist stands next to the client and supports the upper leg in slight abduction to allow testing of the lower leg.10
2. Stabilize: Provide stabilization over the medial aspect of the thigh.
3. Palpate: Palpate the semitendinosus as described for the previous test.
4. Observe: Observe the client flexing the knee of the lower leg (Figure 22-42, C).
5. Grade: The client is graded according to standard definitions of muscle grades.
Substitutions: The sartorius may substitute or assist the hamstrings, but hip flexion and external rotation will occur simultaneously.10,12,13,15 The gracilis may substitute, causing hip adduction with knee flexion.12 The gastrocnemius may assist or substitute if strong plantar flexion of the ankle occurs during knee flexion.10,12,13
Knee Extension
| Rectus femoris | Femoral nerve, L2-4 |
| Vastus intermedius | |
| Vastus medialis | |
| Vastus lateralis |
Procedure for Testing Grades N (5) to F (3)
1. Position: The client is seated, with knees flexed over the edge of the table and feet suspended off the floor. The client may lean backward slightly to release tension on the hamstrings and grasp the edge of the table for stability.6,10,12 The therapist stands next to the client on the side to be tested.6,12
2. Stabilize: Provide stabilization at the thigh by holding hand firmly over it, or place one hand under the client’s knee to cushion it from the edge of the table. The client may grasp the edge of the table.7,10,12–14
3. Palpate: Any of the muscles in the quadriceps femoris group can be palpated as follows: the rectus femoris on the anterior aspect of the midthigh; the vastus medialis on the medial aspect of the distal thigh; and the vastus lateralis on the lateral aspect of the midthigh. The vastus intermedius cannot be palpated.6,15
4. Observe: Observe the client extending the knee to slightly less than full ROM. Observe for hip movement that may betray evidence of substitutions (Figure 22-43, A).
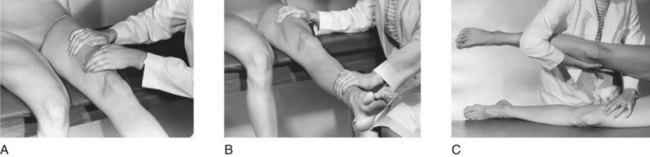
5. Resist: Provide resistance on the anterior surface of the leg, just above the ankle, with downward pressure toward knee flexion.6,10,14 The client should not be allowed to lock the knee joint at the end of the ROM when full extension is achieved.7,10 Maintenance of a slight amount of knee flexion will prevent this condition. Resistance to a locked knee can cause joint injury (Figure 22-43, B).10
Procedure for Testing Grades P (2), T (1), and 0
1. Position: The client assumes a side-lying position on the side to be tested. The lower leg is positioned with the hip extended and the knee flexed to 90 degrees. The therapist stands behind the client.
2. Stabilize: Provide stabilization at the upper leg in slight abduction with one hand, with the other hand over the anterior aspect of the thigh on the leg to be tested.10
3. Palpate: Any of the muscles can be palpated, as described for the previous test, with the same hand used to stabilize the client’s thigh. Then ask the client to straighten the leg, extending the knee. Observe for hip movements that may betray signs of substitution (Figure 22-43, C).
4. Grade: The client is graded according to standard definitions of muscle grades.
Substitutions: Tensor fasciae latae may substitute for or assist weak quadriceps. In this case, hip internal rotation will accompany knee extension.6,10,14
Ankle Plantar Flexion
Procedure for Testing Grades N (5) to F (3)
1. Position: The client is prone, with the hips and knees extended and the feet projecting beyond the edge of the table. The therapist stands at the lower end of the table, facing the client’s feet.6,7,13,14
2. Stabilize: The weight of the leg is usually adequate stabilization. The client may stabilize the leg proximal to the ankle.6
3. Palpate: Palpate the gastrocnemius on the posterior aspect of the calf of the leg or the soleus, which is slightly lateral to and beneath the lateral head of the gastrocnemius.15 The gastrocnemius tendon above the calcaneus may also be palpated.10
4. Observe: Observe the client flexing the plantar portion of the ankle. Observe for flexion of the toes and forefoot before movement of the heel, which may indicate substitutions (Figure 22-44, A).6,14,15
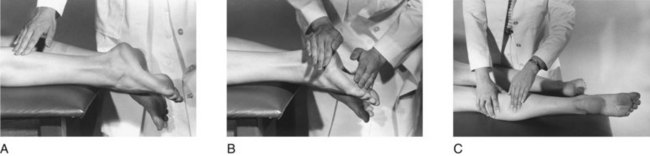
FIGURE 22-44 Ankle plantar flexion. A, Palpate and observe. B, Resist. C, Gravity-minimized position.
5. Resist: Provide resistance on the posterior aspect of the calcaneus as if pulling downward and on the forefoot as if pushing forward.12 If there is considerable weakness, pressure to the calcaneus may be sufficient (Figure 22-44, B).14
Procedure for Testing Grades P (2), T (1), and 0
1. Position: The client assumes a side-lying position on the side to be tested; the hip and knee of the lower limb are extended, and the ankle is in midposition. The upper limb may be flexed at the knee to keep it out of the way. The therapist stands at the lower end of the table.6,10
2. Stabilize: Provide stabilization over the posterior aspect of the calf.10
3. Palpate: Palpate the client in the same manner as described for the previous test.
4. Observe: Observe the client pulling the heel upward, pointing the toes down. Observe for toe flexion and inversion or eversion of the foot, which may indicate substitutions (Figure 22-44, C).
5. Grade: The client is graded according to standard definitions of muscle grades.
Substitutions: The flexor digitorum longus and flexor hallucis longus can substitute for plantar flexors, producing toe flexion and flexion of the forefoot, with incomplete movement of the calcaneus. Substitution by the peroneus longus and brevis will cause foot eversion, and substitution by the tibialis posterior will cause foot inversion. Substitution by all three will effect plantar flexion of the forefoot, with limited movement of the calcaneus.10,12,13,15
Ankle Dorsiflexion With Inversion
Procedure for Testing Grades N (5) to F (3)
1. Position: The client is seated, with the legs flexed at the knees, over the edge of the table. The therapist sits in front of the client, slightly to the side to be tested.6,10,12–14
2. Stabilize: Provide stabilization at the leg, just above the ankle. The client’s heel can rest in the therapist’s lap.6,12
3. Palpate: Palpate the tibialis anterior tendon on the anterior medial aspect of the ankle joint.6,7,10 Muscle fibers may be palpated on the anterior surface of the leg, just lateral to the tibia.15
4. Observe: Observe the client dorsiflexing and inverting the foot, keeping the toes relaxed.12 Watch for extension of the great toe preceding the ankle motion, which may be a sign of muscle substitution (Figure 22-45, A).12–14
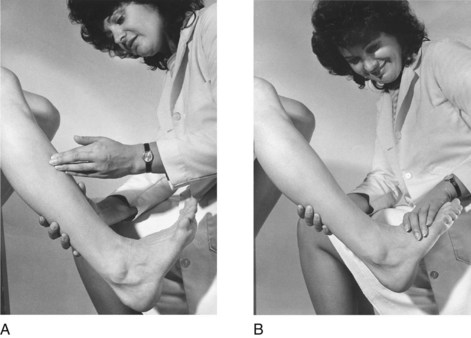
5. Resist: Provide resistance on the medial dorsal aspect of the foot, toward plantar flexion and eversion (Figure 22-45, B).6,10,14
Procedure for Testing Grades P (2), T (1), and 0
The same position and procedure described for the previous test may be used, with modified grading. The test may also be performed with the client in a side-lying or supine position.7,10
1. Grade: If the against-gravity position is used in the procedure for grades P to 0, the therapist must exercise clinical judgment to determine muscle grades. Partial ROM against gravity can be graded poor.12 If the test is performed in the supine position for these grades, standard definitions of muscle grades may be used.10
Substitutions: The extensor hallucis longus and extensor digitorum longus may assist or substitute. Movement will be preceded by extension of the great toe or of all toes.7,10,12–15
Foot Inversion
Procedure for Testing Grades N (5) to F (3)
1. Position: The client assumes a side-lying position on the side to be tested, with the hip in neutral rotation, the knee slightly flexed, and the foot and ankle in a neutral position.6 The upper leg may be flexed at the knee to keep it out of the way. The therapist stands at the end of the table.
2. Stabilize: Provide stabilization at the leg to be tested above the ankle joint on the dorsal surface of the calf, being careful not to put pressure on the tibialis posterior muscle.6,10
3. Palpate: Palpate the tendon of the tibialis posterior muscle between the medial malleolus and navicular bone, or above and just posterior to the medial malleolus.6,7,10
4. Observe: C inverts the foot, keeping the toes relaxed. There normally will be some plantar flexion as well (Figure 22-46, A).10,14

5. Resist: Provide resistance at the medial border of the forefoot toward eversion (Figure 22-46, B).6,7,10,14
Procedure for Testing Grades P (2), T (1), and 0
1. Position: The client is supine, with the hip extended and in neutral rotation, the knee extended, and the ankle in midposition.
2. Stabilize: The client is stabilized in the same manner as described for the previous test.
3. Palpate: The client is palpated in the same manner as described for the previous test.
4. Observe: Observe the client moving the foot inward (medially), inverting it while keeping the toes relaxed.
5. Grade: The client is graded according to standard definitions of muscle grades.
Substitutions: The flexor hallucis longus and flexor digitorum longus can substitute for the tibialis posterior. Movement will be accompanied by toe flexion, or toes will flex when resistance is applied.10,12,13
Foot Eversion
Procedure for Testing Grades Normal (N) and Fair (F)
1. Position: The client assumes a side-lying position, with the lower leg flexed at the knee to keep it out of the way. The upper test leg is in hip extension with neutral rotation, knee extension, and ankle plantar flexion with foot inversion.6
2. Stabilize: Provide stabilization medially or laterally, above the ankle.6
3. Palpate: Palpate the peroneus longus over the upper half of the lateral aspect of the calf, just distal to the head of the fibula. Its tendon can be palpated on the lateral aspect of the ankle, above and behind the lateral malleolus. The peroneus brevis tendon may be palpated on the lateral border of the foot, proximal to the base of the fifth metatarsal.6,10,15 Its muscle fibers can be found on the lower half of the lateral surface of the leg, over the fibula.10
4. Observe: Observe the client everting the foot. (Note that this movement is normally accompanied by some degree of plantar flexion.14,15) Observe for dorsiflexion or toe extension, which may indicate substitutions (Figure 22-47, A).
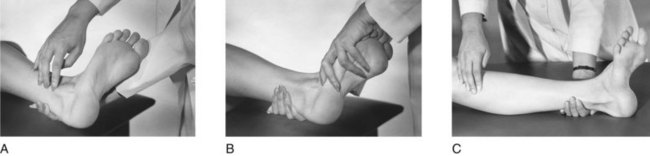
5. Resist: Provide resistance against the lateral border and the plantar surface of the foot toward inversion and dorsiflexion (Figure 22-47, B).6,14
Procedure for Testing Grades P (2), T (1), and 0
1. Position: The client is supine, hip extended and in neutral rotation.10 The knee is extended, and the ankle is in midposition.
2. Stabilize: Provide stabilization at the leg, under the calf.
3. Palpate: The client is palpated in the same manner as described for the previous test.
4. Observe: Observe the client everting the foot (Figure 22-47, C).
5. Grade: Grade according to standard definitions of muscle grades.
Substitutions: The peroneus tertius, while everting the foot, also dorsiflexes it. If it is substituting for the peroneus longus and peroneus brevis, dorsiflexion will accompany eversion. The extensor digitorum longus can substitute for the peroneals, and toe extension will precede or accompany eversion.7,15
Summary
Many diseases and injuries result in muscle weakness. Screening tests can be used to assess the general level of strength available for the client to engage in ADLs; IADLs; and sleep and rest, educational, work, and leisure occupations. These tests can also help determine which clients and muscle groups might require MMT.
MMT evaluates the level of strength in a muscle or muscle group. It is used with clients who have motor unit (lower motor neuron) disorders and orthopedic conditions. It does not measure muscle endurance or coordination, and it cannot be used accurately in upper motor neuron disorders when spasticity and or patterned/synergistic motion is present, or when selective motion is not present.
Accurate assessment of muscle strength depends on the knowledge, skill, and experience of the occupational therapist. Although there are standard definitions of muscle grades, clinical judgment is important in accurate evaluation.
Muscle test results are used to plan intervention strategies to improve occupational performance, compensate for muscle weakness, and increase strength. In some cases, muscle test results can also be used to track the expected course and progression of the disease or disorder, which can assist the OT practitioner when choosing intervention modalities and strategies, and when setting goals, as in the case of Sharon.
1. List three general classifications of physical dysfunction in which muscle weakness is a primary symptom.
2. List at least three purposes for assessing muscle strength.
3. Discuss five considerations and their implications in intervention planning that are based on the results of muscle strength assessment.
5. How can muscle weakness be differentiated from joint limitation?
6. If there is joint limitation, can muscle strength be measured accurately? How is strength recorded when available ROM is less than normal?
8. What are the limitations of MMT?
9. When is MMT contraindicated?
10. What are the criteria for determining muscle grades?
11. In relation to the floor as a horizontal plane, describe or demonstrate what is meant by the terms “with gravity assisting,” “with gravity minimized,” “against gravity,” and “against gravity and resistance.”
12. List five factors that can influence the amount of resistance against which a muscle group can hold.
13. Define the muscle grades: N (5), F− (3−), F (3), P (2), P− (2−), T (1), and zero (0).
14. Explain what is meant by substitution.
15. How are substitutions most likely to be ruled out in the muscle testing procedure?
16. List the steps in the muscle testing procedure.
17. Is it always necessary to perform MMT to determine level of strength? If not, what alternatives may be used to make a general assessment of strength?
References
1. Basmajian, JF. Muscles alive, ed 4. Baltimore: Williams & Wilkins; 1978.
2. Bobath, B. Adult hemiplegia: evaluation and treatment, ed 2. London: William Heinemann Medical Books; 1978.
3. Brunnstrom, S. Movement therapy in hemiplegia. New York: Harper & Row; 1970.
4. Brunnstrom, S. Clinical kinesiology. Philadelphia: FA Davis; 1972.
5. Chusid, J. Correlative neuroanatomy and functional neurology, ed 19. Los Altos, CA: Lange Medical Publications; 1985.
6. Clarkson, HM. Musculoskeletal assessment, ed 2. Philadelphia: Lippincott Williams & Wilkins; 2000.
7. Clarkson, HM, Gilewich, GB. Musculoskeletal assessment. Baltimore: Williams & Wilkins; 1989.
8. Cole, JH, Furness, AL, Twomey, LT. Muscles in action. New York: Churchill Livingstone; 1988.
9. Crepeau, EB, Cohn, ES, Schell, BA. Willard and Spackman’s occupational therapy, ed 11. Philadelphia: Lippincott Williams & Wilkins; 2008.
10. Daniels, L, Worthingham, C. Muscle testing, ed 5. Philadelphia: WB Saunders; 1986.
11. Hallum, A. Neuromuscular diseases. In Umphred DA, ed.: Neurological rehabilitation, ed 5, St Louis: Mosby, 2007.
12. Hislop, HJ, Montgomery, J. Daniels and Worthingham’s muscle testing, ed 6. Philadelphia: WB Saunders; 1995.
13. Hislop, HJ, Montgomery, J. Daniels and Worthingham’s muscle testing, ed 8. St Louis: Saunders Elsevier; 2007.
14. Kendall, FP, McCreary, EK. Muscles: testing and function, ed 2. Baltimore: Williams & Wilkins; 1983.
15. Killingsworth, A. Basic physical disability procedures. San Jose, CA: Maple Press; 1987.
16. Landen, B, Amizich, A. Functional muscle examination and gait analysis. J Am Phys Ther Assoc. 1963;43:39.
17. Latella, D, Meriano, C. Occupational therapy manual for evaluation of range of motion and muscle strength. Clifton, NY: Thomson Delmar Learning; 2003.
18. Pact, V, Sirotkin-Roses, M, Beatus, J. The muscle testing handbook. Boston, MA: Little, Brown; 1984.
19. Pulaski, KH. Adult neurological dysfunction. In Creapeau EB, Cohen ES, Schell BA, eds.: Willard and Spackman’s occupational therapy, ed 10, Philadelphia: Lippincott Williams & Wilkins, 2003.
20. Rancho Los Amigos Hospital, Department of Occupational Therapy. Guide for muscle testing of the upper extremity. Downey, CA: Professional Staff Association of the Rancho Los Amigos Hospital; 1978.