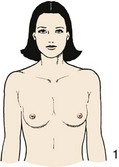
Female Breasts
New cases of invasive breast cancer were predicted to affect 230,480 women in the United States in 2011, with 2140 new cases expected in men (ACS, 2011). The disease is second to lung cancer as the leading cause of death in women with cancer. Early detection is the key to cure. A major responsibility for nurses is to teach patients health behaviors such as breast self-examination (BSE) (Box 30-21).
Box 30-21
Breast Self-Examination
Patients should perform breast self-examination (BSE) once a month to become familiar with the usual appearance and feel of both breasts. Familiarity makes it easier to notice any changes in the breast from one month to another. Early discovery of a change from baseline is the purpose of BSE.
If menstruating, the best time to do BSE is 2 or 3 days after the monthly period ends, when breasts are least likely to be tender or swollen. If no longer menstruating, pick a day such as the first day of the month as a reminder to do BSE. Instructions for BSE:
1. Stand before a mirror. Inspect both breasts for anything unusual such as discharge from the nipples, puckering, dimpling, or scaling of the skin.
The next two steps are designed to emphasize any change in the shape or contour of the breasts. During each step the patient will feel chest muscles tighten.
2. Watching closely in the mirror, clasp hands behind the head, and swing elbows forward.
3. Press hands firmly on hips and bow slightly toward the mirror while pulling shoulders and elbows forward.
Some women do the next part of the examination in the shower. Fingers glide over soapy skin, making it easy to appreciate the texture underneath.
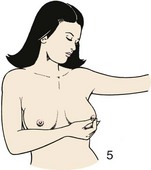
4. Raise the left arm. Use three or four fingers of the right hand to explore the left breast firmly, carefully, and thoroughly. Beginning at the outer edge, press the flat part of the fingers in small circles, moving the circles slowly around the breast. Gradually work toward the nipple. Be sure to cover the entire breast. Pay special attention to the area between the breast and the armpit, including the armpit itself. Feel for any unusual lump or mass under the skin.
5. Gently squeeze the nipple and look for discharge. Repeat the examination on the right breast.
6. Repeat steps 4 and 5 lying down. Lie flat on back, right arm over the head and a pillow or folded towel under the right shoulder. This position flattens the breast and makes it easier to examine. Use the same circular motion described earlier.
7. Repeat on the right breast.
From Seidel HM et al: Mosby’s guide to physical examination, ed 7, St Louis, 2011, Mosby.
If the patient already performs BSE, assess the method she uses and times she does the examination in relation to her menstrual cycle. The best time for a BSE is the fourth through seventh day of the menstrual cycle or right after the menstrual cycle ends, when the breast is no longer swollen or tender from hormone elevations. If the woman is postmenopausal, advise her to check her breasts on the same day each month. The pregnant woman should also check her breasts on a monthly basis.
Older women require special attention when reviewing the need for regular BSE. Fixed incomes limit many older women; thus they fail to pursue regular clinical breast examination and mammography. Unfortunately many older women ignore changes in their breasts, assuming that they are a part of aging. In addition, physiological factors affect the ease with which older women perform a BSE. Musculoskeletal limitations, diminished peripheral sensation, reduced eyesight, and changes in joint range of motion (ROM) limit palpation and inspection abilities. Find resources for older women, including free screening programs. Teach family members to perform the patient’s examination.
The American Cancer Society (ACS, 2011) recommends the following guidelines for the early detection of breast cancer:
• Monthly BSE is an option for women in their 20s.
• Women 20 years of age and older need to report any breast changes to a health care provider immediately.
• Women need a clinical breast examination by a health care provider every 3 years from ages 20 to 40 and annually for women over age 40.
• Women with a family history of breast cancer need an annual examination by a health care provider.
• Asymptomatic women need a screening mammogram by age 40; women age 40 and over need to have a mammogram annually.
• For women at increased risk, the ACS recommends talking with the health care provider for screening options and additional testing.
The patient’s history (Table 30-27) reveals normal developmental changes and signs of breast disease. Because of its glandular structure, the breast undergoes changes during a woman’s life. Knowing these changes (Box 30-22) allows complete and accurate assessment. Encourage both men and women to observe their breasts for changes.
Box 30-22
Normal Changes in the Breast During a Woman’s Life Span
Puberty (8 to 20 Years)
Breasts mature in five stages. One breast may grow more rapidly than the other. The ages at which changes occur and rate of developmental progression vary.
Stage 1 (Preadolescent)
This stage involves elevation of the nipple only.
Stage 2
The breast and nipple elevate as a small mound, and the areolar diameters enlarge.
Stage 3
There is further enlargement and elevation of the breast and areola, with no separation of contour.
Stage 4
The areola and nipple project into the secondary mound above the level of the breast (does not occur in all girls).
Stage 5 (Mature Breast)
Only the nipple projects, and the areola recedes (varies in some women).
Young Adulthood (20 to 30 Years)
Breasts reach full (nonpregnant) size. Shape is generally symmetrical. Breasts are sometimes unequal in size.
Pregnancy
Breast size gradually enlarges to 2 to 3 times the previous size. Nipples enlarge and become erect. Areolas darken, and diameters increase. Superficial veins become prominent. The nipples expel a yellowish fluid (colostrum).
Menopause
Breasts shrink. Tissue becomes softer, sometimes flabby.
Older Adulthood
Breasts become elongated, pendulous, and flaccid as a result of glandular tissue atrophy. The skin of the breasts tends to wrinkle, appearing loose and flabby.
Nipples become smaller and flatter and lose erectile ability. They sometimes invert because of shrinkage and fibrotic changes.
Data from Ebersole P et al: Toward healthy aging, ed 7, St Louis, 2008, Mosby; Hockenberry MJ, Wilson D: Wong’s nursing care of infants and children, ed 9, St Louis, 2011, Mosby; and Seidel HM et al: Mosby’s guide to physical examination, ed 7, St Louis, 2011, Mosby.
TABLE 30-27
Nursing History for Breast Assessment
| ASSESSMENT |
RATIONALE |
| Determine if woman is over age 40; has a personal or family history of breast cancer, early-onset menarche (before age 13), or late-age menopause (after age 50); has never had children or gave birth to first child after age 30; or has recently used oral contraceptives. |
These are risk factors for breast cancer (American Cancer Society [ACS], 2011). |
| Ask if patient (both sexes) has noticed lump, thickening, pain, or tenderness of breast; discharge, distortion, retraction, or scaling of the nipple; or change in size of breast. |
Potential signs and symptoms of breast cancer allow nurse to focus on specific areas of breast during assessment. |
| Determine patient’s use of medications (oral contraceptives, digitalis, diuretics, steroids, or estrogen). Determine his or her caffeine intake. |
Some medications cause nipple discharge. Hormones and caffeine cause fibrocystic changes in breast. |
| Determine patient’s level of activity, alcoholic intake, and weight. |
Breast cancer incidence rates correlate with being overweight or obese (postmenopausal), physical inactivity, and consumption of one or more alcoholic beverages per day (ACS, 2011). |
| Ask if patient performs monthly breast self-examination (BSE). If so, determine time of month she performs examination in relation to menstrual cycle. Have her describe or demonstrate method used. |
Nurse’s role is to educate patient about breast cancer and techniques for BSE. |
| If patient reports a breast mass, ask about length of time since she first noticed the lump. Does lump come and go, or is it always present? Have there been changes in the lump (e.g., size, relationship to menses), and are there associated symptoms? |
Assessment helps to determine nature of mass (e.g., breast cancer vs. fibrocystic disease). |
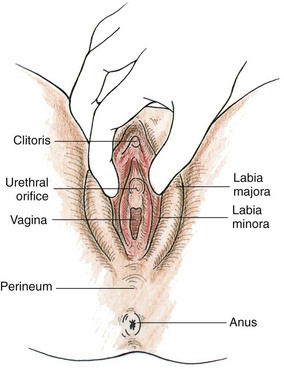
Inspection
Have the patient remove the top gown or drape to allow simultaneous visualization of both breasts. Have her stand or sit with her arms hanging loosely at her sides. If possible, place a mirror in front of her during inspection so she sees what to look for when performing a BSE. To recognize abnormalities the patient needs to be familiar with the normal appearance of her breasts. Describe observations or findings in relation to imaginary lines that divide the breast into four quadrants and a tail. The lines cross at the center of the nipple. Each tail extends outward from the upper outer quadrant (Fig. 30-58).
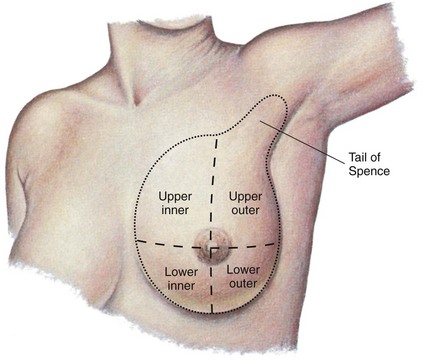
FIG. 30-58 Quadrants of left breast and axillary tail of Spence. (From Seidel HM et al: Mosby’s guide to physical examination, ed 6, St Louis, 2006, Mosby.)
Inspect the breasts for size and symmetry. Normally they extend from the third to the sixth ribs, with the nipple at the level of the fourth intercostal space. It is common for one breast to be smaller. However, inflammation or a mass causes a difference in size. As a woman becomes older, the ligaments supporting the breast tissue weaken, causing the breasts to sag and the nipples to lower.
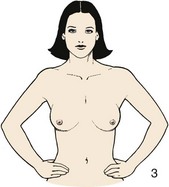
Observe the contour or shape of the breasts and note masses, flattening, retraction, or dimpling. Breasts vary in shape from convex to pendulous or conical. Retraction or dimpling can result from invasion of underlying ligaments by tumors. The ligaments fibrose and pull the overlying skin inward toward the tumor. Edema also changes the contour of the breasts. To bring out retraction or changes in the shape of breasts, ask the patient to assume three positions: raise arms above the head, press hands against the hips, and extend arms straight ahead while sitting and leaning forward. Each maneuver causes a contraction of the pectoral muscles, which accentuates the presence of any retraction.
Carefully inspect the skin for color; venous pattern; and the presence of lesions, edema, or inflammation. Lift each breast when necessary to observe lower and lateral aspects for color and texture changes. The breasts are the color of neighboring skin, and venous patterns are the same bilaterally. Venous patterns are easily visible in thin or pregnant women. Women with large breasts often have redness and excoriation of the undersurfaces caused by rubbing of skin surfaces.
Inspect the nipple and areola for size, color, shape, discharge, and the direction in which the nipples point. The normal areolas are round or oval and nearly equal bilaterally. Color ranges from pink to brown. In light-skinned women the areola turns brown during pregnancy and remains dark. In dark-skinned women the areola is brown before pregnancy (Seidel et al., 2011). Normally the nipples point in symmetrical directions, are everted, and have no drainage. If the nipples are inverted, ask if this has been a lifetime history. A recent inversion or inward turning of the nipple indicates an underlying growth. Rashes or ulcerations are not normal on the breast or nipples. Note any bleeding or discharge from the nipple. Clear yellow discharge 2 days after childbirth is common. While inspecting the breasts, explain the characteristics you see. Teach the patient the significance of abnormal signs or symptoms.
Palpation
Palpation assesses the condition of underlying breast tissue and lymph nodes. Breast tissue consists of glandular tissue, fibrous supportive ligaments, and fat. Glandular tissue is organized into lobes that end in ducts that open onto the surface of the nipple. The largest portion of glandular tissue is in the upper outer quadrant and tail of each breast. Suspensory ligaments connect to skin and fascia underlying the breast to support the breast and maintain its upright position. Fatty tissue is located superficially and to the sides of the breast.
A large portion of lymph from the breasts drains into axillary lymph nodes. If cancerous lesions metastasize (spread), the nodes commonly become involved. Study the location of supraclavicular, infraclavicular, and axillary nodes (Fig. 30-59). The axillary nodes drain lymph from the chest wall, breasts, arms, and hands. A tumor of one breast sometimes involves nodes on the same and opposite sides.
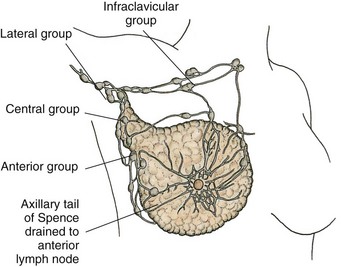
FIG. 30-59 Anatomical position of axillary and clavicular lymph nodes.
To palpate the lymph nodes have the patient sit with her arms at her sides and muscles relaxed. While facing the patient and standing on the side you are examining, support her arm in a flexed position, and abduct it from the chest wall. Place the free hand against the patient’s chest wall and high in the axillary hollow. With the fingertips press gently down over the surface of the ribs and muscles. Palpate the axillary nodes with the fingertips, gently rolling soft tissue (Fig. 30-60). Palpate four areas of the axilla: at the edge of the pectoralis major muscle along the anterior axillary line, the chest wall in the midaxillary area, the upper part of the humerus, and the anterior edge of the latissimus dorsi muscle along the posterior axillary line.
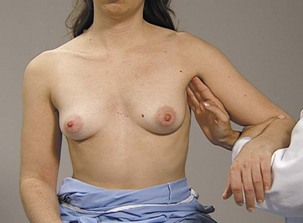
FIG. 30-60 Support patient’s arm and palpate axillary lymph nodes. (From Seidel HM et al: Mosby’s guide to physical examination, ed 7, St Louis, 2011, Mosby.)
Normally lymph nodes are not palpable. Carefully assess each area and note their number, consistency, mobility, and size. One or two small, soft, nontender palpable nodes are normal. An abnormal palpable node feels like a small mass that is hard, tender, and immobile. Continue to palpate along the upper and lower clavicular ridges. Reverse the procedure for the patient’s other side.
It is sometimes difficult for a patient to learn to palpate for lymph nodes. Lying down with the arm abducted makes the area more accessible. Instruct the patient to use her left hand for the right axillary and clavicular areas. Take the patient’s fingertips and move them in the proper fashion. Then have the patient use her right hand to palpate for nodes on the left side.
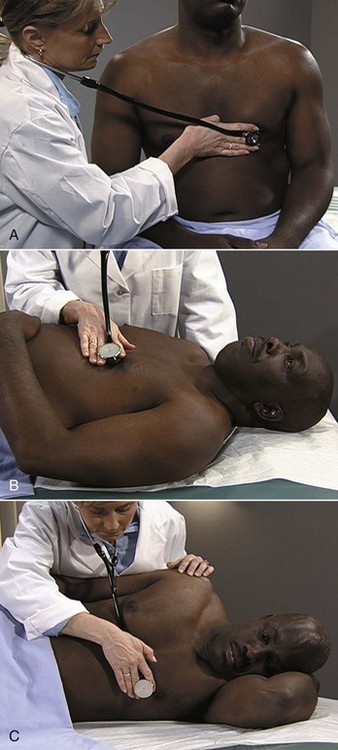
With the patient lying supine and one arm under the head and neck (alternating with each breast), palpate her breast tissue. The supine position allows the breast tissue to flatten evenly against the chest wall. The position of the arm and hand further stretches and positions breast tissue evenly (Fig. 30-61, A). Place a small pillow or towel under the patient’s shoulder blade to further position breast tissue. Palpate the tail of Spence (Fig. 30-61, B).
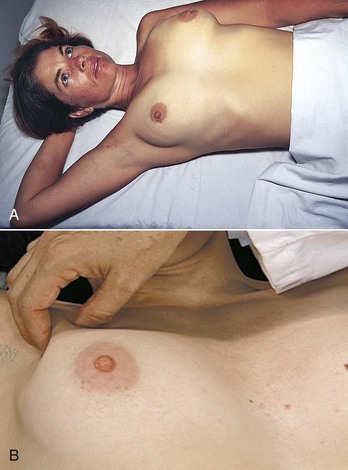
FIG. 30-61 A, The patient lies flat with arm abducted and hand under head to help flatten breast tissue evenly over the chest wall. B, Each breast is palpated in a systematic fashion. (B from Seidel HM et al: Mosby’s guide to physical examination, ed 6, St Louis, 2006, Mosby.)
The consistency of normal breast tissue varies widely. The breasts of a young patient are firm and elastic. In an older patient the tissue sometimes feels stringy and nodular. A patient’s familiarity with the texture of her own breasts is very important. Patients gain familiarity through monthly BSE (Box 30-23).
Box 30-23 Patient Teaching
Female Breast Assessment
Objective
• Patient will follow prevention and detection practices to ensure breast health.
Teaching Strategies
• Have patient perform return demonstration of breast self-examination (BSE) and offer the opportunity to ask questions.
• Explain recommended frequency of mammography and assessment by a health care provider.
• Discuss signs and symptoms of breast cancer.
• Discuss signs and symptoms of benign (fibrocystic) breast disease.
• Inform a woman who is obese or has a family history of breast cancer that she is at higher risk for the disease (ACS, 2011). Encourage dietary changes, including limiting meat consumption to well-trimmed, lean beef, pork, or lamb; removing skin from cooked chicken before eating it; selecting tuna and salmon packed in water and not oil; and using low-fat dairy products.
• Encourage patient to reduce intake of caffeine and theophyllines. Although this approach is controversial, it can reduce symptoms of benign (fibrocystic) breast disease.
Evaluation
• Have patient demonstrate BSE.
• During follow-up visit, determine whether patient has had mammography performed.
• Ask patient to explain frequency of mammography.
• Have patient describe signs and symptoms of breast cancer compared with benign (fibrocystic) breast disease.
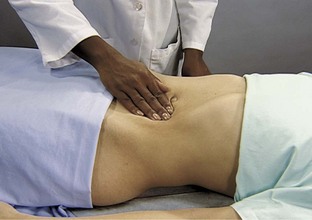
If the patient complains of a mass, examine the opposite breast to ensure an objective comparison of normal and abnormal tissue. Use the pads of the first three fingers to compress breast tissue gently against the chest wall, noting tissue consistency. Perform palpation systematically in one of three ways: (1) clockwise or counterclockwise, forming small circles with the fingers along each quadrant and the tail; (2) using a vertical technique with the fingers moving up and down each quadrant; or (3) palpating from the center of the breast in a radial fashion, returning to the areola to begin each spoke (Fig. 30-62, A to C). Whichever approach you use, be sure to cover the entire breast and tail, directing attention to any areas of tenderness. Use a bimanual technique when palpating large, pendulous breasts. Support the inferior portion of the breast in one hand while using the other hand to palpate breast tissue against the supporting hand.
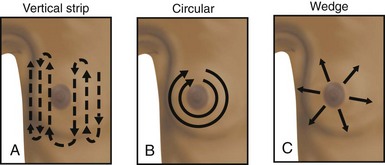
FIG. 30-62 Various methods for palpation of breast. A, Palpate from top to bottom in vertical strips. B, Palpate in concentric circles. C, Palpate out from center in wedge sections. (From Seidel HM et al: Mosby’s guide to physical examination, ed 7, St Louis, 2011, Mosby.)
During palpation note the consistency of breast tissue. It normally feels dense, firm, and elastic. With menopause breast tissue shrinks and becomes softer. The lobular feel of glandular tissue is normal. The lower edge of each breast sometimes feels firm and hard. This is the normal inframammary ridge and not a tumor. It helps to move the patient’s hand so she can feel normal tissue variations. Palpate abnormal masses to determine location in relation to quadrants, diameter in centimeters, shape (e.g., round or discoid), consistency (soft, firm, or hard), tenderness, mobility, and discreteness (clear or unclear boundaries).
Cancerous lesions are hard, fixed, nontender, irregular in shape, and usually unilateral. A common benign condition of the breast is benign (fibrocystic) breast disease. Bilateral lumpy, painful breasts and sometimes nipple discharge characterize this condition. Symptoms are more apparent during the menstrual period. When palpated the cysts (lumps) are soft, well differentiated, and movable. Deep cysts feel hard.
Give special attention to palpating the nipple and areola. Palpate the entire surface gently. Use the thumb and index finger to compress the nipple and note any discharge. During the examination of the nipple and areola, the nipple sometimes becomes erect with wrinkling of the areola. These changes are normal. Continue by positioning the patient and examining the other breast.
After completing the examination, have the patient demonstrate self-palpation. Observe the patient’s technique and emphasize the importance of a systematic approach. Urge the patient to see her health care provider if she discovers an abnormal mass during routine monthly BSE. She also needs to know all of the signs and symptoms of breast cancer.


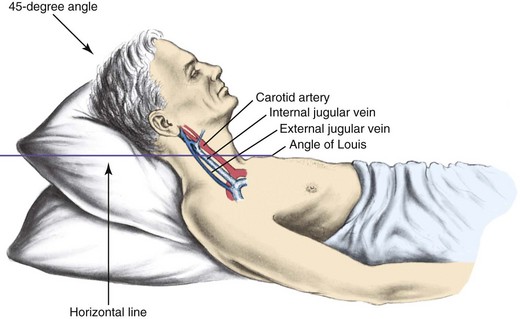
 to 1 inch) as the patient reaches a 45-degree angle. Measure venous pressure by measuring the vertical distance between the angle of Louis and the highest level of the visible point of the internal jugular vein pulsation.
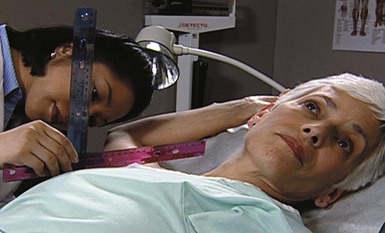


 second to several seconds. It normally takes 5 to 20 seconds to hear a bowel sound. However, it takes 5 minutes of continuous listening before determining that bowel sounds are absent (
 inch) in a gentle dipping motion (
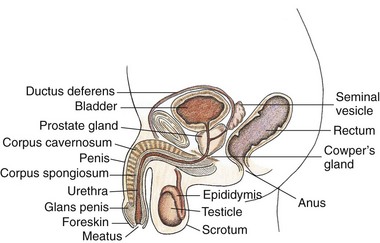


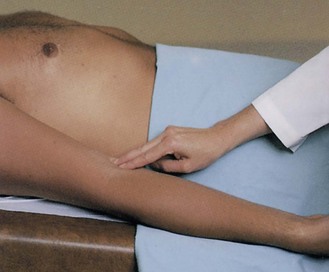
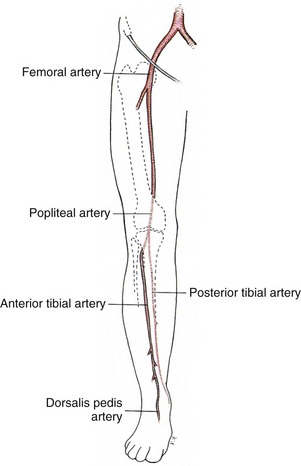
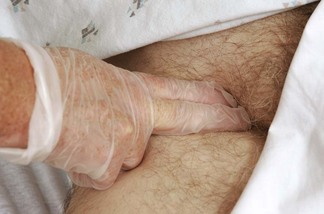
 inch) in size. Gently palpate the testicles and epididymis between the thumb and first two fingers. The testes feel smooth, rubbery, and free of nodules. The epididymis is resilient. Note the size, shape, and consistency of the organs. The most common symptoms of testicular cancer are a painless enlargement of one testis and the appearance of a palpable, small, hard lump, about the size of a pea, on the front or side of the testicle. In the older adult the testicles decrease in size and are less firm during palpation. Continue to palpate the vas deferens separately as it forms the spermatic cord toward the inguinal ring, noting nodules or swelling. It normally feels smooth and discrete.


 Answers to Clinical Application Questions can be found on the Evolve website.