Health Assessment and Physical Examination
• Discuss the purposes of physical assessment.
• Discuss how cultural diversity influences a nurse’s approach to and findings from a health assessment.
• List techniques for preparing a patient physically and psychologically before and during an examination.
• Describe interview techniques used to enhance communication during history taking.
• Make environmental preparations before an examination.
• Identify data to collect from the nursing history before an examination.
• Demonstrate the techniques used with each physical assessment skill.
• Discuss normal physical findings in a young, middle-age, and older adult.
• Discuss ways to incorporate health promotion and health teaching into the examination.
• Identify ways to use physical assessment skills during routine nursing care.
• Describe physical measurements made in assessing each body system.
• Identify self-screening examinations commonly performed by patients.
• Identify preventive screenings and the appropriate age(s) for each screening to occur.

http://evolve.elsevier.com/Potter/fundamentals/
The health assessment and physical examination are the first steps toward providing safe and competent nursing care. The nurse is in a unique position to determine each patient’s current health status, distinguish variations from the norm, and recognize improvements or deterioration in his or her condition. As a nurse, you must be able to recognize and interpret each patient’s behavioral and physical presentation. By performing health assessments and physical examinations, you will identify health patterns and evaluate each patient’s response to treatments and therapies.
Nurses gather assessment data about patients’ past and current health conditions in a variety of ways, using a comprehensive or focused approach, depending on the patient situation. Assessments are performed at health fairs, at screening clinics, in a health provider’s office, in acute care agencies, or in patients’ homes. Depending on the outcome of an assessment, a nurse considers evidence-based recommendations for care based on a patient’s values, the health provider’s clinical expertise, or own personal experience.
A complete health assessment involves a nursing history (see Chapter 16) and behavioral and physical examination. Through the health history interview you gather subjective data about a patient’s condition. You obtain objective data while observing a patient’s behavior and overall presentation. You identify additional objective data through a head-to-toe body system review during the physical examination. Your clinical judgments are based on all of the gathered data to create a plan of care for each situation. With accurate data you create a patient-centered care plan, identifying the nursing diagnoses, desired patient outcomes, and nursing interventions. Continuity in health care improves when you evaluate a patient by making ongoing, objective, and comprehensive assessments.
Purposes of the Physical Examination
A physical examination is conducted as an initial evaluation in triage for emergency care; for routine screening to promote wellness behaviors and preventive health care measures; to determine eligibility for health insurance, military service, or a new job; or to admit a patient to a hospital or long-term care facility. After considering the patient’s current condition, a nurse selects a focused physical examination on a specific system or area. For example, when a patient is having a severe asthma episode, the nurse first focuses on the pulmonary and cardiovascular systems so treatments can begin immediately. When the patient is no longer at risk for a bad outcome or injury, the nurse performs a more comprehensive examination of other body systems.
For patients who are hospitalized, a nurse integrates the collection of physical assessment data during routine patient care, validating findings with what is known about the patient’s health history. For example, on entering a patient’s room a nurse may notice behavioral patient cues that indicate comfort, anxiety, or sadness; assess the skin during the bed bath; or assess physical movements and swallowing abilities while administering medications. Use physical examination to do the following:
• Gather baseline data about the patient’s health status.
• Support or refute subjective data obtained in the nursing history.
• Identify and confirm nursing diagnoses.
• Make clinical decisions about a patient’s changing health status and management.
Cultural Sensitivity
Respect the cultural differences among patients from a variety of backgrounds when completing an examination. It is important to remember that cultural differences influence patient behaviors. Consider the patient’s health beliefs, use of alternative therapies, nutrition habits, relationships with family, and comfort with physical closeness during the examination and history. These factors will affect your approach as well as the type of findings you might expect.
Be culturally aware and avoid stereotyping on the basis of gender or race. There is a difference between cultural characteristics and physical characteristics. Learn to recognize common characteristics and disorders among members of ethnic populations within the community. It is equally important to recognize variations in physical characteristics such as in the skin and musculoskeletal system, which are related to racial variables. By recognizing cultural diversity, you show respect for each patient’s uniqueness, leading to higher-quality care and improved clinical outcomes (see Chapter 9).
Preparation for Examination
Physical examination is a routine part of a nurse’s patient assessment. In many care settings a head-to-toe physical assessment is required daily. You perform a reassessment when a patient’s condition changes as it improves or worsens. In some health care settings such as during a home health visit a focused physical examination is preferred. Proper preparation of the environment, equipment, and patient ensures a smooth physical examination with few interruptions. A disorganized approach causes errors and incomplete findings. Safety for confused patients should be a priority; never leave a confused or combative patient alone during an examination.
Infection Control
Some patients present with open skin lesions, infected wounds, or other communicable diseases. Use standard precautions throughout an examination (see Chapter 28). When an open sore or microorganism is present, wear gloves to reduce contact with contaminants. If a patient has excessive drainage or there is a risk of splattering from a wound, additional personal protective equipment such as an isolation gown or eye shield should be used. Follow agency hand hygiene policies before initiating and after completing a physical assessment.
Although most health care agencies make nonlatex gloves available, it is your responsibility to identify latex allergies in patients and use equipment items that are latex free. By recognizing risk factors for latex allergies, the patient remains free of a natural rubber latex (NRL) allergy response. Two types of allergic responses appear with NRL. The most immediate is an immunological reaction type 1 response, for which the body develops antibodies known as immunoglobulin E that can lead to an anaphylactic response. Atopy occurs when there is an increased tendency for the body to form antibodies as a result of the immune response. The second is the allergic contact dermatitis type 4 response, which causes a delayed reaction that appears 12 to 48 hours after exposure (Bundesen, 2008). Both require prior exposure to the substance to which the body reacts. The severity of the response varies among individuals. Table 30-1 provides a short list of products that contain latex and suggests available alternatives.
TABLE 30-1
Products Containing Latex and Nonlatex Substitutes*
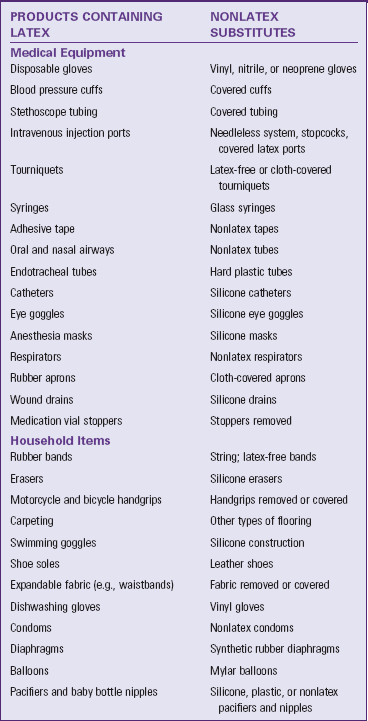
*This list is intended to provide examples of products and alternatives. It is not complete.
Modified from American Latex Allergy Association: Literature review on latex-food cross-reactivity, 1991-2006, 2011, http://www.latexallergyresources.org/topics/CrossReactiveAllergens.cfm. Accessed September 8, 2011; and Seidel HM et al: Mosby’s guide to physical examination, ed 7, St Louis, 2011, Mosby;
Environment
A respectful, considerate physical examination requires privacy. In the acute setting, nurses perform assessments in a patient’s room. Examination rooms are used in clinics or office settings. In the home the examination is performed in a space where privacy can be established such as the patient’s bedroom.
Examination spaces need to be well equipped for any procedures. Adequate lighting is necessary to properly illuminate body parts. The hospital patient room can be secured for privacy so patients are comfortable discussing their condition. Eliminate extra noise and take precautions to prevent interruptions from others. The room must be warm enough to maintain comfort.
Depending on the body part being assessed, it may be difficult to perform a selected assessment skill when a patient is in bed or on a stretcher. Special examination tables make positioning easier and body areas more easily accessible. By assisting patients on and off the examination table, injury can be avoided, and falls prevented. Examination tables can be uncomfortable; elevate the head of the table about 30 degrees. A small pillow helps with head and neck comfort. If the examination is completed in the patient room, raise the patient’s bed to be able to reach him or her more easily.
Equipment
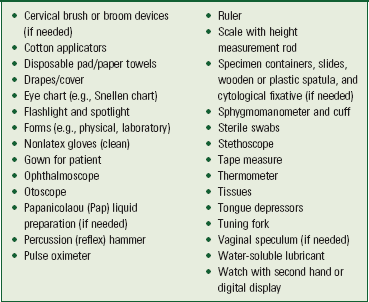
Perform hand hygiene thoroughly before handling equipment and starting an examination. Arrange any necessary equipment so that it is readily available and easy to use. Prepare equipment as appropriate (e.g., warm the diaphragm of the stethoscope between the hands before applying it to the skin). Be sure that equipment functions properly before using it (e.g., ensure that the ophthalmoscope and otoscope have good batteries and light bulbs). Box 30-1 lists typical equipment used during a physical examination.
Physical Preparation of the Patient
To show respect for a patient, ensure that physical comfort needs are met. Before starting, ask if the patient needs to use the restroom. An empty bladder and bowel facilitate examination of the abdomen, genitalia, and rectum. Collection of urine or fecal specimens occurs at this time if needed.
Physical preparation involves making certain that patient privacy is maintained with proper dress and draping. The patient in the hospital likely is wearing only a simple gown. In the clinic or health care provider’s office the patient needs to undress and usually is provided a disposable paper cover or paper gown. If the examination is limited to certain body systems, it is not always necessary for the patient to undress completely. Provide the patient privacy and plenty of time to undress to avoid embarrassment. After changing into the recommended gown or cover, the patient sits or lies down on the examination table with a light drape over the lap or lower trunk. Make sure that he or she stays warm by eliminating drafts, controlling room temperature, and providing warm blankets. Routinely ask if he or she is comfortable.
Positioning
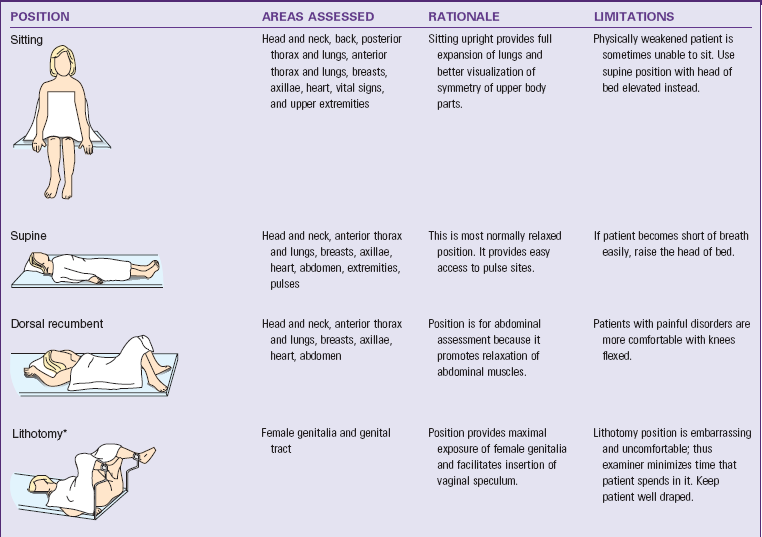
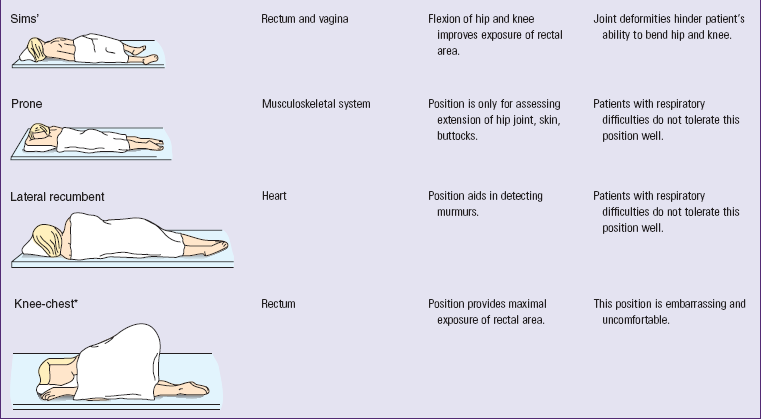
During the examination ask the patient to assume proper positions so body parts are accessible and he or she stays comfortable. Table 30-2 lists the preferred positions for each part of the examination and contains figures illustrating the positions. Patients’ abilities to assume positions depend on their physical strength, mobility, ease of breathing, age, and degree of wellness. After explaining the positions, help the patient to assume them. Take care to maintain respect and show consideration by adjusting the drapes so that only the area examined is accessible. During the examination a patient may need to assume more than one position. To decrease the number of position changes, organize the examination so all techniques requiring a sitting position are completed first, followed by those that require a supine position next, and so forth. Use extra care when positioning older adults with disabilities and limitations.
Psychological Preparation of a Patient
Many patients find an examination stressful or tiring, or they experience anxiety about possible findings. A thorough explanation of the purpose and steps of each assessment lets a patient know what to expect and how to cooperate. Adapt explanations to the patient’s level of understanding and encourage him or her to ask questions and comment on any discomfort. Convey an open, professional approach while remaining relaxed. A quiet, formal demeanor inhibits the patient’s ability to communicate, but a style that is too casual may cause him or her to doubt an examiner’s competence (Seidel et al., 2011).
Consider cultural or social norms when performing an examination on a person of the opposite gender. When this situation occurs, another person of the patient’s gender or a culturally approved family member needs to be in the room. By taking this step you demonstrate cultural awareness for a patient’s individual needs. As a side benefit, the second person acts as a witness to the conduct of the examiner and the patient should any question arise.
During the examination, watch the patient’s emotional responses by observing whether his or her facial expressions show fear or concern or if body movements indicate anxiety. When you remain calm, the patient is more likely to relax. Especially if the patient is weak or elderly, it is necessary to pace the examination, pausing at intervals to ask how he or she is tolerating the assessment. If the patient feels alright, the examination can proceed. However, do not force the patient to cooperate based on your schedule. Postponing the examination is advantageous because the findings may be more accurate when the patient can cooperate and relax.
Assessment of Age-Groups
It is necessary to use different interview styles and approaches to physical examination for patients of different age-groups. Your approach will vary with each group. When assessing children, show sensitivity and anticipate the child’s perception of the examination as a strange and unfamiliar experience. Routine pediatric examinations focus on health promotion and illness prevention, particularly for the care of well children who receive competent parenting and have no serious health problems (Josephson and AACAP Work Group, 2007). This examination focuses on growth and development, sensory screening, dental examination, and behavioral assessment. Children who are chronically ill or disabled and foster, foreign-born, or adopted children sometimes require additional examination visits. When examining children, the following tips help in data collection:
• Gather all or part of the history on infants and children from parents or guardians.
• Perform the examination in a nonthreatening area; provide time for play to become acquainted.
• Because parents sometimes think the examiner is testing them, offer support during the examination and do not pass judgment.
• Call children by their first name and address the parents as “Mr., Mrs., or Ms.” rather than by their first name unless instructed differently.
• Use open-ended questions to allow parents to share more information and describe more of the children’s problems. This also allows observation of parent-child interactions. You can interview older children, who often provide details about their health history and severity of symptoms.
• Treat adolescents as adults and individuals because they tend to respond best when treated as such.
• Remember that adolescents have the right to confidentiality. After talking with parents about historical information, speak alone with adolescents.
A comprehensive health assessment and examination of older adults includes physical data, developmental stage, family relationships, religious and occupational pursuits, and a review of the patient’s cognitive, affective, and social level (Kresevic, 2008). An important aspect is to assess the patient’s ability to perform basic activities of daily living (e.g., bathing, grooming) and complex instrumental activities of daily living (e.g., making phone call).
Throughout the examination recognize that with advancing age the body does not demonstrate obvious injury or disease as vigorously as younger patients and older adults do not always exhibit the expected signs and symptoms (Meiner, 2011). Characteristically older adults present with subtle or atypical signs and symptoms. Principles to follow during examination of an older adult include the following:
• Do not stereotype about aging patients’ level of cognition. Most older adults are able to adapt to change and learn about their health. Similarly most are reliable historians.
• Recognize that some older adults have sensory or physical limitations that affect how quickly they can be interviewed and examinations can be conducted. It might be necessary to plan for more than one examination session. Sometimes it helps to give patients an initial health questionnaire before they come to a clinic or office.
• Perform the examination with adequate space; this is especially important for patients with mobility aids such as a cane or walker.
• During the examination use patience, allow for pauses, and observe for details. Recognize normal physiological and behavioral changes that are characteristic of later life.
• Certain types of health information are stressful for older patients to give. Some view illness as a threat to independence and a step toward institutionalization.
• Be aware of the location of the closest bathroom facility in case the patient has an urgent need to eliminate.
• Be alert to signs of increasing fatigue such as sighing, grimacing, irritability, leaning against objects for support, and drooping head and shoulders.
Organization of the Examination
You will conduct a physical examination by assessing each body system. Use judgment to ensure that an examination is relevant and includes the correct assessments. Patients with focused symptoms or needs require only parts of an examination; thus, when a patient comes to a clinic with symptoms of a severe chest cold, a neurological assessment should not be required. A patient entering the emergency department with acute abdominal symptoms requires assessment of the body systems most at risk for being abnormal. However, when a patient is admitted to the hospital, you will perform a complete examination at the time of admission and at least once each day. Agency guidelines may define the components of a complete examination (see agency policy). A patient in the community seeks screening for specific conditions, often dependent on the patient’s age or health risks listed in Table 30-3.
TABLE 30-3
Recommended Preventive Screenings
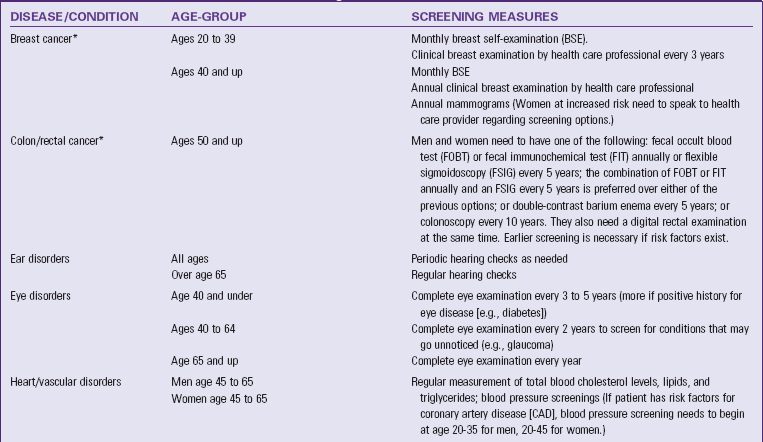
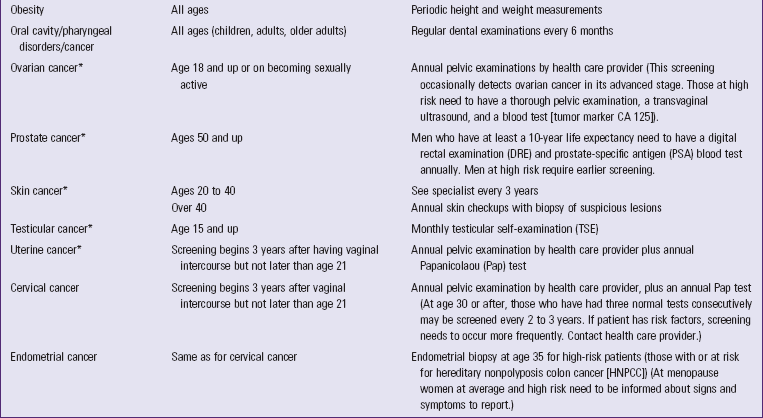
*Data from American Cancer Society: Cancer facts and figures 2011, Atlanta, 2011, The Society; website for further information on preventative screenings: Guide to clinical preventive services, AHRQ Publication No. 05-0570, Rockville, Md, 2011, Agency for Healthcare Research and Quality, http://www.ahrp.gov/.
Any physical examination should follow a systematic routine to avoid missing important findings. A head-to-toe approach includes all body systems, and the examiner recalls and performs each step in a predetermined order. For an adult the examination begins with an assessment of the head and neck and progresses methodically down the body to incorporate all body systems. The following tips help keep an examination well organized:
• Compare both sides of the body for symmetry. A degree of asymmetry is normal (e.g., the biceps muscles in the dominant arm are sometimes more developed than the same muscles in the nondominant arm).
• If the patient is seriously ill, first assess the systems of the body most at risk for being abnormal. For example, a patient with chest pain first undergoes a cardiovascular assessment.
• If the patient becomes fatigued, offer rest periods between assessments.
• Perform painful procedures near the end of an examination.
• Record assessments in specific terms in the electronic or paper record. A standard form allows for recording information in the same sequence that it is gathered.
• Use common and accepted medical terms and abbreviations to keep notes accurate, brief, and concise.
• Record quick notes during the examination to avoid delays. Complete any larger documentation notes at the end of the examination.
Techniques of Physical Assessment
The four techniques used in a physical examination are inspection, palpation, percussion, and auscultation.
Inspection
To inspect, carefully look, listen, and smell to distinguish normal from abnormal findings. To do so, you must be aware of any personal visual, hearing, or olfactory deficits. It is important to deliberately practice this skill and learn to recognize all of the possible pieces of data that can be gathered through inspection alone. Inspection occurs when interacting with a patient, watching for nonverbal expressions of emotional and mental status. Physical movements and structural components can also be identified in such an informal way. Most important, be deliberate and pay attention to detail. Follow these guidelines to achieve the best results during inspection:
• Make sure that adequate lighting is available, either direct or tangential.
• Use a direct lighting source (e.g., a penlight or lamp) to inspect body cavities.
• Inspect each area for size, shape, color, symmetry, position, and abnormality.
• Position and expose body parts as needed so all surfaces can be viewed but privacy can be maintained.
• When possible, check for side-to-side symmetry by comparing each area with its match on the opposite side of the body.
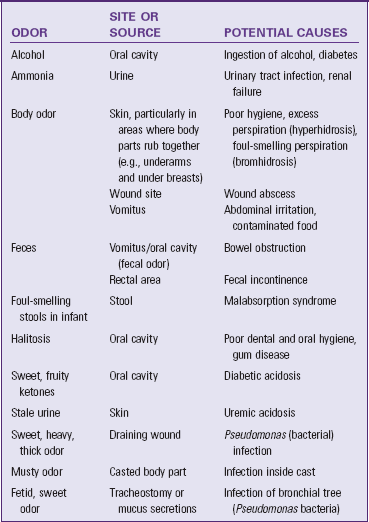
While assessing a patient, recognize the nature and source of body odors (Table 30-4). An unusual odor often indicates an underlying pathology. Olfaction helps to detect abnormalities that cannot be recognized by any other means. For example, when a patient’s breath has a sweet, fruity odor, assess for signs of diabetes. Continue to inspect various parts of the body during the physical examination. Palpation may be used concurrently with inspection, or it may follow in a more deliberate fashion.
Palpation
Palpation involves using the sense of touch to gather information. Through touch you make judgments about expected and unexpected findings of the skin or underlying tissue, muscle, and bones. For example, you palpate the skin for temperature, moisture, texture, turgor, tenderness, and thickness and the abdomen for tenderness, distention, or masses. Use different parts of the hand to detect different characteristics (Table 30-5). The palmar surface of the hand and finger pads is more sensitive than the fingertips and should be used to determine position, texture, size, consistency, masses, fluid, and crepitus (Fig. 30-1, A). Assess body temperature by using the dorsal surface or back of the hand (Fig. 30-1, B). The palmar surface of the hand and fingers (Fig. 30-1, C) is more sensitive to vibration. Measure position, consistency, and turgor by lightly grasping the body part with the fingertips (Fig. 30-1, D).
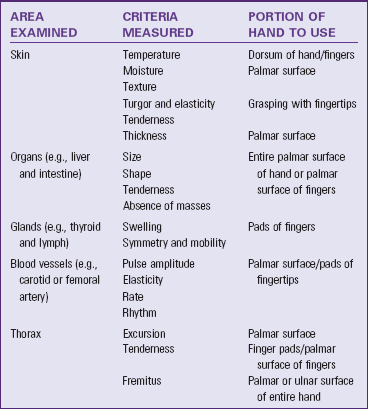
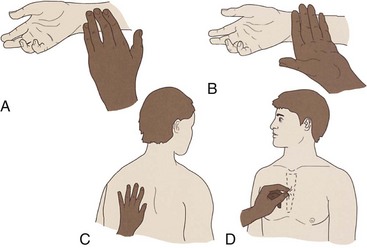
FIG. 30-1 A, Radial pulse is detected with the pads of fingertips, the most sensitive part of the hand. B, Dorsum of the hand detects temperature variations in skin. C, The bony part of the palm at the base of the fingers detects vibrations. D, Skin is grasped with the fingertips to assess turgor.
Touching the patient is a personal experience for both you and the patient. Display respect and concern throughout the examination. Before palpating consider the patient’s condition and ability to tolerate the assessment techniques, paying close attention to areas that are painful or tender. In addition, always be conscious of the environment and any threats to the patient’s safety.
Prepare for palpation by warming hands, keeping fingernails short and using a gentle approach. Palpation proceeds slowly, gently, and deliberately. The patient needs to be guided to relax and feel comfortable since tensed muscles make assessment more difficult. To promote relaxation, have him or her take slow, deep breaths and place both arms along the sides of the body. Ask the patient to point to more sensitive areas, watching for nonverbal signs of discomfort. Palpate tender areas last.
Two types of palpation are used for physical examination, light and deep. Light palpation is performed by placing the hand on the body part being examined; it also involves pressing inward about 1 cm ( inch). Light, superficial palpation of structures such as the abdomen gives the patient the chance to identify areas of tenderness (Fig. 30-2, A). Inquire about areas of tenderness and assess them further for potentially serious pathologies. Deep palpation is used to examine the condition of organs such as those in the abdomen (Fig. 30-2, B). Depress the area under examination approximately 4 cm (2 inches) (Seidel et al., 2011), using one or both hands (bimanually). When using bimanual palpation, relax one hand (sensing hand) and place it lightly over the patient’s skin. The other hand (active hand) helps apply pressure to the sensing hand. The lower hand does not exert pressure directly and thus remains sensitive to detect organ characteristics. For safety deep palpation should be observed by your clinical instructor when you first attempt the procedure.

Percussion
Percussion involves tapping the skin with the fingertips to vibrate underlying tissues and organs. The vibration travels through body tissues, and the character of the resulting sound reflects the density of the underlying tissue. The denser the tissue, the quieter the sound. By knowing how various densities influence sound, it is possible to locate organs or masses, map their edges, and determine their size. An abnormal sound suggests a mass or substance such as air or fluid within an organ or body cavity. The skill of percussion is used more often by advanced practice nurses than by nurses in daily practice at the bedside.
Auscultation
Auscultation involves listening to sounds the body makes to detect variations from normal. Some sounds such as speech and coughing can be heard without additional equipment, but a stethoscope is necessary to hear internal body sounds.
Internal body sounds are created by blood, air, or gastric contents as they move against the body structures. For example, normal heart sounds are created when the heart valves close, moving blood to the next portion of the cardiovascular system. Normal sounds for each body system are discussed later in this chapter. Learn to recognize abnormal sounds after learning normal variations. Becoming more proficient in auscultation occurs by knowing the types of sounds each body structure makes and the location in which the sounds are heard best.
To auscultate internal sounds you need to hear well, have a good stethoscope, and know how to use it properly. Nurses with hearing disorders can obtain stethoscopes with extra sound amplification. Chapter 29 describes the parts of the stethoscope and its general use. The bell is best for hearing low-pitched sounds such as vascular and certain heart sounds, and the diaphragm is best for listening to high-pitched sounds such as bowel and lung sounds.
By practicing with the stethoscope, you become proficient at using it and realize when sounds are clear and when there are extraneous sounds. Extraneous sounds created by rubbing against the tubing or chest piece interfere with auscultation of body organ sounds. By deliberately producing these sounds, you learn to recognize and disregard them during the actual examination. Box 30-2 contains ways to practice using and techniques for caring for the stethoscope. Describe any sound you hear using the following characteristics:
• Frequency indicates the number of sound wave cycles generated per second by a vibrating object. The higher the frequency, the higher the pitch of a sound and vice versa.
• Loudness refers to the amplitude of a sound wave. Auscultated sounds range from soft to loud.
• Quality refers to sounds of similar frequency and loudness from different sources. Terms such as blowing or gurgling describe the quality of sound.
• Duration means the length of time that sound vibrations last. The duration of sound is short, medium, or long. Layers of soft tissue dampen the duration of sounds from deep internal organs.
Auscultation requires concentration and practice. While listening, know which sounds are normally produced in certain parts of the body and what causes the sounds. Normal sounds will be discussed in each body system section of this chapter. After understanding the cause and character of normal auscultated sounds, it becomes easier to recognize abnormal sounds and their origins.
General Survey
When a patient first enters the examination room, observe his or her walk and general appearance and be attentive to his or her behavior and dress. A general survey, or appraisal, of the patient’s presentation and behavior provides information about characteristics of an illness, the patient’s ability to function independently, body image, emotional state, recent changes in weight, and developmental status. If there are abnormalities or problems, assess the affected body system more closely during the full examination.
General Appearance and Behavior
Assess appearance and behavior while preparing the patient for the examination. For this review include:
• Gender and race: A person’s gender affects the type of examination performed and the order of the assessments. Different physical features are related to gender and race. Certain illnesses are more likely to affect a specific gender or race (e.g., the incidence of skin cancer is more common in whites than in blacks, prostate cancer is higher in black men than in white men, and cancer of the bladder is four times higher in men than women) (American Cancer Society [ACS], 2011).
• Age: Age influences normal physical characteristics and a person’s ability to participate in some parts of the examination.
• Signs of distress: Sometimes obvious signs or symptoms indicate pain (grimacing, splinting painful area), difficulty breathing (shortness of breath, sternal retractions), or anxiety. Set priorities and examine the related physical areas first.
• Body type: Observe if the patient appears trim and muscular, obese, or excessively thin. Body type reflects the level of health, age, and lifestyle.
• Posture: Normal standing posture shows an upright stance with parallel alignment of the hips and shoulders. Normal sitting posture involves some degree of rounding of the shoulders. Observe whether the patient has a slumped, erect, or bent posture, which reflects mood or pain. Changes in older adult physiology often result in a stooped, forward-bent posture, with the hips and knees somewhat flexed and the arms bent at the elbows.
• Gait: Observe as the patient walks into the room or stands at the bedside (if the patient is ambulatory). Note whether movements are coordinated or uncoordinated. A person normally walks smoothly, with the arms swinging freely at the sides and the head and face leading the body.
• Body movements: Observe whether movements are purposeful, noting any tremors involving the extremities. Determine if any body parts are immobile.
• Hygiene and grooming: Note the patient’s level of cleanliness by observing the appearance of the hair, skin, and fingernails. Determine if his or her clothes are clean. Grooming depends on the patient’s cognitive and emotional function, daily or social activities, and occupation. Observe for excessive use of cosmetics or colognes that could indicate a change in self-perception.
• Dress: Culture, lifestyle, socioeconomic level, and personal preference affect the selection and wearing of clothing. However, you should assess whether or not the clothing is appropriate for the temperature, weather conditions, or setting. Depressed or mentally ill people may not be able to select proper clothing, and an older adult might tend to wear extra clothing because of sensitivity to cold.
• Body odor: An unpleasant body odor can result from physical exercise, poor hygiene, or certain disease states. Validate any odors that might indicate a health problem.
• Affect and mood: Affect is a person’s feelings as he or she appears to others. Patients express mood or emotional state verbally and nonverbally. Determine whether or not verbal expressions match nonverbal behavior and if the mood is appropriate for the situation. By maintaining eye contact you can observe facial expressions while asking questions.
• Speech: Normal speech is understandable and moderately paced and shows an association with the person’s thoughts. However, emotions or neurological impairment sometimes causes rapid or slowed speech. Observe whether the patient speaks in a normal tone with clear inflection of words.
• Signs of patient abuse: During the examination observe if the patient fears his or her spouse or partner, a caregiver, a parent, or an adult child. Abuse of children, women, and older adults is a growing health problem. Consider any obvious physical injury or neglect as signs of possible abuse (e.g., evidence of malnutrition or presence of bruising on the extremities or trunk). Abuse occurs in many forms: physical, mental or emotional, sexual, social, and financial or economic. Observe the behavior of the individual for any signs of frustration, explanations that do not fit his or her physical presentation, or signs of injury. Most states mandate a report to a social service center when abuse or neglect is suspected (Box 30-3). It is difficult to detect abuse because victims often do not complain or report that they are in an abusive situation (Cohen et al., 2007). If abuse is suspected, find a way to interview the patient in private; patients are more likely to reveal any problems when the suspected abuser is absent from the room. It is imperative that you help the patient find safe housing or seek protection from the abuser since the risk for further abuse is high once the victim has reported it or tries to leave the abusive situation.
Box 30-3 Clinical Indicators of Abuse
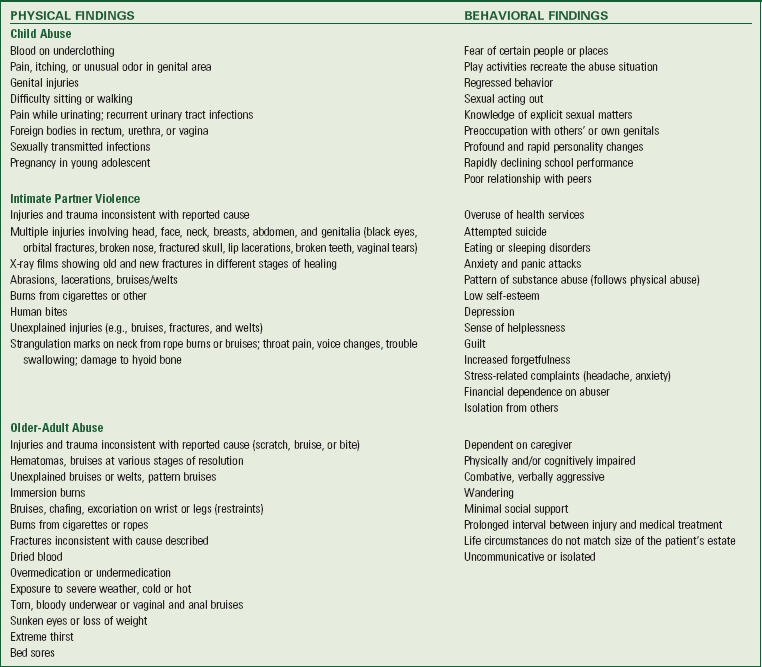
Data from Hockenberry MJ, Wilson P: Wong’s nursing care of infants and children, ed 9, St Louis, 2011, Mosby; Krieger CL: Intimate partner violence, Nurs Women’s Health 12(3):225, 2008; Muehlbauer M, Crane PA: Elder abuse and neglect, J Psychosocial Nurs 44(11):43; Westley C: Elder mistreatment: a self-learning module, Medsurg Nurs 14(2):133, 2005.
• Substance abuse: Unusual or inconsistent behavior may be an indicator of substance abuse, which can affect all socioeconomic groups. Although a single patient visit to a clinic does not always reveal the problem, unusual behaviors should be investigated further to reveal behaviors that should be confirmed with a well-focused history and physical examination. Always approach the patient in a caring and nonjudgmental way; substance abuse involves both emotional and lifestyle issues. Box 30-4 lists characteristics of patients who should be further assessed for potential substance abuse. The CAGE questionnaire provides a useful set of questions to guide assessment. CAGE is an acronym for the following:
• Have you ever felt the need to Cut down on your drinking or drug use?
• Have people Annoyed you by criticizing your drinking or drug use?
• Have you ever felt bad or Guilty about your drinking or drug use?
• Have you ever used or had a drink first thing in the morning as an Eye-opener to steady your nerves or feel normal?
If two or more of the CAGE questions are positive, be aware that substance abuse is likely and the patient needs guidance and encouragement to seek treatment. Among older adults risk factors for development of alcohol-related problems include chronic medical disorders, sleep disorders, social isolation, loneliness, bereavement, and acute or chronic pain. Older women appear to abuse alcohol more often than elderly men (Boyle and Davis, 2006).
Vital Signs
After completing the general survey, measure the patient’s vital signs (see Chapter 29). Measurement of vital signs is more accurate if completed before beginning positional changes or movements. If there is a chance that the vital signs are skewed when first measured, recheck them later during the rest of the examination. Pain, considered the fifth vital sign, should also be assessed.
Height and Weight
Height and weight reflect a person’s general health status. Standardized tables help reveal the normal expected adult weight for a given height (Table 30-6). Assess every patient to identify if he or she is at a healthy weight, overweight, or obese. Weight is routinely measured during health screenings, visits to physicians’ offices or clinics, and on admission to the hospital. Infants and children are measured for both height and weight at each health care visit to assess for healthy growth and development. If older adults are underweight, difficulty with feeding and other functional activities is a possibility. Measuring height and weight of older adults, along with obtaining a dietary history, shows risk factors for chronic diseases (Box 30-5).
TABLE 30-6
Height and Weight Table: Weights for Persons 25 to 59 Years According to Build*

*Indoor clothing weighing 5 pounds for men and 3 pounds for women.
Courtesy Metropolitan Life Insurance Company: Statistical bulletin, New York, 2010, Metropolitan.
Assess trends in weight changes compared with height for signs of poor health. Assessments screen for abnormal weight changes. A patient’s weight normally varies daily because of fluid loss or retention. However, a downward trend in a frail older adult indicates that there is a serious reduction in nutritional reserves. The nursing history helps to focus on possible causes for a change in weight (Table 30-7). Ask the patient to report current height and weight, along with a history of any substantial weight gain or loss. A weight gain of 5 pounds (2.3 kg) in 1 day indicates fluid-retention problems. A weight loss is considered significant if the patient has lost more than 5% of body weight in a month or 10% in 6 months.
TABLE 30-7
Nursing History for Weight Assessment
When a patient is hospitalized, daily weight is measured at the same time of day, on the same scale, with approximately the same clothes. This allows an objective comparison of subsequent weights. Accuracy of weight measurement is important because health care providers base medical and nursing decisions (e.g., drug dosage, medications) on changes.
Several different scales are available for use. Patients capable of bearing their own weight use a standing scale. The standard platform scale is calibrated by moving the large and small weights to zero. By adjusting the calibrating knob, the balance beam is leveled and steadied. The patient stands on the scale platform and remains still as the nurse adjusts the largest solid weight to the 50-pound or 22.5-kg increment under the patient’s weight. Next the smaller weight is moved to balance the scale at the nearest  pound or 0.1 kg (Seidel et al., 2011). Electronic scales automatically display the weight within seconds. They are calibrated automatically each time they are used.
Bed and chair scales are available for patients who are unable to bear weight. Newer electronic hospital beds have built-in electronic scales for weighing patients who are not able to get out of bed.
You can use a basket or platform scale to weigh infants. After removing the infant’s clothing, weigh him or her in dry disposable diapers. Adjust the measurement later for the weight of the diaper, ensuring an accurate reading. Keep the room warm to prevent chills. Place a light cloth or paper on the surface of the infant scale to prevent cross-infection from urine or feces. When placing an infant in a basket or on a platform, hold a hand lightly above him or her to detect movements and prevent accidental falls. Measure an infant’s weight in both ounces and grams.
Measure height in patients capable of standing by having them remove their shoes. The standing surface should be clean. Use a measuring rod attached vertically to a weight scale, or use a tape ruler on the wall. As the patient stands erect, place a flat surface on his or her head that is even with the vertical measure. Then read the number on the scale or ruler that indicates his or her height in centimeters or inches.
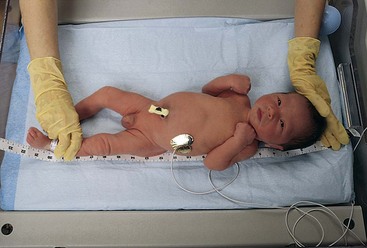
Remove the shoes of a nonweight-bearing patient and position the patient (such as an infant) supine on a firm surface. When measuring an infant, hold his or her head and make sure that his or her legs are straight at the knees. After positioning the infant, use a tape measure to measure length from the head to the bottom of the feet (Fig. 30-3). Record the infant’s length to the nearest 0.5 cm or  inch.
inch.
Skin, Hair, and Nails
The integumentary system refers to the skin, hair, scalp, and nails. To assess the integument, you first gather a health history to guide your examination and use the techniques of inspection and palpation.
Skin
Begin an assessment of the skin by focusing on the health history questions found in Table 30-8. The physical examination begins with an inspection of all visible skin surfaces; the less visible surfaces are assessed when you examine other body systems. Use the senses of sight, smell, and touch while performing inspection and palpation of the skin.
TABLE 30-8
Nursing History for Skin Assessment
| ASSESSMENT | RATIONALE |
| Ask patient about history of changes in skin: dryness, pruritus, sores, rashes, lumps, color, texture, odor, and lesion that does not heal. | Patient is best source to recognize change. Usually skin cancer is first noticed as a localized change in skin color. |
| Consider if patient has the following history: fair, freckled, ruddy complexion; light-colored hair or eyes; tendency to burn easily. | Characteristics are risk factors for skin cancer. |
| Determine whether patient works or spends excessive time outside. If so, ask whether patient wears sunscreen and the level of protection. | Exposed areas such as face and arms are more pigmented than rest of body. The American Cancer Society (2011) recommends use of sunscreen. |
| Determine whether patient has noted lesions, rashes, or bruises. | Most skin changes do not develop suddenly. Change in character of lesion possibly indicates cancer. Bruising indicates trauma or bleeding disorder. |
| Question patient about frequency of bathing and type of soap used. | Excessive bathing and use of harsh soaps cause dry skin. |
| Ask if patient has had recent trauma to skin. | Some injuries cause bruising and changes in skin texture. |
| Determine whether patient has history of allergies. | Skin rashes commonly occur from allergies. |
| Ask if patient uses topical medications or home remedies on skin. | Incorrect use of topical agents causes inflammation or irritation. |
| Ask if patient goes to tanning parlors, uses sunlamps, or takes tanning pills. | Overexposure of skin to these irritants can cause skin cancer. |
| Ask if patient has family history of serious skin disorders such as skin cancer or psoriasis. | Family history can reveal information about patient’s condition. |
| Determine if patient works with creosote, coal, tar, petroleum products, arsenic compounds, or radium. | Exposure to these agents creates risk for skin cancer. |
Assessment of the skin reveals the patient’s health status related to oxygenation, circulation, nutrition, local tissue damage, and hydration. Check the condition of the patient’s integument to determine the need for nursing care. For example, assessment findings can help determine the type of hygiene measures required to maintain integrity of the integument (see Chapter 39). Adequate nutrition and hydration become goals of therapy if there is an alteration in the integumentary status (see Chapter 44).
Every patient has a risk for skin impairment during administration of care in a hospital setting. Risk increases if there is pressure against the skin when the patient is immobile, from reactions to various medications used in treatment, and from moisture if the patient is incontinent. At high risk are patients who are neurologically impaired or chronically ill or have had orthopedic or vascular injuries. Also at higher risk are patients with diminished mental status, poor tissue oxygenation, low cardiac output, or inadequate nutrition. Patients who are homebound, in nursing homes, or extended care facilities are often at risk for similar problems, depending on their level of mobility and the presence of chronic illness. Routinely assess the skin of all at-risk patients to look for primary or initial lesions that develop. Without proper care primary lesions can deteriorate to become secondary lesions that require more extensive nursing care. For example, the development of a pressure ulcer lengthens a hospital stay unless it is prevented or discovered and treated early (see Chapter 48).
Adequate lighting is required when assessing the skin. Daylight is the best choice to identify variations in skin color, especially for detecting skin changes in dark-skinned patients. When sunlight is not available, fluorescent lighting is the next best choice. Room temperature also affects skin assessment. A room that is too warm causes superficial vasodilation, resulting in increased redness of the skin. A cool environment causes the sensitive patient to develop cyanosis around the lips and nail beds (Seidel et al., 2011).
Although you inspect the skin over each part of the body during an examination, it is helpful to make a brief but careful overall visual sweep of the entire body. This approach provides a good idea of the distribution and extent of any lesions and the overall symmetry of skin color. Inspect all skin surfaces, making a point to do so when examining other body systems. Often overlooked, inspection of the feet is absolutely essential for patients with poor circulation or diabetes. If any abnormalities are found during an examination, palpate the involved areas. Use disposable gloves for palpation if open, moist, or draining lesions are present.
Throughout the examination remain alert for skin odors. White and black adolescents and adults ordinarily have body odor because they have a greater number of functioning apocrine glands. In contrast, Asians and Native Americans/American Indians often do not (Seidel et al., 2011). Fig. 30-4 illustrates a normal cross-section of the skin.

FIG. 30-4 A cross-section of the skin reveals three layers: epidermis, dermis, and subcutaneous fatty tissues.
Color
Skin color varies from body part to body part and from person to person. Despite individual variations, it is usually uniform over the body. Table 30-9 lists common variations. Normal skin pigmentation ranges in tone from ivory or light pink to ruddy pink in light skin and from light to deep brown or olive in dark skin. In older adults pigmentation increases unevenly, causing discolored skin. While inspecting the skin be aware that cosmetics or tanning agents sometimes mask normal skin color.
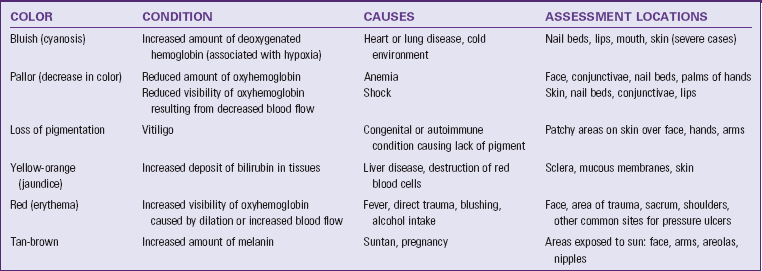
The assessment of color first involves areas of the skin not exposed to the sun such as the palms of the hands. Note if the skin is unusually pale or dark. Areas exposed to the sun such as the face and arms are darker. It is more difficult to note changes such as pallor or cyanosis in patients with dark skin. Usually color hues are most evident in the palms, soles of the feet, lips, tongue, and nail beds. Areas of increased color (hyperpigmentation) and decreased color (hypopigmentation) are common. Skin creases and folds are darker than the rest of the body in the dark-skinned patient.
Inspect sites where abnormalities are more easily identified. For example, pallor is more evident in the face, buccal (mouth) mucosa, conjunctiva, and nail beds. Observe for cyanosis (bluish discoloration) in the lips, nail beds, palpebral conjunctivae, and palms. In recognizing pallor in the dark-skinned patient, observe that normal brown skin appears to be yellow-brown and normal black skin appears to be ashen gray. Also assess the lips, nail beds, and mucous membranes for generalized pallor; if pallor is present, the mucous membranes are ashen gray. Assessment of cyanosis in the dark-skinned patient requires observing areas where pigmentation occurs the least (conjunctiva, sclera, buccal mucosa, tongue, lips, nail beds, and palms and soles). In addition, verify these findings with clinical manifestations (Seidel et al., 2011).
The best site to inspect for jaundice (yellow-orange discoloration) is on the patient’s sclera. You can see normal reactive hyperemia, or redness, most often in regions exposed to pressure such as the sacrum, heels, and greater trochanter. Inspect for any patches or areas of skin color variation. Localized skin changes such as pallor or erythema (red discoloration) indicate circulatory changes. For example, an area of erythema is caused by localized vasodilation resulting from a sunburn, inflammation, or fever. It is difficult to observe erythema in the dark-skinned patient; thus palpate the area for heat and warmth to note the presence of skin inflammation. Compare the area with a different part of the skin to detect a difference in temperature. An area of an extremity that appears unusually pale results from arterial occlusion or edema. Be sure to ask if the patient has noticed any changes in skin coloring.
There is also a pattern of findings associated with patients who are chemically dependent or intravenous (IV) drug abusers (Table 30-10). It is sometimes difficult to recognize signs and symptoms through an isolated examination. A patient who takes repeated IV injections has edematous, reddened, and warm areas along the arms and legs. This pattern suggests recent injections. Evidence of old injection sites appears as hyperpigmented and shiny or scarred areas.
TABLE 30-10
Physical Findings of the Skin Indicative of Substance Abuse
Data from Brewer JD et al: Cocaine abuse: dermatologic manifestations and therapeutic approaches, J Am Acad Dermatol 59:483, 2008; McKenry L et al: Mosby’s pharmacology in nursing, ed 22, St Louis, 2006, Mosby; and Smith DE, Seymour RB: Clinician’s guide to substance abuse, New York, 2001, McGraw-Hill.
Moisture
The hydration of skin and mucous membranes helps to reveal body fluid imbalances, changes in the environment of the skin, and regulation of body temperature. Moisture refers to wetness and oiliness. The skin is normally smooth and dry. Skinfolds such as the axillae are normally moist. Minimal perspiration or oiliness is often present (Seidel et al., 2011). Increased perspiration can be associated with activity, exposure to warm environments, obesity, anxiety, or excitement. Use ungloved fingertips to palpate skin surfaces. Observe for dullness, dryness, crusting, and flaking that resembles dandruff when the skin surface is lightly rubbed. Excessively dry skin is common in older adults and persons who use excessive amounts of soap during bathing (Meiner, 2011). Other factors causing dry skin include lack of humidity, exposure to sun, smoking, stress, excessive perspiration, and dehydration. Excessive dryness worsens existing skin conditions such as eczema and dermatitis.
Temperature
The temperature of the skin depends on the amount of blood circulating through the dermis. Increased or decreased skin temperature indicates an increase or decrease in blood flow. An increase in skin temperature often accompanies localized erythema or redness of the skin. A reduction in skin temperature often accompanies pallor and reflects a decrease in blood flow. It is important to remember that a cold exam room can cause changes in the patient’s skin temperature and color.
Accurately assess temperature by palpating the skin with the dorsum or back of the hand. Compare symmetrical body parts. Normally the skin temperature is warm. Sometimes it is the same throughout the body, and other times it varies in one area. Always assess skin temperature for patients at risk of having impaired circulation such as after a cast application or vascular surgery. You can identify a stage I pressure ulcer early by noting warmth over an area of erythema on the skin (see Chapter 48).
Texture
Texture refers to the character of the surface of the skin and how the deeper layers feel. By palpating lightly with the fingertips, you determine whether the patient’s skin is smooth or rough, thin or thick, tight or supple, and indurated (hardened) or soft. The texture of the skin is normally smooth, soft, even, and flexible in children and adults. However, the texture is usually not uniform throughout, with thicker texture over the palms of the hand and soles of the feet. In older adults the skin becomes wrinkled and leathery because of a decrease in collagen, subcutaneous fat, and sweat glands.
Localized skin changes result from trauma, surgical wounds, or lesions. When there are irregularities in texture such as scars or indurations, ask the patient about recent injury to the skin. Deeper palpation sometimes reveals irregularities such as tenderness or localized areas of induration, which can be caused by repeated injections.
Turgor
Turgor refers to the elasticity of the skin. Normally the skin loses its elasticity with age, but fluid balance can also affect skin turgor. Edema or dehydration diminishes turgor. To assess skin turgor, grasp a fold of skin on the back of the forearm or sternal area with the fingertips and release (Fig. 30-5). Since the skin on the back of the hand is normally loose and thin, turgor is not reliably assessed at that site (Seidel et al., 2011). Normally the skin lifts easily and falls immediately back to its resting position. When turgor is poor, it stays pinched and shows tenting. Evaluate the ease with which the skin moves and the speed at which it returns to its resting state. Failure of the skin to reassume its normal contour or shape indicates dehydration. The patient with poor skin turgor does not have resilience to the normal wear and tear on the skin, and a decrease in turgor predisposes the patient to skin breakdown.
Vascularity
The circulation of the skin affects color in localized areas and leads to the appearance of superficial blood vessels. Vascularity occurs in localized pressure areas when patients remain in one position. Vascularity appears reddened, pink or pale (see Chapter 48). With aging, capillaries become fragile and more easily injured. Petechiae are nonblanching, pinpoint-size, red or purple spots on the skin caused by small hemorrhages in the skin layers. Many petechiae have no known cause, but some may indicate serious blood-clotting disorders, drug reactions, or liver disease.
Edema
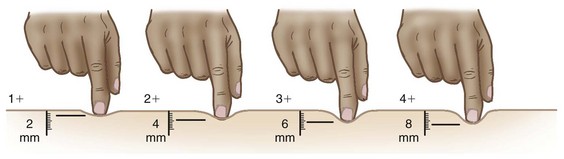
Areas of the skin become swollen or edematous from a buildup of fluid in the tissues. Direct trauma and impairment of venous return are two common causes of edema. Inspect edematous areas for location, color, and shape. The formation of edema separates the surface of the skin from the pigmented and vascular layers, masking skin color. Edematous skin also appears stretched and shiny. Palpate edematous areas to determine mobility, consistency, and tenderness. When pressure from the examiner’s fingers leaves an indentation in the edematous area, it is called pitting edema. To assess the degree of pitting edema, press the edematous area firmly with the thumb for several seconds and release. The depth of pitting, recorded in millimeters, determines the degree of edema (Seidel et al., 2011). For example, 1+ edema equals a 2-mm depth, 2+ edema equals a 4-mm depth, 3+ equals 6 mm, and 4+ equals 8 mm (Fig. 30-6).
Lesions
The term lesion refers broadly to any unusual finding of the skin surface. Normally the skin is free of lesions, except for common freckles or age-related changes such as skin tags, senile keratosis (thickening of skin), cherry angiomas (ruby red papules), and atrophic warts. Lesions that are primary occur as an initial spontaneous sign of a pathological process such as with an insect bite. Secondary lesions result from later formation or trauma to a primary lesion such as occurs with a pressure ulcer. When you find a lesion, collect standard information about its color, location, texture, size, shape, type, grouping (clustered or linear), and distribution (localized or generalized). Next observe for any exudate, odor, amount, and consistency. Measure the size of the lesion in centimeters by using a small, clear, flexible ruler. Measure each lesion for height, width, and depth.
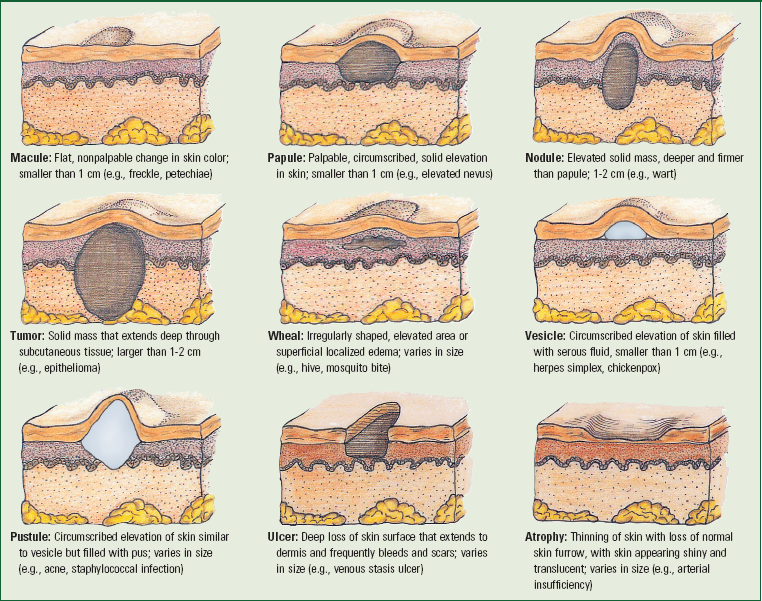
Palpation helps determine the mobility, contour (flat, raised, or depressed), and consistency (soft or indurated) of a lesion. Certain types of lesions present characteristic patterns. For example, a tumor is usually an elevated, solid lesion larger than 2 cm. Primary lesions such as macules and nodules come from some stimulus to the skin (Box 30-6). Secondary lesions such as ulcers occur as alterations in primary lesions. After you identify a lesion, closely inspect it in good lighting. Palpate gently, covering the entire area of the lesion. If it is moist or draining fluid, wear gloves during palpation and pay attention to whether or not the patient identifies any areas of tenderness.
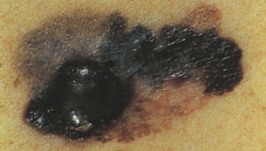
Skin (cutaneous) malignancies are the most common neoplasms in patients. For this reason the examiner should incorporate a thorough skin assessment on all patients. Cancerous lesions have distinct features and over time undergo changes in color and size (Box 30-7). Basal cell carcinoma is most common in sun-exposed areas and frequently occurs with a history of sun-damaged skin; it almost never spreads to other parts of the body. Squamous cell carcinoma is more serious than basal cell and develops on the outer layers of sun-exposed skin; these cells may travel to lymph nodes and throughout the body. Malignant melanoma, a skin cancer that develops from melanocytes, begins as a mole or other area that has changed in appearance and is usually located on normal skin; in African Americans (more than in other races), it can also appear under fingernails or on the palms of the hands and soles of the feet. Use the ABCD mnemonic to assess the skin for any type of carcinoma (ACS, 2011):
Box 30-7
Skin Malignancies
0.5- to 1-cm crusted lesion that is flat or raised and has a rolled, somewhat scaly border
Frequently appearance of underlying, widely dilated blood vessels within the lesion
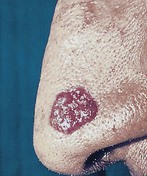
Occurs more often on mucosal surfaces and nonexposed areas of skin than basal cell
0.5- to 1.5-cm scaly lesion sometimes ulcerated or crusted; appears frequently and grows more rapidly than basal cell
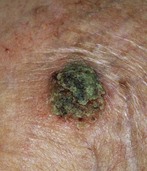
0.5- to 1-cm brown, flat lesion; appears on sun-exposed or nonexposed skin; variegated pigmentation, irregular borders, and indistinct margins
Ulceration, recent growth, or recent changes in long-standing mole are ominous signs
Illustrations from Belcher AE: Cancer nursing, St Louis, 1992, Mosby; Habif TP: Clinical dermatology: a color guide to diagnosis and therapy, ed 3, St Louis, 1996, Mosby; and Zitelli B, Davis H: Atlas of pediatric physical diagnosis, ed 2, St Louis, 1991, Mosby.
• Asymmetry—look for an uneven shape
• Border irregularity—look for edges that are blurred, notched, or ragged
• Color—look for pigmentation that is not uniform; variegated areas of blue, black, and brown and areas of pink, white, gray, blue, or red are abnormal
• Diameter—look for areas greater than the size of a typical pencil eraser
Report abnormal lesions to the health care provider for further examination. Since ultraviolet light of the sun or tanning beds increase the risk for development of skin cancers, teach patients about the risks that exist. They should be taught how to perform a skin self-examination, using the best-quality teaching materials (Box 30-8).
Hair and Scalp
Two types of hair cover the body: soft, fine, vellus hair, which covers the body; and coarse, long, thick terminal hair, which is easily visible on the scalp, axillae, and pubic areas and in the beard on men. First, obtain health history information listed in Table 30-11. Prepare to inspect the condition and distribution of hair and the integrity of the scalp by first obtaining a good light source. In addition, hair assessment occurs during all portions of the examination.
TABLE 30-11
Nursing History for Hair and Scalp Assessment
| ASSESSMENT | RATIONALE |
| Ask patient if he or she is wearing a wig or hairpiece and ask him or her to remove it. | Wigs or hairpieces interfere with inspection of hair and scalp. (Patient sometimes requests to omit this part of examination.) |
| Determine if patient has noted change in growth or loss of hair; change in texture or color. | Change often occurs slowly over time. |
| Identify type of hair care products used for grooming. | Excessive use of chemical agents and burning of hair causes drying and brittleness. |
| Determine if patient has recently had chemotherapy (drugs that cause hair loss) or taken a vasodilator (minoxidil) for hair growth. | Chemotherapeutic agents kill cells that rapidly multiply such as tumor and normal hair cells. Minoxidil causes excessive hair growth. |
| Has patient noted changes in diet or appetite? | Nutrition influences condition of hair. |
Inspection
During inspection explain that it is necessary to separate parts of the hair to detect abnormalities. Wear a pair of clean gloves if open lesions or lice are noted.
First inspect the color, distribution, quantity, thickness, texture, and lubrication of body hair. Scalp hair is coarse or fine and curly or straight; and it should be shiny, smooth, and pliant. While separating sections of scalp hair, observe characteristics of color and coarseness. Color varies from very light blond to black to gray and is sometimes altered by rinses or dyes. In older adults the hair becomes dull gray, white, or yellow.
Be aware of the normal distribution of hair growth in a man and a woman. At puberty an increase in the amount and distribution of hair occurs for both genders. During the aging process the hair may thin over the scalp, axillae, and pubic areas. For older men, facial hair decreases. A woman with hirsutism has hair growth on the upper lip, chin, and cheeks, with vellus hair becoming coarser over the body. This may be related to an endocrine disorder. For some a change in hair growth negatively affects body image and emotional well-being. The amount of hair covering the extremities is sometimes reduced as a result of aging, or it could result from arterial insufficiency that could reduce hair growth over the lower extremities. In the United States and some other cultures, women commonly shave their legs and axilla, although shaving remains a matter of personal preference among women from all cultures.
Assess for causes of changes in the thickness, texture, and lubrication of scalp hair. At times these are a result of febrile illnesses or scalp diseases that result in hair loss. Conditions such as thyroid disease alter the condition of the hair, making it fine and brittle. Hair loss (alopecia) or thinning of the hair is usually related to genetic tendencies or endocrine disorders such as diabetes, thyroiditis, and even menopause. Poor nutrition causes stringy, dull, dry, and thin hair. The oil of sebaceous glands lubricates the hair, but excessively oily hair is associated with androgen hormone stimulation. Dry, brittle hair occurs with aging and excessive use of chemical agents.
Normally the scalp is smooth and inelastic, with even coloration. Carefully separate strands of hair and thoroughly inspect the scalp for lesions, which are not easy to notice in thick hair. Note the characteristics of any scalp lesion. For lumps or bruises, ask if the patient has experienced recent head trauma. Moles on the scalp are common, but they can bleed as a result of vigorous combing or brushing. Dandruff or psoriasis frequently causes scaliness or dryness of the scalp.
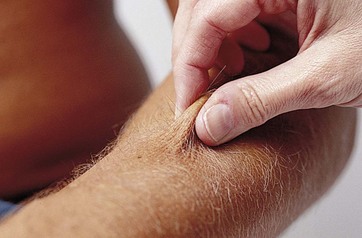
Careful inspection of hair follicles on the scalp and pubic areas can reveal lice or other parasites. The three types of lice are Pediculus humanus capitis (head lice), Pediculus humanus corporis (body lice), and Pediculus pubis (crab lice). The presence of lice does not mean a person practices poor hygiene. Lice spread easily, especially among children who play closely together. Head and crab lice attach their eggs to hair. The tiny eggs look like oval particles of dandruff, although the lice themselves are difficult to see (Fig. 30-7). Head and body lice are very small with grayish-white bodies, whereas crab lice have red legs. To better identify infestations, observe for small, red, pustular eruptions in the hair follicles and areas where skin surfaces meet, such as behind the ears and in the groin. A person often has intense itching of the scalp, especially on the back of the head or neck. Combing with a fine-tooth comb reveals the small oval-shaped lice; discovery of lice requires immediate treatment. Teach the patient to perform best hair and scalp hygiene practices (Box 30-9).

Nails
The condition of the nails reflects general health, state of nutrition, a person’s occupation, and habits of self-care. Before assessing the nails, gather a brief history (Table 30-12). The most visible portion of the nail is the nail plate, the transparent layer of epithelial cells covering the nail bed (Fig. 30-8). The vascularity of the nail bed creates the underlying color of the nail. The semilunar whitish area at the base of the nail bed is called the lunula, from which the nail plate grows.
TABLE 30-12
Nursing History for Nail Assessment
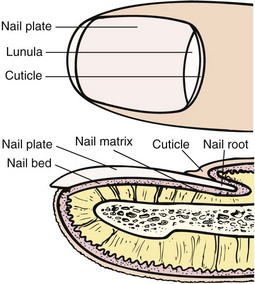
FIG. 30-8 Components of nail unit. (From Lewis SL et al: Medical-surgical nursing, ed 8, St Louis, 2011, Mosby.)
Inspection and Palpation
Inspect the nail bed for color, length, symmetry, cleanliness, and configuration. The shape and condition of the nails can give clues to pathophysiological problems. Assess the thickness and shape of the nail, the texture of the nail, the angle between the nail and the nail bed, and the condition of the lateral and proximal nail folds around the nail. When inspecting the nails, you gather a sense about the patient’s hygiene practices. The nails are normally transparent, smooth, well rounded, and convex, with a nail bed angle of about 160 degrees (Box 30-10). A larger angle and softening of the nail bed indicate chronic oxygenation problems. The surrounding cuticles are smooth, intact, and without inflammation. When you assess for basic care of the nails, you recognize that nail biting, stains, and jagged edges either represent poor nail care or are caused by habits or occupational exposure to grease or dirt. Jagged, bitten, or broken nail edges or cuticles predispose a patient to localized infection.

When palpating, expect to find a firm nail base and check for any abnormalities such as erythema or swelling. For patients with impaired circulation, especially observe for early signs of infection or open lesions. To palpate, gently grasp the patient’s finger and observe the color of the nail bed. The nail bed and nails appear pink with white nail tips in white patients. In darker-skinned patients the nail beds are darkly pigmented with a blue or reddish hue. A brown or black pigmentation is normal with longitudinal streaks (Fig. 30-9). Trauma, cirrhosis, diabetes mellitus, and hypertension cause splinter hemorrhages. Vitamin, protein, and electrolyte changes cause various lines or bands to form on the nail beds.
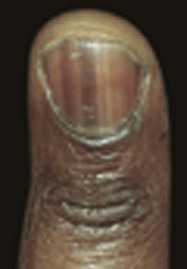
FIG. 30-9 Pigmented bands in nail of patient with dark skin. (From Habif TP: Clinical dermatology: a color guide to diagnosis and therapy, ed 5, St Louis, 2010, Mosby.)
Nails normally grow at a constant rate, but direct injury or generalized disease changes growth patterns. With aging the nails of the fingers and toes become harder and thicker. Longitudinal striations develop, and the rate of nail growth slows. Nails become more brittle, dull, and opaque and turn yellow in older adults with insufficient calcium. In addition, the cuticle becomes less thick and wide.
Calluses and corns are commonly found on the toes or fingers. A callus is flat and painless, resulting from a thickening of the epidermis. Friction and pressure from shoes cause corns, usually over bony prominences. During the examination instruct the patient in proper nail care (Box 30-11).
Head and Neck
An examination of the head and neck includes assessment of the head, eyes, ears, nose, mouth, pharynx, and neck (lymph nodes, carotid arteries, thyroid gland, and trachea). During assessment of peripheral arteries also assess the carotid arteries. Assessment of the head and neck uses inspection, palpation, and auscultation, with inspection and palpation often used simultaneously.
Head
The nursing history screens for intracranial injury and local or congenital deformities (Table 30-13). Inspect the patient’s head, noting the position, size, shape, and contour. The head is normally held upright and midline to the trunk. Holding it tilted to one side acts as a behavioral indicator of a potential unilateral hearing or visual loss or is a physical indicator of muscle weakness in the neck. A horizontal jerking or bobbing indicates a tremor.
TABLE 30-13
Nursing History for Head Assessment
Note the patient’s facial features, looking at the eyelids, eyebrows, nasolabial folds, and mouth for shape and symmetry. It is normal for slight asymmetry to exist. If there is facial asymmetry, note if all features on one side of the face are affected or if only a portion of the face is involved. Various neurological disorders (e.g., facial nerve paralysis) affect different nerves that innervate muscles of the face.
Examine the size, shape, and contour of the skull. The skull is generally round with prominences in the frontal area anteriorly and the occipital area posteriorly. Trauma typically causes local skull deformities. In infants a large head results from congenital anomaly or the buildup of cerebrospinal fluid in the ventricles (hydrocephalus). Some adults have enlarged jaws and facial bones resulting from acromegaly, a disorder caused by excessive secretion of growth hormone. Palpate the skull for nodules or masses. Gently rotate the fingertips down the midline of the scalp and along the sides of the head to identify abnormalities. Palpate the temporomandibular joint (TMJ) space bilaterally. Place the fingertips just anterior to the tragus of each ear. The fingertips should slip into the joint space as the patient’s mouth opens to gently palpate the joint spaces. Normally the movements should be smooth, although it is not unusual to hear or feel a clicking or snapping in the TMJ (Seidel et al., 2011).
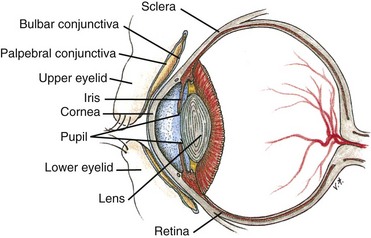
Eyes
Examination of the eyes includes assessment of visual acuity, visual fields, extraocular movements, and external and internal eye structures. Fig. 30-10 shows a cross-section of the eye. The eye assessment detects visual alterations and determines the general level of assistance that patients require when ambulating or performing self-care activities. Some patients with visual problems also need special aids for reading educational materials or instructions (e.g., medication labels). Table 30-14 reviews the nursing history for an eye examination. Box 30-12 describes common types of visual problems.
TABLE 30-14
Nursing History for Eye Assessment
| ASSESSMENT | RATIONALE |
| Determine if patient has history of eye disease, (e.g., glaucoma, retinopathy, cataracts), eye trauma, diabetes, hypertension, or eye surgery. | Some diseases or trauma cause risk for partial or complete visual loss. Patient may have had surgery for a visual disorder. |
| Determine problems that prompted patient to seek health care. Ask patient about eye pain, photophobia (sensitivity to light), burning or itching, excess tearing or crusting, diplopia (double vision) or blurred vision, awareness of a “film” or “curtain” over field of vision, floaters (small, black spots that seem to float across field of vision), flashing lights, or halos around lights. | Common symptoms of eye disease indicate need for health care provider. |
| Determine whether there is family history of eye disorders or diseases. | Certain eye problems such as glaucoma or retinitis pigmentosa are inherited. |
| Review patient’s occupational history and recreational hobbies. Are safety glasses worn? | Performance of close, intricate work causes eye fatigue. Working with computers causes eye strain. Certain occupational tasks (e.g., working with chemicals) and recreational activities (e.g., fencing, motorcycle riding) place people at risk for eye injury unless they take precautions. |
| Ask patient if he or she wears glasses or contacts and, if so, how often. | Patients need to wear glasses or contacts during certain portions of examination for accurate assessment. |
| Determine when patient last visited ophthalmologist or optometrist. | Date of last eye examination reveals level of preventive care patient takes. |
| Assess medications patient is taking, including eye drops or ointment. | Determines need to assess patient’s knowledge of medications. Certain medications cause visual symptoms. |
Visual Acuity
The assessment of visual acuity (i.e., the ability to see small details) tests central vision. The easiest way to assess near vision is to ask patients to read printed material under adequate lighting. If patients wear glasses, make sure that they wear them during the assessment. Determine the language the patient speaks and his or her reading ability. Asking patients to read aloud helps to determine literacy. If the patient has difficulty reading, move to the next step.
Assessment of distant vision requires using a Snellen chart (paper chart or projection screen). The chart should be well lighted. Test vision without corrective lenses first. Have the patient sit or stand 6.1 m (20 feet) away from the chart and try to read all of the letters beginning at any line with both eyes open. Then have the patient read the line with each eye separately (patient covers the opposite eye with an index card or eye cover to avoid applying pressure to the eye). Note the smallest line for which the patient is able to read all of the letters correctly and record the visual acuity for that line. Repeat the test with the patient wearing corrective lenses. Complete the test rapidly enough so the patient does not memorize the chart (Seidel et al., 2011). If a patient is unable to read, use an E chart or one with pictures of familiar objects. Instead of reading letters, patients tell which direction each E is pointing or the name of the object.
The Snellen chart has standardized numbers at the end of each line of the chart. The numerator is the number 20, or the distance the patient stands from the chart. The denominator is the distance from which the normal eye is able to read the chart. Normal visual acuity is 20/20. The larger the denominator, the poorer the patient’s visual acuity. For example, a value of 20/40 means that the patient, standing 20 feet away, can read a line that a person with normal vision can read from 40 feet away. Record visual acuity for each eye and both eyes, and record whether the test was performed with or without correction (including glasses or contact lenses).
If patients cannot read even the largest letters or figures of a Snellen chart, test their ability to count upraised fingers or distinguish light. Hold a hand 30 cm (1 foot) from the patient’s face and have him or her count the upraised fingers. To check light perception shine a penlight into the eye and turn off the light. If the patient notes when the light is turned on or off, light perception is intact.
Assess near vision by asking the patient to read a handheld card containing a vision screening chart. The patient holds the card a comfortable distance (5 to 6 cm [about  to 14 inches]) from the eyes and reads the smallest line possible. This portion of the examination is a good time to discuss the need for routine eye examinations (Box 30-13).
Extraocular Movements
Six small muscles guide the movement of each eye. Both eyes move parallel to one another in each of the six directions of gaze (Fig. 30-11). To assess extraocular movements the patient sits or stands, and the nurse faces the patient from 60 cm (2 feet) away. The nurse holds a finger at a comfortable distance (15 to 30 cm [6 to 12 inches]) from the patient’s eyes. While the patient maintains his or her head in a fixed position facing forward, the nurse directs him or her to follow with the eyes only as the nurse’s finger moves to the right, left, and diagonally up and down to the left and right. The nurse moves the finger smoothly and slowly within the normal field of vision.
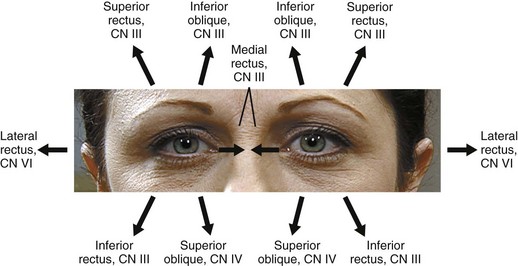
FIG. 30-11 Six directions of gaze. Direct patient to follow finger movement through each gaze. CN, Cranial nerve. (From Seidel HM et al: Mosby’s guide to physical examination, ed 7, St Louis, 2011, Mosby.)
As the patient gazes in each direction, observe for parallel eye movement, the position of the upper eyelid in relation to the iris, and the presence of abnormal movements. As the eyes move through each direction of gaze, the upper eyelid covers the iris only slightly. Nystagmus, an involuntary, rhythmical oscillation of the eyes, occurs as a result of local injury to eye muscles and supporting structures or a disorder of the cranial nerves innervating the muscles. Initiate nystagmus in patients with normal eye movements by having them gaze to the far left or right.
Visual Fields
As a person looks straight ahead, he or she is normally able to see all objects in the periphery. To assess visual fields direct the patient to stand or sit 60 cm (2 feet) away at eye level. The patient gently closes or covers one eye (e.g., the left) and looks at your eye directly opposite. You close your opposite eye (in this case the right) so the field of vision is superimposed on that of the patient. Next move a finger equidistant between you and the patient outside the field of vision and slowly bring it back into the visual field. The patient reports when he or she is able to see the finger. If you see the finger before the patient does, a portion of the patient’s visual field is reduced. To test temporal field vision, hold an object or your finger slightly behind the patient. Repeat the procedure for each field of vision for the other eye. Patients with visual field problems are at risk for injury because they cannot see all of the objects in front of them. Older adults commonly have loss of peripheral vision caused by changes in the lens.
External Eye Structures
To inspect external eye structures, stand directly in front of the patient at eye level and ask him or her to look at your face.
Position and Alignment: Assess the position of the eyes in relation to one another. Normally they are parallel to one another. Bulging eyes (exophthalmos) usually indicate hyperthyroidism. Crossed eyes (strabismus) result from neuromuscular injury or inherited abnormalities. Tumors or inflammation of the orbit often cause abnormal eye protrusion.
For the remainder of the eye examination have the patient remove contact lenses.
Eyebrows: Inspect the eyebrows for size, extension, texture of hair, alignment, and movement. Normally the eyebrows are symmetrical. Coarseness of hair and failure to extend beyond the temporal canthus possibly reveals hypothyroidism. Thin brows possibly are a result of waxing or plucking. Aging causes loss of the lateral third of the eyebrows. To assess movement, ask the patient to raise and lower the eyebrows. The brows normally raise and lower symmetrically. An inability to move the eyebrows indicates a facial nerve paralysis (cranial nerve VII).
Eyelids: Inspect the eyelids for position; color; condition of the surface; condition and direction of the eyelashes; and the patient’s ability to open, close, and blink. When the eyes are open in a normal position, the lids cover the sclera above the iris but not the pupil. The lids are also close to the eyeball. An abnormal drooping of the lid over the pupil is called ptosis (pronounced “toe-sis”), caused by edema or impairment of the third cranial nerve. In the older adult ptosis results from a loss of elasticity that accompanies aging. The nurse observes for defects in the position of the lid margins. An older adult frequently has lid margins that turn out (ectropion) or in (entropion). Entropion sometimes leads to the lashes of the lid irritating the conjunctiva and cornea, increasing the risk of infection. Normally the eyelashes are distributed evenly and curved outward away from the eye. An erythematous or yellow lump (hordeolum or sty) on the follicle of an eyelash indicates an acute suppurative inflammation.
To inspect the surface of the upper lids ask the patient to close his or her eyes while observing for tremors of the lids. The lids are normally smooth and the same color as the surrounding skin. Redness indicates inflammation or infection. Lid edema is sometimes caused by allergies or heart or kidney failure. Edema of the eyelids prevents them from closing. Inspect any lesions for typical characteristics and discomfort or drainage. Wear clean gloves if drainage is present.
The lids normally close symmetrically. Their failure to close exposes the cornea to drying. This condition is common in unconscious patients or those with facial nerve paralysis. To inspect the lower lids, ask the patient to open the eyes again while the nurse looks for the same characteristics noted for the upper lids. Normally a patient blinks involuntarily and bilaterally up to 20 times a minute. The blink reflex lubricates the cornea. Report absent, infrequent, rapid, or monocular (one-eyed) blinking.
Lacrimal Apparatus: The lacrimal gland (Fig. 30-12), located in the upper outer wall of the anterior part of the orbit, is responsible for tear production. Tears flow from the gland across the surface of the eye to the lacrimal duct, which is in the nasal corner or inner canthus of the eye. The lacrimal gland is sometimes the site of tumors or infections and should be inspected for edema and redness. Palpate the gland gently to detect tenderness; normally tenderness cannot be felt.
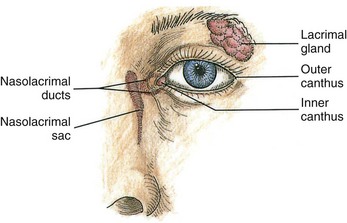
FIG. 30-12 The lacrimal apparatus secretes and drains tears, which moisten and lubricate eye structures.
The nasolacrimal duct sometimes becomes obstructed, blocking the flow of tears. Observe for evidence of edema in the inner canthus. Gentle palpation of the duct at the lower eyelid just inside the lower orbital rim causes a regurgitation of tears.
Conjunctivae and Sclerae: The bulbar conjunctiva covers the exposed surface of the eyeball up to the outer edge of the cornea. Observe the sclera under the bulbar conjunctiva; it normally has the color of white porcelain in light-skinned patients and is light yellow in dark-skinned patients. Sclerae become pigmented and appear either yellow or green if liver disease is present.
Take care when inspecting the conjunctivae. For adequate exposure of the bulbar conjunctiva, retract the eyelids without placing pressure directly on the eyeball. Gently retract both lids, with the thumb and index finger pressed against the lower and upper bony orbits. Ask the patient to look up, down, and from side to side. Many patients begin to blink, making the examination difficult. Inspect for color, texture, and the presence of edema or lesions. Normally the conjunctivae are free of erythema. The presence of redness indicates an allergic or infectious conjunctivitis. Bright red blood in a localized area surrounded by normal-appearing conjunctiva usually indicates subconjunctival hemorrhage. Conjunctivitis is a highly contagious infection. It is easy to spread the crusty drainage that collects on eyelid margins from one eye to the other. Wear clean gloves during the examination. Performing proper hand hygiene is necessary before and after the examination.
Corneas: The cornea is the transparent, colorless portion of the eye covering the pupil and iris. From a side view, it looks like the crystal of a wristwatch. While the patient looks straight ahead, inspect the cornea for clarity and texture while shining a penlight obliquely across its entire surface. The cornea is normally shiny, transparent, and smooth. In older adults it loses its luster. Any irregularity in the surface indicates an abrasion or tear that requires further examination by a health care provider. Both conditions are very painful. Note the color and details of the underlying iris. In an older adult the iris becomes faded. A thin white ring along the margin of the iris, called an arcus senilis, is common with aging but is abnormal in anyone under age 40. To test for the corneal blink reflex, see the cranial nerve test section of this chapter.
Pupils and Irises: Observe the pupils for size, shape, equality, accommodation, and reaction to light. They are normally black, round, regular, and equal in size (3 to 7 mm in diameter) (Fig. 30-13). The iris should be clearly visible.

Cloudy pupils indicate cataracts. Dilated pupils result from glaucoma, trauma, neurological disorders, eye medications (e.g., atropine), or withdrawal from opioids. Inflammation of the iris or use of drugs (e.g., pilocarpine, morphine, or cocaine) causes constricted pupils. Pinpoint pupils are a common sign of opioid intoxication. Shining a beam of light through the pupil and onto the retina stimulates the third cranial nerve, causing the muscles of the iris to constrict. Any abnormality along the nerve pathways from the retina to the iris alters the ability of the pupils to react to light. Changes in intracranial pressure, lesions along the nerve pathways, locally applied ophthalmic medications, and direct trauma to the eye alter pupillary reaction.
Test pupillary reflexes (to light and accommodation) in a dimly lit room. Instruct the patient to avoid looking directly at the light. While the patient looks straight ahead, bring a penlight from the side of his or her face, directing the light onto the pupil (Fig. 30-14). A directly illuminated pupil constricts, and the opposite pupil constricts consensually. Observe the quickness and equality of the reflex. Repeat the examination for the opposite eye.
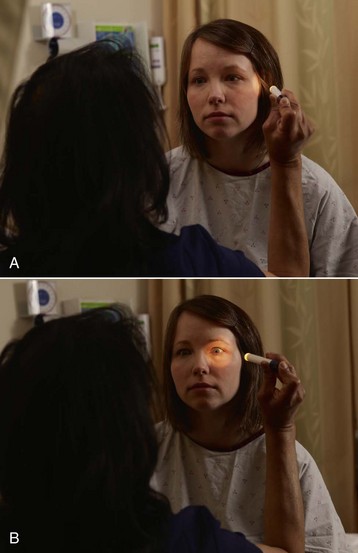
FIG. 30-14 A, To check pupillary reflexes the nurse first holds the penlight to the side of the patient’s face. B, Illumination of the pupil causes pupillary constriction.
To test for accommodation, ask the patient to gaze at a distant object (the far wall) and then at a test object (finger or pencil) held approximately 10 cm (4 inches) from the bridge of his or her nose. The pupils normally converge and accommodate by constricting when looking at close objects. The pupillary responses are equal. Testing for accommodation is only important if the patient has a defect in the pupillary response to light (Seidel et al., 2011). If assessment of pupillary reaction is normal in all tests, record the abbreviation PERRLA (pupils equal, round, reactive to light, and accommodation).
Internal Eye Structures
The examination of the internal eye structures through the use of an ophthalmoscope is beyond the scope of new graduate nurses’ practice. Advanced nurse practitioners use the ophthalmoscope to inspect the fundus (Fig. 30-15), which includes the retina, choroid, optic nerve disc, macula, fovea centralis, and retinal vessels. Patients in greatest need of an examination are those with diabetes, hypertension, and intracranial disorders.
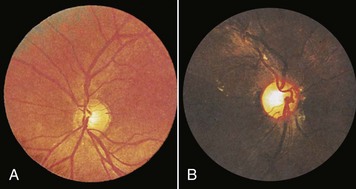
Ears
The ear assessment determines the integrity of ear structures and hearing acuity. The three parts of the ear are the external, middle, and inner ear (Fig. 30-16). Inspect and palpate external ear structures, which consist of the auricle, outer ear canal, and tympanic membrane (eardrum). The ear canal is normally curved and approximately 2.5 cm (1 inch) long in an adult. It is lined with skin containing fine hairs, nerve endings, and glands secreting cerumen. The middle ear is inspected with an otoscope. It is an air-filled cavity containing the three bony ossicles (malleus, incus, and stapes). The eustachian tube connects the middle ear to the nasopharynx. Pressure between the outer atmosphere and the middle ear is stabilized through the eustachian tube. Finally the inner ear is tested by measuring the patient’s hearing acuity. The inner ear contains the cochlea, vestibule, and semicircular canals. Assessing the ears determines the integrity of ear structures and the condition of hearing. Use nursing history data to identify patients’ risks for hearing disorders (Table 30-15).
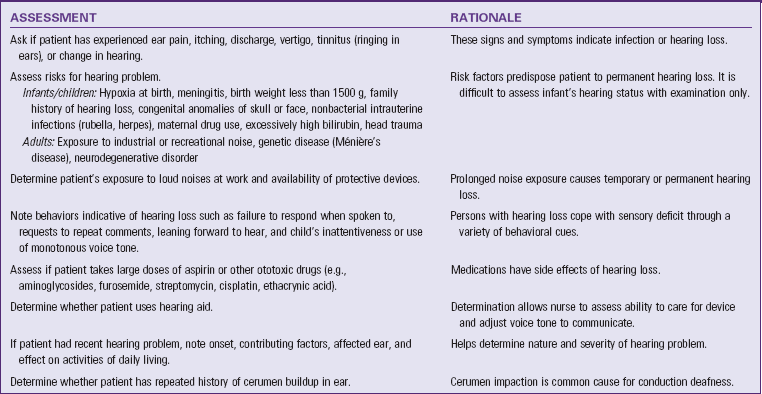
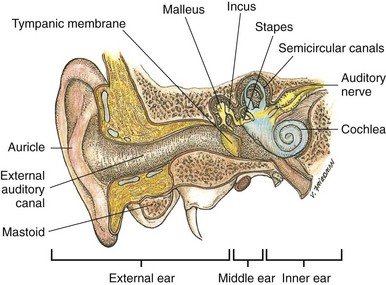
Understanding the mechanisms for sound transmission helps identify the nature of hearing disorders. Sound travels through the ear by air and bone conduction. Nerve impulses from the cochlea travel to the auditory (eighth cranial nerve) and the cerebral cortex. Disorders of the ear result from several types of problems, including mechanical dysfunction (blockage by cerumen or foreign body), trauma (foreign bodies or noise exposure), neurological disorders (auditory nerve damage), acute illnesses (viral infection), and toxic effects of medications.
Auricles
With the patient sitting comfortably, inspect the size, shape, symmetry, landmarks, position, and color of the auricle (Fig. 30-17). The auricles are normally of equal size and level with one another. The upper point of attachment is in a straight line with the lateral canthus, or corner of the eye. The position of the auricle is almost vertical. Ears that are low set or at an unusual angle are a sign of chromosome abnormality such as Down syndrome. Ear color is usually the same as that of the face, without moles, cysts, deformities, or nodules. Redness is a sign of inflammation or fever. Extreme pallor indicates frostbite.
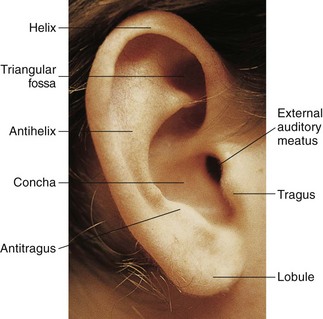
FIG. 30-17 Anatomical structures of auricle. (From Seidel HM et al: Mosby’s guide to physical examination, ed 7, St Louis, 2011, Mosby.)
Palpate the auricles for texture, tenderness, and skin lesions. Auricles are normally smooth and without lesions. If the patient complains of pain, gently pull the auricle, press on the tragus, and palpate behind the ear over the mastoid process. If palpating the external ear increases the pain, an external ear infection is likely. If palpating the auricle and tragus does not influence the pain, the patient possibly has a middle ear infection. Tenderness in the mastoid area indicates mastoiditis.
Inspect the opening of the ear canal for size and presence of discharge. If discharge is present, wear clean gloves. A swollen or occluded meatus is not normal. A yellow, waxy substance called cerumen is common. Yellow or green, foul-smelling discharge indicates infection or a foreign body.
Ear Canals and Eardrums
Observe the deeper structures of the external and middle ear with the use of an otoscope. A special ear speculum attaches to the handle of the ophthalmoscope. For best visualization select the largest speculum that fits comfortably in the patient’s ear. Before inserting the speculum, check for foreign bodies in the opening of the auditory canal.
Make sure that the patient avoids moving the head during the examination to avoid damage to the canal and tympanic membrane. Infants and young children might need to be held securely to prevent movement. Lay infants supine with head turned to one side and arms held securely at the sides. Have young children sit on their parents’ laps with their legs held between the parents’ knees.
Turn on the otoscope by rotating the dial at the top of the handle. To insert the speculum properly, ask the patient to tip the head slightly toward the opposite shoulder. Hold the handle of the otoscope in the space between the thumb and index finger, supported on the middle finger. This leaves the ulnar side of the hand to rest against the patient’s head, stabilizing the otoscope as you insert it into the canal (Seidel et al., 2011). There are two ways to grip the otoscope: (1) hold the handle along the patient’s face with the fingers against the face or neck; and (2) lightly brace the inverted otoscope against the side of the patient’s head or cheek. This latter grip, used with children, prevents accidental movement of the otoscope deeper into the ear canal. Insert the scope while pulling the auricle upward and backward in the adult and older child (Fig. 30-18). This maneuver straightens the ear canal. For infants the auricle should be pulled down and back.

FIG. 30-18 Otoscopic examination. (From Seidel HM et al: Mosby’s guide to physical examination, ed 7, St Louis, 2011, Mosby.)
Insert the speculum slightly down and forward 1 to 1.5 cm ( inch) into the ear canal. Take care not to scrape the sensitive lining, which is painful. The ear canal normally has little cerumen and is uniformly pink with tiny hairs in the outer third of the canal. Observe for color, discharge, scaling, lesions, foreign bodies, and cerumen. Normally cerumen is dry (light brown to gray and flaky) or moist (dark yellow or brown) and sticky. Dry cerumen is common in Asians and Native Americans (Seidel et al., 2011). A reddened canal with discharge is a sign of inflammation or infection. In other adults accumulated cerumen is a common problem; buildup creates a mild hearing loss. During the examination ask the patient about methods he or she uses to clean the ear canal (Box 30-14).
The light from the otoscope allows visualization of the tympanic membrane. Know the common anatomical landmarks and their appearances (Fig. 30-19). Gently move the otoscope so the entire tympanic membrane and its periphery are visible. Because the tympanic membrane is angled away from the ear canal, the light from the otoscope appears as a cone shape rather than a circle. A ring of fibrous cartilage surrounds the oval membrane. The umbo is near the center of the membrane, behind which is the attachment of the malleus. The underlying short process of the malleus creates a knoblike structure at the top of the drum. Check carefully to make sure that there are no tears or breaks in the membrane. The normal tympanic membrane is translucent, shiny, and pearly gray. It is free from tears or breaks. A pink or red bulging membrane indicates inflammation. A white color reveals pus behind it. The membrane is taut, except for the small triangular pars flaccida near the top. If cerumen is blocking the tympanic membrane, warm water irrigation safely removes the wax.
Hearing Acuity
A patient with a hearing loss often fails to respond to conversation. The three types of hearing loss are conduction, sensorineural, and mixed. A conduction loss interrupts sound waves as they travel from the outer ear to the cochlea of the inner ear because the sound waves are not transmitted through the outer and middle ear structures. For example, causes of a conduction loss include swelling of the auditory canal and tears in the tympanic membrane. A sensorineural loss involves the inner ear, auditory nerve, or hearing center of the brain. Sound is conducted through the outer and middle ear structures, but the continued transmission of sound becomes interrupted at some point beyond the bony ossicles. A mixed loss involves a combination of conduction and sensorineural loss. Patients working or living around loud noises are at risk for hearing loss. In addition, adolescents are at risk for premature hearing loss from continued exposure to loud music in their car or home or at concert events. Hearing loss among adolescents is increasing, especially among those with high levels of noise exposure such as from loud music (Shargorodsky et al., 2010).
Older adults experience an inability to hear high-frequency sounds and consonants (e.g., S, Z, T, and G). Deterioration of the cochlea and thickening of the tympanic membrane cause older adults to gradually lose hearing acuity. They are especially at risk for hearing loss caused by ototoxicity (injury to auditory nerve) resulting from high maintenance doses of antibiotics (e.g., aminoglycosides).
To conduct a hearing assessment, have the patient remove any hearing aid if worn. Note his or her response to questions. Normally he or she responds without excessive requests to have the questions repeated. If a hearing loss is suspected, check the patient’s response to the whispered voice. Test one ear at a time while the patient occludes the other ear with a finger. Ask him or her to gently move the finger up and down during the test in response to the whispered sound. While standing 30 to 60 cm (1 to 2 feet) from the testing ear, speak while covering the mouth so the patient is unable to read lips. After exhaling fully, whisper softly toward the unoccluded ear, reciting random numbers with equally accented syllables such as nine-four-ten. If necessary, gradually increase voice intensity until the patient correctly repeats the numbers. Then test the other ear for comparison. Seidel et al. (2011) report that patients normally hear numbers clearly when whispered, responding correctly at least 50% of the time.
If a hearing loss is present, test the hearing using a tuning fork. A tuning fork of 256 to 512 hertz (Hz) is most commonly used. The tuning fork allows for comparison of hearing by bone conduction with that of air conduction. Hold the base of the tuning fork with one hand without touching the tines. Tap the fork lightly against the palm of the other hand to set the fork in vibration (Table 30-16).
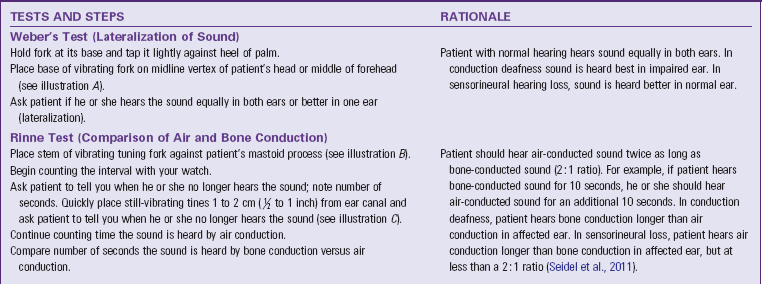
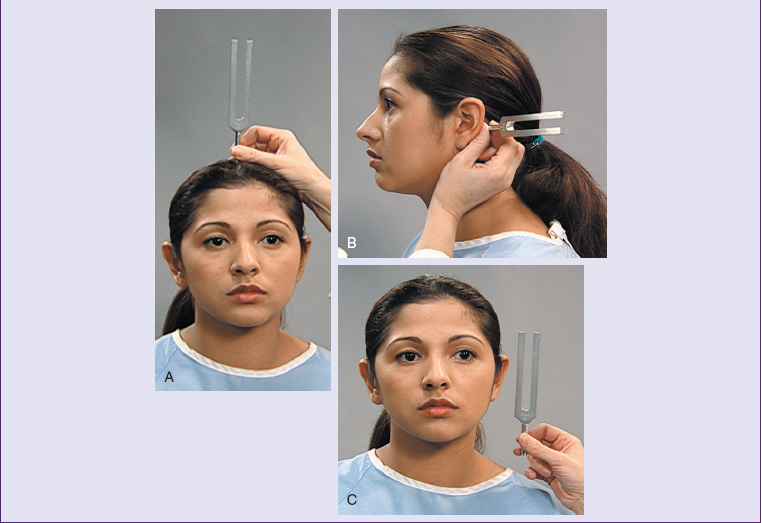
Nose and Sinuses
Assess the integrity of the nose and sinuses by using inspection and palpation. The patient sits during the examination. A penlight allows for gross examination of each naris. A more detailed examination requires use of a nasal speculum to inspect the deeper nasal turbinates. Do not use a speculum unless a qualified practitioner such as a nurse educator or an advanced practice nurse is present. Table 30-17 lists components of the nursing history.
TABLE 30-17
Nursing History for Nose and Sinus Assessment
| ASSESSMENT | RATIONALE |
| Ask if patient has had trauma to nose. | Trauma causes septal deviation and asymmetry of external nose. |
| Ask if patient has history of allergies, nasal discharge, epistaxis (nosebleeds), or postnasal drip. | History is useful in determining source or nature of nasal and sinus drainage. |
| If there is history of nasal discharge, assess color, amount, odor, duration, and associated symptoms (e.g., sneezing, nasal congestion, obstruction, or mouth breathing). | Aids in ruling out presence of infection, allergy, or drug use. |
| Assess for history of nosebleed, including site, frequency, amount of bleeding, treatment, and difficulty stopping bleeding. | Characteristics sometimes reveal trauma, medication use, or excessive dryness as causative factors. |
| Ask if patient uses nasal spray or drops, including amount, frequency, and duration of use. | Overuse of over-the-counter nasal preparations causes physical change in mucosa. |
| Ask if patient snores at night or has difficulty breathing. | Difficulty breathing or snoring indicates septal deviation or obstruction. |
Nose
When inspecting the external nose, observe for shape, size, skin, color, and the presence of deformity or inflammation. The nose is normally smooth and symmetrical with the same skin color as the face. Recent trauma sometimes causes edema and discoloration. If swelling or deformities exist, gently palpate the ridge and soft tissue of the nose by placing one finger on each side of the nasal arch and gently moving the fingers from the nasal bridge to the tip. Note any tenderness, masses, or underlying deviations. Nasal structures are usually firm and stable.
Air normally passes freely through the nose when a person breathes. To assess patency of the nares, place a finger on the side of the patient’s nose and occlude one naris. Ask the patient to breathe with the mouth closed. Repeat the procedure for the other naris.
While illuminating the anterior nares, inspect the mucosa for color, lesions, discharge, swelling, and evidence of bleeding. If discharge is present, apply gloves. Normal mucosa is pink and moist without lesions. Pale mucosa with clear discharge indicates allergy. A mucoid discharge indicates rhinitis. A sinus infection results in yellowish or greenish discharge. Habitual use of intranasal cocaine and opioids causes puffiness and increased vascularity of the nasal mucosa. For the patient with a nasogastric tube, routinely check for local skin breakdown (excoriation) of the naris, characterized by redness and skin sloughing.
To view the septum and turbinates, have the patient tip the head back slightly to provide a clear view. Illuminate the septum and observe for alignment, perforation, or bleeding. Normally the septum is close to the midline and thicker anteriorly than posteriorly. The turbinates are covered with mucous membranes that warm and moisten inspired air. Normal mucosa is pink and moist, without lesions. A deviated septum obstructs breathing and interferes with passage of a nasogastric tube. Perforation of the septum often occurs after repeated use of intranasal cocaine. Note any polyps (tumorlike growths) or purulent drainage.
Sinuses
Examination of the sinuses involves palpation. In cases of allergies or infection, the interior of the sinuses becomes inflamed and swollen. The most effective way to assess for tenderness is by externally palpating the frontal and maxillary facial areas (Fig. 30-20). Palpate the frontal sinus by exerting pressure with the thumb up and under the patient’s eyebrow. Gentle, upward pressure elicits tenderness easily if sinus irritation is present. Do not apply pressure to the eyes. If sinus tenderness is present, the sinuses may be transilluminated. However this procedure requires advanced experience. Box 30-15 describes teaching guidelines during nose and sinus assessment.

Mouth and Pharynx
Assess the mouth and pharynx to detect signs of overall health; determine oral hygiene needs; and determine therapies needed for patients with dehydration, restricted intake, oral trauma, or oral airway obstruction. To assess the oral cavity use a penlight and tongue depressor or gauze square. Wear clean gloves during the examination. Have the patient sit or lie down. Assess the oral cavity also while administering oral hygiene (see Chapter 39). Table 30-18 describes the nursing history for assessment of the mouth and pharynx.
TABLE 30-18
Nursing History for Mouth and Pharyngeal Assessment
| ASSESSMENT | RATIONALE |
| Determine if patient wears dentures or retainers and if they are comfortable. | Patient needs to remove dentures to visualize and palpate gums. Ill-fitting dentures chronically irritate mucosa and gums. |
| Determine if patient has had recent change in appetite or weight. | Symptoms result from painful mouth conditions or poor hygiene. |
| Determine if patient uses tobacco products: | |
| •Smoking cigarette, cigar, or pipe | Smoking these products increases risk for lung, oral cavity, larynx, and esophageal cancers (American Cancer Society [ACS], 2011). |
| •Smokeless tobacco: use of chewing tobacco and snuff | Smokeless tobacco causes various cancers and noncancerous oral disorders. Long-term snuff users have increased risk for cancer of the gums and cheeks (ACS, 2011). |
| Review history for alcohol consumption. | Oral and pharyngeal cancers are more common in alcohol users than nonalcohol users. Combine tobacco with heavy use of alcohol, the risk is significantly increased, as the two act synergistically. Those who both smoke and drink, have a 15 times greater risk of developing oral cancer than others (Oral Cancer Foundation, 2011). Effects of alcohol are also independent of tobacco use. |
| Assess dental hygiene practices, including use of fluoride toothpaste, frequency of brushing and flossing, and frequency of dental visits. | Assessment reveals patient’s need for education and/or financial support. Periodontal disease has a higher prevalence in older adults who have history of high plaque buildup, use tobacco, and visit the dentist infrequently. |
| Ask if patient has pain from chewing or eating. If so, ask if mouth lesions are present, including duration and associated symptoms. | Pain is often associated with broken tooth, teeth grinding, or temporomandibular joint problems. Extra care is needed during oral hygiene administration. |
| Review the patient’s medical history for a previous diagnosis of the human papilloma virus. | The human papilloma virus, particularly HPV16, has been definitively implicated in oral cancers, particularly those that occur in the back of the mouth (oropharynx, base of tongue, tonsillar pillars and crypt, as well as the tonsils themselves) (Oral Cancer Foundation, 2011). |
Lips
Inspect the lips for color, texture, hydration, contour, and lesions. With the patient’s mouth closed, view the lips from end to end. Normally they are pink, moist, symmetrical, and smooth (Fig. 30-21). Lip color in the dark-skinned patient varies from pink to plum. Have female patients remove their lipstick before the examination. Anemia causes pallor of the lips, with cyanosis caused by respiratory or cardiovascular problems. Cherry-colored lips indicate carbon monoxide poisoning. Any lesions should be evaluated for the potential of being an infection, irritation, or skin cancer.
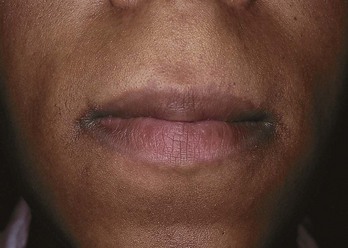
Buccal Mucosa, Gums, and Teeth
Ask the patient to clench the teeth and smile to observe teeth occlusion. The upper molars normally rest directly on the lower molars, and the upper incisors slightly override the lower incisors. A symmetrical smile reveals normal facial nerve function.
Inspect the teeth to determine the quality of dental hygiene (Box 30-16). Note the position and alignment of the teeth. To examine the posterior surface of the teeth, have the patient open the mouth with the lips relaxed. Use a tongue depressor to retract the lips and cheeks, especially when viewing the molars. Note the color of teeth and presence of dental caries (cavities), tartar, and extraction sites. Normal, healthy teeth are smooth, white, and shiny. A chalky white discoloration of the enamel is an early indication of caries formation. Brown or black discolorations indicate the formation of caries. A stained yellow color is from tobacco use; coffee, tea, and colas cause a brown stain. In the older adult loose or missing teeth are common because bone resorption increases. An older adult’s teeth often feel rough when tooth enamel calcifies. Yellow or darkened teeth are also common in the older adult because of the general wear and tear that exposes the darker underlying dentin.
To view the mucosa and gums, ask the patient to first remove any dental appliance. View the inner oral mucosa by having the patient open and relax the mouth slightly and then gently retract his or her lower lip away from the teeth (Fig. 30-22). Repeat this process for the upper lip. Inspect the mucosa for color; hydration; texture; and lesions such as ulcers, abrasions, or cysts. Normally the mucosa is glistening, pink, smooth, and moist. Some common small, yellow-white raised lesions on the buccal mucosa and lips are Fordyce spots, or ectopic sebaceous glands (Seidel et al., 2011). If lesions are present, palpate them gently with a gloved hand for tenderness, size, and consistency.
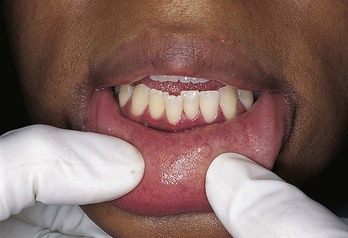
To inspect the buccal mucosa, ask the patient to open the mouth and then gently retract the cheeks with a tongue depressor (Fig. 30-23). View the surface of the mucosa from right to left and top to bottom. A penlight illuminates the most posterior portion of the mucosa. Normal mucosa is glistening, pink, soft, moist, and smooth. Varying shades of hyperpigmentation are normal in 10% of whites after age 50 and as many as 90% of blacks by the same age. For patients with normal pigmentation, the buccal mucosa is a good site to inspect for jaundice and pallor. In older adults the mucosa is normally dry because of reduced salivation. Thick white patches (leukoplakia) are often a precancerous lesion seen in heavy smokers and alcoholics. Palpate for any buccal lesions by placing the index finger within the buccal cavity and the thumb on the outer surface of the cheek. Patients who smoke cigarettes, cigars, or pipes and those who use smokeless tobacco have an increased risk of oral, pharyngeal, laryngeal, and esophageal cancer. These individuals may have leukoplakia or other lesions anywhere in their oral cavity (e.g., lips, gums, or tongue) at an early age.
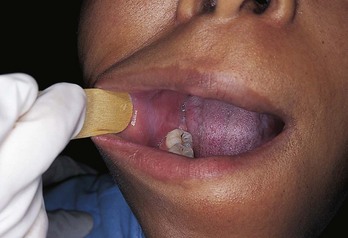
Inspect the gums (gingivae) for color, edema, retraction, bleeding, and lesions while retracting the cheeks. Healthy gums are pink, smooth, and moist and fit tightly around each tooth. Dark-skinned patients often have patchy pigmentation. In older adults the gums are usually pale. Using clean gloves, palpate the gums to assess for lesions, thickening, or masses. Normally there is no tenderness. Spongy gums that bleed easily indicate periodontal disease and vitamin C deficiency. If the patient has loose or mobile teeth, swollen gums, or pockets containing debris at the tooth margins, a dental referral should be considered to check for periodontal disease or gingivitis.
Tongue and Floor of Mouth
Carefully inspect the tongue on all sides and the floor of the mouth. Have the patient relax the mouth and stick the tongue out halfway. Note any deviation, tremor, or limitation in movement. This tests hypoglossal nerve function. If the patient protrudes the tongue too far, it elicits the gag reflex. When the tongue protrudes, it lays midline. To test for tongue mobility, ask the patient to raise it up and move it from side to side. It should move freely.
Using a penlight for illumination, examine the tongue for color, size, position, texture, and coatings or lesions. A normal tongue is medium or dull red in color, moist, slightly rough on the top surface, and smooth along the lateral margins. The undersurface of the tongue and the floor of the mouth are highly vascular (Fig. 30-24). Take extra care to inspect this area, a common site for oral cancer lesions. The patient lifts the tongue by placing its tip on the palate behind the upper incisors. Inspect for color, swelling, and lesions such as nodules or cysts. The ventral surface of the tongue is pink and smooth, with large veins between the frenulum folds. To palpate the tongue, explain the procedure and ask the patient to protrude it. Grasp the tip with a gauze square and gently pull it to one side. With a gloved hand palpate the full length of the tongue and the base for any areas of hardening or ulceration. Varicosities (swollen, tortuous veins) are common in the older adult and rarely cause problems.
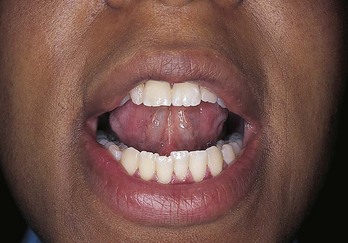
Palate
Have the patient extend the head backward, holding the mouth open to inspect the hard and soft palates. The hard palate, or roof of the mouth, is located anteriorly. The whitish hard palate is dome shaped. The soft palate extends posteriorly toward the pharynx. It is normally light pink and smooth. Observe the palates for color, shape, texture, and extra bony prominences or defects (Fig. 30-25). A bony growth, or exostosis, between the two palates is common.
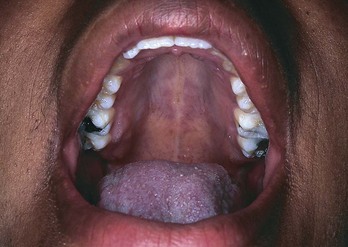
Pharynx
Perform an examination of pharyngeal structures to rule out infection, inflammation, or lesions. Have the patient tip the head back slightly, open the mouth wide, and say “ah” while you place the tip of a tongue depressor on the middle third of the tongue. Take care not to press the lower lip against the teeth. By placing the tongue depressor too far anteriorly, the posterior part of the tongue mounds up, obstructing the view. Placing the tongue depressor on the posterior tongue elicits the gag reflex.
With a penlight, first inspect the uvula and soft palate (Fig. 30-26). Both structures, which are innervated by the tenth cranial (vagus) nerve, should rise centrally as the patient says “ah.” Examine the anterior and posterior pillars, soft palate, and uvula. View the tonsils in the cavities between the anterior and posterior pillars and note the presence or absence of tissue. The posterior pharynx is behind the pillars. Normally pharyngeal tissues are pink and smooth and well hydrated. Small irregular spots of lymphatic tissue and small blood vessels are normal. Note edema, petechiae (small hemorrhages), lesions, or exudate. The back of the pharynx is a common site for oral cancer (Oral Cancer Foundation, 2011). Patients with chronic sinus problems frequently exhibit a clear exudate that drains along the wall of the posterior pharynx. Yellow or green exudate indicates infection. A patient with a typical sore throat has a red and edematous uvula and tonsillar pillars with possible presence of yellow exudate.
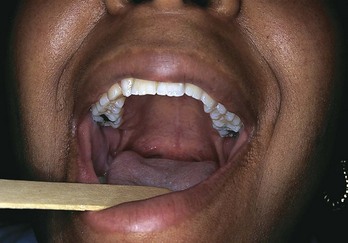
Neck
Assessment of the neck includes assessing the neck muscles, lymph nodes of the head and neck, carotid arteries, jugular veins, thyroid gland, and trachea (Fig. 30-27). You may postpone the examination of the jugular veins and carotid arteries until the vascular system assessment. Inspect and palpate the neck to determine the integrity of its structures and examine the lymphatic system. An abnormality of superficial lymph nodes sometimes reveals the presence of an infection or malignancy. Examine the lymphatic system region by region during the assessment of other body systems (head and neck, breast, genitalia, and extremities). Examination of the thyroid gland and trachea also aids in ruling out malignancies. Perform this examination with the patient sitting. The sternocleidomastoid and trapezius muscles outline the areas of the neck, dividing each side of the neck into two triangles. The anterior triangle contains the trachea, thyroid gland, carotid artery, and anterior cervical lymph nodes. The posterior triangle contains the posterior lymph nodes. Table 30-19 reviews the nursing history for the head and neck examination.
TABLE 30-19
Nursing History for Neck Assessment
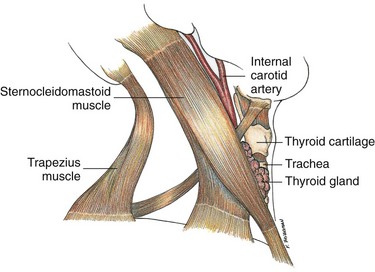
FIG. 30-27 Anatomical position of major neck structures. Note triangles formed by the sternocleidomastoid muscle, lower jaw, and anterior neck anteriorly and the sternocleidomastoid muscle, trapezius muscle, and lower neck posteriorly.
Neck Muscles
First inspect the neck in the usual anatomical position, with slight hyperextension. Observe for symmetry of the neck muscles. Ask the patient to flex the neck with the chin to the chest, hyperextend the neck backward, and move the head laterally to each side and then sideways with the ear moving toward the shoulder. This tests the sternocleidomastoid and trapezius muscles. The neck normally moves without discomfort. Perform other tests for muscle strength and function during assessment of the musculoskeletal system.
Lymph Nodes
An extensive system of lymph nodes collects lymph from the head, ears, nose, cheeks, and lips (Fig. 30-28). The immune system protects the body from foreign antigens, removes damaged cells from the circulation, and provides a partial barrier to growth of malignant cells within the body. Assessing the lymph nodes requires competence when caring for patients with suspected immunoincompetence, which is often linked to allergies, human immunodeficiency virus (HIV) infection, autoimmune disease (e.g., lupus erythematosus), or serious infection.
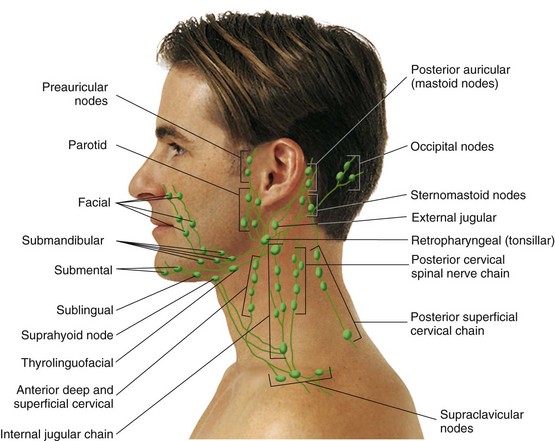
FIG. 30-28 Palpable lymph nodes in the head and neck. (From Seidel HM et al: Mosby’s guide to physical examination, ed 7, St Louis, 2011, Mosby.)
With the patient’s chin raised and head tilted slightly, first inspect the area where lymph nodes are distributed and compare both sides. This position stretches the skin slightly over any possible enlarged nodes. Inspect visible nodes for edema, erythema, or red streaks. Nodes are not normally visible.
Use a methodical approach to palpate the lymph nodes to avoid overlooking any single node or chain. The patient relaxes with the neck flexed slightly forward. Inspect and palpate both sides of the neck for comparison. During palpation either face or stand to the side of the patient for easy access to all nodes. Use the pads of the middle three fingers of each hand to gently palpate in a circular motion over the nodes (Fig. 30-29). Check each node methodically in the following sequence: occipital nodes at the base of the skull, postauricular nodes over the mastoid, preauricular nodes just in front of the ear, retropharyngeal nodes at the angle of the mandible, submandibular nodes, and submental nodes in the midline behind the mandibular tip. Try to detect enlargement and note the location, size, shape, surface characteristics, consistency, mobility, tenderness, and warmth of the nodes. If the skin is mobile, move it over the area of the nodes. It is important to press underlying tissue in each area and not simply move the fingers over the skin. However, if you apply excessive pressure, you miss small nodes and destroy palpable nodes.
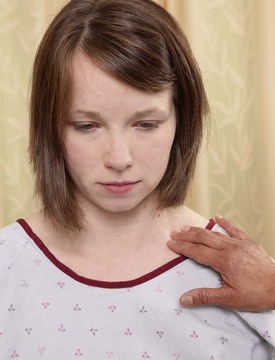
To palpate supraclavicular nodes, ask the patient to bend the head forward and relax the shoulders. Palpate these nodes by hooking the index and third finger over the clavicle lateral to the sternocleidomastoid muscle. Palpate the deep cervical nodes only with the fingers hooked around the sternocleidomastoid muscle.
Normally lymph nodes are not easily palpable. However, small, mobile, nontender nodes are common. Lymph nodes that are large, fixed, inflamed, or tender indicate a problem such as local infection, systemic disease, or neoplasm (Seidel et al., 2011) (Box 30-17). When you find enlarged nodes, explore the adjacent areas and regions drained by the nodes. Tenderness almost always indicates inflammation. A problem involving a lymph node of the head and neck means an abnormality in the mouth, throat, abdomen, breasts, thorax, or arms. These are the areas drained by the head and neck nodes.
Thyroid Gland
The thyroid gland lies in the anterior lower neck, in front of and to both sides of the trachea. The gland is fixed to the trachea, with the isthmus overlying the trachea and connecting the two irregular, cone-shaped lobes (Fig. 30-30). Inspect the lower neck overlying the thyroid gland for obvious masses, symmetry, and any subtle fullness at the base of the neck. Ask the patient to hyperextend the neck, which helps tighten the skin for better visualization. Offer the patient a glass of water, and, while observing the neck, have him or her swallow. This maneuver helps to visualize an abnormally enlarged thyroid. Normally the thyroid cannot be visualized.
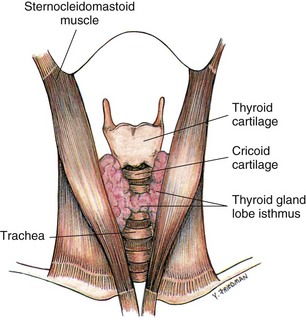
Advanced practice nurses examine the thyroid by palpating for more subtle masses; this technique is not discussed here.
Carotid Artery and Jugular Vein
This portion of the examination is described under examination of the vascular system (see later section).
Trachea
The trachea is a part of the upper respiratory system that you directly palpate. It is normally located in the midline above the suprasternal notch. Masses in the neck or mediastinum and pulmonary abnormalities cause displacement laterally. Have the patient sit or lie down during palpation. Determine the position of the trachea by palpating at the suprasternal notch, slipping the thumb and index fingers to each side. Note if the finger and thumb shift laterally. Do not apply forceful pressure because this elicits coughing.
Thorax and Lungs
Accurate physical assessment of the thorax and lungs requires review of the ventilatory and respiratory functions of the lungs. If disease is affecting the lungs, it affects other body systems as well. For example, reduced oxygenation causes changes in mental alertness because of the sensitivity of the brain to lowered oxygen levels. Use data from all body systems to determine the nature of pulmonary alterations. You will use inspection, palpation, and auscultation to examine the thorax and lungs. Diagnostic equipment such as x-ray films, magnetic resonance imaging (MRI, and computed tomography (CT) scans create little need for the use of percussion as an assessment measure. Risk factors for lung disease are reviewed at the time of respiratory assessment (Box 30-18).
Before assessing the thorax and lungs, be familiar with the landmarks of the chest (Fig. 30-31, A to C). These landmarks help you identify findings and use assessment skills correctly. The patient’s nipples, angle of Louis, suprasternal notch, costal angle, clavicles, and vertebrae are key landmarks that provide a series of imaginary lines for sign identification. Keep a mental image of the location of the lobes of the lung and the position of each rib (Fig. 30-32, A to C). The proper orientation to anatomical structures ensures a thorough assessment of the anterior, lateral, and posterior thorax.
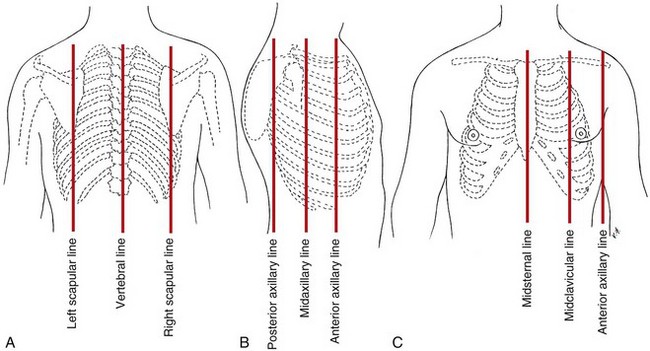
FIG. 30-31 Anatomical chest wall landmarks. A, Posterior chest landmarks. B, Lateral chest landmarks. C, Anterior chest landmarks.

FIG. 30-32 Position of lung lobes in relation to anatomical landmarks. A, Anterior position. B, Lateral position. C, Posterior position. (From Seidel HM, et al: Mosby’s guide to physical examination, ed 7, St Louis, 2011, Mosby.)
Locating the position of each rib is critical to visualizing the lobe of the lung being assessed. To begin, locate the angle of Louis at the manubriosternal junction. The angle is a visible and palpable angulation of the sternum and is the point at which the second rib articulates with the sternum. Count the ribs and intercostal spaces (between the ribs) from this point. The number of each intercostal space corresponds with that of the rib just above it. The spinous process of the third thoracic vertebra and the fourth, fifth, and sixth ribs help to locate the lobes of the lung laterally. The lower lobes project laterally and anteriorly (Fig. 30-32, B). Posteriorly the tip or inferior margin of the scapula lies approximately at the level of the seventh rib (Fig. 30-32, C). After identifying the seventh rib, count upward to locate the third thoracic vertebra and align it with the inner borders of the scapula to locate the posterior lobes.
The examination requires the patient to be undressed to the waist, with good lighting. Assess patients at risk for pulmonary problems such as the patient confined to bed rest or with chest pain who cannot fully expand the lungs. The examination begins with the patient sitting for assessment of the posterior and lateral chest. Have him or her sit or lie down for assessment of the anterior chest. Table 30-20 reviews the nursing history for lung examination.
TABLE 30-20
Nursing History for Lung Assessment
| ASSESSMENT | RATIONALE |
| Assess history of tobacco or marijuana use, including type of tobacco, duration and amount (Pack-years = Number of years smoking × Number of packs per day), age started, and efforts to quit and length of time since smoking stopped. | Smoking is a risk factor for lung cancer, heart disease, cerebrovascular disease, emphysema, or chronic bronchitis. It accounts for a significant percentage of all cancer deaths. It increases the risk for 15 types of cancer (American Cancer Society, 2010). |
| Ask if patient has had a persistent cough (productive or nonproductive), sputum streaked with blood, voice change, chest pain, shortness of breath, orthopnea, dyspnea during exertion or at rest, poor activity tolerance, or recurrent attacks of pneumonia or bronchitis. | Symptoms of cardiopulmonary alterations help localize objective physical findings. (Warning signals for lung cancer are in italic type.) The diaphragm of the lungs expands more easily when the individual is sitting upright, as for patients who must be in an upright position to breathe. |
| Determine if patient works in environment containing pollutants (e.g., asbestos, arsenic, coal dust) or requiring exposure to radiation. Does patient have exposure to secondhand smoke? | These risk factors increase chance for various lung diseases. |
| Review history for known or suspected human immunodeficiency virus (HIV) infection; substance abuse; low income; or being a resident or employee of nursing home or shelter, homeless, recent prison inmate, family member of tuberculosis (TB) patient, or immigrant to the United States from a country where TB is prevalent (Frakes and Evans, 2004). | These are risk factors for TB. |
| Ask if patient has history of persistent cough, hemoptysis, unexplained weight loss, fatigue, night sweats, or fever. | These are risk factors for both TB and HIV infection. |
| Does patient have history of chronic hoarseness? | Hoarseness indicates laryngeal disorder or abuse of cocaine or opioids (sniffing). |
| Assess history of allergies to pollens, dust, or other airborne irritants and to foods, drugs, or chemical substances. | Symptoms such as choking feeling, bronchospasm with respiratory stridor, wheezes on auscultation, and dyspnea are often caused by allergic response. |
| Review family history for cancer, TB, allergies, or chronic obstructive pulmonary disease. | Conditions place patient at risk for lung disease. |
| Ask if patient has had a pneumonia or influenza vaccine and a TB test; if not, educate him or her on need to do so. | The very young, the very old, and those with chronic respiratory problems or immunosuppressive diseases are at increased risk for respiratory disease. |
Posterior Thorax
Begin examination of the posterior thorax by observing for any signs or symptoms in other body systems that indicate pulmonary problems. Reduced mental alertness, nasal flaring, somnolence, and cyanosis are examples of assessed signs that indicate oxygenation problems. Inspect the posterior thorax by observing the shape and symmetry of the chest from the patient’s back and front. Note the anteroposterior diameter. Body shape or posture significantly impairs ventilatory movement. Normally the chest contour is symmetrical, with the anteroposterior diameter one third to one half of the transverse, or side-to-side, diameter. A barrel-shaped chest (anteroposterior diameter equals transverse diameter) characterizes aging and chronic lung disease. Infants have an almost round shape. Congenital and postural alterations cause abnormal contours. Some patients lean over a table or splint the side of the chest because of a breathing problem. Splinting or holding the chest wall because of pain causes a patient to bend toward the side affected. Such a posture impairs ventilatory movement.
Standing at a midline position behind the patient, look for deformities, position of the spine, slope of the ribs, retraction of the intercostal spaces during inspiration, and bulging of the intercostal spaces during expiration. The scapulae are normally symmetrical and closely attached to the thoracic wall. The normal spine is straight without lateral deviation. Posteriorly the ribs tend to slope across and down. The ribs and intercostal spaces are easier to see in a thin person. Normally no bulging or active movement occurs within the intercostal spaces during breathing. Bulging indicates that the patient is using great effort to breathe.
Also assess the rate and rhythm of breathing (see Chapter 29). Observe the thorax as a whole. It normally expands and relaxes regularly with equality of movement bilaterally. In healthy adults the normal respiratory rates vary from 12 to 20 respirations per minute.
Palpation of the posterior thorax provides further information about a patient’s health status. Palpate the thoracic muscles and skeleton for lumps, masses, pulsations, and unusual movement. If the patient voices pain or tenderness, avoid deep palpation. Fractured rib fragments could be displaced against vital organs. Normally the chest wall is not tender. If there is a suspicious mass or swollen area, lightly palpate it for size, shape, and the typical qualities of a lesion.
To measure chest excursion or depth of breathing, stand behind the patient and place the thumbs along the spinal processes at the tenth rib, with the palms lightly contacting the posterolateral surfaces. Place thumbs 5 cm (2 inches) apart, pointing toward the spine with fingers pointing laterally (Fig. 30-33, A). Press the hands toward the spine so a small skinfold appears between the thumbs. Do not slide the hands over the skin. Instruct the patient to exhale and then take a deep breath. Note movement of the thumbs during inhalation (Fig. 30-33, B). Chest excursion is symmetrical, separating the thumbs 3 to 5 cm ( to 2 inches). Reduced chest excursion may be caused by pain, postural deformity, or fatigue. In older adults chest movement normally declines because of costal cartilage calcification and respiratory muscle atrophy.
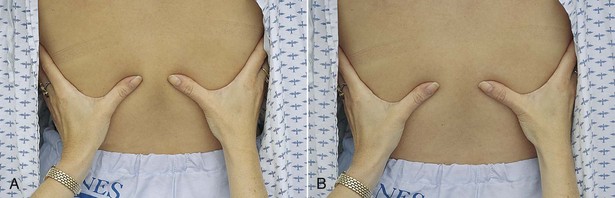
FIG. 30-33 A, Hand position for palpation of posterior thorax excursion. B, As patient inhales, movement of chest excursion separates thumbs.
During speech the sound created by the vocal cords is transmitted through the lung to the chest wall. The sound waves create vibrations that you palpate externally. These vibrations are called vocal or tactile fremitus. The accumulation of mucus, the collapse of lung tissue, or the presence of one or more lung lesions blocks the vibrations from reaching the chest wall.
To palpate for tactile fremitus, place the palmar surfaces of the fingers or the ulnar part of the hand over symmetrical intercostal spaces, beginning at the lung apex (Fig. 30-34, A) and using a firm, light touch. Ask the patient to say “ninety-nine” or “one-one-one.” Palpate both sides simultaneously and symmetrically (from top to bottom) for comparison or use one hand, quickly alternating between the two sides (Seidel et al., 2011). Normally a faint vibration is present as the patient speaks. If fremitus is faint, ask the patient to speak in a louder or lower tone of voice. Normally fremitus is symmetrical. Vibrations are strongest at the top, near the level of the tracheal bifurcation. Strong vibrations through the chest wall occur in crying infants.
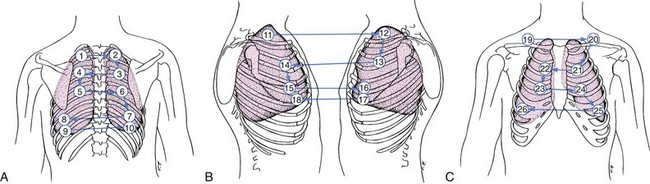
FIG. 30-34 A to C, A systematic pattern (posterior-lateral-anterior) is followed when palpating and auscultating the thorax.
Auscultation assesses the movement of air through the tracheobronchial tree and detects mucus or obstructed airways. Normally air flows through the airways in an unobstructed pattern. Recognizing the sounds created by normal airflow allows you to detect sounds caused by airway obstruction. Follow the same systematic approach when listening that was used for palpation (see Fig. 30-34, A).
Place the diaphragm of the stethoscope firmly on the skin, over the posterior chest wall between the ribs (Fig. 30-35). The patient folds the arms in front of the chest and keeps the head bent forward while taking slow, deep breaths with the mouth slightly open. Listen to an entire inspiration and expiration at each position of the stethoscope. If sounds are faint, as in the obese patient, ask the patient to breathe harder and faster temporarily. Breath sounds are much louder in children because of their thin chest walls. The bell works best in children because of a child’s small chest. Auscultate for normal breath sounds and abnormal or adventitious sounds. Normal breath sounds differ in character, depending on the area you are auscultating. Bronchovesicular and vesicular sounds are normally heard over the posterior thorax (Table 30-21).
TABLE 30-21
| DESCRIPTION | LOCATION | ORIGIN |
| Vesicular | ||
| Vesicular sounds are soft, breezy, and low pitched. Inspiratory phase is 3 times longer than expiratory phase. | Best heard over periphery of lung (except over scapula) | Created by air moving through smaller airways |
| Bronchovesicular | ||
| Bronchovesicular sounds are blowing sounds that are medium pitched and of medium intensity. Inspiratory phase is equal to expiratory phase. | Best heard posteriorly between scapulae and anteriorly over bronchioles lateral to sternum at first and second intercostal spaces | Created by air moving through large airways |
| Bronchial | ||
| Bronchial sounds are loud and high pitched with hollow quality. Expiration lasts longer than inspiration (3 : 2 ratio). | Heard only over trachea | Created by air moving through trachea close to chest wall |

FIG. 30-35 Use the diaphragm of the stethoscope to auscultate breath sounds. (From Seidel HM et al: Mosby’s guide to physical examination, ed 7, St Louis, 2011, Mosby.)
Abnormal sounds result from air passing through moisture, mucus, or narrowed airways. They also result from alveoli suddenly reinflating or an inflammation between the pleural linings of the lung. Adventitious sounds often occur superimposed over normal sounds. The four types of adventitious sounds are crackles, rhonchi, wheezes, and pleural friction rub. A specific entity causes each sound, and each has typical auditory features (Table 30-22). During auscultation note the location and characteristics of the sounds and listen for the absence of breath sounds (found in patients with collapsed or surgically removed lobes).
TABLE 30-22

Data from Seidel HM et al: Mosby’s guide to physical examination, ed 7, St Louis, 2011, Mosby.
If there are abnormalities in tactile fremitus or auscultation, perform the vocal resonance tests (spoken and whispered voice sounds). Place the stethoscope over the same locations used to assess breath sounds and have the patient say “ninety-nine” in a normal voice tone. Normally the sound is muffled. If fluid is compressing the lung, the vibrations from the patient’s voice are transmitted to the chest wall, and the sound becomes clear (bronchophony). Then ask the patient to whisper “ninety-nine.” The whispered voice is usually faint and indistinct. Certain lung abnormalities cause the whispered voice to become clear and distinct (whispered pectoriloquy).
Lateral Thorax
Extend the assessment of the posterior thorax to the lateral sides of the chest. The patient sits during examination of the lateral chest. Have the patient raise the arms to improve access to lateral thoracic structures. Use inspection, palpation, and auscultation skills to examine the lateral thorax (see Fig. 30-34, B). Do not assess excursion laterally. Normally the breath sounds you hear are vesicular.
Anterior Thorax
Inspect the anterior thorax for the same features as the posterior thorax. The patient sits or lies down with the head elevated. Observe the accessory muscles of breathing: sternocleidomastoid, trapezius, and abdominal muscles. The accessory muscles move little with normal passive breathing. However, patients who use a great deal of effort to breathe as a result of strenuous exercise or pulmonary disease (e.g., chronic obstructive pulmonary disease) rely on the accessory and abdominal muscles to contract, thereby leading to inspiration and expiration. Some patients who require great effort produce a grunting sound.
Observe the width of the costal angle. It is usually larger than 90 degrees between the two costal margins. Observe the breathing pattern. Normal breathing is quiet and barely audible near the open mouth. You most often assess respiratory rate and rhythm anteriorly (see Chapter 29). The male patient’s respirations are usually diaphragmatic, whereas a female’s are more costal. Accurate assessment occurs as the patient breathes passively.
Palpate the anterior thoracic muscles and skeleton for lumps, masses, tenderness, or unusual movement. The sternum and xiphoid are relatively inflexible. Place the thumbs parallel approximately along the costal margin 6 cm ( inches) apart with the palms touching the anterolateral chest. Push the thumbs toward the midline to create a skinfold. As the patient inhales deeply, the thumbs normally separate approximately 3 to 5 cm (
 to 2 inches), with each side expanding equally.
Assess tactile fremitus over the anterior chest wall. Anterior findings differ from posterior findings because of the heart and female breast tissue. Fremitus is felt next to the sternum at the second intercostal space, at the level of the bronchial bifurcation. It decreases over the heart, lower thorax, and breast tissue.
Auscultation of the anterior thorax follows a systematic pattern (see Fig. 30-34, C) comparing right and left sides. This is important so lung sounds in one region on one side of the body can be compared with sounds in the same region on the opposite side of the body.
If possible, have the patient sit to maximize chest expansion. Give special attention to the lower lobes, where mucus secretions commonly gather. Listen for bronchovesicular and vesicular sounds above and below the clavicles and along the lung periphery. In addition, auscultate for bronchial sounds, which are loud, high pitched, and hollow sounding, with expiration lasting longer than inspiration (3 : 2 ratio). This sound is normally heard over the trachea.
Heart
Compare the assessment of heart function with findings from the vascular assessment (see later section). Alterations in either system sometimes manifest as changes in the other. Some patients with signs or symptoms of heart (cardiac) problems have a life-threatening condition requiring immediate attention. In this case act quickly and conduct only the portions of the examination that are absolutely necessary. Conduct a more thorough assessment when the patient is more stable. The nursing history (Table 30-23) provides data to help interpret physical findings.
TABLE 30-23
Nursing History for Heart Assessment
| ASSESSMENT | RATIONALE |
| Determine history of smoking, alcohol intake, caffeine intake, use of prescriptive and recreational drugs, exercise habits, and dietary patterns and intake (including fat and sodium intake). | Smoking; alcohol ingestion; cocaine use; lack of regular exercise; intake of foods high in carbohydrates, fats, and cholesterol are risk factors for cardiovascular disease. Caffeine can cause heart dysrhythmias. |
| Determine if patient is taking medications for cardiovascular function (e.g., antidysrhythmics, antihypertensives) and if he or she knows their purpose, dosage, and side effects. | Knowledge allows nurse to assess compliance with drug therapies. Medications sometimes affect vital sign values. |
| Assess for chest pain or discomfort, palpitations, excess fatigue, cough, dyspnea, leg pain or cramps, edema of feet, cyanosis, fainting, and orthopnea. Ask if symptoms occur at rest or during exercise. | These are key symptoms of heart disease. Cardiovascular function is sometimes adequate during rest but not during exercise. Positions affect how well lungs can expand. |
| If patient reports chest pain, determine if it is cardiac in nature. Anginal pain is usually a deep pressure or ache that is substernal and diffuse, radiating to one or both arms, neck, or jaw. | Assessment determines nature of pain and need to initiate care immediately. |
| Determine whether patient has a stressful lifestyle. What physical demands and/or emotional stress exist? | Repeated exposure to stress increases risk for heart disease. |
| Assess family history for heart disease, diabetes, high cholesterol levels, hypertension, stroke, or rheumatic heart disease. | Factors increase risk for heart disease. |
| Ask patient about history of heart trouble (e.g., heart failure, congenital heart disease, coronary artery disease, dysrhythmias, murmurs). | Knowledge reveals patient’s level of understanding of condition. Preexisting condition influences examination techniques used and findings to expect. |
| Determine whether patient has preexisting diabetes, lung disease, obesity, or hypertension. | These disorders alter heart function. |
Assess cardiac function through the anterior thorax. Form a mental image of the exact location of the heart (Fig. 30-36). In the adult it is located in the center of the chest (precordium), behind and to the left of the sternum, with a small section of the right atrium extending to the right of the sternum. The base of the heart is the upper portion, and the apex is the bottom tip. The surface of the right ventricle composes most of the anterior surface of the heart. A section of the left ventricle shapes the left anterior side of the apex. The apex actually touches the anterior chest wall at approximately the fourth to fifth intercostal space just medial to the left midclavicular line. This is the apical impulse or point of maximal impulse (PMI).
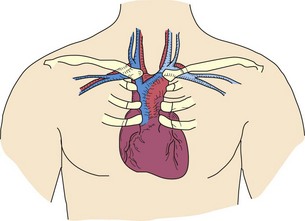
An infant’s heart is positioned more horizontally. The apex of the heart is at the third or fourth intercostal space, just to the left of the midclavicular line. By the age of 7 a child’s PMI is in the same location as the adult’s. In tall, slender persons the heart hangs more vertically and is positioned more centrally. In shorter or stockier individuals the heart tends to lie more to the left and horizontally (Seidel et al., 2011).
To assess heart function, a clear understanding of the cardiac cycle and associated physiological events is of utmost importance (Fig. 30-37). The heart normally pumps blood through its four chambers in a methodical, even sequence. Events on the left side occur just before those on the right. As blood flows through each chamber, the valves open and close, the pressures within chambers rise and fall, and the chambers contract. Each event creates a physiological sign. Both sides of the heart function in a coordinated fashion.
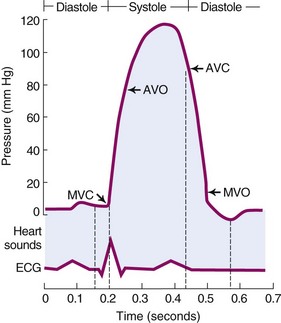
FIG. 30-37 Cardiac cycle. AVC, Aortic valve closes; AVO, aortic valve opens; ECG, electrocardiogram; MVC, mitral valve closes; MVO, mitral valve opens.
There are two phases to the cardiac cycle: systole and diastole. During systole the ventricles contract and eject blood from the left ventricle into the aorta and from the right ventricle into the pulmonary artery. During diastole the ventricles relax, and the atria contract to move blood into the ventricles and fill the coronary arteries.
Heart sounds occur in relation to physiological events in the cardiac cycle. As systole begins, ventricular pressure rises and closes the mitral and tricuspid valves. Valve closure causes the first heart sound (S1), often described as “lub.” The ventricles then contract, and blood flows through the aorta and pulmonary circulation. After the ventricles empty, ventricular pressure falls below that in the aorta and pulmonary artery. This allows the aortic and pulmonic valves to close, causing the second heart sound (S2), described as “dub.” As ventricular pressure continues to fall, it drops below that of the atria. The mitral and tricuspid valves reopen to allow ventricular filling. When the heart attempts to fill an already distended ventricle, a third heart sound (S3) can be heard, as with heart failure. An S3 is considered abnormal in adults over 30 years of age but can often be heard normally in children and young adults. It can also be present among women in the late stages of pregnancy. A fourth heart sound (S4) occurs when the atria contract to enhance ventricular filling. An S4 is often heard in healthy older adults, children, and athletes; but it is not normal in adults. Because S4 also indicates an abnormal condition, report it to a health care provider.
Inspection and Palpation
Make the patient relaxed and comfortable before the examination. Explain the procedure to relieve his or her anxiety. An anxious or uncomfortable patient has mild tachycardia, which leads to inaccurate findings.
Use the skills of inspection and palpation simultaneously. Begin the examination with the patient in the supine position or the upper body elevated 45 degrees because patients with heart disease frequently suffer shortness of breath while lying flat. Stand at the patient’s right side. Do not let the patient talk, especially when auscultating heart sounds. Good lighting in the room is essential.
Direct your attention to the anatomical sites best suited for assessment of cardiac function. During inspection and palpation look for visible pulsations and exaggerated lifts and palpate for the apical impulse and any source of vibrations (thrills). Follow an orderly sequence, beginning with assessment of the base of the heart and moving toward the apex. First inspect the angle of Louis, which lies between the sternal body and manubrium, and feel the ridge in the sternum approximately 5 cm (2 inches) below the sternal notch. Slip the fingers along the angle on each side of the sternum to feel adjacent ribs. The intercostal spaces are just below each rib. The second intercostal space allows identification of each of the six anatomical landmarks (Fig. 30-38). The second intercostal space on the right is the aortic area, and the left second intercostal space is the pulmonic area. You need to use deeper palpation to feel the spaces in obese or heavily muscled patients. After locating the pulmonic area, move the fingers down the patient’s left sternal border to the third intercostal space, called the second pulmonic area. The tricuspid area is located at the fourth or fifth intercostal space along the sternum. To find the apical or mitral area, locate the fifth intercostal space just to the left of the sternum and move the fingers laterally to the left midclavicular line. Locate the apical area with the palm of the hand or the fingertips. Normally you feel the apical impulse as a light tap in an area 1 to 2 cm ( to
to  inch) in diameter at the apex (Fig. 30-39). Another landmark is the epigastric area at the tip of the sternum. Palpate there if you suspect aortic abnormalities.
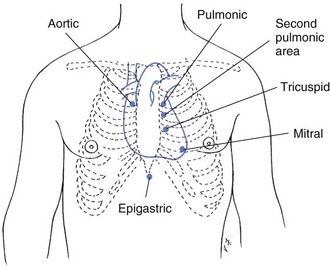
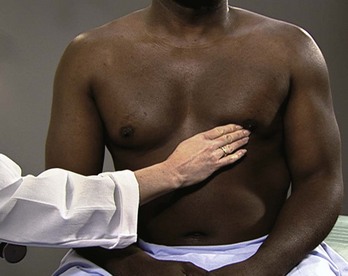
FIG. 30-39 Palpation of apical pulse. (From Seidel HM et al: Mosby’s guide to physical examination, ed 7, St Louis, 2011, Mosby.)
Locate the six anatomical landmarks of the heart and inspect and palpate each area. Look for the appearance of pulsations, viewing each area over the chest at an angle to the side. Normally pulsations are not seen, except perhaps at the PMI in thin patients or at the epigastric area as a result of abdominal aorta pulsation. Use the proximal halves of the four fingers together and alternate this with the ball of the hand to palpate for pulsations. Touch the areas gently to allow movements to lift the hand. Normally no pulsations or vibrations are felt in the second, third, or fourth intercostal spaces. Loud murmurs cause a vibration. Time palpated pulsations or vibrations and their occurrence in relation to systole or diastole by auscultating heart sounds simultaneously.
The apical impulse or PMI is easily felt. If you cannot locate it with the patient in a supine position, have him or her roll onto the left side, moving the heart closer to the chest wall. Estimate the size of the heart by noting the diameter of the PMI and its position relative to the midclavicular line. In cases of serious heart disease, the cardiac muscle enlarges, with the PMI found to the left of the midclavicular line. The PMI is sometimes difficult to find in the older adult because the chest deepens in its anteroposterior diameters. It is also difficult to find in muscular or overweight patients. An infant’s PMI is located near the third or fourth intercostal space. It is easy to palpate because of the child’s thin chest wall.