CHAPTER 18 Laboratory Procedures
This chapter covers only those phases of dental laboratory procedures that are directly related to removable partial denture fabrication. Familiarity with laboratory procedures relative to making fixed restorations and complete dentures is presumed. Such information is available in numerous textbooks on those subjects and is not duplicated here. For example, the principles and techniques involved in the waxing, casting, and finishing of single inlays, crowns, and fixed partial dentures are adequately covered in lecture material and textbooks and in manuals available to the dental student, the dental laboratory technician, and the practicing dentist. Similarly, knowledge of the principles and techniques for mounting casts, articulating teeth, and waxing, processing, and polishing complete dentures is presumed as a necessary background for the laboratory phases of removable partial denture fabrication. Therefore this chapter is directed specifically toward the laboratory procedures involved in the fabrication of a removable partial denture.
Duplicating a Stone Cast
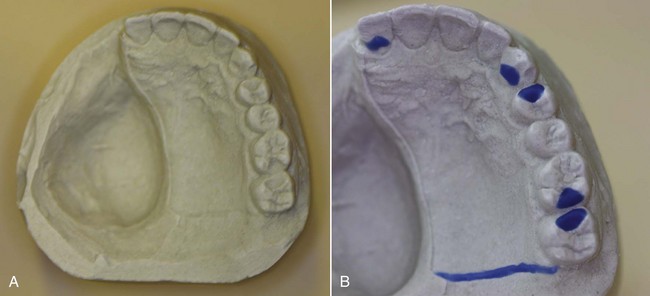
A stone cast may be duplicated for several purposes. One is the duplication in stone of the original or corrected master cast to preserve the original. One use of such a cast is for fitting a removable partial denture framework without danger of fracture or abrading the surface of the original master cast. Another use might be for processing a temporary prosthesis where wax relief and blockout on the original cast allow production of a duplicate, which following processing will make insertion of the prosthesis easier.
Another purpose of duplicating a cast is to allow an investment cast to be formed for framework fabrication. Careful preparation of the master cast for production of this investment cast involves consideration of the defined path of insertion, heights of contour, and retentive and stabilization areas designed into the mouth preparations. The framework produced should be carefully evaluated on the cast for fit, just as a fixed partial denture is evaluated on a working cast with dies (Figure 18-1).
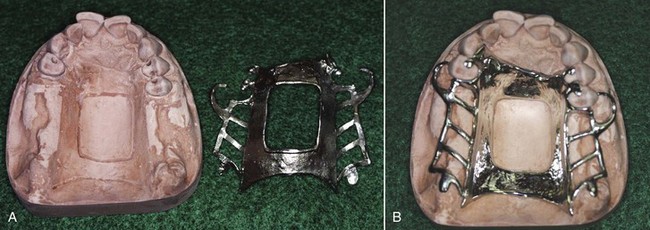
Figure 18-1 A, Framework returned from the laboratory with the master cast. B, Replacement on the cast reveals areas of contact that can erode the cast surface. Careful fitting to the cast will allow determination of potential framework adjustment regions before fitting in the mouth. If the framework is indiscriminately finished in the laboratory or before intraoral placement, critical tooth contact regions may be lost, resulting in a poorly retained and stabilized prosthesis. Most often, such an overly adjusted framework is poorly stabilized, not poorly retained.
Blockout should be accomplished on the master cast before an investment cast is made. On this investment cast, the wax or plastic pattern is formed. The use of preformed plastic patterns eliminates some of the danger of damaging the surface of the investment cast in the process of forming the pattern. With freehand waxing, considerable care must be taken not to score or abrade the investment cast. The metal framework is ultimately cast against its surface, and the finished casting and the original cast are then returned to the dentist after all fitting has been completed on the duplicate cast.
Duplicating Materials and Flasks
Duplicating materials include both colloidal and silicone materials. Colloidal materials are made fluid by heating and return to a gel while cooling. The cast to be duplicated must be placed in the bottom of a suitable flask, called a duplicating flask. A duplicating flask should contain the fluid material to facilitate its cooling, to support the mold while it is being filled with the cast material, and to facilitate removal of the cast from the mold without permanent deformation or damage to the mold. Numerous duplicating flasks are available on the market.
The technique for duplicating is the same for any cast, whether or not blockout is present. However, if wax or clay blockout is present, the temperature of the duplicating material must not be any higher than that recommended by the manufacturer, to prevent melting and distortion of the blockout material.
Ordinary baseplate wax may be used for paralleled blockout and ledges, but care must be taken that the temperature of the duplicating material is not too high because it will then melt the wax. The use of prepared blockout material, such as Ney blockout wax or Wills undercut material, may be preferred.
Duplicating Procedure
The equipment needed and the steps required for duplication using a silicone material are described in Figures 18-2 through 18-6.
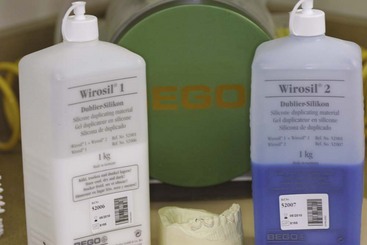
Figure 18-2 Duplicating material with a vacuum curing unit in the background, which is used to ensure a dense mold.
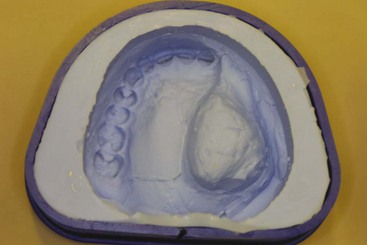
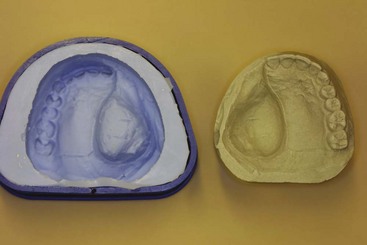
Figure 18-4 Refractory cast (right) following removal from the duplication mold (left). This cast incorporates all the features of the relieved and blockout master cast generated from the clinical framework impression.
Waxing the Removable Partial Denture Framework
When preformed plastic patterns are used (Figure 18-7), parts of the denture framework must be waxed freehand to prevent excessive bulk and to create the desired contours for a satisfactory custom-made removable partial denture framework (Figure 18-8).
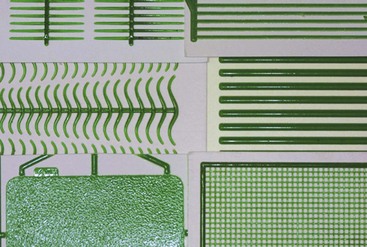
Figure 18-7 Preformed plastic patterns are available in many shapes and sizes for clasps, for minor connectors connecting to teeth, or for distal extension bases, bars, mesh, and palatal coverage. Because they are made of soft plastic material, they tend to stretch on removal from their backing. Therefore care must be exercised when one is removing patterns. Their use generally requires that tacky liquid be applied first to the investment cast at their area of placement.
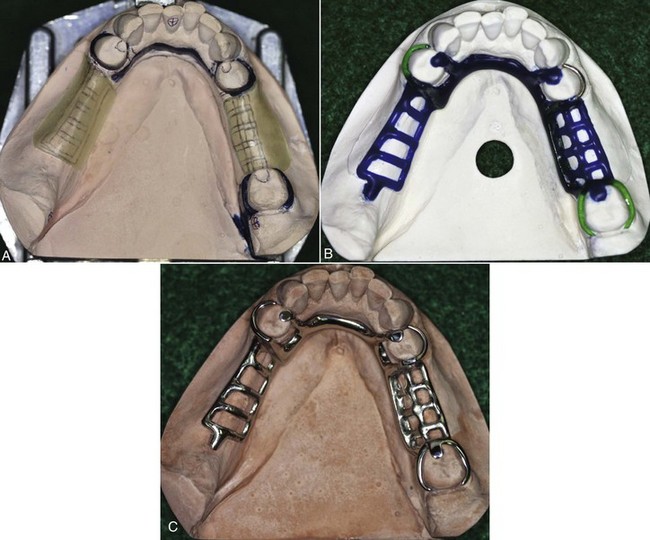
Figure 18-8 Three steps are involved in making a denture framework by using relief, blockout ledges, and ready-made pattern forms. A, Master cast with relief, blockout of undercuts at posterior right and anterior lingual regions, and shaped blockout ledges for location of retentive and nonretentive clasp arms. B, Completed pattern using lingual bar major connector pattern, plastic clasp forms resting on investment ledges, wrought wire, and open retention mesh. C, Finished casting returned to master cast.
Although most dentists do not fabricate their own removable partial denture castings, it is essential that they have an understanding of the dental laboratory procedures involved. This enables them to design the removable partial denture framework, complete a laboratory work authorization that communicates the desired design and authorizes its fabrication, and evaluate the quality of the framework (Figure 18-9). Understanding and evaluation of the key features required in a completed removable partial denture framework ensure the patient of a chance to function comfortably with the finished product (Figure 18-10). The contrary is also true.
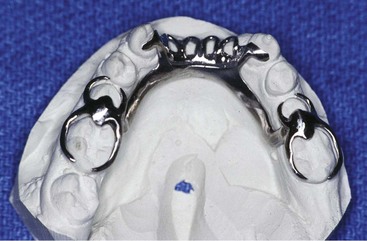
Figure 18-9 Evaluation of the framework by the clinician is as important for removable partial denture frameworks as it is for implant and/or fixed partial denture castings. Careful scrutiny of attention to detail in following the design specifications is necessary, as is evaluation of the fit of the framework to the cast. On this cast, initial seating of the framework reveals interference with complete seating bilaterally from the embrasure clasps. Only minor adjustment should be required to completely seat the framework. If major adjustment is needed, or if after complete seating of the framework the clasp assemblies do not contact the teeth as prescribed, the framework should be remade.
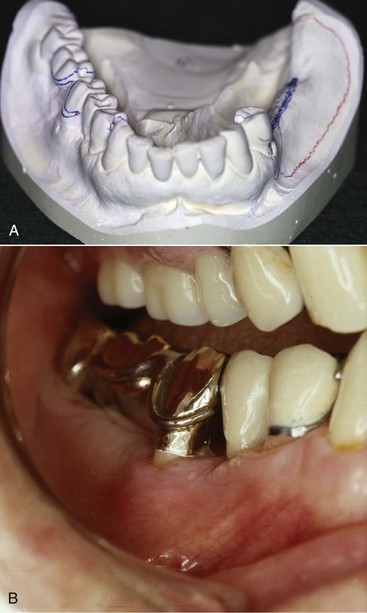
Figure 18-10 A, Design of a mandibular removable partial denture framework is outlined on the master cast for the technician to follow in waxing and casting the framework. B, Cast framework as returned from the laboratory is evaluated intraorally, revealing sufficiently accurate adaptation and design identical to the embrasure clasp and mesio-occlusal rest #28, as shown on the design cast in A.
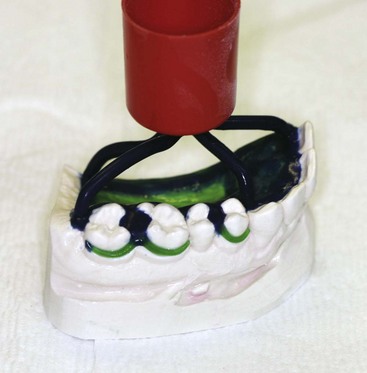
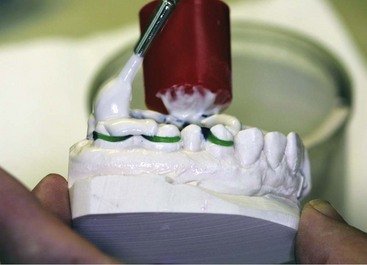
Forming the Wax Pattern for a Mandibular Class II Removable Partial Denture Framework
Examples that illustrate many of the essentials of waxing a removable partial denture framework are presented in Figures 18-11 through 18-20. This exercise includes the waxing of three types of direct retainers (circumferential, combination, and bar type), a mandibular lingual bar major connector, a maxillary anterior-posterior palatal strap major connector, both distal extension and tooth-bound modification spaces, and adaptation of round, 18-gauge, wrought-wire retentive arms for combination-type direct retainers.
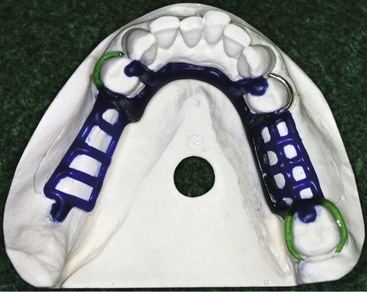
Figure 18-11 Occlusal view of mandibular Kennedy Class I, modification 1 wax pattern on a refractory cast. The lingual bar major connector joins three clasp assemblies (RPA: rest, proximal plate and Akers clasp, wrought wire, and cast circumferential).
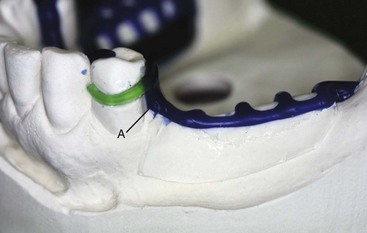
Figure 18-12 Buccal view of left side of the pattern shown in Figure 18-11. A tapered retainer clasp pattern is placed on the refractory cast ledge produced by duplication of shaped blockout ledges. The cast illustrates relief provided beneath the minor connector, which retains the denture base resin. The tissue index at the gingival region of the proximal plate will provide an easily identifiable finish line for resin finishing and future trimming of altered cast impression.
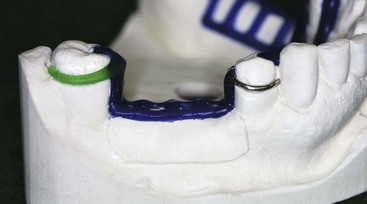
Figure 18-13 Buccal view of modification space of the pattern shown in Figure 18-11. A wrought-wire clasp is contoured at the anterior extent of the modification space. Such a retainer will not overly stress the tooth if opposite denture base movement causes rotation across the fulcrum (see Figure 18-11, occlusal rests at #21 and #31). A tapered cast circumferential clasp follows the shaped ledge to a distal buccal 0.01-inch undercut. Both proximal plates have been waxed with sufficient bulk to provide a complete casting. If thickness presents a problem with tooth placement, some finishing can be accomplished at a later time.
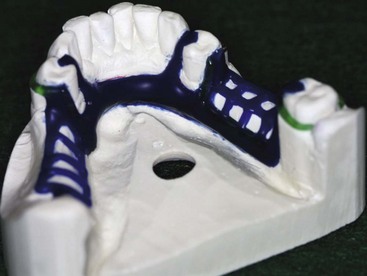
Figure 18-14 Lingual view of the pattern shown in Figure 18-11. The lingual bar major connector rigidly connects components cross-arch. The minor connector for resin retention on the left has buccal and lingual struts to allow unimpeded tooth placement. The tapered proximal plate on the right (tooth #28) is thicker on the lingual and thinner on the buccal, to allow close placement of the buccal surface of the denture tooth to #28. The finish line of the modification space is positioned below adjacent tooth gingival margins to allow normal lingual contouring of the resin matrix.
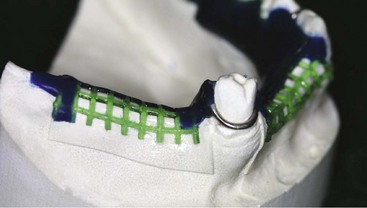
Figure 18-15 Another example of a wax pattern for a mandibular framework. A wrought wire has been adapted to tooth #27. The clasp demonstrates an appropriate circlet shape, allowing maximum length. The circlet shape also allows the undercut to be approached from below; this improves retention—push retention is more efficient than pull retention. Ridge relief is evident beneath the resin minor connector, and the proximal plate housing the wire has been waxed with bulk to facilitate casting. The plate may require adjustment at a later time.
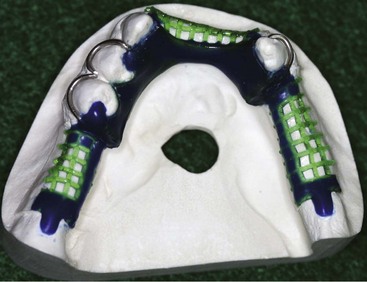
Figure 18-16 Same pattern as shown in Figure 18-15. Includes a lingual plate major connector design. The external finishing line at the anterior modification space is lingual to the anticipated tooth and resin position, allowing a natural contour to be developed in the completed prosthesis. The posterior denture base minor connector patterns have been reinforced with additional wax to add stiffness at the junction with the proximal plate and major connector. Because of the potential for repeated flexure in this region under function, such reinforcement is critical to long-term success with patterns such as this. Because the wrought-wire retainers are not cast, it is important that they be contoured to contact the teeth as accurately as possible, as shown.
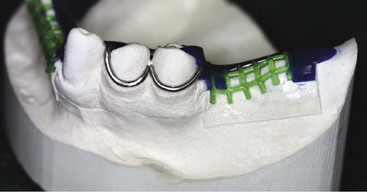
Figure 18-17 Buccal view of the pattern shown in Figure 18-16. Double wrought wires are contoured to follow the ledges, the tissue stop at the posterior of the ridge relief is shown, and an occlusal rest distal of #20 will require finishing following completion of casting.
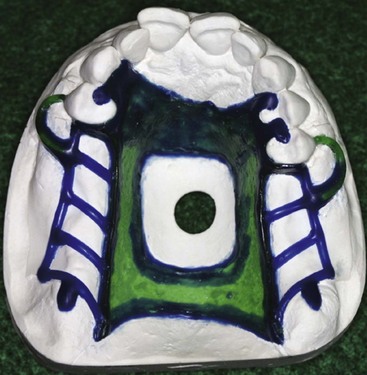
Figure 18-18 Occlusal view of the maxillary refractory cast with a wax pattern. An anatomic replica has been used to develop an anterior-posterior palatal strap major connector with beading evident at the anterior, posterior, and internal edges. Bilateral, tapered I-bar retainers have been waxed as extensions of the resin-retaining minor connectors, and double rests were incorporated into the design on each side.
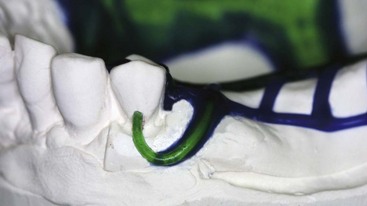
Figure 18-19 Buccal view of right I-bar shown in Figure 18-18. The tissue index is demonstrated gingival to the proximal plate, tissue relief is provided beneath the denture base minor connector, and the I-bar shows a taper as it approaches the mid-buccal 0.01-inch undercut.
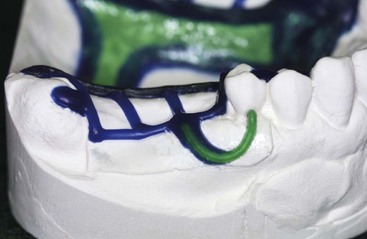
Figure 18-20 Buccal view of I-bar opposite to that shown in Figure 18-19. Many of the same features seen in Figure 18-19 are evident in this example. The tissue stop distal to the ridge relief is shown and the palatal external finishing line continues distal to the junction of the hard and soft palate (which is the terminus of the posterior palatal strap).
Attaching Wrought-Wire Retainer Arms by Soldering
Wrought-wire retainers may be attached to a removable partial denture framework after it has been cast and finished (Figures 18-21 and 18-22). The soldering procedure may be accomplished by electric soldering or by a direct-heat method with an oxygen-gas flame. With either method, care must be taken to use compatible alloys, appropriate solder, and flux in conjunction with the careful application of controlled heat.
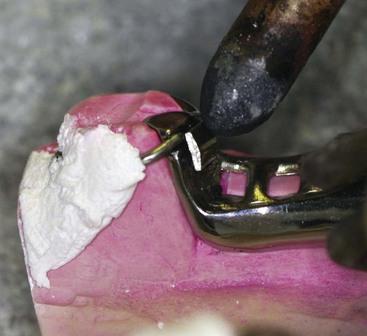
Figure 18-21 Wrought wire can be soldered to cast frameworks as an alternative method to incorporation in the wax pattern and casting procedure. Electric soldering is a common method for soldering and does not require heating of the entire framework. Following preparation of the minor connector where the wire will be soldered, an 18-gauge, round, wrought-wire clasp is carefully adapted and then is secured to the framework and the duplicate stone cast with the use of refractory investment. In this situation, a distolingual molar undercut will be used bilaterally for retention. The flux is placed at the proximal plate, followed by placement of sufficient solder, and the electric heat element tip is placed into contact with the solder while the frame is grounded at another location.
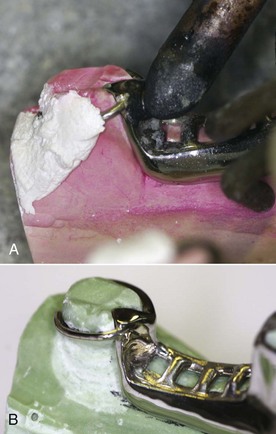
Figure 18-22 A, An electric soldering technique has been used to solder the wrought wire. The solder has flowed into the space between the framework and the wire as well as around the wire to ensure its secure attachment to the framework. B, Finished and polished wrought-wire retainer.
Students are encouraged to review the Chapter 12 discussion of the selection of metal alloys to enhance their understanding of the properties of solder, flux, the effects of heat on metal alloys, and the necessity for quality control in soldering procedures.
Waxing Metal Bases
A technique for forming the retentive framework for the attachment of acrylic-resin bases has been given. Two basic types of metal bases may be used instead of the resin base. The advantages of cast metal bases in preference to acrylic-resin bases have been discussed in Chapter 9. The type of base to be used must be determined before blockout and duplication, so that the relief over each edentulous ridge may be provided or eliminated as required.
For an acrylic-resin base, relief for the retentive frame must be provided. No relief over the residual ridge is used for a complete metal base. For a partial metal base, the junction between metal and acrylic-resin must be clearly defined by trimming the relief along a definite, previously determined line.
One type of metal base is the complete base with a metal border to which tube teeth, cast copings, or an acrylic-resin superstructure may be attached. If a porcelain or plastic tube or grooved teeth are used, they must be positioned first and the pattern waxed around them to form a coping. The teeth are then attached to the metal base by cementation or, with the use of resin teeth, are attached with additional acrylic-resin under pressure, a so-called pressed-on method of attaching acrylic-resin teeth to a metal base. Another method of attaching teeth is to wax the base to form a coping for each tooth, either by carving recesses in the wax or by waxing around artificial teeth. Rather than attaching a stock tooth, the full tooth may be waxed into occlusion, the base invested, and the wax patterns replaced with heat-polymerized acrylic-resin. This method permits some variation in the dimension and form of the supplied teeth that is not possible with stock teeth. It is particularly applicable to abnormally long or short spaces or when a stock tooth of desired width is not available. With modern cross-linked acrylic-resins, such processed teeth are fairly durable; however, the addition of gold occlusal surfaces is an option.
When artificial teeth are to be arranged to occlude with an opposing cast or an opposing template, the metal base must be formed for attachment of the tissue-colored denture resin supporting the teeth. This is the most common method of attaching teeth to a metal base. The wax pattern for the base is formed from one thickness of 24-gauge casting wax, which is then reinforced at the border and forms the retention of the acrylic-resin superstructure. Because metal borders are more difficult to adjust than acrylic-resin, they are usually made somewhat short of the area normally covered with an acrylic-resin base. Also, because border thickness adds objectionable weight to the denture, it is made with only a slight border roll. This is one disadvantage of the complete metal base, because the border accuracy of the impression registration cannot be used to fullest advantage, and contouring of facial and lingual surfaces cannot be as effective as with an acrylic-resin base, in which added bulk can sometimes be used to advantage.
The border is first penciled lightly on the investment cast, and then the 24-gauge sheet casting wax is smoothly adapted. Considerable care must be taken not to stretch and thin the sheet wax in adapting it to the cast. To prevent wrinkling, the wax should be adapted in at least two longitudinal pieces and joined and sealed together at the ridge crest. The wax is then trimmed along the penciled outline with a warm, dull instrument to prevent scoring of the investment cast.
A single piece of 14-gauge round wax is now adapted around the border over the sheet wax. With a hot spatula, the round wax must be sealed to the cast along its outer border. Sufficient wax is flowed onto the round wax to blend it smoothly into the sheet wax, thus completing a border roll. The inner half of the round wax form remains untouched. Wax is added when needed to facilitate carving without trimming the original 24-gauge thickness. The result should be a rounded border that blends smoothly into the sheet wax.
The boxing for the resin, which will in turn support the artificial teeth, is now added, again with 14-gauge round wax. The proposed outline for the boxing is identified by lightly scoring the sheet wax. On this scored line, the 14-gauge round wax is adapted, thus forming the outline of the boxing.
With additional wax, the ditch between the sheet wax and the outer border of the round wax is filled in and blended smoothly onto the sheet wax. This is done in the same manner as the border, with sufficient wax added to allow for smoothing and carving. As was mentioned previously, the pattern should not be flamed or polished with a cloth. Instead the pattern must be smoothed by carving.
The result thus far should be a pattern reinforced at the border and at the boxing and slightly concave in between, with some of the original sheet wax exposed. The inside of the boxing is not sealed to the sheet wax, thus leaving a slight undercut for the attachment of the acrylic-resin. With a sharp blade, the margins of the boxing are then carved to a knife-edge finishing line. With the backside of the large end of the No. 7 wax spatula, this margin may be lifted slightly, further deepening the undercut beneath the finishing line.
In addition to the undercut finishing line, retention spurs, loops, or nailheads are added for retention of the acrylic-resin to be added later. Spurs are usually made of 18-gauge or smaller round wax attached at one end only at random acute angles to the sheet wax. Loops are small-gauge round (wax, resin, or metal) circles attached vertically or horizontally with space beneath for the acrylic-resin attachment. Nailheads are made of short pieces of 18-gauge round wax attached vertically to the sheet wax, with the head flattened by a slightly warmed spatula. Any method of providing retention is acceptable if it permits positive attachment of the acrylic-resin and will not interfere with the placement of artificial teeth.
A metal base waxed as described will provide optimum contours with a minimum of bulk and weight, and with adequate provision for the attachment of artificial teeth to the metal base. If properly designed, the more visible portions of the metal base will be covered with the acrylic-resin supporting the supplied teeth.
Spruing, Investing, Burnout, Casting, and Finishing of the Removable Partial Denture Framework
Brumfield has listed factors that influence the excellence of a dental casting (Box 18-1).
Spruing
Brumfield described the function of sprues as follows: The sprue channel is the opening that leads from the crucible to the cavity in which the framework is to be cast. Sprues have the purpose of leading the molten metal from the crucible into the mold cavity. For this purpose, they should be large enough to accommodate the entering stream and of the proper shape to lead the metal into the mold cavity as quickly as possible, but with the least amount of turbulence. Sprues have the further purpose of providing a reservoir of molten metal from which the casting may draw during solidification, thus preventing porosity caused by shrinkage. Spruing of the cast may be roughly summarized in the following three general rules.
The configuration of the sprues, from their point of attachment at the crucible until they reach the mold cavity, may be influential in reducing turbulence. One of the more important sources of difficulty in casting is the entrapment of gases in the mold cavity before they have a chance to escape. If the sprue channels contain sharp right-angle turns, great turbulence is induced, which is calculated to entrap such gases and so lead to faulty castings. Sprue channels should make long radii and easy turns, and should enter the mold cavity from a direction designed to prevent splashing at this point.
As was previously stated, the sprues should be attached to the bulky points of the mold pattern. If two bulky points exist with a thin section between them, each of the bulky spots should be sprued. The points of attachment should be flared out and local constrictions avoided. If this practice is followed, the sprue, which is bulky enough to freeze after the case framework has frozen, will continue to feed molten metal to the framework until it has entirely solidified. The intent is to provide sound metal in the casting proper with all shrinkage porosity forced into the sprue rod, which is later discarded.
The laboratory procedure for multiple spruing is essentially the same for all mandibular and maxillary castings, except those with a palatal plate. Typical examples are illustrated in Figures 18-23 and 18-24.
Figure 18-23 Mandibular cast framework with sprue intact, showing three 8-gauge sprues attached to the lingual bar. If one is concerned about completely filling distal extension base minor connectors, 12-gauge sprues can be attached to the minor connector.
Figure 18-24 For a maxillary framework, multiple 8-gauge sprues or a single main sprue located posteriorly can be used. When a single main sprue is used, additional sprues can feed critical regions for casting completeness.
Two basic types of sprues are used: multiple and single. Most removable partial denture castings require multiple spruing, with the use of 8- to 12-gauge round wax shapes for main sprues and 12- to 18-gauge round wax shapes for auxiliary sprues. Occasionally, however, a single sprue is preferred for cast palates and cast metal bases for the mandibular arch when these are used as complete denture bases. With removable partial dentures, the use of a single sprue is limited to those maxillary frameworks in which—because of the presence of a palatal plate—it is impossible to locate multiple sprues centrally. In such situations, the single sprue may be used advantageously. A single sprue must be attached to the wax pattern so the direction of flow of the molten metal will be parallel to the long axis of the single sprue. In some instances, the investment cast may have to be cut away anteriorly to make room for the attachment of the sprue; in others, the sprue may be attached posteriorly. One disadvantage of using a single sprue for large castings is that an extra long investment ring must be used.
Some important points to remember in multiple spruing are as follows:
Investing the Sprued Pattern
The investment for a removable partial denture casting consists of two parts: the investment cast on which the pattern is formed, and the outer investment surrounding the cast and pattern (see Figure 18-41). The latter is confined within a metal ring, which may or may not be removed after the outer investment has set. If the metal ring is not to be removed, it must be lined with a layer of cellulose, asbestos substitute, or ceramic fiber paper to allow for both setting and thermal expansion of the mold in all directions.
The investment must conform accurately to the shape of the pattern and must preserve the configuration of the pattern as a cavity after the pattern itself has been eliminated through vaporization and oxidation. Brumfield has listed the purposes of the investment as follows:
The investment for casting gold alloys is a plaster-bound silica material, so compounded that the total mold expansion will offset the casting shrinkage of the alloy, which varies from 1% to 1.74% (the highest figure being the shrinkage of pure gold). Generally, the higher the percentage of gold in the alloy, the greater is the contraction of the casting on solidifying.
Only one chromium-cobalt alloy has a sufficiently low melting temperature to be cast into a plaster-silica investment mold. According to Peyton, for the other alloys that have a higher melting temperature, an investment that contains quartz powder held together by an ethyl silicate or sodium silicate binder is generally used. Expansion to offset casting shrinkage for chromium-cobalt alloys is accomplished primarily through thermal expansion of the mold and must be sufficient to offset their greater casting shrinkage, which is on the order of 2.3%. For this reason, the casting ring is usually removed after the mold has hardened to allow for the greater mold expansion necessary with these alloys. Because the investments for chromium-cobalt alloys are generally less porous, there is greater danger that gases will be entrapped in the mold cavity by the molten metal. Spruing must be done with greater care, and in some instances, provision for venting the mold is necessary to prevent defective castings.
Step-by-Step Procedure
The technique for applying the outer investment is usually referred to as investing the pattern. Actually the cast on which the pattern is formed is part of the investment also. This investment technique is presented in Figures 18-25 through 18-27.
Burnout
The burnout operation serves three purposes: it drives off moisture in the mold; it vaporizes and thus eliminates the pattern, leaving a cavity in the mold; and it expands the mold to compensate for contraction of the metal on cooling.
For the investment to heat uniformly, it should be moist at the start of the burnout cycle. Steam will then carry the heat into the investment during the early stages of the burnout. Therefore if the investment is not burned out on the same day that it is poured, it should be soaked in water for a few minutes before it is placed in the burnout furnace.
Just before it is placed in the furnace, the mold should be placed in the casting machine to balance the weight against the weight of the mold. At this time, the mold should be properly oriented to the machine and its crucible, and a scratch line should be made at the top for later repositioning of the hot mold.
The mold should be placed in the oven with the sprue hole down and the orientation mark forward. Burnout should be started with a cold oven, or nearly so. Then the temperature of the oven should be increased slowly to a temperature recommended by the manufacturer. This temperature should be maintained for the period recommended by the manufacturer to ensure uniform heat penetration. More time must be allowed for plastic patterns, particularly palatal anatomic replica patterns. It is important that the peak temperature recommended by the manufacturer not be exceeded during the burnout period. (When a high-heat investment is used, follow the manufacturer’s instructions as to burnout temperature.)
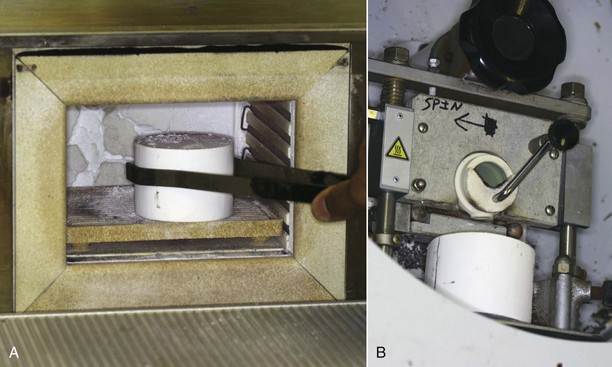
Casting
The method of casting will vary widely with the alloy and equipment used. All methods use force to quickly inject the molten metal into the mold cavity. This force may be centrifugal or air pressure; the former is more commonly used. In any case, too much or too little force is undesirable. If too little force is used, the mold is not completely filled before the metal begins to freeze. If too much force is used, excessive turbulence may result in the entrapment of gases in the casting. With centrifugal casting machines, this is regulated by the number of turns put on the actuating spring.
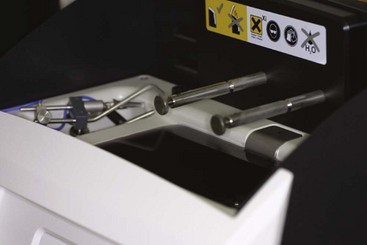
The metal may be melted with a gas-oxygen blowtorch or by an electric muffle surrounding the metal. In some commercial casting procedures and in some dental laboratories, the induction method may be used (Figure 18-28); this provides a rapid and accurate method of melting the metal. Currently available casting machines include those that are electrically controlled to heat alloys to a specified temperature and to release the molten metal at precisely the correct casting temperature. These machines are relatively expensive and are primarily located in commercial laboratories or institutions where casting volume is high.
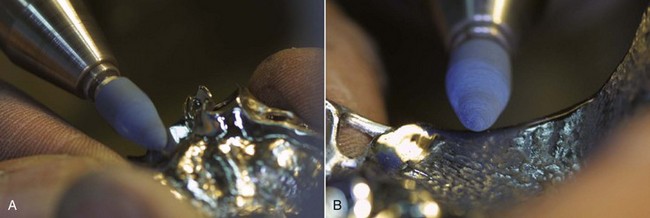
Removing the Casting From the Investment
Chromium-cobalt alloys are usually allowed to cool in the mold, are divested (Figure 18-29), and are not cleaned by pickling. Finishing (Figure 18-30) and polishing (Figure 18-31), which are done with special high-speed equipment, require technical skill in the use of bench lathes. Just before they are polished (high-shine), chromium-cobalt castings are electropolished; this is a controlled deplating process (Figure 18-32).
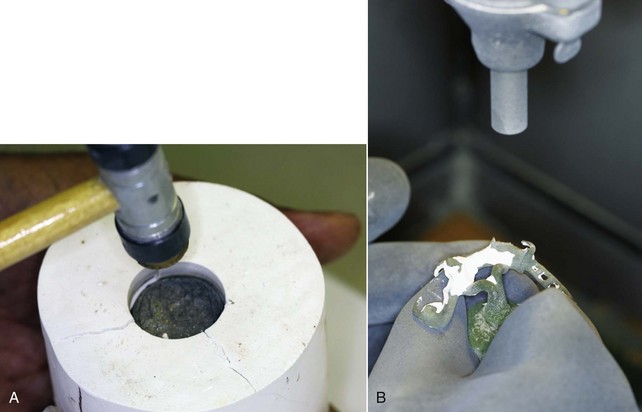
Figure 18-29 A, Divesting of the framework involves bulk removal of the investment. B, The framework is divested with aluminum oxide.
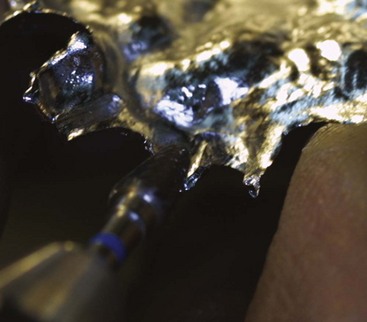
Figure 18-30 Gross finishing is accomplished with metal finishing burs, abrasive stones, or sintered diamonds (except at contact areas).
Finishing and Polishing
Some authorities hold that the sprues should not be removed from the casting until most of the polishing is completed. Although it is true that this policy may prevent accidental distortion, it is difficult to adhere to and is therefore somewhat impractical. Instead, reasonable care should be exercised to prevent any distortion resulting from careless handling. A specific precaution is that a cast clasp arm should not be indiscriminately polished and then pliered into place. The waxing should have been done in such a manner that a minimum of finishing is necessary and the intended relationship of the clasp to the abutment is maintained (Figure 18-33).
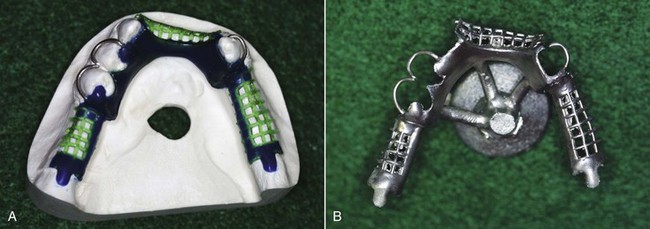
Figure 18-33 Attention to detail in forming the wax pattern not only ensures the quality of the framework, it also saves time in finishing and polishing the resultant casting. A, Wax pattern of the mandibular framework, which incorporates three wrought-wire retainers. B, The same framework following casting shows a smooth casting surface and attention to detail regarding casting completeness and clasp form.
Actual polishing procedures may vary widely according to personal preference for certain abrasive shapes and sizes. However, the following several rules for finishing the casting are important:
Making Record Bases
Bases for jaw relation records should be made of materials that possess accuracy or those that can be relined to provide such accuracy. Relining may be accomplished by seating the previously adapted base onto the tinfoil or lubricant in the cast with an intervening mix of zinc oxide–eugenol paste or with autopolymerizing acrylic-resin. Some use has been made of mercaptan and silicone impression materials for this purpose, but the wisdom of using an elastic lining material for jaw relation record bases is questionable. When rigid setting materials are used for this purpose, any undercuts on the cast must be blocked out with wax or clay to facilitate their removal without damage to the cast.
The ideal jaw relation record base is one that is processed (or cast) to the form of the master cast, becoming the permanent base of the completed prosthesis. Cast metal bases for complete or removable partial dentures offer this advantage, as do acrylic-resin bases that are processed directly to the master cast, thus becoming the permanent denture base. When undercuts are present, the master cast will be destroyed during removal of the base. Then existing undercuts must be blocked out inside the denture base before dental stone is poured into it to make a cast for articulator mounting. A second cast, which includes the undercuts, must be poured against the entire base to support it when the overlying acrylic-resin is processed. With both the processed base and the overlying acrylic-resin, some care must be taken to prevent visible junction lines between the original acrylic-resin base and the acrylic-resin that supports the teeth and establishes facial contours.
Some autopolymerizing acrylic-resin materials are sufficiently accurate for use as jaw relation bases. These are used with a sprinkling technique, which, when properly done, permits formation of a base that compares favorably with a processed base or a visible light polymerized base. A material must be selected that will polymerize in a reasonable time (usually a 12-minute monomer) and will retain its form during the sprinkling process. Because polymerization with typical shrinkage toward the cast begins immediately, alternate addition of monomer and polymer in small increments results in reduced overall shrinkage and greater accuracy. Another option is to use visible light-cured (VLC) denture base materials, which employ a technique similar to that described in Chapter 15 for making custom impression trays.
Technique for Making a Sprinkled Acrylic-Resin Record Base
The technique for sprinkling a record base will be given here because the techniques used for the VLC impression tray and record bases were presented in Chapter 15 and elsewhere in this chapter. Some blockout and lubrication of the cast are necessary (Figure 18-34). Relief of undercut areas on the cast is best accomplished with a water-soluble modeling clay or baseplate wax. Modeling clay is easily formed and shaped on the cast and is easily removed from the cast or the base with a natural-bristle toothbrush under warm running water. Wax must be flushed off the cast with hot water and possibly removed from the inside of the base before use.
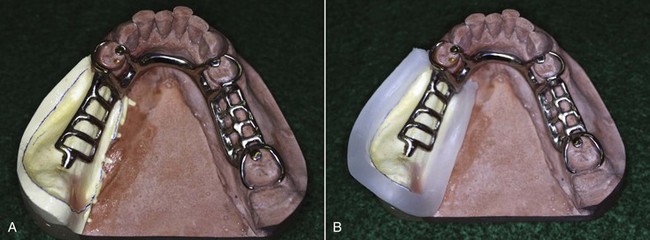
Figure 18-34 A, Preparation of Kennedy Class I, modification 1 distal extension for sprinkle-on record base technique. Cast undercuts are blocked out with wax, and the cast is coated with separator. B, Peripheral extent of the base (the same as peripheral extent of the prosthesis captured during border molding and an impression-making procedure for this altered cast) is outlined with rope wax to contain resin.
Bases for jaw relation records must have maximum contact with the supporting tissue. The accuracy of the base will proportionate to the contact provided to the total area of intimate tissue. Those areas are most often undercut and require blockout of the distolingual and retromylohyoid areas of the mandibular cast, the distobuccal and labial aspects of the maxillary cast, and, frequently, small multiple undercuts in the palatal rugae. These areas and any others are blocked out with a minimum of clay or wax, to obliterate as little of the surface of the cast as possible. A close-fitting base may then be made that will have the necessary accuracy and stability and yet may be lifted from and returned to the master cast without abrading it.
The cast and the blockout or relief are coated with a separating medium. Following this, the cast is wet with the monomer from a dropper bottle. After the surface has been wetted with the monomer, the polymer is sprinkled or dusted onto the wet surface until all the monomer has been absorbed. Sprinkling is best accomplished with a large-mouthed bottle with a single hole in the lid near the rim. This facilitates placement of the polymer without excess in any one area. A flexible bottle with a suitable applicator tip also may be used. The objective should be to apply polymer uniformly over the entire ridge rather than allowing excess to accumulate at the border to be trimmed later. An autopolymerizing acrylic-resin material must be used that will retain its form during the sprinkling procedure without objectionable flow into low areas (Figures 18-35 and 18-36).
Figure 18-35 The cast is wetted with monomer, and polymer resin is added in increments to uniformly control thickness. Use of a typical eyedropper may be difficult if the monomer addition cannot be controlled. Use of peripheral rope wax helps in this regard.
Figure 18-36 The record base is complete when a uniform thickness is created that provides strength and accuracy. The completed unpolymerized resin is covered to ensure polymerization without loss of surface monomer.
Once the polymer has been sprinkled in slight excess, the monomer is again added. Flooding must be prevented; therefore the monomer must be directed over the entire surface gradually until the polymer has just absorbed the monomer. A few seconds delay before the addition of excess monomer will allow the mass to reach a tacky consistency and will prevent it from flowing when more monomer is added. Then the monomer may be added in excess and is immediately absorbed by the application of more polymer, as before. This process is repeated selectively until a uniform layer has been built up that is just thick enough so that none of the underlying cast or relief may be seen.
The final step in sprinkling is the addition of monomer sufficient to leave a wet surface. Immediately, the cast should be placed in a covered glass dish or covered with an inverted bowl. This permits final polymerization in a saturated atmosphere of monomer and prevents evaporation of surface monomer. The cast should not be placed in water nor any attempt made to accelerate polymerization. Slow polymerization is necessary so that shrinkage toward the cast will occur. Only then will overall shrinkage be negligible and accuracy of fit ensured. This is of little consequence in making an impression tray, but it is most essential in making a sprinkled acrylic-resin base.
Although polymerization will be about 90% complete within an hour and an impression tray may even be lifted within a half-hour, it is critical that a sprinkled denture base should be left overnight before it is separated from the cast. It should be lifted dry or under lukewarm tap water. It should not be immersed in hot water because some warping may occur.
A sprinkled acrylic-resin base made with the precautions outlined previously will retain its accuracy for days, or even for an indefinite period, similar to a heat-polymerized resin base (Figure 18-37) or a VLC base.
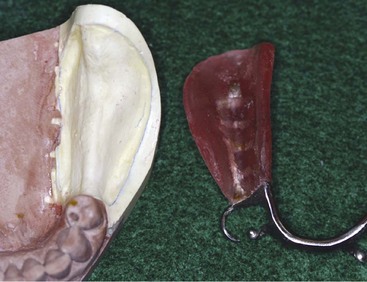
Figure 18-37 Once completely polymerized, the record base and the framework can be removed from the cast, finished, and prepared for addition of the record base. The tissue side of the record base (intaglio) should possess similar accuracy and stability as are seen with the completed prosthesis. Such a record base provides a significant advantage for jaw relation records when minimal teeth remain and ridge configurations along with extensive base areas place a premium on base accuracy and stability.
Occlusion Rims
It has been explained that jaw relation records for removable partial dentures always should be made on accurate bases that may be part of the denture casting itself or may be attached to it in exactly the same relation as the final denture base will be. Further, it has been stated that although use of the final denture base is best for jaw relation records, a sprinkled or corrected acrylic-resin base may be used satisfactorily. In any case, accuracy of the base supporting a maxillomandibular record must be ensured before the function of occlusion rims is considered.
Occlusion rims may be made of several materials. The material that is most commonly used to establish static occlusal relationships is the hard baseplate wax rim. However, use of a wax occlusion rim can be inaccurate when the occlusal portion of the rim is mishandled. When some soft material that sets to a rigid state, such as impression plaster or bite registration paste, is used in conjunction with wax rims to record static occlusal relations, many of the errors common to wax rims are eliminated—provided some space for the material exists between the occlusion rims, the opposing teeth, or both, at the desired vertical dimension to be recorded. Registration made on wax occlusion rims with the use of a wax registration material must be handled carefully and mounted immediately.
Occlusion rims for static jaw relation records should be so shaped that they represent the lost teeth and their supporting structures (Figure 18-38). An occlusion rim that is too broad and is extended beyond where prosthetic teeth will be located is inexcusable. Such rims will substantially alter the shape of the palatal vault and the arch form of the mandibular arch, will crowd the patient’s tongue, will have an unwelcome effect on the patient, and will offer more resistance to jaw relation recording media than will a correctly shaped occlusion rim.
Figure 18-38 Occlusion rims are added to allow recording of jaw relation records. Placement of the wax record is dictated by the opposing tooth position and the supporting ridge character. When possible, the occlusion rim should allow recording of the jaw position within the primary bearing area of the ridge.
Modeling plastic (compound) has several advantages and may be used rather than wax for occlusion rims. It may be softened uniformly by flaming, yet when chilled it becomes rigid and sufficiently accurate. It may be trimmed with a sharp knife to expose the tips of the opposing cusps to recheck or position an opposing cast into the record rim. Opposing occlusion rims of modeling plastic may be keyed with greater accuracy than opposing wax rims. Preferably, however, even those should be trimmed short of contact at the vertical dimension of occlusion, and bite registration paste should be interposed for the final record. As with wax rims, an adjustable frame may be used to support the final record.
Occlusion rims made of extra hard baseplate wax or modeling plastic may be used to support intraoral central bearing devices, intraoral tracing devices, or both. Because of its greater stability, modeling plastic is preferable for this purpose when the edentulous situation permits the use of flat plane tracings. An example of such a situation occurs when an opposing complete denture is made concurrently with the removable partial denture. In such a situation, modeling plastic occlusion rims provide greater stability than wax rims, with corresponding improvement in the predictable accuracy of such a jaw relation record. Although sealing opposing occlusion rims or using clips for complete denture jaw relation records may be acceptable, particularly for an initial articulator mounting, the existence of a removable partial denture framework makes this practice hazardous. The framework with attached base should be seated accurately on its cast before the opposing cast is repositioned in occlusion to it, because it is necessary for the dentist to be able to see the removable partial denture framework is in its designed terminal relation to the supporting teeth before articulating the casts.
Occlusion rims for recording functional, or dynamic, occlusion must be made of a hard wax that can be carved by the opposing dentition. This method, outlined in Chapter 17, presumes that the opposing arch is intact or has been restored. Functional occlusion records cannot be made by this method when both arches are restored simultaneously. Rather, an opposing arch must be as intact as the treatment plan calls for, or it must be restored by whatever prosthetic means the situation dictates. Opposing removable partial dentures or an opposing complete denture may be carried concurrently up to the final occlusal record. One denture is then completed and the functional record is made in opposition to it. Often this necessitates that all opposing teeth are articulated first in wax to establish optimum ridge relations and the correct occlusal plane. One denture is then carried to completion, and the teeth that remain in wax on the opposing denture are removed while the functional occlusal record is being made.
The laboratory steps required for establishing an occlusion with the use of functional occlusal records were described in Chapter 17; however, more detail is provided in the following section. Some inlay waxes are used for this purpose because they can be carved by the opposing dentition, and because most of them are hard enough to support occlusion over a period of hours or days. A wax for recording functional crown and bridge occlusion, because it is established entirely in the dental office, is selected on the basis of how well it may be carved by the opposing dentition in a relatively short time. Therefore a softer wax may be used than is required for the recording of occlusal paths over 24 hours or longer. For this latter purpose, hard inlay wax seems to satisfy best the requirements for a wax that is durable yet capable of recording a functional occlusal pattern. This wax is packaged in the form of sticks. A layer of hard, sticky wax is first flowed onto the surface of the denture base. Two sticks of the inlay wax are then laid parallel along the longitudinal center of the denture base and are secured to it with a hot spatula. This is the only preparation needed before the dental appointment. Because neither the height nor the width of the occlusion rim can be known in advance, and because deep warming of a chilled wax rim is difficult, the rim is not completed before the appointment.
With the patient in the chair, a hot spatula is inserted into the crevice between the two sticks of wax, making the center portion fluid between two supporting walls. Some transfer of heat to the supporting walls occurs, resulting uniform softening of the occlusion rims. The patient is asked to close into this wax rim until the natural teeth are in contact; this establishes both the height and the width of the occlusion rim. Wax is added or carved away as indicated, and the patient is asked to make lateral excursions. Any excess wax is then removed, and any unsupported wax is supported by addition. Finally, wax is added to increase the occlusal vertical dimension sufficiently to allow for (1) denture settling, (2) changes in jaw relations brought about by the reestablishment of posterior support, and (3) carving in all mandibular excursions. When sufficient height and width have been established to accommodate all excursive movements, the patient is given instructions for chewing in the functional record and is then dismissed.
Although this discussion has been included in the chapter on laboratory procedures, the entire procedure of establishing occlusion rims for recording functional occlusion should be considered a chairside procedure rather than a laboratory procedure. It is necessary that the purpose of a functional occlusal record be clearly understood, so that subsequent laboratory steps may be accomplished in such a manner that the effect of the occlusal record may be reproduced on the finished denture.
Making a Stone Occlusal Template from a Functional Occlusal Record
After final acceptance of the occlusal record developed by the patient, the effectiveness of this method for establishing functional occlusion on the removable partial denture will depend on how accurately the following procedures are carried out. For this reason, it will be given as a step-by-step procedure. If the base of the master cast (or processing cast) has not been keyed previously, do this before proceeding. Reduce the thickness and width of the base if it is so large that difficulty will be encountered in flasking. The base may not be reduced after removal from the articulator because the mounting record would be lost.
Keying may be done in several ways, but a method whereby the keyed portions are visible on the articulator mounting eliminates some possibility of remounting error. According to the preferred method, form a 45-degree bevel on the base of the cast by hand or with the model trimmer, and then add three V-shaped grooves on the anterior and posterior aspects of the base of the cast at the bevel. The bevel serves to facilitate reseating of the cast on the articulator mounting, and the mounting surfaces are made still more definite by the triangular grooves. Once placed at the beveled margin, the triangular grooves are visible at all times, and any discrepancy may be clearly seen.
Inspect the underside of the cast framework and the denture bases, removing any particles of wax or other debris. Similarly, inspect and clean the master cast of any particles of stone, wax, or blockout material, or any other debris that might prevent the casting from being seated accurately on it.
Now seat the denture framework on the cast in its original terminal position. This is the position that is maintained by securing it with sticky wax with all occlusal rests seated while the trial denture base is made. It is also the position that the casting assumed in the mouth while the occlusal record was being made, and that must be duplicated on return of the denture framework to the master cast. While holding the framework in this terminal position, secure it again with sticky wax. (If a processing cast is used in place of the master cast, the denture base will have been made on that cast, and the same precautions used in returning the framework to its original position apply.)
With the denture framework and the occlusal record in position, form a matrix of clay around the occlusal record to confine the hard stone, which will form the stone occlusal template. The clay matrix is the same for a metal or electroplated surface as for the wax record. The clay matrix should rise at a 45-degree angle from the buccal and lingual limits of the occlusal registration. Then arch the clay or a sheet of wax across from one side to the other, forming a vault that will permit lingual access when the teeth are articulated.
Leave the occlusal surfaces of a processing cast exposed so that they may act as vertical stops. This will serve to maintain the vertical relation in the articulator. Unless such stone-to-stone stops are used, the technician may alter the vertical relation in the articulator, accidentally or otherwise. Any change in vertical relations is incompatible with a concept of dynamic conclusion because the occlusal pattern is directly related to the degree of jaw separation. Although it may be true that occlusal vertical dimension may be changed when casts are mounted in relation to the opening axis of the mandible, as long as natural cusps remain to influence mandibular movement, the occlusal vertical relation established with a functional occlusal record must not be changed in the articulator.
Cover the surfaces of the adjacent abutment teeth left exposed with sodium silicate, microfilm, or some other separating medium to ensure separation of the stone vertical stops. If the wax record has not been electroplated, use a hard dental stone to form the opposing template. This may be an improved stone, but the use of a stone die material is preferred. Only the occluding surface needs to be poured in the harder stone, with a less costly laboratory stone used to back it up. If this is done, add the second layer to the first before the former takes its initial set to prevent any possibility of accidental separation between the two materials.
Vibrate the stone only into the wax registration and against the stone stops. Pile on the rest of the stone, and leave it uneven to facilitate attachment to the mounting stone. Attach the occlusal template to the articulator without provision for removal or remounting because only the working cast needs to be keyed for remounting.
After the stone template has set, attach the occluded casts to both arms of the articulator before separating the casts. The type of articulating instrument used is of little importance because all eccentric positions are recorded on the template, and whatever instrument is used acts purely as a simple hinge or a tripod. Therefore any laboratory articulator or tripod may be used.
Casts should be attached to the articulating instrument with stone rather than with plaster. Mounting stones are available that have been especially formulated and prepared to minimize the setting expansion inherent in most gypsum products. The least amount of setting expansion of the mounting medium is most desirable to maintain the intended relationship of the opposing casts.
One must remember which arch will be movable as a working cast, and the articulator mounting should be made accordingly. For example, for a mandibular denture, the template is attached to the upper arm of the articulator. For a maxillary denture, the template is mounted upside down on the lower arm. The keyed base of the working cast attached to the opposing arm must be coated with a light coat of microfilm, mineral oil, or petroleum jelly to facilitate its separation from the mounting stone.
After the mounting has been completed, separate the casts and remove the clay. The template, with its mounting, may be removed from the articulator if a mounting ring or mounting stud permits; otherwise trimming must be done on the articulator. With a pencil, outline the limits of the occlusal registration and any excess stone around its borders. With a knife, trim the vertical stops to a sharp edge on the buccal surface where they contact the working cast.
Remove any overhanging stone, leaving the occluding template and vertical stops clearly visible and accessible. Remove the wax registration before arranging artificial teeth to the occluding template.
Arranging Posterior Teeth to an Opposing Cast or Template
Whether posterior teeth are to be arranged to occlude with an opposing cast or with an occlusal template, the denture base on which the jaw relation record has been made must first be removed and discarded unless metal bases are part of the denture framework, or heat-polymerized acrylic-resin bases were used. This statement is based on the assumption that where an adjustable articulator has been used to develop the occlusion, the trial dentures have been evaluated, the articulator mounting has been proved, and the articulator has been programmed for eccentric positions. Because record bases that are entirely tissue supported have no place in recording occlusal relations for removable partial dentures, the bases must be attached to the denture framework. Metal bases that are part of the prosthesis present no problem. The teeth may be arranged in wax or replaced on the metal base, depending on the type of posterior tooth used, and these must be occluded directly to the opposing cast or template.
Unless occlusal relations are recorded on final acrylic-resin bases, autopolymerizing acrylic-resin bases attained by the sprinkling method or VLC bases are the most accurate and stable of bases that may be used for this purpose. (An alternate method is relining of the original impression bases, thus accomplishing the same purpose.) Although static relations may be recorded successfully on corrected bases, functional registrations are best accomplished on new acrylic-resin bases made for that purpose. In either situation, the denture cannot be completed on these bases; neither can the bases be removed conveniently from the retentive framework during the boil out after flasking. Therefore the metal framework must be lifted from the cast, and the original record base removed by flaming its underside. Care must be taken not to allow the acrylic-resin to burn, or the cast framework will become discolored with carbon. The framework is repolished and is then returned to its original position on the master cast and secured there with sticky wax before the artificial teeth are arranged.
Posterior Tooth Forms
Posterior tooth forms for removable partial dentures should not be selected arbitrarily. One should bear in mind that the objective in removable partial denture occlusion is harmony between natural and artificial dentition. Whether the teeth are arranged to occlude with an opposing cast or to an occlusal template, they should be modified to harmonize with the existing dentition. In this respect, removable partial denture occlusion may differ from complete denture occlusion. In the latter case, posterior teeth may be selected and articulated according to the dentist’s concept of what constitutes the most favorable complete denture occlusion, whereas removable partial denture occlusion must be made to harmonize with an existing occlusal pattern. Thus the occlusal surfaces on the finished removable partial denture may bear little resemblance to the original occlusal surfaces of the teeth as manufactured.
Artificial tooth forms should be selected to restore the space and fulfill the esthetic demands of the missing dentition. Manufactured tooth forms usually require modification to satisfactorily articulate with an opposing dentition. The original occlusal form, therefore, is of little importance in forming the posterior occlusion for the removable partial denture.
The posterior teeth may be made of porcelain or resin (including all resin forms—composite, interpolymer network, cross-link, double cross-link, etc.). An advantage of resin teeth is that they are more easily modified and subsequently reshaped for masticating efficiency by the addition of grooves and spillways. Resin teeth are also more easily narrowed bucco-lingually to reduce the size of the occlusal table without sacrificing strength or esthetics. They may be more easily ground to fit minor connectors and irregular spaces and to avoid retentive elements of the removable partial denture framework. However, when resin teeth are used, the occlusion must be evaluated periodically to make sure that the occlusal surfaces have not worn out of contact. It seems that the best combinations of opposing occlusal surfaces used to maintain the established occlusion and to prevent deleterious abrasion are porcelain-to-porcelain surfaces, gold surfaces to natural or restored natural teeth, and gold surfaces to gold surfaces.
Arranging Teeth to an Occluding Surface
The procedure for arranging teeth to a static relationship with an opposing cast is essentially the same as for arranging teeth to an occluding template. On the other hand, articulation of artificial teeth on an adjustable instrument, which reproduces to some extent mandibular movement, will follow more closely the customary pattern for complete denture occlusion. The procedure for arranging posterior teeth to an occluding template was presented in Chapter 17.
Types of Anterior Teeth
Anterior teeth on removable partial dentures are concerned primarily with esthetics and the function of incising. These are best arranged when the patient is present because an added appointment for try-in would be necessary anyway. They may be arranged arbitrarily on the cast and then tried in, but a stone index of their labial surfaces should be made on the master cast after the final arrangement has been established to preserve the arrangement that the patient saw and approved.
From a purely mechanical standpoint, all missing anterior teeth are best replaced with fixed restorations rather than with the removable partial denture. However, for cosmetic or economic reasons, or in situations in which several missing anterior teeth are involved—such as in a Class IV partially edentulous arch—their replacement with the removable partial denture may be unavoidable.
Some types of anterior teeth used in removable partial dentures are as follows:
Waxing and Investing the Removable Partial Denture Before Processing Acrylic-Resin Bases
Waxing the Removable Partial Denture Base
Waxing the removable partial denture base before investing differs little from waxing a complete denture. The only difference is the waxing of and around exposed parts of the metal framework. At the framework–denture base junction, undercut finishing lines should be provided whenever possible. Then the waxing is merely butted to the finishing line with a little excess to allow for finishing. Otherwise, small voids in the wax may become filled with investing plaster, or fine edges of the investment may break off during boil out and packing. In either situation, small pieces of investment may become embedded in the acrylic-resin at the finishing lines. This is prevented by slightly overwaxing and then finishing the acrylic-resin back to the metal finishing line with finishing burs. Abrasive wheels and disks should not be used for this purpose, because they will cut into the metal and may burn the acrylic-resin. Pumice and a rag wheel should be used sparingly for polishing, because they will abrade the acrylic-resin more rapidly than the metal and will leave the finishing line elevated above the adjacent acrylic-resin.
When waxing to polished metal parts that do not possess a finishing line is done, it must be remembered that no attachment will exist, and that over a period of time, some seepage, separation, and discoloration of the acrylic-resin in this area are inevitable. This may be prevented to some extent by roughening the metal whenever possible to effect some mechanical attachment by silicoating the attachment or by using one of the resin adhesives. The wax should be left 1.5 to 2.0 mm thick so that the acrylic-resin will have some bulk at its junction with the polished metal. Thin films of acrylic-resin over metal should be avoided. In finishing, these should be cut back to an area of bulk with finishing burs. Otherwise, any thin acrylic-resin film eventually will separate and become discolored and unclean as a result of marginal seepage.
Gingival forms should be waxed in accordance with modern concepts of esthetics and should be made to prevent entrapment of food particles. Dental students should become familiar with normal gingival architecture as found on diagnostic casts of natural dentitions, beginning in basic technique exercises with the casts of each other’s mouths. In this manner, they may acquire a better concept of gingival contours to be reproduced on prosthetic restorations.
Artificial teeth should be uncovered fully to expose the entire anatomic crown and beyond when gingival recession is simulated. Adjacent or contralateral tooth-gingival relationships should be used as a guide to facilitate the harmonious esthetic presentation of the gingival contours. Relatively few prosthodontic patients are in an age bracket in which some gingival recession and exposed cementum would not normally be present; this should be simulated on prosthodontic restorations in proportion to the patient’s age. With removable partial dentures, gingival contours around the remaining natural teeth should be used as a guide to the gingival contours to be reproduced on the prosthesis. However, interproximal spaces are almost always filled, particularly between posterior artificial teeth.
Frush has listed the following rules for varying the height of the gingival tissue at the cervical portion of the teeth:
The correctly formed papilla should be shaped so that it will be self-cleansing. It should be carved so that it is in harmony with the interpretation of age and will be the deciding factor in the visible outline form of the tooth. As Frush has pointed out, even a drop of wax properly placed can change the appearance of a square tooth to a tapering or ovoid appearance. A properly formed papilla further enhances the natural appearance by increasing the color in this area.
The rules for forming the papilla were given by Frush as follows:
The denture should be waxed and carved as for a cast restoration, which it actually is, regardless of the material or the method of processing used. The fact that a split-mold technique is used for processing does not alter the fact that the form of the denture base is to be reproduced by a casting procedure. Therefore the denture pattern should be waxed with care in the same form as that desired for the finished restoration rather than attempting to shape facial contours on the prosthesis during the polishing phase (Figure 18-39). Polishing should consist primarily of trimming away the flash, stippling polished surfaces when desired, and polishing lightly with brush wheels and pumice, followed by final polishing with a soft brush wheel and a nonabrasive shining agent, such as whiting. Gross trimming and polishing with pumice should not be necessary if the denture has been properly waxed before investing.
Figure 18-39 Waxing of the removable partial denture base should reproduce anatomic contours normal for the specific patient’s characteristics. This is especially important for regions where the junction of denture tooth and resin will be visible. Healthy interdental papillae are convex and extend to contact points of the teeth. Root prominence can be carved into wax to create a natural appearance. Stippling is typically accomplished after processing done with the use of an eccentric round bur. All of these features should be considered against the specific oral environment in which the prosthesis will be placed. A finished and polished prosthesis that demonstrates esthetic features not found in the patient’s mouth may be considered objectionable.
Because the polished surfaces of any denture play an important part in both retention and control of the food bolus, buccal and lingual contours generally should be made concave. In most situations, the border thickness of the denture should be left as recorded in the impression. The only exceptions are the distolingual aspect of the mandibular denture base, to prevent interference with the tongue, and the distobuccal aspect of the maxillary denture base, to prevent interference with the coronoid process of the mandible. These are the only areas that cannot ordinarily be waxed to final contour before investing and may need to be thinned by the dentist at the time of final polishing.
Investing the Removable Partial Denture
In investing a removable partial denture for processing an acrylic-resin base, it must be remembered that the denture cast must be recovered from the flask intact for remounting. The practice of cutting the teeth off the cast to expose the connectors and retainers, which are then embedded in the upper half of the flask, is permissible only when an existing denture base is being relined and no provision has been made for remounting. (In such a situation, it seems that this practice offers no advantage over investing the denture that is being so relined upside down in the lower half of the flask.) Because in the past some increase in occlusal vertical dimension has been inevitable in any split-mold processing technique, this method results in raising of the removable partial denture framework from the supporting teeth by the amount of increase. Occlusal adjustment in the mouth may temporarily reestablish a harmonious occlusal relation with the opposing teeth, whereas the removable partial denture framework will then settle into supporting contact with the abutment teeth at the expense of the underlying ridge.
Changes in occlusal vertical dimension may be held to a minimum by the use of acrylic denture resins that can be placed in the mold in a fluid rather than in a doughy state or those that may be injected in a fluid state into a closed mold. Dimensional changes that occur during relining may also be held to a minimum by the use of autopolymerizing acrylic-resins for this purpose, thus preventing thermal expansion of a mold subjected to elevated temperatures.
When two opposing removable partial dentures are being made concurrently, one is sometimes processed and placed first, and then the final occlusion is established on the second denture to a fully restored arch. In such a situation, when no natural teeth are in opposition, it is not necessary for the first denture to be remounted after processing. In all other situations, remounting to correct for errors in occlusion is absolutely necessary. Flasking must be accomplished so that the cast may be recovered from the flask undamaged.
Minute voids in the base of the cast will have been reproduced in the stone mounting, and although the obvious larger blebs may be trimmed away, smaller blebs will remain. If the voids in the cast become filled with investing material, the effect is that two particles are trying to occupy the same space. Covering the base with tinfoil substitute before investing can prevent this. Coating the base and sides of the cast with petroleum jelly not only keeps the base of the cast isolated from investing material but also may allow the cast to be more easily recovered from the surrounding investment.
The entire cast, except for the wax and teeth, may then be invested in the lower half of the flask (Figure 18-40). As with a complete denture, only the supplied teeth and wax are left exposed to be invested in the upper half. Also, as with a complete denture, the investment in the lower half must be smooth and free of undercuts and must be coated with a separator to facilitate separation of the two halves of the flask.
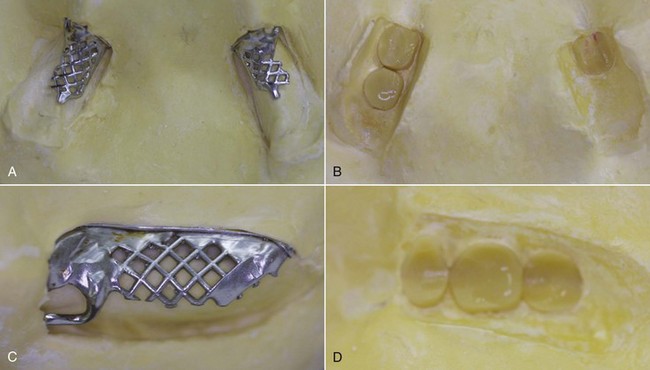
Figure 18-40 Prostheses invested in processing flasks. A, Mandibular Class I master cast with exposed minor connectors of the distal extension bases. B, Denture teeth for framework shown in A. C, Maxillary distal extension minor connector embedded in investing stone. D, Opposing flask unit with denture teeth for distal extension shown in C.
An alternate and preferred procedure is to invest the cast only to the top of the tinfoil on the base, smoothing the investment and applying a reliable separator. Then a second layer of investment placed around the anatomic portion of the cast covers the natural teeth and the exposed parts of the denture framework. This is likewise smoothed and made free of undercuts and coated with a separator before the top half of the flask is poured. Recovery of the cast is thus made easier by having a shell of investment over the anatomic portion of the cast, which may be removed separately.
When the denture base is to be characterized by applying tinted acrylic-resins to the mold, care should be taken not to embed the wax border in the lower half of the flask. Bennett has pointed out the need for investing only to the border of the wax, leaving the entire surface that is to be tinted reproduced in the upper half of the flask. With this precaution, tinting may be carried all the way to the border, and later removal of the flask will not mar the tinted surface. If tinting is not to be done or is to be done only at the cervical margins of the teeth and the papillae, the wax border should be embedded in the lower half, where it may be faithfully reproduced and preserved during polishing.
The use of acrylic-resin materials that require trial packing is complicated by the presence of the retentive framework of the removable partial denture. With their use, trial packing must be done with two sheets of cellophane between two layers of the resin dough; otherwise the flask could not be opened without pulling the resin away from the teeth in one half of the flask or the metal framework in the other. Acrylic-resin dough is placed in each half of the flask, the sheets of cellophane are placed between them, and the flask is closed for trial packing. The flask is then opened, the cellophane is removed, and the excess flash is trimmed away. Trial packing should be repeated until no excess is visible. Final closure is accomplished without the intervening sheets of cellophane.
Acrylic-resin materials have been developed that require no trial packing. These are mixed as usual but may be poured into the mold or placed into the mold in a soft state. They offer little or no resistance to closure of the flask, yet the finished product is comparable with acrylic-resin materials packed in a doughy state. They must be used in some excess, with the excess escaping between the halves of the flask. Although they are soft enough to allow the escape of gross excess, the use of a land space is advisable to prevent a thin film from forming on the land area. Any film that exists on the land area after deflasking may be interpreted as an opening of the flask by that amount, hence the need for some provision for an intervening space to accommodate the excess and to facilitate its escape as the flask is closed.
To provide such a land space, the land area on the lower half of the flask may be painted with melted baseplate wax before the top half is poured. After wax elimination, a space then remains to accommodate any excess acrylic-resin remaining after the flask has been completely closed. It is necessary that no plaster or wax is allowed to remain on the rim of the flask, and that the flask makes metal-to-metal contact before the second half is poured. Only in this way is it possible to see that the flask is completely closed before it is placed in the curing unit.
Pouring of the top half of the flask follows the same procedure as that used with a complete denture. Although it is not absolutely necessary for the entire top half to be poured in stone, it is necessary for a stone cap of some type to be used to prevent tooth movement in an occlusal direction. This is so because of the inability of plaster to withstand closing pressures. All plaster remaining on the occlusal surfaces of the teeth should be removed and a separator added before the stone cap is poured to facilitate its removal during deflasking. If the use of stone investment is preferred, a shell of improved stone or die stone may be painted or applied with the fingers onto the wax and teeth and allowed to harden before the remainder of the flask is filled with plaster. If a full stone investment is preferred, some provision should be made for easy separation during deflasking. Not only should a separator stone cap be used, but metal separators or knife cuts radiating out to the walls of the flask should be placed on the partially set stone. Deflasking then is easily accomplished by removing the stone cap and inserting a knife blade between the sections of stone.
Boil out should be deferred until the investing material has set for several hours or preferably overnight. Boil out must effectively eliminate all wax residue; an adequate source of clean hot water must be available. Immersion of a flask containing the invested denture in boiling water for 5 minutes will adequately soften the wax supporting the artificial teeth so that flask halves may be separated and the remaining wax flushed out. After wax elimination with boiling water, the invested denture should be flushed with a solution of grease-dissolving detergent and again with clean boiling water.
Immediately after boil out, the warm mold should be painted with a thin film of tinfoil substitute, with care taken to not allow it to collect around the cervical portions of the teeth. No tinfoil substitute should be used on any part of the denture teeth. A second coat should be applied after the first coat has reasonably dried, and packing of the mold should proceed immediately after this film has dried to the touch.
When the master cast for a distal extension removable partial denture has been repoured from a secondary impression, the supporting foot on the retention frame may not necessarily be in contact with the cast. Closing pressure within the flask may distort the unsupported extension of the metal framework, with subsequent rebound on deflasking. The finished denture base will then lack contact with the supporting tissue, resulting in denture rotation about the fulcrum line, similar to that which occurs after tissue resorption. To provide support for the distal extension of the metal framework during flask closure, autopolymerizing acrylic-resin should be sprinkled or painted around the tissue stop at the distal end of the framework and allowed to harden before the denture resin continues to be packed (see Figure 5-39).
Processing the Denture
Processing follows the same procedure as that used for a complete denture. Denture base characterization tinting may be added just before packing. This is most desirable if denture base material will be visible when in the mouth. Posterior acrylic-resin bases alone ordinarily do not require characterization, but the dentist should select a denture base material that closely resembles the color of the surrounding tissue. The ideal acrylic-resin base material for removable partial dentures therefore is one that (1) may be used without trial packing; (2) possesses a shade that is compatible with surrounding tissue; (3) is dimensionally stable and accurate; (4) is dense and lends itself to polishing; and (5) polymerizes completely.
There has never been any question concerning the merits of placing tinfoil over the denture before investing; this results in a tinfoil-lined matrix and eliminates the need for a separating film. The fact remains, however, that the use of a tinfoil substitute has become universal.
At best, any tinfoil substitute creates an undesirable film at the gingival margins of the teeth, resulting in microscopic separation between the teeth and the surrounding acrylic-resin. This may be shown by sectioning a finished denture and by observing the marginal discoloration around the cervical portions of the teeth after several months in the mouth. To some extent, injection molding obviates this objection to the use of a tinfoil substitute; this is one of the principal advantages of injection molding over compression molding.
Because the use of compression molding is widespread and is likely to continue, methods are needed that eliminate the use of a tinfoil substitute. The layered silicone rubber method results in more complete adaptation of the acrylic-resin around the cervical portions of porcelain teeth and more complete bonding to acrylic-resin teeth. In addition, denture base tints may be applied directly to the mold without first applying a separating film.
A room-temperature polymerizing silicone rubber that has sufficient body and toughness for the purpose is applied to the wax surface of the denture and over the teeth. To prevent movement of the teeth during processing, the occlusal surfaces should be exposed before the upper half of the flask is poured. The manufacturer’s instructions must be followed as to mixing and time elapsed before the outer stone investment is added, to ensure polymerization and bonding to the overlying investment. Boil out then is completed in the usual way.
A further advantage of the layered silicone rubber method is the ease of accomplishing deflasking. If the wax carving of the denture has been completed with care before flasking, denture tints remain unaltered by unnecessary trimming and polishing of the processed denture.
All resin base materials available up to the present time exhibit some dimensional change, both during processing and in the mouth. The fit of the denture is therefore dependent on the accuracy of the denture base material because impression and cast materials in use today are themselves reasonably accurate. In an attempt to minimize dimensional changes in the denture base, materials and techniques are being improved constantly.
Denture base materials that may be poured into the mold or placed into the mold in a soft state are also popular. This technique eliminates trial packing and excessive pressures, which lead to open flasks and altered occlusal vertical dimension as is sometimes experienced with compression molding of acrylic-resin base materials. Activated, or autopolymerizing, acrylic-resins are commonly used to prevent mold expansion at higher temperatures. Materials other than acrylic-resins are used with various techniques, some of which include styrene, vinyl, and experimentally epoxy resins. The main objective behind the development of newer techniques and materials is greater dimensional accuracy and stability, combined with improved strength and better appearance.
The use of injection molding or poured materials to process removable partial denture base materials combines accuracy and efficiency to help create a well-fitting denture base. The Success Injection System by Dentsply Trubyte (York, PA) combines the accuracy of injection molding with Lucitone 199 (Dentsply Trubyte, York, PA). The hardware consists of the injection unit, aluminum alloy flasks, and associated system flask components. The flasks are numbered; specifically, they are mated halves that need to be matched for more accurate results. The investment and processing techniques are as follows:
 hours. Follow with an additional 30-minute boil. An alternate polymerization method is 9 hours in a water bath of 163 ± 2°F with no boil. Remove the flask from the polymerization tank and allow to air cool for approximately 30 minutes. Place the flask in a lukewarm water bath to cool completely.
The use of VLC denture base materials is claimed to save considerable time in providing a processed base. Manufacturers recommend the use of a light-colored cast to enhance the polymerization of the VLC material. A stone matrix must be fabricated so that the denture teeth can be positively relocated in the same position during the polymerizing process. Once the stone matrix has been completed and verified, the wax and teeth can be removed from the framework, and they can be cleaned and silicoated or coated with the resin bonding agent.
The ideal thickness for the VLC material requires a 1.5-mm space between the edentulous ridge and the retentive component of the framework. The ridge lap of the denture teeth should also be 1.5 mm above the retentive component of the framework, and the tissue side finishing line of the framework should be even with or slightly higher than the palatal side finishing line. If VLC denture base material is to be used, these requirements must be considered at the diagnosis and treatment planning stages.
Without the framework in place, a thin coat of model release agent (MRA) is applied to the denture base areas of the cast, and the VLC material is adapted to the edentulous denture base area and is trimmed to the general outline with a sharp blade. The framework is then seated firmly by being embedded into the uncured VLC material. Make certain that the rests, tissue stops, and other components of the removable partial denture framework are correctly positioned in their designated terminal positions on the cast. Remove any excess material that may interfere with articulation of the casts or positioning of the teeth, and check to ensure that the VLC material is adapted into the tissue side finishing line of the framework on the cast. This will necessitate returning the cast with the framework to the articulator. Once this has been verified, remove the cast from the articulator and process it in the light-polymerizing unit for 2 minutes.
The denture teeth can then be secured to the stone matrix and related to the cast with the framework and the removable partial denture base. The denture teeth may have to be adjusted before the removable partial denture base can be fitted. To do this, trim the ridge lap areas of the teeth enough to provide the required 1.5 mm of space between the tooth and the denture base material. Remember that thin areas should be avoided between the framework and the cast (minimum of 1.5 mm), and between the framework and the denture teeth (minimum of 1.5 mm).
The denture tooth surfaces that are to be bonded to the VLC denture base must be lightly ground and cleaned. The teeth may then be placed in modeling compound or putty to hold them while the bonding agent is applied to all of the designated surfaces to be bonded to the VLC denture base. These coated surfaces should be allowed to sit for 2 minutes and then are processed in the light polymerization unit for 1 minute.
To secure the teeth into their designated position on the VLC denture base, apply a small piece of VLC material to each tooth with the modeling tool provided by the manufacturer. With the aid of the stone matrix and by using a high-intensity light, tack each individual tooth into position on the VLC denture base.
After tacking the teeth to the VLC denture base, paint a narrow band of bonding agent on the junction line between the teeth and the denture base material. The bonding agent acts as a sealer to prevent leakage and aids bonding of the teeth to the denture base material. Allow the bonding agent to set for 2 minutes and then process in the light unit for 1 minute. You can now complete the buccal and lingual contouring of the denture base with additional VLC material. Paint all of the exposed surfaces of the VLC denture base material with the air barrier coating material, and process in the light polymerization unit for 2 minutes. After processing, carefully remove the removable partial denture from the cast. Do not attempt to pry it off. Paint the tissue surfaces of the edentulous areas with the air barrier coating material, and place in the light polymerization unit for 6 minutes with the tissue side up. Clean the removable partial denture with water and a brush to remove all traces of the air barrier coating. Trim and polish in a routine manner to complete the removable partial denture.
The study of the history of denture base materials is a most interesting one that has been covered elsewhere in dental literature. The future of denture base materials promises to be just as fascinating a study, but such a discussion cannot be included within the scope of this book. With newer materials, the future of methyl methacrylate as a denture base material is uncertain despite its acceptance as the best material available since its introduction in 1937. Although it has made possible the simulation of natural tissue color and contours combined with ease of manipulation, the fact remains that it leaves much to be desired as far as accuracy and dimensional stability are concerned. Whether other and newer materials will eventually supplant methyl methacrylate as a denture base material remains to be seen. The fact is that the denture base of the future (1) must be capable of accurately reproducing natural tissue tones faithfully through the use of characterizing stains and customizing procedures, and (2) must not require elaborate processing procedures and equipment, which would make the cost prohibitive for general use.
Remounting and Occlusal Correction to an Occlusal Template
Even with improved denture base materials and processing techniques, some movement of artificial teeth will still occur because of the dimensional instability of the wax in which the artificial teeth were arranged. Until sources of error can be eliminated, remounting will continue to be necessary. How well the occlusion may be perfected by remounting will depend on the manner in which jaw relations were transferred to an instrument and how closely the instrument is capable of reproducing functional occlusion. But even though the articulator is capable of reproducing only a static centric relation, that relation at least should be reestablished before the denture is placed.
Although it is admitted that there are limitations to the perfection of eccentric occlusion in the mouth, some believe that it can be done with more accuracy than on an instrument that is incapable of reproducing eccentric positions. Correction for errors in centric occlusion, however, should not be included in a concept that presumes that centric occlusion may be established satisfactorily by intraoral adjustment, followed then by perfecting of eccentric occlusion. Because of denture instability and the inaccessibility of the occlusion for analysis, accurate intraoral corrections are not possible. Practically, even the occlusal adjustment of natural dentition in which each tooth has its own support can best be done when preceded by an analysis of articulated diagnostic casts.
One cardinal premise must be accepted if prosthetic dentistry is to be anything more than a haphazard procedure. It is possible to transfer centric jaw relation to an instrument with accuracy and to maintain this relation throughout fabrication of the prosthesis. If this is true, then centric occlusion, coinciding with centric jaw relation, with centric occlusion of the remaining natural teeth, or with both, must have been established before initial placement of the prosthesis. This means that occlusal correction to reestablish centric relation by remounting after final processing is an absolute necessity for the success of the restoration. Remounting after processing is accomplished by returning the cast to a keyed relationship with the articulator mounting.
Precautions to Be Taken in Remounting
The following precautions should be taken to ensure the accuracy of remounting to make final occlusal adjustment before polishing and initial placement of the denture. These apply to all types of occlusal relationship records but are directed particularly at remounting an occlusal template when stone vertical stops are used:
Occlusal readjustment, as with the original articulation, is done at the expense of the original tooth anatomy. Occlusal surfaces should be reshaped by adding grooves and spillways and by reducing the area of the occlusal table, thus improving the masticating efficiency of the artificial tooth. Although this may be done immediately after occlusal readjustment and before initial placement of the denture, it may be deferred until completion of the final adjustment. In any event, it is a necessary step in the completion of any removable prosthesis.
Porcelain teeth may be reshaped with abrasive or diamond-mounted points. Resin teeth lend themselves better to reshaping with small burs to restore functional anatomy. Either type should be repolished judiciously to prevent reduction of cuspal contacts. Although cusps may be narrowed, spillways added, and the total area of contact reduced to improve masticating efficiency, critical areas of contact, both vertical and horizontal, must always be preserved.
The term remounting is also applied to the mounting of a completed prosthetic restoration back into an instrument by using some kind of interocclusal records. Discrepancies in occlusion resulting from processing of tooth-supported dentures may be corrected by reattaching the indexed processing cast and denture to the same instrument on which the occlusion was formulated. However, because of some instability inherent in distal extension removable partial dentures, such dentures should be retrieved from processing investment, finished, and polished and prepared for performance of occlusal corrections with the use of new intraoral records. The dentist must make a remounting cast before occlusal corrections can be accomplished. This is done simply first by placing the denture in the mouth and making an irreversible hydrocolloid (alginate) impression of the denture and the remaining teeth in the arch (Figure 18-41). When the impression is removed, the denture usually will remain in the impression or can be accurately replaced. Undercuts in the denture bases are blocked out, the retentive elements of the framework are covered with a thin layer of molten wax, and a remounting cast is poured in the impression. The remounting casts are then oriented in the articulator by the same type of interocclusal records that were used to orient the casts to formulate the occlusion. These procedures will be covered in Chapter 20 as an integral part of the initial placement appointment.
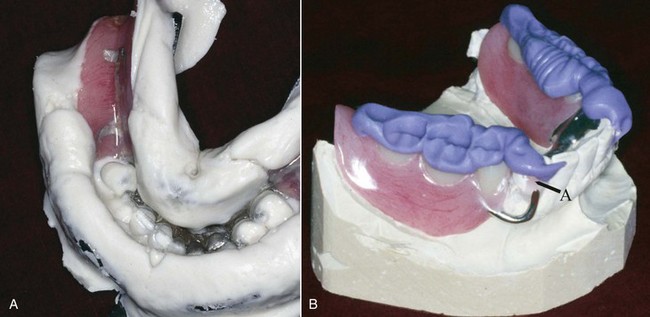
Figure 18-41 A, A stock, perforated tray is used to make an irreversible hydrocolloid (alginate) impression of the denture and dental arch. Blockout of undercuts in the denture base and of tips of direct retainers is necessary, so the denture can be readily removed and replaced on the resultant remounting cast, as illustrated in B. B, Remounting cast poured in stone with the prosthesis in place and interocclusal registration for mounting against a maxillary cast. Wax placed at the retainer tip (A) allows the prosthesis to be readily removed and replaced on the cast for occlusal correction procedures that use an articulator.
Occlusal harmony must exist before the patient is given possession of the dentures. Delaying the correction of occlusal discrepancies until the dentures have had a chance to settle is not justifiable.
Polishing the Denture
Areas to be considered in the polishing of a removable partial denture are (1) the borders of the denture bases, (2) the facial surfaces, and (3) the teeth and adjacent areas.
The borders on complete metal bases will have been established previously. On partial metal bases and complete acrylic-resin bases, the accuracy with which the border may be finished will depend on the accuracy of the impression record and how well this was preserved on the stone cast. Edentulous areas recorded from impressions in stock trays generally lack the accuracy at the borders that is found on casts made from impressions in individualized trays and by secondary impression methods. Border accuracy is determined also by whether or not the impression recorded a functional or a static relationship of the bordering tissue attachments.
Denture Borders
The principal objectives to be considered in making an impression of edentulous areas of a partially edentulous arch include (1) maximal support for the edentulous removable partial denture base, and (2) extension of the borders to obtain maximum coverage compatible with moving tissue. Although this second objective may be met with an adequate individualized impression tray, it is best accomplished with a secondary impression method. Not only the extent of the border but also its width should be recorded accurately. Both extent and width as recorded should be preserved on the stone cast. With the exception of certain areas that are arbitrarily thinned by polishing (mentioned previously in this chapter), finishing and polishing the denture borders should consist only of removing any flash and artifact blebs. Otherwise, borders should be left as recorded in the impression.
When the impression is made in a stock tray, the tray itself will have influenced both the extent and the width of the border. Some areas will be left short of the total area available for denture support, whereas others will be extended beyond functional limits by overextension of the tray. Unfortunately, the technician may attempt to interpret the anatomy of the mouth and arbitrarily trim the denture borders. This presumes that the technician has an intimate knowledge of the anatomy of the mouth of the patient for whom the restoration is being made, which is most unlikely. The dentist must correct any overextension remaining after arbitrarily trimming the border from cast landmarks in the mouth. It is preferable for the dentist to finish the borders of dentures, having painstakingly developed them during impression procedures.
Facial Surfaces
The facial surfaces of the denture base are those polished surfaces lying between the buccal borders and the supplied teeth. Methods have been proposed for making sectional impression records of buccal contours, thereby permitting the denture base to be made to conform to the facial musculature. These have never received wide acceptance and may be considered impractical in removable partial prosthodontics.
Facial surfaces may be established in wax or may be carved into the denture base after processing. Generally, it is desirable that it be done in wax as part of the wax pattern because it is easier to do so, and because contours can best be established at a time when modifications can be made if desired. Buccal surfaces should be contoured to aid in retention of the denture by border molding, to preserve the border roll and thereby prevent food impaction, and to facilitate return of the food bolus back onto the masticating table. Lingual surfaces should be made concave to provide tongue room and to aid in retention of the denture. Polishing of concave surfaces is always more difficult than polishing of flat and convex surfaces. If such contours are established previously in wax, not only is finishing more easily accomplished, but border and gingival areas are less likely to be inadvertently altered.
Finishing Gingival and Interproximal Areas
The contouring of gingival and interproximal areas after processing is difficult and generally unsatisfactory (Figure 18-42). The practice of doing so dates back to the days when vulcanite rubber was trimmed and shaped with Pearson-type chisels, and a trimming block was a necessary piece of equipment in any dental laboratory. Finishing was done with vulcanite burs and with brush wheels and pumice, creating the vertical interproximal grooves that for many years were typical of the denture look. Not only is this contrary to modern concepts of denture esthetics, but also, gingival and interproximal carving of the denture resin around plastic teeth may not be done without causing some damage to the teeth themselves.
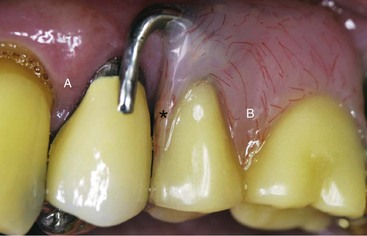
Figure 18-42 Attention to adjacent tooth-tissue contours can facilitate the production of natural-appearing prostheses. The interproximal papilla at A demonstrates both vertical and horizontal components. In general, the horizontal component increases with age. The prosthetic interproximal papilla at B exhibits only a vertical component and appears artificial. The anterior border (*) contour is blunted and provides an obvious and abrupt contour change. Contouring the border to bevel into the interproximal region will reduce its objectionable appearance.
Modern cosmetic considerations demand that gingival carving be done around each tooth individually, with variations in the height of the gingival curve and in the length of the papillae. Interproximally, the papillae should be convex rather than concave. The gingival attachment should be free of grooves and ditches that would accumulate debris and stain and should be as free for cleansing as possible. All this precludes gross shaping and trimming of gingival areas after processing. Gingival carving should be done in wax, and investing should be done with care to prevent blebs and artifacts. Finishing should consist only of trimming around the teeth and the papillae with small round burs to create a more natural simulation of living tissue, plus light stippling with an off-center round bur for the same reason. Polishing should consist only of light buffing with brush wheels and pumice, and finally with a soft brush wheel and a nonabrasive polishing agent specially made for this purpose.
Pumicing of gingival areas can only serve to polish the high spots; although it may be done lightly, its use should be limited to light buffing of areas already made as smooth as in the waxing phase. Heavy pumicing of the denture resin not only creates a typical denture look but also alters the delicately carved wax surface and any plastic teeth present. If pumicing must be done, plastic teeth should be protected with adhesive masking tape during the process.
Any polishing operation on a removable partial denture done on a lathe is made hazardous by the presence of direct retainers, which can easily become caught in the polishing wheel. Although the least damage that might occur is the distortion of a clasp arm, there is a greater possibility that the denture may be thrown forcibly into the lathe pan, with serious damage to the framework or other parts of the denture. The technician must ever be conscious of this possibility and must always cover any projecting clasp with the finger while it is near the polishing wheel. In addition, it is wise to keep a pumice pan well filled with wet pumice to cushion the shock should an accident occur. Any other lathe pan used in polishing should be lined with a towel or with a resilient material for the same reason. The potential hazard of retainers catching gloved fingers or hands that hold a removable partial denture is always present. Serious injury can result, and extreme caution must be taken to prevent such an occurrence. The risk of infection is increased if the removable partial denture has been in place intraorally.