CHAPTER 22 Mechanical Oral Biofilm Control: Interdental and Supplemental Self-Care Devices
The recommendation of self-care devices can be challenging. There are numerous devices on the market to help meet client's self-care needs. However, the plethora of products also makes it difficult to decide which is the appropriate device to recommend. Clients depend on the dental hygienist to help them navigate the “oral healthcare aisle.” In many cases several devices will provide the desired outcome for a client. Therefore it is important for dental hygienists to be familiar with the different devices, the research specific to each device, and the expected results from using the device. This knowledge will foster a conversation between the dental hygienist and client that leads to a recommendation that produces the outcomes valued by the client.
SELECTING SELF-CARE DEVICES
Traditionally, self-care recommendations have consisted of brushing and flossing. Toothbrushes, either manual or powered, continue to be the product of choice for cleaning the facial, lingual, and occlusal surfaces of the teeth. Toothbrushing does not reach the proximal surfaces of teeth or the area immediately under the contact point of adjacent teeth (embrasure space). These areas are known as the interproximal or interdental areas. Dental floss is designed to clean the proximal surfaces of the teeth. In a healthy mouth, brushing and flossing performed effectively on a daily basis can be effective in preventing periodontal diseases in low-risk clients. However, clients who have an increased risk for or who have periodontal disease may need other devices to address their special needs.
With the introduction of new technology, several studies have demonstrated that in some individuals alternatives to manual floss such as floss holders, interdental brushes, and power flossers can be as effective at reducing plaque biofilm, gingivitis, and bleeding as string floss.1,2 Recently studies also have demonstrated that a dental water jet or an antimicrobial mouthwash were as effective as manual floss for the reduction of the same clinical parameters, that is, plaque biofilm, bleeding, and gingivitis.3,4
Removal of plaque biofilm from the interdental areas where toothbrushing does not reach is important for the following reasons:
 To prevent periodontal diseases, most of which commonly begin in the interdental col area, a depressed concave area of gingival tissue under the contact area of two teeth. The col area connects the lingual and buccal papillae, and because of its saddle-like shape it harbors plaque biofilm (Figure 22-1). The epithelial tissue covering the col area is thin and less resistant to infection. When inflammation is present in this area, the papilla is enlarged and the col becomes deeper (see Chapter 17) as evidenced by increased probe readings.
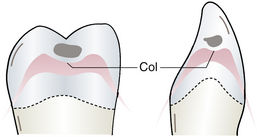
TYPES OF INTERDENTAL AND SUPPLEMENTAL SELF-CARE DEVICES: NONPOWERED
A wide variety of interdental and supplemental plaque control aids are available. In general, when the interdental gingiva fills the embrasure spaces, plaque biofilm removal from proximal tooth surfaces and shallow pockets can be accomplished with dental floss or tape, provided the client has the dexterity and the inclination to use them. When the interdental gingiva is reduced or missing, however, the embrasures are open (type II and type III) and other methods of interdental cleaning are needed. The dental hygienist evaluates the information gained during the assessment phase of care to select the most appropriate interdental and supplemental aids for the client. To accomplish this, it is important to keep in mind the following client conditions and risk factors:
Once an assessment is made, the dental hygienist reviews the care plan and goals with the client to determine which self-care device will be most effective. The simplest, least time-consuming procedures that will effectively control bacterial plaque biofilm and maintain oral health are recommended. Also, if one device works, the dental hygienist chooses it over two devices that would accomplish the same goal. Studies demonstrate that both client acceptance and effectiveness of self-care recommendations improve when the number of devices is limited.
If the client's current self-care regimen is effective in maintaining optimal oral health, the dental hygienist reinforces the behavior, documents the products used in the permanent record, and does not introduce anything new to the daily routine. If a client's regimen is not effective, then the dental hygienist reviews assessment data, including risk factors, and presents new recommendations to the client. Table 22-1 summarizes a variety of powered interdental and supplemental self-care devices.
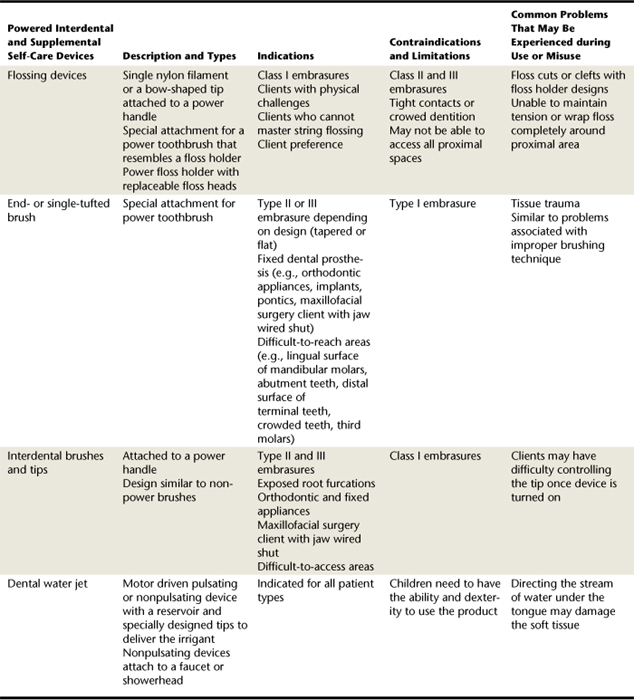
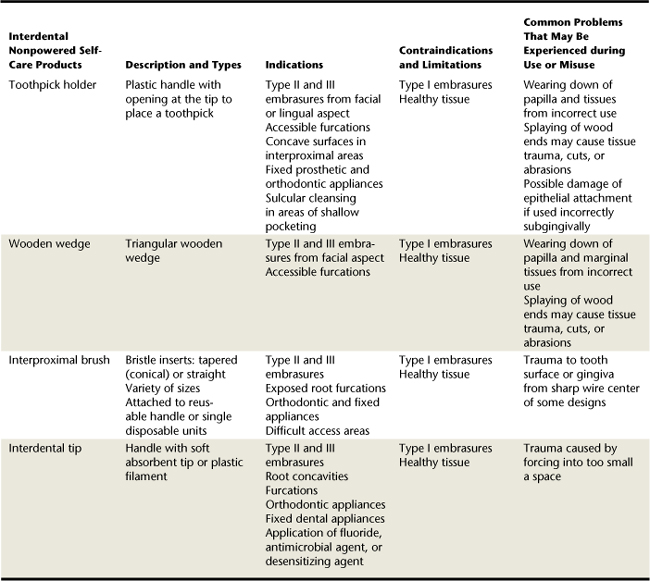
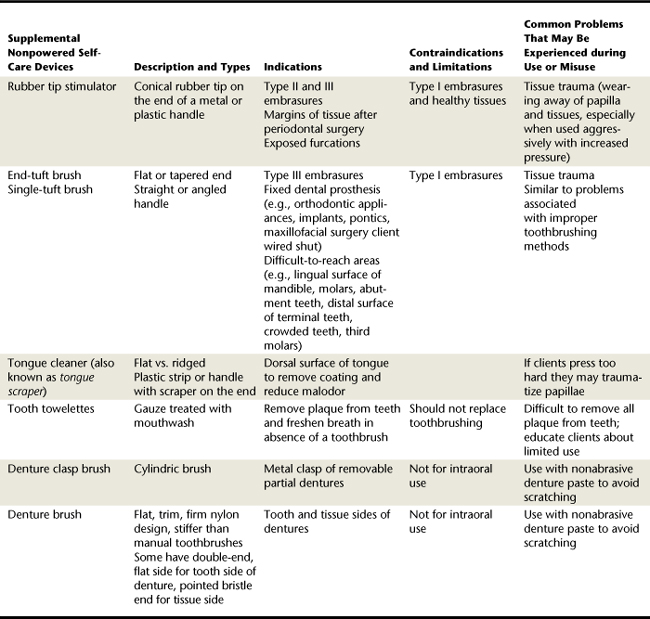
In addition, Table 22-2 summarizes nonpowered interdental self-care devices and Table 22-3 summarizes nonpowered interdental supplemental self-care devices commercially available to help control plaque biofilm. These devices can enhance the benefits of a toothbrush, reach areas that the toothbrush is not designed to access, or meet special client needs based on assessment. They include:

Dental Floss and Tape
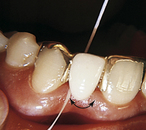
Dental floss is the most frequently recommended product for cleaning proximal tooth surfaces with normal gingival contour and embrasure spaces. Figures 22-2 and 22-3 illustrate the various embrasure types and devices. Dental floss is recommended only for individuals with type I embrasures. Dental floss is most effective when interdental spaces are covered by the papilla; however, as recession becomes more pronounced, floss becomes progressively less effective.
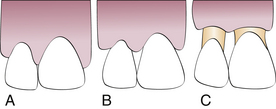
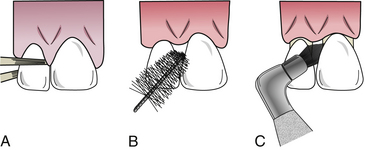
Figure 22-3 Use of interdental plaque control devices. A, Dental floss. B, Interdental brush. C, End-tuft brush.
Most types of dental floss are made of nylon, and some are impregnated with flavoring, fluoride, or antimicrobial or whitening agents. The following general types of dental floss are available:
Unwaxed, Waxed, and Dental Tape
The first dental floss was a waxed silk thread that was designed to go between the teeth to remove the irritants that the toothbrush could not reach. Today dental floss is made of nylon waxed or unwaxed multifilaments. A monofilament type also is available and is coated with a material called polytetrafluoroethylene (PTFE). The coated monofilament slides easily between the teeth and does not fray. The multifilament type allows for separation of the fibers and is either thick or thin. Studies have shown no difference in the effectiveness of unwaxed versus waxed dental floss. Recommendations are based on client's ease of use or preference. Waxed floss may be easier to use for those clients who have tight contacts.
Dental tape or ribbon is a waxed floss product that is wider and flatter than conventional dental floss. The flat-sided surface of dental tape is preferred by some, particularly when the surface area to be flossed is large. The choice of which floss to recommend or even if dental floss is the best choice is influenced by:
Braided and Tufted Floss
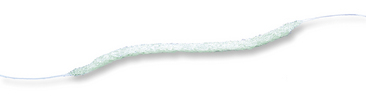
Tufted dental floss, or variable-diameter dental floss, has been found to be equally as effective as waxed or unwaxed dental floss for removing plaque biofilm. Tufted dental floss is designed to have three continuous segments: a length of waxed or unwaxed dental floss; a shorter segment of cylindric, nylon meshwork; and a relatively rigid nylon needle capable of being threaded beneath the contact or under fixed bridges (Figure 22-4). The dental floss segment is used in areas of normal gingival contour, and the other segments are used as indicated in Table 22-2.
Other types of floss are intended for cleaning dental implants. For example, braided floss is sold on a spool or as a precut piece with a stiff nylon end for threading. The braided nylon resembles a cord, can be washed after use, and is reused after drying. Some floss has a mesh or gauze appearance and is meant for one-time use. More information on both types of floss can be located in Chapter 57 on osseointegrated dental implants.
String Flossing Methods
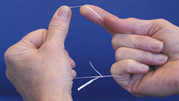
The two primary methods of dental flossing are the spool method and the loop method. Procedure 22-1 reviews the spool method of flossing, a method used by many teens and adults.
Procedure 22-1 SPOOL FLOSSING METHOD: ADULTS
STEPS
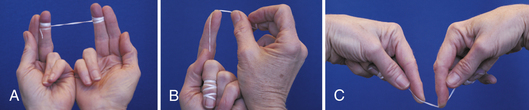
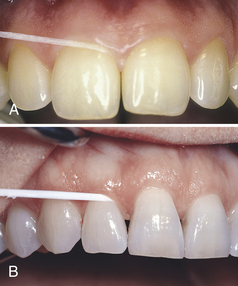
Figure 22-6 A, Dental floss. B, Dental tape.
(A, from Perry DA, Beemsterboer PL: Periodontology for the dental hygienist, St Louis, 2007, Saunders. B, from Newman MG, Takei HH, Klokkevold PR, Carranza FA: Carranza's clinical periodontology, ed 10, St Louis, 2006, Saunders.)
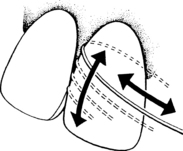
Figure 22-7 Floss wrapped around dental surface.
(From Hoag PM, Pawlak EA: Essentials of periodontics, ed 4, St Louis, 1990, Mosby.)
The spool method of flossing requires manual dexterity. Children or those who have less manipulative ability with their hands may prefer to use the loop method of flossing as described in Procedure 22-2.
Procedure 22-2 LOOP FLOSSING METHOD: CHILDREN AND CLIENTS WITH LIMITED MANUAL DEXTERITY
Proper flossing technique is not easy to master, and detailed instructions need to be given and demonstrated. If the client does not have the ability to master the technique or does not like to floss, other devices need to be recommended. Disclosing solution and the presence of plaque biofilm, gingival bleeding, and periodontal indices are parameters used to assess the effectiveness of plaque biofilm removal in terms of clinical outcomes. Oral signs of gingival trauma (e.g., floss cuts, gingival clefts, gingival abrasion) are used for the safety evaluation (Figure 22-8). Causes of gingival trauma include:
Failing to wrap the floss around the tooth before moving it subgingivally between the tooth and the papilla
Gingival bleeding during flossing can be a result of trauma or an indication of inflammation. When clients with gingival inflammation initiate flossing, the gingiva bleeds as a result of the microulcerations in the sulcular lining that occur during the active disease process. Clients must be aware that bleeding is not a sign to avoid flossing, but rather an indicator of infection that needs to be controlled by improved self-care techniques. In most cases bleeding from gingival inflammation subsides with the regular removal of the plaque biofilm and supportive periodontal therapy.
Floss Holders and Threaders
Clients who have difficulty mastering string floss techniques for interdental cleaning may find it easier to use a floss holder (Figure 22-10). Floss holders are plastic handles that aid in the placement and movement of floss between the teeth. Floss holders are described in Table 22-2, and their method of use in Procedure 22-3. Studies have found that use of floss with proper use of a floss holder reduced plaque biofilm and gingivitis as effectively as use of string floss. In addition, those who used the floss holder preferred using it to traditional flossing techniques.

Figure 22-10 Disposable floss devices are convenient for some clients and may enhance plaque biofilm control.
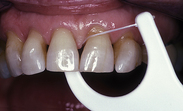
Figure 22-11 Placement of floss holder in mouth.
(From Perry DA, Beemsterboer PL: Periodontology for the dental hygienist, St Louis, 2007, Saunders.)
Procedure 22-3 USE OF A FLOSS HOLDER
STEPS
Another device that assists clients in cleaning under bridges and around abutments or orthodontic appliances is the floss threader (see Figure 22-12). As described in Table 22-2, a floss threader assists in introducing floss between an abutment tooth used for support of a fixed bridge and a pontic, the artificial tooth that replaces a missing natural tooth. Procedure 22-4 reviews the use of a floss threader.
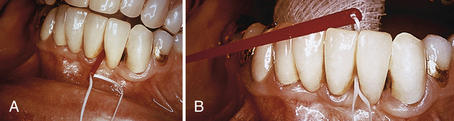
Figure 22-12 A, Facial insertion of the threader tip. B, Threader pulled lingually through the interproximal space.
Procedure 22-4 USE OF A FLOSS THREADER
STEPS
Benefits of Flossing
The benefit of daily flossing is the reduction or prevention of inflammation caused by the presence of interdental plaque biofilm. Studies show that flossing reduces plaque biofilm, bleeding, and gingivitis. It is commonly accepted that flossing reduces the incidence of interproximal caries. However, in some studies, if fluoride was used there was no additional benefit from flossing.5,6 For more details on caries risk and prevention see Chapter 16.
Toothpicks
Some individuals prefer to use toothpicks for control of interdental plaque biofilm, particularly on concave proximal surfaces and exposed furcation areas. Toothpicks can be either wooden or plastic. Studies have shown that the toothpick is as effective as dental floss in reducing interproximal plaque biofilm and gingival bleeding. To use toothpicks, however, there must be sufficient interdental space available (see Table 22-2 for indications). Toothpicks are often too long and have the potential to damage tissue while working lingually. To prevent damage, use of a toothpick holder is recommended for cleaning lingual surfaces. Toothpick holders (Figure 22-14) are designed to allow use from the facial or lingual aspect and adapt better interproximally and posteriorly when compared with toothpicks alone.
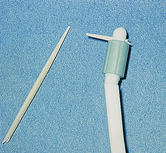
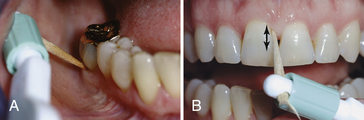
Figure 22-15 A, Toothpick tip placed at gingival margin. B, Gentle up-and-down motion keeping tip on tooth.
(From Newman MG, Takei HH, Klokkevold PR, Carranza FA: Carranza's clinical periodontology, ed 10, St Louis, 2006, Saunders.)
The main concern with using a toothpick or toothpick holder is avoidance of gingival damage. Clients need to be taught proper toothpick use to remove plaque biofilm effectively without causing damage to the gingiva, especially the epithelial attachment (Procedure 22-5).
Procedure 22-5 USE OF A TOOTHPICK IN A TOOTHPICK HOLDER
STEPS
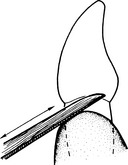
Wooden Wedges
Wooden wedges are designed to remove interproximal plaque biofilm from type II and III embrasures. They are recommended for use only from the facial aspect, where the proximal surfaces are exposed to avoid traumatizing gingival tissue. The use of wooden wedges is reviewed in Procedure 22-6. The key difference between the use of toothpicks and wooden wedges relates to the triangular design of the wedge. Wedges are inserted interdentally, with the base of the triangle resting on the gingival side, the tip pointing occlusally or incisally, and the sides of the triangle against the adjacent tooth surfaces (Figure 22-16). Placing the triangle base against the tissue prevents damage, such as gingival cuts and clefts, to the interdental papilla and gingival margins (see Figure 22-17). The triangular wedge fits the interdental area more snugly, covering a larger surface area, thereby allowing for the removal of more plaque biofilm.
Procedure 22-6 USE OF A WOODEN WEDGE
STEPS
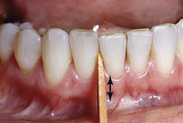
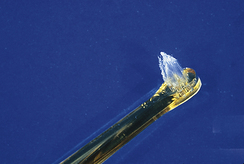
Rubber Tip Stimulators
Interdental stimulators are devices designed primarily for gingival stimulation. The rubber tip stimulator, attached to the end of a metal or plastic handle (see Figure 22-18), is used to remove plaque biofilm by rubbing it against the exposed tooth surfaces, to stimulate the gingiva, and to recontour gingival papillae after periodontal therapy (see Table 22-3). Research on rubber tip stimulators is limited and inconclusive regarding the efficacy of plaque biofilm removal and reduction of infection. A rubber tip stimulator can cause injury to the gingiva if used improperly (Procedure 22-7).
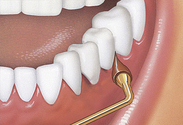
Figure 22-18 Proper placement of a rubber tip stimulator.
(Courtesy Sunstar Americas, Inc, Chicago, Illinois.)
Procedure 22-7 USE OF A RUBBER TIP STIMULATOR
STEPS
Massaging the gingiva with a rubber tip or other device can lead to improved circulation, increased keratinization, and epithelial thickening. Whether these gingival changes provide any clinical benefits has not been studied. Improved gingival health resulting from oral hygiene practices has been shown to be directly related to plaque biofilm removal and reduction of risk factors.
Interdental Brushes and Tips
Interdental brushes are available in various sizes and shapes. The most common brushes are conical or tapered (like an evergreen tree) and designed to be inserted into a plastic, reusable handle that is angled to facilitate interproximal adaptation (see Figure 22-19). Studies have shown that interproximal brushes are equal to or more effective than floss for plaque biofilm removal and for reducing gingival inflammation in type II embrasures, type III embrasures, and exposed furcations. Further indications for use are discussed in Table 22-2. The brush design selected is related to the size of the gingival embrasure or furcation to be cleaned. The interdental brush needs to be slightly larger than the embrasure space so that it can effectively clean the designated area. Interdental brush use is reviewed in Procedure 22-8 and illustrated in Figure 22-19, B.
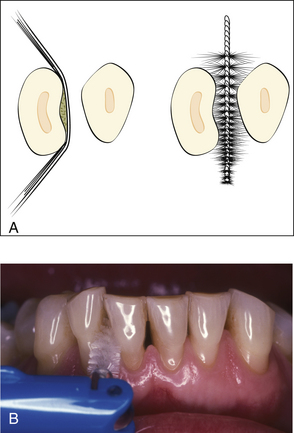
Figure 22-19 A, Cleaning of concave or irregular proximal tooth surfaces. Dental floss may be less effective than an interdental brush on long root surfaces with concavities.
B, Proper placement of inderdental brush. (A, from Newman MG, Takei HH, Klokkevold PR, Carranza FA: Carranza's clinical periodontology, ed 10, St Louis, 2006, Saunders. B, from Perry DA, Beemsterboer PL: Periodontology for the dental hygienist, St Louis, 2007, Saunders.)
Procedure 22-8 USE OF AN INTERDENTAL BRUSH
STEPS
Other interdental tips (see Table 22-2) are also available in various sizes and material including plastic and foam for plaque biofilm removal in areas similar to interdental brushes. Some interdental tips are designed to fit into smaller areas than a Class II embrasure. The tips made of foam or other absorbent material can facilitate delivery of liquid chemotherapeutic agents, such as antimicrobials or desensitizing agents, to the proximal surface. Research in this area is limited, however. Interdental brushes and tips are available in disposable units designed for travel or use when away from home.
End-Tufted or Single-Tufted Brushes
End-tufted or single-tufted toothbrushes, indicated for type II and III embrasures, for difficult-to-reach areas, or around fixed dental appliances (see Table 22-3), are designed with a smaller brush head that has a small group of tufts (end-tufted) or a single tuft (single-tufted) (Figure 22-20). The bristles are directed into the area to be cleaned and activated with a rotating motion, similar to the vibratory motion of Bass toothbrushing. End-tufted brushes have been shown to be effective adjuncts to toothbrushing in controlling gingivitis in adults.
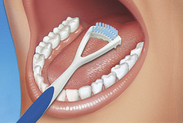
Tongue Cleaners
Bad breath, also known as malodor, is a common client complaint. Tongue cleaning is often overlooked because clients are not aware that the papillae of the tongue harbor bacteria. Bacteria on the tongue are the primary cause of bad breath. Tongue cleaners or scrapers are designed and intended for removal of debris and bacteria from the tongue's dorsal surface (see Figure 22-21). Brushing the tongue with a toothbrush also can remove bacteria and debris. Some clients may find it difficult to reach the tongue's posterior third with a toothbrush, and the bristles may be too soft to remove moderate to heavy debris adequately. Clients may find that a tongue cleaner is easier to use because it does not stimulate the gag reflex as readily as a toothbrush. Tongue cleaners come in many shapes, styles, and colors, from a simple plastic strip to a variety of handled devices. Procedure 22-9 outlines use of a tongue cleaner.
Procedure 22-9 USE OF A TONGUE CLEANER
STEPS
Procedure 22-10 USE OF A DENTAL WATER JET: JET TIP
STEPS
Additional Devices
Tooth Towelettes
Tooth towelettes are being marketed as a method of plaque biofilm removal when toothbrushing is not possible. The tooth towelettes are gauze squares usually treated with some form of mouthwash to freshen breath. The gauze square is held between the thumb and index finger and wiped on the tooth surface, moving from the cervical margin to the incisal or occlusal edge. Both facial and lingual surfaces are cleaned at the same time. Use of towelettes is not meant to replace a daily toothbrushing.
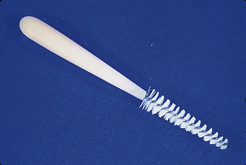
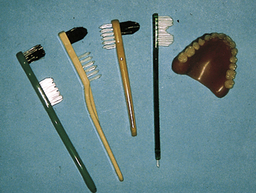
Clasp and Denture Brush
Specialty brushes such as the clasp brush and denture brush have been designed with firm nylon filaments to clean dentures and the clasps of partial dentures (see Table 22-3 and Figures 22-22 and 22-23). Because these prostheses are removable and cleaned outside of the mouth, the firmer filaments cannot cause gingival tissue destruction (see Chapter 35).
TYPES OF INTERDENTAL AND SUPPLEMENTAL SELF-CARE DEVICES: POWERED
In the past several years, many new powered devices have become available to consumers. The most recognizable is the powered toothbrush (see Chapter 21). Other powered devices include flossers, interdental brushes, dental water jets, and tongue cleaners. Not all products have undergone clinical testing. Table 22-3 describes a variety of powered interdental and supplemental devices.
Flossing Devices
Power flossing devices are available to make interdental cleaning easier. Research has shown that these devices can remove plaque biofilm and reduce bleeding and gingivitis similarly to string floss.7,8 Some designs are similar to a floss holder, with floss pulled taught between a bow-shaped handle (Figure 22-24). Another design uses a single flexible nylon tip that is placed interproximally between the tooth and the papilla and is long enough to reach to the lingual aspect of the tooth (Figure 22-25). these products may increase compliance with some clients.
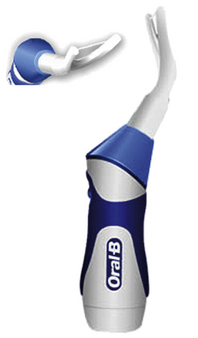
Figure 22-24 Power flosser with bow type tip, similar to nonpower devices.
(Courtesy Procter & Gamble, Cincinnati, Ohio.)
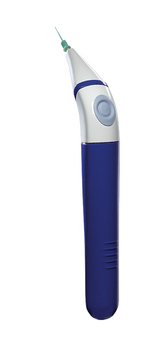
Figure 22-25 Power flosser with a single filament nylon tip.
(Courtesy Water Pik, Inc, Fort Collins, Colorado.)
Interproximal Brushes and Tips
Some power toothbrushes come with attachments designed to clean the approximal or interproximal area. Attached to the brush handle, they are activated by turning on the brush and using it according to the manufacturers directions. These attachments may be similar to a floss holder, an interdental brush, or a single- or end-tufted brush.
Dental Water Jets
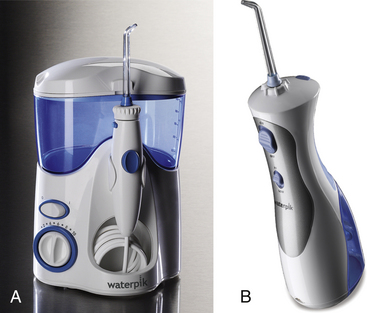
In studies of clients with fixed orthodontics, implants, crown and bridge, and gingivitis and those in a periodontal maintenance program, irrigating the gingival area with a dental water jet that produces pulsating streams of fluid has been reported to reduce plaque biofilm, bleeding, gingivitis, pocket depth, pathogenic microorganisms, and calculus. 8-11 In addition, studies have shown that daily water irrigation can reduce inflammatory mediators that promote or enhance the periodontal disease process. These improvements to the inflammatory response may potentially extend to systemic health, as documented by a study on persons with diabetes in which systemic measures of inflammatory mediators were reduced by the addition of oral irrigation to the self-care routine.9,10
On the other hand, dental water jets that produce a steady stream of fluid as seen with such devices that are attached to a shower or faucet have not been tested clinically for efficacy in reducing clinical parameters.
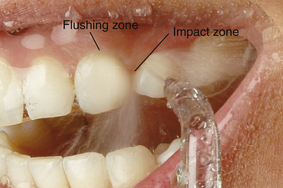
Mechanism of Action
A dental water jet that produces a pulsating stream of fluid (Figure 22-26) works by impacting the gingival margin with the pulsed irrigant (impact zone) and the subsequent flushing of the gingival crevice or pocket (flushing zone). This hydrokinetic activity produces a compression and decompression action that allows the irrigant to reach subgingivally. The majority of studies demonstrating safety and efficacy have been done with devices that deliver 1200 pulsations per minute and pressure settings between medium and high (50 to 90 pounds per square inch). Irrigation pressure can be controlled on most devices. Procedure 22-10 outlines the basic use of a pulsating dental water jet. For additional information on the use of a dental water jet, see Chapter 29.
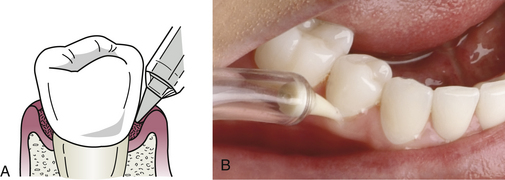
Depth of Delivery of a Solution
The dental water jet has the ability to reach deeper into the periodontal pocket than a toothbrush, interdental aid, or rinsing. This penetration allows for better subgingival cleaning and deeper delivery of antimicrobial agents. The depth to which the solution can reach is dependent on the tip used. A standard jet tip has been shown to reach 71% in pockets 0 to 3 mm, 44% in pockets 4 to 7 mm, and 68% in pockets greater than 7 mm. Specialty tips designed to be placed slightly below the gingival margin deliver a solution up to 90% in pockets 6 mm deep and 64% in pockets 7 mm or greater (Figure 22-28).
Tongue Cleaner Attachments
Powered tongue cleaners have been developed to remove plaque and debris from the dorsum of the tongue and to help control or eliminate malodor. Automation provides a means for additional action that may help clients who have difficulty with dexterity. A tongue cleaning attachment is available for dental water jets and provides a water flushing action or the delivery of an antimicrobial. Tongue cleaning attachments are also available for some power toothbrushes. There are no data to demonstrate that these devices are better than a manual tongue cleaner.
CLIENT EDUCATION TIPS
Explain the importance of interdental and subgingival cleaning to the prevention and control of periodontal disease. Explain that minor dexterity and visual acuity problems may be compensated through use of power devices. Explain how certain devices are better for specific embrasure spaces based on product design and function. Explain the limitations of floss, especially with clients who have deeper pockets, loss of attachment, and type II or III embrasures. Explain that client-specific self-care is an integral part of achieving and maintaining therapy outcomes.LEGAL, ETHICAL, AND SAFETY ISSUES
The legal records of the client should reveal that the client has been counseled on why and how to perform an effective daily personal self-care program. Specific recommendations of products are noted in the legal records. The clients' progress and compliance with recommendations are recorded. Alternative methods are recommended and demonstrated if prior instructions are not producing the expected outcomes or if the client is not able or willing to use a recommended device.KEY CONCEPTS
CRITICAL THINKING EXERCISES
Scenario: As a result of a recent automobile accident, one of your teenage clients has a broken jaw. To allow healing, her mouth is wired shut, keeping her from moving her jaw. She is seeking advice on how to care for her oral cavity. Several wires are present, and staples appear at the cervical margins of all teeth. She also has several intraoral cuts and abrasions, making any form of cleaning somewhat painful.
ACKNOWLEDGMENT
The authors acknowledge the contributions of Brenda Parton Maddox for her past contributions to this chapter.
Refer to the Procedures Manual where rationales are provided for the steps outlined in the procedures presented in this chapter.
1. Noorlin I., Watts T.L. A comparison of the efficacy and ease of use of dental floss and interproximal brushes in a randomized split mouth trial incorporating an assessment of subgingival plaque. Oral Health Prev Dent. 2007;5:13.
2. Yost K.G., Mallatt M.E., Liebman J. Interproximal gingivitis and plaque reduction by four interdental products. J Clin Dent. 2006;17:79.
3. Barnes C.M., Russell C.M., Reinhardt R.A., et al. Comparison of irrigation to floss as an adjunct to toothbrushing: effect on bleeding, gingivitis and supragingival plaque. J Clin Dent. 2005;16:71.
4. Zimmer S., Kolbe C., Kaiser G., et al. Clinical efficacy of flossing versus use of antimicrobial rinses. J Periodontol. 2006;77:1380.
5. Hujoel P.P., Cunha-Cruz J., Banting D.W., Loesche W.J. Dental flossing and interproximal caries: a systematic review. J Dent Res. 2006;85:298.
6. Smiech-Slomkowska G., Jablonska-Zrobek J. The effect of oral health education on dental plaque development and the level of caries-related Streptococcus mutans and Lactobacillus spp. Eur J Orthod. 2007;29:157.
7. Shibly O., Ciancio S.G., Shostad S., et al. Clinical evaluation of an automatic flossing device vs. manual flossing. J Clin Dent. 2001;12:63.
8. Cronin M., Dembling W.Z., Cugini M., et al. A 30-day clinical comparison of a novel interdental cleaning device and dental floss in the reduction of plaque and gingivitis. J Clin Dent. 2005;16:33.
9. Al-Mubarak S., Ciancio S., Aljada A., et al. Comparative evaluation of adjunctive oral irrigation in diabetics. J Clin Periodontol. 2002;29:295.
10. Cutler C.W., Stanford T.W., Abraham C., et al. Clinical benefits of oral irrigation for periodontitis are related to reduction of pro-inflammatory cytokine levels and plaque. J Clin Periodontol. 2000;27:134.
11. Sharma N.C., Lyle D.M., Qaqish J.G., et al. The effect of a dental water jet with orthodontic tip on plaque and bleeding in adolescent patents with fixed appliances. Am J Orthod Dentofacial Orthop. 2008;133:565.
Visit the  website at http://evolve.elsevier.com/Darby/Hygiene for competency forms, suggested readings, glossary, and related websites..