CHAPTER 57 Dental Implant Maintenance
Throughout history, humans have valued teeth and sought ways to replace them—for example, Maggiolo in 1809 was the first to describe implanting gold roots (Figure 57-1). The basic principles and surgical techniques used 100 years ago coincide with those used today. Early experiments with the implantation of artificial hollow-cylinder baskets made of iridoplatinum wire soldered with 24-karat gold were conducted. Research has transformed dental implantology from an unpredictable art to a firmly proven clinical science. Dental implants are now considered the standard of care, and dental practitioners are required to discuss implants as a treatment option with their clients as part of the informed consent process. Dental hygienists must be experts at dental implant hygiene maintenance in order to educate clients throughout and after dental implant therapy.
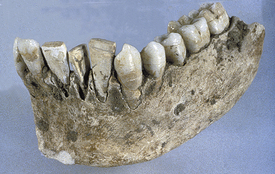
Figure 57-1 Early implant. This mandible dated ad 600 was found in Honduras. It contains three implanted incisors from carved seashells. Calculus formation on these implants suggests that this was a fixed, functional, esthetic tooth replacement.
(From Misch CE: Contemporary implant dentistry, St Louis, 2008, Mosby.)
OSSEOINTEGRATED DENTAL IMPLANTS
Dental implants offer an alternative to people who cannot function physically or psychosocially with conventional dental prostheses. For example, an edentulous person with limited bony support for a denture (narrow or atrophic alveolar ridge) is a potential candidate for dental implants (Figure 57-2). Clients who wear dentures chew at only 25% efficiency as compared with individuals with natural teeth. With implants, chewing efficiency rises to 96%. Implants, beneficial to persons who have lost a single tooth or multiple teeth, make it possible to avoid wearing a removable or fixed partial or full denture appliance. Implants provide a comfortable, functional, attractive, and stable system for replacement of natural teeth for the right candidate.
Natural tooth function describes the security of having a sound foundation on which to bite, chew, and grind. Tooth loss attributed to periodontal diseases, dental caries, or trauma prevents many individuals from experiencing natural tooth function. Although conventional restorative and prosthetic dental care assists clients in adapting to their lost dentition through fixed and removable prosthetic appliances, dental implants clearly provide a chance to regain natural tooth function.
Implant dentistry requires collaboration among the dental implant team (i.e., restorative dentist, periodontist, oral and maxillofacial surgeon, prosthodontist, dental hygienist, dental laboratory technician, and, in some cases, endodontist or orthodontist). The dental hygienist’s contribution consists of the following:
Dentists and dental hygienists work as co-therapists with clients to achieve natural tooth function. The dentist evaluates clients and meets their reconstructive needs for a biologically functioning dentition; the dental hygienist and client maintain the mucous membrane integrity of the tissues around the implant (peri-implant tissues).
Definitions (see Section on Implant Process)
An osseointegrated dental implant is a stable functional replacement for one or more missing teeth. An implant consists of an anchor, an abutment, and a prosthetic tooth or appliance (Figure 57-3).
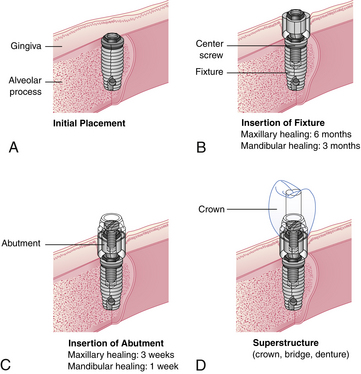
Figure 57-3 A to D, Sequence of treatment with osseointegrated dental implants.
(Courtesy Nobel Biocare, Yorba Linda, California.)
The anchor, a metal device inserted within the bone tissues of the mandibular or the maxillary arch, is frequently coated with a synthetic material that acts as a biocompatible interface to enhance bone formation. Titanium is the preferred metal for an implant anchor because of its biocompatibility with bone tissues. Other metals include Vitallium, cobalt alloys, ceramic, aluminum, and vanadium.
The abutment acts as a connection between the implant anchor and the prosthetic appliance. Surgical insertion of the abutment involves exposing the underlying implant anchor and attaching the abutment to the implant anchors by a center screw. Gingival tissue around the abutment needs approximately 3 weeks to heal in the maxilla and 1 week in the mandible. Oral biofilm control must be achieved at this time for proper healing. With oral biofilm present and host susceptibility, the peri-implant tissue is at risk for inflammation and infection (peri-implantitis).
The prosthetic tooth or appliance is fabricated by the dentist or prosthodontist and is the final attachment. The prosthetic appliance can consist of a crown, a bridge, or a denture and is placed after the healing period of the abutment insertion, which takes a few weeks.
Types of Dental Implants (Scenarios 57-1 to 57-7)
Three types of implants are subperiosteal, transosteal (transosseous), and endosteal (endosseous) implants (Table 57-1). The American Dental Association (ADA) considers endosteal implants to be the safest and most effective.
SCENARIO 57-1 A SINGLE IMPLANT WITH A FIXED PROSTHETIC TOOTH (FIGURE 57-16)
An 18-year-old client has fallen on his bicycle. The fall has affected the maxillary left central incisor. The oral surgeon extracts the tooth because it has Class III mobility and the gingival tissue has developed an infection with exudate. After the client’s condition is assessed, dental treatment is planned for one implant in this area. The anchor is surgically inserted by the oral and maxillofacial surgeon. The restorative dentist or prosthodontist fabricates a crown to match the natural tooth that the client lost, and the fixed prosthetic tooth is secured to the top of the single implant. This type of implant can be removed only by the dentist.
SCENARIO 57-2 A CLIP AND HADER-BAR IMPLANT WITH A REMOVABLE PROSTHETIC APPLIANCE OR DENTURE (FIGURE 57-17)
A 70-year-old client has developed severe aggressive periodontal disease. Her facial contours have collapsed from extensive bone resorption. The general dentist and dental hygienist have discussed the diagnosis and care options with the client and have referred her to an oral surgeon for extraction of remaining teeth. In consultation with the client, the general dentist and oral surgeon plan treatment to include a full removable upper denture and a lower endosteal implant system. The endosteal implant will consist of a two-implant system with a Hader bar between the implants and a full lower removable denture with a clip to hold it in place. With this dental implant approach, the client can readily remove the full lower denture. The client’s ability to remove the prosthetic appliance promotes long-term success of the implant by allowing daily access to oral biofilm accumulation. The maxillary removable prosthetic appliance adds rounded facial contours and alleviates deep furrows.
SCENARIO 57-3 A BALL, CROSSBAR, AND SOCKET IMPLANT PROSTHETIC APPLIANCE (FIGURE 57-18)
A ball, crossbar, and socket implant prosthetic appliance could be used in Scenario 57-2 because the cylinder form of implant system is similar in function to that of the clip and Hader-bar implant with a removable prosthetic appliance described previously. The design, however, is different in that a ball is on the implant abutment and the socket is within the prosthetic appliance.
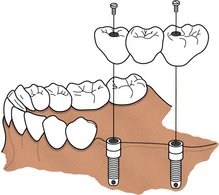
SCENARIO 57-4 A TWO-IMPLANT SYSTEM WITH A TWO-UNIT RESTORATION AND A CANTILEVER BRIDGE (FIGURES 57-19 and 57-20)
A client developed a benign tumor within the lower right mandible. The oral surgeon extracted two molars, removed the tumor, and inserted synthetic bone to promote bone growth. A few months later, two implants were placed in the mandibular right premolar area. The oral surgeon is hesitant to place another implant in the mandibular right molar region for fear of disturbing the inferior alveolar nerve. Therefore a two-unit crown restoration with a cantilever bridge is fabricated. A cantilever bridge allows for a posterior occluding surface area without placement of a third implant.
SCENARIO 57-5 A BLADE IMPLANT SYSTEM (SEE FIGURE 57-12)
A 71-year-old client lost her right posterior molars and second premolar when she was in her early twenties. The bone resorbed, leaving her with a knife-edged ridge that would not allow a cylinder form implant. The oral surgeon places a blade form endosseous implant and attaches a prosthetic bridge to the implant.
SCENARIO 57-6 A FULL MAXILLARY AND MANDIBULAR FIXED PROSTHESIS
A 68-year-old client complains of an ill-fitting conventional denture that she cannot tolerate. She has a strong desire for a fixed restorative implant system. The oral surgeon places a cylinder form of endosteal implant in the maxillary and mandibular arches. The fabricated prosthetic appliance (overdenture) is fixed to the endosteal implants. This implant system provides the client with the greatest comfort and stability. In addition, the psychological dilemma associated with removing the prosthetic appliance is eliminated because this appliance closely resembles the client’s natural tooth function. However, the facial contours are difficult to reshape and rebuild. Fixed appliances also are limited to the amount of bulk and volume they can contain to reshape the facial contours ideally.
SCENARIO 57-7 SINGLE ENDOSSEOUS DENTAL IMPLANTS WITH TRANSITIONAL IMPLANTS OR MINI IMPLANTS
A 70-year-old female client has had her full lower denture for 20 years. The denture has caused areas of discomfort on the lower mandibular gingival ridge. She does not want to wait to have the endosseous dental implants osseointegrate before placement of a fixed permanent lower denture. She has decided to have the four single endosseous implants placed along with transitional implants (mini implants) (see Figure 57-13) in order for the fixed permanent lower denture to be placed immediately. The transitional implants (mini-implants) are temporary. She is able to walk out of the surgical operatory in 1 hour with a fixed permanent lower denture while the endosseous dental implants are osseointegrating over the next 3 months.
Subperiosteal Implant (Figures 57-4 to 57-8)
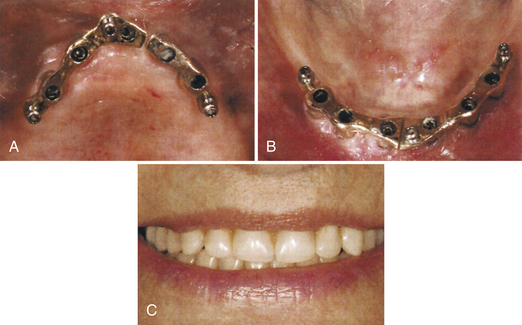
The subperiosteal implant consists of a titanium metal framework made by surgically separating the alveolar tissue, exposing the edentulous ridge, and taking an impression of the ridge while the client is under general anesthesia. The alveolar tissue is sutured, a study model is made, and the laboratory technician casts a framework to the model of the bone. After the titanium framework has been fabricated from the impression of the alveolar bone, the gingival tissue is surgically reexposed and the framework is placed on top of the bone and under the periosteum. Gingival tissue heals over the framework.
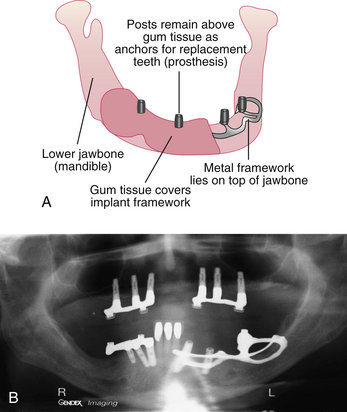
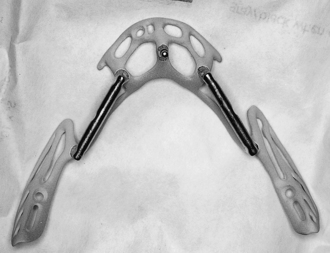
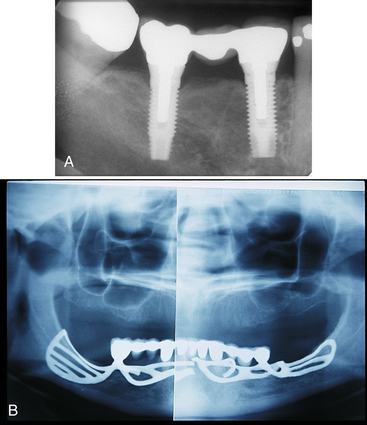
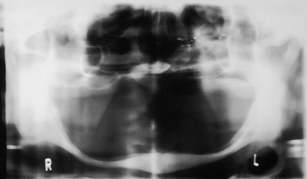
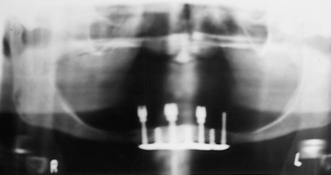
Figure 57-6 A, Radiograph of endosseous implants. B, Panoramic radiograph of a fractured subperiosteal implant.
(A, From Block MS: Color atlas of dental implants, ed 2, St Louis, 2007, Saunders. B, From Babbush CA: Dental implants: the art and science, Philadelphia, 2001, Saunders.)
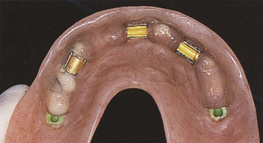
Figure 57-7 Overdenture used with a subperiosteal implant.
(From Babbush CA: Dental implants: the art and science, Philadelphia, 2001, Saunders.)
The implant does not osseointegrate to the bone but affixes itself to the bone by a fibroosseous connective tissue. Posts connected to the metal framework protrude through the gingiva to hold a fixed or removable crown, bridge, or denture. The subperiosteal implant is indicated when the width and depth of the alveolar bone are narrow or when the alveolar ridge is atrophic. Subperiosteal implants may fail because of a poorly designed prosthetic appliance or an infection that begins at the abutment site and spreads throughout the implant framework.
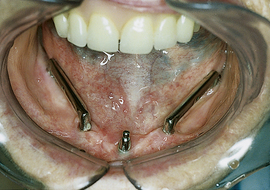
Transosteal Implant (Figures 57-9 to 57-11)
The transosteal implant (staple implant) consists of a titanium metal framework placed through the chin and into the mandible while the client is under general anesthesia. The transosteal implant is strictly for placement in the mandible; it cannot be placed in the maxilla. The design of this framework differs from that of the subperiosteal framework in that the transosteal implant is placed through the lower portion of the jaw, and the subperiosteal implant is placed on the alveolar ridge after the gingival tissue has been separated and exposed by flap surgery. Transosteal implants are most commonly placed when a client with a narrow mandible needs strength and support for chewing, biting, or grinding.
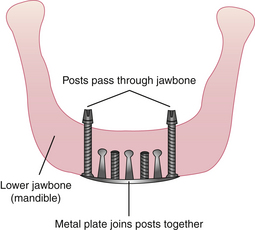
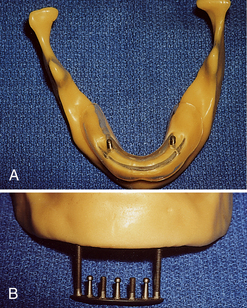
Figure 57-10 Hall transosteal implant with guided stent. A, Superior view. B, Inferior view.
(Courtesy M.J. McDonald.)
A client who cannot tolerate conventional lower dentures because of severe bone resorption needs a transosteal implant. An extraoral 5-cm incision is made through the anterior portion of the mandible to place this implant; no other implant requires this incision. A high-speed drill is used to make holes through the mandible. The transosteal implant consists of a plate and five or seven parallel dowels. Once the holes are made, the implant is tapped and screwed into the mandible. The dowels that protrude through the mandible act as the abutments for the prosthetic appliance that sits on top of the transosteal implant. Compared with other surgical techniques, transosteal implant placement has an increased probability of infection and implant failure. For this reason, transosteal implants are rarely used.
Endosteal Implant (Figures 57-12 to 57-14)
Titanium endosteal implant designs conform to the shape of a natural tooth root, are placed within the jawbone, and are supported from the bone by osseointegration. Four types of endosteal implants are described as follows (see Figure 57-12):
 Blade form consists of one or more abutments and is surgically placed into a slot made in the bone. The prosthetic appliance is then attached to the abutment. Cylinder form consists of a small titanium cylinder and an abutment surgically inserted into the bone that acts as a “root system.” The cylinder form surface may be texture coated or sprayed to enhance osseointegration. Screw form consists of the implant, cover screw, abutment, abutment screw, cylinders, and gold screw. Most widely used, this type of implant provides increased efficiency and improved esthetic result. Transitional or mini-implants are used to support a provisional prosthesis while root-form implants are osseointegrating. Transitional implants are thinner in diameter and designed to support a provisional prosthesis immediately on placement (see Figure 57-13).
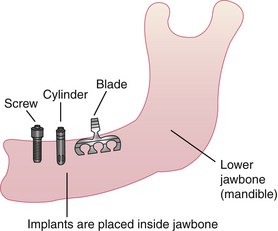
Figure 57-12 Three of the four types of endosteal implants. Screw and cylinder types are more successful than blade types.
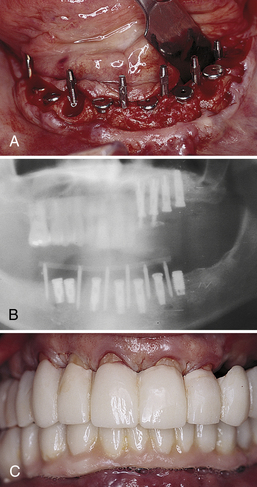
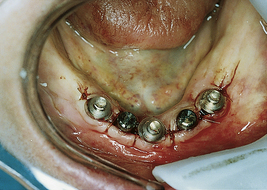
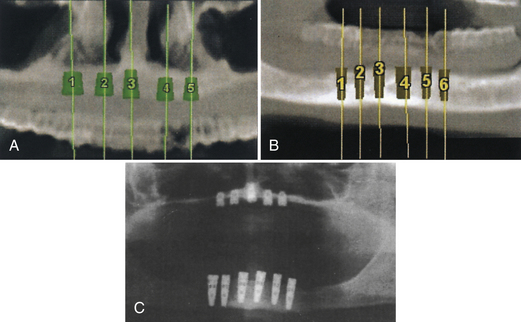
Figure 57-13 Transitional implants placed between osseointegrating screw form implants. A, Occlusal view demonstrates the six transitional implants interstitially among the submerged fixtures. B, Panoramic radiograph demonstrates transitional and regular implants. C, Clinical view demonstrates the mandibular transitional implant-supported, full-arch, temporary restoration.
(From Babbush CA: Dental implants: the art and science, Philadelphia, 2001, Saunders.)
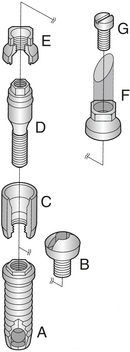
Figure 57-14 Brånemark system components. A, Implant. B, Cover screw. C, Abutment. D, Abutment screw. E, Cylinder. F, Cylinder. G, Gold screw.
(From Worthington P, Lang BR, LaVelle WE: Osseointegration in dentistry: an introduction, Carol Stream, Ill, 1994, Quintessence.)
An example of an entire endosteal implant structure is shown in Figure 57-14. The completed cast crown is attached to the abutment by the gold screw (Figure 57-15). Regardless of design, endosteal implants are the basic tooth root analog units in implant prosthodontic procedures and the most frequently used implants for oral rehabilitation.
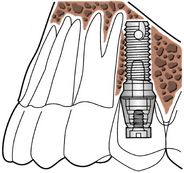
Figure 57-15 The cast crown is attached to the endosteal implant abutment by a gold screw.
(From Worthington P, Lang BR, LaVelle WE: Osseointegration in dentistry: an introduction, Carol Stream, Ill, 1994, Quintessence.)
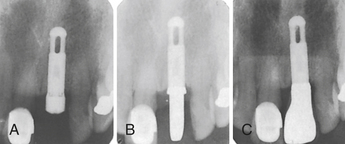
Figure 57-16 Radiographs of a single fixed dental implant. A, Dental implant placed with healing cap. B, Dental implant with abutment. C, Dental implant with fixed restorative crown.
(Courtesy K. Larson.)
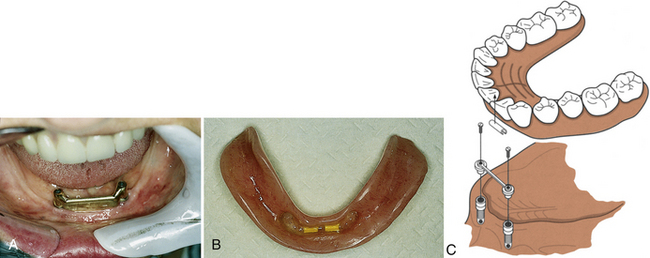
Figure 57-17 A, Crossbar endosteal implant. B, Clip-on type of overdenture. C, Components of the attachment.
(B, Courtesy M.A. Conover. C, From Worthington P, Lang BR, LaVelle WE: Osseointegration in dentistry: an introduction, Carol Stream, Ill, 1994, Quintessence.)
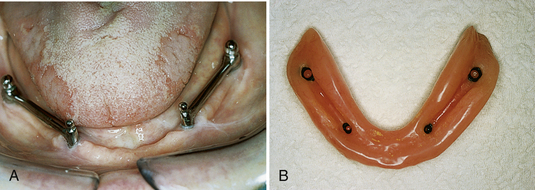
Figure 57-18 A, Ball and crossbar endosteal implant. B, Socket-type overdenture.
(Courtesy M.A. Conover.)
Implant Process
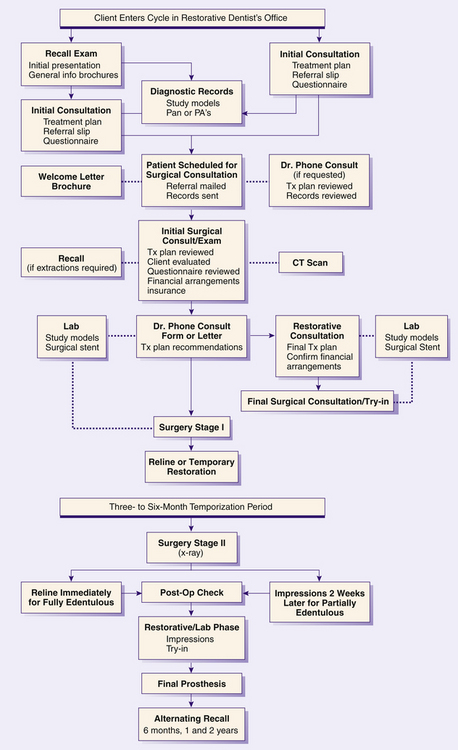
The implant process consists of a three-stage surgical and restorative treatment plan and follows the dental implant client flowchart (Figure 57-21).
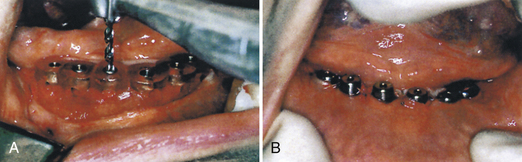
Stage One: First Surgical Procedure
At the first surgical appointment the client is placed under general or local anesthesia. General anesthesia is commonly used with the placement of transosteal implants. In addition, a local anesthetic with a vasoconstrictor may be administered into the gingival tissue for hemostasis. A surgical guide stent, a clear resin device containing holes, is constructed (Figure 57-22) to maintain angulation and axis for drilling the bone and for placement of the fixture. The dental implant anchor is placed into the drilled holes of the bone. The oral surgeon considers the mandibular canal with respect to placement of the implants in the mandible. There should be at least 1 mm of bone between the apex of the endosteal implant and the neurovascular bundle to prevent nerve damage (Figure 57-23). The amount of bone inferior to the maxillary sinus is also a consideration (Figure 57-24). After surgical placement the periosteum is sutured over the implant for a healing period. After surgery, the client experiences a sensation similar to that of having a tooth extracted.
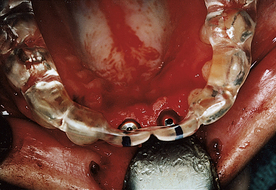
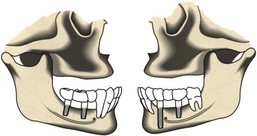
Figure 57-23 Placement of implants with respect to mandibular nerve and canal.
(From Worthington P, Lang BR, LaVelle WE: Osseointegration in dentistry: an introduction, Carol Stream, Ill, 1994, Quintessence.)
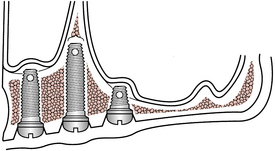
Figure 57-24 Amount of bone relative to the length of the endosteal implant from the anterior to the posterior maxilla.
(From Worthington P, Lang BR, LaVelle WE: Osseointegration in dentistry: an introduction, Carol Stream, Ill, 1994, Quintessence.)
Osseointegration (Figure 57-25) is a biologic phenomenon in which living bone cells directly fuse to a unique metal, titanium or Vitallium, that exhibits excellent biocompatibility. Bone cells grow tightly around the metal anchor and firmly hold it in place (Figure 57-26). Success of the dental implant depends on the osseointegration process, wherein the bone fuses to the implant.
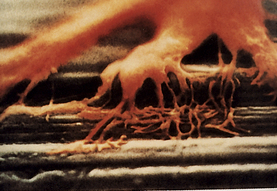
Figure 57-25 Bone cells fusing to a titanium implant, which is termed osseointegration.
(Courtesy Professor Per-Ingvar Brånemark, Institute for Applied Biotechnology, Gothenburg, Sweden.)
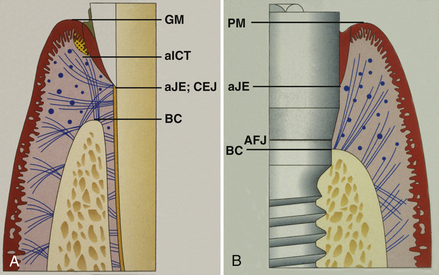
Figure 57-26 A, The sulcular tissue around a tooth is similar to an implant and so is the junctional epithelial (JE) zone. The connective tissue zone, which attaches to cementum on a natural tooth, is completely different around the implant. B, The peri-implant tissues exhibit histologic sulcular and JE zones similar to a natural tooth. The primary difference is the lack of connective tissue attachment and the presence of primarily 2 fiber groups, rather than 11 with the natural tooth.
(From Misch CE: Dental implant prosthetics, St Louis, 2005, Mosby.)
Because mandibular bone is less dense than maxillary bone, the mandible does not require as long of a healing or osseointegration period as does the maxilla. In general, dental implants placed in the mandibular bone heal and osseointegrate within 3 to 6 months, whereas the maxillary bone takes approximately 4 to 6 months to heal and osseointegrate. At the end of the first year, the osseointegration process should be stable.
Once the dental implant has osseointegrated to the bone, the gingival attachment is similar to an ankylosed tooth. Because the periodontal ligament is not present, the implant should not have mobility. The connective tissue attachment is the primary difference between implants and natural teeth. The supracrestal collagenous fibers do not attach to the implant as they do to cementum.
The connective tissue runs parallel to the dental implant instead of perpendicular. Both natural teeth and dental implants possess a junctional epithelium formed by hemidesmosomes; however, the dental implant’s junctional epithelium attachment is not as strong or predictable as that on natural teeth. The cells act as a bridge to the basal lamina and in turn attach to the titanium oxide surface layer of the implant. The biologic seal is then complete. The gingival sulcus depth of a dental implant averages 1.3 mm to 3.8 mm; that is greater than the average sulcus depth around healthy and natural dentition, which is 0.4 mm to 3 mm. The gingival tissue around the dental implant is less vascular than that found around natural teeth.
Success of osseointegration depends on the following (Figure 57-27):
Quantitative assessment of bone density around implants. (Bone density immediately adjacent to the implant is compared with bone at a short distance from the implant, which is outside the region affected by the implant procedure. The red areas represent less-dense bone; see Figure 57-28, B.)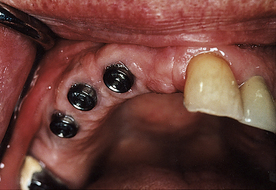
Figure 57-27 Client has healthy peri-implant tissue and good oral hygiene compliance.
(Courtesy A.K. Lakha.)
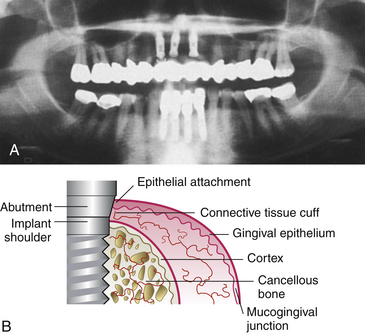
Figure 57-28 A, Radiograph of endosseous implants used for clinical follow-up. B, Blood supply of the connective tissue cuff surrounding the implant or abutment is scarcer than in the gingival complex around the teeth because none originates from the periodontal ligament.
(A, From Babbush CA: Dental implants: the art and science, Philadelphia, 2001, Saunders. B, From Newman MG, Takei HH, Klokkevold PR, Carranza FA, eds: Carranza’s clinical periodontology, ed 10, St Louis, 2006, Saunders.)
The Brånemark system, developed in the 1950s by a Swedish medical researcher, Per Brånemark, is the only system with the ADA Seal of Acceptance. The ADA contends that the Brånemark system is acceptable in fully edentulous people; however, the dentist is responsible for making proper client selection, receiving adequate training and experience in implant placement, and obtaining informed consent.
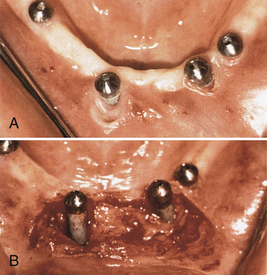
Stage Two: Second Surgical Procedure
After the implants have osseointegrated (determined by radiographic appearance), a second surgery is performed. The implants are surgically uncovered to place the abutments on top of the exposed implants. The implants are then surgically re-covered by suturing the periosteum together, with the abutments protruding through the periosteum. Healing caps (Figure 57-29) are placed to allow the tissue to heal, to permit oral hygiene access to the implant abutments, and to allow the prosthodontist or restorative dentist to secure the prosthetic appliance. The healing caps are removed after 2 to 4 weeks, and the abutments are uncovered (Figure 57-30).

Stage Three: Fabrication of Prosthetic Appliance or Restorative Crown
The third stage (Figure 57-31) of the implant process begins with fabricating the prosthetic appliance and may require several appointments to achieve a desirable fit. The design of the prosthetic appliance should ensure a wide interproximal space for access during daily oral biofilm control. Oral self-care education is provided 1 to 2 weeks after the placement of the prosthetic appliance. Within a few months, natural tooth function should be restored.
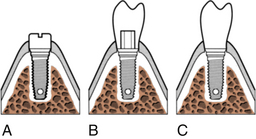
Figure 57-31 Stage two surgery for two-stage endosseous implant systems. A, The cover screws are located, removed, and replaced by an abutment cylinder that penetrates the mucosa into the mouth. B, The prosthetic component is then mounted on the abutment. C, The final stage three restoration is attached with a screw or cement.
(From Worthington P, Lang BR, LaVelle WE: Osseointegration in dentistry: an introduction, Carol Stream, Ill, 1994, Quintessence.)
Candidate Selection Process
The oral health team gathers information about health history, medications, allergies, chief complaints, missing teeth, current prosthetic appliances, radiographs or digital imaging, virtual treatment planning (three-dimensional computer model), and diagnostic models. This information allows the dentist to determine the type of implant to use and the care plan. Figure 57-32 depicts an oral surgery dental implant referral form.

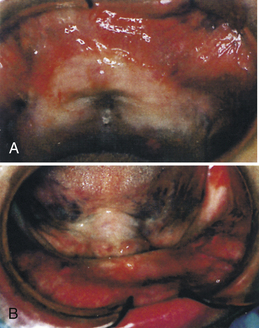
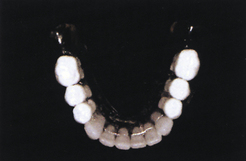

Figure 57-35 Preoperative computed tomography scan, maxilla and mandible, while scanning prosthesis is worn.
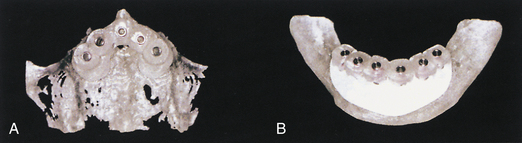
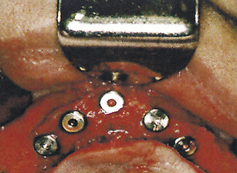
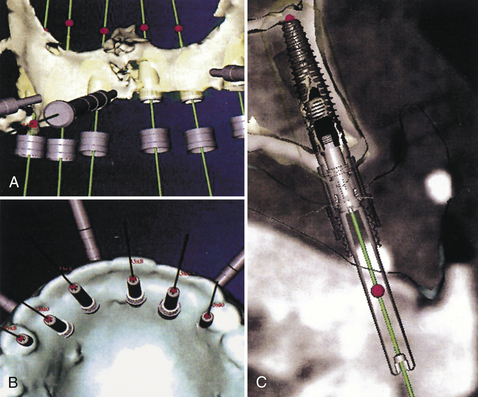
Figure 57-40 A computer model of the maxilla (A and B) and palatal view (C) of the proposed implants’ emergence. The images resemble a traditional radiograph.
Indications and contraindications should be discussed candidly with the client (Box 57-1). The necessity for client adherence to oral self-care recommendations should be emphasized. Unfortunately, many clients view the implant as a new tooth that will tolerate mistreatment better than a natural tooth. This myth must be dispelled, and the client must realize that the gingival tissue around the dental implant needs more daily oral care than the gingival tissue around a natural tooth.
BOX 57-1 Indications and Contraindications for Using Dental Implants
Indications
Some dental implant candidates have lost their natural teeth as a result of significant oral risk factors for periodontal disease. These individuals may also be at risk for failure of the dental implant. The dental hygienist evaluates the client’s risk factors for oral disease (see Chapter 17) and the client’s value system regarding his or her mouth and oral health behaviors. A high level of motivation and good manual dexterity are important requirements in a candidate for dental implants and for long-term success. In fact, a willingness to perform daily oral biofilm control is a criterion that separates a good implant candidate from a poor one. Box 57-2 offers questions to help determine who might be a good implant candidate. If the client has one or more chronic contraindications, the oral health team may recommend another mode of treatment. Once contraindications are resolved, the client can be reevaluated for implants.
Virtual Treatment Planning (Scenario 57-8)
Three-dimensional “virtual” implant treatment planning and surgery allow the oral surgeon to visualize a client’s bony anatomy in three dimensions before making an incision for dental implant placement by using medical-grade computed tomography (CT) scanners and in-office cone beam scanners. Visualization of all pertinent vital structures, including nerves, sinuses, soft-tissue thicknesses, implant-to-restoration distances, and angulations, is possible before surgery. CT technology makes accurate measurements and digital-image storage possible. The images can be imported into proprietary software that allows the oral surgeon to “virtually” place implants for a client on the computer (e.g., SimPlant, Materialise Dental, Glen Burnie, Maryland; NobelProcera, Nobel Biocare, Yorba Linda, California; EasyGuide, Keystone Dental, Burlington, Massachusetts; Facilitate, AstraTech Dental, Waltham, Maryland). From the virtual treatment plan, surgical drilling guides can be fabricated. These surgical guides allow the doctor to surgically place the planned implants in the client’s mouth, in the same positions as in the virtual treatment plan.
SCENARIO 57-8 VIRTUAL DENTAL IMPLANT CLIENT
A 75-year-old woman had severe atrophy of her maxillary and mandibular ridges from long-term denture wear (Figure 57-33). She was unhappy with her inability to retain her dentures and function normally; an implant-stabilized overdenture was her best option. Given the severe atrophy of her maxillary and mandibular ridges, it was impossible to determine the anatomy of the underlying bone for the evaluation and placement of dental implants. Barium upper and lower dentures were fabricated (Figure 57-34) using the SimPlant protocol. While she was wearing these barium dentures, computed tomography scans were taken (Figure 57-35). After evaluation of the scans and determination of the full extent of the atrophy of the ridges, the client underwent virtual treatment planning for five Endopore implants (Sybron Implant Solutions, Orange, California) in the maxilla and six Nobel Biocare implants in the mandible. Bone-borne SurgiGuides (Materialise Dental, Leuven, Belgium) were ordered based on the virtual treatment plan (Figure 57-36).
Through use of the SurgiGuides, all of the implants were successfully placed in one visit (Figures 57-37 to Figure 57-40). After 4 months of osseointegration, a framework and overdenture were successfully fabricated and inserted in each arch (Figure 57-41).
Current systems have similar protocols. First the dentist creates a prosthesis for the client to wear during the CT scan. This is a partial or full denture (scanning prosthesis) that duplicates the planned final restorations. The CT scan is then taken with the client wearing the scan prosthesis. This allows the oral surgeon to visualize the relationship of the restorations to the underlying bone. A computer program (e.g., SimPlant, NobelProcera, EasyGuide) is then used to virtually place implants in the ideal position, relating the planned restorations to the underlying bone. The oral surgeon then downloads the virtual treatment plan to the software company for fabrication of a surgical guide. The oral surgeon uses the surgical guide, with implant-specific drilling instrumentation, to precisely place the implants. This technology is ideally suited for cases where immediate placement of implants is planned. The provisional or final restorations can be planned before surgery and placed with minimal if any alteration. The treatment-planning process is truly restoratively driven.
Virtual treatment planning and computer-generated drilling guides benefit the client by allowing flapless surgery, reduced surgical time, reduced discomfort and swelling, and quicker return to life and work. They benefit the oral surgeon by reducing chair time, stress of surgery, and potential surgical complications, as well as facilitating an accurate means of placing dental implants according to a predetermined restoratively driven treatment plan. Not only does the technology allow the doctor to visualize atrophic or distorted jaw anatomy before surgery, but it also allows the oral surgeon to place implants with precision. Implants can be placed with accuracy and predictability, with as little trauma to the soft tissue and bone as possible. Bleeding, swelling, and alteration of bone and soft-tissue vascularization are minimized. Implants can be placed quickly, thus minimizing client stress, pain, and time in the dental chair.
Benefits and Risks
Benefits and risks should be explained verbally and in writing to potential dental implant clients (Box 57-3).
Benefits
Dental implants allow clients to chew food properly, facilitating essential digestive processes. Clients with dental implants report that they enjoy their food more, their speech is improved, and their comfort, appearance, self-confidence, and self-esteem are increased compared with their previous condition. Other benefits include decreased bone resorption, tissue ulceration, and pressure; elimination of direct force on the gingival tissue and alveolar crest; increased retention of the prosthetic appliance; and preservation of the remaining bone structure. Studies show an overall implant success rate of 96% over a 20-year period.
Risks
Clients may lose dental implants because of oral biofilm–related peri-implantitis. In poor oral hygiene, microflora consists of increased levels of subgingival spirochetes and gram-negative anaerobic rods such as Peptostreptococcus intermedius, Peptostreptococcus gingivalis, Fusobacterium species, and Aggregatibacter actinomycemcomitans. Although Staphylococcus aureus is not commonly found in the oral cavity, it is the only bacterial species known to attach directly to the titanium interface and cause peri-implantitis. Bacterial endotoxins and metabolic end products lyse epithelial and connective tissue and produce an acute inflammatory response in the host. The gingival attachment breaks down and an apical migration of the junctional epithelium begins, followed by apical bone loss and mobility. Absence of connective tissue attachment around the dental implant may account for the fragility of the junctional epithelium. Dental implants are more susceptible to inflammation, which advances more quickly and deeply than around natural teeth.
Rapidly the continued inflammation will be surrounded by fibrous tissue, granulation tissue replaces and destroys the healthy bone, and the implant will fail. Dental implant clients who are partially edentulous are at greater risk for implant failure than dental implant clients with fully edentulous mouths. The remaining natural dentition acts as a reservoir for periodontal microbes, which migrate to the implant sites and initiate infection.
An implant may fail because of a dehiscence (a hole in the buccal or labial plate of the alveolar process caused by placing an implant in an area of insufficient bone). Some also fail because of the body’s inability to accept the metal of the implant, failure to osseointegrate, improper client selection, improper load force (pressure from masticatory processes that is not balanced across the dentition) exerted on the implant, inadequate allowance of healing time and interface development, inadequate manufacturing quality control of the dental implant, inadequate prosthetic design, and surgical complications (Figure 57-42).
Documentation and Informed Consent
The dentist informs the dental implant candidate of the treatment plan, including time requirements to complete the plan, the self-care regimen required, and the benefits and risks of having dental implants. After relevant information is explained, an informed consent document should be signed and dated by the client and clinicians involved. After implant placement, the client should be given a wallet card to keep that identifies the location, the type of dental implant, the catalog number of the dental implant, and the date the implant was placed (Figure 57-43). A dental implant sticker or uniquely colored chart should be used in the client record to identify the dental implant client. A dental implant rubber stamp can be used to place an image of the dental implant on the dental charting form (Figure 57-44).
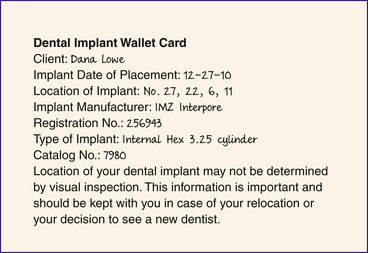
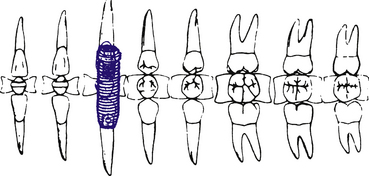
Figure 57-44 Dental implant stamp used to show location of dental implant for documentation in the client record.
Companies have developed an implant Internet-based tracking and management planning portal to register each patient case via a specific identification code. This tracking system allows the dental team to share and provide access to case information in a central and secure online location. Efforts are in place to uphold strict guidelines and maintain Health Insurance Portability and Accountability Act (HIPAA)–compliant security and data encryption. The system is available only to doctors and hygienists for data entry and retrieval.
DENTAL IMPLANT PRACTICE MANAGEMENT
To create optimal treatment plans for clients and to practice with high levels of efficiency, productivity, and profitability, an effective management system must be in place. The Levin Group Method helps clinicians successfully redesign their systems for maximum efficiency (Figure 57-45). This method has the following four components:
Benchmarking to gauge practice performance and to evaluate how the practice could run more efficiently and profitably Customized management systems, because every practice differs in the number of staff members, types of services provided, and types of technologies used for clients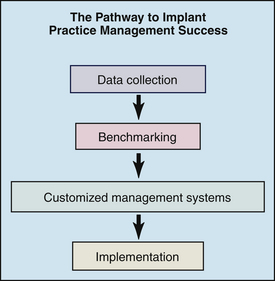
Figure 57-45 The Levin Group Method’s four steps to implant practice management success.
(Adapted from Levin Group Method: four steps to implant practice management success, Owings Mills, Md, 2008, Levin Group.)
Dental Hygiene Implant Maintenance Insurance Plans
Increasingly, dental insurance plans are providing dental implant benefits to their beneficiaries. Many dental plans also consider payment for the procedure code D6080 for dental implant hygiene maintenance if an implant-supported superstructure is involved. In the narrative to the insurance company it is important to communicate that the actual prosthesis was removed, cleaned, tightened, and reinserted. Some dental plans cover this procedure in addition to a regular prophylaxis when performed on the same day.
DENTAL HYGIENE PROCESS OF CARE FOR THE CLIENT WITH DENTAL IMPLANTS (BOX 57-4)
Assessment
During assessment the dental hygienist identifies, evaluates, and documents the following signs and symptoms of oral problems, risk factors, and issues associated with the dental implant:
Amount of oral biofilm and calculus formation as measured by disclosing solution and the plaque and calculus index (Table 57-4) Visualization of salivary percolation as a result of applying pressure to the crown of the implant and causing bubbles to form at the sulcus, indicating a breakdown of the biologic sealBOX 57-4 The Role of the Dental Hygienist in Implant Maintenance
Adapted from Misch CE: Contemporary implant dentistry, ed 3, St Louis, 2007, Mosby.
TABLE 57-2 Attached Peri-Implant Tissue Index
| Grade∗ | Clinical Impression |
|---|---|
| 0 | No keratinized epithelium |
| 1 | ≤1 mm keratinized epithelium |
| 2 | ≤2 mm and >1 mm keratinized epithelium |
| 3 | >2 mm keratinized epithelium |
∗ Create tension by retracting lips laterally to form the mucoperi-implant tissue junction. Use probe to measure the external surface of the attached peri-implant tissue (note that this measurement uses the tissue that is outside of the sulcus); measure from the mucoperi-implant tissue line to the peri-implant tissue margin to determine width.
From Koth D, McKinney RV Jr, Steflik D: Clinical dentistry: evaluation of the implant-gingival tissue interface, Hagerstown, Md, 1984, Harper and Row.
TABLE 57-3 Peri-Implant Tissue Bleeding Index
| Grade∗ | Clinical Impression |
|---|---|
| 0 | |
| 1 | |
| 2 | |
| 3 |
∗ Visual assessment and use of a plastic probe determines grade of peri-implant tissue.
From Koth D, McKinney RV Jr, Steflik D: Clinical dentistry: evaluation of the implant-gingival tissue interface, Hagerstown, Md, 1984, Harper and Row.
TABLE 57-4 Plaque and Calculus Index for Dental Implants
| Grade∗ | Clinical Impression |
|---|---|
| 0 | |
| 1 | |
| 2 | Visible plaque within the peri-implant crevice or on the implant and peri-implant tissue margin and adjacent peri-implant tissue surface; moderate accumulation of soft debris; or subgingival calculus extending more than 1 mm into the crevice or moderate amounts of supra–peri-implant and sub–peri-implant calculus can be seen visually |
| 3 | Heavy accumulation of plaque within the crevice or on the implant surface and peri-implant tissue margin and adjacent implant surface; an abundance of soft matter or heavy accumulation of supra–peri-implant and sub–peri-implant calculus |
∗ Visual assessment and use of a plastic probe determine grade of plaque and calculus.
From Koth D, McKinney RV Jr, Steflik D: Clinical dentistry: evaluation of the implant-gingival tissue interface, Hagerstown, Md, 1984, Harper and Row.
TABLE 57-5 Mobility Evaluation Scale
| Grade | Clinical Impression |
|---|---|
| 0 | Absence of clinical mobility with 500 g in any direction |
| 1 | Slight detectable horizontal movement |
| 2 | Severe horizontal movement greater than 0.5 mm |
| 3 | Moderate visible horizontal mobility up to 0.5 mm |
| 4 | Visible moderate to severe horizontal and any visible vertical movement or apical migration of crestal bone with accompanying severe mobility |
From Misch CE: Contemporary implant dentistry, ed 3, St Louis, 2007, Mosby.
TABLE 57-6 Mobility Index for Free-Standing Endosteal Implants and Attached Prostheses
| Grade∗ | Clinical Impression |
|---|---|
| 0 | No mobility |
| 1 | Slight buccolingual mobility, less than 0.5 mm |
| 2 | Slight buccolingual mobility, more than 0.5 mm but less than 1.0 mm |
| 3 | Mobility more than 0.5 mm in buccolingual and mesiodistal directions |
| 4 | Depressible, salivary percolation (bubbling around implant) |
∗ Use of two single-ended metal instruments to determine mobility. Rock the implant to test horizontal mobility. Test vertical mobility by applying pressure occlusally.
From Koth D, McKinney RV Jr, Steflik D: Clinical dentistry: evaluation of the implant-gingival tissue interface, Hagerstown, Md, 1984, Harper and Row.
TABLE 57-7 Implant Quality Scale
| Group | Management | Clinical Conditions |
|---|---|---|
| I. Success (optimum health) | Normal maintenance | |
| II. Survival (satisfactory health) | ||
| III. Survival (compromised health) | ||
| IV. Failure (clinical or absolute failure) | Removal of implant |
From Misch CE, Perel ML, Wang H Implant success, survival, and failure: the International Congress of Oral Implantologists (ICOI) Pisa Consensus Conference, Implant Dent 17:5, 2008.
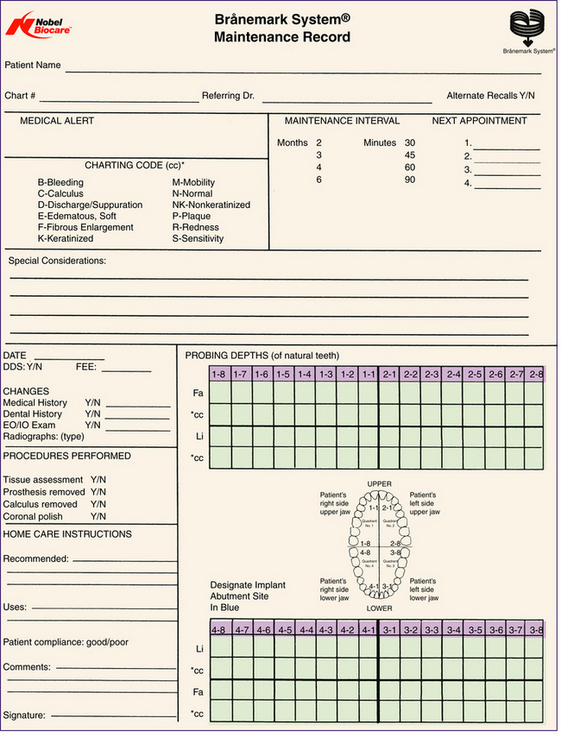
Figure 57-46 provides a sample assessment form for establishing the client’s baseline status maintenance record; this form can be used in conjunction with the human needs assessment form found in Chapter 19, Figure 19-3.
Diagnosis and Planning
Depending on the client’s diagnosed unmet needs, the dental hygienist, in conjunction with the client and the dentist, sets goals and develops a care plan. Client preferences significantly affect the client’s acceptance of oral health recommendations and should be incorporated into the care plan. The dental hygienist works collaboratively with the client to ensure that the proposed care plan is understood and accepted.
Implementation
The oral environment surrounding the dental implant consists of keratinized and nonkeratinized peri-implant tissues. A biologic seal is created and adapts to the titanium abutment. Microbial flora within the sulcus of a dental implant is similar to that found around a natural tooth; oral biofilm and dental calculus accumulate around the abutment and the prosthetic appliance. Supragingival calculus, more common than subgingival calculus, is less tenacious and more easily removed than calculus that forms around a natural tooth. The low surface energy of the titanium abutment and its attraction of proteins with low surface affinity account for this phenomenon. Metabolic end products from oral spirochetes may cause cytotoxicity to gingival tissues by producing and releasing proteolytic enzymes (that dissolve fibrin) and trypsinlike enzymes (that disrupt cell-to-cell adhesion).
Peri-implant inflammation (Figures 57-47 and 57-48) can occur around the implant abutment if biofilm and calculus continue to accumulate. The marginal bone height for the implant decreases, which may lead to failure of the implant. Failing endosseous dental implants may be associated with higher levels of subgingival spirochetes within the peri-implant tissues. The client must perform effective daily oral hygiene care and undergo continued periodontal maintenance therapy to maintain dental implants.1
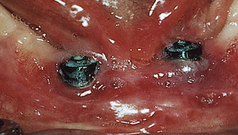
Figure 57-47 Peri-implantitis, an infectious disease around implant. Note amount of plaque and changes in tissue color, size, contour, and consistency.
(Courtesy A.K. Lakha.)
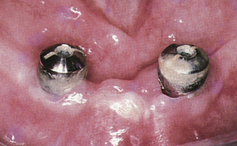
Figure 57-48 Heavy plaque and calculus accumulation around these healing heads have caused a breakdown of the perimucosal seal. The implants are at risk for failure.
(From Babbush CA: Dental implants: the art and science, Philadelphia, 2001, Saunders.)
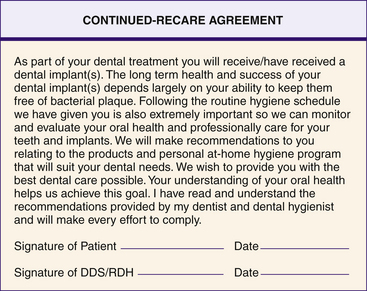
In providing supportive care the dental hygienist works to maintain optimal gingival health and bony support of the dental implant. Therefore the dental hygienist instructs the client on appropriate homecare aids to clean the implants daily (see Chapters 21 and 22) and provides professional oral hygiene care at regular intervals. An understanding of optimum oral health helps the client achieve long-term success. A continued-recare agreement form (Figure 57-49) enables the client to claim personal responsibility for oral health. The client must agree to comply with professional recommendations.
Personal Oral Care
Ongoing self-care education should be customized based on client preferences and with regard to abutment length and position; the prosthetic design and the ease of removal of biofilm between the appliance and gingival tissue; client motivation, compliance, and manual dexterity; and health of the peri-implant tissue. Clients who have lost their teeth because of mutable and immutable risk factors need education on the modification and control of those risk factors (see the discussion of periodontal risk factors in Chapter 17). The hygienist impresses on clients that implants also are vulnerable to periodontal risk factors that can cause peri-implantitis.
The dental hygienist monitors the oral tissues to ensure that the client is not causing trauma with an oral hygiene aid. As a client’s oral condition changes, so do his or her dental hygiene needs. For example, if a client has an increased amount of hemorrhaging, the dental hygienist needs to reassess the client’s condition and modify homecare to include daily application of 0.12% chlorhexidine gluconate or a new implant cleaning strategy.
RECOMMENDED DEVICES AND STRATEGIES FOR CLEANING DENTAL IMPLANTS (BOX 57-5)
Disclosants (see Chapter 15)
Disclosing agents, for professional and home use, are applied to teeth and dental implants for oral biofilm visualization. For example, the client may not see biofilm on the lingual aspect of abutments or on the posterior portion of a bridge without a disclosant. These agents are used as a monitoring strategy once effective self-care behaviors are confirmed.
BOX 57-5 Personal and Professional Oral Hygiene Aids for Persons with Dental Implants
Personal Oral Care Products
Floss
Oral Irrigators
Professional Dental Implant Hygiene Armamentarium
Implant Scalers
Irrigating Tips for Dental Implants
Intraoral Mirror and Penlight
A magnifying intraoral mirror and penlight should be used by the client in conjunction with disclosants for an adequate visual examination of oral biofilm accumulation and color changes in soft tissue.
Toothbrushes (see Chapter 21)
Clients should clean their implants, teeth, and gums two to three times daily with a toothbrush directed at a 45-degree angle toward the soft tissues. Because titanium is less rigid than a natural tooth, the surface of the abutment can be damaged with hard-bristled toothbrushes, facilitating oral biofilm accumulation and gingival or peri-implant recession (loss of gingival tissue around the implant). Therefore soft-bristled brushes are recommended. To prevent trauma to the delicate mucosa surrounding the abutment, the soft-bristled brush should have a small, compact head for reaching the facial, lingual, and occlusal surfaces and for tongue brushing. The toothbrush can be dipped into a 0.12% chlorhexidine gluconate solution to enhance oral biofilm and gingivitis control. Clients also should invest adequate time brushing their prosthetic appliances.
Unituft Interspace Brushes—Tapered or Flat (see Chapter 22)
The unique design of the unituft interspace brush allows the client to focus on one implant or tooth at a time (Figure 57-50). The brush has soft-bristled nylon fibers that do not damage the peri-implant tissue. The facial and lingual surfaces of dental implants can be reached with the unituft interspace brush with either the tapered or flat design. The plastic handle can be placed under hot water and bent for greater access to hard-to-reach areas. The unituft toothbrush is recommended for use two or three times daily to remove oral biofilm and to strengthen the peri-implant and gingival tissue. The unituft brush can be dipped into a 0.12% chlorhexidine gluconate solution to enhance biofilm and gingivitis control.
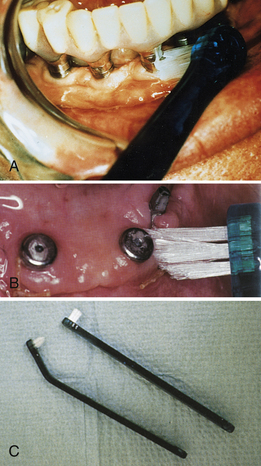
Figure 57-50 A, Application of an end-tuft toothbrush to an endosseous implant. B, Application of a tapered end-tuft toothbrush to healing surgical sites. C, Tapered and flat end-tuft toothbrush design. The plastic handle can be bent to a position for use in lingual areas.
(A, Courtesy J. Kleinman. B and C, From Babbush CA: Dental implants: the art and science, Philadelphia, 2001, Saunders.)
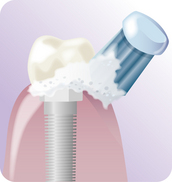
Power Brushes (see Chapter 21)
Power brushes may be prescribed for clients to thoroughly clean around the abutments and interproximal areas under the prosthetic tooth or appliance (Figures 57-51 and 57-52). Brushes can be dipped into 0.12% chlorhexidine gluconate and used. The motion of the brush should follow the curvature of the dental implant along the gingiva. Power brushing is recommended one or two times daily.
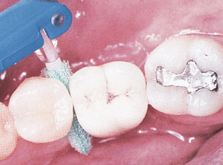
Plastic Nylon-Coated Interdental Brush and Foam Pads—Tapered or Cylindric (see Chapter 22)
The interproximal areas of dental implants can be reached with a cone-shaped or cylindric interdental brush, foam tip, or Proxi-Tip (Figures 57-53 and 57-54). To avoid alteration of the abutment surface, nylon-coated wires are required rather than the conventional metal-wired brushes. Interdental brushes should be discarded when the nylon coating has worn down to the metal wire. The interdental brush can be used from the facial or lingual areas and interproximally. Interdental brushes are recommended for use at least one time daily. The interdental brush also may be used with 0.12% chlorhexidine gluconate for target delivery of the antimicrobial agent.
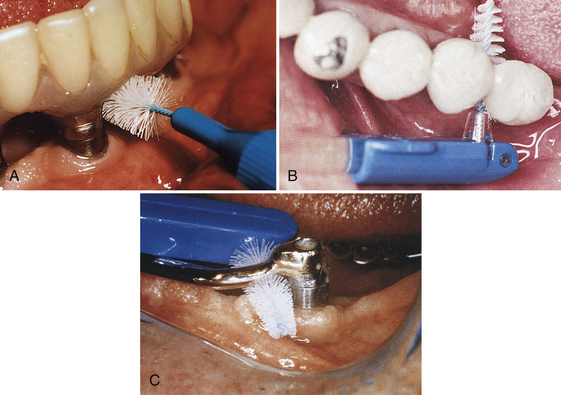
Figure 57-53 A, Application of a John O. Butler nylon-coated Proxabrush to an endosseous implant. B, Coated interproximal brush is used when embrasure space allows easy insertion and removal. C, Connector bars can usually accommodate interproximal brushes for ease of use and effective self-care.
(A, Courtesy J. Kleinman. B, Courtesy Oral-B (now Procter & Gamble), Cincinnati, Ohio. C, From Babbush CA: Dental implants: the art and science, Philadelphia, 2001, Saunders.)
Rubber Tip
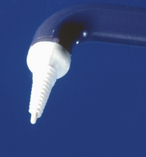
The rubber tip may be used to remove debris accumulation from all surfaces, including the gingival sulcus toward the coronal and abutment surface. The rubber tip also may stimulate and massage the peri-implant tissue. Performance of this procedure is recommended once daily (Figure 57-55).
Dentifrice (see Chapter 23)
Abrasive dentifrice can alter the abutment surface; therefore clients should use a low-abrasive toothpaste (defined as one that has a radioactive dentin abrasion [RDA] score of 130 or less). Toothpastes that carry the ADA Seal of Acceptance or the Canadian Dental Association (CDA) Seal of Recognition meet this criterion of low abrasiveness. For example, a low-abrasive dentifrice such as Crest ProHealth or Colgate Total could be safely recommended for implant clients twice daily in conjunction with an oral hygiene aid. Baking soda (sodium bicarbonate) toothpastes also are low abrasive.
Dental Floss and Dental Tape (see Chapter 22)
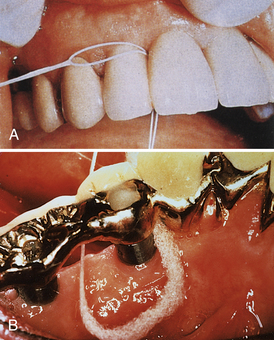
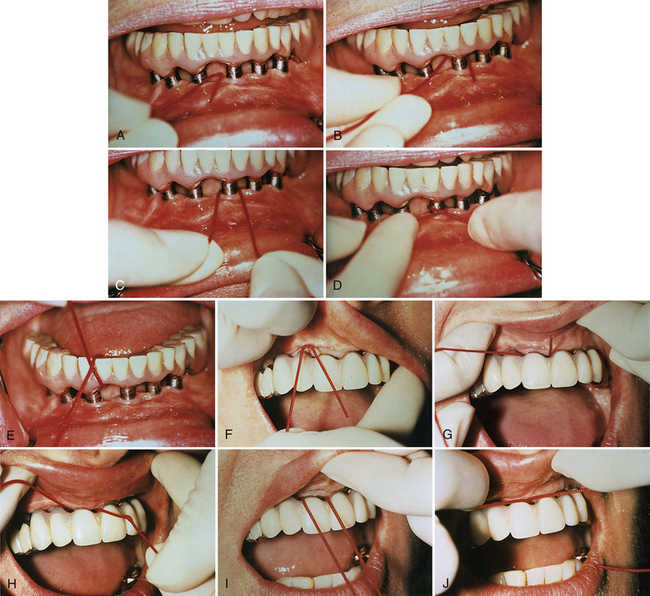
If abutments are spaced close to each other, dental floss or tape should be used to clean their proximal surfaces at least once daily (Figures 57-56 to 57-58). The floss is placed around the implant, crisscrossed, and pulled in a shoe-shining motion to clean the abutment. Floss or tape can be used in conjunction with a floss threader to allow easy access through the embrasure or limited areas. Other aids, such as shoelaces, ribbon, yarn, and gauze, may also be used if embrasure space permits.

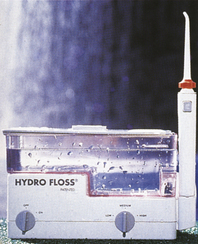
Oral Irrigation
An oral irrigator (Figure 57-59) may be indicated for use in limited access areas where there is evidence of soft-tissue inflammation surrounding the abutment cylinder. The flow rate of the unit should be set at the lowest force (see Chapter 22). Solutions used in the oral irrigator may include water, an ADA-Accepted antimicrobial mouth rinse, or a 0.12% chlorhexidine gluconate mouth rinse (see the discussion of oral antimicrobial agents in Chapter 29).
Antimicrobial Agent (see Chapter 29)
For approximately 5 to 7 days after the abutment connection surgery, use of a capful of the antimicrobial 0.12% chlorhexidine gluconate solution as a 30-second rinse is recommended twice daily to control plaque formation. A cotton swab, soft toothbrush, unituft interspace brush, power rotary brush, interdental brush, or subgingival irrigator (Figure 57-60) may be used for the target delivery of an agent to a site. Rinsing with 0.12% chlorhexidine gluconate reduces both gram-positive and gram-negative oral bacteria by 100% for up to 5 hours after use with the 30-seconds-twice-a-day protocol, resulting in less peri-implant gingivitis and bleeding; however, use of chlorhexidine gluconate as a rinse for more than a month may cause staining of natural teeth or the prosthetic appliance.
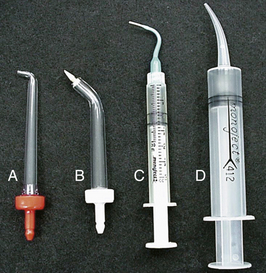
Figure 57-60 Irrigation tip styles. Supragingival (A) and marginal (B) tips are designed to attach to a power irrigator. The two tips on the right are attached to simple syringes. Tip C is a marginal irrigator tip. Tip D has the most difficult fit because the tip becomes progressively wider.
(Courtesy Dr. W.B. Stilley II.)
Cervitec Plus varnish with chlorhexidine gluconate can be used to protect at-risk, exposed, and sensitive implant tissue areas. The combination of 1% chlorhexidine and 1% thymol firmly adheres to the implant surfaces, creating a shield of long-lasting protection. A heavy metal salt agent, hyaluronic acid, can be placed in the implant area with the solution in a syringe. It reduces bacterial colonization and bleeding within the first 2 months and has tissue healing properties.
CARE AND MAINTENANCE OF DENTAL IMPLANTS (SEE BOXES 57-4 and 57-5)
Armamentarium
The clinical armamentarium (Table 57-8) needed to provide professional dental hygiene implant care includes the following:
Set of gold-tipped titanium covered implant hygiene scalers (all types of tips available) (Figure 57-64) Soft, multitufted toothbrush with a compact head design and other appropriate aids for self-care instructionTABLE 57-8 Clinical Implant Hygiene and Maintenance Armamentarium
| Company | Product | Features |
|---|---|---|
| Advanced Implant Technologies | Implant-Prophy+ | |
| Brevet | Implant Cleaning Kit | |
| Quixonic SofTip | Plastic Prophy Tips for Quixonic Sonic Scaler | |
| Hu-Friedy | Implacare | |
| Pro-Dentec | Sensor Probe | |
| Pro-Dentec | Mandrels | |
| Premier | ||
| Straumann (ITI) | Light Curet | |
| Steri-Oss | Scaler System |
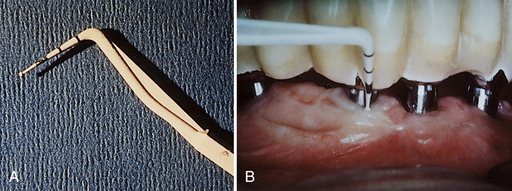
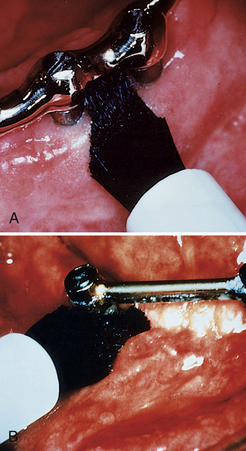
Figure 57-61 A, Plastic, flexible probe (Pro-Dentec) to measure sulcus, if absolutely necessary; it does not alter the abutment surface. B, Plastic, flexible probe measuring sulcus.
(Courtesy J. Kleinman.)

Figure 57-62 Hu-Friedy Implacare Maintenance Instrument with disposable Plasteel (high-grade resin) tips that screw into the handle.
(Courtesy Hu-Friedy, Chicago, Illinois; photography by Dr. Roland Meffert.)
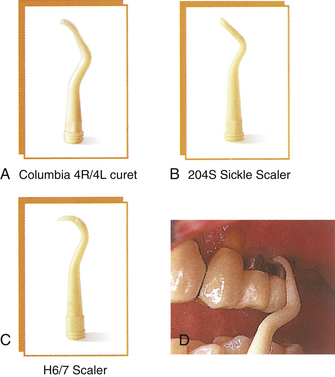
Figure 57-63 A-C, Close-up of working ends of scalers. D, Clinical application of the universal scaler.
(Courtesy Hu-Friedy, Chicago, Illinois.)
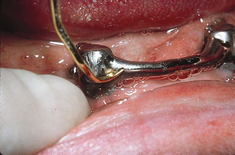
Figure 57-64 Gold-tipped titanium covered dental hygiene implant scalers available in all types of tips.
(Courtesy Denise O’Connor Lirette.)
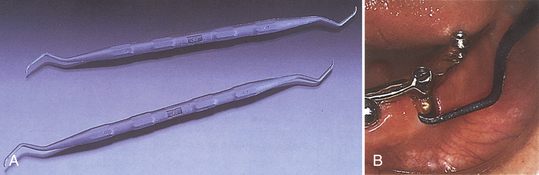
Figure 57-65 A, Graphite-reinforced nylon scalers. B, Application of graphite-reinforced nylon scaler to the dental implant.
(Courtesy Steri-Oss, Yorba Linda, California.)
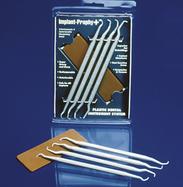
Figure 57-66 Implant-Prophy+ instrument system.
(Courtesy Advanced Implant Technologies, Beverly Hills, California.)
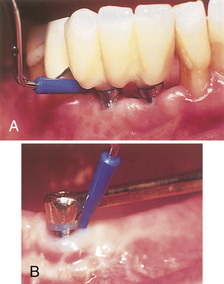
Figure 57-67 A, Disposable polysulfon plastic Quixonic SofTip for sonic scaling of implants. B, Ultrasonic scaler insert for scaling titanium implants.
(A, Courtesy DENTSPLY, York, Pennsylvania. B, Courtesy Tony Riso Company, North Miami Beach, Florida.)
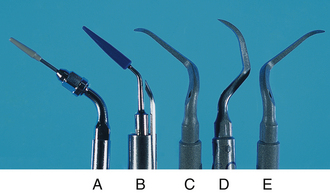
Figure 57-68 Ultrasonic tips for implants. A, Plastic Piezon Implant insert (EMS). B, Blue plastic magnostrictive insert. C, D, and E, Carbon composite piezoelectric inserts: PH1, PH2R, PH2L (Satelec).
(B, Courtesy Tony Riso Company, North Miami Beach, Florida. C, D, and E, From Newman MG, Takei HH, Klokkevold PR, Carranza FA, eds: Carranza’s clinical periodontology, ed 10, St Louis, 2006, Saunders.)
Peri-implant tissue irrigation with an antimicrobial agent such as 0.12% chlorhexidine gluconate, before instrumentation, reduces the pathogenicity of bacterial colonies and risk of local infection. Chemical disinfection to remove endotoxins with agents such as chlorhexidine, citric acid, hydrogen peroxide, stannous fluoride, and tetracycline is under investigation. The clinical efficacy of these agents for total mouth disinfection remains unclear. A plastic disposable syringe or a power oral irrigation unit may be used to accomplish this irrigation procedure because both techniques allow access to the peri-implant sulcus and deliver the antimicrobial solution to the peri-implant sulcus easily and effectively. A solution of 0.12% chlorhexidine gluconate is an excellent antimicrobial agent for peri-implant tissue irrigation. To minimize generalized staining, the solution may be applied locally with a cotton applicator rather than rinsing. An ADA-Accepted antimicrobial mouth rinse is acceptable if a client cannot tolerate the stain or taste of some antimicrobial solutions.
Periodontal Probing around Implants
Periodontal probing around the peri-implant tissue continues to be controversial. Current consensus suggests that probing should not be used as a routine procedure on dental implant clients. Disturbing the biologic seal that attaches the healthy peri-implant tissue to the titanium abutment may cause a local infection within the unattached sulci and lead to implant failure. Some clinicians believe that crevicular probing is too invasive because the probe may push through the “weak” gingival attachment to the bony crest. Also, bleeding on probing may not represent peri-implantitis but an iatrogenic wound. Others believe that probing is a valuable and accurate test for potential or existing periodontal problems. With caution, probing should be used to determine the depth of severe marginal bone loss or peri-implant problems (Box 57-6). If probing is necessary, a plastic disposable probe or a single-use plastic probe that connects to a fiberoptic light source should be used. The fiberoptic light gives good visibility during measurement and examination of the peri-implant sulcus.
BOX 57-6 Indications and Contraindications for Use of Plastic Periodontal Probe
Several types of instruments will remove oral biofilm and dental calculus without damaging the surface of the implant (Figure 57-69). Scratching, gouging, or contaminating the titanium surface will create an area that becomes more retentive to biofilm accumulation and its bacterial byproducts. Instrument rigidity and design, prosthetic appliance design, location of biofilm, and calculus tenacity should be carefully assessed before instrumentation. Because the surface of the titanium abutment can be easily abraded by metal scalers, sonic instruments, and abrasive agents, the following are strongly contraindicated for use on dental implants: metal curets and scalers, metal tip inserts of sonic and ultrasonic scaling instruments, air polishing devices, air abrasive systems, and rubber cup polishing with flour of pumice or abrasive paste (Figures 57-70 and 57-71). A polysulfon disposable tip may be used with a sonic scaler to remove tenacious calculus deposits. The YAG laser is suitable for the irradiation of implant surfaces. Because of the 2.94-μm wavelength of the laser, it has the ability to reduce bleeding on probing and probing depths and to increase clinical attachment levels.
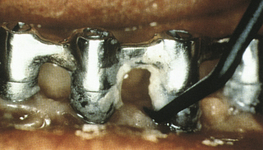
Figure 57-69 Tenacious calculus needs to be removed by a plastic scaler.
(From Babbush CA: Dental implaints: the art and science, Philadelphia, 2001, Saunders.)
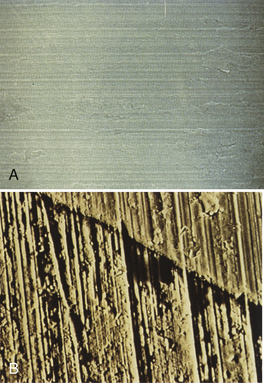
Figure 57-70 A, A smooth titanium implant surface. B, Effects of air abrasion use. Note roughened implant surface.
(From Babbush CA: Dental implants: the art and science, Philadelphia, 2001, Saunders.)

Figure 57-71 A, Effects of ultrasonic scaler use. Note roughened implant surface. B and C, Effects of metallic scaler use. Note roughened implant surface.
(From Babbush CA: Dental implants: the art and science, Philadelphia, 2001, Saunders.)
Plastic, Teflon-coated, graphite wood-tipped, and gold-tipped Gracey instruments have been developed for use in scaling dental implants (see Figures 57-62 to 57-66). The plastic and Teflon-coated instruments are designed to prevent abrasion to the titanium implants and tend to be preferred. The wood-tipped instrument or porte polisher is designed to prevent scratches on the implant surface. Half of a round, pointed toothpick inserted through the end of an interdental brush handle is considered a very safe and effective scaler for use around dental implants. Wood-tipped instruments are used only once, however, then thrown away to prevent splintering and damage to the peri-implant tissue.
The gold-tipped Gracey instruments are fabricated from a special gold alloy that is softer than titanium and therefore does not roughen the surface of the abutments or cause retention of acquired deposits. Gold-tipped Gracey scalers should not be sharpened because the gold is then removed, exposing the underlying metal. Some believe that graphite and gold-tipped scalers may change the surface topography of the implant and should be avoided. Polishing with a gel dentifrice or tin oxide in a rubber cup or rubber point is recommended. Buffing the abutments “shoeshine style” with long gauze strips or floss is effective for biofilm removal. An ordinary cotton shoestring can help to remove biofilm from underneath the prosthetic appliance.
The dental hygienist continually assesses whether the client has problems associated with the dental implant that are related to oral hygiene or to the peri-implant tissue. For example, the dental hygienist can monitor the peri-implant tissue; remove acquired deposits from natural teeth and implants; discuss oral hygiene needs; provide customized instructions (Box 57-7); review self-care recommendations; evaluate the client’s acceptance of and ability to perform the oral self-care regimens; encourage client compliance with implant examinations; take necessary radiographs; and facilitate caries prevention in existing natural dentition via fluoride and amorphous calcium phosphate therapy, sealants, xylitol use, and nutritional counseling.
BOX 57-7 Oral Self-Care Guidelines for Dental Implant Clients
Clients with dental implants should maintain a 3- to 4-month (or as needed) continued-care schedule (Table 57-9). The biofilm and dental calculus accumulated on the appliance also should be removed using the same procedure as with conventional dentures.
TABLE 57-9 Continuing-Care Schedule for Clients with Dental Implants
| Care | Care Schedule |
|---|---|
| Once implant is placed | Oral hygiene education and instruction |
| Radiographic evaluation of bone and periodontal structures | Every 3 months for first year and annually thereafter, unless necessary earlier |
| Continued-care appointment | Every 3 months for first year; thereafter evaluate for 4-month continued-care appointments |
| Removal and cleaning of implant superstructure | Annually, during continued-care appointment |
| Any signs of infection | Return to general dentist in 10-14 days, or refer to specialist |
Be sure to commit client to the next continued-care appointment before appointment ends.
FAILED IMPLANTS2 (Box 57-8; SEE FIGURES 57-42, 57-47, and 57-48)
A failed implant is one that has lost its integration. Unfortunately, removal of the entire dental implant is the only option. Bone regenerative methods may be used if the client desires another implant at this site. The primary reasons for implant failure are peri-implantitis and noncompliance with self-care. Other reasons for implant failures include insufficient client maintenance, insufficient maxillary bone, premature loading, prosthodontic difficulties, illness or systemic disease, insufficient maintenance by the oral health team, insufficient mandibular bone, increased periodontal involvement throughout the mouth, and the need for bone augmentation that is not initially provided. If the dental implant appears to be failing, the dentist must thoroughly examine the supporting structures and intervene quickly. Screw retention of the implant should be evaluated at each continued-care appointment. A loose screw can cause mobility of the dental implant and the associated prosthesis (e.g., the bridge).
BOX 57-8 Criteria for Implant Success
From Misch CE: Contemporary implant dentistry, ed 3, St Louis, 2007, Mosby.
The gingival tissue should be examined for any color changes, edema, consistency, bleeding, exudate, and recession. Evaluation of the radiographs to determine if there is progressive bone loss is necessary. Subgingival microflora around a failing implant is similar to that found around periodontally diseased teeth. Therefore the implant surface affected by peri-implantitis is contaminated by bacterial endotoxins that interfere with biologic repair. If the peri-implant supporting bone is severely cratered, bone regeneration may be attempted if the implant has not lost its integration. Removal of the superstructure and replacement of the small healing screw are advisable in order for the soft tissue to grow over the implant. Bone regenerative (bone repair) techniques are used (e.g., placing allograft bone into the defect and covering the implant with a resorbable guided tissue regeneration membrane). When the bone repair is completed, which usually takes 3 months, the implant is reloaded.
The dentist who placed the implant monitors the client. Annually the removable superstructures should be disassembled for evaluation and cleaned. Radiographs of the implant should be taken and evaluated by the dentist every 6 to 12 months. Clients are instructed to contact the dentist if there is an increased amount of swelling, a fever, or sensitivity in the mandible or sinus area that is not resolved with prescription pain medications.
CLIENT EDUCATION TIPS
Explain the cause and pathogenesis of periodontal disease and importance of oral biofilm control in prevention of oral diseases and maintenance of oral health. Emphasize client responsibility for daily maintenance care to sustain health of peri-implant tissues and prevent periodontal disease and dental caries in existing natural dentition. Instruct client to never use a rigid toothbrush, abrasive dentifrice, safety pins, paper clips, or metal objects to self-clean the implants or abutments. Educate clients about benefits of dental implant reconstruction, and assist in the determination of whether they are candidates for dental implants.LEGAL, ETHICAL, AND SAFETY ISSUES
Dental hygienists must assess for possible peri-implantitis at each professional dental implant care session. The sulcular area around the implant or insert is the primary area of concern. Clients should be referred to a general dentist, periodontist, or oral and maxillofacial surgeon for the informed consent, implant surgery, and placement.KEY CONCEPTS
Dental implants provide an alternative to missing dentition. Dental hygienists must be able to recognize good candidates who will benefit from this investment. Dental implants need more maintenance than natural teeth. The dental hygienist emphasizes and describes the importance of daily oral self-care and professional dental hygiene care to dental implant clients. Osseointegration is a unique biologic phenomenon in which living bone cells fuse to the metal titanium. Air-abrasion, metal instruments, or metal ultrasonic and sonic instruments are not recommended for dental implants. Abrasives and metal instruments may cause scratches and irregularities on the implant, leading to oral biofilm accumulation and inflammation. If metal instruments are used, they should be made of metals as pliable as or more pliable than titanium. Plastic, gold-tipped, Teflon-coated, graphite, or wooden instruments may be used for scaling dental implants. The dental hygienist must know which instruments are safe for titanium metal. Some manufacturers of mechanized instruments market plastic tips that can be used with dental implants. The plastic periodontal probe may disturb the biologic seal between the healthy peri-implant tissue and the titanium abutment. Caution is indicated in the rare times a plastic periodontal probe is used. Implant mobility and signs of inflammation and exudate around the implant sulcus should be recognized, documented, and called to the attention of client and dentist.CRITICAL THINKING EXERCISES
1. Daniels A. The importance of accurate charting for maintaining dental implants. J Pract Hyg. 1993;2:9.
2. Meffert R.M. How to treat ailing and failing implants. Implant Dent. 1992;1:25.
Visit the  website at http://evolve.elsevier.com/Darby/Hygiene for competency forms, suggested readings, glossary, and related websites..