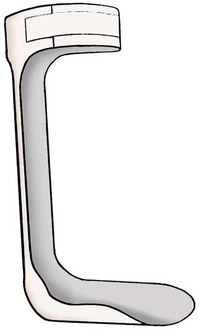
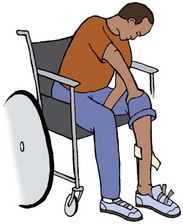
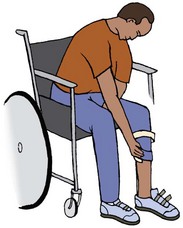
Shoes: If possible, select slip-on shoes to eliminate lacing and tying. If an individual uses an ankle-foot orthosis (AFO) or short leg brace, shoes with fasteners are usually needed:
1. Use elastic laces and leave shoes tied.
2. Use adapted shoe fasteners.
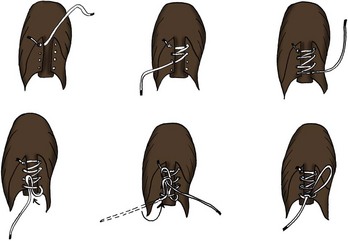
3. Use one-handed shoe-tying techniques (Figure 10-27).
FIGURE 10-27 One-hand shoe-tying method. (Courtesy Christine Shaw, Metro Health Center for Rehabilitation, Metro Health Medical Center, Cleveland, Ohio.)
4. It is possible to learn to tie a standard bow with one hand, but this requires excellent visual, perceptual, and motor planning skills along with much repetition.
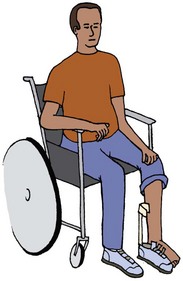
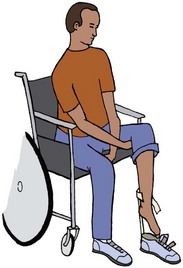
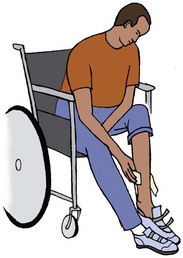
Ankle-Foot Orthosis: The individual with hemiplegia who lacks adequate ankle dorsiflexion to walk safely and efficiently frequently uses an AFO. The following is one technique that may be used.
1. Sit in straight armchair or wheelchair with brakes locked and feet on the floor (Figure 10-28, A). The fasteners are loosened and the tongue of the shoe is pulled back to allow the AFO to fit into the shoe (Figure 10-28, B).
2. AFO and shoe are placed on the floor between the legs but closer to the affected leg, facing up (Figure 10-28, C).
3. With the unaffected hand, lift the affected leg behind the knee and place toes into the shoe (Figure 10-28, D).
4. Reach down with unaffected hand and lift AFO by the upright. Simultaneously use the unaffected foot against the affected heel to keep the shoe and AFO together (Figure 10-28, E).
5. The heel will not be pushed into the shoe at this point. With the unaffected hand, apply pressure directly downward on the affected knee to push the heel into the shoe, if leg strength is not sufficient (Figure 10-28, F).
6. Fasten Velcro calf strap and fasten shoes (Figure 10-28, G). The affected leg may be placed on a footstool to assist with reaching shoe fasteners.
7. To fasten shoes, one-handed bow tying may be used; elastic shoelaces, Velcro-fastened shoes, or other commercially available shoe fasteners may be required if the client is unable to tie shoes.
Method II: Steps 1 and 2 are the same as the positioning required for donning pants.
1. Sit in sturdy armchair or in locked wheelchair.
2. Position stronger leg in front of midline of body with knee flexed to 90 degrees. Using stronger hand, reach forward and grasp ankle of affected leg or sock around ankle. Lift affected leg over stronger leg to crossed position.
3. The fasteners are loosened and the tongue of the shoe is pulled back to allow the AFO to fit into the shoe; Velcro fastener on AFO is unfastened.
4. Using stronger hand, hold heel of shoe and work over toes of affected foot and leg. Once toes are in shoe, work top part of AFO around the calf.
5. Pull heel of shoe onto foot with hand or place foot on floor, place pressure on knee, and push heel down into shoe.
A primary problem encountered by an individual with only one functional hand is the inability or difficulty using one hand to stabilize an object while using that same hand to perform another task. An example in feeding is a person with one functional hand trying to cut food such as meat using a knife while stabilizing the food at the same time. This problem can be resolved by the use of a rocker knife for cutting meat and other foods (Figure 10-29). This knife cuts with a rocking motion rather than a back-and-forth slicing action. Use of a rocking motion with a standard table knife or a sharp paring knife may be adequate to cut tender meats and soft foods. If such a knife is used, the client is taught to hold the knife handle between the thumb and the third, fourth, and fifth fingers, and the index finger is extended along the top of the knife blade. The knife point is placed in the food in a vertical position, and then the blade is brought down to cut the food. The rocking motion, using wrist flexion and extension, is continued until the food is cut. To stabilize a plate or bowl, a product such as foam-padded shelf liner can be used under it to stabilize it. There are many other adaptive devices such as a plate guard (see Figure 10-20) that the person who eats with only one fully functional hand can utilize. Another feeding issue that may arise for the individual is opening packages and containers such as margarine containers and milk cartons while dining. These tasks require practice and should occur with incorporation of the less functional hand in the task if appropriate.
Clients with the use of one hand or one side of the body can accomplish personal hygiene and grooming activities by using assistive devices and alternative methods. The following are suggestions for achieving hygiene and grooming with one hand:
1. Use an electric razor rather than a safety razor.
2. Use a shower seat in the shower stall or a transfer tub bench in a bathtub-shower combination. Also use a bath mat, a wash mitt, a long-handled bath sponge, safety rails on the bathtub or wall, soap on a rope or a suction soap holder, and a suction brush for fingernail care.
3. Sponge bathe while sitting at the lavatory using the wash mitt, suction brush, and suction soap holder. The uninvolved forearm and hand may be washed by placing a soaped washcloth on the thigh and rubbing the hand and forearm on the cloth.
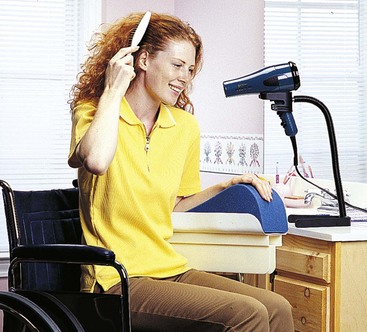
4. Use a wall-mounted hair dryer. This device frees the unaffected upper extremity to hold a brush or comb to style the hair during blow-drying.12
5. Care for fingernails as described previously for clients with incoordination.
6. Use a suction denture brush for care of dentures. The suction fingernail brush may also serve this purpose (see Figure 10-22).
Clients with the use of one hand or one side of the body can accomplish toileting activities by using assistive devices and alternative methods. The following are suggestions for achieving independent and safe toileting with one hand:
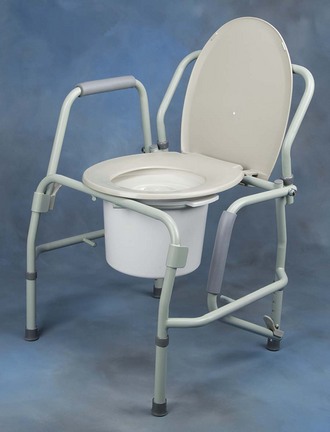
1. Use bedside commode with or without drop arms if unable to get to bathroom quickly or safely (Figure 10-30).
2. Use urinal instead of transferring to toilet. Female- and male-designed urinals are available, but the female urinals are not always effective depending on the client’s body size.
1. The primary problem with writing is stabilization of the paper or tablet. This problem can be overcome by using a clipboard, paperweight, or nonskid surface such as Dycem, or by taping the paper to the writing surface. In some instances, the affected arm may be positioned on the tabletop to stabilize the paper.
2. If dominance must be shifted to the nondominant extremity, writing practice may be necessary to improve speed and coordination. One-handed writing and keyboarding instruction manuals are available.
3. Book holders may be used to stabilize a book while reading or holding copy for typing and writing practice. A soft pillow placed on one’s lap will easily stabilize a book while the person is seated in an easy chair. Clients who enjoy reading as an occupation may want to consider an electronic book reader, such as the Kindle, which allows touch page turning as well as options to enlarge the reading font to the reader’s preference.
4. Dialing numbers on a telephone with one hand requires several motions including lifting the receiver to listen for the dial tone, setting it down, pressing the keys, and lifting the receiver to the ear. To write while using the telephone, a stand or shoulder telephone receiver holder can be used. A speakerphone or headset can also leave hands free to take messages. One-touch dialing using preprogrammed phone numbers eliminates pressing as many keys, simplifies sequencing, and may help compensate for memory deficits.
Principles of transfer techniques for clients with hemiplegia are described in Chapter 11.
Many assistive devices are available to facilitate home management and meal activities. Various factors determine how many home management and meal activities can realistically be performed, which methods can be used, and how many assistive devices can be managed. These factors include (1) whether the client is disabled by the loss of function of one arm and hand, as in amputation or a peripheral neuropathic condition, or (2) whether both arm and leg are affected along with possible visual, perceptual, and cognitive dysfunctions, as in hemiplegia. The references listed at the end of this chapter provide details of homemaking with one hand. The following are some suggestions for home management and meal activities for the client with the use of one hand:17
1. Stabilizing items is a major problem for the one-handed homemaker. Stabilize foods for cutting and peeling by using a cutting board with two stainless steel or aluminum nails in it. A raised corner on the board stabilizes bread for making sandwiches or spreading butter. Suction cups or a rubber mat under the board will keep it from slipping. A nonskid surface or rubber feet may be glued to the bottom of the board.
2. Use sponge cloths, nonskid mats or pads, wet dishcloths, or suction devices to keep pots, bowls, and dishes from turning or sliding during food preparation.
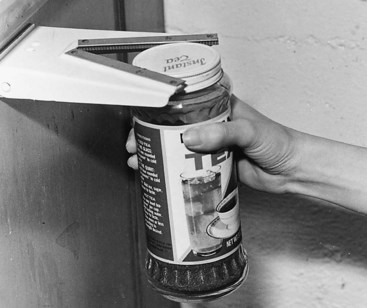
3. To open a jar, stabilize it between the knees or in a partially opened drawer while leaning against the drawer. Break the air seal by sliding a pop bottle opener under the lid until the air is released, then use a Zim jar opener (Figure 10-31).
4. Open boxes, sealed paper, and plastic bags by stabilizing between the knees or in a drawer as just described, and cut open with household shears. Special box and bag openers are also available from ADL equipment vendors.
5. Crack an egg by holding it firmly in the palm of the hand. Hit it in the center against the edge of the bowl. Then using the thumb and index finger, push the top half of the shell up and use the ring and little finger to push the lower half down. Separate whites from yolks by using an egg separator, funnel, or large slotted spoon.
6. Eliminate the need to stabilize the standard grater by using a grater with suction feet, or use an electric countertop food processor instead.
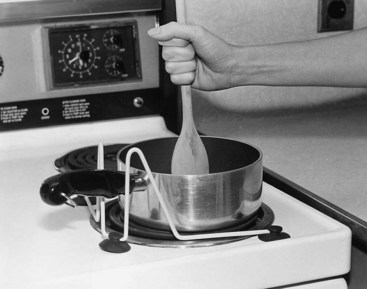
7. Stabilize pots on the counter or range for mixing or stirring by using a pan holder with suction feet (Figure 10-32).
8. Eliminate the need to use hand-cranked or electric can openers, which necessitate the use of two hands, by using a one-handed electric can opener.
9. Use a utility cart to carry items from one place to another. For some clients, a cart that is weighted or constructed of wood may be used as a minimal support during ambulation.
10. Transfer clothes to and from the washer or dryer by using a clothes carrier on wheels.
11. Use electrical appliances—such as a lightweight electrical hand mixer, emersion blender wand, blender, and food processor—that can be managed with one hand and save time and energy. Safety factors and judgment need to be evaluated carefully when electrical appliances are considered.
12. Floor care becomes a greater problem if, in addition to one arm, ambulation and balance are affected. For clients with involvement of only one arm, a standard dust mop, carpet sweeper, or upright vacuum cleaner should present no problem. A self-wringing mop may be used if the mop handle is stabilized under the arm and the wringing lever operated with the stronger arm. Clients with balance and ambulation problems may manage some floor care from a sitting position. Dust mopping or using a carpet sweeper may be possible if gait and balance are fairly good without the aid of a cane. Some people may benefit from a programmable robotic vacuum cleaner such as the ROOMBA from iRobot (http://store.irobot.com/home/index.jsp). However, careful consideration must be made, as the device can also be a safety/tripping hazard if for some reason it does not return to its docking station.
These are just a few of the possibilities for solving homemaking problems for one-handed individuals. The occupational therapist must evaluate each client to determine how the dysfunction affects the performance of homemaking activities. One-handed techniques take more time and may be difficult for some clients to master. Activities should be paced to accommodate the client’s physical endurance and tolerance for one-handed performance and use of special devices. Work simplification and energy conservation techniques should be employed. New techniques and devices should be introduced on a graded basis as the client masters first one technique and device and then another. Family members need to be oriented to the client’s skills, special methods used, and work schedule. The therapist, with the family and client, may facilitate the planning of homemaking responsibilities to be shared by other family members and the supervision of the client, if that is needed. If special equipment and assistive devices are needed for ADL, it is advisable for the client to practice using the devices in the clinic if possible. The therapist can then train the client and demonstrate use of the equipment to a family member before these items are purchased and used at home. After training, the occupational therapist should provide the client with sources to replace items independently, such as a consumer catalog of adaptive equipment.
Clients who must use a wheelchair for mobility need to find ways to perform ADLs from a seated position, to transport objects, and to adapt to an environment designed for standing and walking. Given normal function in the upper extremities and otherwise good health, the wheelchair user can probably perform ADL independently. The client should have a stable spine or use an appropriate orthotic or stabilization device, and the physician should clearly identify mobility precautions.
It is recommended that clients who must use wheelchairs put on clothing in this order: stockings, undergarments, braces (if worn), slacks, shoes, shirt or dress. Underwear may be eliminated as it is an extra step, has the potential to contribute to skin breakdown, and results in greater difficulty when toileting. During initial rehabilitation the person with paraplegia will likely begin dressing training in bed, and as strength, endurance, and balance improve, the patient will progress to dressing in the wheelchair. The ability to dress in the wheelchair will simplify toileting by eliminating the need to go back to bed to manage clothing.
Donning Slacks: Slacks are easier to fasten if they button or zip in front. If braces are worn, zippers in side seams may be helpful. Wide-bottom slacks of stretch fabric are recommended. The procedure for putting on shorts, slacks, and underwear is as follows:
1. Use side rails or a trapeze to pull up to sitting position, back supported with pillows or headboard of the bed.
2. Sit on bed and reach forward to feet, or sit on bed and pull knees into flexed position.
3. Holding top of pants, flip pant leg down to feet.
4. Work pant legs over feet and pull up to hips. Crossing ankles may help get pants on over heels.
5. In a semireclining position, roll from hip to hip and pull up garment.
6. A long-handled reacher may be helpful for pulling garment up or positioning garment on feet if there is impaired balance or range of motion in the lower extremities or trunk.
Socks or Stockings: Soft stretch socks or stockings are recommended. Panty hose that are slightly large may be useful. Elastic garters or stockings with elastic tops should be avoided because of potential skin breakdown. Dressing sticks or a stocking device may be helpful to some clients.
Removing Socks or Stockings: Remove socks or stockings by flexing leg as described for donning, pushing sock or stocking down over heel. Make sure any wrinkles or creases are removed from socks to prevent pressure skin breakdown. Dressing sticks may be needed to push sock or stocking off heel and toe and to retrieve sock.
Slips and Skirts: Slips and skirts slightly larger than usually worn are recommended. A-line, wraparound, and full skirts are easier to manage and look better on a person seated in a wheelchair than narrow skirts.
Shirts: Fabrics should be wrinkle-resistant, smooth, and durable. Roomy sleeves and backs and full shirts are more suitable styles than closely fitted garments.
Donning Shirts: Shirts, pajama jackets, robes, and dresses that open completely down the front may be put on while the client is seated in a wheelchair. If it is necessary to dress while in bed, the following procedure can be used:
1. Balance body by putting palms of hands on mattress on either side of body. If balance is poor, assistance may be needed or bed backrest/head of bed may be elevated. (If backrest cannot be elevated, one or two pillows may be used to support back.) With backrest elevated, both hands are available.
2. If difficulty is encountered in customary methods of applying garment, open garment on lap with collar toward chest. Put arms into sleeves and pull up over elbows. Then hold on to shirt tail or back of dress, pull garment over head, adjust, and button.
1. Sitting in wheelchair or bed, open fastener.
2. Remove garment in the usual manner.
3. If the usual manner is not feasible, grasp collar with one hand while balancing with other hand. Gather material up from collar to hem.
4. Lean forward, duck head, and pull shirt over head.
5. Remove sleeves, first from supporting arm and then from working arm.
Eating activities should present no special problem for the person who uses a wheelchair but has good to normal arm function. Wheelchairs with desk-style armrests and footrests that fit under tabletops are recommended so that it is possible to sit close to the table. Footrests on the wheelchair may be detachable or fixed but need to function within the client’s environment for maximum independence.
Facial and oral hygiene and arm and upper body care should present no problem. Reachers may be helpful for securing towels, washcloths, makeup, deodorant, and shaving supplies from storage areas, if necessary. Special equipment is needed for using tub baths or showers. Transfer techniques for toilet and bathtub are discussed in Chapter 11. The following are suggestions for facilitating safety and independence during bathing activities:
1. Use a handheld shower hose and keep a finger over the spray to determine sudden temperature changes in water. Make sure water heater is set at a safe temperature (120° Fahrenheit, 49° Celsius) to prevent scald burns.41
2. Use long-handled bath brushes with soap insert for ease in reaching all parts of the body.
3. Use soap bars attached to a cord around the neck, or use liquid soap.
4. Use padded shower chair or padded transfer tub bench. Consider commode cutout if bowel program is performed in the shower.
5. Increase safety during transfers by installing grab bars on wall near bathtub or shower and on bathtub to provide balance point when during transfers and when bending to wash legs and buttocks.
6. Fit bathtub or shower bottom with nonskid mat or adhesive material.
7. Remove doors on the bathtub and replace with a shower curtain to increase safety and ease of transfers.
Because sensory loss increases the risk of skin breakdown, regular skin checks and weight shifts should be considered a normal part of the ADL routine. Clients should be instructed in the following:
1. Potential areas on the body for possible skin breakdown, signs of developing skin problems, and ways to maintain good skin integrity.
2. How and when to perform proper weight shifts while up in the wheelchair and how to position oneself in bed to prevent skin breakdown.
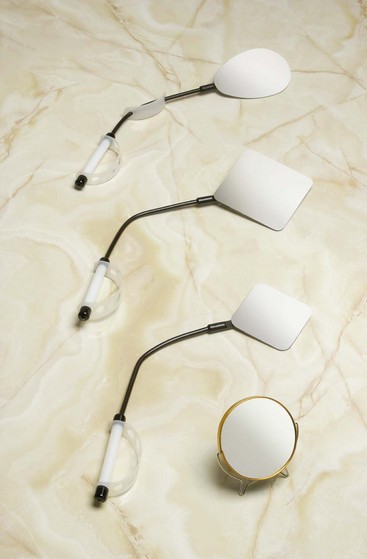
3. Frequency of skin checks and how to perform them. The client can use a long-handled mirror (Figure 10-33) to see areas that are otherwise difficult to observe.
4. Need for maintenance on all equipment to assure disrepair is not contributing to skin breakdown. For example, a tear in a padded tub bench could potentially tear skin on the buttocks, resulting in skin breakdown.
An occupational therapist along with nursing staff may both be involved in instructing the client about digital stimulation or use of intermittent catheterization for elimination. Helping the client to establish a routine for this ADL is also important, as ineffective bowel and bladder management may lead to significant limitations in other activities if the client is experiencing accidents or infections. An occupational therapist may recommend appropriate equipment, help with the establishment of routines, and problem solve as issues arise. An interdisciplinary approach is critical for health maintenance regarding bowel and bladder care:
With the exception of reaching difficulties in some situations, use of the telephone should present no problem. Short-handled reachers may be used to grasp the receiver from the cradle. A cordless telephone can eliminate reaching, except when the phone needs recharging. A mobile phone or other smart phones can also be used. The use of writing implements and a personal computer should be possible. Managing doors may present some difficulties. If the door opens toward the person, it can be opened by the following procedure:
1. If doorknob is on the right, approach door from right and turn doorknob with left hand.
2. Open door as far as possible, and move wheelchair close enough so that it helps keep door open.
3. Holding door open with left hand, turn wheelchair with right hand and wheel through door.
If the door is very heavy and opens out or away from the person, the following procedure is recommended:
When homemaking activities are performed from a wheelchair, the major problems are work heights, adequate space for maneuverability, access to storage areas, and transfer of supplies, equipment, and materials from place to place. If funds are available for kitchen remodeling, lowering counters and opening space under counters and range to a comfortable height for wheelchair use is recommended. Such extensive adaptation is often not feasible, however. The following are some suggestions for homemaking activities:17
1. Remove cabinet doors to eliminate the need to maneuver around them for opening and closing. Frequently used items should be stored toward the front of easy-to-reach cabinets above and below the counter surfaces.
2. If entrance and inside doors are not wide enough, make doors slightly wider by removing strips along the doorjambs. Offset hinges can replace standard door hinges and increase the doorjamb width by 2 inches (Figure 10-34).
FIGURE 10-34 A, Offset door hinges. B, Offset hinges widen doorway for wheelchair user. (Courtesy Sammons Preston.)
3. Use a wheelchair cushion to increase the user’s height so that standard height counters may be used.
4. Use detachable desk-style armrests and swing-away detachable footrests to allow the wheelchair user to get as close as possible to counters and tables and also to stand at counters, if that is possible.
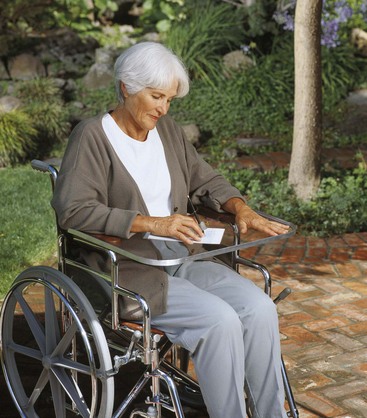
5. Transport items safely and easily with a wheelchair lapboard. The lapboard may also serve as a work surface for writing, preparing food, or drying dishes (Figure 10-35). It also protects the lap from injury from hot pans and prevents utensils from falling into the lap. Use silicone pads as nonslip surfaces and to prevent burning.
6. Fasten a drop-leaf board to a bare wall, or install a slide-out board under a counter to provide a work surface that is a comfortable height in a kitchen that is otherwise standard. Place a cutting board on an open drawer to set up a workstation. The drawer should be stable when pulled out and be at a height that allows the wheelchair user to roll under it and reach with a comfortable arm position.
7. Fit cabinets with custom- or ready-made lazy Susans or pullout shelves to eliminate the need to reach to rear space.
8. Ideally, ranges should be at a lower level than standard height. If this arrangement is not possible, place the controls at the front of the range, and hang a mirror angled at the proper degree over the range so that the cook can see contents of pots.
9. Substitute small electric toaster oven with a microwave oven, or use microwave convection oven for the range if the range is not safely manageable.
10. Use front-loading washers and dryers. Use a reacher for items that are difficult to reach in the washer and dryer.
11. Vacuum carpets with a carpet sweeper or tank-type cleaner that rolls easily and is lightweight or self-propelled. A retractable cord may prevent the cord from tangling in the wheels.
12. Sweep and mop floors with lightweight swivel head cleaners that allow easier reach.
To develop an overview of functional outcomes for each level of SCI, refer to Chapter 36, which provides extensive tables relating ADLs and IADLs to specific levels of SCI. Persons with C1-4 will require assist for all ADLs except communication and mobility, if appropriate equipment is available. Levels C5 will require considerable special equipment and assistance. Externally powered splints and arm braces or mobile arm supports are recommended for C3, C4, and C5 levels of muscle function and are discussed in Chapters 30 and 36. Individuals with muscle function from C6 can be relatively independent with adaptations and assistive devices and may benefit from the use of a wrist-driven flexor hinge hand splint (also known as tenodesis hand splint).
Training in dressing can be commenced when the spine is stable.7,28 Minimum criteria for upper-extremity dressing are as follows:
1. Fair to good muscle strength in deltoids, upper and middle trapezii, shoulder rotators, rhomboids, biceps, supinators, and radial wrist extensors.
2. ROM of 0 degrees to 90 degrees in shoulder flexion and abduction, 0 degrees to 80 degrees in shoulder internal rotation, 0 degrees to 30 degrees in external rotation, and 15 degrees to 140 degrees in elbow flexion.
3. Sitting balance in bed or wheelchair, which may be achieved with the assistance of bed rails, an electric hospital bed, or a wheelchair safety belt.
4. Finger prehension achieved with adequate tenodesis grasp or wrist-driven flexor-hinge splint.
Additional criteria for dressing the lower extremities are as follows:28
1. Fair to good muscle strength in pectoralis major and minor, serratus anterior, and rhomboid major and minor.
2. ROM of 0 degrees to 120 degrees in knee flexion, 0 degrees to 110 degrees in hip flexion, and 0 degrees to 80 degrees in hip external rotation.
3. Body control for transfer from bed to wheelchair with minimal assistance.
4. Ability to roll from side to side, turn from supine position to prone position and back, and balance in side-lying.
Dressing is contraindicated if any of the following factors are present:7,28
1. Unstable spine at site of injury.
2. Pressure sores or tendency for skin breakdown during rolling, scooting, and transferring.
Sequence of Dressing: The recommended sequence for training to dress is to put on slacks while still in bed, then transfer to a wheelchair and put on shirts, socks, and shoes.28 Some clients may wish to put the socks on before the pants because socks may help the feet slip through the pant legs more easily.
Expected Proficiency: Clients with spinal cord lesions at C7 and below can achieve independence with dressing for both the upper and lower extremities. Clients with lesions at C6 can also achieve independence with dressing, but lower-extremity dressing may be difficult or impractical in terms of time and energy for these clients. Clients with lesions at C5 to C6 can achieve upper-extremity dressing, with some exceptions. It is difficult or impossible for these clients to put on a bra, tuck a shirt or blouse into a waistband, or fasten buttons on shirt fronts and cuffs. Factors such as age, physical proportions, coordination, secondary medical conditions, and motivation will affect the degree of proficiency in dressing skills that any client can achieve.7 McBearson demonstrated how to dress with his abilities with C6 quadriplegia.31
Types of Clothing: Clothing should be loose and have front openings. Slacks need to be a size larger than usually worn to accommodate the urine collection device or leg braces if worn. Wraparound skirts and incontinence pads are helpful for women. The fasteners that are easiest to manage are zippers and Velcro closures. Because the client with quadriplegia often uses the thumb as a hook to manage clothing, loops attached to zipper pulls, undershorts, and even the back of the shoes can be helpful. Belt loops on slacks are used for pulling and should be reinforced. Bras should have stretch straps and no wires in them. Front-opening bra styles can be adapted by fastening loops and adding Velcro closures; back-opening styles can have loops added at each side of the fastening. Underwear may be eliminated as it is an extra step, has the potential to contribute to skin breakdown, and results in greater difficulty when toileting.
Shoes can be one-half size to one size larger than normally worn to accommodate edema and spasticity and to avoid pressure sores. Shoe fasteners can be adapted with Velcro, elastic shoelaces, large buckles, or flip-back tongue closures. Loose woolen or cotton socks without elastic cuffs should be used initially. Nylon socks, which tend to stick to the skin, may be used as skill is gained. If neckties are used, the clip-on type or a regular tie that has been preknotted and can be slipped over the head may be manageable for some clients.7,28
Donning Slacks, SCI Level C6-7:
1. Long sit on bed with bed rails up. Slacks are positioned at foot of bed with pant legs over end of bed and front side up.28
2. Sit up and lift one knee at a time by hooking right hand under right knee to pull leg into flexion, then put pants over right foot. Return right leg to extension or semiextended position while repeating procedure with left hand and left knee.7 If unable to maintain leg in flexion by holding with one arm or through advantageous use of spasticity, use a dressing band. This device is a piece of elasticized webbing that has been sewn into a figure-eight pattern, with one small loop and one large loop. The small loop is hooked around the foot and the large hoop is anchored over the knee. The band is measured for the individual client so that its length is appropriate to maintain desired amount of knee flexion. Once slacks are in place, knee loop is pushed off knee and dressing band is removed from foot with dressing stick.
3. Work slacks up legs, using patting and sliding motions with palms of hands.
4. While still sitting, with pants to midcalf height, insert dressing stick in front belt loop. Dressing stick is gripped by slipping its loop over wrist. Pull on dressing stick while extending trunk, returning to supine position. Return to sitting position and repeat this procedure, pulling on dressing sticks and maneuvering slacks up to thigh level.28 If balance is adequate, an alternative is for client to remain seated, lean on left elbow, and pull slacks over right buttock, then reverse process for other side. Another alternative is for client to remain in supine position and roll to one side; throw opposite arm behind back; hook thumb in waistband, belt loop, or pocket; and pull slacks up over hips. These maneuvers can be repeated as often as necessary to get slacks over buttocks.7
5. Using palms of hands in pushing and smoothing motions, straighten the slack legs.
6. In supine position, fasten slacks by hooking thumb in loop on zipper pull, patting Velcro closed or using hand splints and buttonhooks if there are buttons or a zipper pull for zippers.7,28
Variation: Substitute the following for step 2: Sit up and lift one knee at a time by hooking right hand under right knee to pull leg into flexion, then cross the foot over the opposite leg above the knee. This position frees the foot to place the slacks more easily and requires less trunk balance. Continue with all other steps.
Removing Slacks, SCI Level C6-7:
1. Lying supine in bed with bed rails up, unfasten belt and fasteners.
2. Placing thumbs in belt loops, waistband, or pockets, work slacks past hips by stabilizing arms in shoulder extension and scooting body toward head of bed.
3. Use arms as described in step 2 and roll from side to side to get slacks past buttocks.
4. Coming to sitting position and alternately pulling legs into flexion, push slacks down legs.28
5. Slacks can be pushed off over feet with dressing stick or by hooking thumbs in waistband.
Front Opening or Pullover Garments, SCI Level C5-7: Front opening and pullover garments include blouses, jackets, vests, sweaters, skirts, and front-opening dresses.7,28 Upper-extremity dressing is frequently performed in the wheelchair for greater trunk stability. The procedure for putting on these garments is as follows.
Donning Front Opening or Pullover Garments, SCI Level C5-7:
1. Position the garment across thighs with back facing up and neck toward knees.
2. Place both arms under back of garment and in armholes.
3. Push sleeves up onto arms, past elbows.
4. Using a wrist extension grip, hook thumbs under garment back and gather material up from neck to hem.
5. To pass garment over head, adduct and externally rotate shoulders and flex elbows while flexing head forward.
6. When garment is over head, relax shoulders and wrists and remove hands from back of garment. Most of material will be gathered up at neck, across shoulders, and under arms.
7. To work garment down over body, shrug shoulders, lean forward, and use elbow flexion and wrist extension. Use wheelchair arms for balance, if necessary. Additional maneuvers to accomplish this task are to hook wrists into sleeves and pull material free from underarms, or lean forward, reach back, and slide hand against material to aid in pulling garment down.
8. Garment can be buttoned from bottom to top with aid of buttonhook and wrist-driven flexor hinge splint if hand function is inadequate.
Removing Front Opening or Pullover Garments, SCI Level C5-7:
1. Sit in wheelchair and wear wrist-driven flexor hinge splints. Unfasten buttons (if any) while wearing splints and using buttonhook. Remove splints for remaining steps.
2. For pullover garments, hook thumb in back of neckline, extend wrist, and pull garment over head while turning head toward side of raised arm. Maintain balance by resting against opposite wheelchair armrest or pushing on thigh with extended arm.
3. For stretchy front opening style clothing, hook thumb in opposite armhole and push sleeve down arm. Elevation and depression of shoulders with trunk rotation can be used to get garment to slip down arms as far as possible.
4. Hold one cuff with opposite thumb while elbow is flexed to pull arm out of sleeve.
Donning Bra, SCI Level C5-7: When worn, this bra style fastens at the back with a hook and eye. The bra is adapted and has loop extenders attached on both the right and left side of fasteners. Procedurally, the bra is attached in front first around the body, then twisted around into position. Arms are placed in strap last. Here are the step-by-step directions:
1. Place bra across lap with straps toward knees and inside facing up.
2. Using a right-to-left procedure, hold end of bra closest to right side with hand or reacher and pass bra around back from right to left side. Lean against bra at back to hold it in place while hooking thumb of left hand in a loop that has been attached near bra fastener. Hook right thumb in a similar loop on right side, and fasten bra in front at waist level.
3. Hook right thumb in edge of bra. Using wrist extension, elbow flexion, shoulder adduction, and internal rotation, rotate bra around body so that front of bra is in front of body.
4. While leaning on one forearm, hook opposite thumb in front end of strap and pull strap over shoulder, then repeat procedure on other side.7,28
1. Hook thumb under opposite bra strap and push down over shoulder while elevating shoulder.
2. Pull arm out of strap and repeat the procedure for other arm.
3. Push bra down to waist level and turn around as described previously to bring fasteners to front.
4. Unfasten bra by hooking thumbs into the adapted loops near the fasteners.
Alternatives for a back-opening bra are (1) a front-opening bra with loops for using a wrist extension grip or (2) a fully elastic bra that has no fasteners, such as a sports bra, and can be donned like a pullover sweater.
Donning Socks, SCI Level C6-7:
1. Sit in wheelchair, or on bed if balance is adequate, in cross-legged position with one ankle crossed over opposite knee.
2. Pull sock over foot using wrist extension and patting movements with palm of hand.7,28 To prevent pressure areas, check to make sure there are no creases or thickened areas on socks.
1. Sitting in a wheelchair with seat belt fastened, hook one arm at the elbow around the wheelchair upright. This allows for improved stability while reaching.
2. Position foot on stool, chair, or open drawer to elevate the foot easily enough to reach.
3. Pull sock over foot using wrist extension and patting movements with palm of hand.7,28 To prevent pressure areas, check to make sure there are no creases or thickened areas on socks.
1. Use stocking aid or sock cone (see Figure 10-8) to assist in putting on socks while in this position. Powder sock cone (to reduce friction) and apply sock to cone by using thumbs and palms of hands to smooth sock out on cone.
2. With the cord loops of sock cone around the wrist or thumb, throw cone beyond foot.
3. Maneuver cone over toes by pulling cords using elbow flexion. Insert foot as far as possible into cone.
4. To remove cone from sock after foot has been inserted, move heel forward off wheelchair footrest. Use wrist extension (of hand not operating sock cone) behind knee and continue pulling cords of cone until it is removed and sock is in place on foot. Use palms to smooth sock with patting and stroking motion.28
5. Two loops can also be sewn on either side of the top of the sock so that thumbs can be hooked into the loops and the socks pulled on.
Removing Socks, SCI Level C6-7:
1. While sitting in wheelchair or long sitting in bed and hips flexed forward, use a dressing stick or long-handled shoehorn to push sock down over heel. Cross the legs if possible. If adaptive device is not used, hook thumb in socks and use wrist extension to slide socks off.
2. To protect skin, use dressing stick with coated end to push sock off toes.
Donning Shoes, SCI Level C6-7:
1. Use same position for donning socks as for putting on shoes.
2. Use long-handled dressing stick and insert aid into tongue of shoe. Place shoe opening over toes. Remove dressing aid from shoe and dangle shoe on toes.
3. Using palm of hand on sole of shoe, pull shoe toward heel of foot. One hand is used to stabilize leg while other hand pushes against sole of shoe to work shoe onto foot. Use palms and sides of hand to push shoe on.
4. With feet flat on floor or on wheelchair footrest and knees flexed 90 degrees, place a long-handled shoehorn in heel of shoe and press down on top of flexed knee until heel is in the shoe.
5. Fasten shoes.28
Removing Shoes, SCI Level C6-7:
1. Sitting in wheelchair with legs crossed as described previously, unfasten shoes.
2. Use shoehorn or dressing stick to push on heel counter of shoe, dislodging it from heel. Shoe will drop or can be pushed to floor with dressing stick.28
Feeding may be assisted by a variety of devices, depending on the level of the client’s muscle function.1 Someone with an injury from C1-4 will likely need assistance to eat unless an electrical self-feeding device is used. These devices allow independence once set up by using head movement to hit a switch that turns the plate and brings the spoon down to the plate and back up to mouth level.
An injury at C5 may require mobile arm supports or externally powered splints and braces. A wrist splint and universal cuff may be used together if a wrist-driven flexor hinge splint is not used. The universal cuff holds the eating utensil, and the splint stabilizes the wrist. A nonskid mat and a plate with a plate guard may adequately stabilize the plate for pushing and picking up food (C5-7) (see Figure 10-12).
A regular or swivel spoon-fork combination with a universal cuff can be used when there is minimal muscle function (C5). A long plastic straw with a straw clip to stabilize it in the cup or glass eliminates the need for picking up the cups. A bilateral or unilateral clip-type holder on a glass or cup makes it possible for many persons with hand and arm weakness to manage liquids without a straw.
Built-up utensils may be useful for those with some functional grasp or tenodesis grasp. Food may be cut with an adapted knife if arm strength is adequate to manage the device Food may also be cut using a sharp knife if a wrist-driven flexor hinge splint is used.
1. Use a padded shower seat or padded transfer tub bench and transfer board for transfers (SCI Level C1-7).
2. Extend reach by using long-handled bath sponges with loop handle or built-up handle (SCI Level C6-7).
3. Eliminate need to grasp washcloth by using bath mitts or bath gloves (SCI Level C5-7).
4. Hold comb and toothbrush with a universal cuff1 (SCI Level C5-7).
5. Use a wall-mounted hair dryer. Use a universal cuff to hold brush or comb for hair styling while using this mounted hair dryer10 (SCI Level C5-7) (Figure 10-36).
6. Use a clip-type holder for electric razor (SCI Level C5-7).
7. Persons with quadriplegia can use suppository inserters to manage bowel care independently (SCI Level C6-7).
8. Use skin inspection mirror with long stem and looped handle for independent skin inspection (see Figure 10-33). Devices and methods selected must be adapted according to the degree of weakness of each client (SCI Level C6-7).
9. Adapted leg-bag clamps to empty catheter leg-bags are also available for individuals with limited hand function. Elastic leg-bag straps may also be replaced with Velcro straps (SCI Level C5-7).
10. If the client is unable to reach the leg back clamp, a commercially available electric leg bag clamp allows the individual to drive up to a urinal and empty the leg bag with the switch of a button (Richardson Products) (SCI Level C1-7).
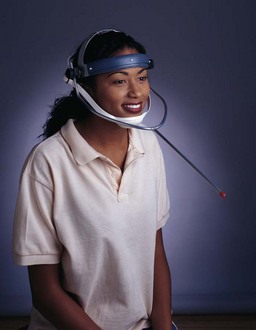
1. Turn pages with an electric page-turner, mouth stick, or head wand if hand and arm function are inadequate (Figure 10-37) (SCI Level C4-5).
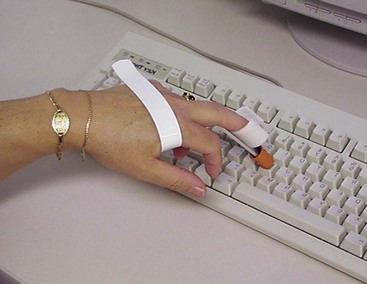
2. For keyboarding, writing, and painting, insert pen, pencil, typing stick, or paintbrush in a universal cuff that has been positioned with the opening on the ulnar side of the palm (Figure 10-38) (SCI Level C5-7).
3. Touch telephone keys with the universal cuff and a pencil positioned with eraser down (SCI Level C5-7). The receiver may need to be positioned for listening. For clients with no arm function, a speakerphone can be used along with a mouth stick to push the button to initiate a call. Set for speed-dial any frequently used numbers. An operator can also assist with dialing (SCI Level C1-C5).
4. Mobile phones allow many functions with voice activation including, calling out, automatic answering that goes to an ear piece, music functions, web searches, calendar programs, contact directories, and global positioning systems (GPSs). A touch-screen phone with multiple functions can eliminate the need for multiple devices to organize information (SCI Level C1-C7).
5. Use personal computers or personal digital assistants (PDAs). A computer mouse or voice-recognition program may be substituted for use of the keyboard. A variety of different mouse and keyboard designs, and sizes, are available (SCI Level C1-7).
6. Clients with hand weakness can use built-up pencils and pens or special pencil holders. The Wanchik writer is an effective adaptive writing device (see Figure 10-16) (SCI Level C5-7).
7. Sophisticated electronic communications devices operated by mouth, pneumatic controls, and head controls are available for clients with no function in the upper extremities. Other communication devices are available that rely on eye blinks and gazes (SCI Level C1-5).
8. MP3 (a digital audio recording format) players are capable of playing digitally available music and podcasts and can be used with universal cuff and a pencil positioned with eraser down or other adapted pointer to press buttons (SCI Level C5-7).
9. Environmental controls allow for easy operation from a panel designed to run multiple devices such as televisions, radios, lights, telephones, intercoms, and hospital beds (see Chapter 17) (SCI Level C1-7).
Principles of wheelchair transfer techniques for the individual with quadriplegia are discussed in Chapter 11. Mobility depends on degree of weakness. Electric wheelchairs operated by hand, chin, head, or pneumatic controls have greatly increased the mobility of persons with severe upper- and lower-extremity weakness. Vans fitted with wheelchair lifts and stabilizing devices permit these clients to be transported to pursue community, vocational, educational, and leisure activities with an assistant. In addition, adaptations for hand controls have made it possible for many clients with function of at least C6 level to drive independently.
Clients with muscle function of C6 or better may be independent for light homemaking with appropriate devices, adaptations, and safety awareness. Many of the suggestions for wheelchair maneuverability and environmental adaptation outlined for someone with paraplegia apply here as well. In addition, clients with upper-extremity weakness need to use lightweight equipment and special devices. A classic book, The Mealtime Manual for People with Disability and the Aging, compiled by Klinger25 contains many excellent specific suggestions that apply to homemakers with weak upper extremities. Specialty suppliers for cooking devices to make meal preparation and cooking easier and more efficient are an excellent source for new ideas. The kitchen and home sections of general national and international stores are other good resources for ideas and products. In this age of digital information-sharing, many people with various disabilities post themselves online performing ADL and IADL such as a woman with C6 quadriplegia who demonstrates many techniques and types of adaptations possible:42
1. For faucets, use extended lever type faucets for easier reach and control or motion sensor faucets (SCI Level C5-7).
2. To eliminate the need for grasp and release, use pump bottles for cleaners and soaps or motion sensor dispensers (SCI Level C5-7).
3. For cooking utensils, see universal cuff adaptations or tenodesis splint or adapted long-handled utensils (SCI Level C5-7).
4. For opening cans, use one-touch can openers.
5. For opening jars, use electric jar openers.
6. To wash dishes, use a combination soap dispenser/sponge.
7. To wash and rinse lettuce, use a salad spinner with a push-button center.
Many people with physical disabilities also have low vision as a result of advancing age, age-related eye diseases, or as a complication of diabetes. As part of a comprehensive OT evaluation, visual changes are considered. Evaluation of the person with low vision should initially involve understanding the specific condition that has caused the low vision such as whether visual acuity is affected or whether a specific field of vision is impaired. For more information on visual loss for the aging individual, please see Chapter 46. The type of visual loss along with any other physical or cognitive deficits will influence treatment choices and adaptive equipment choices. Acquisition of low-vision assistive devices or services such as occupational therapy that address everyday activities has been shown to be highly valued by the client.15
In addition to assistive technology, adaptive equipment and environmental modifications, reorganization and task restructuring may be needed. Weiser-Pike provides a framework of intervention strategies to consider when addressing functional activities for the person with low vision. This framework has been modified to nine categories with some examples in each category (Box 10-4). The OT may use this model in combination with interventions under the specific functional activity as follows.
Adequate training and choice of appropriate intervention and adaptive equipment is essential. Consider Box 10-4 as an activity analysis method to determine how the equipment might function for the person with low vision and how to implement training. This allows the OT practitioner to perform an activity analysis using the equipment prior to implementing instruction. Allow the client to touch and explore the piece of adaptive equipment before beginning practical teaching, break the steps down into small chunks of information, have the client practice a few days before doing the functional activity with the adaptive equipment, and request a return demonstration after the client has practiced.22
The environmental modifications described in the following section are appropriate when performing ADLs for all persons with low vision.
1. Improve lighting by aiming light at the work area, not into the eyes.
2. Reduce glare by having adjustable blinds, sheer curtains, or tinted windows. Wearing dark glasses indoors may also reduce glare.
3. Maximize contrast by providing a work surface that is in contrast to the task. For example, serve a meal on a white plate if the table is dark. Paint a white edge on a dark step. Replace white wall switches with black to contrast with the wall.
4. Simplify figure-ground perception by clearing pathways and eliminating clutter.
5. Work in natural light by placing a chair by a window with the back toward the window.26,35
6. Use magnifiers with lights. These come in a variety of sizes and degrees of magnification. Specialists in low vision can determine the appropriate degree of magnification needed. Some magnifiers are portable, others are attached to stands to do needlework or fine work, and others are sheets of plastic used to magnify an entire page of print.21
1. Use talking watches or clocks to tell time.
2. Use a talking scale to determine weight.
3. Use a large-print magnification screen on the computer.
4. Use high-contrast doorknobs. Paint the doorframe a color that contrasts highly with the door to improve ease of identifying the door.26
5. Use speakerphones, preprogrammed phone numbers, or a phone with large print and high-contrast numbers. Identify phone buttons with contrasting tape or a Velcro dot to teach the client how to turn the phone on and the correct buttons to push. Use a mobile phone with voice recognition commands.
6. Use writing guides to write letters, checks, or signatures.21
7. To read, use books on tape, talking books, electronic books, and digital books such as a Kindle or an iPad. Screens can be magnified, and some of the devices have “reading” capability so the reader can listen to a story or newspaper article. Software is available such as the JAWS screen reader, which reads aloud information that is on a computer screen.
Mobility is eased with the clearing of pathways and the minimizing of clutter and furniture. Lighting in hallways and entryways is also needed. The person with low vision needs to optimize visual scanning abilities by learning to turn and position the head frequently when mobile or participating in an activity.35 The OT practitioner may need to refer a client to a specialist in low vision (such as an orientation and mobility specialist) who is specifically trained in teaching mobility in the community, such as human guide techniques, use of a white cane, and use of service animals to persons with low vision or who are legally blind.
Various devices are available to compensate for low vision while managing the home. Organization and consistency are critical to the safe and efficient performance of home management tasks. Family members need to remember to replace items where they were found and not reorganize items without assistance from the person with low vision.
1. For safety, cleaning supplies should be placed separately from food supplies.
2. Eliminate extra hazardous cleaning supplies and replace with one multipurpose cleanser. Place this cleaning agent in a uniquely shaped bottle or in a specific location.
3. Mark appliance controls with high-contrast tape or paint to identify start and stop buttons or positions. Place Velcro tabs to mark frequently used positions on dials (e.g., on the 350 degrees position for the stove or for the wash-and-wear cycle on the washer or dryer).
4. Label cans by using rubber bands to attach index cards with bold, dark print to each can. When the can is used, the card may be placed into a stack to create a shopping list.
5. Indicate number of minutes needed for microwave cooking by placing rubber bands on the items. Two rubber bands would indicate that the item should be cooked for 2 minutes. Assistance will be needed for initial setup.
6. Use liquid level indicator to determine when hot liquid reaches 1 inch from top of cup or container.26
7. Use cutting guides or specially designed knives to cut meat or bread.21
8. Use a tape recorder to make reminder lists or grocery lists.
9. Discourage use of long flowing gowns with flowing sleeves (e.g., kimono-style) while performing cooking tasks at the stove.
1. Use medication organizer to organize pills.
2. For diabetic management, many products are available for individualized evaluation of the client (e.g., syringe magnifiers, talking or large-print Glucometers, and a device to count the insulin dosages).
3. Use talking scales to evaluate weight.24
1. Use a consistent method of folding money to identify denominations, as in the following example:
$1 | Keep flat |
$5 | Fold in square half |
$10 | Fold lengthwise |
$20 | Fold in half and then lengthwise |
2. Keep different denominations in different sections of the wallet. Learn to recognize coins by size and type of edge (smooth or rough).35
1. Use low-vision playing cards with large letters and symbols.
2. Search for resources in the community for activities aimed at people with low vision.37
The terms morbidly obese and bariatrics both are used to describe the population that is exceptionally large. Morbidly obese is defined as an individual with a body mass index (BMI) of 40 or greater. This population is to be separated from individuals who fall into the overweight or obese category, as overweight and obese individuals most likely do not have functional deficits because of body size.
Individuals who are exceptionally large experience difficulty performing ADLs and IADLs.2,35,39 They may have difficulty with ADLs and IADLs because of limitations in reach strength, pain, and endurance. They may also experience neuropathies that require increased safety awareness to prevent skin breakdown. As with all clients, a comprehensive evaluation of the exceptionally large individual should include primary and secondary medical problems that result in additional functional deficits.
Adaptive techniques, adaptive equipment, and home modifications may allow for increased independence and safety. When recommending adaptive equipment and durable medical equipment, the size and durability of equipment needs to be taken into consideration. For example, the standard molded sock aid may not fit around the exceptionally large client’s calf, whereas softer fabric or flexible plastic sock aids likely accommodate larger calf sizes.19,20
Provide resources for clothing available in larger sizes that may help the client to feel more comfortable in the community and help with self-esteem. Some manufacturers have designed exercise clothing, swimsuits, and work attire in larger sizes. Many resources can be found on the Internet that offer sizes up to at least 7x.
1. Use dressing sticks with a neoprene-covered coat hook on one end and a small hook on the other (see Figure 10-7) for pushing and pulling garments off and on feet and legs.
2. For socks, use a large flexible commercially available sock aid (see Figure 10-8). The rigid sock aids available may not fit around larger calves.
3. Compensate for the need to bend to tie shoelaces by using elastic shoelaces or other adapted shoe fasteners such as Velcro-fastened shoes or secure slip-on shoes. Edema is frequently a problem with this population and should be taken into account when selecting shoes.
4. Use reachers (see Figure 10-9) for picking up socks and shoes, arranging clothes, removing clothes from hangers, picking up objects on the floor, and donning pants to avoid bending or unsafe reaching.
1. Use front-opening or pullover garments that are one size larger than needed and made of fabrics that have some stretch.
2. Use dressing sticks (see Figure 10-7) to push a shirt or blouse over the head and reach around shoulders. Some exceptionally large individuals are not able to touch the opposite shoulder with the opposite hand because of the girth of their trunk.
1. A handheld flexible shower hose for bathing and shampooing hair can eliminate the need to stand in the shower and offers the user control of the direction of the spray.
2. A long-handled bath brush or sponge with a soap holder (see Figure 10-13) or long cloth scrubber can allow the user to reach legs, feet, and back. If the standard long-handled bath brush/sponge is not long enough, add an extension with PVC pipe and a bend about one third of the distance from the handle to improve reach.
3. Safety rails (see Figure 10-15) can be used for bathtub transfers, and safety mats or strips can be placed on the bathtub bottom to prevent slipping.
4. A bariatric transfer tub bench (similar to Figure 10-6) or shower stool set in the bathtub or shower stall can eliminate the need to stand to shower, thus increasing safety and conserving energy. The bench should be built to accommodate the user’s weight. The larger equipment may not be easily obtainable and may need to be special ordered. It is usually more functional to remove the back on the shower equipment to allow for increased sitting surface and room for posterior buttocks to shift back on the seat and allow the user to lean back as legs are lifted into shower or over the edge of the tub. The user must have adequate sitting balance before removing the back of the bench or stool.
5. Evaluate issues with water spillage from the tub or shower in using a transfer tub bench. A large person using a transfer tub bench that fits into the standard tub may need to plan ahead to manage water overflow because the width of the hips may cover the area on the bench originally designed for placement of the shower curtain. Water on the floor can lead to a fall and create extra cleanup. Extra towels may be required when setting up the shower.
6. Grab bars can be installed to prevent falls and ease transfers. A licensed contractor must securely mount these into the studs of the wall. The suction grab bars commercially available would not be safe for this population as the amount of pull and weight would cause the suction to release from the wall.
7. Use a hair dryer to thoroughly dry skin in hard-to-reach areas such as buttocks, crotch, or on abdominal folds to prevent rashes and fungal infections in the folds.
1. Use a long-handle mirror for regular skin checks on feet to look for skin breakdown.
2. Over-the-counter spray products such as deodorant, hair spray, and spray powder can compensate for limited reach as the user does not need to make direct skin contact with the product. The spray can be aimed in the general direction—for example, the underarms—and provide adequate coverage.
1. Use toilet paper holders/extenders for toilet hygiene as reach is often difficult for optimal hygiene. Several types of toilet aids are available in catalogs that sell assistive devices.
2. Use a bidet mounted on the toilet for toilet hygiene. Select one where the controls are not mounted to the seat and likely to be covered by the user’s wide hips. Many options are available from one as simple as a pump with a handheld spray to deluxe models that include front and rear wash, warm-air drying, and water pressure control.
3. Dressing sticks can be used to pull garments up after using the toilet.
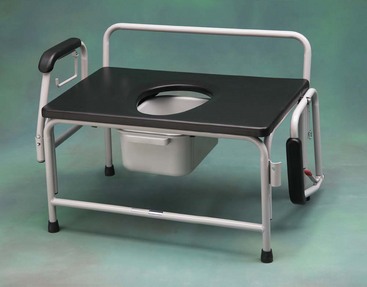
4. Bariatric bedside commodes can be used over the toilet if room allows or at the bedside. The commode should be built to accommodate the user’s weight. The sitting surfaces should be smooth to prevent skin tears or pressure areas. Because body size may push the large person forward, the standard hole size is not in the correct location for toileting. The commode hole should be larger than that for a standard commode to allow space to reach for toilet hygiene and proper alignment for elimination. If the user is not able to stand and pivot to the commode, drop-arm commodes are available for the bariatric population (Figure 10-39).
5. Adapt male urinals with a PVC pipe handle to allow for independent use. This will allow the use of one hand to hold the urinal and one hand to lift abdominal folds to place the urinal.
1. Set up furniture at appropriate height by raising on blocks to elevate or shortening leg rests to lower. Multiple sitting surfaces allow the large individual to alter sitting pressures during the day; elevate lower extremities, which may be prone to edema; and provide alternatives to staying in bed. Several manufacturers make electrical lifts for furniture or chairs that accommodate persons weighing up to 500 pounds.
2. A glider/office chair that is operated by the feet can facilitate transportation if lower-extremity endurance is limited. It should be built to accommodate the user’s weight, and the user should be able to demonstrate safe sit to stand, as the chair is mobile without brakes to secure it during transfers.
3. Encourage the use of mobility aids for safety. A four-wheeled walker with a seat may improve mobility and will improve function as the seat can be used as an energy-conservation method and be used to carry items on the seat when moving from room to room. The user can sit on the four-wheeled walker seat to conserve energy while cooking, brushing teeth, shaving, and washing.
4. For the exceptionally large individual with limited functional mobility, a manual wheelchair is generally not functional as it is too wide for most doorways within the home. If discharged home with a seat width greater than 24 inches, the user is likely to only use it in one room as doorways in most homes are too narrow to accommodate such a large wheelchair. The OT and team should consider alternatives if a bariatric wheelchair is needed but access is limited.
The exceptionally large person may be unable to reach faucet handles, reach into lower cabinets or a clothes dryer, be safe on step stools, or carry heavy items with proper body mechanics because of obstructions caused by abdomen size, limited endurance, and limited reaching and bending. Home management activities can be facilitated by a wide variety of environmental adaptations, assistive devices, energy conservation methods, and work simplification techniques.12,44 The following are suggestions to facilitate home management for the exceptionally large individual:
1. Store frequently used items on the first shelves of cabinets, just above and below counters or on counters where possible. Eliminate unnecessary items.
2. If the individual is unable to reach faucet handles, add an extension onto the handle.
3. Use a high stable stool to work comfortably at counter height with feet firmly placed on the ground, or attach a drop-leaf table to the wall for planning and meal preparation area if a wheelchair is used.
4. Use a utility cart of comfortable height to transport several items at once or a four-wheeled walker.
5. Use reachers to get lightweight items (e.g., a cereal box) from high shelves. Place frequently used items on shelves in cabinets and refrigerator where items are easily accessible and reachable.
6. Eliminate bending by using extended and flexible plastic handles on dust mops, brooms, and dustpans. Sit to do cleaning and move chair as needed.
7. Use pullout shelves or lazy Susans to organize cupboards to eliminate bending and to ease access to items.
8. Eliminate bending by using a wall oven, countertop broiler, microwave oven, and convection oven.
9. Use a metal kitchen spatula to pull out and push in oven racks. There are commercially available tools for this purpose also.
10. Eliminate leaning and bending by using a top-loading automatic washer and elevated dryer. Wheelchair users or people of shorter stature can benefit from front-loading appliances. Use a reacher or other extended tool to obtain clothes from the washer or dryer.
11. Use an adjustable ironing board to make it possible to sit while ironing, or eliminate ironing with the use of permanently pressed clothing.2,19,20,35,39
ADLs and IADLs are areas of occupation that include activities that enable a person to function independently and assume important occupational roles. ADLs include self-care tasks such as bathing/showering, bowel and bladder management, dressing/undressing, eating (or swallowing), feeding, functional mobility such as transfers and bed mobility, sexual activity, toilet hygiene, and the care of personal devices such as hearing aids, orthotics, and splints. IADL tasks include care of others and of pets, child rearing, communication management such as use of telephones, use of personal digital assistants and computers, community mobility such as driving and use of public transportation, financial management such as use of cash and check writing, health management, and maintenance.
Occupational therapists routinely assess performance in ADLs and IADLs to determine a client’s level of functional independence. Interviews and performance analysis are used to carry out the assessment. Performance skills, performance patterns, the environment, and cultural, personal, temporal, and virtual context are also evaluated and taken into consideration when evaluating and establishing treatment goals.
Results of the assessment and ongoing progress are recorded on one of many available ADL checklists or with a standardized assessment, the content of which is summarized for the permanent medical record (please refer to Chapter 8 for further information on documentation). Intervention is client centered and directed at training in independent living skills or with teaching a caregiver to assist the client with ADLs and IADLs. The occupational therapist can include in the intervention plan compensatory strategies, home modification, adaptive equipment, durable medical equipment, work simplification, and energy conservation techniques to improve ADL/IADL performance.
1. Define ADLs and IADLs. List three classifications of tasks that may be considered in each category.
2. What is the role of OT in restoring ADL and IADL independence?
3. List at least three activities that are considered self-care skills, three functional mobility skills, three functional communication skills, and three home management or meal preparation and cleanup skills.
4. List three factors that the occupational therapist must consider before commencing ADL performance assessment and training. Describe how each could limit or affect ADL performance.
5. What is the ultimate goal of the ADL and IADL training program?
6. Discuss the concept of maximal independence, as defined in the text.
7. List the general steps in the procedure for ADL assessment.
8. Describe how the occupational therapist can use the ADL checklist.
9. List the steps in the activities of IADL assessment, and describe who should be involved in a home evaluation.
10. What is the purpose of the home evaluation?
11. List the steps in the home evaluation.
12. What kinds of things are observed in a home assessment?
13. How does the therapist record and report the results of the home evaluation and make the necessary recommendations?
14. How does the occupational therapist, with the client, select ADL and IADL training objectives after an assessment?
15. Describe three approaches to teaching ADL skills to a client with perception or memory deficits.
16. List the important factors to include in an ADL or IADL progress report.
17. Describe the levels of independence, as defined in the text.
18. Give an example of a health management and maintenance issue.
19. Give three examples of adaptations that may be helpful for the person with low vision.
1. Demonstrate the use of at least three assistive devices mentioned in the text.
2. Teach another person to don a shirt using one hand.
3. Teach another person how to don and remove trousers as if he or she had hemiplegia.
4. Teach another person how to don and remove trousers as if his or her legs were paralyzed.
5. Prepare a meal using only one hand, and write about your experience.
1. Activities of daily living for patients with incoordination, limited range of motion, paraplegia, quadriplegia, and hemiplegia. Cleveland: Metro Health Center for Rehabilitation, Metro Health Medical Center for Rehabilitation, 1968. [(rev. 1989)].
2. Alley, DE, et al. The changing relationship of obesity and disability, 1988-2004. JAMA. 2007;298(17):2020–2027.
3. American Occupational Therapy Association. Occupational therapy practice framework: domain & process, ed 2. Am J Occup Ther. 2008;62(6):625–688.
4. Anemaet, WK, et al. Home rehabilitation: guide to clinical practice. St. Louis: Mosby; 2000.
5. Arilotta, C. Performance in areas of occupation: the impact of the environment. Phys Disabil Special. 2003;26:1.
6. Armstrong, M, Lauzen, S. Community integration program, ed 2. Enumclaw, WA: Idyll Arbor; 1994.
7. Asher, IE. Occupational therapy assessment tools: an annotated index, ed 3. Bethesda, MD: American Occupational Therapy Association; 2007.
8. Baum, CM, Connor, LT, Morrison, T, et al. Reliability, validity, and clinical utility of the executive function performance test: a measure of executive function in a sample of people with stroke. AJOT. 2008;62:446–455.
9. Baum, CM, Morrison, T, Hahn, M, et al. Test manual: Executive Function Performance Test. St. Louis: Washington University; 2003.
10. Bergstrom, N. Adaptations for activities of daily living. In Practical manual for physical medicine and rehabilitation. St. Louis: Elsevier Mosby; 2006.
11. Bromley, I. Tetraplegia and paraplegia: a guide for physiotherapists, ed 6. London: Churchill Livingstone Elsevier; 2006.
12. Christiansen, CH, Matuska, KM. editors: Ways of living: adaptive strategies for special needs,, ed 3. Bethesda, MD: American Occupational Therapy Association; 2004.
13. Clark, FA. The concept of habit and routine: a preliminary theoretical synthesis. Occup Ther J Res. 2000;20:1235–1375.
14. Cynkin, S, Robinson, AM. Occupational therapy and activities health: toward health through activities. Boston: Little, Brown; 1990.
15. Department of Justice. Americans with Disabilities Act of 1990 incorporating changes made by the ADA Amendments Act of 2008. www.ada.gov. [Accessed April 2011].
16. Department of Justice: Technical Assistance to the States Act.
17. Fiese, BH, Tomcho, TJ, Douglas, M, et al. A review of 50 years of research on naturally occurring family routines and rituals: cause for celebration? J Family Psych. 2002;16:381–390.
18. Fisher, AG. Assessment of motor and process skills (AMPS). Fort Collins, CO: Three Star Press; 2003.
19. Foti, D. Caring for the person of size. OT Practice. 2005;7:9–14. [Feb].
20. Foti, D, Littrell, E. Bariatric care: practical problem solving and interventions. Physical Disabilities Special Interest Section Quarterly. 27(4), 2004.
21. Girdler, S, et al. The impact of age-related vision loss. OTJR: Occupation, Participation and Health. 2008;28(3):P110–P120.
22. Herget, M. New aids for low vision diabetics. Am J Nurs. 1989;89(10):1319–1322.
23. Hinojosa, J. Position paper: broadening the construct of independence. Am J Occup Ther. 2008;56(6):660.
24. Katz, N, Tadmore, I, Felzen, B, Hartman-Maeir, A. Validity of the Executive Function Performance Test in individuals with schizophrenia. Occup Ther J Res. 2007;27:1–8.
25. Klinger, JL. Mealtime manual for people with disabilities and the aging. Thorofare, NJ: Slack; 1997.
26. Law, ML, et al. Canadian occupational performance measure (COPM), ed 4. Ottawa: CAOT; 2010.
27. Letts, L, Law, M, Rigby, P, et al. Person-environment assessments in occupational therapy. Am J Occup Ther. 1994;48:608.
28. The Lighthouse store: Adaptations. San Francisco www.store.lighthouse-sf.org, 2010.
29. Malick, MH, Almasy, BS. Activities of daily living and homemaking. In Hopkins HL, Smith HD, eds.: Willard and Spackman’s occupational therapy, ed 7, Philadelphia: JB Lippincott, 1988.
30. Maxi aids and appliances for independent living. Farmingdale, NY, Maxi Aids www.maxiaids.com.
31. McBearson, G. Dressing parts 1 and 2. www.youtube.com/watch?v=RR1nd3J5aWQ. [Accessed 2010].
32. Niestadt, ME. Introduction to evaluation and interviewing. In Neistadt ME, Crepeau EB, eds.: Willard and Spackman’s occupational therapy, ed 9, Philadelphia: Williams & Wilkins, 1998.
33. Orr, AL. Issues in aging and vision: a curriculum for university programs and in-service training. New York: American Foundation for the Blind Press; 1998.
34. Radomski, M, Trombly, CA. Occupational therapy for physical dysfunction, ed 6. Baltimore: Williams & Wilkins; 2008.
35. Reynolds, SL, et al. The impact of obesity on active life expectancy in older American men and women. Gerontol.
36. Runge, M. Self-dressing techniques for clients with spinal cord injury. Am J Occup Ther. 1967;21:367.
37. Scheiman, M, et al. Low vision rehabilitation: a practical guide for occupational therapists. Thorofare, NJ: Slack; 2007.
38. Steggles, E, Leslis, J. Electronic aids to daily living. Home & Community Health Special Interest Quarterly. 2001;8:1.
39. Sturn, R, et al. Increasing obesity rates and disability trends. Health Affairs. 2004;23(2):199–205.
40. Uniform Data System for Medical Rehabilitation. Functional independence measure (FIM). Buffalo, NY: State University of New York at Buffalo; 1993.
41. United States Consumer Product Safety Commission. Tap water scalds, Document #5089. www.cpsc.gov. [Accessed August 2010].
42. Vital Recipe 2010. Cooking gadgets, wheelchair tips. www.vitalrecipe.com.
43. Yano, E, Working with the older adult with low vision: home health OT interventions. presentation at Kaiser Permanente Medical Center Home Health Department, Hayward, CA, 1998.
44. Yasuda, YL, Leiberman, D. Adults with rheumatoid arthritis: practice guidelines series. Bethesda: American Occupational Therapy Association; 2001.
45. Zahoransky M: Home & Community Health Special Interest Section Quarterly/American Occupational Therapy Association, Bethesda: 16(4)1, 3.
Electric leg bag source, www.richardsonproducts.com/hydroflushmini.htmlSCI.
JAWS, Freedom Scientific. www.FreedomScientific.com.
Resource list, www.disabledandproductive.com/videos/video-on-using-an-electric-leg-bag-emptier.
Youtube.com. Eating videos. www.youtube.com/watch?v=KZRFj1UZl-c&p=542A86D42A39B2BF&playnext=1&index=3, 2010.