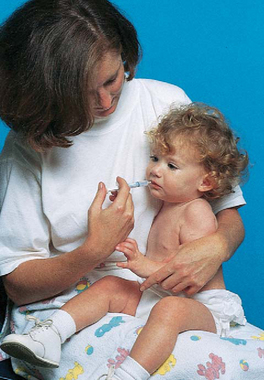
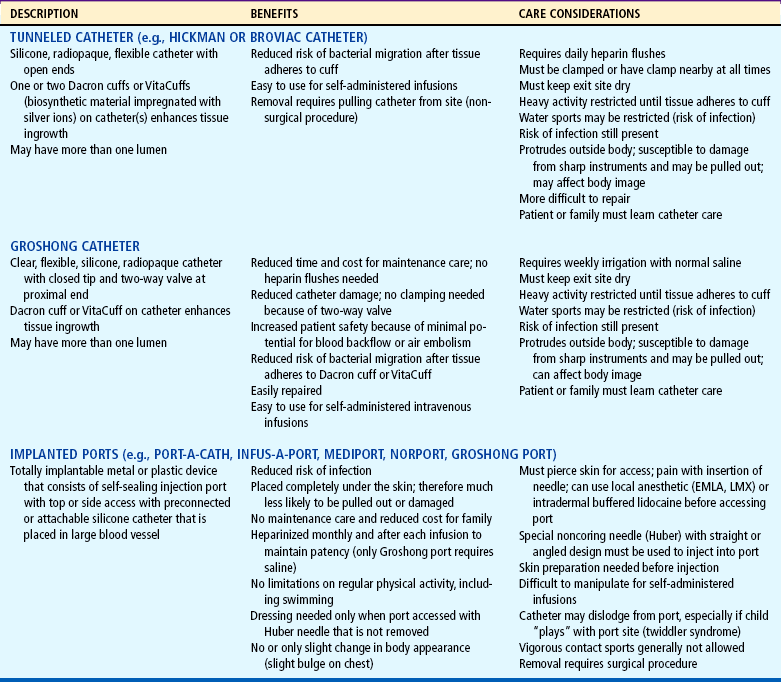
STOOL SPECIMENS

Stool specimens are frequently collected in children to identify parasites and other organisms that cause diarrhea, to assess gastrointestinal function, and to check for occult (hidden) blood. Ideally, stool should be collected without contamination with urine, but in children wearing diapers this is difficult unless a urine bag is applied. Children who are toilet trained should urinate first, flush the toilet, then defecate in the toilet, a bedpan (preferably one that is placed on the toilet to avoid embarrassment), or a commercial potty hat.

NURSINGTIP

To obtain a stool specimen, place plastic wrap over the toilet bowl to collect the stool. Use a tongue depressor or disposable spoon or knife to collect the stool.

Stool specimens should be large enough to obtain an ample sampling, not merely a fecal fragment. Specimens are placed in an appropriate container, which is covered and labeled. If several specimens are needed, the containers are marked with the date and time and kept in a specimen refrigerator. Care is exercised in handling the specimen because of the risk of contamination.

BLOOD SPECIMENS

Whether the specimen is collected by the nurse or others, the nurse is responsible for making certain that specimens, such as serial examinations and fasting specimens, are collected on time and the proper equipment is available. Collecting, transporting, and storing specimens can have a major impact on laboratory results.

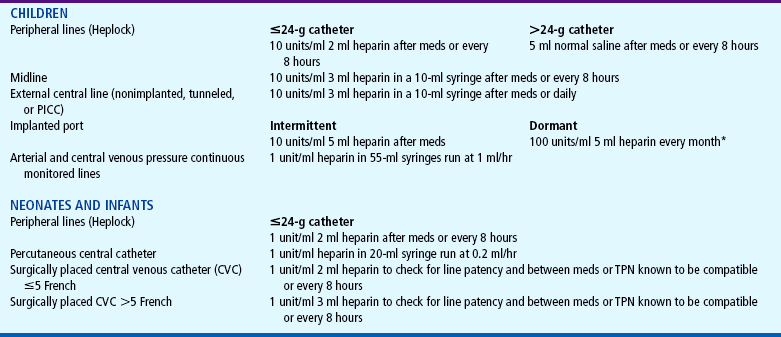
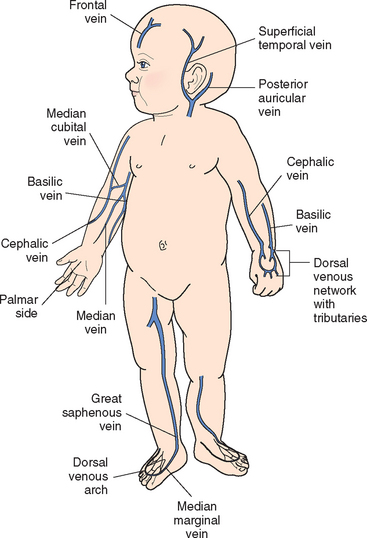
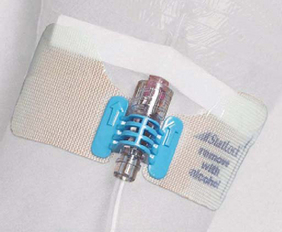
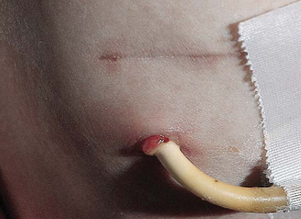
Venous blood samples can be obtained by venipuncture or by aspiration from a peripheral or central access device (see Evidence-Based Practice box). Withdrawing blood specimens through peripheral lock devices in small peripheral veins has met with varying degrees of success. Although it avoids an additional venipuncture for the child, attempting to aspirate blood from the peripheral lock may shorten the life of the device. When using an IV infusion site for specimen collection, consider the type of fluid being infused. For example, a specimen collected for glucose level would be inaccurate if removed from a catheter through which glucose-containing solution was being administered.

NURSINGTIP

image To obtain a blood specimen from a peripheral lock when the infusion solution may interfere with tests results, first aspirate a quantity of blood equal to the volume of fluid in the catheter and discard; then aspirate the blood sample.

image For a blood culture, use the first sample of blood, since organisms are most likely to collect within the catheter itself.

NURSINGALERT

On small or anemic children, keep track of the amount drawn and discarded over time. Frequent taking of blood specimens can rapidly decrease a child’s blood volume. Coordinate blood samples and ask the laboratory to save as much blood as possible to reduce the frequency.

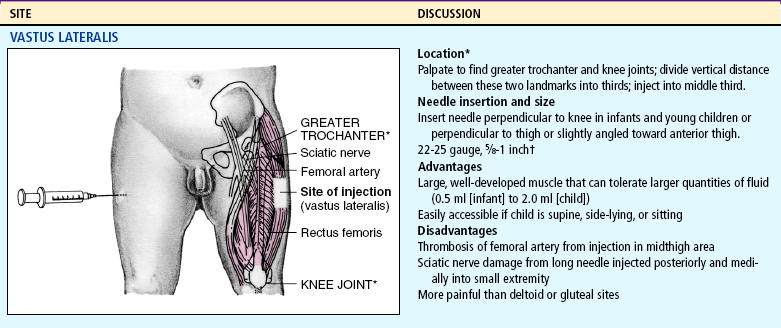
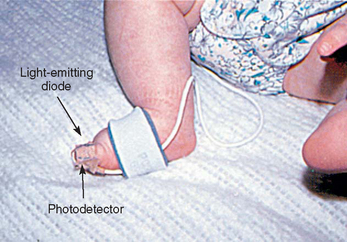
Arterial blood samples are sometimes needed for blood gas measurement, although noninvasive techniques, such as transcutaneous oxygen monitoring and pulse oximetry, are used frequently. Arterial samples may be obtained by arterial puncture using the radial, brachial, or femoral arteries; by deep heel puncture; or from indwelling arterial catheters. Adequate circulation should be assessed before arterial puncture by observing capillary refill or performing the Allen test, a procedure that assesses the circulation of the radial, ulnar, or brachial arteries. Because unclotted blood is required, only heparinized collection tubes are used. In addition, no air bubbles should enter the tube, since they can alter blood gas concentration. Crying, fear, and agitation also affect blood gas values; therefore every effort is made to comfort the child. The nurse should pack the sample in ice to reduce blood cell metabolism and take it to the laboratory for immediate analysis.

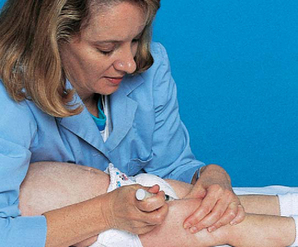
Capillary blood samples are taken from children by a finger stick. A common method for taking peripheral blood samples from infants younger than 6 months of age is by a heel stick. Before the blood sample is taken, the heel is warmed for 3 minutes. The area is cleansed with alcohol, the infant’s foot firmly restrained with the free hand, and the heel punctured with an automatic lancet device (Clinical and Laboratory Standards Institute, 2006). An automatic device delivers a more precise puncture depth and is less painful than using a lance (Vertanen, Fellman, Brommels, and others, 2001). A surgical blade of any kind is contraindicated. An example of a safe device is the BD Quickheel Safety Lancet. The Tenderfoot Preemie device was compared with the Monolet lancet and was found to be safer than the lancet and required fewer heel punctures, less collection time, and lower recollection rates (Kellam, Sacks, Wailer, and others, 2001). Shepherd, Glenesk, Niven, and others (2006) reported the Tenderfoot device was more effective and safer than a lancet for newborn screening tests. Although obtaining capillary blood gases is a common practice, these measures may not accurately reflect arterial values.

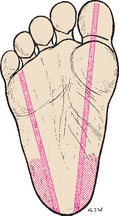
The most serious complications of infant heel puncture are necrotizing osteochondritis from lancet penetration of the underlying calcaneus bone, infection, or abscess (Meehan, 1998). To avoid osteochondritis, the puncture should be no deeper than 2 mm and should be made at the outer aspect of the heel. The boundaries of the calcaneus can be marked by an imaginary line extending posteriorly from a point between the fourth and fifth toes and running parallel to the lateral aspect of the heel and another line extending posteriorly from the middle of the great toe and running parallel to the medial aspect of the heel (Fig. 22-11). Repeated trauma to the walking surface of the heel can cause fibrosis and scarring that may interfere with locomotion.

image

FIG. 22-11 Puncture site (colored stippled area) on sole of infant’s foot.

The specimens are quickly collected, and pressure is applied to the puncture site with dry gauze until bleeding stops. The arm is kept extended, not flexed, while pressure is applied for a few minutes after venipuncture in the antecubital fossa to reduce bruising. The site is covered with an adhesive bandage. In young children, adhesive bandages pose an aspiration hazard; they should be avoided or removed as soon as the bleeding stops. Applying warm compresses to ecchymotic areas increases circulation, helps remove extravasated blood, and decreases pain.

No matter how or by whom the specimen is collected, children, even some older ones, fear the loss of their blood. This is particularly true for children whose condition requires frequent blood specimens. They mistakenly believe that blood removed from their bodies is a threat to their lives. Explaining to them that their body is continuously producing blood provides them with a measure of reassurance. When the blood is drawn, a comment such as “Just look how red it is. You–re really making a lot of nice red blood,” confirms this information and affords them an opportunity to express their concern. An adhesive bandage gives them added reassurance that the vital fluids will not leak out.

EVIDENCE-BASED PRACTICE

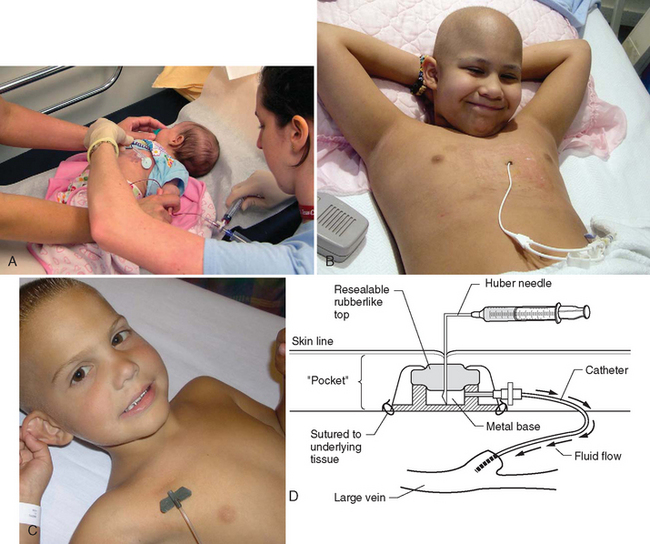
Obtaining Blood Specimens from Central Venous Catheters in Children

Joy Hesselgrave

ASK THE QUESTION

In children, do blood specimens obtained from central venous catheters using the discard, reinfusion, or push-pull method yield more accurate samples?

SEARCH FOR EVIDENCE

Search Strategies

Search selection criteria included English-language research-based publications within the past 15 years on pediatric blood specimen collection from central venous access.

Databases Used

National Guideline Clearinghouse (AHRQ), Cochrane Collaboration, Joanna Briggs Institute, PubMed, TRIP Database Plus, MD Consult, PedsCCM, BestBETs

CRITICALLY ANALYZE THE EVIDENCE

Limited scientific research exists that describes the optimal method for drawing blood samples from central venous access devices (VAD) in the pediatric patient.

A convenience sample of paired specimens compared blood drawn from central lines via push-pull method and discard method on 28 pediatric patients 6 months to 12 years of age. Of the 438 pairs of measurements that were compared, 420, or 95.9%, were within limits of agreement for hemograms, electrolytes, and glucose. The push-pull method eliminates loss of blood and decreases the amount of times the central line is accessed (Barton, Chase, Latham, and others, 2004).

Forty-two nonneutropenic pediatric patients ages 2 to 20 years were randomly assigned to one of two syringe-handling methods for blood sampling. The discard specimen, routinely reinfused, was collected using the usual clean procedure and an exaggerated unclean alternative procedure. Neither the sterile specimens nor the unclean specimens grew organisms, thus suggesting that the reinfusion of the blood specimen would be safe. This study did not evaluate for clots in the discard specimen (Hinds, Wentz, Hughes, and others, 1991).

Thirty bone marrow transplant units were surveyed to evaluate how blood samples were drawn from central VADs. The average patient age was 5 to 16 years. Seventy-five percent of the units used the discard method, with the volume of discard ranging from 0.5 to 10 ml and an average of 4 to 6 ml. Fourteen percent used the reinfusion method, and 11% used the push-pull or mixing method (Keller, 1994).

The Infusion Nurses Society (2006) recommends that the discard method be used when drawing blood samples from central VADs. The discard volume should be 1.5 to 2 times the fill volume of the central VAD.

Frey (2003) summarizes evidence for the practice of all three blood sampling methods. The discard method is most widely reported, with disadvantages including blood loss, blood exposure risk for clinicians, and the potential to confuse the discard specimen for the blood sample. The reinfusion method does not deplete blood volume but risks blood exposure for clinician and potential to reinfuse a contaminated specimen or clots in the discard volume. The push-pull or mixing method demonstrates accuracy for studies other than coagulation and drug levels and reduces blood loss and clinician exposure risk.

APPLY THE EVIDENCE: NURSING IMPLICATIONS

image There is limited pediatric research that clearly supports any particular central line blood sampling method as being superior. All three methods yield accurate results and appear safe. The discard method is the most frequently reported in the literature and benchmarking. However, if there is a concern about blood volume, the push-pull or reinfusion method should be considered.

image If the catheter has multiple lumens, use the distal lumen for laboratory specimen collection.

image Infusions should be stopped and lumens clamped before blood sampling.

image Cleanse the injection cap with antiseptic agent and allow to dry before drawing laboratory specimens.

REFERENCES

Barton, S, Chase, T, Latham, B, et al. Comparing two methods to obtain blood specimens from pediatric central venous catheters. J Pediatr Oncol Nurs. 2004;21(6):320–326.

Frey, M. Drawing blood samples from vascular access devices. J Infus Nurs. 2003;26(5):285–293.

Hinds, PS, Wentz, T, Hughes, W, et al. An investigation of the safety of the blood reinfusion step used with tunneled venous access devices in children with cancer. J Pediatr Oncol Nurs. 1991;8(4):59–64.

Infusion Nurses Society. Policies and procedures for infusion nursing, ed 3. South Norwood, Mass: The Society, 2006.

Keller, CA. Methods of drawing blood samples through central venous catheters in pediatric patients undergoing bone marrow transplant: results of a national survey. Oncol Nurs Forum. 1994;21(5):879–884.

Children also dislike the discomfort associated with venous, arterial, or capillary punctures. Children have identified these procedures as the ones most frequently causing pain during hospitalization and arterial punctures as being one of the most painful of all procedures experienced (Van Cleve, Johnson, and Pothier, 1996). The ones most distressed by venipunctures are toddlers, followed by school-age children and then adolescents. Consequently nurses need to institute pain reduction techniques to lessen the discomfort of these procedures (see Atraumatic Care box).

image ATRAUMATIC CARE

Guidelines for Skin and Vessel Punctures

FOR REDUCTION OF PAIN ASSOCIATED WITH HEEL, FINGER, VENOUS, OR ARTERIAL PUNCTURES

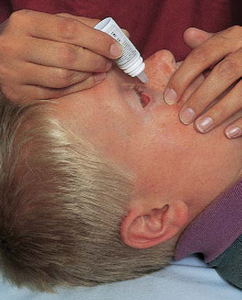
Apply EMLA (an eutectic mixture of lidocaine and prilocaine) topically over the site if time permits (at least 60 minutes). LMX (lidocaine) cream also may be used and requires a shorter application time (30 minutes).

To remove the Tegaderm dressing atraumatically, grasp opposite sides of the film and pull the sides away from each other to stretch and loosen the film. After the film begins to loosen, grasp the other two sides of the film and pull.

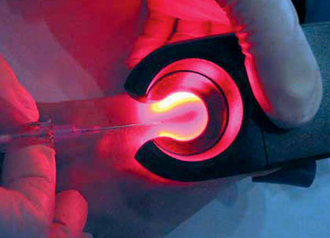
Use iontophoresis (Numby Stuff) over the site if time permits (8 to 20 minutes, depending on the amount of current), a vapocoolant spray, or buffered lidocaine (injected intradermally near the vein with a 30-gauge needle) to numb the skin.

Use nonpharmacologic methods of pain and anxiety control (e.g., ask child to take a deep breath when the needle is inserted and again when the needle is withdrawn; exhale a large breath or blow bubbles to “blow hurt away”; count slowly and then faster and louder if pain is felt).

Keep all equipment out of sight until used.

Enlist parents’ presence or assistance if they wish.

Restrain child only as needed to perform the procedure safely; use therapeutic holding (p. 708).

Allow the skin preparation to dry completely before penetrating the skin.

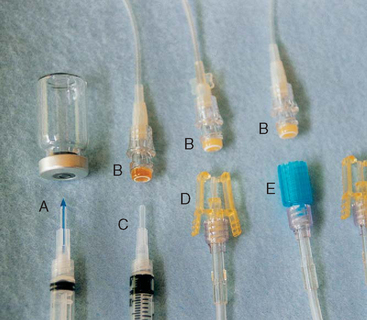
Use the smallest-gauge needle (e.g., 25 gauge) that permits free flow of blood; a 27-gauge needle can be used for obtaining 1 to 1.5 ml blood and for prominent veins (needle length is only ½ inch).

Emphasize that blood entering the syringe or tube does not hurt, and reassure young children that you did not “take their blood” away and that they have a lot more inside.

Place a small bandage over the puncture site to make removal easy and less painful and to reassure young children that their blood will not “leak out.”

Have a “two-try” only policy to reduce excessive insertion attempts–two operators each have two insertion attempts; if insertion is not successful after four punctures, consider alternative venous access, such as a peripherally inserted central catheter (PICC); have a policy for identifying children with difficult access and appropriate interventions (e.g., most experienced operator for the first attempt).

FOR MULTIPLE BLOOD SAMPLES

Use an intermittent infusion device (saline lock) to collect additional samples; consider PICC lines early, not as a last resort.

Coordinate care to allow several tests to be performed on one blood sample using micromethods of testing.

Anticipate tests (e.g., drug levels, chemistry, immunoglobulin levels) and ask the laboratory to save blood for additional testing.

FOR HEEL LANCING IN NEWBORNS

Heel lancing has been shown to be more painful than venipuncture (Larsson, Tannfeldt, Lagercrantz, and others, 1998); consider venipuncture when the amount of blood from the heel would require much squeezing (e.g., genetic screening tests).

The effectiveness of EMLA is controversial, although application of 0.5 g for 30 minutes four times a day in preterm infants was found to be safe (Essink-Tebbes, Wuis, Liem, and others, 1999).

Place diapered newborn against mother’s bare chest in skin-to-skin contact 10 to 15 minutes before and during heel lance (Gray, Watt, and Blass, 2000).

During the procedure, allow newborn to suck a pacifier coated with a slurry of sucrose. When commercially manufactured 24% sucrose solution is unavailable, add 1 teaspoon of table sugar to 4 teaspoons of sterile water. Use this solution to coat the pacifier, or administer 2 ml to the tongue 2 minutes before the procedure (Blass and Watt, 1999).

RESPIRATORY SECRETION SPECIMENS

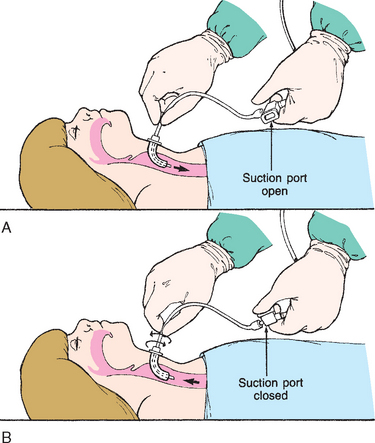
Collection of sputum or nasal discharge is sometimes required for diagnosis of respiratory infections, especially tuberculosis and respiratory syncytial virus (RSV). Older children and adolescents are able to cough and supply sputum specimens when given proper directions. It must be made clear to them that a coughed specimen, not mucus that is cleared from the throat, is needed. It is helpful to demonstrate a deep cough. Infants and small children are unable to follow directions to cough and will swallow any sputum produced; therefore gastric washings (lavage) may be used to collect a sputum specimen. Sometimes a satisfactory specimen can be obtained using a suction device such as a mucus trap if the catheter is inserted into the trachea and the cough reflex is elicited. A catheter inserted into the back of the throat is not sufficient. For children with a tracheostomy, a specimen is easily aspirated from the trachea or major bronchi by attaching a collecting device to the suction apparatus.

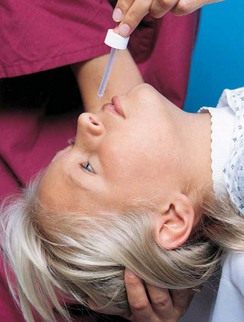
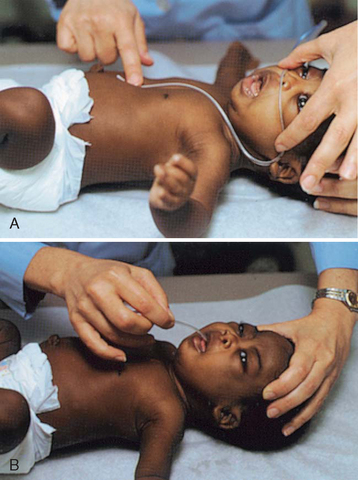
Nasal washings are usually obtained to diagnose an infection of RSV. The child is placed supine, and 1 to 3 ml sterile normal saline is instilled with a sterile syringe (without needle) into one nostril. The contents are aspirated using a small, sterile bulb syringe and are placed in a sterile container. Another method uses a syringe with 5 cm (2 inches) of 18- to 20-gauge tubing. The saline is quickly instilled and then aspirated to recover the nasal specimen. To prevent additional discomfort, all of the equipment should be ready before beginning the procedure.

Other respiratory secretion collection methods include nasopharyngeal swabs to diagnose Bordetella pertussis and throat cultures. The nurse swabs both the tonsils and the posterior pharynx when obtaining a throat culture. The swab stick is inserted into the culture tube. Some culture kits require squeezing an ampule to release the culture medium.

ADMINISTRATION OF MEDICATION

DETERMINATION OF DRUG DOSAGE

Nurses must have an understanding of the safe dosage of medications they administer to children, as well as the expected action, possible side effects, and signs of toxicity (Kennedy, 1996). Unlike with adult medications, there are few standardized pediatric dosage ranges, and with a few exceptions, drugs are prepared and packaged in average adult-dosage strengths.

Factors related to growth and maturation significantly alter an individual’s capacity to metabolize and excrete drugs. Immaturity or defects in any of the important processes of absorption, distribution, biotransformation, or excretion can significantly alter the effects of a drug. Newborn and preterm infants with immature enzyme systems in the liver (where most drugs are broken down and detoxified), lower plasma concentrations of protein for binding with drugs, and immaturely functioning kidneys (where most drugs are excreted) are particularly vulnerable to the harmful effects of drugs. Beyond the newborn period, many drugs are metabolized more rapidly by the liver, necessitating larger doses or more frequent administration. This is particularly important in pain control, since the dosage of analgesics may need to be increased or the interval between doses decreased.

Various formulas involving age, weight, and body surface area as the basis for calculations have been devised to determine children’s drug dosage. Because the administration of medication is a nursing responsibility, nurses need knowledge of not only drug action and patient responses, but also some resources for estimating safe dosages for children. The method most often used to determine children’s dosage is based on a specific dose per kilogram of body weight, such as 0.1 mg/kg.

The most reliable method for determining children’s dosage is to calculate the proportional amount of body surface area (BSA) to body weight. The ratio of BSA to weight varies inversely with length; therefore the infant who is shorter and weighs less than an older child or adult has relatively more surface area than would be expected from the weight. The usual determination of BSA requires the use of the West nomogram or an electronic calculator (widely available on the internet). The BSA is estimated from the height and weight of the child.

Checking Dosage

Administering the correct dosage of a drug is a shared responsibility between the practitioner who orders the drug and the nurse who carries out that order. Children react with unexpected severity to some drugs, and ill children are especially sensitive to drugs. When a dose is ordered that is outside the usual range or when there is some question regarding the preparation or the route of administration, the nurse should always check with the prescribing practitioner before proceeding with the administration, since the nurse is legally liable for any drug administered.

Even when it has been determined that the dosage is correct for a particular child, many drugs are potentially hazardous or lethal. Most facilities have regulations requiring specified drugs to be double-checked by another nurse before they are given to the child. Among drugs that require such safeguards are antiarrhythmics, anticoagulants, chemotherapeutic agents, electrolytes, and insulin. Others frequently included are epinephrine, opioids, and sedatives. Even if this precaution is not mandatory, nurses are wise to take such precautions. Errors in decimal point placement may occur and result in a tenfold or greater dosage error.

Identification

Before the administration of any medication, the child must be correctly identified. Two identifiers (e.g., name and medical record number or birth date) are required before medication administration.

ORAL ADMINISTRATION

The oral route is preferred for administering medications to children because of the ease of administration. Most are dissolved or suspended in liquid preparations. Although some children are able to swallow or chew solid medications at an early age, solid preparations are not recommended for young children because of the danger of aspiration.

Most pediatric medications come in palatable and colorful preparations for ease of administration. Some have a slightly unpleasant aftertaste, but most children will swallow these liquids with little if any resistance. The nurse can taste a minute amount of an oral preparation to ascertain whether it is palatable or bitter. Complaints of dislike from the child can be accepted and the taste camouflaged whenever possible. Most pediatric units have preparations available for this purpose (see Atraumatic Care box).

Preparation

The devices available to measure medicines are not always sufficiently accurate for measuring the small amounts needed in pediatric nursing practice. Although molded plastic calibrated cups offer reasonable accuracy in measuring moderate doses of liquids, paper cups are likely to have irregular shapes or crumpled bottoms. Considerable amounts of thick medication may remain in the cup. Measures of less than a teaspoon are impossible to determine accurately with a cup.

image ATRAUMATIC CARE

Encouraging a Child’s Acceptance of Oral Medication

image Give child a flavored ice pop or small ice cube to suck to numb the tongue before giving the drug.

image Mix the drug with a small amount (about 1 teaspoon) of sweet-tasting substance, such as honey (except in infants because of the risk of botulism), flavored syrups, jam, fruit purees, sherbet, or ice cream; avoid essential food items, since the child may later refuse to eat them.

image Give a “chaser” of water, juice, soft drink, ice pop, or frozen juice bar after the drug.

image If nausea is a problem, give a carbonated beverage poured over finely crushed ice before or immediately after the medication.

image When medication has an unpleasant taste, have child pinch the nose and drink the medicine through a straw. Much of what we taste is associated with smell.

image Flavorings such as apple, banana, and bubble gum can be added at many pharmacies (e.g., FLAVORx) at nominal additional cost. An alternative is to have the pharmacist prepare the drug in a flavored, chewable troche or lozenge.*

image Infants will suck medicine from a needleless syringe or dropper in small increments (0.25 to 0.5 ml) at a time. Use a nipple or special pacifier with a reservoir for the drug.


*For information about compounding drugs, contact Technical Staff, Professional Compounding Centers of America (PCCA), 9901 S. Wilcrest Drive, Houston, TX 77099; (800) 331-2498; http://www.pccarx.com.

The teaspoon is an inaccurate measuring device and is subject to error. Teaspoons vary greatly in capacity, and different persons using the same spoon will pour different amounts. Therefore a drug ordered in teaspoons should be measured in milliliters; the established standard is 5 ml per teaspoon. A convenient hollow-handled medicine spoon is available to accurately measure and administer the drug. Household measuring spoons can also be used when other devices are not available. A device called the Medibottle has been shown to be more effective in delivering oral medication to infants than the oral syringe (Kraus, Stohlmeyer, Hannon, and others, 2001).

Another unreliable device for measuring liquids is the dropper, which varies to a greater extent than the teaspoon or measuring cup. Droppers are available in numerous sizes, but even with the standard USP dropper, the volume of a drop will vary according to the viscosity (thickness) of the liquid measured; viscous fluids produce much larger drops than thin liquids. Many medications are supplied with caps or droppers designed for measuring each specific preparation. These are accurate when used to measure that specific medication but are not reliable for measuring other liquids. Emptying dropper contents into a medicine cup invites additional error. Because some of the liquid clings to the sides of the cup, a significant amount of the drug can be lost.

The most accurate means for measuring small amounts of medication is the plastic disposable syringe, especially the tuberculin syringe for volumes less than 1 ml. Not only does the syringe provide a reliable measure, but it also serves as a convenient means for transporting and administering the medication. The medication can be placed directly into the child’s mouth from the syringe.

Young children and some older children have difficulty swallowing tablets or pills. Because a number of drugs are not available in pediatric preparations, the tablet needs to be crushed before it can be given to these children. Commercial devices* are available, or simple methods can be employed for crushing tablets. Not all drugs can be crushed (e.g., medication with an enteric or protective coating or formulated for slow release).

Children who must take oral medication for an extended period can be taught to swallow tablets or capsules. Training sessions include using verbal instruction, demonstration, reinforcement for swallowing progressively larger candy or capsules, no attention for inappropriate behavior, and gradual withdrawal of guidance once children can swallow their medication.

Because pediatric doses often require dividing adult preparations of medication, the nurse may be faced with the dilemma of accurate dosage. With tablets, only those that are scored can be halved or quartered accurately. If the medication is soluble, the tablet or contents of a capsule can be mixed in a small, premeasured amount of liquid and the appropriate portion given. For example, if half a dose is required, the tablet is dissolved in 5 ml water or flavored liquid and 2.5 ml is given.

Administration

Although administering liquids to infants is relatively easy, the nurse must be careful to prevent aspiration. With the infant held in a semireclining position, the medication is placed in the mouth from a spoon, plastic cup, dropper, or syringe (without needle). The dropper or syringe is best placed along the side of the infant’s tongue, and the liquid is administered slowly in small amounts, allowing the child to swallow between deposits.

NURSINGTIP

In infants up to 11 months of age and children with neurologic impairments, blowing a small puff of air in the face frequently elicits a swallow reflex.

Medicine cups can be used effectively for older infants who are able to drink from a cup. Because of the natural outward tongue thrust in infancy, medications may need to be retrieved from the lips or chin and refed. Allowing the infant to suck medication that has been placed in an empty nipple or inserting the syringe or dropper into the side of the mouth, parallel to the nipple, while the infant nurses are other convenient methods for giving liquid medications to infants. Medication is not added to the infant’s formula feeding because the child may subsequently refuse the formula. Dispose of any plastic covers that may be on the ends of syringes. These covers are small enough to be aspirated by young children.

The young child who refuses to cooperate or resists consistently despite explanation and encouragement may require mild physical coercion. If so, it is carried out quickly and carefully. Every effort is made to determine why the child resists, and the reasons for the coercion are explained to the child in such a way that the child will know that it is being carried out for his or her well-being and is not a form of punishment. There is always a risk in using even mild forceful techniques. A crying child can aspirate a medication, particularly when lying on the back. If the nurse holds the child in the lap with the child’s right arm behind the nurse, the left hand firmly grasped by the nurse’s left hand, and the head securely restrained between the nurse’s arm and body, the medication can be slowly poured into the mouth (Fig. 22-12).

image

FIG. 22-12 Nurse partially restrains child for easy and comfortable administration of oral medication.

INTRAMUSCULAR ADMINISTRATION

Selecting the Syringe and Needle

The volume of medication prescribed for small children and the small amount of tissue available for injection require that a syringe be selected that can measure small amounts of solution. For volumes of less than 1 ml, the tuberculin syringe, calibrated in one-hundredth-milliliter increments, is appropriate. Minute doses may require the use of a 0.5-ml, low-dose syringe. These syringes, along with specially constructed needles, minimize the possibility of inadvertently administering incorrect amounts of a drug because of dead space, which allows fluid to remain in the syringe and needle after the plunger is pushed completely forward. A minimum of 0.2 ml solution remains in a standard needle hub; therefore, when very small amounts of two drugs are combined in the syringe, such as mixtures of insulin, the ratio of the two drugs can be altered significantly. Measures that minimize the effect of dead space are:

image When two drugs are combined in the syringe, always draw them up in the same order to maintain a consistent ratio between the drugs.

image Use the same brand of syringe (dead space may vary between brands).

image Use one-piece syringe units (needle permanently attached to the syringe).

Dead space is also an important factor to consider when injecting medication, since flushing the syringe with an air bubble adds an additional amount of medication to the prescribed dose. This can be hazardous when very small amounts of a drug are given. Consequently, flushing is not advisable, especially when less than 1 ml of medication is given. Syringes are calibrated to deliver a prescribed drug dose, and the amount of medication left in the hub and needle is not part of the syringe barrel calibrations. Certain drugs such as iron dextran and diphtheria and tetanus toxoid may cause irritation when tracked into the subcutaneous tissue. The Z-track method is recommended for use in infants and children rather than an air bubble. Changing the needle after withdrawing the fluid from the vial is another technique to minimize tracking.

The needle length must be sufficient to penetrate the subcutaneous tissue and deposit the medication into the body of the muscle. The needle gauge should be as small as possible to deliver fluid safely. Smaller-diameter (25- to 30-gauge) needles cause the least discomfort, but larger diameters are needed for viscous medication and prevention of accidental bending of longer needles (Table 22-4).

TABLE 22-4

Intramuscular Injection Sites in Children

image

image

image

*Locations are indicated by asterisks on illustrations.

Research has shown that a 1-inch needle is needed for adequate muscle penetration in infants 4 months old and possibly in infants as young as 2 months (Cook and Murtagh, 2002).

Determining the Site

Older children and adolescents usually pose few problems in selecting a suitable site for IM injections, but infants, with their small and underdeveloped muscles, have fewer available sites. It is sometimes difficult to assess the amount of fluid that can be safely injected into a single site. Usually 1 ml is the maximum volume that should be administered in a single site to small children and older infants. The muscles of small infants may not tolerate more than 0.5 ml. As the child approaches adult size, volumes approaching those given to adults may be used. However, the larger the amount of solution, the larger the muscle must be into which it is injected.

Major nerves and blood vessels must be avoided. The preferred site for infants is the vastus lateralis (the rectus femoris is not an acceptable site). The ventrogluteal site is relatively free of major nerves and blood vessels, is a relatively large muscle with less subcutaneous tissue than the dorsal site, has well-defined landmarks for safe site location, is less painful than the vastus lateralis, and is easily accessible in several positions. Cook and Murtagh’s (2006) research into IM injection sites in children indicates that the ventrogluteal site has not been associated with complications and is the preferred site in children of all ages (see Table 22-4). In clinical practice, this site has been safely used in children as young as newborns. The deltoid muscle, a small muscle near the axillary and radial nerves, can be used for small volumes of fluid in children as young as 18 months of age. Its advantages are less pain and fewer side effects from the injectate (as observed with immunizations), compared with the vastus lateralis (Ipp, Gold, Goldback, and others, 1989). Table 22-4 summarizes the three major injection sites and illustrates the location of the preferred IM injection sites for children.

Administration

Although injections that are executed with care seldom cause trauma to the child, there have been reports of serious disability related to IM injections in children. Repeated use of a single site has been associated with fibrosis of the muscle with subsequent muscle contracture. Injections close to large nerves, such as the sciatic nerve, have been responsible for permanent disability, especially when potentially neurotoxic drugs are administered. There are several reports of tissue damage from penicillin. One of the difficulties in administering the opaque preparations, such as penicillin G (Bicillin), is that aspirated blood cannot be detected at the bottom of the syringe, thus increasing the risk of injecting into a blood vessel. When such drugs are injected, great care must be used in locating the correct site. When aspirating, the nurse should look for blood at the top of the syringe near the plunger, since blood may be drawn up through the column of penicillin. One study of IM injection techniques revealed that the straighter the path of needle insertion (e.g., 90-degree angle), the less displacement and shear to tissue, causing less discomfort (Katsma and Smith, 1997).

A reported potential hazard with medication in glass ampules is the presence of glass particles in the ampule after the container is broken. When the medication is withdrawn into the syringe, the glass particles may also be withdrawn and subsequently injected into the patient. As a precaution, medication from glass ampules should be drawn up only through a needle with a filter or injected intravenously through a site in the tubing that is distal to an IV filter.

Most children are unpredictable and few are totally cooperative when receiving an injection. Even children who appear to be relaxed and constrained can lose control under the stress of the procedure. It is advisable to have someone available to help hold the child if needed. Because children often jerk or pull away unexpectedly, the nurse should carry an extra needle to exchange for a contaminated one so that the delay is minimal. The child, even a small one, is told that he or she is receiving an injection (preferably using a phrase such as “putting medicine under the skin”), and then the procedure is carried out as quickly and skillfully as possible to avoid prolonging the stressful experience. Invasive procedures such as injections are especially anxiety provoking in young children, who may associate any assault to the “behind” area with punishment. Because injections are painful, the nurse should employ excellent injection technique and effective pain reduction measures to reduce discomfort (see Nursing Care Guidelines box).

Small infants offer little resistance to injections. Although they squirm and may be difficult to hold in position, they can usually be restrained without assistance. The body of a larger infant can be securely held between the nurse’s arm and body (Fig. 22-13). To inject into the body of the muscle, the nurse firmly grasps the muscle mass between the thumb and fingers to isolate and stabilize the site. In obese children, however, it is preferable to first spread the skin with the thumb and index finger to displace subcutaneous tissue and then grasp the muscle deeply on each side.

image

FIG. 22-13 Holding small child for intramuscular injection. Note how nurse isolates and stabilizes muscle.

If the medication is given around the clock, the nurse must wake the child. Although it may seem to be easier to surprise the sleeping child and do it quickly, this can cause the child to fear going back to sleep. When awakened first, children know that nothing will be done unless they are forewarned. See Nursing Care Guidelines box for techniques that maximize safety and minimize discomfort.

nursingcareguidelines

Intramuscular Administration of Medication

Use safety precautions in administering medication (e.g., check child’s identification).

Apply EMLA (an eutectic mix of lidocaine and prilocaine) topically over site if time permits (at least 60 minutes, preferably 2 to 2½ hours for (intramuscular [IM] injection). LMX (lidocaine) cream may be applied for a shorter interval (see Pain Management, Chapter 7).

Prepare medication.

image Select needle and syringe appropriate to the following:

– Amount of fluid to be administered (syringe size)

– Viscosity of fluid to be administered (needle gauge)

– Amount of tissue to be penetrated (needle length)

image Maximum volume to be administered in a single site is 1 ml for older infants and small children.

Determine site of injection (see Table 22-4), making certain that muscle is large enough to accommodate volume and type of medication.

image Acceptable sites for infants and small or debilitated children are the vastus lateralis muscle and the ventrogluteal muscle.

image The dorsogluteal muscle is insufficiently developed to be a safe site for infants and small children.

Administer medication.

image Obtain sufficient help in restraining child; children are often uncooperative, and their behavior is usually unpredictable.

image Explain briefly what is to be done and, if appropriate, what child can do to help.

image Expose injection area for unobstructed view of landmarks.

image Select a site where skin is free of irritation and danger of infection; palpate for and avoid sensitive or hardened areas. With multiple injections, rotate sites.

image Place child in a lying or sitting position; child is not allowed to stand because:

– Landmarks are more difficult to assess.

– Restraint is more difficult.

– Child may faint and fall.

image Use a new, sharp needle with smallest diameter that permits free flow of the medication.

image Grasp muscle firmly between thumb and fingers to isolate and stabilize muscle for deposition of drug in its deepest part; in obese children, spread skin with thumb and index finger to displace subcutaneous tissue and grasp muscle deeply on each side.

image Allow skin preparation to dry completely before skin is penetrated.

image Have medication at room temperature.

Decrease perception of pain.

image Distract child with conversation.

image Give child something on which to concentrate (e.g., squeezing a hand or side rail, pinching own nose, humming, counting, yelling “Ouch!”).

image Spray vapocoolant (e.g., ethyl chloride or fluorimethane) on site 11 to 15 seconds before injection or place a cold compress or wrapped ice cube on site about a minute before injection, or apply cold to contralateral site.

image Say to child, “If you feel this, tell me to take it out, please.”

image Have child hold a small adhesive bandage and place it on puncture site after IM injection is given.

Insert needle quickly, using a dartlike motion at a 90-degree angle unless contraindicated.

image Use new needle, not one that has pierced rubber stopper on vial.

Avoid tracking any medication through superficial tissues:

image Replace needle after withdrawing medication, or wipe medication from needle with sterile gauze.

image If withdrawing medication from an ampule, use a needle equipped with a filter that removes glass particles; then use a new, nonfilter needle for injection.

image Use the Z-track or air-bubble technique as indicated.

image Avoid depressing the plunger during insertion of the needle.

Aspirate for blood.

image If blood is found, remove syringe from site, change needle, and reinsert into new location.

image If no blood is found, inject into a relaxed muscle:

Ventrogluteal—Place child on side with upper leg flexed and placed in front of lower leg.

Vastus lateralsi—Child can be supine, lying on the side, or sitting.

Inject medication slowly.

Remove needle quickly; hold gauze sponge firmly against skin near needle when removing it to avoid pulling on tissue.

Apply firm pressure to site after injection; massage site to hasten absorption unless contraindicated, as with irritating drugs.

Place a small adhesive bandage on puncture site; with young children decorate it by drawing a smiling face or other symbol of acceptance.

Hold and cuddle young child and encourage parents to comfort child; praise older child.

Allow expression of feelings.

Discard syringe and uncapped, uncut needle in puncture-resistant container located near site of use.

Record time of injection, drug, dose, and injection site.

A needless injection system delivers IM or subcutaneous injections without the use of a needle and eliminates the risk of accidental needle puncture. This needle-free injection system involves a carbon dioxide cartridge that provides the power to deliver the medication through the skin. Although it is not painless, it may reduce pain and also the anxiety of seeing the needle (Polillio and Killy, 1997).

SUBCUTANEOUS AND INTRADERMAL ADMINISTRATION

Subcutaneous and intradermal injections are frequently administered to children, but the technique differs little from the method used with adults. Examples of subcutaneous injections include insulin, hormone replacement, allergy desensitization, and some vaccines. Tuberculin testing, local anesthesia, and allergy testing are examples of frequently administered intradermal injections (see Evidence-Based Practice box).

Techniques to minimize the pain associated with these injections include changing the needle if it pierced a rubber stopper on a vial, using 26- to 30-gauge needles (only to inject the solution), and injecting small volumes (up to 0.5 ml). The angle of the needle for the subcutaneous injection is typically 90 degrees. In children with little subcutaneous tissue, some practitioners insert the needle at a 45-degree angle. However, the benefit of using the 45-degree angle rather than the 90-degree angle remains controversial.

Although subcutaneous injections can be given anywhere there is subcutaneous tissue, common sites include the center third of the lateral aspect of the upper arm, the abdomen, and the center third of the anterior thigh. Some practitioners believe it is not necessary to aspirate before injecting subcutaneously; for example, this is an accepted practice in the administration of insulin. Automatic injector devices do not aspirate before injecting.

EVIDENCE-BASED PRACTICE

Medication Safety and Insulin Therapy

Shelly Nalbone

ASK THE QUESTION

In children, what practices decrease the number of errors in patients receiving insulin therapy?

SEARCH FOR EVIDENCE

Search Strategies

Search selection criteria included English-language publications within the past 10 years, research-based studies, and pediatric populations.

Databases Used

National Guideline Clearinghouse (AHRQ), Cochrane Collaboration, PubMed, CINAHL, University of Michigan Evidence-Based Pediatrics, Micromedex, EMBASE, ProQuest, TRIP Database, Medscape, RxMed, STAT!Ref, RxKinetics

CRITICALLY ANALYZE THE EVIDENCE

The American Society of Health-System Pharmacists (2006) conducted a review of all relevant literature and evidence-based reviews surrounding insulin therapy focusing on safety and patient outcomes in the hospital setting. Practice recommendations included preprinted order sets or computerized order entry and ongoing and annual training.

A quality improvement project to reduce medication errors and assess a standardized protocol for supplemental sliding scale insulin (SSI) in nonintensive care units was described by Donihi, DeVita, and Korytkowski (2006). Before implementation, more than 20 different types of SSI were used. The number of prescribing errors found on chart review 1 year after implementation was reduced from 10.3 to 1.2 per 100 SSI days. Authors recommend preprinted standardized SSI protocols and intense, ongoing education for direct patient care providers.

Ragone and Lando (2002) evaluated sources of errors and stated that, with the advent of new insulin analogs and premixed insulin combinations, the potential for errors in insulin therapy has increased. Errors have occurred when health care workers have mistaken rapid-acting insulin (Humalog) for glargine at bedtime. Inappropriate use of the proper insulin syringe has also led to errors. Excessive heat, inappropriate labeling of vials after opening, and improper handling of insulin pens can affect the efficacy of insulin. Staff education leads to decreased errors and improved patient outcomes.

Heatlie (2003) found in a qualitative study that long delays existed in the dosing of insulin after blood glucose was obtained. Recommendations included preprinted insulin order forms, increased nursing education surrounding diabetes management, and implementation of a 1-hour time limit from blood glucose specimen to insulin administration.

Davis, Harwood, Midgett, and others (2005) described the safety and efficacy of insulin therapy in intermediate care units. They reviewed staffing patterns, order trends, and past errors. Intense educational offerings were developed and implemented. Three months of data collection revealed 275 correct insulin drip rate calculations out of a possible 276. Audit results indicated that insulin therapy could be safely managed with a 1:5 to 1:6 nurse/patient ratio with proper nursing education.

Cohen, Robinson, and Mandrack (2003) identified methods to increase the safety of medication administration, including preprinted medication orders, the use of “smart pumps” for medication administration, and routine double checking by two licensed nurses when administering high-alert medications such as insulin.

APPLY THE EVIDENCE: NURSING IMPLICATIONS

image Preprinted order sets or computerized order entry for insulin therapy should be used in hospital settings.

image SSI should have a set of standardized protocols for hospitals, and use should be minimized.

image Staff education should be ongoing.

image Direct care provider education should be performed annually and be readily available for just-in-time training.

image Processes should be implemented to include annual education and competency validation for all involved staff.

image Patients receiving insulin therapy should be limited to designated areas of the hospital where staff have received appropriate training and development.

image Well-defined policies should be in place to support appropriate patient placement, safe and effective medication administration, strict insulin management, and judicious documentation.

REFERENCES

American Society of Health-System Pharmacists. Professional practice recommendations for safe use of insulin in hospitals. Bethesda, Md: Inpatient Care Practitioners, 2006.

Cohen, H, Robinson, E, Mandrack, M. Getting to the root of medication errors. Nursing. 2003;33(9):36–46.

Davis, E, Harwood, K, Midgett, L, et al. Implementation of a new intravenous insulin method in intermediate-care units in hospitalized patients. Diabetes Educ. 2005;31(6):818–823.

Donihi, A, DeVita, M, Korytkowski, M. Use of a standardized protocol to decrease medication errors and adverse events related to sliding scale insulin. Qual Saf Health Care. 2006;15:89–91.

Heatlie, J. Reducing insulin medication errors: evaluation of a quality improvement initiative. J Nurs Staff Dev. 2003;19(2):92–98.

Ragone, M, Lando, H. Errors of insulin commission? Clin Diabetes. 2002;20(4):221–222.

When giving an intradermal injection into the volar surface of the forearm, the nurse should avoid the medial side of the arm, where the skin is more sensitive.

NURSINGTIP

Families often need to learn subcutaneous injection techniques to administer medications, such as insulin, at home. Begin teaching as early as possible to allow the family the maximum amount of practice time possible.

INTRAVENOUS ADMINISTRATION

The IV route for administering medications is frequently used in pediatric therapy. For some drugs it is the only effective route. This method is used for giving drugs to children who have poor absorption as a result of diarrhea, dehydration, or peripheral vascular collapse; who need a high serum concentration of a drug; who have resistant infections that require parenteral medication over an extended time; who need continuous pain relief; and who require emergency treatment.

Insertion sites and observation of the IV infusion are discussed on p. 733. Several factors need to be considered in relation to IV medication. When a drug is administered intravenously, the effect is almost instantaneous and further control is limited. Most drugs for IV administration require a specified minimum dilution and/or rate of flow, and many are highly irritating or toxic to tissues outside the vascular system. In addition to the precautions and nursing observations related to IV therapy, factors to consider when preparing and administering drugs to infants and children by the IV route include:

image Amount of drug to be administered

image Minimum dilution of drug and whether child is fluid restricted

image Type of solution in which drug can be diluted

image Length of time over which drug can be safely administered

image Rate of infusion that child and vessels can tolerate safely

image IV tubing volume capacity

image Time that this or another drug is to be administered

image Compatibility of all drugs that child is receiving intravenously

image Compatibility with infusion fluids

Before any IV infusion, the site of insertion is checked for patency. Medications are never administered with blood products. Only one antibiotic should be administered at a time.

IV infusion is suitable for children who can tolerate the necessary infusion rate and the extra fluid needed to administer the medication. For the very small infant or fluid-restricted child who is not able to tolerate the increased rate of fluids, special delivery systems, such as syringe pumps, are used. Regardless of the technique, the nurse must know the minimum dilutions for safe administration of IV medications to infants and children.

Peripheral Intermittent Infusion Device

The peripheral lock, also known as an intermittent infusion device or saline or heparin lock, is an alternative to a keep-open infusion when extended access to a vein is required without the need for continuous fluid. It is most frequently employed for intermittent infusion of medication into a peripheral venous route. A short, flexible catheter is used as the lock device, and a site is selected where there will be minimal movement, such as the forearm. The catheter is inserted and secured in the same manner as for any IV infusion device, but the hub is occluded with a stopper or injection cap.

The type of device used may vary, and the care and use of the peripheral lock are carried out according to the protocol of the institution or unit. However, the general concept is the same. The catheter remains in place and is flushed with saline after infusion of the medication. See the Evidence-Based Practice box on flushing with normal saline or heparin.

Children may be discharged with a peripheral lock in place to continue receiving medications without hospitalization; this is usually reserved for children who require medications on a short-term basis and are referred to a home-based infusion company. Those with chronic illnesses who require repeated blood sampling or medications, long-term chemotherapy, or frequent hyperalimentation or antibiotic therapy are best managed with a central venous catheter.

Central Venous Access Device

Central venous access devices (VADs) have several different characteristics. Factors that can influence the type of VAD include the reason for placement of the catheter (diagnosis), length of therapy, risk to the patient in placement of the catheter, and availability of resources to assist the family in maintaining the catheter.

Short-term or nontunneled catheters are used in acute care, emergency, and intensive care units. These catheters are made of polyurethane and are placed in large veins such as the subclavian, femoral, or jugular. Insertion is by surgical incision or large percutaneous threading. A chest x-ray film should be taken to verify placement of the catheter tip before administration of fluids or medications.

Peripherally inserted central catheters (PICCs) can be used for short-term to moderate-length therapy. These catheters consist of silicone or polymer material and are placed by specially trained nurses, physicians, or interventional radiologists (Gamulka, Mendoza, and Connolly, 2005). The most common insertion site is above the antecubital area using the median, cephalic, or basilic vein. The catheter is threaded either with or without a guidewire into the superior vena cava. PICCs can be trimmed before insertion, and the decision can be made to insert the catheter midline, which is considered between the insertion site and the axilla. The midline has a dwell time of 2 to 4 weeks. If the catheter is threaded midline, total parenteral nutrition (TPN) or any other drug known to irritate a peripheral vein (e.g., chemotherapy drugs) should not be administered. The high concentration of glucose in TPN makes it irritating to the vessel; it should be infused through a central catheter.

The decision to insert a PICC needs to be made before several attempts at IV insertion are done. Once the antecubital veins have been punctured repeatedly, they are not considered candidates for this type of catheter. Because this catheter is the least costly and has less chance of complications than other central VADs, it is an excellent choice for many pediatric patients.

NURSINGALERT

Most PICC lines are not sutured into place, so care is needed when changing the dressing.

Long-term central VADs include tunneled catheters and implanted infusion ports (Table 22-5 and Fig. 22-14). They may have single, double, or triple lumens. Several lumens (multilumen) catheters allow more than one therapy to be administered at the same time. Reasons to use multilumen catheters include repeated blood sampling, TPN, administration of blood products or infusion of large quantities and/or concentrations of fluids, administration of incompatible drugs or fluids at the same time (through different lumens), and central venous pressure monitoring.

TABLE 22-5

Comparison of Long-Term Central Venous Access Devices

image

image

FIG. 22-14 Venous access devices. A, Blood being drawn from a central venous catheter. B, Child with external central venous catheter. C, Child with implanted port with Huber needle in place. D, Side view of implanted port.

With any of the central venous catheters, medication is easily instilled through the injection cap. Maintenance of the catheter includes dressing changes, flushing to maintain patency, and prevention of occlusion or dislodgment.

EVIDENCE-BASED PRACTICE

Normal Saline or Heparinized Saline Flush Solution in Pediatric Intravenous Lines

David Wilson

ASK THE QUESTION

Is there a significant difference in the longevity of intravenous (IV) intermittent infusion locks in children when normal saline (NS) is used instead of a heparinized saline (HS) solution as a flush?

SEARCH FOR EVIDENCE

Search Strategies

Selection criteria included English-language publications within the past 15 years with the following terms: saline vs heparin intermittent flush, children’s heparin lock flush, heparin lock patency, and peripheral venous catheter in children.

Databases Used

CINAHL, PubMed

CRITICALLY ANALYZE THE EVIDENCE

image A Cochrane systematic review by Shah and Sinha (2002) revealed eight studies that were randomized or quasirandomized trials of HS administration vs NS, placebo, or no treatment in neonates. The authors of the review concluded that, because of the studies’ heterogeneity and variability in methodologic quality, clinical details, and reporting outcomes, they provided no strong evidence regarding the effectiveness and safety of heparin to prolong catheter life in neonates.

image No significant statistical difference was found between HS and NS flushes for maintaining catheter patency in children (Hanrahan, Kleiber, and Fagan, 1994; Kotter, 1996; Schultz, Drew, and Hewitt, 2002; Hanrahan, Kleiber, and Berends, 2000; Heilskov, Kleiber, Johnson, and others, 1998).

image Several studies reported increased incidence of pain or erythema with HS flushing of infusion devices (Hanrahan, Kleiber, and Fagan, 1994; Robertson, 1994; Nelson and Graves, 1998; McMullen, Fioravanti, Pollack, and others, 1993).

image Several studies found increased patency and/or longer dwell times with HS solutions vs NS in 24-gauge catheters (Mudge, Forcier, and Slattery, 1998; Danek and Noris, 1992; Beecroft, Bossert, Chung, and others, 1997; Gyr, Burroughs, Smith, and others, 1995; Hanrahan, Kleiber, and Berends, 2000).

image Younger children and lower gestational age in preterm neonates were associated with shorter patency of IV catheters (Paisley, Stamper, Brown, and others, 1997; Robertson, 1994; McMullen, Fioravanti, Pollack, and others, 1993).

image Infusion devices flushed with NS lasted longer than those flushed with HS (Nelson and Graves, 1998; Le Duc, 1997; Goldberg, Sankaran, Givelichian, and others, 1999).

image When measured and reported, length of time between flushing peripheral devices affected dwell time (Crews, Gnann, Rice, and others, 1997; Gyr, Burroughs, Smith, and others, 1995).

image None of the studies cited anticoagulation-associated complications with HS, which is a concern in preterm neonates who are at higher risk for development of clotting problems as a result of heparin (Klenner, Fusch, Rakow, and others, 2003).

APPLY THE EVIDENCE: NURSING IMPLICATIONS

image Further research is needed with larger samples of children, especially preterm neonates, using small-gauge catheters (24 gauge) and other gauge catheters, flushed with NS and HS as intermittent infusion devices only (no continuous infusions).

image NS is a safe alternative to HS flush in infants and children with intermittent IV locks larger than 24 gauge; smaller neonates may benefit from HS flush (longer dwell time), but the evidence is inconclusive for all weight ranges and gestational ages.

REFERENCES

Beecroft, PC, Bossert, E, Chung, K, et al. Intravenous lock patency in children: dilute heparin versus saline. J Pediatr Pharmacol Practice. 1997;2(4):211–223.

Crews, BE, Gnann, KK, Rice, MH, et al. Effects of varying intervals between heparin flushes on pediatric catheter longevity. Pediatr Nurs. 1997;23(1):87–91.

Danek, GD, Noris, EM. Pediatric IV catheters: efficacy of saline flush. Pediatr Nurs. 1992;18(2):111–113.

Goldberg, M, Sankaran, R, Givelichian, L, et al. Maintaining patency of peripheral intermittent infusion devices with heparinized saline and saline: a randomized double blind controlled trial in neonatal intensive care and a review of literature. Neonatal Intensive Care. 1999;12(1):18–22.

Gyr, P, Burroughs, T, Smith, K, et al. Double blind comparison of heparin and saline flush solutions in maintenance of peripheral infusion devices. Pediatr Nurs. 1995;21(4):383–389.

Hanrahan, KS, Kleiber, C, Berends, S. Saline for peripheral intravenous locks in neonates: evaluating a change in practice. Neonatal Netw. 2000;19(2):19–24.

Hanrahan, KS, Kleiber, C, Fagan, C. Evaluation of saline for IV locks in children. Pediatr Nurs. 1994;20(6):549–552.

Heilskov, J, Kleiber, C, Johnson, K, et al. A randomized trial of heparin and saline for maintaining intravenous locks in neonates. J Soc Pediatr Nurs. 1998;3(3):111–116.

Klenner, AF, Fusch, C, Rakow, A, et al. Benefit and risk of heparin for maintaining peripheral venous catheters in neonates: a placebo-controlled trial. J Pediatr. 2003;143(6):741–745.

Kotter, RW. Heparin vs. saline for intermittent intravenous device maintenance in neonates. Neonatal Netw. 1996;15(6):43–47.

Le Duc, K. Efficacy of normal saline solution versus heparin solution for maintaining patency of peripheral intravenous catheters in children. J Emerg Nurs. 1997;23(4):306–309.

McMullen, A, Fioravanti, ID, Pollack, D, et al. Heparinized saline or normal saline as a flush solution in intermittent intravenous lines in infants and children. MCN. 1993;18(2):78–85.

Mudge, B, Forcier, D, Slattery, MJ. Patency of 24-gauge peripheral intermittent infusion devices: a comparison of heparin and saline flush solutions. Pediatr Nurs. 1998;24(2):142–149.

Nelson, TJ, Graves, SM. 0.9% Sodium chloride injection with and without heparin for maintaining peripheral indwelling intermittent infusion devices in infants. Am J Health Syst Pharm. 1998;55:570–573.

Paisley, MK, Stamper, M, Brown, T, et al. The use of heparin and normal saline flushes in neonatal intravenous catheters. J Pediatr Nurs. 1997;23(5):521–527.

Robertson, J. Intermittent intravenous therapy: a comparison of two flushing solutions. Contemp Nurs. 1994;3(4):174–179.

Schultz, AA, Drew, D, Hewitt, H. Comparison of normal saline and heparinized saline for patency of IV locks in neonates. Appl Nurs Res. 2002;15(1):28–34.

Shah, PS, Sinha, AK, Heparin for prolonging peripheral intravenous catheter use in neonates. Cochrane Database Syst Rev 2002;2:1–26.

NURSINGALERT

When working with tunneled catheters, PICCs, and peripheral intravenous lines (PIVs), avoid the use of any scissors around the tubing or dressing. Removal is best accomplished using fingers and much patience. In the event that a tunneled catheter is cut, use a padded clamp to clamp the catheter proximal to the exit site to avoid blood loss. Repair kits are available, which may save the catheter and avoid surgery to replace a cut catheter.

With the implanted device the port must be palpated for placement and stabilized, the overlying skin cleansed, and only special noncoring Huber needles used to pierce the port’s diaphragm on the top or side, depending on the style. To avoid repeated skin punctures, a special infusion set with a Huber needle and extension tubing with a Luer connection can be used (see Fig. 22-14). With this attached, the injection procedure is the same as for an intermittent infusion device or a central venous catheter. To prevent infection, meticulous aseptic technique must be used any time the devices are entered, including instillation of heparin or saline to prevent clotting (Harris and Maguire, 1999). There should be a protocol stating that the Huber needle needs to be changed at established intervals, usually 5 to 7 days.

The children and parents are taught the procedure for care of the VAD before discharge from the hospital, including preparation and injection of the prescribed medication, the flush, and dressing changes. A protective device may be recommended for some active children to prevent their accidentally dislodging the needle. Many children take responsibility for preparing and administering medications. Both verbal and written step-by-step instructions are provided for the learners (Table 22-6). See the Evidence-Based Practice box for VAD site care.

TABLE 22-6

Flush Guidelines

image

PICC, Peripherally inserted central catheter; TPN, total parenteral nutrition.

*Patients < 6 months of age: 10 units/ml 5 ml every month or 10 units/ml 5 ml every day if accessed.

Modified from Texas Children’s Hospital, Houston.

EVIDENCE-BASED PRACTICE

Central Venous Catheter Site Care

Terry Jean Brandt, Jessica Hilburn, Anh Mac, Theresa E. Reed, and Brandi Horvath

ASK THE QUESTIONS

(1) In children with central venous catheters (CVC), is chlorhexidine gluconate (CHG) a more effective antiseptic solution than povidone-iodine (PI) in preventing CVC-related site infections and bacteremia? (2) In pediatrics, what is the best antiseptic protocol–PI, CHG, or isopropyl alcohol–to use before accessing a CVC?

SEARCH FOR EVIDENCE

Search Strategies

Search selection criteria included English-language publications within the past 16 years, research-based articles, for CVC site care in infants, children, and adults.

Databases Used

Cochrane Collaboration, Joanna Briggs Institute, CINAHL, PubMed, National Guideline Clearinghouse (AHRQ), Institute for Healthcare Improvement, Centers for Disease Control and Prevention (CDC), Infusion Nurses Society, Oncology Nurses Society, MD Consult, BestBETs, TRIP Database Plus, Children’s Health Care Association

CRITICALLY ANALYZE THE EVIDENCE

Dressing Protocol.

A Cochrane systematic review and CDC Healthcare Infection Control Practices Advisory Committee found no evidence to demonstrate any difference in the incidence of the catheter-related bloodstream infections between gauze and tape vs transparent dressings (Gillies, O’Riordan, Carr, and others, 2003; O’Grady, Alexander, Dellinger, and others, 2002).

Although data regarding the use of the chlorhexidine-impregnated CVC dressing (Biopatch) in children are limited, one randomized, controlled study involving 705 neonates reported a substantial decrease in colonized catheter tips in infants when the Biopatch was used compared with a group using the standard dressing. Biopatch was associated with localized contact dermatitis in infants of very low birth weight (Garland, Alex, Mueller, and others, 2001). Levy, Katz, Solter, and others (2005) found pediatric patients with Biopatch had a significantly reduced risk of CVC colonization compared with patients with transparent dressing alone. There is clear evidence that CHG sponge dressings should not be used in neonates less than 7 days of age, 26 weeks’ gestational age, or 1000 g (O’Grady, Alexander, Dellinger, and others, 2002). Routine application of antibiotic ointment is not recommended because of the risk of fungal infections and antimicrobial resistance (Camp-Sorrell, 2004; O’Grady, Alexander, Dellinger, and others, 2002).

Skin Antisepsis.

The Oncology Nursing Society (Camp-Sorrell, 2004) finds chlorhexidine for catheter site care superior to alcohol and PI. Three evidence-based systematic reviews were found regarding CVC site care. Carson (2004) found most studies supported CHG as superior to PI for preventing microbial colonization of the CVC insertion site and catheter tip and for decreasing the risk of local site infection. However, there is still conflicting evidence regarding the efficacy of CHG vs PI for preventing CVC-related bacteremia. A meta-analysis of eight studies by Chaiyakunapruk, Veenstra, Lipsky, and others (2002) found CHG reduced the risk of catheter-related bloodstream infections by 49% compared with PI. Chaiyakunapruk, Veenstra, Lipsky, and others (2003) found the use of CHG rather than PI for site care led to a cost savings of $113 for each catheter used. In a systematic review focused on bone marrow transplant recipients, CHG was the recommended antisepsis for prevention of catheter-related infection (Zitella, 2003).

APPLY THE EVIDENCE: NURSING IMPLICATIONS

image Weekly dressing changes are advised, using a clear dressing or tape and gauze with a Biopatch.

image Two percent chlorhexidine should be used for catheter site antisepsis; use with caution in preterm and low-birth-weight infants. Biopatch should be used around the catheter site except in low-birth-weight infants in the first 2 weeks of life.

REFERENCES

Camp-Sorrell D, ed. Access device guidelines: recommendations for nursing practice and education, ed 2, Pittsburgh: Oncology Nursing Society, 2004.

Carson, S. Chlorhexidine versus povidone-iodine for central venous catheter site care in children. J Pediatr Nurs. 2004;19(1):74–80.

Chaiyakunapruk, N, Veenstra, D, Lipsky, B, et al. Vascular catheter site care: the clinical and economic benefits of chlorhexidine gluconate compared with povidone iodine. Clin Infect Dis. 2003;37(6):764–771.

Chaiyakunapruk, N, Veenstra, D, Lipsky, B, et al. Chlorhexidine compared with povidone-iodine solution for vascular catheter-site care: a meta-analysis. Ann Intern Med. 2002;136:792–801.

Garland, JS, Alex, CP, Mueller, CD, et al. A randomized trial comparing povidone-iodine to a chlorhexidine gluconate impregnated dressing for prevention of central venous catheter infections in neonates. Pediatrics. 2001;107:1431–1436.

Gillies, D, O’Riordan, L, Carr, D, et al, Comparison of gauze and tape or transparent polyurethane dressings for central venous catheters. Cochrane Database Syst Rev 2003;4:CD003827.

Levy, I, Katz, J, Solter, E, et al. Chlorhexidine-impregnated dressing for prevention of colonization of central venous catheters in infants and children: a randomized controlled study. Pediatr Infect Dis J. 2005;24(8):676–679.

O’Grady, N, Alexander, M, Dellinger, EP, et al. Guidelines for the prevention of intravascular catheter-related infections. MMWR. 2002;51(RR-10):1–29.

Zitella, L. Central venous catheter site care for blood and marrow transplant recipients. Clin J Oncol Nurs. 2003;7(3):289–298.

NURSINGTIP

A pocket sewn on the inside of a T-shirt provides a place in which to coil the catheter line while the child is at play if a dressing is not used.

Infection and catheter occlusion are two of the most common complications of central venous catheters. They require treatment with antibiotics for infection and a fibrinolytic agent, such as alteplase, for clots (Fisher, Deffenbaugh, Poole, and others, 2004; Shen, Li, Murdock, and others, 2003). Uncapping can be prevented by taping the cap securely to the catheter and the clamped line to the dressing. Leaks can be prevented by using a smooth-edged clamp only. Parents are cautioned to keep scissors away from the child to prevent accidental cutting of the catheter. If the catheter leaks, they are instructed to tape it above the leak and then clamp the catheter at the taped site. The child should be taken to the practitioner as soon as possible to prevent infection or clotting after a catheter leak.

NURSINGALERT

If a central venous catheter is accidentally removed, apply pressure to the entry site to the vein, not the exit site on the skin.

NASOGASTRIC, OROGASTRIC, OR GASTROSTOMY ADMINISTRATION

When a child has an indwelling feeding tube or a gastrostomy, oral medications are usually given via that route. An advantage of this method is the ability to administer oral medications around the clock without disturbing the child. A disadvantage is the risk of occluding or clogging the tube, especially when giving viscous solutions through small-bore feeding tubes. The most important preventive measure is adequate flushing after the medication is instilled (see Nursing Care Guidelines box).

RECTAL ADMINISTRATION

The rectal route for administration is less reliable but is sometimes used when the oral route is difficult or contraindicated. It is also used when oral preparations are unsuitable to control vomiting. Some of the drugs available in suppository form are acetaminophen, sedatives, analgesics (morphine), and antiemetics. The difficulty in using the rectal route is that, unless the rectum is empty at the time of insertion, the absorption of the drug may be delayed, diminished, or prevented by the presence of feces. Sometimes the drug is later evacuated, securely surrounded by stool.

The wrapping on the suppository is removed and the suppository lubricated with water-soluble jelly or warm water. Rectal suppositories are traditionally inserted with the apex (pointed end) foremost. Reverse contractions or the pressure gradient of the anal canal may help the suppository slip higher into the canal. Using a glove or finger cot, quickly but gently insert the suppository into the rectum, beyond both of the rectal sphincters. The buttocks are then held together firmly to relieve pressure on the anal sphincter until the urge to expel the suppository has passed—5 to 10 minutes. Sometimes the amount of drug ordered is less than the dosage available. The irregular shape of most suppositories makes the process of dividing them into a desired dose difficult if not dangerous. If the suppository must be halved, it should be cut lengthwise. However, there is no guarantee that the drug is evenly dispersed throughout the petrolatum base.

If medication is administered via a retention enema, the same procedure is used. Drugs given by enema are diluted in the smallest amount of solution possible to minimize the likelihood of being evacuated.

OPTIC, OTIC, AND NASAL ADMINISTRATION

There are few differences between administering eye, ear, and nose medication to children and to adults. The major difficulty is in gaining children’s cooperation. Older children need only explanation and direction. Although the administration of optic, otic, and nasal medication is not painful, these drugs can cause unpleasant sensations that can be eliminated with various techniques.

nursingcareguidelines

Nasogastric, Orogastric, or Gastrostomy Medication Administration in Children

Use elixir or suspension (rather than tablet) preparations of medication whenever possible.

Dilute viscous medication or syrup with a small amount of water if possible.

If administering tablets, crush tablet to a fine powder and dissolve drug in a small amount of warm water.

Never crush enteric-coated or sustained-release tablets or capsules.

Avoid oily medications because they tend to cling to side of tube.

Do not mix medication with enteral formula unless fluid is restricted. If adding a drug:

image Check with pharmacist for compatibility.

image Shake formula well and observe for any physical reaction (e.g., separation, precipitation).

image Label formula container with name of medication, dosage, date, and time infusion started.

Have medication at room temperature.

Measure medication in a calibrated cup or syringe.

Check for correct placement of nasogastric or orogastric tube (see Nursing Care Guidelines box, p. 747).

Attach syringe (with adaptable tip but without plunger) to tube.

Pour medication into syringe.

Unclamp tube and allow medication to flow by gravity.

Adjust height of container to achieve desired flow rate (e.g., increase height for faster flow).

As soon as syringe is empty, pour in water to flush tubing.

Amount of water depends on length and gauge of tubing.

Determine amount before administering any medication by using a syringe to fill completely an unused nasogastric or orogastric tube with water. Amount of flush solution is usually 1.5 times this volume.

With certain drug preparations (e.g., suspensions) more fluid may be needed.

If administering more than one drug at the same time, flush tube between each medication with clear water.

Clamp tube after flushing, unless tube is left open.

NURSINGTIP

To reduce unpleasant sensations, when administering medications:

Eye—Apply finger pressure to the lacrimal punctum at the inner aspect of the lid for 1 minute to prevent drainage of medication to the nasopharynx and the unpleasant “tasting” of the drug.

Ear—Allow medications stored in the refrigerator to warm to room temperature before instillation.

Nose—Position the child with the head hyperextended to prevent strangling sensations caused by medication trickling into the throat rather than up into the nasal passages.

To instill eye medication, the child is placed supine or sitting with the head extended, and the child is asked to look up. One hand is used to pull the lower lid downward; the hand that holds the dropper rests on the head so that it may move synchronously with the child’s head, thus reducing the possibility of trauma to a struggling child or of dropping medication on the face (Fig. 22-15). As the lower lid is pulled down, a small conjunctival sac is formed; the solution or ointment is applied to this area, never directly on the eyeball. Another effective technique is to pull the lower lid down and out to form a cup effect, into which the medication is dropped. The lids are gently closed to prevent expression of the medication, and the child is asked to look in all directions to enhance even distribution of the preparation. Excess medication is wiped from the inner canthus outward to prevent contamination to the contralateral eye.

image

FIG. 22-15 Administering eye drops.

Instilling eye drops in infants can be difficult, since they often clench the lids tightly closed. One approach is to place the drops in the nasal corner where the lids meet. The medication pools in this area, and when the infant opens the lids, the medication flows onto the conjunctiva. For young children, playing a game can be helpful, such as instructing the child to keep the eyes closed until the count of 3 and then open them, at which time the drops are quickly instilled. Ointment can be applied by gently pulling down the lower lid and placing the ointment in the lower conjunctival sac.

NURSINGALERT

If both eye ointment and drops are ordered, give drops first, wait 3 minutes, and then apply the ointment to allow each drug to work. When possible, administer eye ointments before bedtime or naptime, since the child’s vision will be blurred temporarily.

Ear drops are instilled with the child in the prone or supine position and the head turned to the appropriate side. For children younger than 3 years of age, the external auditory canal is straightened by gently pulling the pinna downward and straight back. The pinna is pulled upward and back in children older than 3 years of age. To place the drops deep in the ear canal without contaminating the tip of the dropper, place a disposable ear speculum in the canal and administer the drops through the speculum. After instillation, the child should remain lying on the unaffected side for a few minutes. Gentle massage of the area immediately anterior to the ear facilitates the entry of drops into the ear canal. The use of cotton pledgets prevents medication from flowing out of the external canal. However, the pledgets should be loose enough to allow any discharge to exit from the ear. Premoistening thecotton with a few drops of medication prevents the wicking action from absorbing the medication instilled in the ear.

Nose drops are instilled in the same manner as in the adult patient. Unpleasant sensations associated with medicated nose drops are minimized when care is taken to position the child with the head extended well over the edge of the bed or a pillow (Fig. 22-16). Depending on size, the infant can be positioned in the football hold (see Fig. 22-5, B); in the nurse’s arm with the head extended and stabilized between the nurse’s body and elbow, and the arms and hands immobilized with the nurse’s hands; or as shown in Fig. 22-16. After instillation of the drops, the child should remain in position for 1 minute to allow the drops to come in contact with the nasal surfaces.

image

FIG. 22-16 Proper position for instilling nose drops.

Nasal spray dispensers are inserted into the naris vertically and then angled nasally to avoid trauma to the septum and to direct medication toward the inferior turbinate.

FAMILY TEACHING AND HOME CARE

The nurse usually assumes the responsibility for preparing families to administer medications at home. The family should understand why the child is receiving the medication and the effects that might be expected, as well as the amount, frequency, and length of time the drug is to be administered. Instruction should be carried out in an unhurried, relaxed manner, preferably in an area away from a busy ward or office, following the same guidelines for teaching as outlined in the Nursing Care Guidelines box (p. 699).

The caregiver is carefully instructed regarding the correct dosage. Some persons have difficulty understanding medical terminology from the pharmacy; just because they nod or otherwise indicate an understanding, it cannot be assumed that the message is clear. It is important to ascertain their interpretation of a teaspoon, for example, and to be certain they have acceptable devices for measuring the drug. If the drug is packaged with a dropper, syringe, or plastic cup, the nurse should show or mark the point on the device that indicates the prescribed dose and demonstrate how the dose is drawn up into a dropper or syringe, measured, and the bubbles eliminated. If the nurse has any doubts about the parent’s ability to administer the correct dose, the parent should be asked to give a return demonstration. This is essential when the drug has potentially serious consequences from incorrect dosage, such as insulin or digoxin, or when more complex administration is required, such as parenteral injections. When teaching a parent to give an injection, the nurse must allot adequate time for instruction and practice.

Home modifications are often necessary because the availability of equipment or assistance can differ from the hospital setting. For example, the parent may need guidance in devising methods that allow for one person to hold the child and safely give the drug.

NURSINGTIP

To administer oral, nasal, or optic medication when only one person is available to hold the child, use the following procedure:

image Place child supine on flat surface (bed, couch, floor).

image Sit facing child so that child’s head is between operator’s thighs and child’s arms are under operator’s legs.

image Place lower legs over child’s legs to restrain lower body, if necessary.

image To administer oral medication, place small pillow under child’s head to reduce risk of aspiration.

image To administer nasal medication, place small pillow under child’s shoulders to aid flow of liquid through nasal passages.

The time that the drug is to be administered is clarified with the parent. For instance, when a drug is prescribed in association with meals, the number of meals that the family is accustomed to eating influences the amount of drug the child receives. Does the child have meals twice a day or five times a day? When a drug is to be given several times during the day, together the nurse and parents can work out a schedule that accommodates the family’s routine. This is particularly significant if the drug must be given at equal intervals throughout a 24-hour period. For example, telling parents that the child needs 1 teaspoon of medicine four times a day is subject to misinterpretation, since parents may routinely schedule the doses at incorrect times. Instead, a preplanned schedule based on 6-hour intervals should be set up with the number of days required for therapeutic dosage listed. Modification should also be made to accommodate sleep schedules. Written instruction should accompany all drug prescriptions.

NURSINGTIP

If parents have difficulty reading or understanding English, use colors to convey instructions. For example, mark each drug with a color and place the appropriate color on a calendar chart or on a drawing of a clock to identify when the drug needs to be given. If a liquid medication and syringe are used, also mark the syringe with color-coded tape at the place the plunger needs to be.

MAINTAINING FLUID BALANCE

MEASUREMENT OF INTAKE AND OUTPUT

Accurate measurements of fluid intake and output (I&O) are essential to the assessment of fluid balance. Measurements from all sources—including gastrointestinal and parenteral I&O from urine, stools, vomitus, fistulas, nasogastric suction, sweat, and drainage from wounds—must be taken and considered. Although the practitioner usually indicates when I&O measurements are to be recorded, it is a nursing responsibility to keep an accurate I&O record on certain children, including those:

image Receiving IV therapy

image Who underwent major surgery

image Receiving diuretic or corticosteroid therapy

image With severe thermal burns or injuries

image With renal disease or damage

image With congestive heart failure

image With dehydration

image With diabetes mellitus

image With oliguria

image In respiratory distress

image With chronic lung disease

Infants or small children who are unable to use a bedpan or those who have bowel movements with every voiding require the application of a collecting device (p. 711). If collecting bags are not used, wet diapers or pads are carefully weighed to ascertain the amount of fluid lost. This includes liquid stool, vomitus, and other losses. The volume of fluid in milliliters is equivalent to the weight of the fluid measured in grams. The specific gravity as a measure of osmolality is determined with a refractometer or urine dipsticks and assists in assessing the degree of hydration (see FYI, p. 712).

NURSINGTIP

1 g of wet diaper weight = 1 ml urine

In infants with diapers, weigh all dry diapers to be used and note in an indelible marker the dry weight of the diaper; when there is fluid (urine or liquid stool) in the diaper, the amount of output can be approximated by subtracting the weight of the dry diaper from the weighed amount of the wet diaper.

Disadvantages of the weighed-diaper method of fluid measurement include (1) inability to differentiate one type of loss from another because of admixture, (2) loss of urine or liquid stool from leakage or evaporation (especially if the infant is under a radiant warmer), and (3) additional fluid in the diaper (superabsorbent disposable type) from absorption of atmospheric moisture (in high-humidity incubators).

Special Needs When the Child Is NPO

Infants or children who are unable or not permitted to take fluids by mouth (NPO) have special needs. To ensure that they do not receive fluids, a sign can be placed in some obvious place, such as over their beds or on their shirts, to alert others to the NPO status. To prevent the temptation to drink, fluids should not be left at the bedside.

Oral hygiene, a part of routine hygienic care, is especially important when fluids are restricted or withheld (p. 701). For the young child who cannot brush the teeth or rinse the mouth without swallowing fluid, the mouth and teeth can be cleaned and kept moist by swabbing with saline-moistened gauze.

NURSINGTIP

To keep the mouth feeling moist when the child is NPO, give ice chips (if this is permitted by the practitioner) or spray the mouth from an atomizer. To meet the need to suck, the infant is provided with a safe commercial pacifier.

The child who is fluid restricted presents an equal challenge. Limiting fluids is often more difficult for the child than being NPO, especially when IV fluids are also eliminated. To make certain the child does not drink the entire amount allowed early in the day, the daily allotment is calculated to provide fluids at periodic intervals throughout the child’s waking hours. Serving the fluids in small containers gives the illusion of larger servings. No extra liquid is left at the bedside.

PARENTERAL FLUID THERAPY

Site and Equipment

The site selected for PIV infusion depends on accessibility and convenience. Although it is possible to use any accessible vein in older children, the child’s developmental, cognitive, and mobility needs must be considered when selecting a site. Ideally in older children, the superficial veins of the forearm should be used, leaving the hands free. An older child can help select the site and thereby maintain some measure of control. For veins in the extremities it is best to start with the most distal site and avoid the child’s favored hand to reduce the disability related to the procedure. Restrict the child’s movements as little as possible—avoid a site over a joint in an extremity, such as the antecubital space. In small infants a superficial vein of the hand, wrist, forearm, foot, or ankle is usually most convenient and most easily stabilized (Fig. 22-17). Foot veins should be avoided in children learning to walk and in children already walking. Superficial veins of the scalp have no valves, insertion is easy, and they can be used in infants up to about 9 months of age, but they should be used only when other site attempts have failed. A transilluminator (Fig. 22-18) can aid in finding and evaluating veins for access (see Evidence-Based Practice box).

image

FIG. 22-17 Preferred sites for venous access in infants.

image

FIG. 22-18 Transilluminator: low-heat light-emitting diode (LED) light placed on the skin to illuminate veins; an opening allows cannulation of vein.

Selection of a scalp vein may require clipping the area around the site to better visualize the vein and provide a smoother surface on which to tape the catheter hub and tubing. Clipping a portion of the infant’s hair is upsetting to parents; therefore they should be told what to expect and reassured that the hair will grow in again rapidly (save the hair because parents often wish to keep it). Remove as little as possible, directly over the insertion site and taping surface. A rubber band slipped onto the head from brow to occiput will usually suffice as a tourniquet, although if the vessel is visible, a tourniquet may not be necessary.

NURSINGTIP

A tab of tape should be placed on the rubber band to help grasp it when removing it from the infant’s head. The rubber band should be cut to avoid accidentally dislodging the catheter when moving the rubber band over the IV insertion site. The tape tab will lift the rubber band and allow it to be cut. Hold the rubber band in two places and cut between these areas to prevent the rubber band from snapping on the head.

Situations may occur in which rapid establishment of systemic access is vital, and venous access may be hampered by peripheral circulatory collapse, hypovolemic shock (secondary to vomiting or diarrhea, burns, or trauma), cardiopulmonary arrest, or other conditions (Dubick and Holcomb, 2000). Intraosseous infusion provides a rapid, safe, and lifesaving alternate route for administration of fluids and medications until intravascular access can be attained, especially in children who are 6 years of age and younger.

A large-bore needle, such as a bone marrow aspiration needle (e.g., Jamshidi) or an intraosseous needle (e.g., Cook), is inserted into the medullary cavity of a long bone, most often the proximal tibia. This procedure is usually reserved for children who are unconscious or for those who are receiving analgesia, since the procedure is painful. Local anesthesia should be used for a semiconscious patient. Observe the dependent tissue closely for swelling, since extravasation may be hidden under the leg and compartment syndrome may result.

For most IV infusions in children, a 22- to 24-gauge catheter may be used if therapy is expected to last less than 5 days. The smallest-gauge and shortest-length catheter that will accommodate the prescribed therapy should be chosen. The length of the catheter may be directly related to infection and/or embolus formation—the shorter the catheter, the fewer the complications (Maki, 1994). The gauge of the catheter should maintain adequate flow of the infusate into the cannulated vein while allowing adequate blood flow around the catheter walls to promote proper hemodilution of the infusate.

EVIDENCE-BASED PRACTICE

Use of Transillumination Devices in Obtaining Vascular Access

Jennifer Sanders

ASK THE QUESTION

In children, do transillumination devices decrease the number of attempts needed to obtain vascular access?

SEARCH FOR EVIDENCE

Search Strategies

Search selection criteria included English-language publications within the past 30 years, research-based articles on children undergoing venipuncture.

Databases Used

PubMed, Cochrane Collaboration, MD Consult, BestBETs

CRITICALLY ANALYZE THE EVIDENCE

Five articles were found regarding the efficacy of transillumination; two were published more than 25 years ago (Curran 1980; Kuhns, Martin, Gildersleeve, 1975). All concluded that transillumination aids in decreasing the number of access attempts.

A letter to the editor focused on the method of using two fiberoptic lights as a venous transilluminator. Peripheral intravenous (PIV) access was usually successful on the first attempt because of the increased visualization of the superficial venous anatomy (Dinner, 1992).

A sample of 100 infants ages 2 to 36 months was evaluated for PIV access using a simple otoscope for transillumination. In 40 of the 100 infants, a vein was visible using the otoscope for transillumination. In 23 of these children, transillumination was used after a vein could not be visualized or palpated. In 17 others, one previous attempt to gain PIV access had failed. With transillumination, 39 of 40 PIV attempts were successful on the first attempt. One patient required a second attempt (Goren, Laufer, Yativ, and others, 2001).

A sample of 240 patients was randomized to receive PIV access either with or without transillumination with the Veinlite. Patients were either less than 3 years old and required elective insertion of an IV, or were 3 to 21 years of age with a chronic illness who were previously identified as having difficult access. Those patients in the Veinlite group were significantly more likely to have a successful IV insertion on the first or second attempt (Katsogridakis, Seshadri, Sullivan, and others, 2005).

APPLY THE EVIDENCE: NURSING IMPLICATIONS

image Transillumination should be used before PIV access to decrease the number of attempts needed to successfully obtain access.

image Education and practice in this technique are needed for success. Since the veins stand out so clearly with transillumination, they appear more superficial than they are.

image An assistant may be needed to hold the device when using the transilluminator to obtain PIV access.

image The heat and temperature of the transilluminator should be monitored to prevent injury to the patient’s skin.

image Appropriate equipment should be used to increase the likelihood of visualization of the vasculature.

REFERENCES

Curran, JS. A restraint and transillumination device for neonatal arterial/venipuncture: efficacy and thermal safety. Pediatrics. 1980;66(1):128–130.

Dinner, M. Transillumination to facilitate venipuncture in children (letter to editor). Anesthesiol Analg. 1992;74:467–477.

Goren, A, Laufer, J, Yativ, N, et al. Transillumination of the palm for venipuncture in infants. Pediatr Emerg Care. 2001;17(2):130–131.

Katsogridakis, Y, Seshadri, R, Sullivan, C, et al. Veinlite transillumination in the pediatric emergency department: a therapeutic interventional trial. http://www.veinlite.com/public.html. [retrieved August 2005 from].

Kuhns, LR, Martin, AJ, Gildersleeve, RT, et al. Intense transillumination for infant venipuncture. Radiology. 1975;116:734–735.

Determining the best catheter for the patient early in the therapy provides the best chance of avoiding catheter-related complications (Moureau, 1999). As the length of therapy increases, decisions regarding the type of infusion device (short peripheral, midline, peripherally inserted central catheter, or central venous catheter) should be explored. Guidelines such as flow charts or algorithms are available to help in these decisions (Catudal, 1999).

Safety Catheters and Needleless Systems

Over-the-needle IV catheters with hollow-bore needles carry a high risk for transmission of blood-borne pathogens from needlestick injuries. Safety catheters prevent accidental needlesticks with the use of over-the-needle IV catheters.

Needleless IV systems are designed to prevent needlestick injuries during administration of IV push medications and IV piggyback medications. Some needleless devices can be used with any tubing, whereas others require use of the entire IV delivery system for compatibility. Needleless IV systems rely on prepierced septa that are accessed by blunted plastic cannulas or systems that use valves that open and close a fluid path when activated by insertion of a syringe.

Blunt plastic cannulas and preslit injection port sites (Fig. 22-19) eliminate the need for steel needles and conventional injection port sites but remain accessible via hypodermic needles, a drawback except in emergent situations. Systems that do not permit needled access enhance safety by preventing health care workers from attempting to use needles. A syringe with a blue spike is available to access a single-dose vial (Fig. 22-19, A). The preslit injection port sites are identified by a white ring surrounding the port; this ring alerts users that the system is needleless (Fig. 22-19, B). Syringes are available with the blunt plastic cannula for accessing these sites (Fig. 22-19, C). A lever lock (Fig. 22-19, D) or threaded lock cannula (Fig. 22-19, E) attaches to an IV line, IV Y site, or peripheral intermittent infusion device. A preslit universal vial adapter (not pictured) provides access to standard multiple-dose vials, and syringe cannulas are then used to access the adapter. Valve technology allows syringes and IV tubing to connect directly in-line without the use of an adapter.

image

FIG. 22-19 Interlink intravenous access systems. A, Blue spike syringe. B, Preslit injection port (needleless). C, Blunt plastic cannula syringe. D, Lever lock cannula. E, Threaded lock cannula.

NURSINGALERT

Misconnections of tubing have occurred, resulting in patient deaths. Many needleless IV systems allow other types of tubing such as blood pressure and oxygen tubing to connect and instill air directly into the IV line. Before tubing is connected or reconnected to a patient, trace it completely from the patient to the point of origin for verification (Institute for Safe Medication Practices, 2004).

Infusion Pumps

A variety of infusion pumps are available and used in nearly all pediatric infusions to accurately administer medication and minimize the possibility of overloading the circulation. It is important to calculate the amount to be infused in a given length of time, set the infusion rate, and monitor the apparatus frequently (at least every 1 to 2 hours) to make certain that the desired rate is maintained, the integrity of the system remains intact, the site remains intact (free of redness, edema, infiltration, or irritation), and the infusion does not stop. Continuous infusion pumps, although convenient and efficient, are not without risks. Overreliance on the accuracy of the machine can cause either too much or too little fluid to be infused; therefore its use does not eliminate careful periodic assessment by the nurse. Excess pressure can build up if the machine is set at a rate faster than the vein is able to accommodate (or continues to pump when the needle is out of the lumen).

Securement of a Peripheral Intravenous Line

To maintain the integrity of the IV line, adequate protection of the site is required. The catheter hub is firmly secured at the puncture site with a transparent dressing and commercial securement device (e.g., StatLock) (Fig. 22-20) or clear, nonallergenic tape. Transparent dressings are ideal because the insertion site is easily observed. Minimal tape should be used at the puncture site and on about 1 to 2 inches of skin beyond the site to avoid obscuring the insertion site for early detection of infiltration.

image

FIG. 22-20 StatLock securement devices enhance peripheral intravenous line dwell time and decrease phlebitis.

A protective cover is applied directly over the catheter insertion site to protect the infusion site. Easy access to the IV site for frequent (1- to 2-hour) assessments must be considered. Improvised plastic cups that are cut in half with the ridged edges covered with tape should not be used, since they have injured patients. A commercial site protector, I.V. House, is available in different sizes (Fig. 22-21). Its ventilation holes prevent moisture from accumulating under the dome (Lee and Vallino, 1996). This device is designed to protect the IV site; allow for visibility of the site; minimize use of padded boards, splints, or other restraints and tape; and maintain skin integrity. The connector tubing or extension tubing can be looped to make it small enough to fit under the protective cover to prevent accidental snagging of the catheter. It is important to safely secure the IV tubing to prevent infants and children from becoming entangled in the tubing or from accidentally pulling the catheter or needle out. Securing the tubing in this manner also eliminates movement of the catheter hub at the insertion site (mechanical manipulation). A colorful and interesting sticker can be applied to the protecting device to add a positive note to the procedure.

image

FIG. 22-21 I.V. House used to protect intravenous site.

Finger or toe areas are left unoccluded by dressings or tape to allow for assessment of circulation. The thumb is never immobilized because of the danger of contractures with limited movement later on. An extremity should never be encircled with tape. The use of roll gauze, self-adhering stretch bandages (Coban), and Ace bandages can cause the same constriction and hide signs of infiltration (Infusion Nurses Society, 2000a).

NURSINGALERT

Opaque covering should be avoided; however, if any type of opaque covering is used to secure the IV line, the insertion site and extremity distal to the site should be visible to detect an infiltration. If these sites are not visible, they must be checked frequently to detect problems early.

EVIDENCE-BASED PRACTICE

Peripheral Intravenous Site Care

Joy Hesselgrave

ASK THE QUESTION

In children, what site preparation, dressing, and stabilization measures for peripheral intravenous catheters (PIVs) are optimum for preventing complications and extending dwell time?

SEARCH FOR EVIDENCE

Search Strategies

Search selection criteria included English-language and research-based publications within the past 20 years on PIV site care.

Databases Used

National Guideline Clearinghouse (AHRQ), Cochrane Collaboration, Joanna Briggs Institute, PubMed, TRIP Database Plus, MD Consult, PedsCCM, BestBETs

CRITICALLY ANALYZE THE EVIDENCE

Site Preparation.

Centers for Disease Control and Prevention recommendations by O’Grady, Alexander, Dellinger, and others (2002) indicate that the skin should be disinfected with an appropriate antiseptic before PIV catheter insertion. A 2% chlorhexidine-based preparation is preferred, but tincture of iodine, an iodophor, or 70% alcohol can be used. The Infusion Nurses Society (2006) recommends cleansing the skin with a preparation that combines alcohol with either chlorhexidine gluconate or povidone-iodine before PIV insertion. There is insufficient evidence to recommend a single product for all neonates; chlorhexidine or povidone-iodine without alcohol may be used, but the disinfectant should be promptly removed with sterile water or normal saline to prevent absorption (Association of Women’s Health, Obstetric and Neonatal Nurses, 2007).

Site Dressing.

Multiple studies indicate that either gauze dressings changed every 48 hours or clear semipermeable dressings changed as needed are acceptable for PIV sites (Infusion Nurses Society, 2006). Neonatal guidelines recommend a transparent adhesive dressing or clear tape at the PIV site (Callaghan, Copnell, and Johnson, 2002; Tripepi-Bova, Woods, and Loach, 1997; Hoffmann, Wester, Kaiser, and others, 1988).

Stabilization or Securement Devices.

A prospective study of 105 PIV placements compared a control group using traditional transparent dressing (Tegaderm) and tape with a study group that used transparent dressings and a catheter securement device (StatLock) (Wood, 1997). The control group had a 65% complication rate (dislodgments, infiltration, and phlebitis) vs a 20% complication rate in the study group, indicating a 45% reduction in overall PIV therapy complications in the study group. When comparing tape, StatLock, and HubGuard for a 96-hour PIV protocol change for adults, researchers found that PIVs with StatLock produced a statistically significant improved survival rate (52%) compared with tape (8%) or HubGuard (9%) (Smith, 2006). Securement devices extend the life of a PIV.

A product trial at 83 hospitals throughout the United States was initiated by Venetec International comparing StatLock with tape, the standard hospital PIV securement for adults and children. The product trial included 10,164 patients, 18 months of age and older, requiring a PIV for more than 24 hours. More than 70% of the PIVs initially placed and secured with tape required a PIV restart within a 72-hour treatment period; only 16.6% of PIVs secured with StatLock stabilization required restarts, representing a 76% overall reduction in the rate of restarts with StatLock (Schears, 2006).

APPLY THE EVIDENCE: NURSING IMPLICATIONS

image PIV sites may be dressed with either gauze or clear dressings, with the advantage of clear dressings allowing continuous site visualization. Commercial securement or protection devices extend the life of the PIV in the pediatric patient.

image For children older than 2 months, chlorhexidine is the preferred skin cleanser. For younger infants, nonalcohol-based cleansers are preferred and should be removed with sterile water or sterile normal saline to prevent absorption.

image Apply a clear semipermeable dressing or gauze dressing and tape. If the child is mobile, consider using a securement or protection device (e.g., StatLock, HubGuard, Ray-Marshall Shield, I.V. House, IV Shield, IV Pro).

REFERENCES

Association of Women’s Health, Obstetric and Neonatal Nurses. Neonatal skin care: evidence-based clinical practice guideline, ed 2. Washington, DC: The Association, 2007.

Callaghan, S, Copnell, B, Johnson, L. Comparison of two methods of peripheral intravenous cannula securement in the pediatric setting. J Infus Nurs. 2002;25(4):256–264.

Hoffmann, K, Wester, S, Kaiser, D, et al. Bacterial colonization and phlebitis-associated risk with transparent polyurethane film for peripheral intravenous site dressings. Am J Infect Control. 1988;16(3):101–106.

Infusion Nurses Society. Policies and procedures for infusion nursing, ed 3. South Norwood, Mass: The Society, 2006.

O’Grady, N, Alexander, M, Dellinger, E, et al. Guidelines for the prevention of intravascular catheter—related infections. MMWR. 2002;51(RR10):1–26.

Schears, G. Summary of product trials for 10,164 patients: comparing an intravenous stabilizing device to tape. J Infus Nurs. 2006;29(4):225–230.

Smith, B. Peripheral intravenous catheter dwell times: a comparison of three securement methods for implementation of a 96-hour scheduled change protocol. J Infus Nurs. 2006;29(1):14–17.

Tripepi-Bova, K, Woods, K, Loach, M. A comparison of transparent polyurethane and dry gauze dressings for peripheral IV catheter sites rates of phlebitis, infiltration and dislodgement by patients. Am J Crit Care. 1997;6(5):377–381.

Wood, D. A comparative study of two securement techniques for short peripheral intravenous catheters. J Intraven Nurs. 1997;20(6):280–285.

Traditionally, padded boards or splints have been used to partially immobilize the IV site. Padded boards or splints and restraints were appropriate when metal needles were inserted into the vein to prevent the sharp end from puncturing the vessel, especially at a joint. With the more recent use of soft, pliable catheters, arm or leg boards may not be necessary and have several disadvantages. They obscure the IV site, can constrict the extremity, may excoriate the underlying tissue and promote infection, can cause a contracture of a joint, restrict useful movement of the extremity, and are uncomfortable. Unfortunately, no research has been conducted to demonstrate their proposed benefit of increasing dwell time (patency of the IV line). Adequate securement should eliminate the need for padded boards in most circumstances. Older children who are alert and cooperative can usually be trusted to protect the IV site (see Evidence-Based Practice boxes).

Removal of a Peripheral Intravenous Line

When it comes time to discontinue an IV infusion, many children are distressed by the thought of catheter removal. Therefore they need a careful explanation of the process and suggestions for helping. Encouraging children to remove or help remove the tape from the site provides them with a measure of control and often fosters their cooperation. The procedure consists of turning off any pump apparatus, occluding the IV tubing, removing the tape, pulling the catheter out of the vessel in the opposite direction of insertion, and exerting firm pressure at the site. A dry dressing (adhesive bandage strip) is placed over the puncture site. The use of adhesive-removal pads can decrease the pain of tape removal, but the skin should be washed after use to avoid irritation. To remove transparent dressings (e.g., OpSite, Tegaderm), pull the opposing edges parallel to the skin to loosen the bond. Inspect the catheter tip to ensure the catheter is intact and that no portion remains in the vein.

NURSINGALERT

Consider the child’s age, development, and neurologic status, as well as the predictability of the child (how the child responds to painful treatments), when determining the need for assistance to maintain safety. Manual removal of tape is the preferred method. Only if absolutely necessary should a small cut be made in the tape, using bandage scissors, to facilitate its removal. Before cutting the tape:

image Ensure that all digits are visible.

image Remove any barrier that hinders visibility, such as a protective covering.

image Protect the child’s skin and digits by sliding own finger(s) between the tape and the child’s skin so that the scissors do not touch the patient.

image Place a cut on the tape located on the medial aspect (thumb side) of the extremity.

EVIDENCE-BASED PRACTICE

Frequency of Changing Intravenous Administration Sets

Brandi Horvath

ASK THE QUESTION

In children, should intravenous (IV) administration sets be changed at 24, 48, 72, or 96 hours to safely prevent patient infection while containing costs?

SEARCH FOR EVIDENCE

Search Strategies

Search selection criteria included English-language publications within the past 10 years and research-based articles on frequency of changing IV administration sets.

Databases Used

National Guideline Clearinghouse (AHRQ), Cochrane Collaboration, Joanna Briggs Institute, PubMed, Infusion Nurses Society, Oncology Nurses Society, MD Consult, BestBETs, TRIP Database Plus, PedsCCM

CRITICALLY ANALYZE THE EVIDENCE

A Cochrane systematic review by Gillies, O’Riordan, Wallen, and others (2005) identified the optimum interval for the routine replacement of IV administration sets when infusate or parenteral nutrition solutions are administered. Data results from 13 randomized or quasirandomized controlled trials were pooled to compare different time intervals of administration set changes: every 24 hours vs 48 hours or greater, 48 hours vs at least 72 hours, and 72 hours vs 96 hours. Findings revealed no evidence that changing IV administration sets more often than every 96 hours reduces the incidence of bloodstream infection. There were no differences in results between patients with central and peripheral catheters and those who did or did not receive parenteral nutrition. For IV administration sets including blood or blood products and lipids, the researchers recommending changing the sets every 24 hours.

The Centers for Disease Control and Prevention (O’Grady, Alexander, Dellinger, and others, 2002) recommends changing IV administration sets for crystalloids at no more than 72-hour intervals. Rates of phlebitis were not substantially different for administration sets left in place 96 hours compared with 72 hours. For tubing used to administer blood and blood products or lipid emulsions, replace tubing within 24 hours of starting the infusion.

The Infusion Nurses Society (2006) and Alexander (2006) recommend replacing continuously infusing IV administration sets no more frequently than every 72 hours. Administration sets used intermittently should be changed every 24 hours. Secondary piggyback sets may be changed no more frequently than every 72 hours when attached to a continuously infusing line; once detached from the primary set, they should be changed at 24 hours. Exceptions include sets used with lipids (change at 24 hours if continuous or after each unit if intermittently infused) and blood or blood components (change at the end of 4 hours if continuous or after each intermittent component). All sets should be changed immediately if contamination is suspected.

The Oncology Nursing Society (Camp-Sorreli, 2004) recommends replacing IV administration sets every 96 hours or with catheter change, except for fluids that enhance microbial growth. Tubing used to administer blood, blood products, lipids, or total parenteral nutrition should be replaced 24 hours after initiation of therapy.

APPLY THE EVIDENCE: NURSING IMPLICATIONS

image Replace IV administration sets every 96 hours.

image Replace tubing used for lipid emulsions, blood, and blood products every 24 hours.

image Replace blood tubing with in-line filters after 2 units or 4 hours, whichever comes first.

REFERENCES

Alexander M, ed. Infusion nursing standards of practice. J Infus Nurs 2006;29(1S):S48–S50.

Camp-Sorreli D, ed. Access device guidelines: recommendations for nursing practice and education, ed 2, Pittsburgh: Oncology Nursing Society, 2004.

Gillies, D, O’Riordan, L, Wallen, M, et al, Optimal timing for intravenous administration set replacement. Cochrane Database Syst Rev 2005;4:CD003588. pub2; DOI: 10.1002/14651858.CD003588.pub2,

Infusion Nurses Society. Policies and procedures for infusion nursing, ed 3. South Norwood, Mass: The Society, 2006.

O’Grady, N, Alexander, M, Dellinger, E, et al. Guidelines for the prevention of intravascular catheter-related infections. MMWR. 2002;51(RR-10):1–29.

Complications

The same precautions regarding maintenance of asepsis, prevention of infection, and observation for infiltration are carried out with patients of any age. However, infiltration is more difficult to detect in infants and small children than in adults. The increased amount of subcutaneous fat and the amount of tape used to secure the catheter often obscure the early signs of infiltration. When the fluid appears to be infusing too slowly or ceases, the usual assessment for obstruction within the apparatus—kinks, screw clamps, shutoff valve, and positioning interference (e.g., a bent elbow)—often locates the difficulty. When these actions fail to detect the problem, it may be necessary to carefully remove some of the dressing to obtain a clear view of the venipuncture site. Dependent areas, such as the palm and undersides of the extremity or the occiput and behind the ears, are examined.

Whenever possible, the IV infusion should be placed in an extremity to which the identification band (or bracelet) is not attached. Serious circulatory impairment can result from infiltrated solution distal to the band, which acts as a tourniquet, preventing adequate venous return. To check for return blood flow through the catheter, the tubing is removed from the infusion pump, and the bag is lowered below the level of the infusion site. Resistance during flushing or aspiration for blood return also indicates that the IV infusion may have infiltrated surrounding tissue. A good blood return, or lack thereof, is not always an indicator of infiltration in small infants. Flushing the catheter and observing for edema, redness, or streaking along the vein are appropriate for assessment of the IV.

IV therapy in pediatrics tends to be difficult to maintain because of mechanical factors such as vascular trauma resulting from the catheter, the insertion site, vessel size, vessel fragility, pump pressure, the patient’s activity level, operator skill and insertion technique, forceful administration of boluses of fluid, and infusion of irritants or vesicants through a small vessel (Pettit and Hughes, 1999). These factors cause infiltration and extravasation injuries. Infiltration is defined as inadvertent administration of a nonvesicant solution or medication into surrounding tissue. Extravasation is defined as inadvertent administration of vesicant solution or medication into surrounding tissue (Infusion Nurses Society, 2000a, 2000b). A vesicant or sclerosing agent causes varying degrees of cellular damage when even minute amounts escape into surrounding tissue. Guidelines are available for determining the severity of tissue injury by staging characteristics, such as the amount of redness, blanching, the amount of swelling, pain, the quality of pulses below infiltration, capillary refill, and warmth or coolness of the area (Infusion Nurses Society, 2000a, 2000b; Montgomery, Hanrahan, Korrman, and others, 1999).*

Treatment of infiltration or extravasation varies according to the type of vesicant. Guidelines are available outlining the sequence of interventions and specific treatment of infiltration or extravasation with antidotes (Oncology Nursing Society, 1998; Montgomery, Hanrahan, Korrman, and others, 1999).

NURSINGALERT

When infiltration or extravasation is observed (signs include erythema, pain, edema, blanching, streaking on the skin along the vein, and darkened area at the insertion site), immediately stop the infusion, elevate the extremity, notify the practitioner, and initiate the ordered treatment as soon as possible. Remove the IV line when it is no longer needed (e.g., after infusing an antidote).

PIV catheters are the most commonly used intravascular device. Heavy cutaneous colonization of the insertion site is the single most important predictor of catheter-related infection with all types of short-term, percutaneously inserted catheters. Phlebitis, largely a mechanical rather than infectious process, remains the most important complication associated with the use of peripheral venous catheters.

NURSINGALERT

The most effective ways to prevent infection of an IV site are to cleanse hands between each patient, wear gloves when inserting a catheter, and closely inspect the insertion site and physical condition of the dressing. Proper education of the patient and family regarding signs and symptoms of an infected site can help prevent infections from going unnoticed.

PROCEDURES FOR MAINTAINING RESPIRATORY FUNCTION

INHALATION THERAPY

Oxygen Therapy

Oxygen is administered for hypoxemia and may be delivered by mask, nasal cannula, tent, hood, face mask, or ventilator. Oxygen therapy is frequently administered in the hospital, although increasing numbers of children are receiving oxygen in the home. Oxygen delivered to infants is well tolerated by using a plastic hood (Fig. 22-22). The humidified oxygen should not be blown directly into the infant’s face. Older, cooperative infants and children can use a nasal cannula or prongs, which can supply a concentration of oxygen of about 50%. A mask is not well tolerated by children.

image

FIG. 22-22 Oxygen administered to infant by means of a plastic hood. Note oxygen analyzer (blue machine).

For children beyond early infancy, the oxygen tent is a satisfactory means for administration of oxygen (Fig. 22-23). A tent does not require any device to come into direct contact with the face, but the concentration of oxygen within the tent is difficult to control and to maintain above 30% to 50%. A major difficulty with the use of the tent is keeping the tent closed so that the oxygen concentration is maintained.

image

FIG. 22-23 The tent provides a comfortable method for oxygen administration. (From Wilson SF, Thompson JM: Respiratory disorders, St Louis, 1990, Mosby.)

To reduce oxygen loss, nursing care is planned carefully so that the tent is opened as little as possible. Because oxygen is heavier than air, loss will be greater at the bottom of the tent; therefore the tent is tucked in snugly without open edges. The bottom of the tent should be examined more often when the child is restless and fussy and liable to pull the covers loose. Some tents are even open at the top. Because of the rapidly diffusing qualities of carbon dioxide, the levels of the gas do not build up within these enclosures.

After the tent has been opened for an extended period, it is flushed with oxygen by increasing the flow meter for a few minutes to quickly raise the oxygen and mist concentration. The flow meter is then reset to the prescribed number of liters per minute.

The enclosed tent becomes warm; therefore some type of cooling mechanism is provided. The temperature inside the tent must be checked periodically to be certain that it is maintained at the desired level. Although the cool environment can reduce fever and airway inflammation, it can also produce hypothermia and cold stress. It is important to make certain that the child is kept warm and dry. Because oxygen is drying to the tissues, the gas is humidified, which causes moisture to condense on the tent walls.

NURSINGALERT

Keep the child warm and dry by checking the temperature inside the tent and the child’s bedding and clothing frequently. Adjust the temperature and change clothing as often as needed.

NURSINGALERT

Inspect all toys for safety and suitability (e.g., vinyl or plastic, not stuffed items that absorb moisture and are difficult to keep dry). The high-level oxygen environment makes any source of sparks (e.g., mechanical or electrical toys) a potential fire hazard.

In some instances the child can be removed from the oxygen tent for activities such as feeding and bathing, whereas in other cases the child is placed in the tent only during periods of rest. Still other children may require oxygen continuously and can be removed from the tent or incubator only if an oxygen source is held close to the child’s face. Any change in color, increased respiratory effort, or restlessness is an indication to return the child to the oxygen tent.

Oxygen Toxicity.: Prolonged exposure to high oxygen tensions can damage some body tissues and functions. The organs most vulnerable to the adverse effects of excessive oxygenation are the retina of the extremely preterm infant and the lungs of persons at any age.

Oxygen-induced carbon dioxide narcosis is a physiologic hazard of oxygen therapy that may occur in persons with chronic pulmonary disease, such as cystic fibrosis. In these patients the respiratory center has adapted to the continuously higher arterial carbon dioxide tension (Paco2) levels, and therefore hypoxia becomes the more powerful stimulus for respiration. When the arterial oxygen tension (Pao2) level is elevated during oxygen administration, the hypoxic drive is removed, causing progressive hypoventilation and increased Paco2 levels, and the child rapidly becomes unconscious. Carbon dioxide narcosis can also be induced by the administration of sedation in these patients.

Monitoring Oxygen Therapy

Pulse oximetry is a continuous, noninvasive method of determining oxygen saturation (Sao2) to guide oxygen therapy. A sensor composed of a light-emitting diode (LED) and a photodetector is placed in opposition around a foot, hand, finger, toe, or earlobe, with the LED placed on top of the nail when digits are used (Fig. 22-24). The diode emits red and infrared lights that pass through the skin to the photodetector. The photodetector measures the amount of each type of light absorbed by functional hemoglobins. Hemoglobin saturated with oxygen (oxyhemoglobin) absorbs more infrared light than does hemoglobin not saturated with oxygen (deoxyhemoglobin). Pulsatile blood flow is the primary physiologic factor that influences accuracy of the pulse oximeter. In infants, reposition the probe at least every 3 to 4 hours to prevent pressure necrosis; poor perfusion and very sensitive skin may necessitate more frequent repositioning.

image

FIG. 22-24 Oximeter sensor on great toe. Note that sensor is positioned with light-emitting diode opposite photodetector. Cord is secured to foot to minimize movement of sensor.

Another noninvasive method is transcutaneous monitoring (TCM), which provides continuous monitoring of transcutaneous partial pressure of oxygen in arterial blood (tcPao2) and, with some devices, of carbon dioxide in arterial blood (tcPaco2). An electrode is attached to the warmed skin to facilitate arterialization of cutaneous capillaries. The site of the electrode must be changed every 3 to 4 hours to avoid burning the skin, and the machine must be calibrated with every site change. TCM is used frequently in neonatal intensive care units, but it may not reflect Pao2 in infants with impaired local circulation or in older infants whose skin is thicker.

Oximetry is insensitive to hyperoxia because hemoglobin approaches 100% saturation for all Pao2 readings greater than approximately 100 mm Hg, which is a dangerous situation for the preterm infant at risk for developing retinopathy of prematurity (see Chapter 9). Therefore the preterm infant being monitored with oximetry should have upper limits identified, such as 90% to 95%, and a protocol established for decreasing oxygen when saturations are high.

Oximetry offers several advantages over TCM. Oximetry (1) does not require heating the skin, thus reducing the risk of burns; (2) eliminates a delay period for transducer equilibration; and (3) maintains an accurate measurement regardless of the patient’s age or skin characteristics or the presence of lung disease.

NURSINGALERT

It is important to make certain that sensor connectors and oximeters are compatible. Wiring that is incompatible can generate considerable heat at the tip of the sensor, causing second- and third-degree burns under the sensors. Pressure necrosis can also occur from sensors attached too tightly. Therefore inspect the skin under the sensor frequently.

Applying the sensor correctly is essential for accurate Sao2 measurements. Because the sensor must identify every pulse beat to calculate the Sao2, movement can interfere with sensing. Some devices synchronize the Sao2 reading with the heartbeat, thereby reducing the interference caused by motion. Sensors are not placed on extremities used for blood pressure monitoring or with indwelling arterial catheters, since pulsatile blood flow may be affected.

NURSINGTIP

Infant—Secure the sensor to the great toe and tape the wire to the sole of the foot (or use a commercial holder that fastens with a self-adhering closure). Place a snugly fitting sock over the foot, but check the site frequently for color, temperature, and pulse.

Child—Secure the sensor securely to the index finger and tape the wire to the back of the hand.

Ambient light from ceiling lights and phototherapy, as well as high-intensity heat and light from radiant warmers, can interfere with readings. Therefore the sensor should be covered to block these light sources. IV dyes; green, purple, or black nail polish; nonopaque synthetic nails; and possibly ink used for footprinting can also cause inaccurate Sao2 measurements. The dyes should be removed or, in the case of porcelain nails, a different area used for the sensor. Skin color, thickness, and edema do not affect the readings.

Aerosol Therapy

Aerosol therapy can be effective in depositing medication directly into the airway. The value of aerosolized water, or “mist therapy,” is controversial. This route of administration can be useful in avoiding the systemic side effects of certain drugs and in reducing the amount of drug necessary to achieve the desired effect. Bronchodilators, steroids, and antibiotics, suspended in particulate form, can be inhaled so that the medication reaches the small airways. Aerosol therapy is particularly challenging in children who are too young to cooperate with controlling the rate and depth of breathing. Administration of this therapy requires skill, patience, and creativity.

Medications can be aerosolized or nebulized with air or with oxygen-enriched gas. Handheld nebulizers are the most frequently used equipment. The medicated mist is discharged into a small plastic mask, which the child holds over the nose and mouth. To avoid particle deposition in the nose and pharynx, the child is instructed to take slow, deep breaths through an open mouth during the treatment. For home use an air compressor is necessary to force air through the liquid medication to form the aerosol. Compact, portable units can be obtained from health equipment companies. The metered-dose inhaler (MDI) is a self-contained, handheld device that allows for intermittent delivery of a specified amount of medication. Many bronchodilators are available in this form and are successfully used by children with asthma. For children under the age of 5 or 6 years, a spacer device attached to the MDI can help with coordination of breathing and aerosol delivery. It allows the aerosolized particles to remain in suspension longer. (See also Asthma, Chapter 23.)

Assessment of breath sounds and work of breathing should be done before and after treatments. Young children who become upset by having a mask held close to the face may become fatigued with fighting the procedure and may actually appear worse during and immediately after the therapy. It may be necessary to spend a few minutes calming the child after the procedure and allowing the vital signs to return to baseline to accurately assess changes in breath sounds and work of breathing.

BRONCHIAL (POSTURAL) DRAINAGE

Bronchial drainage is indicated whenever excessive fluid or mucus in the bronchi is not being removed by normal ciliary activity and cough. Positioning the child to take maximum advantage of gravity facilitates removal of secretions. Postural drainage can be effective in children with chronic lung disease characterized by thick mucus, such as cystic fibrosis.

Postural drainage is carried out three or four times daily and is more effective when it follows other respiratory therapy, such as bronchodilator or nebulization medication. Bronchial drainage is generally performed before meals (or 1 to 1½ hours after meals) to minimize the chance of vomiting and is repeated at bedtime. The duration of treatment depends on the child’s condition and tolerance; it usually lasts 20 to 30 minutes. Several positions facilitate drainage from all major lung segments (Fig. 22-25); all positions are not employed at each session. Children will usually cooperate for four to six positions. Older children can tolerate longer periods.

image

FIG. 22-25 Bronchial drainage positions for all major segments of child. For each position, model of tracheobronchial tree is projected beside child to show segmental bronchus (red) being drained and pathway of secretions out of bronchus. Drainage platform is horizontal unless otherwise noted. Red area on child’s chest indicates area to be cupped or vibrated by therapist. A, Apical segment of right upper lobe and apical subsegment of apical-posterior segment of left upper lobe. B, Posterior segment of right upper lobe and posterior subsegment of apical-posterior segment of left upper lobe. C, Anterior segments of both upper lobes. Child should be rotated slightly away from side being drained. D, Superior segments of both lower lobes. E, Posterior basal segments of both lower lobes. F, Lateral basal segments of right lower lobe. Left lateral basal segment would be drained by mirror image of this position (right side down). G, Anterior basal segment of left lower lobe. Right anterior basal segment would be drained by mirror image of this position (left side down). H, Medial and lateral segments of right middle lobe. I, Lingular segments (superior and inferior) of left upper lobe (homologue of right middle lobe). (From Chernick V, editor: Kendig’s disorders of the respiratory tract of children, ed 6, Philadelphia, 1998, Saunders.)

In the hospital an older child can be positioned over an elevated knee rest. Small children and infants can be positioned with pillows or on the therapist’s lap and legs. Infants should not be placed in the Trendelenburg position because they do not have an autonomic regulation of blood flow to the head. Special modifications of the techniques are required in children whose conditions contraindicate the standard positioning, such as head injuries, some types of surgical incisions or burns, and casts.

CHEST PHYSICAL THERAPY

Chest physical therapy (CPT) usually refers to the use of postural drainage in combination with adjunctive techniques that are thought to enhance the clearance of mucus from the airway. These techniques include manual percussion, vibration, and squeezing of the chest; cough; forceful expiration; and breathing exercises. Special mechanical devices are also currently used to perform CPT (e.g., ThAIRapy Vest). Postural drainage in combination with forced expiration has been shown to be beneficial. Noninvasive inspiratory nasal pressure—support ventilation (PSV) during CPT has demonstrated a significant improvement in respiratory muscle performance and a reduction in oxygen desaturation (Fauroux, Boule, Lofaso, and others, 1999).

The most common technique used in association with postural drainage is manual percussion of the chest wall. The patient is dressed in a lightweight shirt and placed in a postural drainage position. The nurse then gently but firmly strikes the chest wall with a cupped hand (Fig. 22-26, A). For infants, special devices are available for percussing small areas (Fig. 22-26, B). A “popping,” hollow sound should be the result, not a slapping sound. The procedure should be done over the rib cage only and should be painless. Percussion can be performed with a soft circular mask (adapted to maintain air trapping) or a percussion cup marketed especially for the purpose of aiding in loosening secretions.

image

FIG. 22-26 A, Cupped hand position for percussion. B, Device for infant percussion.

CPT is contraindicated when patients have pulmonary hemorrhage, pulmonary embolism, end-stage renal disease, increased intracranial pressure, osteogenesis imperfecta, or minimal cardiac reserves.

ARTIFICIAL VENTILATION

Artificial Airways

An artificial airway is usually used in association with mechanical ventilation and in children with upper airway obstruction. Endotracheal intubation can be accomplished by the nasal (nasotracheal), oral (orotracheal), or direct tracheal (tracheostomy) routes. Although it is more difficult to place, nasotracheal intubation is preferred to orotracheal intubation because it facilitates oral hygiene and provides more stable fixation, which reduces the complication of tracheal erosion and the danger of accidental extubation. Only uncuffed endotracheal tubes should be used in children younger than 8 years of age (Curley and Moloney-Harmon, 2001). Air or gas delivered directly to the trachea must be humidified.

Tracheostomy

A tracheostomy is a surgical opening in the trachea; the procedure may be done on an emergency basis or may be an elective one, and it may be combined with mechanical ventilation. Pediatric tracheostomy tubes are usually made of plastic or Silastic (Fig. 22-27). The most common types are the Hollinger, Jackson, Aberdeen, and Shiley tubes. These tubes are constructed with a more acute angle than adult tubes, and they soften at body temperature, conforming to the contours of the trachea. Because these materials resist the formation of crusted respiratory secretions, they are made without an inner cannula.

image

FIG. 22-27 Silastic pediatric tracheostomy tube and obturator.

Children who have undergone a tracheostomy must be closely monitored for complications such as hemorrhage, edema, aspiration, accidental decannulation, tube obstruction, and the entrance of free air into the pleural cavity. The focus of nursing care is maintaining a patent airway, facilitating the removal of pulmonary secretions, providing humidified air or oxygen, cleansing the stoma, monitoring the child’s ability to swallow, and teaching while simultaneously preventing complications.

Because the child may be unable to signal for help, direct observation and use of respiratory and cardiac monitors are essential. Respiratory assessments include breath sounds and work of breathing, vital signs, tightness of the tracheostomy ties, and the type and amount of secretions. Large amounts of bloody secretions are uncommon and should be considered a sign of hemorrhage. The practitioner should be notified immediately if this occurs.

The child is positioned with the head of the bed raised or in the position most comfortable to the child, with the call light easily available. Suction catheters, suction source, gloves, sterile saline, sterile gauze for wiping away secretions, scissors, an extra tracheostomy tube of the same size with ties already attached, another tracheostomy tube one size smaller, and the obturator are kept at the bedside. A source of humidification is provided because the normal humidification and filtering functions of the airway have been bypassed. IV fluids ensure adequate hydration until the child is able to swallow sufficient amounts of fluids.

Suctioning.: The airway must remain patent and requires frequent suctioning during the first few hours after a tracheostomy to remove mucous plugs and excessive secretions. Proper vacuum pressure and suction catheter size are important to prevent atelectasis and decrease hypoxia from the suctioning procedure. Vacuum pressure should range from 60 to 100 mm Hg for infants and children and from 40 to 60 mm Hg for preterm infants. Unless secretions are thick and tenacious, the lower range of negative pressure is recommended. Tracheal suction catheters are available in a variety of sizes. The catheter selected should have a diameter one-half the diameter of the tracheostomy tube. If the catheter is too large, it can block the airway. The catheter is constructed with a side port so that the catheter is introduced without suction and removed while simultaneous intermittent suction is applied by covering the port with the thumb (Fig. 22-28). The catheter is inserted to 0.5 cm beyond or just to the end of the tracheostomy tube. The practice of instilling sterile saline in the tracheostomy tube before suctioning is not supported by research and is no longer recommended (see Evidence-Based Practice box).

image

FIG. 22-28 Tracheostomy suctioning. A, Insertion, port open. B, Withdrawal, port occluded. Note that catheter is inserted just slightly beyond end of tracheostomy tube.

NURSINGALERT

Suctioning should require no more than 5 seconds. Counting one one-thousand, two one-thousand, three one-thousand, and so on while suctioning is a simple means for monitoring the time. Without a safeguard, the airway may be obstructed for too long. Hyperventilating the child with 100% oxygen before and after suctioning (using a bag-valve-mask or increasing the fraction of inspired oxygen concentration [Fio2] ventilator setting) may be performed to prevent hypoxia. Closed tracheal suctioning systems that allow for uninterrupted oxygen delivery may also be used.

FYI

In a closed suction system, a suction catheter is directly attached to the ventilator tubing. This system has several advantages. First, there is no need to disconnect the patient from the ventilator, which allows for better oxygenation. Second, the suction catheter is enclosed in a plastic sheath, which reduces the risk of the nurse being exposed to the patient’s secretions (Carroll, 1998).

The child is allowed to rest for 30 to 60 seconds after each aspiration to allow oxygen saturation to return to normal; then the process is repeated until the trachea is clear. Suctioning should be limited to about three aspirations in one period. Oximetry is used to monitor suctioning and prevent hypoxia.

NURSINGALERT

Suctioning is carried out only as often as needed to keep the tube patent. Signs of mucus partially occluding the airway include an increased heart rate, a rise in respiratory effort, a drop in Sao2, cyanosis, and an increase in the positive inspiratory pressure on the ventilator.

In the acute care setting, aseptic technique is used during care of the tracheostomy. Secondary infection is a major concern, since the air entering the lower airway bypasses the natural defenses of the upper airway. Gloves are worn during the aspiration procedure, although a sterile glove is needed only on the hand touching the catheter. A new tube, gloves, and sterile saline solution are used each time.

EVIDENCE-BASED PRACTICE

Normal Saline Instillation Before Suctioning—Helpful or Harmful?

Marilyn J. Hockenberry

ASK THE QUESTION

In intubated children and those with tracheostomy, is normal saline instillation before suctioning helpful or harmful?

SEARCH FOR EVIDENCE

Search Strategies

Search selection criteria included English-language publications within the past 20 years and research-based articles on suctioning intubated children and those with a tracheostomy.

Databases Used

PubMed, Cochrane Collaboration, MD Consult, BestBETs, PedsCCM

CRITICALLY ANALYZE THE EVIDENCE

image Instillation of normal saline before endotracheal (ET) tube suctioning has been used for years as a method to loosen and dilute secretions, lubricate the suction catheter, and promote cough. In recent years the possible adverse effects of this procedure have been explored. Adult studies have found decreased oxygen saturation, increased frequency of nosocomial pneumonia, and increased intracranial pressure after instillation of normal saline before suctioning (O’Neal, Grap, Thompson, and others, 2001; Kinlock, 1999; Hagler and Traver, 1994; Reynolds, Hoffman, Schlichtig, and others, 1990; Ackerman, 1993; Ackerman and Gugerty, 1990; Bostick and Wendelgass, 1987).

image Two of the first research studies evaluating the effect of normal saline instillation before suctioning in neonates found no deleterious effects. Shorten, Byrne, and Jones (1991) found no significant differences in oxygenation, heart rate, or blood pressure before or after suctioning in a group of 27 intubated neonates. In a second study of nine neonates acting as their own controls, no adverse effects on lung mechanics were found after normal saline instillation and suctioning (Beeram and Dhanireddy, 1992).

image A recent study evaluating the effects of normal saline instillation before suctioning in children found results similar to those in the previously published adult studies. Ridling, Martin, and Bratton (2003) evaluated the effects of normal saline instillation before suctioning in a group of 24 critically ill children, ages 10 weeks to 14 years. A total of 104 suctioning episodes were analyzed. Children experienced significantly greater oxygen desaturation after suctioning if normal saline was instilled.

image The American Thoracic Society’s (2005) official position statement on the care of children with tracheostomies now states that normal saline should not be instilled before suctioning.

APPLY THE EVIDENCE: NURSING IMPLICATIONS

Studies support that the adverse effects of normal saline instillation before suctioning in children are similar to those found for adults. This technique causes a significant reduction in oxygen saturation that can last up to 2 minutes after suctioning. The evidence does not support the use of normal saline instillation before ET suctioning in children.

REFERENCES

Ackerman, MH. The effect of saline lavage prior to suctioning. Am J Crit Care. 1993;2(4):326–330.

Ackerman, MH, Gugerty, B. The effect of normal saline bolus instillation in artificial airways. The Journal. 1990;Spring:14–17.

American Thoracic Society. Care of the child with a chronic tracheostomy. http://www.thoracic.org/sections/publications/statements/pages/respiratory-disease-pediatric/childtrach1-12.html, 2005. [retrieved April 17, 2006, from].

Beeram, MR, Dhanireddy, R. Effects of saline instillation during tracheal suction on lung mechanics in newborn infants. J Perinatol. 1992;12(2):120–123.

Bostick, J, Wendelgass, ST. Normal saline instillation as part of the suctioning procedure: effects of Pao2 and amount of secretions. Heart Lung. 1987;16(5):532–537.

Hagler, DA, Traver, GA. Endotracheal saline and suction catheters: sources of lower airway contamination. Am J Crit Care. 1994;3(6):444–447.

Kinlock, D. Instillation of normal saline during endotracheal suctioning: effects on mixed venous oxygen saturation. Am J Crit Care. 1999;8(4):231–240.

O’Neal, PV, Grap, MJ, Thompson, C, et al. Level of dyspnoea experienced in mechanically ventilated adults with and without saline instillation prior to endotracheal suctioning. Intensive Crit Care Nurs. 2001;17(6):356–363.

Reynolds, P, Hoffman, LA, Schlichtig, R, et al. Effects of normal saline instillation on secretion volume, dynamic compliance, and oxygen saturation (abstract). Am Rev Respir Dis. 1990;141:A574.

Ridling, DA, Martin, LD, Bratton, SL. Endotracheal suctioning with or without instillation of isotonic sodium chloride in critically ill children. Am J Crit Care. 2003;12(3):212–219.

Shorten, DR, Byrne, PJ, Jones, RL. Infant responses to saline instillations and endotracheal suctioning. J Obstet Gynecol Neonatal Nurs. 1991;20(6):464–469.

Routine Care.: The tracheostomy stoma requires daily care. Assessments of the stoma area include observations for signs of infection and breakdown of the skin. The skin is kept clean and dry, and crusted secretions around the stoma may be gently removed with half-strength hydrogen peroxide. Hydrogen peroxide should not be used with sterling silver tracheostomy tubes because it tends to pit and stain the silver surface. The nurse should be aware of wet tracheostomy dressings, which can predispose the peristomal area to skin breakdown. Several products are available to prevent or treat excoriation. The Allevyn tracheostomy dressing is a hydrophilic sponge with a polyurethane back that is highly absorptive. Other possible barriers to help maintain skin integrity include the use of hydrocolloid wafers (e.g., DuoDERM CGF, Hollister Restore) under the tracheostomy flanges, as well as extra-thin hydrocolloid wafers under the chin.

The tracheostomy tube is held in place with tracheostomy ties made of a durable, nonfraying material. The ties are changed daily and when soiled. New ties are looped through the flanges and tied snugly in a triple knot at the side of the neck before the soiled ties are cut and removed. Some nurses have found that threading the ties through a piece of 0.25-inch surgical tubing cushions the ties; others have found the tubing to be irritating to the skin. The ties should be tight enough to allow just a fingertip to be inserted between the ties and the neck (Fig. 22-29). It is easier to ensure a snug fit if the child’s head is flexed rather than extended while the ties are being secured. Ties fastened with self-adhering closures are also available. These devices, such as the Dale tracheostomy tube holder, are made of a soft, cushioning, and slightly stretchy material that is very comfortable. They are becoming increasingly popular because of their ease of use and ability to maintain better skin integrity. However, nurses and family members must consider the safety factor and use them only on a child who will not pull and undo the fastener.

image

FIG. 22-29 Tracheostomy ties are snug but allow one finger to be inserted.

Routine tracheostomy tube changes are usually carried out weekly after a tract has been formed to minimize the formation of granulation tissue. The first change is usually performed by the surgeon; subsequent changes are performed by the nurse and, if the child is discharged home with the tracheostomy, by either a parent or a visiting nurse. Ideally, two caregivers participate in the procedure to assist with positioning the child.

Changing the tracheostomy tube is accomplished using sterile technique. Tube changes should occur before meals or 2 hours after the last meal. Continuous feedings should be turned off at least an hour before a tube change. The new, sterile tube is prepared by inserting the obturator and attaching new ties. The child is suctioned before the procedure to minimize secretions, then restrained and positioned with the neck slightly extended. One caregiver cuts the old ties and removes the tube from the stoma. The new tube is inserted gently into the stoma (using a downward and forward motion that follows the curve of the trachea), the obturator is removed, and the ties are secured. The adequacy of ventilation must be assessed after a tube change because the tube can be inserted into the soft tissue surrounding the trachea; therefore breath sounds and respiratory effort are carefully monitored.

Supplemental oxygen is always delivered with a humidification system to prevent drying of the respiratory mucosa. Humidification of room air for an established tracheostomy can be intermittent if secretions remain thin enough to be coughed or suctioned from the tracheostomy. Direct humidification via a tracheostomy mask can be provided during naps and at night so that the child is able to be up and around unencumbered during much of the day. Room humidifiers are also used successfully.

The inner cannula, if used, should be removed with each suctioning, cleaned with sterile saline and pipe cleaners to remove crusted material, dried thoroughly, and reinserted.

Emergency Care: Tube Occlusion and Accidental Decannulation.: Occlusion of the tracheostomy tube is life threatening, and infants and children are at greater risk than adults because of the smaller diameter of the tube. Maintaining patency of the tube is accomplished with suctioning and routine tube changes to prevent the formation of crusts that can occlude the tube.

NURSINGALERT

Life-threatening occlusion is apparent when the child displays signs of respiratory distress and a suction catheter cannot be passed to the end of the tube despite several attempts and instillation of saline. This situation requires an immediate tube change.

Accidental decannulation also requires immediate tube replacement. Some children have a fairly rigid trachea, so the airway remains partially open when the tube is removed. However, others have malformed or flexible tracheal cartilage, which causes the airway to collapse when the tube is removed or dislodged. Because many infants and children with upper airway problems have little airway reserve, if replacement of the dislodged tube is impossible, a smaller-sized tube should be inserted. If the stoma cannot be cannulated with another tracheostomy tube, oral intubation should be performed.

PROCEDURES RELATED TO ALTERNATIVE FEEDING TECHNIQUES

Some children are unable to take nourishment by mouth because of anomalies of the throat, esophagus, or bowel; impaired swallowing capacity; severe debilitation; respiratory distress; or unconsciousness. These children are frequently fed by way of a tube inserted orally or nasally into the stomach (orogastric or nasogastric gavage) or duodenum-jejunum (enteral gavage), or by a tube inserted directly into the stomach (gastrostomy) or jejunum (jejunostomy). Such feedings may be intermittent or by continuous drip.

Feeding resistance, a problem that may result from any long-term feeding method that bypasses the mouth, is discussed in Chapter 9. During gavage or gastrostomy feedings, infants are given a pacifier. Nonnutritive sucking has several advantages, such as increased weight gain and decreased crying. However, to prevent the possibility of aspiration, only pacifiers with a safe design may be used. Using improvised pacifiers made from bottle nipples is not a safe practice.

NURSINGALERT

When a child is concurrently receiving continuous-drip gastric or enteral feedings and parenteral (IV) therapy, the potential exists for inadvertent administration of the enteral formula through the circulatory system, especially when the parenteral solution is a fat emulsion, which looks milky. Safeguards to prevent this potentially serious error include:

image Use a separate, specifically designed enteral feeding pump mounted on a separate pole for continuous-feeding solutions.

image Label all tubing for continuous enteral feeding with brightly colored tape or labels.

image Use specifically designed continuous-feeding bags to contain the solutions instead of parenteral equipment, such as a burette.

GAVAGE FEEDING

Infants and children can be fed simply and safely by a tube passed into the stomach through either the nares or the mouth. The tube can be left in place or inserted and removed with each feeding. In older children it is usually less traumatic to tape the tube securely in place between feedings. When this alternative is used, the tube should be removed and replaced with a new tube according to hospital policy, specific orders, and the type of tube used. Meticulous hand washing is practiced during the procedure to prevent bacterial contamination of the feeding, especially during continuous-drip feedings (see Atraumatic Care box).

image ATRAUMATIC CARE

Reducing the Distress of Nasogastric Tube Insertion

Numerous strategies can be used to decrease discomfort during nasogastric (NG) tube insertion. Most important, the nurse performing the procedure should be competent in NG tube placement. The nurse should discuss the procedure with the child in a developmentally appropriate way and give family members the details of what to expect during the procedure. Administration of sedation and analgesia should be considered before NG insertion. The use of topical lidocaine and phenylephrine for the nose and tetracaine and benzocaine spray for the throat before NG insertion has been found to reduce pain and discomfort in a group of adult patients (Singer and Konia, 1999). A smaller-caliber, soft, flexible tube should be used. To prevent the trauma of reinsertion, make certain the NG tube is well secured after placement.

Data from Maglinte C: Strategies for reducing the pain and discomfort of nasogastric intubation, Acad Emerg Med 6(3):166-168, 1999.

Not all feeding tubes are the same. Polyethylene and polyvinylchloride types lose their flexibility and need to be replaced frequently, usually every 3 or 4 days. The polyurethane and silicone tubes are indwelling and remain flexible; so that they can remain in place longer and afford more patient comfort. Use of these small-bore tubes for continuous feeding has reduced the incidence of complications such as pharyngitis, otitis media, and incompetence of the lower esophageal sphincter. Although the increased softness and flexibility of the tubes are advantages, they also have disadvantages such as difficult insertion (may require a stylet or metal guidewire), collapse of the tube during aspiration of gastric contents to test for correct placement, dislodgment during forceful coughing, and unsuitability for thick feedings. Traditional methods for verifying placement are less reliable with the small-bore tubes.

Infants will be easier to control if they are first wrapped in a mummy restraint (see Fig. 22-7). Even tiny infants with random movements can grasp and dislodge the tube. Preterm infants do not ordinarily require restraint, but if they do, a small blanket folded across the chest and secured beneath the shoulders is usually sufficient. Care must be taken so that breathing is not compromised.

Whenever possible, the infant should be held and provided a means of nonnutritive sucking during the procedure to associate the comfort of physical contact with the feeding. When this is not possible, gavage feeding is carried out with the infant or child on the back or toward the right side and the head and chest elevated. Feeding the child in a sitting position helps maintain the placement of the tube in the lowest position, thus increasing the likelihood of correct placement in the stomach (see Nursing Care Guidelines box).

Two standard methods of measuring tube length for insertion are (1) measuring from the nose to the bottom of the earlobe and then to the end of the xiphoid process or (2) measuring from the nose to the earlobe and then to a point midway between the xiphoid process and the umbilicus (Fig. 22-30, A). For very low—birth-weight infants, weight can be used to predict insertion length (Table 22-7). See Evidence-Based Practice box for placement verification techniques.

TABLE 22-7

Recommended Minimum Insertion Lengths for Orogastric Tubes in Very Low–Birth-Weight Infants

image

From Gallaher KJ, Cashwell S, Hall V, and others: Orogastric tube insertion length in very-low-birth-weight infants (<1500 grams), J Perinatal 13(2):128-131, 1993.

image

FIG. 22-30 Gavage feeding. A, Measuring tube for orogastric feeding from tip of nose to earlobe and to midpoint between end of xiphoid process and umbilicus. B, Inserting tube.

NURSINGALERT

Nurses need to take precautions when assessing tube placement. One study reported that out of 39 children, 43.5% had nasogastric tube placement errors as viewed by radiography (Ellett and Beckstrand, 1999).

GASTROSTOMY FEEDING

Feeding by way of a gastrostomy tube is a variation of tube feeding that is often used for children in whom passage of a tube through the mouth, pharynx, esophagus, and cardiac sphincter of the stomach is contraindicated or impossible. It is also used to avoid the constant irritation of a gastric tube in children who require tube feeding over an extended period. Placement of a gastrostomy tube may be performed with the patient under general anesthesia or percutaneously using an endoscope with the patient sedated and under local anesthesia (percutaneous endoscopic gastrostomy [PEG]). The tube is inserted through the abdominal wall into the stomach about midway along the greater curvature and, when surgically placed, is secured by a purse-string suture. The stomach is anchored to the peritoneum at the operative site. The tube used can be a Foley, wing-tip, or mushroom catheter. Immediately after surgery the catheter is left open and attached to gravity drainage for 24 hours or more.

nursingcareguidelines

Nasogastric Tube Feedings in Children

Place child supine with head slightly hyperflexed or in a sniffing position (nose pointed toward ceiling).

Measure the tube for approximate length of insertion, and mark the point with a small piece of tape.

Insert a tube that has been lubricated with sterile water or water-soluble lubricant through either the mouth or one of the nares to the predetermined mark. Because most young infants are obligatory nose breathers, insertion through the mouth causes less distress and helps to stimulate sucking. In older infants and children the tube is passed through the nose and alternated between nostrils. An indwelling tube is almost always placed through the nose.

image When using the nose, slip the tube along the base of the nose and direct it straight back toward the occiput.

image When entering through the mouth, direct the tube toward the back of the throat (Fig. 22-30, B).

image If the child is able to swallow on command, synchronize passing the tube with swallowing.

image Confirm placement by x-ray examination, if available. Document pH and color of aspirate (see Evidence-Based Practice box, p. 748).

Stabilize the tube by holding or taping it to the cheek, not to the forehead, because of possible damage to the nostril. To maintain correct placement, measure and record the amount of tubing extending from the nose or mouth to the distal port when the tube is first positioned. Recheck this measurement before each feeding.

Warm the formula to room temperature. Do not microwave! Document pH and color of aspirate before each feeding to confirm tube placement. Pour formula into the barrel of the syringe attached to the feeding tube. To start the flow, give a gentle push with the plunger, but then remove the plunger and allow the fluid to flow into the stomach by gravity. The rate of flow should not exceed 5 ml every 5 to 10 minutes in preterm and very small infants and 10 ml/min in older infants and children to prevent nausea and regurgitation. The rate is determined by the diameter of the tubing and the height of the reservoir containing the feeding and is regulated by adjusting the height of the syringe. A usual feeding may take from 15 to 30 minutes to complete.

Flush the tube with sterile water (1 or 2 ml for small tubes to 5 to 15 ml or more for large ones), or see discussion of flushing for administering medication through nasogastric tubes in the Nursing Care Guidelines box (p. 730) to clear it of formula.

Cap or clamp indwelling tubes to prevent loss of feeding. If the tube is to be removed, first pinch it firmly to prevent escape of fluid as the tube is withdrawn. Withdraw the tube quickly.

Position the child with the head elevated about 30 degrees and on the right side or abdomen for at least 1 hour in the same manner as after any infant feeding to minimize the possibility of regurgitation and aspiration. If the child’s condition permits, bubble the youngster after the feeding.

Record the feeding, including the type and amount of residual, the type and amount of formula, and how it was tolerated.

For most infant feedings, any amount of residual fluid aspirated from the stomach is refed to prevent electrolyte imbalance, and the amount is subtracted from the prescribed amount of feeding. For example, if the infant is to receive 30 ml and 10 ml is aspirated from the stomach before the feeding, the 10 ml of aspirated stomach contents is refed along with 20 ml of feeding. Another method can be used in children. If residual fluid is more than one fourth of the last feeding, return the aspirate and recheck in 30 to 60 minutes. When residual fluid is less than one fourth of the last feeding, give the scheduled feeding. If large amounts of aspirated fluid persist and the child is due for another feeding, notify the practitioner.

Postoperative care of the wound site is directed toward prevention of infection and irritation. The area is cleansed at least daily or as often as needed to keep the area free of drainage. After healing takes place, meticulous care is needed to keep the area surrounding the tube clean and dry to prevent excoriation and infection. Daily applications of antibiotic ointment or other preparations may be prescribed to aid in healing and prevention of irritation. Care is exercised to prevent excessive pull on the catheter that might cause widening of the opening and subsequent leakage of highly irritating gastric juices. The tube is securely taped to the abdomen, leaving a small loop of tubing at the exit site to prevent tension on the site.

Granulation tissue may grow around a gastrostomy site (Fig. 22-31). This moist, beefy red tissue is not a sign of infection. However, if it continues to grow, the excess moisture can irritate the surrounding skin.

image

FIG. 22-31 Appearance of healthy granulation tissue around stoma.

For children receiving long-term gastrostomy feeding, a skin-level device (e.g., MIC-KEY, Bard Button) offers several advantages. The small, flexible silicone device protrudes slightly from the abdomen, is cosmetically pleasing in appearance, affords increased comfort and mobility to the child, is easy to care for, and is fully immersible in water. The one-way valve at the proximal end minimizes reflux and eliminates the need for clamping. However, the button requires a well-established gastrostomy site and is more expensive than the conventional tube. In addition, the valve may become clogged. When functioning, the valve prevents air from escaping; therefore the child may require frequent bubbling. With some devices, during feedings the child must remain fairly still because the tubing easily disconnects from the opening if the child moves. With other devices, extension tubing can be securely attached to the opening (Fig. 22-32). The feeding is instilled at the other end of the tubing in a manner similar to that for a regular gastrostomy. The extension tubing may also have a separate medication port. Both the feeding and the medication ports have plugs attached. Some skin-level devices require a special tube to decompress the stomach (to check residual or release air).

image

FIG. 22-32 Child with skin-level gastrostomy device (MIC-KEY), which provides for secure attachment of extension tubing to gastrostomy opening.

EVIDENCE-BASED PRACTICE

Assessing Correct Placement of Nasogastric or Orogastric Tubes in Children

Marilyn J. Hockenberry

ASK THE QUESTION

In children, how do we assess for correct placement of nasogastric or orogastric tubes?

SEARCH FOR EVIDENCE

Search Strategies

Search selection criteria included English-language publications within the past 10 years, research-based articles (level 3 or lower), children or adult populations, comparisons to gold standard (x-ray examination).

Databases Used

PubMed, Cochrane Collaboration, MD Consult, Joanna Briggs Institute, National Guideline Clearinghouse (AHRQ), TRIP Database Plus, PedsCCM, BestBETs

CRITICALLY ANALYZE THE EVIDENCE

Studies compared various methods used to evaluate placement of the tube with the gold standard, x-ray examination. Nine articles were found, five adult and four child sample populations.

image pH-assisted feeding tubes, child (Krafte-Jacobs, Persinger, Carver, and others, 1996)

image Bilirubin, adult and child (Westhus, 2004; Metheny, Stewart, Smith, and others, 1999; Metheny, Smith, and Stewart, 2000)

image Enzyme tests, child and adult (Westhus, 2004; Metheny, Stewart, Smith, and others, 1997)

image Bedside sonography for tube placement, adult (Hernandez-Socorro, Marin, Ruiz-Santana, and others, 1996)

image Aspiration of insufflated air for tube placement, adult (Neumann, Meyer, Dutton, and others, 1995; Harrison, Clay, Grant, and others, 1997)

Most reliable tests for determining tube placement in the nine published studies (other than the gold standard of x-ray examination) were the combination of:

image pH testing (Huffman, Jarczyk, O’Brien, and others, 2004; Metheny, Stewart, Smith, and others, 1999; Westhus, 2004; Gharpure, Meert, Sarnaik, and others, 2000)

image Visual inspection of aspirate

image Bilirubin and enzyme tests

Bilirubin and enzyme measures are not currently available at the bedside. Sensitivity and specificity of the bedside tests for children need further evaluation. Auscultation is an unreliable method to confirm tube placement because of the similarity of sounds produced by air in the bronchus, esophagus, or pleural space.

APPLY THE EVIDENCE: NURSING IMPLICATIONS

image Use x-ray to confirm initial placement. Document pH and color of aspirate with initial placement.

image A pH of 5 or less supports the conclusion that the tip of the tube is in a gastric location.

image A pH greater than 5 does not reliably predict the correct distal tip location. It may indicate respiratory or esophageal placement, or presence of medications to suppress acid secretion.

image If pH is greater than 5, use other measures to evaluate tube placement. If bilirubin and enzyme testing is not available, check color of aspirate. Gastric contents are clear, off-white, or tan; they may be brown tinged if blood is present. Respiratory secretions may look the same. Intestinal contents are often bile stained, light to dark yellow, or greenish brown. It may also be necessary to obtain an x-ray.

image A change in pH may indicate tube dislodgment. Check external markings and tube length to ensure tube has not moved. If uncertain about placement, obtain an x-ray.

image pH and color of aspirate can be checked before medication or feeding. For continuous feedings, it is recommended that tube placement be checked every 4 hours.

image A Visual Bilirubin Scale, effective in determining bilirubin content in feeding tube aspirates, has been published (Metheny, Smith, and Stewart, 2000). Evaluation of the accuracy of the scale is needed with children.

image Risk factors for improper tube placement are comatose or semicomatose state, swallowing problems, and recurrent retching or vomiting.

image Experience of the individual inserting the tube is always important.

REFERENCES

Gharpure, V, Meert, KL, Sarnaik, AP, et al. Indicators of postpyloric feeding tube placement in children. Crit Care Med. 2000;28(8):2962–2966.

Harrison, AM, Clay, B, Grant, MJ, et al. Nonradiographic assessment of enteral feeding tube position. Crit Care Med. 1997;25(12):2055–2059.

Hernandez-Socorro, CR, Marin, J, Ruiz-Santana, S, et al. Bedside sonographic-guided versus blind nasoenteric feeding tube placement in critically ill patients. Crit Care Med. 1996;24(10):1690–1694.

Huffman, S, Jarczyk, KS, O’Brien, E, et al. Methods to confirm feeding tube placement: application of research in practice. Pediatr Nurs. 2004;30(1):10–13.

Krafte-Jacobs, B, Persinger, M, Carver, J, et al. Rapid placement of transpyloric feeding tubes: a comparison of pH-assisted and standard insertion techniques in children. Pediatrics. 1996;98(2 Pt 1):242–248.

Metheny, NA, Smith, L, Stewart, BJ. Development of a reliable and valid bedside test for bilirubin and its utility for improving prediction of feeding tube location. Nurs Res. 2000;49(6):302–309.

Metheny, NA, Stewart, BJ, Smith, L, et al. pH and concentration of bilirubin in feeding tube aspirates as predictors of tube placement. Nurs Res. 1999;48(4):189–197.

Metheny, NA, Stewart, BJ, Smith, L, et al. pH and concentrations of pepsin and trypsin in feeding tube aspirates as predictors of tube placement. JPEN. 1997;21:279–285.

Neumann, MJ, Meyer, CT, Dutton, JL, et al. Hold that x-ray: aspirate pH and auscultation prove tube placement. J Clin Gastroenterol. 1995;20(4):293–295.

Westhus, N. Methods to test feeding tube placement in children. MCN Am J Maternal/Child Nurs. 2004;29(5):282–291.

Feeding of water, formula, or pureed foods is carried out in the same manner and rate as in gavage feeding. A mechanical pump may be used to regulate the volume and rate of feeding. After feedings, the infant or child is positioned on the right side or in the Fowler position, and the tube may be clamped or left open and suspended between feedings, depending on the child’s condition. A clamped tube allows more mobility but is appropriate only if the child can tolerate intermittent feedings without vomiting or prolonged backup of feeding into the tube. Sometimes a Y tube is used to allow for simultaneous decompression during feeding. If a Foley catheter is used as the gastrostomy tube, very slight tension is applied. The tube is securely taped to maintain the balloon at the gastrostomy opening to prevent leakage of gastric contents and to prevent the tube’s progression toward the pyloric sphincter, where it may occlude the stomach outlet. As a precaution, the length of the tube should be measured postoperatively and then remeasured each shift to be certain it has not slipped. A mark can be made above the skin level to further ensure its placement. When the gastrostomy tube is no longer needed, it is removed; the skin opening usually closes spontaneously by contracture.

NASODUODENAL AND NASOJEJUNAL TUBES

Children at high risk for regurgitation or aspiration such as those with gastroparesis, mechanical ventilation, or brain injuries may require placement of a postpyloric feeding tube. Insertion of a nasoduodenal or nasojejunal tube is done by a trained practitioner because of the risk of misplacement and potential for perforation in tubes requiring a stylet. Accurate placement is verified by radiography. Small-bore tubes may easily clog. Flush tube when feeding is interrupted, before and after medication administration, and routinely every 4 hours or as directed by institutional policy. Tube replacement should be considered monthly to ensure optimal tube patency. Continuous feedings are delivered by mechanical pump to regulate volume and rate. Bolus feeds are contraindicated. Tube displacement is suspected in the child showing signs of feeding intolerance such as vomiting. Stop feedings and notify the practitioner.

TOTAL PARENTERAL NUTRITION

TPN provides for the total nutritional needs of infants or children when feeding by the gastrointestinal tract is impossible, inadequate, or hazardous. Some common conditions include chronic intestinal obstruction, inadequate intestinal length, and prophylactically after surgery or during critical illness.

TPN therapy involves IV infusion of highly concentrated solutions of carbohydrates, lipids, amino acids, vitamins, minerals, water, trace elements and other additives in a single container (Teitelbaum, Guenter, Howell, and others, 2005). The highly concentrated solutions require infusion into a vessel with sufficient volume and turbulence to allow for rapid dilution. The wide-diameter vessels selected are the superior vena cava and innominate or intrathoracic subclavian veins approached by way of the external or internal jugular veins. The highly irritating nature of concentrated glucose precludes the use of the small peripheral veins in most instances. However, dilute glucose-protein hydrolysates that are appropriate for infusing into peripheral veins are being used with increasing frequency. When peripheral veins are used, intralipid becomes the major calorie source. For long-term alimentation, VADs are commonly used (see p. 725).

The major nursing responsibilities are the same as for any IV therapy: control of sepsis, monitoring of the infusion rate, and assessment of the patient’s tolerance of the solution. The TPN solution must be prepared under sterile conditions. The infusion is maintained at a constant rate by an infusion pump. The TPN infusion rate should not be increased or decreased without the practitioner being informed, since alterations can cause hyperglycemia or hypoglycemia.

General assessments, such as vital signs, I&O measurements, and laboratory tests, facilitate early detection of infection or fluid and electrolyte imbalance. Additional amounts of potassium and sodium chloride are often required in hyperalimentation; therefore observation for signs of potassium or sodium deficit or excess is part of nursing care. This is rarely a problem except in children with reduced renal function or metabolic defects. Hyperglycemia may occur during the first day or two as the child adapts to the high-glucose load of the hyperalimentation solution. Although hyperglycemia occurs infrequently, insulin may be required to assist the body’s adjustment. To prevent hypoglycemia at the time the hyperalimentation is disconnected, the rate of the infusion and the amount of insulin are decreased gradually.

In addition to children’s physical needs, their developmental needs must also be considered during the often long-term use of TPN. Development should be regularly assessed to monitor the child’s progress, and appropriate interventions should be instituted to encourage expected milestones. Delays in the areas of gross motor and language skills are found most often; therefore special attention should be directed to these areas.

FAMILY TEACHING AND HOME CARE

When alternative feedings are needed for an extended period, the family may need to learn how to feed the child with a nasogastric, gastrostomy, or TPN feeding regimen. The same principles discussed earlier in this chapter for compliance, especially in terms of education (p. 698), and in Chapter 21 for discharge planning and home care are applied. Because of the numerous skills the family must learn for home TPN, ample time must be allowed for the family to learn and perform the procedures under supervision before assuming full responsibility for the child’s care.

The family may be referred to community agencies that provide support and practical assistance. The Oley Foundation* is a nonprofit research and education organization that assists persons receiving enteral nutrition and home TPN.

PROCEDURES RELATED TO ELIMINATION

ENEMA

The procedure for giving an enema to an infant or child does not differ essentially from that for an adult, except for the type and amount of fluid administered and the distance for inserting the tube into the rectum. Depending on the volume, a syringe with rubber tubing, an enema bottle, or an enema bag should be used (see Nursing Care Guidelines box).

An isotonic solution is used in children. Plain water is not used because, being hypotonic, it can cause rapid fluid shift and fluid overload. The Fleet enema (pediatric or adult sized) is not advised for children because of the harsh action of its ingredients (sodium biphosphate and sodium phosphate). Commercial enemas can be dangerous to patients with megacolon and to dehydrated or azotemic children. The osmotic effect of the Fleet enema may produce diarrhea, which can lead to metabolic acidosis. Other potential complications are extreme hyperphosphatemia, hypernatremia, and hypocalcemia, which may lead to neuromuscular irritability and coma (Walton, Thomas, Aly, and others, 2000).

NURSINGTIP

If prepared saline is not available, it can be made by adding 1 teaspoon of table salt to 500 ml (1 pint) of tap water.

Because infants and young children are unable to retain the solution after it is administered, the buttocks must be held together for a short time to retain the fluid. The enema is administered and expelled while the child is lying with the buttocks over the bedpan and with the head and back supported by pillows. Older children are usually able to hold the solution if they understand what to do and if they are not expected to hold it for too long. The nurse should have the bedpan handy or, for the ambulatory child, ensure that the bathroom is available before beginning the procedure. An enema is an intrusive procedure and thus threatening to the preschool child; therefore a careful explanation is especially important to ease possible fear.

nursingcareguidelines

Administration of Enemas to Children

Age Amount (ml) Insertion Distance
Infant 120-240 2.5 cm (1 inch)
2-4 years 240-360 5 cm (2 inches)
4-10 years 360-480 7.5 cm (3 inches)
11 years 480-720 10 cm (4 inches)

A preoperative bowel preparation solution given orally or through a nasogastric tube is increasingly being used instead of an enema. The polyethylene glycol—electrolyte lavage solution (GoLYTELY) mechanically flushes the bowel without significant absorption, thereby avoiding potential fluid and electrolyte imbalance. Another effective oral cathartic is magnesium citrate solution.

FYI

NuLYTELY, a modification of GoLYTELY, has been found to have the same therapeutic advantage as GoLYTELY and was developed to improve on the taste (Diab and Marshall, 1996).

OSTOMIES

Children may require stomas for various health problems. The most frequent causes in the infant are necrotizing enterocolitis and imperforate anus (less often, Hirschsprung disease). In the older child the most frequent causes are inflammatory bowel disease, especially Crohn disease (regional enteritis), and ureterostomies for distal ureter or bladder defects.

Care and management of ostomies in the older child differ little from the care of ostomies in the adult patient. The major emphasis in pediatric care is preparing the child for the procedure and teaching care of the ostomy to the child and family. The basic principles of preparation are the same as for any procedure (see p. 689). Simple, straightforward language is most effective, together with the use of illustrations and a replica model (e.g., drawing a picture of a child with a stoma on the abdomen and explaining it as “another opening where bowel movements [or any other term the child uses] will come out”). At another time the nurse can draw a pouch over the opening to demonstrate how the contents are collected. Using a doll to demonstrate the process is an excellent teaching strategy, and special books are available.*

Ostomy equipment consists of a one- or two-piece system with a hypoallergenic skin barrier to maintain peristomal skin integrity. The pouch should be large enough to contain a moderate amount of stool and flatus but not so large as to overwhelm the infant or child. A backing helps minimize the risk of skin breakdown from moisture trapped between the skin and pouch. Small clips or rubber bands should be avoided to prevent choking in the young child. Granulation tissue may grow around an ostomy site (see Fig. 22-31). This moist, beefy red tissue is not a sign of infection. However, if it continues to grow, the excess moisture can cause irritation of the surrounding skin.

Protection of the peristomal skin is a major aspect of stoma care. Well-fitting appliances are important to prevent leakage of contents. Before the appliance is applied, the skin is prepared with a skin sealant that is allowed to dry. Then stoma paste is applied around the base of the stoma or the back of the wafer. The sealant and paste work together to prevent peristomal breakdown.

In infants with a colostomy left unpouched, skin care is similar to that of any diapered infant. However, the peristomal skin is protected with a wafer barrier, such as a hydrocolloid dressing (e.g., DuoDERM) or a barrier substance (e.g., zinc oxide ointment [Desitin], or a mixture of the zinc oxide ointment and stoma [Stomahesive] powder). A gauze dressing may be applied over the stoma and wafer to absorb stomal drainage. If the skin becomes inflamed, denuded, or infected, the care is similar to the interventions used for diaper dermatitis (see Chapter 30). A product that helps protect healthy skin, heal excoriated skin, and minimize pain associated with skin breakdown is Proshield Plus. The skin protectant adheres to denuded weeping skin. Proshield Plus can be applied over topical antifungal and antibacterial agents if infection is present. “No-sting” barrier film is a skin sealant that has no alcohol base and can be used on open skin without stinging.

With young children, protection of the pouch from being pulled off is also an important consideration. One-piece outfits keep exploring hands from reaching the pouch, and the loose waist prevents any pressure on the appliance. Keeping the child occupied with toys during the pouch change is also helpful. As children mature, their participation in ostomy care is encouraged. Even preschoolers can assist by holding supplies, pulling paper backings from the appliance, and helping clean the stoma area. Toilet training for bladder control needs to begin at the appropriate time as for any other child.

Older children and adolescents should eventually have total responsibility for ostomy care just as they would for usual bowel function. During adolescence, concerns for body image and the ostomy’s impact on intimacy and sexuality emerge. The nurse should stress to teenagers that the presence of a stoma need not interfere with their activities. These youngsters can choose which ostomy equipment is best suited to their needs. Attractively designed and decorated pouch covers are well liked by teenagers.

An enterostomal therapy nurse specialist is an important member of the health care team and will have additional suggestions and skin care information and ostomy pouching options. Further information may be obtained by contacting the Wound, Ostomy and Continence Nurses Society.*

FAMILY TEACHING AND HOME CARE

Because these children are almost always discharged with a functioning colostomy, preparation of the family should begin as early as possible in the hospital. The family is instructed in the application of the device (if used), care of the skin, and appropriate action in case skin problems develop. Early evidence of skin breakdown or stomal complications, such as ribbonlike stools, excessive diarrhea, bleeding, prolapse, or failure to pass flatus or stool, is brought to the attention of the physician, the nurse, or the stoma specialist. The same principles are applied as discussed earlier in this chapter for compliance, especially in terms of education (p. 699), and in Chapter 21 for discharge planning and home care.

KEY POINTS

image Informed consent is valid when the person is capable of giving consent (is over the age of majority and is competent), is supplied with information needed to make an intelligent decision, and acts voluntarily when exercising freedom of choice.

image Informed consent is needed for major surgery, minor surgery, and diagnostic tests and medical treatments with an element of risk.

image The major principles in psychologic preparation of the child for procedures are to establish trust, provide support, and give an explanation in easy-to-understand terms.

image Preparation for procedures should be based on developmental characteristics of the child and family, emphasizing the importance of the parents’ role.

image Most parents and children want to be together during stressful procedures and should be offered this opportunity, with guidance on how the parent can comfort the child.

image In the performance of a procedure the nurse should expect success, involve the child when possible in the procedure, provide distraction, and allow for expression of feelings.

image Proper positioning of infants and small children for procedures is essential to minimize movement and discomfort.

image In giving postprocedural support, encourage children to express feelings and praise for completion of the procedure.

image Stressful times before and after surgery that produce anxiety in children are admission, blood tests, injection of preoperative medication (if used), transportation to the operating room, and return from the PACU.

image Assessment of compliance entails measuring factors that affect compliance through clinical judgment, self-reporting, direct observation, monitoring of appointments and therapeutic response, pill counts, and chemical assays.

image Compliance strategies may be classified as organizational, educational, and behavioral.

image Knowledge of the ill child’s eating habits and favorite foods can help in maintaining adequate nutrition.

image Skin care is an essential to prevent skin breakdown.

image Control of fever may be accomplished by administration of antipyretics; hyperthermia is controlled by environmental means (minimum clothing, increased air circulation, hypothermia mattress, or cool compresses).

image Infection control is based on two systems. Standard precautions provide protection when the infected person is undiagnosed. Transmission-based precautions add extra interventions for patients diagnosed with or suspected of having an infection.

image Ensuring safety in the hospital setting is a major concern and can be achieved through environmental measures, limit setting, infection control, and safe transportation.

image Restraints are used cautiously and require a medical order. Therapeutic holding can avoid the use of restraints.

image Factors that affect drug dosage determination are growth and maturation, difficulty in evaluating drug response, and BSA.

image Family teaching regarding medication administration includes telling parents why the child is receiving the drug; its possible effects; and the amount, frequency, and length of time the drug is to be administered.

image The preferred sites for intramuscular injection in children are the vastus lateralis and ventrogluteal areas.

image Intermittent venous access is accomplished by a peripheral intermittent infusion device, a peripherally inserted central catheter, a central venous catheter, or an implanted port.

image Several safety catheters and needleless device systems are available to reduce the risk of needlestick injuries in patients and caregivers.

image Nursing assessment of fluid and electrolyte disturbances entails observation of general appearance, vital signs, and measurement of I&O.

image Oxygen can be administered by hood, mask, nasal cannula, incubator, or oxygen tent.

image Tracheostomy suctioning involves premeasured insertion of the catheter, application of suction for 5 seconds when withdrawing the catheter, and supplemental oxygen before and after suctioning.

image Alternative forms of feeding include gavage feeding, gastrostomy feeding, and TPN.

image In the care of children with ostomies, nurses play an important role in family support and instruction in care of the stoma site.

REFERENCES

Algren, C, Algren, J. Pediatric sedation essentials for the preoperative nurse. Nurs Clin North Am. 1997;32(1):17–30.

Algren, C, Ireland, D, Stewart, E. Perioperative and perianesthesia care of the child. In: Albers AC, Schwartz P, eds. Comprehensive care of the pediatric patient: prehospital through rehabilitation. Park Ridge, Ill: Emergency Nurses Association, 1998.

American Academy of Pediatrics. Consent for emergency medical services for children and adolescents. Pediatrics. 2003;111(3):703–705.

American Academy of Pediatrics. Informed consent, parental permission, and assent in pediatric practice. Pediatrics. 1995;95(2):314–317.

Anderson, SL, Schaechter, J, Brosco, JP. Adolescent patients and their confidentiality: staying within legal bounds. Contemp Pediatr. 2005;22(7):54.

Axelrod, P. External cooling in the management of fever. Clin Infect Dis. 2000;31(Suppl 5):S224–S229.

Berg, AT, Shinnar, S, Levy, SR, et al. Childhood-onset epilepsy with and without preceding febrile seizures. Neurology. 1999;53(8):1742–1748.

Berger, JE, AAP Committee on Medical Liability. Consent by proxy for nonurgent pediatric care. Pediatrics. 2003;112(5):1186–1195.

Blass, EM, Watt, L. Suckling- and sucrose-induced analgesia in human newborns. Pain. 1999;83(3):611–623.

Broome, M. Consent (assent) for research with pediatric patients. Semin Oncol Nurs. 1999;15(2):96–103.

Broome, M, Rehwaldt, M, Fogg, L. Relationship between cognitive behavioral techniques, temperament, observed distress, and pain reports in children and adolescents during lumbar puncture. J Pediatr Nurs. 1998;13(1):48–54.

Bryant RA, Doughty D, eds. Acute and chronic wounds: nursing management, ed 2, St Louis: Mosby, 2000.

Burke, N. Alternative methods for newborn urine sample collection. Pediatr Nurs. 1995;21(6):546–549.

Calianno, C. Patient hygiene, part II, Skin care: keeping the outside healthy. Nursing. 1999;29(12 Suppl):1–11.

Carroll, P. Closing in on safer suctioning. RN. 1998;61(5):22–27.

Catudal, R. Pediatric IV therapy: actual practice. J Vasc Access Devices. 1999;4(2):27–29.

Clinical and Laboratory Standards Institute. Blood collection via capillary puncture in infants. http://www.phlebotomypages.com/phleb_infants.htm. [retrieved March 31, 2006, from].

Cohen, HA, Woloch, B, Linder, N, et al. Urine samples from disposable diapers: an accurate method for urine cultures. J Fam Pract. 1997;44(3):290–292.

Cook, IF, Murtagh, J. Ventroluteal area: a suitable site for intramuscular vaccination of infants and toddlers. Vaccine. 2006;24(13):2403–2408.

Cook, IF, Murtagh, J. Needle length required for intramuscular vaccination of infants and toddlers. An ultrasonographic study. Aust Fam Physician. 2002;31(3):295–297.

Curley, MAQ, Moloney-Harmon, PA. Critical care nursing of infants and children, ed 2. Philadelphia: Saunders, 2001.

Diab, FH, Marshall, JB. The palatability of five colonic lavage solutions. Aliment Pharmacol Ther. 1996;20(5):815–819.

Dubick, MA, Holcomb, JB. A review of intraosseous vascular access: current status and military application. Mil Med. 2000;165(7):552–559.

Eaton, L. Hand washing is more important than cleaner wards in controlling MRSA. BMJ. 2005;330(7497):922.

Eckler, J. Combating infection. Nursing. 1997;27(10):20.

Ellett, ML, Beckstrand, J. Examination of gavage tube placement in children. J Soc Pediatr Nurs. 1999;4(2):51–60.

Essink-Tebbes, CM, Wuis, EW, Liem, KD, et al. Safety of lidocaine-prilocaine cream application four times a day in premature neonates: a pilot study. Eur J Pediatr. 1999;158(5):421–423.

Fauroux, B, Boule, M, Lofaso, F, et al. Chest physiotherapy in cystic fibrosis: improved tolerance with nasal pressure support ventilation. Pediatrics. 1999;103(3):E32.

Fennell, ME. Parents in the OR? You bet!. RN. 1999;62(12):38–40.

Fisher, AA, Deffenbaugh, C, Poole, RL, et al. The use of alteplase for restoring patency to occluded central venous access devices in infants and children. J Infus Nurs. 2004;27(3):171–174.

Gamulka, B, Mendoza, C, Connolly, B. Evaluation of a unique, nurse-inserted, peripherally inserted central catheter program. Pediatrics. 2005;6(115):1602–1606.

Gray, L, Watt, L, Blass, EM, Skin-to-skin contact is analgesic in healthy newborns. Pediatrics 2000;105(1):110–111. retrieved July 7, 2007, from http://www.pediatrics.org/cgi/content/full/105/1/E14

Gray, M. Atraumatic urethral catheterization of children. Pediatr Nurs. 1996;22(4):306–310.

Hall, PA, Payne, JF, Stack, CG, et al. Parents in the recovery room: survey of parental and staff attitudes. BMJ. 1995;310(6973):163–164.

Harris, J, Maguire, D. Developing a protocol to prevent and treat pediatric central venous catheter occlusions. J Intraven Nurs. 1999;22(4):194–198.

Institute for Safe Medication Practices. Problems persist with life-threatening tubing misconnections. ISMP Medication Safety Alert. 2004.

Infusion Nurses Society. Policies and procedures for infusion nursing. Norwood, Mass: The Society, 2000.

Infusion Nurses Society. Revised infusion nursing standards of practice. J Intraven Nurs. 2000;23(6 Suppl):S17. [S39, S41, S45, S49-50, S60,].

Ipp, MM, Gold, R, Goldback, M, et al. Adverse reactions to diphtheria, tetanus, pertussis—polio vaccination at 18 months of age: effect of injection site and needle length. Pediatrics. 1989;83(5):679–682.

Joint Commission on Accreditation of Healthcare Organizations. Care of the patient: restraint and seclusion standards. In: Comprehensive accreditation manual for hospitals. Naperville, Ill: Joint Commission Resources; 2001:TX.7.1–TX.7.5.5.

Kain, ZN, Caldwell-Andrews, AA, Krivutza, DM, et al. Trends in the practice of parental presence during induction of anesthesia and the use of preoperative sedative premedication in the United States, 1995-2002: results of a follow-up national survey. Anesth Analg. 2004;98(5):1252–1259.

Kain, Z, Caldwell-Andrews, A, Wang, S. Psychological preparation of the parent and pediatric surgical patient. Anesthesia Clin North Am. 2002;20(1):29–44.

Katsma, D, Smith, G. Analysis of needle path during intramuscular injection. Nurs Res. 1997;46(5):288–292.

Kellam, B, Sacks, LM, Wailer, JL, et al. Tenderfoot Preemie vs a manual lancet: a clinical evaluation. Neonatal Netw. 2001;20(7):31–36.

Kennedy, D. Medication “safety checks” in pediatric acute care. J Intraven Nurs. 1996;19(6):295–302.

Klein, EJ, Diekema, DS, Paris, CA, et al. A randomized, clinical trial of oral midazolam plus placebo versus oral midazolam plus oral transmucosal fentanyl for sedation during laceration repair. Pediatrics. 2002;109(5):894–897.

Kraus, D, Stohlmeyer, LA, Hannon, DR, et al. Effectiveness and infant acceptance of the Rx Medibottle versus the oral syringe. Pharmacotherapy. 2001;21(4):416–423.

KyngAs, H, Kroll, T, Duffy, M. Compliance in adolescents with chronic diseases: a review. J Adolesc Health. 2000;26:379–388.

Landsman, IS, Cook, DR. Pediatric anesthesia. In: O’Neill J, Rowe MI, Grosfeld JL, et al, eds. Pediatric surgery. St Louis: Mosby, 1998.

LaRosa-Nash, PA, Murphy, JM. An approach to pediatric perioperative care: parent-present induction. Nurs Clin North Am. 1997;32(1):183–199.

Larsson, BA, Tannfeldt, G, Lagercrantz, H, et al. Alleviation of the pain of venipuncture in neonates. Acta Paediatr. 1998;87(7):774–779.

Lee, WE, Vallino, LM. Intravenous insertion site protection: moisture accumulation in intravenous site protectors. J Intraven Nurs. 1996;29(4):194–197.

Liebman, M, Barnsteiner, J. Fever education: does it reduce parent fever anxiety? Pediatr Emerg Care. 2001;17(1):47–51.

Maki, DG. Infections caused by intravascular devices used for infusion therapy: pathogenesis, prevention, and management. In Bisno AL, Waldvogel FA, eds.: Infections associated with indwelling medical devices, ed 2, Washington, DC: American Society for Microbiology, 1994.

Manworren, R, Fledderman, M. Preparation of the child and family for surgery. In: Wise BV, Mckenna C, Garvin G, et al, eds. Nursing care of the general pediatric surgical patient. Gaithersburg, Md: Aspen, 2000.

Maxwell, LG, Yaster, M. Perioperative management issues in pediatric patients. Anesthesiol Clin North Am. 2000;18(3):601–632.

Meehan, RM. Heelsticks in neonates for capillary blood sampling. Neonatal Netw. 1998;17(1):17–24.

Montgomery, LA, Hanrahan, K, Korrman, K, et al. Guidelines for IV infiltrations in pediatric patients. Pediatr Nurs. 1999;25(2):167–180.

Moureau, N. Practical access, a back-to-basics review of intravenous therapy. J Vasc Access Devices. 1999;4(2 Suppl):1–4.

Munro, H, D’Errico, FC. Parental involvement in perioperative anesthetic management. J Perianesth Nurs. 2000;15(6):397–400.

Nelson, D. Procedural sedation in the emergency department. In: Krauss B, Brustowicz RM, eds. Pediatric procedural sedation and analgesia. Philadelphia: Lippincott Williams & Wilkins, 1999.

Oncology Nursing Society. Cancer chemotherapy guidelines and recommendations for practice, ed 2. Pittsburgh: Oncology Nursing Press, 1998.

Pettit, J, Hughes, K. Neonatal intravenous therapy practices. J Vasc Access Devices. 1999;4:7–16.

Polillio, AM, Killy, J. Does a needleless injection system reduce anxiety in children receiving intramuscular injections? Pediatr Nurs. 1997;23(1):46–49.

Purssell, E. The use of antipyretic medications in the prevention of febrile convulsions in children. J Pediatr Nurs. 2000;9(4):473–480.

Quality, equipment hold keys to infection control. ED Manage. 2006;18(2):19–21.

Quigley, SM, Curley, MAQ. Skin integrity in the pediatric population: preventing and managing pressure ulcers. J Soc Pediatr Nurses. 1996;1(1):7.

Ratliff, CR, Rodheaver, GT. Pressure ulcer assessment and management. Lippincott’s Primary Care Pract. 1999;3:242–258.

Redmond, MC. Malignant hyperthermia: perianesthesia recognition, treatment, and care. J Perianesth Nurs. 2001;16(4):259–270.

Romino, SL, Keatley, VM, Secrest, J, et al. Parental presence during anesthesia induction in children. AORN J. 2005;81(4):780–792.

Rote, N, Huether, S, McCance, K. Hypersensitivities, infection, and immunodeficiencies. In Huether S, McCance K, eds.: Understanding pathophysiology, ed 2, St Louis: Mosby, 2000.

Selekman, J, Snyder, B. Institutional policies on the use of physical restraints on children. Pediatr Nurs. 1997;23(5):531–537.

Sharber, J. The efficacy of tepid sponge bathing to reduce fever in young children. Am J Emerg Med. 1997;15(2):188–192.

Shen, V, Li, X, Murdock, M, et al. Recombinant tissue plasminogen activator (alteplase) for restoration of function to occluded central venous catheters in pediatric patients. J Pediatr Hematol Oncol. 2003;25(1):38–45.

Shepherd, AJ, Glenesk, A, Niven, CA, et al. A Scottish study of heel-prick blood sampling in newborn babies. Midwifery. 2006;22(2):158–168.

Shinnar, S, Pellock, JM, Berg, AT, et al. Short-term outcomes of children with febrile status epilepticus. Epilepsia. 2001;42(1):47–53.

Singer, AJ, Konia, N. Comparison of topical anesthetics and vasoconstrictors vs lubricants prior to nasogastric intubation: a randomized, controlled trial. Acad Emerg Med. 1999;6(3):184–190.

Teitelbaum, D, Guenter, P, Howell, WH, et al. Definition of terms, style, and conventions used in A.S.P.E.N. guidelines and standards. Nutr Clin Pract. 2005;20(2):281–285.

Tillett, J. Adolescents and informed consent: ethical and legal issues. J Perinatal Neonatal Nurs. 2005;19(2):112–121.

Van Cleve, L, Johnson, L, Pothier, P. Pain responses of hospitalized infants and children to venipuncture and intravenous cannulation. J Pediatr Nurs. 1996;11:169–174.

Vertanen, H, Fellman, V, Brommels, M, et al. An automatic incision device for obtaining blood samples from the heels of the preterm infants causes less damage than a conventional manual lancet. Arch Dis Child Fetal Neonatal Ed. 2001;84:F53–F55.

Wald, ER. To bag or not to bag. J Pediatrics. 2005;174(4):418–419.

Walton, DM, Thomas, DC, Aly, HZ, et al. Morbid hypocalcemia associated with phosphate enema in a six-week-old infant. Pediatrics. 2000;106(3):e37.


*Preparatory materials include Going to the Hospital and Going to the Doctor, available from Family Communications, Inc., 4802 Fifth Ave., Pittsburgh, PA 15213; (412) 687-2990; http://www.fci.org; Hospital Friends, available from the Centering Corporation, 7230 Maple St., Omaha, NE 68134; (866) 218-0101. Other resources include Berenstein Bears Go to the Doctor and Berenstein Bears Visit the Dentist (New York, Random House), available in most bookstores.

*This section was revised by Shannon McCord, MSN, RN, CPNP.

*Staging of pressure ulcers and guidelines for prevention and management of pressure ulcers can be found at http://wocn.org.

*Available from Hollister, Inc., 2000 Hollister Drive, Libertyville, IL 60048; (800) 323-4060; http://www.hollister.com.

Available from ConvaTec, PO Box 5254, Princeton, NJ 08543-5254; (800) 422-8811; http://www.convatec.com.

*Lidocaine hydrochloride 2% jelly is available from International Medication Systems, Ltd., 1886 Santa Anita Ave., South El Monte, CA 91733; (800) 423-4136; http://www.ims-limited.com; and from AstraZeneca, 1800 Concord Pike, Wilmington, DE 19801; (800) 842-992; http://www.astrazeneca-us.com.

*Trademark Medical manufactures a pill crusher and has compiled a list of more than 190 medications that should not be crushed or chewed. Both are available from Trademark Medical, 449 Sovereign Court, St. Louis, MO 63011; (800) 325-9044; http://www.trademarkmedical.com.

*Guidelines for determining tissue injury severity are available from the Infusion Nurses Society, 315 Norwood Park South, Norwood, MA 02062; (781) 440-9408; fax: (781) 440-9409; http://www.ins1.org.

Guidelines on interventions for infiltration and extravasation are available from the Oncology Nursing Society, 125 Enterprise Drive, Pittsburgh, PA 15275; (412) 859-6100; fax: (412) 859-6162; http://www.ons.org.

Guidelines for prevention of intravascular device—related infections are available from the Centers for Disease Control and Prevention, 1600 Clifton Road, Atlanta, GA 30333; (404) 639-1515; http://www.cdc.gov/ncidod/dhqp/gl_intravascular.html.

*214 Hun Memorial, MC-28, Albany Medical Center, Albany, NY 12208; (800) 776-OLEY; http://www.oley.org.

*Children with ileostomies are fitted immediately after surgery with an appliance to protect the skin from the proteolytic enzymes in the liquid stool. Infants may not be fitted with a pouch in the immediate postoperative period. When stomal drainage is minimal, a gauze dressing will suffice. Parents are usually given a choice of caring for the colostomy with or without an appliance. Pediatric appliances are available in a variety of sizes to ensure an adequate fit. Parents may find the following pamphlets helpful: A Parent’s Guide to Necrotizing Enterocolitis or Parent’s Guide to Ostomy Care for Children, available from ConvaTec.

*(888) 224-9626; http://www.wocn.org.