| STEPS |
RATIONALE |
1. Determine whether patient is incontinent or has excess drainage on bedclothes.
|
Determines need for protective waterproof pads or extra bath blankets on bed. |
2. Check chart for orders or specific precautions for movement and positioning.
|
Ensures safety and use of proper body mechanics for nurse and patient. |
3. Explain procedure to patient, noting that patient will be asked to turn on side to roll over bedclothes.
|
Minimises anxiety and promotes cooperation. |
4. Prepare needed equipment and supplies.
|
|
|
|
Minimises spread of infection. |
6. Assemble and arrange equipment on bedside chair or table. Remove unnecessary equipment.
|
Provides for smooth procedure and ensures comfort. |
7. Draw room curtain around bed or close door.
|
Maintains privacy, thus promoting emotional and physical comfort. |
8. Lower side rail on near side of bed. Remove call light.
|
Provides easy access to bed and bedclothes. |
9. Adjust bed height to comfortable working position.
|
Minimises strain on nurse’s back. It is easier to remove and apply bedclothes evenly to bed in flat position. |
10. Loosen top sheet at foot of bed.
|
Makes bedclothes easier to remove. |
11. Remove bedspread and blanket separately by folding them into squares and placing them in dirty linen bag (if not to be reused). Do not allow bedclothes to contact uniform. Do not fan or shake bedclothes.
|
Reduces transmission of microorganisms. |
12. If blanket and bedspread are to be reused, fold by bringing top and bottom edges together. Fold into neat squares and place over back of chair.
|
Facilitates replacement and prevents wrinkling. |
13. Cover patient with bath blanket in following manner. Unfold bath blanket over top sheet. Ask patient to hold top edge of bath blanket. If patient is unable to help, tuck top of bath blanket under shoulder. Grasp top sheet under bath blanket at patient’s shoulders, and bring down to foot of bed. Remove, and discard it into linen bag. Optional: Patient may be covered with loosened top sheet if bath blanket is not available.
|
Bath blanket provides warmth and keeps body parts covered during bedclothes removal. |
14. With help from another nurse, slide mattress towards head of bed.
|
If mattress slides towards foot of bed when head of bed is raised, it is difficult to tuck bedclothes in and is uncomfortable for patient. |
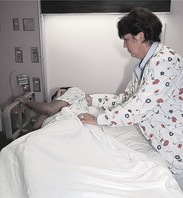
15. Position patient on their side on far side of bed, facing away. Adjust pillow under head. Be sure furthest side rail is up.
|
Provides space for placement of clean linen. Side rail ensures safety. |
16. Loosen bottom sheet, moving from head to foot of bed.
|
|
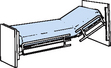
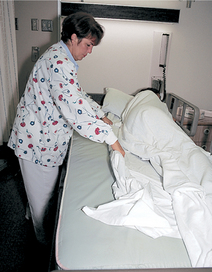
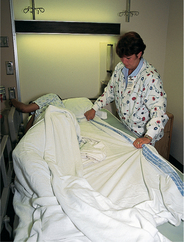
17. Fanfold first drawsheet and then bottom sheet towards patient (see illustration). Tuck edges of linen just under buttocks, back and shoulders. Do not fanfold mattress pad if it is to be reused.
|
Provides maximum work space for placing clean linen. Later, when patient turns to other side, soiled linen can easily be removed. |
18. Wipe off moisture on mattress with towel and appropriate disinfectant.
|
Reduces transmission of microorganisms. |
19. Apply clean linen to exposed half of bed:
|
|
| |
a. Place clean mattress pad on bed by folding it lengthwise with centre crease in middle of bed. Fanfold top layer over mattress. (If pad is reused, simply smooth out wrinkles.)
|
Applying linen over bed in successive layers minimises energy and time nurse uses in bedmaking. |
| |
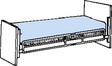
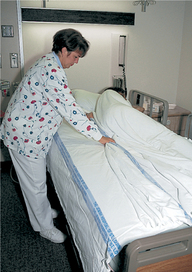
b. Unfold bottom sheet lengthwise so centre crease is situated lengthwise along centre of bed. Fanfold sheet’s top layer towards centre of bed alongside patient (see illustration). Smooth bottom layer of sheet over mattress, and bring edge over near side. Allow sheet’s edge to hang about 25 cm over mattress edge. Lower hem of bottom sheet should lie seam down and even with bottom edge of mattress.
|
Proper positioning of linen on one side ensures that adequate linen will be available to cover opposite side of bed. Keeping seam edges down eliminates irritation to patient’s skin. |
|
|
|
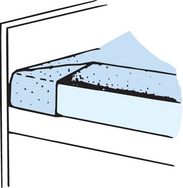
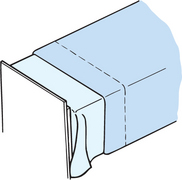
20. Mitre bottom sheet at head of bed:
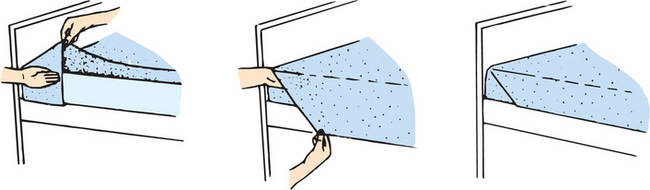
a. Face head of bed diagonally. Place hand away from head of bed under top corner of mattress, near mattress edge, and lift. b. With other hand, tuck top edge of bottom sheet smoothly under mattress so side edges of sheet above and below mattress would meet if brought together. c. Face side of bed, and pick up top edge of sheet at approximately 45 cm down from top of mattress (see illustration). d. Lift sheet, and lay it on top of mattress to form neat triangular fold, with lower base of triangle even with mattress side edge (see illustration). e. Tuck lower edge of sheet, which is hanging free below mattress, under mattress (see illustration). Tuck with palms down without pulling triangular fold. f. Hold part of sheet covering side edge of mattress in place with one hand. With other hand, pick up top of triangular linen fold, and bring it down over side of mattress. Tuck this portion of sheet under mattress (see illustrations).
|
Mitred corner cannot be loosened easily, even if patient moves about frequently in bed. |
|
|
|
|
|
|
|
|
|
21. Tuck remaining part of sheet under mattress, moving towards foot of bed. Keep sheet smooth.
|
Folds of sheet are a source of irritation. |
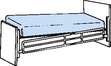
22. Optional: Open drawsheet so it unfolds in half. Lay centre fold along middle of bed lengthwise, and position sheet so it will be under buttocks and torso (see illustration). Fanfold top layer towards patient with edge alongside back. Smooth bottom layer out over mattress and tuck excess edge under mattress (keep palms down).
|
Drawsheet is used to lift and reposition patient. Placement distributes most of bodyweight over sheet. |
23. Place waterproof pad over drawsheet with centre fold against patient’s side. Fanfold far half towards patient.
|
Used to protect bedclothes from soiling. |
24. Raise side rail on working side, and go to other side.
|
Maintains safety. |
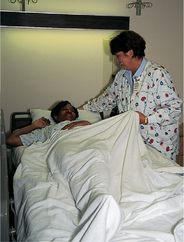
25. Lower side rail. Help patient to roll slowly onto other side, over folds of linen (see illustration).
|
Exposes opposite side of bed for removal of soiled linen and placement of clean linen. |
|
|
|
26. Loosen edge of soiled linen from underneath mattress.
|
Makes linen easier to remove. |
27. Without allowing dirty linen to touch uniform, remove soiled linen by folding it into a bundle or square, with soiled side turned in. Discard it into linen bag.
|
Reduces transmission of microorganisms. |
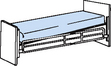
28. Spread clean, fanfolded linen smoothly over edge of mattress from head to foot of bed (see illustration).
|
Smooth linen will not irritate patient’s skin. |
29. Help patient roll back into supine position. Reposition pillow.
|
Patient’s comfort is maintained. |
30. Mitre corner of bottom sheet at foot of bed (see Step 20). When tucking corner, be sure sheet is smooth and free of wrinkles.
|
Wrinkles and folds can cause mechanical irritation to skin. |
31. Facing side of bed, grasp remaining edge of bottom sheet, keep back straight, and pull as excess linen is tucked under mattress. Proceed from head to foot of bed. (Avoid lifting mattress during tucking to ensure fit.) Mitre remaining corners, keeping bottom sheet smooth.
|
Proper use of body mechanics while tucking linen prevents injury to nurse. |
32. Smooth fanfolded drawsheet over bottom sheet. Grasp edge of sheet with palms down, lean back and tuck sheet under mattress. Tuck from middle to top and to bottom.
|
Tucking first at top or bottom may pull sheet sideways, causing poor fit. |
33. Place top sheet over patient with centre fold lengthwise down middle of bed. Open sheet from head to foot, and unfold it over patient (see illustration).
|
Sheet should be equally distributed over bed by correctly positioning centre fold. |
|
|
|
34. Without allowing dirty linen to touch uniform, ask patient to hold clean top sheet, or tuck sheet around shoulders. Remove bath blanket, and discard it into linen bag.
|
Sheet prevents exposure of body parts. Having patient hold sheet encourages participation in care. |
35. Place blanket on bed, unfolding it so that crease runs lengthwise along middle of bed. Unfold blanket to cover patient. Top edge should be parallel with edge of top sheet and 15–20 cm down from top sheet’s edge.
|
Blanket should be placed to cover patient completely and provide adequate warmth. |
36. Place bedspread over bed according to Step 35. Be sure top edge extends about 2.5 cm above blanket’s edge. Tuck top edge over and under top edge of blanket.
|
Bedspread gives bed neat appearance and provides extra warmth. |
37. Make cuff by turning edge of top sheet down over top edge of blanket and bedspread.
|
Smooth cuff protects patient’s face from rubbing against blanket or bedspread. |
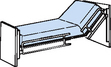
38. Standing on one side at foot of bed, lift mattress corner slightly with one hand, and tuck top bedclothes under mattress. Top sheet and blanket are tucked under together. Be sure they are loose enough to allow for movement of patient’s feet. Horizontal toe pleat may be made (see illustration).
|
Tucking all top bedclothes together gives neat appearance. Pressure sores can develop on patient’s toes and heels from feet rubbing between tight-fitting bed sheets. |
| |
|
39. Make modified mitred corner with top sheet, blanket and bedspread:
a. Pick up side edge of top sheet, blanket and bedspread approximately 45 cm up from foot of mattress. Lift to form triangular fold, and lay it on bed. b. Tuck lower edge of sheet, which is hanging free below mattress, under mattress. Do not pull triangular fold. c. Pick up triangular fold, and bring it down over mattress while holding bedclothes in place along side of mattress. Do not tuck tip of triangle.
|
Modified mitred corner secures top bedclothes but keeps an even edge of blanket and top sheet draped over mattress. |
40. Raise side rail. Make other side of bed; spread top sheet, blanket and bedspread out evenly; fold top edge of bedspread over blanket, and make cuff with top sheet (see Step 37); make modified mitred corner at foot of bed (see Step 39).
|
Side rail protects patient from accidental falls. |
41. Change pillowcase:
a. Have patient raise head. While supporting neck with one hand, remove pillow. b. Remove soiled case and discard into linen bag. c. Grasp clean pillowcase at centre of closed end. Gather case, turning it inside out over hand holding it. With same hand, pick up middle of one end of pillow. Pull pillowcase down over pillow with other hand and be sure pillow corners fit evenly in corners of pillowcase.
|
Prevents injury during flexion and extension of neck.
Method makes it easy to slide pillowcase over pillow. Poorly fitting case constricts fluffing and expansion of pillow.
|
42. Support patient’s head under neck, and place pillow under head.
|
Prevents hyperextension of neck muscles. |
43. Place call light within patient’s reach; return bed to comfortable position.
|
Ensures safety and comfort. |
44. Open room curtains. Rearrange furniture. Place personal items within easy reach on overbed table or bedside stand. Return bed to comfortable height.
|
Promotes sense of wellbeing. |
45. Place dirty linen in main dirty linen bag or chute; wash hands.
|
Prevents transmission of microorganisms. |