Chapter Eight Physical assessment techniques
The health history described in the preceding chapters provides subjective data for health assessment, the individual’s own perception of the health state. This chapter presents objective data, the signs perceived by the examiner through the physical examination.
This chapter will enable you to develop the physical examination skills that are the basis for assessment of all body systems. These skills, as well as knowledge of normal anatomy and physiology and pathophysiology, enable you to look for, rather than merely look at. Consider a statement by the eighteenth-century German poet Goethe: ‘We see only what we know’. To recognise a significant finding, you need to know what to look for and to do that you need to have an adequate collection of information in order to identify the impact of symptoms on function and level of safety risk for the patient.
CULTIVATING YOUR SENSES
You will use your senses—sight, smell, touch and hearing—to gather data during the physical examination. You always have perceived the world through your senses, but now they will be focused in a new way. Applying your senses to assess each person’s health state may seem awkward at first, but this will be polished with repetition and practice. The skills required for physical examination are inspection, palpation, percussion and auscultation. The skills are performed one at a time and usually in this order with the exception of abdominal assessment—see Chapter 19.
Inspection
Inspection is concentrated observation. It is close, careful scrutiny, first of the person as a whole and then of each body system. Inspection begins the moment you first meet the person and develop a ‘general survey’ (specific data to consider for the general survey are presented in the following chapter). Inspection is always the first assessment technique you will use during physical examination. You can begin your general survey of the person while you are talking with them about their health history. Then as you move through each relevant body system you will also begin with a detailed inspection (an outline of the areas for inspection will be presented in each body system chapter). A detailed inspection takes time and yields a surprising amount of data.
Learn to use each person as their own control and compare the right and left sides of the body. The two sides are nearly symmetrical. Inspection requires good lighting and adequate exposure of the body part being assessed. In some circumstances you need to use equipment (for example, an otoscope, penlight torch) to enhance your own sense of vision.
Palpation
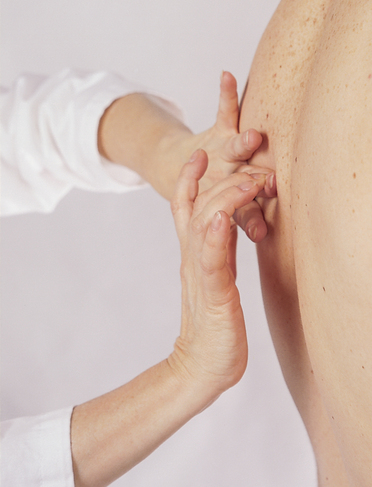
Palpation involves the use of touch during physical examination and usually follows focused inspection. Palpation is used to assess: texture, temperature, moisture, organ location and size, as well as any swelling, vibration or pulsation, rigidity or spasticity, crepitation of joints, presence of lumps or masses and presence of tenderness or pain. Different parts of the hands are best suited for assessing different factors:
• Fingertips—best for fine tactile discrimination, as of skin texture, swelling, pulsation and determining presence of lumps
• A grasping action of the fingers and thumb—to detect the position, shape and consistency of an organ or mass
• The dorsa (backs) of hands and fingers—best for determining temperature because the skin here is thinner than on the palms
• Base of fingers (metacarpophalangeal joints) or ulnar surface of the hand—best for vibration.
You should always wash your hands or apply a suitable skin antiseptic before touching the person and at the end of the physical examination. It is not necessary to use gloves every time you perform a palpation technique. Throughout the subsequent chapters you will be prompted about when it is necessary to use gloves. You should be guided by standard infection control precautions (see Table 8.1) and hospital or healthcare agency policy.
TABLE 8.1 Standard precautions for use with all patients
Source: National Health and Medical Research Council, 2010: Australian guidelines for the prevention and control of infection in health care, Commonwealth of Australia. Available at http://www.nhmrc.gov.au/_files_nhmrc/file/publications/synopses/CD33_InfectionControlGuidelines2010.pdf
Your palpation technique should be slow and systematic. A person stiffens when touched suddenly, making it difficult for you to feel very much. Use a calm, gentle approach and inform the person about what you are going to do to them. Warm your hands by rubbing them together or holding them under warm water. Identify any tender areas, and palpate them last.
There are three palpation techniques: light palpation, deep palpation and bimanual palpation. Light palpation involves the use of the gentle pressure from the finger pads of your dominant hand. You need to place the flattened finger pads onto the skin surface (keeping the fingers together) and apply gentle pressure to the body surface (approximately 1–2 cm deep depending on the part of the body being assessed) while moving the fingers in a gentle, slow, circular motion. Move the hand and cover the entire surface to be examined, noting the findings as you progress. Always start with light palpation to detect surface characteristics. For example, you would use light palpation to assess swelling, crepitation, range of movement and pain in an injured joint.
Deep palpation follows light palpation and is usually only performed as part of abdominal assessment. The technique for deep palpation is similar to light palpation; however, the skin surface is more deeply depressed with the fingers. The actual depth of deep palpation is largely dependent on the amount of abdominal fat the person has. For a person with a normal body mass index you may only need to palpate to a depth of 2.5 cm to evaluate abdominal contents, whereas for a person who is obese you may have to palpate to a depth of 5 cm to be able to evaluate abdominal contents. When deep palpation is needed (as for abdominal examination), intermittent pressure is better than one long continuous palpation. You should not progress from light to deep palpation when the person complains of pain or when traumatic abdominal injury is suspected as you could cause further pain or even injury to the person. You should always refer the person to a medical practitioner when you detect significant abdominal pain or discomfort on light palpation.
Bimanual palpation requires the use of both of your hands to envelop or capture certain body parts or organs—such as the spleen, liver, kidneys, uterus, ovaries—for more precise examination of the size, shape. This is the least utilised palpation technique for most nurses. This technique will be further described in subsequent chapters.
Percussion
Percussion involves tapping the person’s skin with short, sharp strokes to assess underlying structures. The strokes yield a palpable vibration and a characteristic sound that depicts the location, size and density of the underlying organ. Percussion has the following uses:
• Mapping out the location and size of an organ by exploring where the percussion note changes between the borders of an organ and its neighbours
• Signalling the density (air, fluid or solid) of a structure by a characteristic note
• Detecting an abnormal mass if it is fairly superficial; the percussion vibrations penetrate about 5 cm deep—a deeper mass would give no change in percussion
• Eliciting pain if the underlying structure is inflamed, as with maxillary sinus areas or over a kidney
• Eliciting a deep tendon reflex using the percussion hammer.
Two methods of percussion can be used—direct (sometimes called immediate) and indirect (or mediate). The technique of direct percussion involves the striking hand directly contacting the body wall producing a sound. However, indirect percussion is the technique most commonly used in a nursing health assessment and involves the use of both hands, most commonly in abdominal assessment. The striking hand contacts the stationary hand fixed on the person’s skin. This yields a sound and a subtle vibration. The procedure of indirect percussion is as follows.
The stationary hand
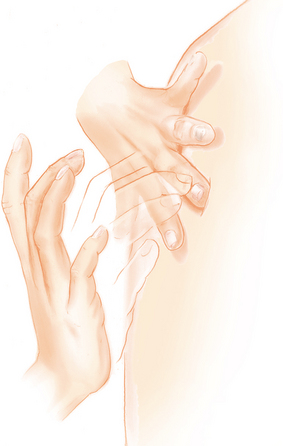
Hyperextend the middle finger (sometimes called the pleximeter) and/or index finger of your non-dominant hand and place the distal portion, the phalanx and distal interphalangeal joint, firmly against the person’s skin, for example over the abdominal skin. Avoid the person’s ribs and scapulae. Percussing over a bone yields no data because it always sounds ‘dull’. Lift the rest of the stationary hand (finger tips, other fingers, thumb and heel of the hand) up off the person’s skin (Fig 8.1). Otherwise the resting hand will dampen off the produced vibrations, just as a drummer uses the hand to halt a drum roll.
The striking hand
Use the middle finger of your dominant hand as the striking finger (sometimes called the plexor) (Fig 8.2). Hold your forearm close to the skin surface, with your upper arm and shoulder steady. Scan your muscles to make sure they are steady but not rigid. The action is all in the wrist, and it must be relaxed. Spread your fingers, move from the wrist in a hammer-like motion, and bounce your middle finger off the stationary one. Aim for just behind the nail bed or at the distal interphalangeal joint; the goal is to hit the portion of the finger that is pushing the hardest into the skin surface. Flex the striking finger so that its tip, not the finger pad, makes contact. It hits directly at right angles to the stationary finger.
Percuss two times in this location using even, staccato blows. Lift the striking finger off quickly; a resting finger damps off vibrations. Then move to a new body location and repeat, keeping your technique even. The force of the blow determines the loudness of the note. You do not need a very loud sound; use just enough force to achieve a clear note. The thickness of the person’s body wall will be a factor. You will need a stronger percussion stroke for people with obese or very muscular body walls.
Percussion can be an awkward technique for beginning examiners. You may feel surprised and embarrassed if your striking finger misses your stationary hand completely. It will hurt if your nails are too long. As with all new skills, refinement follows practice. After a few weeks your hand placement becomes precise and feels natural, and your ears learn to perceive the subtle difference in percussion notes.
Production of sound
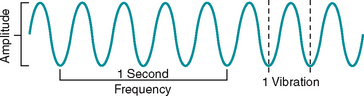
All sound results from vibration of some structure (Fig 8.3). Percussing over a body structure causes vibrations that produce characteristic waves and are heard as ‘notes’ (see Table 8.2). Each of the five percussion notes is differentiated by the following components:
1. Amplitude (or intensity), a loud or soft sound. The louder the sound, the greater the amplitude. Loudness depends on the force of the blow and the structure’s ability to vibrate.
2. Pitch (or frequency), the number of vibrations per second, written as ‘cps’, or cycles per second. More rapid vibrations produce a high-pitched tone; slower vibrations yield a low-pitched tone.
3. Quality (timbre), a subjective difference due to a sound’s distinctive overtones. A pure tone is a sound of one frequency. Variations within a sound wave produce overtones. Overtones allow you to distinguish a C on a piano from a C on a violin.
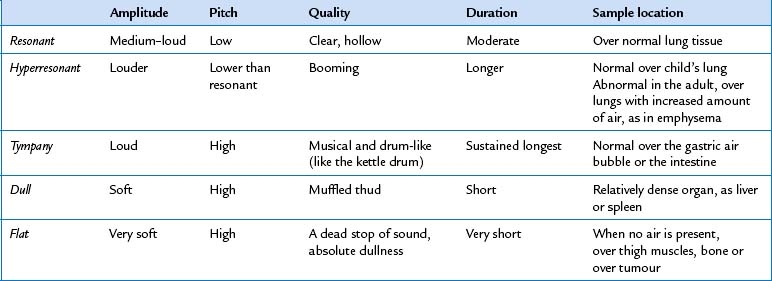
A basic principle is that a structure with relatively more air (such as the lungs) produces a louder, deeper and longer sound because it vibrates freely, whereas a denser, more solid structure (such as the liver) gives a softer, higher, shorter sound because it does not vibrate as easily. Although Table 8.2 describes five ‘normal’ percussion notes, variations occur in clinical practice. The quality of the percussion note will be affected by the thickness of the body wall. Do not learn these various notes just from written description. Practise on a willing partner.
Auscultation
Auscultation is listening to sounds produced by the body, such as the heart and blood vessels and the lungs and abdomen. It is likely that you already have heard certain body sounds with your ear alone—for example, the harsh gurgling of very congested breathing. However, most body sounds are very soft and must be channelled through a stethoscope for you to evaluate them. The stethoscope does not magnify sound but does block out extraneous room sounds. Of all the equipment you will use, the stethoscope quickly becomes a very personal instrument. Take time to learn its features and to fit one individually to yourself.
The fit and quality of the stethoscope are important and you are advised to purchase a quality instrument for your own personal use. You cannot assess what you cannot hear through a poor instrument. The slope of the earpiece should point forward towards your nose. This matches the natural slope of your ear canal and efficiently blocks out environmental sound. If necessary, twist the earpieces to parallel the slope of your ear canals. The earpieces should fit snugly, but if they hurt, they are inserted too far. Adjust the tension and experiment with different rubber or plastic earplugs to achieve the most comfort. The tubing should be of thick material, with an internal diameter of 4 mm, and about 36 to 46 cm long. Longer tubing may distort the sound.
Choose a stethoscope with two endpieces—a diaphragm and a bell (Fig 8.4). You will use the diaphragm most often because its flat edge is best for high-pitched sounds—breath, bowel and normal heart sounds. Hold the diaphragm firmly against the person’s skin—firm enough to leave a slight ring afterward. The bell endpiece has a deep, hollow cup-like shape. It is best for soft, low-pitched sounds such as extra heart sounds or murmurs. Hold it lightly against the person’s skin—just enough that it forms a perfect seal. Any harder causes the person’s skin to act as a diaphragm, obliterating the low-pitched sounds.

Some stethoscopes have one endpiece with a ‘tunable diaphragm’. This enables you to listen to both low and high frequency sounds without rotation of the endpiece. For low frequency sounds (traditional bell mode) hold the endpiece very lightly on the skin; for high frequency sounds (traditional diaphragm mode) press the endpiece firmly on the skin.
Before you can evaluate body sounds, you must eliminate any confusing artifacts:
• Any extra room noise can produce a ‘roaring’ in your stethoscope, so the room must be quiet.
• Keep the examination room warm. If the person starts shivering, the involuntary muscle contractions could drown out other sounds.
• Warm the stethoscope by rubbing it in your palm.
• The friction on the endpiece from a man’s hairy chest causes a crackling sound that mimics an abnormal breath sound called crackles. To minimise this problem, wet the hair before auscultating the area.
• Never listen through clothing. Where possible ask the person to remove clothing. In situations where this is not possible you will need to place the stethoscope under the clothing to listen, but take care that no clothing rubs on the stethoscope.
• Finally, avoid your own ‘artifact’, such as breathing on the tubing or the ‘thump’ from bumping the tubing together.
Auscultation is a skill that beginning examiners are eager to learn, but one that is difficult to master. First you must learn the wide range of normal sounds. Once you can recognise normal sounds, you can distinguish the abnormal sounds and ‘extra’ sounds. Be aware that in some body locations you may hear more than one sound; this can be confusing. You will need to listen selectively, to only one thing at a time. As you listen, ask yourself: ‘What am I actually hearing? … What should I be hearing at this spot?’
SETTING
Often nurses are conducting health assessments in busy ward or clinic situations, which are noisy and lack privacy. However, where possible the setting for the physical examination should be warm and comfortable, quiet, private and well lit. Try to eliminate any distracting noises—such as humming machinery, radio or television, or people talking—that could make it difficult to hear body sounds. Your time with the individual should be secure from interruptions from other healthcare personnel. Lighting with natural daylight is best, although it is often not available; artificial light from two sources will suffice and will prevent shadows.
Where possible, position the examination table or bed so that both sides of the person are easily accessible. The bed should be at a height at which you can stand without stooping and should be equipped to raise the person’s head up to 45 degrees. A bedside locker or table is needed to lay out all your equipment.
EQUIPMENT
During the examination, you do not want to be searching for equipment or to have to leave the room to find an item. Have all your equipment at easy reach and laid out in an organised fashion. The equipment used will depend on the purpose of the examination (for example, a comprehensive screening examination, focussed screening examination or examination related to specific body systems). Each chapter outlines the specific equipment required. Most of the equipment is described as it comes into use throughout the text.
Designate a ‘clean’ versus a ‘used’ area for handling of your equipment. In a hospital setting, you may use the bedside stand for your clean surface and the overbed table for the used equipment surface. Or in a clinic setting, use two separate areas of the pull-up table. Distinguish the clean area by one or two disposable paper towels. On the towels, place all the new, newly cleaned or newly alcohol-swabbed equipment that you will use on this patient. Use alcohol swabs to clean all equipment that you carry from patient to patient (e.g. your stethoscope endpieces, the reflex hammer, ruler). As you proceed through the examination, pick up each piece of equipment from the clean area and, after use on the patient, relegate it to the used area or (as in the case of tongue blades, gloves) throw directly in the rubbish bin.
A SAFER ENVIRONMENT
In addition to monitoring the cleanliness of your equipment, take all steps to avoid any possible transmission of infection between patients or between patient and examiner. A nosocomial infection (an infection acquired during hospitalisation) is a hazard because hospitals have sites that are possible reservoirs for virulent microorganisms. Some of these microorganisms have become resistant to antibiotics, such as methicillin-resistant Staphylococcus aureus (MRSA), vancomycin-resistant Enterococcus (VRE) or multidrug-resistant tuberculosis.
The single most important step to decrease risk of microorganism transmission is hand hygiene. Hospitals and other healthcare facilities now have dispensers mounted on the wall outside every patient room or bed area. These dispensers contain a waterless, quick-drying, antiseptic solution for hand cleansing before you have any contact with the patient, their bed linen or belongings; before a procedure, after touching a patient or their surroundings and after a procedure or where there is any risk that you were exposed to body fluids (World Health Organization (WHO), 2009). You can use an alcohol-based hand rub in all situations where your hands are visibly clean. You will need to wash hands with soap and water after inadvertent contact with blood, body fluids, secretions and excretions; and after contact with any equipment contaminated with body fluid (Hand Hygiene Australia, 2011). The reader is also referred to the WHO (2006) ‘Your 5 Moments for Hand Hygiene’ guidelines which are a strategy to improve hand hygiene.
Wear disposable gloves when the potential exists for contact with any body fluids (e.g. blood, urine, faeces, mucous membranes, drainage, open skin lesions). Wearing disposable gloves is not a protective substitute to hand hygiene, however, because gloves may have undetectable holes or may become torn during use, or hands may become contaminated as gloves are removed. Routine hand hygiene should be performed after removing gloves. In most cases it is not necessary to use sterile gloves. Sterile gloves must be worn for aseptic procedures and contact with sterile body sites. Wear a gown, mask and protective eyewear when the potential exists for any blood or body fluid spattering (e.g. suctioning, arterial puncture) or if a patient is on transmission-based precautions. Gloves are always changed between activities. In addition, be sure to clean the over bed table after you have used it as an equipment surface.
The Australian Guidelines for the Prevention and Control of Infection in Health Care (National Health and Medical Research Council (NHMRC), 2010) describe important aspects of infection prevention and control. A significant part of the guidelines describes a two-tiered approach involving effective work practices that minimise the risk of selection and transmission of infectious agents (NHMRC, 2010: 18).
Standard precautions (see Table 8.1) relate to the routine application of basic infection control strategies to minimise risk to patients and healthcare workers, such as hand hygiene, personal protective equipment, cleaning and appropriate handling of equipment and disposal of sharps (NHMRC, 2010: 22). The second-tier infection control strategy involves extra work practices in situations where standard precautions alone are insufficient to prevent transmission. These are known as transmission-based precautions. These involve interventions that interrupt the mode of transmission of infections—droplet precautions, airborne precautions depending on the infective agent. Examples of such precautions include isolation of a patient, wearing specific personal protective equipment and having specific equipment for that patient only (NHMRC, 2010: 23).
Clinical alert
Do not let your stethoscope become a staph-oscope! Stethoscopes and other equipment that are frequently used on many patients can become a common vehicle for transmission of infection. (Since your stethoscope touches many people, clean the endpieces with an alcohol swab or wipe to eliminate a possible vector of infection.) It is important to clean your stethoscope endpieces between patients.
THE CLINICAL SETTING
General approach
Consider your emotional state and that of the person being examined. The person is usually anxious due to the anticipation of being examined by a stranger and the unknown outcome of the examination. If anxiety can be reduced, the person will feel more comfortable and the data gathered will more closely describe the person’s natural state. Anxiety can be reduced by an examiner who is confident and self-assured, as well as considerate and unhurried.
Usually, a beginning examiner feels anything but self-assured! Most worry about their technical skill, about missing something significant or about forgetting a step. Many are embarrassed themselves about encountering a partially dressed individual. All these fears are natural and common. The best way to minimise them is with a lot of practice on a healthy willing subject, usually a fellow student. You have to feel comfortable with your motor skills before you can absorb what you are actually seeing or hearing in a ‘real’ person. This comes with practice under the guidance of an experienced tutor, in an atmosphere in which it is acceptable to make mistakes and to ask questions. Your subject should ‘act like a patient’ so that you can deal with the ‘real’ situation while still in a safe setting. After you feel comfortable with the laboratory setting, accompany your tutor as they examine an actual patient so that you can observe an experienced examiner. You will have already established rapport with the person while taking their health history. You need to take the opportunity to make sure that the person understands the purpose of the physical examination and types of examination that will be performed.
Hands on
With this preparation, it is possible to interact with the person in a confident manner. The extent and focus of the physical examination is dependent on the purpose and context of the assessment. In most situations the extent and focus of the physical examination is directed by the person’s presenting signs and symptoms. However, some nurses routinely conduct comprehensive health assessments where all body systems are examined. Regardless of the purpose of the assessment, begin by measuring the person’s temperature, pulse, respirations and blood pressure (Ch 9) and pain (Ch 10). All of these are familiar, relatively nonthreatening actions; they will gradually accustom the person to the examination. Make sure you cleanse your hands in the person’s presence. This indicates you are protective of this person and are starting fresh for them. Explain each step in the examination and how the person can cooperate. Encourage the person to ask questions. Keep your own movements slow, methodical and deliberate.
As you proceed through the examination, avoid distractions and concentrate on one step at a time. The sequence of the steps may differ depending on the extent of the assessment, the age of the person and your own preference. However, you should establish a system that works for you and stick to it to avoid omissions. Organise the steps so the person does not change positions too often and watch out for your patient getting tired. Providing rest breaks might be necessary for very sick or elderly patients. Although proper exposure is necessary, use additional drapes to maintain the person’s privacy and to prevent chilling.
Do not hesitate to write out the examination sequence and refer to it as you proceed. The person will accept this as quite natural if you explain you are making brief notations to ensure accuracy. Many agencies use a printed form. You will find that you will glance at the form less and less as you gain experience. Even with a form, you sometimes may forget a step in the examination. When you realise this, perform the manoeuvre in the next logical place in the sequence. (See Ch 29 for the sequence of steps in the complete physical examination.)
As you proceed through the examination, occasionally offer some brief teaching about the person’s body. For example, you might say, ‘This tapping on your back (percussion) is a little like playing different drums. The different notes I hear tell me where each organ starts and stops. You probably can hear the difference yourself from within your body’. Or, ‘Everyone has two sounds for each heartbeat, something like this—lub-dup. Your own beats sound normal’. Do not do this with every single step, or you will be hard pressed to make a comment when you do come across an abnormality. But some sharing of information builds rapport and increases the person’s confidence in you as an examiner. It also gives the person a little more control in a situation in which it is easy to feel completely helpless.
At some point, you will want to linger in one location to concentrate on some complicated findings. To avoid anxiety, tell the person, ‘I always listen to heart sounds on a number of places on the chest. Just because I am listening a long time does not necessarily mean anything is wrong with you’. And it follows that sometimes you will discover a finding that may be abnormal and you want another examiner to double-check. You need to give the person some information, yet you should not alarm the person unnecessarily. Say something like, ‘I do not have a complete assessment of your heart sounds. I want Ms Wright to listen to you too’.
At the end of the examination, summarise your findings and share the necessary information with the person. Thank the person for the time spent. In a hospital setting, appraise the person of what is scheduled next. Before you leave a hospitalised person, lower the bed; make the person comfortable and safe; put the call bell within reach; and return the bedside table, television or any equipment to the way it was originally.
DEVELOPMENTAL CONSIDERATIONS
Children are different from adults. Their difference in size is obvious. Their bodies grow in a predictable pattern that is assessed during the physical examination. However, their behaviour is also different. Behaviour grows and develops through predictable stages, just as the body does. Each examiner needs to know the expected emotional and cognitive features of these stages and to perform the physical examination based on developmental principles (Berk, 2010; Hockenberry and Wilson, 2011).
With all children, the goal is to increase their comfort in the setting. This approach reveals their natural state as much as possible and will give them a more positive memory of healthcare providers. Remember that a ‘routine’ examination is anything but routine to the child. You can increase their comfort by attending to the following developmental principles and approaches. The order of the developmental stages is more meaningful than the exact chronological age. Each child is an individual and will not fit exactly into one category. For example, if your efforts to ‘play games’ with the preschooler are rebuffed, modify your approach to the security measures used with the toddler.
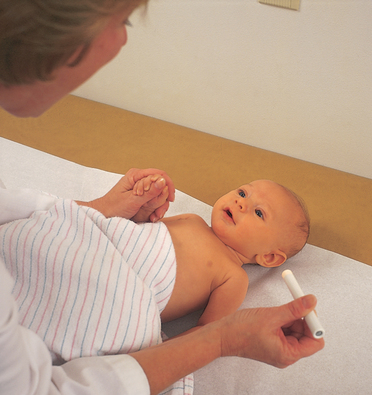
The infant (birth to 1 year)
Erikson defines the major task of infancy as establishing trust. An infant is completely dependent on the parent for their basic needs. If these needs are met promptly and consistently, the infant feels secure and learns to trust others.
Position
• The parent/guardian always should be present for the child’s feeling of security.
• Place the neonate or young infant flat on a padded examination table (Fig 8.5). The infant may also be held against the parent’s chest for some steps.
• Once the baby can sit without support (around 6 months), as much of the examination as possible should be performed while the infant is in the parent’s lap.
• By 9 to 12 months, the infant is acutely aware of the surroundings. Anything outside the infant’s range of vision is ‘lost’, so the parent must be in full view.
Preparation
• Timing should be 1 to 2 hours after feeding, when the baby is not too drowsy or too hungry.
• Maintain a warm environment. A neonate may require an overhead radiant heater.
• An infant will not object to being naked. Have the parent remove outer clothing, but leave a nappy on a boy.
• An infant does not mind being touched, but make sure your hands and stethoscope endpiece are warm.
• Use a soft, crooning voice during the examination; the baby responds more to the feeling in the tone of the voice than to what is actually said.
• An infant likes eye contact; lock eyes from time to time.
• Smile; a baby prefers a smiling face to a frowning one. (Often beginning examiners are so absorbed in their technique that they look serious or stern.) Take time to play.
• Keep movements smooth and deliberate, not jerky.
Sequence
• Seize the opportunity with a sleeping baby to listen to heart, lung and abdomen sounds first.
• Perform least distressing steps first. (See the sequence in Ch 29.) Save the invasive steps of examination of the eye, ear, nose and throat until last.
• Elicit the Moro or ‘startle’ reflex at the end of the examination because it may cause the baby to cry.
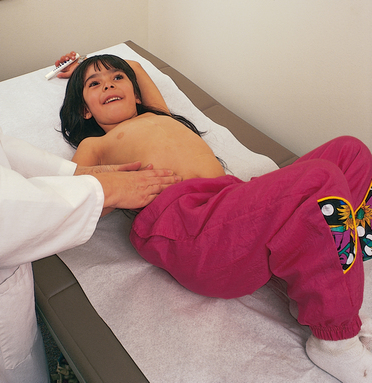
The toddler (1–3 years)
This is Erikson’s stage of developing autonomy. However, the need to explore the world and be independent is in conflict with the basic dependency on the parent. This often results in frustration and negativism. The toddler may be difficult to examine; do not take this personally. Since they are acutely aware of the new environment, the toddler may be frightened and cling to the parent. Also, the toddler has fear of invasive procedures and dislikes being restrained (Fig 8.6).

Position
• The toddler should be sitting up on the parent’s lap for all of the examination. When the toddler must be supine (as in the abdominal examination), move chairs to sit knee-to-knee with the parent. Have the toddler lie in the parent’s lap with the toddler’s legs in your lap.
• Enlist the aid of a cooperative parent to help position the toddler during invasive procedures. The child’s legs can be captured between the parent’s. An arm of the parent can encircle the child’s head, holding it against the chest, and the other arm can hold the child’s arms.
Preparation
• Children 1 or 2 years of age can understand symbols, so a security object, such as a special blanket or teddy bear, is helpful.
• Begin by greeting the child and the accompanying parent by name, but with a child 1 to 6 years old, focus more on the parent. By essentially ‘ignoring’ the child at first, you allow the child to adjust gradually and to size you up from a safe distance. Then turn your attention gradually to the child, at first to a toy or object the child is holding, or perhaps to compliment a dress, the hair or what a big girl or boy the child is. If the child is ready, you will note these signals: eye contact with you, smiling, talking with you or accepting a toy or a piece of equipment.
• A 2-year-old child does not like to take off their clothes; have the parent undress the child one part at a time.
• Children 1 or 2 years of age like to say ‘No’. Do not offer a choice when there really is none. Avoid saying, ‘May I listen to your heart now?’ When the 1- or 2-year-old child says ‘No’, and you go ahead and do it anyway, you lose trust. Instead, use clear firm instructions, in a tone that expects cooperation, ‘Now it is time for you to lie down so I can check your tummy’.
• Also, 1- or 2-year-old children like to make choices. When possible, enhance autonomy by offering the limited option: ‘Shall I listen to your heart next, or your tummy?’
Sequence
• Collect some objective data during the history, which is a less stressful time. While you are focusing on the parent, note the child’s gross motor and fine motor skills and gait.
• Begin with ‘games’, such as the Denver II test (Ch 3) or cranial nerve testing (Ch 22).
• Start with nonthreatening areas. Save distressing procedures—such as examination of the head, ear, nose or throat—for last.
The preschool child (3–5 or 6 years)
The child at this stage displays developing initiative. The preschooler takes on tasks independently and plans the task and sees it through. A child of this age is often cooperative, helpful and easy to involve. However, children of this age have fantasies and may see illness as punishment for being ‘bad’. The concept of body image is limited. The child fears any body injury or mutilation, so they will recoil from invasive procedures (e.g. tongue blade, rectal temperature, injection and venepuncture).
Preparation
• A preschooler can talk. Verbal communication becomes helpful now, but remember that the child’s understanding is still limited. Use short, simple explanations.
• The preschooler is usually willing to undress. Leave underpants on until the genital examination.
• Talk to the child and explain the steps in the examination exactly.
• Do not allow a choice when there is none.
• As with the toddler, enhance the autonomy of the preschooler by offering choice when possible.
• Allow the child to play with equipment to reduce fears.
• A preschooler likes to help; have the child hold the stethoscope for you.
• Use games. Have the child ‘blow out’ the light on the penlight as you listen to the breath sounds. Or, pretend to listen to the heart sounds of the child’s teddy bear first. One technique that is absorbing to a preschooler is to trace their shape on the examining table paper (Hockenberry and Wilson, 2007). You can comment on how big the child is, then fill in the outline with a heart or stomach and listen to this paper doll first. After the examination, the child can take the paper doll home as a souvenir.
• Use a slow, patient, deliberate approach. Do not rush.
• During the examination give the preschooler needed feedback and reassurance: ‘Your tummy feels just fine’.
The school-age child (6–12 years)
During the school-age period, the major task of the child is developing industry. The child is developing basic competency in school and in social networks and desires the approval of parents and teachers. When successful, the child has a feeling of accomplishment. During the examination, the child is cooperative and is interested in learning about the body. Language is more sophisticated now, but do not overestimate and treat the school-age child as a small adult. The child’s level of understanding does not match that of their speech.
Preparation
• Break the ice with small talk about family, school, friends, music or sports.
• The child should undress themself, leave underpants on, and use a gown and drape.
• Demonstrate equipment—a school-age child is curious to know how equipment works.
• Comment on the body and how it works (Fig 8.7). An 8- or 9-year-old child has some understanding of the body and is interested to learn more. It is rewarding to see the child’s eyes light up when they hear the heart sounds.
The pre-adolescent/adolescent (10–19 years)
The major task of adolescence is developing a self-identity. This takes shape from various sets of values and different social roles (son or daughter, sibling and student). In the end, each person needs to feel satisfied and comfortable with whom they are. In the process, the adolescent is increasingly self-conscious and introspective. Peer group values and acceptance are important. It is important to gain the adolescent’s consent prior to assessment and to ensure confidentiality.
Preparation
• The body is changing rapidly. During the examination, the adolescent needs feedback that their own body is healthy and developing normally.
• The adolescent has keen awareness of body image, often comparing themself to peers. Appraise the adolescent of the wide variation among teenagers on the rate of growth and development.
• Communicate with some care. Do not treat the teenager like a child, but do not overestimate and treat them like an adult either.
• Since the person is idealistic at this age, the adolescent is ripe for health teaching. Positive attitudes developed now may last through adult life. Focus your teaching on ways the adolescent can promote wellness.
The adult over 65 years
During later years, the tasks are developing the meaning of life and one’s own existence and adjusting to changes in physical strength and health.
Preparation
• For the adult over 65, loss is inevitable, including changes in physical appearance of the face and body, declining energy level, loss of job through retirement, loss of financial security, loss of long-time home and death of friends or spouse. How the person adapts to these life stressors significantly affects health.
• Adjust examination pace to meet possible slowed pace of the frail older person.
• Do not mistake diminished vision or hearing for confusion. Confusion of sudden onset may signify a disease state. It is noted by short-term memory loss, diminished thought process, diminished attention span and labile emotions (Ch 21).
Amella EJ. Presentation of illness in older adults. Am J Nurs. 2004;104(10):40–52.
Berk LE. Development through the lifespan, 5th edn. Boston: Allyn and Bacon, 2010.
Gewanter B, Klein R, Jones S. Antibiotic-resistant bacteria on the rise. Am J Nurs. 2002;102(3):116.
Grayson L, Russo P, Ryan K, et al, Hand hygiene Australia manual. Australian Commission for Safety and Quality in Healthcare and World Health Organization, 2009. Available at http://www.hha.org.au/ForHealthcareWorkers.aspx.
Hand Hygiene Australia. The national hand hygiene initiative. Available at http://www.hha.org.au/.
Hockenberry M, Wilson D. Wong’s nursing care of infants and children, 9th edn. St Louis: Mosby, 2011.
Markel H. The stethoscope and the art of listening. N Engl J Med. 2006;354(6):551–553.
National Health and Medical Research Council, 2010: Australian guidelines for the prevention and control of infection in health care, Commonwealth of Australia. Available at http://www.nhmrc.gov.au/_files_nhmrc/file/publications/synopses/CD33_InfectionControlGuidelines2010.pdf.
O’Keefe M. Revitalizing the art of auscultation. JEMS. 2001;26(5):79–80.
Perkin RM, Van Stralen D. 20 things you may not know about pediatrics. JEMS. 2000;25(3):38–49.
Romero DV, Treston J, O’Sullivan AL. Hand-to-hand preventing MRSA. Nurse Pract. 2006;31(3):16–25.
Romig LE. PREP for peds: size-up & approach tips for pediatric calls. JEMS. 2001;26(5):24–33.
Schuster RJ, Weber ML. Noise in the ambulatory health care setting: How loud is too loud? J Ambul Care Manage. 2003;26(3):243–249.
Touhy TA. Ebersole and Hess’s gerontological nursing & healthy aging. St Louis: Mosby/Elsevier, 2010.
World Health Organization. Your 5 moments for hand hygiene. Available at http://www.who.int/gpsc/tools/5momentsHand Hygiene_A3.pdf.
World Health Organization. Guidelines on hand hygiene in health. Available at www.cec.health.nsw.gov.au/files/clean-hands/…/who-guidelines.pdf, 2009.