Medication Administration
A sound knowledge base is required for medications to be administered safely. Nurses need to be prepared to administer medications using a variety of routes. The following sections explain the steps involved in administering medications using various routes.
Oral Administration
The easiest and most desirable way to administer medications is by mouth (Skill 31-1 on pp. 612-615). Patients usually are able to ingest or self-administer oral medications with a minimum of problems. Food delays stomach emptying, which may decrease the therapeutic effects of oral medications. Therefore most oral medications reach their therapeutic action best if given 30 minutes to 1 hour before meals. In addition, some medications must be taken with food. Some situations contraindicate the patient’s receiving medications by mouth (see Table 31-5). Many medications interact with nutritional and herbal supplements. You need to be knowledgeable about these interactions to determine the best time to give oral medications.
An important precaution to take when administering any oral preparation is to protect patients from aspiration. Aspiration occurs when food, fluid, or medication intended for GI administration inadvertently enters the respiratory tract. Protect the patient from aspiration by assessing his or her ability to swallow. Box 31-14 provides techniques that protect patients from aspirating. Proper positioning is essential in preventing aspiration. Position a patient in a seated position at a 90-degree angle when administering oral medications if not contraindicated by his or her condition. Usually having the patient slightly flex the head in a chin-down position reduces aspiration. Use a multidisciplinary approach (e.g., speech therapist, dietitian, and occupational therapist) with patients who have difficulty swallowing (Eisenstadt, 2010).
Special consideration is needed when administering medications to patients with enteral or small-bore feeding tubes (Box 31-15). Failing to follow current evidence-based recommendations from the American Society for Parenteral and Enteral Nutrition (ASPEN) can result in tube obstruction, reduced medication effectiveness, and increased risk of medication toxicity (Boullata, 2009). Before giving a medication by this route, verify that the location of the tube (e.g., stomach or jejunum) is compatible with medication absorption. For example, iron dissolves in the stomach and is mostly absorbed in the duodenum. If iron is administered through a jejunal tube, it has poor bioavailability. Use liquid medications when possible. When liquid medications are not available, crush simple tablets or open gelatin capsules and dilute them in sterile water. Do not use tap water (Bankhead et al., 2009). Tap water often contains contaminants (e.g., pathogens, heavy metals) that can interact with a medication and affect its bioavailability (Boullata, 2009). Only use oral syringes when preparing medications for this route to prevent accidental parenteral administration. Flush tubes with at least 15 mL of sterile water before and after giving medications. When administering more than one medication at a time, give each separately and flush between medications with at least 15 mL of sterile water (Bankhead et al., 2009). Determine if medications need to be given on an empty stomach or if they are compatible with the patient’s enteral feeding. If a medication needs to be given on an empty stomach or is not compatible with the feeding (e.g., phenytoin, carbamazepine [Tegretol], warfarin [Coumadin], fluoroquinolones, proton pump inhibitors), the feeding needs to be held at least 30 minutes before or 30 minutes after medication administration (Boullata, 2009). Verify the time with a drug reference or consult with a pharmacist. Monitor the patient closely for adverse reactions. The risk for drug-drug interactions is high when two or more medications are given in this route because they can interact together as soon as they are administered.
Box 31-15 Procedural Guidelines 
Giving Medications Through an Enteral Tube (Nasogastric Tube, G-tube, J-Tube, or Small-Bore Feeding Tube)
The skill of giving medications through an enteral tube cannot be delegated to nursing assistive personnel (NAP). Instruct the NAP about:
60-mL Oral syringe, gastric pH test strips (scale of 1.0 to 11.0 or greater), graduated container, sterile water, medication to be administered, pill crusher if medication in tablet form, medication administration record (MAR) (electronic or printed), clean gloves
1. Check accuracy and completeness of each MAR with prescriber’s medication order. Check patient’s name and medication name, dosage, and route and time of administration. Recopy or reprint any portion of printed MAR that is difficult to read.
2. Assess patient’s knowledge about medication. Also assess medical history and for history or allergies to medications and foods. Make sure that patient’s food and drug allergies are listed on the MAR and are prominently displayed on the patient’s medical record per agency policy.
3. Avoid complicated medication regimens that frequently interrupt enteral feedings. Investigate and use alternative routes of medication administration if possible (e.g., intravenous, transdermal, rectal).
a. Evaluate where medication is absorbed and ensure that point of absorption is not bypassed by feeding tube. For example, some medications (e.g., antacids) are absorbed in the stomach. If the patient’s tube is placed in the intestines, these medications are not absorbed because the stomach is bypassed by the tube (Williams, 2008).
b. Determine if medication interacts with enteral feeding. If interaction occurs, hold the feeding for at least 30 minutes before giving the medication (see agency policy or consult with pharmacist or drug reference).
4. Perform hand hygiene and prepare medication (see Skill 31-1, Steps 1a to 1g). Check label of medication with MAR two times for accuracy. This is the first and second accuracy check.
a. Prepare medications in a liquid form (suspension, elixir, or solution) when possible to prevent tube obstruction (Bankhead et al., 2009).
b. Before crushing tablets, be sure that they are crushable. Buccal, sublingual, enteric-coated or sustained-release medications cannot be crushed (Williams, 2008).
5. Never add medications directly to a tube feeding (Bankhead et al., 2009). Sometimes the tube feeding needs to be held. Verify this and the amount of time that you hold a feeding with agency policy, a pharmacist, or a medication reference before administering the medication to maximize the therapeutic effect of the medication (Bankhead et al., 2009; Williams, 2008).
6. Take medications to patient at correct time (see agency policy). Give time-critical, STAT, and single-order medications at the time ordered. Perform hand hygiene.
7. Identify the patient using at least two patient identifiers (e.g., name and birth date or name and account number) according to facility policy. Compare identifiers with information on the patient’s medical record.
8. Compare label of medications against MAR one more time at patient’s bedside. This is the third accuracy check.
9. Explain procedure and medications to patient.
10. Grind simple compressed tablets to a fine powder. Open hard gelatin capsules and pour powder into a medication cup. Dissolve crushed tablets, contents of capsules, and powders in 15 to 30 mL of sterile water. Dissolve each medication separately (Bankhead et al., 2009).
11. Do not give whole or undissolved medications through the feeding tube (Williams, 2008).
12. Put on clean gloves. Note: If patient has a latex allergy, use latex-free gloves.
13. Stop feeding if applicable and verify placement of any feeding tube that enters the mouth or nose using pH testing (see Chapter 44).
14. Assess gastric residual (see Chapter 44).
15. Flush tube with at least 15 mL of sterile water.
16. Draw up medication in syringe. Do not mix medications together (Bankhead et al., 2009).
17. Connect syringe with medication to nasogastric tube, G-tube, J-tube, or small-bore feeding tube. Do not use pigtail vent.
18. Administer medication by either pushing the medication through the tube with the syringe or allowing it to flow into the body freely using gravity. Administer each medication separately. If resistance is felt when pushing medication through the tube, stop administration and contact the patient’s health care provider.
19. Flush tube with at least 15 mL of sterile water between each medication (Bankhead et al., 2009).
20. After giving all the medications, flush tube with at least 15 mL of sterile water (Bankhead et al., 2009).
21. Restart tube feeding if appropriate; hold feeding for 30 minutes or longer if needed to avoid alterations in medication bioavailability (Bankhead et al., 2009).
22. Clean area and put supplies away. Remove gloves and perform hand hygiene.
23. Document administration of medications, dose, route, and time on MAR.
24. Evaluate patient’s response to the medication at times that correspond with onset, peak and duration of the medication. If the desired effect is not achieved, a different medication or route of administration is probably indicated because of problems with the drug bioavailability when given the enteral route. If patient self-administers medications, evaluate his or her ability to give them and technique used. Provide and reinforce medication as needed.
Topical Medication Applications
Topical medications are medications that are applied locally, most often to intact skin. They come in many forms (see Table 31-1). They are also applied to mucous membranes.
Skin Applications
Because many locally applied medications such as lotions, pastes, and ointments create systemic and local effects, apply these medications using gloves and applicators. Use sterile technique if the patient has an open wound. Skin encrustation and dead tissues harbor microorganisms and block contact of medications with the tissues to be treated. Before applying medications, clean the skin thoroughly by washing the area gently with soap and water, soaking an involved site, or locally debriding tissue.
Apply each type of medication according to directions to ensure proper penetration and absorption. When applying ointments or pastes, spread the medication evenly over the involved surface and cover the area well without applying an overly thick layer. Prescribers sometimes order a gauze dressing to be applied over the medication to prevent soiling clothes and wiping away the medication. Lightly spread lotions and creams onto the surface of the skin; rubbing often causes irritation. Apply a liniment by rubbing it gently but firmly into the skin. Dust a powder lightly to cover the affected area with a thin layer.
Some topical medications are applied in the form of a transdermal patch that remains in place for an extended amount of time (e.g., 12 hours or 7 days). Before applying a new patch, remove the old one. Medication remains on the patch even after its recommended duration of use. Nurses and patients have inadvertently left old transdermal patches in place, resulting in the patient receiving an overdose of the medication. For example, patients who use fentanyl transdermal patches for pain management can experience respiratory depression, coma, and death when the patches are not removed. Many patches are clear, which makes them difficult to see. Therefore carefully assess the patient’s skin and be sure to remove the existing patch before applying a new patch. Follow these guidelines to ensure safe administration of transdermal or topical medications (ISMP, 2007b):
• Document the location on the patient’s body where the medication was placed on the MAR.
• When applying a transdermal patch, ask the patient if he or she has an existing patch.
• When taking a medication history or reconciling medications, specifically ask the patient if he or she takes any medications in the forms of patches, topical creams, or any route other than the oral route.
• If the dressing or patch is difficult to see (e.g., clear), apply a noticeable label to the patch.
Nasal Instillation
Patients with nasal sinus alterations sometimes receive medications by spray, drops, or tampons (Box 31-16). The most commonly administered form of nasal instillation is decongestant spray or drops, used to relieve symptoms of sinus congestion and colds. Caution patients to avoid abuse of medications because overuse leads to a rebound effect in which the nasal congestion worsens. When excess decongestant solution is swallowed, serious systemic effects also develop, especially in children. Saline drops are safer than nasal preparations that contain sympathomimetics (e.g., Afrin or Neo-Synephrine) as a decongestant for children.
Box 31-16 Procedural Guidelines
Administering Nasal Instillations
The skill of administering nasal instillations cannot be delegated to nursing assistive personnel (NAP). Instruct the NAP about:
Prepared medication with clean dropper or spray container, facial tissue, small pillow (optional), washcloth (optional), clean gloves (if patient has extensive nasal drainage), medication administration record (MAR) (electronic or printed), penlight
1. Check accuracy and completeness of each MAR with prescriber’s medication order. Check patient’s name and medication name, dosage, and route and time of administration. Recopy or reprint any portion of printed MAR that is difficult to read.
2. Refer to the medical record to determine which sinus is affected if giving nasal drops.
3. Assess patient’s medical history (e.g., history of hypertension, heart disease, diabetes mellitus, hyperthyroidism) and for history or allergies to medications and foods. Make sure that patient’s food and drug allergies are listed on the MAR and prominently displayed on his or her medical record per agency policy.
4. Perform hand hygiene. Using a penlight, inspect condition of nose and sinuses. Palpate sinuses for tenderness (see Chapter 30).
5. Assess patient’s knowledge regarding use of nasal instillation, technique for instillation, and willingness to learn self-administration.
6. Review pertinent information related to medication: action, purpose, normal dose and route, side effects, time of onset and peak action, and nursing implications.
7. Perform hand hygiene and prepare medication (see Skill 31-1, Steps 1a to 1g). Compare medication label against MAR at least two times while preparing medication. This is the first and second accuracy check.
8. Take medication to patient at correct time (see agency policy). Perform hand hygiene.
9. Identify the patient using two patient identifiers (e.g., name and birth date or name and account number) according to facility policy. Compare identifiers with information on the patient’s medical record.
10. Compare names of medication on label with MAR one more time at patient’s bedside. This is the third accuracy check.
11. Explain procedure to patient regarding positioning and sensations to expect such as burning or stinging of mucosa or choking sensation as medication trickles into throat.
12. Arrange supplies and medications at bedside. Apply clean gloves if patient has nasal drainage. Note: If patient has a latex allergy, use latex-free gloves.
13. Gently roll or shake container.
14. Instruct patient to clear or blow nose gently unless contraindicated (e.g., risk of increased intracranial pressure or nosebleeds).
a. Help patient to supine position and position head properly.
(1) For access to posterior pharynx, tilt patient’s head backward.
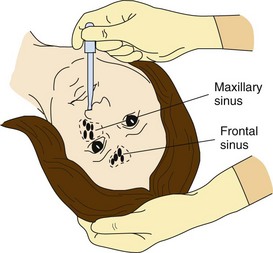
(2) For access to ethmoid or sphenoid sinus, tilt head back over edge of bed or place small pillow under patient’s shoulder and tilt head back (see illustration).
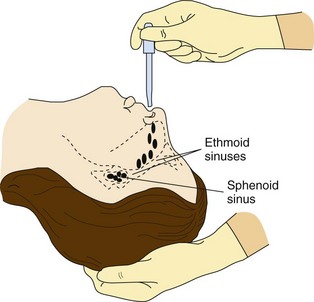
(3) For access to frontal and maxillary sinus, tilt head back over edge of bed or pillow with head turned toward side to be treated (see illustration).
b. Support patient’s head with nondominant hand.
c. Instruct patient to breathe through mouth.
d. Hold dropper 1 cm ( inch) above nares and instill prescribed number of drops toward midline of ethmoid bone.
e. Have patient remain in supine position 5 minutes.
f. Offer facial tissue to blot runny nose but caution patient against blowing nose for several minutes.
a. Help patient to supine position and position head slightly tilted forward.
b. Help patient place spray nozzle into appropriate nares, pointing the nozzle to the side and away from the center of the nose.
c. Have patient spray medication into the nose while inhaling.
d. Help patient take nozzle out of nose and instruct him or her to breathe out through the mouth.
e. Offer facial tissue but caution patient against blowing nose for several minutes.
17. Assist patient to a comfortable position after medication is absorbed.
18. Dispose of soiled supplies in proper container and perform hand hygiene.
19. Document name of medication, dose, route, and time of administration on MAR.
20. Observe patient for onset of side effects 15 to 30 minutes after administration. Ask if he or she is able to breathe through nose after decongestant administration. It may be necessary to have patient occlude one nostril at a time and breathe deeply.
21. Evaluate patient’s response to medications at times that correlate with the onset, peak, and duration of the medication. Evaluate patient for both desired effect and adverse effects. Reinspect condition of nasal passages between instillations.
22. Ask patient to review risks of overuse of decongestants and methods for administration.
It is easier to have the patient self-administer sprays because he or she is able to control the spray and inhale as it enters the nasal passages. For patients who use nasal sprays repeatedly, check the nares for irritation. Nasal drops are effective in treating sinus infections. Position patients to permit the medication to reach the affected sinus. Severe nosebleeds are usually treated with packing or nasal tampons, which are treated with epinephrine, to reduce blood flow. Usually a physician or advanced practice clinician places nasal tampons.
Eye Instillation
Common medications used by patients are eyedrops and ointments, including OTC preparations such as artificial tears and vasoconstrictors (e.g., Visine and Murine). Many patients, especially older adults, receive prescribed ophthalmic medications for eye conditions such as glaucoma or after cataract extraction. Age-related problems, including poor vision, hand tremors, and difficulty grasping or manipulating containers, affect the older adult’s ability to self-administer eye medications. Instruct patients and family members about the proper techniques for administering them (Skill 31-2 on pp. 616-619). Determine the patient’s and family’s ability to self-administer through a return demonstration of the procedure. Showing patients each step of the procedure for instilling eyedrops can improve adherence. Follow these principles when administering eye medications:
• Avoid instilling any form of eye medications directly onto the cornea. The cornea of the eye has many pain fibers and thus is very sensitive to anything applied to it.
• Avoid touching the eyelids or other eye structures with eyedroppers or ointment tubes. The risk of transmitting infection from one eye to the other is high.
• Use eye medication only for the patient’s affected eye.
• Never allow a patient to use another patient’s eye medications.
Intraocular Administration: The nurse administers some medications intraocularly (see Skill 31-2). Medications delivered this way resemble a contact lens. Place the medication into the conjunctival sac where it remains in place for up to 1 week. Medications such as pilocarpine are administered this way. Patients require teaching about monitoring for adverse reactions to the disk. They also need to know how to insert and remove the disk.
Ear Instillation
Internal ear structures are very sensitive to temperature extremes. Instill eardrops at room temperature to prevent vertigo, dizziness, or nausea. Although the structures of the outer ear are not sterile, sterile solutions are used in case the eardrum is ruptured. The entrance of nonsterile solutions into middle ear structures can result in infection. If a patient has ear drainage, be sure that the eardrum has not ruptured. Never occlude or block the ear canal with the dropper or irrigating syringe. Forcing medication into an occluded ear canal creates pressure that injures the eardrum. Box 31-17 provides guidelines for administering eardrops.
Box 31-17 Procedural Guidelines
Administering Ear Medications
The skill of administering ear medications cannot be delegated to nursing assistive personnel (NAP). Instruct the NAP about:
Medication administration record (MAR) (electronic or printed), clean gloves, and washcloth if patient has drainage from the ear; for drops: medication bottle with dropper, cotton-tipped applicator, cotton ball (optional); for irrigation: irrigating syringe, kidney-shaped basin, towel
1. Check accuracy and completeness of each MAR with prescriber’s medication order. Check patient’s name and medication name, dosage, and route and time of administration. Recopy or reprint any portion of printed MAR that is difficult to read.
2. Assess patient’s medical history (e.g., history of dizziness, hearing loss) and allergies to medications, food, and latex.
3. Perform hand hygiene. Prepare medication (see Skill 31-1, Steps 1a to 1g). Check label of medication with MAR two times for accuracy. This is the first and second accuracy check.
4. Take medication to patient at correct time (see agency policy). Perform hand hygiene.
5. Identify the patient using two identifiers (e.g., name and birth date or name and account number) according to facility policy. Compare identifiers with information on the patient’s medical record.
6. Compare names of medications on label with the MAR one more time at the patient’s bedside. This is the third accuracy check. Hold medication container in hands for a few minutes to bring medication to body temperature.
7. Explain procedure to patient regarding positioning and sensations to expect such as hearing bubbling or feeling water in ear as medication trickles into ear.
8. Teach patient about medication.
a. Apply clean gloves and gently clean outer ear with washcloth if drainage is present. Note: If patient has a latex allergy, use latex-free gloves.
b. Place patient in side-lying position (if not contraindicated by his or her condition) with ear to be treated facing up or have him or her sit in chair or at the bedside. If eardrops are a cloudy suspension, shake them for about 10 seconds.
c. Straighten ear canal by pulling auricle down and back (children younger than 3 years) or upward and outward (children 4 years of age and older and adults).
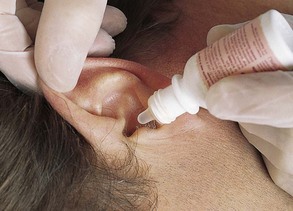
d. Instill prescribed drops holding dropper 1 cm ( inch) above ear canal (see illustration).
e. Ask patient to remain in side-lying position 2 to 3 minutes. Apply gentle massage or pressure to tragus of ear with finger unless contraindicated because of pain.
f. If cotton ball is needed, place it into outermost part of canal. Do not press cotton deep into canal. Remove it after 15 minutes.
10. Clean the area and put supplies away.
11. Remove gloves and perform hand hygiene.
12. Document medication administration on MAR.
13. Evaluate patient’s response to the medication at times that correspond with its onset, peak, and duration.
Vaginal Instillation
Vaginal medications are available as suppositories, foam, jellies, or creams. Solid, oval-shaped suppositories come individually packaged in foil wrappers and are sometimes stored in the refrigerator to prevent them from melting. After a suppository is inserted into the vaginal cavity, body temperature causes it to melt and be distributed and absorbed. Foam, jellies, and creams are administered with an applicator inserter (Box 31-18). Give a suppository with a gloved hand in accordance with standard precautions (see Chapter 28). Patients often prefer administering their own vaginal medications and need privacy. Because vaginal medications are often given to treat infection, discharge is usually foul smelling. Follow aseptic technique and offer the patient frequent opportunities to maintain perineal hygiene (see Chapter 39).
Box 31-18 Procedural Guidelines
Administering Vaginal Medications
The skill of administering vaginal medications cannot be delegated to nursing assistive personnel (NAP). Instruct the NAP to:
Vaginal cream, foam, jelly, or suppository with applicator (if required); clean gloves; towels and/or washcloth; perineal pad; drape or sheet; water-soluble lubricating jelly; medication administration record (MAR) (electronic or printed)
1. Check accuracy and completeness of each MAR with prescriber’s medication order. Check patient’s name and medication name, form (cream or suppository), dosage, and route and time of administration. Recopy or reprint any portion of printed MAR that is difficult to read.
2. Assess patient’s medical history (e.g., history of vaginal drainage) and allergies to medications, food, and latex.
3. Perform hand hygiene. Prepare medication (see Skill 31-1, steps 1a to 1g). Check name of medication on label with MAR two times for accuracy. This is the first and second accuracy check.
4. Take medication to patient at the correct time (see agency policy). Perform hand hygiene.
5. Identify patient using two patient identifiers (e.g., name and birth date or name and account number) according to facility policy. Compare identifiers with information on patient’s medical record.
6. Compare names of medication on label with the MAR one more time at patient’s bedside. This is the third accuracy check.
7. Teach patient about the medication. Explain procedure regarding positioning and sensations to expect such as feelings of moisture or wetness in the vaginal area. Assess patient’s ability to manipulate applicator or suppository and position self to insert medication. Be sure that patient understands the procedure if she plans to self-administer the medication.
8. Close room door or pull curtain to provide privacy.
9. Put on clean gloves. Note: If patient has a latex allergy, use latex-free gloves.
10. Be sure that lighting is adequate to visualize vaginal opening. Inspect condition of external genitalia and vaginal canal (see Chapter 30), noting appearance of any discharge. Clean area with towel or washcloth if necessary (see Chapter 39).
11. Help patient into dorsal recumbent position and keep abdomen and lower extremities draped.
12. Administer vaginal suppository:
a. Remove suppository from foil wrapper and apply liberal amount of sterile, water-based lubricating jelly to the smooth or rounded end. Lubricate gloved index finger of dominant hand.
b. With nondominant gloved hand expose vaginal orifice by gently retracting labial folds.
c. With dominant gloved hand gently insert rounded end of suppository along posterior wall of vaginal canal entire length of finger (7.5 to 10 cm [3 to 4 inches]) to ensure equal distribution of medication along walls of vaginal cavity (see illustration).
d. Withdraw finger and wipe away remaining lubricant from around orifice and labia.
a. Fill cream or foam applicator following package directions.
b. With nondominant gloved hand, expose vaginal orifice by gently retracting labial folds.
c. With dominant gloved hand, insert applicator approximately 5 to 7.5 cm (2 to 3 inches). Push applicator plunger to deposit medication into vagina to allow equal distribution of medication (see illustration).
d. Withdraw applicator and place on paper towel. Wipe off residual cream from labia or vaginal orifice.
14. Dispose of supplies, remove gloves, and perform hand hygiene.
15. Instruct patient to remain on back for at least 10 minutes to allow medication to be distributed and absorbed evenly throughout vaginal cavity and not lost through orifice.
16. Document medication administration on MAR.
17. If using an applicator, wearing gloves, wash with soap and warm water, rinse, and store for future use.
18. Offer patient perineal pad when she resumes ambulation.
19. Evaluate patient’s response to medication at times that correspond with the onset, peak, and duration of the medication. Inspect appearance of discharge of vaginal canal and condition of external genitalia between applications.
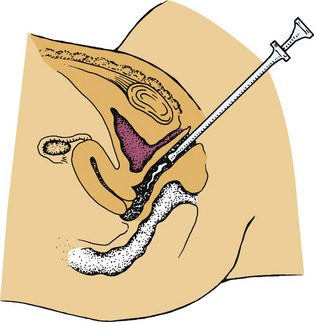
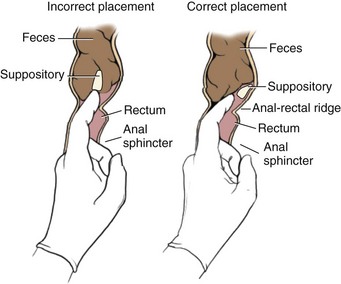
Rectal Instillation
Rectal suppositories are thinner and more bullet-shaped than vaginal suppositories. The rounded end prevents anal trauma during insertion. Rectal suppositories contain medications that exert local effects such as promoting defecation or systemic effects such as reducing nausea. Rectal suppositories are often stored in the refrigerator until administered. Sometimes it is necessary to clear the rectum with a small cleansing enema before inserting a suppository (Box 31-19).
Box 31-19 Procedural Guidelines
Administering Rectal Suppositories
The skill of administering rectal suppositories cannot be delegated to nursing assistive personnel (NAP). Instruct NAP to:
Rectal suppository, water-soluble lubricating jelly, clean gloves, drape or sheet, tissue, medication administration record (MAR) (electronic or printed)
1. Check accuracy and completeness of each MAR with prescriber’s medication order. Check patient’s name and medication name, dosage, and route and time of administration. Recopy or reprint any portion of printed MAR that is difficult to read.
2. Review medical history (e.g., hemorrhoids, anal fissures, rectal surgery, or bleeding) and allergies to medications, food, and latex.
3. Perform hand hygiene and prepare medication (see Skill 31-1, steps 1a to 1g). Compare names of medication on label with the MAR two times for accuracy. This is the first and second accuracy check.
4. Take medication to patient at the correct time and perform hand hygiene.
5. Identify patient using two patient identifiers (e.g., name and birth date or name and account number) according to facility policy. Compare identifiers with information on patient’s medical record.
6. Compare names of medication on label with the MAR one more time at patient’s bedside. This is the third accuracy check.
7. Teach patient about the medication. Explain procedure regarding positioning and sensations to expect such as feelings of needing to defecate. Be sure that patient understands the procedure if he or she is going to self- administer the medication.
8. Close room door or pull curtain to ensure privacy.
9. Put on clean gloves. Note: If patient has a latex allergy, use latex-free gloves.
10. Help patient to the Sims’ position. Keep him or her draped with only anal area exposed.
11. Be sure that there is adequate lighting to visualize anus. Examine condition of anus externally and palpate rectal walls as needed (see Chapter 30). Dispose of gloves in proper receptacle if soiled.
12. Apply new pair of clean gloves (if previous gloves were soiled). Note: If patient has a latex allergy, use latex-free gloves.
13. Remove suppository from wrapper and lubricate rounded end (see illustration) with sterile water-soluble lubricating jelly. Lubricate index finger of dominant hand with a water-soluble lubricant.
14. Ask patient to take slow deep breaths through mouth and relax anal sphincter.
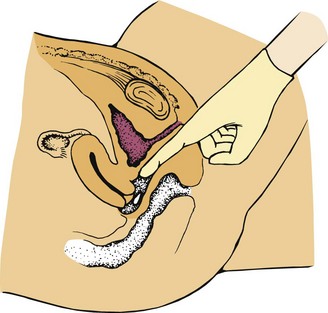
15. Retract buttocks with nondominant hand. Insert suppository gently through anus, past internal sphincter and against rectal wall, 10 cm (4 inches) in adults, 5 cm (2 inches) in children and infants (see illustration). Apply gentle pressure to hold buttocks together momentarily if needed to keep medication in place.
STEP 15 Inserting rectal suppository. (From deWit S: Fundamental concepts and skills for nursing, ed 3, Philadelphia, 2009, Saunders.)
16. Withdraw finger and wipe anal area with tissue.
17. Dispose of supplies, remove gloves, and perform hand hygiene.
18. Ask patient to remain flat or on side for at least 5 minutes to prevent expulsion of suppository.
19. Place call light within patient’s reach.
20. Document medication administration on MAR.
21. Observe for effects of suppository (e.g., bowel movement, relief of nausea) at times that correlate with the onset, peak, and duration of the medication.
Administering Medications by Inhalation
Medications administered with handheld inhalers are dispersed through an aerosol spray, mist, or powder that penetrates lung airways. The alveolar-capillary network absorbs medications rapidly.
Pressurized metered-dose inhalers (pMDIs), breath-actuated metered dose inhalers (BAIs), and dry powder inhalers (DPIs) deliver medications that produce local effects such as bronchodilation. Some medications create serious systemic side effects. pMDIs use a chemical propellant to push the medication out of the inhaler and require the patient to apply approximately 5 to 10 pounds of pressure to the top of the canister to administer the medication. Children or older adults with chronic respiratory diseases often use pMDIs. These two populations have diminished hand strength. Therefore it is essential to assess if patients in these groups have enough strength to use the pMDI.
BAIs release medication when a patient raises a lever and inhales. Release of the medication depends on the strength of the patient’s breath on inspiration and is a good choice for patients who have difficulty using pMDIs (Restrepo and Gardner, 2010).
DPIs hold dry powdered medication and create an aerosol when the patient inhales through a reservoir that contains a dose of the medication. Some DPIs are unit dosed. These inhalers require patients to load a single dose of medication into the inhaler with each use. Other DPIs hold enough medication to be used in 1 month. DPIs require less manual dexterity. Because the device is activated with the patient’s breath, there is no need to coordinate puffs with inhalation. However, the medication inside the DPI can clump if the patient is in a humid climate, and some patients cannot inspire fast enough to administer the entire dose of the medication.
Patients who receive medications by inhalation frequently suffer chronic respiratory disease such as chronic asthma, emphysema, or bronchitis. Different respiratory problems require different inhaled medication. For example, patients with asthma usually receive antiinflammatory medications because asthma is primarily an inflammatory disease, whereas patients with chronic obstructive pulmonary disease (COPD) receive bronchodilators because they usually have problems with bronchoconstriction. Inhaled medications are also often described as “rescue” or “maintenance” medications. Rescue medications are short acting and taken for immediate relief of acute respiratory distress. Maintenance medications are used on a daily schedule to prevent acute respiratory distress. The effects of maintenance medications start within hours of administration and last for a longer period of time than rescue medications. Some inhalers contain combinations of rescue and maintenance medications. Because patients depend on inhaled medications for disease control and current evidence shows that many patients do not use their inhalers correctly, patients need to learn how to self-administer inhalers safely and effectively (Restrepo and Gardner, 2010) (Skill 31-3 on pp. 619-622).
Some patients use a spacer with the pMDI. The spacer is a 4- to 8-inch (10.16 to 20.32 cm) long tube that attaches to the pMDI and allows the particles of medication to slow down and break into smaller pieces, which improves drug absorption in the patient’s airway. Spacers have a face mask for infants and children less than 4 years of age. They are especially helpful when the patient has difficulty coordinating the steps involved in self-administering inhaled medications. When patients do not use their inhalers and spacers correctly, they do not receive the full effect of the medication. Therefore patient education is essential. BAIs and DPIs do not use spacers.
One important aspect of patient teaching is to help the patient determine when the MDI, BAI, or DPI is empty and needs to be replaced. Floating the MDI in water to determine how much medication is left is no longer recommended because extra propellant causes the container to float even if no medication remains in the inhaler. Furthermore, non–ozone-depleting MDIs with hydrofluoroalkanes (HFAs) should never be immersed (Hess, 2008). Devices that count down the number of remaining doses are available for MDIs. Some DPIs have mechanisms that indicate how many doses are left. However, these mechanisms are not always accurate. Therefore, to calculate how long medication in an inhaler will last, divide the number of doses in the container by the number of doses the patient takes per day. For example, a patient is to take albuterol. The ordered dose is 2 puffs 4 times a day. The canister has a total of 200 puffs. Complete the following calculations to determine how long the MDI will last:


The canister in this example will last 25 days. To ensure that the patient does not run out of medication, teach him or her to refill it at least 7 to 10 days before it runs out.
Administering Medications by Irrigations
Some medications irrigate or wash out a body cavity and are delivered through a stream of solution. Irrigations most commonly use sterile water, saline, or antiseptic solutions on the eye, ear, throat, vagina, and urinary tract. Use aseptic technique if there is a break in the skin or mucosa. Use clean technique when the cavity to be irrigated is not sterile, as in the case of the ear canal or vagina. Irrigations cleanse an area, instill a medication, or apply hot or cold to injured tissue (see Chapter 48).
Parenteral Administration of Medications
Parenteral administration of medications is the administration of medications by injection into body tissues. When medications are administered this way, it is an invasive procedure that is performed using aseptic techniques (Box 31-20). After a needle pierces the skin, there is risk of infection. Each type of injection requires certain skills to ensure that the medication reaches the proper location. The effects of a parenterally administered medication develop rapidly, depending on the rate of medication absorption. The nurse closely observes the patient’s response.
Equipment
A variety of syringes and needles are available, each designed to deliver a certain volume of a medication to a specific type of tissue. Use nursing judgment when determining the syringe or needle that will be most effective.
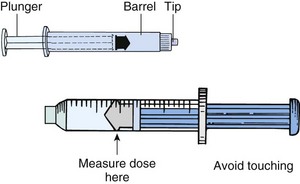
Syringes: Syringes consist of a cylindrical barrel with a tip designed to fit the hub of a hypodermic needle and a close-fitting plunger. In general syringes are classified as being Luer-Lok or non–Luer-Lok. This nomenclature is based on the design of the tip of the syringe. Luer-Lok syringes have needles that are twisted onto the tip and lock themselves in place (Fig. 31-10, A and B). This design prevents the inadvertent removal of the needle. Non–Luer-Lok syringes (Fig. 31-10, C and D) have needles that slip onto the tip. Syringes have safety devices to prevent needlestick injury.
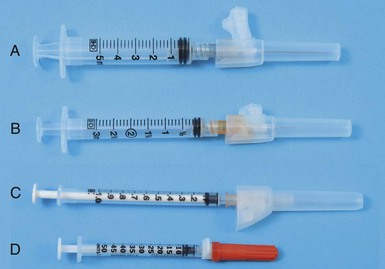
FIG. 31-10 Types of syringes. A, 5-mL syringe. B, 3-mL syringe. C, Tuberculin syringe marked in 0.01 (hundredths) for doses less than 1 mL. D, Insulin syringe marked in units (50).
Syringes come in a number of sizes, from 0.5 to 60 mL. It is unusual to use a syringe larger than 5 mL for an injection. A 1- to 3-mL syringe is usually adequate for a subcutaneous or IM injection. A larger volume creates discomfort. Use larger syringes to administer certain IV medications and irrigate wounds or drainage tubes. Syringes often come prepackaged with a needle attached. However, you sometimes change a needle based on the route of administration and size of the patient.
The tuberculin syringe (Fig. 31-10, C) is calibrated in sixteenths of a minim and hundredths of a milliliter and has a capacity of 1 mL. Use a tuberculin syringe to prepare small amounts of medications (e.g., intradermal or subcutaneous injections). A tuberculin syringe is also useful when preparing small, precise doses for infants or young children.
Insulin syringes (Fig. 31-10, D) are available in sizes that hold 0.3 to 1 mL and are calibrated in units. Most insulin syringes are U-100s, designed to be used with U-100 strength insulin. Each milliliter of U-100 insulin contains 100 units of insulin.
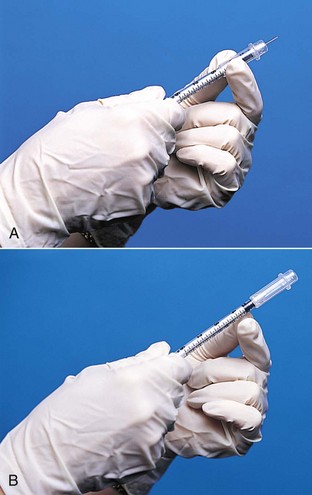
Fill a syringe by pulling the plunger outward while the needle tip remains immersed in the prepared solution. Only touch the outside of the syringe barrel and the handle of the plunger to maintain sterility. Avoid letting any unsterile object touch the tip or inside of the barrel, the hub, the shaft of the plunger, or the needle (Fig. 31-11).
Needles: Some needles come packaged in individual sheaths to allow flexibility in choosing the right needle for a patient, whereas others are preattached to standard-size syringes. Most needles are made of stainless steel, and all are disposable. A needle has three parts: the hub, which fits onto the tip of a syringe; the shaft, which connects to the hub; and the bevel, or slanted tip (Fig. 31-12). The tip of a needle, or the bevel, is always slanted. The bevel creates a narrow slit when injected into tissue that quickly closes when the needle is removed to prevent leakage of medication, blood, or serum. Long beveled tips are sharper and narrower, minimizing discomfort when entering tissue used for subcutaneous or IM injections.

Most needles vary in length from  to 3 inches (Fig. 31-13). Choose the needle length according to the patient’s size and weight and the type of tissue into which the medication is to be injected. A child or slender adult generally requires a shorter needle. Use longer needles (1 to
  inches) for IM injections and a shorter needle (
 to
to  inch) for subcutaneous injections. As the needle gauge becomes smaller, the needle diameter becomes larger. The selection of a gauge depends on the viscosity of fluid to be injected or infused.
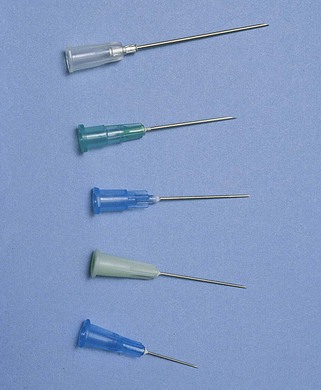
 -inch length; 20 gauge, 1-inch length; 21 gauge, 1-inch length; 23 gauge, 1-inch length; and 25 gauge,
  -inch length.
Disposable Injection Units: Disposable, single-dose, prefilled syringes are available for some medications. Be careful to check the medication and concentration because all prefilled syringes appear very similar. With these syringes you do not have to prepare medication doses, except perhaps to expel portions of unneeded medications.
The Tubex and Carpuject injection systems include reusable plastic mechanisms that hold prefilled, disposable, sterile cartridge-needle units (Fig. 31-14). Load the cartridge Luer tip first into the plastic syringe holder, secure it (following package directions), and check for air bubbles in the syringe. Advance the plunger to expel air and excess medication as in a regular syringe. The glass cartridge can be used with needleless systems or safety needles. After giving the medication, safely dispose of the glass cartridge in a puncture-proof and leak-proof receptacle.
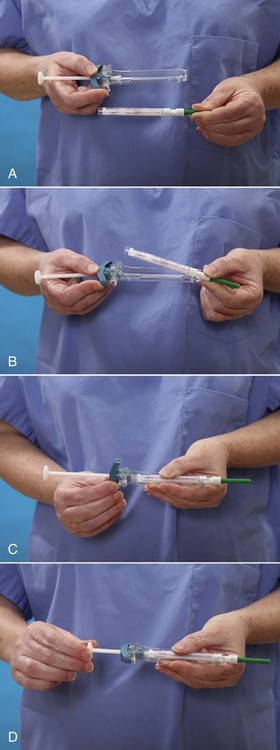
FIG. 31-14 A, Carpuject syringe and prefilled sterile cartridge with needle. B, Assembling the Carpuject. C, The cartridge slides into the syringe barrel. Turn and lock the syringe into the cartridge. D, Screw the plunger into the end of the cartridge. Expel excess medication to obtain accurate dose (not pictured).
Preparing an Injection From an Ampule
Ampules contain single doses of medication in a liquid. Ampules are available in several sizes, from 1 mL to 10 mL or more (Fig. 31-15, A). An ampule is made of glass with a constricted neck that must be snapped off to allow access to the medication. A colored ring around the neck indicates where the ampule is prescored so you can break it easily. Carefully aspirate the medication into a syringe (Skill 31-4 on pp. 622-626) with a filter needle. The use of a filter needle prevents particulate matter such as small glass fragments from entering the syringe (Cocoman and Murray, 2008; Nicoll and Hesby, 2002). Replace the filter needle with an appropriate-size needle or a needleless access device before administering the injection.
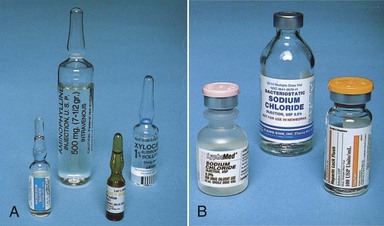
Preparing an Injection From a Vial
A vial is a single-dose or multidose container with a rubber seal at the top (see Fig. 31-15, B). A metal cap protects the seal until it is ready for use. Vials contain liquid or dry forms of medications. Medications that are unstable in solution are packaged dry. The vial label specifies the solvent or diluent used to dissolve the medication and the amount of diluent needed to prepare a desired medication concentration. Normal saline and sterile distilled water are commonly used to dissolve medications.
Unlike the ampule, the vial is a closed system, and air needs to be injected into it to permit easy withdrawal of the solution. Failure to inject air when withdrawing creates a vacuum within the vial that makes withdrawal difficult. If concerned about drawing up parts of the rubber stopper or other particles into the syringe, use a filter needle when preparing medications from vials (Cocoman and Murray, 2008; Nicoll and Hesby, 2002). Some vials contain powder, which is mixed with a diluent during preparation and before injection (see Skill 31-4). After mixing multidose vials, make a label that includes the date and time of mixing and the concentration of medication per milliliter. Some multidose vials require refrigeration after the contents are reconstituted.
Mixing Medications
If two medications are compatible, it is possible to mix them in one injection if the total dose is within accepted limits so a patient does not have to receive more than one injection at a time. Most nursing units have charts that list common compatible medications. If there is any uncertainty about medication compatibilities, consult a pharmacist or a medication reference.
Mixing Medications From a Vial and an Ampule: When mixing medication from both a vial and ampule, prepare medication from the vial first. Using the same syringe and filter needle, next withdraw medication from the ampule. Nurses prepare the combination in this order because it is not necessary to add air to withdraw medication from an ampule.
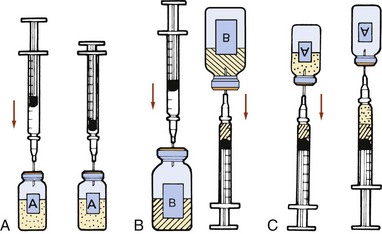
Mixing Medications From Two Vials: Apply these principles when mixing medications from two vials:
Use only one syringe with a needle or needleless access device attached to mix medications from two vials (Fig. 31-16). Aspirate the volume of air equivalent to the dose of the first medication (vial A) (Fig. 31-16, A). Inject the air into vial A, making sure that the needle does not touch the solution. Withdraw the needle and aspirate air equivalent to the dose of the second medication (vial B). Inject the volume of air into vial B (Fig. 31-16, B). Immediately withdraw the medication from vial B into the syringe and insert the needle back into vial A, being careful not to push the plunger and expel the medication within the syringe into the vial. Withdraw the desired amount of medication from vial A into the syringe (Fig. 31-16, C). After withdrawing the necessary amount, withdraw the needle and apply a new safety needle or needleless access device suitable for injection.
Insulin Preparation
Insulin is the hormone used to treat diabetes. It is administered by injection because the GI tract breaks down and destroys an oral form of insulin. Most patients with diabetes who take insulin injections learn to administer their own injections. In the United States and Canada health care providers usually prescribe insulin in concentrations of 100 units per milliliter of solution. This is called U-100 insulin. Insulin is also commercially available in concentrations of 500 units per milliliter of solution; it is called U-500 insulin. U-500 insulin is 5 times as strong as U-100 insulin and is used only in rare cases when patients are very resistant to insulin (Davidson et al., 2010).
Use the correct syringe when preparing insulin. Use a 100-unit insulin syringe or an insulin pen to prepare U-100 insulin. Because there is no syringe currently designed to prepare U-500 insulin, many medication errors result with this kind of insulin. When ordering U-500 insulin, ensure that prescribers specify units and volume (e.g., 150 units, 0.3 mL of U-500 insulin) and use tuberculin syringes to draw up the doses. Verify dose with another nurse or pharmacist before administering it to the patient. Additional safety measures common with U-500 insulin include having the insulin listed as being concentrated in computerized medication dispensing systems, making prescribers and pharmacists verify that the patients is to receive U-500 insulin when it is ordered, and only stocking U-500 insulin on patient care units when it is ordered for a specific patient (ISMP, 2007a).
Insulin is classified by rate of action, including rapid, short, intermediate, and long acting. To provide safe and effective care, you need to know the onset, peak, and duration for each of your patients’ ordered insulin doses. Refer to a medication reference or consult with a pharmacist if you are unsure of this information. Only regular insulin can be given intravenously. Orders for insulin injections attempt to imitate the normal pattern of a patient’s insulin release from the pancreas. Some insulins come in a stable premixed solution (e.g., 70/30 insulin is 70% NPH [intermediate] and 30% regular), eliminating the need to mix the insulins in a syringe. Other patients use an insulin pen. The insulin pen provides multiple doses and allows the patient or nurse to dial in the dose, avoiding the need to use a syringe for insulin preparation. A patient with diabetes sometimes requires more than one type of insulin. For example, by receiving a short-acting (regular) and an intermediate-acting (NPH) insulin, a patient receives more sustained control of blood glucose levels over 24 hours.
Insulin is ordered by a specific dose at select times. Correction insulin, also known as sliding-scale insulin, provides a dose of insulin based on the patient’s blood glucose level (Box 31-21). The term correction insulin is preferred because it indicates that small doses of rapid- or short-acting insulins are needed to correct a patient’s elevated blood sugar. Reliance on correction insulin is unlikely to achieve long-term glucose control; therefore it should only be ordered on a temporary basis (ADA, 2010).
Before drawing up insulin doses, gently roll all cloudy insulin preparations between the palms of the hands to resuspend the insulin (ADA, 2004). Do not shake insulin vials; shaking causes bubbles to form. Bubbles take up space in the syringe and alter the dose.
If more than one type of insulin is required to manage the patient’s diabetes, the nurse can mix two different types of insulin into one syringe if they are compatible (Box 31-22). If regular and intermediate-acting insulin is ordered, prepare the regular insulin first to prevent the regular insulin from becoming contaminated with the intermediate-acting insulin (ADA, 2004). Use the following principles when mixing insulins (ADA, 2004; Novo Nordisk, 2010):
• Patients whose blood glucose levels are well controlled on a mixed-insulin dose need to maintain their individual routine when preparing and administering their insulin.
• Do not mix insulin with any other medications or diluents unless approved by the prescriber.
• Never mix insulin glargine (Lantus) or insulin detemir (Levemir) with other types of insulin.
• Inject rapid-acting insulins mixed with NPH insulin within 15 minutes before a meal.
• Verify insulin doses with another nurse while preparing them if required by agency policy.
Administering Injections
Each injection route differs based on the type of tissues the medication enters. The characteristics of the tissues influence the rate of medication absorption and thus the onset of medication action. Before injecting a medication, know the volume of the medication to administer, the characteristics and viscosity of the medication, and the location of anatomical structures underlying injection sites (Skill 31-5 on pp. 626-631).
If a nurse does not administer injections correctly, negative patient outcomes result. Failure to select an injection site in relation to anatomical landmarks results in nerve or bone damage during needle insertion. Inability to maintain stability of the needle and syringe unit can result in pain and tissue damage. If you fail to aspirate the syringe before injecting an IM medication, the medication may accidentally be injected directly into an artery or vein. Injecting too large a volume of medication for the site selected causes extreme pain and results in local tissue damage.
Many patients, particularly children, fear injections. Patients with serious or chronic illness often are given several injections daily. Minimize the patient’s discomfort in the following ways:
• Use a sharp-beveled needle in the smallest suitable length and gauge.
• Position the patient as comfortably as possible to reduce muscular tension.
• Select the proper injection site, using anatomical landmarks.
• Apply a vapocoolant spray (e.g., Fluori-Methane spray or ethyl chloride) or topical anesthetic (e.g., EMLA cream) to the injection site before giving the medication when possible.
• Divert the patient’s attention from the injection through conversation using open-ended questioning.
• Insert the needle quickly and smoothly to minimize tissue pulling.
• Hold the syringe steady while the needle remains in tissues.
Subcutaneous Injections
Subcutaneous injections involve placing medications into the loose connective tissue under the dermis (see Skill 31-5). Because subcutaneous tissue is not as richly supplied with blood as the muscles, medication absorption is somewhat slower than with IM injections. However, medications are absorbed completely if the patient’s circulatory status is normal. Because subcutaneous tissue contains pain receptors, the patient often experiences slight discomfort.
The best subcutaneous injection sites include the outer posterior aspect of the upper arms, the abdomen from below the costal margins to the iliac crests, and the anterior aspects of the thighs (Fig. 31-17). The site most frequently recommended for heparin injections is the abdomen (Fig. 31-18). Alternative subcutaneous sites for other medications include the scapular areas of the upper back and the upper ventral or dorsal gluteal areas. The injection site chosen needs to be free of skin lesions, bony prominences, and large underlying muscles or nerves.

The administration of low-molecular-weight heparin (LMWH) (e.g., enoxaparin) requires special considerations. When injecting the medication, use the right or left side of the abdomen at least 2 inches from the umbilicus (the patient’s “love handles”) and pinch the injection site as you insert the needle. Administer LMWH in its prefilled syringe with the attached needle and do not expel the air bubble in the syringe before giving the medication (Sanofi-Aventis, 2010).
Use U-100 insulin syringes with preattached 25- to 31-gauge needles when giving U-100 insulin and 1-mL tuberculin syringes when giving U-500 insulin (ADA, n.d.; ISMP, 2002). Recommended sites for insulin injections include the upper arm and the anterior and lateral portions of the thigh, buttocks, and abdomen. Rotating injections within the same body part (intrasite rotation) provides more consistency in the absorption of the insulin. For example, if the patient receives the morning insulin in the right arm, give the next injection in a different place in the same arm. The injections are to be given at least an inch (2.5 cm) away from the previous site. No injection site should be used again for at least 1 month. The rate of insulin absorption varies based on the site; the abdomen has the quickest absorption, followed by the arms, thighs, and buttocks (ADA, 2004).
Only small volumes (0.5 to 1.5 mL) of water-soluble medications are given subcutaneously because the tissue is sensitive to irritating solutions and large volumes of medications. In children smaller volumes up to 0.5 mL are given (Hockenberry and Wilson, 2009). Collection of medications within the tissues causes sterile abscesses, which appear as hardened, painful lumps under the skin.
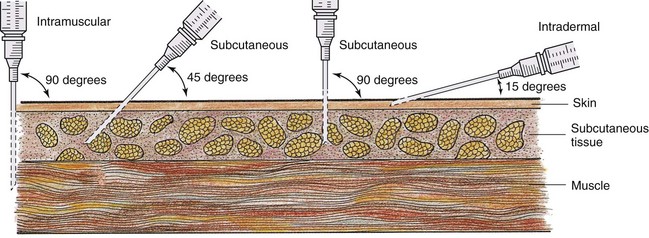
A patient’s body weight indicates the depth of the subcutaneous layer. Therefore choose the needle length and angle of insertion based on the patient’s weight and an estimation of the amount of subcutaneous tissue (Annersten and Willman, 2005). Generally a 25-gauge,  -inch needle inserted at a 45-degree angle (Fig. 31-19) or a
  -inch needle inserted at a 90-degree angle deposits medications into the subcutaneous tissue of a normal-size patient. Some children require only a
  -inch needle. If the patient is obese, pinch the tissue and use a needle long enough to insert through fatty tissue at the base of the skinfold. Thin patients often do not have sufficient tissue for subcutaneous injections; the upper abdomen is usually the best site in this case. To ensure that a subcutaneous medication reaches the subcutaneous tissue, follow this rule: If you can grasp 2 inches (5 cm) of tissue, insert the needle at a 90-degree angle; if you can grasp 1 inch (2.5 cm) of tissue, insert the needle at a 45-degree angle (Rushing, 2004).
Intramuscular Injections
The IM route provides faster medication absorption than the subcutaneous route because of the greater vascularity of the muscle. However, IM injections are associated with many risks. Therefore, whenever administering a medication by the IM route, first verify that the injection is justified (Nicoll and Hesby, 2002; WHO, 2006). In many cases such as influenza and pneumonia shots, no alternative sites are available to give the medication.
Use a longer and heavier-gauge needle to pass through subcutaneous tissue and penetrate deep muscle tissue (see Skill 31-5). Weight and the amount of adipose tissue influence needle size selection. For example, a very obese patient often requires a needle 3 inches long, whereas a thin patient only requires a  - to 1-inch needle (Koster et al., 2009; Zaybak et al., 2007). Because most agencies have needles that range in length from only
  to
to  inches, investigate different medication routes when IM injections are ordered for patients who are obese (TCHP Education Consortium, 2005).
The angle of insertion for an IM injection is 90 degrees (see Fig. 31-19). Muscle is less sensitive to irritating and viscous medications. A normal, well-developed adult patient tolerates 2 to 5 mL of medication into a larger muscle without severe muscle discomfort (Nicoll and Hesby, 2002; Prettyman, 2005). However, larger volumes of medication (4 to 5 mL) are unlikely to be absorbed properly. Children, older adults, and thin patients tolerate only 2 mL of an IM injection. Do not give more than 1 mL to small children and older infants, and do not give more than 0.5 mL to smaller infants (Hockenberry and Wilson, 2009).
Assess the muscle before giving an injection. Properly identify the site for the IM injection by palpating bony landmarks, and be aware of the potential complications associated with each site (Nicoll and Hesby, 2002). It needs to be free of tenderness. Repeated injections in the same muscle cause severe discomfort. With the patient relaxed, palpate the muscle to rule out any hardened lesions. Minimize discomfort during an injection by helping the patient assume a position that helps to reduce muscle strain. Other interventions such as distraction and applying pressure to the IM site decrease pain during an IM injection.
Sites: When selecting an IM site, consider the following: Is the area free of infection or necrosis? Are there local areas of bruising or abrasions? What is the location of underlying bones, nerves, and major blood vessels? What volume of medication is to be administered? Each site has different advantages and disadvantages.
Ventrogluteal: The ventrogluteal muscle involves the gluteus medius; it is situated deep and away from major nerves and blood vessels. This site is the preferred and safest site for all adults, children, and infants, especially for medications that have larger volumes and are more viscous and irritating (Hockenberry and Wilson, 2009; Nicoll and Hesby, 2002). The ventrogluteal site is recommended for volumes greater than 2 mL (Nicoll and Hesby, 2002). Research shows that injuries such as fibrosis, nerve damage, abscess, tissue necrosis, muscle contraction, gangrene, and pain are associated with all the common IM sites except the ventrogluteal site. Actually the only published case study of a complication at the ventrogluteal site reported a local reaction to the medication, which is not a complication associated with the site itself (Nicoll and Hesby, 2002).
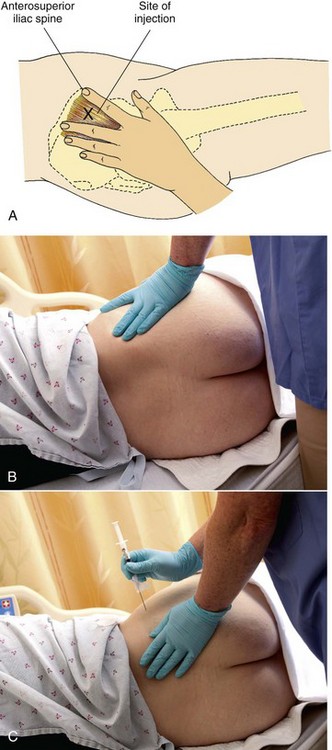
Locate the ventrogluteal muscle by positioning the patient in a supine or lateral position. Flexing the knee and hip helps to relax this muscle. Place the palm of your hand over the greater trochanter of the patient’s hip with the wrist perpendicular to the femur. Use the right hand for the left hip and use the left hand for the right hip. Point the thumb toward the patient’s groin and the index finger toward the anterior superior iliac spine; extend the middle finger back along the iliac crest toward the buttock. The index finger, the middle finger, and the iliac crest form a V-shaped triangle; the injection site is the center of the triangle (Fig. 31-20, A to C).
Vastus Lateralis: The vastus lateralis muscle is another injection site for adults and children. The muscle is thick and well developed, is located on the anterior lateral aspect of the thigh, and extends in an adult from a hand breadth above the knee to a hand breadth below the greater trochanter of the femur (Fig. 31-21, A and B). Use the middle third of the muscle for injection. The width of the muscle usually extends from the midline of the thigh to the midline of the outer side of the thigh. With young children or cachectic patients, it helps to grasp the body of the muscle during injection to be sure that the medication is deposited in muscle tissue. To help relax the muscle, ask the patient to lie flat with the knee slightly flexed or in a sitting position. The vastus lateralis site is often used for infants, toddlers, and children receiving biologicals (e.g., immunoglobulins, vaccines, or toxoids) (Nicoll and Hesby, 2002).

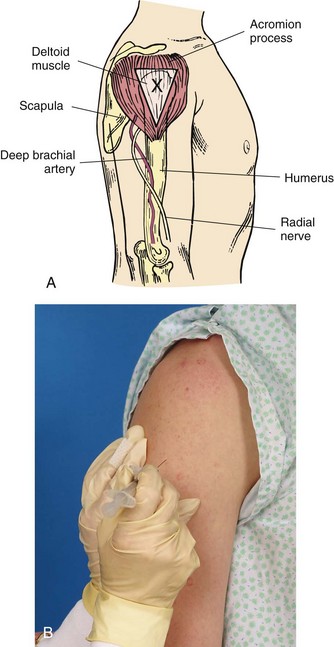
Deltoid: Although the deltoid site is easily accessible, this muscle is not well developed in many adults. There is a potential for injury because the axillary, radial, brachial, and ulnar nerves, as well as the brachial artery, lie within the upper arm under the triceps and along the humerus. Use this site for small medication volumes (2 mL or less) (Nicoll and Hesby, 2002). Carefully assess the condition of the deltoid muscle, consult medication references for suitability of the medication, and carefully locate the injection site using anatomical landmarks (Fig 31-22, A). Use this site only for small medication volumes, when giving immunizations (e.g., hepatitis B, flu shots), or when other sites are inaccessible because of dressings or casts (Nicoll and Hesby, 2002). To locate the muscle, fully expose the patient’s upper arm and shoulder. Do not roll up a tight-fitting sleeve. Have the patient relax the arm at the side and flex the elbow. The patient may sit, stand, or lie down (Fig. 31-22, B). Palpate the lower edge of the acromion process, which forms the base of a triangle in line with the midpoint of the lateral aspect of the upper arm. The injection site is in the center of the triangle, about 3 to 5 cm (1 to 2 inches) below the acromion process. You can also locate the site by placing four fingers across the deltoid muscle, with the top finger along the acromion process. The injection site is then three finger widths below the acromion process.
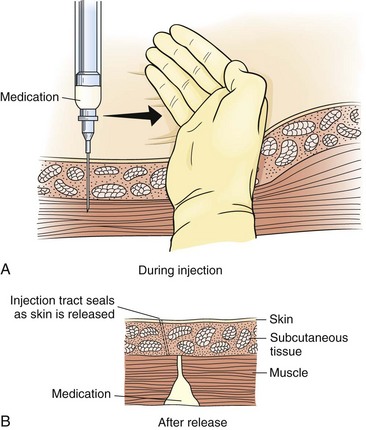
Use of the Z-Track Method in Intramuscular Injections: It is recommended that, when administering IM injections, the Z-track method be used to minimize local skin irritation by sealing the medication in muscle tissue (Nicoll and Hesby, 2002). To use the Z-track method, put a new needle on the syringe after preparing the medication so no solution remains on the outside needle shaft. Then select an IM site, preferably in a large, deep muscle such as the ventrogluteal muscle. Place the ulnar side of the nondominant hand just below the site and pull the overlying skin and subcutaneous tissues approximately 2.5 to 3.5 cm (1 to  inches) laterally or downward (Nicoll and Hesby, 2002). Hold the skin in this position until you administer the injection. After preparing the site with an antiseptic swab, inject the needle deep into the muscle. Grasp the barrel of the syringe with the thumb and index finger of the nondominant hand and slowly inject the medication at a rate of 10 seconds per mL if there is no blood return on aspiration (Nicoll and Hesby, 2002). The needle remains inserted for 10 seconds to allow the medication to disperse evenly rather than channeling back up the track of the needle (Nicoll and Hesby, 2002). Release the skin after withdrawing the needle. This leaves a zigzag path that seals the needle track where tissue planes slide across one another (Fig. 31-23, A and B). The medication cannot escape from the muscle tissue. Injections using this technique result in less discomfort and decrease the occurrence of lesions at the injection site (Nicoll and Hesby, 2002).
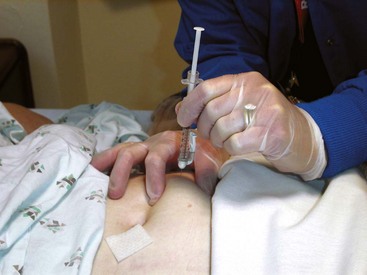
Intradermal Injections
Intradermal injections typically are used for skin testing (e.g., tuberculin screening and allergy tests). Because these medications are potent, they are injected into the dermis, where blood supply is reduced and medication absorption occurs slowly. Sometimes patients have a severe anaphylactic reaction if the medications enter the circulation too rapidly. Skin testing requires that the nurse be able to clearly see the injection sites for changes in color and tissue integrity. Intradermal sites need to be lightly pigmented, free of lesions, and relatively hairless. The inner forearm and upper back are ideal locations.
Use a tuberculin or small hypodermic syringe for skin testing. The angle of insertion for an intradermal injection is 5 to 15 degrees (see Fig. 31-19), and the bevel of the needle is pointed up. As you inject the medication, a small bleb resembling a mosquito bite appears on the surface of the skin. If a bleb does not appear or if the site bleeds after needle withdrawal, there is a good chance that the medication entered subcutaneous tissues. In this case test results will not be valid.
Safety in Administering Medications by Injection
Needleless Devices: Between 600,000 and 1 million accidental needlesticks and sharps injuries occur annually in health care settings (OSHA, 2009). Needlestick injuries commonly occur when health care workers recap needles, mishandle IV lines and needles, or leave needles at a patient’s bedside. Exposure to bloodborne pathogens is one of the deadliest hazards to which nurses are exposed on a daily basis. Most needlestick injuries are preventable with the implementation of safe needle devices. The Needlestick Safety and Prevention Act mandates the use of special needle safety devices to reduce the frequency of needlestick injuries.
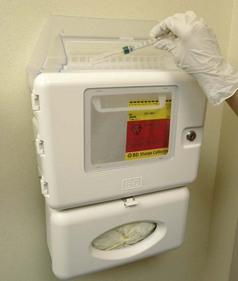
Safety syringes have a sheath or guard that covers a needle after it is withdrawn from the skin (Fig. 31-24, A and B). The needle is immediately covered, eliminating the chance for a needlestick injury. The syringe and sheath are disposed of together in a receptacle. Use needleless devices whenever possible to reduce the risk of needlestick and sharps injuries (OSHA, 2009). Always dispose of needles and other instruments considered sharps into clearly marked, appropriate containers (Fig. 31-25). Containers need to be puncture proof and leak proof. Never force a needle into a full needle disposal receptacle. Never place used needles and syringes in a wastebasket, in your pocket, on a patient’s meal tray, or at the patient’s bedside. Box 31-23 summarizes the recommendations for the prevention of needlestick injuries.
Intravenous Administration
The nurse administers medications intravenously by the following methods:
1. As mixtures within large volumes of IV fluids
2. By injection of a bolus or small volume of medication through an existing IV infusion line or intermittent venous access (heparin or saline lock)
3. By “piggyback” infusion of a solution containing the prescribed medication and a small volume of IV fluid through an existing IV line
In all three methods the patient has either an existing IV infusion running continuously or an IV access site for intermittent infusions. In most agencies policies and procedures list persons who are able to give IV medications and the situations in which they may be given. These policies are based on the medication, capability, and availability of staff, and the type of monitoring equipment available.
Chapter 41 describes the technique for performing venipuncture and establishing continuous IV fluid infusions. Medication administration is only one reason for supplying IV fluids. IV fluid therapy is used primarily for fluid replacement in patients unable to take oral fluids and as a means of supplying electrolytes and nutrients.
When using any method of IV medication administration, observe patients closely for symptoms of adverse reactions. After a medication enters the bloodstream, it begins to act immediately, and there is no way to stop its action. Thus take special care to avoid errors in dose calculation and preparation. Carefully follow the six rights of safe medication administration, double-check medication calculations with another nurse, and know the desired action and side effects of every medication you give. If the medication has an antidote, make sure that it is available during administration. When administering potent medications, assess vital signs before, during, and after infusion.
Administering medications by the IV route has advantages. Often the nurse uses this route in emergencies when a fast-acting medication must be delivered quickly. The IV route is also best when it is necessary to give medications to establish constant therapeutic blood levels. Some medications are highly alkaline and irritating to muscle and subcutaneous tissue. These medications cause less discomfort when given intravenously. Because IV medications are immediately available to the bloodstream once they are administered, verify the prescribed rate of administration with a medication reference or a pharmacist before giving them to ensure that the medication is given safely over the appropriate amount of time. Patients experience severe adverse reactions if IV medications are administered too quickly.
Large-Volume Infusions: Of the three methods of administering IV medications, mixing them in large volumes of fluids is the safest and easiest. Because the medication is not in a concentrated form, the risk of side effects or fatal reactions is minimal when infused over the prescribed time frame. Medications are diluted in large volumes (500 or 1000 mL) of compatible IV fluids such as normal saline or lactated Ringer’s solution. Vitamins and potassium chloride are two types of medications commonly added to IV fluids. There is a danger with continuous infusion: if the IV fluid is infused too rapidly, the patient is at risk for medication overdose and circulatory fluid overload.
In the past nurses often mixed medications into IV fluids. However, standards developed by the U.S. Pharmacopeia and other health care professional organizations no longer support this practice on a routine basis (ASHP, n.d.b). Many patient safety risks such as incorrect calculation, nonaseptic preparation, and incorrect labeling occur when nurses have to prepare medications in IV containers on patient care units. Current best practices include use of IV medications that come in standardized concentrations and dosages; standardized procedures for ordering, preparing, and administering IV medications; and ready-to-administer doses when possible (ASHP, 2008). Nurses only mix medications into IV fluids in emergency situations. The nurse never prepares high-alert medications (e.g., heparin, dopamine, dobutamine, nitroglycerin, potassium, antibiotics, or magnesium) on a patient care unit. Check with a pharmacist before mixing a medication in an IV container. If the pharmacist confirms that you need to prepare the medication, ask another nurse to verify your medication calculations and have that nurse watch you during the entire procedure to ensure that you prepare the medication safely. First ensure that the IV fluid and medication are compatible. Then prepare the medication in a syringe (see Skill 31-4) using strict aseptic technique. Clean the injection port of the IV bag with an alcohol swab, remove the cap from the needle, and stick the needle into the IV fluid. Push the medication into the IV fluid and mix the solution by turning the IV bag gently end to end. Finally attach a medication label following ISMP safe label guidelines (2010e). Administer the medication to the patient at the prescribed rate (see Chapter 41). Do not add medications to IV bags that are already hanging because there is no way to tell the exact concentration of the medication. Add medications only to new IV bags.
When administering medications in large IV infusions, regulate the IV rate according to the health care provider’s order. Monitor patients closely for adverse reactions to the medication and fluid volume overload. Also check the site frequently for infiltration and phlebitis (see Chapter 41).
Intravenous Bolus: An IV bolus involves introducing a concentrated dose of a medication directly into the systemic circulation (Skill 31-6 on pp. 631-635). Because a bolus requires only a small amount of fluid to deliver the medication, it is an advantage when the amount of fluid that the patient can take is restricted. The IV bolus, or “push,” is the most dangerous method for administering medications because there is no time to correct errors. In addition, a bolus may cause direct irritation to the lining of blood vessels. Before administering a bolus confirm placement of the IV line. Never give a medication intravenously if the insertion site appears puffy or edematous or the IV fluid cannot flow at the proper rate. Accidental injection of a medication into the tissues around a vein causes pain, sloughing of tissues, and abscesses, depending on the composition of the medication.
Determine the rate of administration of an IV bolus medication by the amount of medication that can be given each minute. For example, if a patient is to receive 4 mL of a medication over 2 minutes, give 2 mL of the IV bolus medication every minute. Look up each medication to determine the recommended concentration and rate of administration. Consider the purpose for which an IV medication is prescribed and any potential adverse effects related to the rate or route of administration.
Volume-Controlled Infusions: Another way of administering IV medications is through small amounts (50 to 100 mL) of compatible IV fluids. The fluid is within a secondary fluid container separate from the primary fluid bag. The container connects directly to the primary IV line or to separate tubing that inserts into the primary line (Skill 31-7 on pp. 635-639). Three types of containers are volume-control administration sets (e.g., Volutrol or Pediatrol), piggyback sets, and mini-infusers. Using volume-controlled infusions has several advantages:
• It reduces risk of rapid-dose infusion by IV push. Medications are diluted and infused over longer time intervals (e.g., 30 to 60 minutes).
• It allows for administration of medications (e.g., antibiotics) that are stable for a limited time in solution.
Piggyback: A piggyback is a small (25 to 250 mL) IV bag or bottle connected to a short tubing line that connects to the upper Y-port of a primary infusion line or to an intermittent venous access (Fig. 31-26). The label on the medication follows the ISMP IV piggyback medication label format (2010e) (Fig. 31-27). The piggyback tubing is a microdrip or macrodrip system (see Chapter 41). The set is called a piggyback because the small bag or bottle is higher than the primary infusion bag or bottle. In the piggyback setup the main line does not infuse when the piggybacked medication is infusing. The port of the primary IV line contains a back-check valve that automatically stops flow of the primary infusion once the piggyback infusion flows. After the piggyback solution infuses and the solution within the tubing falls below the level of the primary infusion drip chamber, the back-check valve opens, and the primary infusion again flows.
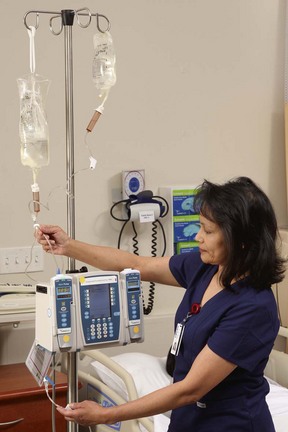
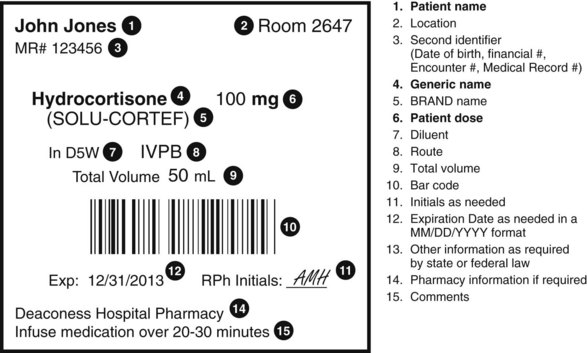
Volume-Control Administration: Volume-control administration (e.g., Buretrol) sets are small (150-mL) containers that attach just below the primary infusion bag or bottle. The set is attached and filled in a manner similar to that used with a regular IV infusion. Follow package directions for priming sets (see Chapter 41).
Intermittent Venous Access
An intermittent venous access (commonly called a saline lock) is an IV catheter capped off on the end with a small chamber covered by a rubber diaphragm or a specially designed cap. Special rubber-seal injection caps usually accept needle safety devices (see Chapter 41). Advantages to intermittent venous access include the following:
• Cost savings resulting from the omission of continuous IV therapy
• Effectiveness of nurse’s time enhanced by eliminating constant monitoring of flow rates
Before administering an IV bolus or piggyback medication, assess the patency and placement of the IV site. After the medication has been administered through an intermittent venous access, the access must be flushed with a solution to keep it patent. Generally normal saline is an effective flush solution for peripheral catheters. Some agencies require the use of heparin. Nurses need to verify and follow institution policies regarding the care and maintenance of the IV site.
Administration of Intravenous Therapy in the Home
Sometimes patients are discharged from an acute care setting and continue to receive IV therapy in the home. Medications such as antibiotics, chemotherapy, total parenteral nutrition, analgesics, and blood transfusions are given in the home. Most patients who have home IV therapy have a central venous catheter inserted before discharge (see Chapter 41). In addition, patients who need to receive IV therapy in the home have home care nurses to assist with maintenance and monitoring.
Carefully assess patients and their families to determine their ability to manage this therapy at home. Begin instruction on IV care management while the patient is still in the hospital. Patients and families need to learn how to recognize problems and what to do when these problems occur. It is important for the family to recognize signs of infection and complications and know when to notify the home care nurse or health care provider when these occur. In addition, patients and their families need information regarding maintenance of IV administration equipment, including the infusion pump.
Safety Guidelines for Nursing Skills
Ensuring patient safety is an essential role of the professional nurse. To ensure patient safety, communicate clearly with members of the health care team, assess and incorporate the patient’s priorities of care and preferences, and use the best evidence when making decisions about your patient’s care. When performing the skills in this chapter, remember the following points to ensure safe, individualized patient care.
• Be vigilant during the entire process of medication administration. Ensure that your patients receive the appropriate medications. Know why each medication is ordered for your patient. Understand what you need to do before, during, and after medication administration. Evaluate the effectiveness and assess for adverse effects after your patients take their medications.
• Take care of yourself. You think as clearly and critically as possible if you are healthy. Healthy behaviors such as getting adequate sleep, making healthy food choices, and relaxing pelvic floor muscles during stress are positive ways to help you better process information and make safe decisions during medication administration.
• Set up and prepare medications in distraction-free areas.
• Verify expiration date of medications during preparation. Do not administer expired medications.
• Identify each patient using at least two identifiers before administering medications.
• Clarify all unclear orders and ask for help whenever you are uncertain about a medication order or calculation. Consult with your peers, pharmacists, and other health care providers. Resolve all your concerns related to medication administration before preparing and giving medications.
• Use technology (e.g., bar-code scanning, electronic MARs) that is available to you when preparing and administering medications. Follow all policies related to the safe use of technology and do not use “work-arounds.” Nurses who use “work-arounds” fail to follow agency protocols, policies, or procedures during medication administration in an attempt to administer medications to patients in a timelier manner. Failure to follow the standard of care greatly increases the risk for making a medication error, impairs patient safety, and places the nurse at risk for malpractice and disciplinary action (see Chapter 23).
• Educate patients about their medications during medication administration. Patients are often able to identify inappropriate medications. Answer all patient questions and resolve their concerns before giving medications. Include family caregivers in medication education when appropriate.
• In most circumstances you cannot delegate medication administration. Ensure that you follow standards set by your state Nurse Practice Act and guidelines established by the health care agency. Licensed practical nurses (LPNs) or licensed vocational nurses (LVNs) can usually administer medications given PO, subcutaneously, intramuscularly, and intradermally. In some cases they can give medications intravenously if they have had special training and if the medications are not high alert. Some states also allow certified medical assistants (CMAs) to administer some types of medications (e.g., PO medications) in some health care settings (e.g., long-term care facilities). The skills in this chapter assume that you are not in a setting where you can delegate medication administration to nursing assistive personnel (NAP). If you are practicing in a state and a health care setting that allow you to delegate medication administration, follow the guidelines for safe delegation (see Chapter 21), agency policies, and the standards outlined in the Nurse Practice Act in your state.
Skill 31-1 Administering Oral Medications
• Glass of water, juice, or preferred liquid
• Device for crushing or splitting tablets (optional)

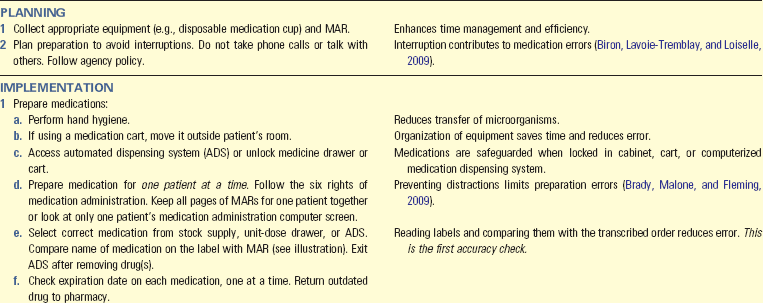
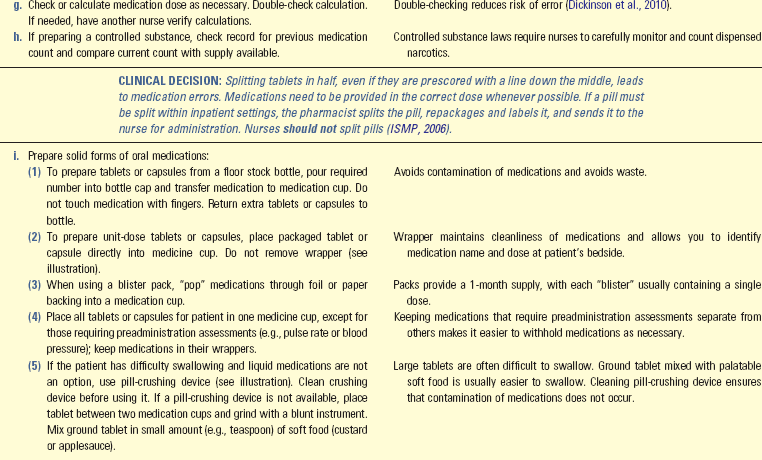
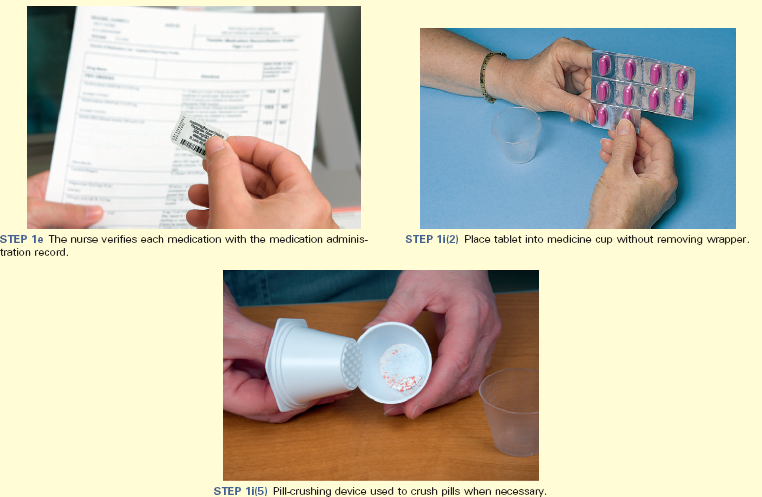
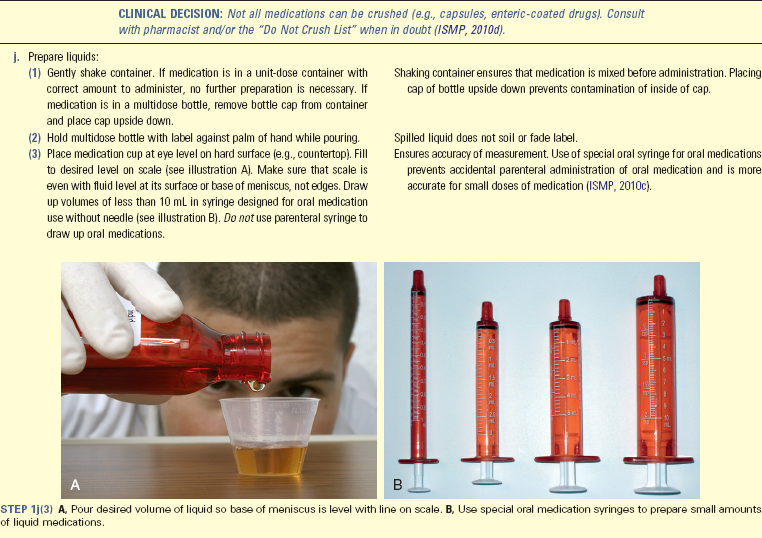


Unexpected Outcomes and Related Interventions:
1. Patient exhibits adverse effects (side effect, toxic effect, allergic reaction) such as urticaria, rash, wheezing.
• Always notify prescriber and pharmacy when patient exhibits adverse effects.
• Withhold further doses and add allergy information to patient’s medical record.
2. Patient refuses medication.
• Explore reasons why patient does not want medication.
• Educate if misunderstandings of medication therapy are apparent.
• Do not force patient to take medication; patients have the right to refuse treatment. If patient continues to refuse medication despite educational attempts, record why the drug was withheld on patient’s chart and notify prescriber.
• Chart medication dose, route, time and date given on MAR immediately after administering.
• Record the reason that any drug is withheld and follow agency policy for proper recording.
• Record and report evaluation of medication effect to prescriber if required (e.g., report urine output following administration of diuretic if ordered by prescriber).
• Instruct patients and family caregivers about all aspects of medication administration, including dosage, desired effect, when to take medications, proper storage of medications, anticipated side effects, and whether to take medication with or without food, to ensure safe medication administration at home.
• Evaluate patient’s ability to safely self-administer medications. If unable to safely self-administer, attempt nursing interventions such as a chart or pillbox to assist in self-administration. If interventions fail and patient still is unable to administer medications safely, notify the prescriber.
Skill 31-2 Administering Ophthalmic Medications
• Medication bottle with sterile eyedropper or ointment tube or medicated intraocular disk
• Washbasin filled with warm water and washcloth if eyes have crust or drainage
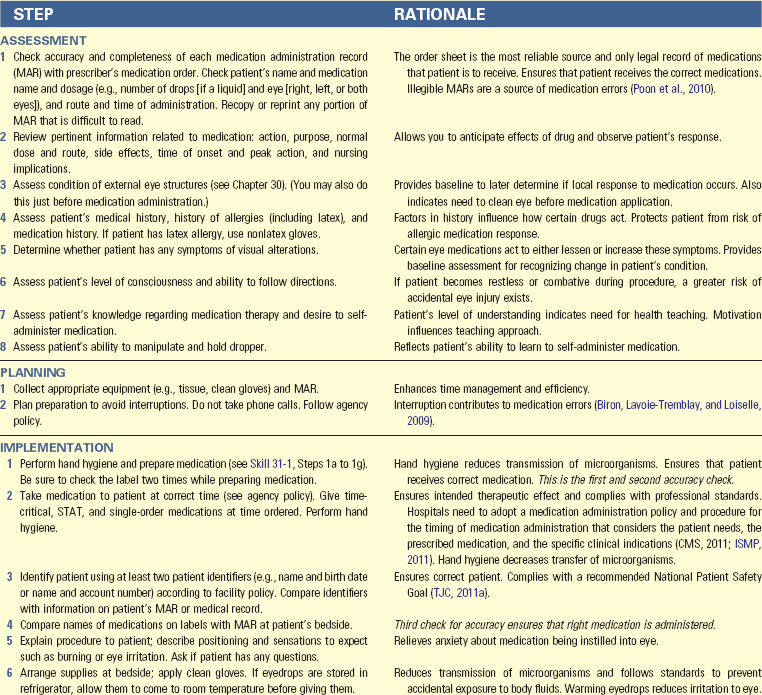
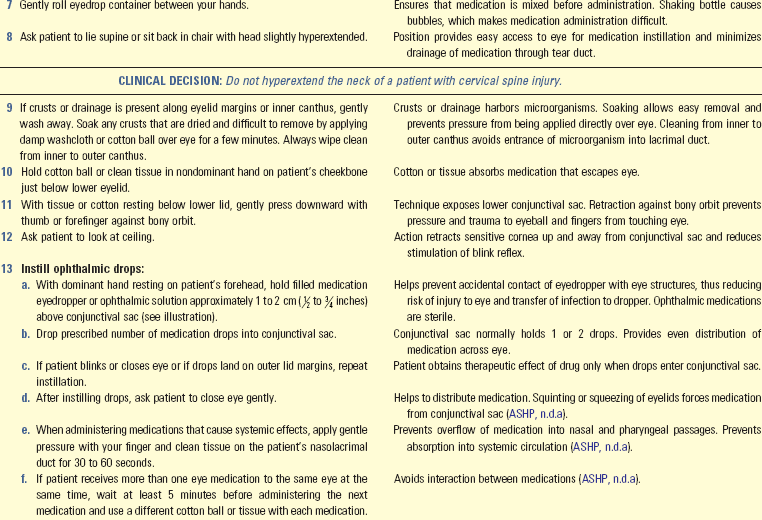
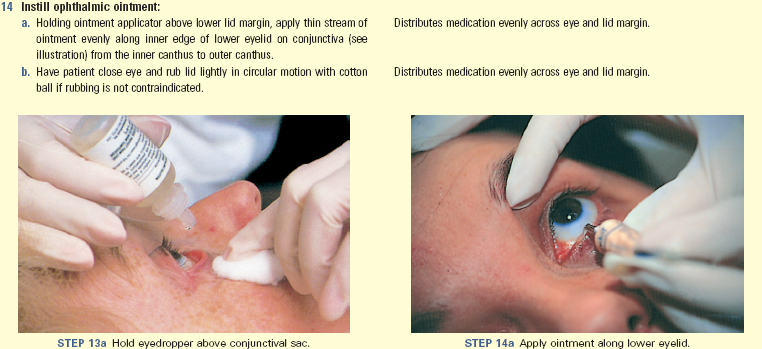
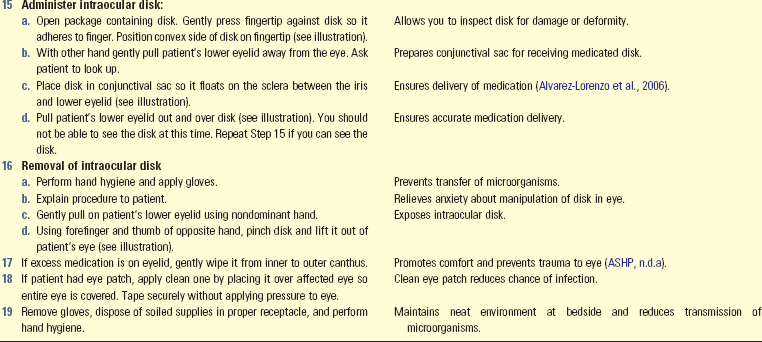
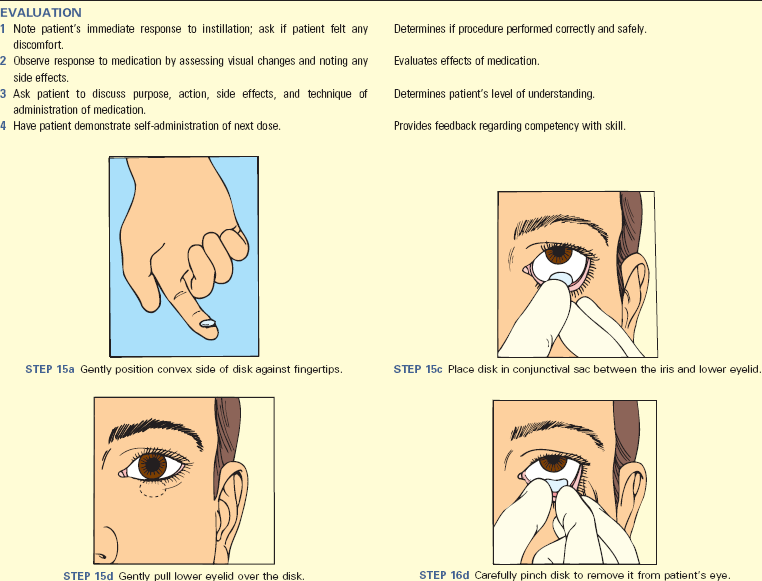
Unexpected Outcomes and Related Interventions:
1. Patient cannot instill drops without supervision.
• Reinforce teaching and allow patient to self-administer drops as much as possible to enhance confidence.
• If patient cannot self-administer drops, teach family caregivers to instill them into patient’s eye.
2. Patient displays signs of allergic reaction (e.g., tearing, reddened sclera) or systemic response (e.g., bradycardia) to medication.
Skill 31-3 Using Metered-Dose Or Dry Powder Inhalers
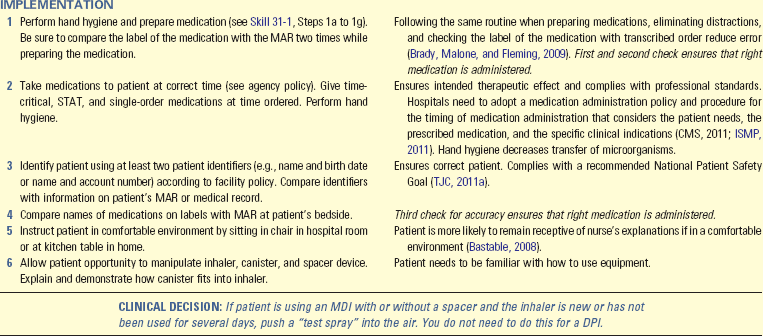
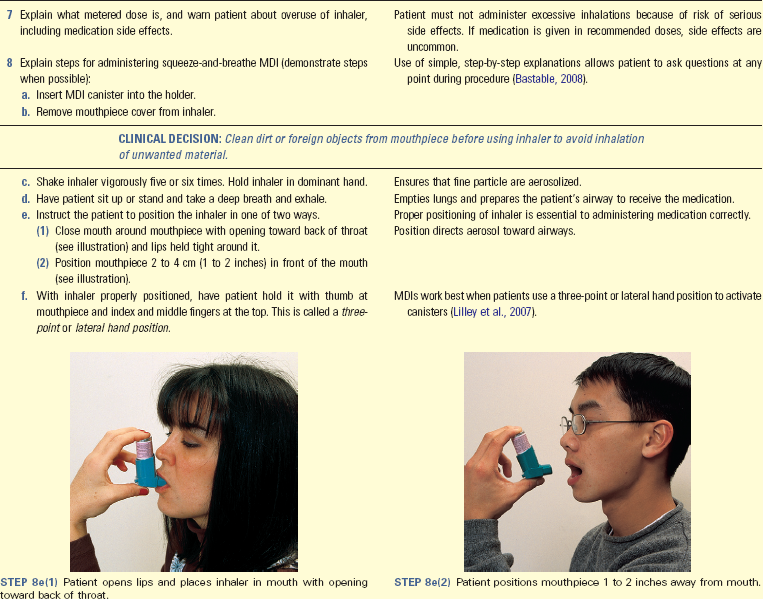
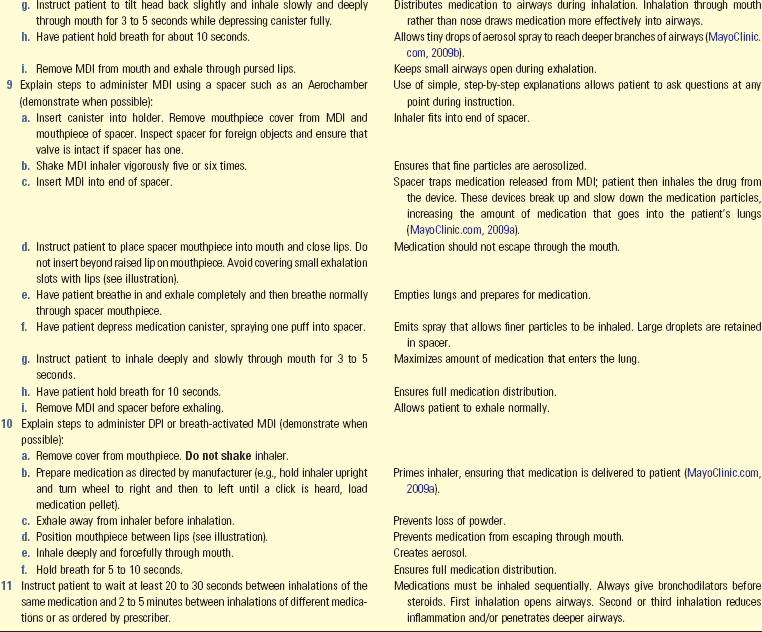
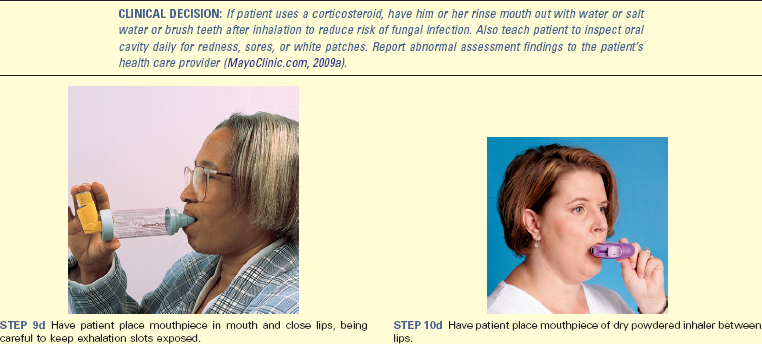
Unexpected Outcomes and Related Interventions:
1. Patient needs a bronchodilator more than every 4 hours.
• Indicates respiratory problems; reassessment of type of medication and delivery methods is needed.
• Notify health care provider if respiratory status does not improve.
2. Patient experiences cardiac dysrhythmias, light-headedness, and/or syncope, especially if receiving beta-adrenergics.
3. Patient is not able to self-administer medication properly.
4. Patient experiences paroxysms of coughing caused by irritation of posterior pharynx.
Skill 31-4 Preparing Injections
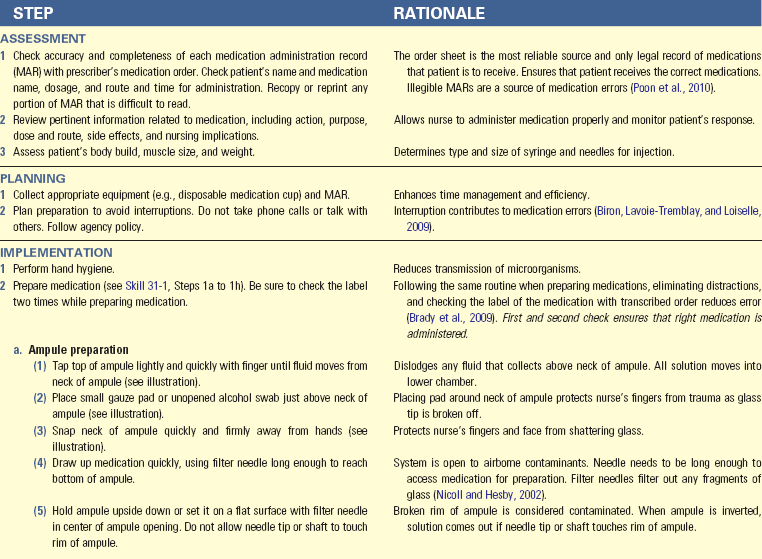
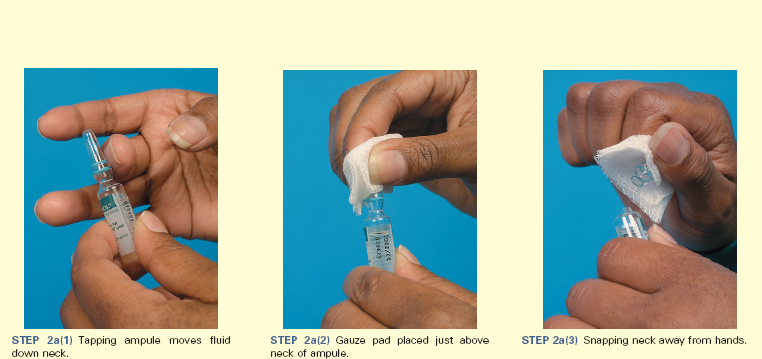
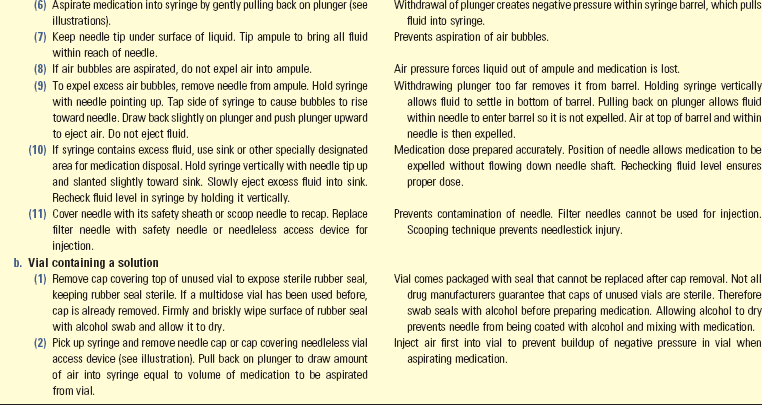
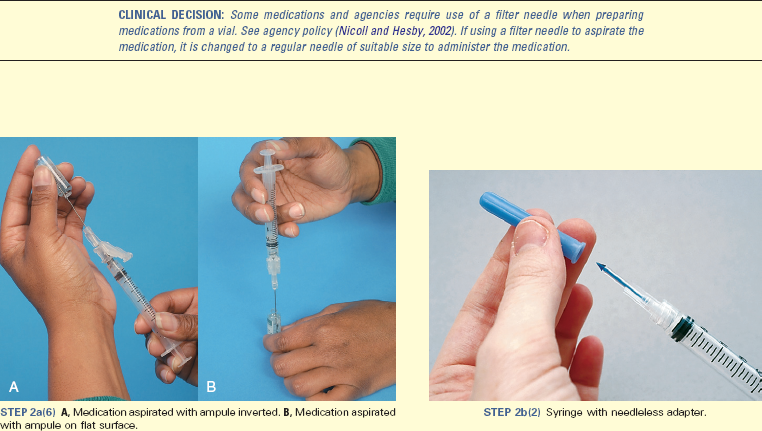
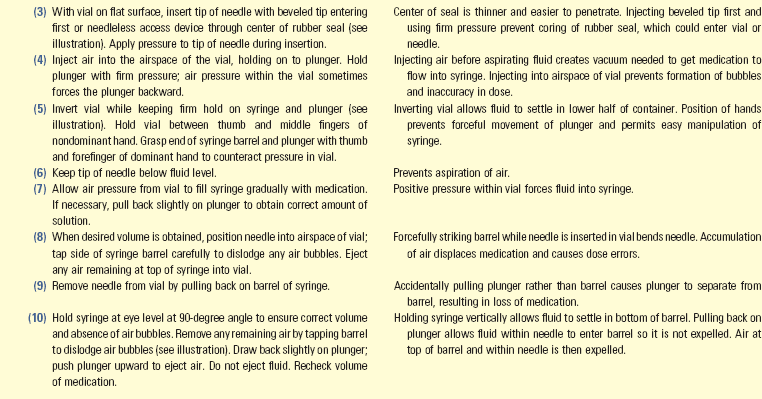
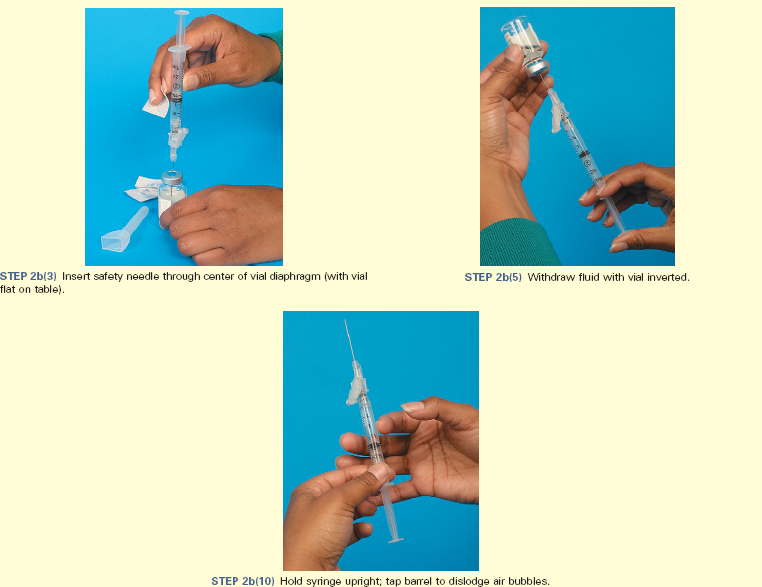
Skill 31-5 Administering Injections
• Proper size safety syringe and needle:
• Subcutaneous: Syringe (1 to 3 mL) and needle (27 to 25 gauge,  to
to  inch)
inch)
• Subcutaneous U-100 insulin: Insulin syringe (0.3, 0.5, or 1 mL) with preattached needle (28 to 31 gauge,  to
to  inch)
inch)
• Subcutaneous U-500 insulin: 1-mL tuberculin syringe with needle (25 to 27 gauge,  to
to  inch)
inch)
• Intramuscular (IM): Syringe 2 to 3 mL for adult, 0.5 to 1 mL for infants and small children
• Needle, length corresponding to site of injection and age of patient. Refer to following guidelines; length needed may vary outside of these guidelines for patients who are smaller or larger than average.

• Needle gauge often depends on length of needle. Administer most biologicals and medications in aqueous solutions with 20- to 25-gauge needle. Use 18- to 25-gauge needles for medications in oil-based solutions (Nicoll and Hesby, 2002).
 to
to  inch)
inch)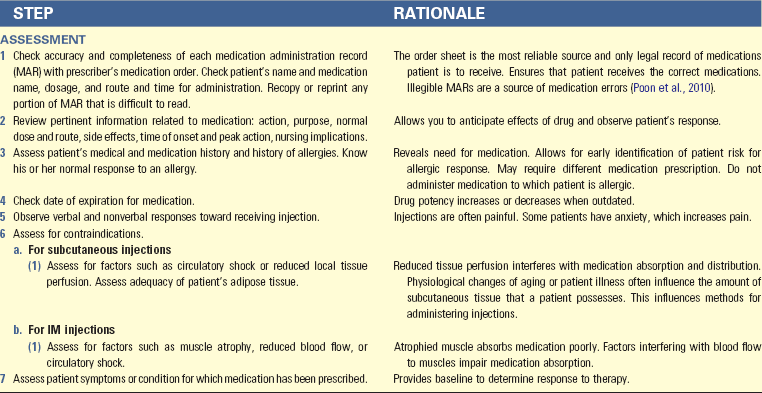
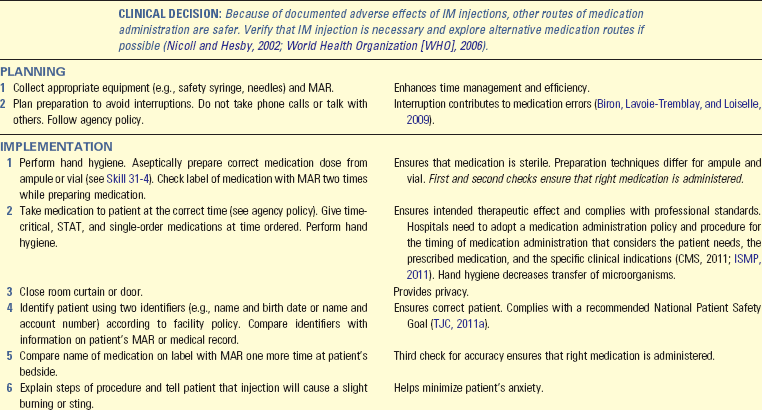
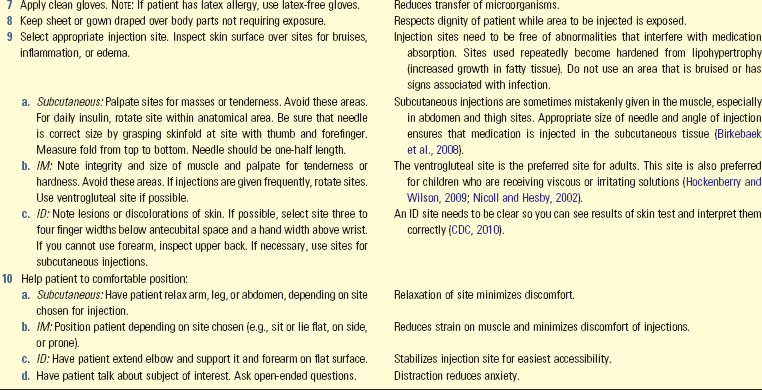
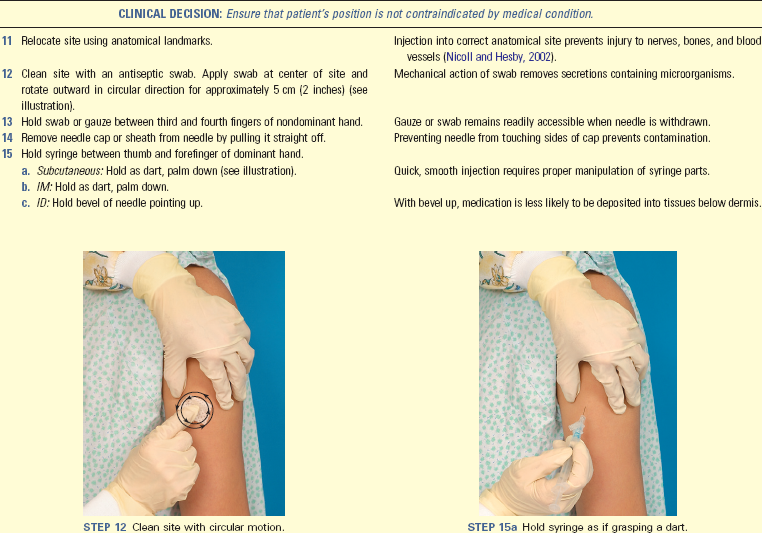
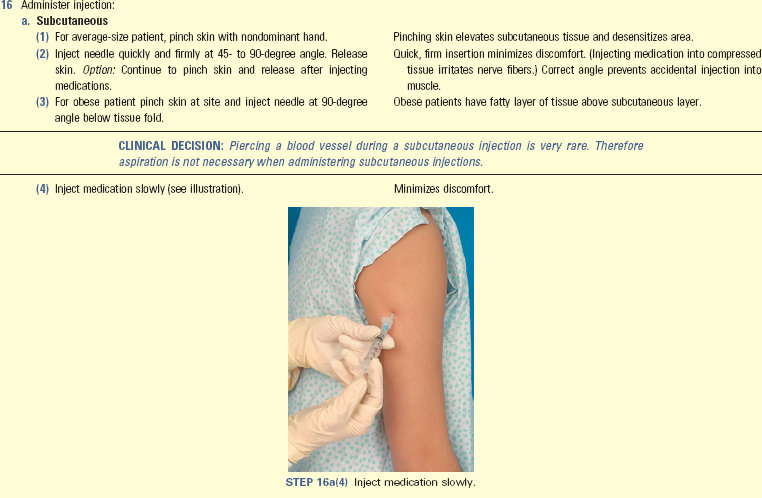
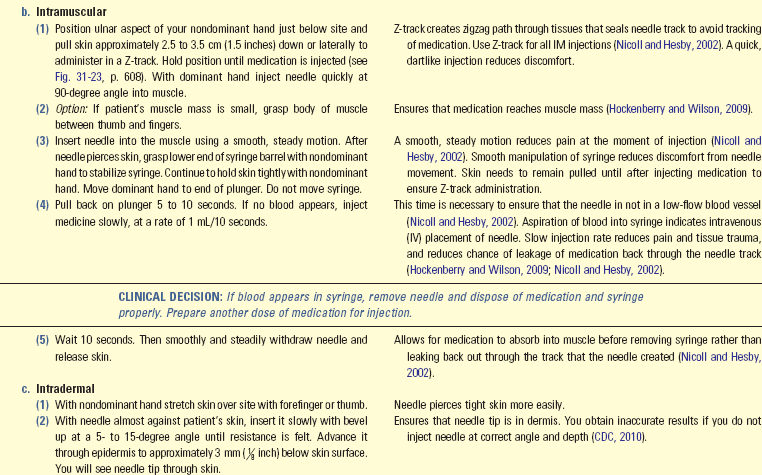
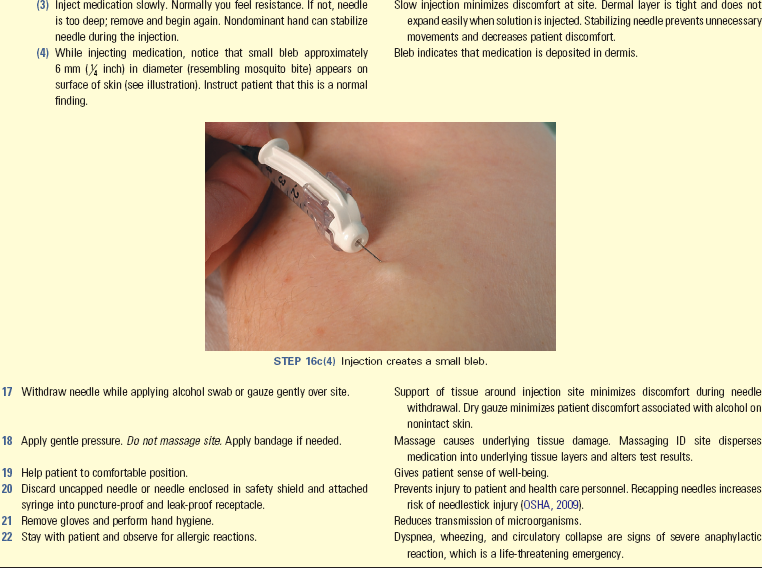
Unexpected Outcomes and Related Interventions:
1. Raised, reddened, or hard zone (induration) forms around ID test site.
• Notify patient’s health care provider.
• Document sensitivity to injected allergen or positive test if tuberculin skin testing was completed.
2. Hypertrophy of skin develops from repeated subcutaneous injections.
3. Patient develops signs and symptoms of allergy or side effects.
• Follow agency policy or guidelines for appropriate response to adverse drug reactions.
4. Patient complains of localized pain, numbness, tingling, or burning at injection site, indicating possible injury to nerve or tissues.
• Chart medication dose, route, site, time, and date given on MAR immediately after giving medication per agency policy.
• Document if scheduled medication is withheld and record the reason per agency policy.
• Report any undesirable effects from medication to prescriber.
• Record patient’s response to medications in nurses’ notes and report to prescriber if required.
• Assess patient’s readiness to learn before instructing in self-injections. Some patients are hesitant to administer injections to themselves; thus relieve any anxiety before teaching this skill to a patient.
• Some patients prefer to reuse their syringes to save costs. This practice is safe and practical if the needle is not contaminated during the preparation and administration of the injection. Teach patients to immediately recap needles after use.
• Patients can often purchase or obtain sharps boxes for home use. If this is not possible, they can use a hard plastic bottle that they cannot see through (e.g., a fabric softener bottle or detergent bottle) to safely store syringes after use. Disposal of needles used in the home varies among communities. Check with local authorities to verify how to dispose of needles.
Skill 31-6 Administering Medications By Intravenous Bolus
• Medication in vial or ampule
• Safety syringe for medication preparation
• Needleless device or sterile safety needle (21 to 25 gauge)
• IV lock: vial of appropriate flush solution (saline most common, heparinized flush is sometimes used; if using heparin, most common concentration is 10 to 100 units/mL; see agency policy)

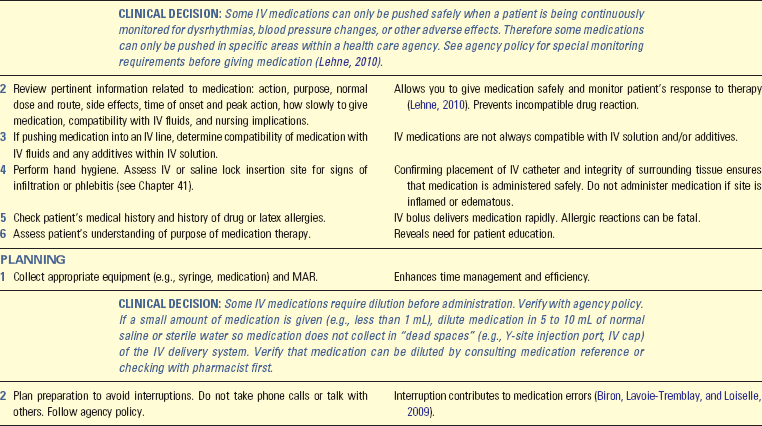
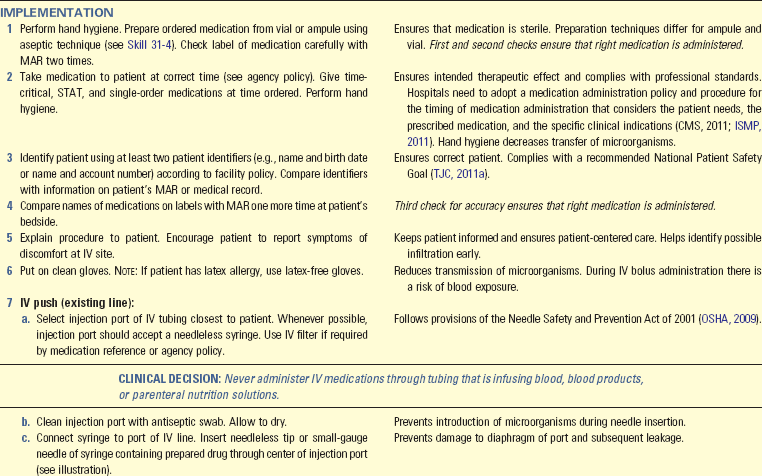
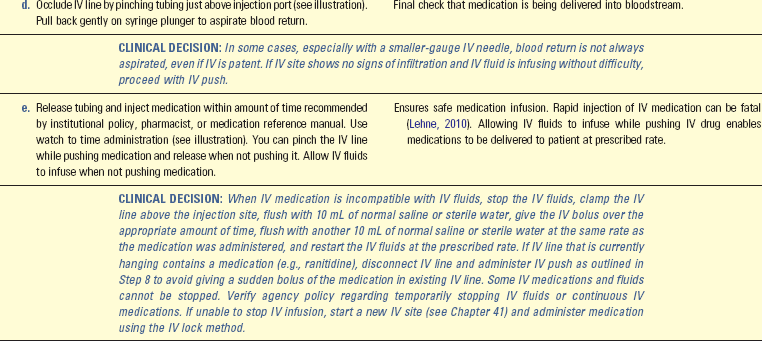
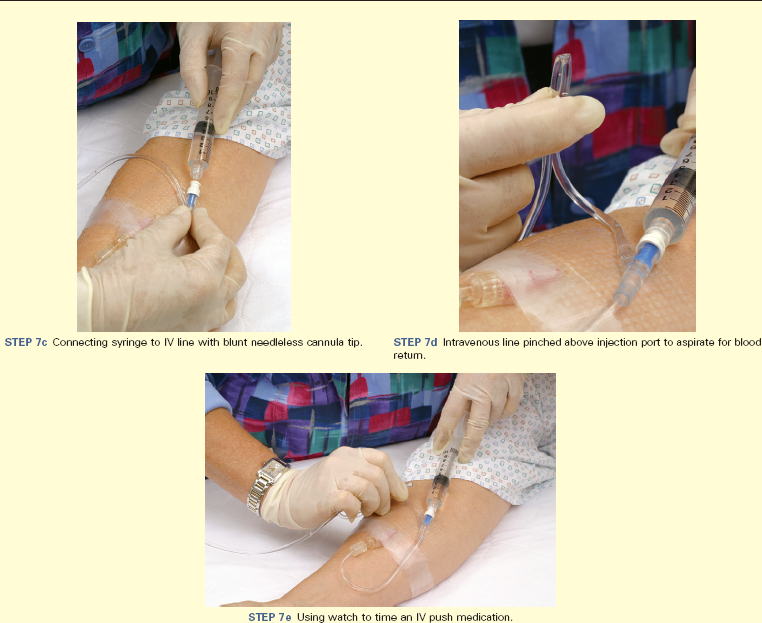

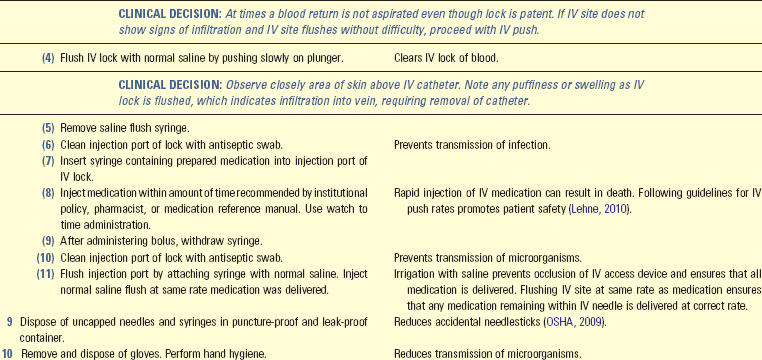

Unexpected Outcomes and Related Interventions:
1. Patient develops adverse reaction to medication.
• Stop delivering medication immediately and follow institution policy or guidelines for appropriate response and reporting of adverse drug reactions.
2. IV site shows symptoms of infiltration or phlebitis (see Chapter 41).
Skill 31-7 Administering Intravenous Medications by Piggyback, Intermittent Intravenous Infusion Sets, and Mini-Infusion Pumps

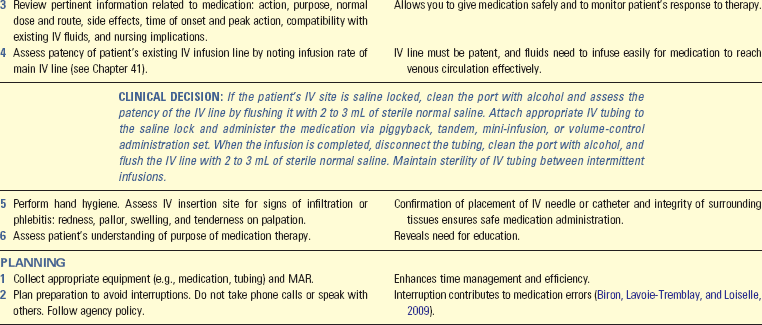
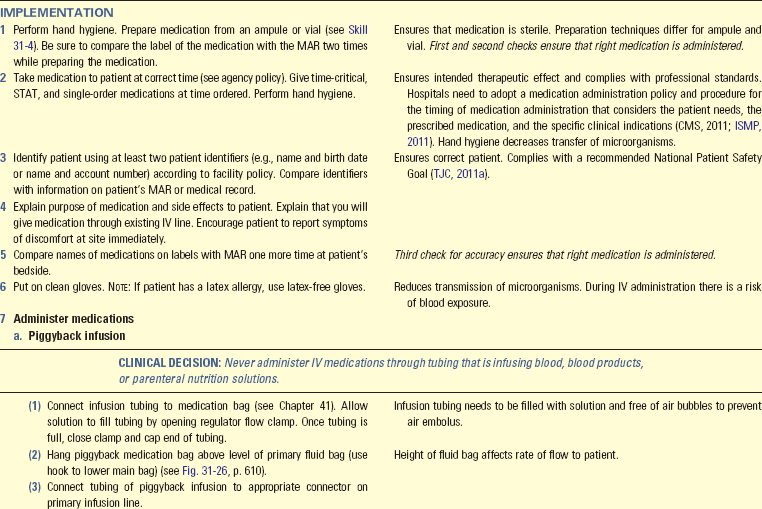
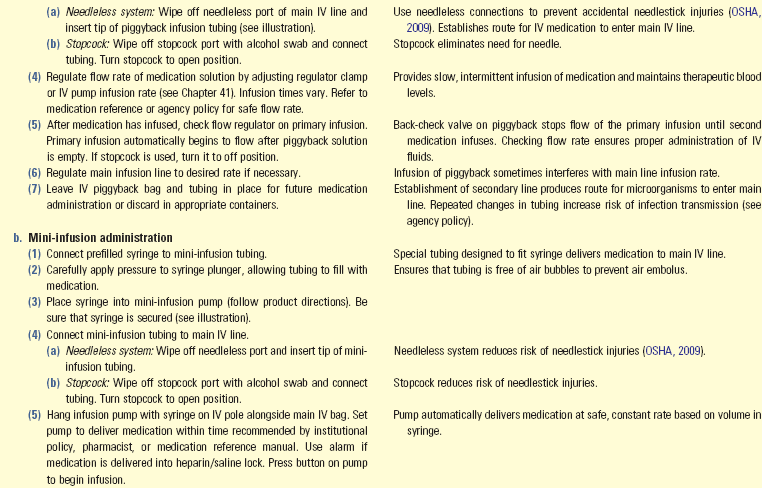
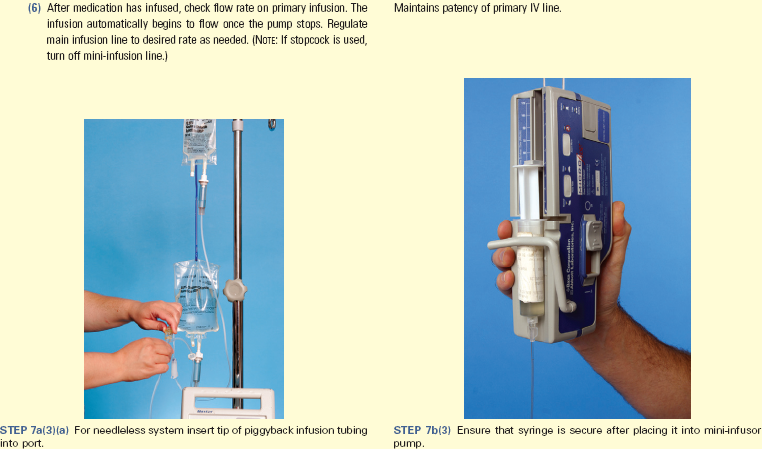
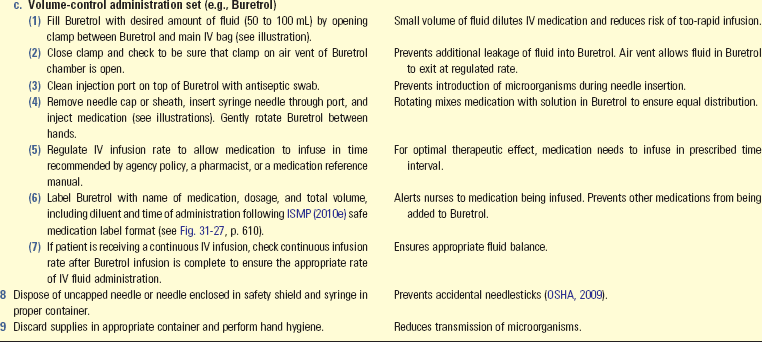
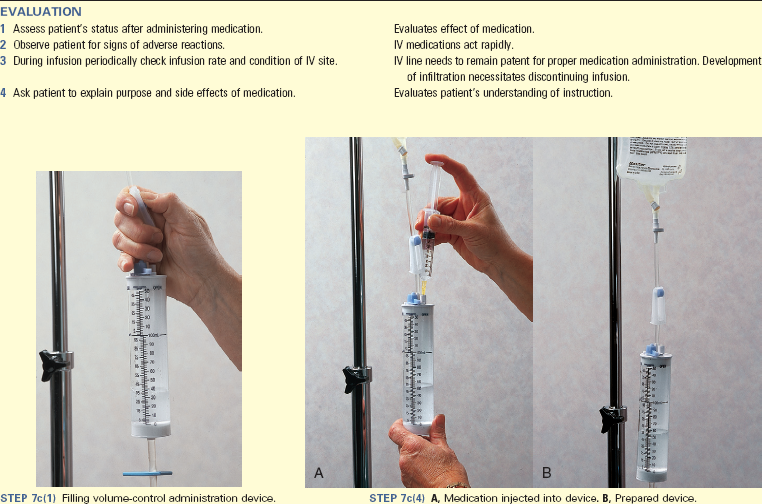
Unexpected Outcomes and Related Interventions:
1. Patient develops adverse drug reaction.
• Stop medication infusion immediately.
• Follow institutional policy or guidelines for appropriate response and reporting of adverse drug reactions.
2. Medication does not infuse over desired period.
• Determine reason (e.g., improper calculation of flow rate, malpositioning of IV needle at insertion site, or infiltration).
3. IV site shows signs of phlebitis or infiltration (see Chapter 41).
• See related interventions in Skill 31-6.
Key Points
• Learning medication classifications improves understanding of nursing implications for administering medications with similar characteristics.
• All controlled substances are handled according to strict procedures that account for each medication.
• The nurse applies understanding of the physiology of medication action when timing administration, selecting routes, initiating actions to promote medication efficacy, and observing responses to medications.
• The older adult’s body undergoes structural and functional changes that alter medication actions and influence the manner in which nurses provide medication therapy.
• Verify medication calculations with another nurse to ensure accuracy.
• Medications given parenterally are absorbed more quickly than those administered by other routes.
• Each medication order needs to include the patient’s name, order date, medication name, dosage, route, time of administration, drug indication, and prescriber’s signature.
• A medication history reveals allergies, medications a patient is taking, and the patient’s adherence to therapy.
• The six rights of medication administration contribute to accurate preparation and administration of medication doses.
• The six rights of medication administration are the right medication, right dose, right patient, right route, right time, and right documentation.
• Nurses need to avoid distractions and follow the same routine when preparing medications to reduce medication errors.
• Nurses administer only medications they prepare, and prepared medications are never left unattended.
• Document medications immediately after administration.
• A nurse uses clinical judgment in determining the best time to administer prn medications.
• The nurse reports a medication error immediately.
• When preparing medications, the nurse checks the medication container label against the MAR three times.
• The Z-track method for IM injections protects subcutaneous tissues from irritating parenteral fluids.
• Failure to select injection sites by anatomical landmarks leads to tissue, bone, or nerve damage.
Clinical Application Questions
Preparing for Clinical Practice
Janice, a nursing student, is caring for Esteban, a 48-year-old Latino who had diabetes and hypertension. Esteban’s health care provider writes a new medication order for furosemide 30 mg IVP STAT and then q8h.
1. What does Janice need to know about furosemide before administering it?
2. Three vials of furosemide arrive on the patient care unit. The labels on the vials say: “40 mg furosemide/4 mL.” How much medication does Janice prepare in the syringe?
3. Janice collects the appropriate equipment to administer the medication, performs hand hygiene, prepares the medication in the syringe, and takes it to Esteban at the correct time. Which step does she need to take next in administering the medication?
 Answers to Clinical Application Questions can be found on the Evolve website.
Are You Ready to Test Your Nursing Knowledge?
1. The nurse is having difficulty reading a physician’s order for a medication. He or she knows that the physician is very busy and does not like to be called. What is the most appropriate next step for the nurse to take?
1. Call a pharmacist to interpret the order
2. Call the physician to have the order clarified
3. Consult the unit manager to help interpret the order
4. Ask the unit secretary to interpret the physician’s handwriting
2. The patient has an order for 2 tablespoons of Milk of Magnesia. How much medication does the nurse give him or her?
3. A nurse is administering eardrops to an 8-year-old patient with an ear infection. How does the nurse pull the patient’s ear when administering the medication?
4. A patient is to receive cephalexin (Keflex) 500 mg PO. The pharmacy has sent 250-mg tablets. How many tablets does the nurse administer?
 tablet
 tablets
5. A nurse is administering medications to a 4-year-old patient. After he or she explains which medications are being given, the mother states, “I don’t remember my child having that medication before.” What is the nurse’s next action?
2. Identify the patient using two patient identifiers
3. Withhold the medications and verify the medication orders
4. Provide medication education to the mother to help her better understand her child’s medications
6. A patient is transitioning from the hospital to the home environment. A home care referral is obtained. What is a priority in relation to safe medication administration for the discharge nurse?
1. Set up the follow-up appointments with the physician for the patient.
2. Ensure that someone will provide housekeeping for the patient at home.
3. Ensure that the home care agency is aware of medication and health teaching needs.
4. Make sure that the patient’s family knows how to safely bathe him or her and provide mouth care.
7. A nursing student takes a patient’s antibiotic to his room. The patient asks the nursing student what it is and why he should take it. Which information does the nursing student include when replying to the patient?
1. Only the patient’s physician can give this information.
2. The student provides the name of the medication and a description of its desired effect.
3. Information about medications is confidential and cannot be shared.
8. The nurse is administering a sustained-release capsule to a new patient. The patient insists that he cannot swallow pills. What is the nurse’s next best course of action?
1. Ask the prescriber to change the order
2. Crush the pill with a mortar and pestle
9. The nurse takes a medication to a patient, and the patient tells him or her to take it away because she is not going to take it. What is the nurse’s next action?
1. Ask the patient’s reason for refusal
2. Explain that she must take the medication
3. Take the medication away and chart the patient’s refusal
4. Tell the patient that her physician knows what is best for her
10. The nurse receives an order to start giving a loop diuretic to a patient to help lower his or her blood pressure. The nurse determines the appropriate route for administering the diuretic according to:
11. A patient is receiving an intravenous (IV) push medication. If the drug infiltrates into the outer tissues, the nurse:
1. Continues to let the IV run.
2. Applies a warm compress to the infiltrated site.
3. Stops the administration of the medication and follows agency policy.
4. Should not worry about this because vesicant filtration is not a problem.
12. If a patient who is receiving intravenous (IV) fluids develops tenderness, warmth, erythema, and pain at the site, the nurse suspects:
13. After seeing a patient, the physician gives a nursing student a verbal order for a new medication. The nursing student first needs to:
1. Follow ISMP guidelines for safe medication abbreviations.
2. Explain to the physician that the order needs to be given to a registered nurse.
3. Write down the order on the patient’s order sheet and read it back to the physician.
4. Ensure that the six rights of medication administration are followed when giving the medication.
14. A nurse accidently gives a patient a medication at the wrong time. The nurse’s first priority is to:
1. Complete an occurrence report.
2. Notify the health care provider.
15. A patient is taking albuterol through a pressurized metered-dose inhaler (pMDI) that contains a total of 200 puffs. The patient takes 2 puffs every 4 hours. How many days will the pMDI last?
Answers: 1. 2; 2. 4; 3. 4; 4. 4; 5. 3; 6. 3; 7. 2; 8. 1; 9. 1; 10. 2; 11. 3; 12. 2; 13. 2; 14. 4; 15. 16.
References
Alvarez-Lorenzo, C, et al. Contact lenses for drug delivery: achieving sustained release with novel systems. Am J Drug Deliv. 2006;4(3):131.
American Diabetes Association (ADA). Insulin administration: position statement. Diabetes Care. 2004;27(1S):S106.
American Diabetes Association (ADA), Standards of medical care in diabetes—2010: position statement. Diabetes Care 2010;33(1):S11. http://care.diabetesjournals.org/content/33/Supplement_1/S11.full.pdf+html [Accessed September 3, 2011].
American Diabetes Association (ADA). Syringes (U-100). http://forecast.diabetes.org/files/images/issues/SyringesChart.pdf. [n.d. Accessed September 3, 2011].
American Hospital Association. The patient care partnership. http://www.aha.org/aha/issues/Communicating-With-Patients/pt-care-partnership.html, 2003. [Accessed September 3, 2011].
American Medical Association (AMA). United States Adopted Name Council. http://www.ama-assn.org/ama/pub/about-ama/our-people/coalitions-consortiums/united-states-adopted-names-council.shtml, 2010. [Accessed September 3, 2011].
American Nurses Association. Nursing: scope and standards of practice, ed 2. Silver Spring, Md: The Association; 2010.
American Society of Health-System Pharmacists (ASHP). Healthcare leaders vow to stop intravenous medication errors. http://www.ashp.org/menu/AboutUs/ForPress/PressReleases/PressRelease.aspx?id=511, 2008. [Accessed September 18, 2011].
American Society of Health-System Pharmacists (ASHP). How to use eye drops properly. http://www.safemedication.com/safemed/MedicationTipsTools/HowtoAdminister/HowtoUseEyeDropsProperly.aspx. [n.d.a Accessed September 3, 2011].
American Society of Health-System Pharmacists [ASHP]. The ASHP discussion guide for compounding sterile preparations: summary and implementation of USP chapter <797>. http://www.ashp.org/s_ashp/docs/files/HACC_797guide.pdf. [n.d.b Accessed September 3, 2011].
Bankhead, R, et al. Enteral nutrition practice recommendations. JPEN J Parenter Enteral Nutr. 2009;33:1.
Bastable, S. Nurse as educator: principles of teaching and learning for nursing practice, ed 3. Sudbury, Mass: Jones & Bartlett; 2008.
Biron, AD, Lavoie-Tremblay, M, Loiselle, CG. Characteristics of work interruptions during medication administration. J Nurs Scholarship. 2009;41(4):330.
Boullata, JI. Drug administration through an enteral feeding tube: the rationale behind the guidelines. Am J Nurs. 2009;109(10):34.
Centers for Disease Control and Prevention (CDC). Tuberculosis (TB). http://www.cdc.gov/tb/, 2010. [Accessed September 18, 2011].
Centers for Medicare and Medicaid Services. http://www.ismp.org/download/files/Updated_IGs_Medication_Adminis_Nov-18-11.pdf, 2011 [Accessed January 3, 2012].
Cornett, S. Assessing and addressing health literacy. Online J Issues Nurs. 14(3), 2009.
Ebersole, P, et al. Toward healthy aging: human needs and nursing response, ed 7. St Louis: Mosby; 2008.
Eisenstadt, ES. Dysphagia and aspiration pneumonia in older adults. J Am Acad Nurse Pract. 2010;22(1):17.
Giger, JL, Davidhizar, RE. Transcultural nursing: assessment and intervention, ed 5. St Louis: Mosby; 2008.
Guenter, P. Safe practices for enteral nutrition in critically ill patients. Crit Care Nurs Clin North Am. 2010;22(2):197.
Hess, DR. Aerosol delivery devices in the treatment of asthma. Respir Care. 2008;53(6):699.
Hockenberry, MJ, Wilson, D. Wong’s essentials of pediatric nursing, ed 8. St Louis: Mosby; 2009.
Institute for Safe Medication Practices (ISMP). ISMP medication safety alert!. http://www.ismp.org/Newsletters/acutecare/articles/A1Q02Action.asp, 2002. [Accessed September 3, 2011].
Institute for Safe Medication Practices (ISMP). ISMP Acute Care Guidelines for Timely Administration of Scheduled Medications. http://www.ismp.org/Tools/guidelines/acutecare/tasm.pdf, 2011. [Accessed September 1, 2011].
Institute for Safe Medication Practices (ISMP). Preventing errors with tablet splitting. http://www.accessdata.fda.gov/scripts/cdrh/cfdocs/psn/transcript.cfm?show=54#7, 2006. [Accessed September 3, 2011].
Institute for Safe Medication Practices (ISMP). Humulin R concentrate U-500. http://www.ismp.org/Newsletters/ambulatory/archives/200708_2.asp, 2007. [Accessed September 3, 2011].
Institute for Safe Medication Practices (ISMP). Patches: what you can’t see can harm patients. Nurse Advise-ERR. 2007;5(4):1.
Institute for Safe Medication Practices (ISMP). ISMP’s list of confused drug names. http://www.ismp.org/Tools/confuseddrugnames.pdf, 2010. [Accessed September 3, 2011].
Institute for Safe Medication Practices (ISMP). ISMP’s list of error-prone abbreviations, symbols, and dose designations http://www.ismp.org/Tools/errorproneabbreviations.pdf, 2010. [Accessed September 3, 2011].
Institute for Safe Medication Practices (ISMP). Never use parenteral syringes for oral medications. http://www.accessdata.fda.gov/psn/transcript.cfm?show=94#9, 2010. [Accessed September 3, 2011].
Institute for Safe Medication Practices (ISMP). Oral dosage forms that should not be crushed. http://www.ismp.org/Tools/DoNotCrush.pdf, 2010. [Accessed September 3, 2011].
Institute for Safe Medication Practices (ISMP). Principles of designing a medication label for intravenous piggyback medication for patient specific, inpatient use. http://www.ismp.org/tools/guidelines/labelFormats/IVPB.asp, 2010. [Accessed September 3, 2011].
Institute of Medicine (IOM). Preventing medication errors. http://books.nap.edu/openbook.php?record_id=11623, 2007. [Accessed September 3, 2011].
Institute of Medicine (IOM). Report brief, to err is human: building a safer health system. http://iom.edu/CMS/8089/5575/4117.aspx, 2003. [accessed September 3 2011].
Lehne, RA. Pharmacology for nursing care, ed 7. St Louis: Saunders; 2010.
Lilley, LL, et al. Pharmacology and the nursing process, ed 5. St Louis: Mosby; 2007.
Maggiore, RJ, Gross, CP, Hurria, A. Polypharmacy in older adults with cancer. Oncologist. 2010;15(5):507.
Mayhew, MS. Medication reconciliation and discontinuity of care. J Nurse Pract. 2010;6(1):61.
MayoClinic.com. Asthma inhalers: which one’s right for you? http://www.mayoclinic.com/health/asthma-inhalers/HQ01081, 2009. [Accessed September 7, 2011].
MayoClinic.com. Using a metered-dose asthma inhaler and spacer. http://www.mayoclinic.com/health/asthma/MM00608, 2009. [Accessed September 7, 2011].
Morris, DG. Calculate with confidence, ed 5. St Louis: Mosby; 2010.
Novo Nordisk. Levimir. http://www.novomedlink.com/products/Levemir/levemir-home.aspx, 2010. [Accessed November 13, 2011].
Occupational Safety and Health Administration (OSHA). Bloodborne pathogens and needlestick prevention. http://osha.gov/SLTC/bloodbornepathogens/index.html, 2009. [Accessed September 7, 2011].
Palmer, J, Metheny, NA. Preventing aspiration in older adults with dysphagia. Am J Nurs. 2008;108(2):40.
Paparella, S. Death by syringe: a call to action. J Emerg Nurs. 2008;34(1):49.
Prettyman, J. Subcutaneous or intramuscular? Confronting a parenteral administration dilemma. MedSurg Nurs. 2005;14(2):93.
Qureshi, B. Cultural, religious and ethnic issues in prescribing. Practice Nurse. 2010;39(5):35.
Razzi, CC. Incorporating the BEERS criteria may reduce ED visits in elderly patients. J Emerg Nurs. 2009;35(5):453.
Restrepo, RD, Gardner, DD. Selecting the best inhaler device: not always an easy task. J Respir Care Pract. 2010;23(6):8.
Rushing, J. How to administer a subcutaneous injection. Nursing. 2004;34(6):32.
Sanofi-Aventis. Lovenox® injections at home. http://www.lovenox.com/consumer/prescribed-lovenox/lovenox-at-home.aspx, 2010. [Accessed September 7, 2011].
Skidmore-Roth, L. Mosby’s drug guide for nurses, ed 9. St Louis: Mosby; 2011.
The Joint Commission (TJC). Joint Commission alert: prevent pediatric medication errors children are three times more at risk than adults. http://www.jointcommission.org/NewsRoom/NewsReleases/nr_04_11_08.htm, 2008.
The Joint Commission (TJC): Comprehensive accreditation manual for hospitals: the official handbook (E-dition), 2010, TJC.
The Joint Commission (TJC). 2011 National patient safety goals (NPGs). http://www.jointcommission.org/hap_2011_npsgs/, 2011. [Accessed September 18, 2011].
The Joint Commission (TJC). Official do not use list. http://www.jointcommission.org/facts_about_the_official_/, 2011. [Accessed September 18, 2011].
Twin Cities Health Professionals (TCHP) Education Consortium. Management of the obese patient. http://tchpeducation.com/homestudies/generalinterest/obesity/obesitybook_2011_final.pdf, 2005. [Accessed September 18, 2011].
US Food and Drug Administration (USFDA). MedWatch: the FDA safety information and adverse event reporting program. http://www.fda.gov/Safety/MedWatch/default.htm, 2010. [Accessed September 7, 2011].
Williams, NT. Medication administration through enteral feeding tubes. Am J Health-System Pharm. 2008;65(24):2347.
World Health Organization (WHO). Injection safety: misuse and overuse of injection worldwide. http://www.who.int/mediacentre/factsheets/fs231/en/index.html, 2006. [Accessed September 7, 2011].
Research References
Annersten, M, Willman, A. Performing subcutaneous injections; a literature review. Worldviews Evid Based Nurs. 2005;2(3):122.
Birkebaek, NH, et al. A 4-mm needle reduces the risk of intramuscular injections without increasing backflow to skin surface in lean diabetic children and adults. Diabetes Care. 2008;31(9):e65.
Brady, A, Malone, A, Fleming, S. A literature review of the individual and systems factors that contribute to medication errors in nursing practice. J Nurs Manage. 2009;17(6):679.
Cocoman, A, Murray, J. Intramuscular injections: a review of best practice for mental health nurses. J Psych Mental Health Nurs. 2008;15(5):424.
Davidson, MB, et al. U-500 regular insulin: clinical experience and pharmacokinetics in obese, severely insulin-resistant type 2 diabetic patients. Diabetes Care. 2010;33(2):281.
Dickinson, A, et al. Paediatric nurses’ understanding of the process and procedure of double-checking medications. J Clin Nurs. 2010;19(5-6):728.
Edmiaston, J, et al. Validation of a dysphagia screening tool in acute stroke patients. Am J Crit Care. 2010;19(4):357.
Foote, SO, Coleman, JR. Medication administration: the implementation process of bar-coding for medication administration to enhance medication safety. Nurs Econ. 2008;26(3):207.
Fowler, SB, Sohler, P, Zarillo, DF. Bar-code technology for medication administration: medication errors and nurse satisfaction. MedSurg Nurs. 2009;18(2):103.
Green, R. A descriptive correlation study of medication error and nursing. South Online J Nurs Res. 8(2), 2008.
Greenfield, S, Whelan, B, Cohn, E. Use of dimensional analysis to reduce medication errors. J Nurs Educ. 2006;45(2):91.
Helmons, PJ, Wargel, LN, Daniels, CE. Effect of bar-code-assisted medication administration on medication administration errors and accuracy in multiple patient care areas. Am J Health-Syst Pharm. 2009;66:1202.
Koster, MP, et al. Needle length for immunization of early adolescents as determined by ultrasound. Pediatrics. 2009;124(2):667.
Krueger, L. Experiences of Hmong patients on hemodialysis and the nurses working with them. Nephrol Nurs J. 2009;36(4):379.
Longhurst, CA, et al. Decrease in hospital-wide mortality rate after implementation of a commercially sold computerized physician order entry system. Pediatrics. 2010;126(1):14.
Nicoll, LH, Hesby, A. Intramuscular injection: an integrative research review and guideline for evidence-based practice. Appl Nurs Res. 2002;16(2):149.
Poon, EG, et al. Effect of bar-code technology on the safety of medication administration. N Engl J Med. 2010;362(18):1698.
Sowan, AK, et al. Impact of computerized orders for pediatric continuous drug infusions on detecting infusion pump programming errors: a simulated study. J Pediatr Nurs. 2010;25(2):108.
Walsh, KA. The relationship among mathematics anxiety, beliefs about mathematics, mathematics self-efficacy, and mathematics performance in associate degree nursing students. Nurs Educ Perspect. 2008;29(4):226.
Zaybak, A, et al. Does obesity prevent the needle from reaching muscle in intramuscular injections? J Adv Nurs. 2007;58(6):552.