9 THE METAL-CERAMIC CROWN PREPARATION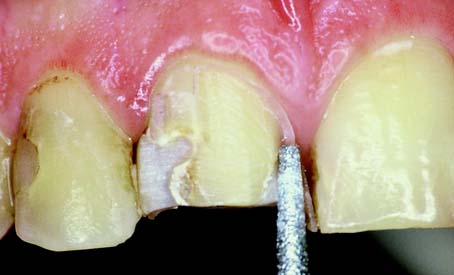
In many dental practices, the metal-ceramic crown is one of the most widely used fixed restorations. This has resulted in part from technologic improvements in the fabrication of this restoration by dental laboratories and in part from the growing amount of cosmetic demands that challenge dentists today.
The restoration consists of a complete-coverage cast metal crown (or substructure) that is veneered with a layer of fused porcelain to mimic the appearance of a natural tooth. The extent of the veneer can vary.
To be successful, a metal-ceramic crown preparation requires considerable tooth reduction wherever the metal substructure is to be veneered with dental porcelain. Only with sufficient thickness can the darker color of the metal substructure be masked and the veneer duplicate the appearance of a natural tooth. The porcelain veneer must have a certain minimum thickness for esthetics. Consequently, much tooth reduction is necessary, and the metal-ceramic preparation is one of the least conservative of tooth structures (Fig. 9-1).
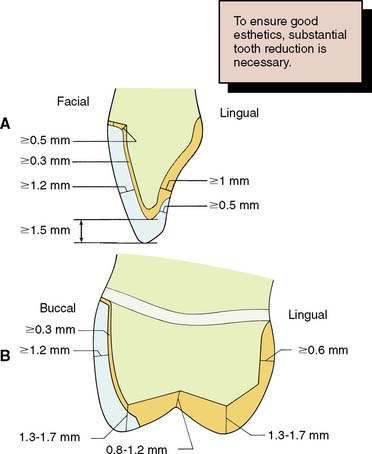
Fig. 9-1 Recommended minimum dimensions for a metal-ceramic restoration on an anterior tooth (A) and a posterior tooth (B). Note the significant reduction needed compared to that for a complete cast or partial veneer crown.
Historically, attempts to veneer metal restorations with porcelain had several problems. A major challenge was the development of an alloy and a ceramic material with compatible physical properties that would provide adequate bond strength. In addition, it was initially difficult to obtain a natural appearance.
The technical aspects of the fabrication of this restoration are discussed further in Chapter 24. For now, only a brief description is provided. The metal substructure is waxed and then cast in a special metal-ceramic alloy that has a higher fusing range and a lower thermal expansion than do conventional gold alloys. After preparatory finishing procedures, this substructure, or framework, is veneered with dental porcelain. The porcelain is fused onto the framework in much the same manner as household articles are enameled. Modern dental porcelains fuse at a temperature of about 960° C (1760° F). Because conventional gold alloys would melt at this temperature, the special alloys are necessary.
INDICATIONS
The metal-ceramic crown is indicated on teeth that require complete coverage and for which significant esthetic demands are placed on the dentist (e.g., the anterior teeth). It should be recognized, however, that, if esthetic considerations are paramount, an all-ceramic crown (see Chapters 11 and 25) has distinct cosmetic advantages over the metal-ceramic restoration; nevertheless, the metal-ceramic crown is more durable than the all-ceramic crown and generally has superior marginal fit. Furthermore, it can serve as a retainer for a fixed dental prosthesis because its metal substructure can accommodate cast or soldered connectors. Whereas the all-ceramic restoration cannot accommodate a rest for a removable prosthesis, the metal-ceramic crown may be successfully modified to incorporate occlusal and cingulum rests as well as milled proximal and reciprocal guide planes in its metal substructure (see Chapter 21).
Typical indications are similar to those for all-metal complete crowns: extensive tooth destruction as a result of caries, trauma, or existing previous restorations that precludes the use of a more conservative restoration; the need for superior retention and strength; an endodontically treated tooth in conjunction with a suitable supporting structure (a post and core); and the need to recontour axial surfaces or correct minor malinclinations. Within certain limits, this restoration can also be used to correct the occlusal plane.
CONTRAINDICATIONS
Contraindications for the metal-ceramic crown, as for all fixed restorations, include patients with active caries or untreated periodontal disease. In young patients with large pulp chambers, the metal-ceramic crown is also contraindicated because of the high risk of pulp exposure (see Fig. 7-4). If at all possible, a more conservative restorative option such as a composite resin or porcelain laminate veneer (see Chapter 25) or an all-ceramic crown with less reduction (see Chapter 11) is preferred.
A metal-ceramic restoration should not be considered whenever a more conservative retainer is feasible, unless maximum retention is needed, as for a long-span fixed dental prosthesis. If the facial wall is intact, the practitioner should decide whether it is truly necessary to involve all axial surfaces of the tooth in the proposed restoration. Although perhaps technically more demanding and time consuming, a more conservative solution that satisfies the patient’s needs and may provide superior long-term service can usually be found.
ADVANTAGES
The metal-ceramic restoration combines, to a large degree, the strength of cast metal with the esthetics of an all-ceramic crown. The underlying principle is to reinforce a brittle, more cosmetically pleasing material through support derived from the stronger metal substructure. Natural appearance can be closely matched by good technique and, if desired, through characterization of the restoration with internally or externally applied stains. Retentive qualities are excellent because all axial walls are included in the preparation, and it is usually quite easy to ensure adequate resistance form during tooth preparation. The complete-coverage aspect of the restoration permits easy correction of axial form. In addition, the required preparation is often much less demanding than for partial-coverage retainers. In general, the degree of difficulty of a metal-ceramic preparation is comparable to that of preparing a posterior tooth for a complete cast crown.
DISADVANTAGES
The preparation for a metal-ceramic crown requires significant tooth reduction to provide sufficient space for the restorative materials. To achieve better esthetics, the facial margin of an anterior restoration is often placed subgingivally, which increases the potential for periodontal disease. However, a supragingival margin can be used if significant cosmetic concerns do not preclude it or if the restoration incorporates a porcelain labial margin (see Chapter 24).
In comparison with an all-ceramic restoration, the metal-ceramic crown may have slightly inferior esthetics, but it can be used in higher stress situations or on teeth that would not provide adequate support for an all-ceramic restoration.
Because of the glasslike nature of the veneering material, a metal-ceramic crown is subject to brittle fracture (although such failure can usually be attributed to poor design or fabrication of the restoration). A frequent problem is the difficulty of accurate shade selection and of communicating it to the dental ceramist. This is often underestimated by the novice. Because many procedural steps are required for both metal casting and porcelain application, laboratory costs generally render the metal-ceramic restoration among the more expensive of dental procedures.
PREPARATION
The recommended sequence of preparation is illustrated for a maxillary right central incisor (Fig. 9-2); however, the same step-by-step approach can be applied to other teeth (Fig. 9-3). As with all tooth preparations, a systematic and organized approach to tooth reduction saves time.
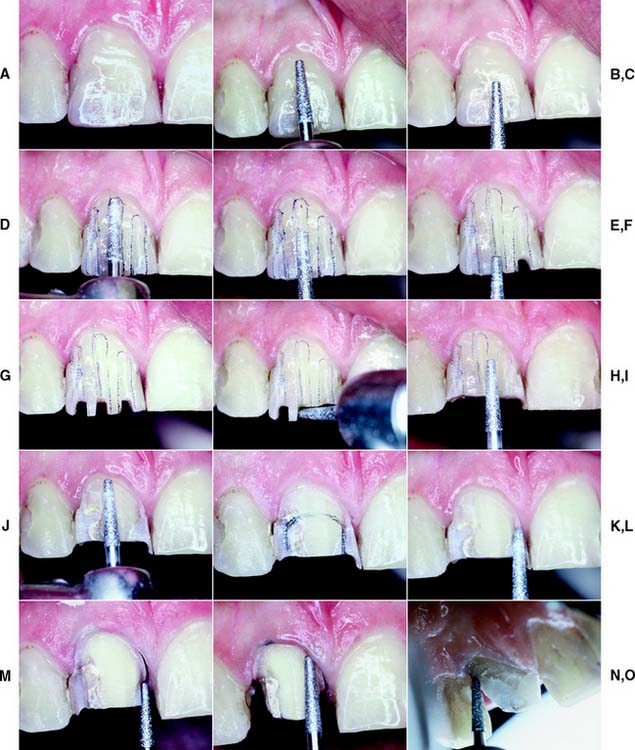
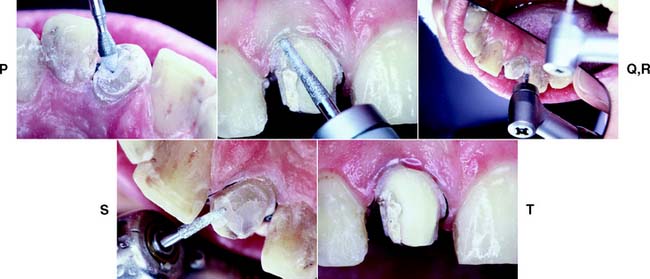
Fig. 9-2 Preparation of a maxillary incisor for a metal-ceramic crown. A, Heavily restored maxillary central incisor. B and C, Rotary instrument aligned with the cervical one third and incisal two thirds to gauge correct planes of reduction. D and E, Guiding grooves placed in the two planes. The cervical groove is made parallel to the path of placement, which usually coincides with the long axis of the tooth. The secondary facial depth groove is prepared parallel to the facial contour of the tooth. F and G, Incisal guiding grooves are placed. H, Incisal edge reduction. I to K, Facial reduction accomplished in two planes. L, Breaking proximal contact, maintaining a lip of enamel to protect the adjacent tooth from inadvertent damage. M and N, Proximal reduction. O, Placing a 0.5-mm lingual chamfer. P, A football-shaped diamond is recommended for lingual reduction of anterior teeth. Q to S, Finishing the preparation with a fine-grit diamond. T, The completed preparation.
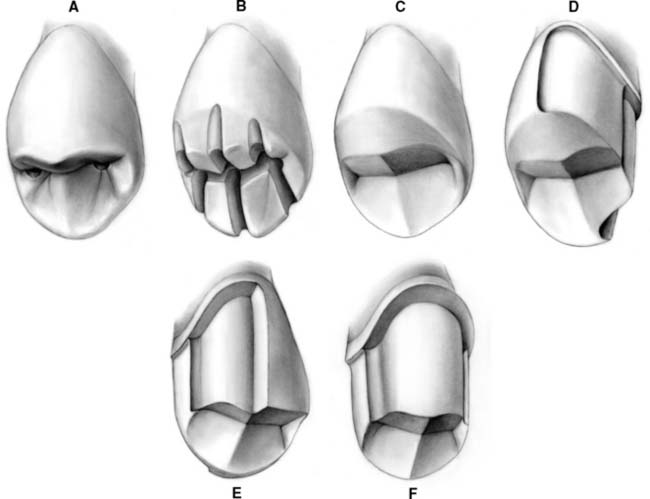
Fig. 9-3 Preparation of a maxillary premolar for a metal-ceramic crown. A, Depth holes. B, Occlusal depth cuts. C, Completed occlusal reduction. D and E, Lingual chamfer and facial shoulder are prepared on half the tooth (lingual view [D] and facial view [E]. F, Completed preparation.
Armamentarium
The instruments needed to prepare teeth for a metal-ceramic crown (Fig. 9-4) include:
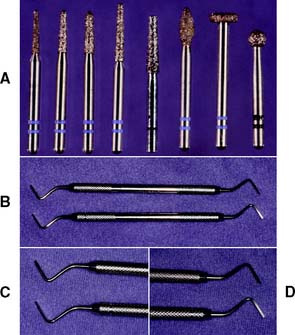
Fig. 9-4 Armamentarium for the metal-ceramic crown preparation. A, Diamond rotary instrument. B to D, Off-angle hatchets. These are useful for smoothing the shoulder margins of metal-ceramic crown preparations.
The actual sequence of steps can be varied slightly, depending on operator preference.
Step-By-Step Procedure
The preparation is divided into five major steps: guiding grooves, incisal or occlusal reduction, labial or buccal reduction in the area to be veneered with porcelain, axial reduction of the proximal and lingual surfaces, and final finishing of all prepared surfaces.
Guiding grooves

Incisal (occlusal) reduction
The completed reduction of the incisal edge on an anterior tooth should allow 2 mm for adequate material thickness to permit translucency in the completed restoration. Posterior teeth generally require less reduction (1.5 mm) because esthetics is not as critical. Caution must be used, however, because excessive occlusal reduction shortens the axial walls and thus is a common cause of inadequate retention and resistance form in the completed preparation. This can be particularly problematic on anterior teeth (on which, as a consequence of tooth form, most of the retention is derived from the proximal walls).
Labial (buccal) reduction
When completed, the reduction of the facial surface should have produced sufficient space to accommodate the metal substructure and porcelain veneer. A minimum of 1.2 mm is necessary for the ceramist to produce a restoration with satisfactory appear-ance (1.5 mm is preferable). This requires signifi-cant tooth reduction. For comparison, the cervical diameter of a maxillary central incisor averages between 6 and 7 mm.
In the cervical area of small teeth, obtaining optimal reduction is not always feasible (see Fig. 7-4.) A compromise is often made with lesser reduction in the area where the cervical shoulder margin is prepared.
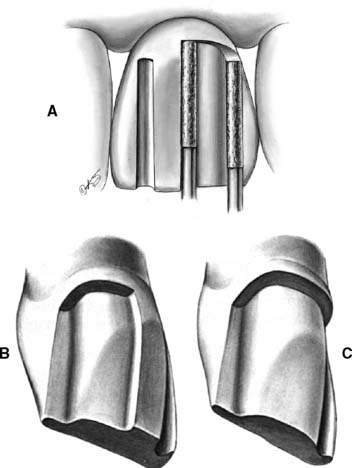
Fig. 9-7 A, The cervical shoulder is established as the tooth structure between the depth grooves is removed. The rotary instrument is moved parallel to the intended path of placement during this procedure. B, The facial reduction should be completed in two phases; initially, one half is maintained intact for assessment of the adequacy of reduction. Note the two distinct planes of reduction on the facial. The proximal aspect parallels the cervical reduction on the facial wall. C, Facial reduction completed. A 6-degree taper has been established between the proximal walls.
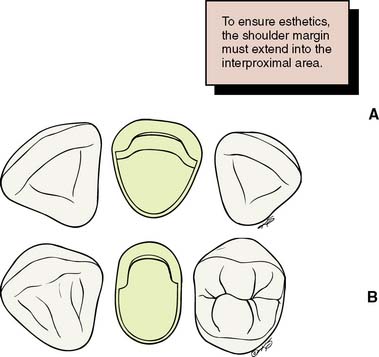
Fig. 9-8 A, The facial shoulder preparation should wrap around into the interproximal embrasure and extend at least 1 mm lingual to the proximal contact. B, The shoulder preparation extends adequately to the lingual side of the proximal contact. Note that on the mesial (visible) side, the preparation extends slightly farther than on the distal (cosmetically less critical) side.
From a periodontal point of view, a supragingival margin is always preferred. Its application is restricted, however, because patients often object to a visible metal collar or discolored root surface. Such objections are common, even when the gingival margin is not visible during normal function, as in patients with a low lip line, and generally limit the use of supragingival margins to posterior teeth (Fig. 9-9) and to undiscolored anterior teeth (in which case a porcelain labial margin is preferred; see Chapter 24). The optimum location of the margin should be carefully determined with the full cooperation of the patient. Where a subgingival margin is to be placed, careful tissue manipulation is essential; otherwise, there will be damage that leads to permanent gingival recession and subsequent exposure of the metal collar. This is most effectively avoided through meticulous gingival displacement with a cord before finishing (Fig. 9-10). The configuration of the margin is also finalized at this time (Fig. 9-11).
Fig. 9-9 Supragingival margins on the maxillary premolars. They were possible because of a favorable lip line hiding the cervical aspect of these posterior teeth. The subgingival margins on the mandibular premolars were prepared only because of previously existing restorations.
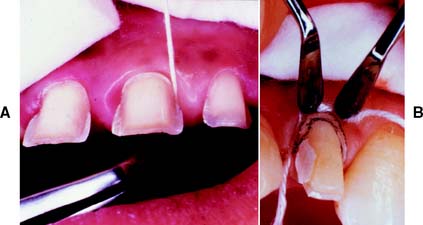
Fig. 9-10 A, Gingival displacement cord (under tension) is placed in the interproximal sulcus. B, A second instrument can be used to prevent the cord from rebounding from the sulcus after it has been packed.
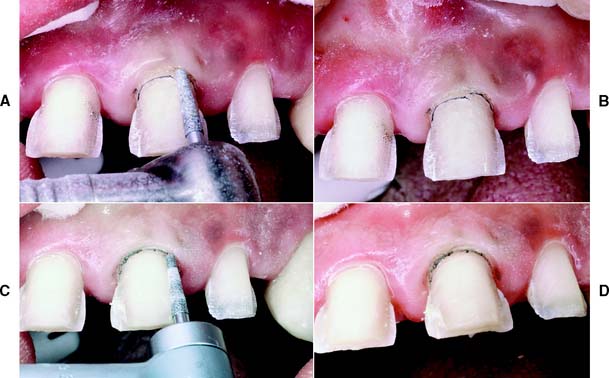
Fig. 9-11 A, After tissue displacement, the facial margin is extended apically. Caution is needed, because if the diamond inadvertently grabs the cord, it may be ripped out of the sulcus and traumatize the epithelial attachment. B, Note the additional apical extension of the shoulder on the distal aspect. C, The entire facial shoulder is placed at a level that will be subgingival after the tissue rebounds. D, The facial margin has been prepared to the level of the previously placed cord.
Axial reduction of the proximal and lingual surfaces
Sufficient tooth structure must be removed to provide a distinct, smooth chamfer of about 0.5 mm width (see Fig. 9-2M to P).
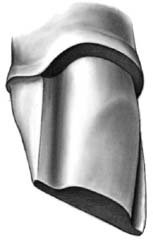
Fig. 9-12 A lingual chamfer is prepared to allow adequate space for metal. A smooth transition from interproximal shoulder to chamfer is essential.
Fig. 9-13 A, Proximal reduction of the flange with a facial approach. B, Once sufficient tooth structure has been removed, the cervical chamfer is prepared simultaneously with the lingual axial surface. After the distolingual preparation has been completed, the mesial chamfer is blended into a smooth transition with the shoulder.
Finishing
The margin must provide distinct resistance to vertical displacement of an explorer tip, and it must be smooth and continuous circumferentially. (A properly finished margin should feel like smooth glass slab.) All other line angles should be rounded, and the completed preparation should have a satin finish free from obvious diamond scratch marks. Tissue displacement is particularly helpful when subgingival margins are being finished (Fig. 9-14). Sometimes this step is postponed until just before impression making after tissue displacement.
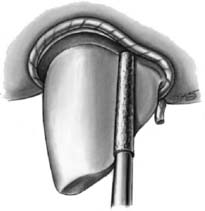
Fig. 9-14 Controlled tissue displacement can be helpful when finishing the margin with a fine-grit diamond or another rotary instrument.
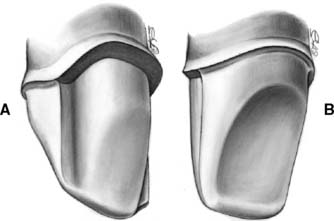
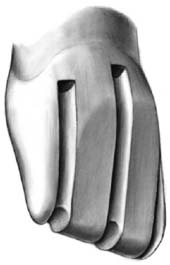
Fig. 9-15 A, Completed preparation. Note that the transition from incisal to axial walls is rounded, and a distinct 90-degree or slightly sloping shoulder has been established. B, An even chamfer width and a smooth transition between lingual and axial surfaces. The chamfer is distinct and blends smoothly into the facial shoulder.
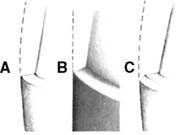
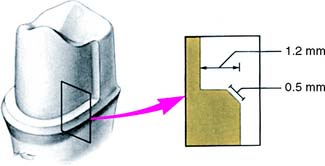
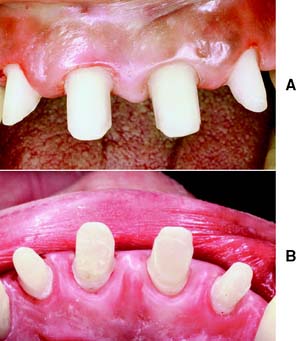
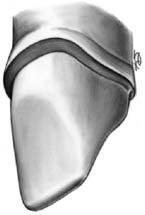
Fig. 9-19 The “wingless” variation does not exhibit the defined transition from chamfer to shoulder seen in Fig. 9-15. Rather, the shoulder gradually narrows toward the lingual side. Interproximally, the same criteria for minimum extension of the shoulder apply as for the wing-type or flange preparation.
Evaluation
Areas often missed during finishing are the incisal edges of anterior preparations and the transition from occlusal to axial wall of posterior preparations. The completed chamfer should provide 0.5 mm of space for the restoration at the margin. The chamfer must be smooth and continuous, and when it is evaluated, a distinct resistance to vertical displacement of the tip of an explorer or periodontal probe should be felt. The chamfer should be continuous with the interproximal shoulder or beveled shoulder. The cavosurface angle of the chamfer should be slightly obtuse or 90 degrees. Under no circumstances should any unsupported tooth structure remain, especially at the facial margin. Care is also needed to avoid creating an undercut between the facial and lingual walls. This aspect of the preparation should be thoroughly evaluated. Excessive convergence should also be avoided, because this may lead to pulpal exposure. All residual debris is removed with thorough irrigation. (Various examples of metal-ceramic preparations are shown in Figs. 9-20 and 9-21.)
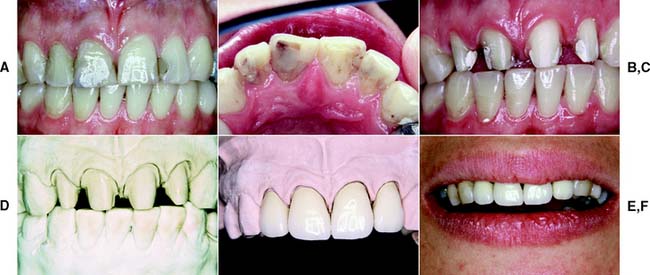
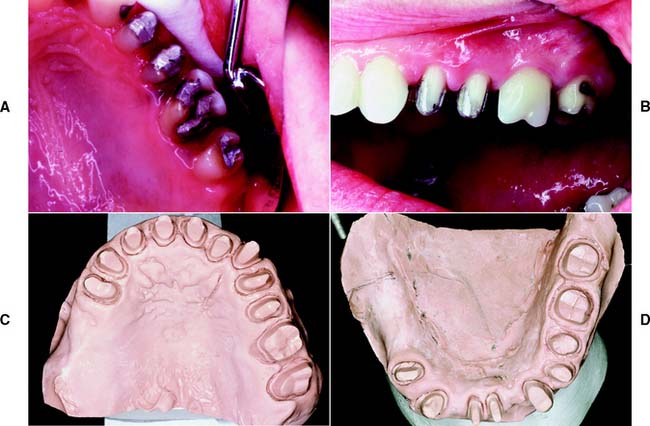
Fig. 9-21 A, Metal-ceramic preparations on the maxillary premolars in conjunction with more conservative preparations on the molars. B, Buccal view of the preparations. Note that, by comparison, considerable tooth reduction was needed on the premolars to accommodate metal-ceramic restorations. C, Except for the molars, all remaining teeth in this patient have been prepared for metal-ceramic restorations. Note the subtle variations and modifications of the same underlying theme: wing-type preparations on the anterior teeth, wingless on the premolars. D, Mandibular arch of the same patient. Many of the smaller mandibular teeth were prepared with wingless restorations. Because of previously existing restorations, excessively heavy shoulder-like chamfers resulted on some of the posterior teeth.
SUMMARY CHART
COMPLETE CAST CROWN
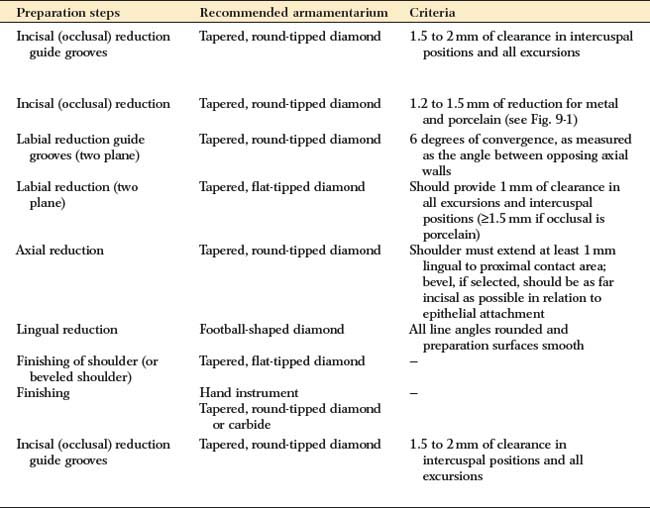
| Preparation steps | Recommended armamentarium | Criteria |
|---|---|---|
| Incisal (occlusal) reduction guide grooves | Tapered, round-tipped diamond | 1.5 to 2 mm of clearance in intercuspal positions and all excursions |
| Incisal (occlusal) reduction | Tapered, round-tipped diamond | 1.2 to 1.5 mm of reduction for metal and porcelain (see Fig. 9-1) |
| Labial reduction guide grooves (two plane) | Tapered, round-tipped diamond | 6 degrees of convergence, as measured as the angle between opposing axial walls |
| Labial reduction (two plane) | Tapered, flat-tipped diamond | Should provide 1 mm of clearance in all excursions and intercuspal positions (≥1.5 mm if occlusal is porcelain) |
| Axial reduction | Tapered, round-tipped diamond | Shoulder must extend at least 1 mm lingual to proximal contact area; bevel, if selected, should be as far incisal as possible in relation to epithelial attachment |
| Lingual reduction | Football-shaped diamond | All line angles rounded and preparation surfaces smooth |
| Finishing of shoulder (or beveled shoulder) | Tapered, flat-tipped diamond | — |
| Finishing | Hand instrument | — |
| Tapered, round-tipped diamond or carbide | ||
| Incisal (occlusal) reduction guide grooves | Tapered, round-tipped diamond | 1.5 to 2 mm of clearance in intercuspal positions and all excursions |