11 TOOTH PREPARATION FOR ALL-CERAMIC RESTORATIONS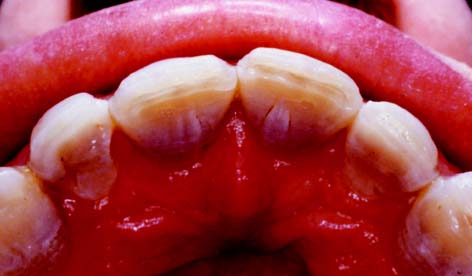
All-ceramic inlays, onlays, veneers, and crowns are some of the most esthetically pleasing prosthodontic restorations. Because there is no metal to block light transmission, they can resemble natural tooth structure better in terms of color and translucency than can any other restorative option. Their chief disadvantage is their susceptibility to fracture, although this is lessened by use of the resin-bonded technique.
The restorations may be fabricated in several ways. The technique (first developed more than 100 years ago) originally called for a platinum foil matrix to be intimately adapted to a die. This supported the porcelain during firing and prevented distortion. The foil was removed before cementation of the restoration.
Today, popular fabrication processes for the restorations include hot-pressing and slip-casting. These options are discussed in Chapter 25.
COMPLETE CERAMIC CROWNS
Complete ceramic crowns should have relatively even thickness circumferentially. For the hot-pressed ceramic crown (IPS Empress* or OPC†) (Fig. 11-1), usually about 1 to 1.5 mm is needed to create an esthetically pleasing restoration. Incisally, a greater ceramic thickness may be required.
Only minor differences in tooth preparation design exist among the restorations fabricated with the various techniques. Therefore, the hot-pressed crown preparation is described in detail, and the necessary variations are discussed when pertinent.
Advantages
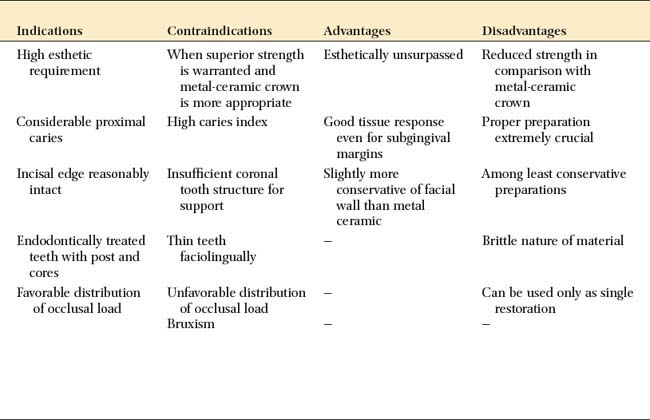
The advantages of a complete ceramic crown include its superior esthetics, its excellent translucency (similar to that of natural tooth structure), and its generally good tissue response. Lack of reinforcement by a metal substructure enables slightly more conservative reduction of the facial surface than is possible with the metal-ceramic crown, although the lingual surface needs additional reduction for strength. The appearance of the completed restoration can be influenced and modified by selecting different colors of luting agent. However, changing cement color under restorations that rely on an opaque core for strength, such as the slip-cast alumina core system (In-Ceram‡), is ineffective.
Disadvantages
The disadvantages of a complete ceramic crown include reduced strength of the restoration because of the absence of a reinforcing metal substructure. Because of the need for a shoulder-type margin circumferentially, significant tooth reduction is necessary on the proximal and lingual aspects. Porcelain brittleness, when combined with the lack of a reinforcing substructure, requires the incorporation of a circumferential support with a shoulder. Thus, by comparison, the proximal and lingual reductions are less conservative than those needed for a metal-ceramic crown.
Difficulties may be associated with obtaining a well-fitting margin when certain techniques are used. The “unforgiving” nature of porcelain, if an inadequate tooth preparation goes uncorrected, can result in fracture.
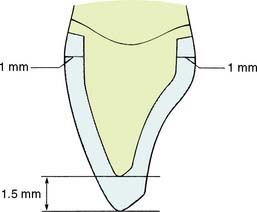
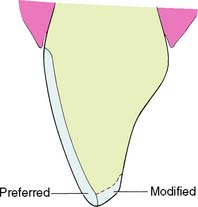
Proper preparation design is critical to ensuring mechanical success. A 90-degree cavosurface angleis needed to prevent unfavorable distribution of stresses and to minimize the risk of fracture (Fig. 11-2). The preparation should provide support for the porcelain along its entire incisal edge, unless a ceramic system that includes a high-strength core is chosen (see Chapter 25).
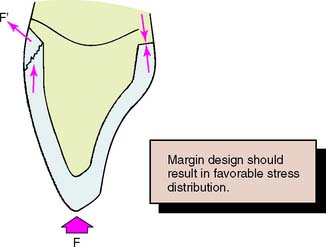
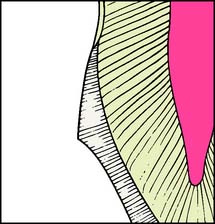
Fig. 11-2 A sloping shoulder is not recommended for the all-ceramic crown. It does not support the porcelain. Incisal loading leads to tensile stresses near the margin.
All-ceramic restorations are not effective as retainers for a fixed dental prosthesis, although the strongest of the slip-cast materials (In-Ceram Zirconia§) and the higher-strength pressed systems (IPS Empress 2¶) may be suitable for anterior applications. The brittle nature of porcelain necessitates that connectors of large, cross-sectional dimension (a minimum of 4 × 4 mm is recommended) be incorporated in the fixed dental prosthesis design. This typically leads to impingement on the interdental papilla by the connector, with increased potential for periodontal failure.
Wear has been observed on the functional surfaces of natural teeth that oppose porcelain restorations. This also applies to teeth opposed by metal-ceramic restorations, especially the mandibular incisors, which can exhibit significant wear over time (see Fig. 19-1).
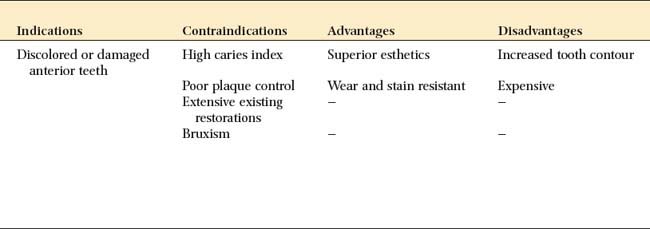
Indications
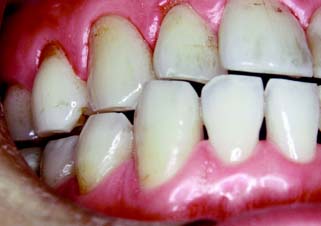
The complete ceramic crown is indicated in areas with a high esthetic requirement where a more conservative restoration would be inadequate (Fig. 11-3). Usually such a tooth has proximal and/or facial caries that can no longer be effectively restored with composite resin.
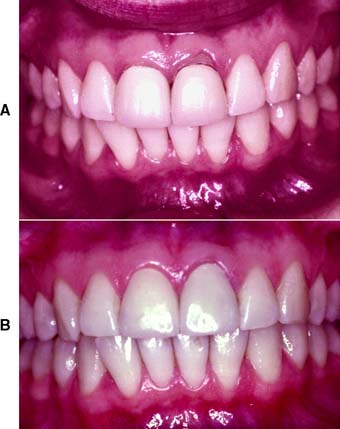
Fig. 11-3 A, Inadequately fitting all-ceramic crowns have led to recurrent caries and gingival recession around these central incisors. The patient was a professional model and therefore had exceptionally high esthetic requirements. B, The gingival defect was corrected by minor periodontal recontouring, the teeth were reprepared, and new all-ceramic crowns were provided.
The tooth should be relatively intact with sufficient coronal structure to support the restoration, particularly in the incisal area, where it is important not to exceed a maximum porcelain thickness of 2 mm; otherwise, failure of the brittle material will occur.
Because of the relative weakness of the restoration, the occlusal load should be favorably distributed (Fig. 11-4). In general, this means that centric contact must be in an area where the porcelain is supported by tooth structure (e.g., in the middle third of the lingual wall).
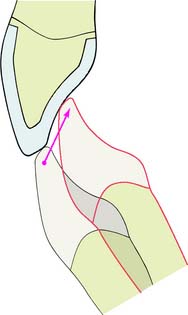
Fig. 11-4 The design of the occlusion on an all-ceramic crown is crucial to avoid fracture. Centric contacts are best confined to the middle third of the lingual surface. Anterior guidance should be smooth and consistent with contact on the adjacent teeth. Leaving the restoration out of contact is not recommended. Future eruption may lead to protrusive interferences, precipitating fracture.
Contraindications
The ceramic crown is contraindicated when a more conservative restoration can be used. Rarely is it recommended for molar teeth. Because of the increased occlusal load and the reduced esthetic demand, metal-ceramic restorations are the treatment of choice. If occlusal loading is unfavorable (Fig. 11-5) or if it is not possible to provide adequate support or an even shoulder width of at least1 mm circumferentially, a metal-ceramic restoration should be considered instead.
Preparation
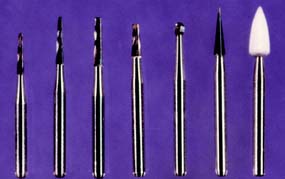
Armamentarium
The instruments needed for preparing an all-ceramic crown (Fig. 11-6) include the following:

Step-by-step procedure
The preparation sequence for a ceramic crown (Fig. 11-7) is similar to that for a metal-ceramic crown; the principal difference is the need for a 1-mm-wide chamfer circumferentially (Fig. 11-8).

Fig. 11-7 All-ceramic crown preparation. A, Labial view. B, Lingual view. To prevent stress concentrations in the ceramic, all internal line angles should be rounded. The shoulder should be as smooth as possible to facilitate the technical aspects of fabrication.
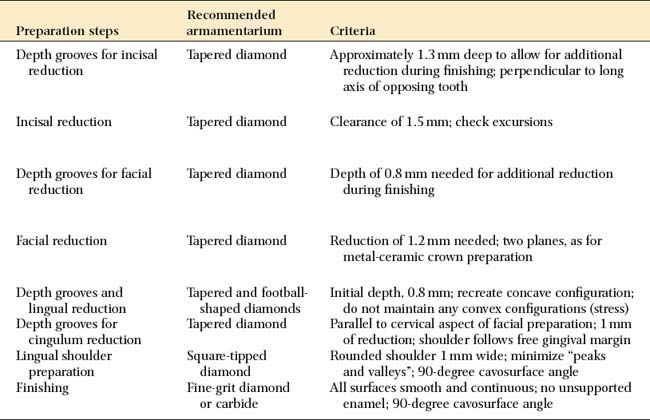
Incisal (occlusal) reduction
The completed reduction of the incisal edge should provide 1.5 to 2 mm of clearance for porcelain in all excursive movements of the mandible. This enables fabrication of a cosmetically pleasing restoration with adequate strength. If the restoration is used for posterior teeth (rare), 1.5 to 2 mm of clearance is needed on all cusps.
Facial reduction
Lingual reduction
Chamfer preparation
For subgingival margins, displace the tissue with cord before proceeding with the chamfer preparation. The ultimate objective is to direct stresses optimally in the completed porcelain restoration. This is accomplished when the chamfer or rounded shoulder margin completely supports the crown; any forces exerted on the crown are then in a direction parallel to its path of placement. A sloping shoulder results in unfavorable loading of the porcelain, with a greater likelihood of tensile failure. A 90-degree cavosurface angle is optimal. Care must be taken, however, that no residual unsupported enamel is overlooked, because it easily chips off.
The completed chamfer should be 1 mm wide, smooth, continuous, and free of any irregularities.
CERAMIC INLAYS AND ONLAYS
For patients demanding esthetic restorations, ceramic inlays and onlays provide a durable alternative to posterior composite resins. The procedure consists of bonding the ceramic restoration to the prepared tooth with an acid-etch technique. The bonding mechanism relies on acid etching of the enamel and the use of composite resin, as seen in the resin-retained fixed dental prosthesis technique (see Chapter 26). Bonding to porcelain is achieved by etching with hydrofluoric acid and the use of a silane coupling agent (materials are identical to those marketed as porcelain repair kits). A similar restoration entails the use of laboratory-processed composite resin instead of the ceramic.
Indications
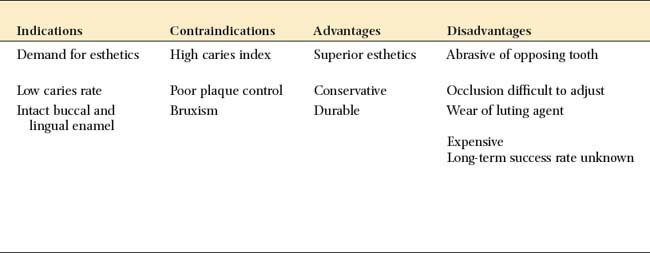
A ceramic inlay can be used instead of amalgam or a gold inlay for patients with a low caries rate who require a Class II restoration and wish to restore the tooth to its original appearance. It is the most conservative ceramic restoration and enables most of the remaining enamel to be preserved.
Contraindications
Because these restorations are time consuming and expensive, they are contraindicated in patients with poor oral hygiene or active caries. Because of their brittle nature, ceramic restorations may be contraindicated in patients with excessive occlusal loading, such as those with bruxism.
Advantages
Ceramic inlays and onlays can be extremely esthetic restorations. The restoration wear associated with posterior composite restorations is not a problem with the ceramic restorations. Marginal leakage associated with polymerization shrinkage and high thermal coefficient of expansion of the resin is reduced, because the luting layer is very thin.
Disadvantages
Accurate occlusion can be difficult to achieve with ceramic inlays and onlays. Because they are fragile, intraoral occlusal adjustment is impractical before they are bonded in place. Therefore, any areas of adjustment need careful finishing and polishing, which is a time-consuming procedure. Rough porcelain is extremely abrasive of the opposing enamel. Castable glass-ceramic restorations (see Chapter 25) are less abrasive than the traditional feldspathic porcelain. Wear of the composite resin-luting agent can be a problem, leading to marginal gaps. These eventually allow chipping or recurrent caries. Accuracy is important with these restorations, because accurately fitting restorations (marginal gaps less than 100 μm) have been shown to reduce this problem significantly. Finishing of the margins can be difficult in the less accessible interproximal areas. Resin flash or overhangs are difficult to detect and can initiate periodontal disease.
Bonded ceramic inlays are a relatively new concept, and long-term clinical performance is hard to judge. The patient should always be made aware that unforeseen problems may surface over time when a newer procedure is used.
Preparation
Armamentarium
As for metal inlays, carbide burs are used in the preparation (Figs. 11-9 and 11-10), but diamonds may be substituted:
Step-by-step procedure
Rubber dam isolation is recommended for visibility and moisture control. Before applying the dam, mark and assess the occlusal contact relationship with articulating film. To avoid chipping or wear of the luting resin, the margins of the restoration should not be at a centric contact.
Outline form
Caries excavation
PORCELAIN LAMINATE VENEERS
Laminate veneering (Fig. 11-11) is a conservative method of restoring the appearance of discolored, pitted, or fractured anterior teeth. It consists of bonding thin ceramic laminates onto the labial surfaces of affected teeth. The bonding procedure is the same as that for ceramic inlays except that a photopolymerize luting resin is usually used.
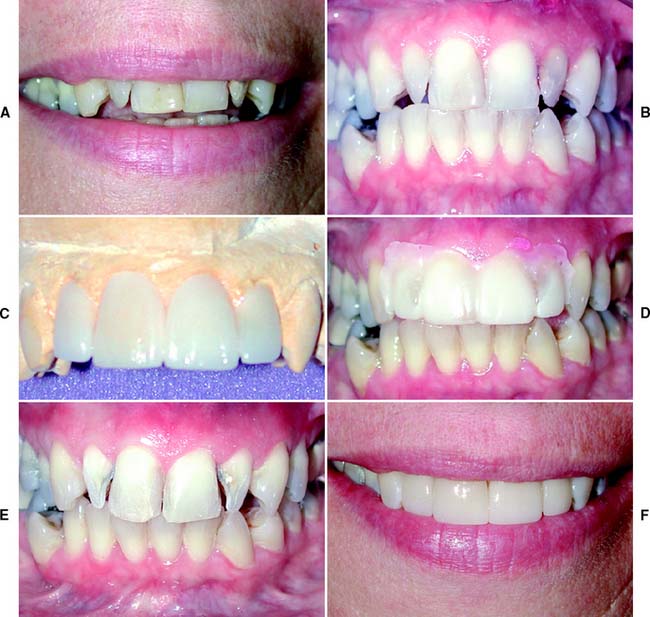
Fig. 11-11 Esthetic facial veneers. A and B, Unesthetic maxillary incisors with crowding. The 50-year-old patient was not prepared to pursue an orthodontic option. C, Diagnostic waxing to optimal incisor form. D, Vacuum-formed matrix used to place interim restoration resin directly on the unprepared teeth to simulate the final esthetics. E, Tooth preparations. F, Restorations in place.
Advantages and Indications
The main advantage of laminate veneers is that they are conservative of tooth structure. Typically, only about 0.5 mm of facial reduction is needed. Because this is confined to the enamel layer, local anesthesia is not usually required. The main disadvantage of the procedure relates to difficulty in obtaining restorations that are not excessively contoured. This is almost inevitable in the gingival area if enamel is left for bonding. Little has been reported about the effect of the restorations on long-term gingival health and whether or how often they need replacement over a patient’s lifetime.
Esthetic veneers should always be considered as a conservative alternative to cemented crowns. In many practices, they have largely replaced metal-ceramic crowns for the treatment of multiple discolored but otherwise sound teeth.
Preparation
Armamentarium
The instruments needed for preparing a porcelain laminate veneer include the following:
Step-by-step procedure
The gingival third and proximal line angles are often overcontoured with these restorations (Fig. 11-12). Therefore, maximum reduction should be achieved with minimum penetration into the dentin.
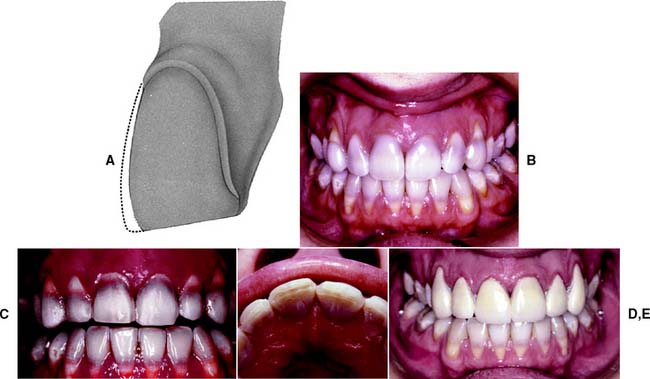
Fig. 11-12 Porcelain facial veneer preparation. A, The proximal contact areas and incisal edge are preserved, and the preparation is limited to enamel. Normally, a reduction depth of about 0.5 mm is recommended, but making a series of depth holes with a round bur guards against penetrating thin enamel. B, Tetracycline-stained teeth. Composite resin veneers were placed earlier but failed to mask the discoloration satisfactorily. Six maxillary porcelain labial veneers will be provided. C and D, Completed tooth preparations. E, Interim restorations made directly with composite resin, which are retained by etching small areas of enamel (see Chapter 15).
SUMMARY CHART
ALL-CERAMIC CROWN PREPARATION
| Preparation steps | Recommended armamentarium | Criteria |
|---|---|---|
| Depth grooves for incisal reduction | Tapered diamond | Approximately 1.3 mm deep to allow for additional reduction during finishing; perpendicular to long axis of opposing tooth |
| Incisal reduction | Tapered diamond | Clearance of 1.5 mm; check excursions |
| Depth grooves for facial reduction | Tapered diamond | Depth of 0.8 mm needed for additional reduction during finishing |
| Facial reduction | Tapered diamond | Reduction of 1.2 mm needed; two planes, as for metal-ceramic crown preparation |
| Depth grooves and lingual reduction | Tapered and football-shaped diamonds | Initial depth, 0.8 mm; recreate concave configuration; do not maintain any convex configurations (stress) |
| Depth grooves for cingulum reduction | Tapered diamond | Parallel to cervical aspect of facial preparation; 1 mm of reduction; shoulder follows free gingival margin |
| Lingual shoulder preparation | Square-tipped diamond | Rounded shoulder 1 mm wide; minimize “peaks and valleys”; 90-degree cavosurface angle |
| Finishing | Fine-grit diamond or carbide | All surfaces smooth and continuous; no unsupported enamel; 90-degree cavosurface angle |
SUMMARY CHART
PORCELAIN LAMINATE VENEERS
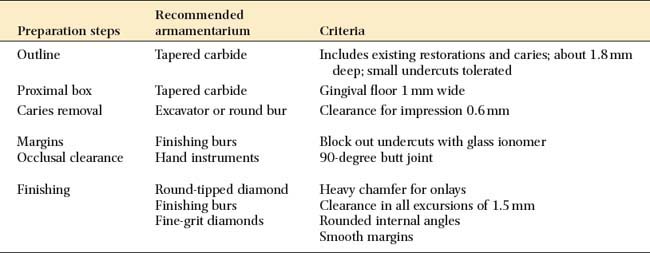
| Preparation steps | Recommended armamentarium | Criteria |
|---|---|---|
| Outline | Tapered carbide | Includes existing restorations and caries; about 1.8 mm deep; small undercuts tolerated |
| Proximal box | Tapered carbide | Gingival floor 1 mm wide |
| Caries removal | Excavator or round bur | Clearance for impression 0.6 mm |
| Margins | Finishing burs | Block out undercuts with glass ionomer |
| Occlusal clearance | Hand instruments | 90-degree butt joint |
| Finishing | Round-tipped diamond | Heavy chamfer for onlays |
| Finishing burs | Clearance in all excursions of 1.5 mm | |
| Fine-grit diamonds | Rounded internal angles | |
| Smooth margins |
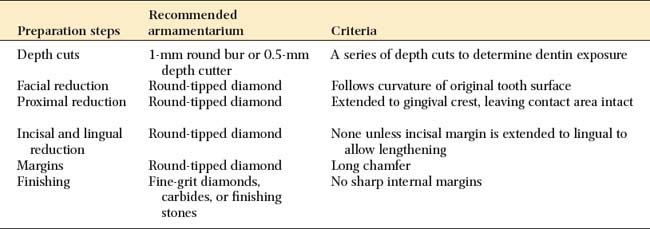
| Preparation steps | Recommended armamentarium | Criteria |
|---|---|---|
| Depth cuts | 1-mm round bur or 0.5-mm depth cutter | A series of depth cuts to determine dentin exposure |
| Facial reduction | Round-tipped diamond | Follows curvature of original tooth surface |
| Proximal reduction | Round-tipped diamond | Extended to gingival crest, leaving contact area intact |
| Incisal and lingual reduction | Round-tipped diamond | None unless incisal margin is extended to lingual to allow lengthening |
| Margins | Round-tipped diamond | Long chamfer |
| Finishing | Fine-grit diamonds, carbides, or finishing stones | No sharp internal margins |
STUDY QUESTIONS