24 METAL-CERAMIC RESTORATIONS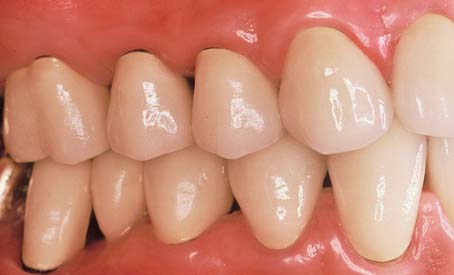
HISTORICAL PERSPECTIVE
Ceramic objects have been fabricated for thousands of years. The earliest techniques usually consisted of shaping the item in clay or soil and then baking it to fuse the particles together. The initial attempts resulted primarily in coarse and somewhat porous products, such as goblets and other forms of pottery. Later developments led to very detailed stoneware items. The Egyptian faiences are the first known effort to enamel a substructure with a ceramic veneer (Fig. 24-1). Their typical blue-green hues result from metal oxides created during the firing process.
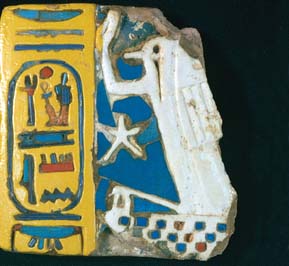
Fig. 24-1 Glazed Egyptian faience tile from the Western Doorway or Gate of the Mortuary Temple of Ramses III, with a “Rekhyet” bird worshipping the cartouche of Ramses III, “Lord of the Two Lands” (ca. 1182–1151 BCE), Dynasty XX, excavated at Medinet Habu by the Oriental Institute.
(Courtesy of the Oriental Institute, The University of Chicago.)
More recently, although still in antiquity, Chinese ceramists developed porcelain, which was characterized by vitrification, translucency, hardness, and impermeability. European attempts at developing porcelain of similar quality were conducted in the 17th century. These efforts spread the knowledge of porcelain’s basic components: kaolin and feldspar.
As early as the second half of the 18th century, Pierre Fauchard and others attempted to use porcelain in dentistry. Their efforts were largely unsuccessful. However, porcelain was successfully used for dental prostheses by the end of the 1800s, when the technique to fire all-porcelain jacket crowns on a platinum matrix was first developed.1 It was not until the mid-1950s that a dental porcelain was developed with a coefficient of thermal expansion similar to that of dental casting alloys. The metal-ceramic restoration first became available commercially during the later 1950s.2 Today this technique is considered a routine procedure with high predictability.
OVERVIEW
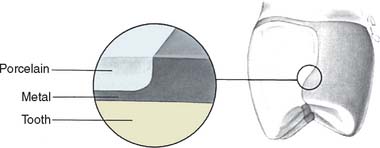
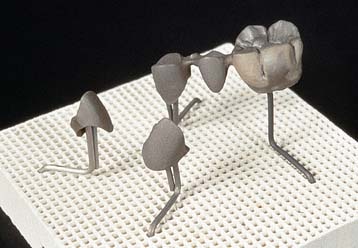
The metal-ceramic restoration (Fig. 24-2) consists of a metal substructure (see Chapter 19) supporting a ceramic veneer that is mechanically and chemically bonded to it. The chemical component of the bond is achieved through firing (baking).
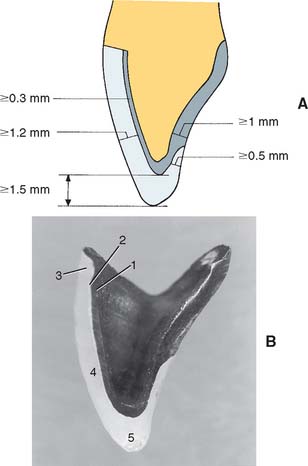
Fig. 24-2 A, Longitudinal section through a metal-ceramic crown. Note the minimum dimensions. B, Sectioned metal-ceramic restoration. 1, Metal substructure; 2, opaque porcelain; 3, gingival porcelain; 4, body porcelain; 5, incisal porcelain.
Porcelain powders of varying composition and color are applied and fired to produce the desired appearance. The first ceramic layer, the opaque, masks the dark metal oxide and is the primary source of color for the completed restoration. The opaque is covered with slightly translucent body porcelain, which is then veneered with a more translucent enamel overlay that contains only a few pigments. Achieving an accurate appearance match may warrant incorporating either translucent or highly pigmented powders into selected areas of the buildup. The shiny, lifelike appearance of the completed metal-ceramic restoration results from a surface glaze formed during an additional firing after the restoration has been shaped.
Historically, the metal-ceramic restoration was fabricated with metal margins, and the veneer was limited to visible areas. More recently, however, the use of porcelain on occlusal and lingual surfaces has become common.3 Several techniques4,5 have been developed to obtain porcelain margins on the facial aspect of the restoration. The latter technique is common for anterior teeth, whereas the metal collar is commonly used in posterior areas with a lesser esthetic demand.
METAL PREPARATION
Shape
Sharp angles or pits on the veneering surface of a metal-ceramic restoration should be avoided because they can contribute to internal stress in the final porcelain.6 Convex surfaces and rounded contours should be created so that the porcelain is supported without development of stress concentrations (Fig. 24-3). In addition, a smooth surface facilitates wetting of the framework by the porcelain slurry.
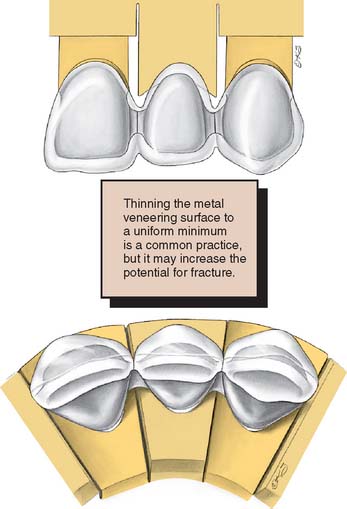
Fig. 24-3 Substructure design for an anterior partial fixed dental prosthesis. The metal should be shaped to support an even thickness of porcelain.
The intended metal-ceramic junction should be as definite (90-degree angle) and as smooth as possible to make finishing easier during all fabrication stages (Fig. 24-4). The metal framework must be sufficiently thick to prevent distortion during firing. A minimum of 0.3 mm is advocated for the noble metal alloys; 0.2 mm is sufficient for base metal alloys, which can be finished thinner and still withstand distortion because of their higher fusing ranges, moduli of elasticity, and yield strengths (see Chapter 19).
The mechanical properties of a metal-ceramic restoration depend largely on the design of the substructure that supports the ceramic veneer. The metal-ceramic interface must be at least 1.5 mm from all centric occlusal contacts and must be distinct to facilitate the removal of excess porcelain. The veneering surface must be finished to a smooth texture with rounded internal angles to allow proper wetting by the opaque porcelain.
Investment Removal
After the framework has been cast, all investment should be removed ultrasonically with airborne particle abrasion or with steam (according to the alloy manufacturer’s directions). The phosphate-bonded investments, which must be used with the high-fusing metal-ceramic alloys, are more difficult to remove from the metal surface than are conventional gypsum-bonded investments. Hydrofluoric acid dissolves the refractory silica component of the investment. However, this acid is extremely dangerous and must be handled very cautiously.7 A small spill on the skin results in painful acid burns, and slight exposure to the fumes may produce severe corneal damage. Less dangerous substitute solutions (e.g., Stripit *) are available.
Careful examination of the internal aspect of the framework may reveal small investment particles. Several cycles of ultrasonic cleaning may be necessary to eliminate all residual investment. If air abrasion is used for investment removal, the margins of the framework must be protected to prevent damage by the abrasive particles.8
Oxide Removal
The oxide layer that has been formed on the metal surface during casting must be partially removed with either acid or air abrasion. For optimal metal-porcelain bonding, the alloy manufacturer’s directions should be followed precisely, because achieving a successful bond depends on a controlled thickness of the metal-oxide layer.
Metal Finishing
Care is needed when the veneering surfaces are ground, to avoid dragging the metal over itself, which could entrap air and grinding debris (which later results in bubbling or contamination of the porcelain). Finishing the surface in one direction with light pressure helps avoid trapping debris between folds of the metal, which is a problem when high-gold content alloys with high elongation values are used (Fig. 24-5).
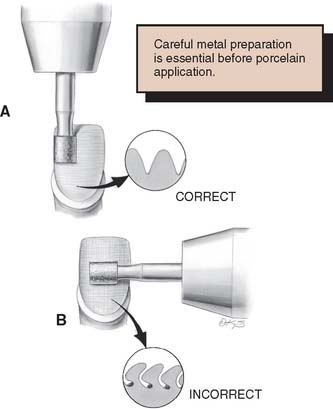
Fig. 24-5 A, Correct way to prepare the veneer area. The metal should be ground in the same direction. B, Incorrect multidirectional grinding can trap debris in the high-noble alloys.
Surface finishing should be performed with ceramic-bound stones, because the organic binders used in conventional rotary instruments are a potential source of contamination. Carbide burs also may be used safely. After the surface has been smoothed, it should be air abraded with aluminum oxide according to the manufacturer’s instructions. This creates a satin finish on the veneering surface that is easily wettable by the porcelain slurry (Fig. 24-6).
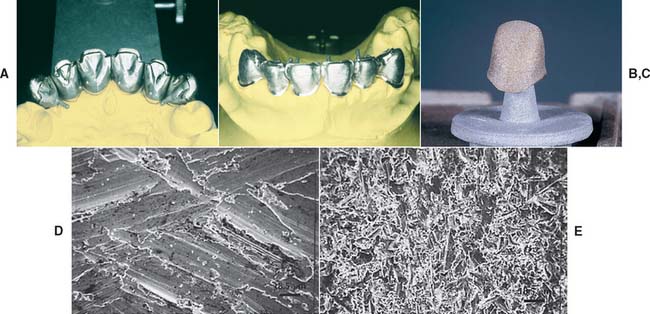
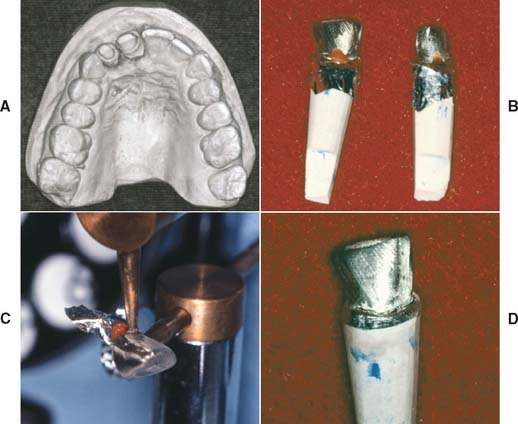
Fig. 24-6 Metal preparation. A and B, Castings prepared by grinding. C, Satin finish obtained by air-abrasion. D and E, Scanning electron micrographs of metal after grinding with a stone (D) and with air-abrasion (E).
(D and E, Courtesy of Dr. J. L. Sandrik.)
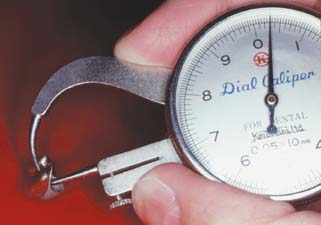
Thickness
A dial (or metric) caliper is invaluable for verifying that the metal substructure conforms to all specified minimum dimensions (Fig. 24-7). Metal thickness of less than 0.3 mm may lead to distortion during firing. Sometimes the margin is thinned to a knife edge so that a metal line is not visible. There is no evidence that thinning the margin adversely affects the fit of restorations cast in contemporary alloys.9,10 The all-porcelain labial margin design can provide a better appearance, particularly when a high smile line and thin gingival tissue necessitate good esthetics at the labial margin.
Finishing
Finishing of the metal-ceramic interface is a difficult laboratory procedure and requires attention to detail. The axial surfaces and visible portion of the metal collar should be contoured and finished to a rubber wheel stage before preparation of the veneering surface is attempted (Fig. 24-8A and B). At this time, the margin itself is left untouched. Round stones and carbides can be used to finish the veneering surface at the metal-ceramic interface (Fig. 24-8C), and the desired right-angle configuration is then easily obtained. Any remaining irregularities can be blended easily with barrel-shaped stones (Fig. 24-8D).
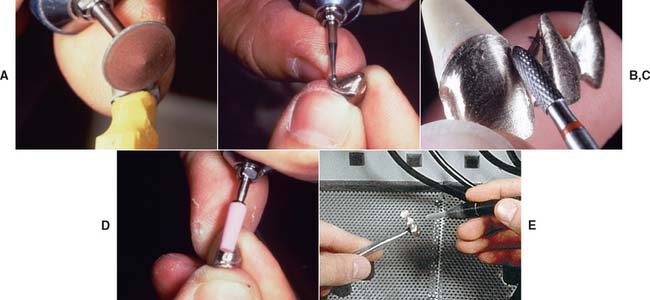
Fig. 24-8 Preparing the substructure. A, Nonveneering surface finished to the rubber wheel stage. B and C, Metal-ceramic junction delineated with a tungsten carbide bur. D, Veneering surface dressed with a ceramic-bound stone. (Note: To avoid perforation, check the metal thickness regularly with calipers.) E, Air abrasion of the veneering area. The margins have been protected by soft wax.
When the grinding phase is completed, a satin finish is obtained by air abrading the veneering surface with a fine-grit alumina (Fig. 24-8E).
Cleaning
Although a properly prepared framework appears smooth to the naked eye, its appearance is still quite rough when viewed with a microscope. Small particles, grinding debris, oil, and finger grease must be removed because they interfere with the wetting process, which is crucial for a good metal-to-ceramic bond.
The substructure can be cleaned by immersion in a general-purpose cleaning solution in an ultrasonic unit. The duration of the cleaning cycle depends on the unit, but 5 minutes is adequate in most cases. Residual soap can be removed by rinsing the substructure in distilled water. Some manufacturers recommend following this with a rinse in 92% alcohol (conventional 70% isopropyl alcohol should not be used because it contains aromatic and mineral oils, which could cause contamination). Steam cleaning is an excellent and time-saving alternative to ultrasonic cleaning. To prevent further contamination, the veneering surface should not be touched once the cleaning procedures have been completed.
Oxidizing
To establish the chemical bond between metal and porcelain, a controlled oxide layer must be created on the metal surface (Fig. 24-9). In noble-metal alloys, iron, tin, indium, and gallium are the base elements used for oxide formation (see p. 748).
The oxide layer is typically obtained by placing the substructure on a firing tray, inserting it into the muffle of a porcelain furnace, and raising the temperature to a specified level that sufficiently exceeds the firing temperature of the porcelain. A vacuum is created in the firing chamber, which, although insufficient to remove adherent gases, reduces the thickness of the oxide layer. The incorrect term degassing often is used interchangeably with oxidizing (see p. 750).
The specific procedure may vary slightly, depending on the alloy used. High-gold content ceramic alloys usually are held at the oxidizing temperature for several minutes. The first porcelain application can be performed as soon as the casting has cooled to room temperature after it is removed from the furnace.
Many of the lower gold content alloys contain more base elements, which can result in a thicker oxide layer. Some of these systems therefore do not require the work to be held at the oxidizing temperature for any length of time. To reduce excessive surface oxides, some manufacturers recommend briefly air abrading the casting with alumina or placing it in hydrofluoric acid after firing.
Because of lower costs, the use of nonnoble or base metal alloys for metal-ceramic restorations is now widespread. These alloy systems undergo continuous oxide formation. Although the techniques for different systems vary, most manufacturers prefer not to oxidize substructures made of base metal alloys. Instead, they recommend performing the first porcelain application immediately after cleaning. Because the extent of oxide formation cannot be easily controlled, there is a potential for failure through the thick and brittle oxide layer with these alloy systems. However, it may be of no significance with other alloy systems.
MATERIALS SCIENCE
Dental ceramics are generally classified into three groups according to their maturation or fusion range: high-fusing (1290° to 1370° C [2350° to 2500° F]), medium-fusing (1090° to 1260° C [2000° to 2300° F]), and low-fusing (870° to 1070° C [1600° to 1950° F]). In contrast to denture teeth and the original porcelain jacket crowns, which are fired in the medium- and high-fusing ranges, metal-ceramic veneer restorations are fired in the range of 950° to 1020° C (1750° to 1860° F). This discussion is limited to these low-fusing porcelains.
Porcelain Manufacture
Dental porcelain is produced from a blend of quartz (SiO2), feldspar (potassium aluminum silicate orthoclase, sodium aluminum silicate albite), and other oxides. During manufacture, the materials are heated to high temperature to form a glassy mass and then rapidly cooled by quenching them in water, which causes the glassy mass to fracture into many small fragments. The resulting product is called a frit. This process may be repeated several times, after which the frit is ball-milled until the desired particle size distribution is obtained. Because fritting takes place at temperatures much higher than those used in the fabrication of a dental restoration, most of the chemical reactions between raw materials occur before they are used in the dental laboratory. Typical compositions are provided in Table 24-1, although the actual compositions vary according to the proposed use of the end product. Most formulations designed for metal-ceramic use are similar to that described by Weinstein and colleagues.11,12 They consist of a mixture of two frits: a low-fusing glass frit and a high-expansion frit consisting of crystalline leucite (KAlSi2O6) (Fig. 24-10) with tetragonal symmetry (Fig. 24-11). This combination overcomes the two principal difficulties in veneering metal with ceramic: having a porcelain firing temperature well below the melting range of the metal and having a sufficiently high thermal expansion compatible with the metal. After firing in the laboratory, dental ceramics consist of about 20% volume tetragonal leucite crystals dispersed in a glassy matrix.13 The structure of this glassy matrix is a random Si-O network. The silicon atom combines with four oxygen atoms in a tetrahedral configuration (Fig. 24-12). These tetrahedra may be linked into a chain with both covalent and ionic bonds, which leads to a metastable structure. However, such a Si-O network would have a very high melting point. Usually, potassium and sodium are added to the glass composition to help break down the Si-O network and are therefore known as glass modifiers. In dental ceramics, potassium and sodium are initially provided by the feldspars. Two desirable consequences result: (1) The softening temperature of the glass is reduced, and (2) the coefficient of thermal expansion is increased. The manufacturer adjusts the oxide content so that the dental ceramic’s coefficient of thermal expansion is close to the corresponding value for the alloys used to make the substructure. If the composition of the glass is not properly adjusted, extensive breakdown and reorganization of the Si-O network may occur, leading to a crystallization of the glass (also called devitrification). The change in lattice structure from a vitreous to a crystalline form (devitrification) is shown schematically in Figure 24-13. This phenomenon may occur partially in dental ceramics if a ceramic restoration is fired too often, and it is typically associated with an increase in the coefficient of thermal expansion and opacity.
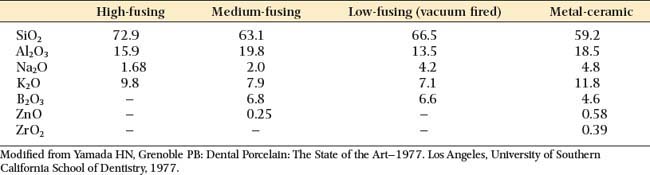
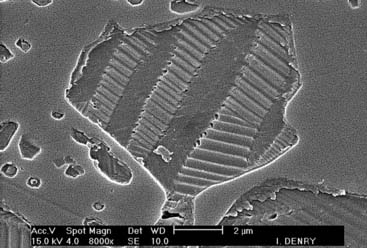
Fig. 24-10 Scanning electron micrograph of polished and etched leucite-containing dental ceramic, showing a tetragonal leucite crystal.
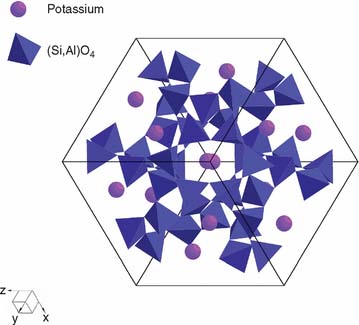


Fig. 24-13 Change in the Si-O network structure from a glassy (A) to a crystalline (B) form.
(Modified from Kingery WD, et al: Introduction to Ceramics, 2nd ed. New York, Wiley & Sons, 1976.)
Feldspar also contains alumina (Al2O3), which acts as an intermediate oxide to increase the viscosity and hardness of the glass. As a result, dental porcelain has a good resistance to slump or pyroplastic flow; this resistance is necessary for obtaining the desired configuration of the restoration.
Porcelain Technique
Dental porcelain is usually received from the manufacturer in powder form, which is mixed with either water or a water-based glycerin-containing liquid to form a paste of workable consistency. This mixture is then used to make a restoration with the required configuration. Several condensation techniques (e.g., vibration and blotting) are used to remove as much excess water as possible. The porcelain particles are drawn together during condensation by capillary action. Proper condensation minimizes steam generation during the drying phase of firing. When the mass is heated, individual porcelain particles conglomerate by sintering. The viscous flow of unfused particles results in wetting and bridging between such particles (Fig. 24-14). Consequently, a loss of interstitial space occurs, accompanied by as much as a 27% to 45% volumetric shrinkage after firing.14
Types of Porcelain
The following porcelain blends are produced for the different roles they play in the fabrication of metal-ceramic restorations: opaque, body, and incisal porcelains.
Opaque porcelain
This is applied as a first ceramic coat and performs two major functions: it masks the color of the alloy, and it is responsible for the metal-ceramic bond.
Opacifying oxides are added to the original porcelain blend. The density of these oxides is greater than that of the glass matrix. Consequently, the oxides of tin, titanium, and zirconium have a higher refractive index than do the components of the glass matrix (feldspar and quartz): 2.01 to 2.61 and 1.52 to 1.54, respectively. When a specific range of oxide particle sizes is used, most of the incident light is scattered and reflected rather than transmitted through the porcelain, effectively masking the color of the alloy substrate.
A scanning electron microscope (SEM) view of the alloy-porcelain interface15 for a high noble metal alloy is shown in Figure 24-15. When the region around the interface is examined for specific elements (a technique known as elemental mapping), the concentrations of aluminum and titanium can be identified. These appear as dense regions in the figure, which indicates that discrete oxide particles of aluminum and titanium are in the opaque porcelain, probably just beneath the surface. By comparing the elemental map with the photomicrograph of the interface, it is possible to identify the distribution and size of the subsurface opacifying oxide particles. Silicon examined in this way also demonstrates a uniform porcelain distribution, which is to be expected.
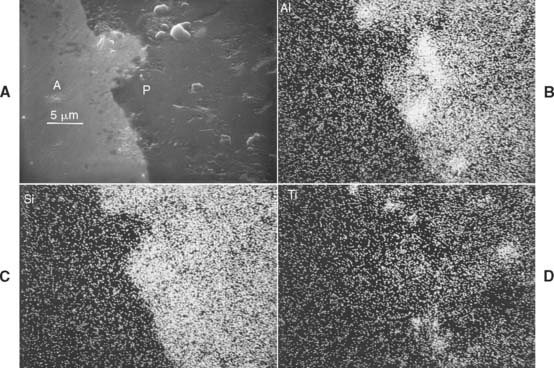
Fig. 24-15 Alloy-porcelain interface for a high noble metal alloy system: Degudent U (Degussa) and Vita normal (Vident). A, Scanning electron microscopic view of the interface. B to D, Elemental maps of aluminum (B), silicon (C), and titanium (D).
(From Laub LW, et al: The metal-porcelain interface of gold crowns [abstract no. 874]. J Dent Res 57:A293, 1978.)
Body porcelain
Body porcelain is fired onto the opaque layer, usually in conjunction with the incisal porcelain. It provides some translucency and contains metallic oxides that aid in shade matching. Body porcelains are available in a wide selection of shades to match adjacent natural teeth. Most porcelain manufacturers provide an opaque shade for each body shade. Although porcelains of different manufacturers are given the same nominal shade (e.g., the popular VITA Classical shade guide *), there is significant color variation among manufacturers,16,17 and a dentist should know which system the technician uses.
Porcelain-Alloy Bonding
The formation of a strong bond between the opaque porcelain layer and the cast alloy is essential for the longevity of the metal-ceramic restoration. Extensive research since the 1970s has provided insight into the important factors for achieving metal-ceramic bonding. Early work18 established the importance of wetting the alloy surface by the porcelain at the firing temperature. Although similar measurements of contact angles have not been reported for current dental porcelains and casting alloys, good wetting is essential for minimizing porosity at the metal-ceramic interface. A detailed relationship between the elevated-temperature contact angle and metal-ceramic bonding has not been established, but the research by O’Brien and Ryge18 indicates that perfect wetting (a contact angle of 0 degrees) does not occur.
In the model by Borom and Pask,19 an idealized continuous lattice structure is considered across the metal-ceramic interface for chemical bonding. This would be achieved in principle by incorporating certain oxidizable elements in the porcelain composition that can diffuse into the casting alloy at the elevated temperatures of the porcelain firing cycles and have the same equilibrium chemical potentials in both the metal and ceramic. However, in reality the situation at the dental metal-ceramic interface does not fit this idealized model. Research on gold20 and high-palladium21,22 alloys used for ceramic veneering has shown that the structure of the oxidized regions is highly complex, and similar results would be anticipated for detailed studies of other types of oxidized dental casting alloys. The existence of multiple phases in the oxidized region of the alloy indicates that the proposed continuity19 of atomic bonds cannot generally be achieved across the metal-ceramic interface, except possibly at sites where the glass matrix of the porcelain is in contact with the solid solution matrix of the alloy.
Manufacturers incorporate in the casting alloy composition small amounts of certain base metals that form oxides23,24 and contribute chemical bonding to the metal-ceramic adherence. Investigators using the electron microprobe and SEM15,25-30 have shown that these elements accumulate at the metal-ceramic interface and form an interfacial oxide layer. For noble metal alloys, elements having a major role for porcelain adherence are iron (high-gold alloys), tin and indium (lower gold content, palladium-silver, silver-palladium, and high-palladium alloys), and gallium (high-palladium alloys). For base metal alloys in which the principal elements are nickel and cobalt, chromium oxidation provides chemical bonding for porcelain adherence, whereas titanium oxidation fulfills this role for the titanium casting alloys.
Figure 24-16A is an SEM photomicrograph of the interface for a high-palladium alloy bonded to dental porcelain. This alloy undergoes complex external and internal oxidation during the porcelain firing cycles. The internal oxide particles in the palladium solid solution grains are too small (less than 1 to 2 μm in diameter) for accurate compositional determinations by x-ray energy-dispersive spectroscopic analysis with the SEM. X-ray diffraction21 has shown that CuGa2O3 and SnO2 are present in the oxidation region when the alloy surface receives standard airborne particle abrasion with 50 μm of aluminum oxide before oxidation. Figure 24-16B shows line scans obtained with the SEM for major elements in the metal and ceramic near the interface. Variations in the x-ray counts occurred when the line scan crossed a region of internal oxidation.
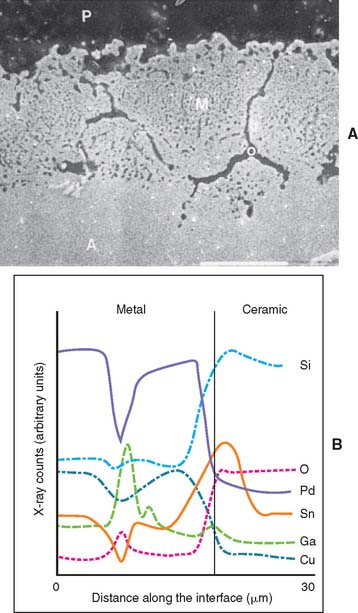
Fig. 24-16 A, Secondary electron (scanning electron microscopic [SEM]) photomicrograph of the metal-ceramic interface for Liberty (Heraeus Kulzer) palladium-copper-gallium (Pd-Cu-Ga) high-palladium alloy (A) bonded to VITA VMK 68 (Vident) dental porcelain (P). The grain boundaries of the alloy (M) have been widened by the formation of oxide (O) deposits, and there are numerous very small oxide particles within the grains. Scale bar = 10 μm. B, Elemental line scans perpendicular to the metal-ceramic interface obtained by x-ray energy-dispersive spectroscopic analyses for the Liberty alloy. Because the raw SEM data have not undergone matrix corrections, the relative elemental concentrations (x-ray counts) are qualitative, but the indicated trends are appropriate. O, oxygen; Si, silica; Sn, tin.
(From Papazoglou E, et al: New high-palladium casting alloys. Studies of the interface with porcelain. Int J Prosthodont 9:315, 1996.)
Factors Affecting the Bond
Most metal-ceramic systems require that the cast alloy be subjected to an initial oxidation step before the several layers of dental porcelain are fired. (A notable exception is the palladium-copper-gallium [Pd-Cu-Ga] high-palladium alloy Freedom Plus,* in which the oxidation step does not need to be performed before firing the opaque porcelain layer.) This step has also been called a conditioning bake or degassing. The latter term, which is frequently used in the dental laboratory industry, is inaccurate, because this procedure’s purpose is to oxidize the metal surface for subsequent adherence to the fired porcelain. Historically, some clinicians thought that the heating cycle might result in loss of gases incorporated in the alloy during melting. However, this occurs during solidification because of the much greater solubility of atmospheric gases in the molten alloy than in the solidified alloy; it results in the formation of microscopic porosity31 in the casting.
The oxide layer between the metal and ceramic should have an optimum thickness for a strong metal-ceramic interfacial bond. This was demonstrated in the 1970s for selected noble and base metal alloys.32 Research has shown that particular care is required with the base metal casting alloys to avoid excessively thick oxide layers.33 Beryllium is added to some nickel-chromium (Ni-Cr) alloy compositions to lower the melting range; beryllium also has an effect on the thickness of the oxide layer.34 Some systems require the application of a bonding agent before firing of the opaque porcelain. Certain formulations consist of colloidal gold suspensions that are fired on silver-colored, gold-based ceramic alloys for esthetic purposes. SEM examination of the interfaces has shown that in Ni-Cr alloys, the bonding agents may increase or decrease the width of the interaction zone between the metal and ceramic.29 An analysis of bonding agents for several Ni-Cr alloys indicates that they contain elements found in porcelain (e.g., aluminum, tin, and silicon).34 For certain specific brands of Ni-Cr alloys, the bonding agent appears to increase the adherence between the alloy and the opaque porcelain. The manufacturer indicates whether a bonding agent is necessary or beneficial.
Airborne particle abrasion with aluminum oxide (alumina) is routinely performed on the alloy castings to create surface irregularities and to provide mechanical interlocking with the opaque dental porcelain, which has sufficiently low viscosity in the firing temperature range to flow into these microscopic openings. Early studies found no effect of such surface roughening in the interfacial resistance of gold-platinum-palladium (Au-Pt-Pd),35 gold-palladium-silver (Au-Pd-Ag), and Ni-Cr36 systems to shear loading. More recent research with a Pd-Cu-Ga high-palladium alloy showed that controlled amounts of mechanical surface roughening that yielded greater notch depth for the irregularities increased the metal-ceramic bond strength, with greater improvements from coarse roughening.37
The linear coefficients of thermal expansion for the metal (αM) and ceramic (αC) must closely match to achieve a strong interfacial bond. Typically, αM values range from 13.5 to 14.5 × 10⁻⁶/degree Celsius; αC values range from 13.0 to 14.0 × 10⁻⁶/degree Celsius.38 The slightly higher coefficient for the metal causes the ceramic to be in a beneficial state of residual compressive stress at room temperature (Fig. 24-17). (The thermal contraction and expansion coefficients are assumed to be equal, and residual stress is developed in the ceramic only below its glass transition temperature, at which time viscous flow is no longer possible.) Porcelain is much stronger in compression than tension, and residual tensile stress in the porcelain must be avoided, to prevent fracture of the restoration.
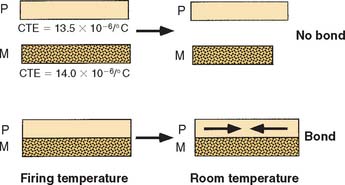
Fig. 24-17 The ceramic-metal bond at the firing temperature and at room temperature when the thermal coefficient of expansion of the metal is 0.5 × 10⁻⁶/degree Celsius greater than that of the ceramic, which thus places the ceramic in compression at room temperature.
(Adapted from Craig RG, et al: Dental Materials: Properties and Manipulation, 7th ed. St. Louis, Mosby, 2000.)
Adherence between the alloy casting and porcelain is very important in fixed prosthodontics, and investigators have used a variety of test configurations with shear, tensile, flexural, and torsional loading to determine the metal-ceramic bond strength. Ideally, the interfacial bond is strong enough so that fracture of the test specimen occurs entirely within the porcelain (cohesive failure). In one early study,39 no significant difference was found in the diametral tensile strength of commercial dental porcelains for air firing and vacuum firing. Lower tensile strength values of 28 MPa (4100 psi) for opaque porcelain, in comparison with 42 MPa (6100 psi) for gingival porcelain, were attributed to greater porosity and the inclusion of opacifying oxides in the latter. In addition, vacuum firing appeared to have little effect on the porosity of the opaque porcelain. On the basis of this research, the tensile strength of the metal-ceramic bond should exceed 28 MPa to have cohesive failure through the porcelain rather than failure at the interface. Measurement of the shear strength of dental porcelain40 allows a similar prediction for the minimum interfacial shear strength required for cohesive shear failure through the ceramic. Results from several studies34,41,42 in which researchers measured the tensile bond strength of metal-ceramic systems were consistent with these concepts. Cohesive failure within the porcelain occurred at 15 to 39 MPa (2200 to 5700 psi), whereas shear bond strengths ranged from 55 to 103 MPa (8000 to 15,000 psi). For many of the shear bond strength determinations, a mixed mode of failure was observed, in which adhesive failure at the metal-ceramic interface extended into the porcelain, which fractured cohesively.
Subsequently, the focus for evaluating the metal-ceramic interfacial bond was directed toward measurement of porcelain adherence rather than determination of bond strength. Anusavice and associates43 reported a finite element analysis of the tests that had been used to measure metal-ceramic bond strength (e.g., pull-shear, three-point bending, and four-point bending). Two major problems were revealed for all the bond strength tests: The stress varied with position along the metal-ceramic interface (particularly near porcelain termination sites), and there was a lack of the pure shear stress conditions that were considered necessary to simulate the loading generally expected to cause clinical failure. Furthermore, the small mismatch between the thermal contraction coefficients of the metal (αM) and ceramic (αC) results in an unknown amount of residual stress at the interface, and an idealized value of metal-ceramic bond strength assumes the presence of a residual stress-free interface.
To avoid these problems, O’Brien proposed a completely different approach,44,45 focusing on the mode of failure of metal-ceramic specimens or restorations rather than measurement of bond strength. The adhesive and/or cohesive failure can occur at six possible sites or combinations of those sites (Fig. 24-18). Adhesive failure can occur (1) at the porcelain-metal interface if no oxide layer is present, (2) at the metal oxide-metal interface, and (3) at the porcelain-metal oxide interface. Cohesive failure can occur (4) through the porcelain, which is the desirable mode; (5) through the metal oxide layer; and (6) through the metal.* This approach for evaluating the metal-ceramic bond by determining the area fraction of adherent porcelain on fractured test specimens was adopted in the American National Standards Institute/American Dental Association (ANSI/ADA) specification no. 38 for metal-ceramic systems,46 although the method of microscopic measurement was not specified.
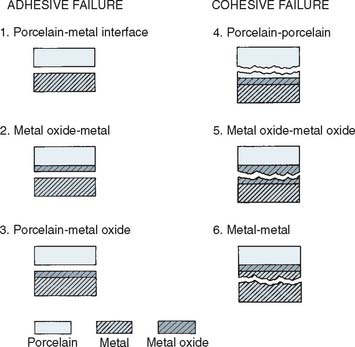
Fig. 24-18 Possible modes of failure of alloy-porcelain restorations.
(Modified from O’Brien WJ: Evolution of dental casting. In Valega TM Sr, ed: Alternatives to Gold Alloys in Dentistry [DHEW Publication No. (NIH) 77–1227, p 5]. Washington, DC, U.S. Government Printing Office, 1977.)
A quantitative x-ray spectrometric method was developed by Ringle and coworkers47 to measure porcelain adherence. The fracture surfaces of metal-ceramic specimens loaded to failure in biaxial flexure are examined with the SEM, with x-ray energy-dispersive spectroscopic analysis. This method is based on the principle that silicon is a major element in dental porcelain but is largely absent in dental alloys (except as contaminants from investments or polishing abrasives used to prepare specimens). The amount of dental porcelain remaining on the metal surface of the fractured specimen is readily determined by measuring the silicon Kα signal, with necessary calibration measurements on the oxidized alloy surface before porcelain application and on the porcelain surface before testing the specimen. This technique has been used to measure the oxide adherence to a variety of ceramic alloys48 and the porcelain adherence to high-palladium alloys49,50 and to titanium and an alloy of titanium-aluminum-vanadium (Ti-6Al-4V).51-54 Another philosophical change in the recommended method for evaluating the metal-ceramic bond has occurred with the introduction of International Organization for Standardization (ISO) standard no. 9693 for dental porcelain fused to metal restorations,55 which contains a three-point bending test. Lenz and colleagues56 performed a finite element analysis for this test, considering the stress concentrations that arise at the porcelain termination sites, although the effect of unknown residual stresses arising from the mismatch between αM and αC could not be included.57 Investigators using several Pd-Ga high-palladium alloys with identical values of elastic modulus found no correlation between the porcelain adherence measured by the x-ray spectrometric method49,50 and the force to failure by the three-point bending test in ISO standard no. 969355 and Lenz and colleagues’ analysis.56 These experimental results cast doubt on the effectiveness of x-ray spectrometric technique48,49 in measuring porcelain adherence. In future experimental research in this area, investigators may use a fracture-mechanics approach to evaluate the metal-ceramic interfacial bond.
Other important factors that affect the metal-ceramic bond are the surface treatment of the alloy before the porcelain is fired and the atmosphere of the porcelain furnace during firing. As previously mentioned, air abrasion of the cast alloy is typically performed before the oxidation step to help remove surface contaminants that remain from devesting and to help clean the casting and provide microscopic surface irregularities for mechanical retention of the ceramic. The oxidation step for the alloy can be performed in air or by using the reduced atmospheric pressure (approximately 0.1 atm) available in dental porcelain furnaces. A much thinner oxide layer is formed if the alloy is oxidized at this reduced atmospheric pressure, in comparison with the thickness for oxidation in air. One manufacturer (Heraeus Kulzer, Armonk, New York) recommends performing the oxidation step in air and then carefully reducing the thickness of the oxide layer before firing the opaque porcelain. Manufacturer’s recommendations for the oxidation of the alloy and the porcelain firing cycles must be followed. An early study58 showed that the shear bond strength of porcelain-gold alloy specimens was 60% greater when air firing was employed; another study at that time59 revealed that the tensile bond strength varied according to the furnace atmosphere used. The shear bond strength of porcelain-nickel–based alloy specimens was greater when firing was performed in oxidizing atmospheres than in non-oxidizing or reducing atmospheres.60 More recently, Wagner and associates37 found that the use of a reducing atmosphere severely reduced the bond strength of a Pd-Cu-Ga high-palladium alloy, which confirmed the role of alloy oxidation during the standard porcelain firing cycles. Areas of current research activity are surface modification of cast titanium with chemical solutions,52 control of interfacial variables (different porcelain firing environments and sputtered gold film),53 and use of special gold54 and silicon nitride61 coatings to improve the porcelain adherence.
SELECTION CRITERIA
Most manufacturers of modern dental porcelains specify the alloy systems with which a material is compatible. Usually that compatibility refers to the relative coefficients of thermal expansion. The shade selected clinically determines which powders to combine. Depending on the characteristics of the color to be matched, several powders can be combined for the desired esthetic result. Commercially available porcelains can be divided into fine-grain and coarse-grain types. The typical particle size of a fine-grain porcelain ranges from 5 to 110 μm; the particle size for a coarse-grain porcelain can be as large as 200 μm.
Opaque Porcelain
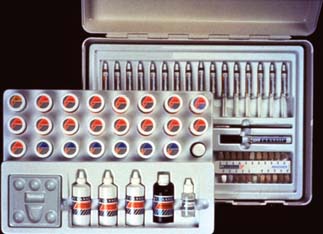
For a proper mechanical bond and chemical interaction at the interface, opaque porcelain must wet the surface easily. It becomes the primary source of color of the restoration and must mask the color of the metal, even in thin layers. Opaque thickness generally should not exceed 0.1 mm; otherwise, achieving an esthetic result without overcontouring the restoration becomes impossible, although a greater thickness may be needed to mask the darker oxide of some alloys.62 Small amounts of zirconium oxide and titanium oxide, in conjunction with alumina, act as the opacifying agents to block the darker color of the oxidized metal. Some of these oxides are also present in the body porcelain. Manufacturers supply opaque porcelains in paste and powder form (Fig. 24-19).
Body and Incisal Porcelains
As with opaque porcelain, the selection of body and incisal porcelains is based largely on their esthetic properties. However, the amount of shrinkage that occurs when these powders are fired must also be considered. The volume of body and incisal porcelains usually shrinks as much as 27% to 45% during a first firing14; opaque porcelain, on the other hand, may exhibit some cracking during an initial bake, but it remains relatively stable dimensionally. Lower-fusing metal-ceramic porcelains* have become popular.63 These materials should be considered when opposing enamel wear is likely to be a problem, because in vitro they tend to exhibit lower abrasiveness than do conventional formulations.64
FABRICATION
For optimum esthetics, custom-mixing body and enamel powders to achieve desired color variations is recommended.
Porcelain Application
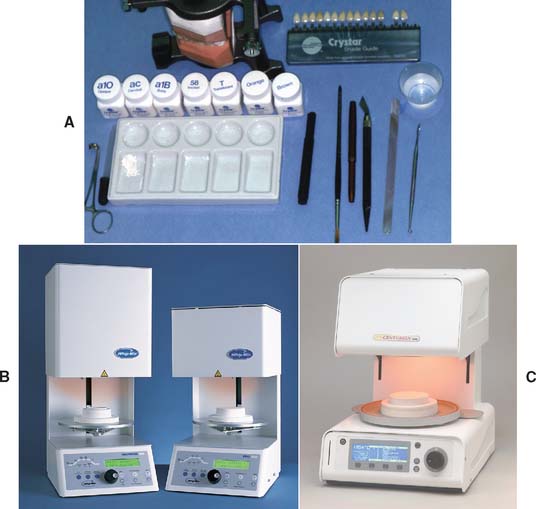
Armamentarium (Fig. 24-20)
Step-by-step procedure
After the metal substructure has been oxidized, it must be inspected carefully. An uninterrupted oxide layer should cover the entire surface to be veneered.
Opaque porcelain (Fig. 24-21)
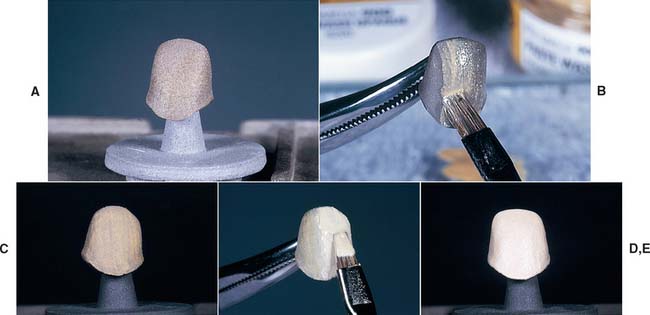
Fig. 24-21 Opaque porcelain application. A, Substructure is oxidized. B, Porcelain is applied. Vibration can be used to help spread the opaque into an even, thin film (C). D, Application of additional opaque. E, After drying in front of the furnace, the opaque powder should have a uniform matte-white appearance. Excess must be removed before firing.
Body and incisal porcelains
When a satisfactory opaque layer has been fired, the body and incisal porcelains (Fig. 24-23) can be applied. The use of several porcelains in one restoration is common. Body porcelains with increased opacity* may be used where less translucency is required (e.g., the gingival area of the pontic, incisal mamelons) to mimic existing anatomic features of adjacent natural teeth. Special neck powders can be applied on the cervical third, and incisal powders on the incisal edge, to simulate natural enamel. In general, the restoration is built to anatomic contour; when it is acceptable, a cut-back similar to that made during the waxing stage allows for a veneer of the more translucent incisal porcelain.
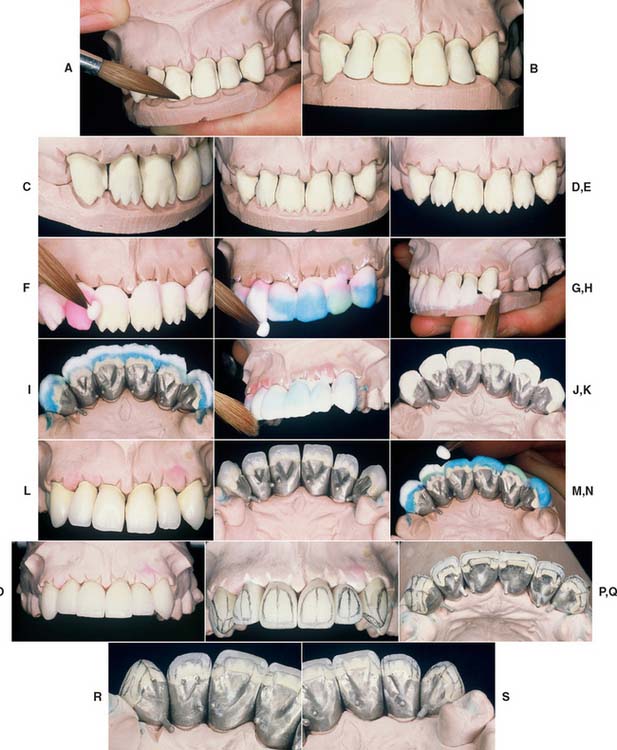
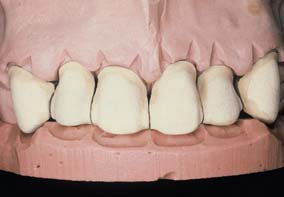
Fig. 24-23 Body and incisal porcelain application. A to E, Development of incisal mamelons with opacious dentin. The incisal plaster or silicone putty index is made from the anatomic contour wax patterns (see Chapter 18) and serves as a guide to developing proper incisal edge position. F and G, Cervical and body powders are added to the contour. H, Alternatively, the incisal index can be used to establish incisal edge position. This is especially helpful for extensive restorations. I, Restorations are slightly overbuilt. J, The buildup is smoothed with a whipping brush. K, Restorations are separated with a razor blade before firing. Additional porcelain is added to the proximal contacts. L and M, Restorations after firing of the first body bake. N, Porcelain is added in areas of deficient contour. O, After firing, the proximal contacts are carefully adjusted, and the restorations are seated on the cast. P to S, Restorations are contoured by grinding. Careful attention is paid to the shape and position of line angles and incisal edges. When completed, the restorations are ready for clinical evaluation and final contouring intraorally (see Chapter 30).

Fig. 24-24 Mean shrinkage values from firing of a typical maxillary central incisor metal-ceramic crown.
(From Rosenstiel SF: Linear firing shrinkage of metal-ceramic restorations. Br Dent J 162:390, 1987.)

Fig. 24-25 A, This restoration had a defect (arrow) at the gingival margin after the first firing. Access for repair is made by grinding out such cracks. B, Additional porcelain is applied after the area is moistened. C, The porcelain has been added, and the restoration is ready for a second firing.
Internal Characterization
Internal or intrinsic characterization or staining may be accomplished by incorporating colored pigments in the opaque, body, or incisal powder. These pigments are ceramic in nature and have physical properties similar to those of the porcelain powders.
Most commercially available porcelains have colored opaque modifiers that can be selectively mixed with the opaque to increase the saturation of the desired pigment. A variation of this approach is to use opacified dentin powders that produce a finished restoration with a slightly higher chroma than one prepared with the more translucent dentin powders. Similarly, a translucent powder can be used to enhance incisal translucency (Fig. 24-26). Highly colored glazes, commonly used as surface stains, may be layered within the buildup powders to create special effects (Fig. 24-27).
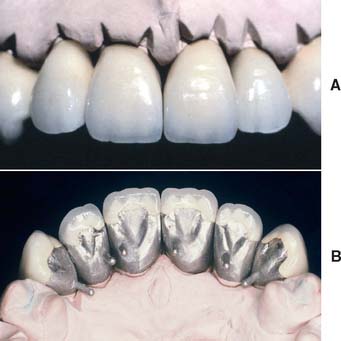
Fig. 24-26 A and B, Natural incisal appearance has been achieved through subtle layering of porcelains of different translucencies.
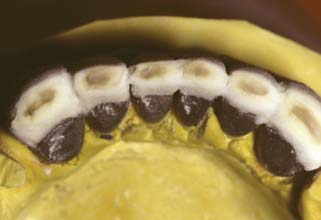
Fig. 24-27 Porcelain stain was applied intrinsically to create the effect of discolored dentin in these mandibular incisors seen before firing.
The use of internal stains presents little technical difficulty for operators familiar with metal-ceramic procedures. However, because the pigment is built into the material, if the desired effect is not obtained through internal staining, the porcelain must be stripped from the substructure.
Another technique for internal characterization is to fire the body powders initially, carve them into the desired mamelon shape, and then apply the subsequent enamel powders. A disadvantage of this approach is that an additional firing is needed.
Contouring
The appearance of the finished restoration depends on its color, shape, and surface texture, which can be altered by shaping and characterizing dental porcelain to mimic the appearance of natural teeth (see Fig. 24-23P to S).
The appearance of restorations can be influenced considerably through the selected use of optical illusion (see Chapter 20). The human eye is capable of discerning differences in height and width, but its depth perception is far less developed. Even trained observers experience difficulty when attempting to recognize subtle differences in the third dimension.
Through selective contouring, the apparent shape of a restoration can be made to look quite different from its actual configuration. The perceived size of a tooth depends on the reflection of its line angles and the relative position and spacing of these reflections. Even though an edentulous area on one side may be slightly larger than a space occupied by the corresponding tooth on the contralateral side, a restoration can be made to appear similar (or even identical) through careful mimicking of the line angle distribution and contours immediately adjacent to the line angles. The clinician can create an illusion that the restoration is narrower than it really is (Fig. 24-28). In addition, by simulating the normal distance between line angles superimposed on a pontic in an edentulous area that is otherwise too narrow, it is possible to create the illusion that teeth are of normal size but merely crowded. Careful application of these principles may trick the casual observer into concluding that the teeth overlap and that a portion of the tooth (or restoration) is behind an adjacent tooth when, in reality, the overlap does not exist.
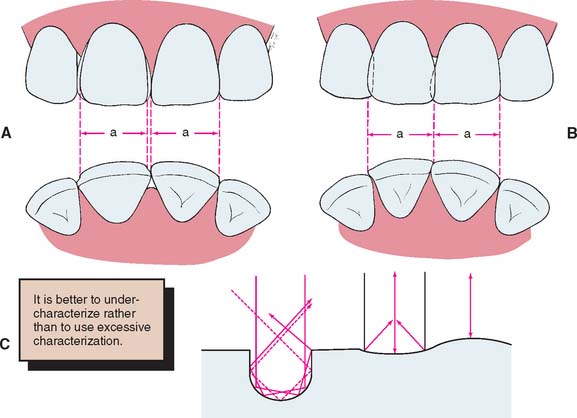
Fig. 24-28 A and B, The esthetics of an abnormally sized restoration can be improved by matching the location of the line angles and adjusting the interproximal areas. C, The pattern of light reflection depends on the surface texture of the restoration.
(A and B redrawn from Blancheri RL: Optical illusions and cosmetic grindings. Rev Asoc Dent Mex 8:103, 1950.)
The surface texture of a metal-ceramic restoration should resemble that of the adjacent teeth, including selected characterizing irregularities that exist on those teeth. Several rules of light reflection must be remembered when the clinician attempts to accomplish this:
Thus, a smooth restoration can appear larger than one of identical size that has been characterized or textured. Careful study of adjacent teeth and an understanding of how their reflective patterns should be simulated before characterization are essential. Care must also be taken not to “overcharacterize,” which would draw attention to the restoration and reveal that it is artificial.
Glazing and Surface Characterization
Metal-ceramic restorations are glazed to create a shiny surface similar to that of natural teeth (Fig. 24-29). * The glazing cycle can be performed concurrently with any necessary surface characterization (see Chapter 30).
In autoglazing, the contoured bisque bake is raised to its fusion temperature and maintained for a time before cooling. A pyroplastic surface flow occurs, and a vitreous layer or surface glaze is formed. Sharp angles and edges are rounded slightly during this process. Consequently, occlusal contact in porcelain is altered slightly during glazing.
In contrast, in overglazing, a separate mix of powder and liquid is applied to the surface of a shaped restoration, and the restoration is subsequently fired. The firing procedure is similar to that for autoglazing, although there are variations among brands. Because most metal-ceramic restorations include low-fusing porcelain, overglazing is not currently in widespread use.
External Characterization
Surface stains are highly pigmented glazes, which can be mixed with glycerin and water (supplied with most commercially available staining kits).
By moistening the bisque firing, mimicking the appearance of the glazed restoration is made possible. After the desired effect has been obtained by placing selected stains on the surface, the restoration is held outside the open muffle of the glazing furnace, and the stain is allowed to dry.
When it turns white and chalky, any excess that may have been accidentally applied to the metal surface is removed, and the restoration is fired. During this staining and glazing bake, a pyroplastic surface flow occurs, and a glassy layer (or autoglaze) forms on the surface in which the stains are incorporated.
PORCELAIN LABIAL MARGINS
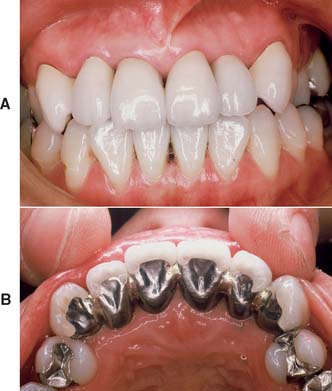
Many patients object to the grayness at the margin associated with metal-ceramic restorations. However, hiding the margin subgingivally may not be possible. If esthetics is of prime importance, a collarless metal-ceramic crown (Fig. 24-30) should be considered. Collarless crowns have a facial margin of porcelain and lingual and proximal margins of metal* (Fig. 24-31).
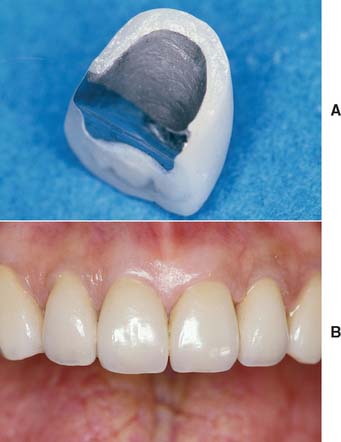
Fig. 24-30 A and B, Metal-ceramic restorations with porcelain labial margins combine the excellent esthetics of all-ceramic with the strength of the metal-ceramic technique.
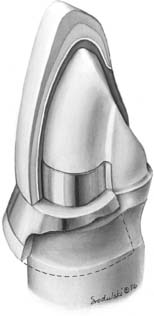
Fig. 24-31 Schematic of a collarless restoration fabricated with the platinum foil technique. To support the foil during burnishing, a “skirt” of a suitable blockout material has been added to the facial aspect of the die adjacent to the proposed porcelain labial margin. This prevents distortion of the foil upon removal from the die. Alternatively, a blocked-out die can be duplicated in epoxy resin or electroplated.
Advantages and Disadvantages
The collarless crown’s most obvious advantage is the esthetic improvement it offers over the conventional metal-ceramic restoration. Plaque removal also is easier when gingival tissues are in contact with vacuum-fired glazed porcelain than when they are contacting highly polished gold. Therefore, porcelain appears to be the material of choice for restorations that will be in contact with gingival tissues.
The difficulties encountered during fabrication, however, limit its application. Although a technically comparable result is feasible,71,72 the marginal adaptation of these restorations (as currently produced by most commercial laboratories) is slightly inferior to that of cast metal. Because of careless handling, fracture of the unsupported margin is sometimes a problem during evaluation or cementation. Fracture during function is rarely a problem, because the labial margin is not subjected to high tensile stresses.73 In addition, the collarless metal-ceramic restoration is more time consuming and therefore more costly to make.
Indications and Contraindications
A porcelain labial margin is indicated when a conventional metal-ceramic restoration will not create the desired esthetic result. It is contraindicated when an extremely smooth, 1-mm-wide shoulder cannot be prepared in the area of the ceramic veneer. (In this regard, the conventional metal-ceramic restoration is somewhat more “forgiving.”) Although multiple porcelain margins may be used in one fixed prosthesis without sacrificing marginal adaptation, the limitations of the operator and the technical auxiliaries should be carefully and objectively assessed before the dentist and patient commit themselves to a fixed prosthesis consisting of multiple collarless retainers.
Framework Design for Labial Margin
Various framework designs have been proposed with different facial framework reductions74 (Fig. 24-32). In general, the more metal reduction, the better the esthetic result. However, the technical procedures become more demanding. Removal of up to 2 mm of the labial framework has been shown not to decrease the fracture resistance of the restoration.75,76
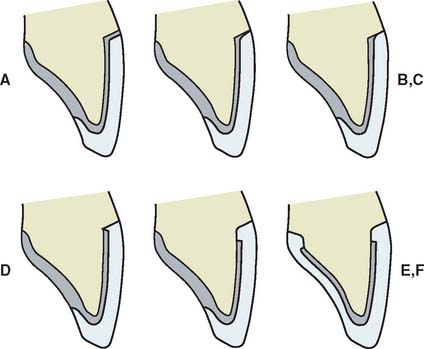
Fig. 24-32 Labial margin designs for metal-ceramic restorations. A, A thin metal band provides excellent adaptation but is very unesthetic unless it can be hidden subgingivally. For esthetic reasons, this design is rarely used for anterior teeth. B, “Disappearing” margin, sometimes called a conventional margin, is commonly used and is esthetically acceptable in some patients. However, the metal often causes unacceptable grayness of the gingival tooth surface. C to E, Various cut-back designs for labial porcelain margin restorations. Reducing the metal provides better esthetics but makes the laboratory phase more demanding and may result in margin chipping. F, A 360-degree porcelain margin provides excellent light transmission in the gingival area and optimal esthetics; however, the laboratory fabrication is very demanding. This design requires a preparation design that is similar to that for an all-ceramic crown (see Chapter 11) with a circumferential rounded shoulder. Close cooperation between dentist and technician is essential in determining the best labial margin design.
Methods of Fabrication
Several techniques have been proposed to fabricate porcelain labial margins in metal-ceramic restorations: platinum foil matrix, direct lift or cyanoacrylate resin, and porcelain wax.
Platinum foil matrix technique
The platinum foil technique4 involves use of a platinum matrix that is spot-welded to the metal substructure. Its primary purpose is to support the porcelain during firing.
Step-by-step procedure (Fig. 24-33)
Direct lift (cyanoacrylate resin) technique
Because this technique is less time consuming5 and easier to perform than the platinum foil technique, it is more widely used. The substructure is fabricated in the same manner, but the die is coated with a layer of cyanoacrylate resin, and the porcelain is condensed directly onto it (because the die no longer absorbs moisture from the wet ceramic buildup). Separation is achieved with a porcelain release agent. As with most techniques, a second bake is usually necessary for satisfactory marginal adaptation.
The principal difficulty associated with the cyanoacrylate resin technique occurs during the characterization and glazing firing. Because the porcelain is not supported as in the platinum foil technique, the margin tends to round off slightly; therefore, special shoulder powders are needed.
Step-by-step procedure (Fig. 24-34)
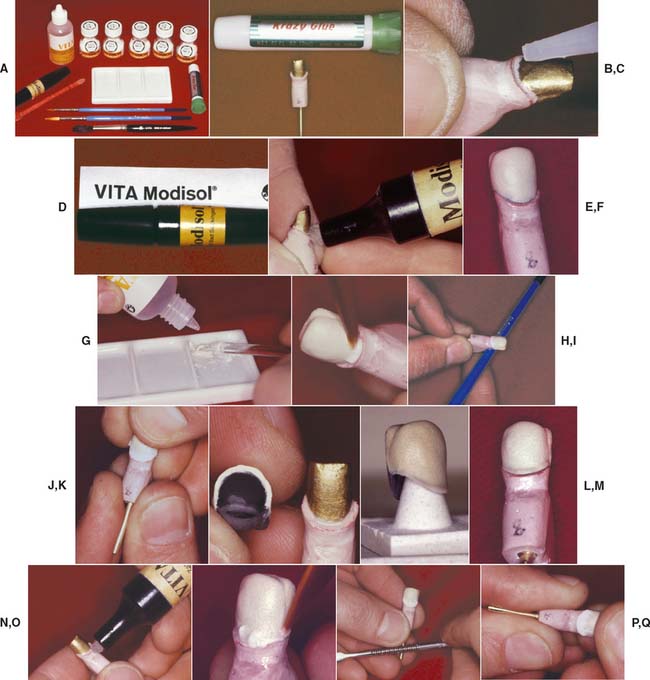
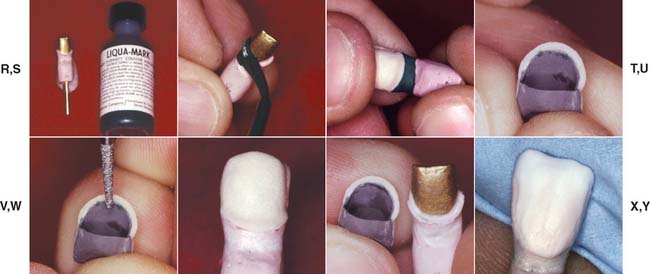
Fig. 24-34 The direct lift (cyanoacrylate resin) technique for a porcelain labial margin. A, Armamentarium. B, Cyanoacrylate resin serves as a sealant of the porous stone die. C, The resin is applied to the die where the porcelain will be in direct contact with the die. Compressed air is used to minimize film thickness. D, Recommended separating medium. E, The separating liquid is applied to the shoulder of the prepared die. F, The opaqued casting seated on the prepared die. G, Mixing the shoulder porcelain. H, Shoulder porcelain is applied in direct contact with the die and opaque porcelain. I, Light tapping is used to assist in condensation. J, Separating the dry buildup from the die. K, The buildup before firing. L, First firing of the shoulder porcelain completed. M, The fixed restoration is reseated on the die. Note the minor marginal discrepancy. N, Before additional porcelain application, the die is relubricated. O, Second application of shoulder porcelain. P, Vibration. Q, Separating after the second shoulder application. R, Water-soluble marking agent for detecting premature contact. S, The marking agent is applied to the shoulder. T, The fired restoration is gently tried on the die. U, Markings are visible on the porcelain and on the internal aspect of the casting. V, Excess porcelain is removed. W, The seated restoration. X, Internal view of the completed shoulder. Y, Conventional buildup with body and incisal powders.
Porcelain wax technique
A mixture of body porcelain and wax (6:1 by weight)77 is applied to the die for final adaptation of the porcelain labial margin of the metal-ceramic restoration.
Step-by-step procedure (Fig. 24-35)
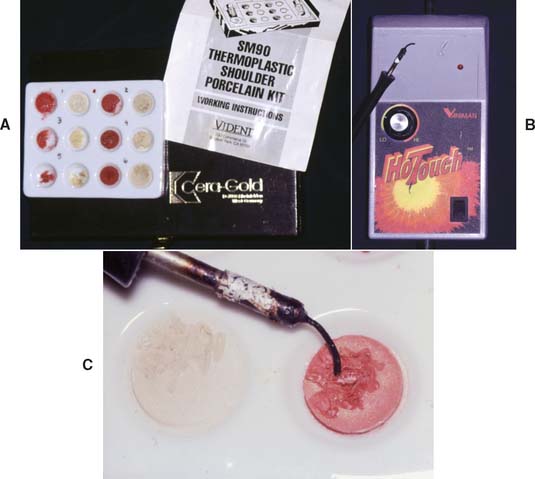
Fig. 24-35 The porcelain wax technique. Special porcelain-wax mixtures (A) and electric waxing instruments (B) are available for this technique. C, The mixture is flowed to place and shaped with conventional carving instruments before firing.
Advantages and disadvantages of each technique are summarized in Table 24-2.
Table 24-2 ADVANTAGES AND DISADVANTAGES OF FABRICATION TECHNIQUES
| Method | Advantages | Disadvantages |
|---|---|---|
| Platinum foil | No shoulder porcelain (best esthetics)78 | Time consuming |
| Good marginal adaptation | Technically difficult | |
| Smooth surface78 | ||
| Low plaque accumulation78 | ||
| Wax suspension | Separates easily | Shoulder porcelain needed |
| Less accurate fit79 | ||
| Direct lift | Least time consuming | Shoulder porcelain needed |
| Rougher margins78 |
TROUBLESHOOTING
Technical failures can occur in the complex metal-ceramic system and are difficult to diagnose. Different errors may lead to problems that appear similar. Table 24-3 summarizes some of these.
Table 24-3 COMMON REASONS FOR FAILURE OF METAL-CERAMIC RESTORATIONS
| Failure | Reason |
|---|---|
| Fracture during bisque bake | Improper condensation |
| Improper moisture control | |
| Poor framework design | |
| Incompatible metal-porcelain combination | |
| Bubbles | Too many firings |
| Air entrapment during building of restoration | |
| Improper moisture control | |
| Poor metal preparation | |
| Poor casting technique | |
| Unsatisfactory appearance | Poor communication with technician |
| Inadequate tooth reduction | |
| Opaque too thick | |
| Excessive firing | |
| Clinical fracture | Poor framework design |
| Centric stops too close to metal-ceramic interface | |
| Improper metal preparation |
Cracks
Surface cracks and fractures in the opaque porcelain are usually of little concern. They can be patched before the body firing begins. Fractures during the bisque bake, however, often are the result of improper condensation, overly rapid drying, or haphazard moisture control. Poor substructure design, resulting in areas of unsupported porcelain, also can lead to porcelain failure (see Chapter 19). After cementation, pinpointing the cause of failure may be difficult. If the substructure is properly designed and the porcelain-metal interface is kept away from direct occlusal contact, cracks and fractures should not develop during normal function.
Bubbles
Even the most experienced ceramist sometimes traps air between the metal and the opaque. Usually this is of little concern. However, if a restoration is fired too many times, the trapped air may appear as blisters that rise to the surface. If this occurs, the porcelain must be stripped, and the procedure is started over.
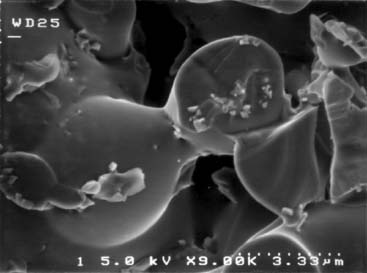
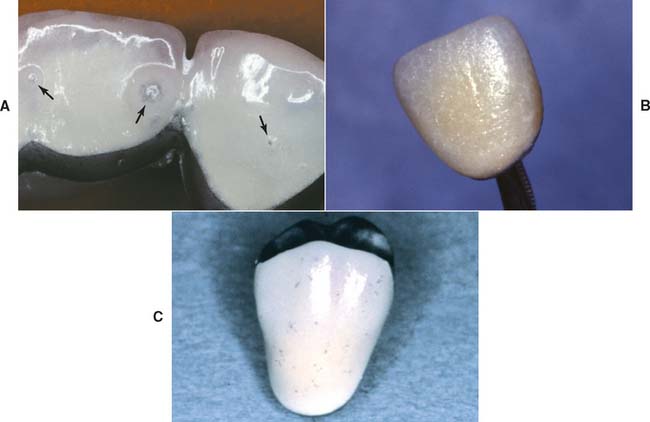
If bubbles appear after only a few firings, improper casting technique, insufficient metal preparation, and haphazard moisture control can usually be isolated as the cause (Fig. 24-36).
Unsatisfactory Appearance
Poor esthetic results often result from poor communication between the operator and the dental technician (see Chapter 16). An opaque application that is too thick can result in opacity of the veneer. Inadequate tooth reduction, especially in the cervical third and the interproximal areas, is one of the more common causes of a poor esthetic result. Careful communication, based on a thorough understanding and knowledge of relevant laboratory procedures and color science, is essential.
REVIEW OF TECHNIQUE
Fabricating a metal-ceramic restoration involves the following steps:
SUMMARY
Substructure design for metal-ceramic restorations must be based on an understanding of fundamental material properties. Restorations should be waxed to anatomic contour and then cut back in the area that is to be veneered. This allows an even porcelain thickness, which not only is a means of obtaining superior mechanical properties in the completed restoration but also simultaneously helps standardize shade matching.
Metal-ceramic restorations with excellent appearance and good mechanical properties are obtainable if the techniques of metal preparation, framework design, porcelain manipulation, drying, and firing are carefully followed. Lifelike effects can be achieved by layering cervical, body, and incisal porcelains and by the judicious use of internal characterization and special dentin powders with relatively higher concentrations of opacifiers. Although it may create esthetic problems in many patients, the simplest way to obtain good marginal fit is to use a narrow, 0.2- to 0.3-mm facial collar.
Whenever optimum appearance is desired, the procedures described in this chapter for fabricating a labial porcelain margin should be considered. However, the level of expertise needed to produce excellent marginal adaptation with these techniques is higher than that needed to use a cast margin; this should be considered in treatment planning. When failure occurs, all technical steps and materials should be reevaluated.
 GLOSSARY*
abrade \uh-braād\ vt (1677): to rub away the external covering or layer of a part—comp ATTRITION, EROSION
abra·sion \ă-braā ’shun\ n (1656) 1: the wearing away of a substance or structure (such as the skin or the teeth) through some unusual or abnormal mechanical process 2: an abnormal wearing away of the tooth substance by causes other than mastication—comp ATTRITION, EROSION
aluminous porcelain \a-lōō’mi-nus pôr’si-lin, pōr’-\: a ceramic material composed of a glass matrix phase with 35% or more of aluminum oxide, by volume
bees’ wax n (1676): a low-melting wax obtained from honeycomb and used as an ingredient of many dental impression waxes
bisque bake \b sk baāk\: a series of stages of maturation in the firing of ceramic materials relating to the degree of pyro chemical reaction and sintering shrinkage occurring before vitrification (glazing)—called also biscuit bake
ce·ram·ics \sa-răm’iks\ n 1: compounds of one or more metals with a nonmetallic element, usually oxygen. They are formed of chemical and biochemical stable substances that are strong, hard, brittle, and inert nonconductors of thermal and electrical energy 2: the art of making porcelain dental restorations
co·he·sion \kō-hē’zhun\ n (1660) 1: the act or state of sticking together tightly 2: the force whereby molecules of matter adhere to one another; the attraction of aggregation 3: molecular attraction by which the particles of a body are united throughout their mass
1cop·ing \kō’png\ n 1: a long, enveloping ecclesiastical vestment 2a: something resembling a cope (as by concealing or covering) 2b: coping
2cop·ing \kō’png\ n (ca. 1909): a thin covering or crown—usage: see C. IMPRESSION, TRANSFER C.
1craze \kraāz\ vb. \kraāzd\; craz·ing \kraā’zng\ vt (14c): to produce minute cracks on the surface or glaze of; to develop a mesh of fine cracks
2craze \kraāz\ n (1534): a crack in a surface or coating (as of glaze or enamel)
de·gas \dē-găs’\ vt; de·gassed \dē-găsd’\ pt., pp; de·gassing \dē-găs’ing\ ppr (1920) 1: to remove gas from an object or substance 2: the name commonly used to denote the first heat cycle (oxidation cycle) in fabrication of a metal ceramic restoration that removes surface impurities from the metallic component and produces surface oxides prior to the application of opaque porcelain
de·vit·ri·fi·ca·tion \dē-vt’ra-f-kaā’shun\ n (1832): to eliminate vitreous characteristics partly or wholly; to crystallize
feld·spar \f ld’spär, fl’-\ n (1757) 1: any one of a group of minerals, principally aluminosilicate of sodium, potassium, calcium, or barium, that are essential constituents of nearly all crystalline rocks 2: a crystalline mineral of aluminum silicate with sodium, potassium, barium, and/or calcium; a major constituent of some dental procelains
feld·spath·ic \fld-spăth’k, fl’-\ adj (ca. 1828): related to or containing feldspar; used especially with reference to porcelain glaze
fir·ing \fıār’ng\: the process of porcelain fusion, in dentistry, specifically to produce porcelain restorations
1frit \frt\ n (1662) 1: the calcined or partly fused matter of which glass is made 2: a mass of fused porcelain obtained by firing the basic constituents and plunging them into water while hot. The frit is ground to make porcelain powders
glaze \glaāz\ vb glazed \glaāzd\; glaz·ing \glaā’zng\ vt (14c) 1: to cover with a glossy, smooth surface or coating 2: the attainment of a smooth and reflective surface 3: the final firing of porcelain in which the surface is vitrified and a high gloss is imparted to the material 4: a ceramic veneer on a dental porcelain restoration after it has been fired, producing a nonporous, glossy or semi-glossy surface—see NATURAL G., OVERGLAZE
intrinsic coloring \n-trn’zk, -sk kŭl’ar-ng\: coloring from within; the incorporation of a colorant within the material of a prosthesis or restoration
ka·olin \kā’a-ln\ n (1727): fine, usually white, clay that is used in ceramics and refractory materials as a filler or extender
mam·e·lon \măm’a-l n\ n: one of three tubercles sometimes found on the incisal edges of incisor teeth—mam·e·lon·at·ed \măm’a-la-nā’td\ v, mam·e·lon·a·tion \măm’a-la-nā’shun\ n
metal ceramic restoration \mt’l sa-răm’k rs-ta-rā’shun\: a tooth or/and implant retained fixed dental prosthesis that uses a metal substructure upon which a ceramic veneer is fused—see COLLARLESS M.C.R. mi·cro·crack \mıā’krō-krăk\ n: in porcelain, one of the numerous surface flaws that contributes to stress concentrations and results in strengths below those theoretically possible
mod·i·fi·er \md’a-fıā’ar\ n: a substance that alters or changes the color or properties of a substance
natural glaze \năch-ar-al, năch’ral glāz\: the production of a glazed surface by the vitrification of the material itself and without addition of other fluxes or glasses
o·pac·i·ty \ō-păs’-tē\ n (1611): the quality or state of a body that makes it impervious to light
o·paque \ō-pāk’\ adj (1641): the property of a material that absorbs and/or reflects all light and prevents any transmission of light
o·ver·glaze \ō’var-glāz\ adj (1879): the production of a glazed surface by the addition of a fluxed glass that usually vitrifies at a lower temperature
pig·ment \pg’mant\ n (14c): finely ground, natural or synthetic, inorganic or organic, insoluble dispersed particles (powder), which, when dispersed in a liquid vehicle, may provide, in addition to color, many other essential properties such as opacity, hardness, durability, and corrosion resistance. The term is used to include an extender, white or color pigments. The distinction between powders that are pigments and those that are dyes is generally considered on the basis of solubility—pigments being insoluble and dispersed in the material, dyes being soluble or in solution as used
platinum foil \plăt’n-um foil\: a precious-metal foil with a high fusing point that makes it suitable as a matrix for various soldering procedures as well as to provide an internal form for porcelain restorations during their fabrication
por·cel·ain \pôr’sa-ln, pōr’-\ n (known in Europe, ca. 1540): a ceramic material formed of infusible elements joined by lower fusing materials. Most dental porcelains are glasses and are used in the fabrication of teeth for dentures, pontics and facings, metal ceramic restorations, including fixed dental prostheses, as well as all-ceramic restorations such as crowns, laminate veneers, inlays, onlays, and other restorations
porcelain labial margin \pôr’sa-ln, pōr’- lā’bē-al mär’jn\: the extension of ceramic material to the finish line of the preparation without visible metal substructure in the marginal area—syn PORCELAIN BUTT MARGIN
quartz \kwôrts\ n (ca. 1631): an allotropic form of silica; the mineral SiO2 consisting of hexagonal crystals of colorless, transparent silicon dioxide
si·li·ca \sl’-ka\ n (ca 1301): silicon dioxide occurring in crystalline, amorphous, and usually impure forms (as quartz, opal, and sand, respectively)
2sinter \sn’tar\ vt (1871): to cause to become a coherent mass by heating without melting
2stain \stān\ vb (14c) 1: to suffuse with color 2: to color by processes affecting chemically or otherwise the material itself 3: in dentistry, to intentionally alter restorations through the application of intrinsic or extrinsic colorants to achieve a desired effect, best termed characterization or to characterize a restoration
static fatigue \stăt’k fa-tēg\: the delayed failure of glass and ceramic materials resulting from stress enhanced chemical reactions aided by water vapor acting on surface cracks. Analogous to stress corrosion occurring in metals
thermal expansion \thûr’mal k-spăn’shun\: expansion of a material caused by heat
trans·luc·en·cy \trăns’lōō’san-sē\ n (1611): having the appearance between complete opacity and complete transparency; partially opaque
STUDY QUESTIONS
1 Ernsmere JB. Porcelain dental work. Br J Dent Sci. 1900;43:547.
2 Johnston JF, et al. Porcelain veneers bonded to gold castings: a progress report. J Prosthet Dent. 1958;8:120.
3 MacEntee MI, Belser UC. Fixed restorations produced by commercial dental laboratories in Vancouver and Geneva. J Oral Rehabil. 1988;15:301.
4 Goodacre CJ, et al. The collarless metal-ceramic crown. J Prosthet Dent. 1977;38:615.
5 Toogood GD, Archibald JF. Technique for establishing porcelain margins. J Prosthet Dent. 1978;40:464.
6 Warpeha WS, Goodkind RJ. Design and technique variables affecting fracture resistance of metal-ceramic restorations. J Prosthet Dent. 1976;35:291.
7 Moore PA, Manor RC. Hydrofluoric acid burns. J Prosthet Dent. 1982;47:338.
8 Felton DA, et al. Effect of air abrasives on marginal configurations of porcelain-fused-to-metal alloys: an SEM analysis. J Prosthet Dent. 1991;65:38.
9 Hamaguchi H, et al. Marginal distortion of the porcelain-bonded-to-metal complete crown: an SEM study. J Prosthet Dent. 1982;47:146.
10 Richter-Snapp K, et al. Change in marginal fit as related to margin design, alloy type, and porcelain proximity in porcelain-fused-to-metal restorations. J Prosthet Dent. 1988;60:435.
11 Weinstein M, et al: Fused Porcelain-to-Metal Teeth. U.S. Patent No. 3,052,982, September 11, 1962.
12 Weinstein M, Weinstein AB: Porcelain-Covered Metal-Reinforced Teeth. U.S. Patent No. 3,052,983, September 11, 1962.
13 Barreiro MM, et al. Phase identification in dental porcelains for ceramo-metallic restorations. Dent Mater. 1989;5:51.
14 Rasmussen ST, et al. Optimum particle size distribution for reduced sintering shrinkage of a dental porcelain. Dent Mater. 1997;13:43.
15 Laub LW, et al. The metal-porcelain interface of gold crowns [Abstract no. 874]. J Dent Res. 1978;57:A293.
16 Seghi RR, et al. Spectrophotometric analysis of color differences between porcelain systems. J Prosthet Dent. 1986;56:35.
17 Rosenstiel SF, Johnston WM. The effects of manipulative variables on the color of ceramic metal restorations. J Prosthet Dent. 1988;60:297.
18 O’Brien WJ, Ryge G. Contact angles of drops of enamels on metals. J Prosthet Dent. 1965;15:1094.
19 Borom MP, Pask JA. Role of “adherence oxides” in the development of chemical bonding at glass-metal interfaces. J Am Ceram Soc. 1966;49:1.
20 Ohno H, Kanzawa Y. Structural changes in the oxidation zones of gold alloys for porcelain bonding containing small amounts of Fe and Sn. J Dent Res. 1985;64:67.
21 Brantley WA, et al. X-ray diffraction studies of oxidized high-palladium alloys. Dent Mater. 1996;12:333.
22 Kerber SJ, et al. The complementary nature of x-ray photoelectron spectroscopy and angle-resolved x-ray diffraction. II. Analysis of oxides on dental alloys. J Mater Eng Perform. 1998;7:334.
23 Cascone PJ. The theory of bonding for porcelain-metal systems. In: Yamada HN, Grenoble PB, editors. Dental Porcelain: The State of the Art—1977. Los Angeles: University of Southern California School of Dentistry; 1977:109.
24 Cascone PJ. Oxide formation on palladium alloys and its effects on porcelain adherence [Abstract no. 772]. J Dent Res. 1983;62:255.
25 Lautenschlager EP, et al. Microprobe analyses of gold-porcelain bonding. J Dent Res. 1969;8:1206.
26 Payan J, et al. Changes in physical and chemical properties of a dental palladium-silver alloy during metal-porcelain bonding. J Oral Rehabil. 1986;13:329.
27 Hong JM, et al. The effect of recasting on the oxidation layer of a palladium-silver porcelain alloy. J Prosthet Dent. 1988;59:420.
28 Anusavice KJ, et al. Adherence controlling elements in ceramic-metal systems. I. Precious alloys. J Dent Res. 1977;56:1045.
29 Anusavice KJ, et al. Adherence controlling elements in ceramic-metal systems. II. Nonprecious alloys. J Dent Res. 1977;56:1053.
30 Papazoglou E, et al. New high-palladium casting alloys. Studies of the interface with porcelain. Int J Prosthodont. 1996;9:315.
31 Anusavice KJ. Phillips’ Science of Dental Materials, 11th ed., Philadelphia: Elsevier Science/Saunders; 2003:342.
32 Caputo AA. Effect of surface preparation on bond strength of nonprecious and semi-precious alloys. J Calif Dent Assoc. 1978;6:42.
33 Baran GR. The metallurgy of Ni-Cr alloys for fixed prosthodontics. J Prosthet Dent. 1983;50:639.
34 Laub LW, et al. The tensile and shear strength of some base metal/ceramic interfaces [Abstract no. 504]. J Dent Res. 1977;56:B178.
35 Shell JS, Nielsen JP. Study of the bond between gold alloys and porcelain. J Dent Res. 1962;41:1424.
36 Carpenter MA, Goodkind RJ. Effect of varying surface texture on bond strength of one semiprecious and one nonprecious ceramo-alloy. J Prosthet Dent. 1979;42:86.
37 Wagner WC, et al. Effect of interfacial variables on metal-porcelain bonding. J Biomed Mater Res. 1993;27:531.
38 Craig RG, Powers JM, editors. Restorative Dental Materials. 11th ed.. St. Louis: Elsevier Health Sciences/Mosby. 2002:578.
39 Meyer JM, et al. Sintering of dental porcelain enamels. J Dent Res. 1976;55:696.
40 Johnston WM, O’Brien WJ. The shear strength of dental porcelain. J Dent Res. 1980;59:1409.
41 Nally JN. Chemico-physical analysis and mechanical tests of the ceramo-metallic complex. Int Dent J. 1968;18:309.
42 Kelly M, et al. Tensile strength determination of the interface between porcelain fused to gold. J Biomed Mater Res. 1969;3:403.
43 Anusavice KJ, et al. Comparative evaluation of ceramic-metal bond tests using finite element stress analysis. J Dent Res. 1980;59:608.
44 O’Brien WJ. Cohesive plateau theory of porcelain-alloy bonding. In: Yamada HN, Grenoble PB, editors. Dental Porcelain: The State of the Art—1977. Los Angeles: University of Southern California School of Dentistry; 1977:137.
45 O’Brien WJ. The cohesive plateau stress of ceramic-metal systems [Abstract no. 501]. J Dent Res. 1977;56:B177.
46 ANSI/ADA Specification No. 38 for Metal-Ceramic Systems. Chicago: American Dental Association, 2000.
47 Ringle RD, et al. An x-ray spectrometric technique for measuring porcelain-metal adherence. J Dent Res. 1983;62:933.
48 Mackert JR, et al. Measurement of oxide adherence to PFM alloys. J Dent Res. 1984;63:1335.
49 Papazoglou E, et al. Porcelain adherence to high-palladium alloys. J Prosthet Dent. 1993;70:386.
50 Papazoglou E, et al. Effects of dental laboratory processing variables and in vitro testing medium on the porcelain adherence of high-palladium casting alloys. J Prosthet Dent. 1998;79:514.
51 Adachi M, et al. Oxide adherence and porcelain bonding to titanium and Ti-6Al-4V alloy. J Dent Res. 1990;69:1230.
52 Cai Z, et al. Porcelain adherence to dental cast CP titanium: effects of surface modifications. Biomaterials. 2001;22:979.
53 Sadeq A, et al. Effects of interfacial variables on ceramic adherence to cast and machined commercially pure titanium. J Prosthet Dent. 2003;90:10.
54 Lee KM, et al. SEM/EDS evaluation of porcelain adherence to gold-coated cast titanium. J Biomed Mater Res B Appl Biomater. 2004;68:165.
55 International Organization for Standardization. ISO Standard No. 9693: Dental Porcelain Fused to Metal Restorations. Geneva, Switzerland: International Organization for Standardization, 2000.
56 Lenz J, et al. Bond strength of metal-ceramic systems in three-point flexure bond test. J Appl Biomater. 1995;6:55.
57 Papazoglou E, Brantley WA. Porcelain adherence vs. force to failure for palladium-gallium alloys: critique of metal-ceramic bond testing. Dent Mater. 1998;14:112.
58 Leone EF, Fairhurst CW. Bond strength and mechanical properties of dental porcelain enamels. J Prosthet Dent. 1967;18:155.
59 Knap FJ, Ryge G. Study of bond strength of dental porcelain fused to metal. J Dent Res. 1966;45:1047.
60 Sced IR, McLean JW. The strength of metal/ceramic bonds with base metals containing chromium. Br Dent J. 1972;13:232.
61 Wang RR, et al. Silicon nitride coating on titanium to enable titanium-ceramic bonding. J Biomed Mater Res. 1999;46:262.
62 Terada Y, et al. The masking ability of an opaque porcelain: a spectrophotometric study. Int J Prosthodont. 1989;2:259.
63 McLaren EA. Utilization of advanced metal-ceramic technology: clinical and laboratory procedures for a lower-fusing porcelain. Pract Periodont Aesthet Dent. 1998;10:835.
64 Metzler KT, et al. In vitro investigation of the wear of human enamel by dental porcelain. J Prosthet Dent. 1999;81:356.
65 Rosenstiel SF. Linear firing shrinkage of metal-ceramic restorations. Br Dent J. 1987;162:390.
66 Evans DB, et al. The influence of condensation method on porosity and shade of body porcelain. J Prosthet Dent. 1990;63:380.
67 Rosenstiel SF, Porter SS. Apparent fracture toughness of metal ceramic restorations with different manipulative variables. J Prosthet Dent. 1989;61:185.
68 Mackert JRJr, Evans AL. Effect of cooling rate on leucite volume fraction in dental porcelains. J Dent Res. 1991;70:137.
69 Asaoka K, Tesk JA. Transient and residual stress in a porcelain-metal strip. J Dent Res. 1990;69:463.
70 Barghi N, et al. Comparison of fracture strength of porcelain-veneered-to–high noble and base metal alloys. J Prosthet Dent. 1987;57:23.
71 Abbate MF, et al. Comparison of the marginal fit of various ceramic crown systems. J Prosthet Dent. 1989;61:527.
72 Belser UC, et al. Fit of three porcelain-fused-to-metal marginal designs in vivo: a scanning electron microscope study. J Prosthet Dent. 1985;53:24.
73 Anusavice KJ, Hojjatie B. Stress distribution in metal-ceramic crowns with a facial porcelain margin. J Dent Res. 1987;66:1493.
74 Touati B, Miara P. Light transmission in bonded ceramic restorations. J Esthet Dent. 1993;5:11.
75 O’Boyle K, et al. An investigation of new metal framework design for metal ceramic restorations. J Prosthet Dent. 1997;78:295.
76 Lehner CR, et al. Variable reduced metal support for collarless metal ceramic crowns: a new model for strength evaluation. Int J Prosthodont. 1995;8:337.
77 Prince J, et al. The all-porcelain labial margin for ceramometal restorations: a new concept. J Prosthet Dent. 1983;50:793.
78 Koidis PT, et al. Color consistency, plaque accumulation, and external marginal surface characteristics of the collarless metal ceramic restoration. J Prosthet Dent. 1991;65:391.
79 Belles DM, et al. Effect of metal design and technique on the marginal characteristics of the collarless metal ceramic restoration. J Prosthet Dent. 1991;65:611.