6 MOUTH PREPARATION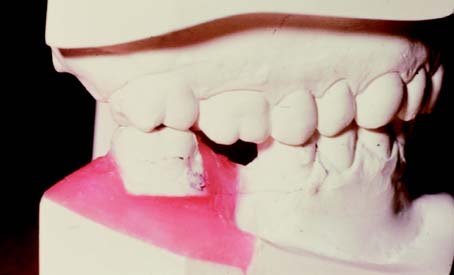
As the scope of fixed prosthodontics has expanded, it has become increasingly clear that failures are often attributable to inadequate mouth preparation. In this case, mouth preparation refers to the dental procedures that need to be accomplished before fixed prosthodontics can be properly undertaken. Rarely are crowns or fixed dental prostheses provided without initial therapy of a multidisciplinary and often extensive nature, because the etiologic factors that lead to the need for fixed prosthodontics also promote other pathologic conditions (caries and periodontal disease are the most common). These must be corrected as an early phase of treatment. Fixed prosthodontics is successful only if restorations are placed on well-restored teeth in a healthy environment, a fact that can become obscured in the misguided attempt to try to help a patient by accelerating treatment; unfortunately, such action often leads to unforgivable failure.
This chapter reviews the ways in which treatment by the different dental disciplines relates to fixed prosthodontics. Detailed descriptions of the particular procedures are obviously beyond the scope of this text.
Comprehensive treatment planning ensures that mouth preparation is undertaken in a logical and efficient sequence aimed at bringing the teeth and their supporting structures to optimum health. Equally important is the need to educate and motivate the patient to maintain long-term dental health through meticulous oral hygiene practices. As a general plan, the following sequence of treatment procedures in advance of fixed prosthodontics should be adhered to:
The following list describes a typical sequence in the treatment of a patient with extensive dental disease, including missing teeth, retained roots, caries, and defective restorations:
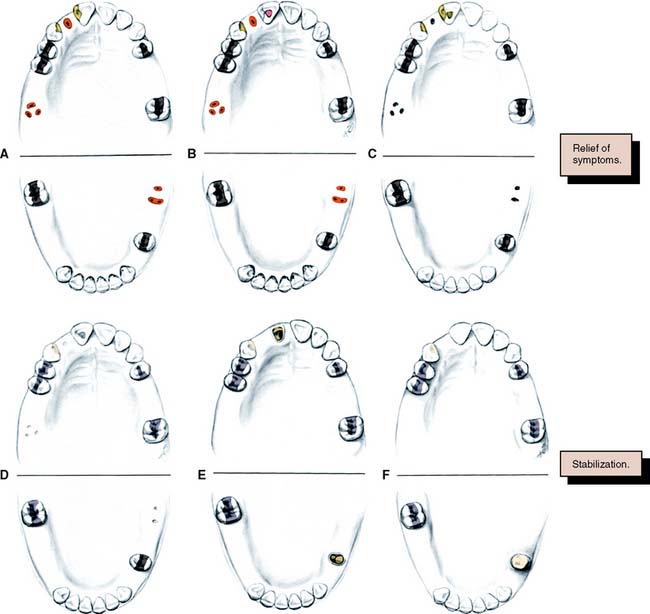
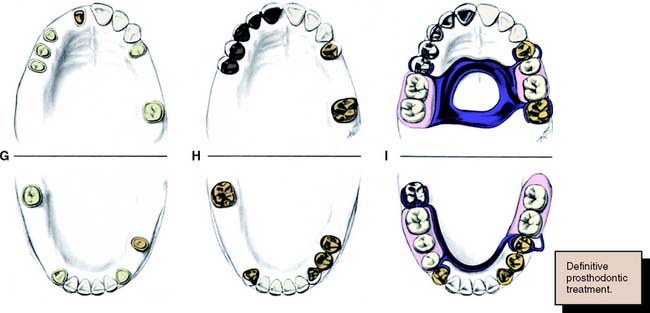
Fig. 6-1 Sequence of treatment. A, The patient has pain that seems to originate from the maxillary right central incisor. In addition, several teeth are missing, and retained roots, caries, calculus, and defective restorations are present. B, Relief of the acute problem by endodontic treatment of the incisor. C, Removal of deposits and unrestorable teeth. D, Caries are controlled, and defective restorations are replaced. The progress of ongoing disease has been halted. E, Endodontic treatment is undertaken, and post and cores and an interim restoration are placed. F, Definitive periodontal treatment is performed. G, Teeth are prepared for the final restoration. H, The fixed restorations are completed. I, Active phase of the treatment has been accomplished. Note that predictable management of complex prosthodontics involving fixed and removable dental prostheses can be facilitated by adopting the technique described on p. 102.
However, the sequence of preparatory treatment should be flexible. Two or more of these phases are often performed concurrently. Carious lesions or defective restorations often prevent proper oral hygiene measures, and their elimination or correction must be a part of preparatory treatment. If caries control results in a pulpal exposure or exacerbates an existing chronic pulpitis, endodontic treatment may be needed earlier than anticipated. When the primary symptoms have been eliminated, the occlusal needs of the patient are carefully evaluated through clinical examination and the study of articulated diagnostic casts. Extensive treatment of both arches simultaneously may be beyond the scope of the nonspecialist, and the use of cross-mounted diagnostically mounted casts should be considered (see p. 102). This enables treatment of each arch to be accomplished predictably and independently. Only when preparatory occlusal treatment is completed will the patient be ready for definitive restorative care.
ORAL SURGERY
Soft Tissue Procedures
Any soft tissue abnormalities that may necessitate surgical intervention should be recognized during the initial or radiographic examination. If necessary, the patient can be referred to an oral surgeon for further consultation and/or treatment. Diagnosis of pathologic conditions can be difficult, and the general practitioner should make the appropriate referral to a specialist when there is doubt.
Elective soft tissue surgery may include alteration of muscle attachments, removal of a wedge of soft tissue distal to the molars, increase of the vestibular depth, or modification of edentulous ridges to accommodate fixed or removable partial prostheses (Fig. 6-2).

Hard Tissue Procedures
Simple tooth removal is the most common surgical procedure involving hard tissue. It should be performed as early during treatment as possible for maximum healing time and osseous recontouring.
Tuberosity reduction (Fig. 6-3) is also common, especially when there is inadequate space to accommodate a prosthesis. Although maxillary or mandibular tori (Fig. 6-4) seldom interfere with the fabrication of a fixed partial dental prosthesis, their excision may make it easier to design a removable partial dental prosthesis and occasionally improves access for oral hygiene measures.
Fig. 6-3 Tuberosity reduction was indicated for this patient to accommodate a mandibular removable dental prosthesis.
(Courtesy of Dr. J. Bergamini.)
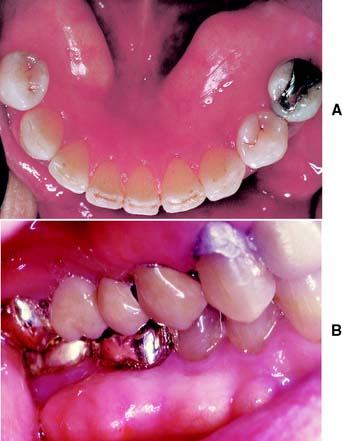
Fig. 6-4 A, Mandibular torus necessitating surgical reduction before the fabrication of a partial removable dental prosthesis. B, Buccal torus that was interfering with oral hygiene.
Impacted or unerupted supernumerary teeth should be removed if damage to adjacent structures can be avoided.
Orthognathic Surgery
Candidates for orthognathic surgery require careful restorative evaluation and attention before treatment. Otherwise, an expected improvement in the facial skeleton may be accompanied by unexpected occlusal dysfunction. After surgery, the connection between plaque control, caries prevention, and periodontal health should be stressed to the patient.
Implant-Supported Fixed Prostheses
Successful implant dentistry requires meticulous selection of the patient and skillful execution of the chosen technique. A team approach to treatment is strongly recommended with close cooperation between the specialties (see Chapter 13).
CARIES AND EXISTING RESTORATIONS
Crowns and fixed dental prostheses are definitive restorations. They are time-consuming and expensive treatment options and should not be recommended unless an extended lifetime of the restoration is anticipated. Many teeth that require crowns are severely damaged or have large existing restorations. Any restoration on such teeth must be carefully examined and a determination made regarding its serviceability. If doubt exists, the restoration should be replaced. Time spent replacing an existing restoration that in retrospect might have been serviceable is a modest price to pay for the assurance that the foundation will be caries free and well restored. Studies have shown that accurately detecting caries beneath a restoration without its complete removal can be very difficult.1-3 Even on caries-free teeth, an existing restoration may not be a suitable foundation. Preparation design is different for a foundation than for a conventional restoration, particularly with regard to the placement of retention. In general, when a crown is needed, the dentist should plan to replace any existing restorations. Although most teeth in need of restoration require foundation restorations, small defects resulting from less extensive lesions can often be incorporated in the design of a cast restoration or can be blocked out with cement (Fig. 6-5). The latter is recommended on axial walls where an undercut would otherwise result. If a small defect is present on the occlusal surface, however, it may be better to incorporate it into the final restoration than to block it out. The difficulty, of course, is anticipating this during the preparatory phase of treatment. Assessment is more difficult when an existing crown or fixed dental prosthesis is being replaced. In that case, the extent of damage can be seen only after the defective restoration has been removed.
FOUNDATION RESTORATIONS
A foundation restoration, or core, is used to build a damaged tooth to ideal anatomic form before it is prepared for a crown. With extensive treatment plans, the foundation may have to serve for an extended time. It should provide the patient with adequate function and should be contoured and finished to facilitate oral hygiene. Subsequent tooth preparation is greatly simplified if the tooth is built up to ideal contour. Then it can be prepared essentially as if it were intact. Guide grooves can be used to facilitate accurate occlusal and axial reduction (see Chapter 8), and the preparation design will be consistent from tooth to tooth. The skills learned preparing preclinical mannequins with “ideal” teeth can be readily transferred to clinical practice.
Selection Criteria
Selection of the foundation material depends on the extent of tooth destruction, the overall treatment plan, and the operator’s preference (Fig. 6-6). The effect of subsequent tooth preparation for the cast restoration on the retention and resistance of the foundation should be considered. Retention features such as grooves or pinholes should be placed sufficiently pulpally to allow adequate room for the definitive restoration. Adhesive retention may be helpful in preventing loss of the foundation during tooth preparation.
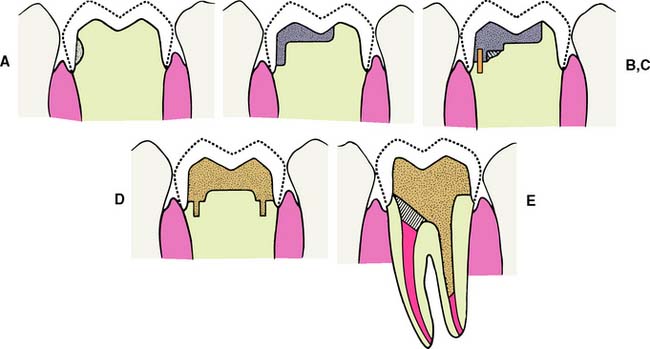
Fig. 6-6 The placement of a foundation restoration depends on the extent of damage to the tooth and should always be designed with the definitive restoration in mind. A, Cement. This is suitable when damage is minimal. B, Amalgam. C, Pin-retained amalgam. D, Cast gold. E, Post and core. (See Chapter 12.)
Dental amalgam
Despite its limitations, amalgam is still the material of choice for most foundation restorations on posterior teeth. It has good resistance to microleakage and is therefore recommended when the crown preparation will not extend more than 1 mm beyond the foundation-tooth junction.4 It can be shaped to ideal restoration form and serves well as an interim restoration. It has better strength than the glass ionomers, and retention can be provided by undercuts, pins, or slots. Adhesive bonding systems such as those based on 4-methacryloxyethyl trimellitate anhydride (4-META) are also available5-8 and may reduce leakage of the restoration.9,10 Additional retention may be provided with the use of polymeric beads supplied with the Amalgambond system.11 Amalgam requires an absolutely rigid matrix for proper condensation; otherwise the foundation will break. Matrix placement can be demanding when a tooth with little remaining coronal tissue is restored. This is discussed in the step-by-step procedure on p. 140. Amalgam has a longer setting time than do the other foundation materials. This normally delays crown preparation until a subsequent patient visit. When this presents a problem, a rapid-setting, high-copper, spherical alloy should be chosen. These can be prepared for a crown about 30 minutes after placement. Spherical amalgams are advantageous for foundation restorations because they have greater early strength than do admixed materials, which makes fracture soon after placement less of a possibility.12
Resin-modified glass ionomer cement
This is a suitable choice for a small lesion. The material sets rapidly, enabling crown preparation to be performed with limited delay. When placed correctly, it exhibits adhesion to dentin, although conventional undercut retention is needed to supplement this. It is important to select a material that has adequate radiopacity. A formulation that is more radiolucent than dentin should not be used as a core, because its radiographic appearance may suggest recurrent caries.13 The presence of fluoride in resin modified glass ionomers may help prevent recurrent caries. The chief disadvantage of glass ionomers is their comparatively low strength, which may make the material inferior to amalgam or composite resin for the longer term restoration of extensive lesions.14,15
Composite resin
Composite resin exhibits many of the advantages of glass ionomers. It does not require condensation and sets rapidly. Formulations are available that release fluoride, which may provide an anticariogenic benefit.16 Bonding is achieved with a dentinal bonding agent or by etching a glass ionomer liner. Neither method develops the bond strengths needed to withstand high masticatory forces, and conventional undercut retention is also needed. There are concerns about continued polymerization of the resin and its high thermal expansion coefficient, which may lead to microleakage of the crown.17 Also of concern is the moisture sorption properties of composite resin that causes delayed expansion and may lead to axial binding of crowns made on composite resin cores.18,19 Delayed expansion is not a problem with traditional glass ionomer,20 but it is a problem with the resin–modified glass ionomers and the compomer materials.19 Conventional tooth-colored composite resin is not recommended as a foundation material, because it is difficult to discern the composite-tooth junction. Special colored core materials should be used.
Pin-retained cast metal core
A cast metal core should be considered for an extensively damaged tooth. The cemented foundation is retained by tapered pins. The preparation requires careful location and placement of the pinholes but otherwise is straightforward. The foundation is fabricated in the laboratory as an indirect procedure. This increases the complexity and expense of treatment but facilitates obtaining good preparation form.
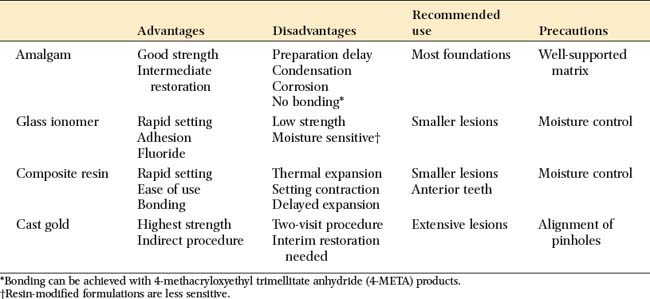
Advantages and disadvantages of the available materials are summarized in Table 6-1.
Step-by-Step Procedures
Amalgam core
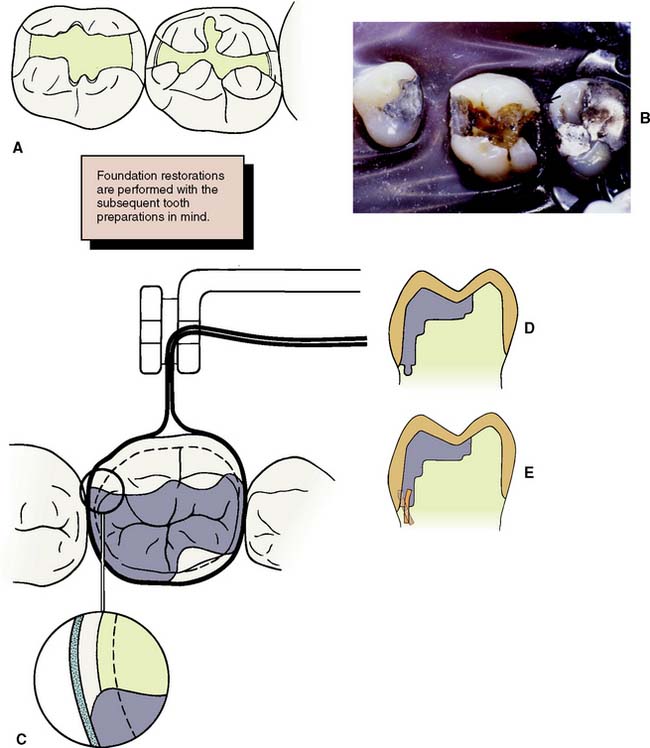
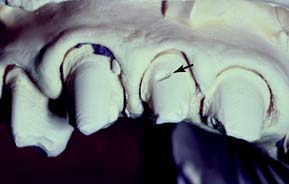
Fig. 6-7 The principles of preparation design for an amalgam foundation restoration differ slightly from those for a conventional extensive amalgam restoration. A, The outline form of a foundation need not include fissures or proximal or occlusal contacts, provided complete caries removal can be accomplished. B, Unsupported enamel (arrow) can sometimes be left when a foundation restoration is prepared. It may facilitate matrix placement and is removed when the crown is prepared. C, Acute cavosurface margins are acceptable for a foundation restoration but not for a definitive amalgam. D, Resistance form is improved by preparing the tooth in a series of steps perpendicular to the direction of occlusal force. E, When pin retention is used, pinholes should be drilled slightly pulpally and at an angle to the root surface (solid line), in comparison with the way they are placed for a conventional extensive amalgam restoration (dashed line). This ensures that retention for the foundation remains after crown preparation.
This can be a particular problem with the extensive reduction necessary for a metal-ceramic restoration. Pin placement is dictated by root furcations and the size of the pulp chamber. In general, pins should be placed further pulpally than when conventional extensive pin amalgams are being provided; to prevent pulp perforation, they should be positioned at a slight angle to the long axis of the tooth. If a pin is slightly exposed during crown preparation, this may not be a problem—in contrast to the conventional pin-amalgam restoration. With a foundation restoration, the pin-amalgam interface receives little stress during function.
Retention can also be provided by slots or wells. These create less residual stress in the dentin and thus reduces the risk of pulp exposure or damage.22-26 They should be placed pulpally to the intended crown margin, at a depth of about 1 mm, with a small carbide bur. Careful condensation of amalgam into the slots ensures good restoration retention.
Bonding agents can assist amalgam retention, but adhesion is not adequate to resist occlusal loading. Retention is currently best provided by conventional means. An example of the use of bonding agents appears in Figure 6-8. If bonding agents are used, the clinician should follow the manufacturer’s directions about storage and manipulation.
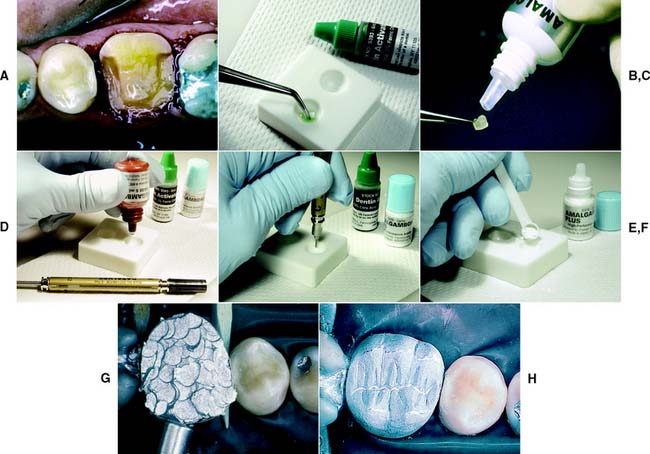
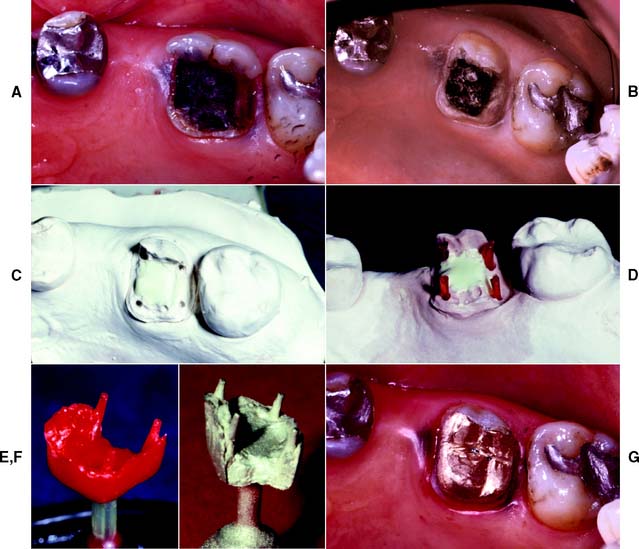
Fig. 6-8 Adhesives such as AmalgamBond, a 4-methacryloxyethyl trimellitate anhydride (4-META) product, may be helpful in retaining amalgam foundations. A, Mandibular molar with extensive tooth structure loss prepared for foundation restoration. B, The dentin conditioner (10% citric acid, 3% ferric chloride) is applied in accordance with the manufacturer’s instructions. Then it is rinsed and lightly dried. C, The conditioner is primed, and the operator waits for 20 seconds. If puddles remain, the operator blows to eliminate them. It is not necessary to dry the primer. D to F, The adhesive is mixed, and the powder liner is incorporated and brushed into the prepared cavity. G, The amalgam is condensed while the liner is still wet. H, The finished restoration.
(Courtesy of Parkell Products, Inc., Farmingdale, New York.)
Bases and varnishes
A base is necessary to prevent thermal irritation if the preparation extends close to the pulp. A material with good physical properties, such as glass ionomer or zinc phosphate, should be chosen, because weaker materials are likely to fracture during amalgam condensation. Excessively thick bases should be avoided if they would leave inadequate thickness of amalgam foundation after tooth preparation. Postoperative sensitivity can be prevented with two or more coats of cavity varnish or a dentin bonding agent. The coats should be placed after any pinholes are drilled but before the pins are placed to avoid material at the pin-amalgam interface.
Calcium hydroxide liners should be reserved for use in deep cavities when a microscopic pulp exposure is suspected. They generally have low strength and do not resist condensation forces well. Macroscopic exposures should receive endodontic treatment or, if direct pulp capping is the only option, a conventional pin-amalgam should be placed as the definitive restoration, at least until the success of the pulp capping can be guaranteed.
Matrix placement
A rigid, well-contoured matrix allows the amalgam to be properly condensed and facilitates carving. However, it can present a problem when much tooth structure is missing. Conventional matrix retainers, such as the Tofflemire, are unstable if both the lingual and the buccal walls are missing. A circumferential matrix (e.g., the AutoMatrix Retainerless Matrix System*) is useful for extensive restorations. Alternatives include copper bands or orthodontic bands. These are removed by cutting with a bur after the amalgam has set. Stability of the matrix is improved by proximal wedging, by crimping to shape, and by using modeling plastic or autopolymerizing acrylic resin for external stabilization27,28 (Fig. 6-9).
Condensation
Condensation follows conventional practice, with particular attention paid to condensing into wells and around pins. If the foundation is prepared during the same visit, a high-copper spherical alloy is chosen. A mechanical condenser is useful for large amalgam restorations.
Contouring and finishing
Care is needed to prevent amalgam fracture during matrix removal. After allowing time for setting, the dentist trims the amalgam away from the occlusal edge of the matrix and removes the wedges and matrix retainer. At this stage, it is helpful to cut the buccal ends of the matrix band with scissors close to the tooth. Then the band can be pulled through the proximal contacts toward the lingual aspect. Pulling the band occlusally is more likely to fracture the freshly placed amalgam.
Contouring follows conventional practice if the foundation is to serve for a significant period. Such a foundation should also be finished to facilitate plaque control. If the foundation is to be prepared shortly after placement, a more rudimentary occlusal contour is acceptable. However, the occlusal contour should be adequate to provide proper tooth stability. Moreover, all margins should be carved properly, because excess leads to plaque retention and makes crown margin placement difficult.
Glass ionomer core
Composite resin
Composite resin foundations are much stronger than glass ionomer foundations, a difference that correlates with the higher diametral tensile strength of the composite.30 They are strong enough for larger pin-retained cores. However, the current materials have disadvantages, particularly their absorption of moisture and high thermal expansion, which has led many dentists to avoid composite resin foundations entirely.
Moisture control
Composite resins are sensitive to moisture contamination, and rubber dam isolation is strongly recommended.
Preparation
Because the material sets rapidly (about 5 minutes), composite resin is generally chosen if the dentist wishes to place the foundation and prepare the tooth during the same visit. The crown is prepared to approximate shape first, and then existing restorations and caries are removed. A glass ionomer is an appropriate choice of liner, with additional retention being provided by pins. For convenient access, the pinholes can be prepared and the liner placed before the pins are seated.
Placement
Both light-cured and chemically cured core composite materials are available. Light-cured composite materials have the convenience of extended working time, but there is concern about the adequacy of polymerization, especially around the pins.31 The autopolymerizing materials need to be mixed and placed quickly, preferably with the aid of a composite syringe (C-R® syringes).* A Mylar matrix is used to confine them and provide good adaptation.
Pin-retained cast core (Fig. 6-11)
As with glass ionomer and composite resin cores, cast cores are used to build a tooth to ideal preparation form without the need for matrix placement or condensation. However, they require the additional steps of an indirect procedure.
ENDODONTICS
Assessment
During the initial data collection, attention must be directed toward potential endodontic needs of the patient. The clinical examination should include vitality testing of all teeth in the dental arch. This may be done with an electric pulp tester, an “ice pencil” (conveniently made by filling an anesthetic needle cap with water and freezing), an aerosol cryogen spray, or heated gutta-percha. Tenderness to percussion should also be noted. Any abnormal sensitivity, soft tissue swellings, fistulous tracts, or discolored teeth should prompt suspicion of pulpal involvement.
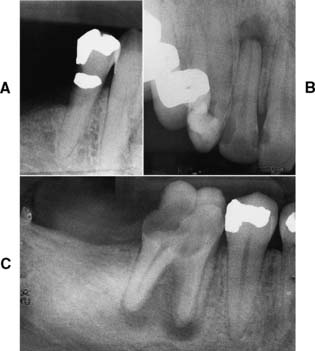
Patients who have definite symptoms seldom present problems in diagnosis, because pain is generally their chief complaint. When there is doubt concerning pulpal health, however, patients should be examined radiographically during the mouth preparation phase, and the films should be carefully inspected for signs of periapical disease (a radiolucency or widening of the periodontal ligament space). When there is doubt regarding the endodontic prognosis of a tooth, radiographic findings (Fig. 6-12) should always be evaluated in reference to the results of percussion and vitality tests.
Treatment
As a general rule, conventional (or orthograde) rather than surgical (or retrograde) endodontics should be performed if possible—not only because additional trauma results from the surgical approach but also because apicoectomy adversely affects the crown/root ratio and thus the support of the planned prosthesis. If an existing post prevents access to a recurrent periapical lesion, the post can usually be removed. (A Masserann kit has shown some success with this; see Chapter 12.) When a post and core restoration is needed in an endodontically treated tooth, 3 to 5 mm of apical seal should be retained (see Chapter 12).
Performing elective endodontics may be desirable in the following situations: when there are problems in obtaining a compatible line of draw between multiple abutments, when it is impossible to gain adequate retention in a badly worn or damaged tooth, and when the endodontic prognosis of an abutment tooth is compromised and additional preparation is likely to further jeopardize its longevity.
DEFINITIVE PERIODONTAL TREATMENT
Unless a patient’s existing periodontal disease has been properly diagnosed and treated, fixed prosthodontics is doomed to failure. The treatment modalities presented in Chapter 5 form the basis for an effective approach to chronic periodontal disease. In addition, certain specific periodontal procedures may be indicated to improve the prognosis of a restoration. They are presented in the ensuing text.
Mucosal Reparative Therapy
The width of the band of attached keratinized gingiva may be increased by surgical grafting as part of mouth preparation before restorative treatment. Although the amount of gingiva necessary for long-term periodontal health is open to debate and definite conclusions are difficult to draw, comprehensive evaluation of the amount of attached keratinized tissue is always advised.32,33 It is recommended34,35 that a tooth to be treated with a restoration extending into the gingival sulcus have approximately 5 mm of keratinized gingiva, at least 3 mm of which is attached gingiva. Where less keratinized gingiva is present, or in areas of localized gingival recession, a grafting or other gingival augmentation procedure should be considered.
Free Autogenous Gingival Graft
A free (detached) autogenous gingival graft (Fig. 6-13) is used to increase the width of attached gingiva in areas where it is deemed inadequate. The donor site most commonly used is the hard palate, although any area of keratinized tissues, such as an edentulous ridge or the retromolar pad, may be suitable.
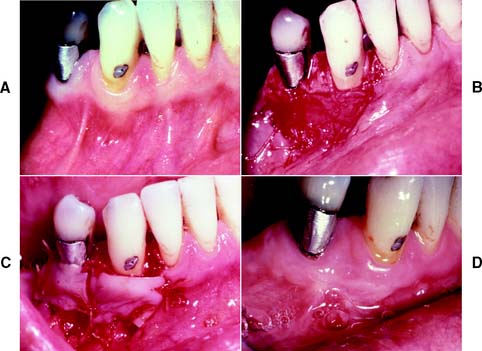
Fig. 6-13 Free autogenous gingival graft. A, Planned abutment tooth lacking adequate keratinized gingiva. B, The recipient site is prepared. C, The graft is sutured to place. Some apical adjustment is needed around the premolar before application of the surgical dressing. D, The healed graft. (Compare the width of attached keratinized gingiva here with that in part A.) The defective restoration can be treated at this stage.
The recipient bed site is prepared by making a horizontal split-thickness incision just coronal to the mucogingival junction. As the incision passes apical to the junction, it may become either split thickness or full thickness.36,37 The recipient bed is trimmed of tissue tags and thinned. (A template of tinfoil may be used as a guide for the correct size and shape of the graft.) The graft is then carefully removed from the donor site, and any fat or glandular tissue is excised, so that a maximum thickness of 1 mm is left. Sterile saline is used to keep the graft moist until it is placed on the recipient bed for a check of size and shape, and it is then further shaped if necessary. When the proper dimensions have been attained, the graft is sutured into place. Finally, the graft site and the donor site may be covered with a surgical dressing. Complete healing requires approximately 6 weeks,38,39 at which time the donor site and the grafted site should appear normal.
Laterally Positioned Pedicle Graft
The laterally positioned pedicle graft40,41 (Fig. 6-14) is used for an area of recession or lack of attached gingiva on a single tooth when there are adequate amounts of keratinized gingiva in adjacent teeth or edentulous spaces. Although several studies have proposed techniques in which free (detached) autogenous gingival grafts are used for root coverage,42-44 the pedicle graft can be a more predictable treatment because of maintenance of the blood supply to the pedicle.
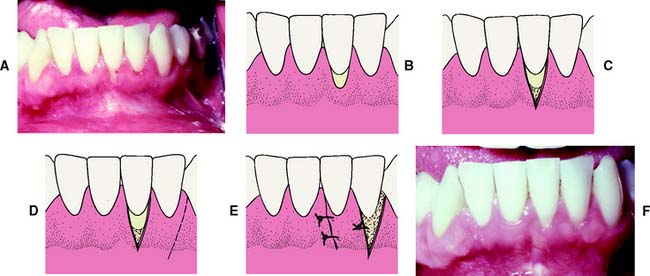
Fig. 6-14 Laterally positioned pedicle graft. A and B show localized recession around the left mandibular central incisor. The lateral incisor has an adequate band (width) of keratinized tissue, so it is suitable as a donor site. C, Bed preparation of the recipient site. An incision is made obliquely toward the site. D, Releasing incision at the distal of the donor site. The graft is rotated into position over the recipient site. E, Flap sutured in position. A free autogenous gingival graft may be used to cover the donor site. F, The healed graft. There is almost always some loss of attachment at the donor site (average, 1 mm).
The recipient site is prepared by excising 1 to 3 mm of split-thickness marginal gingiva bordering the recession area. At the donor site, oblique vertical incisions are placed in the mucosa as far apically as possible to ensure adequate blood supply for the graft. The apical area of the donor tissue is made wider than the coronal area. The flap is mobilized and placed on the recipient site and sutured into place. A free gingival graft may be needed to cover the donor site. A surgical dressing is placed over the site.
There are certain limitations of laterally positioned pedicle grafts:
Coronally Positioned Pedicle Graft
A coronally positioned (advanced) pedicle graft48,49 (Fig. 6-15) is used when a single tooth exhibits gingival recession and sensitivity. If the width of the attached keratinized gingiva is inadequate, a free autogenous gingival graft may be placed to increase it before the coronal positioning.
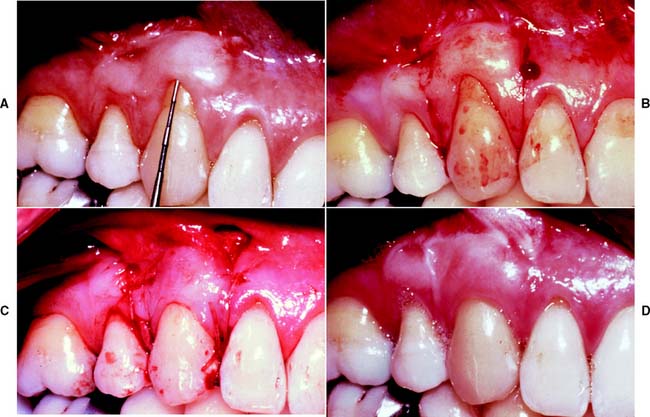
Fig. 6-15 Coronally positioned pedicle graft. A, The position of the free gingival margin after autogenous graft placement. There is approximately 4 mm of recession. B, Incisions for the pedicle. Divergence of the incisions ensures an adequate blood supply because the base of the flap is broad. C, The pedicle is coronally positioned and sutured snugly in place at the cementoenamel junction with horizontal and suspension sutures. D, The healed graft.
(Courtesy of Dr. S. B. Ross.)
Although there are various techniques,50,51 divergent vertical incisions are most commonly placed as far apically as possible into the mucosa. As a result, the apical portion of the flap is broader than the coronal portion, and this ensures that the flap will have an adequate blood supply. The root surface is planed to a glasslike finish, and the graft is sutured in a coronal position to obtain maximum root coverage. Investigators have used an alternative guided tissue regeneration technique to promote reattachment before suturing the graft,52,53 and clinical trials have shown significant root coverage with the use of enamel matrix derivative application prior before coronal positioning of the pedicle.54,55 After the graft has been held in position with pressure to decrease hemorrhage and to obtain proper placement, it is covered with a surgical dressing.
Subepithelial Connective Tissue Graft
Connective tissue that does not carry epithelium has also been used for gingival grafting purposes. This technique involves the use of subepithelial connective tissue harvested from the palate in a split-thickness manner, which allows the wound to be closed after removal of the graft. This approach minimizes patient discomfort at the donor site.
The graft is placed at the recipient site between a minimally reflected split-thickness flap and the periosteum, covering the root. This “sandwich” placement of the connective tissue supplies the graft with blood from two different sources.43,56 Enamel matrix derivatives have been shown to enhance root coverage with connective tissue grafts,57 and a “tunnel” placement may also be used as an alternative technique,58 with up to 100% coverage of root recession reported. The use of connective tissue grafts for root coverage has shown long-term stability with minimal recurrent recession,59 even when roots were previously compromised by caries.60
Crown-Lengthening Procedures
Surgical crown lengthening or extension (Fig. 6-16) may be indicated to improve the appearance of an anterior tooth or when the clinical crown is too short to provide adequate retention without the restoration’s impinging on the normal soft tissue attachment61 or biologic width.* This attachment averages approximately 2 mm in width, and any restoration that impinges on it may cause bone loss because of the effort of the host to maintain the 2 mm distance. If impingement occurs in an interproximal area, it can lead to problems with plaque control and possible osseous resorption.62-64 Therefore, from the standpoint of prognosis, the biologic width should never be compromised.

Fig. 6-16 Surgical crown lengthening. A, Fractured and carious second premolar. B, Reflection of a flap and removal of granulation tissue. C, Bone removed on the mesial aspect to increase the distance to the fracture site to 3.5 mm. D, Distally the bone is removed so that there will be 3.5 mm from the caries to the alveolar crest. E, Healing after the surgical crown lengthening. F, Final crown restoration after cementation, before restoration of the sextant with a removable dental prosthesis.
In some patients, an apparently unsalvageable tooth with extensive subgingival caries, a subgingival fracture, or root perforation resulting from endodontics can be successfully restored after crown lengthening. Crown lengthening increases the crown/root ratio, however, and a pretreatment decision must be made about whether the tooth should be removed or restored.
Crown lengthening may be accomplished either surgically or with combined orthodontic-periodontic65-69 techniques, depending on the patient and the dental situation.
Surgical crown lengthening
It is sometimes possible to achieve an effective increase in crown length by gingivectomy or removal of gingiva by electrosurgery alone (see Fig. 6-16), although osseous recontouring is most often needed to prevent encroachment of the prosthesis on the biologic width. For these procedures, a full-thickness mucoperiosteal flap is reflected, and the osseous resection creates 3.5 to 4.0 mm of space between the gingival crest and the margin of the existing restoration or carious lesion.61,70 In these instances, however, the following factors should be considered:
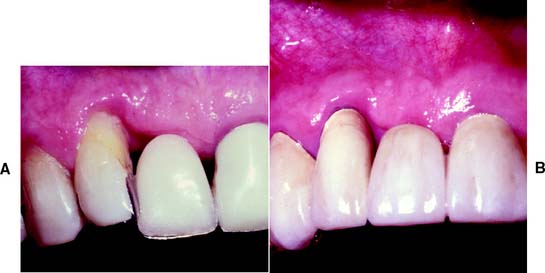
Fig. 6-17 Esthetic problems can occur after surgical crown lengthening of an anterior tooth. A, Lateral incisor is lengthened to include a mesial periodontal defect. B, Esthetics would have been better if the distal aspect had been included and the gingival contour gradually sloped.
Restoration of a tooth that has undergone crown lengthening is commonly undergone in 4 to 6 weeks after the surgical procedure. A clinicale study73 has demonstrated that the biologic width and the position of the free margin of the gingivae exhibited no change at 3 to 6 months after surgery. Therefore, it may be advisable to provisionally restore that tooth in question, either before or immediately after surgical crown lengthening, and subsequently fabricate the final restoration after 3 months.
Although surgical crown lengthening may not be a panacea for fractured, perforated, or badly decayed teeth, it can help solve difficult and/or complex restorative problems when used with proper clinical judgment.
Maintenance and Reconstruction of the Interdental Papilla
The presence or absence of the interproximal papilla, especially in the maxillary anterior area, is a concern to the restorative dentist, the periodontist, and the patient. Multiple techniques have been used, with and without the use of guided tissue or bone regeneration, to maintain and reconstruct the interdental papilla (Figs. 6-18 to 6-20).74-80 The results of these procedures have not been predictable or reproducible. The reconstruction or preservation of the papilla is dependent on multiple factors such as the amount of attachment lost in the area, the blood supply available for the newly created papilla,75 and the distance from the contact area to the crest of the interproximal bone.79 The majority of the techniques used for restoration or reconstruction of the interdental papilla are surgical in nature and therefore involve coordination and cotherapy with surgical or periodontal colleagues. Consultation with the appropriate surgeon before planning of the final restoration of the area is crucial.
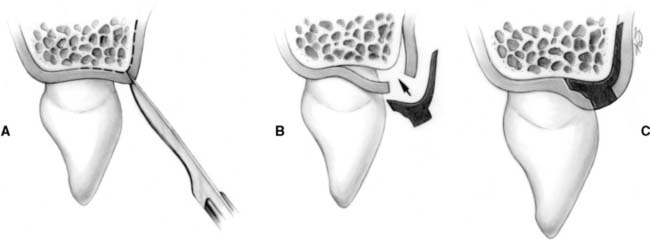
Fig. 6-18 Technique for surgical reproduction of the interdental papilla. A, Intrasulcular incision and buccal incision placed in the interdental papilla, leaving the existing papilla attached to the palatal flap. B, Split-thickness flap is elevated buccally and palatally. Connective tissue graft is prepared for placement under the buccal and palatal flaps. C, Buccal and palatal flaps are sutured after connective tissue from the retromolar area is placed under the flap.
(From Azzi R, et al: Surgical reconstruction of the interdental papilla. Int J Periodontics Restorative Dent 18:467, 1998.)
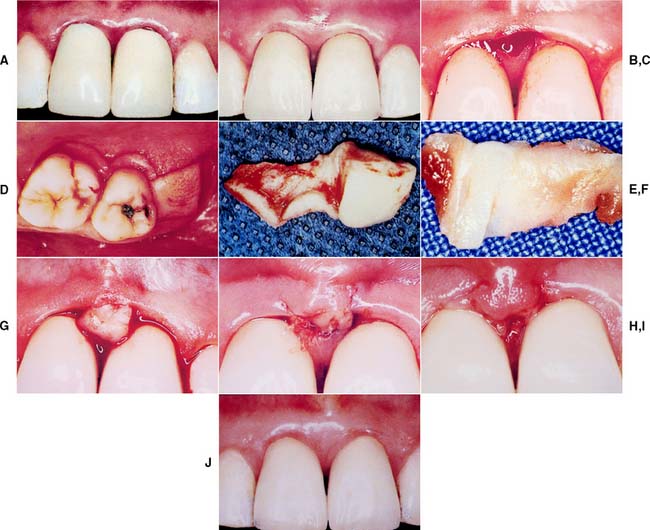
Fig. 6-19 Reconstruction of the interdental papilla. A, Poorly contoured and bulky crowns on maxillary central incisors with loss of interdental papilla. B, Replaced crowns 1 year after cementation with improved tissue contours. However, interdental papilla remains in an apical position. C, Papillary incisions. D, Incisions to harvest retromolar connective tissue combined with incisions to the thin palatal flap. E, Connective tissue harvested in bulk. F, Connective tissue graft trimmed for placement into the papillary area. G, Connective tissue graft placed under buccal and palatal flaps in the interdental area. H, Flaps are sutured over connective tissue graft. I, Three-day postoperative view of papillary graft. J, Final tissue contours around replacement crowns.
(From Azzi R, et al: Surgical reconstruction of the interdental papilla. Int J Periodontics Restorative Dent 18:467, 1998.)
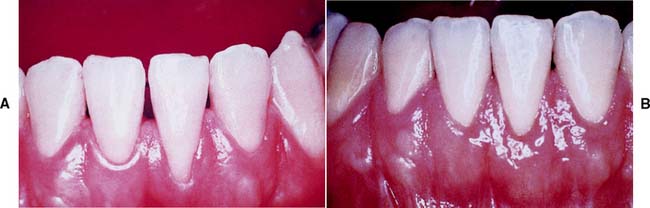
Fig. 6-20 Reconstruction of the interdental papilla. A, Preoperative view of papillary deficiency in the interproximal area of teeth #24 and #25. B, Results of papillary graft and final tissue contour.
(From Azzi R, et al: Surgical reconstruction of the interdental papilla. Int J Periodontics Restorative Dent 18:467, 1998.)
Orthodontic-Periodontic Extrusion
Orthodontic extrusion65,66,81 (Fig. 6-21) may be considered whenever a fracture or carious lesion extends apical to the free margin of the gingiva. However, it is especially important when esthetics is a prime concern. The margin of the fracture or lesion is moved away from the alveolar crest orthodontically (with brackets, wires, and/or elastic bands), and the gingiva often requires surgical repositioning when orthodontic therapy is completed.
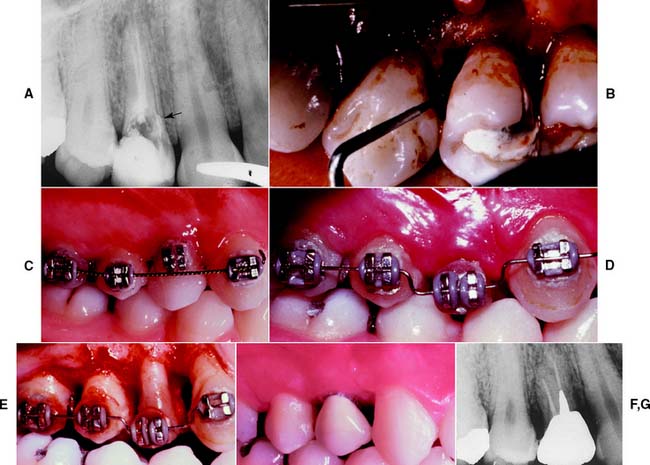
Fig. 6-21 Orthodontic extrusion before restoring a badly damaged tooth. A, This maxillary first premolar has been perforated mesially (arrow). A surgical crown lengthening was contraindicated because of the level of the perforation apical to the osseous crest. B, A flap was reflected to débride the perforation and associated lesion. C, Orthodontic brackets cemented with rebounding wire initially. When the wire is placed in the premolar bracket, it imparts an occlusally directed force. (The occlusion must be relieved periodically as the tooth moves.) D, Completion of the extrusion. E, Osseous recontouring at this stage ensures a harmonious bony and gingival contour. F and G, Coronal tooth structure restored with a metal-ceramic crown.
(Courtesy of Dr. S. B. Ross.)
ORTHODONTIC TREATMENT
Minor orthodontic tooth movement82-85 can significantly enhance the prognosis of subsequent restorative treatment. Uprighting malpositioned abutment teeth can improve axial alignment, create more favorable pontic spaces, and improve embrasure form in the fixed prosthesis. It can also direct occlusal forces along the long axes of the teeth and often leads to a substantial conservation of tooth structure (see Fig. 7-12B and C).
Assessment
The clinical examination should focus on tooth malpositioning both buccolingually and mesiodistally. Abnormal tooth relationships such as anterior or posterior reverse articulation should alert the dentist to the possible need for orthodontic treatment. In particular, attempts to correct abnormal tooth relationships with fixed prosthodontics alone are rarely successful; orthodontic preparation is normally preferred.
The need for orthodontic treatment is determined through a careful analysis of articulated diagnostic casts, whose usefulness can be enhanced with a dental surveyor (Fig. 6-22). One helpful procedure86 is to section a duplicate cast (Fig. 6-23) and reassemble it according to the proposed orthodontic modifications. This facilitates assessing the validity of any minor tooth movement (e.g., closing diastemas, uprighting molars, aligning tilted teeth) and is especially valuable when explaining the treatment proposal to the patient. Diagnostic preparations and waxing procedures made on these altered casts often clearly illustrate the benefits of minor tooth movement. Many dentists are now using computer imaging technology to optimize esthetic treatment planning and improve patient communication87-90 (Fig. 6-24).
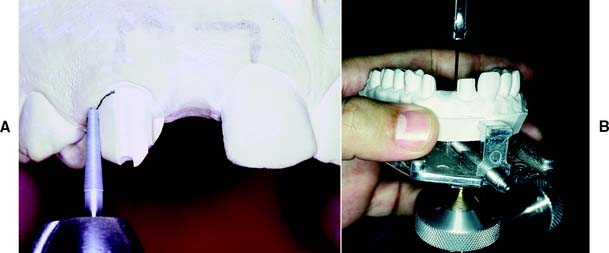
Fig. 6-22 A and B, Use of diagnostic preparations and a dental surveyor in assessing the need for orthodontic treatment before fixed prosthodontics.
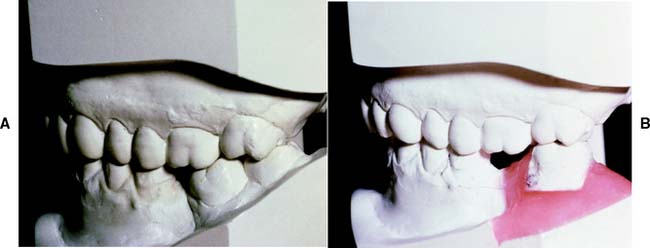
Fig. 6-23 A and B, Diagnostic cast sectioning for determination of desired orthodontic tooth movement.
(Courtesy of Dr. P. Ngan.)
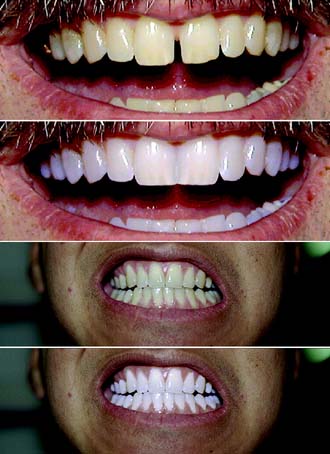
Fig. 6-24 Computer imaging technology can assist in treatment planning and communicating to the patient the esthetic changes that are envisioned. The equipment consists of a video camera, a monitor, and a computer. The software allows the video image to be manipulated to ascertain the posttreatment appearance.
(Courtesy of Dentrix Dental Systems, Inc. © 2005. All rights reserved.)
Treatment
In general practice, it is often possible to perform minor tooth movement before fixed prosthodontic treatment without referral to an orthodontist. However, a specialist should be consulted if treatment is more complex than the straightforward tipping, uprighting, or extruding of an abutment tooth.
For tipping or extruding a single anterior tooth, acid-etch brackets can be used with a multistrand elastic wire ligated in place to attain the desired position. When any anterior tooth is moved, however, the amount of labial bone should be carefully evaluated and found to be adequate. Orthodontic treatment should also be considered when restorations are being used to correct a diastema. Often esthetics can be dramatically improved by distributing the space of a midline diastema around all the anterior teeth (Fig. 6-25A to C). A diagnostic waxing procedure will help determine the optimum tooth position. Uprighting a mesially tilted molar can be accomplished with a coil spring (see Fig. 6-25D to G), but the tooth should first be adjusted out of occlusion. A neglected crown preparation can be salvaged with a simple orthodontic appliance (Fig. 6-26). All orthodontic movement requires adequate anchorage so that inadvertent movement of other teeth is avoided.
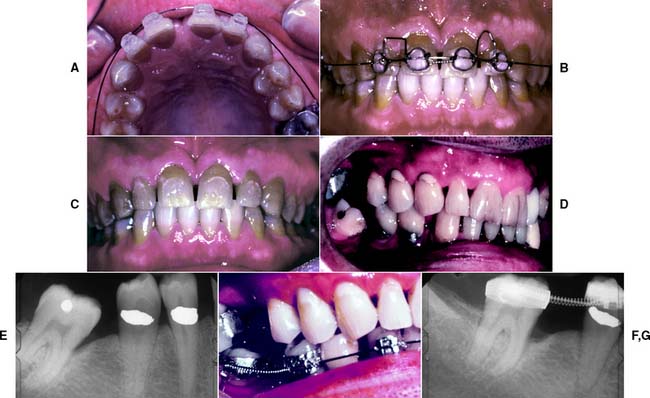
Fig. 6-25 Orthodontic tooth movement as an adjunct to fixed prosthodontics. A to C, Minor tooth movement before correction of a diastema. D to G, A mesially tilted molar uprighted with a coil spring before the provision of a fixed dental prosthesis.
(D to G, Courtesy of Dr. P. Ngan.)

Fig. 6-26 A, The maxillary premolar (arrow) was prepared for a metal-ceramic crown but was inadequately provisionalized. Unfortunately, the patient failed to return when the interim restoration became dislodged. The tooth had moved distally and was in contact with the first molar, making crown placement impossible. B, A removable appliance was used to reposition the tooth before impression making.
(Courtesy of Dr. P. Ngan.)
DEFINITIVE OCCLUSAL TREATMENT
Mouth preparation often involves reorganization of the patient’s occlusion, typically to make maximum intercuspation coincident with centric relation and remove eccentric interferences (see Chapter 4). This may be done therapeutically, principally to relieve symptoms of occlusal dysfunction, or as a prerequisite to extensive restorative treatment. The coincidence of centric relation and maximum intercuspation greatly facilitates accurately transferring the patient’s casts to an articulator. Occlusal adjustment as a therapeutic modality is fraught with controversy. The current balance of research places a low priority on the influence of occlusion in disorders of the temporomandibular joints and associated musculature.91 Also, there is clinical evidence contraindicating occlusal adjustment.92-94 However, these disorders should be diagnosed and alleviated before definitive fixed prosthodontics is undertaken. This can generally be achieved by noninvasive, reversible means.95 The role of occlusal forces in the progress of periodontal disease is also controversial. The balance of current research indicates that occlusal forces do not initiate periodontitis but may modify attachment loss caused by plaque-induced inflammatory periodontal disease.96
When selective reshaping of the natural dentition is being considered, it is important to remember that this is a purely subtractive procedure (tissue is removed), and it is limited by the thickness of the enamel. Obviously, before any irreversible changes are made in the dentition, a careful diagnosis must establish whether restorations are needed.
Diagnostic Adjustment
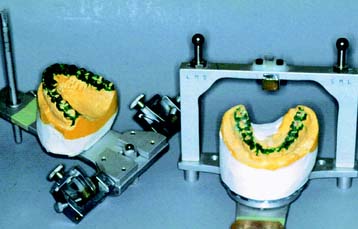
Two sets of articulated diagnostic casts (Fig. 6-27) are required for diagnostic occlusal adjustment. One set serves as a reference; the other is used to evaluate how much tooth structure has been removed and how much more must be removed to meet the objectives of the procedure. This reveals the efficacy of the treatment plan before anything is done clinically.
The occlusal surfaces of each cast are painted with poster paint (which does not soak into the stone) to demonstrate the extent of any planned corrective reshaping. The pin setting on the articulator is recorded before adjustment so that the operator can judge the amount of enamel that must be removed. Each step of the adjustment is recorded sequentially on a reshaping list. When completed, the procedure is reviewed carefully. Areas where enamel is likely to be penetrated are identified so that the patient can be advised of the likely need for additional restorations on these teeth.
The primary objectives of selective occlusal reshaping are as follows:
It is not always possible to achieve each of these goals. If a choice must be made, corrective therapy should not be at the expense of functional surfaces and should not destroy any functional contact.
Clinical Occlusal Adjustment
Patient selection
Careful analysis of the diagnostic occlusal adjustment is necessary to determine whether the patient is a good candidate for such irreversible subtractive treatment. Precise reduction and close attention to the sequence are essential. A written record of each reduction is also recommended. If too much is ground off a tooth, it cannot be put back on. The following should be considered as contraindications to definitive occlusal adjustment:
Occlusal adjustment needs to be undertaken in a logical sequence to avoid repetition and improve the efficacy of treatment. Although different sequences have been proposed, we find the one described next to be successful.
Elimination of centric relation interferences
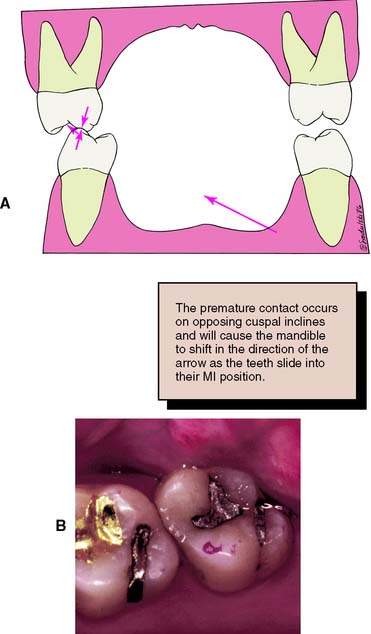
As the mandible rotates around the terminal hinge axis, each mandibular tooth follows its own arc of closure. If the intercuspal and centric relation positions do not coincide, premature contacts are unavoidable.
Step-by-step procedure
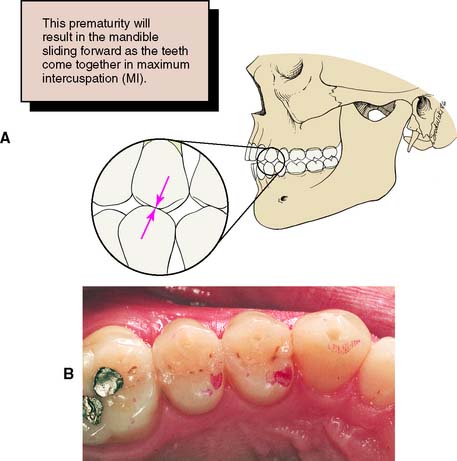
Fig. 6-28 A and B, Interferences that deflect the mandible anteriorly (protrusive interferences) are found between the mesial inclines of maxillary teeth and the distal inclines of mandibular teeth.
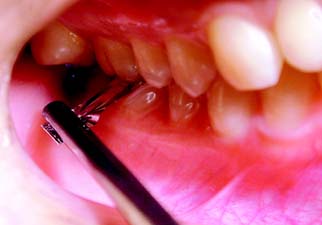
Evaluation
The foregoing rules for occlusal adjustment should be followed as closely as possible while the normal anatomic form of the tooth is maintained. When the discrepancy between centric relation and maximum intercuspation has been corrected, there is uniform contact between all posterior teeth. This can be verified with thin Mylar shim stock held in forceps (Fig. 6-31).
Elimination of lateral and protrusive interferences
The second phase of occlusal adjustment concentrates on laterotrusive, mediotrusive, and protrusive interferences. The dentist uses red and blue marking ribbons to distinguish between centric and eccentric contacts.
The goals of this second phase of adjustment are to eliminate contact between all posterior teeth during protrusive movements and to eliminate any interferences on the nonworking (mediotrusive) side as well as on the working (laterotrusive) side. In certain patients, group function of the working side contacts should be considered rather than the more ideal mutually protected occlusion (e.g., when there is mobility or poor bone support of the canines). In other patients, group function may be retained because of wear or malpositioning of the canines.
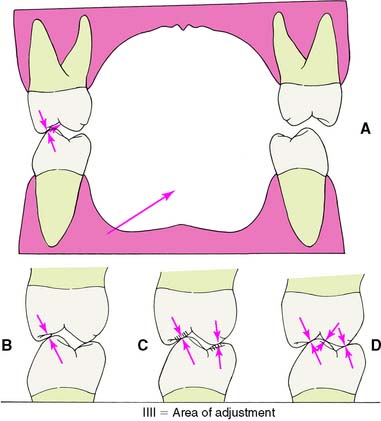
During this phase of adjustment, it is essential that no centric contacts be removed. In general, lateral and protrusive interferences are eliminated by creating a groove that permits escape of the functional cusp during eccentric movement (Fig. 6-32).
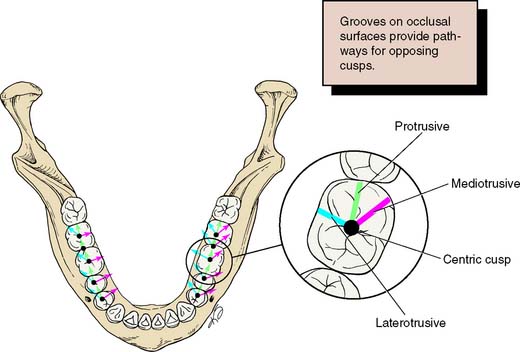
Fig. 6-32 Detection of eccentric interferences is facilitated by understanding where they normally occur. The arrows represent the paths of opposing functional cusps during each excursion (mediotrusive, protrusive, and laterotrusive). Look, for example, to find a mediotrusive interference distobuccal to a centric contact. In the maxillary arch, the pattern is reversed.
SUMMARY
A logical treatment sequence should be planned before any fixed prosthodontic intervention begins. Such planning is normally multidisciplinary: It incorporates oral surgery; operative dentistry; and endodontic, periodontic, orthodontic, and/or occlusal therapies. Mouth preparation is particularly important for fixed prosthodontics, which, like all dental disciplines, is facilitated and enhanced by meticulous preparatory treatment.
 GLOSSARY*
acquired eccentric relation \a-kwīrd′  k-s
k-s n′trk r-lā′shun\: any eccentric relationship position of the mandible relative to the maxilla, whether conditioned or learned by habit, which will bring the teeth into contact
ad·just·ment \a-jŭst′mant\ n (1644) 1: the act or process of modifying physical parts 2: in dentistry, a modification made on a dental prosthesis or natural tooth to enhance fit, function, or acceptance by the patient—see OCCLUSAL A.
articulating paper \är-tk′ya-lāt′ing pā′per\: ink-coated paper strips used to locate and mark occlusal contacts
balancing interference \băl′ans ng n′ter-fear′ans\: undesirable contact(s) of opposing occlusal surfaces on the nonworking side
1base \bās\ vt (1587): the act of placing a lining material under a dental restoration
2base \bās\ n (14c): any substance placed under a restoration that blocks out undercuts in the preparation, acts as a thermal or chemical barrier to the pulp, and/or controls the thickness of the overlying restoration—called also base material—usage: adjectives such as insulating b., therapeutic b. may also be used
BULL: acronym for Buccal of the Upper, Lingual of the Lower (cusps); applies to Clyde H. Schuyler’s rules for occlusal adjustment of a normally related dentition in which those cusps contacting in maximum intercuspation (mandibular buccal and maxillary lingual) are favored by adjustment of those cusps that are not in occlusal contact in maximum intercuspation (maxillary buccal and mandibular lingual)—called also the BULL RULE
calcium hydroxide \kăl′sē-um hī-dr k′sīd\: an odorless white powder that is very slightly soluble in water and insoluble in alcohol. Aqueous and non-aqueous suspensions of calcium hydroxide are often employed as cavity liners to protect the pulp from the irritant action of restorative materials; also used in pulp capping, pulpotomy and apexification procedures
copper band \kp′er bănd\: a copper cylinder employed as a matrix for making an impression
1creep \krēp\ vi crept \krpt\; creep·ing \krēp′ng\ (12c): to slip or gradually shift position; to change shape permanently due to prolonged stress or exposure to high temperature
2creep \krēp\ n (1818): the slow change in dimensions of an object due to prolonged exposure to high temperature or stress
de·bride·ment \dā′brēd-mäN′, d-brēd′ment\ n (ca. 1842): the removal of inflamed, devitalized, contaminated tissue or foreign material from or adjacent to a lesion
defective occlusal contact \d-fk′tv a-klōō′sal kn′tăkt′\ obs: contact that is capable of guiding the mandible from its original path of action into a different path of motion or capable of disturbing the relation between a denture base and its supporting tissues (GPT-1)
deflective occlusal contact \d-flk′tv a-klōō′sal kn′tăkt\: a contact that displaces a tooth, diverts the mandible from its intended movement, or displaces a removable denture from its basal seat—usage: see OCCLUSAL DISHARMONY, OCCLUSAL PREMATURITY
direct pulp capping \d-rkt, dī- pŭlp kăp′ing\: application of a material to exposed vital pulp to protect it and promote healing
equil·i·brate \-kwl′a-brāt\ v -brat·ed \-brā′td\; -brat·ing \-brā′tng\ vt; (1635): to bring or to place in equilibrium
equil·i·bra·tion \-kwl′a-brā′shun\ n (1635): 1: the act or acts of placing a body in a state of equilibrium 2: the state or condition of being in equilibrium—usage: see MANDIBULAR E., OCCLUSAL E.
ex·po·sure \k-spō′zher\ n (1606): 1: the act of laying open, as a surgical or dental exposure 2: in radiology, a measure of the roentgen rays or gamma radiation at a certain place based on its ability to cause ionization. The unit of exposure is the roentgen, called also exposure dose—see ROENTGEN RAY
ex·tru·sion \k-strōō′zhun\ n (1540): the movement of teeth beyond the natural occlusal plane that may be accompanied by a similar movement of their supporting tissues
foundation restoration \foun-dā′shun rs′ta-rā′shun\: the core buildup portion of a natural tooth restoration
graft \graft\ n (14c): a tissue or material used to repair a defect or deficiency—see ALLOGRAFT, ALLOPLASTIC G., AUTOGENOUS G., AUTOGRAFT, FULL THICKNESS G., HETEROGRAFT, HOMOGRAFT, ISOGRAFT, SPLIT-THICKNESS G., XENOGENIC G.
indirect pulp capping \n′d-rkt′, -dī- pŭlp kăp′ng\: a procedure that seeks to stimulate formation of reparative dentin by placing a material over sound or carious dentin
in·ter·fer·ence \n′ter-fîr′ans\ n (1783): in dentistry, any tooth contacts that interfere with or hinder harmonious mandibular movement
intermediate abutment \n′ter-mē′dē-t a-bŭt′ment\: a natural tooth located between terminal abutments that serve to support a fixed or removable dental prosthesis
mandibular repositioning \măn-db′ya-lar rē′pa-zsh′a-nng\: guidance of the mandible to cause closure in a predetermined, altered position
ma·trix \mā′trks\ n, pl ma·tri·ces \mā′tr-sz′\ (15c): 1: a mold or impression in which something is formed 2: the portion of an attachment system that receives the patrix
maximal intercuspal position \măk′sa-mal n′ter-kŭs′pal′ pa-zsh′an\: the complete intercuspation of the opposing teeth independent of condylar position, sometimes referred to as the best fit of the teeth regardless of the condylar position—called also maximal intercuspation—comp CENTRIC OCCLUSION
mouth guard \mouth gard\: a removable dental prosthesis made of resilient material which is useful in reducing mouth injuries and protecting the teeth and surrounding structures from injury
myogenous pain \mī′a-jēn′ŭs\: deep somatic musculoskeletal pain originating in skeletal muscles, fascial sheaths, or tendons
occlusal adjustment \a-klōō′zal, -sal a-jŭst′mant\ 1: any change in the occlusion intended to alter the occluding relation 2: any alteration of the occluding surfaces of the teeth or restorations—see also OCCLUSAL RESHAPING
occlusal vertical dimension \a-klōō′zal, -sal vûr′t-kal d-mn′shun\: the distance measured between two points when the occluding members are in contact
orthognathic surgery: surgical repositioning of all or parts of the maxillae or mandible
pier abutment: see INTERMEDIATE ABUTMENT
1plas·tic \plăs′tk\ adj (1632): 1: capable of being shaped or formed 2: pertaining to the alteration or reformation of living tissues
2plas·tic \plăs′tk\ n (ca. 1909): any of numerous organic synthetic or processed materials that generally are thermoplastic or thermosetting polymers, usually of high molecular weight. They can be cast, extruded, molded, drawn, or laminated into films, filaments, and objects
preprosthetic surgery \prē-prs-tht′k sûr′ja-rē\: surgical procedures designed to facilitate fabrication of a prosthesis or to improve the prognosis of prosthodontic care
protrusive deflection \prō-trōō′sv d-flk′shun\: a continuing eccentric displacement of the midline incisal path on protrusion, symptomatic of a restriction of movement
pulp \pŭlp\ n: the richly vascularized connective tissue of mesodermal origin with much innervation contained in the central cavity of the tooth
pulp capping \pŭlp kăp′ng\: application of a material to protect the pulp from external influences and promote healing, done either directly or indirectly
res·to·ra·tion \rs′ta-rā′shun\ n (1660): a broad term applied to any material or prosthesis that restores or replaces lost tooth structure, teeth, or oral tissues
self-threading pin \slf-thrd′ng pn\: a pin screwed into a hole prepared in dentin to enhance retention
sock·et \sk′t\ (15c): any opening or hollow that forms a holder for something, e.g., a tooth
1splint \splnt\ n (14c): 1: a rigid or flexible device that maintains in position a displaced or movable part; also used to keep in place and protect an injured part 2: a rigid or flexible material used to protect, immobilize, or restrict motion in a part—see ANDERSON S., CAP S., ESSIG S., FUNCTIONAL OCCLUSAL S., GUNNING’s S., INTERDENTAL S., KINGSLEY S., LABIAL S., LINGUAL S., PROVISIONAL S., RESIN-BONDED S., SOFT S., SURGICAL S., WIRE S.
TMD: acronym for TemporoMandibular Disorders—see TEMPOROMANDIBULAR DISORDERS
tor·us \tôr′us\ n, pl tori (1563): 1: a smooth rounded anatomical protuberance 2. in dentistry, prominence (s) sometimes seen on the lingual surface of the mandible and the midline of the hard palate
trau·ma \trou′ma, trô′-\ n, pl trau·ma·ta \trou′ma-ta\ or trau·mas \trou′mas\ trau·mat·ic \trou′măt-īk\ adj—trau·mat·i·cal·ly \trou′măt--kă-lc\ adv (1693): an injury or wound, whether physical or psychic
STUDY QUESTIONS
1 Horowitz AM. A report on the NIH Consensus Development Conference on Diagnosis and Management of Dental Caries Throughout Life. J Dent Res. 2004;83(Spec No C):C15.
2 Kidd EM. Caries diagnosis within restored teeth. Oper Dent. 1989;14:149.
3 Nair MK, et al. The effects of restorative material and location on the detection of simulated recurrent caries. A comparison of dental film, direct digital radiography and tuned aperture computed tomography. Dentomaxillofac Radiol. 1998;27:80.
4 Tjan AHL, Chiu J. Microleakage of core materials for complete cast gold crowns. J Prosthet Dent. 1989;61:659.
5 Fischer GM, et al. Amalgam retention using pins, boxes, and Amalgambond. Am J Dent. 1993;6:173.
6 Ramos JC, Perdigao J. Bond strengths and SEM morphology of dentin-amalgam adhesives. Am J Dent. 1997;10:152.
7 Diefenderfer KE, Reinhardt JW. Shear bond strengths of 10 adhesive resin/amalgam combinations. Oper Dent. 1997;22:50.
8 Olmez A, et al. Clinical evaluation and marginal leakage of Amalgambond Plus: three-year results. Quintessence Int. 1997;28:651.
9 Tarim B, et al. Marginal integrity of bonded amalgam restorations. Am J Dent. 1996;9:72.
10 Korale ME, Meiers JC. Microleakage of dentin bonding systems used with spherical and admixed amalgams. Am J Dent. 1996;9:249.
11 Ratananakin T, et al. Effect of condensation techniques on amalgam bond strengths to dentin. Oper Dent. 1996;21:191.
12 Schulte GA, et al. Early fracture resistance of amalgapin-retained complex amalgam restorations. Oper Dent. 1998;23:108.
13 Prevost AP, et al. Radiopacity of glass ionomer dental materials. Oral Surg. 1990;70:231.
14 Plasmans PJ, et al. A preliminary study on a resin-modified glass-ionomer cement for transitional restorations and subsequent core buildups. Int J Prosthodont. 2000;13:373.
15 Wilson NH, et al. A short-term clinical evaluation of a tricure glass-ionomer system as a transitional restoration and core buildup material. Quintessence Int. 1999;30:405.
16 Cohen BI, et al. A five year study. Fluoride release of four reinforced composite resins. Oral Health. 1998;88:81.
17 Hormati AA, Denehy GE. Microleakage of pin-retained amalgam and composite resin bases. J Prosthet Dent. 1980;44:526.
18 Oliva RA, Lowe JA. Dimensional stability of composite used as a core material. J Prosthet Dent. 1986;56:554.
19 Martin N, Jedynakiewicz N. Measurement of water sorption in dental composites. Biomaterials. 1998;19:77.
20 Cooley RL, et al. Dimensional stability of glass ionomer used as a core material. J Prosthet Dent. 1990;64:651.
21 Lambert RL, Goldfogel MH. Pin amalgam restoration and pin amalgam foundation. J Prosthet Dent. 1985;54:10.
22 Outhwaite WC, et al. Pin vs. slot retention in extensive amalgam restorations. J Prosthet Dent. 1979;41:396.
23 Shavell HM. The amalgapin technique for complex amalgam restorations. J Calif Dent Assoc. 1980;8:48.
24 Bailey JH. Retention design for amalgam restorations: pins versus slots. J Prosthet Dent. 1991;65:71.
25 Irvin AW, et al. Photoelastic analysis of stress induced from insertion of self-threading retentive pins. J Prosthet Dent. 1985;53:311.
26 Felton DA, et al. Pulpal response to threaded pin and retentive slot techniques: a pilot investigation. J Prosthet Dent. 1991;66:597.
27 Bonilla ED, et al. A customized acrylic resin shell for fabricating an amalgam core on the coronally debilitated, endodontically treated posterior tooth. Quintessence Int. 1995;26:317.
28 Livaditis GJ. Crown foundations with a custom matrix, composites, and reverse carving. J Prosthet Dent. 1997;77:540.
29 Nicholson JW, Croll TP. Glass-ionomer cements in restorative dentistry. Quintessence Int. 1997;28:705.
30 Kerby RE, Knobloch L. Strength characteristics of conventional and silver-reinforced glass-ionomer cements. Oper Dent. 1992;17:170.
31 Butchart DGM, Lloyd CH. The retention of self-threading pins embedded in visible light-cured composites. J Dent. 1987;15:253.
32 American Academy of Periodontology. Guidelines for periodontal therapy. J Periodontol. 1998;69:405.
33 American Academy of Periodontology. Parameter on mucogingival conditions. J Periodontol. 2000;71:861.
34 Maynard JG, Wilson RDK. Physiologic dimensions of the periodontium significant to the restorative dentist. J Periodontol. 1979;50:170.
35 Wilson RDK, Maynard JG. Intracrevicular restorative dentistry. Int J Periodontics Restorative Dent. 1981;1:34.
36 Sullivan HC, Atkins JH. Free autogenous gingival grafts. I. Principles of successful grafting. Periodontics. 1968;6:121.
37 Dordick B, et al. Clinical evaluation of free autogenous gingival grafts placed on alveolar bone. Part I. Clinical predictability. J Periodontol. 1976;47:559.
38 Oliver RC, et al. Microscopic evaluation of the healing and revascularization of free gingival grafts. J Periodontal Res. 1968;3:84.
39 Staffileno HJr, Levy S. Histological and clinical study of mucosal (gingival) transplants in dogs. J Periodontol. 1969;40:311.
40 Grupe HE, Warren RF. Repair of gingival defects by a sliding flap operation. J Periodontol. 1956;29:92.
41 Bjorn H. Coverage of denuded root surfaces with a lateral sliding flap: use of free gingival grafts. Odontol Rev. 1971;22:37.
42 Holbrook T, Ochsenbien C. Complete coverage of the denuded root surface with a one-stage gingival graft. Int J Periodontics Restorative Dent. 1983;3:9.
43 Miller PDJr. Root coverage using the free soft tissue autograft following citric acid application. III. A successful and predictable procedure in areas of deep wide recession. Int J Periodontics Restorative Dent. 1985;5:15.
44 Raetzke PB. Covering localized areas of root exposure employing the “envelope” technique. J Periodontol. 1985;56:397.
45 Caffesse RG, Guinard EA. Treatment of localized gingival recessions. IV. Results after three years. J Periodontol. 1980;51:167.
46 Sullivan HC, Atkins JH. Free autogenous gingival grafts. III. Utilization of grafts in the treatment of gingival recession. Periodontics. 1968;6:152.
47 Miller PDJr. A classification of marginal tissue recession. Int J Periodontics Restorative Dent. 1985;5:9.
48 Bernimoulin JP, et al. Coronally repositioned periodontal flap. Clinical evaluation after one year. J Clin Periodontol. 1975;2:1.
49 Maynard JG. Coronal positioning of a previously placed autogenous gingival graft. J Periodontol. 1977;48:151.
50 Tarnow DP. Semilunar coronally repositioned flap. J Clin Periodontol. 1986;13:182.
51 Allen EP, Miller PDJr. Coronal positioning of existing gingiva: short-term results in the treatment of shallow marginal tissue recession. J Periodontol. 1989;60:316.
52 Pini Prato GP, et al. Guided tissue regeneration versus mucogingival surgery in the treatment of human buccal recessions. A 4-year follow-up study. J Periodontol. 1996;67:1216.
53 Matarasso MD, et al. Guided tissue regeneration versus coronally repositioned flap in the treatment of recession with double papillae. Int J Periodontics Restorative Dent. 1998;18:445.
54 Berlucci I, et al. Enamel matrix proteins (Emdogain) in combination with coronally advanced flap or subepithelial connective tissue graft in the treatment of shallow gingival recession. Int J Periodontics Restorative Dent. 2002;22:583.
55 Cueva MA, et al. A comparative study of coronally advanced flaps with and without the addition of enamel matrix derivative in the treatment on marginal tissue recession. J Periodontol. 2004;75:949.
56 Langer B, Langer L. Subepithelial connective tissue graft technique for root coverage. J Periodontol. 1985;56:715.
57 McGuire MK, Nunn M. Evaluation of human recession defects treated with coronally advanced flaps and either enamel matrix derivative or connective tissue. Part 1. Comparison of clinical parameters. J Periodontol. 2003;74:1110.
58 Zabalegui I, et al. Treatment of multiple gingival recessions with the tunnel subepithelial connective tissue graft: a clinical report. Int J Periodontics Restorative Dent. 1999;19:199.
59 Harris RJ. Root coverage with connective tissue grafts: an evaluation of short- and long-term results. J Periodontol. 2002;73:1054.
60 Goldstein M, et al. Coverage of previously carious roots is as predictable a procedure as coverage of intact roots. J Periodontol. 2002;73:1419.
61 Davarpanah M, et al. Restorative and periodontal considerations of short clinical crowns. Int J Periodontics Restorative Dent. 1998;18:5.
62 Palomo F, Kopczyk RA. Rationale and methods for crown lengthening. J Am Dent Assoc. 1978;96:257.
63 Ochsenbien C, Ross SE. A reevaluation of osseous surgery. Dent Clin North Am. 1969;13:87.
64 Maynard JG: Personal communication, 1993.
65 Ross SB, et al. Orthodontic extrusion: a multidisciplinary treatment approach. J Am Dent Assoc. 1981;102:189.
66 Brown IS. The effect of orthodontic therapy on certain types of periodontal defects: clinical findings. J Periodontol. 1973;44:742.
67 Ingber JS. Forced eruption. I. A method of treating isolated one and two wall infrabony osseous defects: rationale and case report. J Periodontol. 1974;45:199.
68 Delivanis P, et al. Endodontic-orthodontic management of fractured anterior teeth. J Am Dent Assoc. 1978;97:483.
69 Potashnik SR, Rosenberg ES. Forced eruption: principles in periodontics and restorative dentistry. J Prosthet Dent. 1982;48:141.
70 Baima RF. Extension of clinical crown length. J Prosthet Dent. 1986;55:547.
71 Rosenberg ES, et al. Tooth lengthening procedures. Compend Contin Educ Dent. 1980;1:161.
72 Pontoriero R, Carnevale G. Surgical crown lengthening: A 12-month clinical wound healing study. J Periodontol. 2001;72:841.
73 Lanning SK, et al. Surgical crown lengthening: evaluation of the biological width. J Periodontol. 2003;74:468.
74 Evian C, et al. Retained interdental procedure for maintaining anterior esthetics. Comp Contin Educ Dent. 1985;6:5.
75 Han TJ, Takei HH. Progress in gingival papilla reconstruction. Periodontol 2000. 1996;11:65.
76 Cortellini P, et al. The modified papilla preservation technique with bioresorbable barrier membranes in the treatment of intrabony defects. Case reports. Int J Periodontics Restorative Dent. 1996;16:547.
77 Beagle JR. Surgical reconstruction of the interdental papilla: case report. Int J Periodontics Restorative Dent. 1992;12:145.
78 Azzi R, et al. Surgical reconstruction of the interdental papilla. Int J Periodontics Restorative Dent. 1998;18:467.
79 Tarnow DP, et al. The effect of the distance from the contact point to the crest of bone on the presence or absence of the interproximal papilla. J Periodontol. 1992;63:995.
80 Pini Prato GP, et al. Interdental papilla management: A review and classification of the therapeutic approaches. Int J Periodontics Restorative Dent. 2004;24:246.
81 Johnson GK, Sivers JE. Forced eruption in crown-lengthening procedures. J Prosthet Dent. 1986;56:424.
82 Tuncay OC. Orthodontic tooth movement as an adjunct to prosthetic therapy. J Prosthet Dent. 1981;46:41.
83 Miller TE. Orthodontic therapy for the restorative patient. I. The biomechanic aspects. J Prosthet Dent. 1989;61:268.
84 Celenza F, Mantzikos TG. Periodontal and restorative considerations of molar uprighting. Compendium. 1996;17:294.
85 Shaughnessy TG. Implementing adjunctive orthodontic treatment. J Am Dent Assoc. 1995;126:679.
86 Proffit WR. Contemporary Orthodontics, 2nd ed. St. Louis: Mosby, 1993.
87 Ackerman JL, Proffit WR. Communication in orthodontic treatment planning: bioethical and informed consent issues. Angle Orthod. 1995;65:253.
88 Grubb JE, et al. Clinical and scientific applications/advances in video imaging. Angle Orthod. 1996;66:407.
89 Levine JB. Esthetic diagnosis. Curr Opin Cosmet Dent. 9, 1995.
90 Goldstein RE, Miller MC. The role of high technology in maintaining esthetic restorations. J Esthet Dent. 1996;8:39.
91 Clark GT, et al. The validity and utility of disease detection methods and of occlusal therapy for temporomandibular disorders. Oral Surg Oral Med Oral Pathol Oral Radiol Endod. 1997;83:101.
92 Kirveskari P. The role of occlusal adjustment in the management of temporomandibular disorders. Oral Surg. 1997;83:87.
93 Kirveskari P, et al. Occlusal adjustment and the incidence of demand for temporomandibular disorder treatment. J Prosthet Dent. 1998;79:433.
94 Kerstein RB, et al. A comparison of ICAGD (immediate complete anterior guidance development) to mock ICAGD for symptom reductions in chronic myofascial pain dysfunction patients. Cranio. 1997;15:21.
95 McNeill C. Craniomandibular disorders: guidelines for evaluation, diagnosis, and management. In: American Academy of Craniomandibular Disorders: Oral and Facial Pain. Chicago: Quintessence Publishing; 1990.
96 Gher ME. Changing concepts. The effects of occlusion on periodontitis. Dent Clin North Am. 1998;42:285.