Skin Integrity and Wound Care
• Discuss the risk factors that contribute to pressure ulcer formation.
• Describe the pressure ulcer staging system.
• Discuss the normal process of wound healing.
• Describe the differences of wound healing by primary and secondary intention.
• Describe complications of wound healing.
• Explain the factors that impede or promote wound healing.
• Describe the differences between nursing care of acute and chronic wounds.
• Complete an assessment for a patient with impaired skin integrity.
• List nursing diagnoses associated with impaired skin integrity.
• Develop a nursing care plan for a patient with impaired skin integrity.
• List appropriate nursing interventions for a patient with impaired skin integrity.
• State evaluation criteria for a patient with impaired skin integrity.

http://evolve.elsevier.com/Potter/fundamentals/
Skin, the largest organ in the body, constitutes 15% of the total adult body weight (Wysocki, 2012). It is a protective barrier against disease-causing organisms and a sensory organ for pain, temperature, and touch; and it synthesizes vitamin D. Injury to the skin poses risks to safety and triggers a complex healing response. A nurse’s most important responsibilities include assessing and monitoring skin integrity; identifying problems; and planning, implementing, and evaluating interventions to maintain skin integrity. Once a wound occurs, it is critical to know the process of normal wound healing to identify the appropriate nursing interventions.
Scientific Knowledge Base
The skin has two layers: the epidermis and the dermis (Fig. 48-1). They are separated by a membrane, often referred to as the dermal-epidermal junction. The epidermis, or the top layer, has several layers. The stratum corneum is the thin, outermost layer of the epidermis. It consists of flattened, dead, keratinized cells. The cells originate from the innermost epidermal layer, commonly called the basal layer. Cells in the basal layer divide, proliferate, and migrate toward the epidermal surface. After they reach the stratum corneum, they flatten and die. This constant movement ensures replacement of surface cells sloughed during normal desquamation or shedding. The thin stratum corneum protects underlying cells and tissues from dehydration and prevents entrance of certain chemical agents. The stratum corneum allows evaporation of water from the skin and permits absorption of certain topical medications.
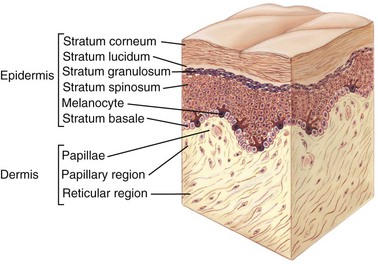
FIG. 48-1 Layers of skin. (From Applegate E: The anatomy and physiology learning system, ed 3, St Louis, 2006, Saunders.)
The dermis, the inner layer of the skin, provides tensile strength, mechanical support, and protection to the underlying muscles, bones, and organs. It differs from the epidermis in that it contains mostly connective tissue and few skin cells. Collagen (a tough, fibrous protein), blood vessels, and nerves are found in the dermal layer. Fibroblasts, which are responsible for collagen formation, are the only distinctive cell type within the dermis.
Understanding skin structure helps you maintain skin integrity and promote wound healing. Intact skin protects the patient from chemical and mechanical injury. When the skin is injured, the epidermis functions to resurface the wound and restore the barrier against invading organisms while the dermis responds to restore the structural integrity (collagen) and the physical properties of the skin. The normal aging process alters skin characteristics and makes skin more vulnerable to damage. Box 48-1 provides a summary of the changes in aging skin.
Pressure Ulcers
Pressure ulcer, pressure sore, decubitus ulcer, and bedsore are terms used to describe impaired skin integrity related to unrelieved, prolonged pressure. The most current terminology is pressure ulcer (Fig. 48-2), which is consistent with the recommendations of the pressure ulcer guidelines written by the Wound, Ostomy and Continence Nurses Society (WOCN, 2010). A pressure ulcer is localized injury to the skin and other underlying tissue, usually over a body prominence, as a result of pressure or pressure in combination with shear and/or friction. A number of contributing factors are also associated with pressure ulcers; the significance of these factors is yet to be elucidated (EPUAP and NPUAP, 2009). Any patient experiencing decreased mobility, decreased sensory perception, fecal or urinary incontinence, and/or poor nutrition is at risk for pressure ulcer development.

Many factors contribute to the formation of a pressure ulcer. Pressure is the major cause. Tissues receive oxygen and nutrients and eliminate metabolic wastes via the blood. Any factor that interferes with blood flow in turn interferes with cellular metabolism and the function or life of the cells. Prolonged, intense pressure affects cellular metabolism by decreasing or obliterating blood flow, resulting in tissue ischemia and ultimately tissue death.
Pathogenesis of Pressure Ulcers
Pressure is the major element in the cause of pressure ulcers. Three pressure-related factors contribute to pressure ulcer development: (1) pressure intensity, (2) pressure duration, and (3) tissue tolerance.
Pressure Intensity: A classic research study identified capillary closing pressure as the minimal amount of pressure required to collapse a capillary (e.g., when the pressure exceeds the normal capillary pressure range of 15 to 32 mm Hg) (Burton and Yamada, 1951). Therefore, if the pressure applied over a capillary exceeds the normal capillary pressure and the vessel is occluded for a prolonged period of time, tissue ischemia can occur. If the patient has reduced sensation and cannot respond to the discomfort of the ischemia, tissue ischemia and tissue death result.
The clinical presentation of obstructed blood flow occurs when evaluating areas of pressure. After a period of tissue ischemia, if the pressure is relieved and the blood flow returns, the skin turns red. The effect of this redness is vasodilation (blood vessel expansion), called hyperemia (redness). Evaluate an area of hyperemia by pressing a finger over the affected area. If it blanches (turns lighter in color) and the erythema returns when you remove your finger, the hyperemia is transient and is an attempt to overcome the ischemic episode, thus called blanching hyperemia (Pieper, 2012). However, if the erythematous area does not blanch (nonblanching erythema) when you apply pressure, deep tissue damage is probable.
Blanching occurs when the normal red tones of the light-skinned patient are absent. It does not occur in patients with darkly pigmented skin. The Task Force on the Implications for Darkly Pigmented Intact Skin in the Prediction and Prevention of Pressure Ulcers (Bennett, 1995) defined darkly pigmented skin as skin that “remains unchanged (does not blanch) when pressure is applied over a bony prominence, irrespective of the patient’s race or ethnicity.” Characteristics of intact dark skin that alert nurses to the potential for pressure ulcers are in Box 48-2.
Pressure Duration: Low pressure over a prolonged period and high-intensity pressure over a short period are two concerns related to duration of pressure. Both types of pressure cause tissue damage. Extended pressure occludes blood flow and nutrients and contributes to cell death (Pieper, 2012). Clinical implications of pressure duration include evaluating the amount of pressure (checking skin for reactive hyperemia) and determining the amount of time that a patient tolerates pressure (checking to be sure after relieving pressure that the affected area blanches).
Tissue Tolerance: The ability of tissue to endure pressure depends on the integrity of the tissue and the supporting structures. The extrinsic factors of shear, friction, and moisture affect the ability of the skin to tolerate pressure: the greater the degree to which the factors of shear, friction, and moisture are present, the more susceptible the skin will be to damage from pressure. The second factor related to tissue tolerance is the ability of the underlying skin structures (blood vessels, collagen) to assist in redistributing pressure. Systemic factors such as poor nutrition, increased aging, hydration status, and low blood pressure affect the tolerance of the tissue to externally applied pressure.
Risk Factors for Pressure Ulcer Development
A variety of factors predispose a patient to pressure ulcer formation. These factors are often directly related to disease such as decreased level of consciousness, the presence of a cast, or secondary to an illness (e.g., decreased sensation following a cerebrovascular accident).
Impaired Sensory Perception: Patients with altered sensory perception for pain and pressure are more at risk for impaired skin integrity than those with normal sensation. Patients with impaired sensory perception of pain and pressure are unable to feel when a portion of their body undergoes increased, prolonged pressure or pain. Thus the patient who can’t feel or sense that there is pain or pressure is at risk for the development of pressure ulcers.
Impaired Mobility: Patients unable to independently change positions are at risk for pressure ulcer development. For example, patients with spinal cord injuries have decreased or absent motor and sensory impairment and are unable to reposition off bony prominences.
Alteration in Level of Consciousness: Patients who are confused or disoriented and those who have expressive aphasia or other inability to verbalize or changing levels of consciousness are unable to protect themselves from pressure ulcer development. Patients who are confused or disoriented are sometimes able to feel pressure but are not always able to understand how to relieve it or communicate their discomfort. Patients in a coma cannot perceive pressure and are unable to move voluntarily to relieve pressure.
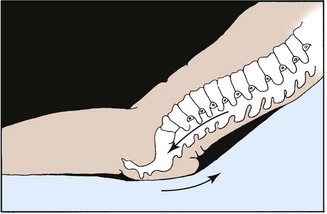
Shear: Shear force is the sliding movement of skin and subcutaneous tissue while the underlying muscle and bone are stationary (Bryant, 2012). For example, shear force occurs when the head of the bed is elevated and the sliding of the skeleton starts but the skin is fixed because of friction with the bed (Fig. 48-3). It also occurs when transferring a patient from bed to stretcher and the patient’s skin is pulled across the bed. When shear is present, the skin and subcutaneous layers adhere to the surface of the bed, and the layers of muscle and the bones slide in the direction of body movement. The underlying tissue capillaries are stretched and angulated by the shear force. As a result, necrosis occurs deep within the tissue layers. The tissue damage occurs deep in the tissues, causing undermining of the dermis.
Friction: The force of two surfaces moving across one another such as the mechanical force exerted when skin is dragged across a coarse surface such as bed linens is called friction (WOCN, 2010). Unlike shear injuries, friction injuries affect the epidermis or top layer of the skin. The denuded skin appears red and painful and is sometimes referred to as a “sheet burn.” A friction injury occurs in patients who are restless, in those who have uncontrollable movements such as spastic conditions, and in those whose skin is dragged rather than lifted from the bed surface during position changes.
Moisture: The presence and duration of moisture on the skin increases the risk of ulcer formation. Moisture reduces the resistance of the skin to other physical factors such as pressure and/or shear force. Prolonged moisture softens skin, making it more susceptible to damage. Immobilized patients who are unable to perform their own hygiene needs depend on the nurse to keep the skin dry and intact. Skin moisture originates from wound drainage, excessive perspiration, and fecal or urinary incontinence.
Classification of Pressure Ulcers
You need to assess pressure ulcers at regular intervals using systematic parameters to evaluate wound healing, plan appropriate interventions, and evaluate progress. Assessment includes depth of tissue involvement (staging), type and approximate percentage of tissue in wound bed, wound dimensions, exudate description, and condition of surrounding skin.
One method for assessment of a pressure ulcer is the use of a staging system. Staging systems for pressure ulcers are based on describing the depth of tissue destroyed. Accurate staging requires knowledge of the skin layers. A major drawback of a staging system is that you cannot stage an ulcer covered with necrotic tissue because the necrotic tissue is covering the depth of the ulcer. The necrotic tissue must be debrided or removed to expose the wound base to allow for assessment.
Pressure ulcer staging describes the pressure ulcer depth at the point of assessment. Thus, once you have staged the pressure ulcer, this stage endures even as it heals. Pressure ulcers do not progress from a stage III to a stage I; rather, a stage III ulcer demonstrating signs of healing is described as a healing stage III pressure ulcer (Pieper, 2012). The EPUAP and NPUAP have developed clinical practice guidelines for pressure ulcers and have advanced the following classification/staging system (EPUAP and NPUAP, 2009):
Stage I: Nonblanchable Redness of Intact Skin
Intact skin presents with nonblanchable erythema of a localized area usually over a bony prominence. Discoloration of the skin, warmth, edema, hardness, or pain may also be present. Darkly pigmented skin may not have visible blanching.
Further description: The area may be painful, firm, soft, warmer, or cooler than adjacent tissue. Stage I may be difficult to detect in individuals with dark skin tones. It may indicate “at-risk” persons (Fig. 48-4, A).
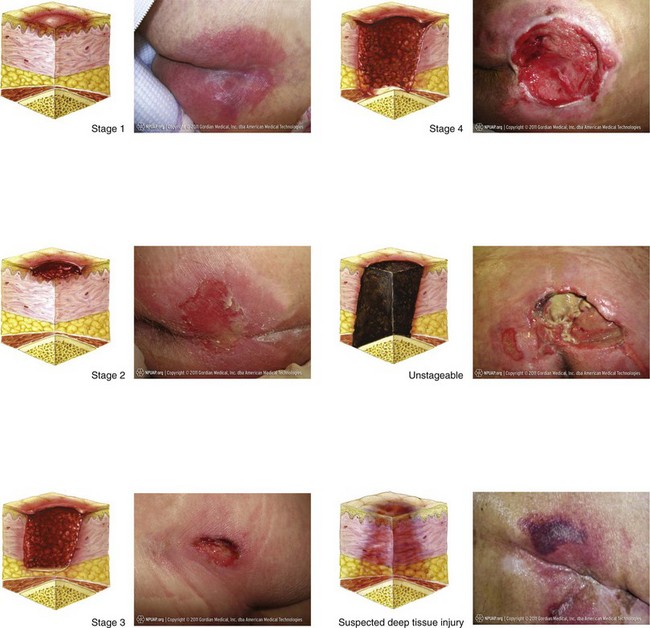
Stage II: Partial-thickness Skin Loss or Blister
A partial-thickness loss of dermis presents as a shallow open ulcer with a red-pink wound bed without slough. It may also present as an intact or open/ruptured serum-filled or serosangineous filled blister.
Further description: Stage II presents as a shiny or dry shallow ulcer without slough or bruising. This stage should not be used to describe skin tears, tape burns, incontinence-associated dermatitis, maceration, or excoriation (Fig. 48-4, B).
Stage III: Full-thickness Skin Loss (Fat Visible)
A stage III ulcer is a full-thickness tissue loss. Subcutaneous fat may be visible; but bone, tendon, or muscle is not exposed. Some slough may be present. It may include undermining and tunneling.
Further description: The depth of a stage III pressure ulcer varies by anatomical location. The bridge of the nose, ear, occiput, and malleolus do not have (adipose) subcutaneous tissue; and stage III ulcers can be shallow. In contrast, areas of significant adiposity can develop extremely deep stage III pressure ulcers. Bone/tendon is not visible or directly palpable (Fig. 48-4, C).
Stage IV: Full-thickness Tissue Loss (Muscle/Bone Visible)
A stage IV ulcer is a full-thickness tissue loss with exposed bone, tendon, or muscle. Slough or eschar may be present. It often includes undermining and tunneling.
Further description: The depth of a stage IV pressure ulcer varies by anatomical location. The bridge of the nose, ear, occiput, and malleolus do not have (adipose) subcutaneous tissue; and these ulcers can be shallow. Stage IV ulcers can extend into muscle and/or supporting structures (e.g., fascia, tendon, or joint capsule), making osteomyelitis or osteitis likely to occur. Exposed bone/muscle is visible or directly palpable (Fig. 48-4, D).
Unstageable/Unclassified: Full-thickness Skin or Tissue Loss—Depth Unknown
The EPUAP and the NPUAP (2009) developed a definition for an ulcer in which the base of the wound cannot be visualized and a definition of tissue injury in which the depth of injury is unknown. An unstageable ulcer is a full-thickness tissue loss in which actual depth of the ulcer is completely obscured by slough (yellow, tan, gray, green, or brown) and/or eschar (tan, brown, or black) in the wound bed (Fig. 48-4, E).
Further description: Until enough slough and/or eschar are removed to expose the base of the wound, the true depth cannot be determined; but it is either a stage III or IV. Stable (dry, adherent, intact without erythema or fluctuance) eschar on the heels serves as “the natural (biological) cover of the body” and should not be removed.
Suspected Deep-Tissue Injury—Depth Unknown
Suspected deep-tissue injury is a purple or maroon localized area of discolored intact skin or blood-filled blister caused by damage of underlying soft tissue from pressure and/or shear (Fig. 48-4, F).
Further description: The area may be preceded by tissue that is painful, firm, mushy, boggy, warmer, or cooler than adjacent tissue. Deep-tissue injury may be difficult to detect in individuals with dark skin tones. Evolution may include a thin blister over a dark wound bed. The wound may further evolve and become covered by thin eschar. Evolution may be rapid, exposing additional layers of tissue even with treatment.
In addition, Bennett (1995) suggests that, when assessing patients with darkly pigmented skin, proper lighting is important to accurately assess the skin (see Box 48-2). Either natural light or a halogen light is recommended. This prevents the blue tones that fluorescent light sources produce on darkly pigmented skin, which interferes with accurate assessment. Additional aspects of assessing dark skin are in Box 48-3.
 Box 48-3 Cultural Aspects of Care
Skin Color Impact
Detecting cyanosis and other changes in skin color in patients is an important clinical skill. However, this detection becomes a challenge in dark-skinned patients (Nix, 2012; Rajendran et al, 2006). There are concerns about the inability of practitioners to describe accurately early pressure ulcer or pressure injury in people with darkly pigmented skin (Henderson et al., 1997). Cyanosis is “a slightly bluish-grayish slatelike or dark purple discoloration of the skin caused by the presence of at least 5 g of reduced hemoglobin in arterial blood.” Color differentiation of cyanosis varies according to skin pigmentation. In dark-skinned patients, you need to know the individual’s baseline skin tone. You should not confuse the normal hyperpigmentation of Mongolian spots that are seen on the sacrum of African, Native American, and Asian patients with cyanosis. Observe the patient’s skin in nonglare daylight. The Gaskin’s Nursing Assessment of Skin Color (GNASC) is a useful tool for assessment for identifying changes in skin color that increase the patient’s risk for pressure ulcers (Gaskin, 1986).
• It is difficult but possible to detect cyanosis in the dark-skinned patient.
• Be aware of situations that produce changes in skin tone such as inadequate lighting.
• Examine body sites with the least melanin such as under the arm for underlying color identification.
• Evaluate pigmented skin for color-specific changes in skin tone.
You need to assess the type of tissue in the wound base; this information is used to plan appropriate interventions. The assessment of tissue type includes the amount (percentage) and appearance (color) of viable and nonviable tissue. Granulation tissue is red, moist tissue composed of new blood vessels, the presence of which indicates progression toward healing. Soft yellow or white tissue is characteristic of slough (stringy substance attached to wound bed), and it must be removed by a skilled clinician before the wound is able to heal. Black or brown necrotic tissue is eschar, which also needs to be removed before healing can proceed.
The measurement of the size of the wound provides overall changes in size, which is an indicator for wound healing progress (Nix, 2012). Use disposable wound-measuring devices to obtain measurement of width and length. Select a uniform, consistent method for measuring wound length and width to facilitate meaningful comparisons of wound measurements across time (EPUAP and NPUAP, 2009). Measure depth by using a cotton-tipped applicator in the wound bed.
Wound exudate should describe the amount, color, consistency, and odor of wound drainage and is part of the wound assessment. Excessive exudate indicates the presence of infection. Finally, assess the condition of the skin surrounding the wound for redness, warmth, maceration, or edema (swelling). The presence of any of these factors on the skin surrounding the wound indicates wound deterioration.
The skin around the wound (periwound) should be assessed. Examine the periwound area for redness, warmth, and signs of maceration and palpate the area for signs of pain or induration.
Wound Classifications
A wound is a disruption of the integrity and function of tissues in the body (Baharestani, 2008). It is imperative for the nurse to know that all wounds are not created equal. Understanding the etiology of a wound is important because the treatment for it varies, depending on the underlying disease process.
There are many ways to classify wounds. Wound classification systems describe the status of skin integrity, cause of the wound, severity or extent of tissue injury or damage, cleanliness of the wound (Table 48-1), or descriptive qualities of the wound tissue such as color (Fig. 48-5). Wound classifications enable a nurse to understand the risks associated with a wound and implications for healing.
TABLE 48-1
| DESCRIPTION | CAUSES | IMPLICATIONS FOR HEALING |
| Onset and Duration | ||
| Acute | ||
| Wound that proceeds through an orderly and timely reparative process that results in sustained restoration of anatomical and functional integrity | Trauma, a surgical incision | Wounds are usually easily cleaned and repaired. Wound edges are clean and intact. |
| Chronic | ||
| Wound that fails to proceed through an orderly and timely process to produce anatomical and functional integrity | Vascular compromise, chronic inflammation, or repetitive insults to tissue (Doughty and Sparks-Defriese, 2012) | Continued exposure to insult impedes wound healing. |
| Healing Process | ||
| Primary Intention | ||
| Wound that is closed | Surgical incision, wound that is sutured or stapled | Healing occurs by epithelialization; heals quickly with minimal scar formation. |
| Secondary Intention | ||
| Wound edges not approximated | Pressure ulcers, surgical wounds that have tissue loss | Wound heals by granulation tissue formation, wound contraction, and epithelialization. |
| Tertiary Intention | ||
| Wound left open for several days, then wound edges are approximated (see Fig. 48-4,C) | Wounds that are contaminated and require observation for signs of inflammation | Closure of wound is delayed until risk of infection is resolved (Doughty and Sparks-Defriese, 2012). |
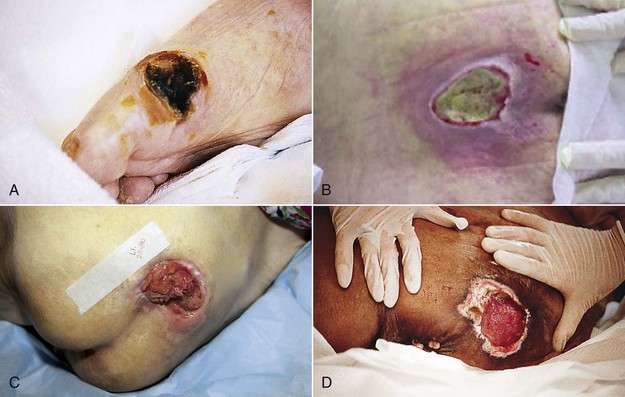
FIG. 48-5 Wounds classified by color assessment. A, Black wound. B, Yellow wound. C, Red wound. D, Mixed-color wound. (A and D, Courtesy Scott Health Care—A Molnlyche Company, Philadelphia, Pa; B and C from Bryant RA, Nix DP, editors: Acute and chronic wounds: current management concepts, ed 4, St Louis, 2012, Mosby.)
Process of Wound Healing
Wound healing involves integrated physiological processes. The tissue layers involved and their capacity for regeneration determine the mechanism for repair for any wound (Doughty and Sparks-Defriese, 2012).
There are two types of wounds: those with loss of tissue and those without. A clean surgical incision is an example of a wound with little tissue loss. The surgical incision heals by primary intention (Fig. 48-6, A). The skin edges are approximated, or closed, and the risk of infection is low. Healing occurs quickly, with minimal scar formation, as long as infection and secondary breakdown are prevented (Doughty and Sparks-Defriese, 2012). In contrast, a wound involving loss of tissue such as a burn, pressure ulcer, or severe laceration heals by secondary intention. The wound is left open until it becomes filled by scar tissue. It takes longer for a wound to heal by secondary intention; thus the chance of infection is greater. If scarring from secondary intention is severe, loss of tissue function is often permanent (Fig. 48-6, B).
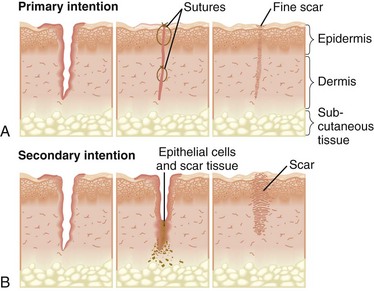
FIG. 48-6 A, Wound healing by primary intention such as a surgical incision. Wound healing edges are pulled together and approximated with sutures or staples, and healing occurs by connective tissue deposition. B, Wound healing by secondary intention. Wound edges are not approximated, and healing occurs by granulation tissue formation and contraction of the wound edges. (From Black JM, Hawks JH: Medical-surgical nursing: clinical management for positive outcomes, ed 8, St Louis, 2009, Mosby.)
Wound Repair
Partial-thickness wounds are shallow wounds involving loss of the epidermis (top layer) and possibly partial loss of the dermis. These wounds heal by regeneration because epidermis regenerates. An example of this is the repair of a clean surgical wound or an abrasion. Full-thickness wounds extending into the dermis (involving both layers of tissue) heal by scar formation because deeper structures do not regenerate. Pressure ulcers are an example of full-thickness wounds.
Partial-Thickness Wound Repair: Three components are involved in the healing process of a partial-thickness wound: inflammatory response, epithelial proliferation (reproduction) and migration, and reestablishment of the epidermal layers.
Tissue trauma causes the inflammatory response, which in turn causes redness and swelling to the area with a moderate amount of serous exudate. This response is generally limited to the first 24 hours after wounding. The epithelial cells begin to regenerate, providing new cells to replace the lost cells. The epithelial proliferation and migration start at both the wound edges and the epidermal cells lining the epidermal appendages, allowing for quick resurfacing. Epithelial cells begin to migrate across the wound bed soon after the wound occurs. A wound left open to air can resurface within 6 to 7 days, whereas one that is kept moist can resurface in 4 days. The difference in the healing rate is related to the fact that epidermal cells only migrate across a moist surface. In a dry wound the cells migrate down into a moist level before migration can occur (Doughty and Sparks-Defriese, 2012). New epithelium is only a few cells thick and must undergo reestablishment of the epidermal layers. The cells slowly reestablish normal thickness and appear as dry, pink tissue.
Full-Thickness Wound Repair: The four phases involved in the healing process of a full-thickness wound are hemostasis, inflammatory, proliferative, and remodeling.
Hemostasis: A series of events designed to control blood loss, establish bacterial control, and seal the defect occurs when there is an injury. During hemostasis injured blood vessels constrict, and platelets gather to stop bleeding. Clots form a fibrin matrix that later provides a framework for cellular repair.
Inflammatory Phase: In the inflammatory stage damaged tissue and mast cells secrete histamine, resulting in vasodilation of surrounding capillaries and exudation of serum and white blood cells into damaged tissues. This results in localized redness, edema, warmth, and throbbing. The inflammatory response is beneficial, and there is no value in attempting to cool the area or reduce the swelling unless the swelling occurs within a closed compartment (e.g., ankle or neck).
Leukocytes (white blood cells) reach the wound within a few hours. The primary-acting white blood cell is the neutrophil, which begins to ingest bacteria and small debris. The second important leukocyte is the monocyte, which transforms into macrophages. The macrophages are the “garbage cells” that clean a wound of bacteria, dead cells, and debris by phagocytosis. Macrophages continue the process of clearing the wound of debris and release growth factors that attract fibroblasts, the cells that synthesize collagen (connective tissue). Collagen appears as early as the second day and is the main component of scar tissue.
In a clean wound the inflammatory phase establishes a clean wound bed. The inflammatory phase is prolonged if too little inflammation occurs, as in a debilitating disease such as cancer or after administration of steroids. Too much inflammation also prolongs healing because arriving cells compete for available nutrients. An example is a wound infection in which the increased metabolic energy requirements present in an infected wound compete for the available calorie intake.
Proliferative Phase: With the appearance of new blood vessels as reconstruction progresses, the proliferative phase begins and lasts from 3 to 24 days. The main activities during this phase are the filling of the wound with granulation tissue, contraction of the wound, and the resurfacing of the wound by epithelialization. Fibroblasts are present in this phase and are the cells that synthesize collagen, providing the matrix for granulation. Collagen mixes with the granulation tissue, and this matrix supports the reepithelialization. Collagen provides strength and structural integrity to a wound. During this period the wound contracts to reduce the area that requires healing. Finally the epithelial cells migrate from the wound edges to resurface. In a clean wound the proliferative phase accomplishes the following: the vascular bed is reestablished (granulation tissue), the area is filled with replacement tissue (collagen, contraction, and granulation tissue), and the surface is repaired (epithelialization). Impairment of healing during this stage usually results from systemic factors such as age, anemia, hypoproteinemia, and zinc deficiency.
Remodeling: Maturation, the final stage of healing, sometimes takes place for more than a year, depending on the depth and extent of the wound. The collagen scar continues to reorganize and gain strength for several months. However, a healed wound usually does not have the tensile strength of the tissue it replaces. Collagen fibers undergo remodeling or reorganization before assuming their normal appearance. Usually scar tissue contains fewer pigmented cells (melanocytes) and has a lighter color than normal skin. In dark-skinned individuals the scar tissue may be more highly pigmented than surrounding skin.
Complications of Wound Healing
Hemorrhage: Hemorrhage, or bleeding from a wound site, is normal during and immediately after initial trauma. Hemostasis occurs within several minutes unless large blood vessels are involved or the patient has poor clotting function. Hemorrhage occurring after hemostasis indicates a slipped surgical suture, a dislodged clot, infection, or erosion of a blood vessel by a foreign object (e.g., a drain). Hemorrhage occurs externally or internally. For example, if a surgical suture slips from a blood vessel, bleeding occurs internally within the tissues, and there are no visible signs of blood unless a surgical drain is present. A surgical drain may be inserted into tissues beneath a wound to remove fluid that collects in underlying tissues.
You detect internal bleeding by looking for distention or swelling of the affected body part, a change in the type and amount of drainage from a surgical drain, or signs of hypovolemic shock. A hematoma is a localized collection of blood underneath the tissues. It appears as a swelling, change in color, sensation, or warmth or mass that often takes on a bluish discoloration. A hematoma near a major artery or vein is dangerous because pressure from the expanding hematoma obstructs blood flow.
External hemorrhaging is obvious. The nurse observes dressings covering the wound for bloody drainage. If bleeding is extensive, the dressing soon becomes saturated, and frequently blood drains from under the dressing and pools beneath the patient. Observe all wounds closely, particularly surgical wounds, in which the risk of hemorrhage is great during the first 24 to 48 hours after surgery or injury.
Infection: Wound infection is the second most common health care–associated infection (nosocomial) (see Chapter 28). According to the Centers for Disease Control and Prevention (CDC) (2001), a wound is infected if purulent material drains from it, even if a culture is not taken or has negative results. A sample of drainage from an infected wound does not always reveal bacteria because of poor culture technique or administration of antibiotics. Positive culture findings do not always indicate an infection because many wounds contain colonies of noninfective resident bacteria. In fact, all chronic dermal wounds are considered contaminated with bacteria. What differentiates contaminated wounds from infected wounds is the amount of bacteria present. It is generally agreed that wounds with more than 100,000 (105) organisms per gram of tissue are infected (Stotts, 2012b). The chances of wound infection are greater when the wound contains dead or necrotic tissue, there are foreign bodies in or near the wound, and the blood supply and local tissue defenses are reduced. Bacterial wound infection inhibits wound healing.
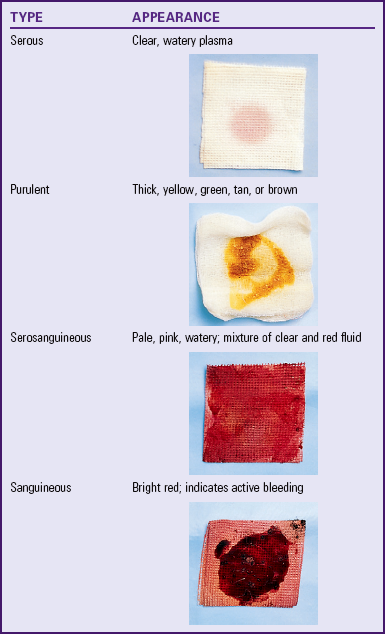
Some contaminated or traumatic wounds show signs of infection early, within 2 to 3 days. A surgical wound infection usually does not develop until the fourth or fifth postoperative day. The patient has a fever, tenderness and pain at the wound site, and an elevated white blood cell count. The edges of the wound appear inflamed. If drainage is present, it is odorous and purulent, which causes a yellow, green, or brown color, depending on the causative organism (Table 48-2).
Dehiscence: When a wound fails to heal properly, the layers of skin and tissue separate. This most commonly occurs before collagen formation (3 to 11 days after injury). Dehiscence is the partial or total separation of wound layers. A patient who is at risk for poor wound healing (e.g., poor nutritional status, infection, or obesity) is at risk for dehiscence. However, obese patients have a higher risk because of the constant strain placed on their wounds and the poor healing qualities of fat tissue (Camden, 2012). Dehiscence frequently involves abdominal surgical wounds and occurs after a sudden strain such as coughing, vomiting, or sitting up in bed. Patients often report feeling as though something has given way. When there is an increase in serosanguineous drainage from a wound, be alert for the potential for dehiscence. A strategy to prevent dehiscence is to place a folded thin blanket or pillow over an abdominal wound when the patient is coughing. This provides a splint to the area, supporting the healing tissue when coughing increases the intraabdominal pressure.
Evisceration: With total separation of wound layers, evisceration (protrusion of visceral organs through a wound opening) occurs. The condition is an emergency that requires surgical repair. When evisceration occurs, the nurse places sterile towels soaked in sterile saline over the extruding tissues to reduce chances of bacterial invasion and drying of the tissues. If the organs protrude through the wound, blood supply to the tissues is compromised. The presence of an evisceration is a surgical emergency. Immediately contact the surgical team, do not allow the patient anything by mouth (NPO), observe him or her for signs and symptoms of shock, and prepare him or her for emergency surgery.
Nursing Knowledge Base
Prediction and Prevention of Pressure Ulcers
A major aspect of nursing care is the maintenance of skin integrity. Consistent, planned skin care interventions are critical to ensuring high-quality care. Nurses constantly observe their patients’ skin for breaks or impaired skin integrity. Impaired skin integrity occurs from prolonged pressure, irritation of the skin, and/or immobility, leading to the development of pressure ulcers. A pressure ulcer is a localized injury to the skin and/or underlying tissue, usually over a bony prominence, as a result of pressure or pressure in combination with shear and/or friction (EPUAP and NPUAP, 2009).
Risk Assessment
Several instruments are available for assessing patients who are at risk for developing a pressure ulcer. By identifying at-risk patients, you are able to put interventions into place for the at-risk patient and spare patients with little risk for pressure ulcer development the unnecessary and sometimes costly preventive treatment. Prevention and treatment of pressure ulcers are major nursing priorities. The incidence of pressure ulcers in a facility or agency is an important indicator of quality of care. Evidence exists that a program of prevention guided by risk assessment simultaneously reduces the institutional incidence of pressure ulcers by as much as 60% and brings down the costs of prevention at the same time (Braden, 2001). Several risk-assessment scales (Bergstrom et al., 1987; Norton et al., 1962) developed by nurses enable systematic risk assessment of patients. The Braden Scale, a widely used risk-assessment tool, is in the WOCN guidelines (2010) as being a valid tool to use for pressure ulcer risk assessment. The Braden Scale (Table 48-3) was developed based on risk factors in a nursing home population (Bergstrom et al., 1987) and is composed of six subscales: sensory perception, moisture, activity, mobility, nutrition, and friction/shear. The total score ranges from 6 to 23; a lower total score indicates a higher risk for pressure ulcer development (Braden and Bergstrom, 1989). The cutoff score for onset of pressure ulcer risk with the Braden Scale in the general adult population is 18 (Ayello and Braden, 2002). It is highly reliable when used to identify patients at greatest risk for pressure ulcers (Bergstrom et al., 1987; Braden and Bergstrom, 1994). The Braden Scale is the most commonly used assessment scale for pressure ulcer risk.
TABLE 48-3
Braden Scale for Predicting Pressure Ulcer Risk
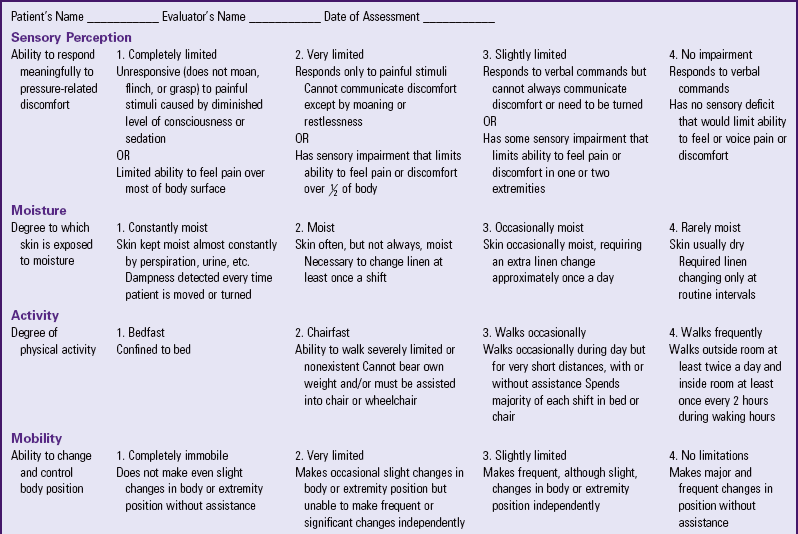
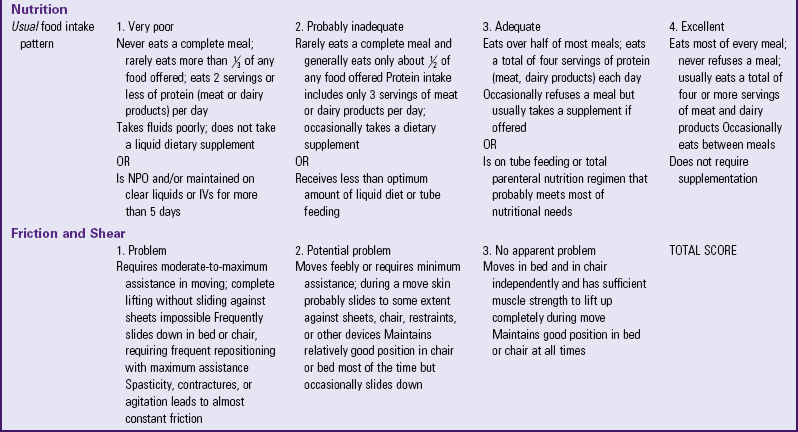
Copyright 1988. Used with permission of Barbara Braden, PhD, RN, Professor, Creighton University School of Nursing, Omaha, Nebraska, and Nancy Bergstrom, Professor, University of Texas-Houston, School of Nursing, Houston, Texas, http://www.bradenscale.com.
Prevention
Preventing pressure ulcers is a priority in caring for patients and is not limited to patients with restrictions in mobility. Impaired skin integrity is not usually a problem in healthy, immobilized individuals but is a serious and potentially devastating problem in ill or debilitated patients (WOCN, 2010).
Economic Consequences of Pressure Ulcers: Pressure ulcers are a continual problem in acute and restorative care settings. For adult patients with pressure ulcers, 56.5% were 65 years and older (WOCN, 2010). Paralysis and spinal cord injury are common preexisting conditions among younger adults with primary diagnosis of pressure ulcers. Older adults admitted to acute and long-term facilities are a vulnerable population. Among persons admitted to long-term care, 10.3% to 18.4% had one or more pressure ulcers on admission (Baumgarten et al., 2003; Siem et al., 2003).
When a pressure ulcer occurs, the length of stay in a hospital and the overall cost of health care increase. The actual cost of treatment is difficult to estimate. About 1.6 million patients each year in acute care settings develop pressure ulcers, representing a cost of $11 to $17.2 billion to the U.S. health care system (Pieper, 2012). Adult inpatient hospital stays with a diagnosis of pressure ulcers totaled $11 billion in 2006 (WOCN, 2010). Although it is difficult to get a handle on the exact numbers of pressure ulcers, the number of patients with pressure ulcers, and the cost, the occurrence of pressure ulcers is costly to patients in terms of disability, pain, and suffering and in the costs to institutions and third-party payers. The Centers for Medicare and Medicaid Services (CMS) implemented a policy effective October 1, 2008 whereby hospitals no longer receive additional reimbursement for care related to eight conditions, including stage III and IV pressure ulcers that occur during the hospitalization. This policy was put in place to provide additional incentives for hospitals to improve quality of care. Using guidelines such as the WOCN Guidelines (WOCN, 2010) helps reduce or eliminate the occurrence of pressure ulcers and prevent the expense that will not be reimbursed.
Factors Influencing Pressure Ulcer Formation and Wound Healing
Impaired skin integrity resulting in pressure ulcers is primarily the result of pressure. However, additional factors, including shear force, friction, moisture, nutrition, tissue perfusion, infection, and age, increase the patient’s risk for pressure ulcer development and poor wound healing.
Nutrition
For patients weakened or debilitated by illness, nutritional therapy is especially important. A patient who has undergone surgery (see Chapter 50) and is well nourished still requires at least 1500 kcal/day for nutritional maintenance. Alternatives such as enteral feedings (see Chapter 44) and parenteral nutrition (see Chapter 41) are available for patients unable to maintain normal food intake.
Normal wound healing requires proper nutrition (Table 48-4). Deficiencies in any of the nutrients result in impaired or delayed healing (Stotts, 2012a). Physiological processes of wound healing depend on the availability of protein, vitamins (especially A and C), and the trace minerals zinc and copper. Collagen is a protein formed from amino acids acquired by fibroblasts from protein ingested in food. Vitamin C is necessary for synthesis of collagen. Vitamin A reduces the negative effects of steroids on wound healing. Trace elements are also necessary; (i.e., zinc for epithelialization and collagen synthesis and copper for collagen fiber linking).
TABLE 48-4
Role of Selected Nutrients in Wound Healing
Modified from Ayello EA et al.: Nutritional aspects of wound healing, Home Healthc Nurse 17(11):719, 1999; and Stotts NA: Nutritional assessment and support. In Bryant RA, Nix DP, editors: Acute and chronic wounds: current management concepts, ed 4, St Louis, 2012a, Mosby.
Calories provide the energy source needed to support the cellular activity of wound healing. Protein needs especially are increased and are essential for tissue repair and growth. A balanced intake of various nutrients (i.e., protein, fat, carbohydrates, vitamins, and minerals) is critical to support wound healing.
Serum proteins are biochemical indicators of malnutrition (Stotts, 2012a). Serum albumin is probably the most frequently measured of these laboratory parameters. Albumin alone is not sensitive to rapid changes in nutritional status. Transferrin also evaluates protein status, but alone it does not determine malnutrition. The best measure of nutritional status is prealbumin, because it reflects not only what the patient has ingested but also what the body has absorbed, digested, and metabolized (Stotts, 2012a).
Tissue Perfusion
Oxygen fuels the cellular functions essential to the healing process; therefore the ability to perfuse the tissues with adequate amounts of oxygenated blood is critical to wound healing (Doughty and Sparks-Defriese, 2012). Patients with peripheral vascular disease are at risk for poor tissue perfusion because of poor circulation. Oxygen requirements depend on the phase of wound healing (e.g., chronic tissue hypoxia is associated with impaired collagen synthesis and reduced tissue resistance to infection).
Infection
Wound infection prolongs the inflammatory phase; delays collagen synthesis; prevents epithelialization; and increases the production of proinflammatory cytokines, which leads to additional tissue destruction (Stotts, 2012b). Indications that a wound infection is present include the presence of purulent drainage; change in odor, volume, or character of wound drainage; redness in the surrounding tissue; fever; or pain.
Age
Increased age affects all phases of wound healing. A decrease in the functioning of the macrophage leads to a delayed inflammatory response, delayed collagen synthesis, and slower epithelialization.
Psychosocial Impact of Wounds
The psychosocial impact of wounds on the physiological process of healing is unknown. The patient’s psychological response to any wound is part of the nurse’s assessment. Body image changes often impose a great stress on the patient’s adaptive mechanisms. They also influence self-concept (see Chapter 33) and sexuality (see Chapter 34). Make sure that the patient’s personal and social resources for adaptation are a part of the assessment. Factors that affect the patient’s perception of the wound include the presence of scars, drains (drains are often necessary for weeks or even months after certain procedures), odor from drainage, and temporary or permanent prosthetic devices.
Critical Thinking
Successful critical thinking requires a synthesis of knowledge, experience, information gathered from patients, critical thinking attitudes, and intellectual and professional standards. Clinical judgments require the nurse to anticipate the information necessary, analyze the data, and make decisions regarding patient care. Critical thinking is always changing. During assessment (Fig. 48-7) consider all elements that build toward making appropriate nursing diagnoses.
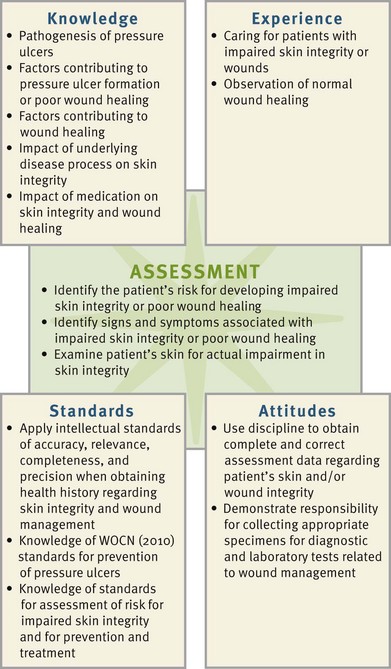
FIG. 48-7 Critical thinking model for skin integrity and wound care assessment. WOCN, Wound, Ostomy, and Continence Nurses Society.
When caring for patients who have impaired skin integrity and chronic wounds, integrate knowledge from nursing and other disciplines, previous experiences, and information gathered from patients to understand the risk to skin integrity and wound healing. Knowledge of normal musculoskeletal physiology, the pathogenesis of pressure ulcers, normal wound healing, and the pathophysiology of underlying diseases enables you to have a scientific basis for care. The WOCN (2010) has guidelines for assessment of risk for impaired skin integrity, prevention measures, interventions to promote wound healing, and other standards of practice, which you should use in planning care. Past experience with patients at risk for impaired skin integrity or patients with wounds increases the experiential knowledge base helping you to identify interventions. Finally you need to be disciplined during assessment to obtain comprehensive and correct assessment data. You also need to be creative. Because chronic wounds are difficult to heal, be diligent in evaluating nursing interventions and determining which interventions are effective and which need modification.
Nursing Process
Apply the nursing process and use a critical thinking approach in your care of patients. The nursing process provides a clinical decision-making approach for you to develop and implement an individualized plan of care.
Assessment
During the assessment process thoroughly assess each patient and critically analyze findings to ensure that you make patient-centered clinical decisions required for safe nursing care. Baseline and continual assessment data provide critical information about a patient’s skin integrity and the increased risk for pressure ulcer development. Focusing on specific elements such as a patient’s level of sensation, movement, and continence status helps guide the skin assessment (Box 48-4).
Through the Patient’s Eyes
When patients have an acute surgical or traumatic wound, the wound sometimes heals promptly and without complications. However, when pressure ulcers or chronic wounds are present, the course of treatment is lengthy and costly. Because the patient and family need to be involved with wound care management, it is important to know the patient’s expectations. A patient who has realistic goals and is informed about the length of time for wound healing is more likely to adhere to the specific therapies designed to promote healing and prevent further skin breakdown. Therefore it is important to assess the patient’s perception of what is occurring with the wound healing interventions. The health care professional wants to determine the patient’s and family’s understanding of wound assessment; wound interventions; and supportive interventions such as positioning, nutrition, and ambulation.
Skin
A nurse continually assesses the skin for signs of ulcer development (Box 48-5). The neurologically impaired patient; the chronically ill patient in long-term care; the patient with diminished mental status; and the intensive care unit (ICU), oncology, hospice, or orthopedic patient have increased potential for developing pressure ulcers.
Assessment for tissue pressure damage includes visual and tactile inspection of the skin. Perform baseline assessment to determine a patient’s normal skin characteristics and any actual or potential areas of breakdown. You need to individualize assessment characteristics of a patient’s skin, depending on his or her skin tone (Bennett, 1995; Henderson et al., 1997). Accurate assessment of patients with darker skin pigmentation is an essential skill for all health care providers (Nix, 2012). Assessment characteristics of darkly pigmented skin are in Boxes 48-2 and 48-3.
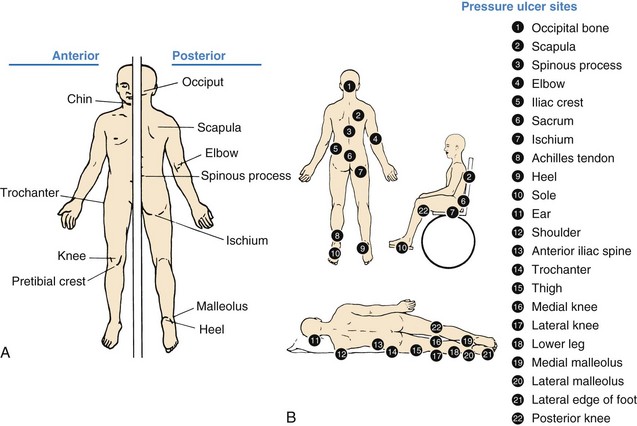
Pay particular attention to areas located over bony prominences or under casts, traction, splints, braces, collars, or other orthopedic devices. The frequency of pressure checks depends on the schedule of appliance application and the response of the skin to the external pressure (Fig. 48-8).
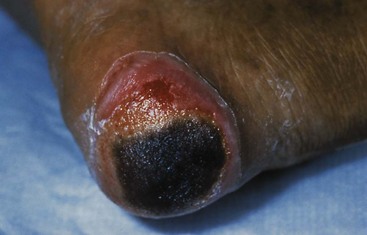
FIG. 48-8 Formation of pressure ulcer on heel resulting from external pressure from mattress of bed. (Courtesy Janice Colwell, RN, MS, CWOCN, FAAN, Clinical Nurse Specialist, University of Chicago Medical Center.)
When you note hyperemia, document the location, size, and color and reassess the area after 1 hour. When you suspect abnormal reactive hyperemia, outline the affected area with a marker to make reassessment easier. These signs are early indicators of impaired skin integrity, but damage to the underlying tissue is sometimes more progressive. Tactile assessment enables you to use palpation to acquire further data about induration and the damage to the skin and underlying tissues.
Gently palpate the reddened tissue, observing for blanching with return to normal skin tones in patients with light-toned skin. In addition, palpate for induration, noting the size in millimeters or centimeters of the induration around the injured area and changes in temperature of the surrounding skin and tissues.
Use visual and tactile inspection over the body areas most frequently at risk for pressure ulcer development (Fig. 48-9). For example, when a patient lies in bed or sits in a chair, he or she places body weight heavily on certain bony prominences. Body surfaces subjected to the greatest weight or pressure are at greatest risk for pressure ulcer formation.
Pressure Ulcers
Pressure ulcers have multiple etiological factors. Assessment for pressure ulcer risk includes using an appropriate predictive measure and assessing a patient’s mobility, nutrition, presence of body fluids, and comfort level (Skill 48-1 on pp. 1213-1215).
Predictive Measures: On admission to acute care and rehabilitation hospitals, nursing homes, home care programs, and other health care facilities, assess individuals for risk of pressure ulcer development (WOCN, 2010). Perform pressure ulcer risk assessment systematically (WOCN, 2010). Use an assessment tool such as the Braden scale (see Table 48-3). The interpretation of the meaning of the total numerical scores differs with each risk-assessment scale. Lower numerical scores on the Braden scale indicate that a patient is at high risk for skin breakdown. A benefit of the predictive instruments is to increase a nurse’s early detection of patients at greatest risk for ulcer development. Once you identify these patients, institute the appropriate interventions to maintain skin integrity and implement prevention strategies (WOCN, 2010). Perform reassessment for pressure ulcer risk on a scheduled basis.
Mobility: Assessment includes documenting the level of mobility and the potential effects of impaired mobility on skin integrity. Documenting assessment of mobility also includes obtaining data regarding the quality of muscle tone and strength. For example, determine whether the patient is able to lift weight off of the sacral area and roll the body to a side-lying position. Some patients have adequate range of motion to move independently into a more protective position. Finally note the patient’s activity tolerance (see Chapter 38).
You must assess mobility as part of baseline data. If a patient has some degree of mobility independence, reinforce the frequency of position changes and measures to relieve pressure. The frequency of position changes is based on ongoing skin assessment; revise it as data change. Be meticulous when assessing pressure sites.
Nutritional Status: An assessment of patients’ nutritional status is an integral part of the initial assessment data for patients at risk for impaired skin integrity and wounds (Stotts, 2012a). Malnutrition is a risk factor for pressure ulcer development (Posthauer and Thomas, 2008). A loss of 5% of usual weight, weight less than 90% of ideal body weight, and a decrease of 10 pounds in a brief period are all signs of actual or potential nutritional problems (Stotts, 2012a).
Body Fluids: Continual exposure of the skin to body fluids increases a patient’s risk for skin breakdown and pressure ulcer formation (Box 48-6). Some body fluids such as saliva and serosanguineous drainage are not as caustic to the skin, and the risk of skin breakdown from exposure to these fluids is low. However, exposure to urine, bile, stool, ascitic fluid, and purulent wound exudates carries a moderate risk for skin breakdown, especially in patients who have other risk factors such as chronic illness or poor nutrition. Finally exposure to gastric and pancreatic drainage has the highest risk for skin breakdown. Again, it is important to prevent and reduce the patient’s exposure to body fluids; and, when exposure occurs, you need to provide meticulous hygiene and skin care.
Pain: Until recently there has been little research about pain and pressure ulcers. The WOCN (2010) has recommended the assessment and management of pain be included in the care of patients with pressure ulcers (Dallam et al., 2008). Maintaining adequate pain control and patient comfort increases the patient’s willingness and ability to increase mobility, which in turn reduces pressure ulcer risk.
Wounds
A nurse often assesses wounds under two conditions: at the time of injury before treatment and after therapy, when the wound is relatively stable. Each condition requires him or her to make different observations and take different actions. Regardless of the setting, it is important that you initially obtain information regarding the cause and history of the wound (see Box 48-4).
Emergency Setting: You see wounds in any setting, including clinics, emergency departments, youth camps, or your own backyard. The type of wound determines the criteria for inspection. For example, you do not need to inspect for signs of internal bleeding after an abrasion, but you should inspect in the event of a puncture wound.
When you judge a patient’s condition to be stable because of the presence of spontaneous breathing, a clear airway, and a strong carotid pulse (see Chapters 30 and 40), inspect the wound for bleeding. An abrasion is superficial with little bleeding and is considered a partial-thickness wound. The wound often appears “weepy” because of plasma leakage from damaged capillaries. A laceration sometimes bleeds more profusely, depending on the depth and location of the wound. For example, minor scalp lacerations tend to bleed profusely because of the rich blood supply to the scalp. Lacerations greater than 5 cm (2 inches) long or 2.5 cm (1 inch) deep cause serious bleeding. Puncture wounds bleed in relation to the depth and size of the wound (e.g., a nail puncture does not cause as much bleeding as a knife wound). The primary dangers of puncture wounds are internal bleeding and infection.
Inspect the wound for foreign bodies or contaminant material. Most traumatic wounds are dirty. Soil, broken glass, shreds of cloth, and foreign substances clinging to penetrating objects sometimes become embedded in the wound.
The size of the wound is the next step in assessment. A deep laceration requires suturing. A large, open wound may expose bone or tissue that needs to be protected.
When the injury is a result of trauma from a dirty penetrating object, determine when the patient last received a tetanus toxoid injection. Tetanus bacteria reside in soil and in the gut of humans and animals. A tetanus antitoxin injection is necessary if the patient has not had one within 5 years.
Stable Setting: When a patient’s condition is stabilized (e.g., after surgery or treatment), assess the wound to determine progress toward healing. If the wound is covered by a dressing and the health care provider has not ordered it changed, do not directly inspect it unless you suspect serious complications. In such a situation inspect only the dressing and any external drains. If the health care provider prefers to change the dressing, he or she assesses the wound at least daily. When removing dressings, take care to avoid accidental removal or displacement of underlying drains. Because removal of dressings can be painful, consider giving an analgesic at least 30 minutes before exposing a wound.
Wound Appearance: Observe whether wound edges are closed. A surgical incision healing by primary intention should have clean, well-approximated edges. Crusts often form along the wound edges from exudate. A puncture wound is usually a small, circular wound with the edges coming together toward the center. If a wound is open, the edges are separated, and you inspect the condition of tissue at the wound base. Also look for complications such as dehiscence and evisceration. The outer edges of a wound normally appear inflamed for the first 2 to 3 days, but this slowly disappears. Within 7 to 10 days a normally healing wound resurfaces with epithelial cells, and edges close. Table 48-5 lists assessment characteristics for abnormal wound healing in primary and secondary wounds. If infection develops, the area directly surrounding the wound becomes brightly inflamed and swollen.
TABLE 48-5
Assessment of Abnormal Healing in Primary and Secondary Intention Wounds
| PRIMARY INTENTION WOUNDS | SECONDARY INTENTION WOUNDS |
| Incision line poorly approximated | Pale or fragile granulation tissue, granulation tissue bed excessively dry or moist |
| Drainage present more than 3 days after closure | Purulent exudate present |
| Inflammation increased in first 3-5 days after injury | Necrotic or slough tissue present in wound base |
| No epithelialization of wound edges by day 4 | Epithelialization not continuous |
| No healing ridge by day 9 | Fruity, earthy, or putrid odor present |
| Presence of fistula(s), tunneling, undermining |
Modified from Stotts NA, Cavanaugh CE: Assessing the patient with a wound, Home Healthc Nurse 17(1):27, 1999.
Skin discoloration usually results from bruising of interstitial tissues or hematoma formation. Blood collecting beneath the skin first takes on a bluish or purplish appearance. Gradually, as the clotted blood is broken down, shades of brown and yellow appear.
Character of Wound Drainage: Note the amount, color, odor, and consistency of drainage. The amount of drainage depends on the location and extent of the wound. For example, drainage is minimal after a simple appendectomy. In contrast, it is moderate for 1 to 2 days after drainage of a large abscess. When you need an accurate measurement of the amount of drainage within a dressing, weigh the dressing and compare it with the weight of the same dressing when clean and dry. The general rule is that 1 g of drainage equals 1 mL of volume of drainage. Another method of quantifying wound drainage is to chart the number of dressings used and the frequency of change. An increase or decrease in the number or frequency of dressings indicates a relative increase or decrease in wound drainage. The color and consistency of drainage vary, depending on the components. Types of drainage include the following: serous, sanguineous, serosanguineous, and purulent (see Table 48-2). If the drainage has a pungent or strong odor, you should suspect an infection. Describe the appearance of the wound according to characteristics observed. An example of accurate recording follows:
Abdominal incision is 5 cm in length in RLQ; edges well approximated without inflammation or exudate. 1.2-cm diameter circle of serous drainage present on one 4 × 4 gauze changed every 8 hours.
Drains: The health care provider inserts a drain into or near a surgical wound if there is a large amount of drainage. Some drains are sutured in place. Exercise caution when changing the dressing around drains that are not sutured in place to prevent accidental removal. A Penrose drain lies under a dressing; at the time of placement a pin or clip is placed through the drain to prevent it from slipping farther into a wound (Fig. 48-10). It is usually the health care provider’s responsibility to pull or advance the drain as drainage decreases to permit healing deep within the drain site.

Assess the number of drains, drain placement, character of drainage, and condition of collecting equipment. Observe the security of the drain and its location with respect to the wound. Next note the character of drainage. If there is a collecting device, measure the drainage volume. Because a drainage system needs to be patent, look for drainage flow through and around the tubing. A sudden decrease in drainage through the tubing may indicate a blocked drain, and you need to notify the health care provider. When a drain is connected to suction, assess the system to be sure that the pressure ordered is being exerted. Evacuator units such as a Hemovac or Jackson-Pratt (Fig. 48-11) exert a constant low pressure as long as the suction device (bladder or container) is fully compressed. These types of drainage devices are often referred to as self-suction. When the evacuator device is unable to maintain a vacuum on its own, notify the surgeon, who then orders a secondary vacuum system (such as wall suction). If fluid accumulates within the tissues, wound healing does not progress at an optimal rate, and this increases the risk of infection.
Wound Closures: Surgical wounds are closed with staples, sutures, or wound closures. A frequent skin closure is the stainless-steel staple. The staple provides more strength than nylon or silk sutures and tends to cause less irritation to tissue. Look for irritation around staple or suture sites and note whether closures are intact. Normally for the first 2 to 3 days after surgery the skin around sutures or staples is edematous. Continued swelling may indicate that the closures are too tight. The skin can be cut by overly tight suture material, leading to wound separation. Early suture removal reduces formation of defects along the suture line and minimizes chances of unattractive scar formation.
Dermabond is a tissue adhesive that forms a strong bond across apposed wound edges, allowing normal healing to occur below. It can be used to replace small sutures for incisional repair. A vial containing the Dermabond solution is used to apply the product to approximated tissue. The wound edges are held together until the solution dries, providing an adhesive closure. Although generally used for small superficial lacerations, some surgeons use it on larger wounds where subcutaneous sutures are needed (Bruns and Worthington, 2000).
Palpation of Wound: When inspecting a wound, observe swelling or separation of wound edges. While wearing gloves, lightly press the wound edges, detecting localized areas of tenderness or drainage collection. If pressure causes fluid to be expressed, note the character of the drainage. The patient is normally sensitive to palpation of wound edges. Extreme tenderness indicates infection.
Wound Cultures: If you detect purulent or suspicious-looking drainage, obtaining a specimen of the drainage for culture may be necessary (see Chapter 28). Never collect a wound culture sample from old drainage. Resident colonies of bacteria from the skin grow within exudate and are not always the true causative organisms of a wound infection. Clean a wound first with normal saline to remove skin flora. Aerobic organisms grow in superficial wounds exposed to the air, and anaerobic organisms tend to grow within body cavities. Use a different method of specimen collection for each type of organism per agency policy (Box 48-7).
Box 48-7
Recommendations for Standardized Techniques for Wound Cultures*
• Clean intact skin with a disinfectant solution. Allow to dry.
• Use a 10-mL disposable syringe with a 22-gauge needle, pulling 0.5 mL of air into the syringe.
• Insert the needle through intact skin next to the wound; withdraw plunger and apply suction to the 10-mL mark.
• Move the needle back and forward at different angles for two to four explorations.
• Remove the needle, expel the excess air, and cap and prepare the syringe for the laboratory (Stotts, 2012b).
• Clean the wound surface with a nonantiseptic solution.
• Use a sterile swab from a culturette tube (Fig. 48-12).
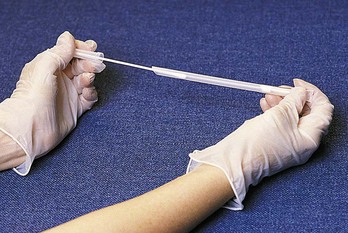
• Moisten the swab with normal saline.
• Rotate the swab in 1 cm2 (0.4 in2) of clean tissue in the open wound. Apply pressure to the swab to elicit tissue fluid (Stotts, 2012b). Insert the tip of the swab into the appropriate sterile container, label, and transport to the laboratory.
*Check agency policy to determine need to obtain health care provider order.
Modified from Stotts NA: Wound infection: diagnosis and management. In Bryant RA, Nix DP, editors: Acute and chronic wounds: current management concepts, ed 4, St Louis, 2012, Mosby.
Gram stains of drainage are often performed as well. This test allows the health care provider to order appropriate treatment earlier than when only cultures are done. No additional specimens are usually required. The microbiology laboratory needs only to be notified to perform the additional test.
The gold standard of wound culture is tissue biopsy. A health care provider or wound care specialist with special training obtains the biopsy (Stotts, 2012b).
Nursing Diagnosis
Assessment reveals clusters of data to indicate whether an actual or a risk for impaired skin integrity exists. In addition, the assessment data will provide information on the related factor. For example, a postoperative patient has purulent drainage from a surgical wound and reports tenderness around the area of the wound. These data support a nursing diagnosis of impaired skin integrity related to infection (Box 48-8). After completing an assessment of a patient’s wound, the nurse identifies nursing diagnoses that direct supportive and preventive care. Multiple nursing diagnoses are associated with impaired skin integrity and wounds:
• Imbalanced nutrition: less than body requirements
• Risk for impaired skin integrity
Some patients are at risk for poor wound healing because of previously defined factors that impair healing. Thus, even though the patient’s wound appears normal, the nurse identifies nursing diagnoses such as impaired nutrition or ineffective peripheral tissue perfusion that direct nursing care toward support of wound repair.
The nature of a wound can cause problems unrelated to wound healing. Alteration in comfort and impaired mobility are problems that have implications for the patient’s eventual recovery. For example, a large abdominal incision causes enough pain to interfere with the patient’s ability to turn in bed effectively.
Planning
After identifying nursing diagnoses, develop a plan of care for a patient who has actual or is at risk for impaired skin integrity. During planning synthesize information from multiple resources (Fig. 48-13). Critical thinking ensures that a patient’s plan of care integrates all that you know about the individual and key critical thinking elements. Professional standards are especially important to consider when you develop a plan of care.
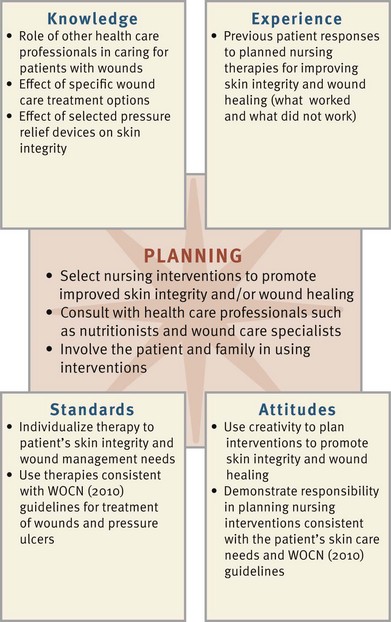
FIG. 48-13 Critical thinking model for skin integrity and wound care planning. WOCN, Wound, Ostomy, and Continence Nurses Society.
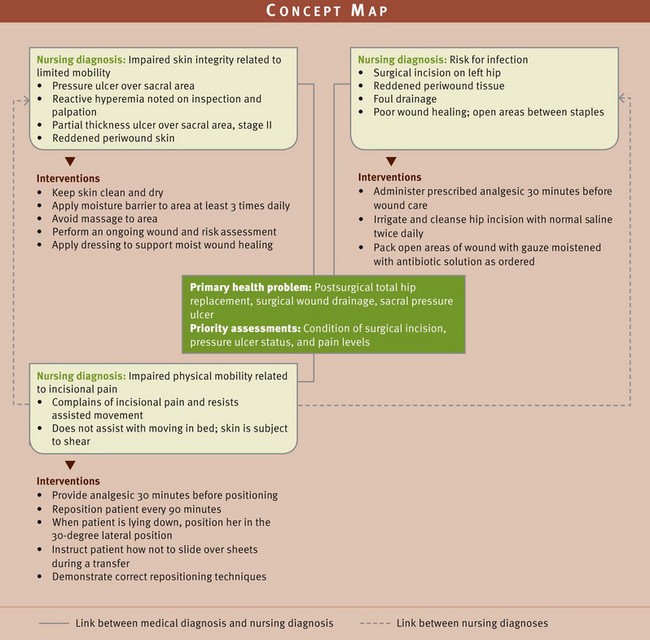
Patients who have large, chronic wounds or infected wounds have multiple nursing care needs. A concept map helps to individualize care for a patient who has multiple health problems and related nursing diagnoses (Fig. 48-14). This map helps you use critical thinking skills to organize complex patient assessment data into related nursing diagnoses with the patient’s chief medical diagnosis. As you identify linkages between the nursing diagnoses and the chief medical diagnosis, the concept map also links potential interventions that apply to the patient’s health care needs.
Goals and Outcomes
Nursing care is based on a patient’s identified needs and priorities. You establish goals and expected outcomes, and from the goals you plan interventions according to the risk for pressure ulcers or the type and severity of the wound and the presence of any complications such as infection, poor nutrition, peripheral vascular diseases, or immunosuppression that can affect wound healing (see the Nursing Care Plan). A goal frequently identified when working with a patient with a wound is to see wound improvement within a 2-week period. The outcomes of this goal can include the following:
• Higher percentage of granulation tissue in the wound base
 Nursing Care Plan
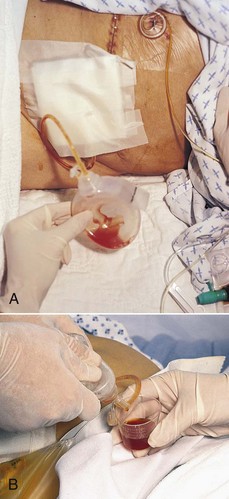
Impaired Skin Integrity
Mrs. Stein, who is 76 years of age, is 7 days postoperative for a total hip replacement. She developed redness and oozing of foul-smelling tan-colored drainage from the hip incision on postoperative day 4. Significant medical history includes arthritis and mild hypertension. Because of surgical pain at the incision site, she did not easily transfer from her bed to the chair. Now on day 7 she notes some pain at the incision and complains of a painful, burning sensation in the sacral region. She is continent of urine and stool but continues to “scoot” over to the side of the bed when preparing for bed-to-chair transfers.
| Assessment Activities | Findings/Defining Characteristics* |
| Obtain an oral temperature. | Patient has elevated temperature and is diaphoretic. |
| Ask Mrs. Stein how the surgical site limits her mobility. | She relates that her hip always aches and the pain increases on movement. |
| She tells you that she prefers to keep the hip immobile to keep the pain level down. | |
| Position of comfort is supine, and Mrs. Stein resists position changes. | |
| Perform a total body skin assessment, paying special attention to the surgical incision and sacral area. | Open areas: sacrum and left hip incision. |
| Sacral area. | Patient has reactive hyperemia around the open sacral area; this area does not blanch on palpation. |
| There is a partial-thickness ulcer directly over the sacral area. | |
| Left hip, surgical incision. | Small openings between staples oozing tan foul-smelling fluid. Periwound area red and warm. |
Impaired skin integrity related to pressure and friction on sacral bony prominence and infection of original wound
| Goals | Expected Outcomes (NOC)† |
| Tissue Integrity: Skin | |
| Injury to Mrs. Stein’s skin and underlying tissue resulting from pressure and friction on bony prominence will be reduced within 2 to 4 weeks. | Mrs. Stein will have intact skin integrity in the area of nonblanching erythema. Mrs. Stein’s sacral ulcer will show signs of healing. Mrs. Stein will maintain intact skin over other pressure points. |
| Red area around hip wound and tan-colored drainage will be absent within 5 days. | Left hip wound demonstrates signs of healing. |
| Immobility Consequences: Physiological | |
| Mrs. Stein’s ability to tolerate position changes and correctly change positions will improve within 2 to 4 weeks. | Reactive hyperemia will be within normal limits at all pressure points. |
| Reactive hyperemia in sacral region will have a decrease in nonblanchable pressure areas. |
†Outcome classification labels from Moorhead S et al: Nursing outcomes classification (NOC), ed 4, St Louis, 2008, Mosby.
| Interventions (NIC)‡ | Rationale |
| Pressure Management | |
| Reposition Mrs. Stein every 90 minutes. Offer pain medication as needed. When Mrs. Stein transfers from bed to chair, remind her not to slide over sheets but to pick up pelvis and relocate from one position to another. Be careful not to slide Mrs. Stein on sheets. | Repositioning removes pressure and allows normal hyperemic response. Frequency of turning is based on initial and ongoing assessment (Bryant and Nix, 2012). Sliding patient’s skin on sheets causes friction and deteriorates involved area. |
| Elevate head of bed no more than 30 degrees. | The higher the head of the bed is elevated, the more likely it is that shearing forces are present, adding to pain and deterioration of the skin loss in the sacral area (WOCN, 2010). |
| Pressure Ulcer Care | |
| Keep skin dry and clean; avoid rubbing area. | Moisture softens skin and causes a break in skin integrity. Rubbing an area of nonblanching erythema causes further tissue damage (WOCN, 2010). |
| Use moisture barrier ointment over the ulcer at least 3 times a day to decrease friction and provide moisture to the open tissue. | An ointment covers the area, providing base of ulcer with moisture, which encourages healing. Ointment prevents sheets from rubbing on area, thus decreasing the friction. |
| Surgical Wound Care | |
| Irrigate wound with saline solution twice per day per wound care provider’s order. | Cleans wound and surrounding area of wound debris and exudate. |
| Apply dressing (i.e., gauze moistened with antibiotic solution twice a day after irrigation) according to wound care provider’s order. | Provides appropriate topical therapy to wound, placing wound in best environment for healing. |
| At frequent intervals evaluate patient’s pain level and offer pain medication as indicated by assessment. | Provides patient with pain reduction/relief, allowing for greater mobility and comfort. |
‡Intervention classification labels from Bulechek GM, Butcher HK, and Dochterman JM: Nursing interventions classification (NIC), ed 5, St Louis, 2008, Mosby.
These outcomes are reasonable if the overall goal for the patient is to heal the wound. Plan therapies according to the severity and type of wound and the presence of any complicating conditions (e.g., infection, poor nutrition, immunosuppression, and diabetes) that affect wound healing. Other goals of care for patients with wounds include the following: promoting wound hemostasis, preventing infection, promoting wound healing, maintaining skin integrity, gaining comfort, and promoting health.
Setting Priorities
You establish nursing care priorities in wound care based on the comprehensive patient assessment and goals and established outcomes. These priorities also depend on whether the patient’s condition is stable or emergent. An acute wound needs immediate intervention; whereas in the presence of a chronic, stable wound the patient’s hygiene is more important. When there is a risk for pressure ulcer development, preventive interventions such as skin care practices, elimination of shear, and positioning are high priorities. Promotion of wound healing is a major nursing priority; and the type of wound care administered depends on the type, size, and location of the wound and overall treatment goals.
Other patient factors to consider when establishing priorities include patient preferences, daily activities, and family factors. These factors are important regardless of the setting for health care. The priorities of care may not vary from outpatient, home, acute care, or restorative care settings.
Teamwork and Collaboration
With early discharge from health care settings, it is important to consider a patient’s plan for discharge. Anticipating the patient’s discharge wound care needs and related equipment and resources such as referral to a home care agency or outpatient wound care clinic helps to improve not only wound healing but also the patient’s level of independence. Patients and their families often need to continue the objectives of wound management after discharge (Box 48-9). You need to consider the ability of the caregiver and the amount of time needed to change a particular dressing when selecting a dressing for the patient to use after discharge. For example, in the home setting some caregivers choose more expensive dressing materials to reduce the frequency of dressing changes. The nurse and patient work together to establish ways of maintaining patient involvement in nursing care and promoting wound healing, whether the patient is in the hospital or home.
Implementation
Perhaps the most effective intervention for problems with skin integrity and wound care is prevention. Prompt identification of high-risk patients and their risk factors helps to prevent pressure ulcers.
Prevention of Pressure Ulcers: When a patient is immobile, the major risk to the skin is the formation of pressure ulcers. Nursing interventions focus on prevention. The first step in prevention is to assess the patient’s risk factors for pressure ulcer development (Table 48-6). Plan on reducing or eliminating the identified risk factors.
TABLE 48-6
A Quick Guide to Pressure Ulcer Prevention
| RISK FACTOR | NURSING INTERVENTIONS |
| Decreased sensory perception | Assess pressure points for signs of nonblanching reactive hyperemia. Provide pressure-redistribution surface. |
| Moisture | Assess need for incontinence management. Following each incontinent episode, clean area with no-rinse perineal cleaner and protect skin with moisture-barrier ointment. |
| Friction and shear | Reposition patient using drawsheet and lifting off surface. Provide trapeze to facilitate movement. Position patient at a 30-degree lateral turn and limit head elevation to 30 degrees. |
| Decreased activity/mobility | Establish and post individualized turning schedule. |
| Poor nutrition | Provide adequate nutritional and fluid intake; assist with intake as necessary. Consult dietitian for nutritional evaluation. |
Early identification of patients at risk and their risk factors helps you prevent pressure ulcers. Prevention minimizes the impact that risk factors or contributing factors have on pressure ulcer development. Three major areas of nursing interventions for prevention of pressure ulcers are: (1) skin care and management of incontinence; (2) mechanical loading and support devices, which include proper positioning and the use of therapeutic surfaces; and (3) education (WOCN, 2010).
Topical Skin Care and Incontinence Management: You need to perform frequent skin assessment (see Box 48-5) at a minimum on a once-a-day basis. However, high-risk patients have more frequent skin assessments such as every shift. In addition, ensure that the patient’s skin is clean and dry.
When you clean the skin, avoid soap and hot water. Use cleaners with nonionic surfactants that are gentle to the skin (WOCN, 2010). Many types of products are available for skin care, and you need to match their use to the specific needs of the patient. After you clean the skin and make sure that it is completely dry, apply moisturizer to keep the epidermis well lubricated but not oversaturated.
Make an effort to control, contain, or correct incontinence, perspiration, or wound drainage. Patients who have fecal incontinence and who are also receiving enteral tube feeding provide a management challenge. When patients have an incontinent episode, gently clean the area, dry, and apply a thick layer of moisture barrier to the exposed areas. A moisture barrier protects the skin from excessive moisture and bacteria found in the urine or stool.
It is helpful to use the expertise of an advanced practice nurse with a focus on wound care or management of incontinence while caring for at-risk patients. Methods for controlling or containing incontinence vary. You can treat urinary incontinence with behavioral techniques, medication, and surgery. Behavioral techniques help patients learn ways to control their bladder and sphincter muscles. Two examples are bladder and habit training, which is also called timed voiding.
Consider using absorbent pads and garments only after trying these measures. Although controversial, absorbent products such as absorptive underpads and garments are sometimes part of the treatment plan for an incontinent patient. Use only products that wick moisture away from the patient’s skin (WOCN, 2010).
Positioning: Positioning interventions reduce pressure and shearing force to the skin. Elevating the head of the bed to 30 degrees or less decreases the chance of pressure ulcer development from shearing forces (WOCN, 2010). Change the immobilized patient’s position according to activity level, perceptual ability, and daily routines (Brienza et al., 2008). A standard turning interval of  to 2 hours does not always prevent pressure ulcer development. Patients need repositioning on a schedule of at least every 2 hours if allowed by their overall condition. When repositioning, use positioning devices to protect bony prominences (WOCN, 2010). The WOCN guidelines (2010) recommend a 30-degree lateral position (Fig. 48-15), which should prevent positioning directly over the bony prominence. To prevent shear and friction injuries, use a transfer device to lift rather than drag the patient when changing positions (see Chapter 47).
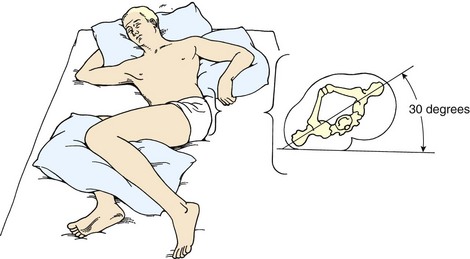
FIG. 48-15 Thirty-degree lateral position at which pressure points are avoided. (Adapted from Bryant RA, Nix DP, editors: Acute and chronic wounds: current management concepts, ed 4, St Louis, 2012, Mosby.)
Some patients are able to sit in a chair. Make sure to limit the total amount of time they sit to 2 hours or less. In the sitting position the pressure on the ischial tuberosities is greater than in the supine position. In addition, teach a mobile patient at risk for skin breakdown in a sitting position to shift weight every 15 minutes (WOCN, 2010). Shifting weight provides short-term relief on the ischial tuberosities. Also have him or her sit on foam, gel, or an air cushion to redistribute weight away from the ischial areas. Rigid and donut-shaped cushions are contraindicated because they reduce blood supply to the area, resulting in wider areas of ischemia (WOCN, 2010).
After repositioning the patient, reassess the skin. Identifying characteristics that indicate early signs of tissue ischemia in darkly pigmented skin are in Boxes 48-2 and 48-3. For patients with light-toned skin, observe for normal reactive hyperemia and blanching. Never massage the reddened areas. Massaging reddened areas increases breaks in the capillaries in the underlying tissues and the risk of injury to underlying tissue and pressure ulcer formation (WOCN, 2010).
Support Surfaces (Therapeutic Beds and Mattresses): A support surface is a specialized device for pressure redistribution designed for management of tissue loads, microclimate, and/or other therapeutic functions (i.e., mattresses, integrated bed system, mattress replacement, overlay or seat cushion, or seat cushion overlay) (EPUAP and NPUAP, 2009). A variety of support surfaces, including specialty v and mattresses, reduce the hazards of immobility to the skin and musculoskeletal system. However, none eliminates the need for meticulous nursing care. No single device eliminates the effects of pressure on the skin.
When selecting support surfaces, incorporate the patient’s needs. Knowledge about support surface characteristics (Table 48-7) assists you in clinical decision making. In selecting a support surface, know the patient’s risks and the purpose for the support surface; a flow chart is often helpful (Fig. 48-16). Teach patients and families the reason for and proper use of the beds or mattresses (Box 48-10). Some common errors with support surfaces are placing the wrong side of the support surface toward the patient, not plugging powered support surfaces into the electrical source, not turning on the power source for powered support surfaces, failing to place hand between the metal bed frame and the mattress to determine if patient sinks to the point of touching the bed frame for some support surfaces, and improperly inflating some support surfaces. When used correctly, these support services help reduce pressure ulcers in patients at risk.
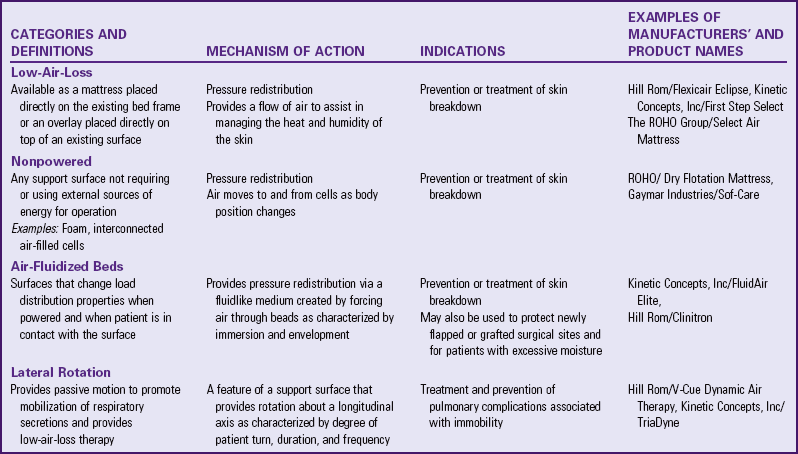
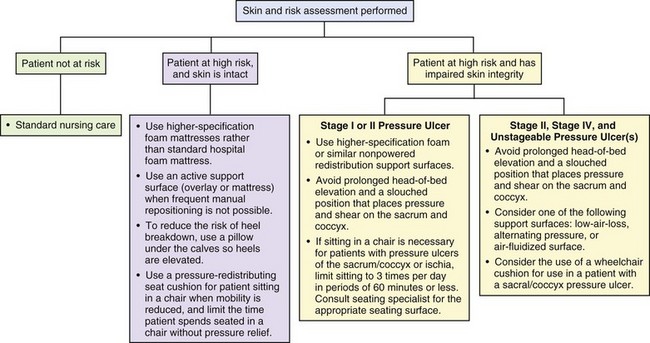
FIG. 48-16 Considerations for choosing the appropriate support surface. (Modified from WOCN: Guideline for prevention and management of pressure ulcers, 2010, Mt Laurel, NJ; and National Pressure Ulcer Advisory Panel (NPUAP) and European Pressure Ulcer Advisory Panel (EPUAP): International guideline for prevention and treatment of pressure ulcers, Washington DC, 2009, National Pressure Ulcer Advisory Panel.)
Acute Care
Management of Pressure Ulcers: Treatment of patients with pressure ulcers requires a holistic approach that uses the expertise of several multidisciplinary health care professionals (WOCN, 2010). In addition to the nurse, the health care provider, the wound care nurse specialist, physical therapist, occupational therapist, nutritionist, and pharmacist are involved. Aspects of pressure ulcer treatment include local care of the wound and supportive measures such as adequate nutrients and redistribution of pressure (Skill 48-2 on pp. 1215-1217).
When treating a pressure ulcer, reassess the wound for location, stage, size, tissue type and amount, exudate, and surrounding skin condition (Nix, 2012). Acute wounds require close monitoring (every 8 hours). Sometimes chronic wound assessment occurs less frequently. Depending on the topical management system, evaluate the wound with every dressing change, usually not more than 1 time per day.
The use and documentation of a systematic approach to monitor progress of an actual pressure ulcer leads to better decision making and optimum outcomes (Nix, 2012). Several healing and documentation tools are available to document wound assessments over time. Using a tool helps link assessment to outcomes so an evaluation of the plan of care follows objective criteria (Nix, 2012). For example, the Bates-Jensen Wound Assessment Tool (Harris et al., 2010) addresses 15 wound characteristics. You score individual items and calculate the sum total, providing an overall indication of wound status. The scoring assists in evaluating whether the goals of the wound management are effective.
Wound Management: Maintenance of a physiological local wound environment is the goal of effective wound management (Rolstad, Bryant, and Nix, 2012). To maintain a healthy wound environment, you need to address the following principles: prevent and manage infection, clean the wound, remove nonviable tissue, manage exudate, maintain the wound in a moist environment, and protect the wound.
A wound does not move through the phases of healing if it is infected. Preventing wound infection includes cleaning and removing nonviable tissue. Clean pressure ulcers only with noncytotoxic wound cleaners such as normal saline or commercial wound cleaners. Noncytotoxic cleaners do not damage or kill fibroblasts and healing tissue (Rolstad, Bryant, and Nix, 2012). Some commonly used cytotoxic solutions are Dakin’s solution (sodium hypochlorite solution), acetic acid, povidone-iodine, and hydrogen peroxide. These are not used in clean, granulating wounds.
Irrigation is a common method of delivering a wound-cleaning solution to the wound. Studies have shown that there is an optimal effective range of irrigation pressures that ensures adequate removal of bacteria (Gardner and Frantz, 2008). One method to ensure an irrigation pressure within the correct range is to use a 19-gauge needle or an angiocatheter and a 35-mL syringe that delivers saline to a pressure ulcer at 8 psi (Fig. 48-17).

Debridement is the removal of nonviable, necrotic tissue. Removal of necrotic tissue is necessary to rid the wound of a source of infection, enable visualization of the wound bed, and provide a clean base necessary for healing.
The method of debridement depends on which is most appropriate to the patient’s condition and care goals (WOCN, 2010). It is important to remember that during the debridement process some normal wound observations to make include an increase in wound exudate, odor, and size. You need to assess and prevent or effectively manage pain that occurs with debridement (WOCN, 2010).
Methods of debridement include mechanical, autolytic, chemical, and sharp/surgical. One method of mechanical debridement is the use of wet-to-dry saline gauze dressings. Place moistened gauze into the wound and allow the dressing to dry thoroughly before “pulling” the gauze that has adhered to the tissue out of the pressure ulcer. This is a nonselective method of debridement because devitalized and viable tissues are both removed; thus it is not used routinely. Never use this method in a clean, granulating wound. Other methods of mechanical debridement are wound irrigation (high-pressure irrigation and pulsatile high-pressure lavage) and whirlpool treatments (Ramundo, 2012).
Autolytic debridement uses synthetic dressings over a wound to allow the eschar to be self-digested by the action of enzymes that are present in wound fluids. You accomplish this by using dressings that support moisture at the wound surface. If the wound base is dry, use a dressing that adds moisture; if there is excessive exudate, use a dressing that absorbs the excessive moisture while maintaining moisture at the wound bed. Some examples of these dressings are transparent film and hydrocolloid dressings.
You can accomplish chemical debridement with the use of a topical enzyme preparation, Dakin’s solution, or sterile maggots. Topical enzymes induce changes in the substrate resulting in the breakdown of necrotic tissue (Ramundo, 2012). Depending on the type of enzyme used, the preparation either digests or dissolves the tissue. These preparations require a health care provider’s order. Dakin’s solution breaks down and loosens dead tissue in a wound. Apply the solution to gauze and apply to the wound. Sterile maggots are used in a wound because it is thought that they ingest the dead tissue.
Surgical debridement is the removal of devitalized tissue by using a scalpel, scissors, or other sharp instrument. Health care providers and in some states trained advanced practice nurses perform surgical debridement of an ulcer or wound. Nurses should check the Nurse Practice Act for their state to see if surgical debridement is a nursing function. It is the quickest method of debridement. It is usually indicated when the patient has signs of cellulitis or sepsis.
A moist environment supports the movement of epithelial cells and facilitates wound closure. A wound that has excessive exudate (drainage) provides an environment that supports bacterial growth, macerates the periwound skin, and slows the healing process. If excessive wound exudate is present, evaluate the volume, consistency, and odor of the drainage to determine if signs and symptoms of infection are present.
Remember, the wound will not heal unless the contributory factors are controlled or eliminated. Therefore it is critically important for you to address the causative factors (e.g., shear, friction, pressure, and moisture), or it is unlikely that the wound will heal despite topical therapy (Rolstad, Bryant, and Nix, 2012).
The treatment plan needs to be altered as a wound heals. For example, a transparent film dressing is used initially to autolytically debride (liquefy the tissue using body moisture) a necrotic wound. Once the wound is cleaned of necrotic tissue, discontinue the transparent film dressing; and, based on the wound base characteristics, choose a new dressing. A wound with excessive drainage requires a dressing with a high absorptive capacity. Continued reassessment is key to supporting the wound as it moves through the phases of wound healing.
Education: Education of the patient and caregivers is an important nursing function (Rolstad, Bryant, and Nix, 2012). A variety of educational tools, including videotapes and written materials, are available for you to use when teaching patients and caregivers/family to prevent and treat pressure ulcers and care for wounds. The Agency for Health Care Policy and Research (AHCPR, 1992a, 1994) has booklets on pressure ulcer prevention and treatment that are helpful when teaching patients and their caregivers/family. They are available in English and Spanish. Individualize your teaching for each patient, especially older patients.
Understanding and assessing the experience of the patient and support person are also important dimensions in the treatment of people with pressure ulcers (WOCN, 2010). Clinicians are only just now exploring through research the caregiver’s perspective of the concerns and issues faced by frail older spouses caring for their loved ones with pressure ulcers. You need to plan interventions to meet the identified psychosocial needs of patients and their support persons (WOCN, 2010).
Nutritional Status: Nutritional assessment and support of the patient with a wound is based on the appreciation that nutrition is fundamental to normal cellular integrity and tissue repair (Stotts, 2012a). Early intervention is necessary to correct inadequate nutrition and support healing. The Joint Commission (2008) recommends nutritional assessment within 24 hours of admission. Reassessments reflect changes in status and effects of interventions (Stotts, 2012a). Box 48-11 defines parameters for clinically significant malnutrition (AHCPR, 1994). Assess the patient’s mouth and skin for signs of nutritional deficiencies (see Chapter 44). Give vitamin and mineral supplements if you suspect or know of any deficiencies.
Protein Status: Patients with pressure ulcers who are underweight or losing weight need enhanced caloric and protein supplementation (WOCN, 2010). A patient can lose as much as 50 g of protein per day from an open, weeping pressure ulcer. Although the recommended intake of protein for adults is 0.8 g/kg/day, a higher intake of protein up to 1.8 g/kg/day is necessary for healing. Increased protein intake helps rebuild epidermal tissue. Increased caloric intake helps replace subcutaneous tissue. Vitamin C promotes collagen synthesis, capillary wall integrity, fibroblast function, and immunological function.
First Aid for Wounds: In an emergency setting use first aid measures for wound care. Under stable conditions a variety of interventions ensure wound healing. When a patient suffers a traumatic wound, first aid interventions include stabilizing cardiopulmonary function (see Chapter 40), promoting hemostasis, cleaning the wound, and protecting it from further injury.
Hemostasis: After assessing the type and extent of the wound, control bleeding by applying direct pressure on it with a sterile or clean dressing such as a washcloth. After bleeding subsides, an adhesive bandage or gauze dressing taped over the laceration allows skin edges to close and a blood clot to form. If a dressing becomes saturated with blood, add another layer of dressing, continue to apply pressure, and elevate the affected part. Avoid further disruption of skin layers. Serious lacerations need to be sutured by a health care provider. Pressure dressings used during the first 24 to 48 hours after trauma help maintain hemostasis.
Normally allow a puncture wound to bleed to remove dirt and other contaminants such as saliva from a dog bite. When a penetrating object such as a knife blade is present, do not remove the object. The presence of the object provides pressure and controls some bleeding. Removal causes massive, uncontrolled bleeding. Except for skull injuries, apply pressure around the penetrating object but not on it and transport the patient to an emergency facility.
Cleaning: The process of cleaning a wound involves selecting an appropriate cleaning solution and using a mechanical means of delivering that solution without causing injury to the healing wound tissue (WOCN, 2010). Gently cleaning a wound removes contaminants that serve as sources of infection. However, vigorous cleaning using a method with too much mechanical force causes bleeding or further injury. For abrasions, minor lacerations, and small puncture wounds, first rinse the wound with normal saline and lightly cover the area with a dressing. When a laceration is bleeding profusely, only brush away surface contaminants and concentrate on hemostasis until the patient can be cared for in a clinic or hospital.
According to the WOCN guidelines (2010), normal saline is the preferred cleaning agent. It is physiologically neutral and does not harm tissue. Gentle cleaning with normal saline and the application of moist saline dressings are often used in healing wounds. Use saline to maintain the moist surface needed to promote the development and migration of epithelial tissue. Wet-to-dry saline dressings are only for debriding wounds. Never use them in a clean, granulating wound.
Dressings: The more extensive the wound, the larger the dressing required. In the home a clean towel or diaper is often the best secondary dressing. A bulky dressing applied with pressure minimizes movement of underlying tissues and helps immobilize the entire body part. A bandage or cloth wrapped around a penetrating object should immobilize it adequately.
Alternative dressings are available to cover and protect certain types of wounds such as large wounds, wounds with drainage tubes or suction catheters in the wound, and wounds that need frequent changing because of excessive drainage. Pouches or special wound collection systems cover these wounds and collect their drainage. Some of these devices have a plastic door on the front of the wound pouch, allowing you to change the packing without removing the pouch from the skin.
The use of dressings requires an understanding of wound healing. A variety of dressing materials are commercially available. The correct dressing selection facilitates wound healing (Rolstad, Bryant, and Nix, 2012). The dressing type depends on the assessment of the wound and the phase of wound healing. When you identify the objectives for the wound care, the dressing choice becomes clear. A wound that requires infection management requires a different set of dressings than one requiring the removal of nonviable tissue.
For surgical wounds that heal by primary intention, it is common to remove dressings as soon as drainage stops. In contrast, when dressing a wound healing by secondary intention, the dressing material becomes a means for providing moisture to the wound or assisting in debridement.
Purposes of Dressings: A dressing serves several purposes:
• Protects a wound from microorganism contamination
• Promotes healing by absorbing drainage and debriding a wound
• Supports or splints the wound site
• Protects patients from seeing the wound (if perceived as unpleasant)
When the skin is broken, a dressing helps reduce exposure to microorganisms. However, when drainage is minimal, the healing process forms a natural fibrin seal that eliminates the need for a dressing. Wounds with extensive tissue loss always need a dressing.
Pressure dressings promote hemostasis. Applied with elastic bandages, a pressure dressing exerts localized downward pressure over an actual or potential bleeding site. A pressure dressing eliminates dead space in underlying tissues so wound healing progresses normally. Check pressure dressings to be sure that they do not interfere with circulation to a body part. Assess skin color, pulses in distal extremities, the patient’s comfort, and changes in sensation. Pressure dressings are not removed routinely.
A primary function of a dressing on a healing wound is to absorb drainage. Most surgical gauze dressings have three layers: a contact or primary layer, an absorbent layer, and an outer protective or secondary layer. The contact dressing covers the incision and part of the adjacent skin. Fibrin, blood products, and debris adhere to its surface. A problem occurs if the wound drainage dries, causing the dressing to stick to the suture line. Improperly removing the dressing causes disruption of the healing epidermal surface. If the dressing is sticking to the surgical incision, lightly moisten it with saline solution. This causes the dressing to become saturated, loosening it from the incisional area and preventing trauma to the incisional area during removal.
The dressing technique varies, depending on the goal of the treatment plan for the wound. For example, if the goal is to maintain a moist environment for a clean granulating wound, it is important to not let the saline-moistened gauze dressing dry and stick to it. This is in direct contrast to the dressing technique that you use if the goal of care is to mechanically debride the wound using a saline wet-to-dry dressing. When wounds such as a necrotic wound require debriding, use a wet-to-dry dressing technique. Place the moist dressing (contact dressing) into the wound and allow it to dry. The contact dressing debrides necrotic tissue and debris. In this case the contact dressing is allowed to dry so it sticks to underlying tissue, and debridement occurs during removal.
Dressings applied to a draining wound require frequent changing to prevent microorganism growth and skin breakdown. Bacteria grow readily in the dark, warm, moist environment under a dressing. Skin surfaces become macerated and irritated. Minimize periwound skin breakdown by keeping the skin clean and dry and reducing the use of tape.
The absorbent dressing layer serves as a reservoir for additional secretions. The wicking action of woven gauze dressings pulls excess drainage into the dressing and away from the wound. The final outer layer of a dressing helps prevent bacteria and other external contaminants from reaching the wound surface. Usually the outer dressing is made of a thicker dressing material. Apply adhesives to this layer to secure the dressings.
A dressing needs to support a moist wound environment if the wound is healing by secondary intention. A moist wound base facilitates the movement of epithelialization, thus allowing the wound to resurface as quickly as possible.
Types of Dressings: Dressings vary by type of material and mode of application (wet or dry) (Skill 48-3 on pp. 1218-1221). They need to be easy to apply, comfortable, and made of materials that promote wound healing. The WOCN guidelines (2010) are helpful when selecting dressings based on the goal of wound treatment (Box 48-12). To avoid causing damage to the periwound skin, it is important that the dressing technique that you use to treat pressure ulcers and other wounds is not excessively moist (Box 48-13).
Most pressure ulcers require dressings. The type of dressing is usually based on the stage of the pressure ulcer, the type of tissue in the wound, and the function of the dressing (Table 48-8). Before placing a dressing on a pressure ulcer, it is important to know the stage of the pressure ulcer; have done a thorough assessment of it; and understand the goal of the treatment, the mechanism of action of the dressing, and principles of wound care.
TABLE 48-8
Dressings by Pressure Ulcer Stage
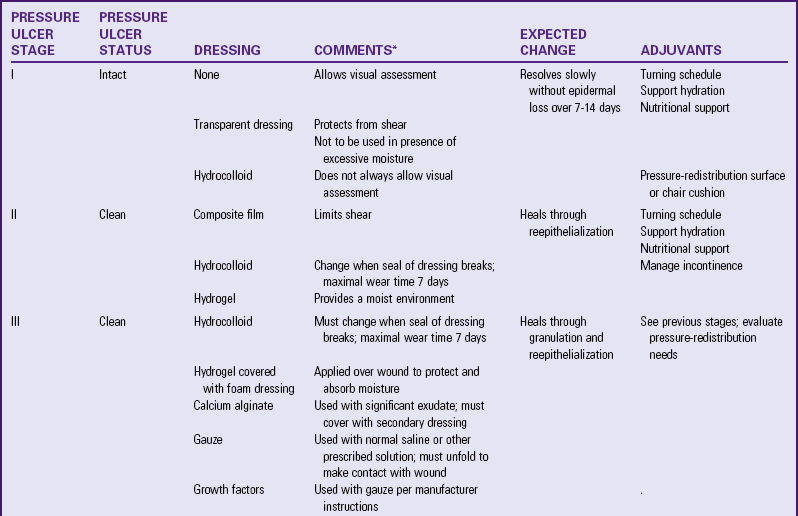
*As with all occlusive dressings, wound should not be clinically infected.
Gauze sponges are the oldest and most common dressing. They are absorbent and are especially useful in wounds to wick away the wound exudate. Gauze is available in different textures and various lengths and sizes; the 4 × 4 is the most common size. Gauze can be saturated with solutions and used to clean and pack a wound. When used to pack a wound, the gauze is saturated with the solution (usually normal saline), wrung out, unfolded, and lightly packed into the wound. The purpose of this type of dressing is to provide moisture to the wound yet to allow wound drainage to be wicked into the gauze pad. Unfolding the dressing allows easier wicking action.
Use nonadherent gauze dressings such as Telfa over clean wounds with little or no drainage. Telfa gauze has a shiny, nonadherent surface that does not stick to incisions or wound openings but allows drainage to pass through to the gauze topper.
Another type of dressing is a self-adhesive, transparent film. This type of dressing traps moisture over the wound, providing a moist environment (Fig. 48-18). The transparent film dressing is ideal for small superficial wounds such as partial-thickness wounds or to protect high-risk skin. Use a film dressing as a secondary dressing and for autolytic debridement of small wounds. It has the following advantages:
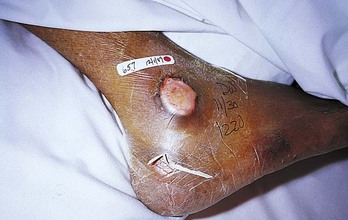
• Serves as a barrier to external fluids and bacteria but still allows the wound surface to “breathe” because oxygen passes through the transparent dressing
• Promotes a moist environment that speeds epithelial cell growth
Hydrocolloid dressings are dressings with complex formulations of colloids, elastomeric, and adhesive components. They are adhesive and occlusive. The wound contact layer of this dressing forms a gel as fluid is absorbed and maintains a moist healing environment. Hydrocolloids support healing in clean granulating wounds and autolytically debride necrotic wounds; they are available in a variety of sizes and shapes. This type of dressing has the following functions:
• Absorbs drainage through the use of exudate absorbers in the dressing
• Slowly liquefies necrotic debris
• Is impermeable to bacteria and other contaminants
• Is self-adhesive and molds well
• Acts as a preventive dressing for high-risk friction areas
• May be left in place for 3 to 5 days, minimizing skin trauma and disruption of healing
This type of dressing is most useful on shallow to moderately deep dermal ulcers. Hydrocolloid dressings cannot absorb the amount of drainage from heavily draining wounds, and some are contraindicated for use in full-thickness and infected wounds. Some hydrocolloids leave a residue in the wound bed that is easy to confuse with purulent drainage.
Hydrogel dressings are gauze or sheet dressings impregnated with water- or glycerin-based amorphous gel. This type of dressing hydrates wounds and absorbs some smaller amounts of exudate. Hydrogel dressings are for partial-thickness and full-thickness wounds, deep wounds with some exudate, necrotic wounds, burns, and radiation-damaged skin. They are very useful in painful wounds because they are very soothing to the patient and do not adhere to the wound bed and thus cause little trauma during removal. A disadvantage is that some hydrogels require a secondary dressing and you must take care to prevent periwound maceration. Hydrogels come in a sheet dressing or a tube; thus you are able to squirt the gel directly into the wound base.
Hydrogel has the following advantages:
• Is soothing and can reduce wound pain
• Provides a moist environment
• Debrides necrotic tissue (by softening the necrotic tissue)
Many other types of dressings are available. Foam and alginate dressings are for wounds with large amounts of exudate and those that need packing. Foam dressings are also used around drainage tubes to absorb drainage. Calcium alginate dressings are manufactured from seaweed and come in sheet and rope form. The alginate forms a soft gel when it comes in contact with wound fluid. These highly absorbent dressings are for wounds with an excessive amount of drainage and do not cause trauma when removed from the wound. Do not use these in dry wounds, and they require a secondary dressing. Several manufacturers produce composite dressings, which combine two different dressing types into one dressing. Research is ongoing regarding which type of dressing is best for which type of wound.
Changing Dressings: To prepare for changing a dressing, you need to know the type of dressing, the presence of underlying drains or tubing, and the type of supplies needed for wound care. Poor preparation causes a break in aseptic technique (see Chapter 28) or accidental dislodging of a drain. Your judgment in modifying a dressing change procedure is important during wound care, particularly if the character of a wound changes. Notifying the health care provider of any change is essential.
Sometimes (e.g., with chronic nonsurgical wounds) the nurse uses a clean technique for a dressing change. The clean technique refers to the fact that the nurse maintains medical versus sterile asepsis (Chapter 28). He or she wears clean gloves, but the dressing materials are in sterile packages and are carefully placed over the wound. Deep wounds that require irrigation are usually irrigated with a sterile solution. A complete patient and wound history is essential in determining when a clean dressing technique is appropriate. For example, chronic pressure ulcer wounds use a clean technique. On the other hand, a fresh surgical wound requires sterile technique so as not to introduce microorganisms into a healing wound.
The health care provider’s order for changing a dressing indicates the dressing type, the frequency of changing, and any solutions or ointments to be applied to the wound. An order to “reinforce dressing prn” (add dressings without removing the original one) is common right after surgery, when the health care provider does not want accidental disruption of the suture line or bleeding. The medical or operating room record usually indicates whether drains are present and from what body cavity they drain. After the first dressing change, describe the location of drains and the type of dressing materials and solutions to use in the patient’s care plan. Follow these guidelines during a dressing change procedure:
• Assessing the skin beneath the tape
• Performing thorough hand hygiene before and after wound care
• Wearing sterile gloves before directly touching an open or fresh wound (see Chapter 28)
• Removing or changing dressings over closed wounds when they become wet or if the patient has signs or symptoms of infection and as ordered
To prepare a patient for a dressing change, do the following:
• Evaluate patient’s pain and, if indicated, administer required analgesics so peak effects occur during the dressing change
• Describe steps of the procedure to lessen patient anxiety
• Gather all supplies required for the dressing change
Often it is necessary to teach patients how to change dressings in preparation for home care. In this situation, demonstrate dressing changes to the patient and family and then provide an opportunity for them to practice. Usually wound healing has progressed to the point that risks of complications such as dehiscence or evisceration are minimal. The patient needs to be able to change a dressing independently or with assistance from a family member before discharge. Contaminated dressings in the home should be disposed of in a manner consistent with local regulations. Skill 48-3 outlines the steps for changing dry and moist dressings.
Packing a Wound: The first step in packing a wound is to assess its size, depth, and shape. These characteristics are important in determining the size and type of dressing used to pack a wound. The dressing needs to be flexible and in contact with the entire wound surface. Make sure that the type of material used to pack the wound is appropriate. Many new dressing materials such as alginates are also used for packing. If gauze is the appropriate dressing material, saturate it with the ordered solution, wring out, unfold, and lightly pack into the wound. The entire wound surface needs to be in contact with part of the moist gauze dressing (see Skill 48-3).
It is important to remember not to pack the wound too tightly. Overpacking causes pressure on the tissue in the wound bed. Pack the wound only until the packing material reaches the surface of the wound; there should never be so much packing material that it extends higher than the wound surface. Packing that overlaps onto the wound edges causes maceration of the tissue surrounding the wound.
A treatment modality for wounds is negative-pressure wound therapy (NPWT) or vacuum-assisted closure (one brand name is V.A.C.). NPWT is the application of subatmospheric (negative) pressure of a wound through suction to facilitate healing and collect wound fluid (Netsch, 2012). The vacuum-assisted closure (V.A.C.) (Fig. 48-19) is a device that assists in wound closure by applying localized negative pressure to draw the edges of a wound together (Fig. 48-20, A and B). NPWT supports wound healing by edema reduction and fluid removal, macro deformation and wound contraction, and micro deformation and mechanical stretch perfusion. Secondary effects include angiogenesis, granulation tissue formation, and reduction in bacterial bioburden (Netsch, 2012) (Fig. 48-21). There have been modifications to the V.A.C. The V.A.C. Instill allows intermittent instillation of fluids into the wound, especially those wounds not responding to traditional NPWT (Jerome, 2007).

FIG. 48-19 V.A.C. unit. V.A.C., Vacuum-assisted closure. (Courtesy Kinetic Concepts, Inc [KCI], San Antonio, Tex.)
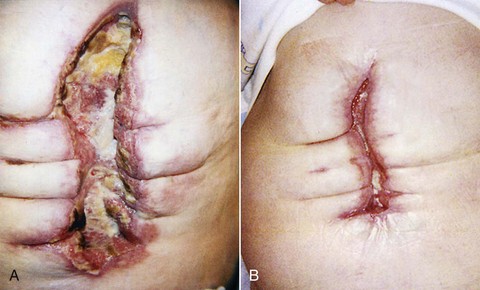
FIG. 48-20 A, Dehisced wound before wound V.A.C. therapy. B, Dehisced wound after wound V.A.C. therapy. V.A.C., Vacuum-assisted closure. (Courtesy Kinetic Concepts, Inc [KCI], San Antonio, Tex.)
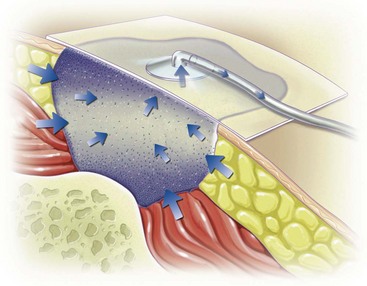
FIG. 48-21 V.A.C. system using negative pressure to remove fluid from area surrounding wound, reducing edema and improving circulation to area. V.A.C., Vacuum-assisted closure. (Courtesy Kinetic Concepts, Inc [KCI], San Antonio, Tex.)
NPWT is used for treating acute and chronic wounds (Skill 48-4 on pp. 1221-1224). The schedule for changing NPWT dressings varies, depending on the type of wound and amount of drainage. Wear time for the dressing is anywhere from 24 hours to 5 days. As the wound heals, granulation tissue lines its surface. The wound has a stippled or granulated appearance. The surface area sometimes increases or decreases, depending on wound location and the amount of drainage removed by the NPWT system. NPWT is also used to enhance the take of split-thickness skin grafts. It is placed over the graft intraoperatively, decreasing the ability of the graft to shift and evacuating fluids that build up under it (Netsch, 2012; Xie et al., 2010). An airtight seal must be maintained (Box 48-14).
Securing Dressings: Use tape, ties, or a secondary dressing and cloth binders to secure a dressing over a wound site. The choice of anchoring depends on the wound size and location, the presence of drainage, the frequency of dressing changes, and the patient’s level of activity.
Most often strips of tape are used to secure dressings if the patient is not allergic to it. Nonallergenic paper and plastic tapes minimize skin reactions. Common adhesive tape adheres well to the surface of the skin, whereas elastic adhesive tape compresses closely around pressure bandages and permits more movement of a body part. Skin sensitive to adhesive tape becomes severely inflamed and denuded and in some cases even sloughs when the tape is removed. It is important to assess skin under tape at each dressing change.
Tape is available in various widths such as 1.3, 2.5, 5 and 7.5 cm ( , 1, 2, and 3 inches). Choose the size that sufficiently secures the dressing. For example, a large abdominal wound dressing needs to remain secure over a large area despite frequent stress from movement, respiratory effort, and possibly abdominal distention. Strips of 7.5-cm (3-inch) adhesive better stabilize such a large dressing so it does not continually slip off. When applying tape, ensure that it adheres to several inches of skin on both sides of the dressing and that it is placed across the middle of the dressing. When securing the dressing, press the tape gently, making sure to exert pressure away from the wound. This way, tension occurs in both directions away from the wound, minimizing skin distortion and irritation. Never apply tape over irritated or broken skin. Protect irritated skin by using a solid skin barrier and applying the tape over the barrier.
To remove tape safely, loosen the ends and gently pull the outer end parallel with the skin surface toward the wound. Apply light traction to the skin away from the wound as the tape is loosened and removed. The traction minimizes pulling of the skin. Adhesive remover also loosens the tape from the skin. If tape covers an area of hair growth, the patient experiences less discomfort if you pull it in the direction of the hair growth.
To avoid repeated removal of tape from sensitive skin, secure dressings with pairs of reusable Montgomery ties (Fig. 48-22). Each section consists of a long strip; half contains an adhesive backing to apply to the skin, and the other half folds back and contains a cloth tie or a safety pin/rubber band combination that you fasten across a dressing and untie at dressing changes. A large, bulky dressing often requires two or more sets of Montgomery ties. Another method to protect the surrounding skin on wounds that need frequent dressing changes is to place strips of hydrocolloid dressings on either side of the wound edges, cover the wound with a dressing, and apply the tape to the dressing. To provide even support to a wound and immobilize a body part, apply elastic gauze or cloth bandages and binders over a dressing.
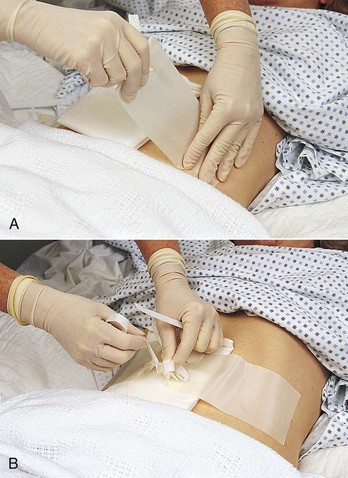
Comfort Measures: A wound is often painful, depending on the extent of tissue injury. Use several techniques to minimize discomfort during wound care. Carefully removing tape, gently cleaning wound edges, and carefully manipulating dressings and drains minimize stress on sensitive tissues. Careful turning and positioning also reduce strain on a wound. Administering analgesic medications 30 to 60 minutes before dressing changes (depending on the time of peak action of a drug) also reduces discomfort.
Cleaning Skin and Drain Sites: Although a moderate amount of wound exudate promotes epithelial cell growth, some health care providers order cleaning a wound or drain site if a dressing does not absorb drainage properly or if an open drain deposits drainage onto the skin. Wound cleaning requires good hand hygiene and aseptic techniques (see Chapter 28). You sometimes use irrigation to remove debris from a wound.
Basic Skin Cleaning: Clean surgical or traumatic wounds by applying noncytotoxic solutions with sterile gauze or by irrigation. The following three principles are important when cleaning an incision or the area surrounding a drain:
1. Clean in a direction from the least contaminated area such as from the wound or incision to the surrounding skin (Fig. 48-23) or from an isolated drain site to the surrounding skin (Fig. 48-24).
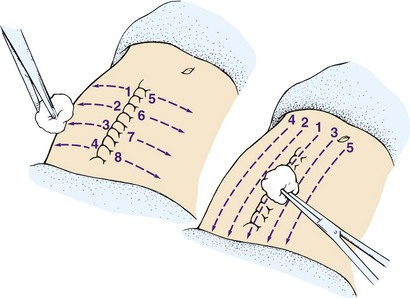

2. Use gentle friction when applying solutions locally to the skin.
3. When irrigating, allow the solution to flow from the least to most contaminated area (see Skill 48-5).
After applying a solution to sterile gauze, clean away from the wound. Never use the same piece of gauze to clean across an incision or wound twice.
Drain sites are a source of contamination because moist drainage harbors microorganisms. If a wound has a dry incisional area and a moist drain site, cleaning moves from the incisional area toward the drain. Use two separate swabs or gauze pads, one to clean from the top of the incision toward the drain and one to clean from the bottom of the incision toward the drain. To clean the area of an isolated drain site, clean around the drain, moving in circular rotations outward from a point closest to the drain. In this situation the skin near the site is more contaminated than the site itself. To clean circular wounds, use the same technique as in cleaning around a drain.
Irrigation: Irrigation is a special way of cleaning wounds. Use an irrigating syringe to flush the area with a constant low-pressure flow of solution. The gentle washing action of the irrigation cleans a wound of exudate and debris. Irrigation is particularly useful for open, deep wounds; wounds involving an inaccessible body part such as the ear canal; or when cleaning sensitive body parts such as the conjunctival lining of the eye.
Wound Irrigations: Irrigation of an open wound requires sterile technique. Use a 35-mL syringe with a 19-gauge needle (Rolstad, Bryant, and Nix, 2012) to deliver the solution. This irrigation system has a safe pressure and does not damage healing wound tissue. It is important to never occlude a wound opening with a syringe because this results in the introduction of irrigating fluid into a closed space. The pressure of the fluid causes tissue damage and discomfort. Always irrigate a wound with the syringe tip over but not in the drainage site. Make sure that fluid flows directly into the wound and not over a contaminated area before entering the wound. Skill 48-5 on pp. 1224-1226 lists steps for wound irrigation.
Suture Care: A surgeon closes a wound by bringing the wound edges as close together as possible to reduce scar formation. Proper wound closure involves minimal trauma and tension to tissues with control of bleeding.
Sutures are threads or metal used to sew body tissues together (Fig. 48-25). The patient’s history of wound healing, the site of surgery, the tissues involved, and the purpose of the sutures determine the suture material used. For example, if the patient has had repeated surgery for an abdominal hernia, the health care provider can choose wire sutures to provide greater strength for wound closure. In contrast, a small laceration of the face calls for the use of very fine Dacron (polyester) sutures to minimize scar formation.
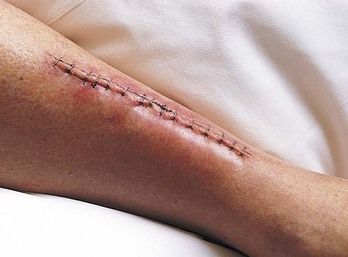
Sutures are available in a variety of materials, including silk, steel, cotton, linen, wire, nylon, and Dacron. They come with or without sharp surgical needles attached. Steel staples are a common type of outer skin closure that causes less trauma to tissues than sutures while providing extra strength.
Sutures are placed within tissue layers in deep wounds and superficially as the final means for wound closure. Deep sutures are usually composed of an absorbable material that disappears over time. Sutures are foreign bodies and thus are capable of causing local inflammation. The surgeon tries to minimize tissue injury by using the finest suture possible and the smallest number necessary.
Policies vary within institutions as to who is able to remove sutures. If it is appropriate that the nurse remove them, a health care provider’s order is required. An order for suture removal is not written until the health care provider believes that the wound has closed (usually in 7 days). Special scissors with curved cutting tips or special staple removers slide under the skin closures for suture removal (Fig. 48-26). The health care provider usually specifies the number of sutures or staples to remove. If the suture line appears to be healing in certain locations better than in others, some health care providers choose to have only some sutures removed (e.g., every other one).
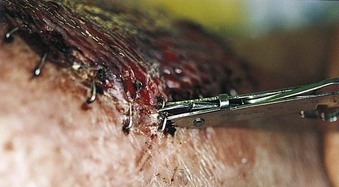
To remove staples, insert the tips of the staple remover under each wire staple. While slowly closing the ends of the staple remover together, squeeze the center of the staple with the tips, freeing it from the skin (see Fig. 48-26).
To remove sutures, first check the type of suturing used (Fig. 48-27). With intermittent suturing the surgeon ties each individual suture made in the skin. Continuous suturing, as the name implies, is a series of sutures with only two knots, one at the beginning and one at the end of the suture line. Retention sutures are placed more deeply than skin sutures, and nurses may or may not remove them, depending on agency policy. The manner in which the suture crosses and penetrates the skin determines the method for removal. Never pull the visible portion of a suture through underlying tissue. Sutures on the surface of the skin harbor microorganisms and debris. The portion of the suture beneath the skin is sterile. Pulling the contaminated portion of the suture through tissues can lead to infection. Clip suture materials as close to the skin edge on one side as possible and pull the suture through from the other side (Fig. 48-28).
Drainage Evacuation: When drainage interferes with healing, evacuation is achieved by using either a drain alone or a drainage tube with continuous suction. You may apply special skin barriers, including hydrocolloid dressings similar to those used with ostomies (see Chapter 46), around drain sites. The skin barriers are soft material applied to the skin with adhesive. Drainage flows on the barrier but not directly on the skin. Drainage evacuators (Fig. 48-29) are convenient portable units that connect to tubular drains lying within a wound bed and exert a safe, constant, low-pressure vacuum to remove and collect drainage. Ensure that suction is exerted and that connection points between the evacuator and tubing are intact. The evacuator collects drainage. Assess for volume and character every shift and as needed. When the evacuator fills, measure output by emptying the contents into a graduated cylinder and immediately reset the evacuator to apply suction.
Bandages and Binders: A simple gauze dressing is often not enough to immobilize or provide support to a wound. Binders and bandages applied over or around dressings provide extra protection and therapeutic benefits by the following:
1. Creating pressure over a body part (e.g., an elastic pressure bandage applied over an arterial puncture site)
2. Immobilizing a body part (e.g., an elastic bandage applied around a sprained ankle)
3. Supporting a wound (e.g., an abdominal binder applied over a large abdominal incision and dressing)
4. Reducing or preventing edema (e.g., a pressure bandage applied to the lower leg)
5. Securing a splint (e.g., a bandage applied around hand splints for correction of deformities)
6. Securing dressings (e.g., elastic webbing applied around leg dressings after a vein stripping)
Bandages are available in rolls of various widths and materials, including gauze, elasticized knit, elastic webbing, flannel, and muslin. Gauze bandages are lightweight and inexpensive, mold easily around contours of the body, and permit air circulation to prevent skin maceration. Elastic bandages conform well to body parts but are also for exerting pressure.
Binders are bandages that are made of large pieces of material to fit a specific body part. Most binders are made of elastic or cotton. An abdominal binder and a breast binder are examples.
Principles for Applying Bandages and Binders: Correctly applied bandages and binders do not cause injury to underlying and nearby body parts or create discomfort for the patient. For example, a chest binder should not be so tight as to restrict chest wall expansion. Before applying a bandage or binder, the nurse’s responsibilities include the following:
• Inspecting the skin for abrasions, edema, discoloration, or exposed wound edges
• Covering exposed wounds or open abrasions with a sterile dressing
• Assessing the condition of underlying dressings and changing if soiled
• Assessing the skin of underlying areas that will be distal to the bandage for signs of circulatory impairment (coolness, pallor or cyanosis, diminished or absent pulses, swelling, numbness, and tingling) to provide a means for comparing changes in circulation after bandage application
After applying a bandage, the nurse assesses, documents, and immediately reports changes in circulation, skin integrity, comfort level, and body function (e.g., ventilation or movement). The nurse who applies a bandage loosens or readjusts it as necessary. He or she needs a health care provider’s order before loosening or removing a bandage applied by a health care provider. The nurse explains to the patient that any bandage or binder feels relatively firm or tight. Carefully assess a bandage to be sure that it is applied properly and providing therapeutic benefit and replace any soiled bandages.
Binder Application: Binders are especially designed for the body part to be supported. The most common type of binder is the abdominal binder (Skill 48-6 on pp. 1226-1228). Well-fitting bras are now replacing breast binders. Both provide support after breast surgery or exert pressure to reduce lactation in a woman after childbirth.
Abdominal Binders: An abdominal binder supports large abdominal incisions that are vulnerable to tension or stress as the patient moves or coughs (Fig. 48-30). Secure an abdominal binder with safety pins, Velcro strips, or metal stays.
Slings: Slings support arms with muscular sprains or fractures. A commercially manufactured sling consists of a long sleeve that extends above the elbow with a strap that fits around the neck. In the home patients can use a large triangular piece of cloth. The patient sits or lies supine during sling application (Fig. 48-31). Instruct him or her to bend the affected arm, bringing the forearm straight across the chest. The open sling fits under the patient’s arm and over the chest, with the base of the triangle under the wrist and the point of the triangle at his or her elbow. One end of the sling fits around the back of the patient’s neck. Bring the other end up and over the affected arm while supporting the extremity. Tie the two ends at the side of the neck so the knot does not press against the cervical spine. Fold the loose material at the elbow evenly around the elbow and pin. Always support the lower arm and hand at a level above the elbow to prevent the formation of dependent edema.
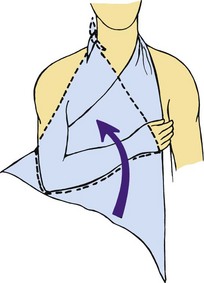
Bandage Application: Rolls of bandage secure or support dressings over irregularly shaped body parts. Each roll has a free outer end and a terminal end at the center of the roll. The rolled portion of the bandage is its body, and its outer surface is placed against the patient’s skin or dressing. Skill 48-7 on pp. 1228-1229 describes the steps for applying an elastic bandage. Use a variety of bandage turns, depending on the body part to be bandaged.
Assessment for Temperature Tolerance: Before applying heat or cold therapies, assess the patient’s physical condition for signs of potential intolerance to heat and cold. First observe the area to be treated. Assess the skin, looking for any open areas such as alterations in skin integrity (e.g., abrasions, open wounds, edema, bruising, bleeding, or localized areas of inflammation) that increase the patient’s risk of injury. Because the health care provider commonly orders heat and cold applications for traumatized areas, the baseline skin assessment provides a guide for evaluating skin changes that can occur during therapy. Include in your assessment the neurological system for sensation (to understand if the patient senses extremes of cold or heat) and the patient’s mental status to be sure that he or she can correctly communicate any issues with the hot or cold therapy.
Assessment includes identification of conditions that contraindicate heat or cold therapy. Do not cover an active area of bleeding with a warm application because bleeding will continue. Warm applications are contraindicated when the patient has an acute, localized inflammation such as appendicitis because the heat causes the appendix to rupture. If a patient has cardiovascular problems, it is unwise to apply heat to large portions of the body because the resulting massive vasodilation disrupts blood supply to vital organs.
Cold is contraindicated if the site of injury is already edematous. It further retards circulation to the area and prevents absorption of the interstitial fluid. If the patient has impaired circulation (e.g., arteriosclerosis), it further reduces blood supply to the affected area. Cold therapy is also contraindicated in the presence of neuropathy, because the patient is unable to perceive temperature change and damage resulting from temperature extremes. One other contraindication for cold therapy is shivering. Cold applications sometimes intensify shivering and dangerously increase body temperature.
Assess the patient’s response to stimuli. Sensation to light touch, pinprick, and mild temperature variations (see Chapter 30) reveals the ability of the patient to recognize when heat or cold becomes excessive. If a patient has peripheral vascular disease, pay particular attention to the integrity of extremities. For example, if the health care provider’s order is to apply a cold compress to a lower extremity, assess circulation to the leg by assessing for capillary refill; observing skin color; and palpating skin temperatures, distal pulses, and edematous areas. If signs of circulatory inadequacy are present, it is important for you to question the order.
Level of consciousness influences the ability to perceive heat, cold, and pain. If a patient is confused or unresponsive, the nurse needs to make frequent observations of skin integrity after therapy begins.
Also assess the condition of equipment being used. Check electrical equipment for cracked cords, frayed wires, damaged insulation, and exposed heating components. Make sure that equipment containing circulating fluids does not have leaks. Check equipment for evenness of temperature distribution.
Local application of heat and cold to an injured body part is sometimes therapeutic. However, before using these therapies, you need to understand normal body responses to local temperature variations, assess the integrity of the body part, determine the patient’s ability to sense temperature variations, and ensure proper operation of equipment. You are legally responsible for safe administration of heat and cold applications.
Bodily Responses to Heat and Cold: Exposure to heat and cold causes systemic and local responses. Systemic responses occur through heat-loss mechanisms (sweating and vasodilation) or mechanisms promoting heat conservation (vasoconstriction and piloerection) and heat production (shivering) (see Chapter 30). Local responses to heat and cold occur through stimulation of temperature-sensitive nerve endings within the skin. This stimulation sends impulses from the periphery to the hypothalamus, which becomes aware of local temperature sensations and triggers adaptive responses for maintenance of normal body temperature. If alterations occur along temperature sensation pathways, the reception and eventual perception of stimuli are altered.
The body is able to tolerate wide variations in temperature. The normal temperature of the surface of the skin is 34° C (93.2° F), but temperature receptors usually adapt quickly to local temperatures between 15° and 45° C (59° and 113° F). Pain develops when local temperatures exceed this range. Excessive heat causes a burning sensation. Cold produces a numbing sensation before pain.
The adaptive ability of the body creates the major problem in protecting patients from injury resulting from temperature extremes. A person initially feels an extreme change in temperature but within a short time hardly notices it. This is dangerous because a person insensitive to heat and cold extremes can suffer serious tissue injury. You need to recognize patients most at risk for injuries from heat and cold applications (Table 48-9).
TABLE 48-9
Conditions That Increase Risk of Injury from Heat and Cold Application
Local Effects of Heat and Cold: Heat and cold stimuli create different physiological responses. The choice of heat or cold therapy depends on local responses desired for wound healing (Table 48-10).
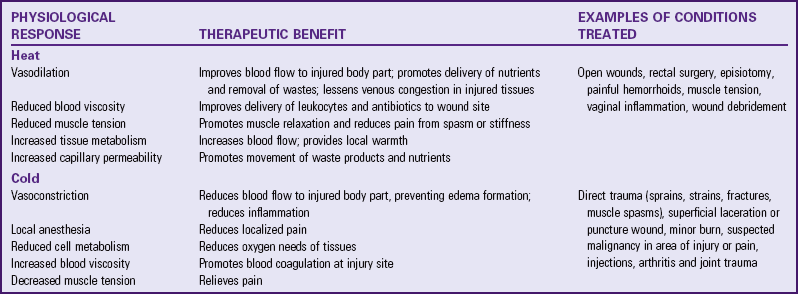
Effects of Heat Application: Heat generally is quite therapeutic, improving blood flow to an injured part. However, if heat is applied for 1 hour or more, the body reduces blood flow by a reflex vasoconstriction to control heat loss from the area. Periodic removal and reapplication of local heat restores vasodilation. Continuous exposure to heat damages epithelial cells, causing redness, localized tenderness, and even blistering.
Effects of Cold Application: The application of cold initially diminishes swelling and pain. Prolonged exposure of the skin to cold results in a reflex vasodilation. The inability of the cells to receive adequate blood flow and nutrients results in tissue ischemia. The skin initially takes on a reddened appearance, followed by a bluish-purple mottling, with numbness and a burning type of pain. Skin tissues freeze from exposure to extreme cold.
Factors Influencing Heat and Cold Tolerance: The response of the body to heat and cold therapies depends on the following factors:
• A person is better able to tolerate short exposure to temperature extremes than prolonged exposure.
• Exposed skin layers and certain areas of the skin (e.g., the neck, inner aspect of the wrist and forearm, and perineal region) are more sensitive to temperature variations. The foot and palm of the hand are less sensitive.
• The body responds best to minor temperature adjustments. If a body part is cool and a hot stimulus touches the skin, the response is greater than if the skin were already warm.
• A person has less tolerance to temperature changes to which a large area of the body is exposed.
• Tolerance to temperature variations changes with age. Patients who are very young or old are most sensitive to heat and cold.
• If a patient’s physical condition reduces the reception or perception of sensory stimuli, tolerance to temperature extremes is high, but the risk of injury is also high.
• Uneven temperature distribution suggests that the equipment is functioning improperly.
Application of Heat and Cold Therapies: A prerequisite to using any heat or cold application is a health care provider’s order, which includes the body site to be treated and the type, frequency, and duration of application (Box 48-15). Consult agency procedure manual for correct temperatures to use.
Choice of Moist or Dry: You can administer heat and cold applications in dry or moist forms. The type of wound or injury, the location of the body part, and the presence of drainage or inflammation are factors to consider in selecting dry or moist applications. Box 48-16 summarizes advantages and disadvantages of both.
Warm, Moist Compresses: Warm, moist compresses improve circulation, relieve edema, and promote consolidation of purulent drainage. A compress is a piece of gauze dressing moistened in a prescribed warmed solution. A pack is a larger cloth or dressing applied to a larger body area.
Heat from warm compresses dissipates quickly. To maintain a constant temperature, you need to change the compress often or apply a waterproof heating pad over it. Because moisture conducts heat, the temperature setting of any device should be lower for a moist compress than for a dry application. You can also use a layer of plastic wrap or a dry towel to insulate the compress and retain heat. Moist heat promotes vasodilation and evaporation of heat from the surface of the skin. For this reason a patient can feel chilly. Always try to control drafts within the room and keep the patient covered with a blanket or robe.
Warm Soaks: Immersion of a body part in a warmed solution promotes circulation, lessens edema, increases muscle relaxation, and provides a means to apply medicated solution. Sometimes a soak is also accompanied by wrapping the body part in dressings and saturating them with the warmed solution.
Position the patient comfortably, place waterproof pads under the area to be treated, and heat the solution to about 40.5° to 43° C (105° to 110° F). After immersing the body part, cover the container and extremity with a towel to reduce heat loss. It is usually necessary to remove the cooled solution and add heated solution after about 10 minutes. The challenge is to keep the solution at a constant temperature. Never add a hotter solution while the body part remains immersed. After any soak dry the body part thoroughly to prevent maceration.
Sitz Baths: The patient who has had rectal surgery, an episiotomy during childbirth, painful hemorrhoids, or vaginal inflammation benefits from a sitz bath, a bath in which only the pelvic area is immersed in warm or, in some situations, cool fluid. The patient sits in a special tub or chair or a basin that fits on the toilet seat so the legs and feet remain out of the water. Immersing the entire body causes widespread vasodilation and nullifies the effect of local heat application to the pelvic area.
The desired temperature for a sitz bath depends on whether the purpose is to promote relaxation or to clean a wound. It is often necessary to add warm or cool water during the procedure, which normally lasts 20 minutes, to maintain a constant temperature. Agency procedure manuals recommend safe water temperatures. A disposable sitz basin contains an attachment resembling an enema bag that allows gradual introduction of additional water.
Prevent overexposure of the patient by draping bath blankets around his or her shoulders and thighs and controlling drafts. The patient should be able to sit in the basin or tub with feet flat on the floor and without pressure on the sacrum or thighs. Because exposure of a large portion of the body to heat causes extensive vasodilation, assess the pulse and facial color and ask whether the patient feels light-headed or nauseated.
Commercial Hot Packs: Commercially prepared disposable hot packs apply warm, dry heat to an injured area. The chemicals mix and release heat when you strike, knead, or squeeze the pack. Package directions recommend the time for heat application.
Cold, Moist, and Dry Compresses: The procedure for applying cold, moist compresses is the same as that for warm compresses. Apply cold compresses for 20 minutes at a temperature of 15° C (59° F) to relieve inflammation and swelling. You can use clean or sterile compresses.
Commercially prepared cold packs that are similar to the disposable hot packs for dry applications are available. They come in various shapes and sizes to fit different body parts. When using cold compresses, observe for adverse reactions such as burning or numbness, mottling of the skin, redness, extreme paleness, and a bluish skin discoloration.
Cold Soaks: The procedure for preparing cold soaks and immersing a body part is the same as for warm soaks. The desired temperature for a 20-minute cold soak is 15° C (59° F). Control drafts and use outer coverings to protect the patient from chilling. It is often necessary to add cold water during the procedure to maintain a constant temperature.
Ice Bags or Collars: For a patient who has a muscle sprain, localized hemorrhage, or hematoma or who has undergone dental surgery, an ice bag is ideal to prevent edema formation, control bleeding, and anesthetize the body part. Proper use of the bag requires the following steps:
1. Fill the bag with water, secure the cap, invert to check for leaks, and pour out the water.
2. Fill the bag two-thirds full with crushed ice so you are able to easily mold it over a body part.
3. Release any air from the bag by squeezing its sides before securing the cap because excess air interferes with conduction of cold.
5. Cover the bag with a flannel cover, towel, or pillowcase.
6. Apply the bag to the injury site for 30 minutes; you can reapply the bag in an hour.
Evaluation
You evaluate nursing interventions for reducing and treating pressure ulcers by determining the patient’s response to nursing therapies and whether he or she achieved each goal. To evaluate outcomes and responses to care, you measure the effectiveness of interventions. The optimal outcomes are to prevent injury to the skin and tissues, reduce injury to the skin and underlying tissues, and possible wound healing with restoration of skin integrity.
Through the Patient’s Eyes
It is important to include the patient and caregiver in the evaluation process. Determine what they know about the formation of impaired skin integrity, determine how the patient and caregiver feel about the presence of the wound and the need for wound care, and develop a plan of care to provide education and support. Chronic wounds such as pressure ulcers take time to heal, and it is likely that the patient will be in the home setting with the pressure ulcer.
Patient Outcomes
Because each patient has different risk factors for impaired skin integrity, you need to individualize nursing interventions. Patients with minimal mobility impairments or relatively stable health status need only a few measures. You evaluate nursing interventions for reducing and treating pressure ulcers by determining the patient’s response to nursing therapies and whether he or she achieved each goal (Fig. 48-32).
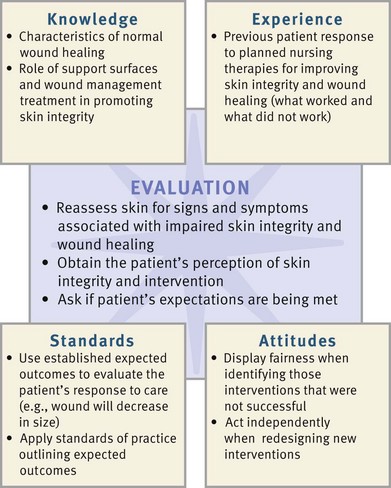
Patients with impaired skin integrity need evaluation on an ongoing basis for factors that contribute to skin breakdown. This includes a comprehensive skin assessment and a wound assessment using a validated risk-assessment tool. Assessment provides the foundation for the plan of care, and evaluation is critical for monitoring the effectiveness of the plan (Nix, 2012).
If the identified outcomes are not met for a patient with impaired skin integrity, questions to ask include the following:
• Was the etiology of the skin impairment addressed? Were the pressure, friction, shear, and moisture components identified; and did the plan of care decrease the contribution of each of these components?
• Was wound healing supported by providing the wound base with a moist protected environment?
• Were issues such as nutrition assessed and a plan of care developed that provided the patient with the calories to support healing?
Finally, evaluate the need for additional referrals to other experts in wound care and pressure ulcers, such as nurses certified in wound care. Care of patients with a pressure ulcer or wound requires a multidisciplinary team approach.
Safety Guidelines for Nursing Skills
Ensuring patient safety is an essential role of the professional nurse. To ensure patient safety, communicate clearly with the members of the health care team, assess and incorporate the patient’s priorities of care and preferences, and use the best evidence when making decisions about care. When performing the skills in this chapter, remember the following points to ensure safe, individualized patient-centered care:
• Position patient in a manner that the side rails on the bed are in an upright position to prevent him or her from rolling over the side of the bed.
• When changing wound dressings, keep a plastic bag within reach to discard dressings and prevent cross-contamination. Keep extra gloves within reach to allow a change of gloves if the gloves become soiled.
• If irrigating a wound, use goggles for protection from splashing.
• When applying an elastic bandage, check the extremity where the bandage is applied for temperature or sensation changes.

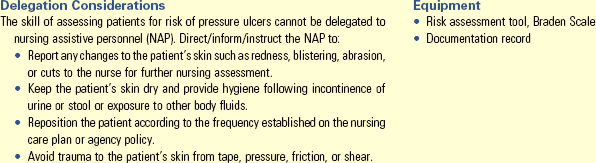
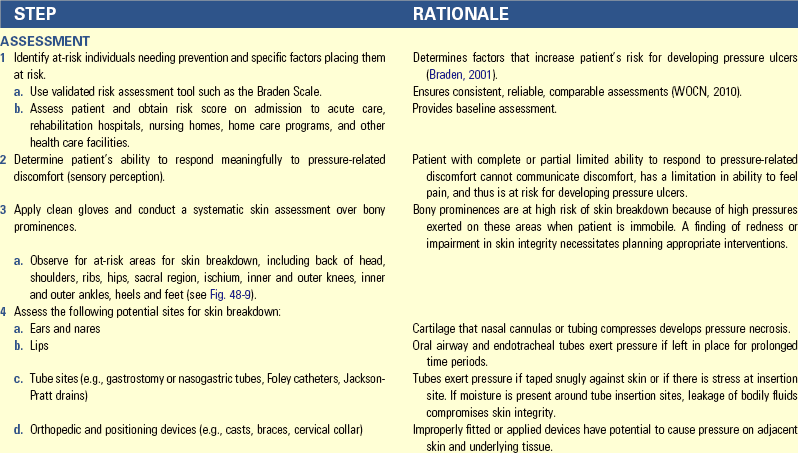
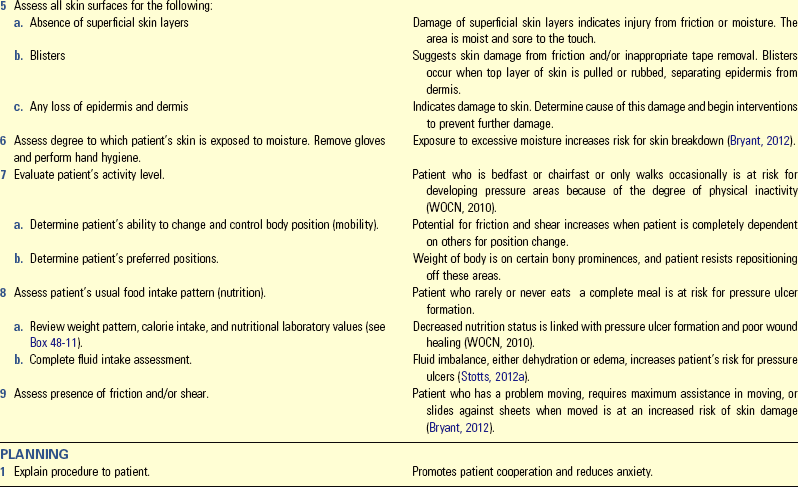
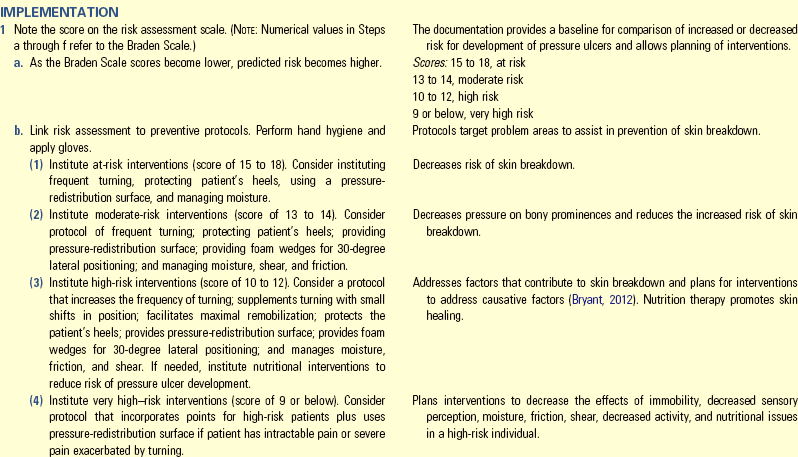
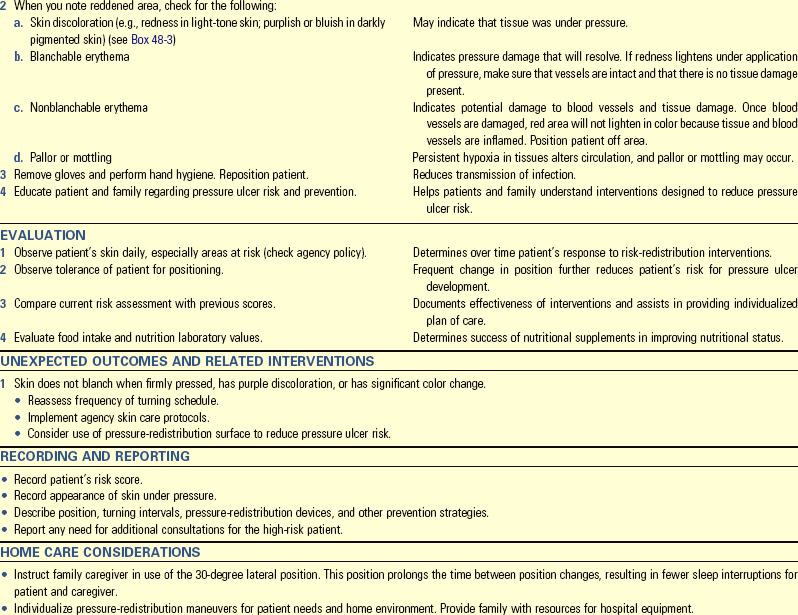


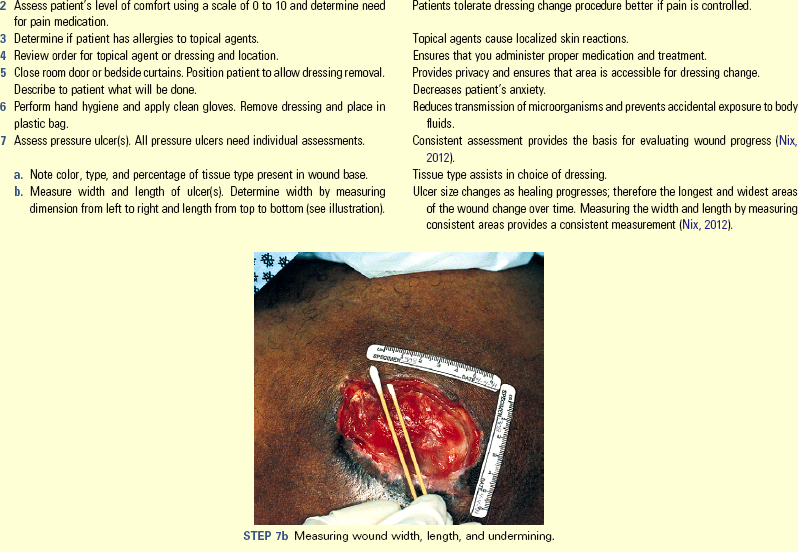
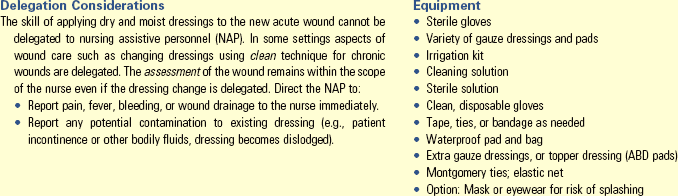
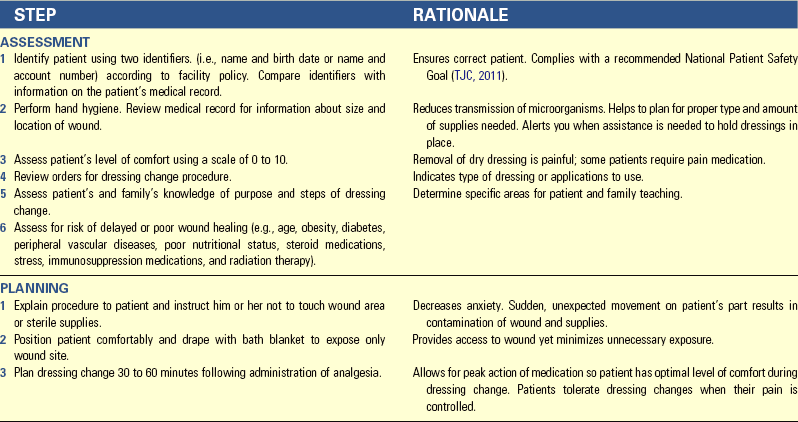
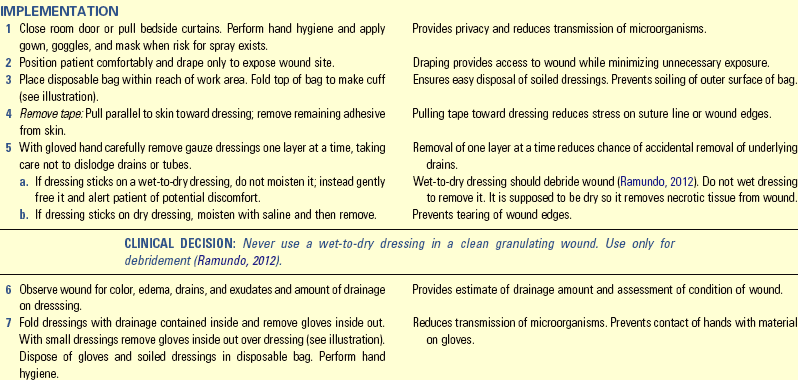
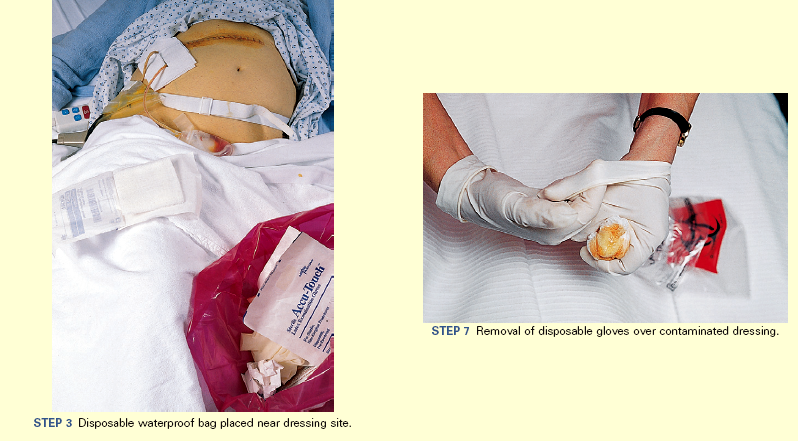
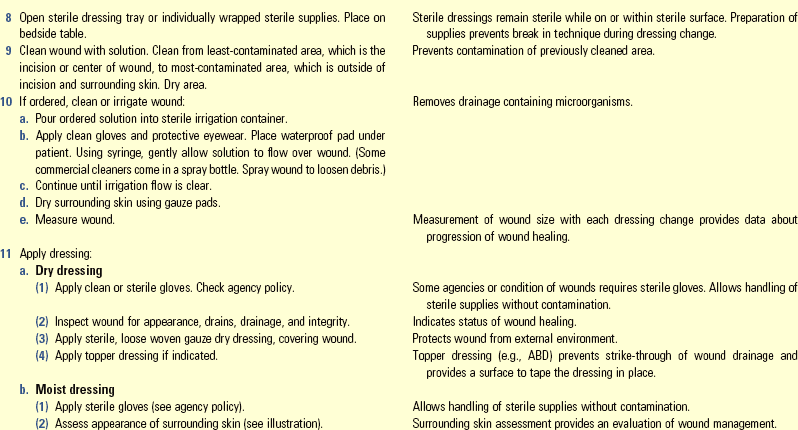
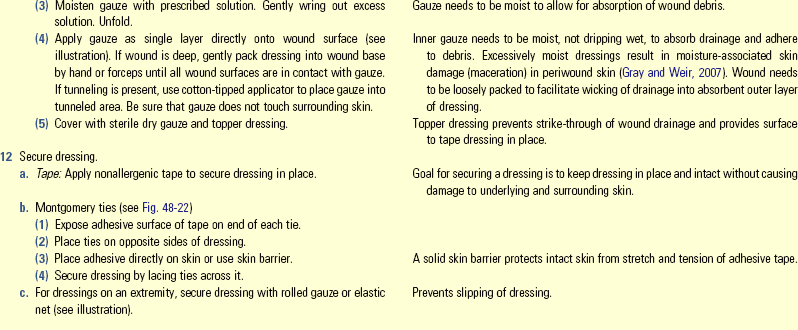
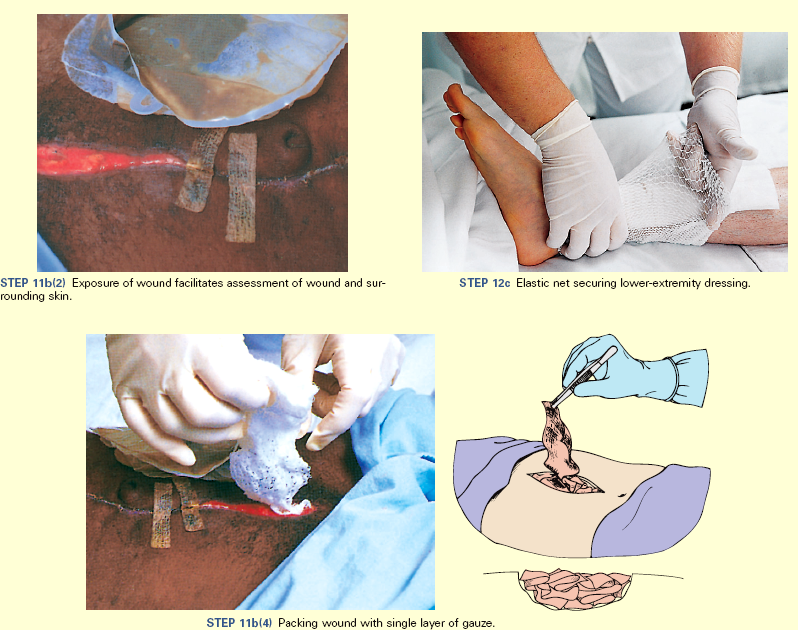

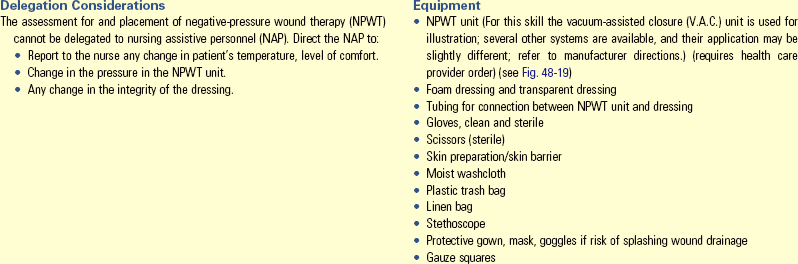
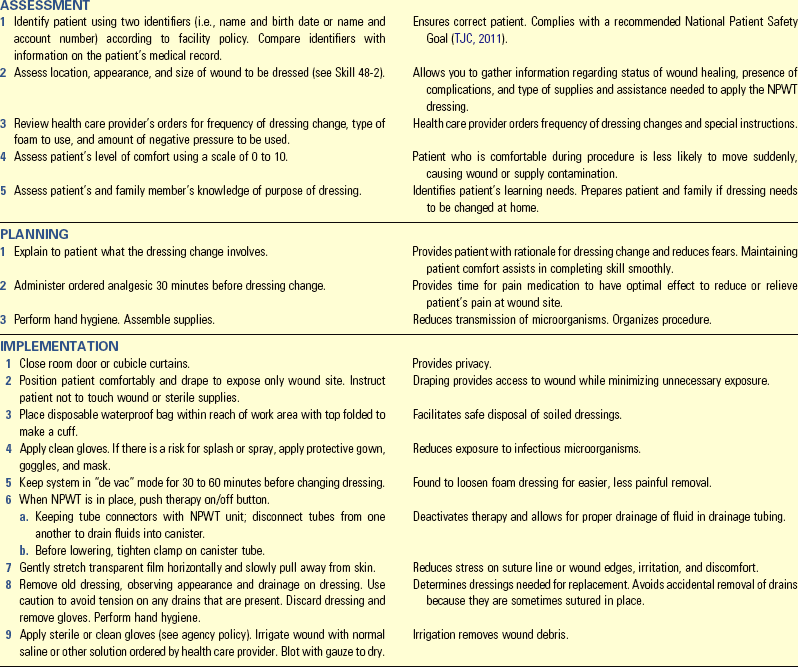
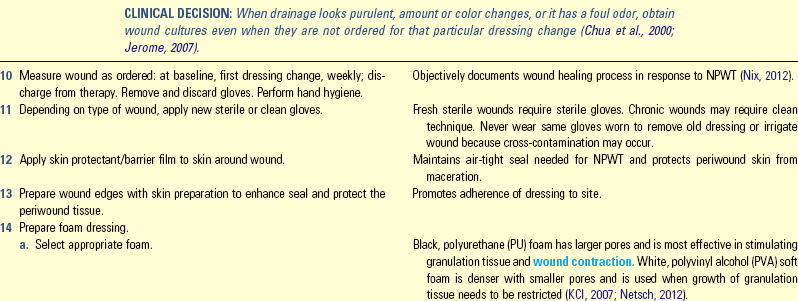
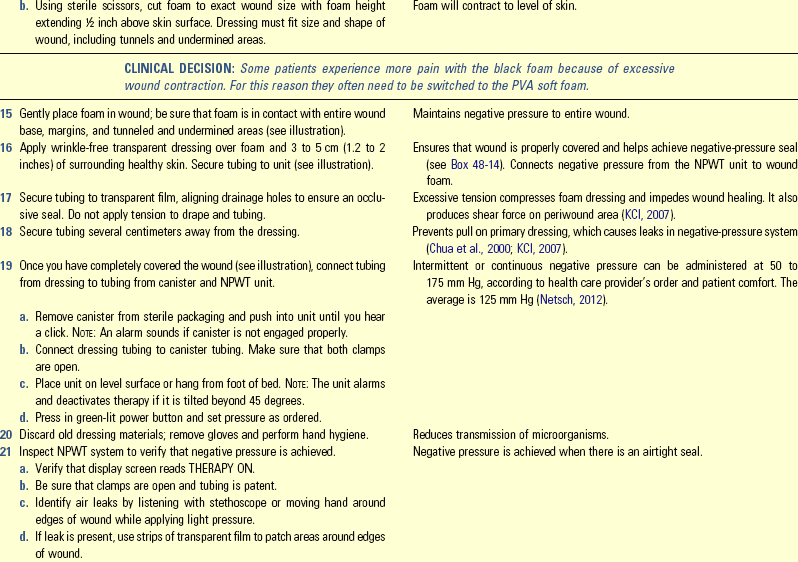
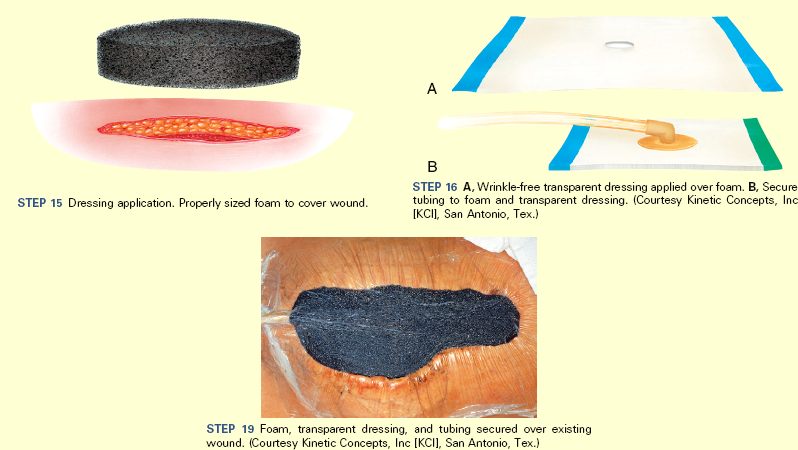
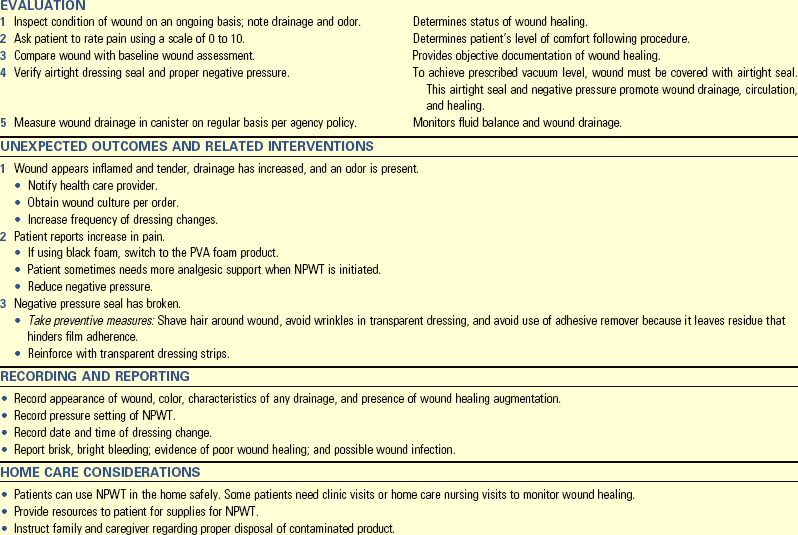
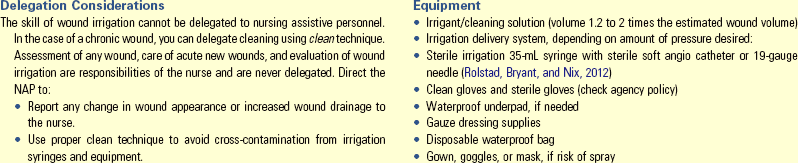
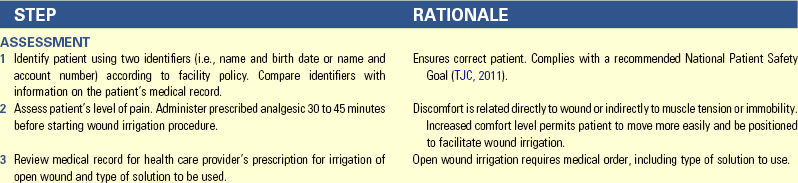

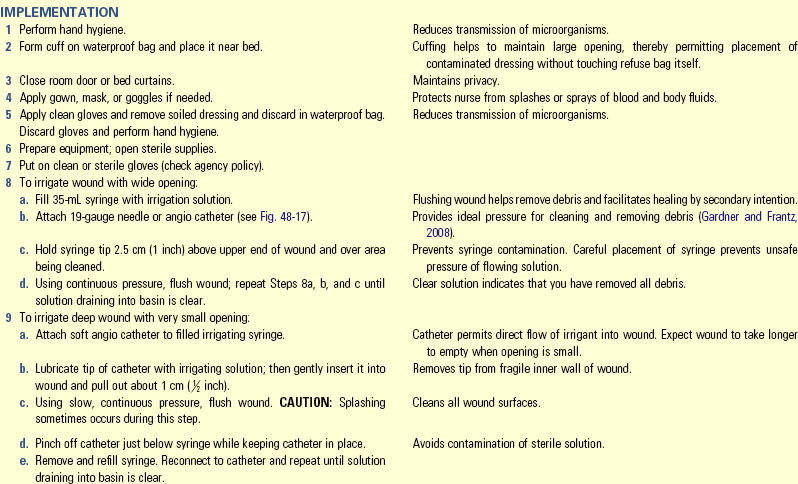
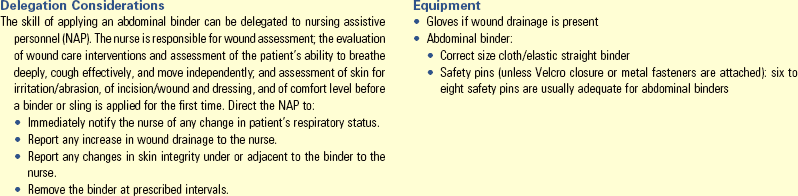
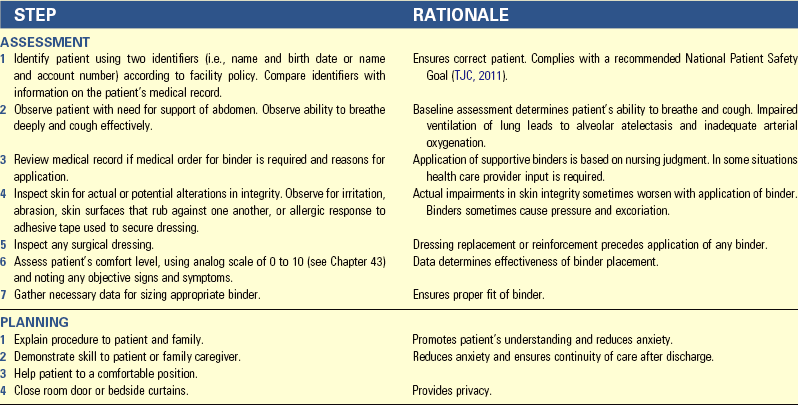
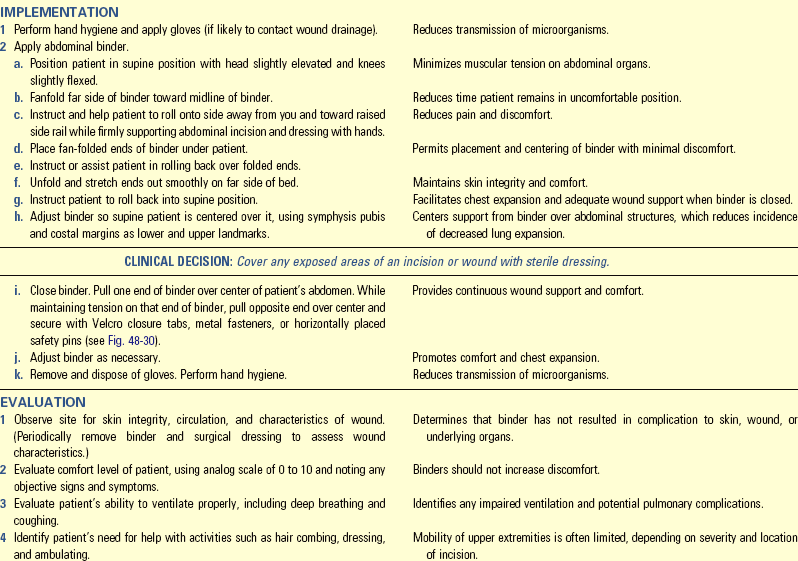
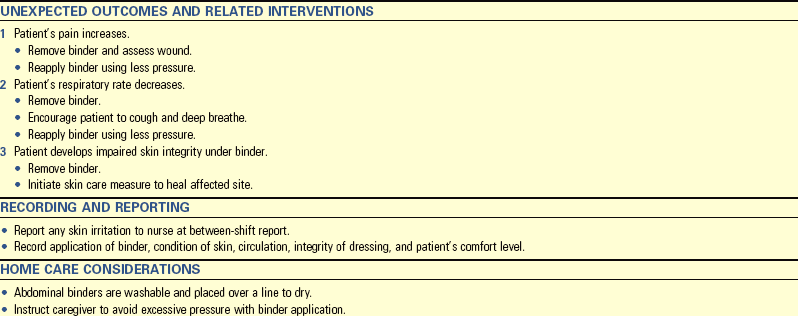
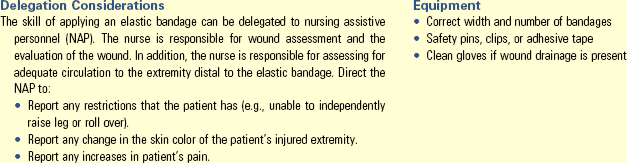
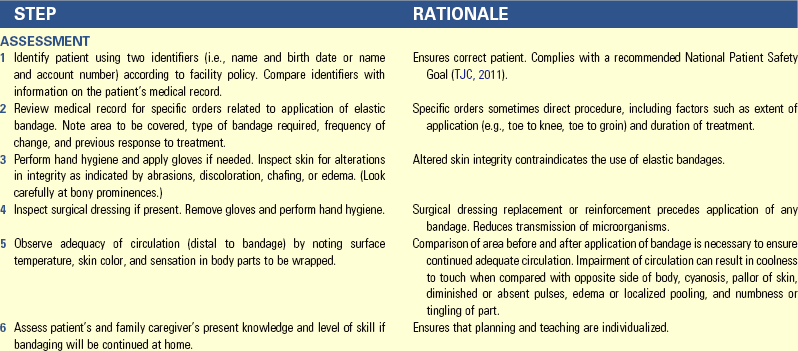
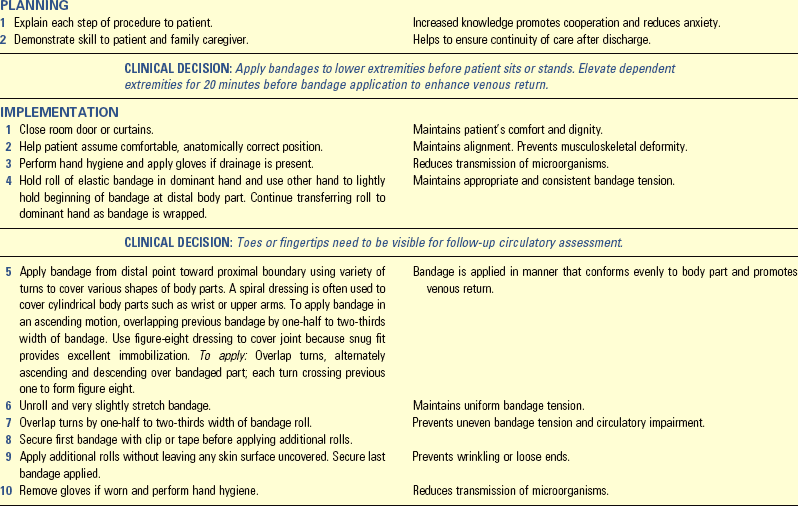
Key Points
• Pressure ulcers contribute to patient discomfort and decreased functional status, increased length of stay in acute and extended care settings, and increased cost of care.
• Wound assessment scales help measure improvement of a healing pressure ulcer; do not use the staging system for this purpose.
• Evaluate all patients on an ongoing basis for risk factors that contribute to development of impaired skin integrity.
• Alterations in mobility, sensory perception, level of consciousness, and nutrition and the presence of moisture increase the risk for pressure ulcer development.
• The risk of impaired skin integrity related to immobilization depends on the extent and duration of immobilization.
• Pressure, shearing force, and friction are contributing factors to the development of pressure ulcers.
• When the external pressure against the skin is greater than the pressure needed to keep the capillary open, blood flow decreases to the adjacent tissues.
• Meticulous ongoing assessment of the skin and identification of risk factors are important in decreasing the opportunity for pressure ulcer development.
• Preventive skin care is aimed at controlling external pressure on bony prominences and keeping the skin clean, well lubricated and hydrated, and free of excess moisture.
• Proper positioning reduces the effects of pressure and guards against the shearing force.
• Therapeutic beds and mattresses redistribute the effects of pressure; however, base selection on assessment data to identify the best bed for individual needs.
• Cleaning and topical agents used to treat pressure ulcers vary according to the stage of the pressure ulcer and condition of the wound bed. Assessment of the ulcer enables the nurse to select proper skin care agents.
• Direct nutritional interventions at improving wound healing through increasing protein and calorie levels.
• Wound assessment requires a description of the appearance of the wound base, size, presence of exudate, and the periwound skin condition.
• When tissue loss is extensive, a wound heals by secondary intention.
• The chances of wound infection are greater when the wound contains dead or necrotic tissue, when foreign bodies lie on or near the wound, and when the blood supply and tissue defenses are reduced.
• The principles of wound first aid include control of bleeding, cleaning, and protection.
• The layers of a dry dressing absorb drainage and prevent entrance of bacteria.
• A moist environment supports wound healing.
• The wet-to-dry dressing mechanically removes dead tissue and wound exudate to debride the wound.
• When cleaning wounds or drain sites, clean from the least to most contaminated area, away from wound edges.
• Apply a bandage or binder in a manner that does not impair circulation or irritate the skin.
• An acute sprain, closed fracture, or bruise responds best to cold applications.
Clinical Application Questions
Preparing for Clinical Practice
1. Because of the foul-smelling tan-colored drainage from Mrs. Stein’s hip incision, the staples were removed by the health care provider, and an order was written for moist saline gauze dressing to the area 3 times a day. When the dressing is removed, which factors are critical to assess?
2. A head-to-toe skin assessment is done per institutional policy on a daily basis. At the most recent assessment of Mrs. Stein’s skin, redness was noted over the sacral area; on direct examination a small area of denuded tissue was noted. The area was assessed and was found to have minimal depth and a red, moist base. How would you describe the impairment in skin integrity in your charting?
3. What will you include in your plan of care for Mrs. Stein to address the impairment in skin integrity in the sacral area?
4. Mrs. Stein will be discharged tomorrow. Which issues must be assessed regarding her care before discharge? Describe why these issues are of importance.
 Answers to Clinical Application Questions can be found on the Evolve website.
Are You Ready to Test Your Nursing Knowledge?
1. When repositioning an immobile patient, the nurse notices redness over a bony prominence. What is indicated when a reddened area blanches on fingertip touch?
1. A local skin infection requiring antibiotics
2. Sensitive skin that requires special bed linen
3. A stage III pressure ulcer needing the appropriate dressing
4. Blanching hyperemia, indicating the attempt by the body to overcome the ischemic episode.
2. Which type of pressure ulcer is noted to have intact skin and may include changes in one or more of the following: skin temperature (warmth or coolness), tissue consistency (firm or soft), and/or pain?
3. When obtaining a wound culture to determine the presence of a wound infection, from where should the specimen be taken?
4. After surgery the patient with a closed abdominal wound reports a sudden “pop” after coughing. When the nurse examines the surgical wound site, the sutures are open, and pieces of small bowel are noted at the bottom of the now-opened wound. Which corrective intervention should the nurse do first?
1. Allow the area to be exposed to air until all drainage has stopped
2. Place several cold packs over the area, protecting the skin around the wound
3. Cover the area with sterile, saline-soaked towels and immediately notify the surgical team; this is likely to indicate a wound evisceration
4. Cover the area with sterile gauze, place a tight binder over it, and ask the patient to remain in bed for 30 minutes because this is a minor opening in the surgical wound and should reseal quickly
5. Which description best fits that of serous drainage from a wound?
6. For a patient who has a muscle sprain, localized hemorrhage, or hematoma, which wound care product helps prevent edema formation, control bleeding, and anesthetize the body part?
7. Which skin care measures are used to manage a patient who is experiencing fecal and urinary incontinence?
1. Keeping the buttocks exposed to air at all times
2. Using a large absorbent diaper, changing when saturated
3. Using an incontinence cleaner, followed by application of a moisture-barrier ointment
4. Frequent cleaning, applying an ointment, and covering the areas with a thick absorbent towel
8. Which of the following describes a hydrocolloid dressing?
1. A seaweed derivative that is highly absorptive
2. Premoistened gauze placed over a granulating wound
3. A debriding enzyme that is used to remove necrotic tissue
4. A dressing that forms a gel that interacts with the wound surface
9. Which of the following is an indication for a binder to be placed around a surgical patient with a new abdominal wound?
1. Collection of wound drainage
2. Reduction of abdominal swelling
3. Reduction of stress on the abdominal incision
4. Stimulation of peristalsis (return of bowel function) from direct pressure
10. When is an application of a warm compress indicated? (Select all that apply.)
11. What is the removal of devitalized tissue from a wound called?
12. Name the three important dimensions to consistently measure to determine wound healing.
13. What does the Braden Scale evaluate?
1. Skin integrity at bony prominences, including any wounds
2. Risk factors that place the patient at risk for skin breakdown
3. The amount of repositioning that the patient can tolerate
4. The factors that place the patient at risk for poor healing
14. On assessing your patient’s sacral pressure ulcer, you note that the tissue over the sacrum is dark, hard, and adherent to the wound edge. What is the correct stage for this patient’s pressure ulcer?
15. Name one intervention and the rationalization to use that intervention to reduce the likelihood of a shear injury to a patient.
Answers: 1. 4; 2. 1; 3. 4; 4. 3; 5. 3; 6. 2; 7. 3; 8. 4; 9. 3; 10. 1, 3; 11. 1; 12. Width, length, and depth; 13. 2; 14. 3; 15. See Evolve.
References
Agency for Health Care Policy and Research (AHCPR), Panel for the Prediction and Prevention of Pressure Ulcers in Adults. Pressure ulcers in adults: prediction and prevention, Clinical Practice Guideline No. 3, AHCPR Pub No. 92-0047. Rockville, Md: Agency for Health Care Policy and Research, Public Health Service, US Department of Health and Human Services; 1992.
Agency for Health Care Policy and Research (AHCPR), Panel for Treatment of Pressure Ulcers in Adults. Treatment of pressure ulcers, Clinical Practice Guideline No. 15, AHCPR Pub No. 95-0653. Rockville, Md: Agency for Health Care Policy and Research, Public Health Service, US Department of Health and Human Services; 1994.
Ayello, EA, Braden, B. How and why to do pressure ulcer risk assessment. Adv Skin Wound Care. 2002;15(13):125.
Baharestani, MM. Quality of life and ethical issues. In Baranoski S, Ayello EA, eds.: Wound care essentials: practice principles, ed 2, Philadelphia: Lippincott, Williams & Wilkins, 2008.
Bennett, MA. Report of the Task Force on the Implications for Darkly Pigmented Intact Skin in the Prediction and Prevention of Pressure Ulcers. Adv Wound Care. 1995;8(6):34.
Braden, BJ. Risk assessment in pressure ulcer prevention. In: Krasner DL, Rodeheaver GT, Sibbald RG, eds. Chronic wound care: a clinical source book for healthcare professionals. Wayne, Pa: HMP Communications, 2001.
Brienza, DM, et al. Pressure redistribution: seating, positioning and support surfaces. In Baranoski S, Ayello EA, eds.: Wound care essentials: practice principles, ed 2, Philadelphia: Lippincott, Williams & Wilkins, 2008.
Bryant, RA. Types of skin damage and differential diagnosis. In Bryant RA, Nix DP, eds.: Acute and chronic wounds: current management concepts, ed 4, St Louis: Mosby, 2012.
Bryant, RA, Nix, DP. Developing and maintaining a pressure ulcer prevention program. In Bryant RA, Nix DP, eds.: Acute and chronic wounds: current management concepts, ed 4, St Louis: Mosby, 2012.
Camden, SG. Skin care needs of the obese patient. In Bryant RA, Nix DP, eds.: Acute and chronic wounds: current management concepts, ed 4, St Louis: Mosby, 2012.
Centers for Disease Control and Prevention (CDC). Feeding back surveillance data to prevent hospital acquired infections. Emerg Infect Dis. 2001;7(2):295.
Chua, PC, et al. Vacuum-assisted wound closure. Am J Nurs. 2000;100(12):45.
Dallam, DE, et al. Pain management and wounds. In Baranoski S, Ayello EA, eds.: Wound care essentials: practice principles, ed 2, Philadelphia: Lippincott, Williams & Wilkins, 2008.
Doughty, DB, Sparks-Defriese, B. Wound-healing physiology. In Bryant RA, Nix DP, eds.: Acute and chronic wounds: current management concepts, ed 4, St Louis: Mosby, 2012.
European Pressure Ulcer Advisory Panel (EPUAP) and National Pressure Ulcer Advisory Panel (NPUAP). Treatment of pressure ulcers: quick reference guide. Washington DC: National Pressure Ulcer Advisory Panel; 2009.
Fellows, J, Cresodina, L. Home prepared saline: a safe, cost effective alternative for wound cleansing in home care. J Wound Ostomy Continence Nurs. 2006;33(6):606.
Gardner, SE, Frantz, RA. Wound bioburden. In Baranoski S, Ayello EA, eds.: Wound care essentials: practice principles, ed 2, Philadelphia: Lippincott, Williams & Wilkins, 2008.
Gaskin, FC. Detection of cyanosis in the person with dark skin. J Natl Black Nurses Assoc. 1986;1:52.
Harris, C, et al. Bates Jensen wound assessment tool: pictorial guide validation project. J Wound Ostomy Continence Nurs. 2010;37(3):253.
Henderson, CT, et al. Draft definition of stage I pressure ulcers: inclusion of persons with darkly pigmented skin. Adv Wound Care. 1997;10(5):16.
Jerome, D. Advances in negative pressure wound therapy: the V.A.C. Instill. J Wound Ostomy Continence Nurs. 2007;34(2):191.
KCI USA. The V.A.C.: therapy safety information, product information. San Antonio: Author; 2007.
Netsch, DS. Negative-pressure wound therapy. In Bryant RA, Nix DP, eds.: Acute and chronic wounds: current management concepts, ed 4, St Louis: Mosby, 2012.
Nix, D. Skin and wound inspection and assessment. In Bryant RA, Nix DP, eds.: Acute and chronic wounds: current management concepts, ed 4, St Louis: Mosby, 2012.
Norton, D, et al. An investigation of geriatric nursing problems in hospital. Edinburgh: Churchill Livingstone; 1962.
Pieper, B. Pressure ulcers: impact, etiology, and classification. In Bryant RA, Nix DP, eds.: Acute and chronic wounds: current management concepts, ed 4, St Louis: Mosby, 2012.
Posthauer, ME, Thomas, DR. Nutrition and wound care. In Baranoski S, Ayello EA, eds.: Wound care essentials: practice principles, ed 2, Philadelphia: Lippincott, Williams & Wilkins, 2008.
Rajendran PJ, et al: Improving the detection of stage I pressure ulcers by enhancing color images, 2006, Engineering in Medicine and Biology Society, EMBS ’06 Annual International Conference of IEEE, New York.
Ramundo, JM. Wound debridement. In Bryant RA, Nix DP, eds.: Acute and chronic wounds: current management concepts, ed 4, St Louis: Mosby, 2012.
Rolstad, BS, Bryant, RA, Nix, DP. Topical management. In Bryant RA, Nix DP, eds.: Acute and chronic wounds: current management concepts, ed 4, St Louis: Mosby, 2012.
Siem, CA, et al. Skin assessment and pressure ulcer care in hospital-based skilled nursing facilities. Ostomy Wound Manage. 2003;49(6):42.
Stotts, NA. Nutritional assessment and support. In Bryant RA, Nix DP, eds.: Acute and chronic wounds: current management concepts, ed 4, St Louis: Mosby, 2012.
Stotts, NA. Wound infection: diagnosis and management. In Bryant RA, Nix DP, eds.: Acute and chronic wounds: current management concepts, ed 4, St Louis: Mosby, 2012.
The Joint Commission (TJC). Nutritional, functional and pain assessments and screens. http://www.jointcommission.org/standards_information/jcfaqdetails.aspx?StandardsFaqId=208&ProgramId=1.. [2008].
The Joint Commission (TJC). 2011 National Patient Safety Goals (NPSG). http://www.jointcommission.org/standards_information/npsgs.aspx, 2011. [Accessed November 21, 2011].
Thompson, G. An overview of negative pressure wound therapy (NPWT). Wound Care. 2008;6:523.
Woo, KY, Ayello, EA, Sibald, RG. The skin and periwound skin disorders and management. Wound Healing S Africa. 2009;2(2):43.
Wound, Ostomy and Continence Nurses Society. Guideline for prevention and management of pressure ulcers, Guideline for Prevention and Management of Pressure Ulcers: WOCN Clinical Practice Guideline Series. Mount Laurel, NJ: WOCN; 2010.
Wysocki, AB. Anatomy and physiology of skin and soft tissue. In Bryant RA, Nix DP, eds.: Acute and chronic wounds: current management concepts, ed 4, St Louis: Mosby, 2012.
Research References
Baumgarten, M, et al. Pressure ulcers and the transition to long-term care. Adv Skin Wound Care. 2003;16:299.
Bergstrom, N, et al. The Braden Scale for predicting pressure sore risk. Nurs Res. 1987;36(4):205.
Braden, BJ, Bergstrom, N. Clinical utility of the Braden Scale for predicting pressure sore risk. Decubitus. 1989;2(3):50.
Braden, BJ, Bergstrom, N. Predictive validity of the Braden Scale for pressure sore risk in a nursing home population. Res Nurs Health. 1994;17(6):459.
Bruns, TB, Worthington, JM. Using tissue adhesive for wound repair: a practical guide to Dermabond. Am Fam Physician. 2000;61(5):1383.
Burton, AC, Yamada, S. Relation between blood pressure and flow in the human forearm. J Appl Physiol. 1951;4(5):329.
Gray, M, Weir, D. Prevention and treatment of moisture-associated skin damage (maceration) in the periwound skin. J Wound Ostomy Continence Nurs. 2007;34(2):153.
Xie, X, et al. The clinical effectiveness of negative-pressure wound therapy: a systematic review. J Wound Care. 2010;19(11):490.