CHAPTER 27 Management of Extrinsic and Intrinsic Stains
 Describe indications, contraindications, precautions, and techniques for rubber-cup and air polishing. Describe effects of rubber-cup and air polishing on teeth, gingiva, restorative materials, and oral care setting. Use the Mohs Hardness Scale and particle size to evaluate the abrasiveness of polishing agents used in dental hygiene practice.
Clients dissatisfied with the appearance of their teeth have a human need for a wholesome facial image. Identification of the cause of staining must be made because some stains cannot be modified, and others can be altered only slightly. During assessment, the dental hygienist identifies types of stain and client factors that contribute to tooth stain (see Chapter 15). With this information the client and dental hygienist formulate the stain management plan. The dental hygienist selects the least damaging method to remove and control stain; more than one method may be indicated for the same client.
TYPES OF STAINS
Extrinsic Tooth Stains
Extrinsic stains can be caused by smoking cigarettes, marijuana, cigars, or pipes; using spit (smokeless) tobacco; and rinsing with antimicrobial agents with substantivity such as chlorhexidine or cetylpyridinium chloride. Other common sources of stains include artificial and natural dyes in foods and beverages (e.g., tea, coffee, cola beverages, red wine, berries), iron tablets, chromogenic bacteria in oral biofilm, and poor oral hygiene. Teeth also may become stained from environmental factors such as metallic dust in industrial employment settings (see Chapter 15). Extrinsic stains usually can be removed by scaling with hand-activated, sonic, and ultrasonic instruments and by rubber-cup or air polishing.
Intrinsic Tooth Stains
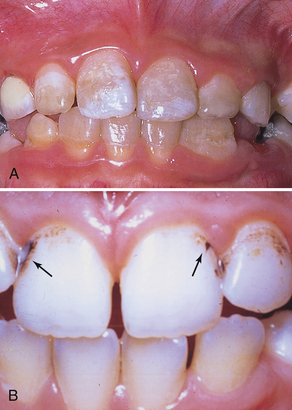
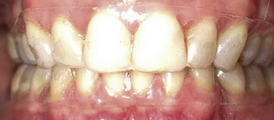
Intrinsic stains may be hereditary, developmental in nature, or associated with aging. Defects in enamel or dentin during tooth development resulting from high fevers, trauma, excessive intake of fluoride, or tetracycline medication may result in permanently mottled or stained tooth structure (Figure 27-1, A). Tooth enamel effects may range from barely noticeable pitting to gross enamel discoloration and defects that fracture easily. Color changes may be slight or severe, including yellow, light to dark brown, blue-gray, and black. Given the translucence of enamel, intrinsic stains may occur adjacent to large restorations, pulpal necrosis, and dental caries (see Chapter 15).
EXTRINSIC STAIN MANAGEMENT
Extrinsic stain management focuses primarily on oral self-care that may prevent the recurrence of stain. Often, modifying the daily oral care regimen is the most long-lasting solution for extrinsic stain management and should always be based on the client’s health history, oral assessment, and self-care assessment. Once removed, extrinsic stain may be prevented by a client’s change in self-care practices (e.g., using a power toothbrush with whitening and stain-repelling dentifrice), smoking cessation, and avoidance of stain-producing foods and beverages (Figure 27-1, B).
Cleansing and Polishing Agents for Managing Extrinsic Stains
Agents used to clean and polish teeth, restored tooth surfaces, and dental appliances contain abrasive agents (see Chapter 23, Figure 23-5). Abrasive agents are composed of natural or synthetic materials that vary in hardness, particle shape, and particle size (grit). These agents are commonly used in both clinical and laboratory procedures and added to dentifrices, prophylaxis pastes, abrasive strips, and polishing discs. Fine grit abrasive agents are used for cleaning and polishing tooth enamel, whereas fine, medium, and coarse grit abrasives are used to polish dental appliances in the laboratory. A very hard abrasive can produce minimal abrasion if its particle size is very fine to superfine.
Abrasives found in dentifrices (e.g., calcium pyrophosphate, dibasic calcium phosphate dehydrate, tricalcium phosphate, hydrated alumina, hydrated silica, sodium metaphosphate) should have extremely low abrasiveness because toothpastes are used for daily cleaning. Abrasives found in prophylaxis pastes (superfine pumice, silicon dioxide, zirconium silicate, calcium carbonate) have a low to moderate abrasiveness to facilitate extrinsic stain removal and polish teeth. Abrasives used in the laboratory and to contour some restorations (rouge, tripoli, cuttle, garnet, emery) may have low, moderate, or high abrasiveness. Abrasive agents used in the mouth must produce a smooth, clean, lustrous surface with minimal scratches because polished tooth surfaces are more resistant to the accumulation of extrinsic stain and calculus.
Natural abrasives include Arkansas stone, chalk, cuttle, kieselguhr, corundum, pumice, emery, garnet, quartz, sand, tripoli, zirconium silicate, and diamond. Synthetic abrasives include aluminum oxide, tin oxide, silicon carbide, synthetic diamond, and rouge. Common abrasives are listed in Table 27-1. Dental substrates are listed in Table 27-2.
TABLE 27-1 Abrasives Used in Dental Hygiene Practice
| Abrasive Agent | Mohs Hardness Value∗ | Application |
|---|---|---|
| Potassium | 0.4 | Used as a cleaning agent in dentifrices and in desensitizing agents (potassium nitrate); promotes occlusion of dentinal tubules. |
| Sodium | 0.5 | Used as a cleaning agent in dentifrices; used in some fluoride compounds. |
| Aluminum silicates | 2 | Used as a cleaning and polishing agent; no excessive abrasion; compatible with dental fluoride compounds; noncorrosive to aluminum containers. |
| Sodium bicarbonate, kaolinite | 2.5 | Used as a cleaning agent in dentifrices for oral biofilm and stain removal and as an acid-neutralizing agent. |
| Calcium carbonate (whiting, calcite chalk) | 3 | Used as a cleaning agent in dentifrices for oral biofilm and stain removal; mild abrasive used to polish tooth enamel, gold foil, amalgam, and plastic materials. |
| Phosphate salts (pyrophosphate, dibasic calcium phosphate dehydrate, tricalcium phosphate, sodium metaphosphate) | 5 | Used as cleaning agents in dentifrices for oral biofilm and stain removal. |
| Rouge (jewelers rouge, iron oxide) | 5-6 | Used for polishing gold and precious metal alloys in the dental laboratory; blended with soft binders into a cake form. Not used in the mouth. |
| Pumice | 6-7 | |
| Superfine pumice (pumice flour) | Used as a cleaning agent in prophylaxis paste for oral biofilm and stain removal; used for polishing tooth enamel, gold foil, dental amalgam, and acrylic resin. | |
| Fine pumice | Not for use on natural teeth. | |
| Medium pumice | Not for use on natural teeth. | |
| Coarse pumice | Not for use on natural teeth. | |
| Tin oxide (putty powder, stannic oxide) | 6-7 | Used extensively for polishing teeth and metallic restorations; mixed with water or glycerin to form a mildly abrasive paste. |
| Silica or sand (silex [silicon dioxide], hydrated silica, sodium potassium aluminum silicate) | 6-7 | |
| Zirconium silicate (zircon) | 6.5-7.5 | Used in dental prophylaxis pastes and to coat abrasive disks and strips. |
| Garnet | 6.5-7.5 | Used for polishing acrylic dental appliances and composites. |
| Cuttle | 7 | Originally a powdered calcareous shell of the cuttlefish but now derived from quartz; used to coat paper disks to finish gold alloys, acrylics, and composites. |
| Corundum (aluminum oxide [alumina]) | 9 | |
| Silicon carbide | 9.5 | Used as an abrasive in coated disk; can cut metal alloys, ceramics, and plastic materials. |
| Diamond | 10 | Used in polishing paste; used on ceramic, porcelain, and resin-based composite materials and metal-backed abrasive strips and furcation files. |
∗ Mohs Hardness Value: standard for the hardness of abrasives and substrates; the higher the value, the harder or more abrasive the material. For comparison, cementum is 2 to 3, dentin is 3 to 4, and enamel or apatite is 5 to 6. Even a very hard material will be minimally abrasive if used with a very fine particle size.
TABLE 27-2 Hardness Values for Dental Substrates
| Material | Mohs Hardness Value | Knoop Hardness Value |
|---|---|---|
| CAD/CAM Ceramic | 6-7 | |
| Porcelain | 6-7 | 14 |
| Composite | 5-7 | 45-64 |
| Glass-ceramic | 5-6 | 360 |
| Tooth enamel | 5-6 | 355-461 |
| Dental amalgam | 4-5 | 90 |
| Dentin | 3-4 | 68 |
| Hard gold alloys | 3-4 | 248-280 |
| Pure gold | 2-3 | |
| Acrylic (denture base) | 2-3 | 20 |
| Cementum | 2-3 | 40 |
For extrinsic tooth stain removal or the polishing of a restorative material to be achieved, an abrasive agent is applied against the surface to abrade the stain away and/or create a surface with a high luster. The following key characteristics of the abrasive agent affect the size of the surface scratches and the polishing outcome:
Hardness determines whether one abrasive material can scratch the surface of another material. Hardness is assessed using the Mohs Hardness Scale, which ranges from 1 (lowest hardness material) to 10 (highest hardness material). To polish, particles must be 1 to 2 units on the scale harder than the surface being polished. Cleansing a surface requires a material that is less than or equal to that of the surface being cleaned in order to prevent scratching. Particle shape of an abrasive may be angular, blocky, semiround, or round. Sharp angular edges deepen the scratches on the surface being polished. Particle size (also known as grit) affects cleaning rate and scratch pattern produced on a surface. Fine grit yields the least amount of surface abrasion even if the abrasive material is high on the Mohs Hardness Scale, whereas coarse grit, the most abrasive, can scratch and roughen surfaces, making them more likely to accumulate oral biofilm and stain. There is no industry standard for defining superfine, fine, medium, or coarse grit. The meaning of these labels varies from manufacturer to manufacturer.Bleaching or Whitening Agents
Although intrinsic stains cannot be removed by traditional professional methods (scaling and selective polishing), they may be managed by tooth bleaching with a chemical oxidizing agent to lighten tooth discolorations or by restorative procedures such as veneers and crowns. Several commonly used oxidizing agents found both in professionally applied, professionally dispensed and in over-the-counter (OTC) products include hydrogen peroxide, carbamide peroxide, or papain (an enzyme from papaya fruit) as the active ingredient. A whitening product containing 10% carbamide peroxide is equivalent to another product that contains 3.3% hydrogen peroxide. Recognition of intrinsic staining and referral for appropriate treatment address the client’s human need for a wholesome facial image. Intrinsic tooth stain severity usually determines which stain management method is recommended, and these are discussed later in this chapter.
EXTRINSIC STAIN REMOVAL
Rubber-Cup Polishing
Rubber-cup polishing is the removal of extrinsic tooth stains after scaling using a low-speed dental handpiece, a prophylaxis angle with rubber cup and bristle brush, and prophylaxis paste or other cleaning or polishing agent. This traditional method is effective for removal of extrinsic tooth stains, has good client acceptance, and is easy to learn and perform. Five variables influence efficiency, effectiveness, and tooth structure loss during extrinsic tooth stain removal with a rubber cup:
Abrasiveness of the prophylaxis paste (or other abrasive agent) used during the procedure: The harder the abrasive, the greater the rate of abrasion. Always use the least abrasive agent to accomplish stain removal. Quantity of abrasive agent: The greater the amount of abrasive particles applied, the greater the rate of abrasion. Abrasive agent particles should be suspended in a lubricating vehicle such as water or humectants to decrease both quantity of abrasive particles and frictional heat generated by the procedure. Never use a dry abrasive agent on tooth enamel. Always use wet abrasive agents. Contact time of the rubber cup or bristle brush on the tooth surface: The longer the contact time, the greater the rate of abrasion and frictional heat. Always use short, intermittent contact between rubber cup and the tooth or restorative materials. Speed or revolutions per minute (rpm) of the rubber cup or bristle brush: The greater the speed of the rotating rubber cup, the greater the rate of abrasion and frictional heat generated. Always use low speeds no greater than 3000 rpm. Applied pressure or force of the rubber cup or bristle brush on the tooth surface: The greater the force applied to the rubber cup against the tooth, the greater the rate of abrasion and frictional heat generated. Always use a light intermittent (staccato) touch.To preserve tooth structure and prevent damage to teeth and restorative materials, the practitioner starts with the least abrasive agent and amount of agent, with the least amount of contact time, at the lowest speed, and with the least amount of pressure to remove the extrinsic stain and to avoid tooth surface damage. The clinician can always increase any of these variables if necessary to achieve the desired clinical outcome.
Adverse Effects on Teeth
Rubber-cup polishing removes the outer layer of tooth enamel. Because the highest fluoride concentration is in the outermost layer, performing rubber-cup polishing routinely over many maintenance visits could increase client risk for dental caries and tooth structure loss. Use of a fluoride-containing prophylaxis paste replaces some of the fluoride lost from abrasive polishing procedures, but a professionally applied, high-concentration topical fluoride treatment is necessary to compensate for the lost fluoride. Demineralized tooth areas lose three times more surface structure during polishing than intact enamel. Newly erupted teeth are not fully mineralized, so polishing should be avoided on these teeth.
Dentin and cementum are less resistant to abrasion than tooth enamel. Because dentin and cementum can be abraded 25 times faster and 35 times faster, respectively, than enamel, polishing roots should be avoided. Moreover, tooth sensitivity to rubber-cup polishing may occur in cervical areas owing to the thinness of enamel in these areas and exposed dentin or cementum. Finally, coarse abrasives may actually roughen tooth surfaces, causing increased oral biofilm accumulation, and if necessary for extrinsic stain removal should be followed with less-abrasive paste (first medium grit followed by fine grit) to minimize enamel scratches. The rubber cup must be changed with each smaller grit.
Adverse Effects on Restorations
Rubber-cup polishing may damage restorations by making surfaces rough. Gold, amalgam, conventional composites, and microfilled composites exhibit surface roughness after being polished with a prophylaxis paste. Therefore prophylaxis pastes designed for cosmetic restorations are recommended (e.g., Soft Shine Cosmetic Polishing Paste, Waterpik, Fort Collins, Colorado). If polishing a titanium implant is desired, a nonabrasive prophylaxis paste made for implants or a mild, nonabrasive toothpaste is used. (Note that air polishing cannot be safely used on dental implants.) Restorative materials should be polished with the appropriate agent to maintain restorations.
Adverse Effects on Soft Tissues
Irritation of soft tissues can result from rubber-cup polishing if the tissues are inflamed; particles of the abrasive agent can become embedded in the gingiva and delay healing. Trauma to gingiva can also occur with improper technique, especially if the rubber cup is used at a high speed or with excessive pressure and/or is kept in one place too long. Pressure should be enough to flatten one edge of the cup so it slips into the sulcus but not enough so that the entire lip of the cup is flattened. Generation of heat with the handpiece and rubber cup may initiate pulpal necrosis, especially in primary teeth with large pulps. Pulpal discomfort may also occur if pressure, speed, and abrasiveness of the polishing paste are sufficient to generate heat.
Adverse Effects on Environment
Aerosol production during rubber-cup polishing may transmit infectious disease to people in the dental care setting. Microorganisms remain suspended in the air for hours and settle on environmental surfaces. Inhalation of contaminated aerosols could be problematic for those with respiratory problems or who are immunocompromised. The clinician may also experience occupational injury from the weight of the handpiece. Most of these problems can be minimized by adhering to appropriate protocols for technique, ergonomic principles and equipment, and infection control and by using rubber-cup polishing selectively.
Risk Management Strategies for Rubber-Cup Polishing
Because of the adverse effects discussed in the preceding section, contraindications to rubber-cup polishing exist (Box 27-1). After scaling and root planing, stains and biofilm on teeth can be removed during hand-activated and mechanized scaling; biofilm can also be removed mechanically using a toothbrush and interdental aids. When stains remain after scaling, selective polishing is indicated.
BOX 27-1 Contraindications and Precautions to Rubber-Cup Polishing
∗ Precautions needed, but these are not strict contraindications.
Selective Rubber-Cup Polishing
Selective rubber-cup polishing, also known as extrinsic stain removal, is the practice of omitting tooth polishing where there is no extrinsic tooth stain and when the procedure could cause loss of tooth structure, damage to restorative materials, or gingival abrasion or undermine the systemic health of the client. The procedure is applied “selectively” by polishing only those tooth surfaces that are stained, avoiding newly erupted teeth, cementum, dentin, demineralized areas, and restored tooth surfaces that could be damaged by the process. Not all teeth need to be polished on a routine basis. Enamel is approximately 2.5 mm thick on cuspal surfaces, with considerable thinning at the cervix of the tooth. Polishing with pumice for 30 seconds removes about 4 µm of the fluoride-rich outer layer of enamel. These effects are cumulative over years of polishing during maintenance visits.
Tooth polishing (extrinsic stain removal) has no therapeutic value in terms of periodontal health. Although it is a cosmetic concern, tooth stain is not pathologic. Because extrinsic stain and oral biofilm do not block fluoride uptake in enamel, topical fluoride applications can be provided without first polishing the teeth.
The value of stain removal lies in the client’s desire for whiter teeth and a pleasing facial appearance. Therefore selective polishing of only tooth surfaces with stain (instead of the routine polishing of all tooth surfaces) is recommended. For clients to make an informed decision, they need to be educated about the cumulative adverse effects of tooth polishing, its lack of therapeutic value, and the purely cosmetic nature of the procedure. Clients should be informed about alternative methods of stain removal and management.
Oral Prerinse
Before selective polishing, all clients should rinse with a preprocedural antimicrobial rinse for 30 seconds to decrease infectious aerosol production. Protective safety glasses for the client are recommended for all intraoral procedures, especially for those that generate spatter. The dental hygienist follows the Centers for Disease Control and Prevention (CDC) guidelines for infection control to ensure that clients and clinicians are protected from health risks.
Postprofessionally Applied Topical Fluoride Therapy
When selective polishing is indicated, or when the client requests the rubber-cup polishing procedure on all teeth even after an informed discussion about harmful effects, the rubber-cup polishing procedure should be followed by professionally applied topical fluoride therapy.
Client Education and Motivation
Often clients with poor oral hygiene are unaware of the look and feel of clean, polished teeth. Teeth with oral deposits may feel and look normal to the individual after a period of time. Scaling and polishing teeth in half of the mouth is an effective strategy because it allows the client to experience the look and feel of clean tooth surfaces and a positive gingival response as compared with what the client has been living with. When selective polishing is used as a teaching strategy, most clients take notice and cannot wait until the other half of the mouth is treated. Through professional dental hygiene care and selective polishing, a new baseline for the client is established to maintain at home.
Armamentarium for Rubber-Cup Polishing
Prophylaxis Paste (Figure 27-2, A)
Abrasives used in polishing agents (e.g., prophylaxis pastes) are applied selectively based on amount and type of extrinsic stain, and whether the surface to be polished is tooth or restored surface. Prophylaxis pastes are pleasantly flavored and may contain active ingredients to prevent dental caries (fluoride), enhance tooth smoothness and enamel luster (e.g., amorphous calcium phosphate [ACP], casein phosphopeptides [CPP-ACP]), improve tooth whiteness (e.g., hydrogen peroxide), or decrease tooth sensitivity (e.g., fluoride, arginine bicarbonate, CPP-ACP, ACP, bicarbonate or carbonate). Types of prophylaxis pastes are:
Hydrogen peroxide–containing prophylaxis paste (Natural Elegance)
NovaMin-containing prophylaxis paste (with calcium, phosphorus, sodium and silica) (NuCare Prophy Paste)
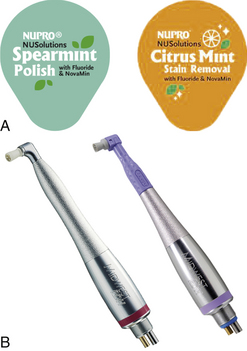
Figure 27-2 A, Examples of commercial prophylaxis pastes in unit doses. B, Low-speed handpieces.
(Courtesy DENTSPLY Preventive Care Division, York, Pennsylvania.)
Prophylaxis pastes containing microfine white sapphire particles are also marketed to restore the original luster to veneer, composite, gold, and porcelain restorations and can also be used safely on natural teeth (e.g., Soft Shine cosmetic polishing paste). Toothpastes also contain mild abrasives for cleaning with a toothbrush or with a rubber cup and low-speed handpiece. The least abrasive type of paste necessary for stain removal should be used at a low speed with light intermittent pressure.
Prophylaxis Angle and Dental Handpiece (Figure 27-2, B)
A disposable or stainless steel prophylaxis angle attached to a low-speed, ergonomically designed handpiece is used for selective polishing.
The head of the prophylaxis angle will have one of the following:
Rubber cup (screw-type, latch-type, or snap-on or on a disposable prophylaxis angle)—used on all tooth surfaces Flat or pointed bristle brush (screw-type, latch-type, or snap-on or on a disposable prophylaxis angle)—for stain removal on occlusal surfaces and in fossa (Figure 27-3)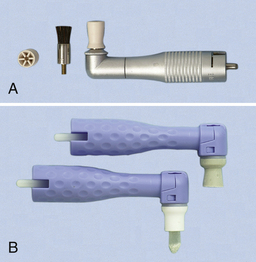
Figure 27-3 A, Metal prophylaxis angle with rubber cup and brush. B, Disposable plastic prophylaxis angles with rubber cup and with brush.
(From Newman MG, Takei HH, Klokkevold PR, Carranza FA: Carranza’s clinical periodontology, ed 10, St Louis, 2006, Saunders.)
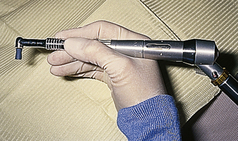
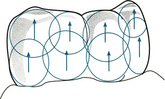
Figure 27-5 Overlapping strokes to ensure complete coverage of the tooth as needed.
(From Bird DL, Robinson DS: Torres and Ehrlich modern dental assisting, ed 9, St Louis, 2009, Saunders.)
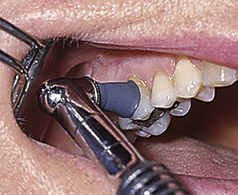
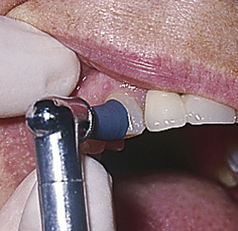
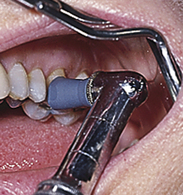
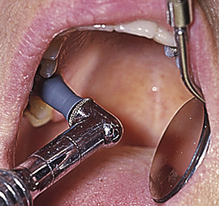
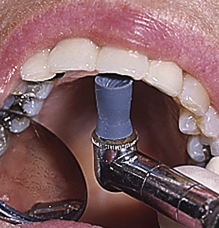

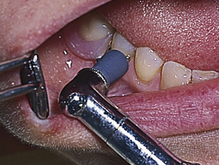

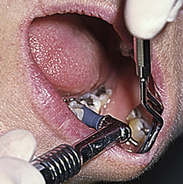
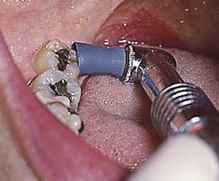
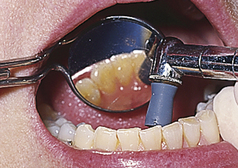
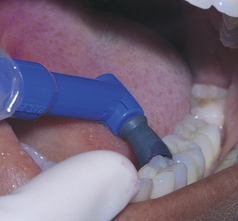
Figure 27-17 Polishing the lingual surfaces of the mandibular left posterior quadrant.
(From Bird DL, Robinson DS: Torres and Ehrlich modern dental assisting, ed 9, St Louis, 2009, Saunders.)
Handpieces and stainless steel prophylaxis angles are cleaned, lubricated, and sterilized according to manufacturers’ directions. Disposable prophylaxis angles are discarded after each use. Materials and procedures for rubber-cup polishing are outlined in Procedure 27-1.
Procedure 27-1 RUBBER-CUP POLISHING
Photographs courtesy Dr. Margaret Walsh, University of California–San Francisco.
STEPS
Preparation and Positioning
Stroke
Hand Scaling
Hand-activated instruments such as curets and sickle scalers are designed primarily for calculus removal but can also be used for extrinsic stain removal (see Chapter 24). When stain adheres to calculus, it may be efficiently removed along with the calculus. Because hand-activated instruments are small, they can remove stain in areas inaccessible to a rubber cup (e.g., in an embrasure). Hand-activated instruments are not abrasive to enamel surfaces; however, they can remove cementum on root surfaces, so overinstrumentation should be avoided. When moderate to heavy stain is present on root surfaces, the dental hygienist is faced with the problem of removing the stain with the least alteration of exposed cementum or dentin. Because stain removal is only cosmetic, the client should be informed that stain is not associated with oral disease and will not harm teeth or gingiva if not removed. As much stain as possible should be removed during root planing with curets. The less root structure removed, the less chance of root surface sensitivity after the procedure. At present, any method capable of removing stain from root surfaces might also remove cementum.
Sonic and Ultrasonic Scaling Instruments
Ultrasonic and sonic scaling (see Chapter 25) to remove extrinsic stain has the same advantages and disadvantages as when these processes are used for calculus removal. Efficiency and efficacy are the primary benefits for selecting mechanized instruments for stain removal. In addition, a slender tip is able to remove stain on occlusal surfaces and in areas of rotated or overlapped teeth. There is usually good client acceptance, and operator fatigue is minimized compared with hand-activated instrumentation.When comparing the results of studies on the effects of hand-activated instruments versus sonic and ultrasonic instruments on root surface roughness, the findings are ambiguous. Rough cementum and lost tooth structure are encountered with both types of instruments.
Aerosols are created with sonic and ultrasonic instrumentation and if used improperly can generate heat and cause tissue trauma. Aerosols can be minimized with the use of high-volume evacuation.
Air Polishing
Air polishing is a method of stain removal that uses a specially designed device with a handpiece that delivers a spray of warm water and prophy powder (sodium bicarbonate or aluminum trihydroxide) under pressure (see Figures 27-18 and 27-19). An efficient and effective method of stain removal, the air polisher has the following advantages:
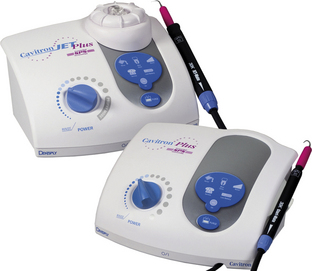
Figure 27-18 Flavored prophy powder for use in air polishing device.
(Courtesy DENTSPLY Preventive Care Division, York, Pennsylvania.)

Figure 27-19 Prophy-Jet and ultrasonic scaler combination.
(Courtesy DENTSPLY Preventive Care Division, York, Pennsylvania.)
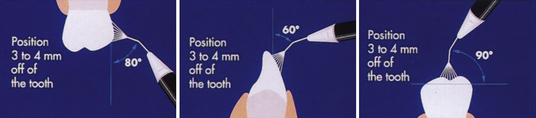
Figure 27-20 Recommended angulations of Prophy-Jet nozzle to tooth surface.
(Adapted from DENTSPLY Preventive Care Division, York, Pennsylvania.)
Air-polishing also is recommended for cleaning and removing extrinsic stain from pits and fissures before placement of dental sealants.
Effects on Enamel, Cementum, and Dentin
Intact enamel surfaces are not damaged when stain removal is accomplished with the air polisher. However, prolonged use of air polishing on cementum and dentin can remove significant tooth structure and should be avoided. Results are inconsistent with regard to which method is ideal for stain removal on root surfaces. Currently it appears that air polishing may be the least damaging and most efficient means of removing stain on enamel, but no polishing method is risk-free for cementum.
Effects on Soft Tissues
Gingival bleeding and abrasion are the most common soft-tissue effects of air polishing. These outcomes are temporary, and healing occurs quickly. However, the tip of the air polisher should be pointed away from the gingiva to avoid tissue trauma.
Clients report a salty taste when sodium bicarbonate prophy powder is used in the device, but it is not objectionable if the water-to-powder ratio is properly adjusted. Laying a moist gauze square on the tongue may prevent tongue irritation and an excessively salty taste. Rinsing with water or mouthwash also helps to reduce the salty taste. Another option is the use of mint-flavored or aluminum trihydroxide prophy powder (see Figure 27-19).
Effects on Restorations
The effects of air polishing on restorative materials have been extensively researched.
Avoid air polishing on or near the following:
Effects on Dental Implants (see Chapter 57)
Until there is more definitive research, the air polisher is not recommended on sapphire and pure titanium implants.
Safety Issues
Air polishing safety concerns for the client, clinician, and others in the treatment area appear in the literature. Client concerns include the following:
These problems can be managed by coating a client’s lips with a protective lubricant, using appropriate technique including safety suction devices, removing contact lenses, wearing safety glasses, and placing a protective drape over the client’s nose and eyes.
Because air polishing may cause bleeding and bacteremia, the American Heart Association (AHA) recommends antibiotic premedication to prevent infective endocarditis for clients at the highest risk for adverse outcomes (see Chapter 10).
It is important for the body to maintain a specific balance between acids and bases. Some individuals cannot adjust if this balance is disturbed. Owing to the potential absorption of sodium bicarbonate by the oral mucosa, air polisher manufacturers caution against using the sodium bicarbonate prophy powder during air polishing with such clients. Limited information is available on the systemic effects of sodium bicarbonate or aluminum trihydroxide absorption from air polishing powder.
Because of the marked rise in aerosols generated with air polishing, additional health hazards potentially exist for clients and healthcare professionals present during or after a procedure. To decrease potential risks, standard precautions including the following should be adhered to:
The clinician needs to wear a well-fitting face mask with recommended bacterial filtration efficiency (BFE) scores of 74% to 98%. The client needs to rinse with a preprocedural antimicrobial such as 0.12% chlorhexidine gluconate for up to 2 minutes to reduce production of infectious aerosols. Disinfect contaminated surfaces as far away as 6 feet from the immediate treatment area to help prevent cross-contamination between clients. Contaminated surfaces, if not covered with disposable plastic drapes, should be cleaned and disinfected with an approved high-level surface disinfectant (see Chapter 7). To ensure safety of clinicians and clients, the CDC guidelines for infection control as outlined previously for rubber-cup polishing are followed.Air polishing is included in the dental hygiene care plan only after a careful review of the client’s health and dental history and a thorough examination of the oral hard and soft tissues. A synopsis of the medical contraindications to air polishing can be found in Box 27-2. Table 27-3 contains a listing of other contraindications and precautions that should be considered when evaluating appropriateness of air polishing for a particular client.
TABLE 27-3 Dental Contraindications and Precautions Related to Air Polishing
| Specially Processed Sodium Bicarbonate Air-Polishing Powder | Aluminum Trihydroxide Air-Polishing Powder (Sodium-Free) | |
|---|---|---|
| Composite restorations or bonding | No | No |
| Luting agents | No | No |
| Porcelain restorations, including crowns, veneers, inlays, onlays | Yes, if margin is avoided; otherwise, no | No |
| Gold (foil or castings) restorations | Yes, if margin is avoided; otherwise, no | No |
| Compomer | No | No |
| Amalgam restorations | Yes | Yes |
| Microfilled composite restorations | No | No |
| Glass ionomer restorations | No | No |
| Hybrid composite restorations | No | No |
| Absence of stain | No | No |
| Exposed cementum or dentin | Yes | Yes |
| Areas of hypersensitivity | No | No |
| Immediately after deep scaling or root planing when acute gingival or periodontal inflammation is present | Yes | Yes |
Air Polishing Technique
Materials and sequence of steps for air polishing are outlined in Procedure 27-2, based on the manufacturer’s guidelines for the Cavitron Prophy-Jet (Dentsply Preventive Care Division, York, Pennsylvania). Manufacturers’ directions should be followed for maintenance and care of equipment.
Procedure 27-2 AIR POLISHING TECHNIQUE
EQUIPMENT
STEPS
Preparation and Positioning
Adaptation and Stroke
Other
INTRINSIC STAIN MANAGEMENT
Although intrinsic stains cannot be removed by traditional professional methods (scaling and selective polishing), they may be managed by tooth bleaching with a chemical oxidizing agent to lighten tooth discolorations or by restorative procedures such as veneers and crowns.
Several commonly used oxidizing agents found both in professionally applied, professionally dispensed and in over-the-counter (OTC) products include hydrogen peroxide, carbamide peroxide, or papain (an enzyme from papaya fruit) as the active ingredient. A whitening product containing 10% carbimide peroxide is equivalent to another product that contains 3.3% hydrogen peroxide. Recognition of intrinsic staining and referral for appropriate treatment address the client’s human need for a wholesome facial image. Intrinsic tooth stain severity usually determines which stain management method is recommended, and these are discussed later in this chapter.
Tooth Whitening
Tooth whitening is a viable alternative for stain management when tooth stains are intrinsic. Tooth whitening is a cosmetic procedure. Many techniques ranging from OTC products to professionally dispensed whitening to in-office laser systems are available and vary significantly in cost to the client. Whitening procedures must be approached with caution. The dental hygienist has a responsibility to understand the processes involved in tooth whitening. It is also important to ensure that clients understand the ramifications of tooth whitening before its initiation. The dental hygienist’s role is summarized in Box 27-3.
BOX 27-3 Dental Hygienist’s Role in Tooth Bleaching
BLEACHING OR WHITENING AGENTS
Over-the-Counter Whitening Products
There are three types of OTC whitening toothpastes:
Toothpaste containing a mild abrasive to remove extrinsic stains and agents to prevent stain formation. All toothpastes contain some abrasives and are capable of potentially removing stains whether they are labeled “whitening” or not. Toothpastes with a high content of abrasives are not recommended for daily use. Toothpaste containing a bleaching agent, such as papain, carbamide peroxide, or hydrogen peroxide (note that the American Dental Association [ADA] Council on Scientific Affairs does not recommend some of them for long-term use). Toothpaste containing titanium dioxide; the titanium dioxide covers extrinsic stains like paint covers a wall and does not change the internal tooth color.Some OTC products are a cause for concern in terms of efficacy and safety owing to the potential for overuse and abuse by uninformed clients. Commercial whitening kits containing an oxidizing agent and materials to form a “boil and fit” mouth tray are available. Oxidizing gel may seep out of improperly fitted trays and harm soft tissues. An acidic prerinse that can damage enamel is found in some kits. Laypersons may not know how to deal with side effects they may encounter. Once removed, extrinsic stain may be prevented by a client’s change in self-care practices.
Without a comprehensive oral examination to determine stain cause and the safest, most appropriate method to use in treating the stain, clients may neglect to seek appropriate care for what may be a serious undiagnosed oral problem. For example, a dark area on a tooth may be due to a carious lesion or a tooth in need of a root canal. Whitening would not remedy either situation. Clients should be encouraged to seek professional care to lighten teeth.
Professionally Dispensed Whitening Systems for Home Use
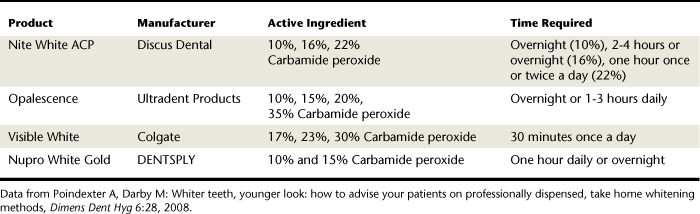
Professionally dispensed whitening systems (Table 27-4) involve the in-office fabrication of a custom mouth tray, dispensing of the appropriate whitening agent, and client education on how this is used at home with a prescribed frequency and time period (Figure 27-21). This procedure is also called nightguard vital bleaching (NGVB). The dentist monitors the client until the desired outcome is achieved. Home whitening with a custom-fitted tray and whitening agent is the superior tooth whitening method because of product innovations that control dentinal hypersensitivity and loss of enamel. It is lower in cost to the client than in-office bleaching, and it has the most scientific evidence supporting its effectiveness. It does require client adherence to the protocol for a good outcome. (See Chapter 35 for fabrication of custom-fitted bleaching trays.) In most cases an oxidizing agent, usually 10% to 30% carbamide peroxide, is loaded into a flexible polyvinyl, custom-made tray that the client wears 1 to 2 hours a day or overnight for a 2- to 6-week period. In addition to the oxidizing agent, Carbopol (carboxypolymethylene polymer) may be added to thicken the gel, improve adherence to the tooth surface, and prolong the release of oxygen. This additive keeps the gel contained within the tray and slows the chemical reaction.
Home whitening is effective in producing a lightened tooth surface, but clients should be informed that the degree of change, especially with tetracycline-stained teeth, may be unpredictable. Therefore client expectations must be clarified before any treatment. Clients need to know the following:
Teeth with horizontal bands or striations of various colors, as seen with tetracycline-stained teeth, may bleach at different rates, making enamel defects more noticeable. Although the teeth may look lighter, they may not necessarily be whiter, owing to their normal, intrinsic tooth color.Side Effects of Tooth Whitening
Short-term side effects are usually minimal and disappear on cessation of treatment. The most common side effects are mild thermal tooth sensitivity and gingival irritation. Tooth sensitivity is attributed to the easy passage of the hydrogen peroxide through the enamel and dentin to the pulp, resulting in a reversible pulpitis. Use of a prescription self-applied fluoride gel or a shortened bleaching exposure time may decrease sensitivity. Clients with recession should not have bleaching because of the possibility of exposed dentin, which provides the hydrogen peroxide a direct route to the pulp. In 10% of the population there is a gap at the cementoenamel junction (CEJ) between the enamel and the cementum, leaving exposed dentinal tubules that can lead to extreme sensitivity. Gingival irritation may occur if the bleaching tray is overfilled. Use of a syringe dosage system, a highly viscous gel, and a properly fitted tray may prevent any excess from escaping the trays.
Occasionally, sore throats, tooth pain, tingling of tissues, and headaches are reported as side effects of tooth bleaching. Slight morphologic changes in the enamel have also been noted with the vital bleaching gels. A study, however, showed that 10% carbamide peroxide did not significantly alter enamel microhardness. Localized microstructural and chemical changes were seen, but these were not clinically significant. Long-term misuse (overuse) of whitening products can decrease enamel hardness.
Although wide variations in data exist concerning composite restorations, some composites may be more susceptible to alterations, and some higher-concentration bleaching agents are more likely to cause these alterations. These changes, however, are unlikely to be clinically significant. No effects on porcelain or ceramic materials have been reported. Whitening of teeth containing amalgam restorations is not contraindicated but should be approached with caution because some changes in amalgam have been noted. Another possible side effect involves the temporomandibular joint (TMJ). When fabricating the bleaching tray, a thin material should be used to avoid interference with the client’s occlusion. No long-term systemic effects have been identified. See Box 27-4 for a complete list of contraindications.
In-Office Whitening Procedures
In-office tooth whitening is any bleaching procedure performed in the office by a dental professional. Techniques may differ based on a number of factors: cause of the stain, tooth vitality, and the number of teeth needing the procedure (single tooth, multiple teeth, one arch, or both arches). Office time involved, client preference and compliance, cost, provider preference, and oral assessment findings are additional factors to consider when selecting the most appropriate procedure.
Vital tooth whitening is bleaching a tooth that has a vital pulp. In-office techniques for bleaching vital teeth can be classified as professional bleaching, power bleaching, conventional or traditional bleaching, laser bleaching, or combination bleaching. Often, the combination of office and home whitening procedures enhances the desired effect. Nonvital tooth whitening is bleaching an endodontically treated tooth that has no pulp. For a nonvital tooth or teeth, the procedure is usually intracoronal and may also be combined with one of the procedures indicated for vital teeth.In-Office Bleaching Procedures for Vital Teeth
Manufacturers of in-office bleaching systems have specific instructions for use of their products, and their instructions should always be followed. In general, the bleaching procedure for vital teeth involves the following:
Placement of a rubber dam, use of a light-cured paint-on dam, and/or protection of the gingival tissues with a petroleum jelly is necessary. Teeth may or may not be etched before placement of the bleaching agent. A gel or liquid bleaching agent, usually 35% hydrogen peroxide, is applied to the enamel surface. If the liquid form is used, gauze squares saturated with the bleaching agent are placed on the facial surfaces. The bleaching agent is allowed to remain on the teeth for about 30 minutes. A heat source, visible light curing lamp (resin curing light), plasma arc, light-emitting diode (LED), xenon-halide light, or laser is applied to catalyze the oxidizing agent and accelerate the chemical reaction. The value of the heat or light source has not been established in the literature (Figure 27-22). Local anesthesia must never be used during bleaching. Client discomfort is monitored at all times to avoid tissue burns or excess heat buildup in the pulp. Analgesics may be recommended for the first 24 hours postoperatively if tooth sensitivity is experienced. At the end of the procedure, all excess bleaching agent should be removed with water before removing the rubber dam.
Figure 27-22 In-office bleaching procedure with a rubber dam, bleaching gel, and a resin curing light as the heat source.
(Courtesy Dr. Brent B. Hutson.)
The in-office bleaching procedure lasts from 30 to 60 minutes and may involve one to three appointments at 2- to 4-week intervals until teeth sufficiently lighten or no further color change is noted. This time interval between appointments allows the pulp to settle down in case irritation develops. Clients should be informed that white spots on the tooth might become whiter and result in a blotchy appearance. If tooth-colored restorations need to be done, it is advisable to wait 2 to 3 weeks to determine the correct color shade. In addition, resin bonds are significantly weakened after tooth bleaching, so this time interval prevents failed restorations owing to inadequate bond strength.
Side Effects of In-Office Bleaching Procedures
Gingival burns and tooth sensitivity can occur. Although rare, more serious side effects such as acute irreversible pulpitis and pulp necrosis may occur after vital bleaching with 35% hydrogen peroxide. Long-term stability is unknown because there are no controlled clinical studies that follow clients for years after bleaching. The use of the light as a catalyst may cause marked photosensitivity and hyperpigmentation in persons taking acne medication, antidepressants, anticancer drugs, antipsychotics, diuretics, hypoglycemics, and nonsteroidal antiinflammatory drugs (NSAIDS). Skin should be shielded.
Laser-Assisted Bleaching
Laser manufacturers claim that laser bleaching is faster, produces fewer side effects, and increases tooth whitening. Lasers are used primarily to accelerate the chemical reaction of the bleaching agent and do not bleach teeth alone. Laser bleaching, however, has not been supported by clinical studies to confirm safety and efficacy. Future research may confirm that lasers are effective for deep stains that conventional bleaching cannot alter. Lasers are more costly and technique sensitive than traditional in-office methods. The U.S. Food and Drug Administration (FDA) granted market clearance to the argon or CO2 laser for bleaching teeth. The argon laser is approved for use only as a heat source. Clients who desire immediate whitening results may have one in-office procedure to begin the whitening process, followed by 1 or 2 weeks of using home trays to complete the process.
Power and Combination Bleaching
Alternatively, `instead of the heat-activated in-office procedure, a high concentration of hydrogen peroxide, 30% to 50%, can be placed in the client’s custom-fabricated bleaching trays and worn for about 30 minutes without the application of heat. The client is monitored in the office for color change and discomfort. Following the one-time high-concentration office procedure, the client continues the traditional at-home bleaching process with the lower-concentration bleaching agent.
Intracoronal Bleaching
Intracoronal bleaching, a method of in-office bleaching, is used only for bleaching endodontically treated teeth and is usually performed by an endodontist. With both of the following techniques, the bleaching agent is placed within the tooth. Nonvital bleaching techniques usually fall into these two categories:
Thermocatalytic: The bleaching agent is usually 30% hydrogen peroxide, sodium perborate, or sodium hypochlorite. The agent is placed within the coronal portion of the pulp chamber with a cotton pellet after the cervical portion has been sealed with zinc phosphate or zinc oxide–eugenol cement to prevent penetration of the bleaching agent into the dentinal tubules and the possibility of cervical resorption. Heat (heat lamp, heated instrument, electric heating device, or an ultraviolet light) is applied to hasten the reaction. Walking: The walking bleach method is so called because a paste of sodium perborate and hydrogen peroxide is placed in the coronal portion of the pulp chamber, the tooth is sealed, and the client is seen again in a week. At that time, the paste may be reapplied if further alteration in color is necessary. Often, only a small amount of color change can be achieved, but it may be sufficient to satisfy the client. This procedure is technique sensitive; failure to follow exact protocols may result in severe pain during or following the procedure. If the cervical area is not sealed well, cervical resorption may occur. To enhance the final effect, both nonvital bleaching methods may be combined with the professional or home bleaching methods for vital teeth.Microabrasion
Microabrasion is a procedure that removes superficial dark stains or “white spot” decalcified areas of enamel. It is more effective on mild stains than in moderate or severe cases. This procedure involves removal of a thin layer of enamel and uses a paste of abrasives and hydrochloric acid on a specially designed prophy angle attachment. Some commercially prepackaged kits are available. Although considered effective, this procedure is technique sensitive, may require multiple applications of the abrasive paste and hydrochloric acid, and removes some tooth structure.
Side Effects
Burns, sensitivity, pulpal damage, and noticeable removal of the outermost fluoride-rich layer of tooth enamel can occur. It is sometimes difficult for the dentist to determine the exact amount of enamel to remove, and a restorative procedure may be needed if the stain is deep. Long-term studies are not available. Home bleaching may be recommended after microabrasion, to enhance whitening.
Restorative Management of Stained Teeth
Deep stains, mottled or pitted teeth, and grayish-blue stains may need restorative procedures by the dentist, such as composite bonding, veneers, or full crowns to provide the client with a more esthetic appearance than can be achieved by whitening or microabrasion. All bleaching of teeth should be done before restorative procedures to ensure that crowns, bondings, and veneers will match the new enamel shade. Although not as conservative as bleaching, these procedures may assist the client in achieving a more desirable oral facial image. A dentist performs most restorative procedures, but the dental hygienist should be able to explain all procedures to the client.
Veneers
Veneers are thin, shell-like facings, usually made of composite resin or porcelain, bonded onto anterior facial tooth surfaces.
Indirect technique: The veneer is fabricated in a dental laboratory on a stone die made from an impression; a small amount of tooth structure must be removed for this restoration. Direct technique: Teeth indicated for composite bonding are isolated, polished with pumice, and acid-etched. A bonding agent and an optional opaquer can be added before the composite is molded onto the facial surface. This procedure can change the appearance and shape of the tooth. After curing, the bonded area must be contoured, finished, and polished. Relatively inexpensive, this procedure is done quickly, requires only one visit, is good for young teeth with large pulps, and does not remove much tooth structure. However, it can look bulky and has the potential to chip and stain over time.Porcelain veneers, although expensive, are ideal for older teeth. Fabrication involves an indirect technique as follows:
Tooth is prepared by removing a thin layer of enamel, making an impression, and sending the impression to the laboratory for construction of the porcelain veneer. On the second visit the temporary veneer is removed and the permanent veneer is checked for proper fit. The tooth is then isolated, polished with pumice, etched, rinsed, and dried. A bonding agent and an optional opaquer are applied. The inside of the veneer is conditioned, and composite is added to bond the veneer to the tooth. The veneer is placed, and excess composite is removed.If not designed properly, porcelain veneers can be bulky, stain at the margins, and chip. When well designed, they have good esthetic properties and are more durable than composite veneers.
Full-Coverage Crowns
Full crowns are used when caries, defects, or restorations on the teeth are extensive. In some cases they may be indicated after endodontic treatment to prevent brittle enamel from fracturing. Good esthetics can be achieved with crowns, but a large amount of tooth structure must be removed. Crowns should not be recommended just to make the teeth appear whiter. More conservative techniques are available and should be discussed with the informed client.
LEGAL ASPECTS OF EXTRINSIC STAIN REMOVAL AND TOOTH WHITENING
State statutes regarding the legality of polishing teeth by allied dental personnel must be followed. Delegation of extrinsic stain removal procedures to dental assistants in states where assistants are not legally allowed to perform them is illegal. An ethical issue arises when delegation to dental assistants is legal but a lack of background knowledge exists to determine when polishing is contraindicated.
The dental practice act in each jurisdiction will determine the extent of the dental hygienist’s legal involvement in whitening or restorative services and should be consulted before any clinical whitening service is provided. If the whitening system is defined as a topical medication under the dental practice act, then dental hygienists may, in some states, provide in-office whitening. The exact technique for in-office whitening is dependent on the specific system used, and manufacturers’ directions are followed for maximum safety and efficacy. Protection of the client’s gingiva, lips, eyes, and clothing is highly recommended. Some state dental practice acts specifically state that only licensed dentists may provide laser bleaching.
CLIENT EDUCATION TIPS
Soft deposits return promptly after professional dental hygiene care. Daily oral self-care using mechanical and chemotherapeutic methods to control oral biofilm and oral infection is critical for long-term oral and systemic health. Explain oral self-care interventions to minimize recurrence of extrinsic stains in the context of the client’s readiness to change. Explain adverse effects of tooth polishing on tissues, restorative materials, and dental care environment. Explain rationale for selective polishing and why teeth should not be polished at each continued-care appointment.LEGAL, ETHICAL, AND SAFETY ISSUES
All recommended guidelines on the safe use of rubber cup, air polishing, and tooth bleaching systems must be followed to minimize client risk. Clients must be informed of and consent to procedures that may harm tooth structure, oral soft tissues, and restorations before the performance of those procedures. Risk management strategies for treating medically compromised or immunocompromised clients must be followed. State statutes regarding the legality of polishing teeth by allied dental personnel must be followed. Delegation of extrinsic stain removal procedures to dental assistants in states where assistants are not legally allowed to perform them is illegal. An ethical issue arises when delegation to dental assistants is legal but a lack of background knowledge exists to determine when polishing is contraindicated.KEY CONCEPTS
Rubber-cup polishing, air polishing, and bleaching are selective procedures that should be included in dental hygiene care plans only after client assessment is complete. Selective polishing is the practice of omitting tooth polishing in areas where there is no stain to avoid removing some of the fluoride-rich outer layer of enamel and other adverse effects on teeth.CRITICAL THINKING EXERCISES
ACKNOWLEDGMENT
The authors acknowledge Marylou E. Gutmann for her past contributions to this chapter.
Refer to the Procedures Manual where rationales are provided for the steps outlined in the procedures presented in this chapter.
Visit the  website at http://evolve.elsevier.com/Darby/Hygiene for competency forms, suggested readings, glossary, and related websites.