General Approaches Toward Examining the Child
 Ordinarily, the sequence for examining patients follows a head-to-toe direction. The main function of such a systematic approach is to provide a general guideline for assessment of each body area to avoid omitting segments of the examination. The standard recording of data also facilitates exchange of information among different professionals. The typical organization of a physical examination is in the chapter outline. In examining children, this orderly sequence is frequently altered to accommodate the child’s developmental needs, although the examination is recorded following the head-to-toe model. Using developmental and chronologic age as the main criteria for assessing each body system accomplishes several goals:
• Minimizes stress and anxiety associated with assessment of various body parts
• Fosters a trusting nurse-child-parent relationship
• Allows for maximum preparation of the child
• Preserves the essential security of the parent-child relationship, especially with young children
• Maximizes the accuracy and reliability of assessment findings
Preparation of the Child
Although the physical examination consists of painless procedures, for some children the use of a tight arm cuff, probes in the ears and mouth, pressure on the abdomen, and a cold piece of metal to listen to the chest are stressful. Therefore the nurse should use the same considerations discussed in Chapter 27 for preparing children for procedures. In addition to that discussion, general guidelines related to the examining process are given in the Nursing Care Guidelines box.
 NURSING CARE GUIDELINES
Performing Pediatric Physical Examination
Perform the examination in an appropriate, nonthreatening area:
• Have room well lit and decorated with neutral colors.
• Have room temperature comfortably warm.
• Place all strange and potentially frightening equipment out of sight.
• Have some toys, dolls, stuffed animals, and games available for child.
• If possible, have rooms decorated and equipped for different-age children.
• Provide privacy, especially for school-age children and adolescents.
Provide time for play and becoming acquainted.
Observe behaviors that signal child’s readiness to cooperate:
If signs of readiness are not observed, use the following techniques:
• Talk to parent while essentially “ignoring” child; gradually focus on child or a favorite object, such as a doll.
• Make complimentary remarks about child, such as appearance, dress, or a favorite object.
• Tell a funny story or play a simple magic trick.
• Have a nonthreatening “friend” available, such as a hand puppet to “talk” to child for the nurse (see Fig. 6-26, A).
If child refuses to cooperate, use the following techniques:
• Assess reason for uncooperative behavior; consider that a child who is unduly afraid may have had a traumatic experience.
• Try to involve child and parent in process.
• Avoid prolonged explanations about examining procedure.
• Use a firm, direct approach regarding expected behavior.
• Perform examination as quickly as possible.
• Have attendant gently restrain child.
• Minimize any disruptions or stimulation.
Begin examination in a nonthreatening manner for young children or children who are fearful:
• Use activities that can be presented as games, such as test for cranial nerves (see Table 6-13) or parts of developmental screening tests (see Appendix A).
• Use approaches such as Simon Says to encourage child to make a face, squeeze a hand, stand on one foot, and so on.
If several children in the family will be examined, begin with most cooperative child to model desired behavior.
Involve child in examination process:
• Provide choices, such as sitting on table or in parent’s lap.
• Allow child to handle or hold equipment.
• Encourage child to use equipment on a doll, family member, or examiner.
Examine child in a comfortable and secure position:
Proceed to examine the body in an organized sequence (usually head to toe) with the following exceptions:
• Alter sequence to accommodate needs of different-age children (see Table 6-2).
• In emergency situation, examine vital functions (airway, breathing, and circulation) and injured area first.
Reassure child throughout the examination, especially about bodily concerns that arise during puberty.
Discuss findings with family at the end of the examination.
Praise child for cooperation during the examination; give a reward such as a small toy or sticker.
The physical examination should be as pleasant as possible, as well as educational. For example, use of a detailed drawing or anatomically correct doll can help preschoolers and older children learn about their bodies (Vessey, 1995). The paper-doll technique is a useful approach to teaching children about the body part that is being examined (Fig. 6-5). At the conclusion of the visit, the child can bring home the paper doll as a memento.

Table 6-2 summarizes guidelines for positioning, preparing, and examining children at various ages. Because no child fits precisely into one age category, it may be necessary to vary the approach after a preliminary assessment of the child’s developmental achievements and needs. Even with the best approach, many toddlers are uncooperative and inconsolable for much of the physical examination. However, some seem intrigued by the new surroundings and unusual equipment and respond more like preschoolers than toddlers. Likewise, some early preschoolers may require more of the “security measures” employed with younger children, such as continued parent-child contact, and less of the preparatory measures used with preschoolers, such as playing with the equipment before and during the actual examination (Fig. 6-6).
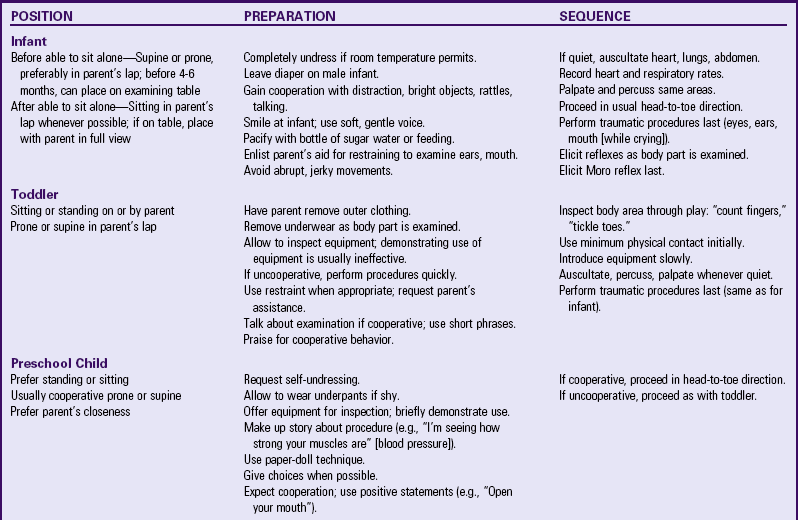
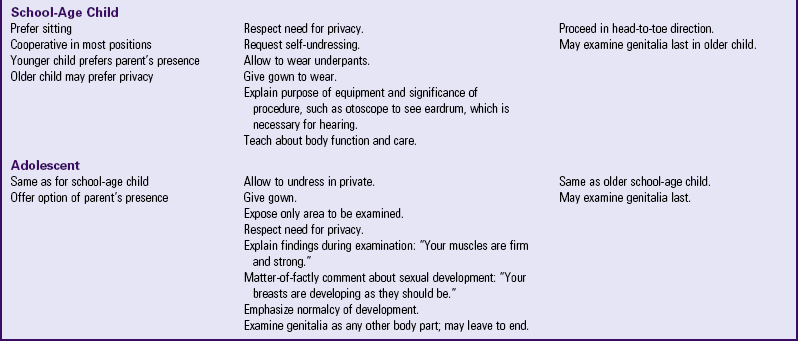
Despite numerous variations in the general approaches, some common ones are detailed here. For example, the suggested sequence may change considerably when the child is in pain or when obvious physical defects are present. In either situation, examine the affected area last to minimize distress early in the examination and to focus on normal, healthy, functioning body parts.
Physical Examination
Although the approach to and sequence of the physical examination differ according to the child’s age, the following discussion outlines the traditional model for physical assessment. The focus includes all pediatric age-groups; however, see Chapter 8 for a detailed discussion of a newborn assessment. Because the physical examination is a vital part of preventive pediatric care, Fig. 6-7 gives a schedule for periodic health visits.
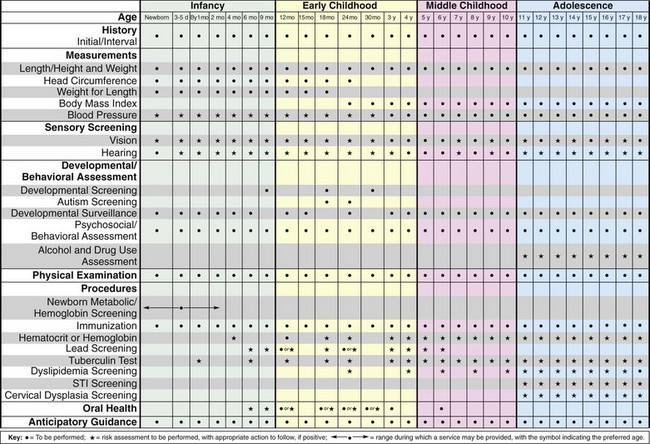
Fig. 6-7 Preventive health care chart. STI, Sexually transmitted infection. (Modified from American Academy of Pediatrics Committee on Practice and Ambulatory Medicine and Bright Futures Steering Committee: Recommendations for preventive pediatric health care, Pediatrics 120(6):1376, 2007.)
Growth Measurements
Measurement of physical growth in children is a key element in evaluating their health status. Physical growth parameters include weight, height (length), skinfold thickness, arm circumference, and head circumference. Values for these growth parameters are plotted on percentile charts, and the child’s measurements in percentiles are compared with those of the general population.
 Skill—Measuring Physical Growth
Growth Charts
The most commonly used growth charts in the United States are from the National Center for Health Statistics (NCHS) (Ogden, Kuczmarski, Flegal, et al, 2002). The growth charts have been revised to include the body mass index–for-age (BMI-for-age) charts, 3rd and 97th smoothed percentiles for all charts, and the 85th percentile for the weight-for-stature and BMI-for-age charts (see Appendix B). The data were collected from five national surveys between 1963 and 1994. The revised charts have eliminated the disjunctions between the curves for infants and other children and have been extended for children and adolescents to 20 years.
The weight-for-age percentile distributions are now continuous between the infant and the older child charts at 24 to 36 months. The length-for-age to stature-for-age and weight-for-length to weight-for-stature curves are parallel in the overlapping ages of 24 to 36 months. The revised weight-for-stature charts provide a smoother transition from the weight-for-length charts for preschool-age children.
The most prominent change to the complement of growth charts for older children and adolescents is the addition of the BMI-for-age growth curves. The BMI-for-age charts were developed with national survey data (1963 to 1994), excluding data from the 1988 to 1994 National Health and Nutrition Examination Surveys III (NHANES III) for children older than 6 years because an increase in body weight and BMI occurred between NHANES III and previous national surveys. Without this exclusion, the 85th and 95th percentile curves would have been higher, and fewer children and adolescents would have been classified as at risk of or overweight. Therefore the BMI-for-age growth curves do not represent the current population of children older than 6 years of age.
 NURSING ALERT
The sex-specific BMI-for-age charts for ages 2 to 20 years replace the 1977 NCHS weight-for-stature charts that were limited to prepubescent boys younger than  years and with statures less than 145 cm (4 feet, 9 inches), and to prepubescent girls younger than 19 years and with statures less than 137 cm (4 feet, 6 inches).
Breast- and Formula-Fed Infants: The national survey data better represent the combined size and growth patterns of the general U.S. population (1971 to 1994). Over the past 30 years in the United States, approximately half of all infants were reported to have been breast-fed, and approximately one third were breast-fed for 3 months or more. Therefore, compared with the 1977 NCHS growth charts, the nationally representative data on which the revised infant growth charts are based better represent the combined growth patterns of breast-fed and formula-fed infants in the U.S. population (Ogden, Kuczmarski, Flegal, et al, 2002).
Special Groups: Although differences in size and growth occur among the major racial and ethnic groups in the United States, these appear to be small and inconsistent. Therefore the revised growth charts include all infants and children whatever their race or ethnicity. Because the growth patterns of preterm, very low–birth-weight (VLBW) (<1500 g [3.3 lb]) infants are considerably different from those of higher birth-weight, full-term infants and specialized growth charts exist to track the growth of VLBW infants, data for VLBW infants were excluded from the revised charts.
Version of the Growth Charts: Three different versions of the charts are available (www.cdc.gov/growthcharts). The first set contains all nine smoothed percentile lines (3rd, 5th, 10th, 25th, 50th, 75th, 90th, 95th, 97th), and the second and third sets contain seven smoothed percentile lines. The second set contains the 5th and 95th percentile lines, and the third set contains the 3rd and 97th percentile lines at the extreme ends of the distribution. In addition, the charts for weight-for-stature and BMI-for-age contain the 85th percentile. In all the growth charts, age is truncated to the nearest full month, for example, 1 month (1.0 to 1.9 months), 11 months (11.0 to 11.9 months), and 23 months (23.0 to 23.9 months).
The three sets of charts are provided to meet the needs of various users. Set 1 shows all the major percentile curves but may have limitations when the curves are close together, especially at the youngest ages. Most users in the United States may wish to use the format shown in set 2 for the majority of routine clinical applications (see Appendix C). Pediatric endocrinologists and others dealing with special populations, such as children with failure to thrive, may wish to use the format in set 3.
Nurses are often responsible for measuring growth in children, so it is essential that they understand the revised growth charts. Several important differences exist between the 1977 and the revised charts with significant implications for classifying children as underweight or overweight. Nurses need to become familiar with determining BMI, which only requires information about the child’s weight and height.* With the increasing number of overweight children in the United States, the BMI charts are a critical component of children’s physical assessment.
NURSING ALERT
BMI-for-age may be used to identify children and adolescents at the upper end of the distribution who are either overweight (≥95th percentile) or at risk for being overweight (≥85th and <95th percentile) (Ogden, Carroll, and Flegal, 2008). Formulas for determining BMI are available at www.cdc.gov/nccdphp/dnpa/bmi and in Appendix B.
Children whose growth may be questionable include:
• Children whose height and weight percentiles are widely disparate (e.g., height in the 10th percentile and weight in the 90th percentile, especially with above-average skinfold thickness)
• Children who fail to follow the expected growth velocity in height and weight, especially during the rapid growth periods of infancy and adolescence
• Children who show a sudden increase (except during puberty), decrease, or no change in a previously steady growth pattern.
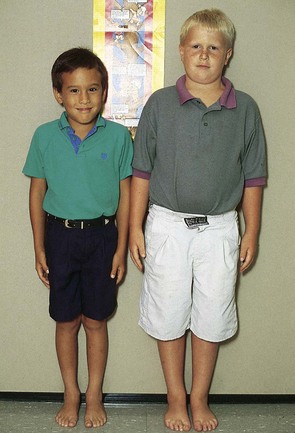
Because growth is a continuous but uneven process, the most reliable evaluation lies in comparing growth measurements over time. It is important to remember that normal growth patterns vary among children the same age (Fig. 6-8).
Ethnic Differences in Growth: A potential concern with the U.S. growth charts is their accuracy in evaluating the growth of children from different ethnic and socioeconomic backgrounds. These growth charts can serve as a reference guide for all racial or ethnic groups if used from the perspective that different groups of children have varying normal distributions on the growth curves.
Length
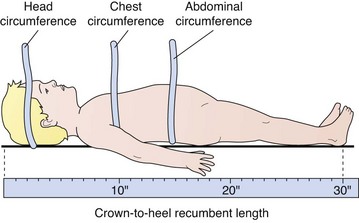
The term length refers to measurements taken when children are supine (also referred to as recumbent length). Until children are 24 months old (or 36 months if using the chart for birth to 36 months), measure recumbent length. Because of the normally flexed position during infancy, fully extend the body by (1) holding the head in midline, (2) grasping the knees together gently, and (3) pushing down on the knees until the legs are fully extended and flat against the table. If using a measuring board, place the head firmly at the top of the board and the heels of the feet firmly against the footboard.
If such a measuring device is not available, measure length by placing the child on a paper-covered surface, marking the end points of the top of the head and the heels of the feet, and measuring between these two points (Fig. 6-9). For accurate measurement, hold the writing utensil at a right angle to the table when marking the cephalic point; position the feet with the toes pointing directly to the ceiling when marking the heel point. Regardless of the method used, have someone assist in holding the child’s head in midline while you extend the legs and take the measurements.
Height
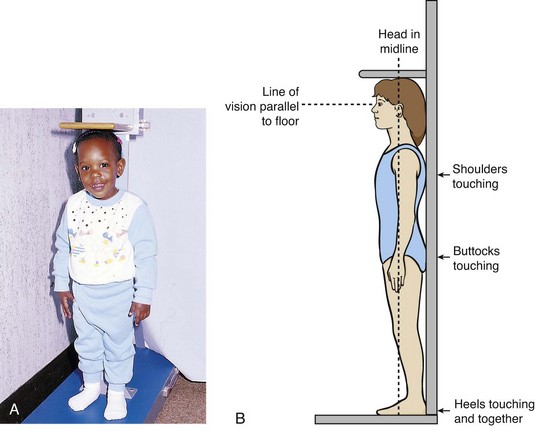
The term height (or stature) refers to the measurement taken when a child is standing upright. Measure height by having the child, with shoes removed, stand as tall and straight as possible, with the head in midline and the line of vision parallel to the ceiling and floor. Be certain the child’s back is to the wall or other vertical flat surface, with the heels, buttocks, and back of the shoulders touching the wall and the medial malleoli touching if possible (Fig. 6-10). Check for and correct bending of the knees, slumping of the shoulders, or raising of the heels.
NURSING TIP
Normally, height is less if measured in the afternoon than in the morning. To minimize this variation, apply modest upward pressure under the jaw or the mastoid processes behind the ears.
For the most accurate measurement, use a wall-mounted unit (stadiometer; see Fig. 6-10). The movable measuring rod of platform scales is accurate only if it remains parallel to the floor and rests securely on the topmost part of the head. To improvise a flat surface for measuring length, attach a paper or metal tape or yardstick to the wall, position the child adjacent to the tape, and place a three-dimensional object, such as a thick book or box, on top of the head. Rest the side of the object firmly against the wall to form a right angle. Measure length or stature to the nearest 1 mm or  inch.
inch.
Weight
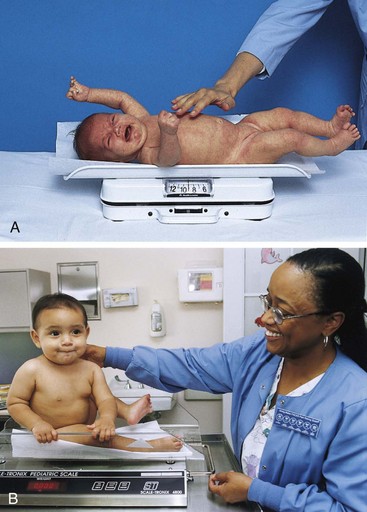
Weight is measured with an appropriately sized balance beam scale, which measures weight to the nearest 10 g (0.35 oz) for infants and 100 g (0.22 lb) for children. Before weighing the child, balance the scale by setting it at 0 and noting if the balance registers exactly in the middle of the mark. If the end of the balance beam rises to the top or bottom of the mark, more or less weight, respectively, is needed. Some scales are designed to self-correct, but others need to be recalibrated by the manufacturer. Scales vary in their accuracy; infant scales tend to be more accurate than adult platform scales, and newer scales tend to be more accurate than older ones, especially at the upper levels of weight measurement. When precise measurements are necessary, two nurses should take the weight independently; if there is a discrepancy, take a third reading.
Take measurements in a comfortably warm room. When the birth to 36-month growth charts are used, children should be weighed nude. Older children are usually weighed while wearing their underpants or a light gown. However, always respect the privacy of all children. If the child must be weighed wearing some article of clothing or some type of special device, such as a prosthesis or an armboard for an intravenous device, note this when recording the weight. Children who are measured for recumbent length are usually weighed on an infant platform scale and placed in a lying or sitting position. When weighing a child, place your hand lightly above the infant to prevent him or her from accidentally falling off the scale (Fig. 6-11, A) or stand close to the toddler, ready to prevent a fall (Fig. 6-11, B). For maximum asepsis, cover the scale with a clean sheet of paper between each child’s measurement.
Skinfold Thickness and Arm Circumference
Measures of relative weight and stature cannot distinguish between adipose (fat) tissue and muscle. One convenient measure of body fat is skinfold thickness, which is increasingly recommended as a routine measurement. Measure skinfold thickness with special calipers, such as the Lange calipers. The most common sites for measuring skinfold thickness are the triceps (most practical for routine clinical use), subscapula, suprailiac, abdomen, and upper thigh. For greatest reliability, follow the exact procedure for measurement and record the average of at least two measurements of one site.
Arm circumference is an indirect measure of muscle mass. Measurement of arm circumference follows the same procedure as for skinfold thickness except the midpoint is measured with a paper or steel tape. Place the tape vertically, along the posterior aspect of the upper arm to the acromial process and to the olecranon process; half the measured length is the midpoint. Percentiles for triceps skinfold and arm circumference in children are in Appendix B and may be used as reference data. However, the percentiles are not standards or norms, since values between the 5th and 95th percentiles are not ranges of normal.
Head Circumference
Measure head circumference in children up to 36 months of age and in any child whose head size is questionable. Measure the head at its greatest circumference, usually slightly above the eyebrows and pinna of the ears and around the occipital prominence at the back of the skull (see Fig. 6-9). Because head shape can affect the location of the maximum circumference, more than one measurement at points above the eyebrows is necessary to obtain the most accurate measure. Use a paper or metal tape, since a cloth tape can stretch and give a falsely small measurement. For greatest accuracy, use devices marked with tenths of a centimeter, since the percentile charts have only 0.5-cm increments.
Plot the head size on the appropriate growth chart under head circumference. Generally, head and chest circumferences are equal at about 1 to 2 years of age. During childhood, chest circumference exceeds head size by about 5 to 7 cm (2 to 2.75 inches). (For newborns see Physical Assessment, Chapter 8.)
Physiologic Measurements
Physiologic measurements, key elements in evaluating physical status of vital functions, include temperature, pulse, respiration, and blood pressure. Compare each physiologic recording with normal values for that age-group (see inside back cover). In addition, compare the values taken on preceding health visits with present recordings. For example, a falsely elevated blood pressure reading may not indicate hypertension if previous recent readings have been within normal limits. The isolated recording may indicate some stressful event in the child’s life.
As in most procedures carried out with children, treat older children and adolescents much the same as adults. However, give special consideration to preschool children (see Atraumatic Care box). For best results in taking vital signs of infants, count respirations first (before the infant is disturbed), take the pulse next, and measure temperature last. If vital signs cannot be taken without disturbing the child, record the child’s behavior (e.g., crying) along with the measurement.
Temperature
Temperature is the measure of heat content within an individual’s body. The core temperature most closely reflects the temperature of the blood flow through the carotid arteries to the hypothalamus. Core temperature is relatively constant despite wide fluctuations in the external environment. When a child’s temperature is altered, receptors in the skin, spinal cord, and brain respond in an attempt to achieve normothermia, a normal temperature state. In pediatrics, there is a lack of consensus regarding what temperature constitutes normothermia for every child. For rectal temperatures in children, a value of 37° to 37.5° C (98.6° to 99.5° F) is an acceptable range, where heat loss and heat production are balanced. For neonates, a core body temperature between 36.5° and 37.6° C (97.7° and 99.7° F) is a desirable range. In the neonate, obtain temperature measurements for monitoring adequacy of thermoregulation, not fever; therefore temperature measurements in each infant should be carefully considered in the context of the purpose and the environment.
Skill—Measuring Body Temperature
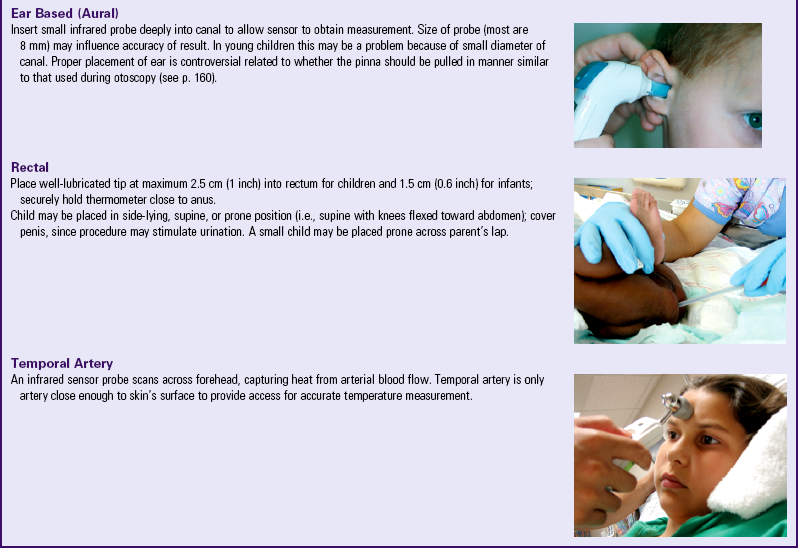
The nurse can measure temperature in healthy children at several body sites via oral, rectal, axillary, ear canal, tympanic membrane, temporal artery, or skin route (Box 6-10). For the ill child other sites for temperature measurement that have been investigated include the urinary bladder, pulmonary artery, and esophageal and nasopharyngeal sites (Martin and Kline, 2004) (Box 6-11). One of the most important influences on the accuracy of temperature is improper temperature-taking technique. Detailed discussion of temperature-taking methods and visual examples of proper techniques are given in Table 6-3. For a critical review of the evidence on temperature taking methods, see the Evidence-Based Practice box.
TABLE 6-3
TEMPERATURE MEASUREMENT LOCATIONS FOR INFANTS AND CHILDREN
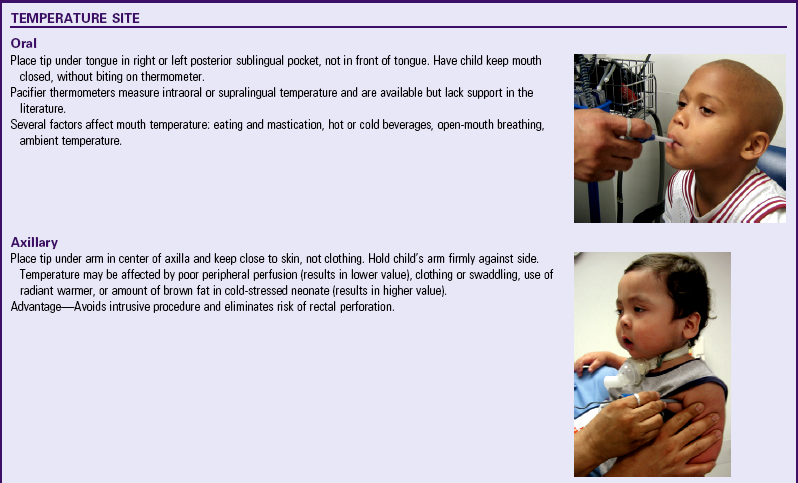
Data from Martin SA, Kline AM: Can there be a standard for temperature measurement in the pediatric intensive care unit? AACN Clin Issues 15(2):254-266, 2004; and Falzon A, Grech V, Caruana B, et al: How reliable is axillary temperature measurement? Acta Paediatr 92(3):309-313, 2003. Oral, axillary, rectal, and temporal artery images courtesy Paul Vincent Kuntz, Texas Children’s Hospital, Houston.
The most frequently used temperature measurement devices in infants and children are as follows (Healthcare Product Comparison System, 2004a, 2004b):
Electronic intermittent thermometers—Measure the patient’s temperature at oral, rectal, and axillary sites and are used as primary diagnostic indicators
Infrared thermometers—Measure the patient’s temperature by collecting emitted thermal radiation from a particular site (e.g., ear canal)
Electronic continuous thermometers—Measure the patient’s temperature during the administration of general anesthesia, treatment of hypothermia or hyperthermia, and other situations that require continuous monitoring
Box 6-12 provides a detailed description of these devices.
BOX 6-12 TYPES OF THERMOMETERS USED TO MEASURE TEMPERATURE IN INFANTS AND CHILDREN
Temperature is sensed with an electronic component called thermistor mounted at the tip of a plastic and stainless steel probe, which is connected to an electronic recorder. A disposable plastic cover is used for infection control.
Temperature measurement appears on digital display within 60 seconds.
Thermal radiation is measured from axilla, ear canal, or tympanic membrane.
Temperature measurement appears on digital display in approximately 1 second.
Three types are available for ear-based use: tympanic, ear canal, and arterial heat balance via the ear canal (AHBE).
Often these devices are all inappropriately referred to as tympanic thermometers.
Temperatures measured in this way reflect arterial (bloodstream) temperature.
Although this is frequently used in pediatric settings (especially ambulatory clinics), debate continues on the reliability of ear-based thermometry in screening febrile children.
Most models use “offsets” for internal calculations that transform ear temperature into supposedly equivalent oral or rectal temperatures.
This measures the infrared heat energy radiating from canal opening, scans canal for highest temperature reading, and then calculates arterial temperature (correlates highly with core or internal body temperature).
It is available in two sizes; smaller size of LighTouch Pedi-Q is for infants and toddlers.
A probe is connected to a microprocessor chip, which translates signals into degrees and sends temperature measurement to digital display.
It is used like an oral electronic thermometer and can be used for measuring oral, rectal, and axillary temperature.
It is more accurate and easier to read, but somewhat more expensive, than plastic strip thermometer.
Liquid Crystal Skin Contact Thermometer (Chemical Dot Thermometer)
This single-use, disposable, flexible thermometer has a specific chemical mixture in each circle that changes color to measure temperature increments of  of a degree.
1. Kept in mouth (1 minute), axilla (3 minutes), or rectum (3 minutes); color change is read 10 to 15 seconds after removing thermometer
2. Wearable, continuous-use thermometer, which is placed under axilla; may be read within 2 to 3 minutes after placement and continuously thereafter; discard and replace every 48 hours
NURSING ALERT
The belief that core temperature can be estimated by adding 1° C to the temperature taken in the axilla is incorrect. Do not add a degree to the finding obtained by taking a temperature by the axillary route (Craig, Lancaster, Williamson, et al, 2000).
Pulse
A satisfactory pulse can be taken radially in children older than 2 years of age. However, in infants and young children, the apical impulse (heard through a stethoscope held to the chest at the apex of the heart) is more reliable (see Fig. 6-33 for location of pulses). Count the pulse for 1 full minute in infants and young children because of possible irregularities in rhythm. However, when frequent apical rates are necessary, use shorter counting times (e.g., 15- or 30-second intervals). For greater accuracy, measure the apical rate while the child is asleep; record the child’s behavior along with the rate. Grade pulses according to the criteria in Table 6-4. Compare radial and femoral pulses at least once during infancy to detect the presence of circulatory impairment, such as coarctation of the aorta. (See inside back cover for normal rates for pediatric age-groups.)
TABLE 6-4
| GRADE | DESCRIPTION |
| 0 | Not palpable |
| +1 | Difficult to palpate, thready, weak, easily obliterated with pressure |
| +2 | Difficult to palpate, may be obliterated with pressure |
| +3 | Easy to palpate, not easily obliterated with pressure (normal) |
| +4 | Strong, bounding, not obliterated with pressure |
Respiration
Count the respiratory rate in children in the same manner as for the adult patient. However, in infants observe abdominal movements, since respirations are primarily diaphragmatic. Because the movements are irregular, count them for 1 full minute for accuracy (see also p. 164). (See inside back cover for normal respiratory rates in children.)
Blood Pressure
Blood pressure (BP) measurement by noninvasive methods is part of a routine vital sign determination. Measure BP annually in children 3 years of age through adolescence and in children with symptoms of hypertension, children in emergency departments and intensive care units, and high-risk infants (National High Blood Pressure Education Program Working Group on High Blood Pressure in Children and Adolescents, 2004).
Measurement Devices: Ambulatory BP monitoring in children and adolescents is a valuable method for assessing and managing suspected hypertension (Bald, 2002). Also measure BP using electronic devices that employ oscillometric or Doppler techniques. In oscillometry, pressure changes are transmitted through the arterial wall to the pressure cuff, and the oscillations are detected by a pressure-sensitive indicator. Oscillometers have digital read-outs for systolic, diastolic, and mean arterial pressures (MAP) and for pulse. The MAP is not the same as the mean BP (arithmetic average of systolic and diastolic pressures). Rather, it is a value somewhat lower than the arithmetic mean. BP readings using oscillometry, such as Dinamap, are generally higher (10 mm Hg higher) than measurements using auscultation (Park, Menard, and Schoolfield, 2005) (Table 6-5). Differences between Dinamap and auscultatory readings prevent the interchange of the readings by the two methods. The oscillometric BP monitoring method is a reliable screening tool used in a variety of age-groups (Mattu, Heran, and Wright, 2004a, 2004b).
TABLE 6-5
NORMATIVE DINAMAP BLOOD PRESSURE VALUES (SYSTOLIC/DIASTOLIC; MEAN ARTERIAL PRESSURE IN PARENTHESES)

From Park M, Menard S: Normative oscillometric blood pressure values in the first 5 years in an office setting, Am J Dis Child 143(7):860-864, 1989.
Doppler ultrasound translates changes in ultrasound frequency caused by blood movement within the artery to audible sound by means of a transducer in the cuff. This technique is useful for systolic pressure measurement but is unreliable for diastolic pressure measurement. Oscillometric and Doppler instruments are useful in measuring BP in infants and have largely replaced the flush method, which reflects only the mean BP, and the auscultatory method.
Selection of Cuff: No matter what type of noninvasive technique is used, the most important factor in accurately measuring BP is the use of an appropriately sized cuff (cuff size refers only to the inner inflatable bladder, not the cloth covering). A technique to establish an appropriate cuff size is to choose a cuff with a bladder width that is approximately 40% of the arm circumference midway between the olecranon and the acromion (see Research Focus box). This will usually be a cuff bladder that covers 80% to 100% of the circumference of the arm (Fig. 6-12) (Beevers, Lip, and O’Brien, 2001; National Institutes of Health, National Heart, Lung, and Blood Institute, 1996). Cuffs that are either too narrow or too wide affect the accuracy of BP measurements. If the cuff size is too small, the reading on the device is falsely high. If the cuff size is too large, the reading is falsely low (Clark, Kieh-Lai, Sarnaik, et al, 2002).
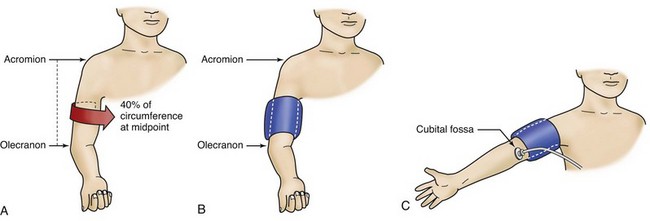
Fig. 6-12 Determination of proper cuff size. A, Cuff bladder width should be approximately 40% of circumference of arm measured at a point midway between olecranon and acromion. B, Cuff bladder length should cover 80% to 100% of circumference of arm. C, Blood pressure should be measured with cubital fossa at heart level. Arm should be supported. Stethoscope bell is placed over brachial artery pulse, proximal and medial to cubital fossa and below bottom edge of cuff. (From National Institutes of Health, National Heart, Lung, and Blood Institute: Update on the Task Force Report [1987] on high blood pressure in children and adolescents: a working group report from the National High Blood Pressure Education Program, NIH Pub No 96-3790, Bethesda, Md, September 1996, The Institutes.)
 RESEARCH FOCUS
Selection of a Blood Pressure Cuff
Researchers have found that selection of a cuff with a bladder width equal to 40% of the upper arm circumference most accurately reflects directly measured radial arterial pressure (Clark, Kieh-Lai, Sarnaik, et al, 2002).
Using limb circumference for selecting cuff width more accurately reflects direct arterial BP than using limb length, since this method takes into account variations in arm thickness and the amount of pressure required to compress the artery. For measurement on sites other than the upper arms, use the limb circumference, although the shape of the limb (e.g., conical shape of the thigh) may prevent appropriate placement of the cuff and inaccurately reflect intraarterial BP (Table 6-6).
TABLE 6-6
RECOMMENDED DIMENSIONS FOR BLOOD PRESSURE CUFF BLADDERS
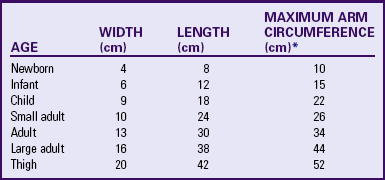
*Calculated so that largest arm would still allow bladder to encircle arm by at least 80%.
From National High Blood Pressure Education Program Working Group on High Blood Pressure in Children and Adolescents: The fourth report on the diagnosis, evaluation, and treatment of high blood pressure in children and adolescents, Pediatrics 114(2 Suppl 4th Rep):555-576, 2004.
When using a site other than the arm, BP measurements using noninvasive techniques may differ. Generally, systolic pressure in the lower extremities (thigh or calf) is greater than pressure in the upper extremities, and systolic BP in the calf is higher than that in the thigh (Fig. 6-13). Table 6-7 lists these differences that are applied to oscillometric measurements taken on the right extremities with the child supine and the cuff size based on the circumference method.
TABLE 6-7
DIFFERENCES IN OSCILLOMETRIC SYSTOLIC BLOOD PRESSURE BETWEEN ARM AND LOWER EXTREMITY SITES IN NORMAL CHILDREN
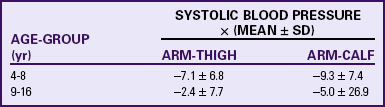
From Park M, Lee D, Johnson GA: Oscillometric blood pressures in the arm, thigh, and calf in healthy children and those with aortic coarctation, Pediatrics 91(4):761-765, 1993.

Fig. 6-13 Sites for measuring blood pressure. A, Upper arm. B, Lower arm or forearm. C, Thigh. D, Calf or ankle.
NURSING ALERT
When taking BP, use an appropriately sized cuff. When the correct size is not available, use an oversized cuff rather than an undersized one or use another site that more appropriately fits the cuff size. Do not choose a cuff based on the name of the cuff (e.g., an “infant” cuff may be too small for some infants).
Measurement and Interpretation: Measuring and interpreting BP in infants and children require attention to correct procedure because (1) limb sizes vary and cuff selection must accommodate the circumference; (2) excessive pressure on the antecubital fossa affects the Korotkoff sounds; (3) children easily become anxious, which can elevate BP; and (4) BP values change with age and growth. In children and adolescents, determine the normal range of BP by body size and age. BP standards that are based on gender, age, and height provide a more precise classification of BP according to body size. This approach avoids misclassifying children who are very tall or very short. The revised BP tables now include the 50th, 90th, 95th, and 99th percentiles (with standard deviations) by gender, age, and height (see inside back cover).
NURSING ALERT
Compare BP in the upper and lower extremities to detect abnormalities, such as coarctation of the aorta, in which the lower extremity pressure is less than the upper extremity pressure.
To use the tables in a clinical setting, determine the height percentile by using the newly revised Centers for Disease Control and Prevention growth charts (www.cdc.gov/growthcharts). The child’s measured systolic BP and diastolic BP are compared with the numbers provided in the table (boys or girls) according to the child’s age and height percentile. The child is normotensive if the BP is below the 90th percentile. If the BP is at or above the 90th percentile, repeat the BP measurement at that visit to verify an elevated BP. BP measurements between the 90th and 95th percentiles indicate prehypertension and necessitate reassessment and consideration of other risk factors. In addition, if an adolescent’s BP is more than 120/80 mm Hg, consider the patient prehypertensive even if this value is below the 90th percentile. This BP level typically occurs for systolic BP at 12 years old and for diastolic BP at 16 years old. If the child’s BP (systolic or diastolic) is at or above the 95th percentile, the child may be hypertensive, and the measurement must be repeated on at least two occasions to confirm diagnosis (National High Blood Pressure Education Program Working Group on High Blood Pressure in Children and Adolescents, 2004) (see Nursing Care Guidelines box).
NURSING CARE GUIDELINES
Using the Blood Pressure Tables
1. Use the standard height charts to determine the height percentile.
2. Measure and record the child’s systolic blood pressure (SBP) and diastolic blood pressure (DBP).
3. Use the correct gender table for SBP and DBP.
4. Find the child’s age on the left side of the table. Follow the age row horizontally across the table to the intersection of the line for the height percentile (vertical column).
5. There, find the 50th, 90th, 95th, and 99th percentiles for SBP in the left columns and for DBP in the right columns.
• BP less than 90th percentile is normal.
• BP between the 90th and 95th percentiles is prehypertension. In adolescents, BP of 120/80 mm Hg or greater is prehypertension, even if this figure is less than the 90th percentile.
6. If the BP is over the 90th percentile, the BP should be repeated twice at the same office visit, and an average SBP and DBP should be used.
7. If the BP is over the 95th percentile, BP should be staged. If BP is stage 1 (95th to 99th percentile plus 5 mm Hg), BP measurements should be repeated on two more occasions. If hypertension is confirmed, evaluation should proceed. If BP is stage 2 (>99th percentile plus 5 mm Hg), prompt referral should be made for evaluation and therapy. If the patient is symptomatic, immediate referral and treatment are indicated.
From National High Blood Pressure Education Program Working Group on High Blood Pressure in Children and Adolescents: The fourth report on the diagnosis, evaluation, and treatment of high blood pressure in children and adolescents, Pediatrics 114(2 Suppl 4th Rep):555-576, 2004.
Orthostatic Hypotension: Orthostatic hypotension (OH), also called postural hypotension or orthostatic intolerance, often manifests as syncope (fainting), vertigo (dizziness), or lightheadedness and is caused by decreased blood flow to the brain (cerebral hypoperfusion). Normally blood flow to the brain is maintained at a constant level by a number of compensating mechanisms that regulate systemic BP. When one assumes a sitting or standing position from a supine or recumbent position, peripheral capillary vasoconstriction occurs, and blood that was pooling in the lower vasculature is returned to the heart for redistribution to the head and remainder of the body. When this mechanism fails or is slow to respond, the person may experience vertigo or syncope. One of the most common causes of OH is hypovolemia, which may be induced by medications such as diuretics, vasodilator medications, and prolonged immobility or bed rest. Other causes of OH include dehydration, diarrhea, emesis, fluid loss from sweating and exertion, alcohol intake, dysrhythmias, diabetes mellitus, sepsis, and hemorrhage.
BP measurements taken with the child supine then standing (at least 2 minutes in each position) may demonstrate variability and assist in the diagnosis of OH. The child with a sustained drop in systolic pressure of more than 20 mm Hg or in diastolic pressure of more than 10 mm Hg after standing for 2 minutes without an increase in heart rate of more than 15 beats/min most likely has an autonomic deficit. Nonneurogenic causes of OH have a compensatory increase in pulse of more than 15 beats/min as well as a drop in BP, as noted previously. For the child or adolescent with vertigo, lightheadedness, nausea, syncope, diaphoresis, and pallor, it is important to monitor BP and heart rate to determine the original cause. BP is an important diagnostic measurement in children and adolescents and must be a part of the routine monitoring of vital signs.
General Appearance
The child’s general appearance is a cumulative, subjective impression of the child’s physical appearance, state of nutrition, behavior, personality, interactions with parents and nurse (also siblings if present), posture, development, and speech. Although the nurse records general appearance at the beginning of the physical examination, it encompasses all the observations of the child during the interview and physical assessment.
Note the facies, the child’s facial expression and appearance. For example, the facies may give clues to children who are in pain; have difficulty breathing; feel frightened, discontented, or unhappy; are mentally delayed; or are acutely ill.
Observe the posture, position, and types of body movement. The child with hearing or vision loss may characteristically tilt the head in an awkward position to hear or see better. The child in pain may favor a body part. The child with low self-esteem or a feeling of rejection may assume a slumped, careless, and apathetic pose. Likewise, a child with confidence, a feeling of self-worth, and a sense of security usually demonstrates a tall, straight, well-balanced posture. While observing such body language, do not interpret too freely but rather record objectively.
Note the child’s hygiene in terms of cleanliness; unusual body odor; the condition of the hair, neck, nails, teeth, and feet; and the condition of the clothing. Such observations are excellent clues to possible instances of neglect, inadequate financial resources, housing difficulties (e.g., no running water), or lack of knowledge concerning children’s needs.
Behavior includes the child’s personality, activity level, reaction to stress, requests, frustration, interactions with others (primarily the parent and nurse), degree of alertness, and response to stimuli. Some mental questions that serve as reminders for observing behavior include: What is the child’s overall personality? Does the child have a long attention span, or is he or she easily distracted? Can the child follow two or three commands in succession without the need for repetition? What is the youngster’s response to delayed gratification or frustration? Does the child use eye contact during conversation? What is the child’s reaction to the nurse and family members? Is the child quick or slow to grasp explanations?
Development can be assessed by carefully observing the child, but verify your impressions with screening tests. This chapter and Chapter 24 discuss various tests for assessing development, speech, vision, and hearing.
Under general appearance, record an overall estimate of the child’s speech development, motor skills, coordination, and recent area of achievement. For example, the following statement may apply to an 18-month-old child: “Motor development advanced for age; climbs, runs, jumps (most recent motor skill), manipulates small objects with ease; excellent coordination and balance; beginning to name many objects; uses two-word phrases; and enjoys ‘talking’ to self and others.”
Skin
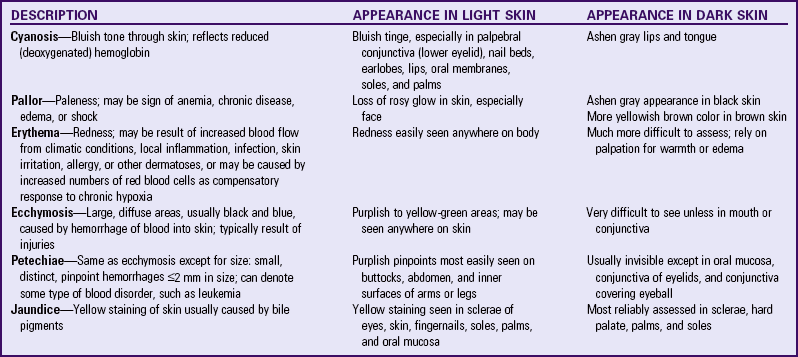
Assess skin for color, texture, temperature, moisture, turgor, lesions, and rashes. Examination of the skin and its accessory organs primarily involves inspection and palpation. Touch allows the nurse to assess the texture, turgor, and temperature of the skin (Turnbull, 2000). The normal color in light-skinned children varies from a milky white and rose to a deeply hued pink. Dark-skinned children, such as those of Native American, Hispanic, or African descent, have inherited various brown, red, yellow, olive green, and bluish tones in their skin. Asian persons have skin that is normally of a yellow tone. Several variations in skin color can occur, some of which warrant further investigation. The types of color change and their appearance in children with light or dark skin are summarized in Table 6-8.
Normally the skin texture of young children is smooth, slightly dry, and not oily or clammy. Evaluate skin temperature by symmetrically feeling each part of the body and comparing upper areas with lower ones. Note any difference in temperature.
Determine tissue turgor, or elasticity in the skin, by grasping the skin on the abdomen between the thumb and index finger, pulling it taut, and quickly releasing it. Elastic tissue immediately resumes its normal position without residual marks or creases. In children with poor skin turgor, the skin remains suspended or tented for a few seconds before slowly falling back on the abdomen. Skin turgor is one of the best estimates of adequate hydration and nutrition.
Accessory Structures
Inspection of the accessory structures of the skin may be performed while examining the skin, scalp, or extremities.
Inspect the hair for color, texture, quality, distribution, and elasticity. Children’s scalp hair is usually lustrous, silky, strong, and elastic. Genetic factors affect the appearance of hair. For example, the hair of African-American children is usually curlier and coarser than that of Caucasian children. Hair that is stringy, dull, brittle, dry, friable, and depigmented may suggest poor nutrition. Record any bald or thinning spots. Loss of hair in infants may indicate lying in the same position and may be a cue to counsel parents concerning the child’s stimulation needs.
Inspect the hair and scalp for general cleanliness. Persons in some ethnic groups condition their hair with oils or lubricants that, if not thoroughly washed from the scalp, clog the sebaceous glands, causing scalp infections. Also examine the area for lesions; scaliness; evidence of infestation, such as lice or ticks; and signs of trauma, such as ecchymosis, masses, or scars.
In children who are approaching puberty, look for growth of secondary hair as a sign of normally progressing pubertal changes. Note precocious or delayed appearance of hair growth because, although not always suggestive of hormonal dysfunction, it may be of great concern to the early- or late-maturing adolescent.
Inspect the nails for color, shape, texture, and quality. Normally the nails are pink, convex, smooth, and hard but flexible (not brittle). The edges, which are usually white, should extend over the fingers. Dark-skinned individuals may have more deeply pigmented nail beds. Short, ragged nails are typical of habitual biting. Uncut, dirty nails are a sign of poor hygiene.
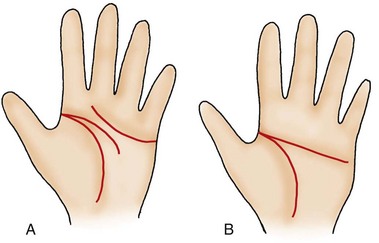
The palm normally shows three flexion creases (Fig. 6-14, A). In some situations such as Down syndrome, the two distal horizontal creases are fused to form a single horizontal crease (the single palmar crease, or transpalmar crease) (Fig. 6-14, B). If grossly abnormal lines or folds are observed, sketch a picture to describe them and refer the finding to a specialist for further investigation.
Lymph Nodes
Lymph nodes are usually assessed during examination of the part of the body in which they are located. The body’s lymphatic drainage system is extensive. Fig. 6-15 shows the usual sites for palpating accessible lymph nodes.
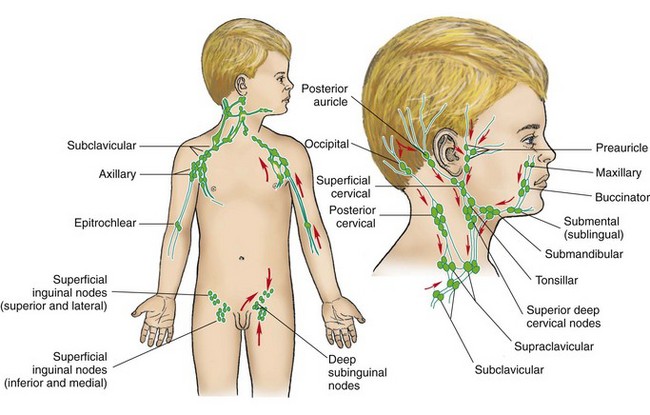
Anatomy Review—Superficial Lymph Nodes
Palpate nodes using the distal portion of the fingers and gently but firmly pressing in a circular motion along the regions where nodes are normally present. During assessment of the nodes in the head and neck, tilt the child’s head upward slightly but without tensing the sternocleidomastoid or trapezius muscles. This position facilitates palpation of the submental, submandibular, tonsillar, and cervical nodes. Palpate the axillary nodes with the child’s arms relaxed at the sides but slightly abducted. Assess the inguinal nodes with the child in the supine position. Note size, mobility, temperature, and tenderness, as well as reports by the parents regarding any visible change of enlarged nodes. In children, small, nontender, movable nodes are usually normal. Tender, enlarged, warm, erythematous lymph nodes generally indicate infection or inflammation close to their location. Report such findings for further investigation.
Head and Neck
Observe the head for general shape and symmetry. A flattening of one part of the head, such as the occiput, may indicate that the child continually lies in this position. Marked asymmetry is usually abnormal and may indicate premature closure of the sutures (craniosynostosis).
Anatomy Review—Structures in the Neck
NURSING ALERT
Significant head lag after 6 months of age strongly indicates cerebral injury and is referred for further evaluation.
Note head control in infants and head posture in older children. Most infants by 4 months of age should be able to hold the head erect and in midline when in a vertical position.
Evaluate range of motion by asking the older child to look in each direction (to either side, up, and down) or by manually putting the younger child through each position. Limited range of motion may indicate wryneck, or torticollis, in which the child holds the head to one side with the chin pointing toward the opposite side a result of injury to the sternocleidomastoid muscle.
NURSING ALERT
Hyperextension of the head (opisthotonos) with pain on flexion is a serious indication of meningeal irritation and is referred for immediate medical evaluation.
Palpate the skull for patent sutures, fontanels, fractures, and swellings. Normally the posterior fontanel closes by the second month of life, and the anterior fontanel fuses between 12 and 18 months. Early or late closure is noted, since either may be a sign of a pathologic condition. (For a more detailed discussion of the cranial bones, see Chapter 8.)
While examining the head, observe the face for symmetry, movement, and general appearance. Ask the child to “make a face” to assess symmetric movement and disclose any degree of paralysis. Note any unusual facial proportion, such as an unusually high or low forehead; wide- or close-set eyes; or a small, receding chin.
In addition to assessment of the head and neck for movement, inspect the neck for size and palpate its associated structures. The neck is normally short, with skinfolds between the head and shoulders during infancy; however, it lengthens during the next 3 to 4 years.
Eyes
Inspection of External Structures
Inspect the lids for proper placement on the eye. When the eye is open, the upper lid should fall near the upper iris. When the eyes are closed, the lids should completely cover the cornea and sclera (Fig. 6-16).
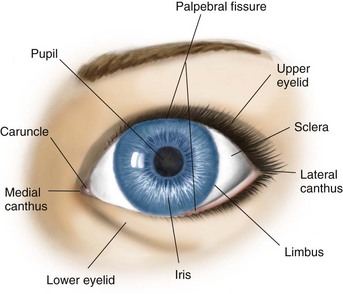
Anatomy Review—Structures of the Eye
Determine the general slant of the palpebral fissures or lids by drawing an imaginary line through the two points of the medial canthus and across the outer orbit of the eyes and aligning each eye on the line. Usually the palpebral fissures lie horizontally. However, in Asians the slant is normally upward.
Also inspect the inside lining of the lids, the palpebral conjunctivae. To examine the lower conjunctival sac, pull the lid down while the patient looks up. To evert the upper lid, hold the upper lashes and gently pull down and forward as the child looks down. Normally the conjunctiva appears pink and glossy. Vertical yellow striations along the edge are the meibomian glands, or sebaceous glands, near the hair follicle. Located in the inner or medial canthus and situated on the inner edge of the upper and lower lids is a tiny opening, the lacrimal punctum. Note any excessive tearing, discharge, or inflammation of the lacrimal apparatus.
The bulbar conjunctiva, which covers the eye up to the limbus, or junction of the cornea and sclera, should be transparent. The sclera, or white covering of the eyeball, should be clear. Tiny black marks in the sclera of heavily pigmented individuals are normal.
The cornea, or covering of the iris and pupil, should be clear and transparent. Record opacities because they can be signs of scarring or ulceration, which can interfere with vision. The best way to test for opacities is to illuminate the eyeball by shining a light at an angle (obliquely) toward the cornea.
Compare the pupils for size, shape, and movement. They should be round, clear, and equal. Test their reaction to light by quickly shining a light toward the eye and removing it. As the light approaches, the pupils should constrict; as the light fades, the pupils should dilate. Test the pupil for any response of accommodation by having the child look at a bright, shiny object at a distance and quickly moving the object toward the face. The pupils should constrict as the object is brought near the eye. Record normal findings on examination of the pupils as PERRLA, which stands for “Pupils Equal, Round, React to Light, and Accommodation.”
Inspect the iris and pupil for color, size, shape, and clarity. Permanent eye color is usually established by 6 to 12 months of age. While inspecting the iris and pupil, look for the lens. Normally the lens is not visible through the pupil.
Inspection of Internal Structures
The ophthalmoscope permits visualization of the interior of the eyeball with a system of lenses and a high-intensity light. The lenses permit clear visualization of eye structures at different distances from the nurse’s eye and correct visual acuity differences in the examiner and child. Use of the ophthalmoscope requires practice to know which lens setting produces the clearest image.
The ophthalmic and otic heads are usually interchangeable on one “body” or handle, which encloses the power source, either disposable or rechargeable batteries. The nurse should practice changing the heads, which snap on and are secured with a quarter turn, and replacing the batteries and light bulbs. Nurses who are not directly involved in physical assessment are often responsible for ensuring that the equipment functions properly.
Preparing the Child: The nurse can prepare the child for the ophthalmoscopic examination by showing the child the instrument, demonstrating the light source and how it shines in the eye, and explaining the reason for darkening the room. For infants and young children who do not respond to such explanations, it is best to use distraction to encourage them to keep their eyes open. Forcibly parting the lids results in an uncooperative, watery eyed child and a frustrated nurse. Usually, with some practice, the nurse can elicit a red reflex almost instantly while approaching the child and may also gain a momentary inspection of the blood vessels, macula, or optic disc.
Funduscopic Examination: Fig. 6-17 shows the structures of the back of the eyeball, or the fundus. The fundus is immediately apparent as the red reflex. The intensity of the color increases in darkly pigmented individuals.
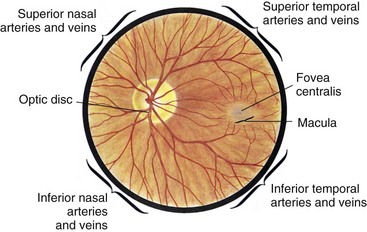
Fig. 6-17 Structures of fundus. (From Seidel HM, Ball JW, Dains JE, et al: Mosby’s guide to physical examination, ed 6, St Louis, 2007, Mosby.)
NURSING ALERT
A brilliant, uniform red reflex is an important sign because it rules out many serious defects of the cornea, aqueous chamber, lens, and vitreous chamber. Any dark shadows or opacities are recorded because they indicate some abnormality in any of these structures.
As the ophthalmoscope is brought closer to the eye, the most conspicuous feature of the fundus is the optic disc, the area where the blood vessels and optic nerve fibers enter and exit the eye. The disc is creamy pink and lighter in color than the surrounding fundus. Normally it is round or vertically oval.
After locating the optic disc, inspect the area for blood vessels. The central retinal artery and vein appear in the depths of the disc and emanate outward with visible branching. The veins are darker and about one fourth larger than the arteries. Normally the branches of the arteries and veins cross each other.
Other structures that are common are the macula, the area of the fundus with the greatest concentration of visual receptors, and, in the center of the macula, a minute glistening spot of reflected light called the fovea centralis; this is the area of most perfect vision.
Vision Testing
Several tests are available for assessing vision. This discussion focuses on four areas: (1) ocular alignment, (2) visual acuity, (3) peripheral vision, and (4) color vision. Vision screening should be performed by age 3 and annually after that or more often if there are concerns (American Academy of Pediatrics, 2003a; Wall, Marsh-Tootle, Evans, et al, 2002). Chapter 24 discusses behavioral and physical signs of visual impairment.
Ocular Alignment: Normally, by the age of 3 to 4 months, children are able to fixate on one visual field with both eyes simultaneously (binocularity). One of the most important tests for binocularity is alignment of the eyes to detect nonbinocular vision, or strabismus (Halle, 2002). In strabismus, or cross-eye, one eye deviates from the point of fixation. If the misalignment is constant, the weak eye becomes “lazy,” and the brain eventually suppresses the image produced by that eye. If strabismus is not detected and corrected by ages 4 to 6 years, blindness from disuse, known as amblyopia, may result.
Tests commonly used to detect misalignment are the corneal light reflex and the cover tests. To perform the corneal light reflex test, or Hirschberg test, shine a flashlight or the light of the ophthalmoscope directly into the patient’s eyes from a distance of about 40.5 cm (16 inches). If the eyes are orthophoric, or normal, the light falls symmetrically within each pupil (Fig. 6-18, A). If the light falls off center in one eye, the eyes are misaligned. Epicanthal folds, excess folds of skin that extend from the roof of the nose to the inner termination of the eyebrow and that partially or completely overlap the inner canthus of the eye, may give a false impression of misalignment (pseudostrabismus) (Fig. 6-18, B). Epicanthal folds are often found in Asian children.
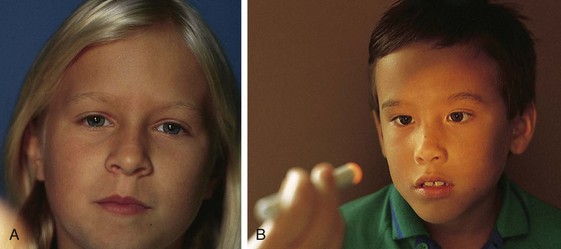
Fig. 6-18 A, Corneal light reflex test demonstrating orthophoric eyes. B, Pseudostrabismus. Inner epicanthal folds cause eyes to appear misaligned; however, corneal light reflexes fall perfectly symmetrically.
In the cover test, one eye is covered, and the movement of the uncovered eye is observed while the child looks at a near (33 cm [13 inches]) or distant (6 m [20 feet]) object. If the uncovered eye does not move, it is aligned. If the uncovered eye moves, a misalignment is present because, when the stronger eye is temporarily covered, the misaligned eye attempts to fixate on the object.
In the alternate cover test, occlusion shifts back and forth from one eye to the other, and movement of the eye that was covered is observed as soon as the occluder is removed while the child focuses on a point in front of him or her (Fig. 6-19). If normal alignment is present, shifting the cover from one eye to the other will not cause the eye to move. If misalignment is present, eye movement will occur when the cover is moved. This test takes more practice than the other cover test because the occluder must be moved back and forth quickly and accurately to see the eye move. Because deviations can occur at different ranges, it is important to perform the cover tests at both close and far distances.
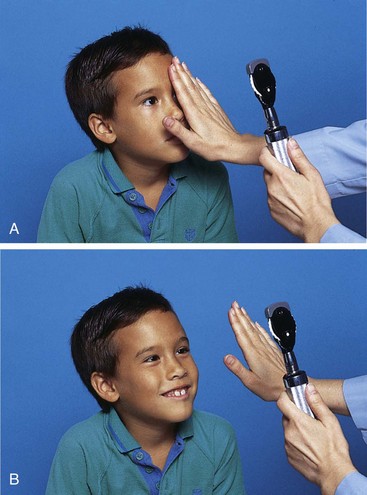
Fig. 6-19 Alternate cover test to detect amblyopia in patient with strabismus. A, Eye is occluded, and child is fixating on light source. B, If eye does not move when uncovered, eyes are aligned.
NURSING ALERT
The cover test is usually easier to perform if the examiner uses his or her hand rather than a card-type occluder (see Fig. 6-19). Attractive occluders fashioned like an ice cream cone or happy-face lollipop cut from cardboard are also well received by young children.
Photoscreening is a technique used to screen for amblyopia, refractive disorders, and media opacities (American Academy of Pediatrics, 2003a; Berry, Simons, Siatkowski, et al, 2001). Using a camera, the nurse obtains images of the pupillary reflexes (reflections) and red reflexes (Bruckner test) (American Academy of Pediatrics, 2003a). Photoscreening offers an effective way to screen infants, preverbal children, and those with developmental delays who are difficult to screen.
Visual Acuity Testing in Children Beyond Infancy: The most common test for measuring visual acuity is the Snellen letter chart, which consists of lines of letters of decreasing size. The American Academy of Pediatrics (2003a) recommends that children stand 10 feet from the chart with their heels at the 10-foot line during testing. When screening for visual acuity in children, the nurse tests the child’s right eye first by covering the left. Children who wear glasses should be screened with them on. Tell the child to keep both eyes open during the examination. If the child fails to read the current line, move up the chart to the next larger line. Continue up the chart until a line is found that the child can pass. Then begin moving down the chart again until the child fails to read the line. To pass each line, the child must correctly identify four of six symbols on the line. Repeat the procedure, covering the right eye. Table 6-9 provides a list of visual screening tests for children and guidelines for referral recommended by the American Academy of Pediatrics (2003a).
TABLE 6-9
EYE EXAMINATION GUIDELINES*
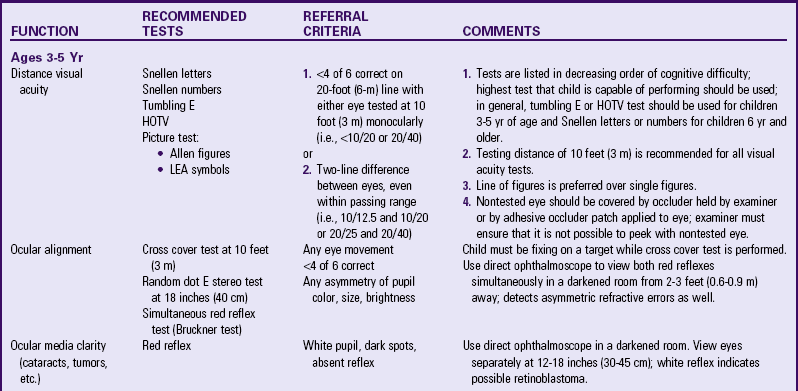
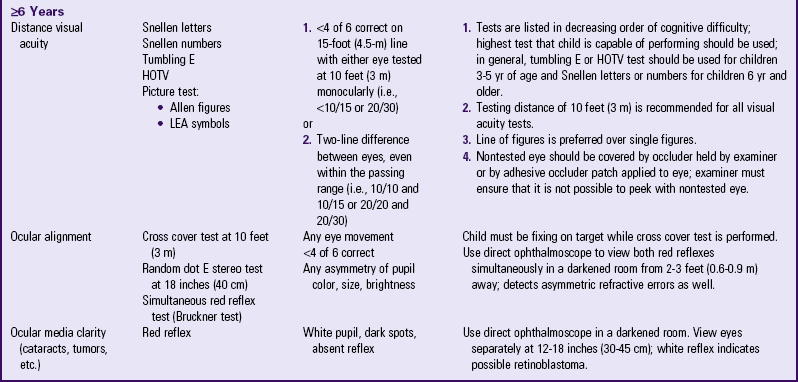
*Assessing visual acuity (vision screening) is one of the most sensitive techniques for detection of eye abnormalities in children. The American Academy of Pediatrics Section on Ophthalmology, in cooperation with American Association for Pediatric Ophthalmology and Strabismus and American Academy of Ophthalmology, has developed these guidelines to be used by physicians, nurses, educational institutions, public health departments, and other professionals who perform vision evaluation services.
From American Academy of Pediatrics, Committee on Practice and Ambulatory Medicine, Section on Ophthalmology: Eye examination in infants, children, and young adults by pediatricians, Pediatrics 111(4):902-907, 2003.
For children unable to read letters and numbers, the tumbling E or HOTV test is useful (Coats and Jenkins, 1997). The tumbling E test uses the capital letter E pointing in four different directions. The child is asked to point in the direction the E is facing. The HOTV test consists of a wall chart composed of the letters H, O, T, and V. The child is given a board containing a large H, O, T, and V. The examiner points to a letter on the wall chart, and the child matches the correct letter on the board held in his or her hand. The tumbling E and HOTV are excellent tests for preschool-age children.
If a child is unable to perform the tumbling E or HOTV test, use the Allen card test. The Allen card test uses common figures to test the child’s vision. It is important to assess whether the child is able to identify the pictures before actual vision testing. The examiner walks backward slowly, flipping through the cards and presenting different pictures to the child. The examiner continues to move backward as the child correctly calls out the figures. When the child begins to miss the figure on the cards, the examiner moves forward to confirm that the child is able to identify the figures at that point. All Allen card figures are 20/30 in size. The farthest distance at which the child is able to accurately identify the pictures becomes the numerator, and 30 becomes the denominator. For example, if the child is able to identify the pictures accurately at 15 feet, record the visual acuity as 15/30. This is equivalent to 20/40 or 10/20 visual acuity.
Visual Acuity Testing in Infants and Difficult-to-Test Children: In newborns, vision is tested mainly by checking for light perception by shining a light into the eyes and noting responses such as pupillary constriction, blinking, following the light to midline, increased alertness, or refusal to open the eyes after exposure to the light. Although the simple maneuver of checking light perception and eliciting the pupillary light reflex indicates that the anterior half of the visual apparatus is intact, it does not confirm that the infant can see. In other words, this test does not assess whether the brain receives the visual message and interprets the signals.
Another test of visual acuity is the infant’s ability to fix on and follow a target. Although any brightly colored or patterned object can be used, the human face is excellent. Hold the infant upright while moving your face slowly from side to side.
NURSING ALERT
If visual fixation and following are not present by 3 to 4 months of age, further ophthalmologic evaluation is necessary.
Other signs that may indicate visual loss or other serious eye problems include fixed pupils, strabismus, constant nystagmus, the setting-sun sign, and slow lateral movements. Unfortunately, it is difficult to test each eye separately; the presence of such signs in one eye could indicate unilateral blindness.
Special tests are available for testing infants and other difficult-to-test children to assess acuity or confirm blindness. For example, in visually evoked potentials, the eyes are stimulated with a bright light or pattern, and electrical activity to the visual cortex is recorded through scalp electrodes. Acuity is assessed by using progressively smaller patterns.
Peripheral Vision: In children who are old enough to cooperate, estimate peripheral vision, or the visual field of each eye, by having the children fixate on a specific point directly in front of them while an object, such as a finger or a pencil, is moved from beyond the field of vision into the range of peripheral vision. As soon as children see the object, have them say “stop.” At that point measure the angle from the anteroposterior axis of the eye (straight line of vision) to the peripheral axis (point at which the object is first seen). Check each eye separately and for each quadrant of vision. Normally children see about 50 degrees upward, 70 degrees downward, 60 degrees nasalward, and 90 degrees temporally. Limitations in peripheral vision may indicate blindness from damage to structures within the eye or to any of the visual pathways.
Color Vision: Another important test is for color vision. It is estimated that 8% to 10% of Caucasian males and less than half that percentage of African-American males inherit the X-linked disorder known as color vision deficit (also known as color blindness, a less acceptable term). From 0.5% to 1% of Caucasian females are affected. Although the severity of impaired perception of color varies considerably, the two most common types are protanomaly, in which the child confuses gray with pink or pale blue with green, and deuteranomaly, in which the child confuses gray with pale purple or green. In most of these individuals the color vision deficit causes no major problems. However, some individuals with more severe deficits may be unable to distinguish amber or red traffic lights, fail to see a red brake light on the rear of a car, have difficulty distinguishing green traffic lights from incandescent street lamps, and have a poor sense of color coordination of clothing. For school-age children the greatest difficulty lies in performance of academic skills that use color as a visual aid. Adolescents may be ineligible for certain vocational opportunities, such as electronics, photography, printing, interior decorating, pharmaceuticals, textiles, police work, and several types of military service.
The tests available for color vision include the Ishihara test and the Hardy-Rand-Rittler test. Each consists of a series of cards (pseudoisochromatic) that contain a color field composed of spots of a certain “confusion” color. Against the field is a number or symbol similarly printed in dots but of a color likely to be confused with the field color by the person with a color vision deficit. As a result, the figure or letter is invisible to an affected individual but is clearly seen by a person with normal vision.
Ears
Inspection of External Structures
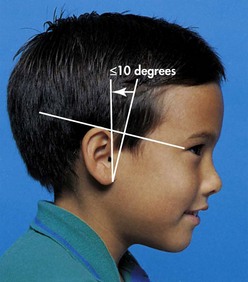
The entire external earlobe is called the pinna, or auricle; one is located on each side of the head. Measure the height alignment of the pinna by drawing an imaginary line from the outer orbit of the eye to the occiput, or most prominent protuberance of the skull. The top of the pinna should meet or cross this line. Low-set ears are commonly associated with renal anomalies or cognitive impairment. Measure the angle of the pinna by drawing a perpendicular line from the imaginary horizontal line and aligning the pinna next to this mark. Normally the pinna lies within a 10-degree angle of the vertical line (Fig. 6-20). If it falls outside this area, record the deviation and look for other anomalies.
Anatomy Review—Landmarks of the Pinna
Normally the pinna extends slightly outward from the skull. Except in newborn infants, ears that are flat against the head or protruding away from the scalp may indicate problems. Flattened ears in an infant may suggest a frequent side-lying position and, just as with isolated areas of hair loss, may be a clue to investigate parents’ understanding of the child’s stimulation needs.
Inspect the skin surface around the ear for small openings, extra tags of skin, or sinuses. If a sinus is found, note this because it may represent a fistula that drains into some area of the neck or ear. Cutaneous tags represent no pathologic process but may cause parents concern in terms of the child’s appearance.
Also assess the ear for hygiene. An otoscope is not necessary for looking into the external canal to note the presence of cerumen, a waxy substance produced by the ceruminous glands in the outer portion of the canal. Cerumen is usually yellow-brown and soft. If an otoscope is used and any discharge is visible, note its color and odor. Avoid transmitting potentially infectious material to the other ear or to another child through hand washing and using disposable specula or sterilizing reusable specula between each examination.
Inspection of Internal Structures
The head of the otoscope permits visualization of the tympanic membrane by use of a bright light, a magnifying glass, and a speculum. Some otoscopes have an attachment for a pneumonic device to insert air into the canal to determine membrane compliance (movement). The speculum, which is inserted into the external canal, comes in a variety of sizes to accommodate different canal widths. The largest speculum that fits comfortably into the ear is used to achieve the greatest area of visualization. The lens, or magnifying glass, is movable, allowing the examiner to insert an object, such as a curette, into the ear canal through the speculum while still viewing the structures through the lens.
Anatomy Review—External, Middle, and Inner Ear
Positioning the Child: Before beginning the otoscopic examination, position the child properly and gently restrain (sit on parents lap and hold parents hands) if necessary. Older children usually cooperate and do not need restraint. However, prepare them for the procedure by allowing them to play with the instrument, demonstrating how it works, and stressing the importance of remaining still. A helpful suggestion is to let them observe you examining the parent’s ear. Restraint is needed for younger children because the ear examination upsets them (see Atraumatic Care box).
As you insert the speculum into the meatus, move it around the outer rim to accustom the child to the feel of something entering the ear. If examining a painful ear, touch a nonpainful part of the affected ear, then examine the unaffected ear, and finally return to the painful ear. By this time the child is usually less fearful of anything causing discomfort to the ear and will cooperate more.
For their protection and safety, restrain infants and toddlers for the otoscopic examination. There are two general positions of restraint. In one the child is seated sideways in the parent’s lap with one arm hugging the parent and the other arm at the side. The ear to be examined is toward the nurse. With one arm the parent holds the child’s head firmly against his or her chest, and with the other arm hugs the child, thereby securing the child’s free arm (Fig. 6-21, A). Examine the ear using the same procedure for holding the otoscope as described later.
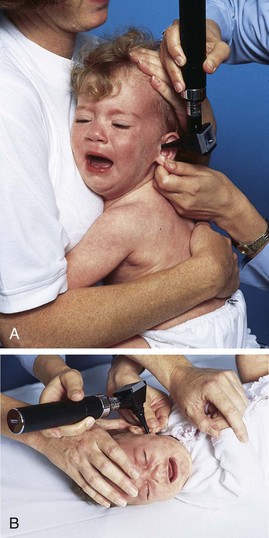
The other position involves placing the child on the side, back, or abdomen with the arms at the side and the head turned so that the ear to be examined points toward the ceiling. Lean over the child, use the upper part of the body to restrain the arms and upper trunk movements, and use the examining hand to stabilize the head. This position is practical for young infants or for older children who need minimum restraint, but it may not be feasible for other children who protest vigorously. For safety, enlist the parent’s or an assistant’s help in immobilizing the head by firmly placing one hand above the ear and the other on the child’s side, abdomen, or back (Fig. 6-21, B).
With cooperative children, examine the ear with the child in a side-lying, sitting, or standing position. One disadvantage to standing is that the child may “walk away” as the otoscope enters the canal. If the child is standing or sitting, tilt the head slightly toward the child’s opposite shoulder to achieve a better view of the drum (Fig. 6-22).
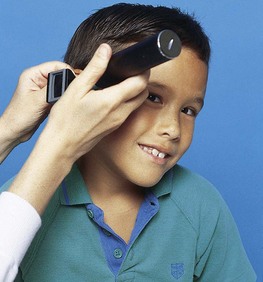
Fig. 6-22 Positioning head by tilting it toward opposite shoulder for full view of tympanic membrane.
With the thumb and forefinger of the free (usually nondominant) hand, grasp the auricle. For the two positions of restraint, hold the otoscope upside down at the junction of its head and handle with the thumb and index finger. Place the other fingers against the skull to allow the otoscope to move with the child in case of sudden movement. In examining a cooperative child, hold the handle with the otic head upright or upside down. Use the dominant hand to examine both ears or reverse hands for each ear, whichever is more comfortable.
Before using the otoscope, visualize the external ear and the tympanic membrane as being superimposed on a clock (Fig. 6-23). The numbers are important geographic landmarks. Introduce the speculum into the meatus between the 3 and 9 o’clock positions in a downward and forward position. Because the canal is curved, the speculum does not permit a panoramic view of the tympanic membrane unless the canal is straightened. In infants the canal curves upward. Therefore pull the pinna down and back to the 6 to 9 o’clock range to straighten the canal (Fig. 6-24, A). With older children, usually those older than 3 years of age, the canal curves downward and forward. Therefore pull the pinna up and back toward a 10 o’clock position (Fig. 6-24, B). If you have difficulty visualizing the membrane, try repositioning the head, introducing the speculum at a different angle, and pulling the pinna in a slightly different direction. Do not insert the speculum past the cartilaginous (outermost) portion of the canal, usually a distance of 0.60 to 1.25 cm (0.23 to 0.5 inch) in older children. Insertion of the speculum into the posterior or bony portion of the canal causes pain.
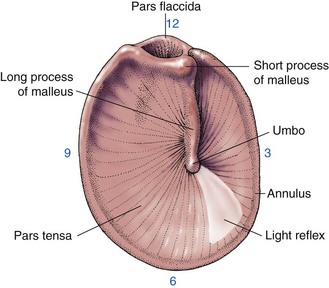
Fig. 6-23 Landmarks of tympanic membrane. (From Rothrock JC: Alexander’s care of the patient in surgery, ed 13, St Louis, 2006, Mosby.)

Fig. 6-24 Positioning for visualizing eardrum in infant (A) and in child older than 3 years of age (B).
In neonates and young infants the walls of the canal are pliable and floppy because of the underdeveloped cartilaginous and bony structures. Therefore the very small 2-mm speculum usually needs to be inserted deeper into the canal than in older children. Exercise great care not to damage the walls or drum. For this reason, only an experienced examiner should insert an otoscope into the ears of very young infants.
Otoscopic Examination: As you introduce the speculum into the external canal, inspect the walls of the canal, the color of the tympanic membrane, the light reflex, and the usual landmarks of the bony prominences of the middle ear. The walls of the external auditory canal are pink, although they are more pigmented in dark-skinned children. Minute hairs are evident in the outermost portion, where cerumen is produced. Note signs of irritation, foreign bodies, or infection.
Foreign bodies in the ear are not uncommon in children and range from erasers to beans. Symptoms may include pain, discharge, and affected hearing. Remove soft objects, such as paper or insects, with forceps. Remove small, hard objects, such as pebbles, with a suction tip, a hook, or irrigation. However, irrigation is contraindicated if the object is vegetative matter, such as beans or pasta, which swells when in contact with fluid.
NURSING ALERT
If there is any doubt about the type of object in the ear and the appropriate method to remove it, refer the child to the appropriate practitioner.
The tympanic membrane is a translucent, light pearly pink or gray. Note marked erythema (which may indicate suppurative otitis media); a dull, nontransparent grayish color (sometimes suggestive of serous otitis media); or ashen gray areas (signs of scarring from a previous perforation). A black area usually suggests a perforation of the membrane that has not healed.
The characteristic tenseness and slope of the tympanic membrane cause the light of the otoscope to reflect at about the 5 or 7 o’clock position. The light reflex is a fairly well-defined, cone-shaped reflection, which normally points away from the face.
The bony landmarks of the drum are formed by the umbo, or tip of the malleus. It appears as a small, round, opaque, concave spot near the center of the drum. The manubrium (long process or handle) of the malleus appears to be a whitish line extending from the umbo upward to the margin of the membrane. At the upper end of the long process near the 1 o’clock position (in the right ear) is a sharp, knoblike protuberance, representing the short process of the malleus. Note the absence of the light reflex or loss or abnormal prominence of any of these landmarks.
Auditory Testing
Several types of hearing tests are available and recommended for screening in infants and children (American Academy of Pediatrics, 2003b) (Table 6-10). Universal newborn hearing screening is available in almost every state in the United States. The nurse must operate under a high index of suspicion for those children who may have conditions associated with hearing loss, whose parents are concerned about hearing loss, and who may have developed behaviors that indicate auditory impairment (Cunningham and Cox, 2003). Chapter 24 discusses types of hearing loss, causes, clinical manifestations, and appropriate treatment.
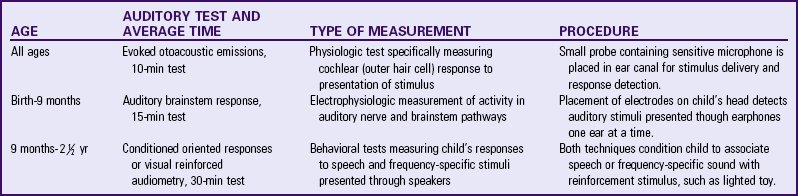
Nose
Inspection of External Structures
The nose is located in the middle of the face just below the eyes and above the lips. Compare its placement and alignment by drawing an imaginary vertical line from the center point between the eyes down to the notch of the upper lip. The nose should lie exactly vertical to this line, with each side exactly symmetric. Note its location, any deviation to one side, and asymmetry in overall size and in diameter of the nares (nostrils). The bridge of the nose is sometimes flat in Asian and African-American children. Observe the alae nasi for any sign of flaring, which indicates respiratory difficulty. Always report any flaring of the alae nasi. Fig. 6-25 illustrates the landmarks used in describing the external structures of the nose.
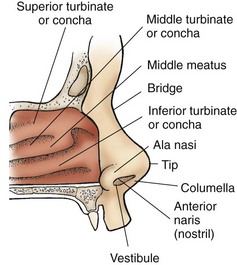
Inspection of Internal Structures
Inspect the anterior vestibule of the nose by pushing the tip upward, tilting the head backward, and illuminating the cavity with a flashlight or otoscope without the attached ear speculum. Note the color of the mucosal lining, which is normally redder than the oral membranes, as well as any swelling, discharge, dryness, or bleeding. There should be no discharge from the nose.
On looking deeper into the nose, inspect the turbinates, or concha, plates of bone that jut into the nasal cavity and are enveloped by mucous membrane. The turbinates greatly increase the surface area of the nasal cavity as air is inhaled. The spaces or channels between the turbinates are called the meatus and correspond to each of the three turbinates. Normally the front end of the inferior and middle turbinate and the middle meatus are seen. They should be the same color as the lining of the vestibule.
Inspect the septum, which should divide the vestibules equally. Note any deviation, especially if it causes an occlusion of one side of the nose. A perforation may be evident within the septum. If this is suspected, shine the light of the otoscope into one naris and look for admittance of light to the other. Because olfaction is an important function of the nose, testing for smell may be done at this point or as part of cranial nerve assessment (see Table 6-13).
Mouth and Throat
With a cooperative child, the nurse can accomplish almost the entire examination of the mouth and throat without the use of a tongue blade. Ask the child to open the mouth wide; to move the tongue in different directions for full visualization; and to say “ahh,” which depresses the tongue for full view of the back of the mouth (tonsils, uvula, and oropharynx). For a closer look at the buccal mucosa, or lining of the cheeks, ask children to use their fingers to move the outer lip and cheek to one side (see Atraumatic Care box).
Anatomy Review—Location of Sinuses
ATRAUMATIC CARE
Encouraging Opening the Mouth for Examination
• Perform the examination in front of a mirror.
• Let child first examine someone else’s mouth, such as the parent, the nurse, or a puppet (Fig. 6-26, A), and then examine child’s mouth.
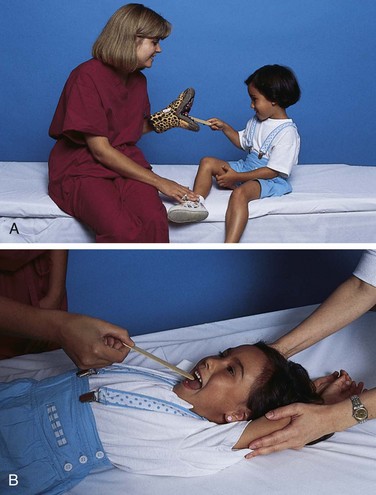
• Instruct child to tilt the head back slightly, breathe deeply through the mouth, and hold the breath; this action lowers the tongue to the floor of the mouth without the use of a tongue blade.
• Lightly brushing the palate with a cotton swab also may open the mouth for assessment.
Infants and toddlers usually resist attempts to keep the mouth open. Because inspecting the mouth is upsetting, leave it for the end of the physical examination (along with examination of the ears) or do it during episodes of crying. However, the use of a tongue blade (preferably flavored) to depress the tongue may be needed. Place the tongue blade along the side of the tongue, not in the center back area where the gag reflex is elicited. Fig. 6-26, B, illustrates proper positioning of the child for the oral examination.
The major structure of the exterior of the mouth is the lips. The lips should be moist, soft, smooth, and pink, or a deeper hue than the surrounding skin. The lips should be symmetric when relaxed or tensed. Assess symmetry when the child talks or cries.
Inspection of Internal Structures
The major structures that are visible within the oral cavity and oropharynx are the mucosal lining of the lips and cheeks, gums (or gingiva), teeth, tongue, palate, uvula, tonsils, and posterior oropharynx (Fig. 6-27). Inspect all areas lined with mucous membranes (inside the lips and cheeks, gingiva, underside of the tongue, palate, and back of the pharynx) for color, any areas of white patches or ulceration, bleeding, sensitivity, and moisture. The membranes should be bright pink, smooth, glistening, uniform, and moist.
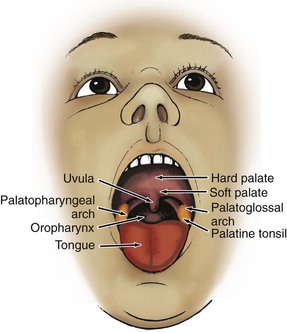
Anatomy Review—Interior Structures of the Mouth
Inspect the teeth for number in each dental arch, for hygiene, and for occlusion or bite (see also Teething, Chapter 12). Discoloration of tooth enamel with obvious plaque (whitish coating on the surface of the teeth) is a sign of poor dental hygiene and indicates a need for counseling. Brown spots in the crevices of the crown of the tooth or between the teeth may be caries (cavities). Chalky white to yellow or brown areas on the enamel may indicate fluorosis (excessive fluoride ingestion). Teeth that appear greenish black may be stained temporarily from ingestion of supplemental iron.
Examine the gums (gingiva) surrounding the teeth. The color is normally coral pink, and the surface texture is stippled, similar to the appearance of an orange peel. In dark-skinned children the gums are more deeply colored, and a brownish area is often observed along the gum line.
Inspect the tongue for papillae, small projections that contain several taste buds and give the tongue its characteristic rough appearance. Note the size and mobility of the tongue. Normally the tip of the tongue should extend to the lips or beyond.
The roof of the mouth consists of the hard palate, which is located near the front of the oral cavity, and the soft palate, which is located toward the back of the pharynx and has a small midline protrusion called the uvula. Carefully inspect the palates to ensure they are intact. The arch of the palate should be dome shaped. A narrow, flat roof or a high, arched palate affects the placement of the tongue and can cause feeding and speech problems. Test movement of the uvula by eliciting a gag reflex. It should move upward to close off the nasopharynx from the oropharynx.
Examine the oropharynx and note the size and color of the palatine tonsils. They are normally the same color as the surrounding mucosa; glandular, rather than smooth in appearance; and barely visible over the edge of the palatoglossal arches. The size of the tonsils varies considerably during childhood. However, report any swelling, redness, or white areas on the tonsils.
Chest
Inspect the chest for size, shape, symmetry, movement, breast development, and the bony landmarks formed by the ribs and sternum. The rib cage consists of 12 ribs on each side and the sternum, or breast bone, located in the midline of the trunk (Fig. 6-28). The sternum is composed of three main parts. The manubrium, the uppermost portion, can be felt at the base of the neck at the suprasternal notch. The largest segment of the sternum is the body, which forms the sternal angle (angle of Louis) as it articulates with the manubrium. At the end of the body is a small, movable process called the xiphoid. The angle of the costal margin as it attaches to the sternum is called the costal angle and is normally about 45 to 50 degrees. These bony structures are important landmarks in the location of ribs and intercostal spaces (ICSs), which are the spaces between the ribs. They are numbered according to the rib directly above the space. For example, the space immediately below the second rib is the second ICS.
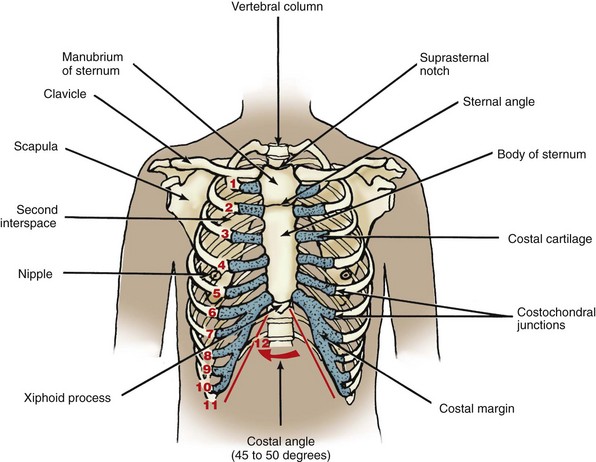
The thoracic cavity is also divided into segments by drawing imaginary lines on the chest and back. Fig. 6-29 illustrates the anterior, lateral, and posterior divisions.
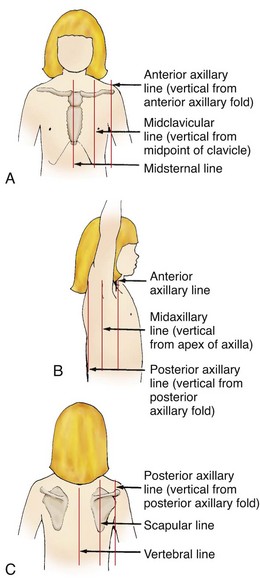
Anatomy Review—Imaginary Landmarks of the Chest
Measure the size of the chest by placing the measuring tape around the rib cage at the nipple line (see Fig. 6-9). For greatest accuracy, take two measurements—one during inspiration and the other during expiration—and record the average. Chest size is important mainly in relation to head circumference (see p. 144). Always report marked disproportions because most are caused by abnormal head growth, although some may be a result of altered chest shape, such as barrel chest (chest is round) or pigeon chest (sternum protrudes outward).
During infancy the chest’s shape is almost circular, with the anteroposterior (front-to-back) diameter equaling the transverse, or lateral (side-to-side), diameter. As the child grows, the chest normally increases in the transverse direction, causing the anteroposterior diameter to be less than the lateral diameter. Note the angle made by the lower costal margin and the sternum, and palpate the junction of the ribs with the costal cartilage (costochondral junction) and sternum, which should be fairly smooth.
Movement of the chest wall should be symmetric bilaterally and coordinated with breathing. During inspiration the chest rises and expands, the diaphragm descends, and the costal angle increases. During expiration the chest falls and decreases in size, the diaphragm rises, and the costal angle narrows (Fig. 6-30). In children younger than 6 or 7 years of age, respiratory movement is principally abdominal or diaphragmatic. In older children, particularly girls, respirations are chiefly thoracic. In either case the chest and abdomen should rise and fall together. Always report any asymmetry of movement.

While inspecting the skin surface of the chest, observe the position of the nipples and any evidence of breast development. Normally the nipples are located slightly lateral to the midclavicular line between the fourth and fifth ribs. Note symmetry of nipple placement and normal configuration of a darker pigmented areola surrounding a flat nipple in the prepubertal child.
Pubertal breast development usually begins in girls between 10 and 14 years of age (see Chapter 19. Record early (precocious) or delayed breast development, as well as evidence of any other secondary sexual characteristics. In males breast enlargement (gynecomastia) may be caused by hormonal or systemic disorders, but more commonly it is a result of adipose tissue from obesity or a transitory body change during early puberty. In either situation investigate the child’s feelings regarding breast enlargement.
In adolescent girls who have achieved sexual maturity, palpate the breasts for evidence of any masses or hard nodules. Use this opportunity to discuss the importance of routine breast self-examination. Emphasize that most palpable masses are benign to decrease any fear or concern that results when a mass is felt.
Lungs
The lungs are situated inside the thoracic cavity, with one lung on each side of the sternum. Each lung is divided into an apex, which is slightly pointed and rises above the first rib; a base, which is wide and concave and rides on the dome-shaped diaphragm; and a body, which is divided into lobes. The right lung has three lobes: the upper, middle, and lower. The left lung has only two lobes, the upper and lower, because of the space occupied by the heart (Fig. 6-31).
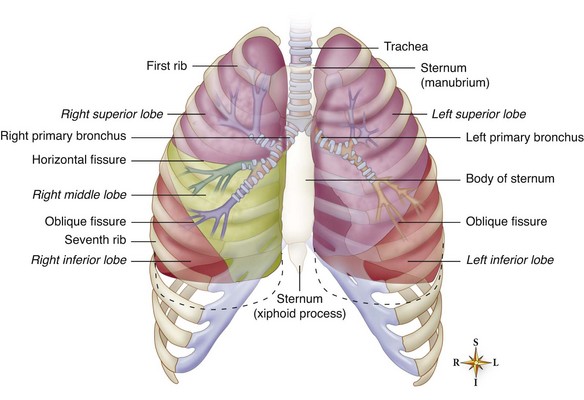
Fig. 6-31 Location of lobes of lungs within thoracic cavity. (From Patton KT, Thibodeau GA: Anatomy and physiology, ed 7, St Louis, 2010, Mosby.)
Anatomy Review—Percussion Sounds in the Thorax
Inspection of the lungs primarily involves observation of respiratory movements. Evaluate respirations for (1) rate (number per minute), (2) rhythm (regular, irregular, or periodic), (3) depth (deep or shallow), and (4) quality (effortless, automatic, difficult, or labored). Note the character of breath sounds, such as noisy, grunting, snoring, or heavy.
Evaluate respiratory movements by placing each hand flat against the back or chest with the thumbs in midline along the lower costal margin of the lungs. The child should be sitting during this procedure and, if cooperative, should take several deep breaths. During respiration your hands will move with the chest wall. Assess the amount and speed of respiratory excursion and note any asymmetry of movement.
Experienced examiners may percuss the lungs. Percuss the anterior lung from apex to base, usually with the child in the supine or sitting position. Percuss each side of the chest in sequence to compare the sounds. When percussing the posterior lung, the procedure and sequence are the same, although the child should be sitting. Resonance is heard over all the lobes of the lungs that are not adjacent to other organs. Record and report any deviation from the expected sound.
Auscultation
Auscultation involves using the stethoscope to evaluate breath sounds (see Nursing Care Guidelines box). Breath sounds are best heard if the child inspires deeply (see Atraumatic Care box). In the lungs breath sounds are classified as vesicular, bronchovesicular, or bronchial (Box 6-13).
NURSING CARE GUIDELINES
Effective Auscultation
• Make certain child is relaxed and not crying, talking, or laughing. Record if child is crying.
• Check that room is comfortable and quiet.
• Warm stethoscope before placing it against skin.
• Apply firm pressure on chest piece but not enough to prevent vibrations and transmission of sound.
• Avoid placing stethoscope over hair or clothing, moving it against skin, breathing on tubing, or sliding fingers over chest piece, which may cause sounds that falsely resemble pathologic findings.
Absent or diminished breath sounds are always an abnormal finding warranting investigation. Fluid, air, or solid masses in the pleural space all interfere with the conduction of breath sounds. Diminished breath sounds in certain segments of the lung can alert the nurse to pulmonary areas that may benefit from chest physiotherapy. Increased breath sounds after pulmonary therapy indicate improved passage of air through the respiratory tract. Box 6-14 lists terms used to describe various respiration patterns.
Various pulmonary abnormalities produce adventitious sounds that are not normally heard over the chest. These sounds occur in addition to normal or abnormal breath sounds. They are classified into two main groups: crackles, which result from the passage of air through fluid or moisture, and wheezes, which are produced as air passes through narrowed passageways, regardless of the cause, such as exudate, inflammation, spasm, or tumor. Considerable practice with an experienced tutor is necessary to differentiate the various types of lung sounds. Often it is best to describe the type of sound heard in the lungs rather than trying to label it. Always report any abnormal sounds for further medical evaluation.
Heart
The heart is situated in the thoracic cavity between the lungs in the mediastinum and above the diaphragm (Fig. 6-32). About two thirds of the heart lies within the left side of the rib cage, with the other third on the right side as it crosses the sternum. The heart is positioned in the thorax like a trapezoid:
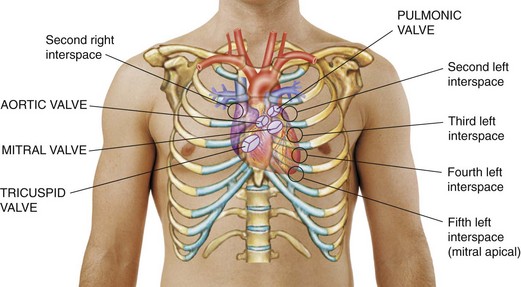
Fig. 6-32 Position of heart within thorax. (From Seidel HM, Ball JW, Dains JE, et al: Mosby’s guide to physical examination, ed 5, 2003, St Louis, Mosby.)
Vertically along the right sternal border (RSB) from the second to the fifth rib
Horizontally (long side) from the lower right sternum to the fifth rib at the left midclavicular line (LMCL)
Diagonally from the left sternal border (LSB) at the second rib to the LMCL at the fifth rib
Horizontally (short side) from the RSB and LSB at the second ICS—base of the heart
Critical Thinking Exercise—Cardiovascular Assessment
Inspection is easiest when the child is sitting in a semi-Fowler position. Look at the anterior chest wall from an angle, comparing both sides of the rib cage with each other. Normally they should be symmetric. In children with thin chest walls, a pulsation may be visible. Because comprehensive evaluation of cardiac function is not limited to the heart, also consider other findings such as the presence of all pulses (especially the femoral pulses) (Fig. 6-33), distended neck veins, clubbing of the fingers, peripheral cyanosis, edema, blood pressure, and respiratory status.
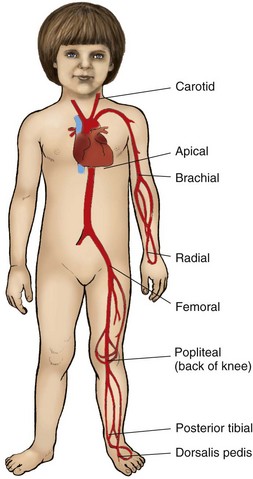
Anatomy Review—Location of Pulses
Use palpation to determine the location of the apical impulse (AI), the most lateral cardiac impulse that may correspond to the apex. The AI is found:
• Just lateral to the LMCL and fourth ICS in children less than 7 years of age
• At the LMCL and fifth ICS in children more than 7 years of age
Although the AI gives a general idea of the size of the heart (with enlargement, the apex is lower and more lateral), its normal location is variable, making it an unreliable indicator of heart size.
The point of maximum intensity (PMI), as the name implies, is the area of most intense pulsation. Usually the PMI is located at the same site as the AI, but it can occur elsewhere. For this reason, the two terms should not be used synonymously.
Assess capillary refill time, an important test for circulation and hydration, by pressing the skin lightly on a central site, such as the forehead, or a peripheral site, such as the top of the hand, to produce a slight blanching. The time it takes for the blanched area to return to its original color is the capillary refill time.
NURSING ALERT
Capillary refill should be brisk—less than 2 seconds. Prolonged refill may be associated with poor systemic perfusion or a cool ambient temperature.
Auscultation
Origin of Heart Sounds: The heart sounds are produced by the opening and closing of the valves and the vibration of blood against the walls of the heart and vessels. Normally two sounds—S1 and S2—are heard, which correspond, respectively, to the familiar “lub dub” often used to describe the sounds. S1 is caused by closure of the tricuspid and mitral valves (sometimes called the atrioventricular valves). S2 is the result of closure of the pulmonic and aortic valves (sometimes called semilunar valves). Normally the split of the two sounds in S2 is distinguishable and widens during inspiration. Physiologic splitting is a significant normal finding.
NURSING ALERT
Fixed splitting, in which the split in S2 does not change during inspiration, is an important diagnostic sign of atrial septal defect.
Two other heart sounds, S3 and S4, may be produced. S3 is normally heard in some children; S4 is rarely heard as a normal heart sound; it usually indicates the need for further cardiac evaluation.
Differentiating Normal Heart Sounds: Fig. 6-34 illustrates the approximate anatomic position of the valves within the heart chambers. Note that the anatomic location of valves does not correspond to the area where the sounds are heard best. The auscultatory sites are located in the direction of the blood flow through the valves.
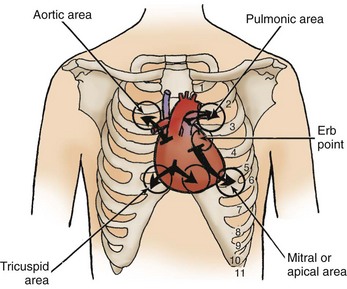
Anatomy Review—Direction of Heart Sounds
Normally S1 is louder at the apex of the heart in the mitral and tricuspid area, and S2 is louder near the base of the heart in the pulmonic and aortic area (Table 6-11). Listen to each sound by inching down the chest. Auscultate the following areas for sounds, such as murmurs, which may radiate to these sites: sternoclavicular area above the clavicles and manubrium, area along the sternal border, area along the left midaxillary line, and area below the scapulae.
TABLE 6-11
SEQUENCE OF AUSCULTATING HEART SOUNDS*

*Use both diaphragm and bell chest pieces when auscultating heart sounds. Bell chest piece is necessary for low-pitched sounds of murmurs, S3, and S4.
Auscultate the heart with the child in at least two positions: sitting and reclining. If adventitious sounds are detected, further evaluate them with the child standing, sitting and leaning forward, and lying on the left side. For example, atrial sounds such as S4 are heard best with the person in a recumbent position and usually fade if the person sits or stands.
Evaluate heart sounds for (1) quality (they should be clear and distinct, not muffled, diffuse, or distant); (2) intensity, especially in relation to the location or auscultatory site (they should not be weak or pounding); (3) rate (they should have the same rate as the radial pulse); and (4) rhythm (they should be regular and even). A particular arrhythmia that occurs normally in many children is sinus arrhythmia, in which the heart rate increases with inspiration and decreases with expiration. Differentiate this rhythm from a truly abnormal arrhythmia by having children hold their breath. In sinus arrhythmia, cessation of breathing causes the heart rate to remain steady.
Heart Murmurs: Another important category of the heart sounds is murmurs, which are produced by vibrations within the heart chambers or in the major arteries from the back-and-forth flow of blood. (For a more detailed discussion, see Assessment of Cardiac Function, Chapter 34.) Murmurs are classified as:
Innocent—No anatomic or physiologic abnormality exists.
Functional—No anatomic cardiac defect exists, but a physiologic abnormality such as anemia is present.
Organic—A cardiac defect with or without a physiologic abnormality exists.
The description and classification of murmurs are skills that require considerable practice and training. In general, recognize murmurs as distinct swishing sounds that occur in addition to the normal heart sounds and record the (1) location, or the area of the heart in which the murmur is heard best; (2) time of the occurrence of the murmur within the S1-S2 cycle; (3) intensity (evaluate in relationship to the child’s position); and (4) loudness. Table 6-12 lists the usual subjective method of grading the loudness or intensity of a murmur.
TABLE 6-12
GRADING THE INTENSITY OF HEART MURMURS
| GRADE | DESCRIPTION |
| I | Very faint; often not heard if child sits up |
| II | Usually readily heard; slightly louder than grade I; audible in all positions |
| III | Loud, but not accompanied by a thrill |
| IV | Loud, accompanied by a thrill |
| V | Loud enough to be heard with a stethoscope barely touching the chest; accompanied by a thrill |
| VI | Loud enough to be heard with the stethoscope not touching the chest; often heard with the human ear close to the chest; accompanied by a thrill |
Abdomen
Examination of the abdomen involves inspection, followed by auscultation and then palpation. Perform palpation last because it may distort the normal abdominal sounds. Knowledge of the anatomic placement of the abdominal organs is essential to differentiate normal, expected findings from abnormal ones (Fig. 6-35).
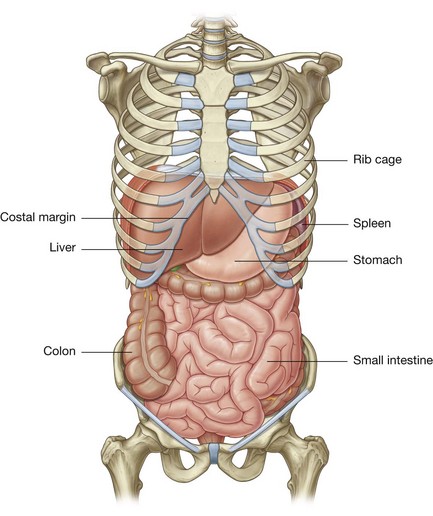
Fig. 6-35 Location of structures in abdomen. (From Drake RL, Vogl W, Mitchell AWM: Gray’s anatomy for students, 2005, New York: Churchill Livingstone.)
For descriptive purposes, the abdominal cavity is divided into four quadrants by drawing a vertical line midway from the sternum to the symphysis pubis and a horizontal line across the abdomen through the umbilicus. The sections are named:
Inspection
Inspect the contour of the abdomen with the child erect and supine. Normally the abdomen of infants and young children is cylindric and, in the erect position, fairly prominent because of the physiologic lordosis of the spine. In the supine position the abdomen appears flat. A midline protrusion from the xiphoid to the umbilicus or symphysis pubis is usually diastasis recti, or failure of the rectus abdominis muscles to join in utero. In a healthy child a midline protrusion is usually a variation of normal muscular development.
NURSING ALERT
A tense, boardlike abdomen is a serious sign of paralytic ileus and intestinal obstruction.
The skin covering the abdomen should be uniformly taut, without wrinkles or creases. Sometimes silvery, whitish striae (“stretch marks”) are seen, especially if the skin has been stretched as in obesity. Superficial veins are usually visible in light-skinned, thin infants, but distended veins are an abnormal finding.
Observe movement of the abdomen. Normally chest and abdominal movements are synchronous. In infants and thin children peristaltic waves may be visible through the abdominal wall; they are best observed by standing at eye level to and across from the abdomen. Always report this finding.
Examine the umbilicus for size, hygiene, and evidence of any abnormalities, such as hernias. The umbilicus should be flat or only slightly protruding. If a herniation is present, palpate the sac for abdominal contents and estimate the approximate size of the opening. Umbilical hernias are common in infants, especially in African-American children.
Anatomy Review—Location of Hernias
Hernias may exist elsewhere on the abdominal wall (Fig. 6-36). An inguinal hernia is a protrusion of peritoneum through the abdominal wall in the inguinal canal. It occurs mostly in males, is frequently bilateral, and may be visible as a mass in the scrotum. To locate a hernia, slide the little finger into the external inguinal ring at the base of the scrotum and ask the child to cough. If a hernia is present, it will hit the tip of the finger.
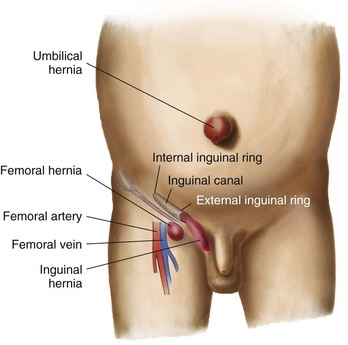
A femoral hernia, which occurs more frequently in girls, is felt or seen as a small mass on the anterior surface of the thigh just below the inguinal ligament in the femoral canal (a potential space medial to the femoral artery). Feel for a hernia by placing the index finger of your right hand on the child’s right femoral pulse (left hand for left pulse) and the middle finger flat against the skin toward the midline. The ring finger lies over the femoral canal, where the herniation occurs. Palpation of hernias in the pelvic region is often part of the genital examination.
Auscultation
The most important finding to listen for is peristalsis, or bowel sounds, which sound like short metallic clicks and gurgles. Record their frequency per minute (e.g., 5 sounds/min). Stimulate bowel sounds by stroking the abdominal surface with a fingernail. Report absence of bowel sounds or hyperperistalsis, since either usually denotes an abdominal disorder.
Palpation
There are two types of palpation: superficial and deep. For superficial palpation, lightly place your hand against the skin and feel each quadrant, noting any areas of tenderness, muscle tone, and superficial lesions such as cysts. Because superficial palpation is often perceived as tickling, use several techniques to minimize this sensation and relax the child (see Atraumatic Care box). Admonishing the child to stop laughing only draws attention to the sensation and decreases cooperation.
Deep palpation is for palpating organs and large blood vessels and for detecting masses and tenderness that were not discovered during superficial palpation. Palpation usually begins in the lower quadrants and proceeds upward to avoid missing the edge of an enlarged liver or spleen. Except for palpating the liver, successful identification of other organs, such as the spleen, kidney, and part of the colon, requires considerable practice with tutored supervision. Report any questionable mass. The lower edge of the liver is sometimes felt in infants and young children as a superficial mass 1 to 2 cm (0.4 to 0.8 inch) below the right costal margin (the distance is sometimes measured in fingerbreadths). Normally, the liver descends during inspiration as the diaphragm moves downward. Do not mistake this downward displacement as a sign of liver enlargement.
NURSING ALERT
If the liver is palpable 3 cm (1.2 inch) below the right costal margin or the spleen is palpable more than 2 cm (0.8 inch) below the left costal margin, these organs are enlarged—a finding that is always reported for further medical investigation.
Palpate the femoral pulses by placing the tips of two or three fingers (index, middle, or ring) along the inguinal ligament about midway between the iliac crest and symphysis pubis. Feel both pulses simultaneously to make certain that they are equal and strong (Fig. 6-37).
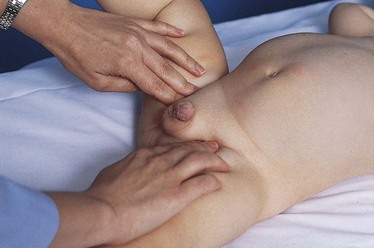
Genitalia
Examination of genitalia conveniently follows assessment of the abdomen while the child is still supine. In adolescents inspection of the genitalia may be left to the end of the examination. The best approach is to examine the genitalia matter-of-factly, placing no more emphasis on this part of the assessment than on any other segment. It helps to relieve children’s and parents’ anxiety by telling them the results of the findings; for example, the nurse might say, “Everything looks fine here.”
If it is necessary to ask questions, such as about discharge or difficulty urinating, respect the child’s privacy by covering the lower abdomen with the gown or underpants. To prevent embarrassing interruptions, keep the door or curtain closed and post a “do not disturb” sign. Have a drape ready to cover the genitalia if someone enters the room.
In examining the genitalia, wear gloves to avoid contact with body substances. It might be helpful for the adolescent to know that wearing gloves also prevents skin-to-skin contact.
The genital examination is an excellent time for eliciting questions or concern about body function or sexual activity. Also use this opportunity to increase or reinforce the child’s knowledge of reproductive anatomy by naming each body part and explaining its function. This part of the health assessment is an opportune time to teach testicular self-examination to boys.
Male Genitalia
Note the external appearance of the glans and shaft of the penis, the prepuce, the urethral meatus, and the scrotum (Fig. 6-38). The penis is generally small in infants and young boys until puberty, when it begins to increase in both length and width. In an obese child the penis often looks abnormally small because of the folds of skin partially covering it at the base. Be familiar with normal pubertal growth of the external male genitalia to compare the findings with the expected sequence of maturation (see Chapter 16).
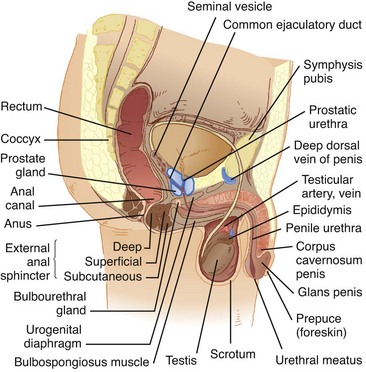
Fig. 6-38 Major structures of genitalia in uncircumcised postpubertal male. (From Black JM: Medical-surgical nursing: clinical management for positive outcomes, ed 8, St Louis, 2008, Saunders.)
Examine the glans (head of the penis) and shaft (portion between the perineum and prepuce) for signs of swelling, skin lesions, inflammation, or other irregularities. Any of these signs may indicate underlying disorders, especially sexually transmitted infections.
Carefully inspect the urethral meatus for location and evidence of discharge. Normally it is centered at the tip of the glans. Also note hair distribution. Normally, before puberty, no pubic hair is present. Soft, downy hair at the base of the penis is an early sign of pubertal maturation. In older adolescents hair distribution is diamond-shaped from the umbilicus to the anus.
Note the location and size of the scrotum. The scrota hang freely from the perineum behind the penis, and the left scrotum normally hangs lower than the right. In infants the scrota appear large in relation to the rest of the genitalia. The skin of the scrotum is loose and highly rugated (wrinkled). During early adolescence the skin normally becomes redder and coarser. In dark-skinned children the scrota are usually more deeply pigmented.
Palpation of the scrotum includes identification of the testes, epididymis, and, if present, inguinal hernias. The two testes are felt as small, ovoid bodies about 1.5 to 2 cm (0.6 to 0.8 inch) long—one in each scrotal sac. They do not enlarge until puberty, when they approximately double in size.
When palpating for the presence of the testes, avoid stimulating the cremasteric reflex, which is stimulated by cold, touch, emotional excitement, or exercise. This reflex pulls the testes higher into the pelvic cavity. Several measures are useful in preventing the cremasteric reflex during palpation of the scrotum. First, warm the hands. Second, if the child is old enough, examine him in a tailor or “Indian” position, which stretches the muscle, preventing its contraction (Fig. 6-39, A). Third, block the normal pathway of ascent of the testes by placing the thumb and index finger over the upper part of the scrotal sac along the inguinal canal (Fig. 6-39, B). If there is any question concerning the existence of two testes, place the index and middle fingers in a scissors fashion to separate the right and left scrota. If, after using these techniques, you have not palpated the testes, feel along the inguinal canal and perineum to locate masses that may be undescended testes. Although undescended testes may descend at any time during childhood and are checked at each visit, report any failure to palpate the testes.
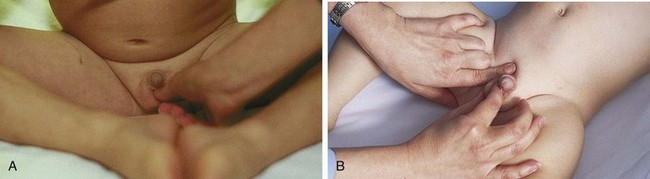
Female Genitalia
The examination of female genitalia is limited to inspection and palpation of external structures. If a vaginal examination is required, the nurse should make an appropriate referral unless he or she is qualified to perform the procedure.
A convenient position for examination of the genitalia involves placing the young child supine on the examining table or in a semireclining position on the parent’s lap with the feet supported on your knees as you sit facing the child. Divert the child’s attention from the examination by instructing her to try to keep the soles of her feet pressed against each other. Separate the labia majora with the thumb and index finger and retract outward to expose the labia minora, urethral meatus, and vaginal orifice.
Examine the female genitalia for size and location of the structures of the vulva, or pudendum (Fig. 6-40). The mons pubis is a pad of adipose tissue over the symphysis pubis. At puberty the mons is covered with hair, which extends along the labia. The usual pattern of female hair distribution is an inverted triangle. The appearance of soft, downy hair along the labia majora is an early sign of sexual maturation. Note the size and location of the clitoris, a small, erectile organ located at the anterior end of the labia minora. It is covered by a small flap of skin, the prepuce.
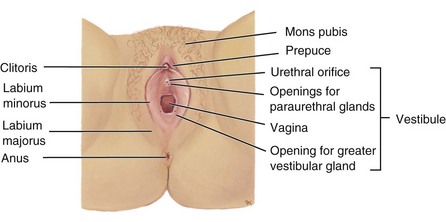
Fig. 6-40 External structures of genitalia in postpubertal female. Labia are spread to reveal deeper structures. (From Applegate E: The anatomy and physiology learning system, ed 3, St Louis, 2006, Saunders.)
The labia majora are two thick folds of skin running posteriorly from the mons to the posterior commissure of the vagina. Internal to the labia majora are two folds of skin called the labia minora. Although the labia minora are usually prominent in the newborn, they gradually atrophy, which makes them almost invisible until their enlargement during puberty. The inner surface of the labia should be pink and moist. Note the size of the labia and any evidence of fusion, which may suggest male scrota. Normally no masses are palpable within the labia.
The urethral meatus is located posterior to the clitoris and is surrounded by the Skene glands and ducts. Although not a prominent structure, the meatus appears as a small V-shaped slit. Note its location, especially if it opens from the clitoris or inside the vagina. Gently palpate the glands, which are common sites of cysts and sexually transmitted lesions.
The vaginal orifice is located posterior to the urethral meatus. Its appearance varies depending on individual anatomy and sexual activity. Ordinarily, examination of the vagina is limited to inspection. In virgins a thin crescent-shaped or circular membrane, called the hymen, may cover part of the vaginal opening. In some instances it completely occludes the orifice. After rupture, small rounded pieces of tissue called caruncles remain. Although an imperforate hymen denotes lack of penile intercourse, a perforate one does not necessarily indicate sexual activity (see also Sexual Abuse, Chapter 16).
NURSING ALERT
In girls who have been circumcised, the genitalia will appear different. Do not show surprise or disgust, but note the appearance and discuss the procedure with the young woman (see also Cultural Competence box, p. 120).
Surrounding the vaginal opening are Bartholin glands, which secrete a clear, mucoid fluid into the vagina for lubrication during intercourse. Palpate the ducts for cysts. Also note the discharge from the vagina, which is usually clear or white.
Anus
After examination of the genitalia, it is easy to identify the anal area, although the child should be placed on the abdomen. Note the general firmness of the buttocks and symmetry of the gluteal folds. Assess the tone of the anal sphincter by eliciting the anal reflex (anal wink). Gently scratching the anal area results in an obvious quick contraction of the external anal sphincter.
Back and Extremities
Note the general curvature of the spine. Normally the back of a newborn is rounded or C shaped from the thoracic and pelvic curves. The development of the cervical and lumbar curves approximates development of various motor skills, such as cervical curvature with head control, and gives the older child the typical double S curve.
Marked curvatures in posture are abnormal. Scoliosis, lateral curvature of the spine, is an important childhood problem, especially in girls. Although scoliosis may be identified by observing and palpating the spine and noting a sideways displacement, more objective tests include:
• With the child standing erect, clothed only in underpants (and bra if older girl), observe from behind, noting asymmetry of the shoulders and hips.
• With the child bending forward so that the back is parallel to the floor, observe from the side, noting asymmetry or prominence of the rib cage.
A slight limp, a crooked hemline, or complaints of a sore back are other signs and symptoms of scoliosis.
Inspect the back, especially along the spine, for any tufts of hair, dimples, or discoloration. Mobility of the vertebral column is easy to assess in most children because of their tendency to be in constant motion during the examination. However, you can test mobility by asking the child to sit up from a prone position or to do a modified sit-up exercise.
Movement of the cervical spine is an important diagnostic sign of neurologic problems, such as meningitis. Normally movement of the head in all directions is effortless.
Extremities
Inspect each extremity for symmetry of length and size; refer any deviation for orthopedic evaluation. Count the fingers and toes to be certain of the normal number. This is so often taken for granted that an extra digit (polydactyly) or fusion of digits (syndactyly) may go unnoticed.
Inspect the arms and legs for temperature and color, which should be equal in each extremity, although the feet may normally be colder than the hands.
Assess the shape of bones. There are several variations of bone shape in children. Although many of them cause parents concern, most are benign and require no treatment. Bowleg, or genu varum, is lateral bowing of the tibia. It is clinically present when the child stands with an outward bowing of the legs, giving the appearance of a bow. Usually there is an outward curvature of both femur and tibia (Fig. 6-41, A). Toddlers are usually bowlegged after beginning to walk until all their lower back and leg muscles are well developed. Unilateral or asymmetric bowlegs that are present beyond the age of 2 to 3 years, particularly in African-American children, may represent pathologic conditions requiring further investigation.
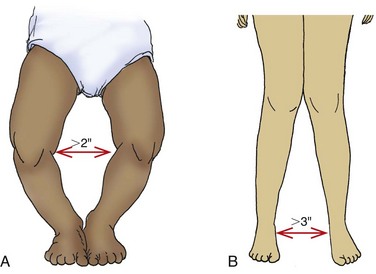
Knock-knee, or genu valgum, appears as the opposite of bowleg, in that the knees are close together but the feet are spread apart. It is determined clinically by using the same method as for genu varum but by measuring the distance between the malleoli, which normally should be less than 7.5 cm (3 inches) (Fig. 6-41, B). Knock-knee is normally present in children from about 2 to 7 years of age. Knock-knee that is excessive, asymmetric, accompanied by short stature, or evident in a child nearing puberty requires further evaluation.
Next inspect the feet. Infants’ and toddlers’ feet appear flat because the foot is normally wide and the arch is covered by a fat pad. Development of the arch occurs naturally from the action of walking. Normally, at birth the feet are held in a valgus (outward) or varus (inward) position. To determine whether a foot deformity at birth is a result of intrauterine position or development, scratch the outer, then inner, side of the sole. If the foot position is self-correctable, it will assume a right angle to the leg. As the child begins to walk, the feet turn outward less than 30 degrees and inward less than 10 degrees.
Toddlers have a “toddling” or broad-based gait, which facilitates walking by lowering the center of gravity. As the child reaches preschool age, the legs are brought closer together. By school age the walking posture is much more graceful and balanced.
The most common gait problem in young children is pigeon toe, or toeing in, which usually results from torsional deformities, such as internal tibial torsion (abnormal rotation or bowing of the tibia). Tests for tibial torsion include measuring the thigh-foot angle, which requires considerable practice for accuracy.
Elicit the plantar or grasp reflex by exerting firm but gentle pressure with the tip of the thumb against the lateral sole of the foot from the heel upward to the little toe and then across to the big toe. The normal response in children who are walking is flexion of the toes. Babinski sign, dorsiflexion of the big toe and fanning of the other toes, is normal during infancy but abnormal after about 1 year of age or when locomotion begins (see Fig. 12-9).
Joints
Evaluate the joints for range of motion. Normally this requires no specific testing if you have observed the child’s movements during the examination. However, routinely investigate the hips in infants for congenital dislocation. Report any evidence of joint immobility or hyperflexibility. Palpate the joints for heat, tenderness, and swelling. These signs, as well as redness over the joint, warrant further investigation.
Muscles
Note symmetry and quality of muscle development, tone, and strength. Observe development by looking at the shape and contour of the body in both a relaxed and a tensed state. Estimate tone by grasping the muscle and feeling its firmness when it is relaxed and contracted. A common site for testing tone is the biceps muscle of the arm. Children are usually willing to “make a muscle” by clenching their fist.
Estimate strength by having the child use an extremity to push or pull against resistance, as in the following examples:
Arm strength—Child holds the arms outstretched in front of the body and tries to raise the arms while downward pressure is applied.
Hand strength—Child shakes hands with nurse and squeezes one or two fingers of the nurse’s hand.
Leg strength—Child sits on a table or chair with the legs dangling and tries to raise the legs while downward pressure is applied.
Note symmetry of strength in the extremities, hands, and fingers, and report evidence of paresis, or weakness.
Neurologic Assessment
The assessment of the nervous system is the broadest and most diverse part of the examination process, since every human function, both physical and emotional, is controlled by neurologic impulses. Much of the neurologic examination has already been discussed, such as assessment of behavior, sensory testing, and motor function. The following focuses on a general appraisal of cerebellar function, deep tendon reflexes, and the cranial nerves.
Cerebellar Function
The cerebellum controls balance and coordination. Much of the assessment of cerebellar function is included in observing the child’s posture, body movements, gait, and development of fine and gross motor skills. Tests such as balancing on one foot and the heel-to-toe walk assess balance. Test coordination by asking the child to reach for a toy, button clothes, tie shoes, or draw a straight line on a piece of paper (provided the child is old enough to do these activities). Coordination can also be tested by any sequence of rapid, successive movements, such as quickly touching each finger with the thumb of the same hand.
Several tests for cerebellar function can be performed as games (Box 6-15). When a Romberg test is done, stay beside the child if there is a possibility that he or she might fall. School-age children should be able to perform these tests, although in the finger-to-nose test preschoolers normally can only bring the finger within 5 to 7.5 cm (2 to 3 inches) of the nose. Difficulty in performing these exercises indicates poor sense of position (especially with the eyes closed) and incoordination (especially with the eyes opened).
Reflexes
Testing reflexes is an important part of the neurologic examination. Persistence of primitive reflexes (see Chapter 8), loss of reflexes, or hyperactivity of deep tendon reflexes is usually a result of a cerebral insult.
Elicit reflexes by using the rubber head of the reflex hammer, flat of the finger, or side of the hand. If the child is easily frightened by equipment, use your hand or finger. Although testing reflexes is a simple procedure, the child may inhibit the reflex by unconsciously tensing the muscle. To avoid tensing, distract younger children with toys or talk to them. Older children can concentrate on the exercise of grasping their two hands in front of them and trying to pull them apart. This diverts their attention from the testing and causes involuntary relaxation of the muscles.
Deep tendon reflexes are stretch reflexes of a muscle. The most common deep tendon reflex is the knee jerk reflex, or patellar reflex (sometimes called the quadriceps reflex). Figs. 6-42 to 6-45 illustrate the reflexes normally elicited. Report any diminished or hyperreflexive response for further evaluation.
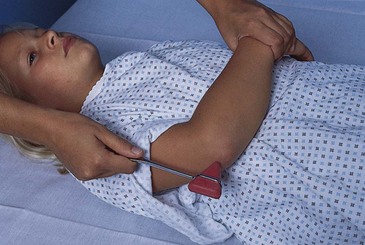
Fig. 6-42 Testing for triceps reflex. Child is placed supine, with forearm resting over chest, and triceps tendon is struck. Alternate procedure: child’s arm is abducted, with upper arm supported and forearm allowed to hang freely. Triceps tendon is struck. Normal response is partial extension of forearm.
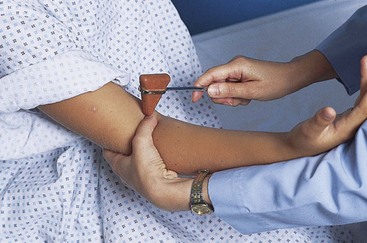
Fig. 6-43 Testing for biceps reflex. Child’s arm is held by placing partially flexed elbow in examiner’s hand with thumb over antecubital space. Examiner’s thumbnail is struck with hammer. Normal response is partial flexion of forearm.
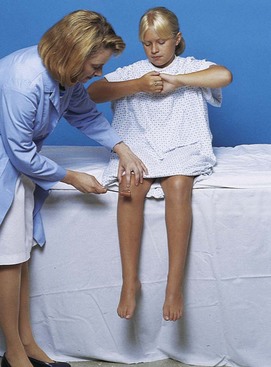

Cranial Nerves
Assessment of the cranial nerves is an important area of neurologic assessment (Fig. 6-46; Table 6-13). With young children, present the tests as games to foster trust and security at the beginning of the examination. Also include the cranial nerve test when examining each system, such as tongue movement and strength, gag reflex, swallowing, cardinal positions of gaze (Fig. 6-47), and position of the uvula during examination of the mouth.
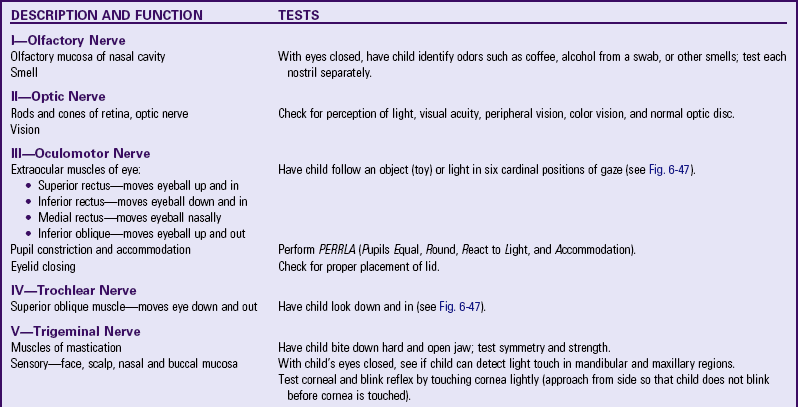
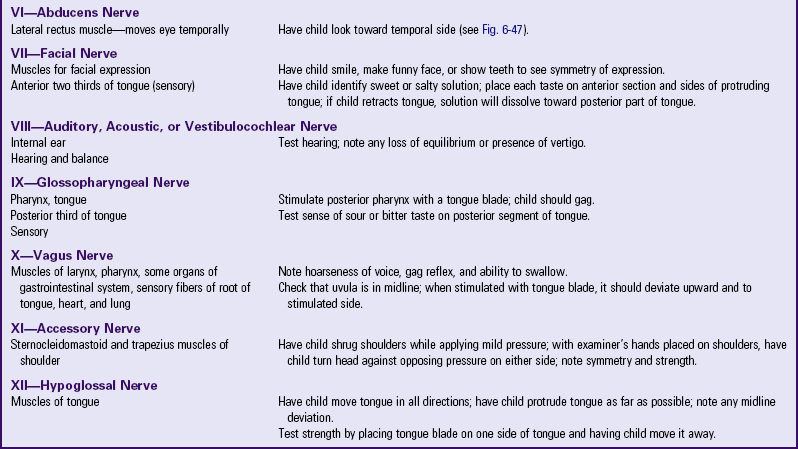
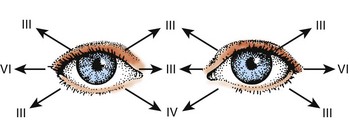
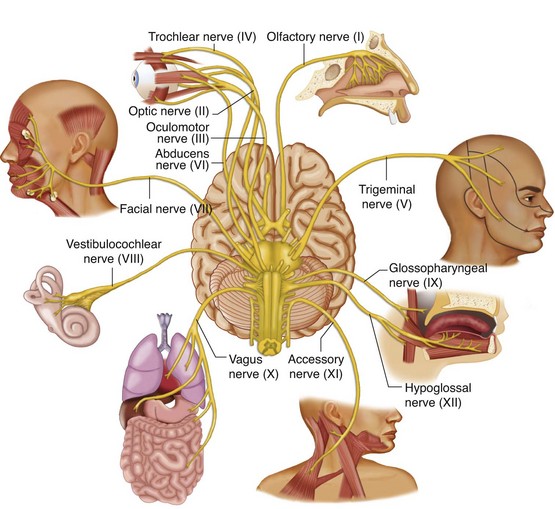
Key Points
• To effectively establish a setting for communication, nurses must make an appropriate introduction and ensure privacy and confidentiality.
• When communicating with parents, nurses need to encourage parental involvement, listen carefully, use silence, and be empathic.
• Communication with children must reflect their developmental stage.
• Nonverbal communication with children may take the form of writing, drawing, and play.
• The objectives of performing a health history are to identify pertinent information, determine the chief complaint, analyze the present illness, secure the patient’s health history, review biologic systems, and record a family medical history and child psychosocial and sexual history.
• Family assessment is the collection of data about family composition and relationships among its members; it also focuses on home and community environment, parents’ occupation and education, and cultural and religious traditions.
• The family function interview examines interaction and roles, power, decision making, problem solving, communication, and expression of feelings and individuality.
• Nutritional assessment is performed by determination of dietary intake, clinical examination, and biochemical analysis.
• Growth measurements during the physical examination focus on length or height, weight, skinfold thickness, and arm and head circumference. Assessment of growth is measured against standard growth charts to determine a child’s status in comparison with other children of the same age.
• Measurements of temperature, pulse, respiration, and BP constitute the physiologic approach to assessment.
• The child’s general appearance is a cumulative, subjective impression of physical appearance, state of nutrition, behavior, personality, interactions with parents and nurse, posture, development, and speech.
• Assessment of the skin, which primarily involves inspection and palpation, focuses on color, texture, temperature, moisture, and turgor. The nurse needs to be aware of both physiologic and ethnic factors that may affect these areas.
• In assessment of the lymph nodes, the nurse examines, by palpation, the part of the body in which the glands are located.
• The head is inspected for shape, symmetry, mobility, and muscle control.
• Examination of the eyes includes placement and alignment, inspection of external and internal structures, and vision testing.
• The ear examination encompasses placement and alignment, external and internal structures, and auditory testing.
• The lungs are examined by inspection, palpation, percussion, and auscultation.
• Auscultation is the most important procedure for examining the heart.
• Abdominal assessment follows an orderly sequence of inspection, auscultation, and palpation, since palpation may distort normal abdominal sounds.
• Examination of the genitalia may provoke anxiety in the child, and the nurse must avoid any transference of anxiety.
• Neurologic assessment addresses behavior; motor, sensory, and cerebellar function; reflexes; and cranial nerves.
References
American Academy of Pediatrics. Pediatric nutrition handbook, ed 5. Elk Grove Village, Ill: The Academy; 2004.
American Academy of Pediatrics, Committee on Practice and Ambulatory Medicine, Section on Ophthalmology. Eye examination in infants, children, and young adults by pediatricians. Pediatrics. 2003;111(4):902–907.
American Academy of Pediatrics, Committee on Practice and Ambulatory Medicine, Section on Otolaryngology and Bronchoesophagology. Hearing assessment in infants and children: recommendations beyond neonatal screening. Pediatrics. 2003;111(2):436–440.
Bald, M. Ambulatory blood pressure monitoring in children and adolescents. Minerva Paediatr. 2002;54(1):13–24.
Beaulieu, R, Humphreys, J. Evaluation of a telephone advice nurse in a nursing faculty managed pediatric community clinic. J Pediatr Health Care. 2008;22(3):175–181.
Beevers, G, Lip, GYH, O’Brien, E. ABC of hypertension blood pressure measurement, part I, Sphygmomanometry: factors common to all techniques. BMJ. 2001;322(7292):981–985.
Berry, BE, Simons, BD, Siatkowski, RM, et al. Preschool vision screening using the MTI-Photoscreener. Pediatr Nurs. 2001;27(1):27–34.
Clark, JA, Kieh-Lai, MW, Sarnaik, A, et al. Discrepancies between direct and indirect blood pressure measurements using various recommendations for arm cuff selection. Pediatrics. 2002;110(5):920–923.
Coats, DK, Jenkins, RH. Vision assessment of the pediatric patient: refinements. Am Acad Ophthalmol. 1997;1(1):1–12.
Craig, JV, Lancaster, GA, Williamson, PR, et al. Temperature measured at the axilla compared with rectum in children and young people: systematic review. BMJ. 2000;320(7243):1174–1178.
Cunningham, M, Cox, EO. Hearing assessment in infants and children: recommendations beyond neonatal screening. Pediatrics. 2003;111(2):436–440.
Halle, C. Achieve new vision screening objectives. Nurse Pract. 2002;27(3):15–35.
Healthcare Product Comparison System. Thermometers, electronic, infrared. Plymouth Meeting, Penn: ECRI; July 2004.
Healthcare Product Comparison System. Thermometers, electronic, thermistor/thermocouple, patient. Plymouth Meeting, Penn: ECRI; July 2004.
Hedley, AA, Ogden, CL, Johnson, CL, et al. Prevalence of overweight and obesity among US children, adolescents, and adults, 1999-2002. JAMA. 2004;291(23):2847–2850.
Livingstone, MBE, Robson, PJ, Wallace, MW. Issues in dietary intake assessment of children and adolescents. Br J Nutr. 2004;92(Suppl 2):S213–S222.
Magar, NA, Dabova-Missova, S, Gjerdingen, DK. Effectiveness of targeted anticipatory guidance during well-child visits: a pilot trial. J Am Board Fam Med. 2006;19(5):450–458.
Marklund, B, Ström, M, Månsson, J, et al. Computer-supported telephone nurse triage: an evaluation of medical quality and costs. J Nurs Manage. 2007;15(2):180–187.
Martin, SA, Kline, AM. Can there be a standard for temperature measurement in the pediatric intensive care unit? AACN Clin Issues. 2004;15(2):254–266.
Mathiasen, H. Empathy and sympathy: voices from literature. Am J Cardiol. 2006;97(12):1789–1790.
Mattu, GS, Heran, BS, Wright, JM. Comparison of the automated non-invasive oscillometric blood pressure monitor (BpTRU™) with the auscultatory mercury sphygmomanometer in a paediatric population. Blood Pressure Monit. 2004;9(1):39–45.
Mattu, GS, Heran, BS, Wright, JM. Overall accuracy of the BpTRU™—an automated electronic blood pressure device. Blood Press Monit. 2004;9(1):47–52.
Murphy, SP, Poos, MI. Dietary reference intakes: summary of applications in dietary assessment. Public Health Nutr. 2002;5(6A):843–849.
National High Blood Pressure Education Program Working Group on High Blood Pressure in Children and Adolescents. The fourth report on the diagnosis, evaluation, and treatment of high blood pressure in children and adolescents. Pediatrics. 2004;114(2 Suppl 4th Rep):555–576.
National Institutes of Health, National Heart, Lung, and Blood Institute, Update on the Task Force Report (1987) on high blood pressure in children and adolescents: a working group report from the National High Blood Pressure Education Program. NIH Pub No 96-3790. Bethesda, Md: The Institutes; September 1996.
Nicklas, TA, Demory-Luce, D, Yang, SJ, et al. Children’s food consumption patterns have changed over 2 decades (1973-1994): the Bogalusa heart study. J Am Diet Assoc. 2004;104(7):1127–1140.
Ogden, CL, Carroll, MD, Flegal, KM. High body mass index for age among US children and adolescents, 2003-2006. JAMA. 2008;299(20):2401–2405.
Ogden, CL, Kuczmarski, RJ, Flegal, KM, et al. Centers for Disease Control and Prevention 2000 growth charts for the United States: improvements to the 1977 National Center for Health Statistics version. Pediatrics. 2002;109(1):45–60.
Park, MK, Menard, SW, Schoolfield, J. Oscillometric blood pressure standards for children. Pediatr Cardiol. 2005;26(5):601–607.
Seidel, HM, Ball, JW, Dains, JE, et al. Mosby’s guide to physical examination, ed 6. St. Louis: Mosby; 2007.
Turnbull, R. Skin assessment in children: a methodical approach. Nurs Times. 2000;96(41):33–34.
Vessey, JA. Developmental approaches to examining young children. Pediatr Nurs. 1995;21(1):53–56.
Wall, TC, Marsh-Tootle, W, Evans, HH, et al. Compliance with vision-screening guidelines among a national sample of pediatricians. Ambul Pediatr. 2002;2(6):449–455.
*Resources: Nicoll LH: Nurses’ guide to the Internet, ed 3, Philadelphia, 2001, Lippincott. Also available is a bimonthly publication, CIN: Computers, Informatics, Nursing. To order, call 800-638-3030; fax: 301-714-2300; e-mail: CustomerService@LWW.com; www.cinjournal.com.
*The term illness is used in its broadest sense to denote any problem of a physical, emotional, or psychosocial nature. It is actually a history of the chief complaint.
*A sleep history and a sleep chart for the family to record the child’s daily sleep and wake activities is available in Wilson D, Hockenberry M: Wong’s clinical manual of pediatric nursing, ed 7, St Louis, 2008, Mosby.
*BMI (English) = [Weight in pounds ÷ (Height in inches × Height in inches)] × 703. BMI (metric) = Weight in kilograms ÷ [Height in meters]2. note: This formula is the BMI calculation for adults, used in some pediatric settings; for child and adolescent BMI table and plotting, see Appendix B.