Transporting Infants and Children
Infants and children need to be transported within the unit and to areas outside the pediatric unit. Infants and small children can be carried for short distances within the unit, but for more extended trips the child should be securely transported in a suitable conveyance.
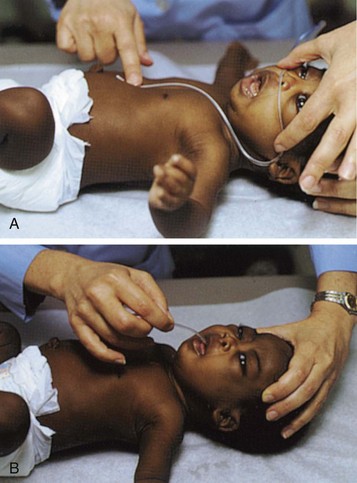
Small infants can be held or carried in the horizontal position with the back supported and the thigh grasped firmly by the carrying arm (Fig. 27-5, A). In the football hold, the infant is carried on the nurse’s arm with the head supported by the hand and the body held securely between the nurse’s body and elbow (Fig. 27-5, B). Both of these holds leave the nurse’s other arm free for activity. The infant also can be held in the upright position with the buttocks on the nurse’s forearm and the front of the body resting against the nurse’s chest. The infant’s head and shoulders are supported by the nurse’s other arm in case the infant moves suddenly (Fig. 27-5, C). Older infants are able to hold their heads erect but are still subject to sudden movements.
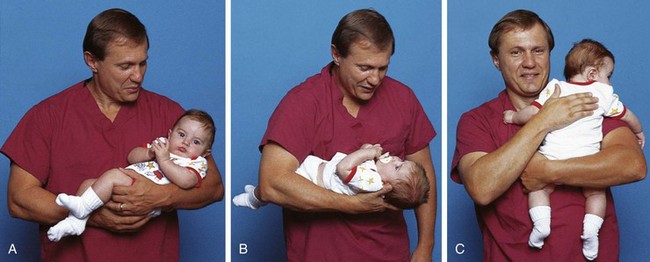
Fig. 27-5 Transporting infants. A, Infant’s thigh firmly grasped in nurse’s hand. B, Football hold. C, Back supported.
The method of transporting children depends on their age, condition, and destination. Older children are safe in wheelchairs or on stretchers. Younger children can be transported in their crib, on a stretcher, in a wagon with raised sides, or in a wheelchair with a safety belt. Stretchers should be equipped with high sides and a safety belt, both of which are secured during transport.
Special care is needed in transporting critically ill patients in the hospital. Critically ill children should always be transported on a stretcher or bed (rather than carried) by at least two staff members with monitoring continued during transport. A blood pressure monitor (or standard blood pressure cuff), pulse oximeter, and cardiac monitor/defibrillator should accompany every patient (Warren, Fromm, Orr, et al, 2004). Airway equipment and emergency medications should accompany the patient.
Restraining Methods and Therapeutic Holding
The Joint Commission (2001) defines restraint as “any method, physical or mechanical, which restricts a person’s movement, physical activity, or normal access to his or her body.” Before initiating restraints, the nurse completes a comprehensive assessment of the patient to determine whether the need for a restraint outweighs the risk of not using one. Restraints can result in loss of dignity, violation of patient rights, psychologic harm, physical harm, and even death. Consider alternative methods first and document them in the patient’s record. The nurse is responsible for selecting the least restrictive type of restraint (Table 27-5). Using less restrictive restraints is often possible by gaining the cooperation of the child and parents.
TABLE 27-5
RESTRAINING CHILDREN: LESS RESTRICTIVE TO MORE RESTRICTIVE TECHNIQUES
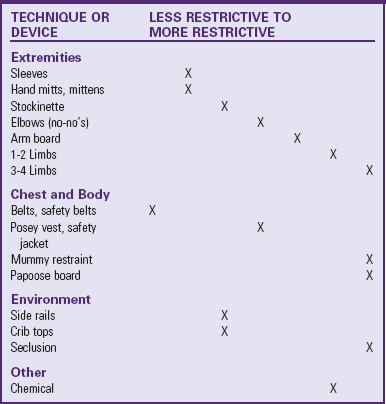
Adapted from Selekman J, Snyder B: Uses of and alternatives to restraints in pediatric settings, AACN Clinical Issues 7(4):603-610, 1996.
The two types of restraints used with children are classified as medical-surgical and behavioral restraints. When a standard or protocol states that immobilization is required 100% of the time as a part of the procedure or postprocedural care process, the restraint device is considered a part of routine care. For example, the postoperative use of elbow restraints after a cleft lip repair, if written in the protocol or standard of care and used for 100% of patients, would not fall under The Joint Commission or Centers for Medicare and Medicaid Services mandates concerning restraints.
Medical-surgical restraints are used for children with an artificial airway or airway adjunct for delivery of oxygen, indwelling catheters, tubes, drains, lines, pacemaker wires, or suture sites. The medical-surgical restraint is used to ensure that safe care is given to the patient. The potential risks of the restraint are offset by the potential benefit of providing safer care. Medical-surgical restraints may be instituted for any of the following reasons:
• Risk for interruption of therapy used to maintain oxygenation or airway patency
• Risk of harm if indwelling catheter, tube, drain, line, pacemaker wire, or sutures are removed, dislodged, or ruptured
• Patient confusion, agitation, unconsciousness, or developmental inability to understand direct requests or instructions
Medical-surgical restraints can be initiated by an individual order or by protocol; the use of the protocol must be authorized by an individual order. The order for continued use of restraints must be renewed each day. Patients are monitored at least every 2 hours.
Behavioral restraints are limited to situations with a significant risk of patients physically harming themselves or others because of behavioral reasons and when nonphysical interventions are not effective. Before initiating a behavioral restraint, the nurse should assess the patient’s mental, behavioral, and physical status to determine the cause for the child’s potentially harmful behavior. If behavioral restraints are indicated, a collaborative approach involving the patient (if appropriate), the family, and the health care team should be used. An order must be obtained as soon as possible, but no longer than 1 hour after the initiation of behavioral restraints. Behavioral restraints for children must be reordered every 1 to 2 hours, based on age. A licensed independent practitioner must conduct an in-person evaluation within 1 hour and again every 4 hours until restraints are discontinued. Children in behavioral restraints must be continuously observed and assessed every 15 minutes. Assessment components include signs of injury associated with applying restraint, nutrition and hydration, circulation and range-of-motion of extremities, vital signs, hygiene and elimination, physical and psychologic status and comfort, and readiness for discontinuation of restraint. The nurse must use clinical judgment in setting a schedule for when each of these parameters needs to be evaluated because every parameter must be assessed during each 15-minute physical assessment.
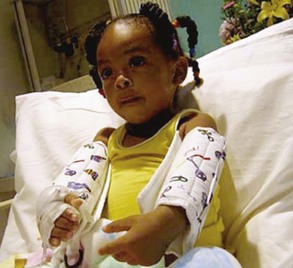
Restraints with ties must be secured to the bed or crib frame, not the side rails. Suggestions for increasing safety and comfort while the child is in a restraint include leaving one finger breadth between skin and the device (Fig. 27-6) and tying knots that allow for quick release. The nurse can also increase safety by ensuring the restraint does not tighten as the child moves and decreasing wrinkles or bulges in the restraint. Placing jacket restraints over an article of clothing; placing limb restraints below waist level, below knee level, or distal to the IV; and tucking in dangling straps also increase safety and comfort.
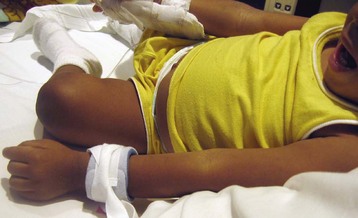
Fig. 27-6 Soft wrist restraints on young child. Wrist restraints must be padded and loose enough to prevent undue pressure, constriction, or tissue injury; and the extremity must be observed frequently for signs of irritation or impaired circulation.
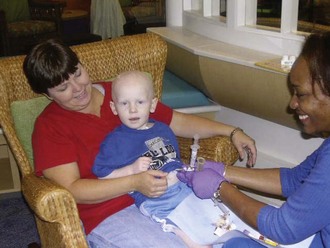
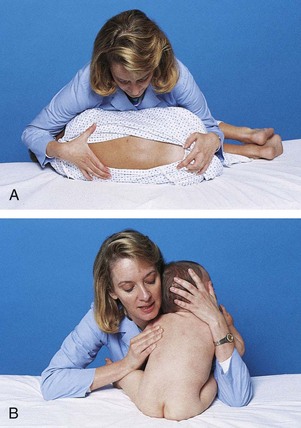
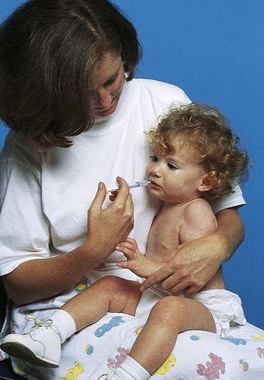
An alternative approach for temporary restraint is therapeutic holding. Therapeutic holding is the use of a secure, comfortable, temporary holding position that provides close physical contact with the parent or caregiver for 30 minutes or less (Fig. 27-7). The use of restraints can often be avoided with adequate preparation of the child; parental or staff supervision of the child; or adequate protection of a vulnerable site, such as an infusion device. The nurse needs to assess the child’s development, mental status, potential to hurt others or self, and safety. The nurse should carefully consider alternative measures to using restraints. Some examples of alternative measures include bringing a child to the nurses’ station for continuous observation, providing diversional activities, or encouraging the participation of the parents.
Mummy Restraint or Swaddle
When an infant or small child requires short-term restraint for examination or treatment that involves the head and neck (e.g., venipuncture, throat examination, gavage feeding), a papoose board with straps or a mummy wrap effectively controls the child’s movements. A blanket or sheet is opened on the bed or crib with one corner folded to the center. The infant is placed on the blanket with shoulders at the fold and feet toward the opposite corner (Fig. 27-8, A). With the infant’s right arm straight down against the body, the right side of the blanket is pulled firmly across the infant’s right shoulder and chest and secured beneath the left side of the body (Fig. 27-8, B). The left arm is placed straight against the infant’s side, and the left side of the blanket is brought across the shoulder and chest and locked beneath the body on the right side (Fig. 27-8, C). The lower corner is folded and brought over the body and tucked or fastened securely with safety pins. Safety pins can be used to fasten the blanket in place at any step in the process.

Fig. 27-8 Application of mummy restraint. A, Infant placed on folded corner of blanket. B, One corner of blanket brought across body and secured beneath body. C, Second corner brought across body and secured, and lower corner folded and tucked or pinned in place. D, Modified mummy restraint with chest uncovered.
To modify the mummy restraint for chest examination, bring the folded edge of the blanket over each arm and under the back, and then fold the loose edge over and secure it at a point below the chest to allow visualization and access to the chest (Fig. 27-8, D).
Jacket Restraint
A jacket restraint is sometimes used to keep the child safe in various chairs. The jacket is put on the child with the ties in back so that the child is unable to manipulate them. The jacket restraint is also useful as a means for maintaining the child in a desired horizontal position. The long tapes, secured to the understructure of the crib, keep the child inside the crib.
Arm and Leg Restraints
Occasionally the nurse needs to restrain one or more extremities or limit their motion. Several commercial restraining devices are available, including disposable wrist and ankle restraints. Restraints must be appropriate to the child’s size and padded to prevent undue pressure, constriction, or tissue injury; and the extremity must be observed frequently for signs of irritation or impaired circulation. The ends of the restraints are never tied to the side rails, since lowering the rail will disturb the extremity, frequently with a jerk that may hurt or injure the child.
Elbow Restraint
Sometimes it is important to prevent the child from reaching the head or face (e.g., after lip surgery or when a scalp vein infusion is in place or to prevent scratching in skin disorders). Elbow restraints fashioned from a variety of materials function well (Fig. 27-9). Commercial elbow restraints are available. An improvised form of elbow restraint consists of a piece of muslin long enough to reach comfortably from just below the axilla to the wrist, with a number of vertical pockets into which tongue depressors are inserted. The restraint is wrapped around the arm and secured with tapes or pins. It may be necessary to pin the top of the restraint to the undershirt sleeve to prevent the restraint from slipping.
 The nurse places the child supine with the legs in a frog position to provide extensive exposure of the groin area. The infant’s legs can be effectively controlled by the nurse’s forearms and hands (
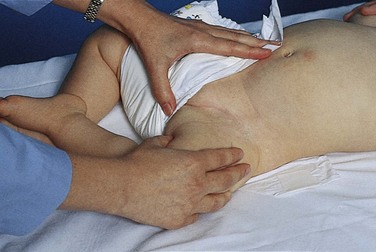
 Animation—Central Venous Access via Femoral Vein
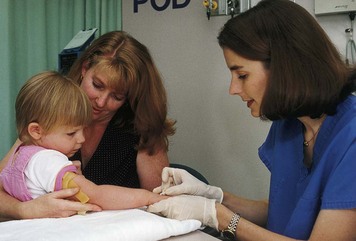
 NURSING ALERT
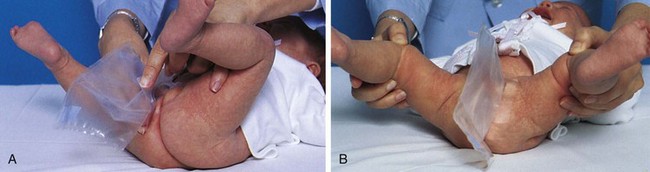
 CULTURAL COMPETENCE
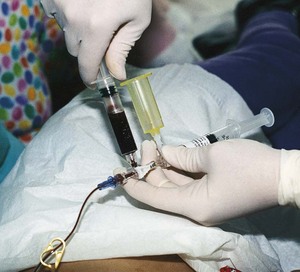

 NURSING CARE GUIDELINES
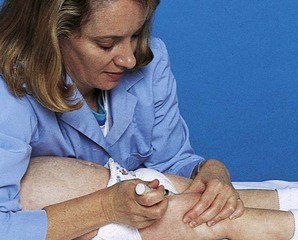
 RESEARCH FOCUS