Prone pelvic assessment and si treatment protocols

Pelvic landmark observation and palpation

Observation and palpation are made of the relative positions and symmetry of landmarks such as the PSISs (for symmetry and orientation including ventral/dorsal, cranial/caudal), sacral sulci (for depth) and inferior lateral angles (for orientations including anterior/posterior, cranial/caudal).

Mobility of the sacrum assessment in prone

Inferior lateral angles (ILAs) spring test
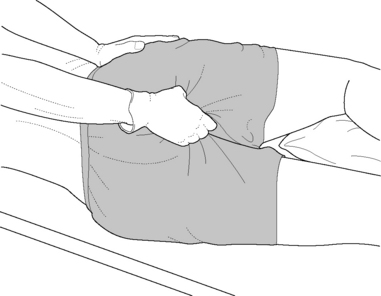
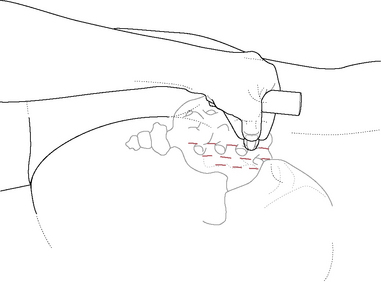
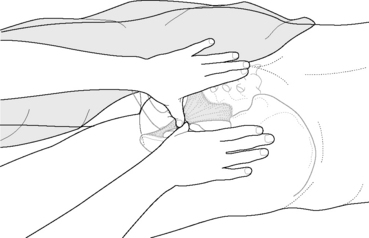
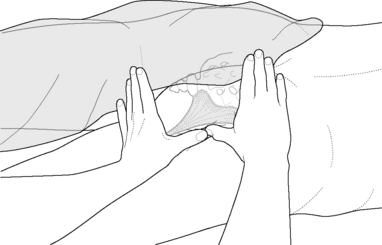
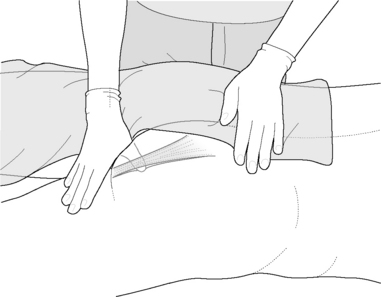
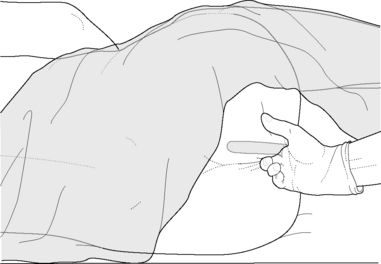
The practitioner places the hands oriented cephalad so that the palm of each hand rests on an ILA and the tips of the fingers are on the sacral sulci (Fig. 11.20).

With one hand at a time, pressure is applied directly cephalad (not obliquely) from one ILA toward the ipsilateral SI joint. This should produce a palpable cephalad movement of the sacrum.

SI dysfunction is indicated if the degree of joint play on that side is distinctly less than the other. If both sides fail to register a degree of ‘give’, bilateral SI joint dysfunction may be present.

The results of this test should correlate with the seated flexion test described earlier and the prone active straight leg raise test described below.

Lumbosacral spring test

CAUTION: This test should not be applied if a spondylolisthesis (forward slippage of the vertebra) is suspected or has been diagnosed.
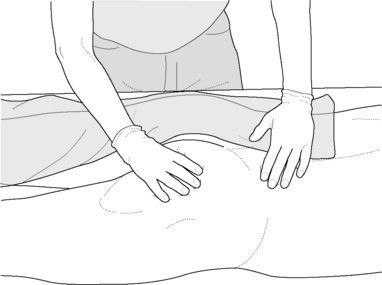
The practitioner is at waist level facing the prone patient and places her hands transversely, one on the other, across the lumbar spine, at L5 level.

A light degree of pressure is applied perpendicular to and through the spine (toward the floor) to evaluate the degree of resilience.

If a hard, non-yielding resistance is noted the test is positive and a lumbosacral restriction exists.

Prone active straight leg raising test

The prone patient is asked to extend the leg at the hip by approximately 10°. Hinging should occur at the hip joint and the pelvis should remain in contact with the table throughout.
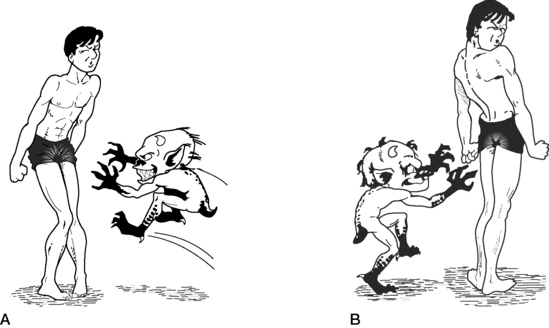
Excessive degrees of pelvic rotation in the transverse plane (anterior pelvic rotation), and/or pain or difficulty in raising the leg is reported during the test, this suggests possible SI joint dysfunction as explained below.
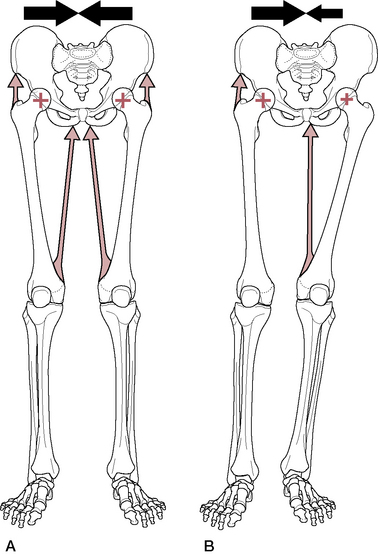
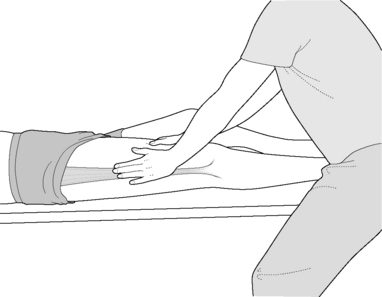
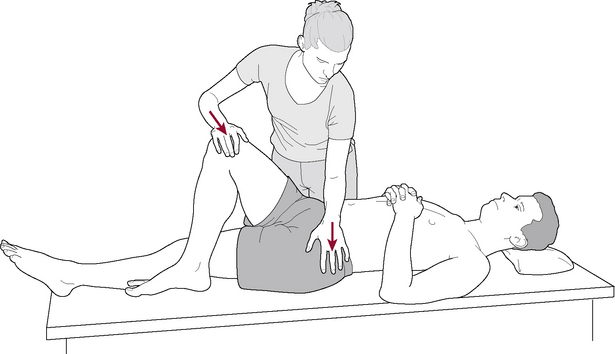
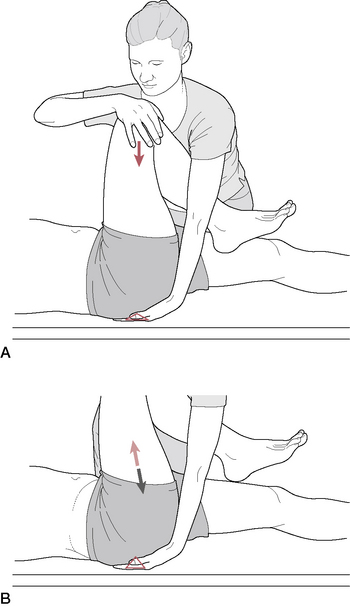
If form features (structural) of the SI joint are at fault, the prone straight leg raise will be more normal when the practitioner, with hands on the innominates, bilaterally applies firm medial pressure toward the SI joints during the procedure (Fig. 11.35C).
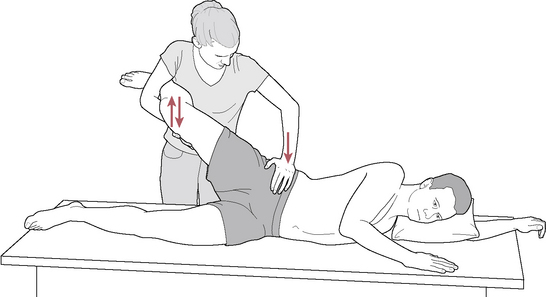
Force closure may be enhanced during the exercise if latissimus dorsi can be recruited to increase tension on the thoracolumbar fascia. Lee (1999) states: ‘This is done by [the practitioner] resisting extension of the medially rotated [contralateral] arm prior to lifting the leg’ (Fig. 11.35D).

As in the supine straight leg raising test (described earlier in this chapter), if force closure enhances more normal SI joint function, the prognosis for improvement is good, to be achieved by means of exercise and reformed use patterns.

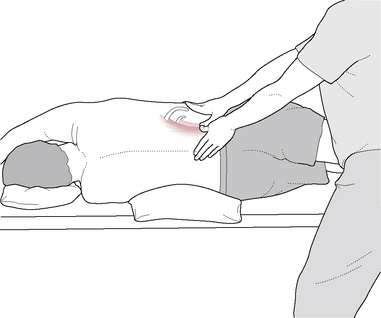
Prone SI joint gapping test (and MET treatment)
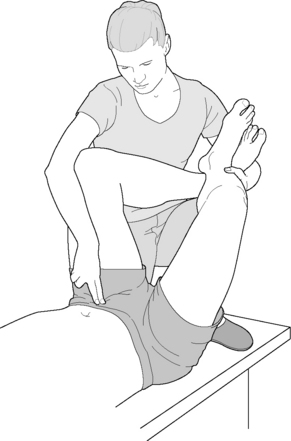
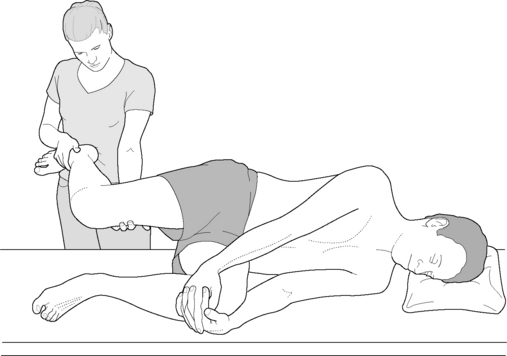
The patient is prone and the practitioner stands on the side to be tested, while facing the table and holding the leg proximal to the ankle joint with her caudad hand.

The patient’s knee is flexed with the thigh resting on the table so that the angle between the leg and the table is a little less than 90°.

The practitioner’s cephalad hand palpates the SI joint as the leg is taken into internal rotation at the hip by pulling the leg laterally, a process that should produce a palpable gapping at the SI joint.

The same assessment is carried out with the knee flexed to a greater degree, so that the angle between table and leg is greater than 90°. Gapping is again palpated for as internal rotation at the hip is produced by the practitioner via the long lever of the lower extremity.

  Page 344 

Failure of gapping may be treated by having the patient attempt to return the leg to its neutral position (i.e. by introducing external rotation of the hip and extension of the knee) against practitioner resistance. Force should be minimal (‘20% of available strength or less’) and maintained for 7–10 seconds. After this, the test should be repeated to evaluate any improvement. If joint play is not restored on retesting, other SI joint approaches should be used.

The seated flexion test, the ILA spring test and the various elements of the supine (see earlier this chapter) and prone active straight leg raising tests offer evidence of sacroiliac dysfunction.

MET for SI joint dysfunction

It is essential to normalize muscles attaching to the pelvis before considering ‘direct action’ to reduce hypomobility of the SI joint. While there are no muscles that actively move the SI joint, there are a great many that directly or indirectly influence its function, either through the transverse slings that engage the force closure mechanisms during the gait cycle (see Chapter 3) or by means of less obvious influences on pelvic mobility.

Lee (1999) says, for example:

When the regional muscles become tight (e.g. hamstrings, piriformis), the mobility of the pelvic girdle (innominate or sacrum) can be affected, however the SI joint remains mobile. This is why it is imperative to evaluate the mobility of the joint with tests [see ‘spring tests’ above] which do not involve active contraction or passive lengthening of the muscles. When the myofascial system is the primary source of dysfunction, specific muscle-lengthening techniques can be effective in restoring the osteokinematics of the pelvic girdle. These techniques are often referred to as ‘muscle energy’ techniques or active mobilization techniques. They facilitate the restoration of motion at the SI joint and can be used in conjunction with passive mobilization techniques.

SI joint dysfunction normalization might therefore include:

specific focus on identification and normalization of shortened postural muscles attaching to, or closely associated with, the pelvis, including hamstrings, adductors, quadriceps (especially rectus femoris), tensor fasciae latae, piriformis, iliopsoas, quadratus lumborum, latissimus dorsi, multifidus and erector spinae. MET treatment of these will be found in the appropriate chapters of this book, including this one

application of ‘shotgun’ technique as described earlier in this chapter to enhance normal ligamentous balance

specific MET procedures directed at particular biomechanical dysfunction patterns relative to a hypomobile SI joint

postural and proprioceptive reeducation (see Chapter 7 for rehabilitation and self-help measures)

use of positional release methods (see next page).

Sacroiliac mobilization using MET

If the seated flexion test (described earlier in this chapter) is positive, the side on which the thumb is seen to move cephalad during flexion is the dysfunctional side.
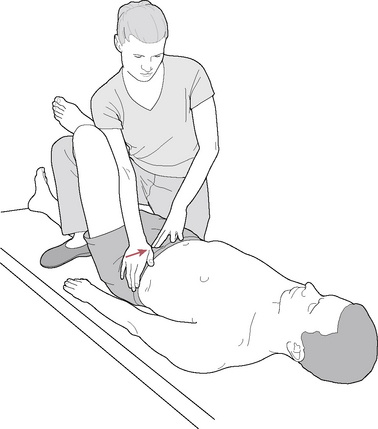
The patient is supine and the practitioner stands contralaterally.

The patient’s affected hip is flexed, with thigh vertical and slightly adducted.

The practitioner places her caudad hand flat under the sacrum so that the index finger can palpate the contralateral SI joint area (Fig. 11.36A and B).

The practitioner’s cephalad hand rests on the flexed knee, resisting the patient’s application of force from the knee into that hand (i.e. force is applied via the long axis of the femur toward the ceiling).

  Page 345 

The palpating hand should note a contraction in the tissues surrounding the SI joint during the 7–10 seconds contraction.

After relaxation of the isometric effort the practitioner applies pressure from the knee, through the femur, toward the SI joint to evaluate any increase in its ability to display ‘spring’ (there should be a sense of localized joint play at the SI joint, on compression, rather than a solid movement of the entire pelvis).

After one or two repetitions of this procedure the seated flexion test should be performed to evaluate relative improvement in the SI joint’s function.

image

Figure 11.36 MET for the right SI joint using long axis compression to ‘spring’ the joint following an isometric contraction.

Prone sacral PRT for pelvic (including SI joint) dysfunction

Two sets of sacral tender points used in PRT of SI and sacral dysfunction are described below.

In 1989, a series of sacral tender points were identified as being related to low back and pelvic dysfunction. These points were found to be amenable to very simple SCS methods of release (Ramirez et al 1989). Subsequently, additional sacral foramen tender points that are believed to relate to sacral torsion dysfunctions were identified (Cislo et al 1991).

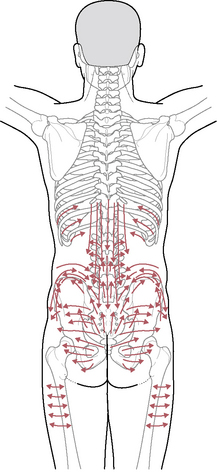
One set lies on the mid-line of the sacrum or close to it, the so-called ‘medial tender points’. These lie in soft tissues over the bony dorsum of the sacrum; when digital palpating pressure is applied to them there is a sense of ‘hardness’ below the point. The characteristic dysfunctions linked to these points are described below, as are appropriate treatment approaches. The medial points, as a rule, require a vertical pressure toward the floor, applied in a way that ‘tilts’ the sacrum sufficiently to relieve the palpated tenderness. Because these points lie on a ‘hard’ surface and the tilting objective is the preferred treatment approach, a shorthand memory jogger (‘hard rock’) helps to differentiate the treatment method from that applied to other sacral points.

The other set of sacral points lies over the sacral foramina and so when pressure is applied to these, there is a sense of ‘softness’ in the underlying tissues. The treatment protocol for this is described below. Once this has been read it will become clear why the shorthand reminder for these points is ‘soft squash’.

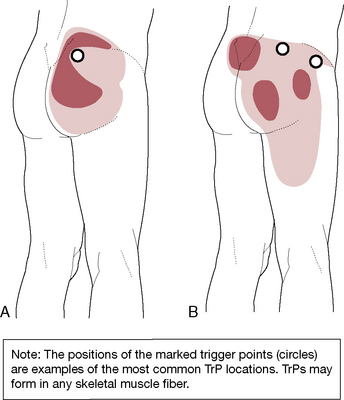
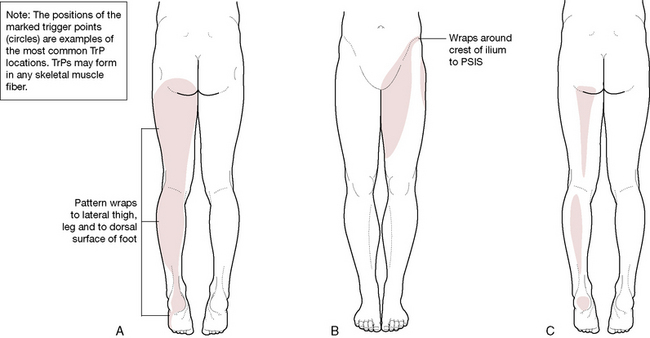
Location of sacral medial points (Fig. 11.37)

The cephalad two points lie just lateral to the mid-line, approximately 1.5 cm (3/4 inch) medial to the inferior aspect of the PSIS bilaterally, and they are known as PS1 (PS = posterior sacrum).

The two bilateral caudad points (PS5) are located approximately 1 cm (just under 1.2 inch) medial and 1 cm superior to the inferior lateral angles of the sacrum.

The remaining three points are on the mid-line: PS2 lies between the 1st and 2nd spinous tubercles of the sacrum, PS3 lies between the 2nd and 3rd sacral tubercles, both of which are identified as being involved in sacral extension dysfunctions, and the last point (PS4) lies on the cephalad border of the sacral hiatus and relates to sacral flexion dysfunctions.

image

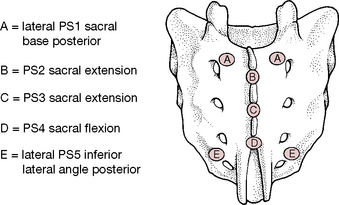
Figure 11.37 Positions of tender points relating to sacral dysfunction

(reproduced with permission from Chaitow 2007).

The original researchers (Ramirez et al 1989) report: ‘We have found that when these tender points occur in groups the associated sudomotor change is frequently confluent over the mid-sacrum. For this reason, we have begun to check all points on all patients with low back pain, even in the absence of sudomotor changes.’ (See notes on skin evaluation using skin drag method in Volume 1, Chapter 6). They report that this process of localization can be rapid if the bony landmarks are used during normal structural examination.

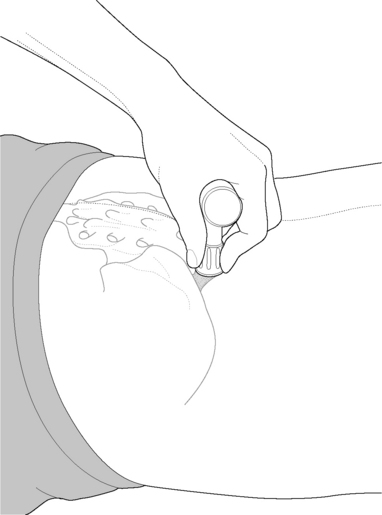
Treatment of medial sacral tender points
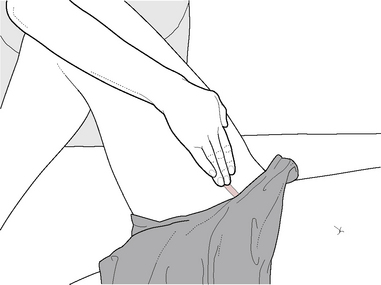
With the patient prone, pressure on the sacrum is applied according to the tender point being treated. The pressure is always straight downward toward the floor, in order to induce rotation around either the transverse or oblique axis of the sacrum.

The PS1 points require pressure at the ‘corner’ of the sacrum opposite the quadrant in which the tender point lies (e.g. left PS1 requires pressure at the right inferior lateral angle).

The PS5 points require pressure near the sacral base on the contralateral side (e.g. a right PS5 point requires pressure on the left sacral base just medial to the SI joint).

The release of PS2 (sacral extension) tender point requires downward pressure (to the floor) to the apex of the sacrum in the mid-line.

The lower PS4 (sacral flexion) tender point requires pressure to the center of the sacral base.

PS3 (sacral extension) requires the same treatment as for PS2 described above.

In all of these examples it is easy to see that the pressure is attempting to exaggerate the existing presumed distortion pattern relating to the point, which is in line with the concepts of SCS and positional release as explained earlier in Volume 1, Chapter 10.

  Page 346 

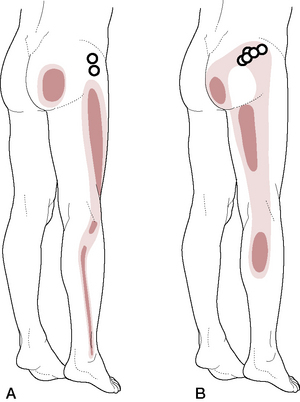
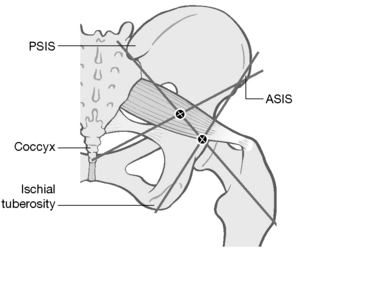
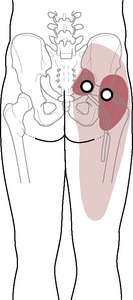
Sacral foramen tender points (Fig. 11.38)

The clinicians who first noted these points reported that a patient with low back pain, with a recurrent sacral torsion, was being treated using SCS methods with poor results. When muscle energy procedures proved inadequate, a detailed survey was made of the region and an area of sensitivity that had previously been ignored was identified in one of the sacral foramina.

image

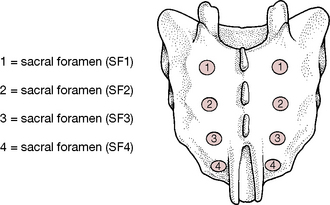
Figure 11.38 Sacral foramen tender points as described in the text

(reproduced with permission from Chaitow 2007).

Experimentation with various release positions for this tender point resulted in benefits and also the examination of this region in other patients with low back pain and evidence of sacral torsion. ‘All the patients [who were examined] demonstrated tenderness at one of the sacral foramina, ipsilateral to the engaged oblique axis [of the sacrum].

The identifiers of the sacral foramina tender points (Cislo et al 1991) have named each pair of points according to their anatomic position.

Clinically, these tender points are located by their positions relative to the posterior superior iliac spines. The most cephalad of the points [SF1 – sacral foramen tender point 1] is 1.5 cm (just over half an inch) directly medial to the apex of the PSIS. Each successively numbered sacral foramen tender point [SF2, SF3, SF4] lies approximately 1 cm (two-fifths of an inch) below the preceding tender point location.

SCS for sacral foramen tender points

Evaluation of the sacral foramina should be a fairly rapid process. Once a sacral torsion has been identified, the foramina on the ipsilateral side are examined by palpation and the most sensitive of these is treated. A left torsion (forward or backward) would therefore involve the foramen on the left side being assessed.

Alternatively, palpation of the foramina, using the skin drag method for rapid evaluation (see Chapter 9), would reveal dysfunction, even if the precise nature of that dysfunction remains unclear. If there was obvious skin drag over a foramen and if digital compression of that foramen was painful, some degree of sacral torsion would be suggested on the same side as the tender foramen.

In this example, a left sacral torsion is assumed (anterior or posterior), with tenderness in the tissues overlying one of the left side sacral foramina.
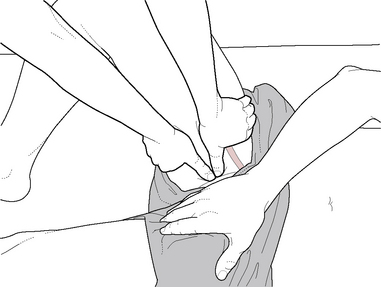
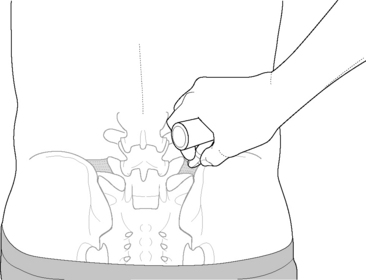
The patient lies prone with the practitioner standing on the side contralateral to the foramen tender point to be treated, facing cephalad, i.e. right side in this example when a left torsion (foramen tender point) is being treated.

The practitioner applies pressure to the sensitive foramen with her tableside (left) hand sufficient to create discomfort, which the patient registers as a score of ‘10’.

The patient’s right leg (contralateral to the tender point side) is abducted to about 30°, with slight flexion at the hip and knee and external rotation at the hip, which allows the leg to be supported by the edge of the table. This should result in a report of some reduction in the pain score.
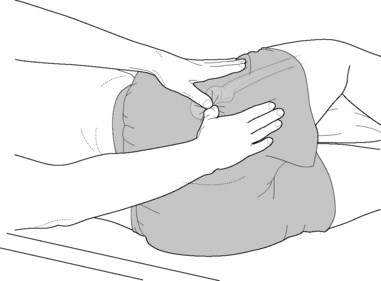
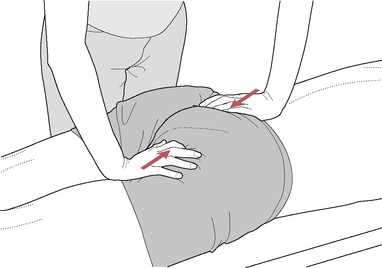
The practitioner, while continuing to apply pressure to the sensitive foramen with her tableside hand, introduces compression to the gluteal musculature below the crest of the ilium on the right, directed anterosuperomedially, using her cephalad forearm or hand (right in this example) (i.e. she effectively ‘squashes’ the tissues).

The arm or hand contact should be approximately 1 inch lateral to the patient’s right PSIS.

The degree of relief of sensitivity initiated in the palpated sacral foramen tender point by the leg abduction, hip flexion and the crowding of the ilium anterosuperomedially should be approximately 70% and is frequently 100%.

The practitioner maintains digital contact with the foramen point while the position of ease is held for 90 seconds, before a slow return to neutral is passively brought about (leg back to the table, contact released).

Whether the sacral torsion is on a forward or backward axis it should respond to the same treatment protocol as described.

Note: Despite the extreme gentleness of all positional release methods (in general) and strain-counterstrain (in particular), in about a third of patients there will be a reaction in which soreness, fatigue, etc. may be noted, just as in more strenuous therapeutic measures. This reaction is considered to be the result of the homeostatic adaptation process of the organism in response to the treatment, which is a feature of many apparently very light forms of treatment. Since the philosophical basis for much bodywork involves the concept of the treatment acting as a catalyst, with the normalization or healing process being the prerogative of the body itself, the reaction described above is an anticipated part of the process and should be recognized as an indication of desirable change and not necessarily ‘bad’. The patient should therefore be forewarned to anticipate such symptoms for a day or two following any appropriate soft tissue manipulation. Suggestions can be given for relief (ice, heat, rest, movement, etc., as appropriate) should this occur.

  Page 347 

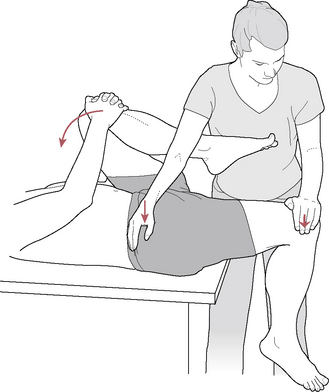
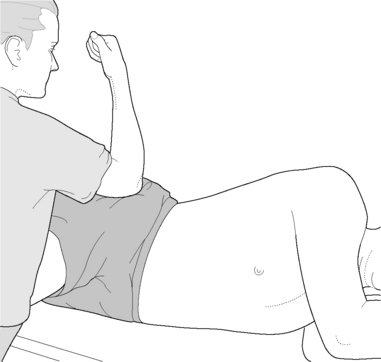
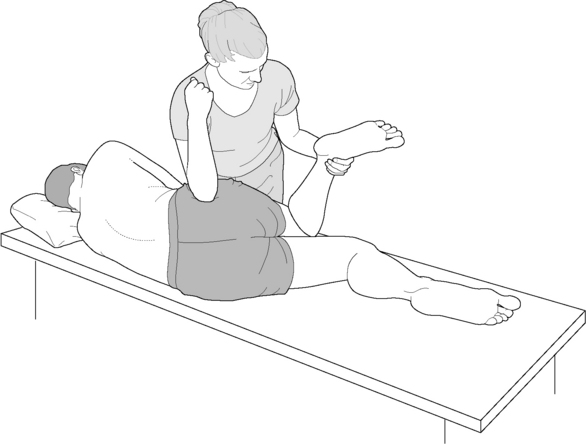
Mobilization with movement (MWM) treatment of SI joint dysfunction (Fig. 11.39)

See Chapter 9 for discussion of MWM methodology.

image

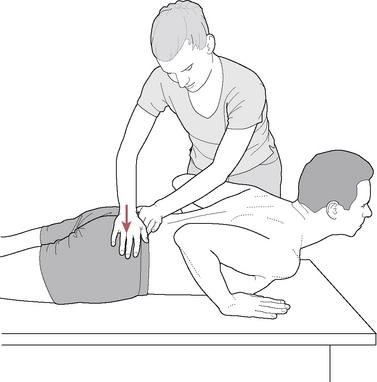
Figure 11.39 MWM for right SI joint with posterior innominate

(adapted with permission from Mulligan B 1999 Manual therapy. Plane View Services Ltd).

A positive seated flexion test identifies the dysfunctional sacroiliac side. The ilium on that side is evaluated as to whether it appears to be more anteriorly or posteriorly oriented (rotated) – see Figure 11.23 earlier in this chapter.

SI restriction with posterior innominate
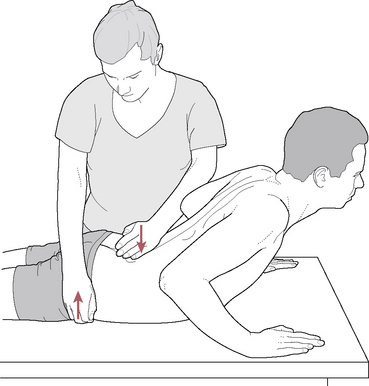
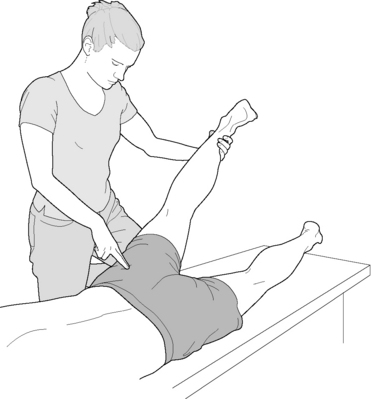
If treating a restricted SI joint with a posterior innominate on that side, the patient is prone, with hands in position as though to do a press-up.

The practitioner stands contralaterally and places her caudad hand (heel of hand, thenar eminence) close to the PSIS and applies lateral pressure to the posterior border of the ilium. There should be no pain.

The patient is asked to rhythmically, using arm and back strength, perform a series of ‘half’ press-ups, 10 times (assuming no pain is noted; if pain is reported, the direction of thenar eminence pressure on the ilium is altered).

The same sequence can be performed several times more (10 press-ups each time), following which reassessment of symptoms and seated flexion test should be undertaken.

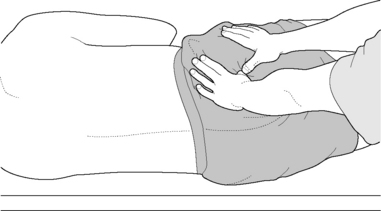
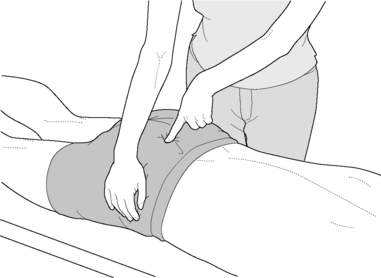
SI restriction with anterior innominate (Fig. 11.40)
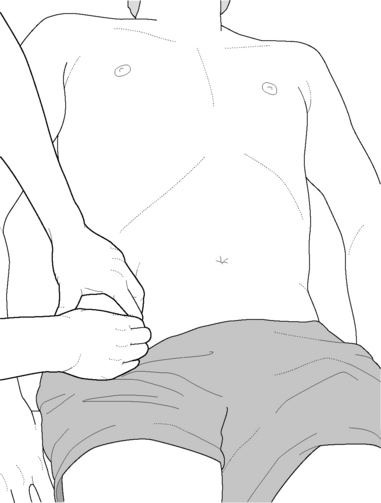
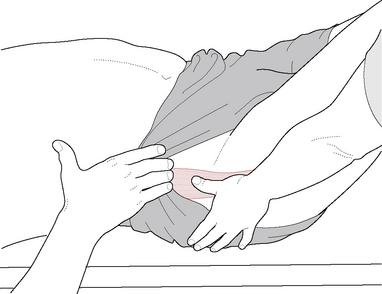
The patient is prone and the practitioner stands contralaterally, so that her caudad hand holds the ASIS, while her cephalad hand’s thenar or hypothenar eminence applies anteriorly directed (toward the floor) stabilizing pressure to the sacrum.

The caudad hand eases the ilium toward the sacrum, painlessly, and the patient performs a series of 10 ‘half’ press-ups.

This is repeated once or twice more, following which reassessment of symptoms and seated flexion test should be undertaken.

image

Figure 11.40 MWM for SI joint with anterior innominate.

Muscles of the pelvis

Several of the muscles that influence the pelvis have been omitted from this chapter due to space constraints and have been addressed inChapters 12and13. These include rectus femoris (p. 414 and p. 485), sartorius (p. 416 and p. 491) and the hamstrings (p. 433 and p. 485), all of which should be included in a thorough treatment of the pelvic structures.

  Page 348 

Iliacus (see Fig. 10.62)

Attachments: Cephalad two-thirds of the concavity of the iliac fossa, inner lip of iliac crest, the anterior aspect of sacroiliac and iliolumbar ligaments and lateral aspect of the sacrum to attach (with psoas major) to the lesser trochanter of the femur ‘but some fibers are attached directly to the femur for about 2.5 cm below and in front of the lesser trochanter’ (Gray’s anatomy 2005). Some fibers of iliacus may attach to the upper part of the capsule of the hip joint (Lee 1999)

Innervation: Femoral nerve (L2–3)

Muscle type: Not determined

Function: Flexes the thigh at the hip and assists lateral rotation (especially in the young), assists minimally with abduction of the thigh, assists with sitting up from a supine position

Synergists: For hip flexion: psoas major, rectus femoris, pectineus, adductors brevis, longus and magnus, sartorius, gracilis, tensor fasciae latae

For lateral rotation of the thigh: long head of biceps femoris, the deep six hip rotators, gluteus maximus, sartorius, posterior fibers of gluteus medius and minimus and psoas major
For abduction of the thigh: gluteus medius, minimus and part of maximus, tensor fasciae latae, sartorius, piriformis and psoas
For sit-ups: psoas major and minor, rectus abdominis

Antagonists: To hip flexion: gluteus maximus, the hamstring group and adductor magnus

To lateral rotation of the thigh: semitendinosus, semi-membranosus, tensor fasciae latae, pectineus, the most anterior fibers of gluteus minimus and medius and (perhaps) adductor longus and magnus
To abduction of the thigh: adductors brevis, longus and magnus, pectineus, and gracilis
To sitting up from supine position: paraspinal muscles.

Indications for treatment

Low back pain

Pain in the front of the thigh

Difficulty rising from seated position

Inability to perform a sit-up

Loss of full extension of the hip

‘Pseudo-appendicitis’ when appendix is normal

Abnormal gait

Difficulty climbing stairs (where hip flexion must be significant).

Special notes

While treatment of the iliacus is discussed here with other pelvic muscles, psoas major is presented with the posterior lower back muscles due to its influence on that region (see p. 287). Both iliacus and psoas major are hip flexors and so are also discussed in Chapter 12 (p. 411) with the hip region.

There is consistent agreement that the primary function of iliacus with its companion, psoas major, is flexion of the thigh at the hip. The iliacus is also continuously active during walking but psoas major is only active (during gait) shortly preceding and during the early swing phase. The iliacus is active during sit-ups, sometimes throughout the entire sit-up, and in others only after the first 30° (Travell & Simons 1992). Lee (1999) notes that it eccentrically controls lateral sidebending of the trunk. Levangie & Norkin (2005) note the probability that tension in iliacus could anteriorly tilt the pelvis.

The iliacus lines the entire internal aspect of the lateral pelvis. Its fibers join the psoas muscle as they both (surrounded by iliac fascia) course through the lacuna musculorum (deep to the inguinal ligament) to attach to the lesser trochanter of the femur. This passageway is constricted anteriorly by the inguinal ligament, medially by the iliopectineal arch and posteriorly and laterally by the pelvic bones, which makes this area vulnerable to neurovascular entrapment by a thickened iliopsoas muscle, such as occurs when a muscle is shortened (Travell & Simons 1992).

An interesting anatomical variation of iliopsoas was found during dissection of a female pelvis. Jelev et al (2005) note, ‘It was the only finding of such a muscle among 108 human cadavers examined over a period of 22 years. The accessory iliopsoas was formed by the connection of two accessory muscles – accessory psoas major and accessory iliacus’. The clinical significance of the finding includes entrapment of the femoral nerve by the accessory bands.

NMT for iliacus

The supine patient’s knees are bent with the ipsilateral leg resting against the practitioner to assure that the iliacus is in a non-working state. The practitioner stands at the level of the hip on the side to be treated.

The fingers of both hands (nails well trimmed) are placed on the medial aspect of the ASIS directly against the interior surface of the ilium. It is important that the hands remain as far lateral as possible and against the ilium to be directly on the iliacus and to avoid contacting internal organs.

The fingers are gently but firmly slid along the interior wall of the ilium while contacting and pressing the iliacus into the bony surface. If not too tender, friction can be applied in gentle, slow movements at 1 inch (2.5 cm) intervals from the iliac crest to the inguinal ligament, while gradually moving posteriorly (internally) as far as possible, all the while remaining in direct contact with the ilium (Fig. 11.41).

An alternative position for accessing iliacus (taught with Lief’s European NMT) has the patient prone, with the practitioner standing contralaterally to the side being treated, one leg forward of the other. The heel and palm of the practitioner’s caudad hand molds itself to tissues overlying the anterosuperior aspect of gluteus minimus, as the fingers curl over/around the iliac crest to access the inner wall of the ilium and the tissues of iliacus. By shifting bodyweight from front to back leg, a slight degree of lift of the pelvis is achieved toward the ceiling, together with rotation of the pelvis toward the treated side. The counterweight and leverage achieved in this way produce pressure onto the palpating digits, so increasing contact with the iliacus muscle, without the need for increased pressure being applied by the practitioner. Localization of tense areas or contractions can easily be achieved as the fingers are slowly and deliberately eased through the tissues in a posterior (internal) direction, until contact with iliacus is no longer possible. Trigger point localization is frequent and potentially exceptionally painful, calling for great attention to the degree of applied pressure. If the patient is heavy and the practitioner light, the contact hand may usefully be supported by means of the other hand overlaying it.

  Page 349 

The iliopsoas tendon is accessible just inferior to the inguinal ligament when the fingers are immediately lateral to the femoral pulse. With the thigh (knee bent) resting against the practitioner, the inguinal ligament is located as well as the femoral pulse (see p. 353 for directions on palpation of this region with regard to adductor muscles). The practitioner’s first two fingers are placed between the femoral pulse and the sartorius muscle (see Fig. 10.68). Static pressure is sustained or, if not too tender, gentle transverse friction is applied to the tendon of the psoas muscle, which may be exceptionally tender.

image

Figure 11.41 The fingers are gently but firmly slid along the interior wall of the ilium while contacting and pressing the iliacus into the bony surface.

Positional release for iliacus

Method 1 (Fig. 11.42)

The patient is supine with both knees and hips flexed to approximately 90°, and with the crossed ankles supported on the practitioner’s thigh.

The practitioner stands facing obliquely cephalad at hip level on the side of dysfunction, with her tableside foot on the table, which makes her thigh available to support the crossed ankles of the patient.

The tender point for iliacus dysfunction lies just over an inch (3 cm) medial to the ASIS in the iliac fossa. Contact may be difficult and should be slowly accessed, with pressure applied posterolaterally.

  Page 350 

The position of ease is found by modifying the degrees of hip flexion and external rotation of the affected side leg and by rotation of the pelvis toward the affected side.

The final position of ease is held for 90 seconds before a slow return to neutral.

image

Figure 11.42 Iliacus tender point is palpated for the level of discomfort as the patient is positioned to remove pain from that point to release the muscle positionally

(adapted with permission from D’Ambrogio & Roth 1997).

Method 2 (Fig. 11.43)

The patient is supine with affected side leg flexed at knee and hip, with hip externally rotated.

The practitioner stands contralateral to the side being treated, facing cephalad, with her tableside foot on the table (medial to the unaffected side leg) with her leg positioned to support the patient’s flexed leg.

The practitioner’s non-tableside hand reaches across the table to the affected side and palpates the tender point on the internal aspect of the ilium, applying sufficient pressure to have the patient register a pain value of ‘10’.

The practitioner’s other hand holds the pelvic crest of the side being treated and draws it inferomedially until pain reduces in the tender point by at least 70%.

This movement of the pelvis should ease the iliac crest toward the iliacus attachment on the lesser trochanter, so shortening the soft tissues during application of the procedure. This position is held for 90 seconds before slowly releasing pressure and returning the limb to neutral.

image

Figure 11.43 Positional release for iliacus muscle

(adapted from Deig 2001).

Gracilis

Attachments: From near the symphysis on the inferior ramus of the pubis to the medial proximal tibia (pesanserinus superficialis)

Innervation: Obturator nerve (L2–3)

Muscle type: Not established

Function: Adducts the thigh, flexes the knee when knee is straight, medially rotates the leg at the knee

Synergists: For thigh adduction: primarily adductor group and pectineus

For flexion of the knee: hamstring group
For medial rotation of the leg: semimembranosus, semitendinosus and pectineus

Antagonists:To thigh adduction: the gluteii and tensor fasciae latae

To flexion of the knee: quadriceps femoris
To medial rotation of the leg: biceps femoris.

Pectineus

Attachments: From the pecten of the pubis to the femur (pectineal line) between the lesser trochanter and the linea aspera

Innervation: Femoral and obturator nerves (L2–4)

Muscle type: Not established

Function: Flexes and adducts the thigh

Synergists: For thigh adduction-flexion action: iliopsoas, adductor group and gracilis

For thigh adduction: primarily adductor group and gracilis

Antagonists:To flexion: gluteus maximus and hamstrings

To adduction: gluteus medius and minimus, tensor fasciae latae.

Adductor longus

Attachments: From the front of the pubis between the crest and symphysis to the middle third of the medial lip of linea aspera

Innervation: Obturator nerve (L2–4)

Muscle type: Postural (type 1), with tendency to shorten and tighten when chronically stressed

Function: Adducts and flexes thigh and has (controversial) axial rotation benefits, depending upon femur position (see below)

Synergists: For thigh adduction: remaining adductor group, gracilis and pectineus

For thigh adduction-flexion action: iliopsoas, remaining adductor group, pectineus and gracilis
For axial rotation of the thigh: depends upon initial position of the hip

Antagonists:To flexion: gluteus maximus, hamstrings, portions of adductor magnus

To adduction: gluteus medius and minimus, tensor fasciae latae, upper fibers of gluteus maximus.
  Page 351 

Adductor brevis

Attachments: From the inferior ramus of the pubis to the upper third of the medial lip of the linea aspera

Innervation: Obturator nerve (L2–4)

Muscle type: Postural (type 1), with tendency to shorten and tighten when chronically stressed

Function: Adducts and flexes thigh and has (controversial) axial rotation benefits, depending upon femur position

Synergists:For thigh adduction: remaining adductor group, gracilis and pectineus

For thigh adduction-flexion action: iliopsoas, remaining adductor group, pectineus and gracilis
For axial rotation of the thigh: depends upon initial position of the hip

Antagonists: To flexion: gluteus maximus, hamstrings, portions of adductor magnus

To adduction: gluteus medius and minimus, tensor fasciae latae, upper fibers of gluteus maximus.

Adductor magnus

Attachments: From the inferior ramus of the ischium and pubis (anterior fibers) and the ischial tuberosity (posterior fibers) to the linea aspera (starting just below the lesser trochanter and continuing to the adductor hiatus) and to the adductor tubercle on the medial condyle of the femur

Innervation: Obturator nerve (L2–4), tibial portion of sciatic nerve (L4-S1)

Muscle type: Postural (type 1), with tendency to shorten and tighten when chronically stressed

Function: Adducts the thigh, flexes or extends the thigh depending upon which fibers contract, and medially rotates the femur; lateral axial rotation benefits may exist (Kapandji 1987, Platzer 2004, Rothstein et al 1998)

Synergists: For thigh adduction: remaining adductor group, gracilis and pectineus

For thigh flexion: iliopsoas, remaining adductor group, pectineus, rectus femoris and gracilis
For thigh extension: gluteus maximus, hamstrings

Antagonists:To adduction: gluteus medius and minimus, tensor fasciae latae, upper fibers of gluteus maximus

To flexion: gluteus maximus, hamstrings, portions of adductor magnus
To extension: iliopsoas, remaining adductor group, pectineus and gracilis.

Indications for treatment

Pain in the groin or medial thigh

Osteitis pubis

Adductor insertion avulsion syndrome

Pain in the hip joint

Intrapelvic pain

SI joint or pubic symphysis dysfunction.

Special notes

The phrase ‘adduction of the hip’ brings to mind the image of the thigh moving toward the mid-line from a neutral position or perhaps even toward neutral from an abducted position. However, perhaps a more important property of the adductors is their influence on pelvic stability and positioning of the innominate, especially during gait.

Kapandji (1987) describes the relationship of the abductors and adductors.

image

Figure 11.44 A: Transverse symmetrical stability of the pelvis is maintained by simultaneous contraction of abductors and adductors. B: Dysfunctional muscular tension can result in pelvic imbalance and changes in weight distribution (after Kapandji 1987).

When the pelvis is supported on both sides, its stability in the transverse direction is secured by the simultaneous contraction of the ipsilateral and contralateral adductors and abductors. When these antagonistic actions are properly balanced (Fig. 11.44A) the pelvis is stabilized in the position of symmetry, as in the military position of standing to attention. If the abductors predominate on one side and the adductors on the other (Fig. 11.44B) the pelvis is tilted laterally toward the side of adductor predominance. If muscular equilibrium cannot be restored at this point the subject will fall to that side.

  Page 352 

When the leg assumes single stance phase and is weight bearing, the ipsilateral abductors are solely responsible for stabilizing the pelvis and the superimposed HAT (head, arms and torso) against the effects of gravity. Levangie & Norkin (2005) explain:

The force of gravity acting on HAT and the non-weight-bearing left lower limb (HATLL) will create an adduction torque around the supporting hip joint; that is, gravity will attempt to drop the pelvis around the right weight-bearing hip joint axis. The abduction countertorque will have to be supplied by the hip abductor musculature. The result will be joint compression or a joint reaction force that is a combination of both body weight and abduction muscular compression. … The countertorque must be produced by the force of the hip abductors (gluteus medius, minimus and tensor fascia lata muscles) acting on the pelvis.

They also note that the adductors can contribute to stability in bilateral stance even in the absence of adequate hip abductor function.

Kuchera & Goodridge (1997) report that these muscles are very prone to spasm and that dysfunction in the adductor muscles is likely to involve pain in the inguinal area, inner thigh and upper medial knee.

Greenman (1996) notes that the adductors are postural in type and therefore prone to shortening when stressed. Liebenson (1996) expands on this by suggesting that clinical presentation of the patient with dysfunctional adductors may involve ‘hip and sacroiliac disorders or medial knee pain; difficulty performing squats and difficulty activating gluteus medius’. He points out that initiation or perpetuating factors for adductor dysfunction might include arthritis of the hip, horse riding, hill running and sudden overload.

Travell & Simons (1992) discuss three conditions associated with chronic overloading of the adductor group.

Pubic stress symphysitis: bilateral focal tenderness of the pubic symphysis with accompanying pain on abduction and extension of the thigh, restricted range (particularly if accompanied by trigger points and with pectineus and adductor longus most probably involved). Shearing action at the symphysis is aggravated by adductor muscles.

Pubic stress fracture: of the inferior or superior pubic rami. This may be associated with tensile forces exerted upon the ramus by the adductors.

Adductor insertion avulsion syndrome: ‘thigh splints’ in the upper and mid-femur corresponding to the attachment site of the adductor muscles.

There is consistent agreement that the action of the adductor muscle group is adduction of the thigh at the hip. This is where agreement ends and dispute begins. Their further roles in rotation of the thigh at the hip, flexion or extension of the thigh and the many roles they may play in gait are fertile ground for debate. As with many of the hip muscles, their action on the joint is determined by the original position of the femur, as well as which fibers of the muscle are active, particularly adductor magnus. The possible roles of the adductors may also be influenced by the degree of anterior or posterior rotation of the pelvis.

There are several points regarding working on the inner thigh that should be noted before beginning hands-on applications.

This region is considered by most to be a ‘private’ area. The practitioner should explain why this area needs to be addressed, offering anatomical illustrations, before proceeding with the treatment steps, and ideally obtain written informed consent.

The inner thigh is often particularly tender and in many cases only a mild degree of pressure can be used in the early stages of treatment.

The inner thigh often stores substantial adipose tissue. When NMT is used, as the gliding strokes are applied while working from the knee toward the pelvis, the adipose tissue may ‘bunch up’, effectively forming a ‘wall’, which prevents the smooth passage of the hands. If this occurs, one hand may need to retract the tissue toward the knee and stabilize it while the other hand applies short (2–3 inch/5–7cm) repetitive gliding strokes, which are repeated in these short segments through the length of the tissues.

The simplest way to locate the pubic bones is to ask the person to find them on himself after he has been shown a skeletal body chart and offered an explanation for treatment. A male patient should be asked to displace the genitals (if necessary) and to ‘protect’ himself during the treatment.

When the pubic attachments are treated it is best not to stare at the treating hands (which are placed at the pubis) as the person may be emotionally uncomfortable with a fixed gaze upon this region.

Whether the patient is male or female, another person should be in the room as a chaperone since both the practitioner and the patient are vulnerable when treating the inguinal area.

When releasing the tissues of the inner thigh, the practitioner should remain conscious of the fact that memories related to emotional traumas associated with rape, sexual molestation and other issues surrounding sexuality may surface when the tissues in this region are treated. Should an emotional reaction occur, the practitioner’s most appropriate response is one of being aware and concerned and to help the person maintain a calming breathing pattern. Referral for counseling should be considered.

Platzer (2004) notes that wandering abscesses from as high as the thoracic region can travel along the fascial tube of the psoas and appear as far down as the thigh. Excessive, unrelenting tenderness, especially if accompanied by enlarged inguinal lymph nodes, would suggest that caution be exercised before treating the area.

  Page 353 

Trigger point target zones for the adductors are illustrated in Chapter 12, Figs 12.23 and 12.24. Their pain patterns include the inner thigh, groin and intrapelvic regions.

The adductor muscles are further discussed with the hip on p. 417, where a sidelying position is described. While a sidelying position does not offer as easy access to the attachments on the pubis and ischium, as does the following supine position, it does provide a less vulnerable body position for the patient and is usually preferred in the early stages of treating or assessing these muscles. The following supine treatment can subsequently be used to access the tendon attachments, if warranted.

NMT for adductor muscle group

The patient is supine with the knee flexed and the thigh laterally rotated to rest against the practitioner (or bolster).

The practitioner stands at the level of the thigh with intent to treat the medial portion of the thigh.

A sheet or other thin cloth can be provided to drape the torso and contralateral leg and can be laid back so that it offers access to the leg being treated, while also covering the pubic region.

Loose-fitting shorts, which can be pulled up to allow access to the inner thigh as well as the pubic attachments of the adductors, may be substituted.

The femoral pulse should be palpated at the top of the femoral triangle (Fig. 11.45).

In palpating the adductor muscles and their pubic attachments, caution must be exercised to avoid pressing on the neurovascular structures of this region, which are found in the immediate region of the pulse.

Once the artery has been identified, the practitioner can visualize the outline of the sartorius which forms the anterolateral boundary of the adductor muscle group. The hamstrings form the posterolateral boundary and the proximal attachments at the pubic region form the cephalad boundary.

Gliding strokes are applied to the medial thigh muscles from the region of the medial knee toward the pubic ridge in segments (Fig. 11.46).

The strokes are repeated 4–5 times to the same tissues before the thumbs are moved medially onto the next segment.

The first gliding stroke should cover the tissues just medial to the sartorius, with the next stroke lying just medial to the first.

The gracilis muscle courses from the medial knee to the pubic bone and, when clothed, lies directly beneath the medial seam (inseam) of the pants. This muscle demarcates the boundary between the anterior and posterior thigh from a medial aspect.

Since a large portion of adductor magnus lies posterior to the gracilis muscle as superficial tissues, the gliding strokes should be continued posterior to the gracilis until the hamstrings are encountered. Encroachment upon the hamstrings will indicate the point at which the gliding strokes cease, even though adductor magnus continues to course laterally deep to the hamstrings. This portion of magnus is addressed in the prone position with the hamstrings on p. 440.

The entire routine of gliding strokes may be performed 2–3 times to the adductor region in one session, if tolerable. The tenderness found in these muscles should decrease with each application. If tenderness increases instead, lymphatic drainage techniques can be applied to the region and positional release techniques employed until local tissue health improves.

image

Figure 11.45 Careful palpation of the pulse of the femoral artery will offer the location of neurovascular structures, which lie relatively exposed at the top of the femoral triangle. As the muscles of the region are treated and especially as the adductor attachments are addressed, caution should be exercised to avoid compressing the artery, nerve and vein as well as inguinal lymph nodes.

image

Figure 11.46 Gliding strokes applied to adductor muscles.

  Page 354 

The pubic attachments of the adductor muscles can be treated with direct contact so long as care is taken not to intrude on the genital region. An explanation should be offered to the person as to why the attachments need to be palpated or treated. Unless indicated by symptomatology to be directly involved in the patient’s condition (inguinal pain, a ‘groin pull’ or description of trauma that points to these attachments having been directly injured), the treatment of the attachment sites can be postponed until a future session and application to the bellies of the muscles performed at the first few sessions. This allows time for any excessive muscle tension to be reduced, thereby usually reducing tenderness of the attachments. In addition, a delay allows for a professional relationship to be established before approaching this region.

Correct positioning of the hands is critical in order to access the attachments without causing physical or emotional discomfort.

The patient’s leg is maintained with partial flexion of both hip and knee and rests against the practitioner so that it lies at 45–60° of lateral hip rotation.

The practitioner’s hands are placed so that the thumbs lie next to each other and the hands wrap around the thigh in opposite directions with a firm (not tickling, yet not aggressive) contact.

Additionally, the patient’s hand can be positioned so as to retract the clothing (yet maintain coverage) while simultaneously ‘protecting’ himself and displacing genitalia, if needed (‘Please protect yourself while I am treating in this region’) (Fig. 11.47).

Both male and female patients are asked to maintain this protective hand position throughout the treatment of the attachments of the adductors. The practitioner should also maintain conscious placement of her hands throughout the procedure to ensure that the fingers do not feel intrusive.

With the leg and hands positioned as described above, the practitioner’s thumbs are placed just medial to the femoral pulse and just caudad to the inguinal ligament. This position is directly over the medial portion of the pectineus.

The thumbs are slid onto the pubic bone and contact is made with the tendon of pectineus. This tendon is not always easily located, although it is often tender.

Static pressure or mild friction can be applied to the pubic attachment. This position is the first point on what will be noted as an ‘inverted L’ shaped sequence of palpation points.

The thumbs are now moved one thumb’s width toward the mid-line onto the adductor longus attachment where, after assessing for the degree of tenderness, the attachment can be treated with appropriate pressure in a similar manner (see Fig. 11.47).

The remaining attachments are addressed in much the same way, while bearing in mind that the most prominent and very palpable tendon is a ‘turning point’, after which the thumbs must be reoriented to face posteriorly, rather than medially.

When the ‘corner’ of the ‘L’ is encountered, the direction of applied pressure changes so that it courses down the pubic ramus toward the ischium, rather than toward the mid-line, which would encounter genitalia.

The practitioner may need to use only one thumb once the ‘corner’ has been turned in order to avoid awkward placement of her hands.

The adductor magnus muscle attaches along the ramus of the pubis all the way to the hamstring attachments, which is the stopping point for NMT examination and treatment of the adductor attachments.

A small portion of obturator externus can be influenced within the anterior aspect of the obturator foramen if the thumb can be slid into place. In order to do this, the leg must be positioned with hip and knee in flexion, as well as approximately 45° of lateral rotation of the femur. In this position, the treatment of the ischial attachment of adductor magnus can be achieved. The thumb is slid laterally (toward the femur) and into the obturator foramen. The foramen will feel like a spoon as the thumb is slid in all directions within it. Care must be taken to avoid sliding out of the foramen medially, which would contact genital tissues.

image

Figure 11.47 Palpation of adductor attachments along the pubic ridge requires careful hand placement for the practitioner as the patient offers a protective hand position throughout the treatment.

Screening short adductors from medial hamstrings: method 1

If there is any apparent limit to full abduction of the hip and shortness of the adductors is suspected, it is necessary to screen between shortness of the one joint and the two joint muscles (the short adductors and the medial hamstrings).

  Page 355 

Janda (1996) states: ‘Abduction of less than 25° indicates shortness of the short one-joint thigh adductors.’ Janda also cautions that during testing of the adductors for shortness, any tendency for compensatory hip flexion by the patient should be controlled.

This is achieved by abducting the supine patient’s extended leg to its easy barrier, which identifies the current medial hamstring shortness, and then introducing flexion of the knee, allowing the lower leg to hang down freely off the edge of the table. Note: On wide massage tables this test must only be used after the patient has been moved sufficiently close to the edge to allow the procedure.

If, after knee flexion has been introduced, further abduction is now easily achieved to 45°, this indicates that any previous limitation into abduction was probably the result of medial hamstring shortness, since this is no longer operating once the knee has been flexed. If, however, restriction remains (as evidenced by continued ‘bind’ or obvious restriction in movement toward reaching a 45° abduction excursion once knee flexion has been introduced), then it is apparent that the short adductors are preventing this movement and are short.

Screening short adductors from medial hamstrings: method 2

The patient lies at the very end of the table (coccyx close to the edge), non-tested leg fully flexed at hip and knee and held toward the chest by the patient (or the sole of the patient’s foot can be resting against the practitioner’s lateral chest wall) to stabilize the pelvis in full rotation, so that the lumbar spine is not in extension (Fig. 11.48).

The tested leg (knee extended) is taken into abduction to the first sign of resistance. If the practitioner has two free hands in this position, one can usefully palpate the inner thigh for bind during the assessment.

If abduction reaches 45°, then the test has revealed no shortness. If a restriction/resistance barrier is noted before 45°, then the knee should be flexed to screen the short adductors from the medial hamstrings as in method (1) above. In all other ways the findings are interpreted as above.

image

Figure 11.48 Assessment and treatment position for shortness in short adductors of the thigh

(adapted from Chaitow 2006).

MET treatment of shortness in short adductors of the thigh

Precisely the same positions may be adopted for treatment as for testing, whether test method 1 or test method 2 was used.

Method 1

If the short adductors (pectineus, adductors brevis, magnus and longus) are being treated, then the leg, with knee flexed, is abducted and held close to its restriction barrier.

An isometric contraction, resisted by the practitioner, is introduced by the patient using around 20% of available strength (longer and somewhat stronger for chronic than for acute) employing the agonists (i.e. the push is toward the mid-line, away from the barrier of resistance) or the antagonists (the push is toward the barrier of resistance, away from the mid-line) for 7–10 seconds.

After the contraction ceases and the patient has relaxed, the leg is eased to its new barrier (if acute) or painlessly (assisted by the patient) beyond the new barrier and into stretch (if chronic), where it is held for not less than 20 seconds (longer if possible), in order to stretch and lengthen shortened tissue.

The process is repeated at least once more.

CAUTION and alternative treatment position: The major error made in treating these particular muscles using MET is allowing pivoting of the pelvis and low spinal sidebending to occur. Maintenance of the pelvis in a stable position is vital and this can most easily be achieved via suitable straps or, during treatment, by having the patient sidelying with the affected side uppermost.

Method 2

The patient is sidelying.

The practitioner stands behind the patient and uses her caudad arm and hand to control the leg and to palpate for bind, with the treated leg flexed or straight as appropriate. The cephalad hand maintains a firm downwards pressure on the lateral pelvis to ensure stability during stretching.

All other elements of treatment are identical to those described for supine treatment above (Fig. 11.49).

image

Figure 11.49 Sidelying assessment and treatment position for shortness in short adductors

(adapted from Chaitow 2006).

  Page 356 

PRT for short adductors

Positional release methodology is ideal for acutely strained or painful conditions.

The patient is supine with the practitioner standing contralaterally.

Tender points for the adductors are located close to the attachments at the anterolateral margin of the pubis or on the medial aspect of the thigh centrally, near the bellies of the short adductor muscles.

Once located, the tender point is pressed with sufficient firmness by the practitioner’s cephalad index finger or thumb to allow the patient to ascribe a value of ‘10’ to the discomfort created.

The practitioner supports the leg proximal to the ankle with her caudad hand and introduces slight hip flexion and adduction until the tender point pain is reduced by at least 70%.

Additional fine tuning to reduce the ‘score’ might involve slight internal rotation, traction or compression through the long axis of the leg.

The final position of ease is held for at least 30 and ideally 90 seconds before a slow return to neutral.

Tensor fasciae latae (see Figs 11.51, 12.19)

Attachments: Anterior aspect of the outer lip of iliac crest, lateral surface of ASIS and deep surface of the fascia lata, descending between the gluteus medius and sartorius to merge into the iliotibial band (tract) usually about one-third of the way down the thigh, ‘although it may reach as far as the lateral femoral condyle’ (Gray’s anatomy 2005). The iliotibial band attaches to the lateral tibial condyle. (See below for additional attachment details from Travell & Simons 1992.)

Innervation: Superior gluteal nerve (L4, L5, S1)

Muscle type: Postural (type 1), with tendency to shorten when chronically stressed

Function: Flexes, abducts and medially rotates the thigh at the hip, stabilizes the pelvis, stabilizes the knee by tensing the iliotibial tract

Synergists:For flexion: rectus femoris, iliopsoas, pectineus, anterior gluteus medius and minimus, sartorius and perhaps some adductors

For abduction: gluteus medius, minimus and part of maximus, sartorius, piriformis and iliopsoas For medial rotation: semitendinosus, semimembranosus, pectineus, the most anterior fibers of gluteus minimus and medius and (perhaps) adductor longus and magnus

Antagonists:To hip flexion: gluteus maximus, the hamstring group and adductor magnus

To abduction: adductors brevis, longus and magnus, pectineus and gracilis
To medial rotation: long head of biceps femoris, the deep six hip rotators, gluteus maximus, sartorius, posterior fibers of gluteus medius and minimus and psoas major.

Indications for treatment

Pain in hip joint and greater trochanter (‘pseudotrochanteric bursitis’)

Pain down lateral surface of the thigh

Discomfort when lying with pressure on the lateral hip region or in positions that stretch the tissues of the lateral hip

Symptoms of meralgia paresthetica (burning pain, tingling, itching and other paresthesia along the lateral thigh) may be mimicked by trigger points from TFL, which may be contributing at least part of the symptoms (Travell & Simons 1992).

  Page 357 

Special notes

While TFL is generally considered to be a flexor, medial rotator and abductor of the thigh at the hip, perhaps its most important function is to stabilize both the knee and the pelvis, particularly during gait where it most likely controls movement rather than produces it (Travell & Simons 1992). Since in a standing position it contracts to perform this stabilizing function, non-weight bearing positions are best used when stretching this muscle to ensure it is in a non-working state (Lee 1999).

Since the TFL/iliotibial band crosses both the hip and knee joints, spatial compression allows it to squeeze and compress cartilaginous elements, such as the menisci. Ultimately, rotational displacement at the knee and hip will take place when it is no longer able to compress. Friction syndrome of the iliotibial band can be produced by irritation of the iliotibial tract as it glides over the greater trochanter, anterior superior iliac spine, Gerdy tubercle or the lateral femoral condyle (Travell & Simons 1992), resulting in painful conditions affecting the hip, thigh or knee.

Travell & Simons (1992) note that:

The anteromedial part and the posterolateral part of the muscle form different attachments, which are reflected in equally distinctive functions.

They describe the anteromedial portion to:

curve anteriorly at the patella and to interweave with the lateral patellar retinaculum and the deep fascia of the leg superficial to the patellar ligament…[and that they] do not attach directly to the patella; most are secured at or above the knee.

They note that posterolateral fibers join the iliotibial band, which attaches to the lateral condyle of the tibia; however, some deep fibers attach to the lateral femoral condyle and linea aspera of the femur. At the proximal end, they note that variations include a slip to the inguinal ligament, fusion with gluteus maximus to ‘form a muscular mass comparable to the deltoid muscle of the shoulder’ and that the entire muscle is sometimes congenitally absent as a family trait.

TFL shortness can produce all the symptoms of acute and chronic sacroiliac problems (Liebenson 2007, Mennell 1964). According to Janda (1982), if TFL and psoas are short, they may ‘dominate’ the gluteals on abduction of the thigh, so that a degree of medial rotation and flexion of the hip will be produced upon abduction.

Pain from TFL shortness can be localized to the PSIS, due to its attachment, or may radiate to the groin or down any aspect of the lateral thigh to the knee. Pain from the iliotibial band itself can be felt in the lateral thigh, with referral to hip or knee.

Although pain may arise in the SI joint, dysfunction in the joint may be caused and maintained by taut TFL structures. Pain of sacroiliitis may mimic TFL’s lateral pain patterns but the TFL pattern ends at the knee while sacroiliitis may extend to the ankle. Differentiating the pain caused by these two conditions can be complicated if satellite trigger points arise in vastus lateralis, which lies in the target zone of TFL’s trigger points and which can produce pain beyond the knee.

TFL or fibers of vastus lateralis lying deep to the iliotibial band can be ‘riddled’ with sensitive fibrotic deposits and trigger point activity (see Fig. 13.32). Persistent exercise, such as cycling, will shorten and toughen the iliotibial band ‘until it becomes reminiscent of a steel cable’ (Rolf 1977).

Lewit’s (1999) TFL palpation (see also ‘functional assessment’ methods on p. 319)

A lateral ‘corset’ of muscles stabilizes the pelvic and low back structures and if TFL and quadratus (and/or psoas) shorten and tighten, the gluteal muscles will weaken. This test proves that such imbalance exists.

The patient is sidelying and the practitioner stands facing the patient’s front, at hip level.

The practitioner’s cephalad hand rests over the ASIS, so that the thumb rests on the TFL and trochanter, with the fingers on gluteus medius.

The caudad hand rests on the mid-thigh to apply slight resistance to the patient’s effort to abduct the leg.

The patient’s tableside leg is slightly flexed to provide stability and there should be a vertical line to the table between one ASIS and the other (i.e. no forward or backward ‘roll’ or side flexion of the pelvis).

The patient abducts the upper leg (which should be extended at the knee and slightly extended at the hip) and the practitioner should feel the trochanter ‘slip away’ as this is done.

If, however, the whole pelvis is felt to move rather than just the trochanter, there is inappropriate muscular imbalance. In balanced abduction, gluteus medius comes into action at the beginning of the movement, with TFL operating later in the pure abduction of the leg.

If there is an overactivity (and therefore shortness) of TFL, then there will be pelvic movement on the abduction and TFL will be felt to come into play before gluteus.

The abduction of the thigh movement will then be modified to include rotation and flexion of the thigh (Janda 1996), confirming a stressed postural structure (TFL), which implies shortness.

It is possible to increase the number of palpation elements involved by having the cephalad hand also palpate (with an extended small finger) quadratus lumborum, during leg abduction.

In a balanced muscular effort to lift the leg sideways, quadratus should not become active until the leg has been abducted to around 25–30°. When it is overactive it will often start the abduction along with TFL, thus producing a pelvic tilt.

  Page 358 

Assessment of shortness in TFL and iliotibial band

The test recommended is a modified form of Ober’s test (Fig. 11.50).

The patient is sidelying with his back close to the edge of the table.

The practitioner stands behind the patient, whose lower leg is flexed at hip and knee and held in this position (by the patient) for stability.

The tested (uppermost) leg is supported by the practitioner, who must ensure that no hip flexion occurs, which would nullify the test.

The leg is extended only to the point where the iliotibial band lies over the greater trochanter.

The tested leg is held by the practitioner at ankle and knee, with the whole leg in its anatomical (neutral) position, neither abducted nor adducted and not forward or backward of the body.

The practitioner carefully introduces flexion at the knee to 90°, without allowing the hip to flex, and then, holding just the ankle, allows the knee to fall toward the table.

If TFL is normal, the thigh and knee will fall easily, with the knee contacting the table surface (unless unusual hip width or thigh length prevents this).

If the upper leg remains aloft, with little sign of ‘falling’ toward the table, then either the patient is not letting go or the TFL is short and does not allow it to fall.

The band will palpate as tender under such conditions, as a rule.

image

Figure 11.50 Assessment for shortness of TFL – modified Ober’s test. When the hand supporting the flexed knee is removed the thigh should fall to the table if TFL is not short

(adapted from Chaitow 2006).

NMT for TFL: supine

Tensor fasciae latae can be treated in a supine (noted here) or sidelying (p. 423) position, while the iliotibial band is best treated in a sidelying position. Treatment of the iliotibial band is discussed with the hip on p. 424, anatomical details are described with the thigh and knee on p. 459, and gliding strokes applied to the band in supine position are mentioned below.

The supine patient’s ipsilateral knee is bent with the leg resting against the practitioner to ensure that the TFL is in a non-working state. The contralateral leg is resting on the table with a bolster or rolled towel placed under the knee for comfort.

The practitioner stands at the level of the ipsilateral hip and faces the person’s contralateral shoulder.

TFL fills the space between the anterior iliac spine and the greater trochanter. The fingers of the practitioners cephalad hand are placed in the region of the TFL and her caudad hand is used to resist the patient’s efforts to medially rotate the leg. Upon resisted rotation, the fibers of TFL will contract to confirm its location, at which time it is relaxed for the rest of the treatment.

Gliding strokes can be applied with one or two thumbs from the greater trochanter to the ASIS in one or two strips, depending upon how wide a space the muscle fills (Fig. 11.51).

If superficial pressure does not reveal tender tissues, deeper pressure may be applied with more gliding strokes.

Probing, searching pressure can be applied with the thumbs, flat pressure bar or controlled elbow (braced by the practitioner’s other hand) at 1 inch intervals until the entire muscle has been addressed.

Sustained pressure (8–12 seconds) can be applied to any ischemic bands, trigger points or taut tissues found in the muscle. The TFL fibers overlie the anterior fibers of gluteus minimus and medius. Deeper pressure applied through TFL (if tolerable) will address these gluteal muscles.

  Page 359 

Lubricated gliding strokes can be applied to the iliotibial band with the flat palm of the practitioner’s cephalad hand while the caudad hand stabilizes the leg (Fig. 11.52). The practitioner should take care not to strain her own body by bending her knees (rather than her back) and to supply pressure from her body weight and body mechanics rather than her shoulder and arms. A more precise examination of the band is best done in a sidelying position.

image

Figure 11.51 Fibers of TFL can be assessed in a supine as well as a sidelying posture (see Chapter 12).

image

Figure 11.52 Stability of the leg is provided by the practitioner while gliding strokes are applied with the practitioner’s palm to the lateral surface of the thigh to assess the IT band. A sidelying version of this step is shown in Chapter 12.

Supine MET treatment of shortened TFL (Fig. 11.53)

The patient lies supine with the unaffected leg flexed at hip and knee. The affected side leg is adducted to its barrier, which brings it under the opposite (bent) leg. The practitioner stands on the contralateral side at the level of the knee.

Using guidelines for acute and chronic problems (see Chapter 9, pages 197/198), the structure will either be treated at or short of the barrier of resistance, using light or fairly strong isometric contractions for short (7 second) or long (up to 20 seconds) durations, using appropriate breathing patterns (as described in Chapter 9).

The practitioner uses her trunk to stabilize the patient’s pelvis, by leaning against the flexed (non-affected side) knee.

The practitioner’s caudad hand supports the affected leg so that the knee is stabilized by the hand.

The practitioner’s cephalad hand maintains a stabilizing contact on the ASIS of the affected side.

The patient is asked to abduct the leg against the practitioner’s resistance using minimal force, for 7–10 seconds. If possible, the patient holds the breath during the contraction.

After the contraction ceases and the patient has relaxed and released the held breath, the leg is taken to or through the new restriction barrier (into adduction past the barrier) to stretch the muscular fibers of TFL (the upper third of the structure).

Care should be taken that the pelvis remains in neutral and is not tilted in any direction during the stretch.

  Page 360 

Stability is achieved by the practitioner increasing pressure against the flexed knee/thigh.

This whole process is repeated until no further gain is possible.

image

Figure 11.53 MET treatment of TFL. If a standard MET method is used, the stretch will follow the isometric contraction in which the patient will attempt to move the right leg to the right against sustained resistance. It is important for the practitioner to maintain stability of the pelvis during the procedure

(reproduced with permission from Chaitow 2006).

Positional release for TFL

The tender point for TFL lies on the anterior border of TFL inferior and slightly lateral to the ASIS.

The patient lies supine and the practitioner is on the side of the table closest to the affected tissues.

The practitioner’s cephalad hand locates and contacts the tender point with sufficient pressure to allow the patient to score a ‘10’ as the pain value. Her caudad hand holds the calf, bringing the leg into flexion at the hip and knee while introducing slight abduction and either internal or external rotation at the hip, whichever reduces the reported score to ‘3’ or less.

The final position of ease should be held for 90 seconds before a slow return to the starting position.

Quadratus lumborum (see Fig. 10.31)

Attachments: Iliocostal fibers (posterior plane): extend nearly vertically from the 12th rib to the iliac crest and iliolumbar ligament; iliolumbar fibers (intermediate plane): diagonally oriented from the iliac crest to the anterior surfaces of the transverse processes of L1–3 or L4; Lumbocostal fibers (anterior plane): diagonally oriented from the 12th rib to the transverse processes of L2–4 or L5

Innervation: Lumbar plexus (T12–L3 or L4)

Muscle type: Postural (type 1), with tendency to shorten

Function: Ipsilateral flexion of the trunk, stabilizes the lumbar spine, elevates ipsilateral hip, assists forced exhalation (coughing), stabilizes the attachments of the diaphragm during inspiration; QL contracting bilaterally extends the lumbar spine

Synergists:For lateral trunk flexion: external and internal obliques

Antagonists:For lateral trunk flexion: contralateral QL, external and internal obliques

See previous and extensive discussions of quadratus lumborum on pp. 255–259 where the anatomy, functional tests, MET/PRT methods, trigger point target zones and a prone position for palpating portions of the muscle are described and illustrated. The following offers a sidelying position for this muscle, which may allow a clearer palpation of its fibers. The practitioner should exercise caution when approaching the transverse processes as excessive pressure on their lateral tips could bruise the overlying tissues. Orientation of the anatomy can sometimes be confusing when the patient is placed in sidelying position. If so, a review of illustrations of the regional anatomy is suggested.

Myofascial release of overlying tissues and adjoining oblique fibers is discussed on p. 278 and can be applied prior to the following steps.

NMT for quadratus lumborum: sidelying position

The patient is in a sidelying position with his head supported in neutral position. A bolster is placed under the contralateral waist area to elongate the side being treated. The patient’s uppermost arm is abducted to lie across the side of his head. The uppermost leg is pulled posteriorly to lie behind the lower leg or to drape off the side of the table while ensuring that the patient does not roll posteriorly off the table. This positioning places tension on the fibers of the quadratus lumborum and ‘opens up’ the lateral abdominal area, which results in more effective palpation.

The practitioner stands posterior to the patient at the level of the hips. A light amount of lubrication is applied to the skin over the QL fibers. Only a portion of quadratus lumborum lies lateral to the erector spinae but the gliding strokes described here will influence tissues that are superficial to and lateral to QL, which may also influence QL’s ability to relax.

Gliding strokes are applied with both thumbs, from the crest of the ilium to the 12th rib, while remaining immediately lateral to the erector spinae. The gliding process is repeated 4–5 times on this first section of tissue. The practitioner should avoid undue stress on her thumbs by pointing the tips of the thumbs toward the direction of the glide rather than placing the tips toward each other during the stroke, which can strain the thumb joints (see description of thumb positioning in Chapter 9, pp. 192–194) (Fig. 11.54). The thumbs are then moved laterally and the gliding process is repeated 4–5 times on the next section of tissue. A third strip of tissue is usually available before encountering the fibers of external oblique. These gliding strokes can also be applied to the external oblique, if needed.

Transverse gliding strokes from several inches lateral to the erector spinae may help to distinguish taut QL fibers from those of the oblique, which run almost parallel to the QL fibers (Travell & Simons 1992).

Gentle friction can be used to examine the attachments of QL on the ‘floating’ 12th rib, which varies in length. Excessive pressure onto the rib should be avoided, especially in patients with known or suspected osteoporosis, and the potentially sharp end of the rib should be carefully palpated.

With the fingers of the cephalad hand wrapping around the rib cage and the thumb pointed toward the spine at a 45° angle (Fig. 11.55), the thumb is slid medially on the inferior surface of the 12th rib until it is just lateral to the erector spinae and, in some cases, must then be slid slightly under the erector mass. Special care is taken to avoid pressing on the sharp lateral edge of the 12th rib or the lateral ends of the transverse processes. Static pressure or mild friction is applied to the transverse process of L1 and just lateral to its tip (onto QL tissue attachments) to assess for tenderness or referred pain patterns.

  Page 361 

The treating thumb is then moved inferiorly at approximately 1-inch intervals and the palpation step is repeated to search for L2–4. The transverse processes are not always palpable and are usually more palpable at the level of L2 and L3. If rotoscoliosis of the lumbar spine exists, the transverse processes are usually more palpable on the side to which the spine is rotated.

The practitioner now turns to face the patient’s feet while standing at the level of the mid-chest. Caudally oriented repetitive gliding strokes are applied to all sections of QL and the nearby oblique fibers in the same manner as the cranially oriented strokes were applied previously.

While continuing to face the patient’s feet, the practitioner applies transverse friction to the pelvic attachment of QL on the uppermost edge of the iliac crest while assessing for tender attachments and taut or fibrotic fibers. This frictional assessment can be continued through the oblique fibers as well. Latissimus dorsi fibers are often also palpable.

image

Figure 11.54 A portion of quadratus lumborum is palpable lateral to the erector spinae muscles. The sidelying position of the patient as shown in this illustration will open the space between the ribs and iliac crest to allow more access to QL.

image

Figure 11.55 With the thumb pointing toward the spine and the fingers wrapped around the rib cage, the palpating thumb can be slid next to (and sometimes under) the lateral edge of the erector spinae muscles, which cover most of the quadratus lumborum fibers.

Gluteus maximus (Fig. 11.56)

Attachments: From the posterolateral sacrum, thoracolumbar fascia, aponeurosis of erector spinae, posterior ilium and iliac crest, dorsal sacroiliac ligaments, sacrotuberous ligament and coccygeal vertebrae to merge into the iliotibial band of fascia lata (anterior fibers) and to insert into the gluteal tuberosity (posterior fibers); deep sacral fibers have been suggested, from the lateral sacrum to the posterior ischial spine, the ischial tuberosity, and the sacrotuberous ligament (Gibbons 2007)

Innervation: Inferior gluteal (L5, S1, S2)

Muscle type: Phasic (type 2), with a tendency to weakness and lengthening (Janda 1983, Lewit 1999)

Function: Extends the hip, laterally rotates the femur at the hip joint, iliotibial band fibers abduct the femur at the hip while gluteal tuberosity fibers adduct it (Platzer 2004), posteriorly tilts the pelvis on the thigh when the leg is fixed, thereby indirectly assisting in trunk extension (Travell & Simons 1992).

Synergists:For extension: hamstrings (except short biceps femoris), adductor magnus and posterior fibers of gluteus medius and minimus

For lateral rotation: long head of biceps femoris, the deep six hip rotators (especially piriformis), sartorius, posterior fibers of gluteus medius and minimus and (maybe weakly) iliopsoas
For abduction: gluteus medius and minimus, tensor fasciae latae, sartorius, piriformis and (maybe weakly) iliopsoas
For adduction: adductors brevis, longus and magnus, pectineus, and gracilis
For posterior pelvic tilt: hamstrings, adductor magnus, abdominal muscles

Antagonists:To extension: mainly iliopsoas and rectus femoris and also pectineus, adductors brevis and longus, sartorius, gracilis, tensor fasciae latae

To lateral rotation: mainly adductors and also semi-tendinosus, semimembranosus, pectineus, the most anterior fibers of gluteus minimus and medius and tensor fasciae latae
  Page 362 
To abduction: adductors brevis, longus and magnus, pectineus and gracilis
To adduction: gluteus medius and minimus, tensor fasciae latae, sartorius, piriformis and (maybe weakly) iliopsoas
To posterior pelvic tilt: rectus femoris, TFL, anterior fibers of gluteus medius and minimus, iliacus, sartorius
image

Figure 11.56 The three gluteal muscles and their positioning in relationship to each other, to the deep six hip rotators and to the sciatic nerve.

(Reproduced, with permission, from Gray’s anatomy for students, 2nd edn, 2010, Churchill Livingstone).

Indications for treatment

Pain on prolonged sitting

Pain when walking uphill, especially when bent forward

When ‘no chair feels comfortable’ (Travell & Simons 1992)

Sacroiliac fixation

An antalgic gait

Restricted flexion of the hip

Special notes

Levangie & Norkin (2005) note gluteus maximus to be the largest muscle of the lower extremity, constituting 12.8% of the total muscle mass of the lower extremity. Vleeming et al (2007) and Lee (1999) cite it as the largest muscle of the body.

Gluteus maximus provides a powerful extensor force for the lower extremity, which is especially important when its synergists, the hamstrings, lose power due to knee flexion (for instance, during stair climbing). It is recruited primarily when the movements it provides involve moderate to heavy effort (running and jumping) or when it is minimally active during balanced standing or easy walking; while maximal activity occurs as in climbing stairs, activity ceases when descending the stairs (Travell & Simons 1992).

Gluteus maximus has powerful fibers that offer a muscular defense against forward tilting of the pelvis. Some fibers share a raphe with multifidus (Lee 1999), giving an indirect connection to the lumbar region. Vleeming et al (2007) note that, through thoracolumbar fascia, gluteus maximus is coupled to the contralateral latissimus dorsi, thus contributing to the self-bracing mechanism of the pelvis and becoming part of an elastic sling for the lower extremity.

This arrangement of muscles and fascia facilitates the transfer of energy, generated by movement of the upper extremity, through the spine and into the lower extremity. The close coupling of the extremity and back muscles through the thoracolumbar fascia and its attachments to the ligamentous stocking of the spine, allow the motion in the upper limbs to assist in rotation of the trunk and movement of the lower extremities in gait, creating an integrated system.

  Page 363 

Vleeming et al (2007) express particular interest in the fibers that attach to the sacrotuberous ligament due to their ability to raise the tension of it, thereby promoting self-locking of the SIJ and governing nutation. This highlights how, in addition for a muscle’s prime function, it may have other roles, such as modulating the tension of ligaments and fascia.Within Vleeming’s text, Gibbons (2007) notes three subdivisions of gluteus maximus - superficial sacral fibers, deep sacral fibers, and deep ilium fibers. He suggests that these have different functions, particularly for the deep sacral fibers (Gibbons & Mottram 2004), which Gibbons describes as coursing from the lateral sacrum to the posterior ischial spine, the ischial tuberosity, and the sacrotuberous ligament. He suggests (as a preliminary observation) that these deep fibers might play a role in controlling vertical loading and pelvic torsion.

Gluteus maximus covers (usually) three bursae: the trochanteric bursa, which lies between the gluteal tuberosity and the greater trochanter, the ischial bursa and the gluteofemoral bursa, which separates the vastus lateralis from gluteus maximus tendon (Travell & Simons 1992). Differential diagnosis is suggested by Travell & Simons to determine if pain is caused by bursal inflammation or trigger points in gluteal tissues. Regarding some of these fibers, they interestingly note that: ‘The most distal fibers of the gluteus maximus that arise from the coccyx originate embryologically as a separate muscle and fuse with the sacral portion before birth’.

When standing, the gluteus maximus covers the ischial tuberosity but as the person sits, the muscle slides up to reveal the tuberosity and leave it free (Platzer 2004). The tuberosity is therefore palpable in a seated posture. Travell & Simons (1992) agree with this but note that a trigger point in the region of the ischial tuberosity can be compressed while seated when the person ‘slouches down on the seat and reclines further against the backrest, [since] the hip extends, [and] the muscle slides down, and the weight-bearing region shifts upward around the curve of the ischial tuberosity’.

Travell & Simons (1992) report that the inferior gluteal nerve, which innervates gluteus maximus, penetrates the piriformis muscle in 15% of 112 subjects, making it vulnerable to nerve entrapment by piriformis (see p. 368). ‘In every such case, the peroneal branch of the sciatic nerve accompanied the inferior gluteal nerve through the piriformis muscle.’

Trigger points in gluteus maximus are primarily to the buttock region, the SI joint, the region of the ischium, crest of the ilium, hip, sacrum and coccyx (Simons et al 1999) (Fig. 11.57).

image

Figure 11.57 A, B: The referred patterns of the gluteus maximus include the sacroiliac joint, sacrum, hip, ischium and coccyx. They can be the source of low backache, lumbago and coccygodynia

(adapted with permission from Travell & Simons 1992).

NMT for gluteus maximus: sidelying position

The patient is in a sidelying position with his head supported in neutral position. A bolster is placed under the uppermost leg, which is flexed at the hip only enough to take up some slack in the muscle. A thin draping can be used and the work applied through the cloth or through shorts, gown or other thin clothing. However, thicker material, such as a towel, may interfere with distinct palpation.

The practitioner stands at the level of the upper thigh or hip in front of the patient and reaches across the uppermost hip with her caudad arm to palpate the posterior tissues. She can also stand behind the patient and use either hand to perform the treatment as long as her wrist is comfortable and is not placed in a strained position.

The fibers of the uppermost edge of the gluteus maximus are found by palpating along a line that runs approximately from the greater trochanter to just cephalad to the PSIS. These fibers overlap the gluteus medius and minimus fibers and the tissue is distinctly thicker here.

Once the uppermost fibers have been located, the thumb, fingers, carefully controlled elbow or flat pressure bar can be applied in a penetrating, compressive manner to assess for taut bands and tender regions of gluteus maximus. Moving the palpating digits transversely across the fibers usually identifies them more distinctly than sliding with the direction of fibers (Fig. 11.58).

It should be remembered that deeper pressure through the gluteus maximus in the first strip of fibers will also access the posterior fibers of the other two gluteal muscles, which lie deep to the maximus.

The palpating hand (elbow, etc.) can then be used to systematically examine the entire gluteal region caudad to this first strip until the gluteal fold is reached. Deep to the gluteus maximus in the region will lie the deep six hip rotators (see pp. 429–433).

The lower portions of gluteus maximus can often be easily picked up between the thumb and fingers as a pincer compression is applied. Protective gloves to prevent transmission of bacteria or viruses are suggested when working in the lower medial gluteal region near the anus, even if palpating through the sheet (Fig. 11.59).

  Page 364 

Pincer compression is also effectively used (if carefully applied) on the tissues attaching to and around the coccyx. This compression treatment of external coccyx muscles is suggested before the internal approach is used as discussed on pp. 383–387.

image

Figure 11.58 Palpation transversely across the fibers will reveal their tautness. There will be a palpable thickness approximately where the thumbs are placed in this illustration where the three gluteal muscles overlap and not necessarily indicative of dysfunction.

image

Figure 11.59 Portions of gluteus maximus may be picked up and compressed between the thumb and fingers.

Gluteus medius (see Fig. 11.56)

Attachments: From the outer surface of the ilium (anterior three-quarters of the iliac crest between the posterior and anterior gluteal lines) and from the gluteal aponeurosis to attach to the posterosuperior angle and lateral surface of the greater trochanter (inserted ‘like a cap’ – Platzer 2004)

  Page 365 

Innervation: Superior gluteal nerve (L4, L5, S1)

Muscle type: Phasic (type 2), with tendency to weakening and lengthening (Janda 1983, Lewit 1999)

Function: All fibers strongly abduct the femur at the hip, anterior fibers flex and medially rotate the femur, posterior fibers extend (Kendall et al 1993, Platzer 2004) and (weakly) laterally rotate the femur. When the leg is fixed, this muscle stabilizes the pelvis during lateral trunk flexion and gait

Synergists:For abduction of hip: gluteus minimus and part of maximus, sartorius, tensor fasciae latae, piriformis and iliopsoas

For flexion: rectus femoris, iliopsoas, pectineus, anterior gluteus minimus, tensor fasciae latae, sartorius and perhaps some adductors
For medial rotation: semitendinosus, semimembranosus, pectineus, the most anterior fibers of gluteus minimus, tensor fasciae latae and (perhaps) adductor longus and magnus
For extension: hamstrings (except short biceps femoris), adductor magnus, gluteus maximus and posterior fibers of gluteus minimus
For lateral rotation: long head of biceps femoris, the deep six hip rotators (especially piriformis), sartorius, gluteus maximus, posterior fibers of gluteus minimus and (maybe weakly) iliopsoas
For lateral pelvic stability: contralateral lateral trunk muscles and contralateral adductors

Antagonists:To abduction: adductors brevis, longus and magnus, pectineus, and gracilis

To hip flexion: gluteus maximus, the hamstring group and posterior fibers of adductor magnus
To medial rotation: long head of biceps femoris, the deep six hip rotators, gluteus maximus, sartorius, posterior fibers of gluteus medius and minimus and iliopsoas
To extension: mainly iliopsoas and rectus femoris and also pectineus, adductors brevis and longus, anterior fibers of adductor magnus, sartorius, gracilis, tensor fasciae latae
To lateral rotation: mainly adductors and also semitendinosus, semimembranosus, pectineus, the most anterior fibers of gluteus minimus and medius and tensor fasciae latae
To lateral pelvic stability: ipsilateral lateral trunk muscles, adductors and contralateral abductors.

Indications for treatment

Lower back pain (lumbago)

Pain at the iliac crest, sacrum, lateral hip, posterior and lateral buttocks or upper posterior thigh

Gluteus minimus (see Fig. 11.56)

Attachments: From the outer surface of the ilium between the anterior and inferior gluteal lines to the anterolateral ridge of the greater trochanter

Innervation: Superior gluteal nerve (L4, L5, S1)

Muscle type: Phasic (type 2), with tendency to weakening and lengthening (Janda 1983, Lewit 1999)

Function: Same as gluteus medius above

Synergists: Same as gluteus medius above

Antagonists: Same as gluteus medius above

Indications for treatment

Hip pain, which can result in limping

Painful difficulty rising from a chair

Pseudo-sciatica

Excruciating and constant pain in the patterns of its target zones

Special notes

Travell & Simons (1992) report gluteus medius to be less than half the size of gluteus maximus and to be two to four times larger than gluteus minimus. The minimus is almost twice as large as the tensor fasciae latae.

Posterior gluteus medius and minimus fibers are overlapped by the gluteus maximus. Gluteus minimus is almost completely covered by the lower half of medius. The thickened portion where all three muscles overlap is sometimes thought by practitioners to be a hypertonic piriformis, which actually lies just caudad to the overlapped area.

Bursae of the region include the trochanteric bursa of gluteus medius, which lies between the gluteus medius tendon and (proximally) the tendon of gluteus minimus and (distally) the surface of the greater trochanter, and the trochanteric bursa of gluteus minimus, which lies between its tendon and the greater trochanter.

Gluteus medius, along with gluteus minimus, is a major lateral pelvic stabilizing force, especially during single limb stance. When gluteus medius is strong, the pelvis remains level or sidebends ipsilaterally (the opposite iliac crest rises) when the leg is singly loaded. However, when gluteus medius is weak and that side is asked to perform single leg stance (such as during walking), the pelvis is seen to sidebend contralaterally, which results in a displacement of the center of gravity toward the weight-bearing side. When this occurs during walking, it produces the Trendelenburg gait and, if bilateral, produces a waddling gait (see Chapter 3). Lee (1999) reports some of the ultimate consequences:

Weakness, or insufficient recruitment and/or timing, of the muscles of the inner and/or outer unit reduces the force closure mechanism through the sacroiliac joint. The patient then adopts compensatory movement strategies to accommodate the weakness. This can lead to decompensation of the lower back, hip and knee.

Nelson-Wong et al (2008) investigated the role of gluteus medius in low back pain due to prolonged standing. They noted that participants who demonstrated co-activation of the left and right gluteus medius muscles developed low back pain; those who displayed reciprocal activation of these muscles did not develop low back pain. Low back pain was functionally induced in these participants through a low demand, common activity of standing.

We were able to predict, with moderate success, those individuals who would develop LBP based upon the single factor of co-activation of hip musculature and correctly identified 74% of subjects into their respective pain or non-pain group. Since this muscle activation pattern was present prior to the onset of subjective pain complaint, it is possible that the presence of muscle co-activation should not be considered to be solely an adaptive response, and in fact may be causal, for development of LBP in some individuals.

Travell & Simons (1992) describe trigger points of the gluteus medius to include referrals to the sacrum, iliac crest, hip, buttocks and upper posterior thigh (Fig. 11.60). They note that the medius trigger points are often satellites of trigger points found in quadratus lumborum. They describe gluteus minimus trigger points as being ‘intolerably persistent and excruciatingly severe’ and to refer down the lateral and posterior thigh and lower leg as far as the ankle, into the lower lateral buttocks and to rarely include the dorsum of the foot. They offer the term ‘pseudo-sciatica’ in regards to gluteus minimus referral patterns ‘when sensory and motor neurological findings are normal’. (Fig. 11.61).

image

Figure 11.60 A, B: Target referral zones for gluteus medius trigger points

(adapted with permission from Travell & Simons 1992).

image

Figure 11.61 A, B: The ‘pseudo-sciatica’ referral patterns for gluteus minimus trigger points

(adapted with permission from Travell & Simons 1992).

Travell & Simons (1992) note that anatomically and functionally, the two smaller gluteal muscles are difficult to differentiate. Though portions of their target zones of referral are similar, minimus patterns extend past the knee, which differentiates them from medius patterns, which end above the knee. They also warn that:

  Page 366 

pain patterns of sacroiliac joint dysfunction and disease can be confused with trigger points of gluteus medius

pain patterns of lumbar facet joints can be mistaken for gluteal trigger points

trochanteric tenderness can be caused by inflammation of the subgluteus medius bursa and can be confused with gluteus medius trigger point patterns

postsurgical lingering pain may be caused by gluteal and other trigger points that have been ignored

pain of vascular origin and that of trigger points may be confused

gluteus minimus referral patterns may be mistaken for radiculopathy

‘sciatica is a symptom, not a diagnosis; its cause should be identified’.

The gluteal muscles can be addressed in both prone and sidelying positions. A prone position is described as preparation for work with the deep hip rotators on p. 427 while the sidelying position for the gluteals is described here. Since hip abductors and the contralateral adductors are synergistic for pelvic stabilization, their treatment together is strongly recommended, a goal that is easily accomplished in the sidelying posture. The uppermost hip is treated and then the contralateral inner thigh is addressed before the patient is asked to reverse his positioning for the second side. The sidelying treatment of the adductors is discussed on p. 421.

NMT for gluteal muscle group: sidelying

The patient is in a sidelying position with his head supported in neutral position. A bolster is placed under the uppermost leg, which is flexed at the hip while the lower leg remains straight. A thin draping can be used and the work applied through the cloth or through shorts, gown or other thin clothing.

The practitioner stands in front of the patient at the level of the upper thigh or hip. She can also stand behind the patient to perform the treatment as long as she is comfortable and is not placed in a strained position.

The practitioner palpates the ASIS and the greater trochanter. An imaginary line drawn between the two represents the tensor fasciae latae. These fibers overlap the most anterior fibers of gluteus minimus and possibly gluteus medius and the tissue is distinctly thicker here.

The practitioner’s thumb, fingers, carefully controlled elbow or the flat pressure bar can be applied in a probing, compressive manner to assess for taut bands and tender regions (Fig. 11.62).

The tissue is examined from the top of the greater trochanter to the crest of the ilium in small segments. Moving the palpating digits transversely across the fibers usually identifies them more distinctly than sliding with the direction of fibers. If very tender, only mild, sustained compression is used.

When the top of the crest is reached, the palpating hand returns to the greater trochanter and moves posteriorly about a thumb’s width and repeats the examination on the next ‘strip’ of fibers. The pattern will begin to resemble spokes of a wheel.

  Page 367 

At the 3rd or 4th strip, the tissues will feel distinctly thicker as the overlapping fibers of all three gluteal muscles are encountered. Following this, the tissues deep to the gluteal muscles will include the piriformis, gemelli, obturators and quadratus femoris, which are discussed on pp. 429–433.

The palpating hand continues the process of examining the tissues from the greater trochanter to their attachment sites (including the lateral border of the sacrum, sacrotuberous ligament and the lateral edge of the coccyx) while using mild transverse friction to discover taut bands and sustained compression to treat ischemia, tender points and trigger points.

If tissues are encountered that are too tender to tolerate this process, lubricated gliding strokes can be repetitiously applied directly on the skin, from the trochanter toward the attachments. The frictional techniques should then be attempted again at a future session when tenderness has been reduced.

Lubricated gliding strokes can also be applied to the gluteal tuberosity of the femur on the upper postero-lateral thigh. If tender (and it often is even with light pressure), it is suggested that the strokes be repeated 6–8 times, then the area allowed to rest for 4–5 minutes, then the strokes applied again. After two or three applications in this manner, the tenderness is usually substantially reduced.

image

Figure 11.62 The elbow can be carefully controlled to apply compression to the gluteal and other hip muscles. Care must be taken to apply levels of pressure appropriate to the condition of the tissues.

Lief’s (European) NMT for the gluteal area (Fig. 11.63)

The practitioner stands at the level of the prone patient’s left hip, half-facing the head of the table. Her left hand and thumb describe a series of cephalad strokes from the sacral apex toward the sacroiliac area, effectively searching for evidence of soft tissue dysfunction in tissues overlaying the sacrum. Strokes are then applied laterally along the superior and inferior margins of the iliac crest to the insertion of the tensor fasciae latae at the ASIS.

Having assessed and treated both left and right sides of the sacrum and pelvic crest, the practitioner then uses a series of two-handed gliding maneuvers in which the hands are spread over the upper gluteal area laterally, the thumb tips are placed at the level of the second sacral foramen with a downward (toward the floor) pressure; they glide cephalad and slowly laterally to pass over and through the fibers of the sacroiliac joint region, in order to evaluate for symmetry of tone and localized contractions/contractures, and to begin the process of normalization of any such changes. This two-handed stroke is repeated several times.

Still standing on the left, the practitioner leans across the patient’s upper thigh and engages her right thumb onto the right ischial tuberosity. A series of gliding movements are carried out from that point laterally to the hip joint and caudad toward the gluteal fold. A further series of strokes, always applying deep, probing but variable pressure, is then carried out from the sacral border across the gluteal area to the hip margins, effectively passing through tissues that include the various gluteal muscles. The finger tips during these strokes are splayed out so that they can guide and balance the hand and thumb movement. Differentiation of the gluteal muscles, one from the other, is far from easy and probably futile. Dysfunction, if recognized, should receive appropriate soft tissue treatment, whether this involves sustained or intermittent pressure, myofascial release, positional release, muscle energy procedures or a combination of these into an integrated sequence (see INIT, p. 203) or any other effective means of soft tissue manipulation.

In deep, tense gluteal muscle the thumb may be inadequate to the task of prolonged pressure techniques and the elbow may be used to sustain deep pressure for minutes at a time. Care should be taken, however, as the degree of pressure possible by this means is enormous and tissue damage and bruising can result from its careless employment.

The practitioner then moves to the right side and repeats the same strokes. Alternatively, rather than changing sides, the taller practitioner can lean across the patient and use hooked finger strokes to effectively access the soft tissues above the hip and around the curve of the iliac crest.

image

Figure 11.63 Suggested lines of NMT strokes for assessment and treatment of the pelvic region using Lief’s protocols

(reproduced with permission from Chaitow 2007).

  Page 368 

MET self-care for gluteus maximus

Liebenson (1996) points out that it is unusual for gluteus maximus to require stretching, ‘except for those individuals in whom the muscle is very tight’. Self-stretching is suggested, involving the patient lying supine, folded hands embracing the knee(s) and drawing one or both knees to the chest until a sense of resistance is noted. At that time the patient pushes back against his own hands, using a mild degree of effort, for approximately 7–10 seconds. Following this contraction, and on complete relaxation, the one or both knees are brought closer to the chest to induce a sense of non-painful stretch. This is held for not less than 30 seconds before being repeated, effectively lengthening any shortened fibers in gluteus maximus.

Note: Gluteus maximus, medius and minimus are phasic muscles and their tendency is to become inhibited, weakened and sometimes lengthened, often in relation to short, tight, antagonist, postural structures (Janda 1983, Liebenson 2007, Norris 1995, 2000). Gluteus maximus seldom therefore requires overall stretching, although it may well develop shortened fibers (and/or trigger point activity) within its overall weakened structures, possibly in an adaptive attempt to induce a degree of stability. These localized shortened structures may be released by use of NMT, INIT, PRT or MFR. Primary attention, however, should be given to restoration of balance between antagonist muscle groups, with tone and strength restoration to the weakened structures initially being provided by means of stretching of the short, tight antagonists.

Positional release for gluteus medius

The tender points for gluteus medius lie approximately an inch (2.5 cm) inferior to the crest of the ilium close to and anterior or posterior to the mid-axillary line.

The patient lies prone and the practitioner stands on the side of dysfunction facing the table just below the level of the pelvis and places her caudad knee onto the table. Her cephalad hand locates and maintains contact on the most tender point located below the iliac crest while her caudad hand lifts the ipsilateral leg into abduction and supports it on her thigh.

The practitioner maintains a proximal hold on the ankle in order to fine tune the leg position, bringing it: (a) into external rotation until the reported pain score drops to ‘3’ or less if the tender point lies posterior to the midaxillary line (Fig. 11.64) or (b) into internal rotation if the tender point lies anterior to the mid-axillary line.

The position of ease is maintained for at least 90 seconds before a slow restoration to the starting position.

image

Figure 11.64 Positional release for gluteus medius – note the patient’s thigh supported on the practitioner’s flexed thigh

(adapted from D’Ambrogio & Roth 1997).

Piriformis (see Fig. 11.12 and Fig. 12.36A)

Attachments: From the ventral aspect of the sacrum between the first four sacral foramina, margin of greater sciatic foramen, capsule of the SI joint and (sometimes) the pelvic surface of the sacrotuberous ligament to attach to the superior border of the greater trochanter

Innervation: Sacral plexus (L5, S1, S2)

Muscle type: Postural (type 1), with tendency to shorten and tighten when chronically stressed

Function: Laterally rotates the extended thigh, abducts the flexed thigh and (perhaps) extends the femur, tilts the pelvis down laterally and tilts it posteriorly by pulling the sacrum downward toward the thigh (Kendall et al 1993)

Synergists:For lateral rotation: long head of biceps femoris, five remaining deep hip rotators, sartorius, gluteus maximus, posterior fibers of gluteus medius and minimus and (maybe weakly) iliopsoas

For abduction of hip: gluteus medius, minimus and part of maximus, sartorius, tensor fasciae latae and iliopsoas
For extension: hamstrings (except short biceps femoris), adductor magnus, gluteus maximus and posterior fibers of gluteus medius and minimus

Antagonists:To lateral rotation: mainly adductors and also semitendinosus, semimembranosus, pectineus, the most anterior fibers of gluteus minimus and medius, and tensor fascia latae

To abduction: adductors brevis, longus and magnus, pectineus and gracilis
To extension: mainly iliopsoas and rectus femoris and also pectineus, adductors brevis and longus, sartorius, gracilis, tensor fasciae latae
  Page 369 

Indications for treatment

Pain (and paresthesias) in the lower back, groin, perineum, buttock

Pain in the hip, posterior thigh and leg and the foot

Pain in the rectum during defecation

Pain during sexual intercourse (female)

Impotence (male)

Nerve entrapment of sciatic nerve (piriformis syndrome)

SI joint dysfunction

Pain in the SI joint

Special notes

Arising from the anterior surface of the sacrum, the piriformis muscle courses through the greater sciatic foramen before attaching to the uppermost surface of the greater trochanter, thereby giving its fibers an anterolateral path. Although there are no muscles that act on the SI joint directly, piriformis comes closest to that objective and has potential to provide stabilization of the joint or, when excessively tense, to restrict sacroiliac motion (Lee 2004). Travell & Simons (1992) point out the strong rotatory shearing force that piriformis can impose on the SI joint, citing its tendency to ‘displace the ipsilateral base of the sacrum anteriorly (forward) and the apex of the sacrum posteriorly.’ Such positioning could have formidable consequences for the lower back as well as the lower extremity.

Vleeming et al (1997) refer to this stabilizing action as ‘self-bracing’ and note that piriformis becomes ‘easily facilitated, resulting in shortness and tightness. Asymmetric length and tone of the piriformis is a frequent clinical finding in the presence of SI dysfunction.’ Elsewhere, they associate piriformis tightness and pain with hamstring, gluteal and abductor weakness.

Piriformis trigger points have been known to refer to the SI joint (Lee 1999, Travell & Simons 1992) as well as the buttocks, hip and posterior thigh. Travell & Simons (1992) note that other authors have described piriformis – referred patterns as causing lumbago, lower backache, pain at the coccyx and as having a ‘sciatic radiation’. They also note that although the piriformis trigger point referred pattern has a different origin from the pain caused by neurovascular compression (piriformis syndrome), ‘the two often occur together.’ Taut fibers created by trigger points are known to cause pressure on neurovascular structures (Simons et al 1999) and the potential for this to occur in this muscle is obvious (described below).

The greater sciatic foramen is firmly bordered on all sides (by the ilium, sacrotuberous ligament and sacrospinous ligament) and when the piriformis is large and fills the space, entrapment of neurovascular structures is clearly possible. These neurovascular bundles include the superior gluteal nerve and blood vessels, the sciatic nerve, the pudendal nerve and vessels, inferior gluteal nerve, posterior femoral cutaneous nerve and the nerves supplying the gemelli, obturator internus and quadratus femoris muscles. Entrapments of these nerves and the wide collection of resulting symptomatology are commonly called the piriformis syndrome. Piriformis syndrome symptoms include swelling in the limb, sexual dysfunction and a wide collection of pain symptoms ranging from lower back pain to pain felt in the hip, buttocks, groin, perineum, posterior thigh and leg, foot and in the rectum during defecation (Travell & Simons 1992).

Travell & Simons suggest three specific conditions that may contribute to piriformis syndrome:

myofascial pain referred from trigger points in the piriformis muscle

neurovascular entrapment within the greater sciatic foramen by piriformis

SI joint dysfunction.

Cailliet (1995) notes that precisely how the piriformis entraps the sciatic nerve ‘remains obscure’ but offers the following postulations as to the causes of the syndrome.

Sacroiliac disease that causes muscle contraction of the piriformis muscle

Inflammatory disease of the muscle, tendon or fascia of the piriformis

Degenerative deformities of the bony component of the notch

Abnormalities of the neurovascular bundle as they course through the tunnel

Directed trauma to the gluteal region (gluteus maximus) or sacroiliac joint.

Travell & Simons (1992) note that the inferior gluteal nerve, which innervates gluteus maximus, penetrated the piriformis muscle in 15% of 112 subjects, making it vulnerable to nerve entrapment by piriformis. ‘In every such case, the peroneal branch of the sciatic nerve accompanied the inferior gluteal nerve through the piriformis muscle.’ They present diverse reports of the varying courses of the two divisions of the sciatic nerve (from cadaver studies) but have arrived at estimated percentages listed in their Volume 2, Fig. 10.6, p. 201, which have been included in the list below.

All fibers pass anterior to the muscle (about 85%)

With the peroneal portion passing through the piriformis and the tibial portion anterior to it (more than 10%)

Tibial portion above and peroneal portion posterior (2–3%)

Both tibial and peroneal portions passing through the piriformis (less than 1%)

Kendall et al (1993) point to either a contracted or a stretched piriformis as a potential contributor to sciatic pain.

In a faulty position with a leg in postural adduction and internal rotation in relation to an anteriorly tilted pelvis, there is marked stretching of the piriformis muscle along with other muscles that function in a similar manner. The mechanics of this position are such that the piriformis muscle and the sciatic nerve are thrust into close contact…The following points should be considered in the diagnosis of sciatic pain associated with a stretched piriformis.

  Page 370 

1. Do the static symptoms diminish or disappear in non-weight bearing?

2. Does internal rotation together with adduction of the thigh in the flexed position, with patient supine, increase sciatic symptoms?

3. Do the symptoms diminish in standing if a lift is placed under opposite foot?

4. Does the patient seek relief of symptoms by placing the leg in external rotation and abduction both in the lying and standing positions?

Kendall et al (1993) report from clinical experience that during the course of examination: A lift applied under the foot of the affected side would increase symptoms, while a lift placed under the foot of the unaffected side would give some immediate relief to the affected leg. While this can clearly be used during examination as an assessment tool for piriformis involvement, correction of insufficient leg length, if it is present, may also be needed for long-lasting relief. Kendall et al recommend heat, massage, stretching (including lower back muscles, if needed), abdominal muscle toning and correction of faulty positions of pelvis, which is similar to the NMT protocols discussed within this text.

A prone position can be used to address piriformis and the remaining hip rotators and is discussed with the hip region on p. 429. The attachment of piriformis on the anterior surface of the sacrum can often be accessed directly with an intrarectal or intravaginal treatment, discussed in the following section with the coccyx. While this step would not routinely be performed on every patient, it may offer substantial relief (often quickly) to the person who needs it.

Assessment of shortened or weak piriformis

Stretch test

When short, piriformis will cause the affected leg of the supine patient to appear to be short and externally rotated.

With the patient supine, the tested leg is placed into flexion at the hip and knee so that the foot rests on the table lateral to the contralateral knee (the tested leg is crossed over the straight non-tested leg) (Fig. 11.65).

The angle of hip flexion should not exceed 60°.

The non-tested side ASIS is stabilized to prevent pelvic motion during the test by being pulled toward the practitioner and the knee of the tested side is pushed into adduction to place a stretch on piriformis.

If there is a short piriformis the degree of adduction will be limited and the patient will report discomfort behind the trochanter.

image

Figure 11.65 MET treatment of piriformis muscle with patient supine. The pelvis must be maintained in a stable position as the knee (right in this example) is adducted to stretch piriformis following an isometric contraction

(adapted from Chaitow 2006).

Palpation test (Fig. 11.66)

The patient is sidelying, tested side uppermost. The practitioner stands at the level of the pelvis in front of and facing the patient and, in order to contact the insertion of piriformis, draws imaginary lines between the ASIS and ischial tuberosity and PSIS and the most prominent point of the trochanter.

  Page 371 

Where these reference lines cross, just posterior to the trochanter, is the insertion of the muscle and pressure here will produce marked discomfort if the structure is short or irritated.

If the most common trigger point site in the belly of the muscle is sought, then the line from the ASIS should be taken to the tip of the coccyx rather than to the ischial tuberosity. Pressure where this line crosses the other will access the mid-point of the belly of piriformis where triggers are common.

Light compression here that produces a painful response is indicative of a stressed muscle and possibly an active myofascial trigger point.

image

Figure 11.66 Using bony landmarks as coordinates, the most common tender areas are located in piriformis, in the belly and close to the attachment of the muscle

(reproduced with permission from Chaitow 2006).

Strength test

The patient lies prone, both knees flexed to 90°.

The practitioner stands at the foot of the table, grasping the lower legs above the ankles and separating them to their comfortable end of range (which internally rotates the hip and therefore allows comparison of range of movement permitted by shortened external rotators, such as the piriformis).

The patient attempts to bring the ankles together as the practitioner assesses the relative strength of the two legs. Mitchell et al (1979) suggest that if there is relative shortness (as evidenced by the lower leg not being able to travel as far from the mid-line as its pair in this position) and if that same side also tests strong, then MET is called for. If there is shortness but also weakness then the reasons for the weakness need to be dealt with prior to stretching using MET.

NMT for piriformis: sidelying

The patient is in a sidelying position with his head supported in neutral position. The uppermost leg is flexed at the hip while the lower leg remains straight. If tension is desired on the muscle, no bolster is placed under the uppermost leg so that it medially rotates to lie on the table, placing the piriformis on slight stretch. If this is too uncomfortable due to reactive trigger points, a bolster can be placed under the flexed (uppermost) leg to support it and reduce tension on piriformis fibers.

A thin draping can be used and the work applied through the cloth or through shorts, gown or other thin clothing.

The practitioner stands in front of the patient at the level of the upper thigh or hip. She can also stand behind the patient to perform the treatment as long as she is comfortable and is not placed in a strained position.

The practitioner palpates the PSIS and the greater trochanter. An imaginary line is drawn from just caudal to the PSIS to the greater trochanter, which represents the location of the piriformis muscle. To confirm correct hand placement, the fibers just cephalad can be palpated and should represent the appreciably ‘thicker’ overlapping of the three gluteal muscles. Piriformis lies just caudad to this overlapped region.

The practitioner’s thumb, fingers, carefully controlled elbow or the flat pressure bar can be applied in a probing, compressive manner to assess for taut bands and tender regions. Awareness of the course of the sciatic nerve and its tendency toward extreme tenderness when inflamed should be ever present in the practitioner’s mind as she carefully examines these tissues (Fig. 11.67).

The tissue is palpated from the top of the greater trochanter to the lateral border of the sacrum, just caudal to the PSIS. Moving the palpating digits transversely across the fibers usually identifies them more distinctly than sliding with the direction of fibers. If very tender, only mild, sustained compression is used.

  Page 372 

Sustained compression can be used to treat ischemia, tender points and trigger points.

If tissues are encountered that are too tender to tolerate this process, lubricated gliding strokes can be repetitiously applied directly on the skin, from the trochanter toward the sacrum. The frictional and compressive techniques should then be attempted again at a future session when tenderness has been reduced.

The tissues around the greater trochanter can be examined with transverse friction. The practitioner faces the patient’s feet and places her thumbs (pointing tip to tip) onto the most cephalad aspect of the greater trochanter. Compression and friction can be used on piriformis, TFL, gluteal and hip rotator attachments in a semi-circular pattern (Fig. 11.68).

image

Figure 11.67 Awareness of the course of the sciatic nerve should be ever present on the practitioner’s mind as examination of this region takes place. Target zone of referral of piriformis is also shown

(adapted with permission from Travell & Simons 1992).

image

Figure 11.68 The tissues attaching to the greater trochanter can be examined within a semi-circular pattern.

Sidelying MET and compression treatment of piriformis

The patient is sidelying, close to the edge of the table, affected side uppermost, both legs flexed at hip and knee.

The practitioner stands facing the patient at hip level. She places her cephalad elbow tip gently over the point behind the trochanter, where piriformis inserts (Fig. 11.69).

The patient should be close enough to the edge of the table for the practitioner to stabilize the pelvis against her trunk. At the same time, the practitioner’s caudad hand grasps the ankle and uses this to bring the upper leg/hip into internal rotation, taking out all the slack in piriformis.

A degree of compression (sufficient to cause discomfort but not pain) is applied via the elbow for 5–7 seconds while the muscle is kept at a reasonable but not excessive degree of stretch.

The practitioner maintains contact on the point but eases the pressure and asks the patient to introduce an isometric contraction (25% of strength for 5–7 seconds) to piriformis by bringing the lower leg toward the table against resistance.

After the contraction ceases and the patient relaxes, the lower limb is taken to its new resistance barrier and elbow pressure is reapplied.

This process is repeated until no further gain is achieved.

image

Figure 11.69 A combined ischemic compression (elbow pressure) and MET sidelying treatment of piriformis. The pressure is alternated with isometric contractions/stretching of the muscle until no further gain is achieved

(adapted from Chaitow 2006).

NMT examination of iliolumbar, sacroiliac and sacrotuberous regions

While muscles of the sacroiliac region most certainly can be a source of indirect movement of the SI joint and may result in its dysfunction, direct movement of the joint is not considered to be muscularly induced. Greenman (1996) notes:

Muscular attachment to the pelvic girdle is extensive, but muscles that directly influence sacroiliac motion are difficult to identify. Movement of the sacroiliac mechanism appears to be mainly passive in response to muscle action in the surrounding areas.

Much of the integrity of the sacroiliac region depends upon the ligamentous structures that bind the sacrum to the ilia. In the application of classic (American) NMT, descriptions have been used that suggest that specific structures, such as the pelvic ligaments, are being treated. The authors of this text question whether in fact the iliolumbar or sacroiliac ligaments, as examples, are being directly treated when NMT protocols are used. It seems more probable that, while NMT techniques address the ligaments to some degree, the tenderness and referred pain noted are more likely to be deriving from myofascial structures that overlie, attach to or are otherwise affiliated with the ligamentous tissue. Since the techniques described have proved to be of benefit to many patients, they have been included here, along with a discussion as to which tissues, besides the ligaments, are potentially being addressed.

Iliolumbar ligament region (see Figs 10.8, 11.3)

Attachments: Five bands extending from the tips and borders of the transverse process of L5 (and sometimes weakly to L4) to attach to the crest and inner surface of the ilium, with its lower fibers blending with the anterior sacroiliac ligament and, laterally, its fibers enveloping portions of the quadratus lumborum muscle before inserting on the crest (Lee 2004)

Innervation: Dorsal division of spinal nerves (Gray’s anatomy 2005); however, Bogduk (2005) notes its precise innervation is not known and presumably is dorsal or ventral rami of L4 and L5 spinal nerves

Muscle type: Not applicable

Function: Stabilizes L5 on the sacrum, primarily preventing anterior slippage and resists flexion, extension, axial rotation and sidebending of L5 on S1

Synergists: Not applicable

Antagonists: Not applicable

  Page 373 

Indications for treatment

Discomfort in the region of the ligament

Radiating pain in a ‘pseudo-sciatica’ pattern

Special notes

These ligaments accept much responsibility for maintaining the stability of the lumbosacral joint. Bogduk (2005) illustrates and discusses five parts to the ligament, with bands running superiorly, anteriorly, inferiorly laterally and vertically. He notes that fibers of quadratus lumborum (QL) and longissimus lumborum arise from the ligament and that some of QL’s fibers are sandwiched between anterior and posterior portions of the ligament.

Pool-Goudzwaard et al (2001) describe iliolumbar ligament as the most important ligament in restraining lumbosacral junction movement. In addition, they suggest that movement of the sacroiliac joints is restrained by fibers that are described as the ‘sacroiliac part’ of the iliolumbar ligament, which is mainly oriented in the coronal plane, perpendicular to the sacroiliac joint.

Vleeming et al (2007) point out: ‘The individual bands are highly variable in their number and their form, but that they consistently blend superiorly with the inter-transverse ligaments of the lumbar vertebrae and inferiorly with the sacroiliac both the posterior and anterior aspects of the SIJ capsule as well as attach laterally to the iliac crest.’ They also note that the taut ligamentous bands form ‘hoods’ over the nerve roots of L4 and L5, with the hoods being capable of nerve root compression.

Bogduk’s (2005) detailed discussion of the anatomical particulars of the iliolumbar ligament is highlighted by his focus on its very existence.

One study has found it to be present only in adults. In neonates and children it was represented by a bundle of muscle. The interpretation offered was that this muscle is gradually replaced by ligamentous tissue. … The structure is substantially ligamentous by the third decade, although some muscle fibres persist. From the fifth decade, the ligament contains no muscle but exhibits hyaline degeneration. From the sixth decade the ligament exhibits fatty infiltration, hyalinisation, myxoid degeneration and calcification. … In contrast, another study unequivocally denied the absence of an iliolumbar ligament in fetuses. It found the ligament to be present by 11.5 weeks of gestation.

Lee (2004) and Vleeming et al (2007) also suggest that the evolution of this ligament from quadratus lumborum fibers has been refuted by its discovery in the fetus (Hanson & Sonesson 1994, Uhtoff 1993).

Regardless of how they evolve, the substantial forces against which these ligaments act is obvious when the transverse processes of the L5 vertebra are examined. Bogduk (2005) reports these to be ‘unlike the transverse processes of any other lumbar vertebra’, with their shape and thickness implying ‘modeling of the bone in response to the massive forces transmitted through the L5 transverse processes and the iliolumbar ligaments’. Their stabilizing forces are needed to resist forward slippage of L5 on the sacral plateau as well as axial rotation, flexion, extension and sidebending of L5.

  Page 374 

Cyriax (1982) offers a controversial viewpoint that the spinal ligaments (except atlantooccipital and atlantoaxial) are not a source of pain.

There appears to me to exist a considerable body of evidence that neither overstretching nor laxity causes symptoms arising from the ligament itself… However, it must seem most improbable to most readers that the spinal ligaments should be the only ones in the whole body from which pain does not ordinarily emanate at all. Nearly all observers in this field share views directly contrary to my own.

He goes on to support his view, while discussing conditions that place the spinal ligaments on stretch and relax, and the apparent lack of ligamentous causation of pain in each case. However, he then confusingly ends his discussion by saying: ‘None of these facts alters my full agreement with Hackett and Ongley that ligamentous injections are a potent method for abolishing backache’.

Vleeming et al (2007) illustrate referred pain from the ligaments of the pelvis and include an extensive discussion of the unilateral nature of these pain patterns (Fig. 11.70).

image

Figure 11.70 Referred pain patterns of (A) sacrotuberous ligament, (B) iliolumbar ligament and (C) sacrospinous ligament

(adapted from Vleeming et al 1997).

The iliolumbar ligament lies deeply under the mass of the erector spinae and multifidus muscles. It is therefore difficult to determine if tenderness elicited during palpation (or relieved by infiltration) is the ligament itself or other nearby tissues.

Bogduk (2005) notes:

Some investigators have regarded tenderness over the posterior superior iliac spine as a sign of iliolumbar ligament sprain but this is hard to credit, for the ligament lies anterior to the ilium and is buried by the mass of the erector spinae and multifidus. Consequently, tenderness in this region cannot be explicitly ascribed to the iliolumbar ligament. Some have claimed to have relieved back pain by infiltrating the iliolumbar ligament, but because of the deep location of this structure, there can be no guarantee that, without radiological confirmation, the ligament was accurately or selectively infiltrated.

The authors of this text, while agreeing with Bogduk’s statement, suggest that treatment (whether it involves injection, manual methods or some other course of therapy) may offer symptomatic relief and should, therefore, be utilized. Although identifying the specific structure which is the cause of a particular pain may not be possible, the relief experienced by many patients following application of the following NMT protocol for the ‘iliolumbar ligament’ region is a testament to its value.

NMT for iliolumbar ligament region

The patient is prone and the practitioner stands on the side to be treated at the level of the waist.

  Page 375 

To treat the region of the iliolumbar ligament (ILL) with NMT, first a broad application over the general area of the ILL is suggested to evaluate the possible overlying or merging fibers of quadratus lumborum, multifidus and iliocostalis lumborum. This step can be performed with the thumb or with the flat surfaced pressure bar.

To locate the region of the ligament, the thumb of the practitioner’s caudad hand is placed on the PSIS and the index finger of the same hand is placed on the spinous process of L5. The flat surface of the pressure bar tip, held by the practitioner’s cephalad hand (or the practitioner’s other thumb), is placed halfway between these two landmarks. This locates the approximate cephalad border of the sacrum. As pressure is applied into the tissues (toward the floor) the bony resistance of the sacrum should be felt through the overlying muscular and ligamentous tissues.

The pressure bar is then moved cephalad one tip width and the pressure again applied to determine if the base of the sacrum has been located. The tip is moved again, if necessary, until it ‘sinks’ into the tissues with no appreciably bony resistance detected. If correctly placed, the pressure bar now rests just cephalad to the sacral base and superficial to the iliolumbar ligament, with muscular tissues lying between the tip of the bar and the ligament (Fig. 11.71).

Vertically oriented pressure is applied (perpendicular to the body) sufficient to sink into and through the overlying muscular tissues (if they are not too tender). If tenderness or referred pain is reported by the patient, this pressure is maintained for 12–20 seconds, during which time the tenderness (and referred pattern, if it is present) should decrease substantially.

A more precise examination can now be performed with the beveled pressure bar (a thumb can sometimes be successfully used instead) by attempting to move laterally around and underneath the overlying muscles. This placement of pressure has previously been presumed to contact the ligament directly but the authors suggest that the muscles that attach to this ligament or fibers of those that overlie it may actually be the source of pain or referral patterns, including multifidus, iliocostalis lumborum and quadratus lumborum.

The practitioner then places the small pressure bar (or thumb) under the lateral edge of the erector spinae and palpates for the ligamentous fibers. (Fig. 11.72). A small, hard, diagonally oriented structure whose quality in palpation is distinctly different from muscular or osseous tissues (more resistance than muscle yet not as hard as bone with a smooth, almost slippery quality) is presumed to be the iliolumbar ligament (confirmation of which tissue it is, in fact, is not possible without sophisticated testing). Static pressure (sustained for 12–20 seconds) or friction (if not too tender) applied with the beveled tip or thumb usually results in a rapid decrease of sensitivity or referred patterns of (usually sciatica-like) pain.

image

Figure 11.71 A general assessment in the region of the iliolumbar ligament includes the overlying muscles.

image

Figure 11.72 A more precise and direct assessment approaches iliolumbar ligament from a lateral aspect by attempting to go around the lateral edge of the erector spinae.

Sacroiliac ligament region (see Fig. 11.4)

Attachments:Anterior sacroiliac ligament: ventrally placed ligaments coursing from sacrum to ilium Interosseous sacroiliac ligament: deeply placed, these fibers bind the articular surfaces of the ilium and sacrum to each other and ‘completely fill(s) the space between the lateral sacral crest and the iliac tuberosity’ (Lee 2004)

Posterior sacroiliac ligament: short head unites the superior articular processes and lateral aspect of upper half of the sacrum to the medial side of the ilium; long head courses vertically from the lower lateral sacral crest to the PSIS and crest of ilium with some of its fibers merging into the thoracolumbar fascia and erector spinae aponeurosis (Levangie & Norkin 2005) and others being covered by the fascia of the gluteus maximus (Lee 2004). The sacrotuberous ligament blends into some of the fibers of this long posterior head
  Page 376 

Innervation: Unclear and debatable, with various sources describing a number of nerves from L2 to S3 (Bogduk 2005)

Muscle type: Not applicable

Function: Unites the articulating surfaces of the ilium and sacrum, preserving the integrity of the SI joint during its various (although minor) movements

Synergists: Not applicable

Antagonists: Not applicable

Indications for treatment

Discomfort on the sacrum

Pain in SI joint

Frequent urges to urinate

Painful menstrual cramps

Special notes

The sacroiliac ligaments (SIL) are designed to preserve the integrity of the sacroiliac joint (SIJ) during the complex movements in which it participates. Though no muscles actively move the SIJ directly, the joint surfaces do move in relation to each other, primarily in response to trunk and leg positioning. The SI joint is well designed to relieve stress on the pelvic ring with the nature of the sacroiliac movements being consistent with this purpose (Bogduk 2005).

A fuller discussion of the sacroiliac joint is to be found earlier in this chapter, including its anatomy and description of several dysfunctional biomechanical features associated with the joint. The following NMT application to the sacroiliac ligament region clearly also addresses muscles that attach to the sacrum or its overlying ligaments, especially multifidus and erector spinae. Trigger points in the region may be within those myofascial components or possibly in the ligaments. Trigger points in ligaments are known to occur (Travell & Simons 1992) but trigger point referral patterns from the sacroiliac ligaments have not been firmly established.

In preparation for the following steps, skin rolling can be gently yet firmly applied repeatedly to the skin overlying the sacrum. This has been found to create significant (and rapid) change in ‘stuckness’ as well as reduction of tenderness of the tissues.

If the tissues are found to be exceptionally tender, lubricated gliding strokes can be substituted for the frictional techniques for one or two sessions until the tissue status has changed enough to tolerate the examination.

If the tissues show signs of underlying inflammation (red, hot, swollen, extreme tenderness, etc.), ice applications and lymphatic drainage techniques are recommended until signs of inflammation are reduced. The following steps are contraindicated for inflamed tissues as the methods could provoke further inflammation.

NMT for sacral region

The patient is prone and the practitioner stands on the side to be treated at the level of the waist.

In the following steps, the thumb or tip of a finger can be substituted for the beveled pressure bar tip; however, the pressure bar has been known to reproduce referral patterns (especially alongside the sacral tubercles) that were not provoked by the finger tip, presumably due to the differences in shape. The tip of the beveled pressure bar is held so that the long edge of the tip is parallel to the sacral tubercles and with the shaft of the bar held at a 45° angle to the vertical. The tip is placed at the most cephalad end of the sacrum, so that the tip touches the lateral aspect of the sacral tubercles. Tissues attaching to the sacral tubercles often exhibit significant referral patterns and are likely being produced by attachment sites of erector spinae or multifidus muscles.

When performing the following steps, pressure should always be tolerable and producing no more than a ‘7’ on the patient’s discomfort scale (see p. 192).

A skin marking pen is used to mark the location of tender tissues or those that produce referred pain or sensations. The practitioner should return to the marked spots several times before the session is completed.

The tip of the pressure bar is moved in a cranial/caudal repetitive frictional pattern, while pressing through the skin and into the underlying tissues. The skin, in this case, will move with the pressure bar so that the effect is to slide skin and tip across the underlying tissues. Each spot is frictioned with 6–8 repetitions of movement of the tip (Fig. 11.73).

The pressure bar is lifted and moved caudally one tip width and the next section of fibers is addressed.

The tip is moved at tip-width intervals and the underlying tissues frictioned until the coccyx is reached. Pressure on the coccyx is avoided so that the last section treated is just before the sacrococcygeal joint.

The pressure bar is now returned to the top of the sacrum and moved one tip width laterally. The next ‘column’ of tissues is treated in the same manner as described above, the only difference being that the pressure bar is held vertically at 90° and is now two tip widths from the mid-line.

Examination of the entire posterior surface of the sacrum is conducted in a similar manner. Three, four or five columns of application are usual depending upon the width of the sacrum. Care should be taken to avoid pressing directly on the SI joint.

  Page 377 

Additional referral patterns may be uncovered by placing the tip of the pressure bar perpendicular to the sacral tubercles and in between them and frictioning in a similar manner as described above.

If the practitioner has marked all sites of tenderness, the patterns can be reviewed to provide clues as to the source of pain. For instance, a medial to lateral pattern implies ligaments, as this is their course; however, a vertical pattern might imply dysfunction involving erector spinae as its fibers lie more vertically inclined.

If each and every tip placement were to be marked (for a visual effect), a uniform pattern would result that exhibits no gaps or spaces between tip placements.

image

Figure 11.73 The pattern of examination of the sacroiliac ligament region by the beveled-tip pressure bar. Overlying tissues include multifidus and erector spinae.

Positional release for sacroiliac ligament (Fig. 11.74)

This approach is ideal for acute problems where more invasive methods might be poorly tolerated or following other forms of treatment to calm distressed tissues.

The patient is prone and the practitioner stands on the contralateral side to the affected SI ligament, level with and facing the pelvis.

The caudad hand holds the contralateral pelvis with finger pads curling under the ASIS area.

The cephalad hand is placed so that the heel of the hand is on the sacrum and stabilizing it while the fingers palpate the most tender point on the sacroiliac ligament.

The patient is asked to grade the perceived discomfort as a ‘10’ and to report on changes in the score as positioning is introduced.

The practitioner eases the pelvis from the table and fine tunes the positioning, slightly cephalad or slightly caudad, with more or less compression medially, until the reported score drops to ‘3’ or less.

The heel of the hand on the sacrum can alter the angle of its pressure to further fine tune positioning.

The final position of ease is held for not less than 90 seconds before a slow return to the start position.

image

Figure 11.74 Positional release for the sacroiliac ligament. Practitioner is palpating a tender point on the ligament with the index finger of her cephalad hand while fine tuning positioning of the pelvis is carried out by the caudad hand

(adapted from Deig 2001).

Sacrotuberous ligament (see Fig. 11.4)

Attachments: Sacrotuberous: lateral band – from PSIS to ischial tuberosity; medial band – from the coccygeal vertebrae to the ischial tuberosity; superior band – from PSIS to coccygeal vertebrae; central bands – arise from the lateral band to attach to the lateral sacral crest Sacrospinous: from the inferior lateral angle of sacrum and coccygeal vertebrae and the SIJ capsule to ischial spine, deep to sacrotuberous ligament

Innervation: Unclear and debatable, with various sources describing a number of nerves from L2 to S3 (Bogduk 2005)

Muscle type: Not applicable

Function: To stabilize the sacrum against excessive nutation

Synergists: Not applicable

Antagonists: Long dorsal SI ligament, which resists counternutation

Indications for treatment

Coccygeal pain

Ischial pain

Pain at ischium when sitting

Pain in posterior thigh, calf and bottom of foot (‘pseudo-sciatica’)

Paresthesia of the skin covering medial and inferior part of the buttock by nerve entrapment – see below (Lee 2004)

  Page 378 

Special notes

The large sacrotuberous ligament (STL) is readily palpable through the overlying gluteus maximus. In its course from the ischial tuberosity to the ilium, sacrum and coccyx, the sacrotuberous ligament transforms the sciatic notch into a large sciatic foramen, which is then further demarcated by the sacrospinous ligament into the lesser and greater sciatic foramina.

Fibers of the biceps femoris tendon often blend with the sacrotuberous ligament and, at times, skip the ischial attachment altogether to attach directly into the ligament, thereby giving biceps femoris significant tensional influences on the sacrum and lower back regions via the ligamentous complex. Gluteus maximus fibers attach to the upper half of the posterior aspect of the ligament, piriformis sometimes attaches to its anterior surface and tendons of multifidus can blend into the superior surface of the ligament (Lee 2004).

The ligament is occasionally penetrated by the branches of the inferior gluteal neurovascular bundle. Lee (2004) notes:

The ligament is pierced by the perforating cutaneous nerve (S2, S3), which subsequently winds around the inferior border of the gluteus maximus muscle to supply the skin covering the medial and inferior part of the buttock, perhaps a source of paraesthesia when entrapped.

Since asymmetric tension of the sacrotuberous ligaments is a positive finding for innominate shear dysfunction (Greenman 1996), palpation of the ischial tuberosities for level as well as palpation of the ligaments for tensional symmetry may provide clues as to whether a taut ligament is part of an entrapment syndrome.

Coursing deep to the ligament through the lesser sciatic foramen is the obturator internus. The foramen is tightly enclosed by the overlying ligaments (sacrotuberous and sacrospinalis), which ‘leaves no room for expansion of the muscle. …Since these two ligaments fuse as they pass one another, there is no space available for pressure relief if the foramen becomes completely filled’. If the obturator internus shortens and bulges or develops trigger points, the pudendal nerve and vessels are vulnerable to entrapment, with resulting perineal pain or dysesthesia (Travell & Simons 1992).

Although the trigger points of this ligament have not been clearly determined, our clinical experience suggests that reflexogenic activity arising from the ligament is probably involved in aching of the buttock region, sacral pain and referred ‘pseudo-sciatica’ pain down the posterior thigh and leg. While it has not been established clearly that these symptoms arise from trigger points within the ligament, the referral pattern responds in a manner similar to that of trigger points when sustained compression is applied, especially to the anterior surface of the ligaments. Vleeming et al (1997) have illustrated referred pain patterns of sacrotuberous and sacrospinous ligaments, which have been incorporated in the referral patterns drawn in Figure 11.70.

When searching for links to lower back problems, Liebenson (2000) notes that palpation of the Silverstolpe reflex is an important step (see description with illustration on p. 225).

Tender points are usually present in the buttock at the height of the coccyx and the sacrotuberous ligament (extremely tender). …Treatment of the sacrotuberous ligament is usually successful in abolishing the trigger point and the related symptoms (Silverstolpe 1989, Silverstolpe & Hellsing 1990).

He remarks that symptoms include low back pain, coccyx pain, pseudo-visceral pain and dysphonia.

The emotional dimension

In our experience, palpation and clinical application of NMT to the area involving the anterior surface of the sacrotuberous ligament often provoke releases of emotions, memories and a virtual flood of feelings which emerge from the patient. Our experience is that such ‘emotional releases’ are often associated with the patient’s experiences of being physically or sexually abused as a child or as an adult, with the emotions often surfacing abruptly with no forewarning to the patient or the practitioner. A keen awareness and sensitivity by the practitioner to the possibility of this occurring is needed, since firm contact with the ligament should be reduced and the treating hand gently removed and placed onto the hip region to avoid further stimulation until the person’s emotions have stabilized. Abrupt removal of all hand contact is to be avoided since this may startle the patient.

While emotional release is not the direct intention of the procedure, awareness of its relationship to holding patterns in the region is important. Should emotional release occur, the best response the practitioner can make is one of being aware and concerned (without involvement in the ‘story’ that might emerge and which is best handled by a trained professional) and to help the person maintain a calming breathing pattern.

We strongly recommended that the practitioner (unless duly licensed and trained as a mental health-care provider) avoid involvement in conversations regarding the story, circumstances or nature of the injuries described by the person, although allowing him or her to talk is fine. Trying to ‘help’ the patient through analyzing or even simply interacting may produce adverse effects. The best response the practitioner can make is to maintain a fluid breathing cycle herself while encouraging the patient to do the same. Within or at the end of the session, professional referral can be given so the person can address the emotional components with a licensed, trained mental health professional.

The broader context of the connection between low back and pelvic problems and the emotions is addressed in Box 11.7.

Box 11.7 Emotion and the back and pelvis: Latey’s lower fist

Latey (1979, 1996) has described observable and palpable patterns of distortion that coincide with particular clinical problems. He uses the analogy of ‘clenched fists’ to describe these characteristic changes. Latey points out that the unclenching of a fist correlates with physiological relaxation, while the clenched fist suggests fixity, rigidity, overcontracted muscles, emotional turmoil, withdrawal from communication and so on. Failure to express emotion results in suppression of activity and, ultimately, chronic contraction of the muscles that would have been used were the emotions to which they relate expressed (e.g. rage, fear, anger, etc.). Latey points out that all areas of the body producing sensations that arouse emotional excitement may have their blood supply reduced by muscular contraction. When considering the causes of hypertonicity and muscle shortening – or circulatory dysfunction – emotional factors should be investigated.

Contraction patterns

What is observed and palpated varies from person to person according to their state of mind and well-being. Apparent though is a record or psychophysical pattern of the patient’s responses, actions, transactions and interactions with his or her environment. The patterns of contraction that are found seem to bear a direct relationship with the patient’s unconscious and offer a reliable avenue for investigation, discovery and treatment.

One of Latey’s concepts involves a mechanism that leads to muscular contraction as a means of disguising a sensory barrage resulting from an emotional state. Thus he describes examples that might impact on low back and pelvic function:

a sensation that might arise from the pit of the stomach being hidden by contraction of the muscles attached to the lower ribs, upper abdomen and the junction between the chest and lower spine

genital and anal sensations, which might be drowned out by contraction of hip, leg and low back musculature.

Three fists

In assessing these and other patterns of muscular tension in relation to emotional states, Latey divides the body into three regions, which he describes as:

upper fist, which includes head, neck, shoulders, arms, upper chest, throat and jaw

middle fist, which focuses mainly on the lower chest and upper abdomen

lower fist, which centers largely on pelvic function.

Only the lower fist perspective is summarized in these notes.

Lower fist (Fig. 11.75)

The lower fist describes the muscular function of the pelvis, low back, lower abdomen, hips, legs and feet, with their mechanical, medical and psychosomatic significance.

Latey identifies the central component of this region as the pelvic diaphragm, stretching as it does across the pelvic outlet, forming the floor of the abdominal cavity. The perineum allows egress for the bowel, vagina and urinary tract as well as the blood vessels and nerve supply for the genitalia, each opening being controlled by powerful muscular sphincters that can be compressed by contraction of the muscular sheet.

When our emotions cause us to contract the pelvic outlet, a further group of muscular units comes into play that increases the pressure on the area from the outside. These are the muscles that adduct the thighs, tilt the pelvis forwards and rotate the legs inwards, dramatically increasing compressive forces on the perineum, especially if the legs are crossed. The impression this creates is one of ‘closing in around the genitals’ and is observed easily in babies and young children when anxious or in danger of wetting themselves.

Another pattern that is sometimes observed is of tension in the muscles of the buttocks that act to reinforce the perineal tension from behind. This tends to compress the anus more than the genitals and produces a different postural picture. Changes of posture and feelings of tension, strength and weakness in different parts of the body are likely to be experienced.

Lower fist problems

Problems of a mechanical nature associated with lower fist contractions include: internally rotated legs and ‘knock knees’; unstable knee joints; pigeon-toed stance, resulting in flat arches.

image

Figure 11.75 A: Lower fist: anterior. B: Lower fist: posterior

(reproduced with permission from Journal of Bodywork and Movement Therapies 1996; 1(1):49 with thanks to the artist Maxwell John Phipps).

There is also likely to be mechanical damage to the hip joints due to compression and overcontraction of mutually opposed muscles. The hip is forced into its socket, muscles shorten and as there is loss of rotation and the ability to separate the legs, backward movement becomes limited. Uneven wear commences with obvious long-term end-results. If this starts in childhood damage may include deformity of the ball and socket joint of the hip.

Low back muscles are also involved and this may represent the beginning of chronic backache, pelvic dysfunction, coccygeal problems and disc damage. The abdominal muscles are automatically affected since they are connected to changes in breathing function that result from the inability of the lower diaphragm to relax and allow normal motion to occur.

Medical complications that can result from these muscular changes involve mainly circulatory function since the circulation to the pelvis is vulnerable to stasis. Hemorrhoids, varicose veins and urethral constriction become more likely, as do chances of urethritis and prostatic problems. All forms of gynecological problems are more common and childbirth becomes more difficult as well.

Latey also describes what he terms ‘withdrawal characteristics’ and, superficially at any rate, they are easy to recognize: ‘The dull lifeless tone of the flesh; lifeless flaccidity of larger surface muscle (or spastic rigidity); lifeless hard fibrous state of deep residual postural muscles (with the possible exception of the head and neck muscles)’.

Practitioners are urged to keep Latey’s concepts in mind when evaluating and working on the body.

  Page 379 
  Page 380 

Sacrotuberous ligament method: prone position

The patient is prone and the practitioner is standing on the side to be treated at the level of the upper thigh and facing toward the patient’s head.

The following steps can usually be applied through very thin shorts, undergarments or through sheet draping. If sheet draping needs to be removed, the sheet is folded off one gluteal region at a time so that the remaining side is still draped, which can provide a sense of privacy to the patient.

The inferior surface of the ischial tuberosity is located just cephalad to the gluteal fold.

The thumbs (tips touching) are then placed approximately 2 inches (5 cm) cephalad to this point and the sacrotuberous ligament is palpated using a medial to lateral sliding movement of the thumbs, which traverses the rather rounded posterior aspect of the ligament. (The ligament feels tubular.)

As increasing digital pressure is applied to the underlying ligament, the patient is asked to report any tenderness, referred pain or paresthesia. The thumbs may slide back and forth, traversing the ligament in a frictional manner, or, if the ligament is found to be tender, sustained compressions can be substituted (Fig. 11.76).

The thumbs are moved toward the sacrum in small increments (a thumb’s width at a time) and the compression and/or friction is applied at each location until the lateral surface of the sacrum is reached. The upper half of the ligament is covered by gluteus maximus, which may be tender even if the ligament is not.

The practitioner now changes position to face the ipsilateral hip to address the lateral surface of the ligament. The practitioner’s thumbs are placed on the lateral surface of the ligament, which lies about 1 inch (2.5 cm) further lateral to the areas to which the previous steps were applied (Fig. 11.77).

  Page 381 

Cranial/caudal friction is applied as the thumbs slide back and forth along the lateral surface of the ligament. The thumbs can also apply friction transversely across the ligament as long as the location and current condition of the sciatic nerve are considered.

image

Figure 11.76 Palpation of the posterior portion of the sacrotuberous ligament is achieved through the overlying gluteus maximus.

image

Figure 11.77 The lateral portion of the ligament may display tenderness or referral patterns not found on the posterior aspect.

CAUTION: As the anterior aspect of the ligament is approached, nitrile or vinyl (surgical) gloves should be worn by the practitioner to avoid contact with bacteria. All residue of oil should be removed from hands before touching latex as oil destroys the integrity of the latex material on contact. See Volume 1,Box 12.9for warnings regarding latex allergies, which can pose a serious health risk to some people, especially those with repetitive exposure. Use of a high-quality vinyl or nitrile glove may be the best way to protect both the patient and the practitioner from unnecessary exposure to latex.

The following steps can usually be applied through draping. If draping needs to be removed, only one gluteal region is exposed at a time. Cloth draping does not provide a sufficient barrier to transmission of bacteria or viruses so protective gloves are needed, especially when contact is made with the anterior surface of the ligament.

When working through draping, thin material is recommended. The thickness of even a thin towel is not recommended as it interferes with palpation and also fills the space that is intended to be filled by the thumb.

The practitioner now relocates to the contralateral side of the patient while wearing protective gloves. Unless contraindicated by cervical pain or vertebral artery occlusion, the patient’s head is rotated to face the practitioner while resting the head on the table so that the patient’s verbal responses may be heard and his face may be observed for any signs of emotional response.

The practitioner stands at the level of the contra-lateral hip and reaches across to the side to be treated. The thumb of her cephalad hand locates the tip of the coccyx while the fingers of that hand palpate for the ischial tuberosity. The palpation of the anterior surface of the ligament will be performed by the practitioner’s caudad hand.

While keeping the elbow low, the thumb of the caudad hand (thumb pointing toward the table) is placed between the previously located coccyx and ischium and onto the medial aspect of the gluteal mound. The caudad hand is held in a relaxed manner and no pressure is used while placing the thumb in position.

Once the landmarks are properly located, the cephalad hand can be used to gently retract the gluteus maximus slightly away from the mid-line.

As the caudad hand glides very gently toward the therapy table and along the medial aspect of the sacro-tuberous ligament, the tension on gluteus maximus is simultaneously released so that excess tissue is carried with the thumb. This helps to avoid placing tension on the sensitive tissues surrounding the anus, which can be extremely uncomfortable for the patient. In fact, other than tenderness elicited by the palpation of the ligament or surrounding muscles, these steps (if gently applied) should cause no discomfort for the patient.

As the thumb slides anteriorly along the medial aspect of the sacrotuberous ligament, the most anterior edge of the ligament will be felt. This location is usually noted as an indentation, or ‘channel’, running under the ligament. While it is not a ‘tunnel’ into which the thumb slips like a glove, it is a palpable indentation into which the thumb can be pressed gently and positioned so that the thumb pad is on the anterior surface of the ligament. The anus and rectum are to be avoided by sliding the thumb laterally into this ‘channel’ before these tissues are reached (Fig. 11.78).

The goal is to gently slide the treating thumb laterally into the ‘channel’ which, unless it is filled by excessive bulking of obturator internus, will usually accommodate most of the thumb. When positioned thus, gentle pressure is placed onto the anterior surface of the ligament by pressing the thumb toward the ceiling. Pressure should be light and increased gradually only to a mild discomfort.

The angling of the thumb can be controlled by hand position so that at least three thumb widths of ligament can be addressed in this manner – one in the center of the palpable portion of the ligament, one close to the sacral attachment and one closer to the ischium.

To treat the origin of the obturator internus, the thumb and hand are rotated (by supinating the forearm) so the thumb pad faces the floor of the channel and is swept across the obturator internus at approximately mid-belly region (Fig. 11.79).

After the second side is treated, consideration should be given to whether direct manual treatment of the coccyx is to be performed internally, immediately following the treatment as described above, wearing the same gloves. If not, the protective gloves should immediately be disposed of in a safe manner, being treated as a contaminated product.

image

Figure 11.78 Protective gloves are worn when delicately palpating the anterior surface of the sacrotuberous ligament. No pressure is applied while positioning the thumb and only light pressure is applied onto the anterior aspect of the ligament after the thumb is fully positioned.

image

Figure 11.79 A short sweeping stroke or static pressure is applied across the floor of the sacrotuberous channel to contact a small portion of the obturator internus muscle.

A sidelying position is also possible for treatment of the sacrotuberous ligament and is achieved by addressing the lowermost hip, with the lowermost leg lying straight and the uppermost leg in a flexed position (on a bolster).

The practitioner stands behind the patient at the level of the pelvis or thigh, depending upon which hand is used. Either hand can be used to perform the task in a manner similar to that described above (including the use of gloves). There are many advantages of using a sidelying position for sacrotuberous ligament treatment, including less strain on the anal tissues, greater tendency of the patient to relax, practitioner’s ability to see the patient’s face for signs of emotional vulnerability and to hear the patient. The only disadvantage lies in the possibility that the practitioner may have difficulty in identifying and locating anatomical structures with the patient in a sidelying position.

  Page 382 

Positional release for sacrotuberous ligament (Fig. 11.80)

The patient lies prone with the practitioner standing on the contralateral side to that being treated, at pelvis level facing the table.

The practitioner’s cephalad hand is oriented with the finger tips pointing caudally and with the palm covering the sacrum.

The finger tips of the caudad hand point cephalad and heel of that hand engages the ischial tuberosity while the fingers simultaneously palpate a tender point on the sacrotuberous ligament.

The most sensitive area is usually located between the ischial tuberosity and the inferior lateral angle of the sacrum.

There are two possible positional release approaches.

1. With hands positioned as described above (and the patient reporting a score of ‘10’ to represent the pain level from the palpated point), the cephalad hand eases the sacrum inferiorly and slightly laterally, while the caudad hand eases the ischial tuberosity cephalad and medially (producing slight external rotation of the hip), so crowding or drawing together the attachment sites of the ligament. The pain should reduce as these two directions of pressure are fine tuned to slacken the ligament. The final position of ease (once the score is ‘3’ or less) should be maintained for at least 90 seconds.

2. Alternatively the practitioner, standing contralateral to the side to be treated, may locate a point of maximum tenderness on the ligament with her cephalad hand while lifting the affected-side leg into slight extension, adduction and external rotation with her caudad hand. Fine tuning to reduce the reported score might usefully include compression toward the pelvis through the long axis of the femur. The final position of ease is held for 90 seconds.

image

Figure 11.80 Positional release of the sacrotuberous ligament

(adapted from Deig 2001).

  Page 383 

Other muscles of the pelvis

The remaining muscles that are either partially or wholly contained within the pelvis contribute to the lower limb (obturator internus and piriformis), the pelvic diaphragm (levator ani and coccygeus) and the perineum (sphincter ani externus, bulbospongiosus, ischiocavernosus, sphincter urethrae, compressor urethrae, sphincter urethrovaginalis and transversus perinei). The anatomy of these muscles is well discussed in Gray’s anatomy (2005). Their clinical implications are covered in detail by Travell & Simons (1992), who also mention several other vestigial sacrococcygeal muscles not included in this list but which, if present, are treated by the steps of these or the previous protocols.

Since positioning of the coccyx and sacrum is of importance to the sacral and pelvic tissues discussed within this chapter, an intrarectal protocol is offered here, which addresses the sacral attachment of piriformis, the sphincter ani, the levator ani and coccygeus muscles, and possibly influences a portion of obturator internus. The inclusion of this material is informational only, as the intrarectal protocol is practised only with prior, supervised training and great precaution and an appropriate license.

The muscles of the pelvic diaphragm

The pelvic diaphragm is composed of the levator ani and coccygeus muscles (Figs 11.81, 11.82). These muscles support the viscera, contract with the abdominal muscles and the abdominothoracic diaphragm to raise intraabdominal pressure and are active during the inspiratory phase of respiration.

image

Figure 11.81 Pelvic aspect of left levator ani and coccygeus with cross-section through the anal canal and showing the greater portion of the prostate removed

(reproduced with permission from Gray’s anatomy 1995).

image

Figure 11.82 Muscles and membranes of the pelvic floor

(Reproduced with permission from Gray’s Anatomy for Students, 2nd edn. 2010).

Levator ani, a broad muscular sheet with varying thickness, is divisible into several portions (Platzer 2004, p. 106).

Puborectalis – Inseparable from pubococcygeus at its origin, these fibers form the crura of the levator, which encloses the genital hiatus; some blend with the sphincter ani externus and some form the retrorectal sling behind the rectum (anal canal). Anterior to the puborectalis fibers lie the urethra and the genital canal.

Puboperinealis – prerectal fibers

Pubococcygeus – These fibers course from the back of the body of the pubis to the sphincter urethrae, to levator prostatae in males or walls of the vagina in females, to the perineal body and rectum and to the anterior surface of the coccyx.

  Page 384 
  Page 385 

Iliococcygeus - Arising from obturator fascia between the obturator canal and the ischial spine to contribute to the anococcygeal ligament and to attach to the last two segments of the coccyx.

Levator ani supports and elevates the pelvic floor. By compressing the visceral canals and reinforcing the sphincter muscles, some fibers contribute to continence and must relax for evacuation to occur (Gray’s anatomy 2005) while others can help to eject a bolus of feces or help empty the urethra at the end of urination (Travell & Simons 1992). Loss of tone of these tissues or injuries incurred during childbirth may contribute to uterovaginal prolapse and the shape that they offer the pelvic floor may help to direct the fetal head into the pelvic outlet (Gray’s anatomy 2005).

The coccygeus (ischiococcygeus) muscle is a triangular musculotendinous sheet arising from the pelvic surface, tip of the ischial spine and the sacrospinous ligament to attach to the lateral margins of the coccyx and the 5th sacral segment. Coccygeus acts with the levator ani as noted above and also to pull the coccyx forward. Travell & Simons (1992) report: ‘It also stabilizes the sacroiliac joint and has powerful leverage for rotating that joint. Therefore, abnormal tension of the coccygeus muscle could easily hold the sacroiliac joint in a displaced position’.

The sphincter ani consists of a tube of skeletal muscle described in concentric layers, the deepest of which is the sphincter ani internus and the remaining being the externus. The superficial lamina is anchored anteriorly to the perineal body and posteriorly to the anococcygeal body. These muscles, composed mainly of type I (slow-twitch) fibers, are well designed for a state of constant tonic contraction (Gray’s anatomy 2005), which increases when intraabdominal pressure rises, such as when coughing, laughing, straining, parturition or lifting weights.

Innervation of these muscles includes:

external sphincter ani – S4 and pudendal nerve

internal sphincter ani – autonomic nervous system

levator ani – varies (S2, S3, S4 or S5) via pudendal plexus

coccygeus – S4, S5 via pudendal plexus.

Indications for treatment include:

‘coccygodynia’

pain in the pelvic floor

pain and tenderness in sacrococcygeal region

pain in genital region

rotary tension at SI joint

anterior displacement of coccyx

painful bowel movements

piriformis syndrome.

Referred pain from the muscles of the pelvic floor can be confusing. A rather vague pain in the coccyx, hip or back is poorly localized and sometimes produces symptoms of coccygodynia, ‘although the coccyx itself is usually normal and not tender’ (Travell & Simons 1992). Posterior thigh pain may be caused by trigger points in either piriformis or obturator internus and the latter may also cause pain and a feeling of fullness in the rectum (Travell & Simons 1992). Levator ani trigger points can produce pain into the vagina, as can the obturator internus.

There is now a well established clinical link between a great deal of pelvic pain and dysfunction and the presence of myofascial trigger points, with deactivation of these producing marked functional and symptomatic improvement, in most cases treated (Anderson et al 2005, Oyama et al 2004, Srinivasan et al 2007). Tu et al 2006 assessed the prevalence of muscular aspects of CPP in a study that involved 987 women (aged 14–79 years). 22% reported significant degrees of sensitivity of the levator ani muscles, and 14% of the piriformis muscles.

Fall et al (2004) have reported:

The bladder provides a good example of how changes in the CNS affect sensory perception. An acute pain insult to the bladder can produce functional changes within the CNS, so that pain persists even after removal of the stimulus. These central functional changes may also be associated with a dysaesthetic (unpleasant sensation) response; for instance, mild distension or stimulation of the bladder by urine not normally perceived, may produce the urge to urinate. Furthermore, core muscles, including pelvic muscles, may become hyperalgesic with multiple trigger points, while other organs may also become sensitive, e.g. the uterus with dyspareunia and dysmenorrhoea, the bowel with irritable bowel symptoms. The spread of abnormal sensory responses between the organs and musculoskeletal system is a well-described consequence of the CNS changes and a crucial cause of complex chronic pelvic pains.

The authors suggest (see cautions below) that the pelvic floor muscles should be examined when a patient presents with pain in the anal, vaginal, perineal or retroscrotal regions, pain during intercourse, defecation or when sitting, or with lower back pain (Travell & Simons 1992, Fitzgerald et al 2009). It is worth restating that trigger points in the abdominal muscles, the inner thigh and the perineal area can all refer internally, and these tissues should be included in any ‘pelvic floor’ assessment.

CAUTION: The inclusion of the following treatment is informational only, with the intrarectal protocol being the most delicate procedure used in NMT. These tissues are to be approached with extreme caution due to the delicate nature of the tissues, the associated apprehension of the patient and the inherent health risks associated with working in areas containing bodily fluids. Training (with hands-on supervision) by an instructor experienced with intrarectal work is strongly recommended prior to practice of these techniques.

  Page 386 

Travell & Simons (1992) describe a vaginal entry similar to the following intrarectal treatment that, in most female cases, is preferred over anal entry and can be used, provided the license allows vaginal palpation (massage licenses do not). If the scope of the license does not allow entry into the rectum, referral to a practitioner trained and experienced in intrarectal work is strongly recommended.

NMT for intrarectal region

The patient is in the sidelying position with the uppermost hip fully flexed and supported on a cushion or lying directly on the table if stretch of the piriformis and obturator internus is required. Only one side will be addressed in this position, that being the internal aspect of the pelvis of the uppermost side. The patient will then be asked to lie on the opposite side for the other half to be treated.

The practitioner stands behind the patient at the level of the upper thigh and wears protective gloves throughout the treatment. The gloves should be disposed of immediately after the treatment as a hazardous waste product due to contact with bodily fluids.

The practitioner’s cephalad hand is placed on the uppermost hip and used to palpate externally. The index finger of the caudad hand (with fingernails well trimmed) is used to gently perform the technique. Aloe vera gel can be used as a lubricant on both the glove and the orifice. If latex gloves are worn, all forms of oil are to be avoided and any residue of oil on the practitioner’s hands should be scrupulously removed before donning the gloves as it dissolves latex upon contact and would compromise the barrier provided by the gloves.

The lubricated index finger of the caudad hand is placed at the anal orifice with the finger pad facing posteriorly and gently slid into the anus, past the anal sphincter, which should be examined for both external and internal hemorrhoids. Gentle pressure applied toward the sphincter muscle usually produces a relaxation response of the muscle. However, Travell & Simons (1992) note that trigger points in these tissues might respond adversely to this type of pressure, producing moderate discomfort, and suggest that the patient might instead bear down on the rectum to relax the muscle as the practitioner inserts the finger.

Gentle pressure (or mild pincer compression against the externally placed thumb) is applied first to the sphincter muscles at finger tip widths around the inside of the sphincter while searching for taut bands and trigger points. If found, the trigger points in the sphincter muscles must be treated (usually with gently applied pincer compression) before further entry can be made.

The index finger is then gently inserted further with the pad of the finger facing posteriorly and moving cephalad at the mid-line. As it approaches the coccyx, caution should be exercised to avoid impacting the distal tip of the coccyx. Instead, the finger should be slid onto the anterior surface of the coccyx, if possible. Sometimes the coccyx may be found to have formed a near 90° angle to the sacrum, in which case the index finger will need to be flexed and hooked around it in order to contact the anterior surface.

Gentle, exploring, short gliding strokes or gentle sustained pressure can be applied to the anterior surface of the coccyx to address the muscles, fascia and ligaments attaching to these bony surfaces. A gentle flexing of the finger can assess for motion of the coccyx, which should offer approximately 30° of flexion/extension movement.

The practitioner’s entire hand and forearm is now smoothly supinated as the straight index finger sweeps laterally across the surface of levator ani and coccygeus muscles (Fig. 11.83). This sweeping action is repeated several times while pressure is applied into the anterior surface of the muscles. The palm of the external hand can offer a supporting surface against which to compress the tissues.

The index finger is then gently inserted further until the pad of the index finger contacts the anterior surface of the sacrum. The finger is slid along the anterolateral aspect of the sacrum until contact with the piriformis tendon is made. The location of the tendon attachment can be confirmed by having the person lift the ipsilateral (flexed) knee toward the ceiling, which will cause the muscle to contract and therefore its tendon to move. Gentle sustained pressure can be applied to the attachment if it is found to be tender or to cause referred pain.

The practitioner’s hand and forearm again supinate repeatedly as the index finger sweeps laterally along the surface of the piriformis muscle. Pressure can be supplied by the external hand to offer a broad surface against which the tissue can be compressed.

  Page 387 

If taut fibers or tender, nodular tissues associated with trigger points are encountered, the practitioner can palpate against the externally placed hand or digit in order to apply sustained compression for 8–12 seconds.

The techniques are applied unilaterally and then the finger is slowly and gently withdrawn.

The person is asked to change positions to offer the second side for treatment. The practitioner should not attempt to treat both sides with the same hand.

The gloves and any paper tissues used during the procedure are immediately disposed of as hazardous waste and the practitioner’s hands are thoroughly cleansed.

image

Figure 11.83 The intrarectal protocol is the most delicate procedure used in NMT. Training (with hands-on supervision) by an instructor experienced with intrarectal work is strongly recommended prior to practice of these techniques.

References

ACOG (The American College of Obstetricians and Gynecologists). Chronic pelvic pain. Obstet Gynecol. 2004;103(3):589-604.

Anderson R. The role of pelvic floor therapies in chronic pelvic pain syndromes. Current Prostate Reports. 2008;6:139-144.

Anderson R.U., Wise D., Sawyer T., et al. Integration of myofascial trigger point release and paradoxical relaxation training treatment of chronic pelvic pain in men. J Urol. 2005;174(1):155-160.

Beal M. The short-leg problem. J Am Osteopath Assoc. 1950;50:109-121.

Beaton L., Anson B. Sciatic nerve and piriformis muscle. J Bone Joint Surg. 1938;20:686-688.

Bogduk N. Clinical anatomy of the lumbar spine and sacrum, ed 4. Edinburgh: Churchill Livingstone, 2005.

Bogduk N. Clinical anatomy of the lumbar spine and sacrum, ed 3. Edinburgh: Churchill Livingstone, 1997.

Bradlay K. Posterior primary rami of segmental nerves. In Glasgow E., Twomey L., Scull E., Klenhans A., editors: Aspects of manipulative therapy, ed 2, Melbourne: Churchill Livingstone, 1985.

Buyruk H.M., Stam H.J., Snijders C.J., et al. The use of colour Doppler imaging for the assessment of sacroiliac joint stiffness: a study on embalmed human pelvises. Eur J Radiol. 1995;21:112-116.

Buyruk H.M., Snijders C.J., Vleeming A., et al. The measurements of sacroiliac joint stiffness with colour Doppler imaging: a study on healthy subjects. Eur J Radiol. 1995;21:117-121.

Buyruk H., Stam H., Snijders C., et al. Measurement of sacroiliac joint stiffness with color Doppler in aging. In: Vleeming A., Mooney V., Dorman T., Snijders C., Stoeckart R., editors. Movement, stability and low back pain. Edinburgh: Churchill Livingstone, 1997.

Cailliet R. Low back pain syndrome, ed 5. Philadelphia: F A Davis, 1995.

Chaitow L. Positional release techniques, ed 3. Edinburgh: Churchill Livingstone, 2007.

Chaitow L. Muscle energy techniques, ed 3. Edinburgh: Churchill Livingstone, 2006.

Chaitow L., DeLany J. Clinical application of neuromuscular techniques. Volume 1, the upper body, ed 2. Edinburgh: Churchill Livingstone, 2008.

Cislo S., Ramirez M., Schwartz H. Low back pain: treatment of forward and backward sacral torsion using counterstrain technique. J Am Osteopath Assoc. 1991;91(3):255-259.

Clarke G. Unequal leg length. Rheumatic Physical Medicine. 1972;11:385-390.

Cohen A., McNeill M., Calkins E. The ‘normal’ sacroiliac joint. AJR Am J Roentgenol. 1967;100:559-563.

Cooperstein R., Lew M. The relationship between pelvic torsion and anatomical leg length inequality: a review of the literature. Journal of Chiropractic Medicine. 2009;8:107-118.

Cyriax J. Textbook of orthopaedic medicine vol 1: diagnosis of soft tissue lesions, ed 8. London: Baillière Tindall, 1982.

D’Ambrogio K., Roth G. Positional release therapy. St Louis, Missouri: Mosby, 1997.

Deig D. Positional release techniques. Boston: Butterworth Heinemann, 2001.

DiGiovanna E. Osteopathic diagnosis and treatment. Philadelphia: Lippincott, 1991.

Don Tigny R. Function of the lumbosacroiliac complex as a self compensating force couple. Vleeming A., Mooney V., Dorman T., Snijders C., editors, Second Interdisciplinary World Congress on Low Back Pain. 1995. San Diego 9–11 November

Dorman T. Self-locking of the sacroiliac articulation. Spine: State of the Art Reviews. 1995;9:407-418.

Dorman T. Pelvic mechanics and prolotherapy. In: Vleeming A., Mooney V., Dorman T., Snijders C., Stoeckart R., editors. Movement, stability and low back pain. Edinburgh: Churchill Livingstone, 1997.

Erdmann H. Die Verspannung dae Wirbelsockels im Beckenring. Junghams H., editor. Wirbelsaule in Forschung und Praxis, vol 1. Stuttgart: Hippokrates, 1956.

Fall M., Baranowski A., Fowler C., et al. EAU guidelines on chronic pelvic pain. Eur Urol. 2004;46(6):681-689.

Fitzgerald M.P., Anderson R.U., Potts J., et al. Randomised multicenter feasibility trial of myofascial physical therapy for the treatment of urological chronic pelvic pain syndromes. The Journal of Urology. 2009;182:570-580.

Frank C., Lardner R., Page P. The assessment and treatment of muscular imbalance - The Janda approach. Champlain, IL: Human Kinetics, 2009.

Gibbons P., Tehan P. Manipulation of the spine, thorax and pelvis. Edinburgh: Churchill Livingstone, 2000.

Gibbons S. Clinical anatomy and function of psoas major and deep sacral gluteus maximus. Vleeming A., Mooney V., Stoeckart R., editors, Movement, stability and lumbopelvic pain. ed 2. 2007.

Gibbons S.G.T., Mottram S.L. Functional anatomy of gluteus maximus: deep sacral gluteus maximus – a new muscle? In: Proceedings of : The 5th Interdisciplinary World Congress on Low Back Pain. Australia: Melbourne; November 7–11, 2004.

Goodheart G. Applied kinesiology. Workshop procedure manual, ed 21. Detroit: Privately published, 1984.

Goodheart G. Applied kinesiology – 1985 workshop procedure manual, ed 21. Detroit: Privately published, 1985.

Gray’s anatomy. Standring S., editor, ed 39. Edinburgh: Elsevier Churchill Livingstone; 2005.

Gray’s anatomy. ed 38. Edinburgh: Churchill Livingstone; 1995.

Greenman P. Principles of manual medicine, 2nd edn. Baltimore: Williams and Wilkins, 1996.

Grob K. Innervation of the SI joint of the human. Z Rheumatol. 1995;54:117-122.

Gutmann G. Zur frage der Konstruktionsgerechten Beanpruchung von Lendenwirbelsaule und Becken beim Menschen. Asklepios. 1965;6:26.

Hackett G. Ligament and tendon relaxation treated by prolotherapy. ed 3. 1958. Available from Hemwell G Institute in Basic Life Principles, Box one, Oak Brook, IL 60522–3001, USA

  Page 388 

Hanson P., Sonesson B. The anatomy of the iliolumbar ligament. Arch Phys Med Rehabil. 1994;75:1245-1246.

Heinking K., Jones J.M., et al. Pelvis and sacrum. In: Ward R., editor. American Osteopathic Association: foundations for osteopathic medicine. Baltimore: Williams and Wilkins, 1997.

Hestboek L., Leboeuf-Yde C. Are chiropractic tests for the lumbopelvic spine reliable? A systematic critical literature review. J Manipulative Physiol Ther. 2000;23(4):258-275.

Hoppenfeld S. Physical examination of the spine and extremities. Norwalk: Appleton and Lange, 1976.

Howard F.M. Chronic pelvic pain. Obstet Gynecol. 2003;101(3):594-611.

Janda V. Introduction to functional pathology of the motor system. Proceedings of the VII Commonwealth and International Conference on Sport, Physiotherapy in Sport. 1982;3:39.

Janda V. Muscle function testing. London: Butterworths, 1983.

Janda V. Evaluation of muscular imbalance. In: Liebenson C., editor. Rehabilitation of the spine. Baltimore: Williams and Wilkins, 1996.

Jelev L., Shivarov V., Surchev L. Bilateral variations of the psoas major and the iliacus muscles and presence of an undescribed variant muscle – accessory iliopsoas muscle. Ann Anat. 2005;187(3):281-286.

Kapandji I. The physiology of the joints, vol II, lower limb, ed 5. Edinburgh: Churchill Livingstone, 1987.

Kappler R. Thrust techniques. In: Ward R., editor. Foundations for osteopathic medicine. Baltimore: Williams and Wilkins, 1997.

Keating J., Avillar M., Price M. Sacroiliac joint arthrodesis in selected patients with low back pain. In: Vleeming A., Mooney V., Dorman T., Snijders C., Stoeckart R., editors. Movement, stability and low back pain. Edinburgh: Churchill Livingstone, 1997.

Kendall F., McCreary E., Provance P. Muscles, testing and function, ed 4. Baltimore: Williams and Wilkins, 1993.

Kuchera M. Treatment of gravitational strain pathophysiology. In: Vleeming A., Mooney V., Dorman T., Snijders C., Stoeckart R., editors. Movement, stability and low back pain. Edinburgh: Churchill Livingstone, 1997.

Kuchera M., Goodridge J. Lower extremity. In: Ward R., editor. American Osteopathic Association: Foundations for osteopathic medicine. Baltimore: Williams and Wilkins, 1997.

Kuchera M., Kuchera W. Postural considerations in coronal and horizontal planes. In: Ward R., editor. Foundations for osteopathic medicine. Baltimore: Williams and Wilkins, 1997.

Latey P. The muscular manifesto. London: Osteopathic Publishing, 1979.

Latey P. Feelings, muscles and movement. Journal of Bodywork and Movement Therapies. 1996;1(1):44-52.

Lee D. Treatment of pelvic instability. In: Vleeming A., Mooney V., Dorman T., Snijders C., Stoeckart R., editors. Movement, stability and low back pain. Edinburgh: Churchill Livingstone, 1997.

Lee D. The pelvic girdle: an approach to the examination and treatment of the lumbopelvic-hip region, ed 3. Edinburgh: Churchill Livingstone, 2004.

Lee D. The pelvic girdle. Edinburgh: Churchill Livingstone, 1999.

Lee D. How accurate is palpation: panel discussion. Journal of Bodywork and Movement Therapies. 2002;6(1):26-27.

Levangie P., Norkin C. Joint structure and function: a comprehensive analysis, ed 4. Philadelphia: F A Davis, 2005.

Lewit K. Manipulative therapy in rehabilitation of the locomotor system. London: Butterworths, 1985.

Lewit K. Manipulation in rehabilitation of the motor system, ed 3. London: Butterworths, 1999.

Liebenson C., editor. Rehabilitation of the spine: a practitioner’s manual. Philadelphia: Lippincott Williams & Wilkins, 2007.

Liebenson C. Rehabilitation of the spine. Baltimore: Williams and Wilkins, 1996.

Liebenson C. The pelvic floor muscles and the Silverstolpe phenomenon. Journal of Bodywork and Movement Therapies. 2000;4(3):195.

Lippitt A. Percutaneous fixation of the sacroiliac joint. In: Vleeming A., Mooney V., Dorman T., Snijders C., Stoeckart R., editors. Movement, stability and low back pain. Edinburgh: Churchill Livingstone, 1997.

Lourie H. Spontaneous osteoporotic fracture of the sacrum. J Am Med Assoc. 1982;248:715-716.

Mennell J. Back pain. Boston: T and A Churchill, 1964.

Merskey H., Bogduk N. Classification of chronic pain. Descriptions of Chronic Pain Syndromes and Definitions of Pain Terms. IASP Press, 2002.

Mitchell F.Sr. Structural pelvic function. In: American Academy of Osteopathy Yearbook. Indianapolis, Indiana: American Academy of Osteopathy; 1967.

Mitchell F., Moran P., Pruzzo H. Evaluation and treatment manual of osteopathic muscle energy procedures. Valley Park: Pruzzo, 1979.

Morrison M. Lecture notes. Seminar at Charing Cross Hotel. 1969. London, September

Nelson-Wong E., Gregory D., Winter D., et al. Gluteus medius muscle activation patterns as a predictor of low back pain during standing. Clin Biomech (Bristol, Avon). 2008;23:545-553.

Nichols P., Bailey N. The accuracy of measuring leg-length differences. Br Med J. 1955;2:1247-1248.

Norris C.M. Spinal stabilisation. 4. Muscle imbalance and the low back. Physiotherapy. 1995;81(3):127-138.

Norris C. Back stability. Champaign, Illinois: Human Kinetics, 2000.

O’Haire C., Gibbons P. Inter-examiner and intra-examiner agreement for assessing sacroiliac anatomical landmarks using palpation and observation. Man Ther. 2000;5(1):13-20.

O’Sullivan P.B. Clinical instability’ of the lumbar spine: its pathological basis, diagnosis and conservative management. In: Jull G.A., Boyling J.D., editors. Grieve’s modern manual therapy. ed 3. Edinburgh: Churchill Livingstone; 2005:311-331. [Chapter 22]

O’Sullivan P., Beales D. Diagnosis and classification of pelvic girdle pain disorders, Part 2: Illustration of the utility of a classification system via case studies. Man Ther. 2007;12:e1-e12.

Oyama I.A., Rejba A., Lukban, et al. Modified Thiele massage as therapeutic intervention for female patients with interstitial cystitis and high-tone pelvic floor dysfunction. Urology. 2004;64(5):862-865.

Platzer W. Color atlas of human anatomy: vol 1, locomotor system, ed 5. Stuttgart: Georg Thieme, 2004.

Petty N. Neuromusculoskeletal examination and assessment: a handbook for therapists, ed 3. Edinburgh: Churchill Livingstone, 2006.

Pool-Goudzwaard A., Kleinrensink G., Snijders C., et al. The sacroiliac part of the iliolumbar ligament. J Anat. 2001;199(4):457-463.

Ramirez M., Hamen J., Worth L. Low back pain: diagnosis by six newly discovered sacral tender points and treatment with counterstrain. J Am Osteopath Assoc. 1989;89(7):905-913.

Richardson C.A., Snijders C.J., Hides J.A., et al. The relationship between the transversely oriented abdominal muscles, sacroiliac joint mechanics and low back pain. Proceedings of the 7th Scientific Conference of IFOMT. 2000. Perth, Australia,2000, November

Rolf I. Rolfing – integration of human structures. New York: Harper and Row, 1977.

Rothstein J., Roy S., Wolf S. Rehabilitation specialist’s handbook, 2nd edn. Philadelphia: F A Davis, 1998.

Schafer R. Clinical biomechanics, ed 2. Baltimore: Williams and Wilkins, 1987.

Silverstolpe L. A pathological erector spinae reflex. Journal of Manual Medicine. 1989;4:28.

  Page 389 

Silverstolpe L., Hellsing G. Cranial and visceral symptoms in mechanical dysfunction. In: Patterson J., Burn L., editors. Back pain, an international review. Dordrecht: Kluwer Academic, 1990.

Simons D., Travell J., Simons L. Myofascial pain and dysfunction: the trigger point manual, vol 1, upper half of body, ed 2. Baltimore: Williams and Wilkins, 1999.

Slipman C., Sterenfeld E., Chou L., et al. The predictive value of provocative sacroiliac joint stress maneuvers in the diagnosis of SI joint syndrome. Arch Phys Med Rehabil. 1998;79(3):288-292.

Snijders C., Bakker M., Vleeming A., et al. Oblique abdominal muscle activity in standing and sitting on hard and soft seats. Clin Biomech (Bristol, Avon). 1995;10(2):73-78.

Snijders C., Vleeming A., Stoeckart R., et al. Biomechanics of the interface between spine and pelvis. In: Vleeming A., Mooney V., Dorman T., Snijders C., Stoeckart R., editors. Movement, stability and low back pain. Edinburgh: Churchill Livingstone, 1997.

Solonen K. The SI joint in the light of roentgenological and clinical studies. Acta Orthop Scand. 1957:26.

Srinivasan A., Kaye J., Moldwin R. Myofascial dysfunction associated with chronic pelvic floor pain: management strategies. Curr Pain Headache Rep. 2007;11(5):359-364.

Te Poorten B. The piriformis muscle. J Am Osteopath Assoc. 1969;69:150-160.

Travell J., Simons D. Myofascial pain and dysfunction: the trigger point manual, vol 2 the lower extremities. Baltimore: Williams and Wilkins, 1992.

Tu F., As-Sanie S., Steege J. Prevalence of musculoskeletal disorders in a chronic pain clinic. J Reprod Med. 2006;51:185-189.

Uhtoff H. Prenatal development of the iliolumbar ligament. J Bone Joint Surg (Br). 1993;75:93-95.

Van Wingerden J.-P., Vleeming A., Snijders C., et al. A functional-anatomical approach to the spine-pelvis mechanism. Eur Spine J. 1993;2:140-144.

Van Wingerden J.-P., Vleeming A., Kleinvensink G., et al. The role of the hamstrings in pelvic and spinal function. In: Vleeming A., Mooney V., Dorman T., Snijders C., Stoeckart R., editors. Movement, stability and low back pain. Edinburgh: Churchill Livingstone, 1997.

Van Wingerden J.-P., Vleeming A., Buyruk H.M., et al. (Submitted for publication). Stabilization of the SIJ in vivo: verification of muscular contribution to force closure of the pelvis. 2001.

Vasilyeva L., Lewit K. Diagnosis of muscular dysfunction by inspection. In: Liebenson C., editor. Rehabilitation of the spine. Baltimore: Williams and Wilkins, 1996.

Vleeming A., Mooney V., Stoeckart R. Movement, stability & lumbopelvic pain: integration of research and therapy, ed 2. Edinburgh: Churchill Livingstone, 2007.

Vleeming A., Snijders C., Stoeckart R., et al. The role of the sacroiliac joints in coupling between spine, pelvis, legs and arms. In: Vleeming A., Mooney V., Dorman T., Snijders C., Stoeckart R., editors. Movement, stability and low back pain. Edinburgh: Churchill Livingstone, 1997.

Vleeming A., Albert H., Ostgaard H.C., et al. European guidelines for the diagnosis and treatment of pelvic girdle pain. Eur Spine J. 2008;17(6):794-819.

Walther D. Applied kinesiology. Pueblo: SDC Systems, 1988.

Ward R., editor. Foundations of osteopathic medicine. Baltimore: Williams and Wilkins, 1997.

* The same mechanics precisely can be incorporated into a sidelying position. The only disadvantage of this is the relative instability of the pelvic region compared to that achieved in the prone position described above.

  Page 390