Assessment Techniques and the Clinical Setting
Outline

The physical examination requires you to develop technical skills and a knowledge base. The technical skills are the tools to gather data. You will relate those data to your knowledge base and to your previous experience. A sturdy knowledge base enables you to look for, rather than merely look at. Consider a statement by the eighteenth century German poet Goethe: “We see only what we know.” To recognize a significant finding, you need to know what to look for.
Cultivating Your Senses
You will use your senses—sight, smell, touch, and hearing—to gather data during the physical examination. You always have perceived the world through your senses, but now they will be focused in a new way. The skills requisite for the physical examination are inspection, palpation, percussion, and auscultation. The skills are performed one at a time and in this order.
Inspection
Inspection is concentrated watching. It is close, careful scrutiny, first of the individual as a whole and then of each body system. Inspection begins the moment you first meet the person and develop a “general survey.” (Specific data to consider for the general survey are presented in the following chapter.) Then as you proceed through the examination, start the assessment of each body system with inspection.
Inspection always comes first. Initially you may feel embarrassed “staring” at the person without also “doing something.” But do not be too eager to touch the person. A focused inspection takes time and yields a surprising amount of data. Train yourself not to rush through inspection by holding your hands behind your back.
Learn to use each person as his or her own control, and compare the right and left sides of the body. The two sides are nearly symmetric. Inspection requires good lighting, adequate exposure, and occasional use of certain instruments (otoscope, ophthalmoscope, penlight, nasal and vaginal specula) to enlarge your view.
Palpation
Palpation follows and often confirms points you noted during inspection. Palpation applies your sense of touch to assess these factors: texture, temperature, moisture, organ location and size, as well as any swelling, vibration or pulsation, rigidity or spasticity, crepitation, presence of lumps or masses, and presence of tenderness or pain. Different parts of the hands are best suited for assessing different factors:
• Fingertips—best for fine tactile discrimination, as of skin texture, swelling, pulsation, and determining presence of lumps
• A grasping action of the fingers and thumb—to detect the position, shape, and consistency of an organ or mass
• The dorsa (backs) of hands and fingers—best for determining temperature because the skin here is thinner than on the palms
• Base of fingers (metacarpophalangeal joints) or ulnar surface of the hand—best for vibration
Your palpation technique should be slow and systematic. A person stiffens when touched suddenly, making it difficult for you to feel very much. Use a calm, gentle approach. Warm your hands by kneading them together or holding them under warm water. Identify any tender areas, and palpate them last.
Start with light palpation to detect surface characteristics and to accustom the person to being touched. Then perform deeper palpation, perhaps by helping the person use relaxation techniques such as imagery or deep breathing. Your sense of touch becomes blunted with heavy or continuous pressure. When deep palpation is needed (as for abdominal contents), intermittent pressure is better than one long, continuous palpation. Avoid any situation in which deep palpation could cause internal injury or pain.
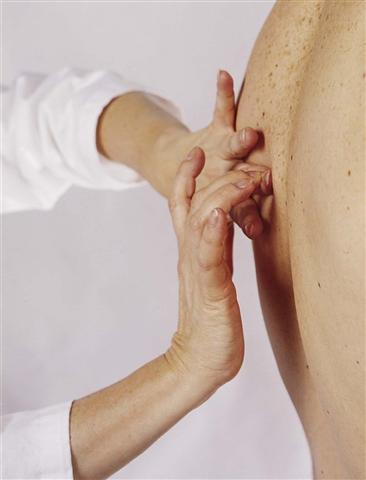
Bimanual palpation requires the use of both of your hands to envelop or capture certain body parts or organs—such as the kidneys, uterus, or adnexa—for more precise delimitation (see Chapters 21 and 26).
Percussion
Percussion is tapping the person’s skin with short, sharp strokes to assess underlying structures. The strokes yield a palpable vibration and a characteristic sound that depicts the location, size, and density of the underlying organ. Why learn percussion when an x-ray study is so much more accurate? It’s because your percussing hands are always available, are easily portable, and give instant feedback. Percussion has the following uses:
• Mapping out the location and size of an organ by exploring where the percussion note changes between the borders of an organ and its neighbors.
• Signaling the density (air, fluid, or solid) of a structure by a characteristic note.
• Detecting an abnormal mass if it is fairly superficial; the percussion vibrations penetrate about 5 cm deep—a deeper mass would give no change in percussion.
• Eliciting a deep tendon reflex using the percussion hammer.
The Stationary Hand
Hyperextend the middle finger (sometimes called the pleximeter) and place its distal portion, the phalanx and distal interphalangeal joint, firmly against the person’s skin. Avoid the person’s ribs and scapulae. Percussing over a bone yields no data because it always sounds “dull.” Lift the rest of the stationary hand up off the person’s skin (Fig. 8-1). Otherwise the resting hand will dampen off the produced vibrations, just as a drummer uses the hand to halt a drum roll.
8-1
The Striking Hand
Use the middle finger of your dominant hand as the striking finger (sometimes called the plexor) (Fig. 8-2). Hold your forearm close to the skin surface, with your upper arm and shoulder steady. Scan your muscles to make sure they are steady but not rigid. The action is all in the wrist, and it must be relaxed. Spread your fingers, swish your wrist, and bounce your middle finger off the stationary one. Aim for just behind the nail bed or at the distal interphalangeal joint; the goal is to hit the portion of the finger that is pushing the hardest into the skin surface. Flex the striking finger so that its tip, not the finger pad, makes contact. It hits directly at right angles to the stationary finger.
8-2
Percuss two times in this location using even, staccato blows. Lift the striking finger off quickly; a resting finger dampens vibrations. Then move to a new body location and repeat, keeping your technique even. The force of the blow determines the loudness of the note. You do not need a very loud sound; use just enough force to achieve a clear note. The thickness of the person’s body wall will be a factor. You will need a stronger percussion stroke for persons with obese or very muscular body walls.
Percussion can be an awkward technique for beginning examiners. You may feel surprised and embarrassed if your striking finger misses your stationary hand completely. You may wince if the fingernail of your striking finger is too long and painfully gouges your stationary finger. As with all new skills, refinement follows practice. After a few weeks, your hand placement becomes precise and feels natural and your ears learn to perceive the subtle difference in percussion notes.
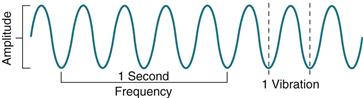
Production of Sound
All sound results from vibration of some structure (Fig. 8-3). Percussing over a body structure causes vibrations that produce characteristic waves and are heard as “notes” (Table 8-1), which are differentiated by the following components:
1. Amplitude (or intensity), a loud or soft sound. Loudness depends on the force of the blow and the structure’s ability to vibrate.
2. Pitch (or frequency), the number of vibrations per second. More rapid vibrations produce a high-pitched tone; slower vibrations yield a low-pitched tone.
3. Quality (timbre), a subjective difference due to a sound’s distinctive overtones. Variations within a sound wave produce overtones. Overtones allow you to distinguish a C on a piano from a C on a violin.
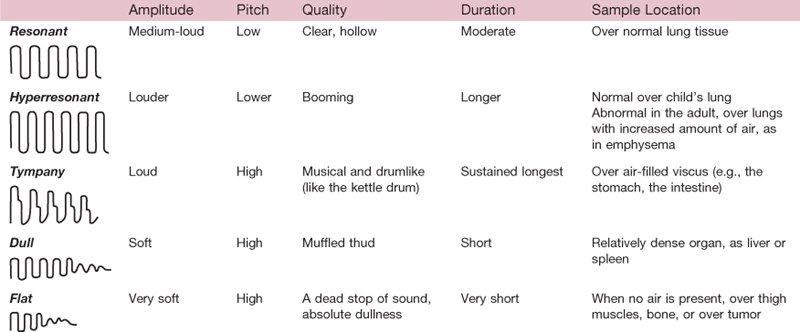
A basic principle is that a structure with relatively more air (e.g., the lungs) produces a louder, deeper, and longer sound because it vibrates freely, whereas a denser, more solid structure (e.g., the liver) gives a softer, higher, shorter sound because it does not vibrate as easily. Although Table 8-1 describes five “normal” percussion notes, variations occur in clinical practice. The “note” you hear depends on the nature of the underlying structure, as well as the thickness of the body wall and your correct technique. Do not learn these various notes just from written description. Practice on a willing partner.
Auscultation
Auscultation is listening to sounds produced by the body, such as the heart and blood vessels and the lungs and abdomen. Likely you already have heard certain body sounds with your ear alone—for example, the harsh gurgling of very congested breathing. However, most body sounds are very soft and must be channeled through a stethoscope for you to evaluate them. The stethoscope does not magnify sound but does block out extraneous room sounds. Of all the equipment you will use, the stethoscope quickly becomes a very personal instrument. Take time to learn its features and to fit one individually to yourself.
The fit and quality of the stethoscope are important. You cannot assess what you cannot hear through a poor instrument. The slope of the earpiece should point forward toward your nose. This matches the natural slope of your ear canal and efficiently blocks out environmental sound. If necessary, twist the earpieces to parallel the slope of your ear canals. The earpieces should fit snugly, but if they hurt, they are inserted too far. Adjust the tension and experiment with different rubber or plastic earplugs to achieve the most comfort. The tubing should be of thick material, with an internal diameter of 4 mm ( in), and about 36 to 46 cm (14 to 18 in) long. Longer tubing may distort the sound.
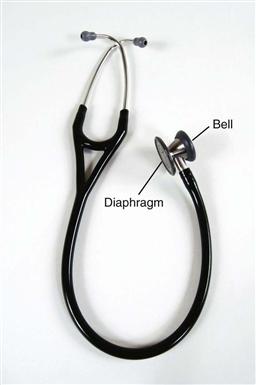
Choose a stethoscope with two endpieces—a diaphragm and a bell (Fig. 8-4). You will use the diaphragm most often because its flat edge is best for high-pitched sounds—breath, bowel, and normal heart sounds. Hold the diaphragm firmly against the person’s skin—firm enough to leave a slight ring afterward. The bell endpiece has a deep, hollow, cuplike shape. It is best for soft, low-pitched sounds such as extra heart sounds or murmurs. Hold it lightly against the person’s skin—just enough that it forms a perfect seal. Any harder causes the person’s skin to act as a diaphragm, obliterating the low-pitched sounds.
Some newer stethoscopes have one endpiece with a “tunable diaphragm.” This enables you to listen to both low- and high-frequency sounds without rotation of the endpiece. For low-frequency sounds (traditional bell mode), hold the endpiece very lightly on the skin; for high-frequency sounds (traditional diaphragm mode), press the endpiece firmly on the skin.
Before you can evaluate body sounds, you must eliminate any confusing artifacts:
• Any extra room noise can produce a “roaring” in your stethoscope, so the room must be quiet.
• Keep the examination room warm. If the person starts shivering, the involuntary muscle contractions could drown out other sounds.
• Clean the stethoscope endpiece with an alcohol wipe. Then warm it by rubbing it in your palm. This avoids the “chandelier sign” elicited when placing a cold endpiece on a warm chest!
• The friction on the endpiece from a man’s hairy chest causes a crackling sound that mimics an abnormal breath sound called crackles. To minimize this problem, wet the hair before auscultating the area.
• Never listen through a gown. Listening through clothing creates artifactual sound and muffles any diagnostically valuable sound from the heart or lungs. So, reach under a gown to listen, but take care that no clothing rubs on the stethoscope.
• Finally, avoid your own “artifact,” such as breathing on the tubing, or the “thump” from bumping the tubing together.
Auscultation is a skill that beginning examiners are eager to learn, but one that is difficult to master. First you must learn the wide range of normal sounds. Once you can recognize normal sounds, you can distinguish the abnormal sounds and “extra” sounds. Be aware that in some body locations, you may hear more than one sound; this can be confusing. You will need to listen selectively, to only one thing at a time. As you listen, ask yourself: What am I actually hearing? … What should I be hearing at this spot?
Setting
The examination room should be warm and comfortable, quiet, private, and well lit. When possible, stop any distracting noises—such as humming machinery, radio or television, or people talking—that could make it difficult to hear body sounds. Your time with the individual should be secure from interruptions from other health care personnel.
Lighting with natural daylight is best, although it is often not available; artificial light from two sources will suffice and will prevent shadows. A wall-mounted or gooseneck stand lamp is needed for high-intensity lighting. This provides tangential lighting (directed at an angle), which will highlight pulsations and body contours better than perpendicular lighting.
Position the examination table so that both sides of the person are easily accessible (Fig. 8-5). The table should be at a height at which you can stand without stooping and should be equipped to raise the person’s head up to 45 degrees. A roll-up stool is used for the sections of the examination for which you must be sitting. A bedside stand or table is needed to lay out all your equipment.
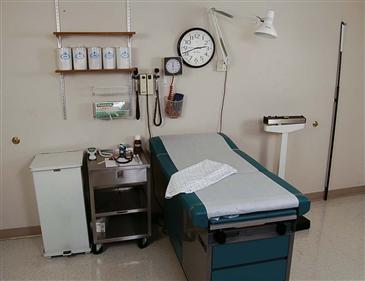
8-5
Equipment
During the examination, you do not want to be searching for equipment or to have to leave the room to find an item. Have all your equipment at easy reach and laid out in an organized fashion (Fig. 8-6). The following items are usually needed for a screening physical examination:
• Platform scale with height attachment
• Stethoscope with bell and diaphragm endpieces
• Pulse oximeter (in hospital setting)
• Nasal speculum (if a short, broad speculum is not included with the otoscope)
• Flexible tape measure and ruler marked in centimeters
• Sharp object (split tongue blade)
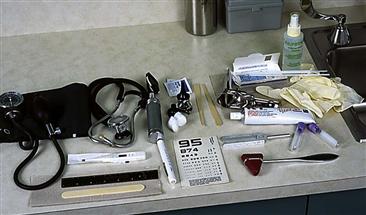
8-6
Most of the equipment is described as it comes into use throughout the text. However, consider these introductory comments on the otoscope and ophthalmoscope.
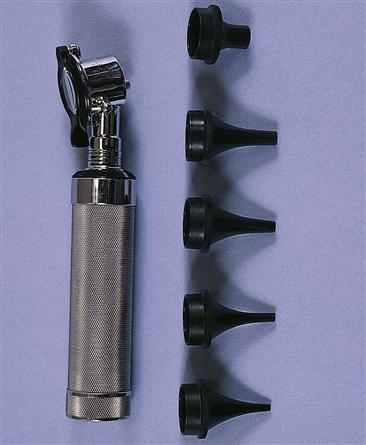
The otoscope funnels light into the ear canal and onto the tympanic membrane. The base serves both as the power source by holding a battery and as the handle. To attach the head, press it down onto the male adaptor end of the base and turn clockwise until you feel a stop. To turn the light on, press the red button rheostat down and clockwise. (Always turn it off after use to increase the life of the bulb and battery.) Five specula, each a different size, are available to attach to the head (Fig. 8-7). (The short, broad speculum is for viewing the nares.) Choose the largest one that will fit comfortably into the person’s ear canal. See Chapter 15 for technique on use of the otoscope.
The ophthalmoscope illuminates the internal eye structures. Its system of lenses and mirrors enables you to look through the pupil at the fundus (background) of the eye, much like looking through a keyhole at a room beyond. The ophthalmoscope head attaches to the base male adaptor just as the otoscope head does (Fig. 8-8). The head has five different parts:
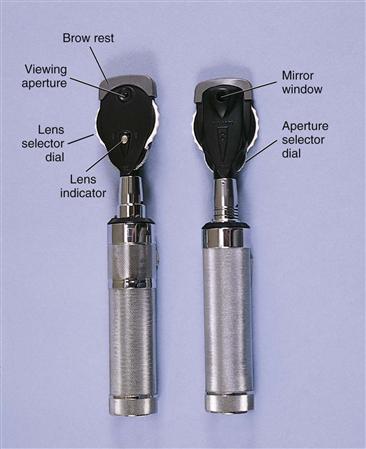
Select the aperture to be used (Fig. 8-9).
Rotating the lens selector dial brings the object into focus. The lens indicator shows a number, or diopter, that indicates the value of the lens in position. The black numbers indicate a positive lens, from 0 to +40. The red numbers indicate a negative lens, from 0 to −20. The ophthalmoscope can compensate for myopia (nearsightedness) or hyperopia (farsightedness) but will not correct for astigmatism. See Chapter 14 for details on how to hold the instrument and what to inspect.
The following equipment occasionally will be used, depending on the individual’s needs: goniometer to measure joint range of motion, Doppler sonometer to augment pulse or blood pressure measurement, fetoscope for auscultating fetal heart tones, and pelvimeter to measure pelvic width.
For a child, you also will need appropriate pediatric-size endpieces for stethoscope and otoscope specula, materials for developmental assessment, age-appropriate toys, and a nipple or pacifier for an infant.
A Clean Field
Do not let your stethoscope become a staph-oscope! Stethoscopes and other equipment that are frequently used on many patients are a common vehicle for transmission of infection. Clean your stethoscope endpiece with an alcohol wipe before and after every patient contact. The best routine is to combine stethoscope rubbing with every hand hygiene.
Designate a “clean” versus a “used” area for handling of your equipment. In a hospital setting, you may use the bedside stand for your clean surface and the overbed table for the used equipment surface. Or in a clinic setting, use two separate areas of the pull-up table. Distinguish the clean area by one or two disposable paper towels. On the towels, place all the new or newly alcohol-swabbed equipment that you will use on this patient (e.g., your stethoscope endpieces, the reflex hammer, ruler). As you proceed through the examination, pick up each piece of equipment from the clean area, and after use on the patient, relegate it to the used area, or (as in the case of tongue blades, gloves) throw it directly in the trash.
A Safer Environment
In addition to monitoring the cleanliness of your equipment, take all steps to avoid any possible transmission of infection between patients or between patient and examiner (Table 8-2). A nosocomial infection (an infection acquired during hospitalization) is a hazard because hospitals have sites that are reservoirs for virulent microorganisms. Some of these microorganisms are resistant to antibiotics, such as methicillin-resistant Staphylococcus aureus (MRSA), vancomycin-resistant Enterococcus (VRE), or multidrug-resistant tuberculosis, or are microorganisms for which there is currently no known cure, such as human immunodeficiency virus (HIV).
TABLE 8-2
Standard Precautions for Use with All Patients

Adapted from Centers for Disease Control and Prevention. (2007). Standard precautions—Excerpt from the guidelines for isolation precautions: preventing transmissions of infectious agents in healthcare settings 2007, Centers for Disease Control and Prevention. Available at: www.cdc.gov/ncidod/dhqp/gl_isolation_standard.html.
The single most important step to decrease risk of microorganism transmission is to wash your hands promptly and thoroughly: (1) before and after every physical patient encounter; (2) after contact with blood, body fluids, secretions, and excretions; (3) after contact with any equipment contaminated with body fluids; and (4) after removing gloves (see Table 8-2). Using alcohol-based hand rubs takes less time than soap-and-water handwashing; it also kills more organisms more quickly and is less damaging to the skin because of emollients added to the product. Alcohol is highly effective against both gram-positive and gram-negative bacteria, Mycobacterium tuberculosis, and most viruses, including hepatitis B and C viruses, HIV, and enteroviruses.5 Use the mechanical action of soap-and-water handwashing when hands are visibly soiled and when patients are infected with spore-forming organisms (e.g., Clostridium difficile or Bacillus anthracis).
Wear gloves when the potential exists for contact with any body fluids (e.g., blood, mucous membranes, body fluids, drainage, open skin lesions). Wearing gloves is not a protective substitute for washing hands, however, because gloves may have undetectable holes or may become torn during use or hands may become contaminated as gloves are removed. Wear a gown, mask, and protective eyewear when the potential exists for any blood or body fluid spattering (e.g., suctioning, arterial puncture).
The Clinical Setting
General Approach
Consider your emotional state and that of the person being examined. The patient is usually anxious due to the anticipation of being examined by a stranger and the unknown outcome of the examination. If anxiety can be reduced, the person will feel more comfortable and the data gathered will more closely describe the person’s natural state. Anxiety can be reduced by an examiner who is confident and self-assured, as well as considerate and unhurried.
Usually, a beginning examiner feels anything but self-assured! Most worry about their technical skill, about missing something significant, or about forgetting a step. Many are embarrassed themselves about encountering a partially dressed individual. All these fears are natural and common. The best way to minimize them is with much tutored practice on a healthy willing subject, usually a fellow student. You have to feel comfortable with your motor skills before you can absorb what you are actually seeing or hearing in a “real” patient. This comes with practice under the guidance of an experienced tutor, in an atmosphere in which it is acceptable to make mistakes and to ask questions. Your subject should “act like a patient” so that you can deal with the “real” situation while still in a safe setting. After you feel comfortable with the laboratory setting, accompany your tutor as he or she examines an actual patient so that you can observe an experienced examiner.
Hands On
With this preparation, it is possible to interact with your own patient in a confident manner. Begin by measuring the person’s height, weight, blood pressure, temperature, pulse, and respirations (see Chapter 9). If needed, measure visual acuity at this time using the Snellen eye chart. All of these are familiar, relatively nonthreatening actions; they will gradually accustom the person to the examination. Then ask the person to change into an examining gown, leaving his or her underpants on. This will feel more comfortable, and the underpants can easily be removed just before the genital examination. Unless your assistance is needed, leave the room as the person undresses.
As you reenter the room, clean your hands in the person’s presence. This indicates you are protective of this person and are starting fresh for him or her. Explain each step in the examination and how the person can cooperate. Encourage the person to ask questions. Keep your own movements slow, methodical, and deliberate.
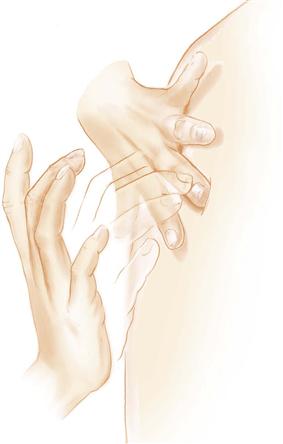
Begin by touching the person’s hands, checking skin color, nail beds, and metacarpophalangeal joints (Fig. 8-10; see Chapters 12 and 22). Again, this is a less threatening way to ease a person into being touched. Most people are used to having relative strangers touch their hands.
8-10
As you proceed through the examination, avoid distractions and concentrate on one step at a time. The sequence of the steps may differ depending on the age of the person and your own preference. However, you should establish a system that works for you and stick to it to avoid omissions. Organize the steps so the person does not change positions too often. Although proper exposure is necessary, use additional drapes to maintain the person’s privacy and to prevent chilling.
Do not hesitate to write out the examination sequence and refer to it as you proceed. The patient will accept this as quite natural if you explain you are making brief notations to ensure accuracy. Many agencies use a printed form. You will find that you will glance at the form less and less as you gain experience. Even with a form, you sometimes may forget a step in the examination. When you realize this, perform the maneuver in the next logical place in the sequence. (See Chapter 27 for the sequence of steps in the complete physical examination.)
As you proceed through the examination, occasionally offer some brief teaching about the person’s body. For example, you might say, “Everyone has two sounds for each heartbeat, something like this—lub-dup. Your own beats sound normal.” Do not do this with every single step, or you will be hard pressed to make a comment when you do come across an abnormality. But some sharing of information builds rapport and increases the person’s confidence in you as an examiner. It also gives the person a little more control in a situation in which it is easy to feel completely helpless.
At some point, you will want to linger in one location to concentrate on some complicated findings. To avoid anxiety, tell the person, “I always listen to heart sounds on a number of places on the chest. Just because I am listening a long time does not necessarily mean anything is wrong with you.” And it follows that sometimes you will discover a finding that may be abnormal and you want another examiner to double-check. You need to give the person some information, yet you should not alarm the person unnecessarily. Say something like, “I do not have a complete assessment of your heart sounds. I want Ms. Wright to listen to you too.”
At the end of the examination, summarize your findings and share the necessary information with the person. Thank the person for the time spent. In a hospital setting, apprise the person of what is scheduled next. Before you leave a hospitalized person, lower the bed to avoid risk for falls; make the person comfortable and safe; and return the bedside table, television, or any equipment to the way it was originally, with the call button available.
 Developmental Competence
Children are different from adults. Their difference in size is obvious. Their bodies grow in a predictable pattern that is assessed during the physical examination. However, their behavior is also different. Behavior grows and develops through predictable stages, just as the body does.
With all children, the goal is to increase their comfort in the setting. This approach reveals their natural state as much as possible and will give them a more positive memory of health care providers. Remember that a “routine” examination is anything but routine to the child. You can increase their comfort by attending to the following developmental principles and approaches. The order of the developmental stages is more meaningful than the exact chronological age. Each child is an individual and will not fit exactly into one category. For example, if your efforts to “play games” with the preschooler are rebuffed, modify your approach to the security measures used with the toddler.
The Infant
Erikson defines the major task of infancy as establishing trust. An infant is completely dependent on the parent for his or her basic needs. If these needs are met promptly and consistently, the infant feels secure and learns to trust others.
Position
• The parent always should be present to understand normal growth and development and for the child’s feeling of security.
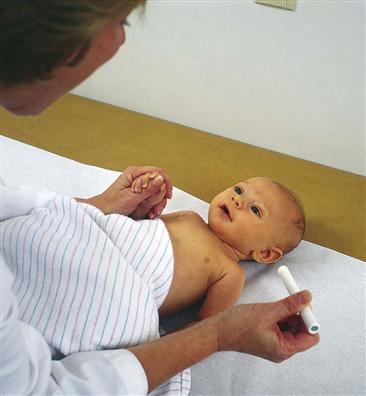
• Place the neonate or young infant flat on a padded examination table (Fig. 8-11). The infant also may be held against the parent’s chest for some steps.
• Once the baby can sit without support (around 6 months), as much of the examination as possible should be performed while the infant is in the parent’s lap.
• By 9 to 12 months, the infant is acutely aware of the surroundings. Anything outside the infant’s range of vision is “lost,” so the parent must be in full view.
8-11
Preparation
• Timing should be 1 to 2 hours after feeding, when the baby is not too drowsy or too hungry.
• Maintain a warm environment. A neonate may require an overhead radiant heater.
• An infant will not object to being nude. Have the parent remove outer clothing, but leave a diaper on a boy.
• An infant does not mind being touched, but make sure your hands and stethoscope endpiece are warm.
• Use a soft, crooning voice during the examination; the baby responds more to the feeling in the tone of the voice than to what is actually said.
• An infant likes eye contact; lock eyes from time to time.
• Smile; a baby prefers a smiling face to a frowning one. (Often beginning examiners are so absorbed in their technique that they look serious or stern.) Take time to play.
• Keep movements smooth and deliberate, not jerky.
• Use a pacifier for crying or during invasive steps.
• Offer brightly colored toys for a distraction when the infant is fussy.
Sequence
• Seize the opportunity with a sleeping baby to listen to heart, lung, and abdominal sounds first.
• Perform least distressing steps first. (See the sequence in Chapter 27.) Save the invasive steps of examination of the eye, ear, nose, and throat until last.
• If you elicit the Moro or “startle” reflex, do it at the end of the examination because it may cause the baby to cry.
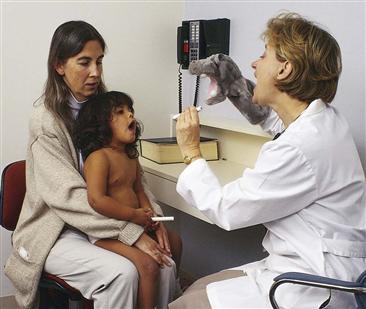
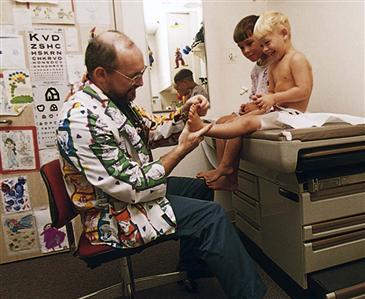
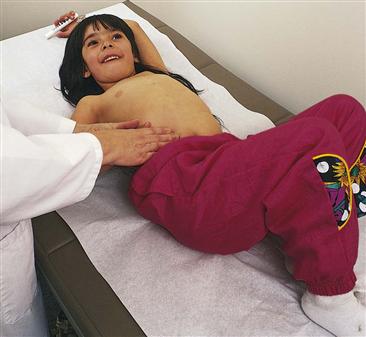
The Toddler
This is Erikson’s stage of developing autonomy. However, the need to explore the world and be independent is in conflict with the basic dependency on the parent. This often results in frustration and negativism. The toddler may be difficult to examine; do not take this personally. Because he or she is acutely aware of the new environment, the toddler may be frightened and cling to the parent. Also, the toddler has fear of invasive procedures and dislikes being restrained (Fig. 8-12).

8-12
Position
• The toddler should be sitting up on the parent’s lap for all of the examination. When the toddler must be supine (as in the abdominal examination), move chairs to sit knee-to-knee with parent. Have the toddler lie in the parent’s lap with the toddler’s legs in your lap.
• Enlist the aid of a cooperative parent to help position the toddler during invasive procedures, such as using the otoscope or taking a rectal temperature.
Preparation
• Children 1 or 2 years of age can understand symbols, so a security object, such as a special blanket or teddy bear, is helpful.
• Begin by greeting the child and the accompanying parent by name, but with a child 1 to 6 years old, focus more on the parent. By essentially “ignoring” the child at first, you allow the child to adjust gradually and to size you up from a safe distance. Then turn your attention gradually to the child, at first to a toy or object the child is holding, or perhaps to compliment a dress, the hair, or what a big girl or boy the child is. If the child is ready, you will note these signals: eye contact with you, smiling, talking with you, or accepting a toy or a piece of equipment.
• A 2-year-old child does not like to take off his or her clothes; have the parent undress the child one part at a time.
• Children 1 or 2 years of age like to say “No.” Do not offer a choice when there really is none. Avoid saying, “May I listen to your heart now?” When the 1- or 2-year-old child says “No” and you go ahead and do it anyway, you lose trust. Instead, use clear, firm instructions, in a tone that expects cooperation, “Now it is time for you to lie down so I can check your tummy.”
• Also, 1- or 2-year-old children like to make choices. When possible, enhance autonomy by offering the limited option: “Shall I listen to your heart next, or your tummy?”
• Demonstrate the procedures on the parent (see Fig. 15-11).
Sequence
• Collect some objective data during the history, which is a less stressful time. While you are focusing on the parent, note the child’s gross motor and fine motor skills and gait.
• Begin with “games,” such as the Denver II test or cranial nerve testing.
• Start with nonthreatening areas. Save distressing procedures—such as examination of the head, ear, nose, or throat—for last.